Transcripts
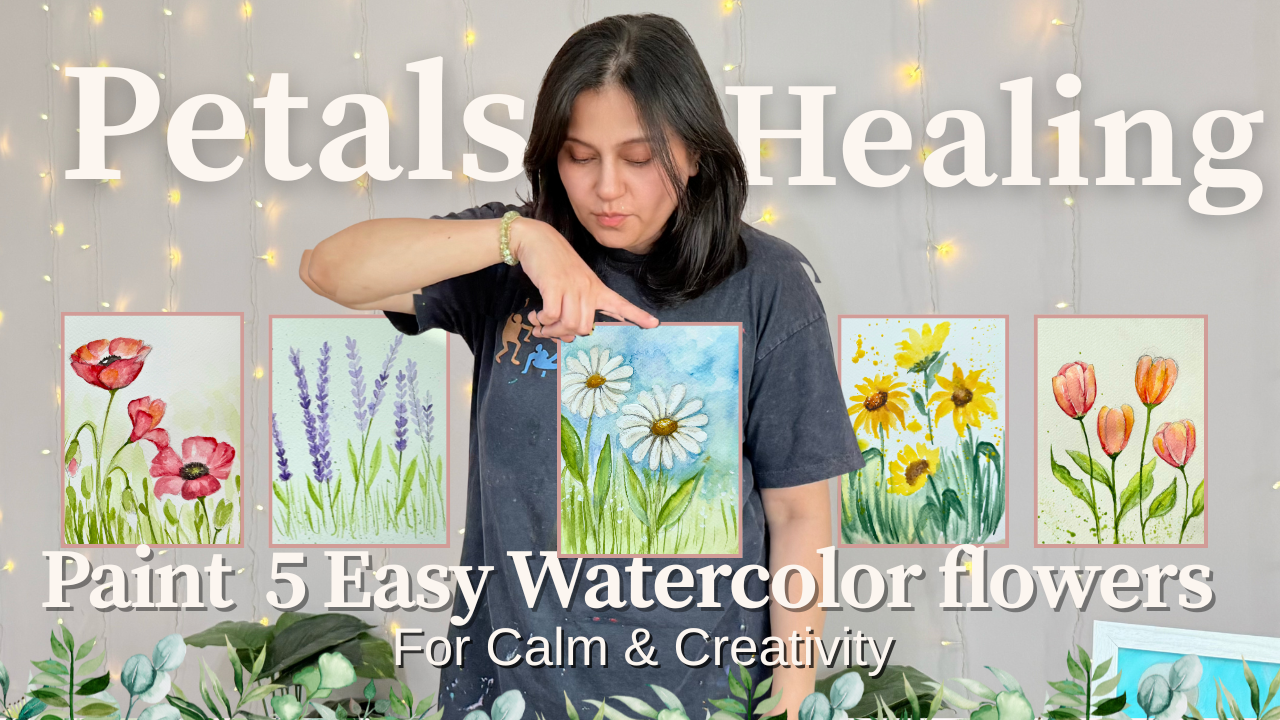
1. Introduction : There is something
deeply healing and magical in
watercolor and flowers. The gentle brushes stroke, the flow of watercolor, the way petals unfold on paper. It's a soft, quiet
reminder to slow down, breathe, and connect
to yourself. In this class, we will
explore the magic together using simple
watercolor technique. And trust me, this
class is for anyone who crave for creativity
and to pause. Hey, everyone. My
name is San Asan. I'm an artist, art educator, and holistic art
therapy practitioner. I'm also a founder of Wildbout Art Studio
based in Bahrain. The past 15 years, I've been teaching
art and design to all the ages,
including watercolor, professional acrylic and
oil painting, mixed media, sketching charcoal typography, which is also known
as wood burning. In this class, I'll
guide you step by step as we paint
flowers like daisy, sunflower, tulips, and more. Gather your material,
trust your brush, and let's begin this
gentle creative journey, one petal at a time.
2. Material & Resourses: Hey, everyone. Let's talk about the material we
need for this class. This class, I'm keeping very simple few materials you needed. Watercolor paper, 300 GSM, cold press, watercolor palette, or if you have to panes, just spread them in any palette and whatever you already
have it, try to use them. We need different
sizes of the brushes, round brush, and
fine detail brush. Depending on the
size of your paper, you can always choose the
sizes of the brushes. I will also have some
watercolor pencils. This is optional. If
you don't have it, you don't need it,
you can just use the regular color
pencils as well. For this course, I'm using A five size Fabriano
watercolor gold press papers, 300 GSM, so I can
maintain my journal, which is quite hard for
me to do it all in one. This will be my guide, and then I can use
these flowers as an inspiration for
my art journal. You need to download the PDF in class resources and you will get all the outlining
of your flower. Without further ado,
let's begin our class.
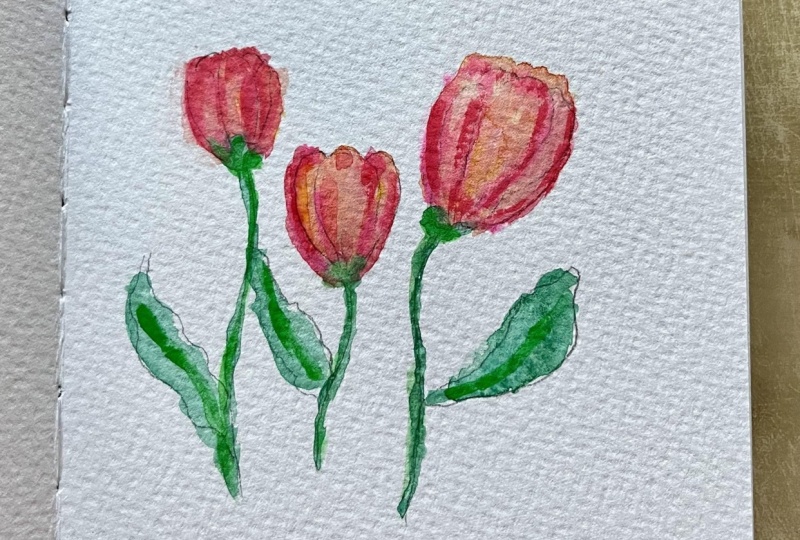
3. Lesson-1 Tulips: Tulips are often seen as a sign of self worth and
new beginnings. And every time I paint one, it reminds me to embrace the softness and beauty
of being in progress. Start with a light
pencil sketch. I'll walk you through it slowly, so feel free to pause at
any point and sketch along. Begin with a middle petal, a gentle teardrop shape
tilted slightly to the side. Now you can sketch
two side petals hugging that center
form like gentle arms. And you can repeat this to make as many flowers
as you want. Sketch in a simple stem and one or two long
curving leaves. Don't worry about details. This will all come
alive with color. Pause here if you need time. And once you are ready, let's move into the fun part, water and colour. Set your palette. I'm using round brush. You can use different sizes depending on the
size of your flower. Now load your brush with a
light wash, maybe soft pink, coral or red and drop
into the wet surface. Let the paint dance. You don't need to cover
the entire petal. In fact, leave a few light areas so the color can breathe. Repeat the same technique for other flowers
and the leaves. This is your soft foundation. Once the first layer dries, we will deepen the flower. Now that the base layer
is dry or slightly damp, we'll go with the second layer. This is where the
tulips start bloom. Mix a slightly stronger
version of your first color, add a touch of more pigment, then gently glided
over some part of the petal, leaving
other untouched. The first layer
still peek through. Keep your brush loose,
don't overwork. Let the petal stay
soft and fluid. Now you can take zero brush
or fine detail brush. Mix a more concentrated
version of your color, maybe a deep red,
purple, or maroon. I'm using the same red
using small curved strokes, add this behind the center
petal to give the flower tip. Focus on where petals overlap. That's where the shadow lives. Behind the edge of clean water using tiny circular movement, this soften the transition
and keep the mood gentle. You can also deepen one side of the leaves or stem to create
contrast and movements. And once you are happy, you can still add another color, maybe yellow or orange to
add a little more drama. Otherwise, if you're happy
with the same color, you can just keep playing
with light and dark. Once you're happy
with the first one, keep doing the others, and this is how you practice. Your tulip should now feel layed alive and
full of softness. Don't worry if it's not perfect. Let it be dreamy. Let it
reflect how you feel today. Once you feel happy and confident with
your tulip painting, you can use and make
these in your journal. It can be anything. I love making whimsical girls, so I created a whimsical
girl holding tulips. Each flower is a new beginning. I'll meet you in
the next lesson.
4. Lesson-2 Lavender : L avender has always been one of my favorite
flowers to paint. It's simple, calming and carries this soft energy
of healing and comfort. In this lesson, we
will learn to paint lavender in very gentle
way step by step, starting with watercolor pencil, green color I pick. Let's begin sketch and then building up with soft
watercolor layers. Start by drawing a very
light vertical lines. This will be your lavender stem. Then gently mark
little dots along with a line to guide where
each flower bud will go. Here I'm using very
fine paintbrush. You can use zero number
and you can think of it like it's climbing upward like your
petals are climbing upward. At the top, the buds are
tighter and smaller. As you move down, they spread a little more. Don't worry about perfection. This is just a guide, like a whisper
beneath the paint. Before you jump into the actual
lavender, let's warm up. Take your brush and practice
these tiny petal strokes, three little dabs shaped like a triangle,
forming a cluster. Imagine them like
little fairy wings, soft, rounded, imperfect. Lavender isn't about precession. It's about flow and softness. Try making three, four of
these cluster to get a feel. Vary the pressure, more
water for lighter strokes, less water for intensity. Once you are comfortable and confident, let's begin painting. Add a few long skinny
leaves at the bottom. Let them dance a
little to the side as if the breeze is gently passing
through a summer field. And that's it. Your first
dreamy lavender stem. You can lay a second
coat once it dry for more dip or let some
areas bleed softly. This give it that dreamy, relaxed look in your painting. This flower always remind
me of quiet moments, the kind where you pause, breathe, and remember that
peace live in small things. Feel free to practice
this in your journal, create a whimsical girl
in Lavender field, or just sit back and enjoy
the softness you've created.
5. Lesson-3 Daisy : Daisies are one of the simplest
and most joyful flowers, and they always remind me that beauty doesn't have
to be complicated. In this lesson, we will
paint a soft daisy using delicate strokes
and a glowing background. As we go, I'll guide you through why painting flower is
more than a technique. It's also a form of self care. We'll start by drawing a
small circle in the center. This is the heart of your daisy. Now, draw a large
circle around it. This will be the outer
edge of the petal, now at diagonal lines forming X, and then a vertical and
horizontal line like a plus sign. This creates eight even section, and now you can draw
inside your daisy petals, placing one in each wedge from the center outward
to the outer circle. Remember, it doesn't
have to be exact. Even if your line
aren't perfect, be kind to yourself. Just starting is
something to celebrate. Now I'm going in a
very light gray, just a touch of pigment
and lots of water. I'll swipe that gently from the outer edge of each
petal towards the center. Leave a little white
space at the top. It's completely
optional, but if you will leave that white tip, it will create a glow. Painting slowly like this help
our nervous system settle. Each petal is like a breath,
calm, quiet, intentional. Now I will start with
the background area, we will add soft blue
wash around the daisy. This will help the
white petals stand out. Start with a diluted
blue and drop it in gently working around the
flowers in small sections. You can add more pigments
to the edge and let it softly fade
towards the daisy, almost like a morning sky. Let it be loose and dreamy. This part always remind
me to let go of control. Watercolor teaches us the beauty happen when we stop
trying so hard. Here you can see I mix some
blue, add some yellow, and now it's time for me
to add the second layer of gray to the base of each
petal for some soft shadow. You can also use a tiny bit of lavender or blue gray
if you want more mood. For the center, I'm
using soft yellow, and I will add more of the orange and brown to
add more depth into it. And here's your daisy
soft, open and glowing. Daisies remind us
to be gentle not just with the paint,
but with ourself. Even if your petals are
uneven or your color bleed, that's the part of the magic. You created something where
nothing existed before. You might want to write a little phrase beside
in your journal, like, I honor this small joy, or I begin, and that is enough. This step is
completely optional. I'm using a round
brush and want to add a little more extra
white glow on my petals. So using wash paint and just gently using the same
direction of my petal, I'm just adding few
strokes of white. So then my daisies
will glow more, and I would love to have some sparkles and
glitter in the end, but I don't have it here. So I hope you enjoy the lesson, see you in the next flower, or keep painting
more daisies until your heart feel full.
Take care, everyone.
6. Lesson-4 Poppies : Poppies are wild,
emotional flowers. They are delicate but strong. I love painting them when I'm feeling tender or reflective. In this lesson, we will paint a loose expressive poppies
using wet on wet technique. We'll start with a sketch, build soft layer of color, and finish with subtle
details. Let's begin. You can follow along,
pause the video, or you can sketch a poppy
according to your choice. Here I am using a
very basic technique of using shapes to
sketch my poppy. And you can also use a
template from your resources. And once you are happy
with your sketching, we will begin with our painting. Erase all the pencil marks. This will help you not to
get gray in your painting. And once you are
done, let's begin. I'm beginning with a
wet on wet technique. I'm using a vibrant red, mixed with little pink. Let the paint spread
and bloom into water. You can add some orange or coral into the wet areas and
let them melt together. This is completely intuitional. This is completely
your own choice. Don't overwork it. Just let the color
tell their story. Leave some white spaces or
light areas for softness. As I paint each petal, I try to slow down
not just my brush, but my whole body, my breath, my thoughts. Painting flower isn't about
making something perfect. It's about noticing, noticing
how the color moves, how water pools in one
place and fade in other. It's a soft conversation
between the brush, the paper, and your presence. Sometimes we rush through our days from one
task to another, but flowers don't rush. They bloom when they are ready. They open slowly, gently, one petal at a time. That's why painting flower
can feel like therapy. You don't just paint, but you see you feel
into what you need. Now you can take smallest
brush size zero or one, and mix a dark color. I'm using black with a
hint of blue and brown. Dot the center with pigment, then pull out tiny
flicks for the stamen. Think of it like a
little burst of energy. If you want, you can
tab a few specs or add shadows under one petal
to give it more dimensions. Blend gently using circular
brush movement and water. This step is completely
intuitional, as I mentioned before. I want you to flow on your own. Think about where the
flower has shadows. If you want, you can
always search for the real poppy flower photograph or if you're following
from other reference, or if you're following me
as a follow along lesson, then notice when I'm
using the dark pigments, the shadows, the pigments
with less water. And whenever I use
dark pigments, I always take water. And blend them in a small
circling motions movements and sometimes if there is a lot, I just quickly take
tissue and dab it to lift the color from there. So the petals will
remain very soft. Also, I want you to
observe your directions. If you notice I am trying to follow the directions
of my pencil. Wherever my pencil
is going in a curve, I'm using my curve direction
and movement of the brush. These are the few tips
if you will follow, you will be able to
create a realism into even your
impressionist flower or abstract looking flowers. So go slow, pause the video, follow along, and keep
enjoying the process. Don't stress yourself to
follow exactly what I'm doing. Maybe the color is different
what you are using. You might not get
the same pigments if you want to go with
an imaginary color, maybe blue poppies or any
other shade, go for it. Enjoy the process. The results will
automatically come. Every flower you paint
can carry an intention. Maybe today you are painting peace or softness or courage. Let it come through your colors, not just your thoughts. I like to think of each
bloom as a part of myself still growing,
still unfolding. It reminds me to be gentle with my process and with myself. So here we are done
with our final poppies, and I hope you
enjoy this lesson. See you in the next one.
7. Lesson-5 Brushstroke Sunflower : Let's bring in a burst of joy
today with this sunflower. This sunflower is all about confidence, warmth,
and resilience. Just like it turned
toward the light, we will turn our focus
inward and paint these bold, beautiful blooms using simple brush strokes
anyone can master. I'm mixing color
of lemon yellow, and ochre, to begin with, I'm just using some
circular dabbing motion onto the paper in a
circular direction. Starting from the
center of the flour, using tiny dot of orange, ochre browns just to create the mix of all the
warm colors in the metal. From the class resources, you can always use the
template to sketch, and then you can follow along. Use yellow like a
healing sunbeam. Let it brighten the places within you that
feel heavy or dull. Layer golden tones
like affirmations. I am safe, I am growing. I am turning towards light. Add brown for grounding, and then green for resilience, and maybe leave
little bit of white because even in our
brightest moments, it's okay to hold some
softness, some space. Today is the special one. It's our last flower in
this watercolor series. For this final bloom, I want to invite you to
try something different. Let go of the pencil. Yes, no outlines, no sketching, your brush, your watercolors,
and your intuition. This is about
trusting your hand, trusting your eyes, and most importantly,
trusting your process. As I mentioned before,
you are still welcome to use the template
if that feels safer. But if you feel ready, even just a little bit, try painting this flower
freely in your own style. Every brush a stroke is a reflection of
your energy today. There is no wrong way to paint. Only your way as the colors bloom on your
paper, take a deep breath. Let it be meditative. Let it be imperfect.
Let it be you. You've come so far, and this final flower is a celebration of that growth.
Let's paint together. Just a quick reminder. Don't forget to upload your finished pieces
I would love to see. And if you have any question, you can always post your
comments in discussion session, and I will be happy
to assist you. I hope you enjoy this video, can't wait to see your projects.
8. Class Project: You've made it to
the final class, and I'm so proud of you. As a class project, this is how I played
with the same flowers. I love to see your version, use them in your unique way, maybe as a part of journal
spread or handmade cards, a dreamy landscape, or even just one flower on a
page that feels like you. I begin with a light sketch
and in this arrangement, I will be using
overlapping technique. If you wish to do the
same as a practice, you can definitely follow along. I have shared each
and every step and how I create this beautiful
water effect in my ways. There are so many examples, and I will share with you what are the other
possibilities you can use this class project to create your unique art style and make something which
resonates with you. I often create these whimsical
flower girls and make those flowy hair
with flowers and sometimes their dresses are floral with the flower prints, or maybe you want to
do a field of flower, something which
you feel happy and something which comes
naturally to you. This is where we shift
from learning how to paint to discover what
you want to express. There is no right or wrong here. Let your intuition guide you. Let your mood
choose the palette. Maybe you feel soft and gentle
today or bold and messy. Follow that. After
the sketch is done, I started with wet on
wet technique using the right brush for my painting because I have some
small flowers. Before I'll start with anything, I'm going to just add the
first layer as a wet on wet. To create a transparency
look in your glass ways, you just need to add
the lightest color, start from the
edge, and then just take water and
spread it all over. Please pause the video if
you are following along and feel free to ask any question if you have
in discussion section. I would be happy to explain
if there is any confusion. Enjoy, relax, and gather
your favorite brushes, pick your flowers you love most, and create something
that speaks to you. Oh Mi Biju, he loves to be around
when I'm painting. He is someone who
can sense my energy, whether I'm in stress,
whether I'm relaxed. And he always soothes
me with his purring. And after grooming
himself like a prince, sometimes even he just curl around and he sleep
next to my paintings. So this is how I paint
and I relax through art. No matter my job
is in art field. I am an art educator,
I'm an artist. Constantly I'm teaching, but teaching you can't
teach with empty cup. You have to fill your cup with your own creative energy first, then I will be able to spread that creativity
to my students. This is what I believe,
and that's the reason I crave for the met through art. After the lunch break, now I'm back to my table as you can see and sense the
energy of the light. And it's a beautiful reflection coming from the window
and I'm loving it. Now it's time for me to add color and create
effect that it's in the transparent glass ways and I can see the water
ripples and reflections. Slow down, pause the
video if you want, and if you're following
exactly the same, I'm using little by little and using water to
spread the paint. Follow the directions of your pencil to create the
illusion of the transparency. Try to use little
by little paint. Use circling motion, circling movement of your brush
to spread the color. One more thing which is very
important as an artist, try to keep looking at your work at your eye level or take
a picture from your phone. You will be able
to see where you want to add more
light or shadows. Once you are done, keep
adding till you feel that, okay, this is what I want. There is no rules to do it one tablespoon
or one teaspoon. Just trust your intuition because right now this is
completely intuitional. There is no reference,
there is no picture. It's just an imagination. So follow along and keep adding till you feel that now it's time
for you to stop. For the final highlights, again, Bichus here, he
jump on my table. For the final highlights, all you need to do is
either you can take the white gelpen or gouache
paint or acrylic paint white. I'm using white gouache
and going to just add a little bit of
outlining around my ways, reflection on top of it, it will give me a little
bit more realistic look. Feel free to do it
according to your choice, and I hope you enjoy
this class project. So go ahead and create
something what you like it. Then upload your project here on Skillshare so I can see it
and celebrate it with you. This is how we open our
imagination and remind ourselves that art isn't
just about technique. It's about freedom,
expression, and joy. Thank you so much
for joining me. Keep painting, keep blooming and see you in the next class. And here my drama king is
posing for my final picture.
9. Thank you for Joining. : Thank you very much for joining me in this watercolor journey, and I'm sure you are more
confident now and give a little extra time to
yourself through your art. Can't wait to see your project till next time, take
care of yourself.
 Sana Asad, Inspiring Self-Discovery Through Art