Transcripts
1. Introduction and Supplies You Will Need: Hi, friends. How are you? I hope you're having a
really great day today. I'm excited about sharing
this lesson with you. This is a drawing and
watercolor painting lesson that I designed,
especially for kids. You do not need to have any drawing or painting experience at all to be successful
with this project. Today we are going
to be creating this underwater scene
with some critters, and I'm excited about
teaching you this lesson. Let's go over the supplies and the materials that you will
need for this project. The first thing
that you'll need is a piece of watercolor paper. You will need some
watercolor painting. You will need some
clean water in a bowl or a cup
and a paintbrush. I use a paint brush
about this size, but you can use whatever
you have available to you. You will need a
permanent marker. Permanent means
it's a marker with the ink that doesn't spread around when
you add water to it. So make sure that your
marker is permanent, and you will also need a paper towel just in case you need to clean something up. So go ahead and gather those
supplies and materials, and I'll see you back
here in just a minute.
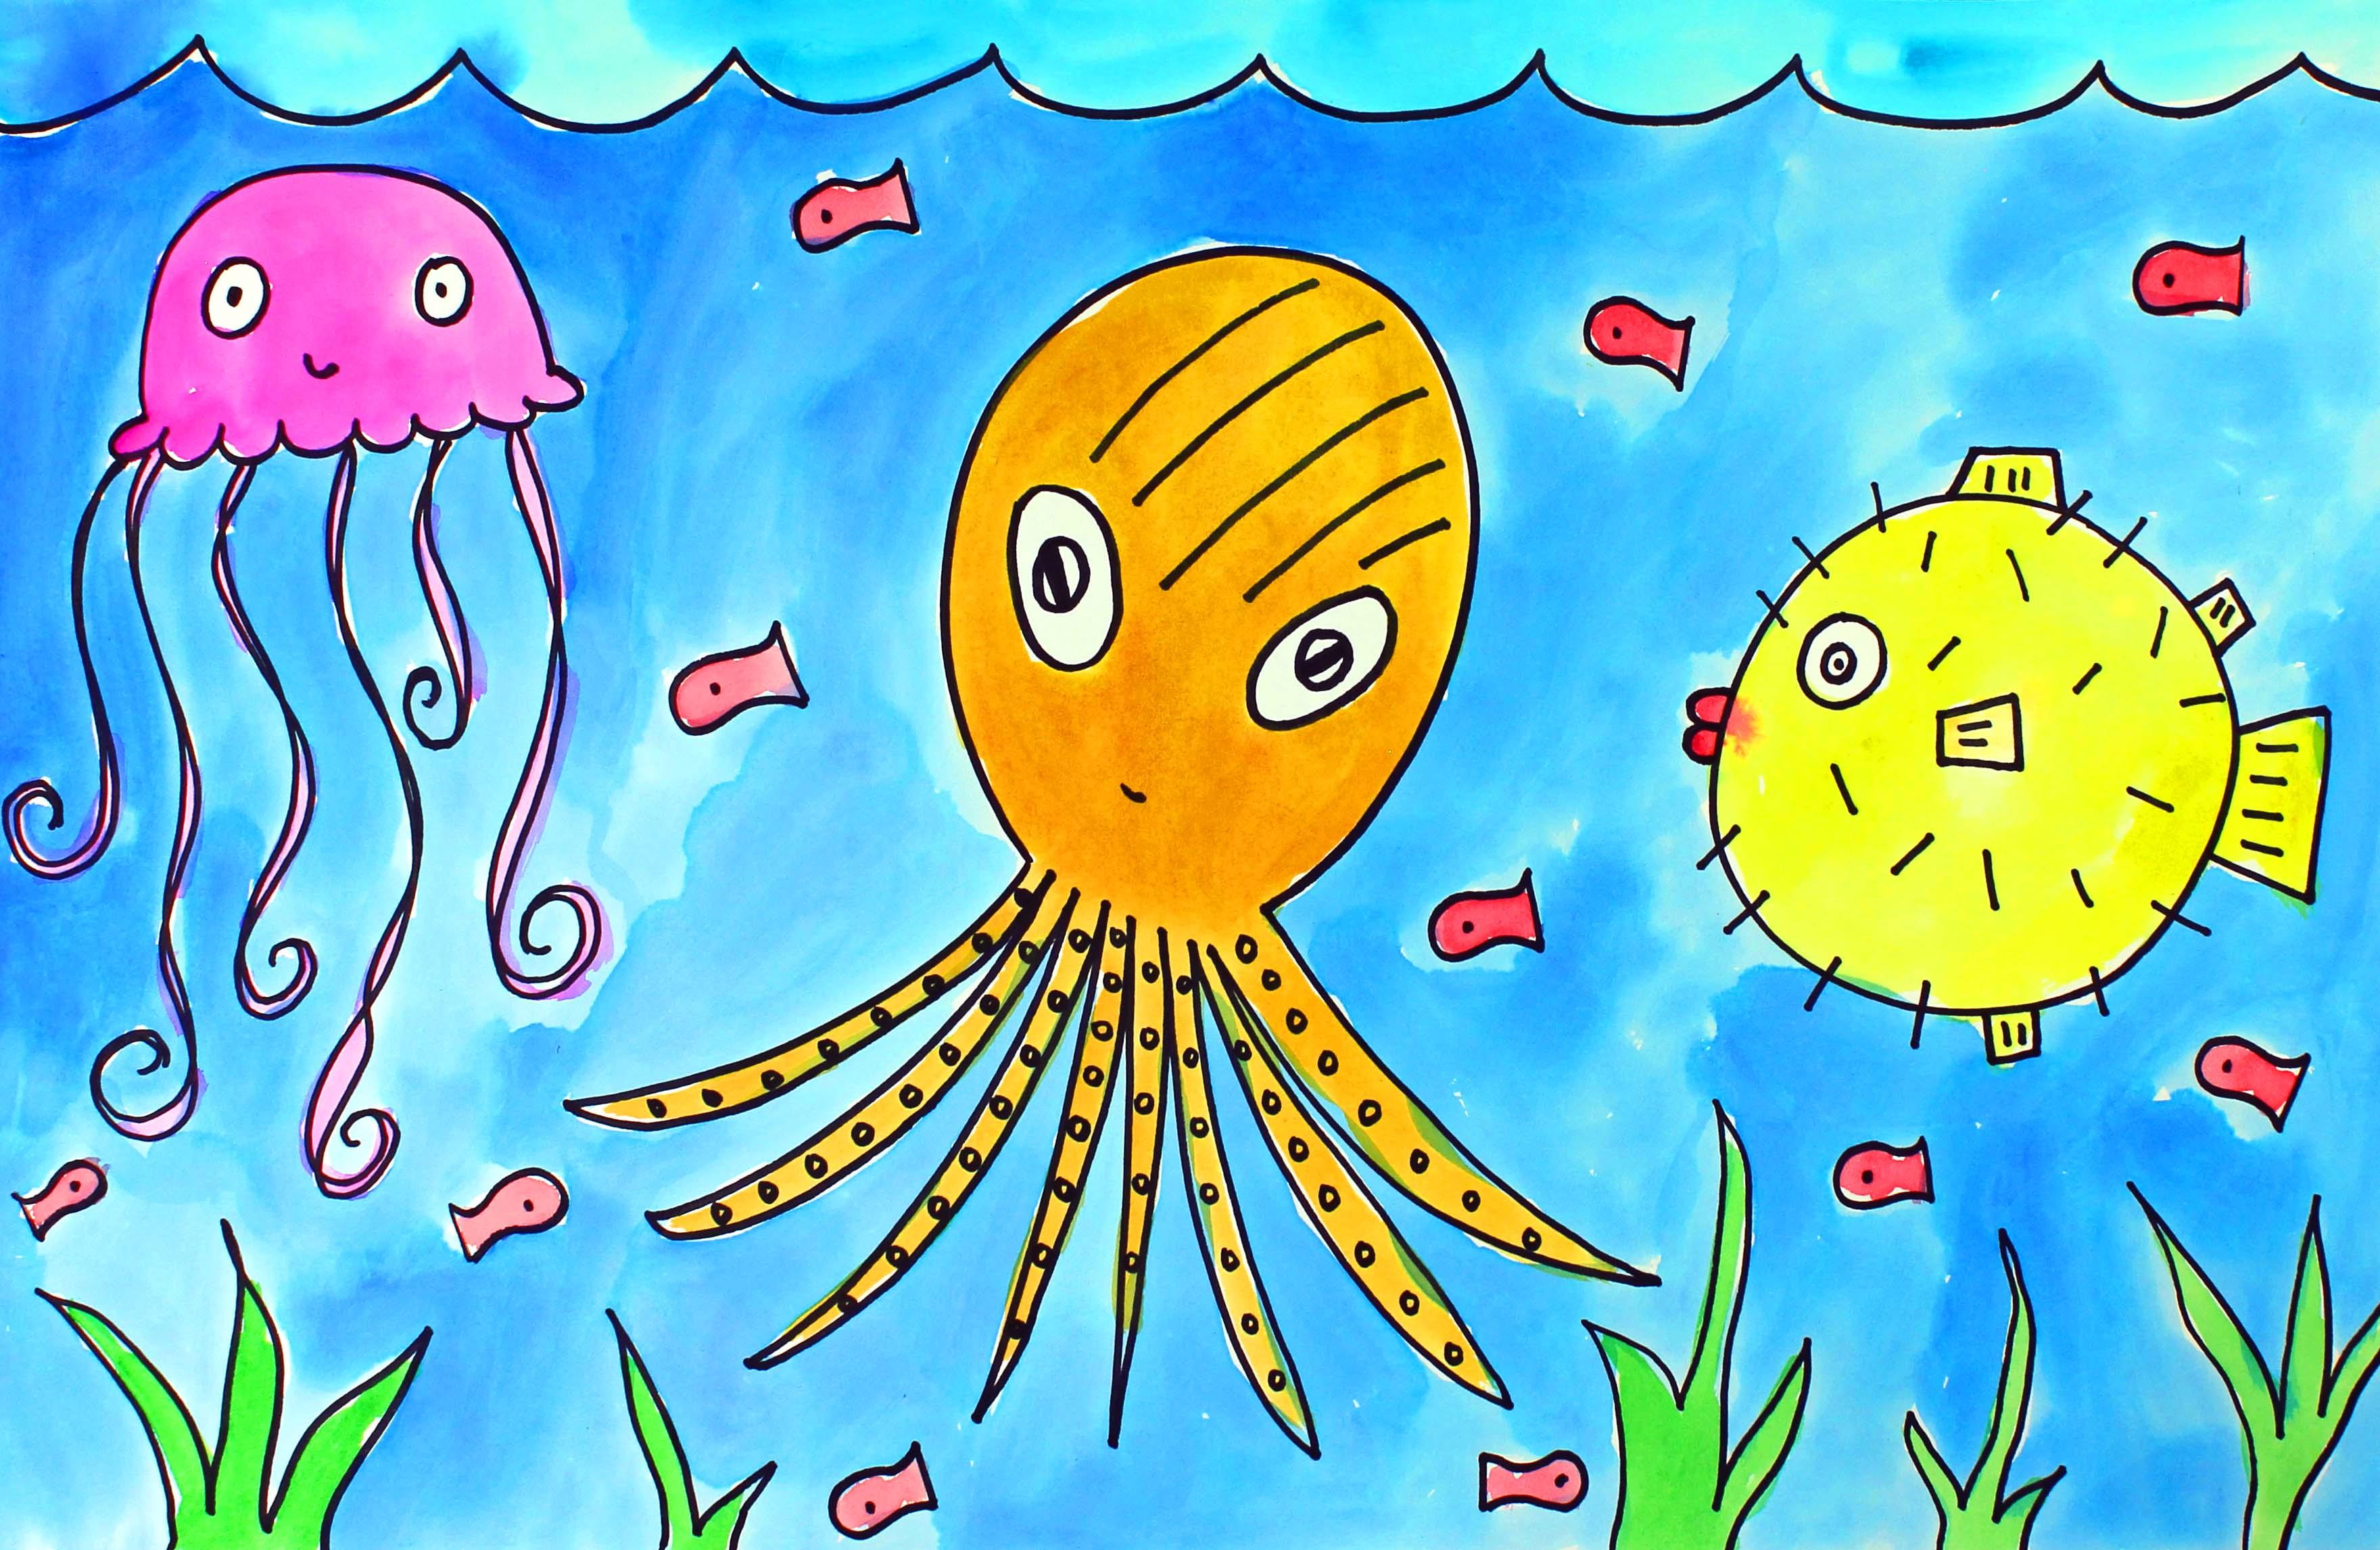
2. Step 1: Draw Ocean Creatures: And in this step, we are going to create
a fun ocean scene. So let's get started. The first thing that
we're going to do is pick up our marker and put the cap on the back
so it doesn't get lost. And at the very tippy top
of your piece of paper, we're going to make
some small waves, and they're going to go
from one side of our paper on our left all the
way over to the right. And it's easy to make
these types of waves. You just go up with a curve
line and then come down, go up and then come down, make sure that they're
all hooked together. Now that we have our waves, let's talk about
our composition, where we are going to
place our ocean creatures. So we're going to be drawing
three ocean creatures, and you get to place these creatures wherever you want to on your piece of paper. Make sure that you have enough room for your
creatures, all of them. Some of them might
be smaller than mine or some of them
might be bigger. It's completely up to you as to how large or small
you'd like to draw them. So we're going to
have an octopus. We're going to have
a puffer fish, and we're going to
have a jellyfish. So I am going to choose to
put my octopus right here. That's going to be in the
middle of my piece of paper. You might choose to
put your octopus over here or over here.
It's up to you. So let's get started
drawing our octopus. So what we're going to do first is we're going to make his body, and that's going to be kind of like an upside down letter C, and I want to make him big
enough that I can really see him if I'm looking at him
from across the room. So I have an upside
down letter C. Now, I know that an
octopus has eight legs. So from this space right here, I'm going to make eight legs. And this is more of
a cartoony octopus, so he's not going to
look really realistic, but we can still have a lot
of fun with him, right? So let's make eight legs. I'm going to come out, and then I'm going to come back in. With a pretty thin leg. I'm going to come out and
I'm going to come in. That's leg number two. I'm going to come out and come back in. That's leg number
three. Leg number four. Leg number five. Leg number six. One, two, three, four, five, six, seven.
I have one more. Come out. Come back
in and close up. Alright? So they might not
be exactly the same size, and that's okay because when
you look at an octopus, you can see that their
legs might look a little bit wider or a little bit more narrow
than the other ones, depending on your perspective
in looking at the octopus. Now let's go back up to the top here and
let's make some eyes. I like to make my octopus
eyes kind of look like this. Like ovals. So I'm
going to make ovals. If you can think of a different way that
you'd like to make your octopus eyes, go
ahead and do that. Now I'm going to make some
circles inside of the ovals. And I think I'm even
going to make a pupil that goes this way, like this. I want to leave a little
bit of white there, so the eye stands
out a little bit. I think I'm going to add just a tiny little smile
like that, just a tiny one. And then I'm also going to add a little bit of detail here, some stripes on the
top of his head. So if you'd like to do
that, you can do that, as well. It's up to you. So now I've started
putting the little suckers on the arms of my octopus. And on each arm, I'm putting many, many, little suckers on there. And those are just
small circles. You can go slowly and carefully
so you do your best work. It might be a tight fit. It might be a little bit snug, getting all these little
circles in there. But you can do it.
Alright. There we go. Oh, look at how cute he is. Alright, so now I
have my octopus. I think the next
thing that I'm going to make is my pufferfish. So I'm going to make my pufferfish over
here on this side. You can make your pufferfish
wherever you like. Let's get started
on our puffer fish. So for our pufferfish, we're going to start
out with a circle. He's not going to be too tiny. He's going to be pretty big. Start out with a circle. And then we're going to make some little ellip and then
we're going to make some fins. So line up over and down, fin on the side, just
a series of lines. You can make these any
shape that you like. One on the bottom, on the back, and then
on the top on the back. And then let's make
a little tail here. Slanted lines, slanted line, and a line connecting
the slanted lines. And then we can add a
little bit of detail. To these little
fins in the tail. And then let's add an eye. They have kind of big
eyes for their bodies. There we go. Now, the thing that makes a puffer fish
really stand out spikes. So let's make some
spikes, spinys. I like to make my
spines all over, and I want to make sure that
they're really straight, but they can go every which way. I'm not going to put any right here because I want
that area to be clear. Maybe I'll put one
more right there. Alright, there's my puffer fish. Now, the last thing
that I'm going to make over here on this side, where I have a little
bit of room left, I'm going to make a jellyfish. So I'm going to put my jellyfish more at the top of my piece of paper because I know from my own experience
being in the ocean, I've seen jellyfish, and they like to hang
out on the top. They like to float on the top, although they like to go
underneath the water as well. They like to submerge. So I'm going to make
an upside down. And then attached to that U, I'm just going to
make a series of curve lines that are
attached to each other. And then I am going to
make some tentacles coming down and then I'm going
to double those up. So I'm just coming
down with curve lines. And then at the bottom,
I'm creating a swirl, and then I'm kind of
doubling that up. Just creates a little
bit more interest. So some of the
tentacles are long, and some are a
little bit shorter. It's up to you how
many you want to make or how long and how short. It's completely up to you. Let you one more right here. Now, jellyfish, I think I'm going to make
one more right here. Jellyfish that I have
seen don't have eyes, but I think because this is
a cartoony type artwork, maybe we can put some
eyes only if you want to. I think I'm going
to choose to put some eyes 'cause I
think it looks cute. Maybe even a little smile. Alright, now that we
have our three critters, our three creatures, now
we can add some details. So we can go down to the bottom and we can
add some seaweed. So we just come up
with some curve lines, not too straight, and then
come right up from the bottom. So it looks like the seaweed is peaking up from the bottom. So any place that you see a spot where you'd like to
add some seaweed, go ahead and do that. Alright. Now that we
have our critters, our ocean critters,
our creatures, and we have our seaweed and
we have our waves above, we're going to take a look at our artwork and see if there's anything else
that we'd like to add. I think that I would
add a few more fish, just some very simple
fish that are kind of swimming around just to fill up the spaces that
don't have anything. So if you'd like to do
something like this, go ahead and take
some time to do that, and we are going
to be coming back, and we're going to
be painting next. So you'll want to make sure
that you get this part done first if there are any spaces
that you'd like to fill up. Alrighty, friends,
I'm finished with my drawing portion
of my artwork, and the next step is going
to be to apply some paint. So I'll see you in
the next video.
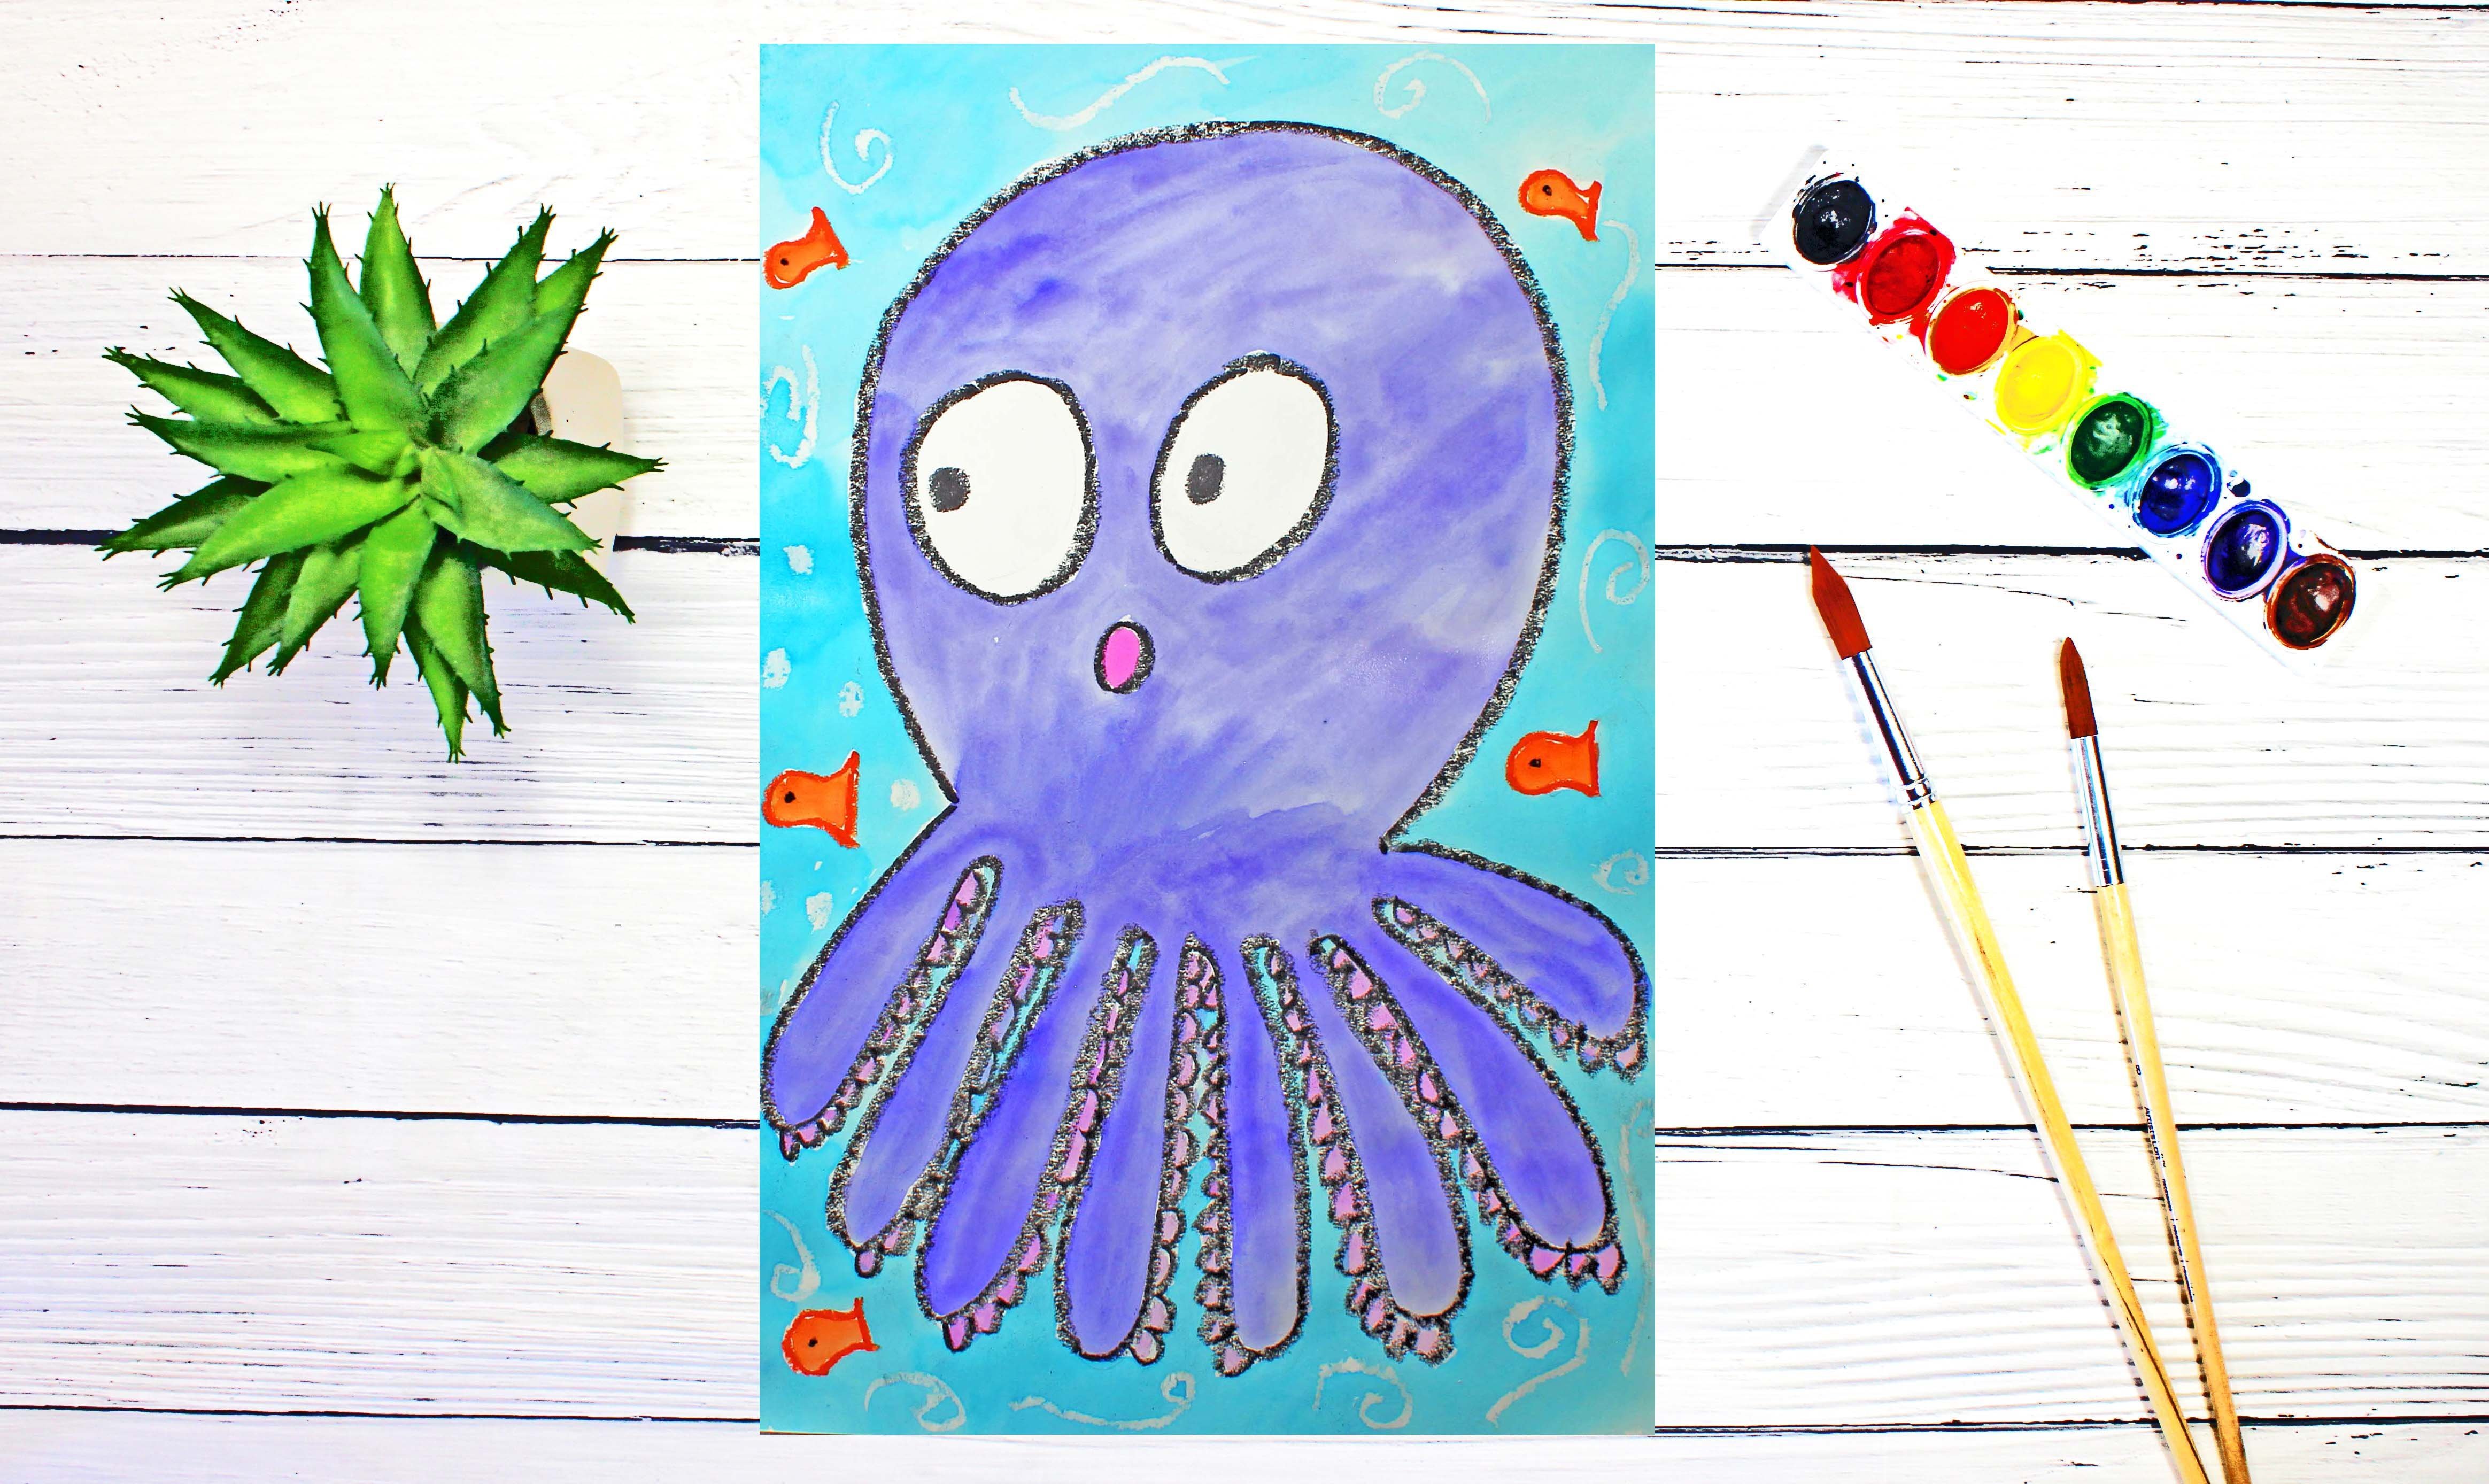
3. Step 2: Paint the Background: In this step, we
are going to apply some watercolor paint
to our artwork. And the first thing
that we're going to do is we are going to put one or two drops of water
into each pan of paint. And what that will do is it will soften up our
paints a little bit. It will dissolve our
paints a little bit so that it is easier
for us to use. So I want to take a
moment to do that. Now that our paint is
softening up a bit, let's turn our attention
to our artwork. So we're going to be painting our artwork under
the ocean scene, and you get to paint it
any way that you'd like. I'm going to paint
my ocean blue. My sky may be a
different shade of blue, and I'm going to paint
the seaweed green, and then I haven't decided quite on my critters, my
ocean critters. I think I'm going to paint
my background first, and then after I
paint my background, then I will turn my attention
to my ocean critters. Let's do that first. Let's
paint our backgrounds first, and then after that's finished, we will paint the other
parts of our design. I'm just going to choose a
couple of different colors. Maybe for the sky, I'll
choose a lighter blue, and then for the ocean, I will choose a
different shade of blue, a darker color blue. So I'm going to go ahead
and paint my background, and you can watch me. I'll speed up the video, and I'll see you back
here in just a minute. Alrighty friends, I'm finished
painting the background, and my next step is
going to be painting the details and our
ocean creatures. So I'll see you back
here in the next video.
4. Step 3: Paint the Ocean Creatures: In this step, we
are going to paint our details and our
ocean creatures. So think about the colors
that you'd like to use. I'm going to use colors that will really pop
out from the blue. So I think I'm
going to use green down here for the seaweed, and I'm going to use the warm colors which
are the orange, yellow, red, maybe even pink
on my actual creatures. So I'm going to go
ahead and do that, and I'm going to
start with my yellow because that is the
lightest color, and I'm going to paint my
pufferfish, this yellow color. It looks like it has a
little bit of green in it. Maybe that's from the water. That's a good color, though, for my puffer fish. So I'm going to go
ahead and paint, and you can watch
me if you'd like, and I'll be back here in just a minute. Two. Alright, friends, I'm
finished painting, and I really like the way
that my artwork turned out. There's one spot
right here that I'd like to take off a
little bit of the paint. So what I'm going to do
is I'm going to hover my paper towel over this cute little octopus
and touch gently, and that will bring up a
little bit of the paint. I had to do the same thing
over here when the red started bleeding into the
yellow, the greenish yellow. So I hope that you enjoyed this lesson. I'll
see you next time.
 Em Winn, Teacher, Art Instructor, Artist