Transcripts
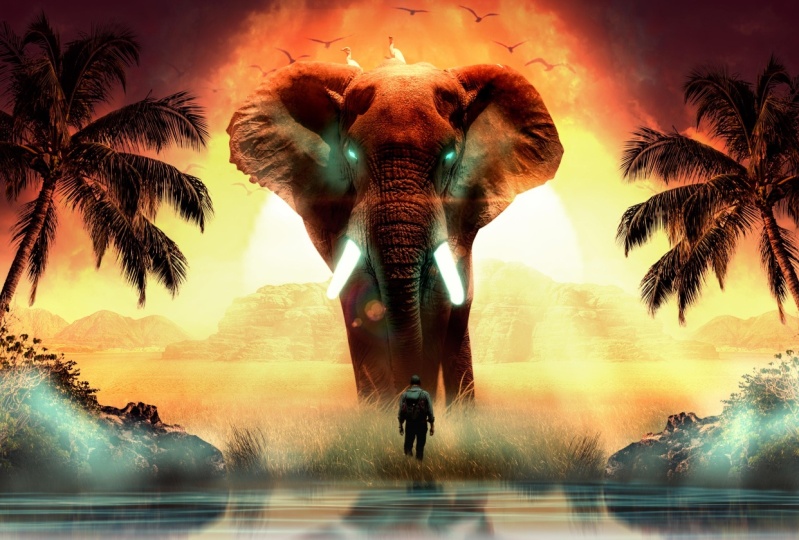
1. 0 Intro: Hello guys, welcome to the masterclass in
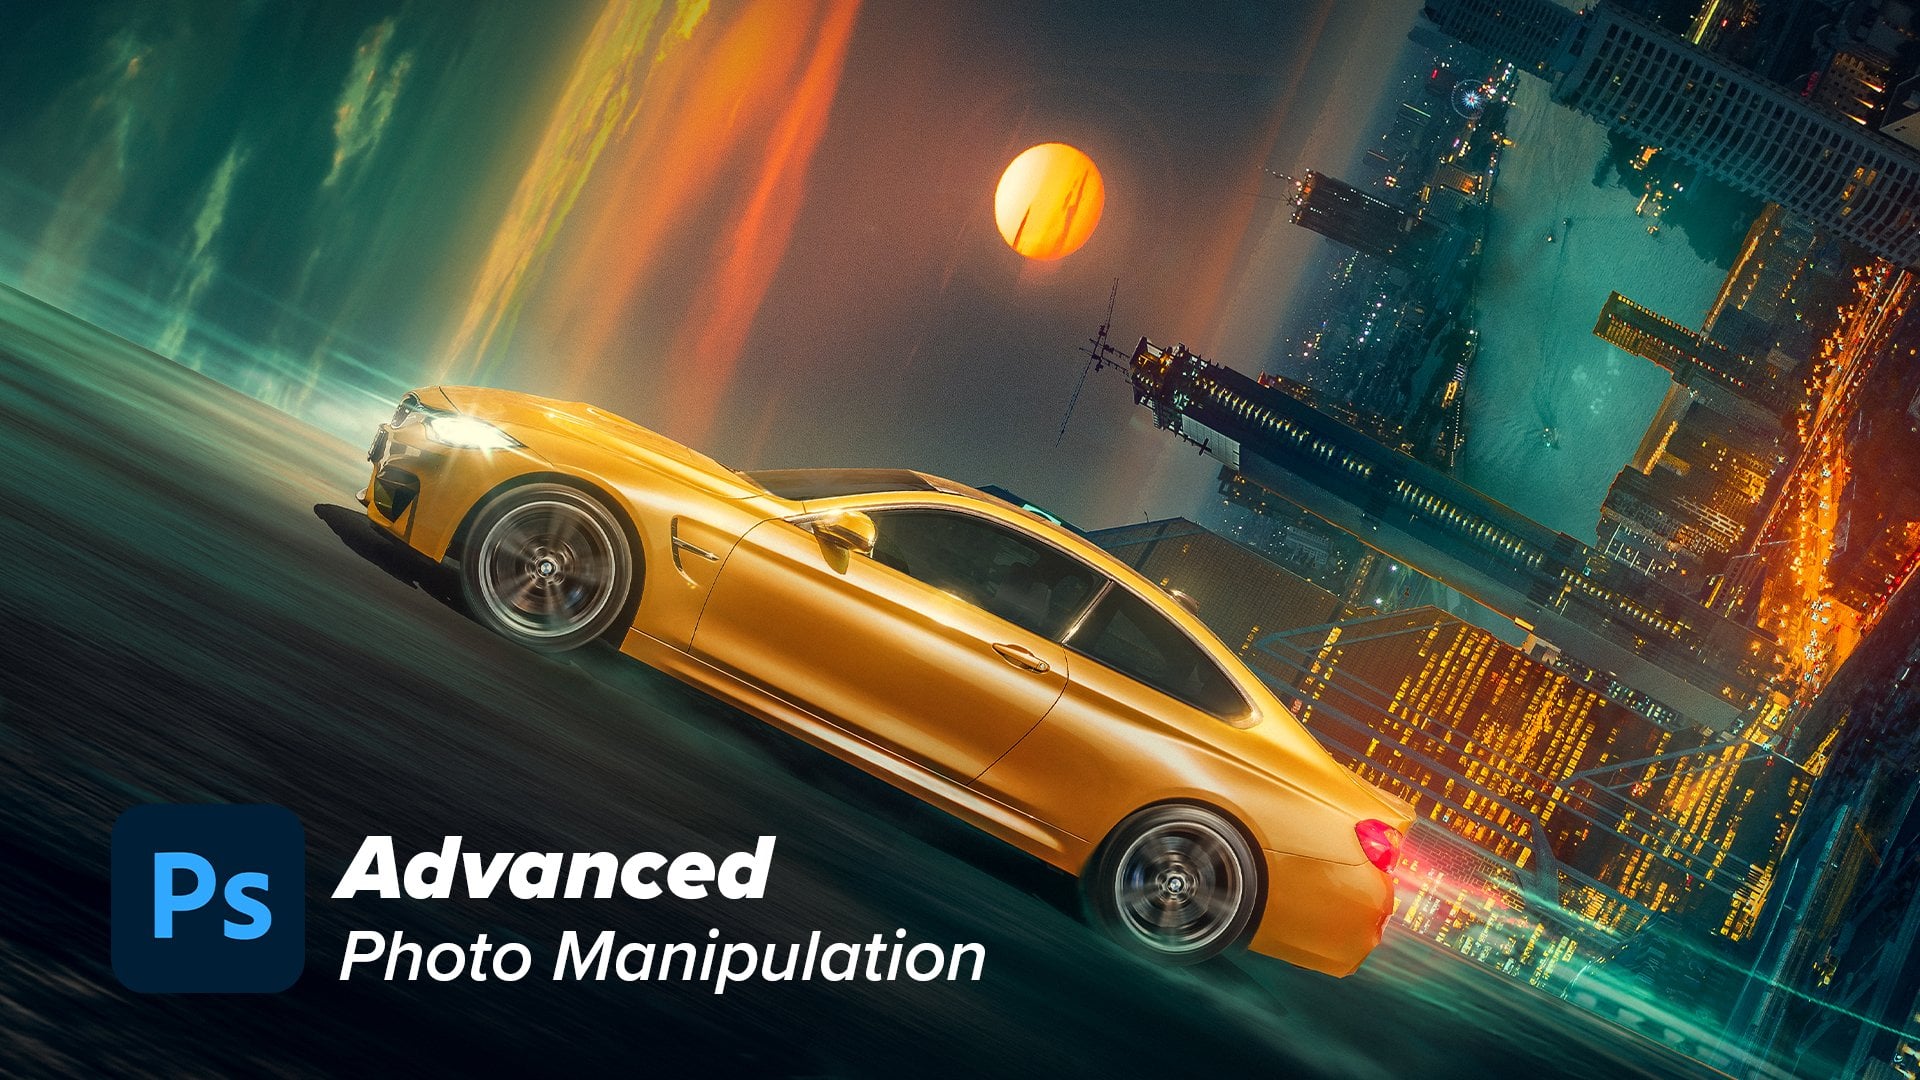
photo manipulation. In this class, we
will learn how to make this visual step-by-step. Every detail I took to make this visual using advanced
photo manipulation techniques, this class will go
beyond the basics. So for example, I'm not going to teach you how to cut images. I'll focus on teaching you
how to correct values, how to match saturation, and how to match colors
of each element. Also how to draw
light into subjects and how to add the
final look and grading. I'm so excited to
start with you guys. So let the fun begin.
2. 1 Blending the sky: Alright guys, I encourage
you to follow up with me step-by-step to make the
best use of this class, you will find all the images that I'm using in
the description. The first thing we're
going to start with is that I'm going
to make a new file. I'm just choosing
the full HD size, 1920 by 1080 B and press Create. The first thing I
love to start with is the background and the sky. So I'm going to start
with the sky image, trying to put it here, making it a little
bit bigger like this. Then I will just duplicate
the layer by pressing Control J and then Control T and right-click and flip horizontal to pour it
into the other side. Like this. So now I will press on the
Mask button, press here. And was the soft rounded
brush with the black color. You can press X to
toggle between the white and black and then erase the edges so that they blend
nicely together like so. Then I will create
a new layer to make the edges a little bit darker and having this
magenta tone like so, I'm just picking this color, making brush bigger with the
brackets pattern and put some dark areas like this because I want the focus
to be in the middle. Okay, let's blend it nicely. And there we go. Then I will put everything
I've done in a group pressing Control G because we want
to be somehow organized. So I will also blend
the sky layers, pressing Control E and then
creating a new mask to, to erase and mask the
edge of the bottle. So I created a new mask and
with the soft edges brush, I will just erase and then
store to erase this part. Try to blend it nicely.
3. 2 Bending the grass ground: The next thing, I'm going
to grab the ground, the grass layer, this image
and put it right here. Of course, they have
a lot of differences. The two images of the
sky and the grass, or have different
values of light, have different colors,
have different situations. So what we're going to do is to match every image to this guy. So we have this
magenta looking sky. We need to match every
image to its main color, saturation and light value. So I'll just, What's it here? Making get a little bit
shorter and just expanding it. It's okay to expand it. And the first thing we're
going to select the sky by pressing from the
select menu and press sky. This feature is only allowed, I guess in the 2021
version of Photoshop. Before that, this option
is not available. I've selected the sky and
before making the mask, I'll press Control I to
invert the selection, to only select and
raise the sky like so. That sounds cool. So next we're going to define some edges because this edge was not erased properly and trying to make the
edges softer, like so. And that's it. So next, I'm going to, I feel like the
sky have a lot of color and it's very saturated. So I think we need to make it a little bit
low or saturation. So I'm going to make a hue
saturation adjustment layer and decreasing the saturation
a little bit like this. So next, I'm going to make
a new group for the grass or fall to the ground and I will start to match everything. And the first thing we're
going to match these colors. So I'm going to create a color
balance adjustment layer. And from there we can start. So we can start in the shadows. As you notice here, the shadows of the sky have
a magenta purple color. So this is the main colors that we want to dominate
in the shadows. So in the shadows we
will just increase. I'm now working on the
shadows of the grass. So I need to create
a clipping mask so that the effect is only
affecting the grass layer. So I'm now just increasing
their magenta in the shadows. And I guess we can also
increase the red, like so. Okay, and the mid tones, we're going to do the same, but let's increase the yellow
and increase the magenta. A lot of bad, increase the
red color a little bit. What do we need here is to match the two colors of the
sky and the grass. And in the highlights, let's bring the yellows up. Because as you can
see in the sky, there's a lot of yellow
colors in the highlights and bring the red and the
magenta little bit higher. I guess we need, I guess this is good. So as you can see
where affects it, the color of the grass. So from here we are good to go. But we need to first add
this atmospheric effect. Because when you go
further in destined, you will find that
the atmosphere affects the, the grass layer. So we need to replicate this
by creating a new layer and just picking some colors from the background
with the soft edges. I'm just picking some color
from the background and trying to draw some
atmosphere effect. Of course, I will
bring the opacity low. The blend mode to screen. And let's decrease this
effect on the opacity. Like so. This perfect. So as you can see, this adds
some depth and the visual. And I guess let's put
some hazing effect here. Increasing the
effect L little bit, like fee 5058 is good. And I'm just using the
mask or the eraser, erasing some parts and
adding other ports. I want to make sure that
it blends properly. Okay, that sounds cool. So next we're going to
match the saturation of the colors of two images
of the sky and the grass. What I'm going to do now is creating a chick
layer for saturation. So I'm just pressing on
selective color layer. This will be a check
layer that will show us which areas have a lot of saturation and which
have low saturation. So what I'm doing is
bringing the blacks down, up to 0 in all the colors. So in the red, bringing the
blacks in 0 or minus 100, and the yellows and
bringing them to minus 100, the greens and also the cyan and the blues
and the magenta. But for the whites
and neutrals out and blacks just increase
them to plus 100. These are the steps for
creating this Check layer. Okay, So what we're seeing
now is a map for saturation. So the areas that have a more white color have a
high saturation and areas with low white color or with more black color mean that
they have low saturation. As you can see, the grass layer
have a lot of saturation. So we need to lower the
saturation of this part by creating a hue saturation
adjustment layer and decreasing the
saturation a little bit. Let's create a clipping mask
and decrease the saturation. I need to create clipping
mask where the grass part. Yeah. So I guess we're good to go.
4. 3 Blending te mountains: The next element that
we're going to put in our design are the mountains
that form mountains. So I'm just putting it into
a separate group also. But first let's make
it bigger, like so. And putting it into the horizon, we need to match the
two horizon lines of the two images that we have a match IT perspective
for the visual. So like this, I guess. And then we're going
to select the sky was the same way we
selected the sky of the grass layer BY select
menu and then select sky. And it will automatically
select the sky. Then we're going to press
Control Shift I to invert the mask and then press the
mask so that we select only. So I'll put this layer here and make it a
little bit bigger. I guess. These sounds good. And then let's just
erase some parts. These parts with the
soft rounded brush. I will erase the sports that the image is
splints together better. I guess. I guess this
sounds cool Already. Well, don't have to make
a lot of effort here. Sounds cool. And then
I will press Alt and drag the image
to duplicate it. And then press Control T, right-click and then flip horizontal and put
it right here. We are trying to
pick specific area in which the two images
blend together more. So I'll just erase this part. I'm trying to choose good area, Enter to be the intersection. So I guess this area
is cool enough. I guess so. Let's erase this. Okay. They sound score. Now we're going to add
the hazing effect and the atmosphere effect because these mountains should
be very far away. So first we're going to blend these two layers by
pressing Control E. And then let's add the
atmosphere effect by making these mountains
and not contrasty. So we need to decrease
the contrast. We will do this by
curves adjustment layer. I'll create a clipping mask and then bringing up the
shadows like so. From here, as you can see here, it immediately lost
some contrast, which gives our brains the illusion that they are
far away into the sea. They are not close to the camera that shot this image, right? Let's bring the light, the light parts
or two bit lower. And this sounds good. And I guess I can change the blending mode of this
curves adjustment layer, tool luminosity so that I only affect the lightness values, not the saturation or the
colors of this month. So next I'm going to put the mountain into a new
group by pressing Control G. And now it's time to add hazing effect or the atmosphere effect
into the mountains. So I'm going to create
a new layer and choosing some color from the rocks and trying
to draw this effect by the soft round brush or
with some smoke brush, like this brush, make
it a little bit bigger. Try to draw some
pressures like so. But we need to focus that
this effect is effecting the lower ages of the mountain much more than the higher edges. Because as you know, the dust and the in the atmosphere is affecting
the parts that are near to the ground with
the higher degree of the upper parts of
the mountain like. So. We are going to just
draw these brushes like so. And then decreasing the opacity. Let's say for a 34, Let's try to make it screen. I guess it works better. And try to make it a
little bit higher, then we can create a mask and erase some parts that we see. It's over. The effect is high on them.
5. 4 Blending the sun: Now we're good to go to add
the other main element, which is the sun,
bringing this image. So what was in my
imagination is that this is a sunset scene and son
should be a very big sign. So I'm trying, I choose, I've chosen this image to
replicate my idea and make it a lot bigger than
normal, like so. And then let's
build this product firstly behind the mountains
and create a new group, pouring it into the
group and create a mask, press Control I to
invert the mask. And with the soft rounded brush or any brush we can
bring back the sun. And the sun was some
effects around it. That's good also because
it's already a sunset scene. So it's not a problem having
some colors around the sun. So let's choose the
soft round brush. And then let's exclude some
parts that are not like these birds and like
this tree on the right, and other parts the bottom. Let's erase this part softly. I guess we can also create a
glow effect around the sun. So I will creating a solid
color adjustment layer with an orange color and then bring the blend mode
into linear light, or linear light is good. Let's change the
color of the bed to be more reddish because
this color is good, we can also decrease
the intensity of it. So I press Control I, and then trying to draw some effect around
the sun. Like so. As you can see, it's very, very high effect
and very intense. So I will first lower the
saturation of the color. And it gets this color is good. And then press Okay and
then decrease the film, not the opacity because the linear light mood is one of the seven
special modes in Photoshop that has
different effect when you decrease
the opacity and DFL. So if you decrease the fell, it just decrease the
intensity of the effect. Not only decreasing the opacity. I guess this is perfect.
6. 5 Blending the elephant: So let's drag the elephant
image and put it here. And let's try to make
it a little bit bigger. Like so. And let's put it above everything and put
it into a new group. And then I guess let's make it a lot bigger because we
want the visual to be, to have a lot of
contrast in sizes. So I need to have a very big elephant
versus a very tiny human, which will give it greatness. So I'll just press
Control T trying to also correct the
perspective of the image. I want the legs of the other fun to be completely vertical. And then we're good,
we're good to go. And for selecting
the elephant image, I want to use the pen tool. I can use the object
selection tool. But here I want the
selection to be very sharp because this is the
focal element of our image. And I wanted to be 100% clear and 100% have a very
precise selection. So I'm going to select it
with the pen tool. Like so. I assume that you know
how to use pen tool because this is an
advanced tutorial. So I'm going to speed
up the process of this selection because it's
somehow time-consuming. So as you can see, I'm trying to make the
best selection as I can. I'm going to speed up this
process and get back to you. Once this election is done. Perfect, after making
the selection, I will press right-click
with the pen tool. I should be on the Burn tool and press right-click and
make selection and press. Okay, this will create a selection from the
past of the pen tool. And then let's create
a new mask precisely. And I guess now we can just rotate it a
little bit like so, a lot of bit higher to make
it look somehow giant. So next I'm going to
make a smart object of this layer because I don't
want to lose this selection. So and also I will try to
mask this part because this part needs to be masked with a different
way than pen tool. So I'm now grabbing
a grass brush, which will create a mask. With this grass brush, I will try to refine
it first, like so. And then try to erase the
bottom parts. Like so. Let's just increase the flow
and turn off this button. And then let's blend it better, making it a little bit smaller. These parts, because
I want this, the elephant to be like is in the middle of these
grass or bushes. So in this part,
erasing this part. And I guess like so. Perfect. So as you have seen
in the final visual, I have created water reflections in the bottom side
of our visual. How can we do this? It's just by duplicating the whole scene and flipping it vertically
and put it in the bottom. So I'm not going to do this. Now. What I'm doing now
is to just make the bottom part as a black part and creating
this box, this black. Let's make it black. And in this part, we will have the
water reflections and we'll continue our design. And then we'll get back to the water reflection
and created a new layer and tort it to pick this brownish color from the dust and start
to paint it here. Because this is now make, make much more sense. Because as you can see here, it's a hazy atmosphere
and there should be a lot of dust at the legs, at the bottom of the legs
of the elephant, of course. Like so. So we want it to
be very subtle, like so. Perfect. And by the way, I'm using
graphic tablet from where comb. This gives me complete control of the pressure sensitivity. Okay, Let's erase it with the
eraser to erase some parts. Now, I guess let's
add some parts here. Yes. This is good. Now we can start to edit the lightness and the
colors of the elephant. So I will firstly make a curves adjustment
layer from here. And let's create a
clipping mask and try to open up the shadows
a little bit and dark, darkening the light values. And let's try to make
it a little bit darker, not so much light. And the light pixels make it a little bit darker
that I'm doing this because I want to match the lightness values of the
elephant to the background. So I will also mask this part because I want
this part to be a little bit light and I don't
want it to be dark. And let's also decrease the
opacity of this dust effect. I guess we need to remove this, some parts of the
selection like so. And this bar needs
to be added also. And now let's draw the shadows. The sun is behind the elephant. So we need to have a long shadow in front of the elephant
because this is a sunset scene. And I'm doing the shadow by
a curves adjustment layer, making the blend mode as
luminosity as you can see here. And then I'm trying to
draw the shadows. Like so. Let's put it behind the elephant and let's
draw the shadow. Simple as that. Draw it here. And let's erase it
from the edges. Yes. I guess we need to erase
this part because the light will pass through
the legs, this part. So we need to firstly erase this part from
the elephant layer. It's open the pressure
sensitivity and let's erase this
part using a mask. Make the flow 100%. And let's use the brush
to erase this part. Like so section. Okay. This isn't good. So in this part we don't, we shouldn't have any shadow because light will
pass through it. This gives it so much realism. So on just close the
pressure sensitivity and let's draw the shadows
in here and there. This is the main
shape of the shadow. Then we will decrease the
flow of the brush and erase some parts from the edges. Like this will give
it much more realism. Okay, That's enough for
the shadows, I guess. Now we're going to
make the near ports of the grass a little bit darker
because as I've told you, that near ports should be
a little bit contrasty and dark and the four parts should be light and less contrast. So what I'm going to do is create a curves
adjustment layer and create a clipping mask for the grass pressing Control I. And then with the
soft rounded brush, I will draw some parts here. Here. This will make it somehow dark. Let's put it above
everything, I guess. Yeah. Okay. So erase this. Every time you add something
to your photo manipulation, you need to make sure that it blends better with
the whole image. So this is good, I guess. Okay, Next what we're
going to do is to match the colors of the
elephant to the background. So we need to add some
magenta tone to the elephant. So I'll just create a color balance adjustment layer and start to edit everything. I will start with
the shadows as lot. But first let's create
a clipping mask by pressing into this button. And then let's
correct the colors. I will start firstly
from the shadows. I will add some
magenta and some blue to the shadows as we have already done in the grass layer. And I guess this is too much. Let's make it a
little bit slower. Perfect. You need to be careful adding
the color balance effect because it changes the
saturation also of the element. So we need also to
add some, I'm Brett. And then in the mid tones, I guess let's just increases the yellows
and increase their reds. Sounds cool. Make sure to
zoom out and zoom in so that you see the whole picture and the big picture and
the highlights. I guess we need to
increase the reds and increase the yellows. And that's it, I guess. Okay, this is the
color balance effect. As you can see, the colors
are now much better.
7. 6 Adding the haze effects: Okay, I guess we
need to add a layer of hazing effect
into the mountains. So what we're going
to do is to create a solid color
adjustment layer into the mountains group
and press Okay, I guess we choose this brownish, light brown color and put
the blending mode to screen, then press Control I. And with the soft, rounded brush with
a very low flow, the brush, we will just paint. Let's make it normal
blending mode as normal and decrease the
opacity, increases the light. I guess this gives us much
more appealing effect. Then press Okay. Let's erase some parts from
the top of the mountain. Okay, next two are
going to create a glow effect around the sun. So I'm just going to duplicate this solid color
adjustment layer and change the
blending mode into, let's make it screen and
change the color into orange. She saturated color. Press Okay, and then let's draw some glow effect around the edges of the
mountain. Like so. Because this makes
more sense around the around the sun on the
edges of the mountain. And I guess the colors
are very saturated so we need to
decrease it like so and press Okay, perfect. Let's open up the opacity, make it a little bit higher, and let's refine the mask
and the blended better. Like so. It sounds a little bit better. This is very glowy and
moody. I loved this one. Perfect. I'm going
to spice things up by the, this overlay layer. Put it here, let's
make it bigger, like so very big. And these rays will
spice everything up. Let's distort it a little bit. This layer is supposed
to be sun rays, and I'm now trying to distort. It, just changes the
blending mode to screen. And now I'm trying to reposition it into a
very good position. Of course, I will
change It's colors by pressing control the EU
and press on colorized, change, the saturation and the hue and tools,
some orangey color. And then press Okay. You can see, okay, perfect. If I want to make the
effect much more intense, I will press Control L. This will open the
levels and I will increase the contrast
and press Okay. I guess we need to make a
mask to erase this edges. Soft, rounded brush. And yeah, this is very hazy and gives me the
impression that I wanted. So now I have just duplicated
the layer by pressing Control J to make the
effect much more intense. I'm trying to mask some parts. And I guess this
looks very cool. So now we're going to add some soft flights into the
elephant from the sun. So we need to create a hue
saturation adjustment layer. And let's make a clipping mask by pressing Alt and pressing
between the two layers. And then I will press colorize. And let's choose
the orange color. After that, I will increase the saturation and the
lightness like so. And let's make it
some more orangey. Now I want to erase some
parts of the these slides. So I will double-click, double-click into the
hue saturation layer and remove the effect from
the dark parts like so. And let's press Alt
to split the cursor and to make the selection much more the blending
much more moose. And I'm now trying to make it smoother and
then press Okay, then I'll press
Control I and draw this warm orangey
soft light into the top parts of the elephant and into his ears to the legs. These are the outer
parts of the elephant. And this gives it a little bit
good-looking effect. Draw it here. And by using the blend F, we are assured
that the effect is only applied into
the bright pixels, not the dark pixels. And then I will duplicate this layer by pressing
Control J and erase everything into the layer
and create clipping mask. What I want here
is that I want to add another layer of highlights. So I'm now making the brush
smaller and trying to add a glow into some specific
edges around the sun area. As you can see. I guess we need to
break this effect. And let's make it a little bit more and
much more intense. Increase the lightness. I guess this is kinda cool effect because we have the sun right
behind the elephant itself.
8. 7 Bleding the man: Okay, that's good
for the elephant. Right now we're going to
start working on the man. So I'm bringing the image of the man and putting
it above everything, putting it into a
separate group, press Control G to make, to put it into a separate
group and start to make it a little bit smaller
to make our selection. I will do this by the
objects selection tool. I'll just select this area and it well be
selected by the AI. So this is, this is enough,
I guess, for civic, I guess here in the hands, there are some parts that
needs to be excluded. So by the brush, I will just erase the sports. So I'm going to
make it very small. Like this, very small. It is something relative. So if the man looks very small, the elephant will look very big. So now I'm going to create a smart object from this layer. I will right-click and press
Convert to Smart Object. And then I'm going to
add a mask to mask the leg part because they wanted the man to be like He's
immersed into the grass, the same as what we have
already done into the elephant. So I'm just using the grass brush and
erasing his legs like so. This part the bottom. And these parts with the grass. I guess they Sounds good. Next, we are going to correct and match the
lightness values. So I'm going to create a curves adjustment layer
and just make clipping mask. And I'm going to
correct the lightness. The man should be very dark because he will
be in the shadow of the elephant and open
up the shadows a little bit, decrease
the highlights. And then I will create a color balance
adjustment layer to match the colors of this man to the whole image and
to the other objects. So we need to add
some magenta to the mid tones and
to add some breads. So I will just start by
increasing the bread into the mid tones and decreasing the greens are increasing a green's
a little bit, and increasing the yellows, the mid tones and the
highlights, I guess, need to increase the
yellows and the reds. In the shadows. We need to increase
the red, I guess. Yeah, increase it
a little bit and increase the magenta
little bit and the blue. Or I guess we need to
decrease the blue. We need to make it a little
bit more to the yellows. Feel free to experiment everything until you
get the best results. We need to put it
behind the curves. Know. I guess now we need to open up the shadows a
little bit like so. That is good. This is very good. Perfect. To make it a little
bit dark from here. And we're good to go.
9. 8 Drawing the elephant lights: So in this part, I decided to add
another color that will bring contrast in colors because as
you can see here, we have a lot of hot colors, like the red, the
orange, the yellow. We need to bring this and
add another cold color. This will bring
contrast to our design. So I decided to add this color into the teeth of the elephant, if I can say it. So, by creating a solid
color adjustment layer and choosing this cyan bluish color. I guess let's make, let's say it's cyan and change the blending mode to
screen and press. Of course, let's create a
clipping mask and then press Control I to invert this mask. And now I'm going to draw
the effect in the teeth. So I'll just draw it here. This is just simple
drawing process. I'll just speed this
up because, you know, you can make a selection of
this part by the pen tool and draw on this
selection or you can just draw it as as
what I'm doing. Now. Let's add this
slide into the eyes. Also, this will make the
elephant much more mysterious. So we will draw the eyes. I will of course, turn on the pressure
sensitivity. And by using the graphic tablet, I can draw the eyes like
so to make the edges thin. So if you want to make the
edges Fen human being, you need to have a pressure
sensitivity tablet. You need to have a tablet and turn on the
pressure sensitivity. Then I will draw the other. I hear. The same way. Like so. This is not heart,
simple eye shape. I guess it's not identical. So we need to edit
it a little bit. So erase this part. And let's add, I guess they
are now somehow identical. Now, we need to add
some parts here into the skin of the elephant. And this can be done only with
the graphic tablet because you need to have
pressure sensitivity to make these shapes. Like so. As you can see here, I'm
pressing into the pen. In some parts and other parts, I'm producing the pressure. This will give me
Marty uniform line. So in some parts
around the teeth here. And let's erase this one. You can do this effect
by mouth, I guess, by creating a line and then erasing some parts
for our from it. So I'm doing the
same effect here. And let's make this
line continuing. And here. Around the eyes. I want, I want it
to look like that. The main source of light, which is their
teeth or the eyes, is diffusing sunlight
through the skin. The elephant, like so. And here. Very good. This part, of course. This one. Yes, this looks very good. Well, it's trace the end
unconformities on the skin. Like so. This is
something very artistic. So it's up to you. However you like it, you can make another virgin. And show us in the
comments section. This is very good. Here, of course,
in the the sports. Because this is a focal point, the trunk is a focal point. So we need to edit
this part also here. And here also. This process, somehow
consuming time. But it's also in, I'm also enjoying doing this. This is fun doing, of course. So I guess now we're good. The next thing, I'm
going to duplicate this solid color layer and
erase everything on it. And let's change the color to a darker color and press Okay. And with the soft round brush, I can draw the light
that reflected light. So these were the
main source of light, the teeth and the eyes. And then we need to have some reflected light
into the skin. So I'm going to bring
the flow down and then I will draw some lights. It should be some way subtle, like so here in this part. And around the main source
flight here, here and there. And let's erase it from here. But some lights here around the eye and also
around the skin. This part. And
around the sports. Of course, it's
decreased a little bit. And let's draw the
lights this part, around this part also. And here of course, here the lead should be this should be a glow of
the main light sources. So it should be around
any light source. Also, make this reflected
light around the teeth. And do the other one. So this looks cool, glowy. And I guess we can
make a new layer of highlights by duplicating the solid color
adjustment layer, this layer up the cutting it. And then from the
properties panel, we will increase the feather. As you can see now, I'm now creating a glow effect from the main source of light, which was the eyes
and the teeth, and also these
lights in the skin. I guess this is better. So I guess we need to change
some stuff in the blend. If sliders in this layer, I'll double-click
into the layer. And from the underlying layer, this one slider,
I will split it. And I'm now trying to execute this effect from the
dark parts of the elephant. So this is good, I guess. Then press Okay. Now I will complete drawing
the reflected light. This light will be reflected
from the main source, so the left teeth will drop
some lights into the trunk. Here. Let's erase it from this and let's draw some lights here and around the edges
and in the ears. So now let's increase the
saturation of the colors. I guess this should be better. Then press Okay. I will increase or draw
some lights. Here. Slides are from the eyes. So the main source of this
slide is the I and its reflect into the
ears is something very artistic and it's
not hyper-realistic. So now we shouldn't be worried about having the most
realistic light rendering. We're just making
something that looks good and at the same
time make sense. And the edges. So this is good. And add some more
intense highlights in some parts like here. And I guess we can choose
the Howard rounded brush and decrease the flow. This gives me some texture. This gives a good
texture into the light. Let's draw it here. It should be much more
intense here, this part, and then erase it here, follow the form of the shape. So I'm now following
the form or the shape of the vase part
of the elephant. And then erase some parts
to blend it better. This looks cool here in
the trunk, of course. This should be better here also. I guess we need to
make it bigger. In the legs and in
the ears. Of course. Sharp highlights are
always good locking. So I'm trying to add this
sharp highlights by drawing with sharp brush and
then erase some edges. This gives me a
very good texture. Let's draw it into
the other ear. Like so. This part. And in
the legs of course, that's making the brush bigger. Andro here. That's what all what
I'm doing here. Drawing some parts and
erase some other ports. You need to practice. You need to practice how to
distribute light in shapes. And you need to start
with some simple shapes, like distributing the light
into a sphere, into a box. And little by little, Adding more complex shapes like organic shapes
like this elephant. And time. By time, you will
master this skill. And it will help you a lot in your photo manipulations
or digital art in general. So I guess this is good. So now what we're
going to do is to reflect some of these
slides into grass. Um, I will duplicate this layer and remove
everything from it. And then choose the
soft rounded brush, changing its shape
and make it bigger. And let's draw some
light into the grass. Of course it will
not be so intense. But we will, we will remove
and erase some parts later. And let's add it here. And then let's double-click into the layer and
remove some reports from the dark areas by using blend if sliders and
then press Okay. And let's erase some
parts from the edges. Like so. Because we want it to blend nicely and to look good. So next, I'm going to duplicate this layer because we need to have some lights
into the guy. So I'll duplicate it to remove everything from it
and press Control. I guess you already
know the process and then make the brush smaller. And Let's draw some lights here and here and the shoulders. These slides should
look very subtle. And it of course, separate the guy from the elephant because it makes
some, somehow some depth. So this, this lead our
eye to the guy of course. So that's good for the
guy and the elephant. So now we're going to add other elements into our
photo manipulation.
10. 9 Blending the palm tree: So I'm going to bring this
image of the palm tree. And now we need to separate this palm tree
from the background. So I guess we can do this by
the object selection tool. I will roughly select the palm and rocks part and create a mask and then
we can refine the edges. We will do this from the properties panel from here
and press Select and Mask. And now from the Refine
Edge tool from the above, I can refine the edge
and remove these parts. That's I don't want. Here. We can also use channels
to separate this. But I guess the Select
and Mask option gives me a very decent result. So I will refine this edge here. Just removing the white
parts from the palm tree. This part here also, and also this part here. And here. In this part. I'll do this for all the parts, so I'm going to
speed the process. Okay, Now we're good to go. I guess also we need
to remove some parts, but let's firstly
drag it and drop it into our composite here. And now press Control
T to make it a bit smaller and put it
into the right possession. So now I will put it into a new group, pressing Control G. And then let's erase the
parts that I don't want. Buy the hard brush. Let's make the flow
one-hundred percent and let's erase this part. Course. The sport. We don't, we don't
want all these so I will just erase it. You can use the pen tool, but I'm now just using the brush tool to
erase this section. So from here, and like this, I will enhance the
intersection between the grass and these rocks later. But for now, let's
erase this one. And I guess we're good to go. Okay, after selection
the palm tree, we will change the colors, the saturation and the
brightness values don't match the sky and the other
elements into our visual. So the first thing
we're going to start with hue saturation layer. I'm going to create
a clipping mask. And I will decrease
the saturation because it has a lot of green color. So I want to get rid of this green and I guess this is good. Next, I will use curves to
adjust the lightness value. So I'm going to create clipping
mask and then try to make it a lot darker. Like so. And make the dark values or the shadows a little
bit also lighter. Next, I'm going to
correct the colors. I'm going to make color
balance adjustment layer. I guess you already
understand this point. I'm just matching the
lightness values, the saturation and the colors. Here, I'm changing,
creating a clipping mask. And then in the mid tones, I'm adding this magenta
tint and the shell. Let's start with the shadows. Adding the magenta and the
blue and some red color. Let's open up the
shadows alphabet. Not so much and
decrease the lightness. Highlights, I guess we
need to make it like this. Okay. This is cool. I guess. Maybe you need to change the
saturation a little bit. Let's make it a bit higher. Cool. So let's make the whole
thing a little bit lower here and good. So now we're going to
create some rim lights that light reflecting
from the sun. So I'm going to do this by
creating a hue saturation adjustment layer and person colorize and create
a clipping mask. Of course, increasing
the saturation. Turning the color into orange and opening up the lightness
as this color is good. And then double-click into
the layer to open the blend. If slider here, I'll try to
make the light as sharp as I can because I want just a subtle rim light
into the palm tree. Not so much light. So I wanted to be like this and then change the blending
mode into Color Dodge. I guess when we change it, we need to lower the
saturation a little bit. And let's just start to paint. So I'll press Control I. And to them the mask
itself press Control I. And then start to
draw some rim lights. And we will change the values of lightness
later if we don't like it. So let's draw it here. Don't forget to lower down
the flow a little bit. And now I'm trying to draw some rim light that's
reflected from the sun. Like so I guess we need to
lower the saturation of the color is so
vivid. Like this. No, I guess this is better. So let's make some
other highlights here. Here. Here, here, and here. Here also. This is giving us some
very good locking. Renoir. I guess we need to decrease
the filter a little bit. And as I've already told you, the color dodge mood is one
of the spatial modes in Photoshop that have
a different effect between the opacity and fell. So I will hear decrease
the intensity of the effect by decreasing
the fell a little bit. And let's try to put some, hey, room lights here. And here. I guess we're good to go. So I'm now trying to
bring this grass layer to enhance the intersection between the rock and the grass. This part. So I'll put it here and of
course I will change its color and saturation and
all stuff don't match colors and the visual. So I'll do this by pressing Control M to change
the lightness values. Like this, make it a bit darker. And press Okay, then press
Control B and the keyboard. To open the color
balance adjustment, Let's change the color and to somehow magenta color
and the mid tones. And we're good to go some, adding some blue also. And then press Okay. Then I can duplicate this
layer by pressing Alt and dragging the layer and
putting it right here. Let's select both layers and press Control
E to merge them. Put it here. And let's also duplicate
this layer to the edges. And let's also duplicate this whole layer and make
it a little bit smaller. We're pressing Control T, make it a bit smaller. And put it here. This is very cool, I
guess is the colors needs to be adjustable for bits. So in the mid tones, I will decrease the magenta bit because
it's a bit too much, decrease it a little bit. And I will increase the yellow's a little
bit and the reds. So I'm now tweaking
the sliders so that I get the best colors
that match our theme. Let's make it a little bit
darker by pressing Control M. And now we're good to go. I think of course
we need to erase some parts from the
bottom of the graph, so we need to create a new mask. And with the software
on the brush, I will just erase
the bottom edges. Make sure that the brush flow is not high because we want
to make very good selection. I guess this grass piece
needs to be edited. It's very big, so we need to make it a
little bit shorter. I am using now the warp tool. You can find it from here. And I'm pressing, I'm pressing Control and putting some points that from which I will change the shape of the
grass as you can see here, I'm now trying to blend
the grass together. Okay, next I'm going to
duplicate the whole group of the palm tree by pressing Alt and dragging into the group. And I will make it a little
bit smaller because I don't want it to
be 100% identical. I want it to be somehow
different from the writer. So I'm now trying
to put a T here. And I guess we're good to go. Sounds perfect.
11. 10 Making the water effect: Alright, now we will start
to create the water part. We will do this by
firstly erasing this black strip at the bottom. I will just delete
this layer and arrays the grass part from
the main grass group. Let's increase the
flow of the brush and let's erase this part. I want this part
to be transparent. And then creating
a new layer and press Alt Control Shift E. This merge all the visible
layers into a new layer. And then I press Control
T and right-click. Or we can just drag it from
the top and put it here. Like so. And that set, as you can see, you can now find the reflection. Let's make it a little
bit compressed. We can create distort to
change the perspective. And pressing Alt Shift, we can distort it in perspective
as you can see here. And let's put it right here. As you can see, once we
have done this process, it's immediately somehow looking that it's water reflection. But we need adding some motion blur, some
water reflection. So I'm going to filter, Let's firstly make it a Smart Object and
then go to filter, blur and motion blur. You need to change the
angle to be 90 degrees. And then let's decrease
the intensity. Be like so. Then press Okay. And let's decrease the opacity. And then we can also
create liquefy filter. And by using Liquify, we can make the brush smaller. And let's start to distort the shape layer so that it looks like it's water distortion. And the reflection should
be, shouldn't be perfect. It should be somehow
distorted because it's what is
happening in nature. So we need to distort it
like so here and here, make sure that you're doing
It's subtle, not over. And let's, though, let's
decrease the opacity. I think this is good. Now we're going to get this
water reflection layer. I will just expand it
and put it right here. Let's erase this white
part first by just selecting it and masking it
out or deleting these pixel. And then change the blending
mode to screen and press on troll you first to change
the colors and saturation. Then press Okay, and then
press Control L to play around with the intensity
and then press Okay. As you can see, I'm now
creating a mask and erasing some parts from the
water reflection. So erase this part. From here. We need also to create
reflection for the palm tree. So I duplicated the group
and press Control E to merge the layers and then press Control T flip vertical
and put it right here. And then press Enter. Let's put it above everything, and let's erase these parts. And then I will create
a motion blur, filter. Blur and motion blur. Then I'll press Okay. And let's put it T. I'll
just take the same layer and press Alt and
drag it and then flip it horizontally to
match the other one. Perfect. I guess we're in
a good point now, but do we need first to create a clipping mask for this layer? I guess the elephant
needs some adjustment. It needs to be a
little bit darker. So what I'm going to do is create a new Curves
Adjustment Layer. And I'll just make the
elephant darker here. I guess this is good. And then press Control I to invert the mask and try
to mask some parts out. Let's create the
blending mode as luminosity to only
affect the lightness. And then press Control I and
with the soft round brush, I will paint in the
bottom parts like so. It gives it more contrast
and good looking. Next, I'm going to bring this lens flare layer
and make it bigger. And let's put a tier, change the blending
mode to screen. It gives us another level
of realism to the lights. Let's create a mask and
erase some parts from here. And I guess this is good.
12. 11 Blending the butterflies: Okay, next, I will have
this butterfly brush. I'll use it to create some
butterflies in this part. So I will choose this color
and create a new layer. And this layer, I'll just
create these Potter flies. And let's erase some of them. There is a lot of them. So we need to erase some of
them to make it look cooler. This one, I guess. Now I'm going to add some
outer glow to the butterfly. I'm pressing double-click
into the layer and press outer glow and change the color to whatever
color you want. And then press Okay. Very good. Let's create the
application from this layer by pressing Alt and dragging the layer
and press Control T, right-click Flip Horizontal,
and make it a bit bigger. Let's add a light
reflections into the water. I'm going to create a solid
color adjustment layer and choose this brush, change the flow tool about 9%. And now I'm trying to create some hazing light
effect like so. As if these butterflies make some light reflections
into the water. We can also use this
border brush to create some hazing effect like this and then erase it to be subtle. With them, that sounds
very cool, very cool. The last part, I will
add this bird's layer. I'll make it very small and very subtle in the background. And I'll press Control
M into the keyboard. And let's make it a very
light should be very subtle. I guess this part needs
to be blended better. So I created new layer
and start to paint with, let's say, this magenta color, very dark magenta color. This will blend
everything together. Make the brush a little
bit bigger here and here also this part. And this is blending
it in a very good way.
13. 12 Adding the final grading & tones: Okay, Now it's time to the
final vignetting effect. So I'm going to create
curves, adjustment layer, make everything a bit darker, and then using the
brush press Control I. And then let's draw
some vignetting effect. We are going to
darkening the edges. This will give our
main focal points more focus and it will make
the visual look better. Okay, and finally, we're going to create a
new layer and press Alt Control Shift E to blend all the layers into
a new final layer. And I will right-click press
Convert to Smart Object. And then it's time to a camera raw filter in
which we're going to edit all the colors to
match everything together. So I will start with
editing some basic stuff, like adding some greenish
tint or I guess magenta. Let's try it. Try to use these
sliders and change everything until you
are 100% satisfied. Guests, we need to decrease
the contrast alphabet. And let's decrease
the highlights because it's very
high and open up the shadows and
decreases the whites. Blacks, I guess we need to
add some blacks texture. I guess we need to add
some texture here. Lower, lower the clarity and the haze it a little bit
and increase the contrast. This is depending on your taste and your
opinion into other visual. The y-prime also going to
increase it a little bit. I guess not so much. Then let's get two curves. In the highlights. I will increase the yellows
and in the shadows, I will increase the blue. This gives me a very good
looking split effect, I guess. And also in the red channel, I will add some red. And I guess we don't. Let's make it very subtle
like five, like 4%. And then in the details, I will add some sharpening. And the Color Mixer,
let's change. The greens and the reds course. Lose a little bit. Not so much. I'm trying to change
everything to see what's It's looking
better and what's not. Let's add a color grading layer. And the shadows, I will add some bluish tone or I
guess reddish know, some magenta to it and
make it a little bit dark. And in the highlights I will add some orangey tune and make
sure that you don't overdo it. You need to make this saturation number
up to ten or nine. Not, not bigger than this. Let's decrease the lightness
a little bit and green. Let's add the grain
effect to unify everything together and
vignetting effect, of course. But make sure that
you don't overdo it. And adding grain effect
and the calibration, let's try to change it. I guess doesn't need
so much change. So I will just keep it like so. And here you then, I guess we're good to go. We can change, get back some
contrast and highlights. Why it's, you know, you do everything
your eyes till you, until you are fully satisfy. Something that has no rules. You don't know what will
be good in advance. You should try it. So this is a Camera Roll effect. As you can see here. This is before and after. I guess we're in a
very good point. And that's it. Okay guys, thanks for watching. I hope you liked this video and most importantly, enjoyed it. See you soon in the
next classes piece.
 Nour Art, Digital artist, Youtuber