Transcripts
1. Introduction: Composition is very critical, and it could
ultimately determine the difference between a
good and a bad picture. Strong communication, sound picture relies
heavily on composition. Understanding how it works and the various techniques
you can apply your photography
could ultimately improve the outputs
of your work. My name is KC Nwakalor. I'm a documentary photographer and producer based in Abuja, Nigeria, but I work extensively
across West Africa. Through my works, I try to humanize real issues
within the continent. This issues are mostly socio-economic,
environmental and health. You probably attended
my other class on basic compositional
techniques and you're looking for a way
to push it a bit further. This is the right class for you. On this class, I'm
going to be teaching you advanced
compositional techniques that can take your photography
to the next level, so that you are able to understand and apply
skills that can ultimately help you develop your own visual style and improve on your
visual awareness. Jump right in and
let's get started.
2. Class Orientation: [MUSIC] It's great to see you on the other
side of the world. On this class, we are going
to be delving more into advanced compositional
techniques that you can apply in your work, in your photography, and you push it even further. To get the best value
out of this class, you would need to have a camera, be it DSLR or a smartphone, whatever you have that can take decent pictures should be fine. You also need a photo
editing software like Adobe Lightroom, or Snapseed, or even
Lightroom Mobile. Whatever you have
that you can use to edit and sort your pictures
is perfectly fine. Do well to complete
the class project, which is basically you taking three new pictures applying the compositional
techniques that you've learned from this class, and uploading them so that
I can give you feedback. You can only get
better if you do. You have to go out
and shoot [MUSIC] and you have to walk the scene, you have to leave
your comfort zone, nothing good grows there. I'm super excited to go on
yet another journey with you. Jump right in. Let's go.
3. Visual Awareness: Great photographers have
mastered the art of seeing. They are able to see
beyond what they look at. Visual awareness refers to being aware of the visual elements
that you can utilize in your picture to make the best
outcome using the knowledge of what you've learned based on all the compositional
techniques that are available, but you being aware of seeing those opportunities when
they happen in front of you. Have you looked at a picture
and you're wondering like, how did that person see that? It's because they
are visually aware, and you can develop it. It comes natural
for some people, but for the most part
you have to work, keep improving, and
practicing to develop yours. Visual awareness is ultimately the difference between
seeing an opportunity, taking it, and missing an
opportunity for a good shot. In my practice, sometimes when I'm out and
I'm not with my camera, I see interesting stuff and I pretty much visualize
it in my head. What are the picture
opportunities there? What are the compositional
opportunities that I can utilize? Sometimes I even use my
hand to form like a frame to think and visualize what
the picture would look like. This level of awareness
would ultimately improve your work because you don't
need your camera to think. You basically see opportunities
and you're looking at, what compositional
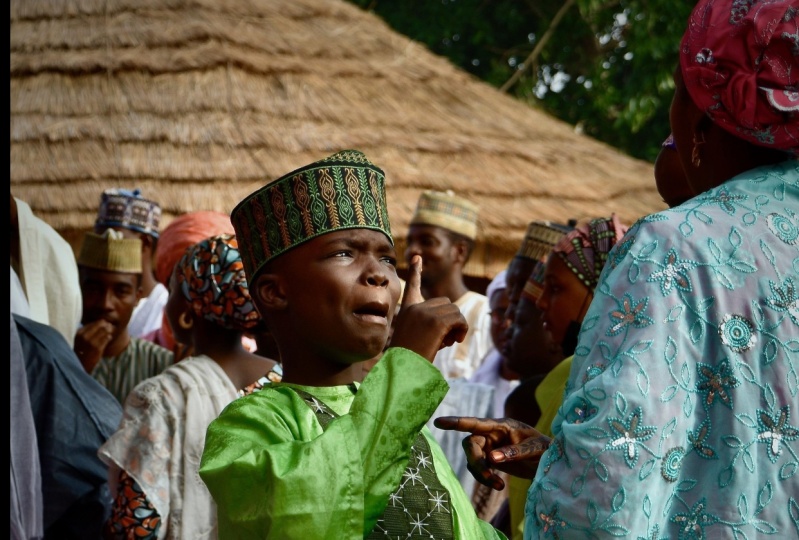
techniques can I apply? Where are the lines? Where are the patterns that I can utilize to tell a story? This picture was very, very instrumental
for young people to show how excited they were. This thing that they have
been protesting about has become a reality. It's just awareness of someone being in the
foreground, smiling, happy, and the concept of what the protest
is about behind him. That stood out for me. Visual awareness is an exercise. You have to do it every single time if you want to be a
photographer for life. You would have to look
at scenes and visualize, how would I photograph this? What is the opportunity? What angle do I need to take? Where is the light
source coming from? What is the background? What way do I need to frame
this picture? What angle? When you keep looking at these things and processing
them in your head, even without a camera
in your hands, you're developing your
visual awareness. It's an exercise that every photographer should
be doing every time. Next time you're on the
subway or a bus station, think about compositional
opportunities, good pictures you could make, and if you have a camera, try and take them. But in this practice, you become more aware of the visual elements in front
of you and how you can make best use of them to create a sound and well composed image. With that being said, let's head over to the next
lesson as we talk about an interesting
compositional technique that could take your
work even further.
4. Shapes: On this lesson, we are going to talk about shapes as a
compositional technique. This is taking it a bit
further from lines. In basic school they teach you the various types of shapes, which is basically
triangle, square, circle. In photography, and
also by extension, in graphic designing or design, when you understand that every single thing is made
up of different shapes, so a combination
of various shapes, you as a photographer, being aware of all these shapes that are coming together, then you can utilize it to make a good
photography composition. One way that shapes
are often utilized in photography is in
terms of framing, and this is basically utilizing a shape to form a frame
around your subject. Example is maybe picture of someone in the rear
view mirror, in a car, or within the window of a house, or a door frame, whatever it is. Putting your subject in
the middle of a frame, makes them more elaborate, makes you notice them more, and that could ultimately
improve your photography. Just placing this
subject in the middle of this frame,
balances the picture. There is something
going on here, and there is something
going on here, and just placing her in the middle places all
the attention on her. This is also a
good use of shape. The square here, placing my
subjects somewhere here, and also the interesting
intersection of the lines like the grid
lines in your camera, placing her head, in the middle of this
intersection point, makes the picture interesting. Like in this picture, using this shape here, with her face, added more visual
value to the picture. Then there is another
compositional technique at play here, the rule of threes, because of the switches, three, you assume
there are more ahead. It helps to be aware
and utilize the shapes, the natural occurring shapes in your pictures and
incorporate it into your work to drive home the point or make your subjects more visible and more relatable. Understanding
shapes is important because not all shapes
are clearly visible. Some are implied, for instance, the curtain, the arch
shape of the curtain, could also be like a triangle. You as a photographer, needs to keep training
your eye so that you able to notice the various shapes
that occur in nature, and you find ways to utilize
it in your photography. This is a good use
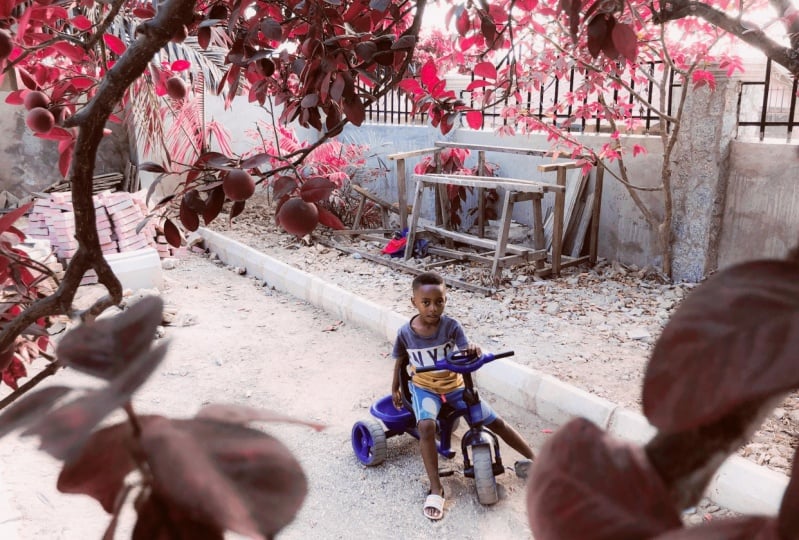
of shape here. The boy, standing in this
black, rectangular shape. I used the rectangular
door frame. Though there is no door there, but to make my subjects
more elaborate. Having learnt that
shapes occur in nature, you as a photographer need
to train your eye to be able to see them and utilize
it in your photography, and one of those ways
is through framing. I want you to go out and try to take pictures of
various shapes you can see and utilize it to make your composition
more interesting. Most importantly, use it to frame your subject
and see the outcome. Head over to the next
lesson as we discuss another interesting
compositional technique.
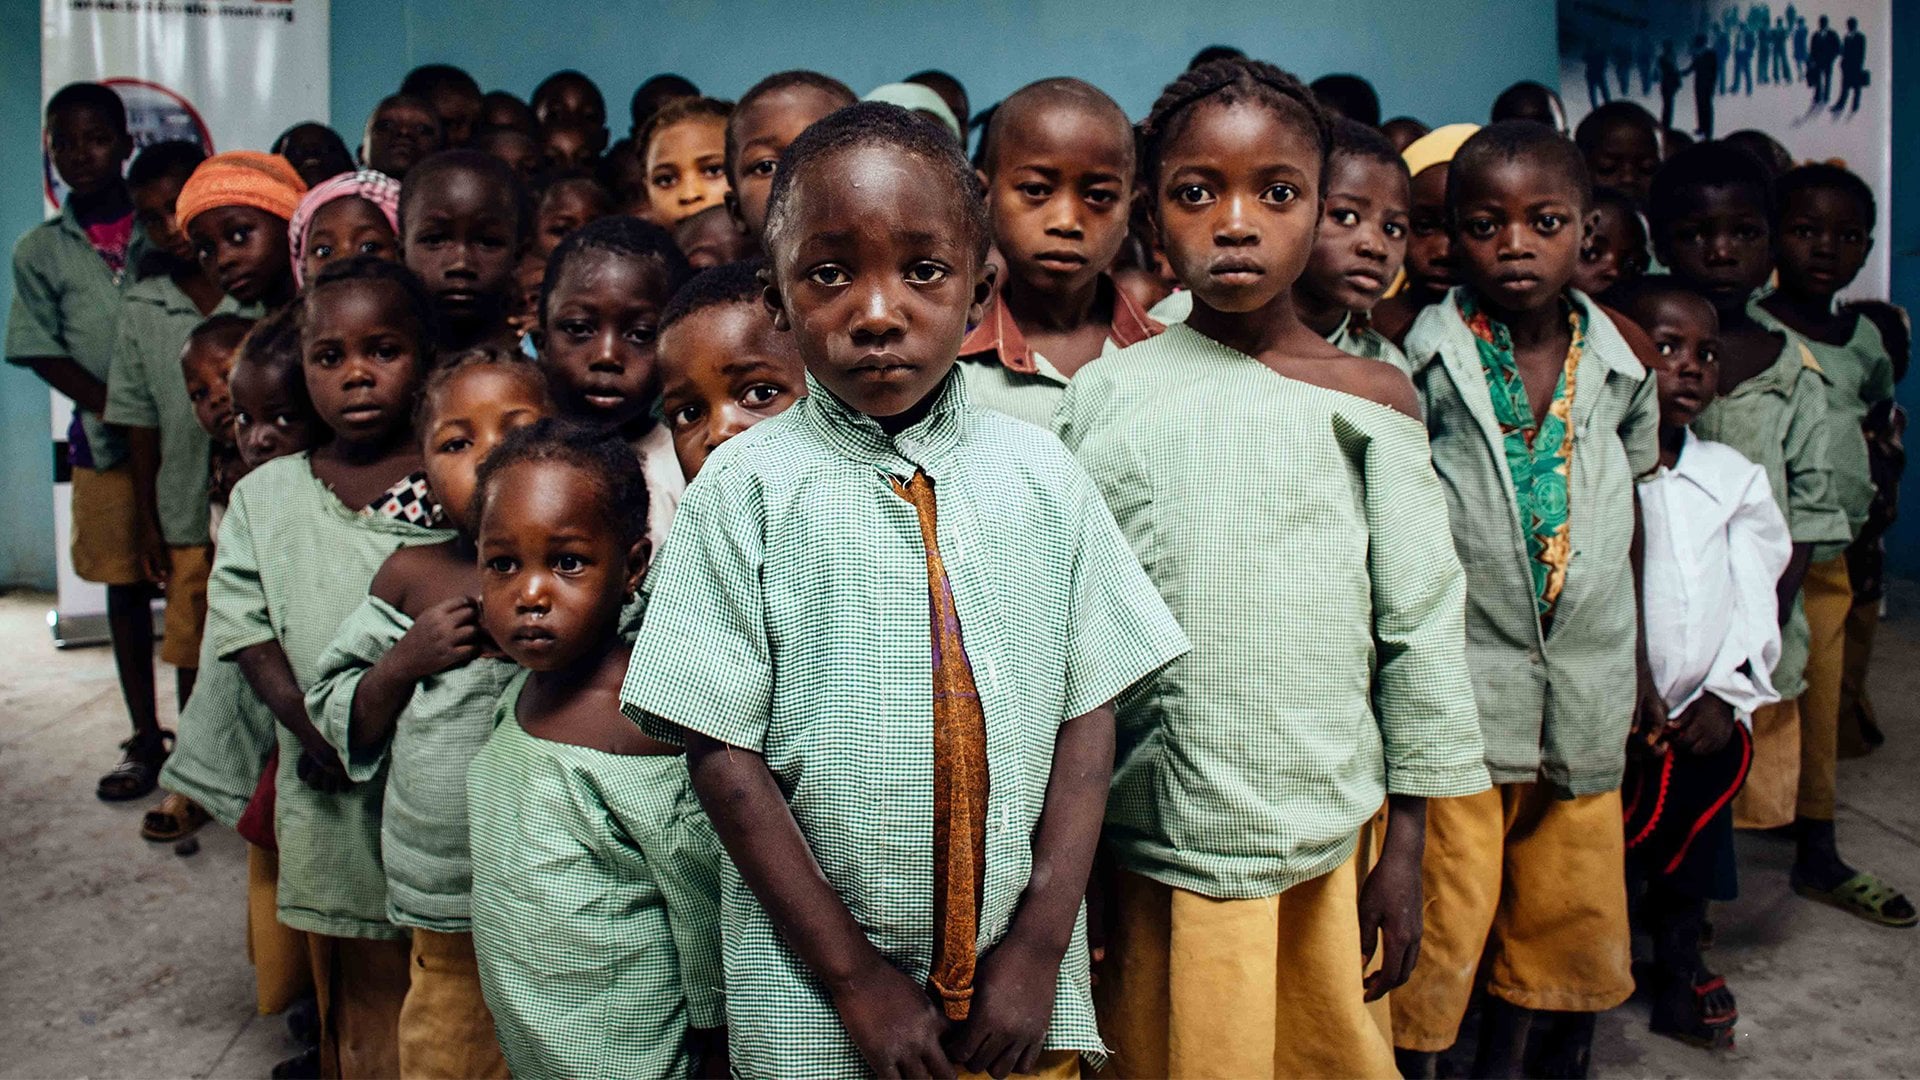
5. Repetition: [MUSIC] On this lesson, we'll talk about repetition
as a compositional technique. Repetition is basically when
you utilize elements that occur in your environment in repeated patterns
in your pictures. These elements could be shapes, it could be colors, it could be lines, it could be texture, it could be form. Whatever it is, it's
occurring numerous times. This takes us to the rule
called rule of threes. It's very, very different
from the rule of third. Rule of threes talks about
the ability of the brain to process things as repetitive
once it's up to three. What that means is when
things are two, it's double. But once it becomes
three and upwards, the brain processes
it as repetitive. We could feel as though
there are more behind, even if it's just three. This is implied
repetition in the sense that this is a man taking
his kids to school. It's just interesting
how they're all lined up wearing similar color. It just makes the
picture interesting. If it was just him and
maybe one of his sons, it wouldn't be as
interesting as it is now. But because there are 1, 2, 3, then 4, you enjoy the flow. There is no face
showing in this picture. It's not the best picture, but there is the fact that the same thing
is happening here, happening here, happening here, just makes the picture
interesting compared to if it was three different people
wearing different clothes, not interacting, there is nothing repetitive
about the picture, you're probably wouldn't
have been this interesting. Think of before when civil more and there is
break in transmission, so there is one
black, one black, one black, then two blues, one black, two blues. It's also a form of
implied repetition. In addition to the
repetitive nature of these police officers
wearing different uniforms, there is also repetitive rhythm between the blacks and the blues and the
blacks and the blues. There is this interest
that your brain picks up and your brain is able to group the
pictures and enjoy it. In your pictures, just try
and look out for opportunities. What are the things existing
in repetitive nature? Do you want to include some sense of mystery
in your picture? Maybe showing three would
be more interesting. Giving people the room to
imagine there are more. Because I mean, if you see three police
officers lined up like this, it puts your mind in
a space where you're wondering like what
about the other line. There are other people there. This is just the
fundamental application of the rule of threes. With this knowledge, you can
add depth in your pictures. People can look at
your pictures and it becomes more
satisfying to look at. Always look out for
opportunities where you can infuse things that are
repetitive in nature, or you frame things
in a way that it feels like those
items are repetitive. [MUSIC] Having learned this, I want you to go out and take
pictures of things that are repetitive in your environment and use it to compose a picture. Place your subjects within that space and see how it works. Jump into the next lesson as we discuss another
compositional technique.
6. Entry & Exit: On this lesson, we talk about another
compositional technique that is very fascinating, and this is called
entry and exit. The concept is very simple, but sometimes
difficult to achieve. It's basically composing
your pictures in a way that it feels like it has an entry point and
an exit point, so this way your viewers
travel through your pictures. A typical example
of entry and exit is when you photograph people in a dark house and they are walking into a brighter
environment which is outside. It adds depth to
your pictures and your viewers feel they're on the journey with the
subject in the picture, feels like they are going in, they're entering and
they're exiting. Photography is basically
in two-dimension. When you have the
opportunity to create a three-dimensional image or a picture that feels
like three-dimensional, one way to do it says utilizing entry and exit as your
compositional technique. This is basically having an area of darkness
and an area of light where it feels like
there is a transition, there is a movement. The viewers can
feel like, "Okay, I enter through here, I enter through here, and I exit through there. It's an illusion but
it's interesting. Looking at this picture, you just know, you
walk through here, the way your eye
journeys through this picture is literally
looking at this place, then travel into this space, go here, and
disappear from here. That is the entry
and exit pathway that I have created in this
picture as the photographer. Nobody knows when they do this, the brain just
processes it that way. Once you look at this picture, you're going to go
through this place, through here, get through here, and probably leave through here. That's the concept
of entry and exit. You can use it to
direct your subject. Let's say there is a
banner somewhere here, it would be interesting
to look at. Looking at this person and maybe his eye pointing
somewhere here, you have a banner passing
any information you want, that would also be interesting. But the concept of entry
and exit is using lights, intensity, darkness, and light to create an illusion
of entry and exit. Like other compositional
techniques, you have to be visually aware
for these opportunities, and make the best
outcome possible. Simply put, entry and exit
is basically you composing your picture bearing
in mind where the entry point is and
where the exit point is. It's more like your viewers
are on a journey with you, they go through the pictures
and they leave the scene. Having learned this, I want you to go out
and take a picture that captures an
entry and exit point. This could be
literal or implied, but just try to explore this compositional technique and see the type of outcome you get. Join me on the lesson as we talk about another
compositional technique.
7. Layering: [MUSIC] Since photographs
are taken in two-dimension, an interesting
compositional techniques can add even more dimensions
to your photographs. This is called layering. Layering is the idea that you utilize various layers of your frame to be able
to tell a story, which is the foreground, the middle ground,
and the background. For most photographers, they only utilize two layers, which is basically the
foreground and the background. Layering brings in that next
dimension where you utilize the three aspects by placing interesting
compositional elements in these various layers. It leads to the main subject, which could be in the middle, or in the last layer, or in the first layer,
whatever it is. All the layers are building up, and gives your viewers a
sense of three-dimension. It gives depth, like people
are going into the picture. For those that don't know, foreground is basically
what is closest to you, middle ground is in the middle, and the background is what
is farthest away from you. Creatively positioning important visual elements
in the foreground, in the middle ground, and
in the background can ultimately lead to what
is called layering. It's basically working
in synergy with the various layers of
your photo so that every single layer
works in tandem with the other to be able to show clearly what
the key subject is. I photographed an orphanage. It shows what's living
in this dormitory. Feels like someone is
sleeping in the foreground. This boy just woke up from his bed and he's just sitting, getting some sunlight, and also observing who
is this photographer or this guy that's in my
room or something like that. Then you have the background of other people's belongings in the picture and in
the background. It gives a who. There is this movement, there is this
three-dimensional feel, your eye starts out here, you see someone sleeping, then you notice this boy, then you're wondering where
is he, what's this place. Then you look at the
background and you get more information
about who he is, and where he is, it's clearly a dormitory. For me, I'm directing your eye whether it's intentional for you to
follow this path or not. The idea is for me to be
in control of how you look at the picture
and make sure that your eye goes to where
I want it to go to. Layering requires
time and patience. The first part is you
attending this class, while also about
you being visually aware when these opportunities
create themselves. Now that you've learned
about layering, bearing in mind the various
layers in a photograph, which is the foreground,
the middle ground, and the background, I want you to go
outside and try to capture things that
occur naturally, actions that are happening. But frame and compose your pictures in a
way that you are utilizing the three layers. Make it in a way that all the layers are
working together to push the eyes of your viewers [MUSIC] to the key
subject of that show. I guarantee you, you will be really intrigued by the
outcome you get. [MUSIC]
8. Visual Style: On this lesson,
we're going to talk about how to develop
your own visual style. Visual style talks about your own unique style
of taking pictures, and it can only be
developed over time. If you've developed
visual awareness, and now you are practicing and seeing opportunities where you can utilize all the compositional
techniques you've learned, visual style starts
developing over time. Basically, visual style is that compositional technique or set of compositional techniques, that occurs frequently in
your work or in your output. It takes time like
every other thing. You evolve as a
photographer and as a storyteller, but over time, based on the compositional
techniques you're utilizing, that tends to become
your visual style. The more you take photographs utilizing these various
compositional techniques, you will start noticing
that there are specific types or patterns, in terms of the
compositional techniques that is always coming
out in your pictures. In my own practice, I've always been drawn to
pictures that are intimate, and it makes me to use lenses that are
purely prime lenses. I want to get in
close to the action. I like to capture images that would make people
feel something. In as much as I know most of the compositional techniques, I see some of those
opportunities, but I tend to go towards more direct in-the-face intimate type of pictures because
that's my style. It's something that
developed over time. Like in this portrait
is my typical approach. I like to utilize a lot
of light, darkness, and I like a lot of dark pictures if I need to
show emotions in my picture. But the primary thing is that, this is something, it wasn't very intentional, it's something that evolved as I kept on practicing
and improving, and learning new
compositional techniques, and understanding why I'm taking pictures in
the first place, what my motivations are. If you look at my pictures, there is this repetitive style that is going on
in the pictures. I mean, apart from the
editing style and everything, but when you look
at the picture, you also feel it's the
same person that took it. I like to be in people's faces. I like to be close to people. I like to share a lot of dark
and light mixed together. I like to be close. You see, there is this repetitive pattern in
my pictures and it came from a place of practice over the years that my style
started taking that shape. In as much as I know most of the compositional techniques, I wouldn't necessarily use
a lot of them in my work, because I know how I
want to capture stories, I know what looks
like my vision. You get what I mean. Starting
off in photography. It's okay for you to
try a couple of things, apply different
compositional techniques, but over time, your style
will start coming through. Your style is a function
of your knowledge, in terms of the various compositional
techniques you can use, and primarily your vision
and why you do your work. What motivates you
and how you see. You see the same concept
is over and over. I'm so drawn to
intimate pictures. I just want to be close to people to be able to
capture their stories. Think of visual
style as your voice, as your visual voice. There are so many
talented artists, for instance,
Rihanna and Beyonce. What separates both of them? It's usually how they sing, apart from their voice, but they have a style that they have developed
over the years. Your visual style is what separates you from the
next photographer. It takes time to develop. Even in my practice, I'm still evolving,
but I have a style. Visual style is that thing
that makes you different, that makes you unique from
every other photographer. It's that thing that makes people look at a
picture and say, "Hey, KC took this picture. That person took that picture." It takes time and patience. As you keep practicing
and keep taking pictures, utilizing all the
compositional techniques you've learned in this class, you will start seeing your own
visual style come through. I'm super excited for you, and I know you'll
do great things.
9. Conclusion: [MUSIC] It's been a very
long journey with you guys, and I'm happy that
you made it this far. I'm very confident
that you've learned new things that could ultimately improve the outcome
in your photographs. In this class, we talked about various compositional
techniques that could improve your work, and also we talked
about how to develop a visual style and
become visually aware, to be able to sight and see
opportunities as they unfold. Please do not forget to
upload your class project, which is basically
you taking pictures, utilizing the
compositional techniques that have been taught
on this class. Kindly upload your
three pictures and I'll have a look
and give you feedback. Remember, just like
every other rules that I've talked about, they are meant to be broken. Once you've learned them
and understood them, feel free to creatively
break them and make the best out of
your photographs. Until we meet
again, see you.
 KC Nwakalor, Documentary Photographer & Producer