Transcripts
1. Intro to AD16 Scenic Vector Illustration with Raster Detailing: Hi, guys, and welcome. My name is Delores
Nascer and I'm coming to you from Sonny,
Manitoba Canada. I have always admired these beautiful
vector illustrations that I've seen all
over the Internet. You don't have to
look far to find 100 examples of this
particular style. I think it's a really
pleasing style because it's usually
kept quite simple, and a lot of the depth is accomplished using
shadows and highlights, and I think that we can
easily pull this off. I'm going to start
by showing you a ton of examples from there, we'll produce a simple sketch that we'll use to fill
out our illustration. Then I'm going to use
a bunch of assets from my own asset gallery to add a
bunch of finishing touches. I think you'll really
enjoy this because we're going to
combine the use of both the vector and the pixel based ssonas
in Affinity Designer. Now, if you didn't do so before, I would suggest
that you hit that follow button up there and that way you'll get all
the information about my classes as I post them. You can also add your name to the mailing list on my website, and that's where
I would send out information about free products, and that's also where I usually host all of my class assets. As you're going
through the class, keep in mind that at the end, it's a nice idea
to leave a review. Think about some of the
things that you're learning and if there's something really
particularly interesting, make sure you add that
into your review. It really helps a lot. Are you ready to
get started with our scenic vector? All right. Let's get to it.
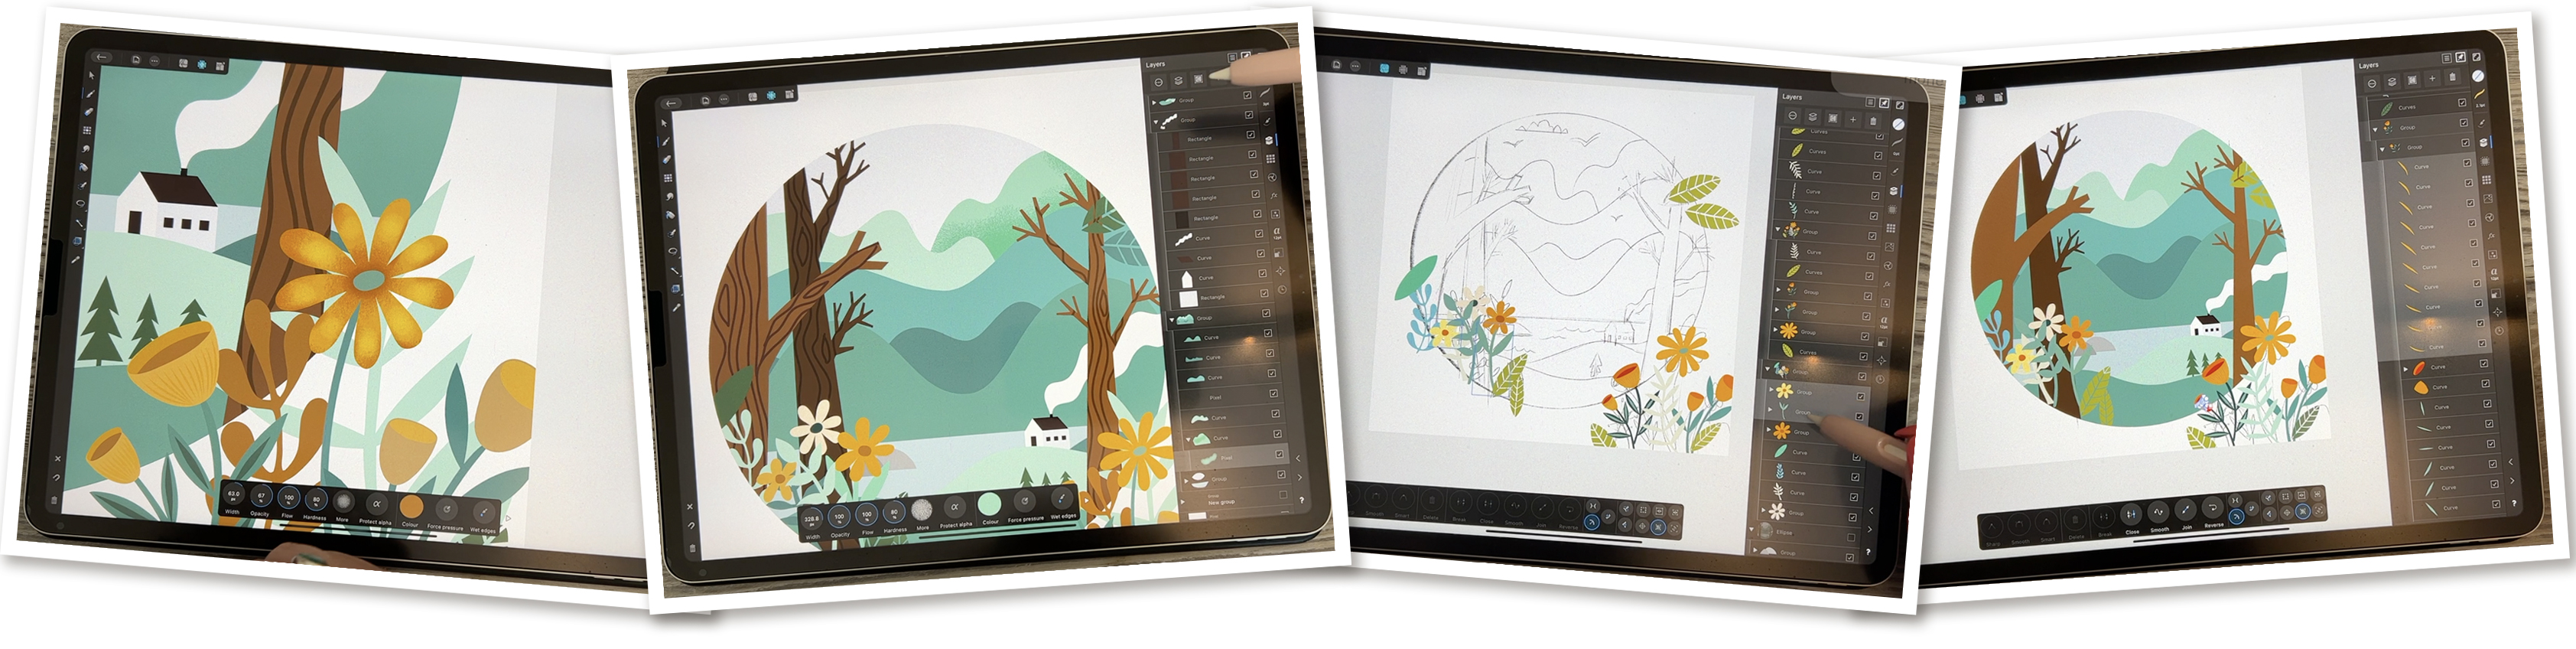
2. Lesson 1: Overview and Inspiration and the Sketch: Okay. Hi, guys.
Welcome to Lesson one. In Lesson one here, I'm going
to give you an overview, and we're going to start
working on our sketch. We're going to keep
it really simple, so don't be intimidated. Okay. Let's get started. I've collected a bunch of them here on a board on Pinterest. This is the thing
that I have in mind. Vector illustrations
tend to have this hard edge, really
sharp illustrations. It doesn't mean that you can't incorporate a ton of texture, and I think that's what I'm
thinking I would like to do. I'm going to create a
sketch I guess I'll in a bunch of the things that
I've been looking at here. I wanted to have
a circular shape. I think I might base it somewhat on on this illustration here. I want to create a circle
and within that circle, I'm going to draw a bunch
of hills, some trees. I'm going to definitely
change it from this, and I want to be
using a bunch of my own assets around the
edges and to fill in. I'm keeping those in mind as
I sketch my illustration. When you're planning
your illustration, take a look at a board like this and if you like
a particular one, definitely click on it and then it'll take you to a
bunch of related ideas. So that's nice sometimes
because you can get ideas for maybe the
way a tree is drawn. Maybe something
like this one here where you've got
a spruce tree or a bunch of spruce trees rather than a basic deciduous tree. A lot of these I would
consider fanciful. They're not realistic per se. I do have another board called fanciful illustrations or
fanciful landscapes, I think. Let's take a look at that one. This one could give you
some ideas as well. Check it out as well. There are some great ideas here for trees, and you can keep
them really simple. If you're not comfortable
or adept at drawing, you can stylize your trees and create something like this. These are not the least bit realistic and yet you
know that they're trees, basically by their scale, and I think the trunk
with the branches. I mean, you know it's a tree. So that's I guess what I
would suggest that you do. I guess there are a few
here by this artist. You could take a
look at that work, and this really reminds me
a lot of the trees that we did in one of my
previous classes. But yeah, these trees are really unrealistic but stylized. This is something
to aspire to when you're working on
this an illustration. I'm going to start by
creating a quick sketch. I'll walk you through
the steps that I took I would say if
you could create an illustration or a sketch
based on some of the stuff that you see here and yet
picking and making it your own. Taking some of the ideas but not directly copying any of
the ones that you see here. Take ideas from two or three. That's the way to
do it to be sure that it isn't a copy of
another artist's work. Let's go and take a look at this sketch
that I've started. I did just to make it
easier for myself. I don't have to refer back to my Pinterest boards and stuff. I decided to print off four of the ones
that I really like. This was the one I showed you that's vignette, a big circle. I think that's the
way I'm going to go. I have started by
drawing the circle here and I've used the
usual process for drawing a circle where you draw a
big ellipse and then make it into a circle by holding
down at the end, like this. I should add a layer. Big circle, overlap
it at the end, edit shape and make
it into a circle. I know that it was
a perfect circle. Then I added a few
ideas for trees. I think I'm going to do
very similar to this one here where I've got some big
trees in different levels. I've done this on
separate layers just to make it easy for myself to erase and
overlap things. For example, here, I've got
this hills and birds and I've got it on its
own layer and you see the chimney and that
sort of thing, the smoke. I've done it on its own layer to make it easier for myself to then erase because then I'm
not disturbing the trees. In this case, I put
the tree on this one, so that was really
not smart of myself, but, you know, everyone
makes mistakes, right? In this case, I had
to work around it, but over on this side, you can see that I
can erase and I'm not erasing the trees at all. This just makes it easier for me to clean up my sketch
because I like having a nice clean sketch at the end that doesn't have any of these overlapping lines and things to cause any confusion. I'm erasing all of those
out as you can see, And then it's easier to tell where I'm supposed to
be drawing because I'm going to definitely
be keeping this in layers to make it
easier for myself. In this case, I have to work
around what I've got there, but I think it's going to be
okay. I can figure this out. Back to my pencil, if I wanted to redraw any of the
lines that I erased, I think I might even erase
this stuff on the outside. One of the things
that I thought was really cool about
this one is how some of the items really
break out of the circle, so that's something
I might consider. I'm not sure what these things are odd odd little tree shapes. I'm not going to be
using that because I think it looks weird. But here, I'm just
cleaning it up, making sure that I've got a
really good clean drawing. I then added some additional
things that I'm going to probably have in the
foreground and I've got this one, just like they have it
here tucked in behind, and yet it's still part
of the foreground. I'm not sure if that will
end up being on the outside. I've kept it on a separate layer because then I can move it around at any point and
make decisions about that. Do like it on the outside. I'm not quite sure how
I'm going to go there. That will be when I'm actually
in the production stage. That's my basic setup. I would suggest that
before we start the class, you take some time to
do a quick sketch. You definitely do
not have to have it as detailed as I have it. Many of the ones
that we looked at there were not nearly
as detailed as this. Something like this one. If you were to take out the girl, this would be a really
simple one to do. It's got little plants
in the foreground, which could be from
your assets library if you've got a bunch
of stuff saved there. Really these little dots that you see are
fireflies, obviously, and those are just
little circles with a bit of a globe put around them and then same
with the butterflies. That's something to think
about. This would be a really fun alternate project that maybe we can do
at some other point. Now I'm basically
ready to go with my drawing of my vector
shapes and whatnot. Now you see here that I have
drawn this in procreate because I'm still
more comfortable doing drawings like
this in that program. You can definitely do your drawing right in
affinity designer, but I am going to save this
out now as a PSD file, so I can bring it in in layers
into affinity designer. Here I would go to share and
I would share it as a PSD. I'm going to save it to files, and I'm going to this is
my class assets folder. I'm going to add a
new folder here, 1607 is the course number, and I'm going to call
it scenic art in AD. You can put it wherever
it makes sense for you. I can't believe I'm at 167
classes. I made the folder. I'll rename this to
sketch done and hit save, and now I'm ready to get
started in Affinity Designer. In the next lesson,
that's what we'll do is we'll get
this imported into Affinity designer and
we'll talk about drawing these vector shapes.
I will see you there.
3. Lesson 2: Creating the Initial Vector Shapes: Hi, guys, welcome to Lesson two. In Lesson two here, we're
going to be working on our vector parts.
Let's get out it. I'm ready to import that sketch. What I do is I hit
that plus sign there and instead of
adding a new document, what I'm going to do
is open from Cloud. I need to locate that in my clas assets folder
because it's a PSD, it's going to come in in layers. If we take a look at
the layers folder here, you can see that all of my different layers that I created are
completely separate. That's really great
because what we can do is turn them off and just create one at a time or
whatever we're working on. I'm going to just keep
this one open for now, what I want to do now is start roughing in
the vector shapes. We know for the circle, we can easily grab the ellipse
tool here and I'm going to drag and you can see the edge of my circle
is here and here. That means I want to start
my circle over here. I can pull and hold one finger down and that's going to give me
a perfect circle. Other way you can do it is to start drawing
from the center and hold three fingers down and you're going
to get it drawing from the center and again
drawing in a perfect circle. I'm going to let go here and I'm going to
put my snapping and magnetics on and grab my move tool and move it
until I have it centered. You know what centered. When you see those red and green lines. At the moment, I also want
to take the fill out. I can leave a little
outline on it if I wanted to just
be able to see it. I'll change this outline
to black and I'll just somewhat increase the size of the line just so
that it's visible. That's only approximately
one point line. Obviously, my sketch and everything is a little
bit off center, so I'm going to grab
that whole group now because I've got the
snapping and magnetics on, I can center it as well. The circle wasn't perfect. I could go just to that
circle and I could center it, move it around or whatever, but you know what? I don't
think it's critical. I'm just going to turn
off that sketch layer of the circle because now
we have the circle here that we can use as a guide. I'm figuring this out as
I go along here because I want to use the power of the
circle as a clipping mask. That ellipse that's
there will end up being the clipping mask that
works for everything else. Let's just get started and then we'll figure
it out and see how that's going to
work out as far as our layers and our clipping. I want to draw the tree and there's quite a few different
ways that you could do it. I'm thinking because I've got
all of my lines straight. I'm just going to
use the pen tool. The thing about the pen tool
that I like is that you can just click and click and
you've got a straight line. I could be using
the pencil tool, but then my line is not necessarily perfectly
straight. It's up to you. If you're comfortable with
using the pencil tool, you could definitely
go in and put a stabilizer on it and see if you can get a really
good drawing that way. Some of the things
I'm going to draw, I'm definitely going to use it. We will go back to
it, but I think I want to start this one
just with the pen tool. I've got the pen
tool selected here, and as I draw, I only have to click from one corner to the next or from the beginning of the
line to the end of the line. Drawing a curved line is a
little bit trickier because you need to create
point with handles. When I get to this end here, what I'm going to do
is I'm going to pull. You see, I'm still pulling in the direction that
I wanted my line, I'm not going all crazy. I'm basically just continuing the angle that I
have after I tap it, and then that will give
me a really nice curve. Now to continue, I
can click back into that point and I can get
straight segments again. I know that there'll be a
little bit of adjustment here, but I like that
I'm basically just tapping to get the
end of that line. Now for this one, I'm going
to go to this end and I'm pulling again in the
direction that I want my curve. These may not be
perfectly lined up, so we might have to
change them afterwards. But I always like to
click in that point to make sure that I now
have a corner point. If I don't, then the handle
is going to affect the line. If I was to try to click up here for a straight line,
it's not going to work. You can see that I'll
still have that curve. What I want to do is
click back into it and click above
and in this case, I can go way out here to finish this tree because we know we're going to use this circle
as a clipping mask. At this point, I should have already decided about
my color scheme, and I know that I've
got some really nice swatch palettes here. I want to keep it a
very limited palette. If you look at this one here, you can see that
there's a ton of yellow and then just
a little bit of blue. I like that one, and this is another really great example
of a limited palette, basically all in greens and yellow greens and
this one as well. Each of the palettes that
we're looking at here has been really simplified.
I'm going to pick One of my palettes here. The one that I'm looking at doing is where is
it peach and mint? No, it's mint chocolate. This
is the one I'm looking for. I think that this will
be pretty good because it already has a little
bit of greens and browns in it and we can definitely add to it
as we're going along, but I'm going to try to
keep everything in that So let's fill it
with a brown color. The other thing you can do here, if that color isn't
exactly how you want it, you could always import
a photograph and create a different palette
like your own palette, or you can go in here and
make changes to your color. If I was to want just
a pure brown color, I could drag this over to
be more into the reddish, deep orange and then really
into the deep brown here. If that's what I want,
and I'm happy with it, then what I would do is go
to my swatches again and add current field to the palette. Now I have that brown added
right into my palette. I know that I've got
these darker colors that I'll be able to use
to add details, which is something we're
going to be doing later on. Now, to make this clip
into this circle, what I want to do is
take that curve and drag it right onto the
word ellipse and let go. Now the ellipse has
actually clipped it. It's completely editable.
We can still get at it. It here, but now it's
within this ellipse. I'm going to continue
drawing my tree. I'm going to get
that one behind it. I might as well hide
this one for now, and I will do the exact
same thing as I did before. I'm going to start with
the pentle In this case, I'm going to go I think I'm
going to do it this way. I'm going to show you
something that we can do here. Piece will be drawn separately. I'm going to fill it with
that same brown and I'm going to go just a little bit darker. I may end
up changing this. This isn't written in stone as far as the colors right now. I'm just doing it so that we can work with it a
little bit more easily. But now I'm going
to also drag that one into it's already
in the curve. I'm going to draw this
little branch separately, and the reason I want to
do that is because then I could possibly copy it
and use it elsewhere. Let's just hide
that guy for now. I'm going to start
this branch way down here so that I have a lot
of extra that I can use. I'm going to move some
of those points around. What I'm doing is I am
somewhat following my sketch, but I know that I want my
branches to taper a little bit, so I'm having them a little
bit narrower at the top, and this one doesn't
have any curves, so it's really fast to draw. I'm watching and I'm trying to get it
pretty much lined up. Here so that you get
that continuity on that long part of the
trunk of that branch. Let's just fill it so we
can see what it looks like. We'll fill it with that color. It doesn't really
matter about the color. Like I said, we're going to be doing changes to the color, but this allows me to do some
of these finer adjustments, making sure that these two line up so that that
branch looks right, and this one here, the
angle was really bad. It's so easy when you don't have a bunch of
points in between. That's another reason
that I like the pen tool for things like this
because the pencil tool does tend to add a lot of intermediate
points which we don't need. I think that's going to be okay. What we can do now
is we could add that to one of our
asset libraries. We could create a whole new set. I'm going to add it to my
birdhouse one here. I will add a new subcategory, this one, I'm going to rename to tree
parts because you never know. I could use these elsewhere, and I will add the
asset from selection. Now that I have that, of course, that one is fine the way it
is. We've used it there. But if I was to be in a completely different
document and I wanted to add another one of
these, it would be so easy. I just have a click
on it and insert. I think now that I do
have that duplicate, I will flip it over. Make sure you have
the whole thing selected and I'm going to flip it so that I've got that little
branch at the bottom, and I think that then I can use it as the second
branch on the tree. I can just decide
on the positioning, and of course, I can still
go in here and edit. I'm going to pull
that back and pull that part in so that
I can now reveal the branch that I was hiding. But now I've got the
parts that I need. I'm going to slide
that into the ellipse. I'm going to slide this one
in and then I'm going to select all the parts for
that tree. That's all of it. Now I can go into
here and add it, and now I've got
these all in one. I think I'll just darken it just to help myself keep it straight. It probably looks a bit weird to have that one short branch. I can make adjustments and that's the beauty of having them separate I can take this
and change its angle and and size, proportion,
that sort of thing. Maybe this one I'll bleed off the top a little bit or clip off the top and then it won't look quite as
similar to this one. The other thing you
can do, of course, is go in and add
additional branches. I've purposely kept my style
here really simple so that these vector shapes
that we're drawing can be very easily accomplished. That will make it look
a little bit different. Go back to my layers, select all of these parts. If you have the
move tool selected, you can hold down one finger to to select. I could have this one selected and then
go through and add the additional parts
that I want to merge together and then
go in here and do the ad, make it a little bit darker. This one I would probably
move behind this one here. I see that I miss
this little guy, so I'll go back and do that step again and now I've got
my second tree here. At any time, you can still
continue to do little edits and now this one. I definitely
want to clip to the curve. The I dragged it halfway into the word ellipse and
now it is also clipped. At this point, I could
move it in behind. Basically, this is
what I'm going to do is I'm going
to go through and draw all of the different
vector layers as I see fit. This one I would consider done, and now I'll reveal another one. In the next lesson,
maybe what we'll do is all of the hill shapes. A little bit to explain
when it comes to that one. I'll save that for
the next lesson. Of camera, I'll probably do this tree here just to
speed up the process. I'll see you in the next lesson. Okay. Okay.
4. Lesson 3: Background Hills and Water: Hi, guys. Welcome
to lesson three. We've done a fair bit already, and now I want to just draw
all the hills of the sky and everything else
that's speaking up this illustration.
Let's get to it. See I've got this
additional tree drawn here. I think what I'll
do now is I'll take all the trees and put them
together in a group here. The group is still working
within that clipping mask, so that's all good and I
can turn that one off. Now I want to start working on the hills and the
land masses here. Probably the water will be part of it to see
what we can get done. I'm going to go back to
my pen tool and I'm going to draw my line across
with one click. As you can see, then
I'm going to click within that anchor point that
I can go right up to here, and you see how I'm pulling and pulling in the direction that
I want my next line to go. That way, when I pull the
next part of the line, I don't get a
really weird curve. I try to pull my line towards where I
want my next one to go. This next one is going
to be down here. I'm actually keeping them
pretty perpendicular here. I'm not pulling too far.
Don't go too far too extreme. Just go as closely as
you can to the line. We can still make adjustments, we're going to go out
to here and pull, and then we can close our
shape off and you can click into that last anchor
point before you click here and you won't
get that weird curve, not that it would matter because
it's going to be hidden. This point, we can use our direct selection and click on whichever
whichever curve we're trying to change
and use the handles here to adjust it to make
it match perfectly. I can go pretty much
any direction with this because I
created this sketch. If I want to fix it up, let's say I wanted to move that hill to be
more of this shape, I could do that at this point. Now, let's just start
filling this as we go along. I'm going to stick to this
family of teal colors here. Not quite sure which ones are going to be
darker or lighter. This one, I'm just going
to fill with this color. I'm going to take that
outline off to be sure. We've got our first hill drawn. I can continue now. I'm going to get my pen tool and I'm going to
draw that next set. What you could do here is hide them as you go along
if it makes it easier. I could have drawn the hills
all the way out to that end. But it really doesn't matter because they are
going to be hidden. We're going to layer them behind each other so that the hill that's in front definitely will cover up whatever is
going on in the background. I think this tree that was on this side covers up
most of this end here. Here I can just doesn't even matter as long as I have it
underneath that curve there. I'm going to make a
straight line across, and here you could be picky about it and worry
about that curve, but it doesn't matter since
it's going to be hidden. I'm going to fill that one with let's try it
slightly darker color and you see here how it's in front and I'm going
to just slide it underneath. So I just get just the top
of the halls showing there. I don't think I'm even going to bother hiding it because I think I can move along to
my next shape here. That would be this one here. Here. There's two different
ways you could draw it. You could start by doing the curve down here and
pulling it this way. That's the alternate
to what I showed you before because before we did the top of the
hill on the bottom. In this case, I've got this
handle I think way too long, so I'm going to go back and redo it with the
top of the heel. I think that one gives me
a little bit more control. Again, we can go straight across here and we'll fill it we can grab that color and use the swiping method
to make it lighter. I want to just fix
this one here. I think I could just
enlarge that curve a little bit and also grab it. You have to hesitate a little
bit when you go to grab it. You can't just grab
it and pull it. You're just going to move
your whole list up and down. Here, I can hesitate
a little bit and then it picks it up and
then I can put it behind. This one has a bump to it and that's because
of that point there. I could get rid of that point. I'm going to delete
it and then just use my handles to smooth
out that curve. I got a couple
more to draw here. You could experiment, try your pencil tool and
see what you think. If you think that goes faster, you could draw it that way, close it really didn't
put too many points in. Maybe that would be
a way to go as well. Remember to hesitate
and then pull it down to be behind all
of the other ones. That's a severe heal. I think I'm going to adjust it. You can delete points if that's going to make it
easier for you to adjust. Choose whatever method you're
the most comfortable using. It seems like it takes a bit
longer to do it this way. But I find that using
the pen tool gives me just a little bit more
control and we've got all the hills in the
background here done. We can do the foreground
ones as well, and I think this one needs to be moved to here
and there we go. These I could group
because they are the background hills and then I could do the foreground
hills separately here. I'll do these real quick
with my pencil tool, and I'm purposely keeping my
number of colors down and the way I'm doing that is
by picking things that I do have in my palette
as much as possible. And I'm not closing
the shapes here. If you are OCD, you can definitely go in on
your selection tool here and then you'll get this option come up so that
you can close it. Those four ground
hells are done. We can take all three of
those and group them. You can see that I'm keeping my palette here
really neat and tidy. Trees, we know will actually end up being
on top like that. Well, we've only
spent a few minutes putting this together
and already, you can really see the light
at the end of the tunnel. I think at this point, I'll hide all of these so that I can start working on some
of my smaller details. To complete our background here. We basically just need to add
the sky and the water in. I'm going to do those separately because I think I want them
to be different colors. Because they're going
to be in behind, the shape can be very basic. We can close it, we can fill
it and I'm going to fill it with this lightest greenish. I'm going to change this
to be a little bit bluer. I'm going to pull to
be more into the blue, maybe even a little bit bluer. What I'm going to
do is add that to my swatches and let's use the
same thing for the water. Again, because it's going to be behind all the stuff
we've already drawn, we don't have to
be too particular about how cleanly we draw it. I'm going to delete that
extra point there just because I am one of those
people that's a little bit OCD. I'm going to choose the
same color for the water. I think I'll do it just
a tiny bit darker. Then what we'll do is go
into the layers here. Take the two blues. We just have to remember that
we've got them together, and We can drag that
underneath everything else. You can see already that we've
got our whole background, all of those vectors drawn, and it was actually
pretty painless. I think for the sky here though, I'm going to go a little
bit lighter and I'm going to go back to the swatches here and I'm going to
make it even bluer. So we have a tiny bit
of contrast there. See what color says sky. Going to be adding
other details in here. We can always change
colors too as we go along. I'm going to add that to my swatches just so
that I have it there. I'll leave the water
as it is for now, and I think that we're really
off to a good start here. We could take that
water group and drag it onto the ellipse and then drag
it under everything else. That way, it is clip just
like everything else here. That completes our basic
construction here. In the next lesson,
what we're going to do is hide all these guys and start working on some
of are finer details. We'll start drawing some of these smaller pieces
in the next lesson. I will meet you there. Okay.
5. Lesson 3: Background Hills and Water: Hi, guys. Welcome
to Lesson four. In lesson four here,
we're going to be working on some of
those smaller details. We're going to do the
cabin and in this lesson, you're going to be
using a bunch of different techniques.
Let's get started. I've hidden all of these things so that we can get back to our sketch layer and I want to draw this
little cabin next. For the most part,
this looks like it can all be drawn with shapes. Let's go to the shapes here and we'll draw a rectangle
to start out with. I'm going to use
the rectangle tool to draw the side
of my cabin here. I'm thinking I'm going to
keep it white just because then it'll really stand out on our background, the
hills and so on. Just to make it maybe a
little bit easier for us to work on right now though I'll leave it in
this light blue. I want to also draw
the little windows in. Let's just hide that for
a second and we'll use the rectangle to draw a window. I think in this case,
I'm going to go with my darkest
darkest brown there, it's almost black, it's so dark. Then let's duplicate it. We're going to drag it and I'm
going to use my move tool. What I'm going to do is
when I start dragging, I'm going to put two fingers down and that will
give us a duplicate. Let's do that and you can see that it's keeping it
perfectly aligned. What can happen is
you can let go too quickly sometimes and you
don't get the duplicate, but that seemed to work great, and I'm going to go
up here now and hit duplicate and you can see that
it not only duplicates it, but it spaces it
exactly the same way as the space in the first
iteration of that square. Let's use the rectangle
to also draw a door, which I will keep
the same color. I'm going to be tucking
it behind the heels here so I can go a little
bit further when I'm drawing and let's turn that rectangle back
on so we can see it. I'm sorry if you find
it hard to see there. I'm going to actually
move it over a tiny bit because I want it centered and I still have
my snapping on here. I'm going to actually I'll leave that on for a
second because I'm going to draw the square that will end up being
the front of the cabin. I'm stopping right at the
edge of this shape here. To create this
part of the front, what I'll do is
use the shape tool that draws a triangle and
I can draw the triangle. If I hold down one finger, then I can draw right
from the center. I'm lined up as close as
I can be to the center and I just start to pull and you can see that I'm
drawing it from the center. I'm going to move
it into position here and it snaps
right to the shape that I had there
previously so I can make adjustments to get the edges
or the corners lined up. I'm going to go a
little bit smaller and actually select
both of these two. I can go into the alignment
options here and then just make sure that they're perfectly centered by hitting
this center alignment. The other thing I want
to do here is just add this together so that
it's all one shape. Again, I'm going to be filling
it with a whitish color. I think I might even leave that color for this side of
it and then just lighten it for the front so that
the front itself is brighter than the side, which is a bit of
a shadow there. Now to draw the top
part of the roof, I'm going to use a trapezoid. I'm going to draw
from this corner to this one and you can see that it's snapped
really nicely. Not sure about the
height here because I'm going to want to
line it up to that. But now I can get my node tool and you can see I'm
holding down one finger. I've grabbed that
corner and I can pull it to be perfectly
straight with this wall. What I really want to do is
line it up to that triangle. I'm going to hide my
sketch temporarily, maybe. That might be the easiest way. Let's color that one dark again. I can lighten it
again later and we'll go back to the layer so that
I can see my trapezoid. Then I'll just grab this
point and bring it over. I'll hold down my single finger there and then I can pull
it nice and straight, can always adjust if necessary. I think I'll color
that darkest color, and now for a chimney, I'll do a rectangle again, maybe about that big. Let's turn off. I had
temporarily turned everything on again just
so that I could see. But I actually need it off at this point so that
I can see my sketch. So that's position that I actually will go darker
probably like a black. I've got my chimney there, and I'll draw this one
with the pencil tool, close it, and I think I'll fill this one
just with pure white. I'll go with one of these
colors and then just swish it. Now let's put those layers back on just so we can see
how everything looks. I also added some trees here, so simple just really
quick with the pen tool. I can show you how to do
one of those in a second. I'll turn all this
stuff back on and I can see that we need to
grab this cabin, everything to do with the cabin, it is already group, sorry. I can take this group now and move it in to the right order. When you see all of
it put together here, it's really starting
to come together. I think that drawing these little extras really
makes a difference. For the trees, let's just
draw another one here. What I did is just used my pen tool and I'll put it
in this same group here. I'm going to grab my pen tool. What I'm going to do
is draw half of it. I'll just start with the
vertical straight line. Then I'm going to just do
what you'd call the branches. I'm not being overly crazy about the positioning because I know that I can go in and
make adjustments. I'm going to get them gradually bigger and line up those guys also as if they're
getting a little bit further away from the
trunk, something like that. Then I'm going to
make this trunk about half of the width of
what I want because what I'm going to do now is
select the whole thing with the move tool
and duplicate it, then I'll go over
here and flip it. I've got my two halves, which you can't see right now. I'm going to select them both and fill them with
that green color, and then I'll move this
one into position. I didn't have it
perfectly straight, but I'm not going to sweat it because I can easily
move these points. I think I might make this one
a little tiny bit narrower. I can bring it up
here to just make sure that I have that
pretty much lined up. And then I will select
both sides of it. They're a little
bit overlapping, which is good because I'm
going to hit the ad key here and now I've got another
version of my tree. You can still go ahead and make any adjustments that you'd
like. I've got them all here. They're all in one group, so I've got most of the
little extras that I wanted. Let's just turn off all of
this and go back to the sketch and you can see that I've got pretty much everything other than the birds and stuff. Birds and these
extra little things that I'm going to have on
the outside are things that I can add in the next
lessons as we go through and start adding things like texture to our final here. I will meet you in
the next lesson.
6. Lesson 4: Smaller Details Including Cabin and Trees: Hi, guys. Welcome
to lesson five. In lesson five
here, I'm going to be showing you how I use my asset gallery to fill out all of the little
details in the foreground. Let's get to it. I think
now what I want to do is just add a bunch
of these flowers and things to the foreground and I'm going to use assets as much as possible that I already
have in my asset studio. Let's take a look at a couple
of these sets that I have. I'm not really quite sure. It's not necessarily going
to match what I've got here, but I want to use my assets as much as possible because
they're already drawn, why not? Some of them even have
textures and highlights and all kinds of different little things that might actually work. We may have to change
colors, but that's okay. I think I'm just going
to randomly just throw in a few right now.
Wow, that one's big. I'll work on arranging
them a little bit better as we move our
way into the lesson. Why were these
assets so darn big? Must have been
working on a really large document when
I originally made those This grouping is
actually really perfect. I almost looks like I
had planned it this way, definitely going to
be changing them, but still it's nice to
have that much of a start. That one I when I was
reducing it down, I should have set the
strokes to scale. I'm trying to remember
where you do that. I think it's in here,
scale with object, and then that way when
I reduce it down, the highlights and lines
and things that I have in there are being reduced
proportionately. Like I said, I'm
going to be changing a ton of the colors
and things like that, but that set was
actually really good for just doing all
those fillers quickly. This time, my phone died. I had been adding more motifs
down here when it died. I really did the same process. I don't think I need to backtrack and show
you all of that. But you can see all of the different little things
that I've added here. I'm going to select
the whole pile using that two finger technique to
get the whole stack of them, and I'm going to group them. This group, I'll separate the ones from each
side. This one. All the ones from this
side, I'm going to put into one group because
it's going to have to go into the circle and the other one is going
to be on the outside. I'll start the other group here. Must be an extra.
I'm going to pull this group out so that it's
separate from this group. I need to add a few
more things here. These all belong to this group, and just one more fern and
we're good on that one. This whole group
here is together, and then the rest of these
will belong to this group. I'm just missing a couple here. I would suggest that
you do this just to keep it straight in your
head because it's easy, especially with some of
these placed elements because they're in groups that it's very easy to lose track of what goes where
and what's going on. I'm going to just tidy
this up a little bit. Don't know what that
is. I'm just going to eliminate it and this one. Am I using it anywhere? I think a couple
of these are way off the screen here because I may have double clicked when I was picking them out
of the asset studio, and we just have a
couple of these left to go this one and this one
belong to this group. Then I guess all of
these can go in there. These are all the
things that will go in the inside of the circle. I'm going to grab that whole
set and put them in here and you'll see that they'll
be cropped by the circle now. Actually, let me
just do it this way. You can see now that
they're cropped here. I think at this point, too, I can get rid of the stroke
that's on the circle because we've got enough of a fill there to see
the whole circle. And this stuff on the outside. Let's just double check if
we turn it off and on again, that work just perfectly. Really, at this point now, we need to start just
making decisions about things like shading and texture and adding all
those little tiny things like the birds and the waves on the water and
that sort of thing. But we've made a lot of
headway in this lesson. Now we can go through and
recolor all of our pieces. I would just select
the piece that you want to change and change it to something that is in your color swatch grouping
that you decided on. And this is going to
be time consuming. So I will do a bunch of it off camera and
come back to you with it all colorized correctly
for our illustration, and then we'll talk about what we need to do for the textures. All right. So I will come
back to you shortly with a finished piece at least
partially finished.
7. Lesson 5: Adding Details & Finalizing the Leaves: Hi, guys. Welcome to lesson six. We've got our illustration
more or less done. At this point, what I want
to do is really show you how much we can add to it by
using highlights and shadows. I've got a trick up my sleeve. Let's get to it. Okay. So you can see here that I have gone through and used
my color palette to colorize my different
motifs here in the front, and I'm ready to
start adding detail. Now, you see I just added
some to the trees already. So I'm going to act track here and take the detail
off one of them. Let's take them off
this front tree here. And I just simply use the
pencil tool for that. I drew some wavy lines. That is probably a
little bit too wavy, but I'm going to stroke
it with the darker brown. You could still lighten it if you feel it's too contrasty, you could lighten
it a little bit, and I guess it's okay. It's not much of
its showing here, so I think I'm just going
to leave the shape of it. I literally just went
through and drew some knots and just the
texture of the wood here. What I do once I've created the shape with the node
tool, I can close it. I'm closing everything
as I go along and then just continuing
to draw lines. And as you can see,
at the moment, we don't have it constrained
or clipped within. I'll show you real quick
how to do that too. You'll see that I've got all of these curves loose
in the folder here. I'm going to select them all, make them into a group,
and then I'm going to take that whole group and
clip it to the curve. Remember to go halfway
down on the name of the layer that you're trying
to use as a clipping mask. Let go and you can
see that it has constrained it all to be
within the tree shape. So that was one of the
first steps that I did. Then I wanted to start doing
all of the shading here. I must confess that I did
this whole thing last night, so I do have this
already finished, but I want to show
you all of the steps. Let's work from back to front. I'm going to grab
this back shape here and now I'm going to
switch to the pixel persona. Once I switch to
the pixel persona, the brushes here will
be the pixel brushes. I am literally just
using the pixel shader brushes for
everything in this project. The other thing I want
to do here is to add a layer directly above it and you need to add
it as a pixel layer. You had just started painting, it would have automatically
added the layer, but now you can see it's in the right place. We've
got what we need. We're going to need
to have it clipped, but I want to spray some of this paint on here first
because what I want to demonstrate is the shading technique that
we're going to use for this. While you're on the pixel layer, go to the layer options here. Going to switch this
to be multiply. The other thing we
want to do here is to use the exact same color. I think that is the right color. I'm going to take
the stroke off. Just in case just to be sure, you can drag your
eye dropper here, you'll see that it samples the color and it'll
be over here, you can just click on it and
it would switch it over. It obviously was the same color. You're thinking to
yourself, well, how could I use the
same color for shading. The trick was having
it on multiply mode, and you'll see that
even though it's the same color that
we just sampled. Here you see that
I'm having trouble. I'm not getting anything
coming out of my brush, and it took me a minute
to figure it out, but I looked down here at the context menu and I've
got protect Alpha on. Let me just take that off and see if that
solves the problem. Yes, you can see that
it is spraying here. I had meantime
made another layer because I thought there was
a problem with my layer. But as it turns out, it wasn't anything
to do with my layer. It had to do with
this protect Alpha. This layer now doesn't have
multiply blending mode on, which is why you can't
really see the color here. Now when I switch
it to multiply, you're going to
see it and I am on the wrong layer or I have this pixel layer in
the wrong positions. Let's go back to back to layers here and I
can just pull that down into that shape and it'll clip it in
the right position. Just like that, we've added
some really good shading, really textural two.
I really like it. What I would suggest you do too is experiment
with your brushes All of these pixel
shade or brushes have different textures to them. Some of them are really bold, some of them are really noisy. This one here gives
you a lot of texture. Let me go a little bit
bigger so you can see it. You see how it almost
like pate spatter. You can experiment and decide
on the look that you want. Now we're on multiply, but
we can still also darken our color a little
bit if we wanted to add some additional
texture in here. I'm lightning as I go here, I might go back to I think
I was using brush three, I've just got a little bit of texture down where there
would be deep shadow. Pretty much that's the way I went through and did
all of the layers, so you can go to the next layer. There is a pixel layer
just above it here. I think that might
be the one that I had put multiply on. Yes, it is. Now I can go back to
my color palette, grab the eye dropper, sample the color, click on that color so that it gets
switched over to here. Because we're on multiply, you're going to see that it does give us some
nice shading here. No, I saw myself spray
over the edge here. What that means is I
don't have it clipped. I just need to drag it
over the word curve for that layer and then it
clips it right to that layer. You pretty much have
to just go through now and do that for all
of your layers, and I did that, I went through
and did all of my layers. Then what I did is I went
through to my flowers, then I got all of
this closed off here, and this is my flower layers. I added these two a
little bit later on, so they're not in that group, but I'll just open that group and drag these to
the bottom of it. Now everything is
within the same group. Pretty much the same
thing goes for this. You would choose the flower
that you want to work on. Let's say I'm working
on this one here. I would add a pixel layer. I would clip that pixel
layer to the flower. I would go into the
layer options here, multiply, go back to my color palette and
sample the color. I know it's these
colors down here, but I'm just wanting to demonstrate every little
step just in case. Now I can take that same color. I'm going to make my
brush quite a lot smaller down to about 150, and you can see that this
will work perfectly. I think I can even
reduce the opacity here just so that I can build it up a little bit more slowly. I would do something like that. I would do the middle
of the flower and then maybe the outside
petals or go really small and do some of the edges. This is where your amazing
artistry comes into play because you're
going to be going through and doing
some of this stuff. Now With the flowers, I found that I wanted to use
highlights more as well. What I did was add an additional pixelaer
This one I set to add. I'm going to use the
exact same color. For this one, I'm going to reduce the
opacity a little bit and I'm going to put highlights on the
middle of the petals. For this, I have to go
a fair bit smaller. You could enlarge as you're
working on them, of course. That's still too small,
that's not too bad. I went through on some of these flowers and actually added a highlight on the
middle of the petals too because that works to
make it look contoured. For that, you can also dial
back opacity a little bit, so it doesn't look too
glaring or too intense. It looks like it was already clipped because I had added it between a clipping
mask or maybe I was right on the curve and
it added it right in there. I'm going to go back
to this layer here and I'm going to go
with a darker color. This is just an experiment, but I want to
darken a little bit more around the
middle of the flower. Remember that you can always
go smaller with your brush, you can always go a
little bit darker. I think that that
helps to really make it look like it's
really deep in there. The center of the flower,
of course, also needs work. I would add a pixel layer, make sure that it's clipped
by dragging it in there, go to my color palette, get my eye dropper
and drop it in there, tap on the color, so it
pulls it over to here. Make sure that I've got multiply set for that
layer and I'm going to make my brush ten a
bit bigger and see how that works.
That's not too bad. I would go maybe even a
little bit smaller and I'm aiming almost to
the outside edge. The tip of my pen is actually
on the outside there. Then that one, I would also add an additional layer has
to be a pixel layer. I'll go to the layer options and go to add back to my brush, I'll make it a tiny bit
bigger and then I can put a highlight on the middle
of that flower as well, and actually like it, that
looks much more contoured, and I'll just dial that
back just to touch. But basically, that's
what you're doing. You're going through and adding all the highlights and details to all of your different pieces. You're going to
go through and do that with all of
your lad masses. Then once you're done, it's
going to look like this. Okay. So I will come back to you in the next
lesson and in that lesson, I'm going to describe all
of the different things I did to take it
from this to this. All right. So I'll meet
you in that next lesson. Okay.
8. Lesson 6: Adding More Details and Dimension: Hey, guys, welcome
to Lesson seven. In Lesson seven here,
I just wanted to recap all the things that
I've done in my illustration. You'll be seeing
my finished piece, and I'll be going through all of the different things that I
did to really finish it off. All right? Let's get to it. There were a few
little finishing touches that I didn't show you, and one of them was
to draw the birds and then the waves on the water. I'm going to I'm back
in the vector persona. I'm going to add a new layer and it's going to
be a vector layer. I'm going to switch
to my pencil tool and I'm going to draw the bird. Now, a bird you can draw
basically as an elongated. I'm going down in the middle, up again and down, and then I'm just going back and following
that same path. Now, I should have
had this on use Phil and I should
switch to black. A black fill so that
you can see it. I'm going to switch
to use fill here so that you can
watch as I do this. I'm going up, down, up, down, and I'm going really wide
on the ends of the Mm, and then I'm going back up again back down in the
middle, up and down. Now there are a lot
of extra points here that I probably
wouldn't need. But in this particular case, it's going to be so small that you're not really
going to see it. It's just the
suggestion of a bird. Here I will also
close the shape. If you really wanted to,
you could definitely go in and alter it, make it a little bit better. But when you're going
to have it like this small on your illustration,
it really doesn't matter. This I would then duplicate
and possibly flip, just to have it different
so that I can add some additional ones in here.
Definitely look at some
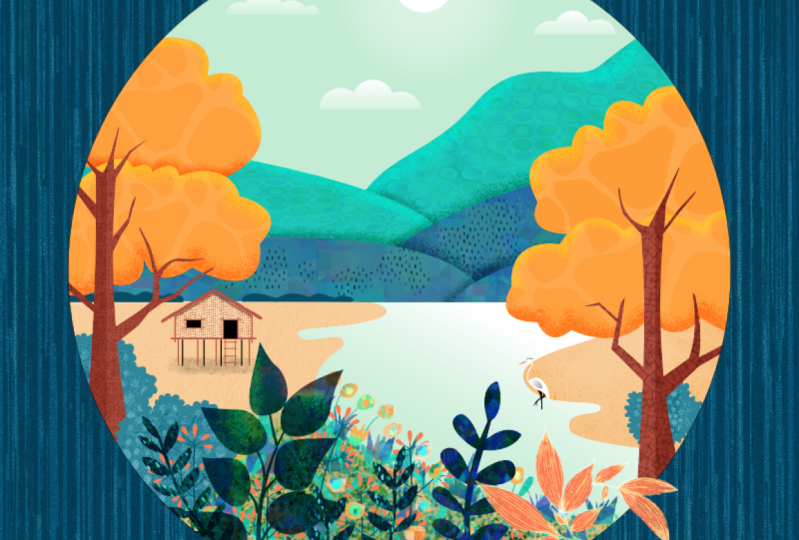
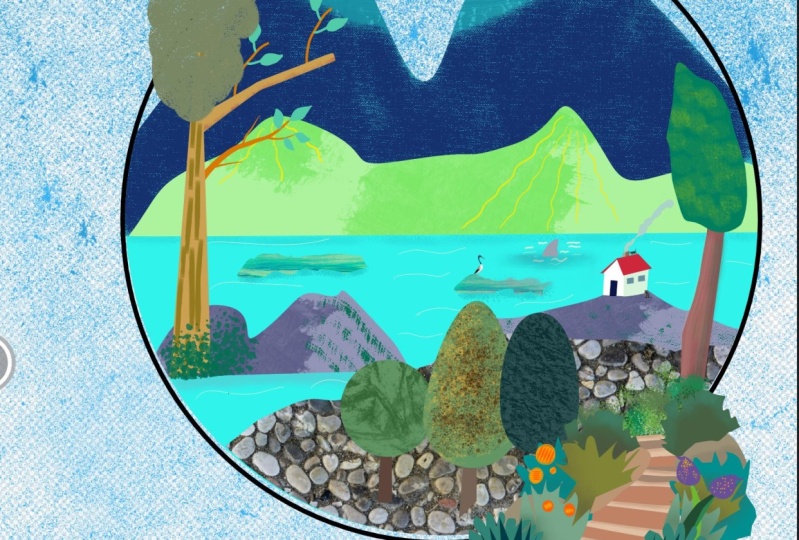
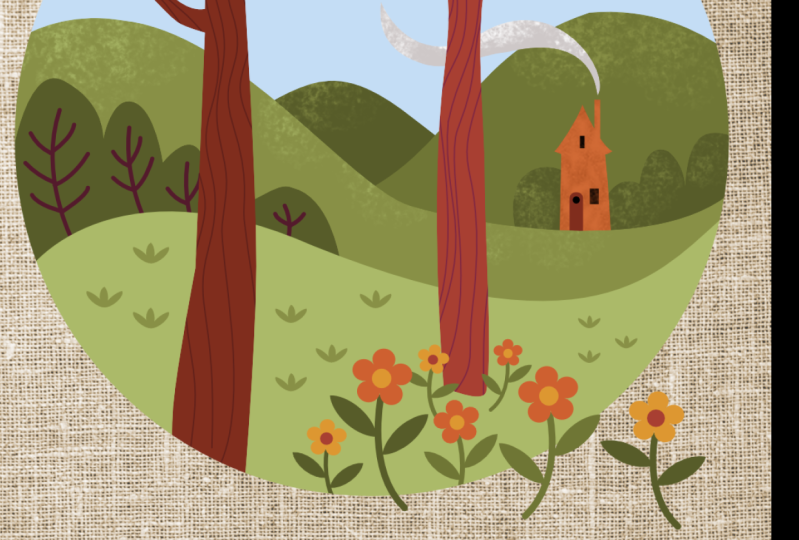
9. Lesson 8 Wrap Up and Closing Thoughts: Well, are you impressed with what you were
able to produce? I was blown away. I found that this was a really interestingly easy a
project to work on. At first, looking at it, you'd think that this would be a really difficult one to do, but it proved to be
actually very simple. The cool thing is using those vector shapes
almost like stencils. Everything we do
as clipped layers really works nicely and
is actually quite easy. I don't know about you,
but I think this is something that I am
really going to be looking at in the future for producing illustrations
for my commercial work. I love seeing these on mockups. Here's a couple of
the ones that I did. I think that this would
be really great on wart and could easily
be placement prints that you put onto
things like T shirts or coat bags or anything
of that nature. I'm so glad that we
had this day to do this project because I think that this one
was really fun. Now, if you enjoyed the class and you like my teaching style, then please hit
that follow button. That way, you'll learn about
my classes as I post them. My Affinity Designer
series has now grown to about 17 classes,
if you can believe it. If you possibly can
post a project. I love senior
projects. I really do. It just makes my day
when I wake up and I've got five or six
projects to take a look at. Okay. So I hope you
really enjoyed this one. I hope you got a
lot out of it and you learned of all the
things that you can do with that pixel persona
in Affinity Designer. It just blows my mind. Every time I think about
the fact that I can use both raster and vector
details in the same document. It's just the most amazing
thing about Affinity Designer. I guess that's it for now and I will see you next time. Bye bye.
 Delores Naskrent, Creative Explorer