Transcripts
1. Introduction: Hey guys, welcome to
my Skillshare class. I'm a musician, but coming from a graphic
design background, my favorite part after finishing a song is designing an
illustrating the covers. In this course,
I'll show you how I designed cover art for
my musical projects. Great cover art is essential
to the listening experience. It can convey the general
aesthetic and vibe of the song, as well as give your listeners
some pleasant eye candy. My approach to design
is to have fun, experiment and come up
with ideas as I go. We will be working
in Adobe Photoshop, and I'll show you various
image manipulation techniques that I've gathered
over the years, like 3D filters, blending modes, texts, defects, adding
noise and more. In this course, we'll be taking a closer look at these
two images I've made. I'll walk you
through the steps of making these kinds of images. So after finishing this course, you'll be able to make your
own. Let's get started.
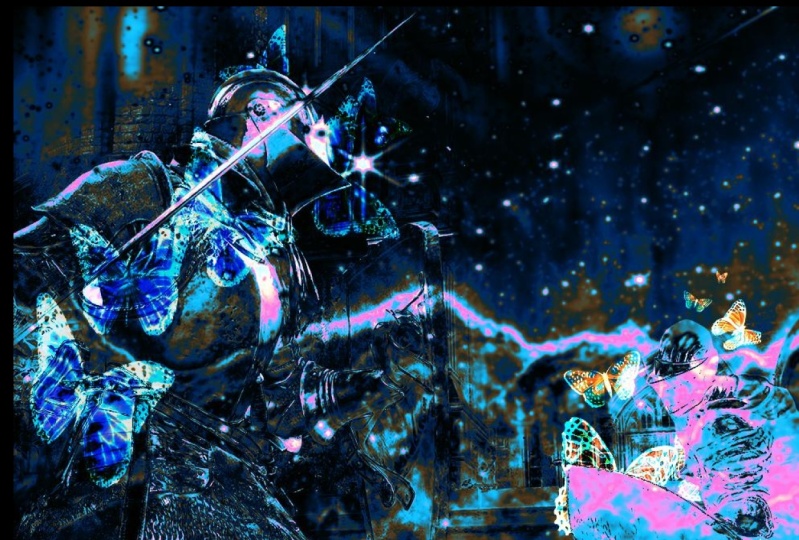
2. Case Study 1: I'm going to start
this edit with an image of the
main character from the 990s eight sci-fi anime
series of experiments lane. Under Effects 3D, I will
generate the normal map, which gives any 2D image a
cool purple 3D VHS effect. I'm using a large soft eraser to blend it in with
the background. In the Layers menu, I'm going to change
the blending mode. Usually I don t
know which one of the blending modes I'm
going to end up using. So I just go through
all of them and find the one that looks
the best for my taste. I like the pose of
this character. I think it will fit
nicely in the foreground. With the lasso tool. I'll cut out a rough
silhouette and press Control J to duplicate my
selection to a new layer. Let's go through
the blending modes again and see what
works the best. I like how the
lightened blending mode looks with this background. It is very important to balance
the various elements in your image. With this image. I'm just dragging it around
and resizing it until I find the best place where
it fits in with the other elements
in my composition. Sometimes an idea won't work out no matter how much
you try to adjust it, then the best option is just to delete it and try out
the different idea. Now, I want to add a
cool-looking Japanese car. I really liked the smoke
effect on this one. Again, using the soft eraser to fade it in and changing
the blending mode, this time to soft
light and using the move tool to adjust
its position and size. Now I'll try to add some text. You can change the font up
here and the best place to get new fonts for free
is duff font.com. I'll be using a cool pixel
art typeface called upheaval. You can add effects to
your text. Down here. I'll be adding Outer
Glow gradient effect. Here. I'm just playing
with the opacity, spread and size sliders to get the effect to look
just how I want it to. Bevel and emboss will add
a 3D effect to your text. It's already looking
pretty cool, but I want to take
it further and experiment by messing
around with the text. I'm pressing Control
D to duplicate the text and create
repetition in the image. I'm selecting all of the
texts layers and pressing Control E to merge them into
a single rasterized layer. I can duplicate,
Move, and Transform. From this point, I
won't be able to change the text properties because now the text is just
rasterized pixels. Let's try a different
blending modes. I like the green that comes with a different blending mode. I'm adjusting the hue, saturation and value of the
layer by pressing Control U. I feel like adding
a vinyl record. Using the magic wand tool. I'll select and delete
the white from my image. While holding down Shift, I'll click and select
all of my layers and press Control E to merge them
into a single image layer. While holding down the Alt key, I'll click between the layers
to apply a clipping mask. Now it takes the shape
of a vinyl record. Now I'll be adding
a background image. I think Tokyo at night
will be a great fit. But it looks kinda flat. So I want to create separation between the foreground
and the background. First to make the
foreground pop out, add an outer glow effect. I'll make the foreground even more saturated and synthetic. Looking. Here, I wanted to see how it would look as a square shape, but I liked the
round shape better. But I'll rotate this layer diagonally and try to use it as an overlay layer to add some texture and make
the image more dynamic. It doesn't look the
way I wanted it to, so I'll turn its visibility off. I want to make the
background a bit darker. So I'll create a new layer
and fill it with pure black and lower its
opacity over here. Up here in the filter menu, there are different
types of blur. The best option to use
his Guassian blur because you can control the
amount of blur you want. Now, there's a clear
separation between the bright, sharp and saturated
foreground and the darker, blurrier, more faded background. Play around with a soft
eraser to make the background less evenly dark to
add some dynamics. Cool, I think the
image is finished. Now, I'll save it as a PNG
or JPEG file and click, okay, here we have
our finished result. I think it would be a
nice cover image for a synthetic techno or
a drum and bass song.
3. Case Study 2: I'm going to start off with this super cute
smiling Labrador. For this image, I don't
have a general idea, so I'll just add some
random images of the top of my head
and see what happens. The difference blending mode
makes it look very creepy, but I loved the
colors that brings out up here under
Edit adjustments, I'll invert the
colors and try to add the Zelda forest image again
for a different effect. Let's see how the forest
will look as a background. Next up, I want to add a ferry. The process is quite
straightforward. You come up with an idea, play around with composition, blending modes, and
the layer structure. It's always a good
idea to add mushrooms. Here, I flipped the
image horizontally. The shortcut for
transforming is Control T, and you can right-click
on it to see its options. I'm using the soft eraser to
fade the edges and blending it in with the background using the Pin Light
blending mode. I want to add some
abstract art elements, so add a visual composition by the 20th century abstract
artists, Wassily Kandinsky. It adds some nice
geometric shapes and the rhythms to the piece. Now, I'll merge all the layers together by pressing
the shortcut Control E and adjust the hue saturation by pressing the
shortcut control, you adjusted colors now make it look like an
underwater scene. So my next idea is to add a C diverse suit and then to overlay it with
a water texture. The image is not finished yet, but here I'll save it because I like how it
looks at the moment. Difference is probably my
favorite blending mode. It inverts the colors in the
light parts of the image. And it always produces some
weird and super cool effect. As always, I'm using the magic one tool to quickly
delete the background. Now, I'm going to add
some particle effects, set it to a hard
light blending mode, lower the opacity and adjust the levels by pressing
the shortcut Control L. Next, I want to add
some organic textures. So I chose this
acrylic pour painting, which looks really interesting. It completely
changes the look of the image and the color is
looking credible source, save this version and
keep going further. I want to keep some
aspects of the last image, so I'll erase a little bit just enough to show the
math and the sea diver. For me, making this kind of an image is sort
of like painting, but you can express your
ideas so much quicker. And the process is incredibly
fun because you get to see how the image is always
changing before your eyes. Also, it's impossible to ruin
your image because you can always go back or change your idea to take a
different direction. In my experience, usually the best art comes
out when I'm just experimenting and
messing around without any concrete idea or
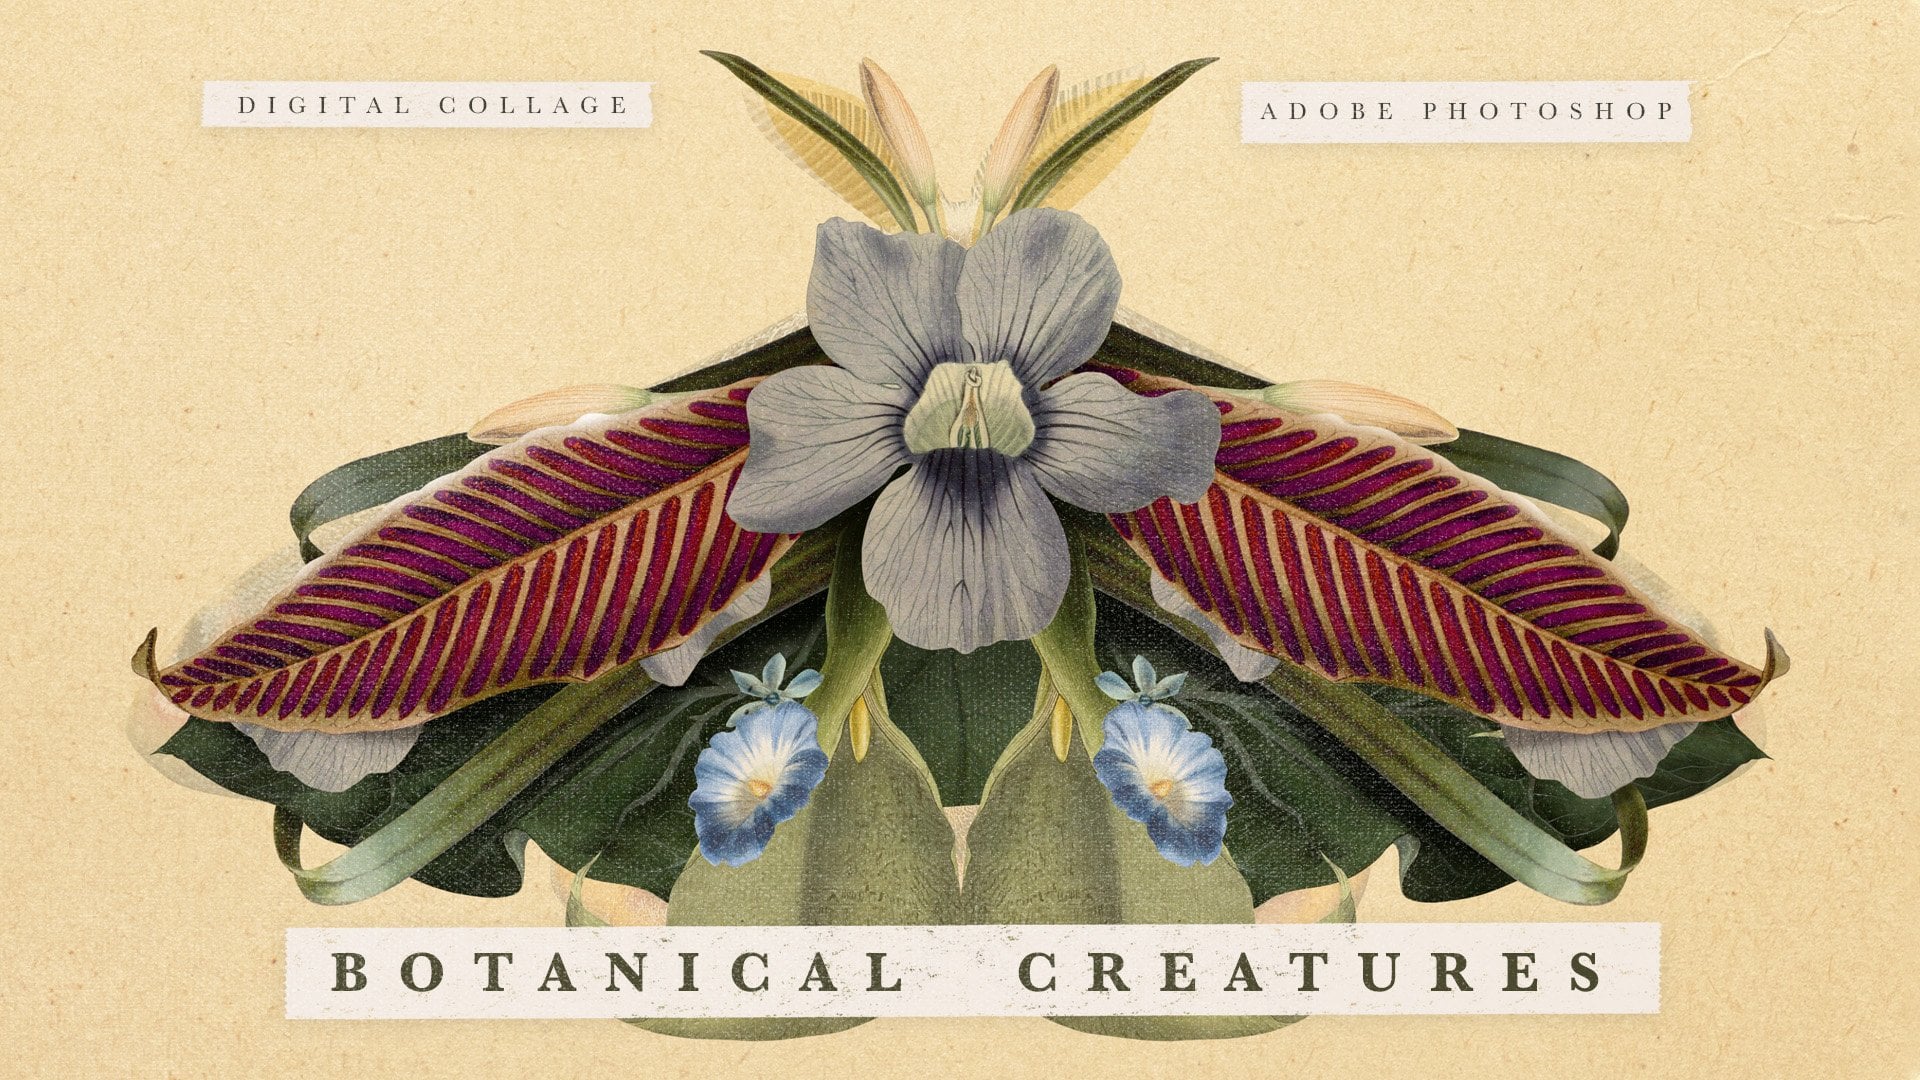
expectations of the outcome. I love adding these
kinds of botanical or enter my logical
illustrations. I think it's interesting
to experiment with making art at different
times of the day. I did this particular piece
at five in the morning. And I feel that ideas that come out when you
haven't slept for awhile are usually much
weirder and more creative. So if you're making something technical where you have
to focus and be precise, it's better to do
it in the morning. But stuff like this where you're just expressing your ideas and experimenting is usually better done at the evenings
or in the nighttime, because at that point, the brain is less active
and the analytical part of the brain doesn't interfere with the subconscious
creative part, which is free to express itself. I'll bring the giant wasp
to the foreground and add a rainbow gradient
outer glow effect. This honeycomb effect
isn't really working. Saw deleted and merge the
rest of the layers using the shortcut Control E and try out a different
Honeycomb image. Here, I set it to a
hue blending mode, and it's unified all of
the colors very nicely. Now, it looks like everything in this image exists in
the world submerged in honey or encapsulated within an amber stone illuminated
by golden light. I think this is it.
I'll try to add another water texture and set it to a saturation
blending mode, which makes the
final image a bit more saturated and lively. Now I'll save it. And I
think this piece will be called the world
within an amber stone.
4. Final Thoughts: I hope you enjoyed watching
the process of making these edits as much as
I enjoyed making them. Now, I encourage you to
try to make your own. And if you do, I'd be
really happy to see them uploaded to the projects
and resources tab. Also check out my other
Skillshare classes. Thanks for watching.
 Acetony, Digital Artist, Painter, Animator