Transcripts
1. Introduction: Hello guys Alex, here in this introductory lesson, I will tell you what awaits you in this course and how we will work. In the first lesson, we will prepare the background for our artwork. I will give you some tips and tricks to create a beautiful, realistic background for our composition. The second lesson, we will work with the model. I will show you how perfectly God the model from all backgrounds and how refine your selection Warner's to get a better result. In the third lesson, we will work with the color and contrast. I will show you how easily change any color on your image and how make a model skin more variety. And the fourth lesson, we will make a flange petals around the model. You're going to learn how to make a main petals Chrome one and make it very easy and simple way. Also, I will show you how to create a sole focus in the frame and how to create a realistic depth of field. And in the final lesson, we will add finishing touches for our artwork. We will add immediate contrast and sharpen for our final image. So guys, I'm very excited to begin our artwork and I'm waiting for you in the first lesson.
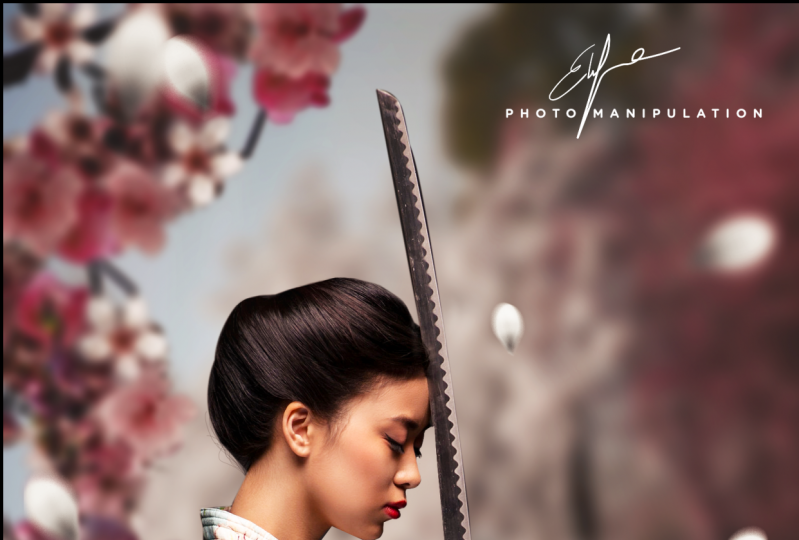
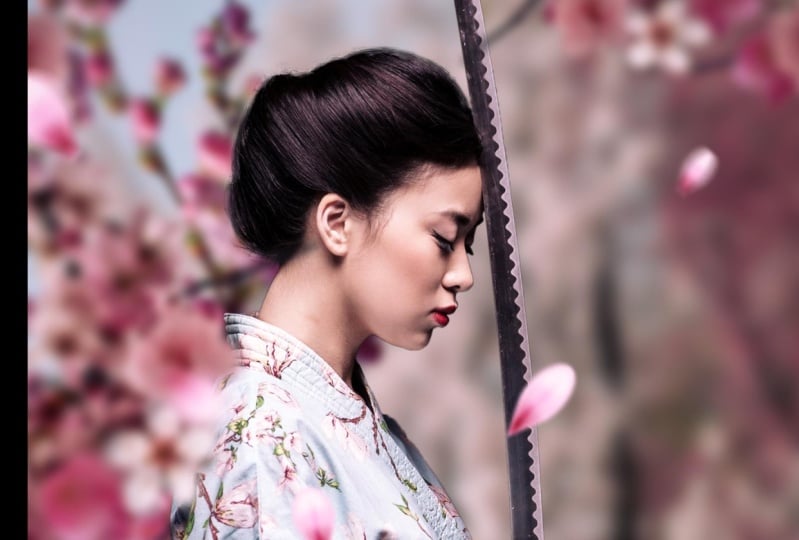
2. Preparing a background: Okay, my friends, let's begin our artwork and the first, let's create a new document. Let's go to the File. New. Set, the width here to one hundred, six hundred, and eight to 2500. And then click on Create button. And now we have a new blank layer here. Next, let's open our folder with the images. Find here the first one, this BG image, and drag it into our document. Something like this. Let's rotate this image and scale it up. Something like this. Okay? Then press Enter button, and now let's delete the background layer. We don't need it. Make a double-click on it. Press Okay. And press Delete model. In the next step, we need to make at depth of field in the frame. To do this, let's go to the Filter. Blur. Gaussian Blur. Set the radius to 20 pixels and breath, okay? And also I want to flip this image horizontal. I think it will be embedded. Press Control T buttons. Then make a right-click here and flip horizontal. Okay, after that, press and robotic. Yes, that's nice. And now let's go to Images folder and find here another image. Maybe, maybe this. Drag it into our document, something like this, and place it to the corner OR gate. After that, press Enter bottom. We also need to blur this image. Let's go to the Filter. Blur, Gaussian Blur. And if you want to make a realistic depth of filtering to frame, we need to reduce the radius here to 10 pixels. I think. They use a different radius for blurring because this branch little bit closer to the camera and we need to set a different value for the blue. Okay, Let's go next. And now we will continue adding branches. Into our composition. Let's open the folder and beak. This image here, drag it into our document and place it in the left corner. Something like this. Rotated a little bit. Okay, after that, press Enter button. Also, let's add a blurb for this layer. Let's go to the filter blue Gaussian blur, radius to 10 pixels and hit Okay. Then pick an x branch. I will use these branch, drag it into our document, are rotated and paste it here. Scaled-up little bit. And let's flip horizontal. Make right-click and food horizontal here. Yes, that will be weather. And place this layer, something like this. Hit Enter button. And also let's go to the Filter, blur and Gaussian blur, and click OK button. Then let's pick the next branch. Open the folder. Pick this image and drag it here. Paste it into the corner. Something like this. Again. Let's scale it up a little bit. Press Enter bottom. And let's go to the Filter Blur. Gaussian Blur we'll hit okay. And the last image, pick this branch. Basis here, scale it up, rotate it a little bit, and paste it here. Something like this. Next, let's go to the Filter, blur and blur this bridge. And now I won't make a copy of this layer because we have our empty spot here. Let's press Control J, hotkey. Then press Control T. And put this image here. Let's flip horizontal this image and place its underlying this. Yeah, hit Enter button. And now I want to make a group for all background players. So hold the Shift key button, press the top layer, and press the bottom layer. After that. Press Control G, hotkey. And now we have a new group. Let's rename this group to background or BG. Yes. So it was the final step in this lesson. And let's go next.
3. Cutting the model from the old background: So we go next and in this lesson we will work with the model. Let's open our folder with the images. Find here image with the model, and drag it into our document. Okay, let's reduce the opacity for this layer little bit. That will be easier to find a better place for our model. And resize this way a little bit, and move a little bit. Okay? After that, press Enter button and return. They are basically 2100. Okay? In the next step, willing to cut the model from the old background. In this case, I'll use a Bantu for selection. Find these two on the panel. Click here. And now. Let's zoom in our image and start making our selection. Okay, I finish the selection of outer path, and now let's make a right-click inside the area. And click Make Selection. Okay? Set the feather to one pixel and click Okay. And now we need to remove the old background from the inside of this area. Let's pick a pen tool again and start a new selection. Here. Okay, I closed the loop. And now let's make a right-click here and make a new selection. And in this window, we need to set a subtract from selection checkbox. Click here, and after that, press Okay, bottom. And now all background is removed. Also, we need to remove the area near their hands. Here. Select the Pen tool and start new selection. Close the loop, and repeat o previous actions. Make a right-click here. Make Selection. Set, subtract from selection checkbooks, and hit Okay. In the next step, we need to adjust the selection borders to remove all imperfections and hard edges. To do this, let's go to the Select and Mask. And in this two, I want to make a borders of selection a little bit software. To do this, Let's increase the smooth radius 2, three pixel setting. And said the feather to one pixel. Again. After that, scroll down and change the output mode. Two new layer with mask, click here and click Okay. All right, and now we have a new layer with mask and original layer with the model. Let's pick this layer. And there we did. President with bottom. Okay, we're all done here. And let's go next.
4. Brightening the skin and adding flowers to the foreground: Okay, welcome to the next lesson. And now we will work with the contrast of background and with the model skin. So first, I want to reduce the color of the background because it's very saturated. And let's go to Adjustment Layers. Click here, find here, vibrance. Let's keep this layer to BG Group. Hold Alt key button, and click on the border of the layers here. After that, double-click on the vibrance layer and reduce the vibrance to minus 40 or minus 50. Minus 50, I think we'll be good. Okay, and after that, kouros, this adjustment layer. Next, let's work with the skin of the model. I want to make it more Latin. To do this, let's make a copy of our model layer. Pick this layer and press Control J to make a copy with this copula layer to original layer. Hold Alt key button and press on the border. After that, Let's delete a mask. Right-click and delete layer mask and create a new mask here. Click on this icon. After that, Let's pick this layer and now we need to desaturate it. To do this, we can use a hotkey Shift Control U, or you can go to the Image Adjustments desaturate. So let's change the blending mode for this layer to screen. Okay? And pick the mask of this layer right here. Pick the black color on the palette and fill this mask with black color. Press all do it. Buttons. Then let's pick a brush to click here. Be sure your hardness to 0 and set of bases it to 30. After that. Let's brush the skin. Something like this. Don't forget, change the color to white and make a few strokes on the skin. Something like this. Okay. Don't forget to paint the hands. Okay. And let's delete this effect from the lips. Change the color to black, and make a few strokes on the lips. Okay. Let's see, before and after. Remove some imperfections here and here. Before and after. And if you want, you can change the URL, paste him to 80 or 70. I think AT will be good. So before and after. Yes, that's great. And also, let's make a little contrast here. Let's create a new Curves Adjustment Layer. Click here, grab this layer to the model, hold the Alt key button, and click on the border. And after that, bent this curve, something like this. Okay? And now we have a more contrast in the shadows and highlights before and after. Close this layer. And in the next step, I want to add some branches to the foreground. Let's open the folder with the images. I grew up with this image and paste it into our document. Rotated little bit. Something like this. Scaled up. Okay, Let's flip horizontal this image. And place this layers like this. Okay. Press Enter button. Then let's go to the Filter. Blur, Gaussian blue, and set the radius to 50 pixel setting. Again. And he Tolkein. Also let's duplicate this layer, press Control J and resize this copy press Control T, and place it here. Something like this. And now let's make a group for the flowers. Hold Control bottom, and pick these layers. After that, press Control, G. Rename this group to flowers. And also let's make a group for the model. Hold Control button and select all of these layers. After that breath control G. Rename this group to model. And it was the final step in this lesson. I will be waiting for you in the next video.
5. Adding petals and coloring: Okay, We continue our work and in this lesson we will be working with the lips. I want to make it purple. And and also I want to make a soft focus in the frame. Let's begin the first. Let's create a new adjustment layer. Click here and find here hue saturation adjustment layer. Then let's pick the eyedropper tool and click on the leaf. And now I have selected all green areas in the frame. You can increase the saturation value. And you'll see all active pixels. So the first, let's reduce the saturation to minus 30 and change the hue to the purple color. Let's increase the area a little bit. Okay. Maybe we'll put more and reduce saturation a little bit more. Maybe minus 50. Okay, That's looks nice. Close this layer and let's see, before and after. And now our lives is purple. In the next step, I want to make a soft focus in the frame. To do this, let's create a new merged layer, press Shift Control, Alt E. And after that, let's go to the Filter. Blur, Gallery, iris blur. Adjust the area for the focus. Something like this. I stretch it a little bit down and we will be top. I want to get them blue borders around the model. And sharp center of my artwork. Something like this. Again. And set the blur radius to 15 or 10 pixels after that hit Okay, and close this window. Let's see, before and after. Okay. After that, let's add a flying petals around the model. Let's open the images folder. Grab the petal image, and drag it into Photoshop. Okay, after that, press Control a, Control C to select and copy this image and press Control V to paste it. Into our document. Okay. Then let's desaturate this petal, press, Shift Control UK, hotkey. And now with our COO, white petal. And then we need make some copies of this petal with different size and different shape. Let's press Control J hotkey and make a first coping. Then press Control T. Resize this pedal, little bit rotated, little bit. More like this. F That make another copy. Control D. Rotated and place to another place. Make another copy Control J or Control D. Find them whether place full petal. Here, greed and other coping. And I think it will be enough. Next, let's select all layers with the petals. I select a top layer, hold the Shift key, and select the bottom layer. After that, press Control E to merge all pedals in one layer. And then let's press Control J to make a copy of this layer and press Control T to transform this layer. Something like this. Again, hide this layer and pick another layer. Let's go to the Filter. Blur. Gaussian Blur. Set the radius to three pixels and he don't gain. And also I want to add a motion blur to this layer. To do this, let's go to the filter MLU and find here radial blur. Amount will be two pixels and hit Okay. Yes, That's looks nice. And now let's enable the top layer. Click here. And let's go to the Filter Blur. Gaussian blue. Increase the radius to 15. Because these petals little more closer to the camera and we need to make it more blurry. So click OK button. And I think we need a one more copy of this top layer. Press Control J. After that, press Control T and add some petals to the top. Something like this. Okay, press the Enter button. And now let's make a group for this layers. Select the top layer. Hold the Shift key, and select the bottom layer. After that, press Control G and rename this group two petals. Ok, and now we're all done in this lesson.
6. Finishing touches: So my friends reached the final lesson. And now we'll make a, some finishing touches for our artwork. The first, let's create a new Curves Adjustment Layer and make a vignette in the frame. Bend this curve, something like this. Okay. Close this layer and pick the brush too. With black color. Be sure your queerness to 0, 0, paste you to 100, flow 100. And make a one stroke in the center of our composition. Something like this. Let's see, before and after. Okay. After that, I want to boost colors in my artwork. To do this, I will create any new vibrance adjustment layer. Increase the saturation to 15. And why baryons to five. Okay, close this layer. And in the final step, we will add a sharpen to our image. Let's make a new merged copy. Press Shift Control Alt E. And now let's go to the Filter, sharpen unsharp mask, set them out to 100, and set the radius to one or two pixels. 1.6, I think. Okay, close this layer. And our work is done. I hope you enjoyed this result and learn something new. So thank you for watching and bye bye.
 Alex Kuzmichev, Graphic Designer