Transcripts
1. Introduction: Hello, everyone.
My name is Alex, and in the short video, I will make you a little
introduction for this class. In this course, I will show
you a whole process of creating this realistic
coffee cup in ender. We will have a clean
and easy explanation of each step of our work. Don't really matter your
experience level in blender. In the first and second lesson, we'll model in a basic
shape of our coffee cup. I third lesson, we
will texture it. In the fourth lesson, we will set a lighting and
the render final composition. Finally, we will get a nice and realistic
image of our coffee cup. Now, if you're ready, let's jump in in the first
video and let's get started.
2. Modelling a base shape: Let's get started, open a blender and create
new project here. Go to file, new and
click on general. After that, we need to delete all standard
objects in the sceam. Let's press a button and delete to delete
all of these objects. Then let's add a
reference image here. Let's go to the menu, add find here image reference open the folder with the image. Find it and press. This image successfully
uploaded in the scene, but it's not apperly aligned. Let's fix it. Set rotation
for x x is two 19. For y x is zero and zx20. Now all looks good. Let's create a basic
shape for our cup. Let's go to the menu. Find here mesh and
click on the cylinder. Let's activate x ray mode to make this cylinder
transparent. Now let's select a move to and drag it down a little
bit. Something like this. After that, let's
go to added mode. Let's select all bottom vertices and drag it down like this. Also, we need to
reduce the radius of this bottom area to match
our reference image. Let's select a scale
to and scale it down. Turn off x ray mode, and switch to face mode. Let's select a top phase, click on this and press
delete buttom In this window, click on faces Let's go
to the bottom phase. Click on this. Make a right
click and find inst faces. And make a border,
something like this. Okay. After that,
let's extrude two and extrude this area to the
top, like this. Okay. Let's create more faces
on this bottom section. Make a right click inst faces
and something like this. Then switch to vertices mode. Click on the center here
and find merge vertices. Merge vertices at center. Okay. Now, we have a
basic shape for this cup, but we don't have a
thickness on the edges. To fix this, let's
go to the modifier, click on this and find solid now we have a
thickness on the edges. You can adjust the
value of thickness. I think 002 looks good. Okay. Okay. Also, let's
make our cap smoother. Let's add a new modifier, find here subdivision surface. Now the cp looks smoother. But we have some
issues on the top. We don't have thickness anymore here and one issue
on the bottom. To fix this, let's create some support edges on top
and the bottom of the cup. Let's select cut two. Make one cut here. Another cut in the bottom. Something like this. Now this edges nice on the bottom edge. Good, but also we need to fix bottom section to remove
all of these artifacts. Turn off the subdivision for a while and make some
support edges here, one here and another edge here. Let's activate subdivision. Now all looks better. Increase the levels
for subdivision, and now everything looks good. Now, our cup is done. In the next step, let's
create a label for this cup. To do this, let's
duplicate this model, switch to object mode. Make a right click
and duplicate object. Make a right click to align
this object to the center. Rename it to label. The first one to cut. Let's turn off the visibility
of this object for a while. Let's go to the label object
and switch to edit mode. Also activate mode, and we need to some
areas on this model. Let's here. Second cut here, then select all of
the top vertices, press delete vertices, and also delete all of
the bottom vertices. Select them and delete. Okay, turn off x ray. Now we also need to add support
edges on the top and on the bottom to make
a right edge on top and the right edge
on the bottom section. Click on, make one cut
here, another cut here. Now, all looks good. Let's go to object mode. Turn on the cp model. Then scale label
model, a little bit. Something like this. Now we're all done and we're
ready to model in a cap.
3. Modelling a cap: Okay. Let's begin modeling
at top of our cup. Let's create a new
cylinder here. Go to add mesh cylinder. Scale it down a little bit. And drag it to the top.
Something like this. Turn off the visibility
of the cup for a while and activate
x ray mold here. Drag it down a little
bit more and scale it down a bit. Okay. Then let's go to the edge mode. Make a one cut in the
middle of our cylinder. Then let's increase the
radius of this edge. Something like this. Then
make another cut here. Scale it down. Okay. Another slice. Here. And scale down. Okay. Select bottom
vertices and scale it up top scale it down. The next, let's the model in this little on the top of the. Click on the move to and
et'sel first vertices. Okay Be sure you select vertices on the front
and on the back sides. Okay. And drag it a little bit. Something like this. Then select these like this. Then these vertices. Don't forget to select vertices
in X ray mode because if we turn off X ray
and select vertices. We only select one
visible vertices but virtues on the back side
is don't have selected. Keep in mind and don't
forget activate X ray. Select the vertices Here. And the last one. Okay. Okay. Everything looks good. Then let's delete
the bottom face. Let's go to face mode. Click on this,
press delete faces. Okay and select the top face. Make a right click
here and insert faces. Something like this. Okay. And extrude this region
a little bit down. Maybe this activate the x ray. Now let's align all
on this section. This. Drag a bit. Then, drag it down. And this drag it down. Drag it down. Drag it down. And these vertices? Okay. Okay. Now all looks good. Also, let's make some super
edges with the look cut, one here another here. To make these corners
sharp Also make one cut here and one here. And the last one on the bottom. Okay. And and maybe
one more here. Yeah. Now, let's create a
thickness for this model. Let's go to the
modifiers, find here, solidify and set a
thickness to 002. Okay. And also, make a subdivision
surface here. Okay. Everything looks good. In the last step,
we need to make a little hole for a dream here. Turn off subdivision for a
while and turn off F image. Then let's go to the faces mode. Select two faces here. Right click on them
and inst faces. Something like this. Then delete the selected faces. And let's make some
super edges here. One here. Okay. We need some more edges. One here and one here to make right corner here. Okay. That's nice. Okay. Don't forget make a super
edges on the top face. Let's go to edit mode. Let's select a move to
click on this face. Then click inst faces. Then let's go to r mode click
and merge versus center. A Turn on subdivision. Let's go to the object mode. And our cup is finished. Turn on the cup object. We all done in this lesson and let's go next to
work with textures.
4. Texturing: Okay, my friends, we go next, and now we'll be working with
the textures on our model. And first, let's go
to the shading mode. Click on this circle. And Find here shader editor, K. In this window, we'll edit all of the
textures for the models. Let's select the first
model this will be a cap and click on the new button to create new
material for this model. I want to make
this cap is black. Click on the base color, and drag this scale to the down. Okay. And now our cap turns to black. Okay. Also, I want to
make it more glossy. To do this. Let's decrease a roughness slider
a little bit left. Something like this and increase metallic
slider little bit. Now we have a good glossy black. Now we don't need
edit anymore here. Let's go to the next model. Click on the cup. And create a new
material for this model. I want to make it white
but a little bit darker, something like this,
and make it more mat. To do this, drag the roughness slider to the
right. Something like this. Now we have a last model with no texture is a label model. I prepared a special texture, but we need to adjust a
little bit in a photoshop. Let's go to the photoshop and I show you how to
prepare this texture. I found aboard texture on the quick megacan this
fantastic texture. Now a little bit adjust it. I want to add a logo here. I will use this image, press control A control
C to copy it and press control V to paste
it on this texture. Then press control, and
scale it down a little bit. Place it to the center
and press answer button. After that, change
the blending mode for this layer to soft
light or overlay. I think soft light
will be better. Also, let's add
roughness texture here. Control A control C to copy and control V
to paste it here. We also need to adjust roughness texture to make
our label more realistic. So let's go to the file
export save for web. Click on save. Type here texture roughness. Okay. Click on this. After that, return
to the blender. Click on the new button, and drag our texture
in this window. First one, and the second. Okay. Clip this node to
the base color. And this node to the roughness. Change the color space to non color because for the
roughness, we don't need it. And also, let's drag it
down a normal texture here. For normal texture, we need
to use additional node. Let's create this add pin here, normal and normal map. Okay. Pin this node
here and here. Now our texture looks
realistic and naturally. Okay, but We need to adjust
a scale of this texture. To do this. Let's create
some additional nodes, press Shift A here,
and find mapping. The first node shift A
texture sinate. Okay. Pin this node
generated to vector and vector to vector
on out textures. Here, here and here. Okay. And now we need to adjust
coordinates of our texture. And first, let's change the
projection mode to box here. And here, now. Everything looks good. But also, we need to change color space for the
normal map to non color. Okay. That looks better. Now we're all done here and we're ready for a
lighting setup. Let's go to the next lesson.
5. Lighting and rendering: Let's go to the lighting. But before we start, let's drag a logo texture a little bit down to
align it for our label. To do this, let's go to
the mapping and here, find the x and click on this. This is too strong, making Something like
this, maybe six. Yeah. That looks nice. Good. Now
let's go to the lighting. At the first thing, what
we need to do create a surface for our cup. To do this, let's create a new mesh I found
here cylinder. Let's rotate it.
Something like this. Okay. Type in x x -90 and y and z zero. Let's scale it up. Let's switch a shading mode
and click on the x ray. Then let's go to the select this vertices and delete them. Okay. Maybe this vertices
we need to delete to. Then switch to edge mode. Click on this edge, and select extrude two. Click on x y z, and extrude this region,
something like this. Then close edit mode, return to object mode, and scale it up this model,
something like this. Little bit. Okay. So now, switch a shading mold. And a line. The surface. Something like this. Okay. Click on the surface. Go to the modifiers and find
here subdivision surface. And set the value to four or three to make a good
smooth for this object. Okay. Let's make a new
material for this surface, click on New turn to
base color to dark gray, maybe this and increase the
roughness a little bit. Then we need to adjust a render settings
for the best review. Let's go to the settings. Render engine set to cycles. D set to GPU compute. Samples in the
viewport set to 1024 and the render
samples set to 4,096. And let's go to the light path. Total 12 diffuse
four gloss four, transmission 12 and
transparent set to eight. And Old, we are
ready for render. But before we use the render, we need to create a
camera in the scene. Let's go to the
point here camera. Let's go to the camera view. Click on this cycle.
Press button, and let's go to the view. Log camera to view,
check this box. And Set the camera,
something like this. But before let's go
to the settings, quick here, focal
length set to 30. Let's change a resolution
for our image. Set here 1920 to
make a square image. Maybe this. Now let's make a rotation
for our object in the scene. I select all objects for the cup and rotated
a little bit. Something like this. Okay. And drag it up? Little bit. Okay. Okay. Adjust a camera a little bit. And let's increase the size for the surface,
something like this. And drag it up a little bit. Now, all good. Then, we need to create
some light sources. Press shift A and
find here light. I will use the area
light. Click on this. Increase the size of
the source and rotate. Here, and here. Scale it down a little bit. Let's go to the render view
to see all changes we made. Now, let's increase the
strength of the slide. Let's go to the settings
and set the power to 100 maybe or maybe 1,000. Yeah, that's better. Something like this,
change to the camera view, and create another source. We can simply duplicate this area click on
this duplicate object, and dir to and rotate this. Scale it down bit. Didn't change the
power five round, I think. I Let's find a better place
for our light sources, to make more depth in the frame. Also, I want to highlight a
background behind our cup. To do this, let's create
a new light source, press Shift A and find
here point light. Drag this item behind our cup. Set the power for the light to 500 color to blue, I think. Increase the radius maybe five. And set the power 1,000. Maybe decrease the radius to four or 3 meters. Okay. Okay. Let's play with
the other sources. Let's make this a
little bit smaller. Maybe this and crease
power for it 3,000. Create nice on the model. Maybe it's too strong.
Let's try to 2000. And this serves drag
it a little bit right. Okay. Yeah, that's good. We need to bit. Okay. Now we have a shadows
and clicks in the frame. Also, we have a nice
glare on the edges, and we have a nice highlight
for the background. You can change this color if you want for any color
in the palate. Maybe purple, maybe reddish. Green, or any color you. I like the sign color,
I turn it back. Now we're ready for render
to start rendering, let's go to the re render image. Now our render is star. Okay. And finally,
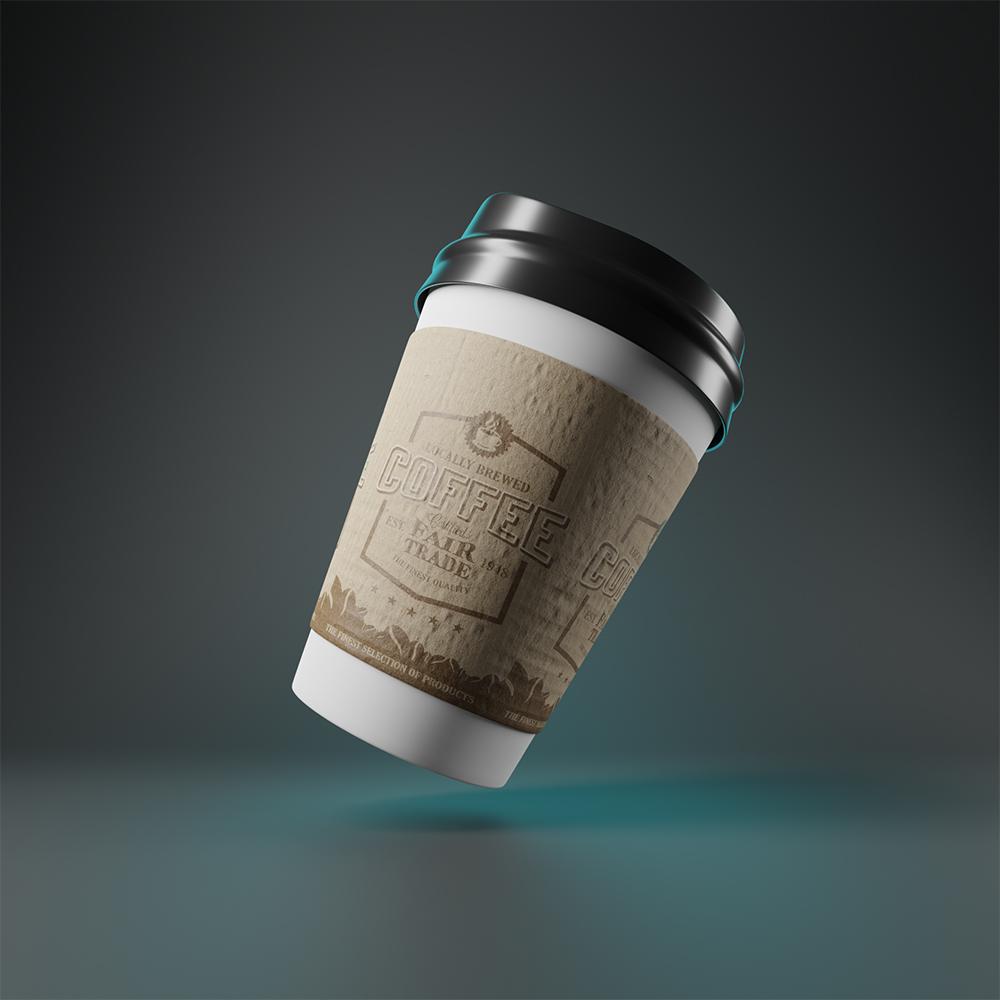
my render is done. We have a nice result
for my opinion. I hope you enjoy this tutorial
and enjoy this result. If you have any questions,
welcome to the comments. Thank you for watching
in the next video.
 Alex Kuzmichev, Graphic Designer