Transcripts
1. Class Introduction: Hello everyone. I'm chubby and watercolor artist and illustrator
from Vietnam. And in today's class, I will teach you how
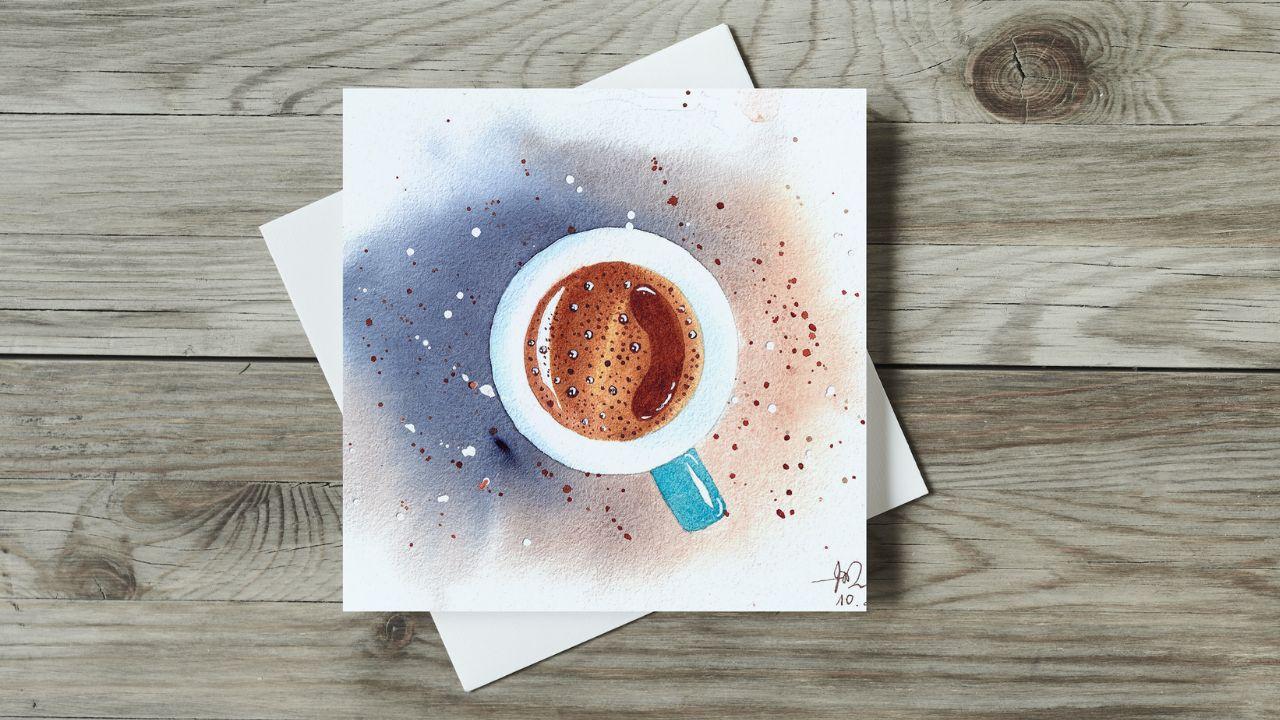
to pin this cup of coffee in watercolor is a very
short and simple portion. You can finish everything
within 1 h in group. Tom. We need to wait for
the paint to dry. But through this
simple ********, even learn how to capture light
and shadow in watercolor. As you can see. We assume that the light
source is on this side, this pending, and even capture the light
here, the shadow here. And also how the
light and shadow reflect on the
surface of the coffee and on the cup and
on the handle. That's why I believe even
learned a lot new things, interesting things
for this class. And if you fight this
class headphone, please click follow
me on Skillshare. You can also check
out my Instagram by visiting my profile
here on Skillshare. And please upload your ******** on the project section
of this class. And I can't wait to
see your ********. So now let's get started.
2. Materials: First, let's talk
a little bit about the materials in use
for this lesson. So I painted this
painting on about home, watercolor, paper pad,
academy or student grid. But for today's demonstration, I will use this red watercolor
paper also from back home. And I been painted in
a very small size, which is a five Route, 21.15 cm. And as you can see, both high the papers, 100% cotton, poor codon. And the painting is also very beautiful on the
student grade paper. But for today's
demonstration and use artist paper because it is more predictable and normally
to theme or lesson that I refer something which
is more predictable. And for the pen, I use a standard pops
up watercolor painting, that is Windsor
and Newton brand. And in the middle of this box, I bought some the palace
I purchased individually. But I think for this
simple piece appending, just any standard ops 12 or
24 color is good enough. And four brush for
this painting, I use three brushes. One is a traditional
mop brush from hobby. It is in I think it is. It is mentioned here
black reasonable. And I use it is as good a preset you number
six to travel brush. I will still use a smaller
brush from a screwdriver, set number two to paint
in some more detail. And I will still use
this wire child pen. That is the unit bone brand. And you use it to, to paint the light, the white part of the bubbles on the
surface of the coffee. If you don't have this
wide Jen parent is, although you can use acrylic, gouache or watercolor color. And we also need to use a bit why the colors
to read face? Why splash route
this cup of coffee. So I think it is very helpful and it is worth
for you, we're chasing it. And we will also need a pencil. And I went to bed. I will need to use a
compare to draw the circle. But if you don't have the
compound, it is okay. You can just do any a
so-called item to draw it and use a ruler. Just to determine the
center of this paper, I wanted to make
sure we put a cup of coffee on the central
of the paper. Like if you don't have it, it is still okay. And small. That is eraser so that we can clean pencil lines
which we don't need. And also, I used to cut two cups of water
to clean brushes. You can use just one factor
that it would be more convenient if you have at
least two cups because you don't have to change
the width to often. And I think that's all that's
enough for the materials. Oh, I forgot. You may need to use one cloth and some piece of newspaper. We need to test
the color. Later. I've been small piece of paper to cover this gap so that
when we splash around, it doesn't affect
the cup of coffee. And I think that's enough for the materials of Fisk glass. If you don't have
everything, it is okay. I think that is very
simple project. And if you have been
painting watercolor for a y, you can, you can pin it with
whatever you have right now.
3. Drawing: So now we need to draw
this cup of coffee. So I use this ruler
just to make sure that we can redraw the cup of coffee in the center
of the paper. You can use your eyes
because I have the ruler, so it is not how
to use it. Later. We need to draw the handle. So make a note here, make it fit. So I'm quite satisfied with the size of this cup of
coffee, of this bending. So I want to draw something
which is similar to this. He'd been the easiest. It'd be just doing
the paper around. You need to draw two circle. I've been having to draw it just anneals piece of
paper and given it to cover the cup of coffee for now. So I need to find the handle. I am not really
confident with my hands, So that's why I need to
use a compound and ruler. But I think it is okay for
you to just draw it by hand because it would be
more natural cubed. So now I need to use
an eraser to erase. That's enough for the drawing.
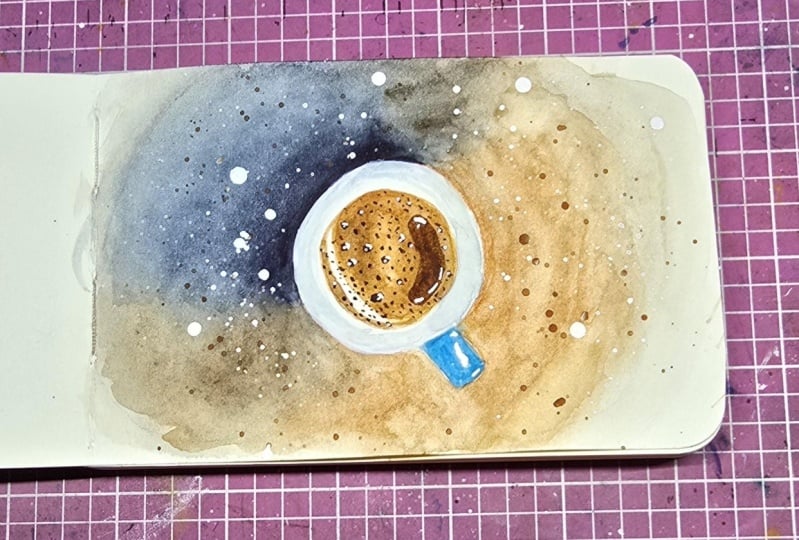
4. Painting the Background: So now with painting
the background first, and as you can see, we demonstrate the light source on this side of the paper. So here I've used the run
Sienna to express the, express their light
part of the table. And I will use indigo to express the darker part
of the shadow part. And let's get started. So first, I write on the, on the paper around the
cup of coffee first, very light brown color so that it is easy to see
which part is wet. I read the paper first
because then I want to make the color
spread naturally. Okay, I think this is okay. So I will add more sienna here. So for this part, I
wouldn't use indigo. If you don't have indigo
in watercolor box, you can use, you can
use Payne's gray. You can see because I
wet the paper first. So now I think I
made a mistake here. So I didn't use tissue
paper to fix it. One dummy surely paying
off the bat, not incited. I think I made a mistake. Again. I have quite a chicken came, but it is okay. We can always use
tissue paper or to fix our mistake and put them on. Here. I'm in I'm in pull some sepia here to make the chances and
between the Indigo and and brands in
a more natural. So I've been making this
part a little bit darker because then what the color dry, it will be neither. So I think that's enough
for the background. Later. When we finished painting, even come back to make some, some of us brush effect here. But for now, it is enough
that we need to read it to dry completely before
painting the next step. So soon later, after 30 min. And in the next video.
5. Painting the Coffee and the Handle: Welcome back. I think it has not
dry completely ear. So I've been paying
the coffee first and then come back to pin
the handle and the couplet. So I will use a round
brush to paint the coffee. So as you can see, we have this. Why? Apostle market? I mean, the potential market first. It is okay if you don't mark it because I think it is easy
to just leave it there. But to make sure we don't
make any stupid mistake, I mean, remark the y part here. So I've been I've been brands. No, I haven't used
the yellow ocher is to pin the ralph of
the coffee first and then come back and
use brand number of brands in there to make
it more delicious. I've been pulled the color here so that it is easy for you to see what colors
I'm using. It is. Actually, I don't really remember the name of
the color I'm using. Just make sure that we know it is the
color of the coffee, so it should be brow. Hello, it's coffee.
Coffee color. But for say, I've been in this light ocher
first before putting this blends in a Palo is
really like coffee color. Then every brand umbrella
to make it more dark. So now we need to
read it to dry. Before painting this part. Before that, I think
I need to make more brand number
because everything in watercolor can be
lighter when it dries, so it's okay to eat
a little bit dark. So now I think it is safe
for us to paint this candle. And I will use the
column, which is nice. It is serially and blue from
I think any, any is fine. I think it is very crowded. The English is a little
bit crowded. Now. I mean, you dispatch
to mixing the cardo. I think my brush is still
dirty with the brand number, but it's okay because I think we need to have some money to give
her some gap here. So make sure you don't
meet any centimeters. So okay, so you need to pin this part here that shows
more white dot here, but I think I've been appended
later using white gel pen. You just easier that way. So now I need to read it to dry completely
before comeback to pin the bubbles on the surface
of the coffee in this cup. That's all for now. And take
a rest during a cup and live and we will see each
other in the next video.
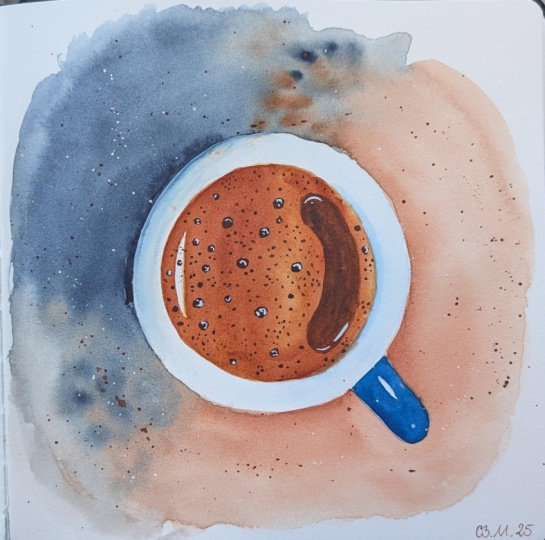
6. Painting the Cup and Bubbles: It has been 30 min
and now it is. It is almost dry now. So I've been come back and
paint the shadow on this cup. So as you can see it on our right hand is
your light source. So this part is light. This part is light and dark. Dark. Indigo color to paint. No, I think I mean I mean, it was a French and Indian blue. This blue so that I don't
want it to be too dark. So this blue to paint
the shadow on the cup. Because I want to
express that this gap is in use ceramic and
his wife Carlo. So the shadow is very light
with very light blue. I would make this a
little bit darker. Okay, So now you've been paying the apples on the surface of the coffee and it will
run umber, burnt umber. So now I've been chairing the
brush towards the smaller one, the smaller bubble. The paper while because I
want I don't want to touch my so you just need to
go one smaller one, make it as randomly as possible. It is quite repetitive process, so you can just it is okay if you just skip
this video on together. I think it's okay for now. So now we need to wait for everything to dry
before coming back and use white gel pen to finish the pupil and with silk
with the splashing effect.
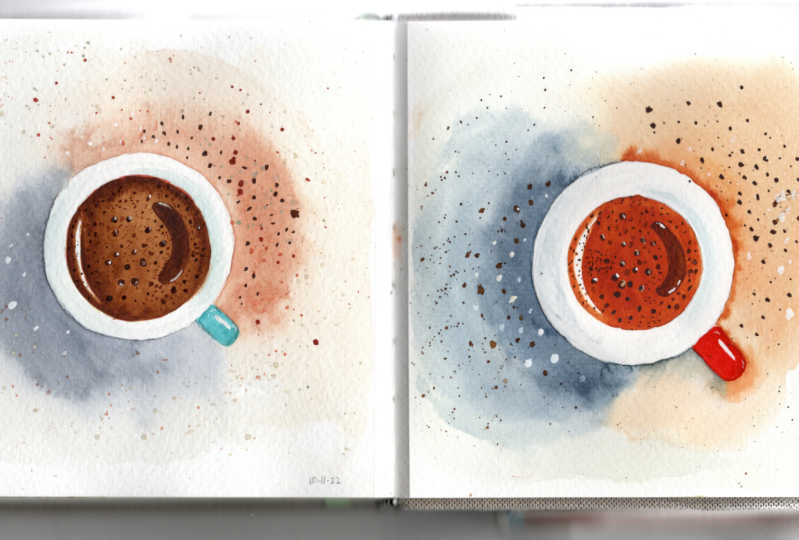
7. Background Splash: So now we almost finished. And then even if the splash
effect around like wow, because I don't want to make this splash on the
surface of the coffee. So remember, we, we draw
this circle when we, when we started, when
we draw the coffee. So now I'm in a circle too. Hello. This cup of coffee
before us, blush color, valid. Okay, So you can
just put it here. We don't have a tool, tip it Dao because I'm
Michelle, We don't touch it. So I use this mop
brush to smash effect. So I wouldn't run number. Sienna is more delicious. This way. I mean,
make it bigger. So now, I mean, you're supposed to color too, with some white color. Here. I think less is more. Sure we clean
everything in this. So now, I mean, it was a white
gel pen is still wet here, so it's difficult
to, I think I win. Again. Wait a little
bit before coming back to this white gel pen to add the y part of the bubble
because I don't want to touch my hand on
the right paper.
8. Finalize the Bubbles: Because it is quite late now, so I just use a dryer to make the process
faster early to be. So now I will use
this white gel pen to go to to paint the
highlights on the bubble. So I will start with
one here first. It's not paying as
LH speak to you, this model, this one. So assuming that the light
source is on the right hand, just pin it like a
moon shape. Still 12. Then we can put a.in the center. It will patiently. If you don't have
a white gel pen, you can use the
pasta color acrylic, and you earn a small
brush to do this. I still need to be careful here. Okay, I think we are done. I've been here. I will use this time
for pen to sign, but you can use any kind of. Today is October 2022.
9. Final Thought: Thanks for watching
the class until now. And I hope that you have
finished your painting and you'll learn a lot of
new interesting things about what the color
for this class. And once again, if you find
this glass have phone, you can visit my profile, check out either
grasses and follow me here on Skillshare
or Instagram. Please, please upload
your photos like on the budget session
of this class. I can't wait to see yours. And goodbye and see
you in another class.
 Trang Chibi ❤️, Watercolor and Gouache Artist