Transcripts
1. Class Introduction: Hello everyone. I am saying TB, what
they're gonna address. And graphic designer
based in good Now, I didn't go to an ACE, gone best study watercolor
painting 100% online using different resources in
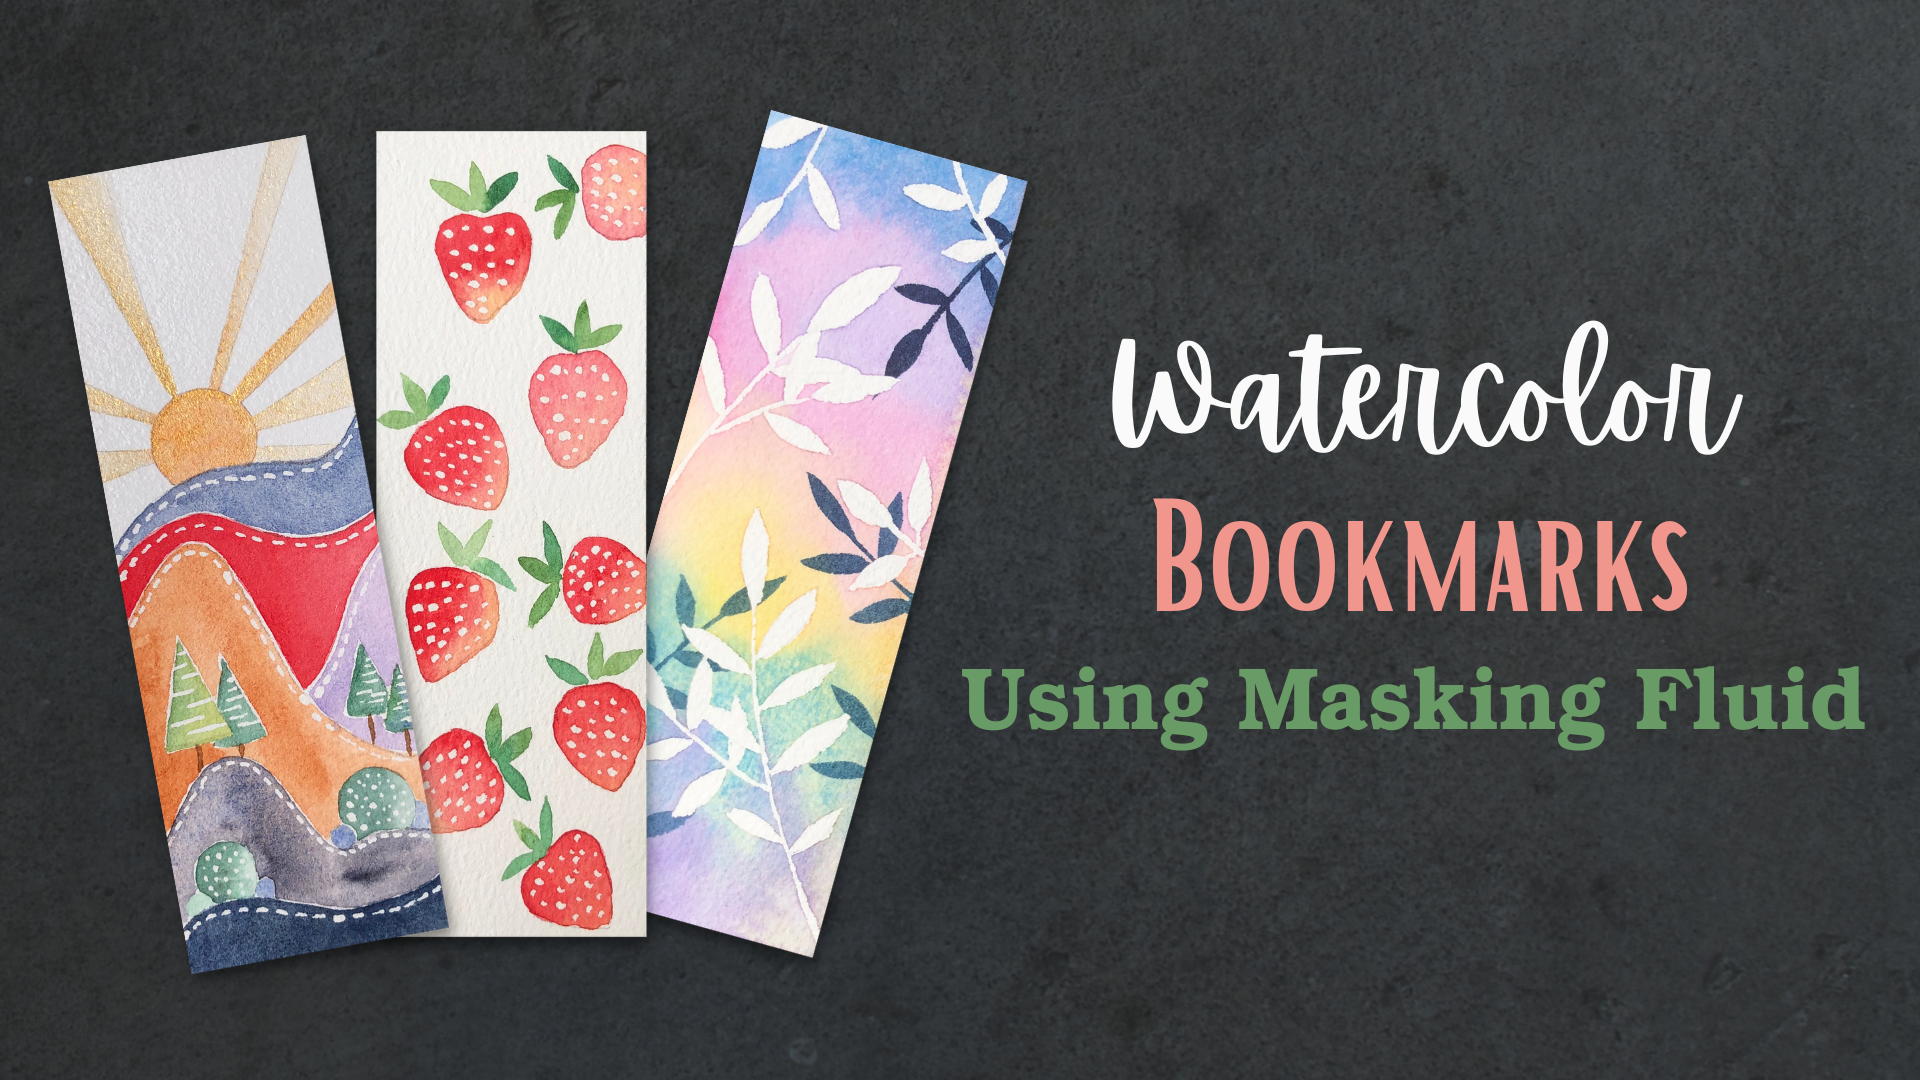
glutenin Skillshare in this class, less pin. This says three watercolor
bookmark together. It is overshot and
simple project. You can finish everything within one hour and maybe even faster. If you use a dry up. In this class, even use
a lot of masking fluid. So if you are not familiar with using masking fluid in
color is very good. But this exercise, if you
find this glass have phone, please follow me here on
Skillshare and my Instagram, my YouTube channel for
shorter tutorials, own for this class introduction, let's move to the
next lesson to pin.
2. Class Materials and Tools: Now let's talk a little
bit about materials. I have a lot of small. This is a paper which
I cut into bookmarks. My size is 515 centimeter. For this project because we
don't use a lot of layers. So you don't have a tool
used to expensive labor. And some artists prefer to create borders for depending met my style is I charged to utilize
every area on the paper. So I taught the paper down
using some two psi sticky tip. I'm using a standard 24. What DO color bops by
Winsor and Newton. And I think that's
enough for this class. To Paris. I five at using two instead of one panelist is more convenient because you can clean one for two and using several brushes
with difference sizes, mop brush and some travel
brush by escort out. It is a synthetic brush. For this project. It's very important, unique masking fluid. It can use whatever
brand you can find. In order to apply masking fluid. I am using watercolor
brush, rolling pin. One important note,
in order to not ruin your brush up to
apply masking fluid. After two or three
minutes using it, you should use a brush out. So far. This is eraser to
remove masking fluid. I think that's all
materials for this class. You can use whatever you
have, just the mixture. Need masking fluid
for this grass.
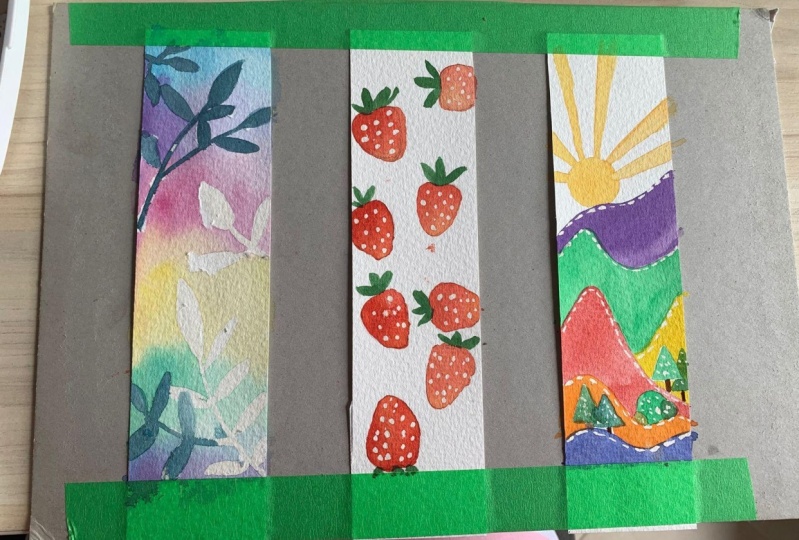
3. Drawing Outlines: Now let's draw the
first bookmark. As you can see on the
screen, I am painting. I am joining three
marks at the same time. This way you can finish
the three bookmarks faster because we can work on one bookmark by waiting for
another book map towards y. And actually for
this simple project, it is not necessary to draw it. If bet, if you are
big and no jaw the ally before
starting, maybe easier. So as you can see
for this book map, we are drawing the white arrow. The Black Belt or here, the black metals here
we've been a pen it later. So for now you just need to draw the white area in order to
apply masking fluid later. You don't have to
follow me exactly normally for botanical
painting ********. I mean, Paul VI, black
and white, our lie. But for this project, I don't think unique to us. Can your chest job I
had whatever you like. My guidance it Chest guidelines. You don't have to follow
me exactly because it is a very simple
and low tech. For this bookmark,
we need to draw the shape of those
Chuck Berry's first. We don't have a 2D drawing. At this stage. He can just pin it
using watercolor later. Again, this project, you don't
have to follow me exactly. You just need to draw first
chomp brace yourself. The shape is quite hot shape. Remember to leave. If some gaps. Moms chubby raise because we need to paint
the leaves later. As you can see on
this green I am on so because I posted
this bookmark, sat on my Instagram, instagram D flat and I am
looking at my Instagram page to know how did how I met eat, eat. I think charting this
bookmark is quite simple. Now let's draw the
Mach number three, compare with the two
previous bookmarks. This bookmark is a little bit more complicated, enjoying it, but don't worry, it just a great opportunity for you to practice
hand drawing. So basically, this
composition has ascend, which I am using a ruler
to Joey that it is, okay if you don't have
that kind of ruler, you can check joy
using your hand. Then we need to draw some
mountains, then some cheese. Again, you don't have to
follow me exactly even arrangement of the
cheese mountains. You may use an eraser to
lead more offensive max. Among these cheese
and mountains.
4. Applying Masking Fluid: Now let us go ahead to
apply masking fluid. And as you can see here, I'm using a brush to
apply masking fluid. If you would like to learn about on the different toys up
applying masking fluid, you can check out my first
class here on Skillshare, where I have bonus lesson, where I review different tones
of applying masking fluid. And you can use whatever brush, or if you don't
have a water brush, you can use a normal brush. But one way you need to note. One thing you need to note is
because it is very easy to ruin a brush by using it
to apply masking fluid. I have a chai different
methods and now I haven't won t repair brush, cleaning soap. And for each one or two minutes, using this brush to
apply masking fluid, you'll need to use and with
soap to clean the brush. And that way, you can
protect your brush and you can use it to apply
masking fluid again and again. As you can see on the screen, I am using this water brush
to use masking fluid to cover the leaves we have already
drawn in the lesson. Actually, if you think
that you can apply masking fluid directly onto the paper without
drawing is okay. Quite simple. I mean, stop talking now and maybe
went to upset how I apply masking to vote for
math. Let's keep going. This book map. What the brush? You can use, whatever you have,
you can use a bottle, you can use ruling pen. But in my case, I'm using whatever brush to create the adults
or the Chuck Berry's. And remember, up to finish applying masking
fluid for the book. Mark on number one, if you are using a brush, let me make sure
to clean it with soap before starting the check. Mark number two. That is
quite simple process. So let's enjoy painting this bookmark. I'm moving to using a ruling
pen to apply masking fluid because I think ruling pen is better for applying
masking fluid, invest more and doors. And as you can see here, I am using this
ruling pen to create some patterns near the mountain to make them more interesting. Father cheese. I am also putting some dot, some dots inside the cheese, similar to what we
have or haven't done. The Chuck Berry's. The second mark. So as you can see, this ruling pen is very good
at applying a small details. It is even better than using
brush or whatever brush. But the problem with running pen is very difficult to
cover a large area. That's why when I
need to apply masking fluid for the whole
list, for example, for a whole bed or I
wouldn't use a brush, but for very small details
and we use this ruling pen. But actually it is even
for this monitors, I can just use a brush
and I can still use this William Penn to apply whole nips in the
mark number one. If you don't have
all of their toys, you can use whatever
you have that you have. Jet choose. The most
convenient for you. It is personal preference.
5. Painting The First Layer: Finally, we can put
them pins on paper. So in order to paint
the book Mach number 1, first, I am wetting the background using a
traditional mop brush. You can use whatever
brush you have bad. Large brush is easier to
cover the whole area. I'm mixing. This one is the Winsor. And Newton, you can use
whatever colors you have. My scheme is input. Actually, I've been caught
blue color on the paper first, and then violet and then
permanent rose because you know, the mix blue color and rose color even have like the
violet or purple color. Then I didn't list
so the blue color near the a yellow color
because if a mixing blue and yellow even create green mesure to not put the
opposite color together. For example, we shouldn't put the violet and yellow
color together because mixing violet
and yellow when create kind of muddy
and gray color. But again, for this
project you don't have a follow me exactly that. Chest, an example of how to pin back Ralph for
this bookmark. Now let's append the
first layer, second map, and use a combination of the red color and the orange color to pin
the shrubbery here. And you can mix between the
red color and orange color, red color and yellow color. As I'm doing here, because it emits seeing red color and yellow
color we will have with the orange
color. Both are okay. Even use many that
on dry technique. And I'm using quite thick pen because I want to make
the shrubbery really red, really orange, and we'll need initials that you didn't
have a to follow me sadly, for this project, you
just need to pin for fun, do whatever you like. Now let's paint the first
layer, the third bookmark. This bookmark when take
us more time to pay, not because it is
more difficult. Because when we
pin the mountains, we have mountains which
is near each other. And we may need to read
for the pen to dry before I continue to pin
mountain mist to eat. And you can put any
colors you like. You don't have it to follow
my color scheme here. That I just put a
violet color onto the paper because later
I will pin the Sun. Orange, yellow color and orange, and orange or yellow and
violet opposite colors. So by putting violet
near this, then the mic, the bookmark more
spent how you see, because we cannot pin
the second mountain near the first mountain
immediately after the first mountain because
the pain is still wet. So I jumped into
the third mountain and I am using the red color here because I still have some red colors remain from
painting this shop Rick. So actually I don't
have any method here. I just put The whatever colors I like and few the
right thing to do. But just to make sure
because later even pin the cheese here in green. Green tone color.
Farther mountain, just being whatever you like. Now, painting the sun. In the version I posted
on my Instagram, I use metric color to
paint the sun because, you know, them parenterally color metabolic and it
look like the sun more. But right now I'm
just using normal. I just want to show you guys
that you can completely achieve this book map
without using metric color. Because I know if
you've just thought with watercolor
painting normally you don't have a metric, a color in your palate. It, the process is quite simple. Just to make sure letter. We pin the cheese because it is inside the mountain
and it is quite small. So you need to pay
more attention and it may need to switch
them on smaller brush. I will stop talking now about the whole painting booth
said is on my videos. So if you want to check
any particular point, just move to eat. Depending this bookmark.
6. Painting The Second Layer: Now the first layer of
the first bookmark, his own red h y. So I will come back and pin some leaves using wet
on dry technique. Right now I'm using
indigo kind of Newton. But you can use
whatever you have just to make sure it is a little bit darker
than the background. Try to put new leaves
into the space, which we didn't put
masking fluid before. That. There is no there's not any significant blank
space in the bookmark. The good way appending
three book must at the same time is
because you can, which you can
utilize written for the first book map to try painting the
second answer, marks. In Chinese painting poses tend to available map
number to come back and pin the lips at
the strawberries here. I'm using two type
of green colors. One is Cygwin and the second
is Hooker's green chest. In order to create the
variation in the leaves. If you can just mixing any
two green tone colors, and that should be okay. I didn't post the name of the colors I'm
using for this project because this project we don't
have to focus on accuracy. You just need to use
whatever materials you have. I call it a second layer. Actually it is only
the first layer. For this project. We
only have one layer. We don't pin over the previous
layer that I just mix. Sure. Now we read
for the brain to dry before painting the
leaves for the convenience. The second book, mark Ashley, you can pin everything
in one go you paint and then you
paint the leaves. But anyway, how did he I think you are I am using
a smaller brush because, you know, that's it. It finish this
painting together. Tom, to pin the
cheese on the mass. Just use green. Actually, I am using both
green and blue colors. Even depends on your preference. Even if you use orange, red color is to pin the chase here is also okay
because the outcome, for example, cheese
can be yellow and red. So just use whatever
color scheme life for this kind of painting.
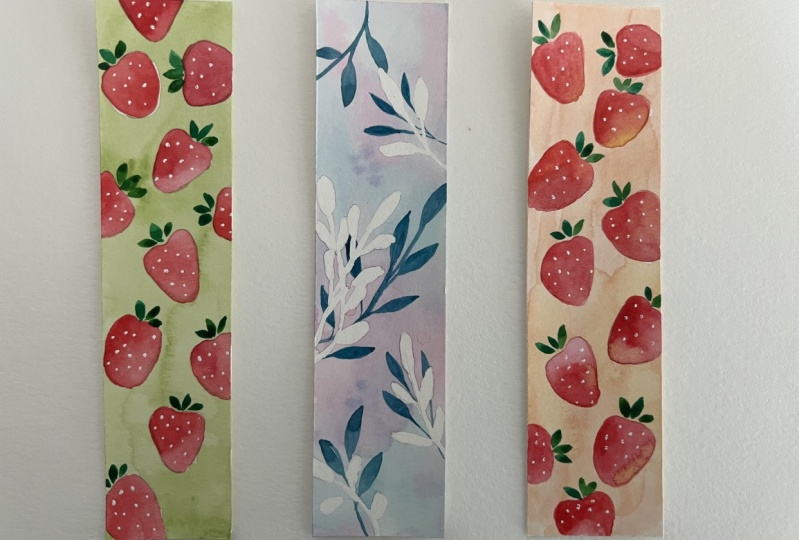
7. Removing Masking Fluid: We have done with the
painting post-test. Now, the final step is to
remove the masking fluid. I'm using a special eraser
to remove masking fluid, but you can see me
using your hand. You see because the masking
fluid ideas has blue color. So after removing
the masking fluid, it bookmarks look
much, much Brett. I hope you enjoyed the
whole process until now.
8. Final Thoughts: Thanks for watching
If the glass. Until now, I hope that you enjoy the whole
painting post-test. And again, if you find
this lesson headphone, please upload your Porsche. Give me a review and follow me on Skillshare and my Instagram
and YouTube channel. And I hope to see you
in another glass.
 Trang Chibi ❤️, Watercolor and Gouache Artist