Transcripts
1. Class Introduction: Hi, everyone. I am Changhib
an artist from Vietnam. Over the years, I have explored various painting mediums
such as acrylic and wash. But my absolute favorite has
always been with a colour. In this class, we'll be painting Vietnam's
national flower, the Lotus in watercolor. This class is ideal for
intermediate learners, and I will walk you through some exciting
advanced techniques, including underpinning
to achieve harmonious and cohesive colors. Went on wear techniques
to create soft, dreamy make rows and interrupted shops to bring realistic pictures
to flower petals. By the end of the class, you will have a stunning lodo painting perfect for display
or as a meaningful gift, and you will gain
essential skills to tackle other natural
elements in your art. If you enjoy my teaching style, be sure to check out my buffy for more watercolor
and guash classes. You can also follow
me on Instagram for daily art,
inspiration and tips. Now, let's grab our brushes and bring these loaders to life.
2. Tools and Materials: In this lesson, I will walk
you through on the tools and materials you will
be using for this class. Keep in mind, these are
just recommendations. Feel free to use whatever readily available
and comfortable to you. For paper. I used about home. Its great watercolor paper. My earlier painting
was on a four size, but to make the filming
process easier, I will use a five sheet
for today's project, which is 15 and 20 centimeters. I recommend using the best quality watercolor
paper available as we will be doing a lot of glazing and
working with water. Good paper makes a huge difference for
watercolor painting. For N, I'm using what do the color
palette with 24 colors. It includes a prime 12 colors
set from Danion Smith, plus some custom
colors I've added. We won't use all 24
colors for this portion, but the color palette
is a little bit tricky, so I will dedicate the
next lesson to colors. For brushes I use a mop brush
for the initial washes, a round brush for the flowers and a liner brush
for the details. For the vein on the leaves, I use masking float
with a ruling pen. If you don't have a masking
float and ruling pen, you can use a white
gel pen instead. It is more convenient but gives a mixed media look rather than a traditional
watercolor fuel. Other essentials
include a jar, water, to clean brushes, and masking
tape to excuse the paper. First on the materials. In the next lesson, we will
dive into the color palette.
3. Color Palette: Let's dive into
the color palette. For the lotus and be using pink to bring out the
dynamics, the petals. I will use pena guidon rose. For the cool pins
or permanent rolls, you are using a different brand. Quinacridon coral,
for the warm pings, or mix permanent rose with
yellow if you don't have it. And Alizarin greens for the duckies petal shadows for the leaves us casket green
for the dad the leaves. If you don't have
a casket green, you can make sack green with
blue or use viridian green. Sub grain for the lighter area. For the stems, we will need burnt umber and burnt sienna. And for the background,
hamarinblue. It is very common color in most pales and that's
on for the colors. In the next lesson, we will discuss the reference
photo and the composition.
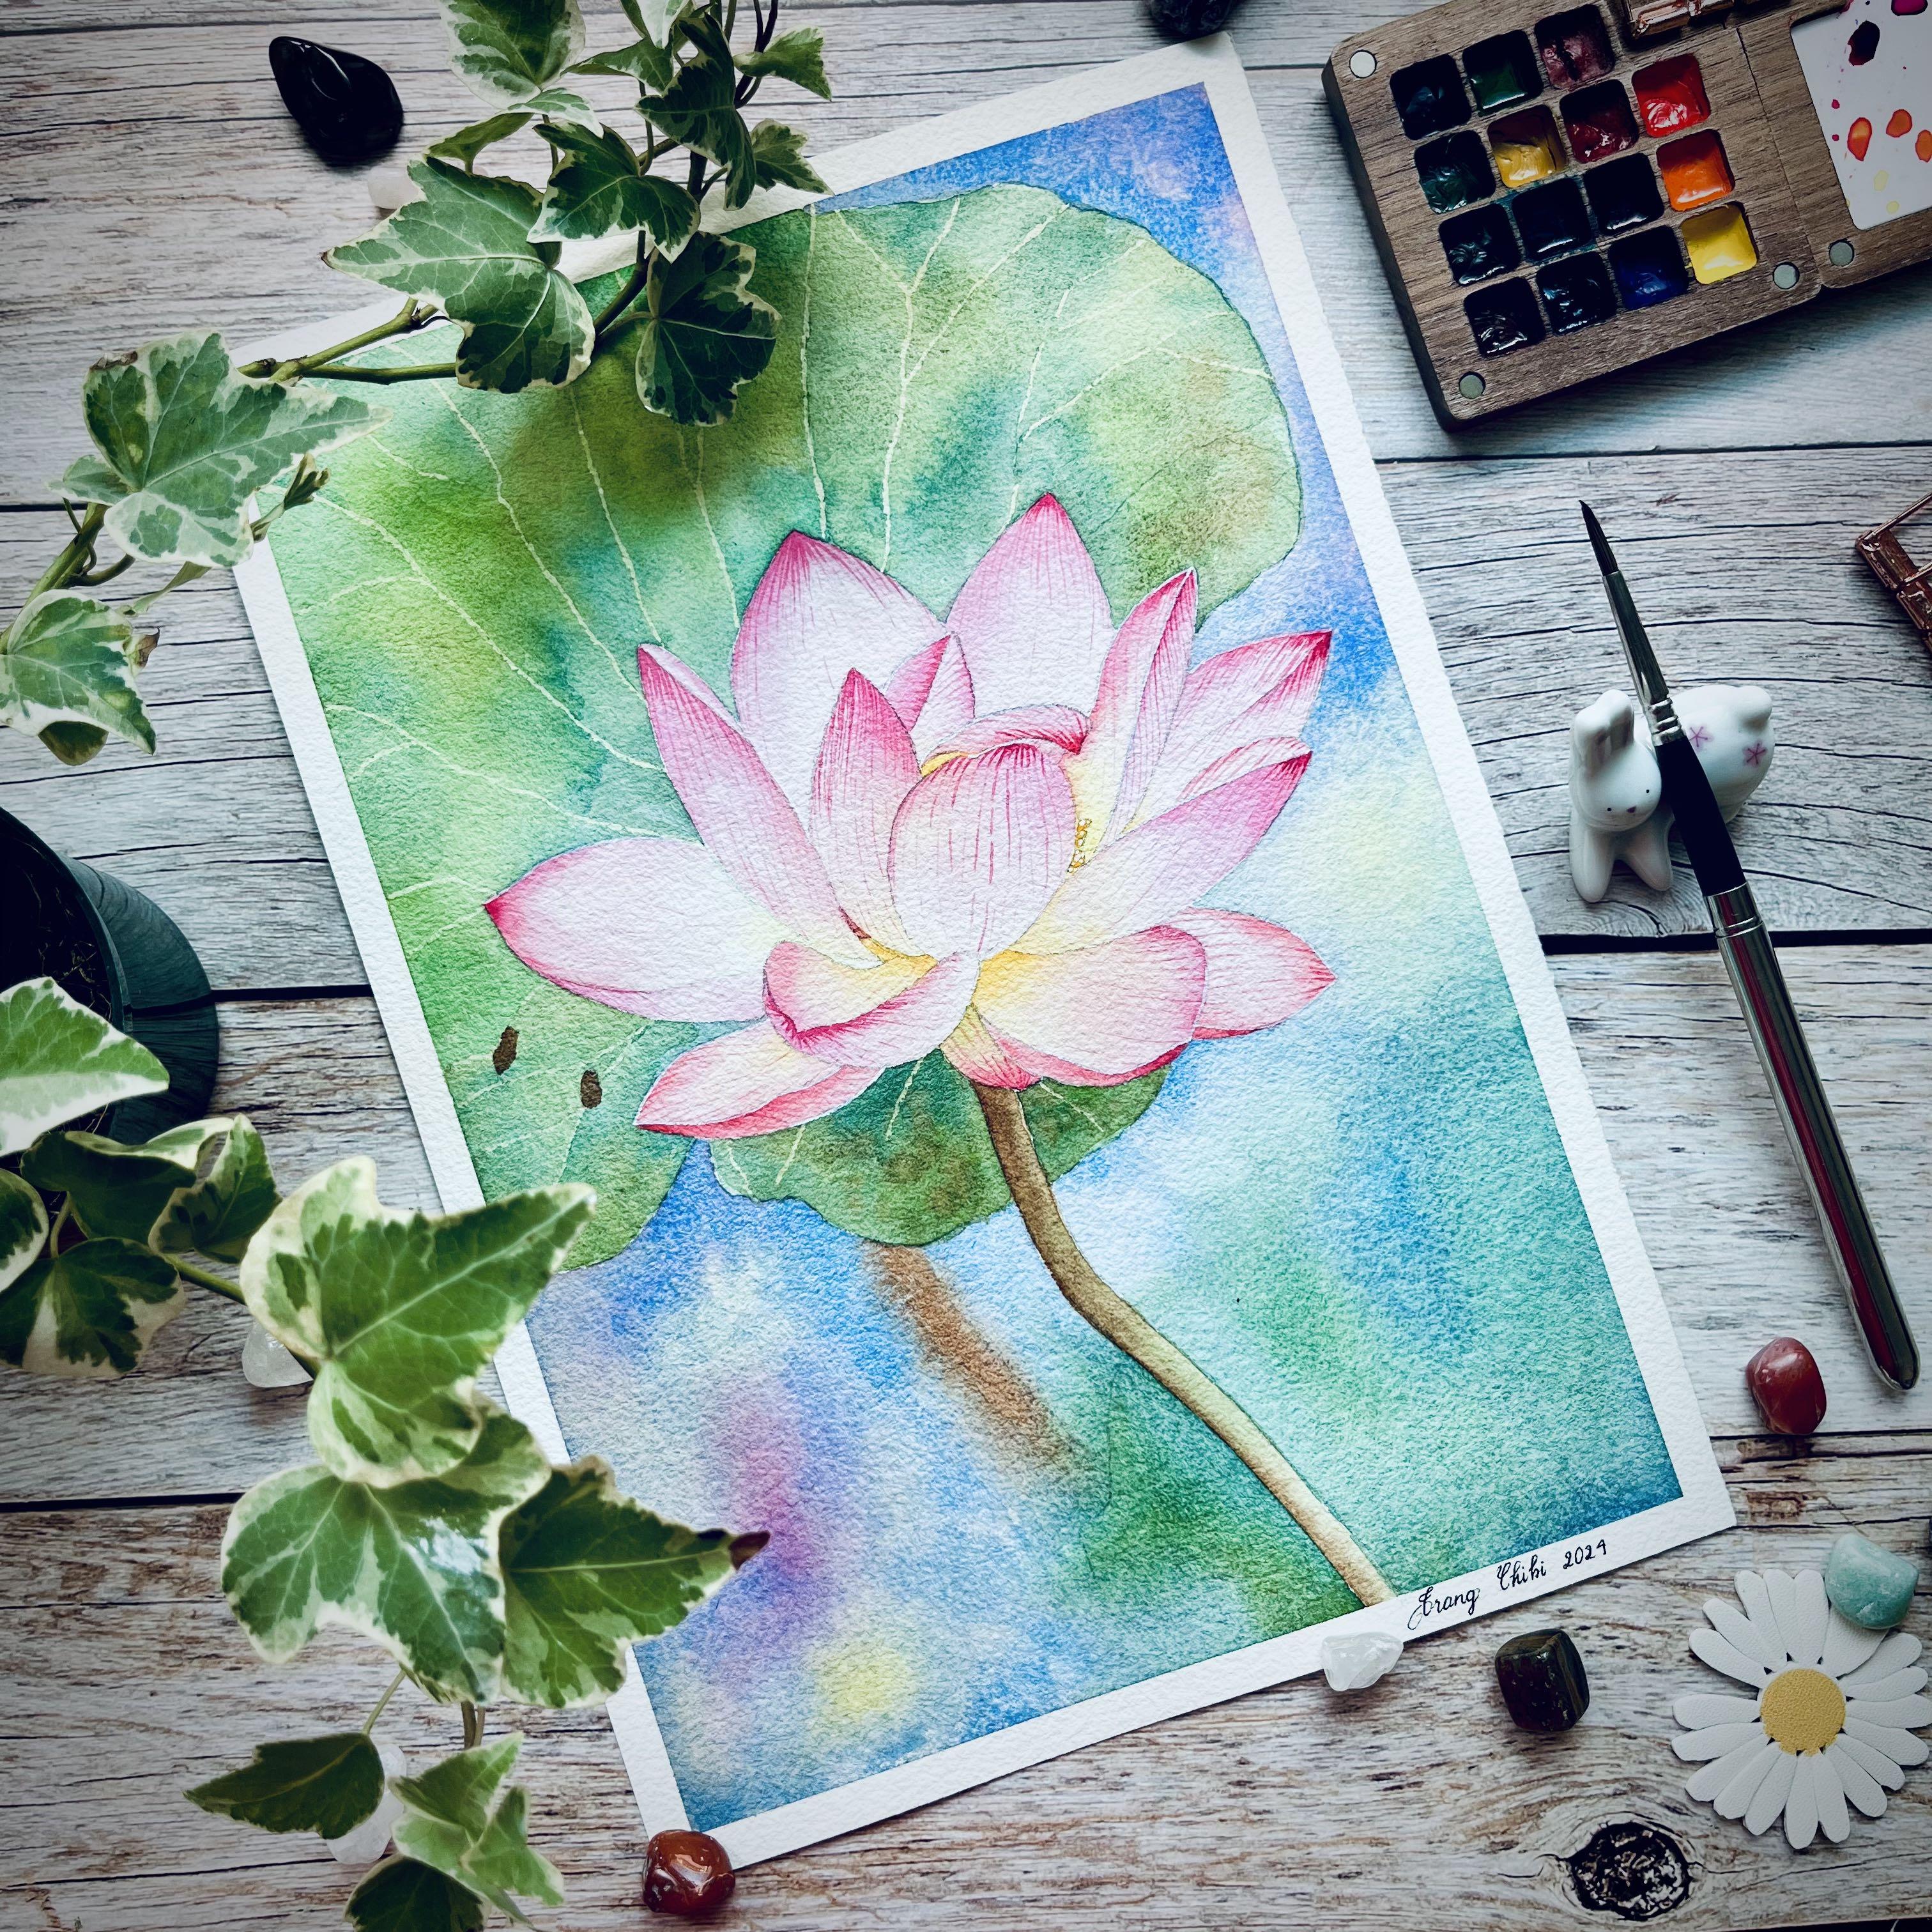
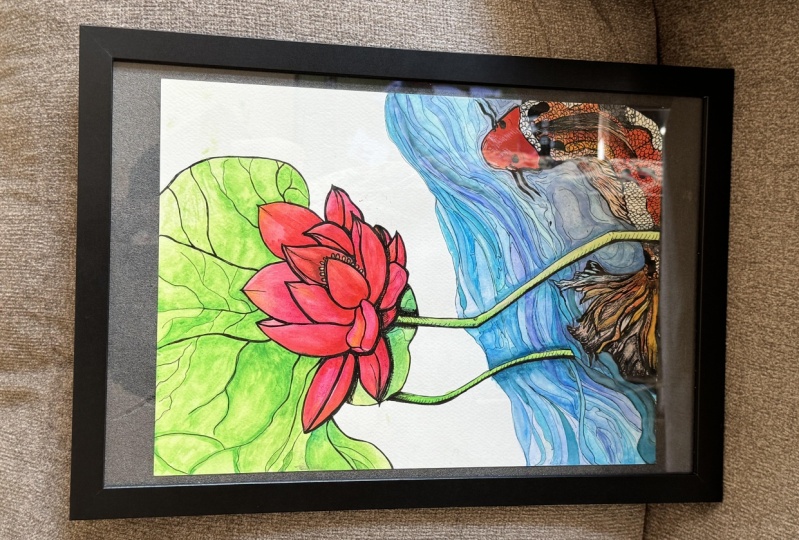
4. Reference Photo and Composition: Composition isn't the
main focus of this class, but let me quickly show
you how I created mine. Here is the reference
photo I use. I love the flowers, but wasn't a fan of the leaves. I combe the flowers
from this photo with a different leaf to create
the final composition. I prepare the ally
using Bro create. You can download it
from the Bjeck section. Since this is an
intermediate class, I will cover how to
transfer the ally to paper. You can use methods like light bobs transfer paper or my personal favorite
for a small piece, a watercolor paper, I taping
the paper to stop screen, closing the window
and racing it. I hope you will
transfer the outline to your paper in
the next lesson, you will start painting.
5. Overview of the Painting Process: Before diving into
detail painting lessons, let me give you a quick overview of what we'll be following. We begin by tansfring
the outline onto the paper and
taping it down. Then we will use skin flow to cover the
veins of the leaves. Next, we will wipe
the entire sheet of paper and up lie
the initial wash. This underpainting
step will help create color harmony throughout
the painting. Once this layer is
completely dry, we will move on to
paint the flower. We start by capturing the light, shadows and delicate shades
of pink on the petals. Then we will add the veins using the interrupted shop technique to bring out realistic pictures. For the leaves, we will
paint the base layer first, remove the masking float, and then work on
adding final details. Finally, we will complete
the painting by working on the background and touching up any missing highlights
with a white pen. That's the overall process
in the upcoming lessons, we will go step by step, and I will guide you through
each part in detail. Let's get started.
6. Masking and Preparing: Now, let's tap down the paper and get ready
to start painting. Now it's time to tip down the paper and prepare
for painting. First, we will use
the masking flute. The skin fluid to cover
the veins of the leaves. I'm using a rolling
pen for this. It's my go to tune apply in
thin lines of muskin float. If you don't have
a muskin float, you can use it how
pen something like this to draw the veins
after finish bending. However, I do feel
that muskin float gives the Azo a more
traditional watercolor look. I've put muskin float
on this small palette. This is how by in skin float, but I didn't purchase
the phone box. There are some shop some
supply shops in Vietnam. They put it into that type small bottle so
that we can purchase it. Cheap cheaper because we actually don't use a lot of
skin float in our painting. I mean, a phone bottle. It might take me several
years to use it up. And You may choose to cover all the flowers
so that it is easy. No, for this bending because you use underpainting picnic, so we shouldn't
cover the flowers. But for some painting
some artist may choose to cover the flowers to paint
the background easier. But for this class, use the underpinding
picnic and I will paint the whole bending But once. I mean, at the same
time, we will make the underpinning layer for the whole pending and
grow the leaves and the flowers at the
same time to create the color the harmonious
colors of the pending. I have what do you call for beginners class
here on skill share. In this class, I review different tones
using masking fluid. You may check it
out if you want, but I just want to
let you know this is my very first class
here on skill share, at that time, I was
not not as good at making online
classes as I am now. Even at the moment, I
don't think my ability to create online course
are good enough, but it is better, it is better than
I am in the past. Once the masking is done, we need to wait for
it to dry completely. And for muskin float, we shouldn't use
hair dryer for this. We need to wait for
it to dry naturally. I will leave it for 30
minutes or 1 hour because it use muskin fluid
is sensitive to heat. So if you use hair dryer, it may I mean, it may go within within the paper and it will be
difficult to remove it later. So we will wait for
the muskin fluid to dry naturally and after that, we will we come by and we will put water and
ps on the paper.
7. Initial Wash - Underpainting: In this lesson, we will
work on the initial wash, also known as the
underpainting layer. This step helps establish
the base values for the painting and ensures color harmony
throughout the piece. Why you could skip this step and paint the petals one by one, like we did in my rows
for beginss course. Doing so make the over on painting feel a little
bit disconnected. By starting with underpainting, we create a unified cohesive
look. Let's get started. So now the masking
float is already dry and you will start
with the initial layer, which is also the
underpainting layer. So I will start with the whole the whole sheet of paper
because we need to wait. You need to wait a little bit for the water to
sing into the paper. So that's why I will wet the paper first and while
waiting for you to sing, I will explain about what colors I should put onto the paper. So for this, I mean,
this mop brush to wet the whole sheet of paper. You can use you can use flat
brush for this purpose, but my favorite brush for this purpose is
the radion mop brush. Now, while waiting for the
water to sing into the paper, let me explain a
little bit about what colors we should put
into the initial layer. If you look at the flowers here, the lotus flower here, we see some petals. We have the the
core shade of pink and In put quinac weedon
rolls into this area. And for the petals, which has the you see, it's worms worm shade
of pink In put, quinac weed on coral. I don't use Alisa invincon
for the initial layer. It is the pen, the color for the shadow, the ducky shade of the flowers, and I put it on another
the later layer. For initial layer,
I will use I will only use the line
this shade of pink. And for the leafs, we don't use the we don't use
the leaf from this photo. But if you see from
my final photo, this leaf have the you see inside it is the dulhad
I mean, casket green. I use casket green for
this purpose and actually, for now for now, I don't use for the initial, I don't use casket green
here because it is, it is for Duco shade and
for the initial wash, we only use the light
shade of the of the color. Actually, I don't
think I will use. I don't use the I don't
use any green here because we will paint
everything red on it and eat green heat green pink. I will create kind of brown colors and that's
what I don't want for this. So I will put the unhamarin blue for the whole area for
the whole back brow area. I also put some yellow
in the center of the flower and some yellow on the on the on the on the
light area of the left here. Actually, I made
a mistake I made a mistake is because I see I shouldn't I shouldn't
duct a pencil. I shouldn't has penculi
here, but it is okay. We don't have to be perfect. But in case you follow
me in this lesson, you can consider not
put a penculi here. Let's get started with
Quena quid on rose. You see, I change normally, I will put the paint on top
of my paper, but this time, I do like this so that you
can see my color palette. You don't need to
be very exact here. Just put it Just put it where
you think it should be, but don't need to be exact because this is
a very light layer. So this one is the worm shed. I will use reenaon rolls here. I will use a smaller brush. To put the pin the yellow. Actually, I use and yellow. For this one, I use
hands yellow medium. I think I didn't mention in the lesson about the
tune and materials, but I think everyone have some yellow color
in the pint bob. Try to the light colour. So you will see the
color in most gather, but it is not problem here because later will be
lighter and this way, we will create the color harmonious or the
whole painting. I think I think that's enough for the very
first layer of the flowers. And then I mean it
was unhamerin blue. Hamarin I was very light tamarin blue to
mark the outline. To mark the leaves and
the back rail area. Actually, for this leaf, I just copy it from this photo. And you see there is
even for this leaf, there is a light shade here. I will put this yellow, it is lemon yellow because
when lemon yellow meat blue, it will create green. I put lemon yellow here. Don't worry, we don't need
to be perfect in this state. And this leave it will have
a circle, a light color. I think I want to use this
yellow here. Let me see. I have a so try to not mix blue, pink and yellow together
because it create a very brown color and that's what we don't
want for this painting. I think we almost done that. Let me put you see something here with the
dynamic of the background. I will come back to
pin pin it later, but I want to put it now
for the innso layer. And so that's on for the initial wash of
underpainting layer. So now I will leave the
painting and let for it to dry. I think now it is
in the morning, I will go for lunch
and I will wait one or 2 hours because I
want it to be really dry so that the paper when
we flat before we come back and work another
other layers on top of it.
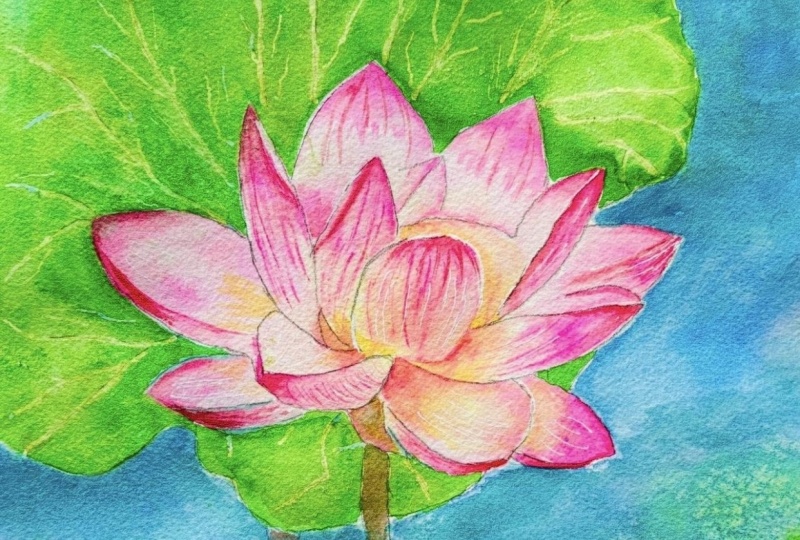
8. Capturing the Pink Shades of the Flower: Now, the first layer, the initial layer is already
dry and we will paint the flowers first and
then we will paint the leaf and finally we
paint the background. Then best at least two
layers for the flowers. Now we focus on the the value of the
petal that mean we will use the paint to
depict the light and shadow in the
petal and then we come back to paint the
veins on the petals. We will paint the petals
on the top of the flower first and I will use quinacqedon
rose for this purpose. This is quinacuilon rose. But this is from Daniel Smith. If you use Windsor and Newton, you can use you can use
permanent rose for this purpose. I will start with I
paint right on dry. You see the petal here, the top, it is dark and the
bottom is live I I've been paint the I put the pain on the top of the petal and then I use water to drop it down. I do feel that this
brush is a little bit too big for the
size of the paper. I'm in five smaller one. This is number six
from Escoda sat. It is number four. I realized he missed when I prepare the Al, I think I missed. So it should be labs. So I think this is an
intermediate collars, you already have
experience pain, we don't paint the battle
next to the first battle, but we paint the pestle
which is far from it. So the structure of the lotus flower is
relatively simple. You see, it is just dark in the in the a size and
lighter in the inside. I am looking at the reference
photo, but actually, once you are familiar
with the lotus flower, you can even paint the
flower without looking at the reference photo because it has quite a
very uniform structure. I do realize it needs to
be lighted in this p, so I try to lift
some colors here. Now, we will paint this petal. I will use quinacudon
coral for this. You see quinaquon coral. Compare with quinaqu, it
has the orange in it, orange shade in it, so it
makes the pink colour warmer. So you see there is a
little bit green here, so I will put a
little bit sub win. Here you can put it in the later layer that
I want to put it here. Now, this video is a little
bit it is 10 minutes now, so I will take a rest while wait for the paper to dry
before coming back to bring other petals because I want to take the rest
now and that's why my eye will be more more precise when
I continue to paint. We continue to paint the
other petals, the flowers. So not sure if in the
final video editing, I will make this is 212 lessons one lessons because you see the painting
post is quite long, but it is quite repetitive. So in the final editing, I might spit up some parts, so it's not as long as in reality because once you know how to paint one or two petals, you will know how to
paint on other petal, sell you don't need to
copy or follow me exactly. So I mean, it was a quinac
idle rose quinac idle rose to the majority of the flower. But you see in the underpainting layer on
the color is merged together. Already there's
already yellow shade we put it in the initial wash fast but I do think that later we will come back to add
add more yellow into it. But for now, I will focus
on the pin shade first. Actually, I think I haven't
pin this petal because I tried to look around
to find any petal which is not next to the red petal. I think here it is
quinacridon rose, but here it is
quinacridon coral. I think I will take a rest again because there's some
area I need to paint, but it is next to the wet petal. I will take a rest
again and then we will come back to paint the
rest of the flowers. They're just very small part of the flower we need to finish. Don't worry, don't
capture on the light and Shadow shade of the
petal because we still have the we
still need to paint the vein on the petal
and finally we will use the azaneGrimson to be in the
luckiest area of the petal. There's still this small area. Right now, I will paint the yellow first and then I will
come back this part later. So this is handsome
yellow medium. So it is not lemon, so you and you will neutral yellow because the lemon is a little bit green. It has a little
bit green into it and if you look at
the reference photo, it is a little bit orange
orange, yellow shade. There is a little bit
yellow on the petal here. I think now we can
paint this area. So this part is just a lighting. The part is actually lighting. Add some yellow into it. We still have this
area, pinacyon how So I think, okay, a small part. This would be I use Bunsen. Just a little part here. I think I mean pencil for it. I even smaller smaller brass. I think in the material lesson, I only mentioned that
it was one row brass. Actually, I think we can paint
everything with one brass. You can use a smaller one, but it will be more convenient. If you different size brass to And I am painting
on the If paper, which is relatively small
small sheet of paper, so I have to use
relatively small brass. I think it is a
little bit too dark. I think that's good enough. Actually, because
it is already dry so I can start to paint the
veins on the petal now, but I think I will stop
the Cora and also take a rest before coming back to paint the veins on the petals.
9. Adding Veins to the Flower Petals: Now, let's start to paint
the veins on the petal. I will just use the
previous color, it is the pinaon rose and pinaden coral to pin
the vein on the petal. I will use this smaller brush
and this brush for this. This technique is
called interrupted, so. It is difficult to explain, but let me display it by action. We need to pin the vein here. So instead of making
a straight line, we I mean, it is in the
light is interrupted. I do think that the color
is a little bit too dark. So it is a little
bit too too dark, so I need to put
more water into it. Because we now it is a little bit too light. I put more color here. We just look at the reference photo to paint
the vein on the petal, it is not a straight light, but it is interrupted. By this technique, you with the we will make the betro more natural. So you see at the
top of the petal, it is color here, I will put the Alizarin
gunson into it. It is Allen grinson
because it is darker set than the quinac weed on
rose and quinac don coral. You see the vein vein we paint on the paper,
it's still wet. We will put a little bit. And it was sin grinson there. Continue to paint the vein. I think I have wrong. Is. I think I for this battle, I will put Quin
guid on rows here. The post is long, but it is quite repetitive. So when I edit the
final video, I will So for this one, it is
a little bit too dark. I mean, just a pain. I put put a paper towel onto it. Asome dark colour. I mean, it is erose or live
in crimson. Moda, okay. I do feel that with Alisa
win Grimson it is easier to achieve the darkest
shade of the pink color. It makes this paper dotty, but it's not problem because
it live in this area anyway. So there dot, the more
natural for the leaf. So I think there is a very dark lie in the
center of the handle. Now, it's too dark. The line here, it is so
knuckle than A line. I think this part it is knuckle than the rest of the battle. For this one, I
will use pina grid on coral to paint the vein. An Marvin Gunson to to
make this pipe knocker. Actually, the shade of pinna goon coral is
a little bit similar to Alizarin Gunson but
it cannot go too dark. So you see my e is all
little bit too dark brown, but it's not big problem, you on way have the
tissue paper for this. If we cannot leave it, just put more water. A Actually, we don't
really see the lie here. I just put a little bit
Alisa glmson here because I do feel that this petal
need to be docker. So the camera shows me
that it is 18 minutes now, I have already spent 18
minutes to bend the vein oh Now, I need to paint
the yellow here. We also need to put some
more yellow on this petal. I need to pick a cuss for this. That's a little bit part a bit, so we have this forgot. We don't see the vein
on the rifle photo, so I just want to put a
little bit radiant into it. I think we almost
done with the flower. So I think we have to have some in here. There may need some adjustment. But for now, I think I will stop and we wait for it to dry completely
in the next lesson, we will paint the leaves and then we paint
the background, and then after everything, we may come back to make the final adjustments
on the flower.
10. Shading the Leaf with Green Layers: So now before painting the leaf, I will spend a little bit time to painting I will
use liner brass because the area is too is
too big for a round brass. So as you can see in
the reference photo, it should be dark like this. Now we will start to
paint the leaf here. You see because the flower will be the central
of the painting. I will paint the
leaves quite loose. I mean, I use almost one layer. I will start with putting a I I start putting the sub wind on the
whole on the whole area. So then I will the bad
need to be to be docen. So because I I want the flower to be the
center of the attention, so I don't need to buy
attention to the leaves. So as you can see,
I don't really have a reference for
the leaves because it's just a feeling so that the leave curve in curve like this. So up the finish the class, you can try the
technique we learned today with another flower
and maybe with another leaf. One leaf and one flower and we have painting
and there's a lot of reference photo for lotus flower and leaf on the Internet. So but I try to search
before there's very few. There are a few photo which has a good composition of
the flower and the leaf. But if we try to
mix and match them. We have a lot of option. I do feel that the paper is
dryer faster than I want. So for this part, I think I will use casket green. Now instead of
putting the sack win first and put the
casket green later because I'm not sure that the pen will be red
until that moment. So for this part, I will move to a small rust because we don't use the
reference photo now, so get more put iPad. And so you can see the moto
painting I painted before. Let me see here, the first
subin is already dry. It is be fatter, we paint the carcass green now instead
of painting one layer of sabran first and then adding carcass
green on top of that. Actually, for this
sometime I change my blend depend on the
feeling I have when I paint. So the leaf will be darker
near the flower because it is the center of the leaf be lighter in this part
and also dark again, dark and co again on the I mean, it was a big rush to make to smooth
the transition here. We only need to be very careful when we pay
near the flower. So I will add more
yellow in some part of the leaves just to make it to have more
dimension and more dynamic. And so add a little
bit of buena. Because the leaf it
knows the center of the photo and so I
don't pay attention. I don't try to
capture the light and shadow and the shade
of colors in each part of the leaf and just
one layer like this. Now we will wait for it to dry before coming back to
remove the masking fluid and also paint the
background of the painting.
11. Painting the Stem: Et's continue to paint. I think I paint the stem here first before
painting the background. Actually, it is not
dry completely, but I think I used this
time to paint the stem. I've been put a light lights she and I put a burn umber on the other part. I will leave the color
in this side because I want it to be even rider a more bunsena on this side. So don't have to make
the stem to uniform, but we want to make the part near the
battle a little bit darker because it is
the part of the shadow. Now if you need the stem, I think I need to wait bit more before removing
the masking float and hinting the background.
12. Painting the Background: We will continue to paint, so I will use this eraser
to erase the skin float. I forgot to mention this
in the material lesson, but actually, you can just use your hand to
remove the skin fluid. Just make sure in this case, you need to clean your hands
first and then wait for it. Make it dry before remove the muskin
fluid because we don't want to the oil from
our hand on the paper. But I think I make
a mistake here. So I think I chain I will
chain this masking tape because next we paint
the back around and I don't want I want to
have a clean bottle. So I mean just change
the masking tape here. This time, I remove the skin float from
outside in what so that I don't de choy
the masking tape again. Okay. So now for I mean the background with the you see the vein here is
a little bit too light. So I mean I mean this
is lemon yellow. I mean, put a lemon
yellow on top of it. So and when it wet, it it so we will also leave some paint from
other area of the leaf. Be a little bit careful
over the flower. But only, we need
to be careful for As I mentioned before, the leaf is not the
central of the attention, so I just don't want to
put a lot of effort. I don't need to
pay the attention to detail when painting
the leaf here. Now, I use this more brush
to paint the background, so I've been at the
hammerinblue again. So part it moves into
the lee, but it is okay. So I put some I think I reco some some colour
here and there to make the filling of
some flour on role. And when the paper is still wet, I I paint this term rep So it bleeds a
little bit too much, but it's not a big problem. And in casket win the pin the leaf here. It will be better if the pencil here is
not really visible. I forgot I remember to not put the pencil
for this painting, but for today's instruction, I forgot to put
the pencil there. So put some yellow. Actually, I think I put
a lot of water here. But make this part a little bit. Add some more yellow
into the back row. I think that's the back row and we almost finished
the painting. Now, we wait for everything
to dry before coming back for the final details and we may
review the whole painting.
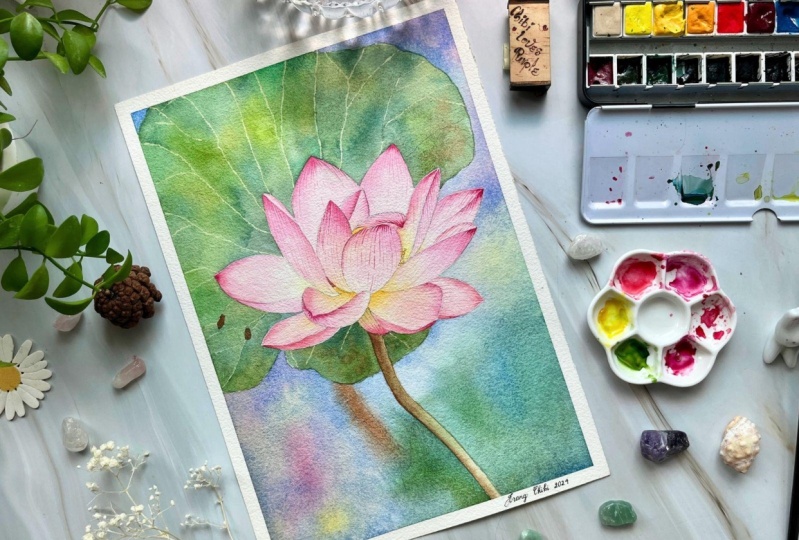
13. Fine Details: Now the painting is
already dry and let's do the final check to see if we need to pay
attention to anything. Here, I think over this, I need to put a
little bit of orange. Just put a little
bit of not here. For this lesson I
don't try to capture on the dew drop on the rotos. We focus on the
underpinning pin. You may want to use this. There are some area
which is really why. I need to be. Yeah. If you don't cover the vein using
musclin fluid, you can also use gel pen to
paint the vein on the leaf. But I do think that
using muskin fluid, make it more natural
and traditional. I don't want to, we don't
want to overuse the gel pen, so just need to put just some some area, we want to make the highlight. I think some here
to make it similar. I think we are done. So now I will
review the pending. Y. So I do think that the painting will look
even more beautiful if we paint it on a large piece
large sheet of paper. But I use this small sheet of paper because I don't want I don't want to spend a lot
of time on filming and this will be easy to explain on
the techniques for you. So I Hope you are successful and see you in
the final nation when I will tell you about our
final grass or and some more and hit in painting
watercolor flowers.
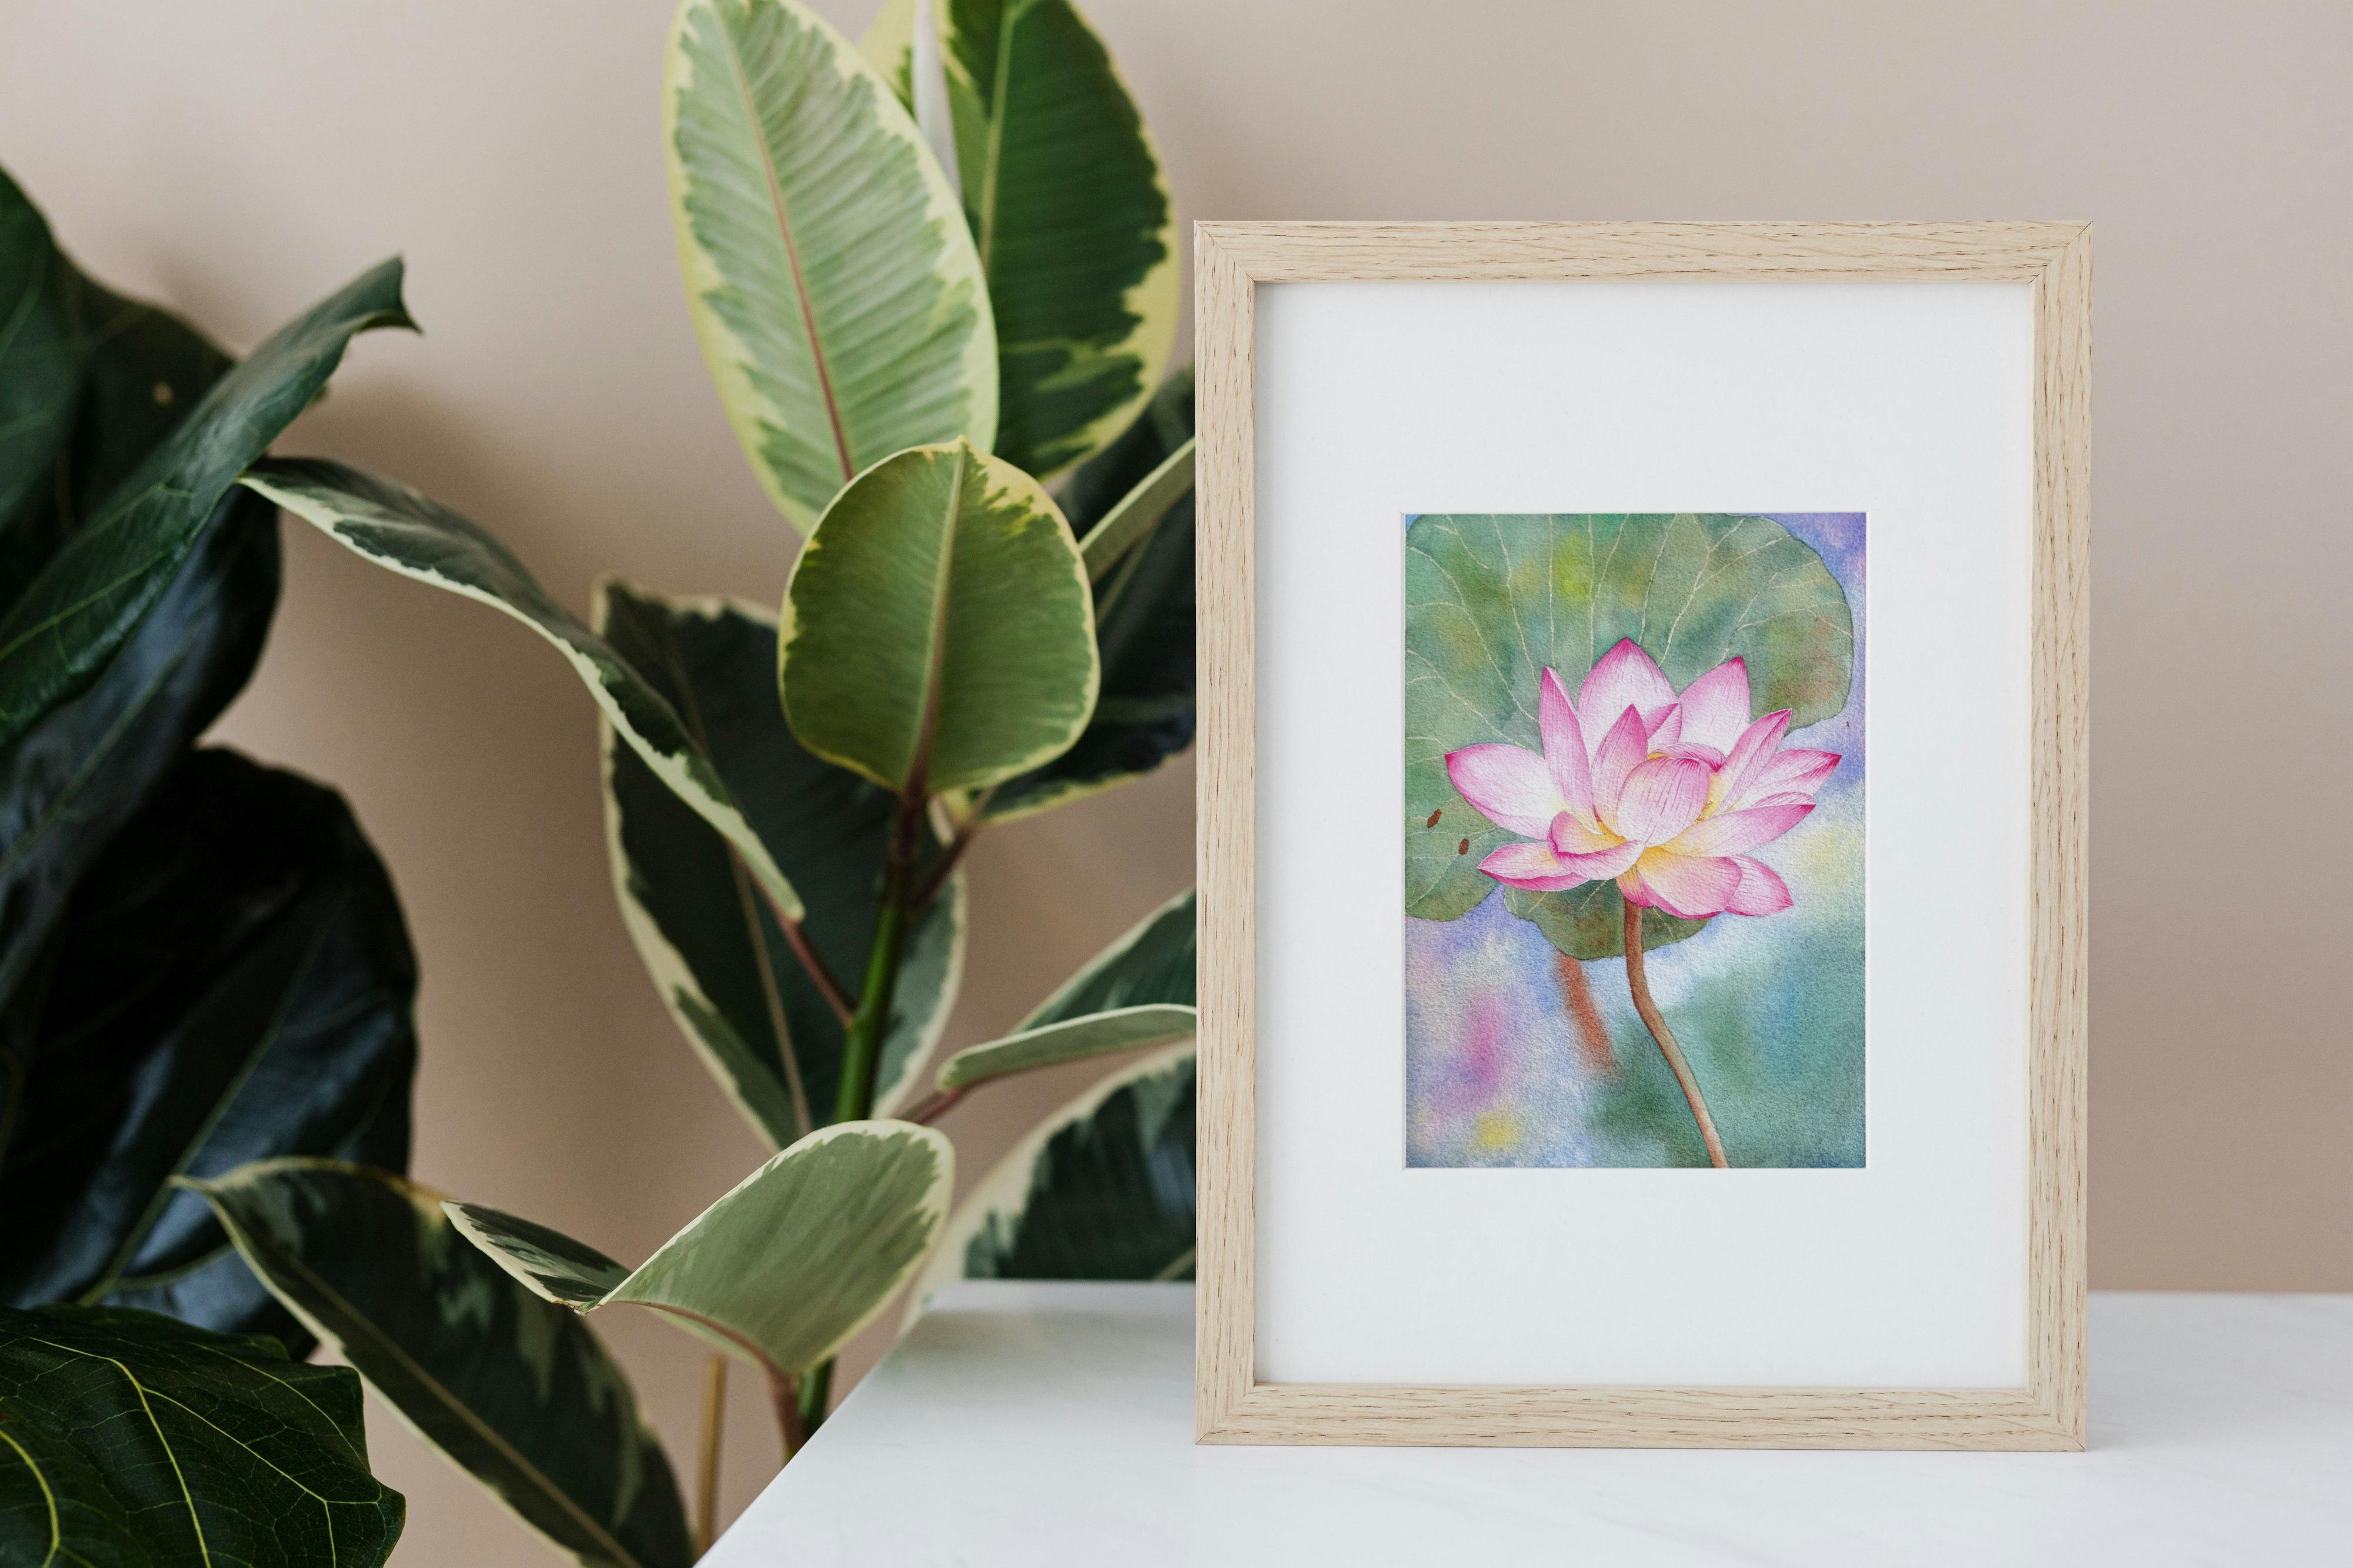
14. Final Thoughts: Thank you so much for joining
me in this lotus glass. I'm so excited to
have had you here. Once you finish your painting, be sure to upload it to
the Project Gallery. I can't wait to see
your creations. Don't forget to check out my Buffy for my
watercolor and wash glasses and follow me on Instagram for daily
Art inspiration. See you again soon
and happy painting.
 Trang Chibi ❤️, Watercolor and Gouache Artist