Transcripts
1. Introduction : Hello everyone, I'm unit and
into this class we'll draw a few cute illustrations
will start from scratch, and we'll be using simple
shapes throughout the process. This class doesn't require any prior experience
or fancy tools. Everything you'll see will
be happening in Procreate. However, if you
have other software or wants to try
traditional materials, you are welcome to join if
you are ready to start, Let's jump right into it.
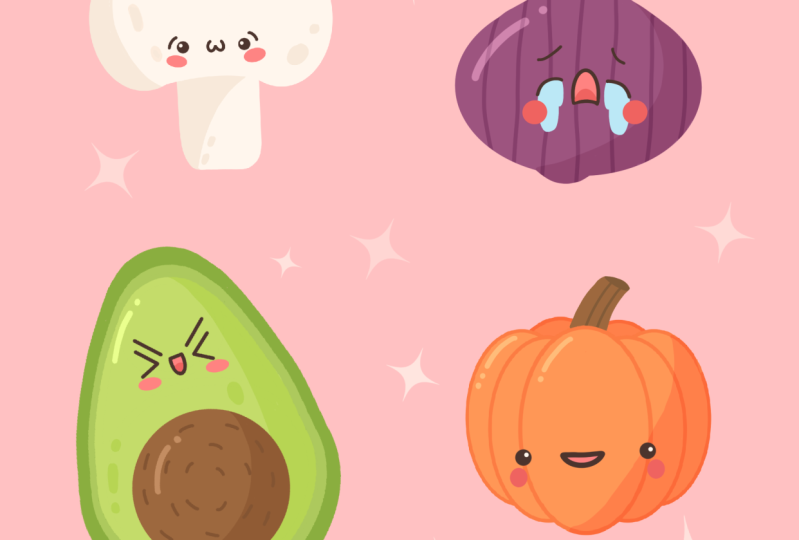
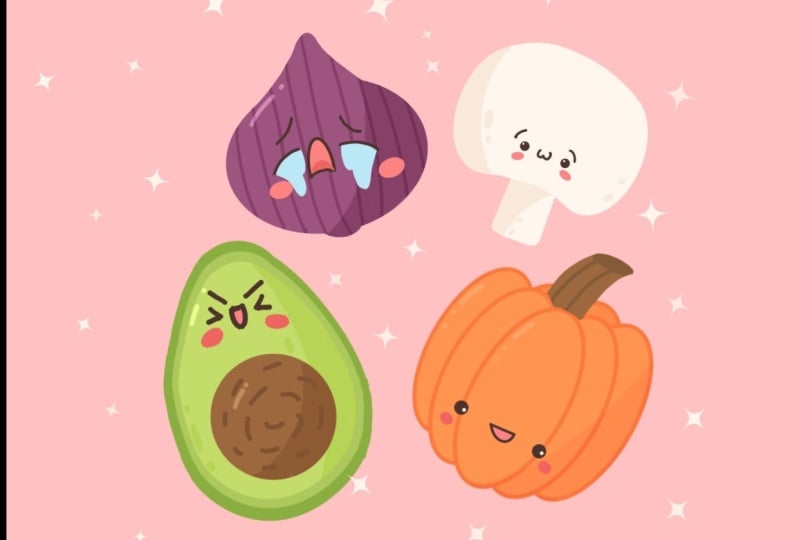
2. Drawing a Mushroom: Firstly, let's
decide what kind of Canvas do we want to use. As you can see on your screens, pixel width and pixel height
are set at 2048 pixels. As for the DPI, we use 300
and S for the color profile. It is set to sRGB with this
loan and scary number. Now when everything is set, alleges he'd done and we will be redirected
to our Canvas. The first thing
that we need to do here is to change the
background color. As for the colors, everything that you
will see during this class you can find in a
project and resources tab, you can download
this palette and you can use it through
the whole class. So now let's go to the colors and check out what we have here. We have two options,
compact and cards. If you go to cards, you will see that
every color here has its own name and serves
its own purpose. So firstly, we will need to set the background to
this pink color. Let's go to the layers. Let's go to the
background color layer, and let's tap onto
these pink thumbnail. Now, our background
is recolored and we can move on to creating
our first illustration. Our first illustration is
going to be a mushroom. So firstly, we again
go into the colors and we are selecting the base
color for the mushroom. Now we need to select the
brush and S4, the brush. I'm going to the Brush
Library and I'm strangely go into the calligraphy
under this folder, I will choose the
mono line brush. Let me make the size of the
brush a little bit smaller. And the first thing
that we need to draw is a little ellipse. So go to the canvas and draw
an ellipse as best as you can without an holding your Apple pencil at
the end of the line, you will see that your shape snaps to something more perfect
than you created before. You can change the size by
moving your Apple pencil to the side and go back-and-forth. And when you're
satisfied with its size, you can hold your pencil and you will have an
ellipse like that. So now we need to change
the inside part and we need to drag the
color that we have bonded soap to this area inside. So just go into this corner and dragging
the color over here. When it's all done, we
will need to create the second ellipse to make
sure that our cap is fields. Holy. So let's go to the layers and we will go to
this layer with our first ellipse and we will swipe it from right to left. We will select Duplicate. Now we need to move
this copy to this side. To do so, we will go to the left top panel and we
will choose this arrow key. Now you can see the bounding box and you can move
it to this side. So let's not go too far from our first elements and we will leave it as
it is right now. Now let's deselect this part. So we are again go into our top-left panel and we are tapping on this Arrow
key one more time. Now we have two ellipses
and we need to connect them with the convex curves. Firstly, let's go to our layers. You can see that we have two
separate layers right here, and it's not what we need. We need everything to be
onto one layer for the cap. So let's merge these
two layers together. You can see that this layer on the top is already selected. So if you tap on it one time, you will see a little list that will help you to merge
these two layers together. To do so, we need to select
Merge down right here. Now everything is on one
layer and we need to make these curves to connect
these two parts together. So let's go and create the curves going from
one element to another. You can again hold
your Apple pencil at the end of the line to
create a perfect shape. And when you're satisfied, just unfolded and move to the bottom parts to
create the same curve. But on the bottom,
try not to go beyond the frames that you already
have on your illustration. And if you did, just grab the eraser and erase the extra parts
that you don't meet. Now we have the
shape like this and we need to recolor
the inner part. So again, we are going to the top corner and we are
dragging the color to this area so the cap is ready and we can move on
to adding this type. So we are again go into our Layers panel and we are
creating one more layer. But this layer, we need to put under the layer
with the cap. So let's just hold
it and drag it down. Now onto this layer, we will need to create a
very rounded rectangles. So firstly, let's start by
creating an exact rectangle. Again, you can go strictly with your Apple pencil and create the shape that you would like. So you don't hold
your Apple pencil at the end of the line
and you're creating a perfect shape
for the rectangle. Now, if you're satisfied with the size and with its position, you are holding your pencil and you are recoloring what
you have for this type. Now we need to make sure that the corners of this rectangle
or a note that straight. So we will just go and grab
the eraser and manually adjust the corners by making
them smooth and round it. Just try not to
overdo it and try to make them equal on both sides. Also try to avoid sharp edges. So we have the basic
shape for our mushroom, but we don't see the difference between the cap and our site. Let's add a little shadows. Firstly, we will again
go to our layers. And with this layer selected, the layer with this type. We will tap on the
plus icon and we will need to clip this layer
to the previous ones. So everything that
we will draw onto this new layer will be only attached to
the previous layer, so we won't go
beyond the borders. Let's tap on it
and we will choose clipping mask also while we
are creating the shadows, we can just grab
the darker color, but you also can use
different blending modes, so forth, the shadows. It's good to use the
multiply blending mode. To go into this
Blending Mode menu, you will need to tap on to
this icon and you will need to search through this lease while you find the
multiply blend mode. Also, if you look
a little bit up, you will see that
there is a slider with the opacity
for the shadows. Let's set it as 50 per cent. You can move your
slider to the left, or you can just write
down the number that you would like
to have right here. So when it's done, Let's go to our colors and
we will select the color that is going to be our
shadows for the mushroom. So when it's done, we will go
to one of the sides and we will create a smooth
shadow or one side. So just go manually and
create the shadow like this. You also can add some little
details, for example, some dots or little areas
that you would like to add. And when we have the
shadow on our side, we can go to our cap, create one more layer and the
shadow over here as well. So let's do so. Select this layer with the cap, tap on the plus icon, select the layer, tap on it one more time and
choose clipping mask. Again, let's go to
our blending modes and we will choose multiply. Again. We will set it as
50 per cent and we will be creating this same
color shadow on one side. So let's go for the left side, and we will be trying to not connect one
shadow with another. So very slightly
go to one side and recreate the shadow over
here hasn't before. You can go and add some
details over different areas, try to make them nice. Don't try to overdo it. So for example, you can add some dots with
Soviet bigger dots. And when you are satisfied
with the result, we can move on to adding
the little cutie face. So again, where I go
into our layers and we are tapping our plus
icon onto this layer, we will go to their colors and we will choose this
color for the eyes. Now let's increase the size
of our brush to maximum, maybe not so maximum. So just find the right amount of percentage that will work
for your illustration. And let's go to our mushroom and let's just put two
dots for the eyes. I am putting them
on the bottom part because I would like to
create a very cute face. And the lower you put your fees, the cuter it will become. So when we have these eyes, Let's add a little highlights
to make it even more cute. I will go again to the colors. I will choose probably the same color for the
mushroom that we had. I will decrease the size of
my brush and I will go to one side of each eye and I will put just one dot for each site. Now when we have these eyes, Let's move on and create
other face features. I'm using the same color
that I used for the eyes. So I'm using the eyedropper tool to select the same
color or here. So just hold your one finger
and when you see this elite, so too, you can move your finger and select
the needed color. So with that, I will
select this dark brown. I will decrease the
size of my brush and I will go and add more
elements for their face. So firstly, let's add the brows. I will go to the
sides and I will create the curves like that. Again, I'm reminding you that you can hold your
Apple pencil at the end of the line to
make a very smooth shape. So it is ready on one side, and let's move on
to the next side. The same over here. Try to make them even. And if it's not working
from the first time, use your two fingers to undo your action and
try one more time. So when you're satisfied
with the browse, let's add a little mouth and we will add it right
between the eyes. So I will go with
the mouth like that. If you want to
move your elements around the whole shape
of the mushroom, you can go to this S ribbon
icon on the top left. And you can use the freehand
method of selecting, select this element
and move it around. So using freehand,
selecting the elements and moving it by using this arrow key on the top when
you're satisfied, just heat one of these
tools that we're using. So for example, it
will be the S ribbon and you will deselect everything that you
have right here. Now the last thing
that we need to add here is little cheeks. So again, firstly, we
will go to our palettes and I will choose this
mushroom cheek color. I will go to the
sides of the eyes and I will create
one on each side. Again, if you want
to move some things, you can go to this S ribbon. Use freehand selected, go to the arrow key
and move it around. Now our mushroom is done. So let's go to the layers. We will select
every layer that we used for the mushroom
and we will group them. So just select the layers. You will need to
select the first one and then you need to slide from left to right to select other layers that
you want to select. When you're selected,
everything that you need just hit this group icon. And also here you
will see that you have a new group which you can rename by tapping on it
twice and choose Rename. So let's just write
down mushroom. We can hide the elements
by tapping onto this icon and we can move on to
add another elements. In the next part, we
will create an O'Neill.
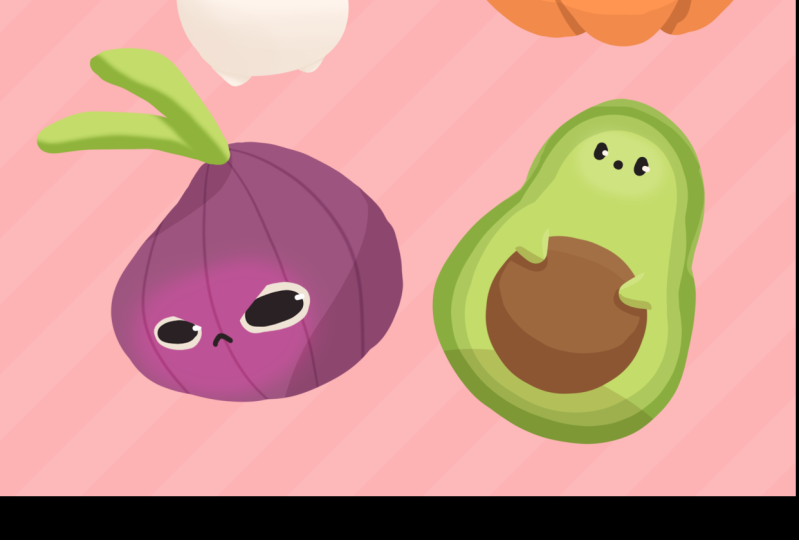
3. Drawing an Onion: Let's start by creating
one more layer. And again, we will go to our colors and select
the different color for our next shape as we
are creating an onion, Let's use this color
that is called onium. I'm getting back to
the canvas and I am going to start by creating
a very squished ellipse. So again, just create the
ellipse as best as you can and hold your Apple pencil
and the end of the line, you can adjust the size. And if it's not enough, if you want to adjust
your ellipse even more, you can unfold your
Apple pencil and go to this top part where there is a little button
called Edit Shape. Here you can move it. You can just drag one
of the corners and adjust your elements
as you just want. And when you're satisfied, just tap on your screen and you will be redirected
to your Canvas. So when we have this
squished ellipse, Let's recolor it firstly. So again, go into this top icon and dragging
it to our element, or here, it doesn't
look like an onion yet because we need to
add two more elements. So firstly, let's go to
the top and we will be creating the dome
shape on the top part. So go from the left and
create the shape like that. If it's not working
from the first time, you can always try to make it as best as you can when you're
satisfied with the shape, Let's recolor it to. And if you want to
make it more smooth, you can go manually
with your brush and adjust the parts
that you don't like. If you want to get
rid of some parts, grab the eraser and
adjust it with an eraser. So now we have the top part and we need to add a little
bump on the boards. And let's again go
and grab our brush. Let's go to the
bottom and we will create a little
thing here or here. Now let's recolor it
and the whole shape of our union is done when
we have the base. Let's add more details. And to add the
details, for example, this tree weeks, we
will need to use an option that is
called Alpha Lock. So firstly, let's grab a different color is going to be audience streaks right here. And we will go to the layers. We will tap on a
layer with a union, and we will choose Alpha Lock. Alpha lock works the same
way as clipping mask with only one difference that it's happening onto the same layer. So you won't go
beyond the borders of the shape that
you already have. And oranges go knowing this information with the monoline brush
along the shapes. And we will create this tricks. So just follow the direction of the onion or make
some peculiar shapes. It's up to you. When you did it. Let's move on and add
the shadow to our shape. Now we're arguing to the layers and we're creating
one more layer. We are tapping on it and we
are selecting Clipping Mask. Now let's tap onto the end icon and choose the
multiplied blending modes. This time, let's set our
shadow for 30 per cent. Let's go to the layers and let's select a different
color for the shadow. Now go into one sites and
creating this shadow over here, adjust the size of
your brush and just cover one sides with the shadow. If you overdo it, just grab the eraser and adjust your shape in
accordance with your vision. Now our basis done so we can move on to adding the
face show features. Let's go to our layers. Let's create one more layer, and let's go and read
the different colors. So again, we are
using the same color that we used for the mushroom. So it's going to be these
ice as it is an onium. Let's create a very funny face. So firstly, we will go
and decrease the size of our brush and we will create
two curves like this. Now let's add the browse. This character will be crying, so we will need to make the brows relatable to
the facial expression. So let's go and create the curves that
we'll be looking in a different direction from
the arts on both sides. Add into curves, tried
to make them even. And when it's done,
let's add the mouth. For the mouth, Let's
create a curve like that. Hold your Apple Pencil. And when you have this shape, Let's go to the
bottom and create the curved to connect these
two shapes together, grab an eraser if you need
to change some parts. And when you're
satisfied with this, let's recolor the inner
part of the mouth. So again, we will
go to our pallets. We will grab the same color as we are going to be using
for the mushroom cheeks. Only in cheeks, It's
the same color and we will just drag it to the
inner part of the mouth. If you want, you can go to their palate one more
time and you can just select the inner mouth shadow and add a little
shadow over here. As we are working
on the same layer, you need to be very
careful to non go beyond the frames of our mouth. So very carefully
go in over here, adding the different
color if it's needed, we can pick the
color that we used for the Outline and adjusted. If we already making the
inner part of the mouth, then let's recolor
these parts of the mouth manually and we will. Use the same color that we used for the mouth and on the
inner part of the mouth, but the mouth to
create the cheeks. So I will increase the
size of the brush. I will go to the sides from the eyes and I will add the cheeks with the
ellipsis like that. So one-on-one sides
manually recolor in it. And also you can just make
a copy of it by going to this S ribbon using
the free hand methods, just selecting this shape
using your three fingers. Swipe from the top
to the bottom of your canvas and choose Copy. Now again, swipe with
three fingers from top to the bottom
and choose Paste. Now you can see you
have a bounding box. You can move this element
to the other side. You can just adjusted the
way you like, rotated, position it wherever you
want and deselect it by going to the top area over
here with the arrow key. Now let's connect
these two shapes together because when we
are coping the element, it appears on a different layer. So let's just go to
this cheek over here, tap on it and we will
choose merge down. Now all the facial
features are on one layer. And as I mentioned before, we are creating a
crying own yen and we will need to create the tiers. So let's go and create
one more layer. We will put it under
the layer with the facial features because
we don't want to be very accurate with
all the things that we have here already done. Let's go to the color palettes
and we will choose tiers. Now, go in again to our Canvas and creating
the shapes of the tiers. So I won't go very lightly
with a shape like that. I will loop, it's over and
I will recolor this shape. Again. You can go and select it. You can move it around so you can copy it to the other side, but it also can go menu and
create this shape over here, just with your Apple Pencil. It's not going from the
first ride correctly. Erase it and try
it one more time. You can grab an eraser tool and adjust your shapes if you want, if you want to change the direction of one
of these elements. So for example, I would
like to go to the left one and I would like to
rotate it a little bit. I will go to this S ribbon. I will use freehand methods, and I will go next to this
arrow transform tool and choose distort or work
with a distorted, you can move it in
accordance with the area that she
gripped with a word. You can have even more
options of the adjustments of these elements when you are satisfied with
everything right here, Let's deselect it by
hitting this S ribbon. And the last thing
that we need to do here is to add
the highlights. So we will go to our layers, we will go over the top layer and we
will choose plus icon. Now let's go to the
N icon right here, and we will change our
blending mode to add, let's set the opacity to 20% and let's grab the same color that we
used for the mushroom. Now, go to the opposite side from the shadow and add
a little highlight. Or here, you can
decrease the size or increase the size just
experimental little bit. You can go over some other
places and add the highlights. Just try not to overdo it. Now the onion is done. So let's go to our layers. Let's select all
the layers that we use for the onion and
legend group them. Let's tap on the group and
let's rename it as an onium. Let's hide all the elements. And in the next chapter, we will be creating an avocado.
4. Drawing an Avocado: Let's start by hitting R plus icon for
creating a new layer. Now let's go to our
colors and let's select the different color
for the avocado. Firstly, we will grab
this avocado skin. We will get back to
our Canvas and we will start by creating an ellipse. So we will need for this
purpose to an ellipsis, The first one we will
create as a circle. So if you are
creating an ellipse and holding down your Apple pencil at the end of the line, you probably won't end up
with a perfect circle. To make a perfect circle, without an holding
your Apple pencil, you will need to SAP on the screen with one of
your fingers and hold it. You can see that it snaps to
a perfectly round circle. And when you're
satisfied with the size, you can unhook everything that
you are holding right now. I will go to the
layers and I will make the onion and
mushroom a little bit smaller to make some
room for other elements. So I will go to this folder, I will go to this arrow
icon uniform methods, and I will just
decrease the size of it and I will do the
same to the mushroom. So selecting it, go
into the Arrow key, making it smaller way
that uniform methods. Now getting back to our avocado, we have our first shape or here, and we need to make one more
smaller circle on the top. So let's just go there
and again creates a smaller circle with
our Apple pencil. Hold your Apple pencil
at the end of the line. Hold your finger to
create a perfect circle. Vary the size. It depends on what kind of
advocator you want to make. We would be very
chunky or will it be more even on
every size of it? So when you are
satisfied with the size, we need to go over the
sides of our shapes and we need to go with the curves and connect these
two parts together. So I'm going to one side. I am creating the
shape like that. Again, as if we are
creating our mushroom. Don't go too far from the
corners of our ellipsis. I'm not sure if
ellipses have corners, so it's probably this side. Don't go too far from the sides and create
this second curves. On the second side, again, you can hold your Apple pencil to make the curves perfect. And we will need to recolor
the enterprise by dragging the color that we have
on our right leg. Just drag it over
all the places. You can go and grab your brush, or you can go and grab
the eraser to make this whole shape more
perfectly looping. So I will go over here and I will try to
make it more smooth. If you want to adjust the shape, you can again go to
this arrow icon, go to the warp tool
and move it a little bit around to find
the perfect shape for your allocator when you're
satisfied with its slope just deselected and we will
need to make a copy of it. So let's go to the layers. Let's swipe from right to
left and choose Duplicate. Now we will go to our
colors and we will select the different
color over here. The first color that we will select for this
purpose is going to be advocator inner one
because we will need to make one more copy
and do it one more time. You selected the color, you need to drag it to
our shape over here. And do we need to make it
smaller and put it right in the center of the shape that we already have
for these kids. So we are going to the
arrow icon over here. We are using uniform
methods and what we need to make sure is that
snapping is turned on. So tap on the
snapping and toggle this little thing or
the snapping area. Now, drag one of the
corners to the side, make it smaller and put it right in the middle
of the shape. You will be sure that it
is in the middle when you reach both vertical
and horizontal lines, like you see on your
screen right now, means that it is in a center. If you move it up or down, one of the lines will disappear
and it won't be right. So when you are
satisfied with this, Let's deselect it and
we will need to make the copy of these parts
this time and again, do the whole thing
one more time. So go into the layers, swiping from
right-to-left duplicates. We will go to the colors. We will choose
avocado inner tube, and we will recolor
these parts as well. When it's done, we are
going to this arrow key. Again, uniform snapping is on, making it a little bit
smaller and dragging it to that center of
the whole avocado. Now, when it is done, we are deselecting
it and we will need to make one more
layer for the peat. So go into our layers, creating one more layer, go into the colors and
grabbing this avocado Pete, go into our layers and
create an, a perfect circle. So again, making it as big
and as good as you can, hold in one finger on the screen to make
it a perfect circle, adjusting the size if you want. So let's go for
something like this, and we will need to drag the
color to the inner part. Now, we need to make sure
that it is in the center. So again, we are going to
our arrow key right here. We are moving it to
this site until we see the vertical line that is going through the whole
shape of our avocado. Now find the placement and hold arrogant and
deselect everything. When we have the base, we already know that we
need to add some shadows. So the shadow for
the avocado flesh we will be doing onto this layer
that we created the last. So let's select it. Let's hit the plus icon. Let's hit it one more time
and choose clipping mask. We'll go to this icon and choose multiply blending modes
and S4, the opacity. Let's set it as 40 per cent. So we click on the
layer and we need to select a different
color for the shadow. Let's go to our
palettes and let's select the avocado
shadow over here. As we clipped to this
layer in particular, we will go over one side and we will create
the shadow over here. So let's just go over the right parts and
create a shadow here. I'm holding the pencil at
the end of the line to create a perfectly
rounded curves. And I will also go and add
some details over some places. Not only go into
the right parts, I'm also go into the
left parts as well. So when the shadows for
the flesh are done, Let's go and create a
shadow for the peat. We will select this layer. We will go to the plus icon, we will tap on to this layer and we will choose
clipping mask. Now let's go to the an icon and select them
multiply blending mode, and we will set it the opacity. So 20 per cent now
go into the colors and selecting the different
color for the shadow. So it is here, we're selecting it and we
are going to one side. I will go with the same
sites that I have, my shadow on the
flesh of the avocado, and I will just go and
create a shadow right here, menu increasing the
size of the brush, going over this shadow
part and recolor in it. When this is done, let's add more
details to the peat. Firstly, I will decrease the size of the
brush and I will go to the colors and grab the color that is
called Pizza details. I will go alone the shape of the whole piece with
the lines like that. Again, try not to overdo. It just adds the right amounts and only you decide
what is right. And when it's done, Let's move on to adding
the face features. Go into the Layers, hitting the plus icon, go into our palettes. And I again select the eye
color that I used before in the face features
color that I used before for this illustration, I want to go with the face
that will be like this. So for the eyes, I'm creating
the V-shape like that. And I want to make a copy of it and just flip it
to the other side. So let just go to the layers. Let's swipe it from right
to left, choose Duplicate, go to the arrow icon and use the Flip Horizontal
option over here. Now, I will move it
to the other side. And as you can see, when the snapping is turned on, I can move it along the lines. And that will mean that
the eyes are on one line, like they should be. Don't think that they
should be on one line. It's up to you. You can move them
around on your wish. When it's all done,
let's deselect it. Let's go to our layers
and let's combine these two layers with
the eyes together. So seven on the top
one merge down. Now let's add the
browse for the browse. This time I will go
with the straight lines like this over both sides. Again, if it's not
happening from the first try, it's okay. Just go and retry
it one more time or one more time until you're satisfied with the whole result. So when you have the browser, Let's add a little
mouth. For the mouth. This time, I will go with the opposite from what
we had on to the onion. So creating that
curve like that, holding the Apple Pencil
and creating this sound, Let's go with a straight line. Let's erase the parts that we don't need with an eraser tool. And let's add the color to
the inner part of the mouth. So again, we are using the same color as we
used for the cheeks. So I'm picking any one of these mushroom
cheeks are only and cheeks and I'm just
dragging it here. If you want to add
more details to use this inner mouth shadow. But remember that you
need to be accurate, very neat what it says, and not going beyond the
frames of the appliance, I will select these
color that we used for the mouth
one more time. And I will end the cheeks under the ice and just creating
an ellipse, recoloring it. And I will make a copy on the other side by
using this S ribbon, selecting this elements
with three fingers down, I will swipe from
top to the bottom. I will choose Copy. And again, I'm swiping
from top to the bottom, choosing paste, moving
it to the other side. And probably I will
flip it horizontally because it is at the angle. So I would like to match it from one side to another side. You want to move it. Move it. If you want them
to be on one line, you are welcome to do it. Now let's deselect everything. Let's go to our layers. I will merge these
two layers together, the whole face and
a single cheek. So just tapping on the
top one, merge down. Now the last thing
that we need to do here is to add
the highlights. So let's create one more layer. Let's set it as
Ed blending mode, and let's set it as
15% of opacity again. Now I will go to
the colors and I will select this mushroom color, and I will go to the opposite
side from the shadow and create the highlights over
the top and own their Pete. We are done with our
third illustration, which was an avocado. Now, let's go to the layers. Let's select all the
layers that we used for our avocado and less group
that tap on the group, rename it as Akito. Now let's hide the elements
made me reposition our shape over here to make room for our
last illustration, which we will be making
in the next part.
5. Drawing a Pumpkin: Our last illustration is
going to be a pumpkin. So let's go to our Layers panel. Let's hit the plus button, and let's go and select a different color
for our elements. So go in here to the Kurds
selecting pumpkin outline. And what we need to do is to
create a vertical ellipse. So again, creates
an analysis as best as it can hold in
the Apple pencil. And when you're satisfied
with the results and hold it, I would like to make it a little bit more horizontally white. So I will go to this top
part and I will select Edit Shape and make it a
bit chunkier like that. My name is Dan tapping
on the screen and we need to change the
color of the inner part. This time we won't use the same color as we used for all the previous
illustrations. We will go to the
colors and we will select pumpkin body
color right here. So drag the color, recolor it. And what we will need to
do is to make a lot of copies of these elements to
create the whole pumpkin. Firstly, let me make some
room for these elements. I will go to the avocado and
I will move it even more. I will move my elements for the pumpkin with an arrow key, maybe make it a little
bit smaller this time. And what we need to do is to create a lot of copies,
as I said before. So go into our layers, swiping it from right-to-left,
choosing Duplicate. Now, go to the bottom copy, go to the arrow key and move
your applicant to this site. So let's make it a
little bit smaller by dragging one corner of our bounding box and
reposition it in that way. Now deselected, now go again to the layers and make a
copy of this layer. So again, selecting
this bottom one, swipe in from right
to left, duplicate, go into the boards and Copy, go into the Arrow key, moving it to this side
and making it smaller, positioning the way you like. And let's again go to our layers and we will create more copious. So I will go to this layer. The second one, I will go
to that duplicate option, go into the Arrow key, moving it to the other side, deselecting it, go
into the same layer or the layer that we used
for the right some elements. So for example, let's go for
that, making duplicates, moving it to the site, Let's deselect it and make two more copies to
finish up our shape. So again, go into the
layers, making a copy, moving it over here
and one more time, go into the layers. Duplicate, move. If you want to adjust them, just go for it. And if you are satisfied
with the whole shape, we will need to go and combine
all the layers together. So I would like to
change these two shapes. I would like to move them down. So just holding the
layer, moving it down. And the same for the next one. I would like to make
them a little bit bigger than the same
for the next one. So let's go into the heirarchy using free-form methods and
making it a bit bigger. I would also want to change
this very first elements. So probably go in and making
it bigger to your goal right now is to create a shape of
the believable, cute pumpkin. So when you are satisfied with
ARAF and we are giving to our layers and we are merging
all the layers together. So you can do it by going
and tapping on the layer, go into merge down, or you can put one
of your finger on the top layer and the second
finger on the bottom layer. And just make a pinch moment to combine all the
elements together. So now when this is done, let's move on and create
the shadow over here, creating one more layer, setting it as a clipping mask, go into the icon and choose
multiply blending mode. Let's set it as 30%
of opacity this time. Now, go into the colors, go into these pumpkin shadow and go into one
side and creating the shadow or the whole shape of our pumpkin manually
recolor on it. And this time, I would also
like to go to the bottom part of our pumpkin and create a shadow to these two
elements as well. Just going over these two parts and creating this
shadow, as you can see, as we have created
our outlines and our flesh part of the
pumpkin on one layer. We are going beyond the frame, going beyond the outlines. They are changing colors, so we need to be very accurate. And if we will ensue far beyond, we will grab the eraser
tool and we will go and try to get rid of these
little overlapping line. When it's done, maybe 30%
is a little bit too much. So let's try out the
different value. Let's lower it down. Let's say 20 per cent. We can always get
back-and-forth and change the things if you think that
something is not working. And when we are done
with the shadow, Let's add this term to the top. Creating one more layer, go into the colors, go into the pumpkin stamp. It will go over this area and we will create a curve like that, and we will replicate
it on the other sides. Now finishing up
these two lines with a curve that is convex and going over the
bottom part and creating the same
convex curve there too. Now, if you want,
you can go with an eraser tool and
adjust your sheep, adjusted here to see what's
going on under it to make it perfectly
positioned elements, you can go and four now, decrease the opacity, change
what you need to change, and then get this opacity back. I would like to
change this part over here and I will go and increase the opacity
to the maximum. So now when we have this term, Let's add a few details to
it and a little shadow. So we want to create a new layer because
it's too much work. We will go and tap on it, and we will choose alpha lock. With alpha lock, we will go
and select a different color, is gonna be Stan
details and shadow. And we will go firstly
to the top and we will create their round
cards over here. And we will add a few lines to make some segments
onset of the step. When it's done, we
will go and create one more layer and we are
ready to add the face. So I'm going to the palettes. I'm choosing eye's color. I'm increasing the size
of the brush probably to maximum or somewhere
near the maximum. Let's try maximum. Yeah, it's working. I'm going to the lower part of my pumpkin and I'm adding
two dots for the eyes. When this is done, I will go and select
the mushroom color, decrease the size of the
brush and add two highlights, or are there, you can
repeat the highlights the same way as you added
them to the mushroom. Or you can make them bigger and add them to the
different side. It's up to you. Now let's grab the same color
that we used for the eyes. Let's decrease the
size of the brush and let's add a mouth. So I will go somewhere
in the middle of the ice area and I will create
a little curve like that. When it's done, Go
into the top part and creating a straight
line over there. If you need to
adjust some places, manually go and adjust them. Go to the mushroom or owning cheeks and add the color to
the inner part of the mouth. If you want to move them out, you know what to do, you will need to go
to this S ribbon, use the freehand method
cell like this part. Go to the arrow key and adjust your placement
of the mouth. So I will leave it as it is. And the last thing
that we need to do, well, it's not the last thing. We need to add the cheeks and we need to add
the highlights. So let's start with the cheeks. We already said the
color for the cheeks. We can go and create
the shapes for them. Probably this color
is not working. Let's switch it to these inner mouth shadow
because it will look better. Let's go over the bottom
part of the eyes, and let's create two shapes that will represent the chicks. So I created one
cheek and I would like to go and
make a copy of it. So go into this S ribbon
selecting the elements, go into the Arrow
key, making the copy. So I pin from top
to the bottom copy, swiping from top to the bottom, paste with this arrow key, moving it to the other side,
positioning if correctly. And let's go to the layers, combine these two
layers together. And the last thing that we will do is aging the highlights. So again, tapping the Plus icon, go and select a different
color, this one, mushroom. And we need to set
this layer as ads. And let's set the
opacity to 15 per cent. Now go into the
opposite side from the shadow and adding a few highlights
over the top areas. Now our elements are fully done. Let's just go and make the
folder for our pumpkin. So we're selecting every
layer that we used, grouping it, It's happened on
the group, rename pumpkin. We can reposition the elements, we can rotate them, we can just find a better
placement for them. So let's just spend a
few moments doing that. And the very last
thing that we will do is creating the new layer. And I will be using
this special brush, which you can also download from the project
and resources tab. This brush is called Spark code. So I will go and add
a few sparkles over our elements just to make them look not so alone on our Canvas. And that's it. Thank you
for watching this class. Leave a review if you
liked it and consider subscribing for more Kawhi
videos in the future.
 Uni Corn, ⭐Kawaii Art Enthusiast⭐