Transcripts
1. Intro: Creating a good and
appealing character is not an easy task, but it is also such a fun one. Hi, everyone, and
welcome to my class. Today, I want to offer you a playful seven day challenge
where we will step by step, create a fun and unique
animal character. You will have a creative task for each day of the challenge, and if you complete all of them, you will get a very detailed and well thought
out original character, which then can be added to your portfolio used for
your books, scenes, stories and fairy tales, or new digital and physical
products like postcards, prints, stickers, t
shirts, and so much more. My name is Kate Key to Freedom. I'm an artist and an illustrator with education in
psychology and design. I have been working on my
skills for many years. Here are some of my works. And one of my favorite
parts of artistic work is, of course, creating characters, making them
believable and alive, evoking emotions and relatable. This process is not
the easiest task, but it can also be so exciting
and very rewarding as the characters that you create can live on in your
artistic world, making your visual stories
richer and more engaging. So in this challenge, we will go through a number of tasks. We will choose an animal you're going to base your character on and have a doodling session
just for the fun of it. I believe that when you are
having fun with your art, it translates to
the viewers, too. You can often feel when
something was made just because it had to be or it
was born from pure joy. Then we will sketch your chosen
animal's realistic shape. Even for cartoon characters, it helps to know the actual
form and build of the animal. Next, we'll try different
ways of sterilization, add some visual features
that will express our character's
strongest in or traits, explore different
color variants, poses, facial expressions,
and activities. And on the last day
of the challenge, we will create a finished
illustration of the character. At the end of the challenge, you will have a fully
developed character with detailed character
sheets showcasing their different expressions and poses and the final
illustration of them in action. A well thought out
appealing character can attract people to engage more with the
stories you tell and also increase attention
to your products. Also, the character design skill is very useful when working with various types of commissions from design
to book illustration. And the character sheets
will make along with the final illustration can serve a good representation of
your work in your portfolio, especially if you don't yet have many projects to showcase. So let's make some
fun characters together. See you in the class.
2. About the Project: We'll have seven mini
projects in this challenge, finalizing them with a
finished illustration of your character in all of
their beauty and grace. Doodling just for fun is a must. No references first, pure joy and working
from imagination, memory, and a
childlike attitude. Now it's time to check ourselves and see how those
animals really look. It's good to learn how
the animal is built in real life before
starting to stylize it. Next, we move into
stylization techniques. You can use the templates I have prepared for you attached to this class or do it your
own way in a free form. Now it's time to
think a bit more and define some key traits
of our character. Then see how these traits can be expressed in
their appearance. Then we'll experiment with different color combinations and we'll get to a more
difficult but also very rewarding part,
character sheets. We'll try to imagine and draw our now somewhat
defined character in different moods and poses, doing different things and having different
facial expressions. Finally, based on all the
material we've generated, we'll create a finished
piece, a final illustration. You can choose how you would like to work with
this challenge. You can either do it
seven days in a row as the title suggests
and dive deep into character
creation or choose a more relaxed and comfortable
pace that works for you. Go slower. There's
no rush or pressure. Don't forget to upload your pieces to the
project section. Again, you can do
this in two ways. Upload them one by one
right after each task. Then return and edit your
entry to add the next ones. Or you can upload them altogether in the end
of the challenge. Either way, I can't wait to
see all your characters. But before we move to
the challenge itself, let's take just 1 minute to
talk about the materials.
3. Materials: You can complete all the tasks either with traditional
materials or in digital. If you're doing it in digital, you will need your tablet, digital pen, and any drawing software that's
comfortable for you. I will be using my iPad, Apple pencil, and Procreate. You can download the additional files with
templates that I have prepared for you and open them directly in your
program of choice. Or you can decide
not to use them. Don't forget to save all
your sketches and tasks. I'd advise you to stay them
all in a separate folder or to the folder dedicated
to your art if you have one. If you're doing it with
traditional material, you will need paper sheets or a sketchbook and your
preferred medium. For most of the tasks, I'd recommend using less time consuming mediums like pencils, crayons, pens,
markers, et cetera. These exercises are intended
to be messy and fast. If you really want,
you can spend a bit more time
on the last task, the finished illustration
of your character. Here you can use
different mediums like gouache or watercolor, but also nothing
stops you from using the same materials that you
used for the first six tasks. You can use the templates
prepared by printing them out or simply use the
structure as a reference. If you don't need them,
just do this your own way, please save all the
separate sheets together in one folder if you're not
doing it in a sketchbook. They will all be useful
for the final piece, as well as for your future
projects with this character. Okay, now that we are ready, let's begin our challenge.
4. Day 1 - Let’s Doodle: And here is the first
day of a challenge. Today, we're going to
focus on having fun. First day, we need to decide which animal you're going
to base your character on. It doesn't have to be an entirely real animal
character in the end, but see if you can take the
real one as an inspiration. If you have a few animals
you're choosing from, just take all of them
today for the sketches. And if you have already one
favorite, stick with it. You first task will be
just to start doodling. Draw whatever comes to
mind with the animal you choose and don't look
at the references yet. Try to recreate it
from your mind. Don't bother about mistakes. They can actually be
very valuable to us. Don't delete or erase anything. Even the sketches
that you think are ugly. We need all of them. Of course, you can
do this exercise both in digital and with
traditional materials. But I would actually recommend using paper and
pencils for this one. This will help you to resist
the temptation to erase a sketch or undo
the uneven stroke. Just let everything
go as it goes. We'll aim to fill one, two pages with these silly doodles. Try to let go and fully
release yourself. This pat is not
about perfection. My character, Silly Wolf
was actually born this way. I was sitting in a
cafe and felt tired, so I just put away my work for some time and started
doodling to relax. I drew these sketches, and when I shared them
on my Instagram stories, I got more attention than usual. I got more comments. People wrote that it was such a funny creature and
reminded them of their pets. Since then, Silly Wolf
started to appear in my different illustrations
until he eventually got an account of his
own and his own story. But my main point here is that the fun character appeared because I was
genuinely having fun. I think it definitely translates
into your work when you actually enjoying the process and not putting too much
pressure on yourself. This energy goes into
your character for sure. So let's have some fun. Wake up the silly
energy and doodle. Do it until you are
satisfied with the results, but make at least one page. Upload them to the
project section and necessarily save
them for yourself. They will be our guide
in the next exercises. I will see you on the
next day the challenge.
5. Day 2 - Learning from references: Welcome to the second
day of the challenge. Do you feel energized
by our first task? I hope you do, because today we have some more
serious work to do. Last time we worked
from our memory, today, we'll work
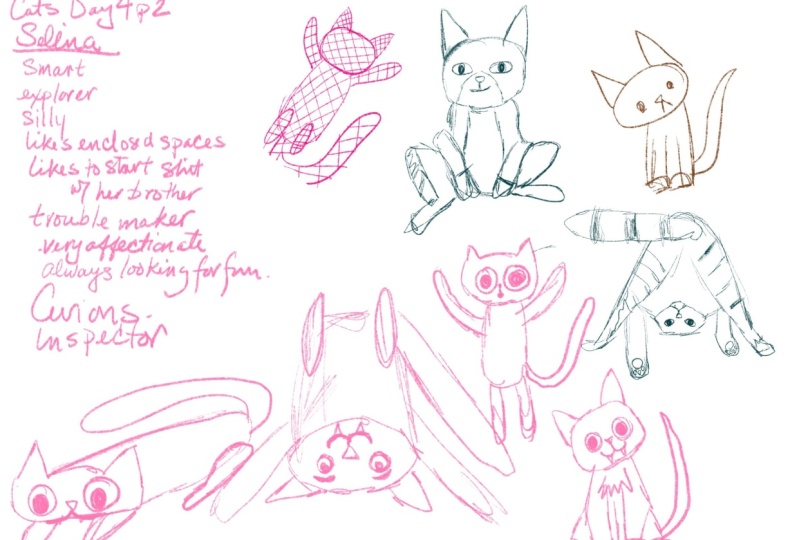
with references. You chose an animal. In my case, it will be a wolf. And now it's time to check
how real wolves look. Search for some photos of the animal you chose to
base your character on, and let's sketch a few of them. Try to find photos with
different poses, for example, how your animal
looks when sitting, walking, running, or sleeping. Check out how the head looks
from the side and the front. If you have little experience drawing this kind of animal, I would also recommend looking at how the skeleton is built. This is especially useful
when the animal is furry and it's hard to see what exactly is going on under all the fluff. Understanding the bone
structure can help you grasp better how
the animal moves, where the legs start, how they bend, et cetera. Another thing to do is to find a video of how
this animal moves, pose at different
moments and see how it looks mid jump
or while running. You can take
screenshots of them. And as we are working
on fun characters, also search for actually
funny moves this animal does. For example, foxes have
a hilarious way of jumping headfirst into the
snow to catch their prey. Seals take amazingly human poses with their own seal grace. Cats can be found in countless
ridiculous positions. Sketch also one, two of those. So for example, here's the fun
photo of the wolf I found, and here is a very
graceful jump. I love how they run too. So choose a few photos and
make sketches from them. They don't need to be perfect. Remember that these
are just studies. We are exploring a new shape
with our hands and eyes. You can correct your
lines, draw over them. Again, try not to
erase too much. Keep your sketches
messy and alive. If you feel that
some shape is hard to grasp and you
can't quite catch it, just draw it a few more times. In the end, you will also have a few sheets filled
with these studies. Don't draw any
background yet and don't go too much into
details or color. I suggest using just one
color pencil or pen, marker, digital pen,
whatever medium you choose. You can add just a bit of shading to understand
the shape better, but don't over polish,
and that's it. You're done with
the second task. Take your sheets and
make a photo of them or save your file and upload
it to the project gallery. If you already uploaded
the previous test, then just click Add it on your
post and add these there. And they will see you on the
third day of the challenge.
6. Day 3 - Stylization: On this day, we will
work on stilization. Stilization is a deliberate
step away from realism, from showing the objects
the way they are. It is a simplification
of a more complex shape. You can notice stylization
in many cartoons, video games, book
illustrations, et cetera. It can be a very expressive way of showing your
character's personality, conveying a certain mood, and evoking different emotions. Today, we're going to search for a way to stylize our character. For this, we will
do an exercise. Check out the additional
materials for this class. There you will find a helpful grid for
working on this exercise. You can print it out
and draw directly on it or use it digitally in
your own drawing program. Or you can just use it as a guide and draw
freely as you like. We will be focusing on just one color today as
we will be working on shape and the work on color is planned for our
next parts of the challenge. On this page, I have
prepared for you, you will see a task under
each cell in the grid. And let me explain
each task one by one. The first one is geometry. Try to draw the animal you chose using just
geometrical shapes. Here are a few
examples of what it might look like, but
don't copy them. Experiment on your own. Don't treat these pages as something that
needs to be neat. If something goes
wrong, just print more these pages and try again or just draw
in your sketchbook. Next task is ornament. Here you will need to
depict your animal as an ornament or fill
it with ornaments, however you interpret it. The third one is pattern. You can draw an auto
shape of your animal and then fill it with
different patterns. Next one is proportions. So here I encourage you to play with your
character's proportions. What if their legs
were extremely long or on the
contrary, extra short? What if their head was
disproportionately big, or the whole body was really wide or really thin and long? Try to follow your intuition about what might fit
your character best. But don't limit
yourself too much yet. Try different variations, even the funniest and
the ugliest ones. Sometimes the best ideas get born from the ugliest sketches. The fifth task is to draw your character really
smooth and round. Like it's a balloon or a
plush toy or something soft. Let all the corners and lines be round without sharp angles. See if that fits your
character or not. And the last part is the
opposite to the previous one. Try to make your character very sharp with lots of angles, sharp teeth, ears, paws. See how that feels
on your character. And we're done.
In the materials, I offer two cells for each task, but you can always print more these pages
and drama sketches or just keep drawing them in your sketchbook as many
of them as you like. This exercise can be quite fun, and I encourage you to put all the critique aside
and just enjoy it. In the end, notice for yourself which sketches you
feel most drawn to. Which ones are the funniest
or maybe the ugliest. Which ones feel more emotional, more like the character
you want to create. Later on, we will use the
jams that you have found in this exercise to refine
the final version, and we're done for today. Great job. I see you in the
next day of the challenge.
7. Day 4 - Adding Special Traits: Welcome to the first
day the challenge. We're already halfway through and half of the job is done. Today we'll work more with the sketches that we did by now and summarize what we have. So open all the files or pages with our
previous exercises, the doodles, the sketches from references,
and distalization. Just sit with them a little. See what feels right for the character
you want to create, what you already like, or simply something that
seems the most fun. At this point, we
can already think more on what these
characters like. What are their main traits, the usual behaviors for them. Often the sketches speak for themselves and
the personality starts to shine through the sketches even before you
have to imagine anything. This is the best case scenario, try to go with things that are already clear
in your sketches. For example, with Mysiil Wolf, it is clear that he is a
funny and mischievous type, probably not obedient or decent. Is a wild and unhinged
animal driven by his simple passions like
food or rest or having fun. I think I drew this kind of
character because I often feel like I lack this
kind of attitude. Everything starts to
seem very serious to me and I need this inner
trickster to shake things up. Also, I feel like I need not to be so obedient and
proper sometimes. This can be also a key
to your new character. What traits do you feel
you need right now? What things would you do if
you allowed yourself to? Do you need more relaxation or to the contrary,
more seriousness? Asking yourself these questions while looking at the
sketches you already have might give you a clearer
and more vivid idea of what your character
should be like. Write down some of the main characteristics of them either directly on your sheet of paper or on a layer in your
drawing software. Three to five traits
will already be enough. Now to the practical part. Think about what visual features will emphasize these qualities. What proportions, what
attributes or accessories or styles will tell about it to
the viewer without words. For example, My wolf's stucko tongue in
most of the pictures shows him as probably not the brightest but wild
and excited creature. He's not worried much
about how he looks. His teeth show that he is still a wild animal and
can be drawn by wild instincts and the sharpness of the lines tells
about his messiness. Ram shapes would make him too cute and soft, but
that's not what he is. He is cute in his own way, but he's also weird and clumsy. Of course, such
interpretations are not universal and different
combinations of features will create
different impressions. So concentrate on the feeling
you get from your character and see if it fits with the traits that
you'd like to give them. And we will keep on sketching
your character now, trying to combine all
the good stuff that you already found through
previous exercises. We are trying to define
the way they look. In addition to that, give your character a couple
of distinct features that we were talking
about something that would tell visually
about their personality. Some other examples of
such features might be. If your character is very
talkative or even gossipy, you might give them
a very big mouth. Or if they love to
run and really fast, they might have exaggeratedly
big and strong legs. Maybe they are always dressed in a giant hoodie because they're shy and hide there from others, or they're easily shocked
and have giant eyes. These are very simple examples, but I'm just giving you hints to help direct your thoughts. So as a result of this day, you need to settle
on a more or less satisfying shape
for your animal. Do not get distracted
by the colors yet. We will work on them on the
next day of the challenge, but you need to have a somewhat finalized
look of your character. If you feel stuck, you can just choose one of the
doodles and sketches you already drew before and just try to polish
it a little bit. Your character doesn't
have to be perfect, and it will still
change all the time. So for now, we just
need a version that we can continue working on. Nothing is set in stone. And if you're done,
that's it for today. Show me sketches. I just adore seeing the process from which the
characters are being born. And in any case, save all the materials from the previous exercises for yourself. They all will be useful. I will see you on the next
day at the challenge.
8. Day 5 - Color Variants: So we are on day five of our
character drawing challenge. And today, we're going to
work on color finally. So take out your color
pencils, markers, pens or open the color
wheel in your program. To make work easier, you can first draw an outline
of your character without colors and then paste it
multiple times on your canvas. If you're doing it on paper, you can print out
the outlines and try different variants
by coloring them. Of course, you can also do
rough sketches by hand. They don't have to be
very neat and perfect, just some quick,
similar sketches. And now let's start
with coloring. Think about the main color
you want for your character. Try it first without
shading or too much detail. See which color fits your
animal's personality best. Next, add any additional
colors for clothes, accessories and other features. My wolf doesn't
have any clothes, so his body is simply one color, but he has bright orange eyes, red tongue, and white teeth, which also add up to the
whole image and make it much more curious than
if it was just all blue. An easy way to find
good color combinations is by using a color wheel. The colors on the
opposite from each other, complimentary colors, create the biggest contrast
and a vibrant look. Colors that are
next to each other and will analogous colors. Create a softer impression. If you're using the
second variant, consider adding some small
contrasting details. It will make it much
more interesting. You can also create different
types of contrast like dark versus light or cool
color versus warm color, saturated versus muted tones. I talked more about
color theory and combinations in my other
video here on Skillshare. It is called color theory and how it can help you
in your artwork. Check it out if you want
to dive deeper into color. Also, you can find
inspiration from real life. Notice interesting
color combinations in your house or on the street
or in someone's clothes. You can try to recreate them to see if they work
with your character. Another way is to look
at art for ideas. Go to a gallery, find a piece that you like because of
its colors and try to remember or make some
sketches or take a photo of the fragments that
you like coloristically. Again, try it as one of the
variants for your character. You can find ready
palettes on interest or on special resources or
take them from photos. I talked about it in my video dedicated specifically
to color too. But this time, I wanted to encourage you to search
more in the real world. This makes you more attentive to your surroundings and also makes you analyze
what you see more, which is the essential part of learning to work
confidently with color. If you see, let's say, an interior of a cafe that looks nice in
terms of calistics, try to think why is it working? What combos are used? What contrast is there? What parts are looking
especially good with each other? What is the main, the dominant, and what are the
supporting colors? By main, I mean taking
the most space. The proportions of color
are important too. When one color is dominant, you can add other
contrasting colors. They usually take
much less space on the drawing but make it more
distinct and interesting, as I showed you with my
wolves eyes and tongue. Create a few color versions and see which one
you like the most. Once you've chosen
your favorite, you can go further into detail. Think if you're going
to add shading and light areas or will
your colors be flat? Then sketch one, two more
detailed color variants. And as soon as you're happy with it, we're done for today. Our character is
fully assembled now. We have all the parts and
now we can work on them in motion on our next
day of the challenge. Applou your color variants
to the project section and I will see you on the
sixth day of the challenge.
9. Day 6 - Poses and Expressions: And it's the six of our
character creation challenge. Today we're going to
draw character sheets. By now you already have a finished look of
your character, and now it's time to work
a little bit more with it. Let's start by imagining and drawing your character
in different poses. Think about how they would move based on their personality. In what poses were most
likely to catch them? What do they usually do? Do they spend most of their time sleeping and relaxing
in various positions, or are they always running, jumping, and being very active? Or maybe both? I have prepared the list of
possible positions. You can choose the
ones you like and draw five to seven of them. Try to take different types of poses to show the full range
of motion of your character. Poses you can choose to draw, standing straight, running,
jumping, sleeping, sitting, crawling, dancing, standing
back to us, meditating, doing yoga or
exercise, swimming, pulling or pushing something, hanging upside down, et cetera. You can use this list or
come up with your own ideas. Do these sketches quite quick. Try not to sit too long
with each of them. Just try to catch
the basic movement. What can help you
with the poses? If your animal is more of
an anthropomorphic one, you can use people's
photos as references. Also, you can take photos of yourself in the
pose you need. Then you can always exaggerate it for the sake of
expressiveness. If your character moves
truly like an animal, then you will need animal
photo references instead. Again, use them
as a base and add bigger amplitude to make the
movement even more distinct. Just type in cat running, find an interesting angle and transfer the same movement
to your own character. For example, my world can move both like a
human and an animal, so I will use a couple
of human and a couple of animal references and also use my own photos to show
you different options. Personally, I do not use
references that often, so if you feel
comfortable without them, you can proceed just
from your imagination. But it still might
be useful to check out some more
complicated positions. Next, when you've drawn
five to seven poses, let's draw some
facial expressions. Take different emotional
states and sketch just the face of your
character in them. Let's do at least three, but you can always do
more if you want to. Here are the examples of what
expressions you can take. Happy, surprised,
angry, scared, crying, thinking hard,
laughing, suspecting, nervous, shouting, et cetera. Again, if you need
some guidance, check out photo references. Try to catch what makes the face look a certain
way emotionally. Like narrow eyes and
visible teeth are usually associated with anger it lifted brows can
be read as fear. Wide eyes are also
about fear or surprise. You can even practice
in front of the mirror. Imagine you are an actor. By the way, I also
often notice that when I'm drawing a certain
emotion of my character, my face tends to unconsciously have a corresponding expression. You can just keep a little
mirror on your desk. That way you will always
have good references. So after you've made three
to five facial expressions, let's do just a couple
more quick sketches of our character doing something
that is typical for them. Maybe they like
playing tennis or watching the stars through the telescope or
dancing flamenco. You can also make
a funny variant, find some unexpected
thing that we would never think this
character could do. Maybe it's a giant rnosas
with a passion for Blet or a big and fierce
pair who likes to crochet or a cute small bunny
who's into heavy lifting. Create a contrast. They often
look fun and expressive. Make just a couple of
these keeping them quick, just to catch the idea and understand your
character better. These exercises are
probably the most challenging and time
consuming in this challenge, but they're also very useful because you get to know your
character better and you don't get stuck in
the situation where you only know how to draw
your character in one pose. Instead, you understand
how they move and react, and this makes your art more
dynamic and interesting. The character won't just stand
in one stiff basic pose, but will actually
start to live in your illustrations
and sketchbooks, telling their own story. Take your time with
these exercises. If you feel that you need
a little bit more time, you can always take
an extra day for this task or return to it after you are done
with the challenge. Character sheets are very
important for portfolios. If you're looking for work that includes character design, if you plan to put
these into portfolio, you might need some additional
time to polish them, add color and organize
them on the sheet. If you're doing it in
digital, it is very easy. Just keep them on
separate layers and arrange neatly
after you're done. Drawing on paper will take
some additional planning, but you can basically
scan or take a photo of them and then cut and
arrange them digitally. If you don't need these
sketches for portfolio yet, just save them for yourself and upload them to
the project section. No need to add color
unless you want to. We are always at the
end of our challenge. The next day is the last one, so make sure you have all the exercises that we
did during the challenge. I will see you on
the seventh day with all these beautiful
and hard work.
10. Day 7 - Final Illustration: We are on the last
day of our challenge. Congratulations. So by now, you already have an
extensive collection of materials about
your character. And using all of
it as a reference, we're gonna make a
final illustration. First, we need an idea. Maybe by working
only on sketches, you already had some
funny thoughts or possible situations that you can depict your character in. If not, you can take one of
the poses or activities we sketched on day six and
think about the context. Where is your character? What surrounds them, and
what is happening to them. This time, I encourage you to draw not just the character, but also the background. Start by exploring
different ideas. Make some sketches, try
different compositions, choose a sketch that
seems to work best and make a bigger and more
detailed version of it. With this sketch,
you can already move to the final illustration. Use the colors
that we picked for your character and
make sure that the background color complements them and that the character
is seen well on it. Usually, it means that
you need a darker or lighter background than your character to
create contrast. You can test different
color variants by making small thumbnails. In digital, you can just copy and paste your little sketch. On paper, just quickly sketch your composition very
roughly a few times. Focus on the main colors first, the background and all the biggest elements
of the illustration. Once you find the color
combination that you like, start drawing the final piece. Don't rush. Feel free to go at your own pace if
you need to spend more time on this part. Also, use any medium you like. Don't make the format too large if you're drawing
with traditional materials. A four or even a
five would be great. A And we're done. It was a lot of work, and now you have your
amazing character. Upload your final piece
to the project section, and let's summarize what we've learned in the last
part of this class.
11. Summary: Congratulations. You have
finished the challenge. We've been on such an
amazing journey together. We let our imagination run
wild and drew like children, then sketched from
references like prose, learned to use stillization, added vivid personality traits, worked with color, poses, and expressions,
and finally created a full colour illustration of our character in
all their glory. It is truly a lot. If you feel like
you need to spend more time on any part
of the challenge, you can always go back
and work on it more. Also, you can repeat
the challenge, but with another character. Your new character now can
go into your portfolio. You can put them on your products like prints
and stickers and cars, tell stories about them or
even make a book or comics. This character can
also appear in your other artworks with
your other characters, which will help you to create a rich and populated
artistic world. I am really excited
to see what you have created in the gallery. Let's all share our
fun characters and creatures and all the messy sketches
that brought them to life. I'd also be very grateful
if you leave me a view. It really helps me to
improve my classes. You can always ask your questions and just say
hi to me on my social media. I hope you enjoyed this
challenge. Thank you for joining. Check out my other Skillshare
classes on color theory, composition, human character
design, and others. See you soon and
happy drawing. Bye. Mm hm.
 Kate Grishina, Illustrator, artist