Transcripts
1. Intro: Isn't it fascinating to have your own illustrations and characters turn
into three D world. For example, becoming
a clothing print, a sculpture, or an
embroidery piece. It seems in a way that
our art comes alive, and our drawing skills come in really handy in
these kinds of project. Hi. My name is
Kate Kita Freedom. I'm an illustrator and an artist with a
psychological education. I have been drawing
for over 15 years. Here are some of my pieces. Right now, I'm working on
a big project of mine, creating a deck of cards and sharing my process
on social media. I also have a Nazi shop with my prints, postcards,
and stickers. So check out my accounts if you're interested and say, hi. I always love to meet
new creative people. I just love to apply my drawing skills to
handmade projects. I'm always crafting something. Dance and party costumes, masks, toys, and
many other things. And my art skills help
me a lot in this. In this class, I
want to show you how your illustration
skills can be applied to create your own
unique embroidered broche to enhance your clothing. And also to advertise
your art without words, because for sure,
everybody is going to be asking you questions
about where you got this. I'm talking from experience. First, we will make
sketches of our character. You can take your existing OC or create a U one from scratch. Then we'll adopt our
drawing for embroidery and think through the colors and materials that we will need. The next fun part
is shopping time, picking the thread, beads, and other materials
for our future bruh. I will cover all
the necessary tools in the separate
part of the class. After we get all we need, we will transfer our sketch to the fabric and make
the embroidery. Add the finishing touches such
as covering the sides and attaching the pin and
v. The brush is done. Don't worry about
your drawing level. I will explain
everything step by step, and I'm sure that even if
you have never drawn before, you will be able to
make this project. Treat it as a fun experiment. Isn't it curious where
it can lead you? Maybe you'll become an
emportory artist or create your own unique wardrobe. In any case, you will add a new medium and a new
technique to your skill set, and our art practice always
benefits from such things. This class is suitable for beginners in both
drawing and embroidery. Of course, the more
skills you have, the wider your means
of expression will be. But the point of this class
is to learn to combine and fearlessly experiment with
two different fields. In our case, illustration
and embroidery, and that always brings
exciting results. Grab your creativity and let's
go. See you in the class.
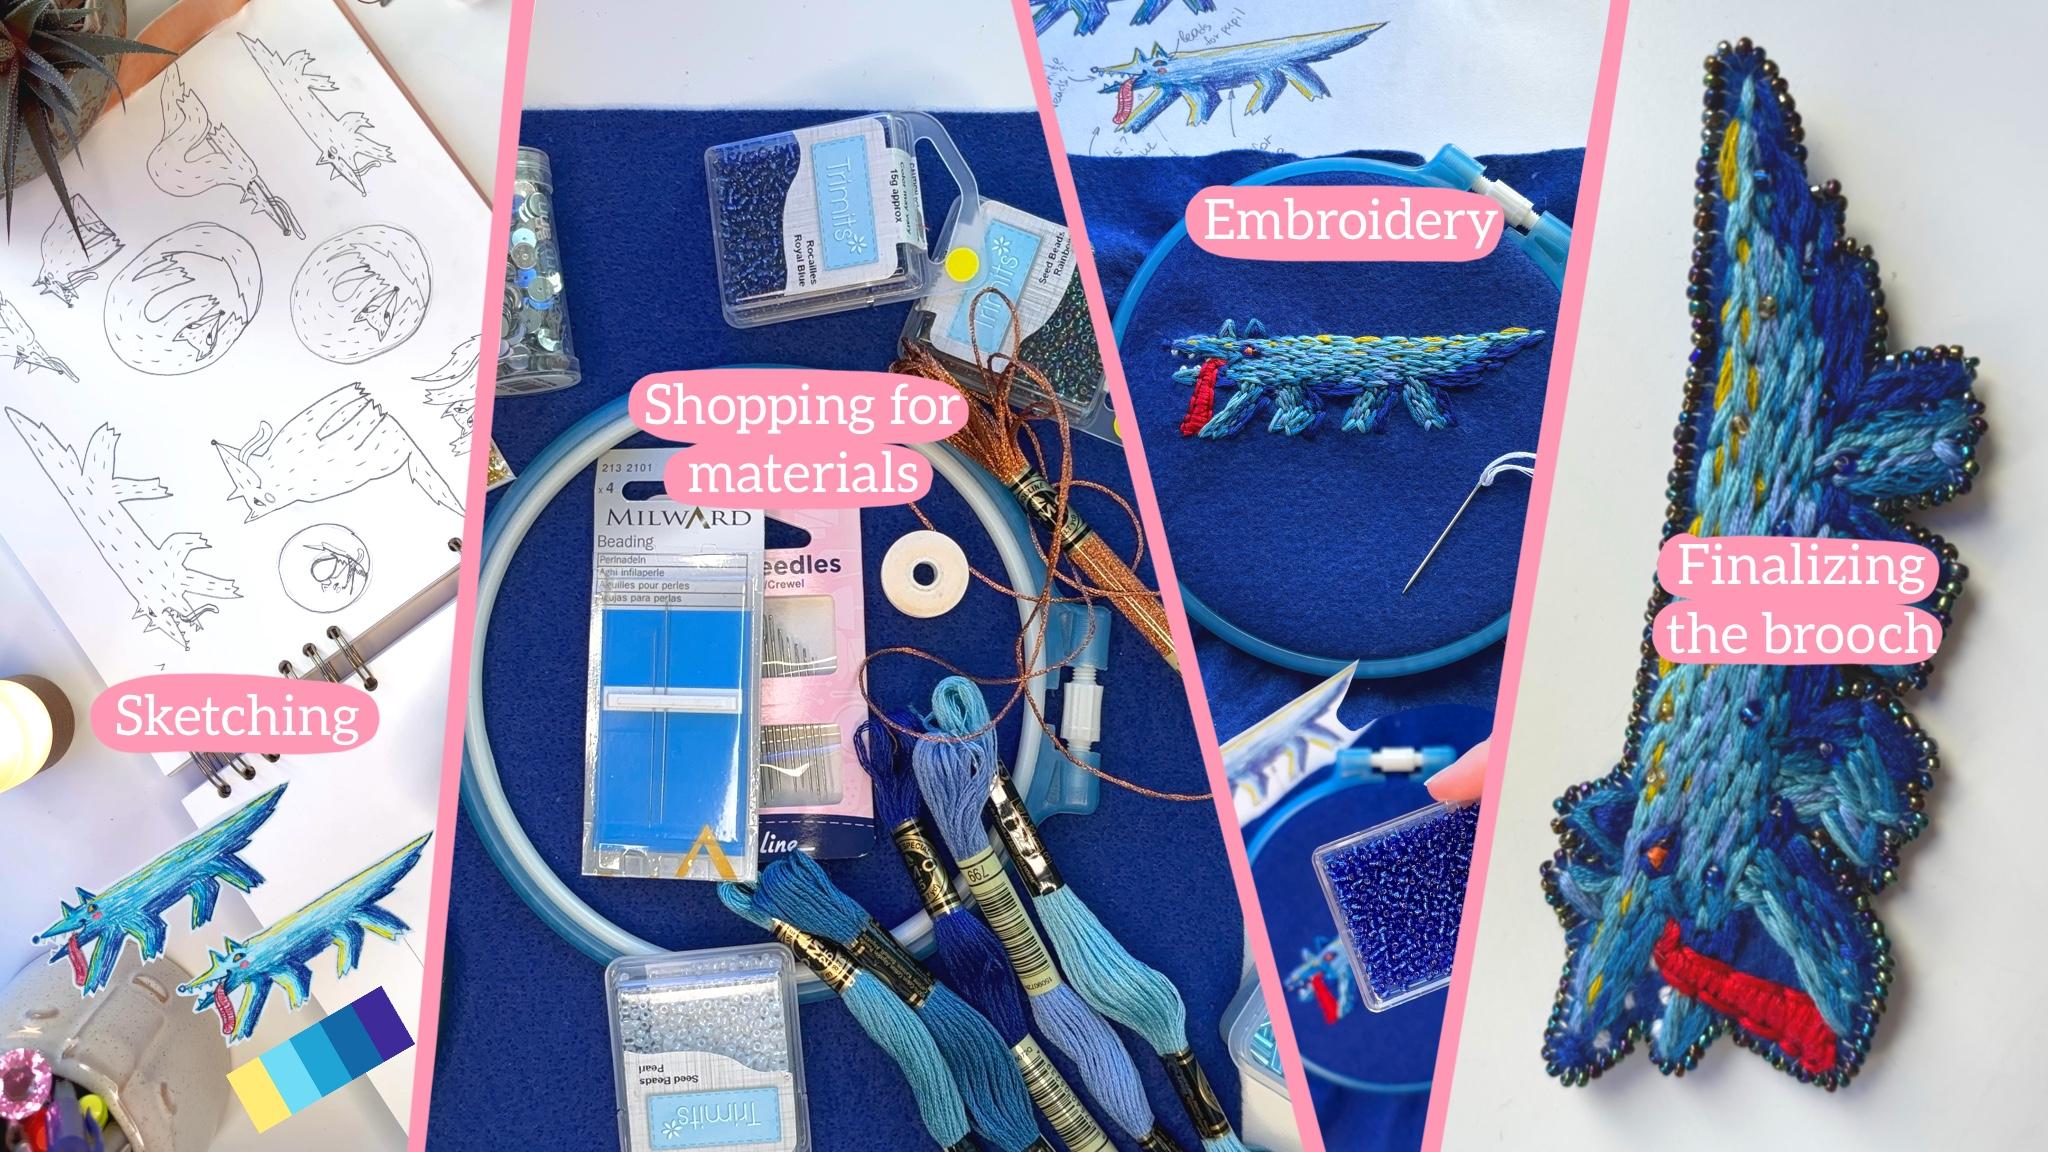
2. The Project: So our project is a whimsical embroidered patch or bruh made from
your illustration. First, you'll need to make
sketches of your character. Think of who or what
it might be and also look for a suitable
shape for the bruh. Then we'll also
add color sketches and determine which
thread we'll need to buy. At this stage, you can think of the textures that
you want to create. I will encourage you to
sketch with pencils as pencil strokes transfer
perfectly to thread stitches. Then we'll go shopping as now we already have an
idea of what we need. Sometimes also the
shop assortment can give us some ideas of
what we want to add. After that, we'll transfer
our sketch to the Feld base, and I'll share a couple
of ways to do it. And it's time to
start embroidering. I'll share with you a
few techniques that will make your embroidery more
interesting and fun. Lastly, we'll need to
add finishing touches. Close the sides of the brush, add the pin, or sew the
patch to the clothing. And you'll get your unique
and amazing embroidery to enhance your wardrobe or give us a gift to
your loved ones. What are we waiting
for? Let's start.
3. Materials: For this project, we will
need sketchbook or paper, pencil, erasor, color pencils. Alternatively, you can use
color markers or pens. A felt sheet as a
base for our patch. A embroidery hoop. Mine is 16th centimeter
in diameter. Something around this
should be enough. Embroidery needles
with larger eyes, thread for bead
embroidery, scissors, embroidery thread in the
colors of your sketch, optional beads and sequence
of different shapes, and a thin needle
for bid embroidery. For the first part of the class, you'll need just the
first point of the list. And I advise you
to go shopping for thread only after you
already have your sketches. It will allow you to avoid buying things that
you don't need and not get stuck in the choice paralysis that craft
stores sometimes give us. I will also explain this in more detail later in the class. If you have your
sketchbook and pencils, you're ready to go.
Let's get to work.
4. Sketching: In this part, we'll create our drawing for the embroidery. There can be a few variants. You can draw your existing
character that you like. You can create a new
character from scratch. We can draw just some fun
objects like flowers, pastry, vegetables,
fruit, et cetera. Some advice before we start. We don't want to make this
embroidery too complicated. Start with simpler shapes. The outline should be
readable from a distance. We aim to play with
texture in this project. When texture is saturated, the shape is better be simpler. Also keep in mind that
this shape will be cut out and we'll need to embroider
everything inside it. Of course, it is
possible to leave some blank spots inside and
play with a base color, but I would advise to
keep it simple this time. Let's start sketching. First, you can just randomly sketch your character
or object in different positions and see which one fits better
for the embroidery. Don't restrict yourself
too much in the beginning. We will choose the
best option later. Now the purpose is just
to make more sketches. I will be drawing my
silly wolf character. I already have an
idea of how he looks. I just need to choose which position I would
like him to be in. When you've done the sketches, see which one you like the
most as a future patch, and see if you can improve
it even more, for example, by simplifying the shape and getting rid of
unnecessary details. Don't think about
texture or shading yet. At this point, we just
need a clear outline. Take your outline and draw it in the actual size you needed
to be for the bruh. Keep in mind that
it needs to hold its shape on a pin
if it's not a patch. You can use tracing paper and carbon paper to
duplicate your drawings. But for color sketches, it's not necessary as we don't
need the exact same shape. We just need to do the
thumbnails of our color. When you have your final sketch, let's unpack our colors. It's best to use color pencils. But if you have markers or
pens, they can work too. My first advice is to make rather short strokes
along the shape. It of course depends a lot
on what you have drawn. If it's an animal with fur, then notice how the
fur direction goes. Usually, you need to follow
the shape of the body. With objects, try to think about what stroke direction will
highlight their shape. Another thing to think
about when drawing is, of course, the
colors and shading. Choose the main color and then think which color your
shade and light would be. For example, my wolf is blue. My shade color will be a darker
blue and a bit of violet. The lid parts will
be a lighter blue, teal or maybe even yellow. You can always use the
same color techniques and palettes that you
normally use in your drawing. If there are some
elements inside of your drawing like
eyes or ornaments, stars, think if you can
highlight them with beads. Also try to imagine which shape and color
beads would work for this. For example, in this pumpkin, I used white round
beads for the white of the eyes and dark iridescent
beads for the pupil, and tubular beads
for the lashes. Want to add sparkle, you can use sequence of the
same color as a thread, or to the contrary,
a contrast in one, such as classic silver and gold. I sometimes even make notes for myself near my sketch
about what goes where, and write down the
beads or thread. This guide makes it a lot easier to shop for
the materials later. Also, I should probably
say that I'm not following any traditional starles of
embroidery with strict rules. I encourage you to experiment
in any way you want and use thread freely as if you're coloring
with your pencils. Your pencil strokes
equals stitches. That's how you can plan ahead, how your embroidery will look. Of course, keep in
mind that with thread, we have to achieve
mixing of colors by mixing different color
strokes together. Visually, they can create an
illusion of a third color. This more free way
of stitching creates a more fun and
contemporary look for the embroidery and makes
it more dynamic and alive. Here are a few examples
for your inspiration. So sketch until you get
to the variant you like. Also, you can share
your sketches along with your final piece
in the project section. Make sure that your final
sketch is of the right size, the same size that you
need for your bruh. And if you are all
set with that, let's move on to the next stage.
5. Shopping: Now we have quite a clear
guidance of what we need. Now we can head to the shop. You can order everything online, but I personally prefer
to go to offline shops. As you can touch everything and see the actual scale of it, the colors can also appear
quite different on the screen. I'm using the
classic DMC thread, but you can use whichever
thread you have at hand. Also, you can use
thicker thread like this if you want more
volume and texture. But keep in mind
that it is harder to make details with them
on a small scale, as they are well thick. Choose five to seven
different colors. One or two for light areas, one or two for darker regions, and two or three shades
of the main color. This will create a
more complex and interesting color scheme
for your embroidery. You can also add some
accents, a metallic thread, a bright contrasting
one for the details, or something for the
contour if you're doing it. Think about the color
of your edge to. You can either
make it invisible, the same color as
everything else, or use a separate color. You can also just leave the
felt base along the edge. But if you're doing
it, make sure it's the right color that
you want in the brush. I'm using these
fake felt sheets. They come in
different colors and are quite easy to embroider on. If you don't have an
embroidery hoop, grab 12, a 16 centimeter or 20 centimeter in diameter
should be enough, but make sure that
it's not bigger than your felt sheet
because otherwise you will not be able to
secure it in the hoop. Also, you will need
an embroidery needle. They usually come in small packs like this and are different from regular sewing needles because they have bigger needle
holes to fit the thread. The thicker the
thread you're using, the bigger the needles you need. If you use in beads or sequence, then you need beat
embroidering needles. They are very thin to
fit into the beat holes, and you need beating thread. I use nyn beat and thread. It can be found in
different colors, but I usually just use the white one as it fits
my various projects, and you need the beats and
sequence themselves with colors and shapes depending on what parts of your piece
you will use them for. So use your imagination and let the shop assortment
inspire you. I usually try to go with
what I already have at hand. But of course, if
you have in mind, like a particular
kind of piece or sequence that you want for the project, totally
go for that. It will be worth
some search time. Next, if you're making
a bruh, you need a pin. Craft shops usually have them. If you're making a patch,
then nothing else is needed. Just a threat to sew your
patch to the clothing. That should be it.
I recommend to write yourself a list of
the items that you need before going to
the shop and also take your sketch with
you or a photo of it. This way, you will always have
a guide to check in with. If you need some
help in the shop, you can always show
the consultants your sketches to explain
what you're looking for. Let's meet after your
shopping is done to get to the next part of our project,
actually embroidery. Finally, see you in the
next part of the class.
6. Embroidery: Now we've got everything we need to start our embroidery process. First, let's prepare
our felt base and put it into the hoop. Try to leave enough
material so that we can also cut out the back
of our brooch from it. Take a felt, unscrew the hoop, and place the felt into it. Stretch it evenly, try not to create excessive or
uneven stretching. Then screw the second
part of the hoop tight. Now we need to transfer
the sketch to the fabric. We can do it in various ways. If your base is
light, you can place your fabric on top
of the drawing and hold them up to the light. For example, press them against the window and draw
over the contours with either a water soluble
marker or to the contrary, a waterproof liner, so that the ink wts much if
you wash your clothes. If you felt is dark like mine, you can draw on top of it by looking at your
drawing for reference. Or if you don't feel
confident enough, you can cut out your sketch and draw the outer
line around it. Again, a waterproof liner or white pencil
might work as well. Then I would recommend drawing some guiding lines for the
direction of your stitches. This way, you will always know how to place your stitches. After you've put the
outlines of all elements and the direction of stitches on your base, it's ready for work. Next, grab your thread. First, it's easier to
stitch around your shape, using straight stitches
or backstitches. After you've done that, let's
start filling in our shape. I usually start
with a darker color and move along the shady side. Along the edge, the stitches will be quite close
to each other. But the further you
move from the edge, the more lose your
stitches should become. As we're trying to
create a gradient. Then I move to the next lighter color and
start on the place where the darkest
teches started to get loose and have more gaps. I put my lightest
stitches there. In this way, I move towards
the lightest color. But try to keep in mind
how much of the space the light dark and main
colors should occupy. You can also draw some guidance
for yourself on the felt. For the beads, I usually add them after finishing with
all the thread work, whether it's full
areas covered by the beats or just to add some
sp on top of the thread. Try to fell all
of your shape and don't leave any uncovered spots. Use your color sketch
as a guidance and go deal you're satisfied
with the results. To optimize thread usage. Try not to use long connections
between stitches on the back side of
your embroidery. Keep your stitches close
and proceed in sections. If you need to
regional the part, secure the thread and
start from there. When you feel that your
embroidery is finished, make sure that you have secured all the ends and cut all
the extra long threads, and we're ready to proceed
to the final step, assembling the brush
or patch together. Now, the biggest part
of your work is done, and I'm very proud of you. Take a break, reward
yourself with a tasty snack, and let's move on to the
next part of the class.
7. Finishing touches: Okay, now the hardest
part of our job is done, but we still need to make some careful
finishing touches to our brush to make sure it
looks good and smooth. First, we need to
cut out our shape. Try to make the border with consistent all around the shape. If you're unsure, it's better to draw the line around beforehand. Then use our cut out piece as a standstill to cut one more piece of felt
for the back side. Draw around it and cut
out the same shape again. If you're making a brush,
let's insert the pin. The back side of the pin will
be hidden under the felt. March the length of
the pin on the felt. Keep in mind how the pin is positioned in relation
to the image. Then make small states
in both places. And make sure the
pin ends fit there. Next, saw the pin to the brush. Be careful with the
stitches so they aren't visible on
your embroidery. Try to stitch only
through the felt and always under your
embroidered stitches. Then place the other side
on top through the slates. If you're making a patch, skip the step and move
straight to the next. Now we need to attach
the back to the front. If you decide to
leave the edge as is, and the color of your base
fits the rest of the work, you can sew along
your embroidery using a back stitch and sewing thread of the same color as the base. If you want a sticker like look, you can make perpendicular
stitches and try to keep them as
even as possible. If you want the edge to
match the rest of the work, cut quite close to the
edge of your embroidery, but be careful not to
damage the thread. You can also add beads along the edge. Here
is how to do it. Take the beads of
the color that you want and take the beating
thread and needle. Make a note at the end and hide it between the
two felt layers. Put one beat on the needle. And insert it from the back
through both layers of felt. Get the needle with
thread through. And then put the needle in the same bead one more
time from the back. Repeating again, one
bit on the needle. Needle goes from the back
through both layers, and getting the needle into the same bit
again from the back. Pulling it tight so the bits sit tightly on the edge and
close to each other. Repeat this around
the whole shape. And here's what we get. It is a bit of a tedious
and lengthy step, but it's worth the effort, as it will create a finished and polished
look to your brush. He. Congratulations if
you've done with this step. We are finished. This was
such an amazing work, and I'm so proud of you. I can't wait to see
all your patches and brushes that you've done. Don't forget to take a photo of your bruh patch and upload it to the
project section below. You can take a photo of your fantastic
creation separately, and also maybe on the cloth
that you've attached them to. I'll see you in the final
part of this class.
8. Conclusion: Congratulations on finishing
this rather big project. I hope you enjoyed all the
steps and like your results. And even if something turned out not quite as you expected, I hope that you
embrace it and see it as a fun and
interesting experiment. We learned to sketch and
adapt our sketches for embroidery to choose the right
materials for our project. And to have fun while doing so. We dive into the
fantastic world of embroidery and learn to
draw with thread and beads. I also really hope
that if you had any fears about
approaching embroidery, that they are all gone because you are
creating the rules in your own process and there is no one to tell you that
you're doing something wrong. I hope you now are more open to experimentation and connecting two different fields together, like we did today with
embroidery and illustration. Of course, we now have an amazing new accessory that
will enhance our clothing, highlight our style, and be a great advertisement
for our art. Or maybe it will become a really precious present
for someone you love. Please don't forget to
share the photos of your sketches and your finished brooches in the project section. I'm really excited to see them. Also, if you have any questions, you can ask them
in the discussion section under this video. I will be happy to help. I would be really
grateful if you leave me a review and give me
any feedback you have, this way will know how to make my classes in future
even better for you. Check out my other classes
here on Skillshare. If you want to chat, or are curious about my own
work and projects. Check out my main Instagram
account, Key of Freedom, where I am creating my
own deck of card and sharing the process or my
other account Silly Wolfs, which is dedicated to
the character that I was embroidering today
to the Silly Wolf. Also I have a Nancy
shop with stickers, prints, ports cards,
and other things. And also just come and say, i, I am happy to meet
new creative people. Hope you enjoyed this class
and found it really useful and see you really soon
in my new classes. Bye
 Kate Grishina, Illustrator, artist