Transcripts
1. Botanicals Intro: Hello. My name is China, and I'm a botanical painter
and a portrait artist. It's my mission to help you become the best artist
that you can be. I've created these videos to
help you on your journey. In this class, I'm going to
show you how to use the brush effectively so you can create stunning
paintings like this. Painting shouldn't be difficult. It should be fun, should
be colorful and playful, and especially with watercolor, you shouldn't be
a perfectionist. In this lesson, I'm
going to show you six different techniques to
paint botanical paintings. Play around with pigment levels, how much water you use, and how to use your
brush in different ways. We're going to use easy
methods to help you create standing artworks in
just a couple of minutes. If you don't have a
huge amount of time, this is a perfect
class to just drop into and paint a little
picture here and there. Follow the video and
see what you can do. Don't forget if you're
looking for feedback, copy your picture in the chats and show your
peers what you've made. I think you'll be
surprised how they look and hopefully
in a good way too. I believe that everybody can paint you just need
to be shown how. These easy videos will help you create artworks that
you're really proud of. Grab your paint brushes
and let's get started.
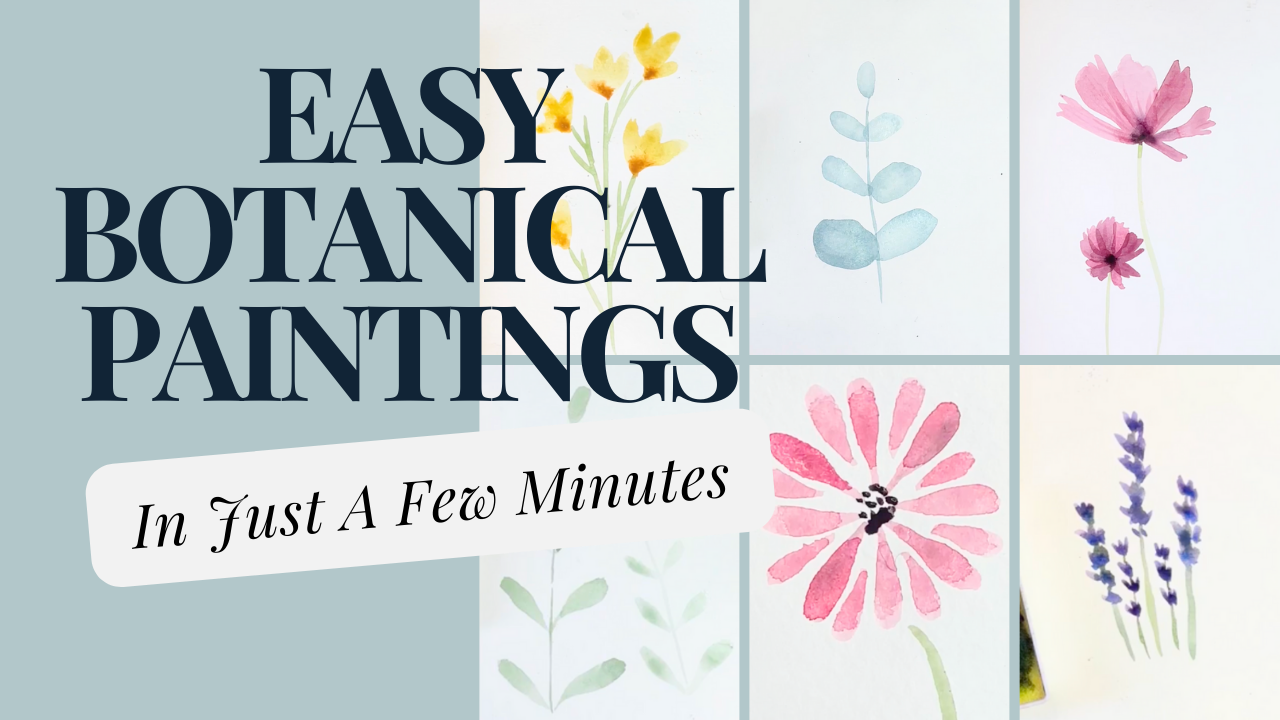
2. Painting 1 - Lavender: Let's start with
our first painting. We're going to
paint this lavender in roughly one to 2 minutes. And I want you to
keep it simple, don't overthink it, and let's
just see how we get on. Grab your brushes and
let's get started. So Let's mix up our color. It's going to be a
mixture of purple and blue to get that lilac feeling. So You might have
two different blues. Try and find the
brightest one just to bring up that intensity. Make sure it's nice and juicy, and then we're just going
to hit it straight away. We want to bring the
brush down and you'll see it's almost in these like little clumps and
we'll go in threes, but allow them to just go
slightly different directions. Whilst it's still wet, we're
going to bring our green in. I have to mix these
two together because it's a really ugly
green otherwise. Mix them in. Then all I want to do is just get a green
going down there. All the way down. And
for pit resistance, we're going to get this blue, juicy blue, and just dab a few little specks in
at the bottom of these. And that looks pretty good. Pretty quick and pretty easy. So the option now is to add a few more and just
grow that lavender field. So I'm going to do that. I've
got all my colors ready. So it really should be nice
and quick. Nice and easy. So feel free to just
watch that minute again, just to double check that you
understand what's going on, and then add as many
lilacs as you want. So you can make it as dense
or as sparse as you want. So I'm going to
add a couple more, see what this looks like first, whether you want to add
the same to yours or not. And yeah, put it in
a frame or give it away as a birthday card.
Such a good touch. You see when it dries,
it's completely different. The blues blend into the purples really well and
gives this lovely, violet feelings really total, and I've not actually had
to think about it too much. Hopefully, yours is
given that same effect. Well done team.
When you're ready, let's move on to
our next painting.
3. Painting 2 - Yellow Buds: A team. Let's try and paint this little bundle
of yellow flowers. Right, girls and boys. First,
let's get our lovely green. So they're a little bit dry. You need to get
them nice and moist and make yourself a
generous amount of green. Now, I mix these two together because they make
sense together, but separately, they're
pretty ******* ugly. So I'll mix my light green, my dark green, and then I'm
just going to do a stem. The stem is going to branch out. So I'm looking for the angles. Just trying to keep
an eye on the levels, making sure nothing is flat, like in a horizontal line, and then just spread them
out a bit like a tree when you're a kid and you're trying
to draw little branches. Just think of that
in this painting. So once you've got your
stem, clean your brush. And then we're going
to mix a warm yellow. Now, my yellow is a
little bit too naive. So I'm going to add
a yellow ochre, just a tiny bit, and
this dulls the yellow, but it still keeps it
in the yellow family, rather than making it
more in the red family. Mixing those together
is a good little shout. Now, just watch how I
push my brush down. First of all, I
want to make sure I've got enough pigment, and I start to
pull the brush and then push down to
make a wider area. And very quickly, this makes
a lovely little petal. Once this is done, I get a thick yellow ochre and just dab that one at the bottom because
it's nice and wet, so it should spread
really easily. So, just watch again and
see how I'm doing it. I'm letting the brush kind of take a little wiggle as well, and I'm just pushing that
paint down to the bottom, so that the bottom of the
petals has the darker section. So it's a little thin bottom, and then a nice chunky
petal as you push down. And obviously, don't forget
to add your darker bases. As this dries, it's
just going to spread that dark color
around the petal, and it's as if you've done
a gradient on purpose, but actually it's just
science doing its own thing. So add some of these. And once you've done your
first layer, let it dry. See whether you want
to do a second layer. Now, this looks great as it is, but I'm going to show you
what it would look like with a second layer and
you can decide whether you want
to do it or not. So the key is
making sure this is absolutely dry first because I don't want to ruin
what's underneath. So I'm just going to do
that same technique again. And I want to let it
overlap a little bit. I'm not too worried about not being able to
see it because, you know, when you've got a
bunch of flowers, often you can't see petals, they're hidden by ones
in the foreground. So just try it. And I'm just going
to use some of the branches that don't
have anything on them. I'm not going to cover it
in too many, and obviously, I'm just going to add that
darker base like we did four. So it looks a little
bit cluttered, but I quite like the density and the interestingness the words? Who knows? The interestingness
of the flowers. So this is what it would
look like if you did loads. So it's up to you whether
you do more or less
4. Painting 3 - Pink Flowers: In this painting,
we're going to paint this lovely little flower
in less than 3 minutes. So grab your brushes,
and let's get started. We're just going to start by
getting the green for stem. So I'm just awakening
this bright green, adding a little bit
of the darker greens. It's not too bright, and trying to look for an average
sort of green. So just see what your
palette looks like. When I'm painting on the paper, I'm adding a bit of movement because flowers usually
aren't straight. They might have a
slight bend to them, so just try and add
this on your picture. Once you've done that,
we're going to mix a red with a little
bit of purple, so it's not too red. Often our colors have a slight
tint of something else. I'm just adding a little
bit of purple if you don't have that add a tiny bit of blue and just see
what you can do. Then I'm going to paint from
the outside of the petal. So I'm pulling that paint down towards the middle where it will meet with the stamen or the ever that central part
is where the goods are. And it's really important that we just add a little bit of a darker color at
the base and let that kind of spread
into the petal. You don't want to overwork
it because it will naturally do it with science. So let's just go
around this flower, and you want these
little like they look like creepy
fingers at the outside. But that's all we're aiming for. And don't forget obviously, just make sure you
dab a little bit of a darker color in the center. And I'm just going to
leave that middle petal, the biggest one for now,
because I do want to go over it once it's
dried a little bit. So instead, I can just move
on to the smaller flower, and do the same technique. Kind of like pulling and pushing from the
outside to the middle, the middle to the outside, purely because of
medium right handed, it's kind of easier to go
in that same direction. But if you want to
rotate your paper, by all means, you can. So give it a few
seconds now to dry, and then we're
going to come back and add the second layer. You can see it's changed ever so slightly just a second ago, I went a little bit lighter, and that means that it's ready for a second layer because
it's going to be dry. I just want to overlap ever so slightly with another petal. I'm just changing the
amount of paint a a little bit lighter
so that we can see underneath and we can
see through the petals, gives a bit of opaqueness, and I want to do the
same on the bigger one. I started on the smaller one
just as a little rehearsal. And now want to go
to the top one, it just fills me with
a bit more confidence. And that's what we
want in painting. We don't want to be scared
when we are painting. So you can add that little darker spot
in the middle again, and that's going to look
really, really nice. And feel free to add as
many petals as you want, or maybe you're just going
to leave it at that. Once this has dried, I want you to mix a much
lighter version of that color. You'll know as I just
picked up the pigment, put it to one side
and added more water. All I'm going to do is a
few really gentle lines, and this is just adding a
little bit of texture on the petals to give it a
little stomach summing. Totally optional,
completely up to you, but I think it just makes it a little bit more interesting. So there we have
it. It is taking us 3 minutes to
paint this picture, and it looked bloody good. So well done, and I'll
see you in the next
5. Painting 4 - Eucalyptus: We're going to take it a
little bit slower now, and I'm going to show
you how to paint this eucalyptus that can
layer and look really good. So watch this technique
and try it along with me. First, you want to
mix your color. So I like to mix navy
blue with a dark green. It gives a bit of a
minty cool effect and that dusty color that
eucalyptus typically has. So make sure you make enough because we will be
using a lot of this. Add lows of water
loads of pigment, and we're going to start off
with an imperfect circle. If you can't draw circles, this is the perfect exercise
for you. So pop that on. And then you see, I'm just
gathering water from the jar, and I'm just placing
it on that circle. I'm making a mountain
out of water, and what it's doing is pushing
the paint to the side. So let me show you from the side what it
should look like. It feels like it's about
to pop or overflow, so it should feel
like too much water. But it won't. After that, you're going to use your brush and just soak up the middle. So try not to paint the middle. You can roll your brush to
soak up some extra water. But you just want to soak
from one point because again, that's going to push the
paint to the edges and give you this gradient without
much of an effort. So you can see that there's a little bit of a
light glow underneath. And if you find yours doesn't
quite have the light glow, it means your initial shaping, painting, or whatever you
would like to call it. That isn't wet enough, so it has to be
really wet so that it doesn't have time to
soak up the pigment. So I'm showing you one
more time on here, and feel free to use these
as demos, practices, or maybe you're going
to go straight for it, in which case, we need a stem. So I'm just going
to turn this into the the eucalyptus by just popping a straight line
that kind of goes for it. I'm not too worried about those little gatherings of
paint in the base. I think actually, that
could look quite nice. But I am just alternating
my eucalyptus leaves anyway because I'm going to give them a chance to dry so that when I go for my my other leaves, it's going to have a really
nice overlay in effect. Trust my dog to start
barking the apologies. Anyway, you can see
that it's coming on, and you can see that there are nice little gradients from
the edges to the center. So the final part
you should do on this layer is just a
little one at the top. You'll notice that my
sizes kind of get smaller as well as I go up the stem. So this is our first layer, and it doesn't take a
huge amount of time. It's not too taxing
on the brain. So then we are ready
for our second layer. So, you are going to
try the same effect. So try and get the same
consistency in paint. And then let your leaves
kind of differ a little bit. Maybe they're a slightly
different direction. Maybe they are a little bit thinner, a little bit rounder. But this variation in
leaf will look really, really good on your
leucalypss. Eucalyptus. So just work your
way up the stem, just add a few that kind of cross cross over in the
middle, if you want, or you can have them
slightly separate, but have them on the
same part of the stem, rather than alternating
step by step, they're just go to go as like a little pair,
a cute little pair. This is actually one of my
favorite paintings to do. It's really effective
and minimal efforts. So I really hope you
enjoyed this one, too. And Team, I'll see you next
time for the next session.
6. Painting 5 - Daisy: This session, I'm going
to show you how to paint this little pink daisy in really easy steps where you don't even have to
construct the petals. I'm going to show you how to
do it in one brush stroke. So grab your paints
and let's get started. We're just going to start
by mixing our color. Choose whatever color you want. But I'm going to go for
this nice little red. And then I'm just going to try and draw a really thin line on my paper and then push
down with my bristles. Let me just show you that again. I'm just going to
draw a thin line. I don't push down.
Thin line first and then start to push down
with the rest of your brush. This makes the petals wider and it gives you
a nice skinny base. Start off with a
Northeast Southwest shape and then do the same in
the gaps in between. This is a little bit
quicker than real life, but I just want you to get
a gist of what's going on. Once you've done
that, I want you to fill in those gaps in between and just rotate the papers so that you can add
those petals in. After this, you are going
to make a darker color. I like to go with something
in the same family, so a bit of purple. It's good. And then I'm just going to.in the middle and make
that nice and speculi. After that, I'm just
adding a little stem and a similar motion for
the leaf on the end. And that'll give you a
really nice little painting in a very small amount of time. So try this at home, and I'll see you in
the next session for the final painting.
7. Painting 6 - Easy Leaves: Alright, folks, this is our final quick
botanical painting. So grab your brush. Let me show you how
to do leaves in a very, very quick painting. This is all about using your brush in a bit of a
way to make the leaf flow, so you don't really have to
do much. So grab your color. I like to use this nice
green for this one. And I'm first go to
start with the stem. So add a little bit
of movement just like we practice before,
small wave on it. And then I'm just
going to try and draw a thin line and
push my brush down. So we tried a similar version
with the flower previously. And this key is to do opposites. So for the leaf, it's a very thin
join on the stem, and then you push the brush
down as far as you can, and it spreads those brushes and creates this leaf like effect. You'll notice that
sometimes there's a little pocket of paint
at the top of your leaf. So I like to just clean and dry the brush
and then just push that back in so that you
don't get any funny textures. So, go up your stem and get your leaves to be a little bit
smaller as you move up, and don't forget the
top of the stem. You'll just add a small one just to finish that
leaf off so that it's not kind of
empty with nothing on it because nature does
not look that way. Once you've done this, I find it easier just to rotate my paper. Make it easy for my hand, so I'm just going to rotate it clockwise so that I can
just do that same motion, and just pull from the stem. You see they're joining
at the stem as well, and then I will push down my brushes to make it
nice and symmetrical. It gives a really nice little
effect on these leaves. Now, once you've done it, you can add another bundle, another stem or a branch. I should work on
my terminologies. But I want you to wait
for it to dry and either get a darker or a lighter
pigment to go on top of it. So these can overlap, which can look really nice, or if you've got enough space, they may not overlap at all. Or maybe you want to go for more than two But the
more contrast we have, so contrasts meaning
light and dark, the more interesting
it's going to look. So here, you'll see that I'm just going for a
very light version, and I could go over it once more with a darker set
of leaves as well. But it looks really nice. It's really simple, and
I hope you enjoyed that. So well done on
this quick course, I hope you've learned lots of lovely techniques to create botanicals in a short
amount of time. Well done team, and I hope to see you in
another lesson soon.
 China Jordan, Art Teacher