Transcripts
1. Welcome to 3D Printing for Beginners: Welcome back to the creative millennial Skillshare channel. Today, we are going to be
teaching you how you can print your first 3D
object from scratch, even if you have no prior
experience in 3D printing. I've got a good friend
of mine, Bailey, who's a systems engineer
and an avid 3D printer, and he's going to be
taken today's class. So without further ado, I'm going to pass you on to him. Hello, my name is Bailey. I spent four years studying Systems Engineering at the
University of Sheffield. Since then, I've delved into the rabbit holders 3D printing
today I'm going to share with you some of the knowledge
I wish I had when I first started printing and take you
for your very first print, even if he had no
experience printing before, by the end of this class, you would have made
your own object and design your own
effusion free 60 file. So let's jump into class one.
2. 3D Printing Software & Equipment Requried: Welcome this in class one. In this class we'll be going
through the software and the equipment required
to start 3D printing. First of all, let's go
for the equipment needed. So the rule materials are
just a type of filament, for example, like this. This is PLA, however, there are other types of
filaments for the software. The 3D printer requires a
program called a slicer. So this will just
take your model and then split it into
individual slices. There are many slices out there. The one that I personally
use is called Cura. Usually 3D printing files
will come in and STL format. Now this STL file is
directly openable in your slicer and which
it will then just slice it into 2D cross-sections. The slicer will then
convert this into a G-code file that
the printer can then read and then
produce your friends. This is what you need to
start printing yourself. You can find STL files
online and download them into your slicer to then print on your
machine at home, however, if you'd like to
design your own files, you'll need a, some
sort of CAD software. The software that I
use is Fusion 360. I think this is one
of the more advanced softwares and it's free. It's also extremely good
for beginners because it's quite simple to use and
it's quite intuitive. I feel, especially coming from
an engineering background. Now we're going to
download fusion, come here and just
go on Fusion 360. Take a seat, Autodesk website. Now, once we're here,
we can see that the price is actually
freedoms and 29 a year, however, we don't
want to pay that. So we're gonna go
on the free trial. It gives you some options here that you can be a business user, a student or teacher. I'm a hobbyist users, so I'm going to click on this. I believe this gives
you a free trial for a year as a hobbyist user, but you can at least get a
year for free, so that's good. So on this page, if we scroll down to the bottom, see it gets started the details. Then once you've entered
your information, it's an x. And here we go, download. Now, that's downloading up here. We just want to open that it's an executable file because I've already got
fusion is stored. It's going to prompt me
with this, this stage. You should just continue
to install it and you just go through the wizard
and it will be fine once you using is stored. This is the page you shall see. This is what fusion it looks
like when you first open it. Right now, we're gonna get into sketching
our very first model. This is Donald fusion. So let's jump into class too.
3. Sketching Your Design In Fusion 360!: Welcome to class. In this class we shall be going through sketching a
very simple design. This is another shall be
sketching issues across, usually for more
complicated design I actually saw on pen and paper. Just get a rough
sketch of air and then translate it over on diffusion. However, for this design, as it's quite simple, we can
start straight infusion. You see we've come up
to this top tab here. There's the sketch. If we click on
that, we can choose a plane in which to
create a sketch. We were the x, y, z y, and z x plane. I'm going to pick
the bottom plane. Once we're here,
we can see we have new tools at the top to us and we are in the sketch
as we are creating across. The first thing that we're
going to need is a rectangle. This can be found
here. First, we need to think how laws we
want to get across. Let's start by just giving
it a very general shape, 40 millimeters
wide and 130 long. Now let's do another one. In order to counsel the
current operation neuron, you can right-click
and then cancel. Now I can drag
these boxes around. The perimeters of
these shapes are blue. This means that they
are in freespace and they an unconstrained. If you wanted to constrain them, we can use some
other tools up here. The first tool I'm going to go over is the sketch dimension. If I click on this and
then click a line, we can define the
length of this line. For example, let's make this 150, because it's a rectangle. It will keep top and
bottom the same. Let's do the same for this one. Let's just make this
20. Keep on going. Let's keep it square. So we will make this on 50. Let's keep this as
40 bit thicker. You can drag these dimensions
to make them a bit neater. I'm going to drag them onto
the top and off to the right. So this process that
we have at the minute isn't looking very
good or square. We might need to do a
little bit of maths to work out how to
make it look better. For example, this
side piece would like to be centered in
the middle of this. In order to do this, we need to move this
over to the left. So we could just do this
by dragging and dropping, or we could use a line. If we click on the line, then over here we get
a sketch palette. We can make a construction line. I know that this, the length of this
rectangle is 150. If I start in the middle
and go out 7550 over two. We can see where this line
is supposed to start. Now using this constraint
tool set up here, we can line these up. So if I click on the coincident constraint,
I can click on this line. And then the point
where once it speed, there we go. Now
they have lined up. I still think this is too high. So let's take another line and just do exactly
the same as we did. We can see that this
line is a 150 long, so I think this cross
would look slightly better at 1 third
of the way down. So at 50 millimeter, and as we can see, our shape has snaps to
where we want it to be. It's important to note here that the constraints are maintained. So if I change the
length of this to 30, you can see that the
rectangle is moved back up. I think this actually looks like a better Cross
than the one before. So I'm gonna leave this at 30. Now we have finished our design. We can click Finish Sketch and come out one more
important note. As you can see, we've
actually created four distinct shapes here when
actually we just want one. In order to remedy this, we go into this
Modifier Tab and trip, which is trim the lines
that we don't want. You may get a warning to say that the constraints
was removed, but as long as this is
your final iteration for the shape, it
doesn't matter. Now we should have one shape. We can finish our sketch. Here's our first sketch.
If we click the Home tab, it will take us to
the home view where we can see there is
a 2D cross-section. To take this 2D sketch
into a 3D shape, we need to use the tool in the
Create tab called Extrude.
4. Sketch to 3D Model! (KEY!): Welcome to class
three. In this clause, we'll be turning our 2D
sketch into a 3D object. To do this, we take our 2D
sketch and we extrude it. Now this extrude feature is under the Create
tab up at the top. If I just click on it
here, click my shape and I can tell how thick
to make the shape. For example, let's go to
ten millimeters and Enter. There we go. Now we have fifth
2A2, the image. Okay, so now we
have our 3D object. This course is looking okay, but it's still not
looking great. I feel like these ends could
be pushed in slightly. I couldn't just go back
into the sketch and edit the length of
this rectangle, which would also work wherever. If I wanted to do posts
editing, there is another way. So let me pan around again. To pan you hold the
Shift and click on the mouse will say if
I select this face, scroll down to the other side, control and select this face. I can use this function in the Modify tab to
press all poof. So this works very similarly
to the extrude function, which is extend your model. However, we want to actually shrink our model
slightly more like that. I think that's the
thing more acceptable. That's quite simple just
to extrude and make it even and uniform. However, if I wanted
this top surface to be smaller than
the bottom surface, I can go back and and extrude
it in a different way. At the bottom here it shows
a timeline of your project and every operation that you
have done in your projects. So it's not double-click
on this extrude. You'd say it takes
me back and now I can edit thickness of it. So now let's say I want it 20. Furthermore, we get this
little feature palette that pops up on the
right-hand side where we get several options. Now most of these options are
gonna be too complicated. Foot stays class. However, this taper angle is
very interesting. We can taper angle and negative to make the
top surface smaller. If we make this minus ten, you can see that across is
actually smaller than the top. Now, I think 20 millimeters is a little bit too
thick for this purpose. I'm going to take that back
down to ten, whatever. I'm going to increase
the taper angle 30. Click Okay, so as
we can see now, it looks a bit nicer. Now we have a model that
we would like to print. The next slash I'll lead us into the printing of this
and how to get it from here into our slicer and
then onto our 3D printer.
5. Sending 3D Model from Fusion 360 to Slicer: In this class we will be taking
or 3D model from fusion, putting it into our slicer, and then sending it
off to the printer. To start this process, we want to go up here and
find the utilities tab. Once you have found this, we
go over to make 3D print. Now this little option
box will pop up. The first thing says select, so we want to select our model. The second option is the format. Now as I mentioned previously, the most common format is STL. So we're gonna leave this alone. You didn't millimeter. Yes, preview mesh know all of the defaults
here are usually good, so I'm not going to
mess with these. If we come down to the output, we have got this box checked. Send a 3D print utility. We do not want this checked. Uncheck this, and
as you can see, we can now click Okay, now we can just
save it anywhere. I'm going to save it
as fusion example. Now, let's navigate to where
we've saved the example. Now, because I've
got multiple slices, I need to be careful watch
when I open it with over we can see here the little
c sign for cure. And that's the one
that I want to send out here has opened. This is where I shall
look like the navigating about Kiara will be slightly
different from fusion, for example, to rotate, It's a right-click
and hold and pan. It's the middle score we'll
cure is a free slicer. And in order to download it, you just go to the
official website and download it for free. When you first opening Cura
it went looked like this as I have already configured
it for my specific printer. However, this is quite
a simple process, as our recall is just simply finding your print
off from a list. I've got five plus up here,
which is why it says it. And then you select what
nozzle size you have most stock nozzles on
no 0.4 millimeters. I have since operated
to null 0.6, but this is not necessary. You will get fine
prints otherwise. But yeah, there there are
plenty of videos out there on how to do that and it will
not be covering it here. So from this point on, we can see all across those tapered in the
center straightaway. We can see that we've got
some options over here. Cure works with what
are known as profiles. So if we click on this
little drop down, we have got the standard
quality profile, low-quality draft quality, and I've got my own custom
one, my quality. The little number next we're at determines the layer height. The layer height is often associated with a
detail of the print. However, it will significantly
increase printing time. For this example, would
draft quality is good enough as there is
no complex shapes? Choose some changes I've
made to the default class, but I'm going to discard
them because it is not a complex shape is just
straight lines and edges, layers being stacked
on top of each other. We don't need that much detail. As you can see down here
in the bottom right. By the way, I haven't changed
any of these settings. These are all the default
costume profile settings on draft quality. Down here on the bottom right, you can see this blue
button saying it's less. So let's give it a click
and see what it does. Is saying that this
model will take an hour and 29 minutes, print US 42 grams of material. If we click on the
preview button, it will give us a layer by layer view with this scroller
on the right-hand side. This will take 31
layer is to print and if we scroll down
for it to them layers. Furthermore, if we wish to see the order in which you
will print the layers, we can use this
little Start button. It's going to phosphorylate
a little bit. And it will show you
the exact fruit that you will nozzle will
take while printing. Now let's cancel some settings. If I scroll up four
layers or five layers, you can see up to four layers. All of the layers of solid, completely filled in
on the fifth layer. See we have this
crisscross pattern. This is known as infill and can save a lot of
material during your prints. If ads print this
completely full, it would use a lot
more than 42 grams. Info is one of the
settings here. And a minute is at 20%. If I bought this
or a 100 module, we'll print completely
filled in 100% solid and uses 89 grams and takes
three hours and 18 minutes. This will be stronger. However, info is not the
primary source of strength. The main source of Trump comes
from your number of rules, which is this option. Here we've got tools, which is good enough for this. I've taken this back
to the default 20%, and now let's just
print the model.
6. PRINTING!!: In this class I'll be showing you how to take the model from Cura and put it onto your
3D printers printing. Now to setup of each 3D printer
will be a bit different. In order to find the information
on your specific setup. I'm sure YouTube will
have plenty of videos. Most printers come with an
SD card and SD card reader. Just plug in the SD card
and the adapter plugged in the SD card appears as
a USB drive or my screen. Now if we look at a
button down here, it says Save to
remove will drive. So let's just click this
and now it's saved it as t e phi p fusion sampled
thought, gee, code. To change the name.
You can go down here. And what you want. I'm
gonna leave that for now. Let's check that. Let's
go over to the print off. All my printer is quite
simple. We should click Print. Now opens minus D chord
and I can see the folder, the file, why that
I want to print. Just click on it. Click Print. And now I preheated
my, my printer. So it's already,
by the way there, but it's not apply at
the right temperature. So let me just adjust that. Again. This is specific
to my printer. Your printer will be slightly
different to do this. Now we've got 220 degrees for the nozzle and 60
degrees for the bed. Now we're all set and she's
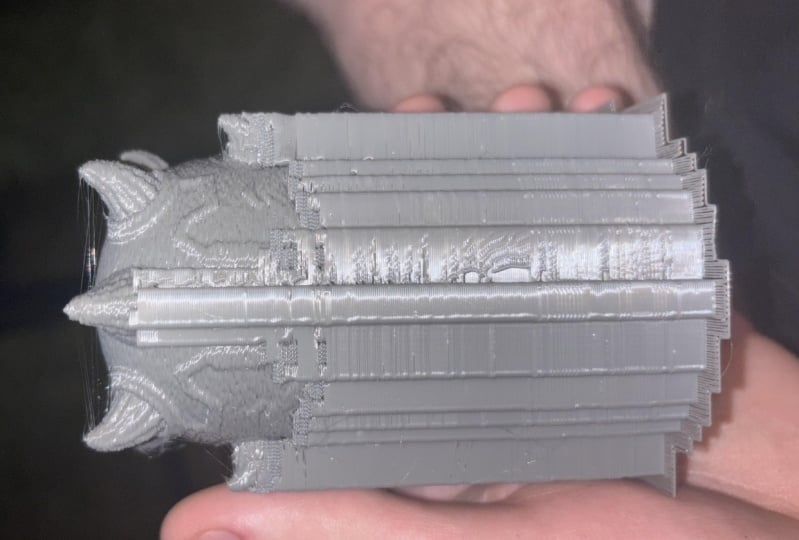
waiting for its heat up. Then I'll stop printing. I buy it is giving
me the honor as if I'm taking up the
cross that we've made today and it's crazy how realistic is the
model we looked at it? So let's keep it up
by this garden again, that was a bit
toasty. Like a chef. My man, look at that. And that is hopefully
what you'll have made something similar
in today's class, but you can see the
details we've modeled. It is exactly the same. On the princess. We've got what? The slightly thicker
bottom base. Going in with the top base. A nice sort of like baking. It's actually like,
yeah, I don't know, like an awful yes, pretty satisfying. It's
really satisfying.
7. Bonus: Basic Fusion 360 Controls: To navigate through fusion, we have got many
different features to help us to scroll
left them right, you holding the mouse will
and scroll left and right. Now we don't have
anything on our screen, so it isn't useful at the minute to rotate around an object. We hold down Shift and
the middle score wheel. And as you can see,
this little green point creates a pivot in
which we rotate. You can see little view cube and the top-right rotating
hasn't seen this, speaking of which
this view cube is a very easy way to
navigate our model. So let me open modal. Say if I want to rotate
around this model, I would hold Shift, middle
score will and rotate. But let's say if I
want it perfectly aligned on the top and I
can't quite get there. I can't just use the view cube. Left-click and then boom, you
want to be on the quarter. Left-click takes me there. I want to go to the Home view, which you can set it to be NAD wish each click the
little home up here.
8. Baileys 3D Printing Gallery: Let me walk you through some of the stuff that I've
made previously. One of my first ever prints and one that I'm really
excited about was this squid game mask is
actually a low poly face masks, so it doesn't get rid of it off. The printing time was about
12 hours on this dream. But yeah, I was really
like this one in the, in the filament that
is printed in as well. Just looks really nice. It's really nice and glossy. Print, an older one from
Harry Potter. Of course. I printed this in
a wood filament, so it gives it a nice
body granny sort of vibe. Printing time on this
was 350 minutes. Printing firm on
the other one was about 12 hours Chrome River. If I said that Mother's Day was recently and instead of going
out and buying something, I figured, let's print it. I printed my mom this nice, this nice picture
frame with some mm and then words on that. Last but not least, I made
this little gear cube. I found the file for this
online and it rotates. I'm not too sure how it works, but yeah, it's definitely
definitely good frame, brain teaser full of
them previous prints, I had found the firewall online somewhere and just downloaded
it and printed it. However, this one
I designed myself. This is a phone older,
designed to hold. My phone. Slips into there like this. And then I've got another
adapter which this slips onto my car
and it just holds my phone like this while
I'm driving along with me about 1015 pounds out on Blank
and info and color holder.
9. Class Project: Welcome to class project. In this section, I
would like you to make your own model using the skills that we've
learned here today. This can be anything from a simple geometric
shape to a pyramid, just something simple and
someone that we've covered. If you get stuck at any point, feel free to re-watch class or if that still doesn't
help comment below. Once you've made the shape, feel free to comment
below and we will give you feedback
on how to improve it.
10. Thank You!: Thank you for watching
today's class and well done. I hope you learned loss and if there's anything else
you'd like to see us explain or give a walk-through
for let us know below.
 Millennial Creatives ✅, Learn Skills from the Future