Transcripts
1. Premiere Pro Masterclass - Welcome: Hello and welcome to the millennial creative Skillshare channel. Today I'm going to be teaching you how you can edit videos and Adobe Premiere Pro. Now my aim is to teach anybody who is new to Adobe Premiere Pro how to create a quality and engaging video. I've been editing for five years myself, creating YouTube videos and other content. And I've learned so many valuable tricks and tips along the way that I'm going to teach you in this class. And I guarantee, even if you are a beginner, this class is going to be super-helpful. It's your journey in editing. So let's get into it. I hope you decide to join me for this class. And let's go.
2. Footage, Cutting & Volume!: So welcome to class 1. Now you can see on screen right now is the footage that you've added it to Adobe Premiere Pro. To do this, simply find the footage you want to add and then drag and drop it onto the timeline and then it pops up like this. Now you can see right here on the right-hand side, this is what we're aiming to end up with at the end of today's session, a fully edited section of clips. So first off, you can see you've got the clip on your Adobe Premiere Pro timeline. And the first thing you want to do an editing is the cut the clip. And when I say cut the clip, I want you to delete any bits of footage that you don't want to use that have too long or gaps or that you might have said something wrong and you've ridden it. So you want to delete the bit that you said wrong. So to do this, you simply want to drag and drop your costs are to the star of the video. Then you want to head over to this section here where you'll find your tools. Click on the raise at all, and then simply click Play. And I'm just gonna pause mine and then your clips will start to play. And essentially all you want to do then is to cut and chop the bits you don't want. So we can see right now coming up on my footage is a bit of dead space where I've stopped speaking. Now, that will help me. Now I don't want to have this dead space. I mean, because people lose interest when the silence. So I want to cut this out. So what I'm gonna do is I'm then going to get my razor tool, which I've already selected. Click on this bill. Then I'm going to go head back over to the arrow tool. Then I'm going to click on the second clip that I've now created. So by using the razor tool, you've created two separate clips. You split it down the middle, and then I've used our tool. I've gone to the corner of the clip and I've dragged it across like that to get rid of the space. And now what you can see here, we've got this gap in the middle of the two clips. I'm going to double-click on the touchpad and press ripple delete. And this brings along all the footage from the right-hand side of the timeline, brings it down. And now once again, I've been able to cut out that bit of dead space and it flows very nicely, and so on and so on. So let's say there was another bit, for example, at the end here. I did not want to have in my video, I'd simply get the razor tool out, I clip it. And let's say this time I wanted to delete the whole thing. Then go back to my selection tool. I click on the clip, I pressed backspace or delete and the clip goes. So the first step is cutting your video in Adobe Premiere Pro. You want to make sure that you go along the whole footage and you delete the bits. You don't want. You delete the silence is you don't want. And then once you've deleted them, you drag and drop the clip or ripple, delete it so the flows very smoothly, and so on. So that's cutting the footage. The next step is basically going to be looking at the volume. So when you're editing your videos, you might find that some of the volumes a bit too loud orbits you quiet. Now to simply edit the volume once again, we're going to be looking at the razor tool here. You want to let say if there was only a certain section of your video that was quiet, Let's say it was this bit here. It was too quiet for me. I need to hire out the volume. So what you can do is you select a clip and you double-click. And that brings up this menu here. You scroll down and you find audio again, and then you press F5 that boost the audio by five decibels. You see it raises a binary. Undo that because let's say that you don't want to increase the volume of the whole clip. It was just a certain section of it. You want to get the razor tool out. You then want to section off the bit. You want to increase the volume and then highlight that little section is on white right now, then you want to double-click. Then it should pop up saying Audio Gain if you scroll down and it does. And then it says for an boosted your audio of that clip by four decibels. And you can see that the rest of the clip will remain the same volume. And then finally for class one, we're going to look at speed and duration. Say you wanted to speed up Eclipse, you had a time-lapse, you double-click Speed Duration. You could tap to 100 percent and it would increase the speed by 20 percent. I don't want to do that for this video because it's a video of me talking. But there is the fast step and editing in Premiere Pro, you want to drag and drop your clips. You are then cut out the bits using the razor tool and reportedly that you don't want in your video. And then you want to make the video nice and succinct by rippled deleting. So the clips are all in line. And then you want to adjust the volume of any clips that are quiet or too loud.
3. Motion Graphics (KEY!!): Welcome to Class 2. In this one, we're going to be looking at making your video engaging and make it look professional. Especially if this is an needs to be a flashy video on YouTube because having graphics that pop-out screen really do help a lot in terms of increasing engagement and making a good view. So the basic form of pop-out is adding text on screen. To add text, you simply get the menu, scroll down to text, click on T, and then you want to click on a space where you want the text. Let's say I wanted to top left-hand corner. I click on the top-left and then I would simply type out this text. Dylan is on Skillshare. But you can see, I'm going to click on the arrow tool again now because the text is slightly too high. So I've clicked on the arrow tool here, and I've scrolled on, I'm gonna go and drag and drop this text down a bit. And now you can see that in this beginner's class, I haven't been able to move the text and it's very helpful. So now the text is nice and on-screen. Again, if I want to chop it, I'm gonna stay on the arrow tool. I'm going to make it a bit shorter by doing the same thing we did the Eclipse, go to the end of it and drag and drop it. And then let's say if it's on the wrong place and I wanted to move it, I would simply click on the text, wants to highlight it, and then click it again and hold that click down and drag and drop it. And I can move that to the side of the video. Next up, let's say as well, as well as this text of this thought you wanted to add a cool little pop-up graphic. What you can do is in Adobe Premiere Pro, head over to the graphics panel at the top, you can see I clicked on it and then it comes up with the essential graphics panel. Nothing now at the moment, don't worry. Then assembly click Browse. And you've got my templates, Adobe Stock. And if you click on Adobe Stock, you'll see all of these great templates. And if you select a free, you'll see the free ones. And then to download a pop-out graphic and intro and outro simply click on the Cloud. You can browse and download the templates you want. And then they, templates moved to the my template section. And you can see these are the ones that I've downloaded. Let's say I wanted to add in this cool logos, this all my video. Or yes, this one here. I'll simply, once I've found and downloaded a template from the my template section, I drag and drop it onto my screen. It loads up. And then you can see that the, this, this graphic pops up on screen. I'm going to drag and drop up here. See I can see that the template and the graphic pops up on screen, except right now is covering my face. Very annoying. How do you sort this out? You somebody had to the editing panel at the top. Click on position on the graphic session. So it will come up like this. You're on the Effect Controls. And he says graphics vector motion, click on vector motion, and then click Position. All while this graphic is highlighted by clicking on it to start with. And then you can see that if you double-click position, it will highlight this whole square on the edge of the video. And you can then move the graphic. And so, and you can only move it once it's highlighted. You can also make it smaller or bigger or rotator. So let's say I want to delete that bit of an angle. And that says, well, this graphic, I wanted to change the text. If you go back onto it, as long as you're clicked on it, you can see that on these graphics panel will pop up here saying, you know, on this graphic your tax background, background, Background, click on your text, click the top bit, then double-click it, it will highlight it, then type in the text you want. Hey, the same for this, but how are you? And then boom, your graphic is now customized for your video. And graphics and templates are so good for editing videos. You can see there if I wanted to add another one, I could scroll down and do a transition one, simply drag and drop it. And then boom, a template is going to appear. And then you go and then my video or make it shorter than that, my video we'll come back on. So that's great for when you're changing the subject. You're changing clips because it's like, okay, we're about to finish on this topic. At this graphic in flashes across the screen disappears now on a new topic. So really adding the graphics as such in Premiere Pro is going to be very, very helpful to your video. So I'm going to add this one a bit wrong change subject, which is here, changed somewhat there. So you can see we're already building up to what we've got here. I'm obviously, I've shown you how to do it once for once or twice. If you wanted to keep doing this more, just head over to the graphics panel, keep dragging and dropping graphics, playing around with them like I've showed you how to. And then obviously you can add text and so on. Now, I really like to add graphics. I think they add so much to a video. I'd recommend doing it. Thank you.
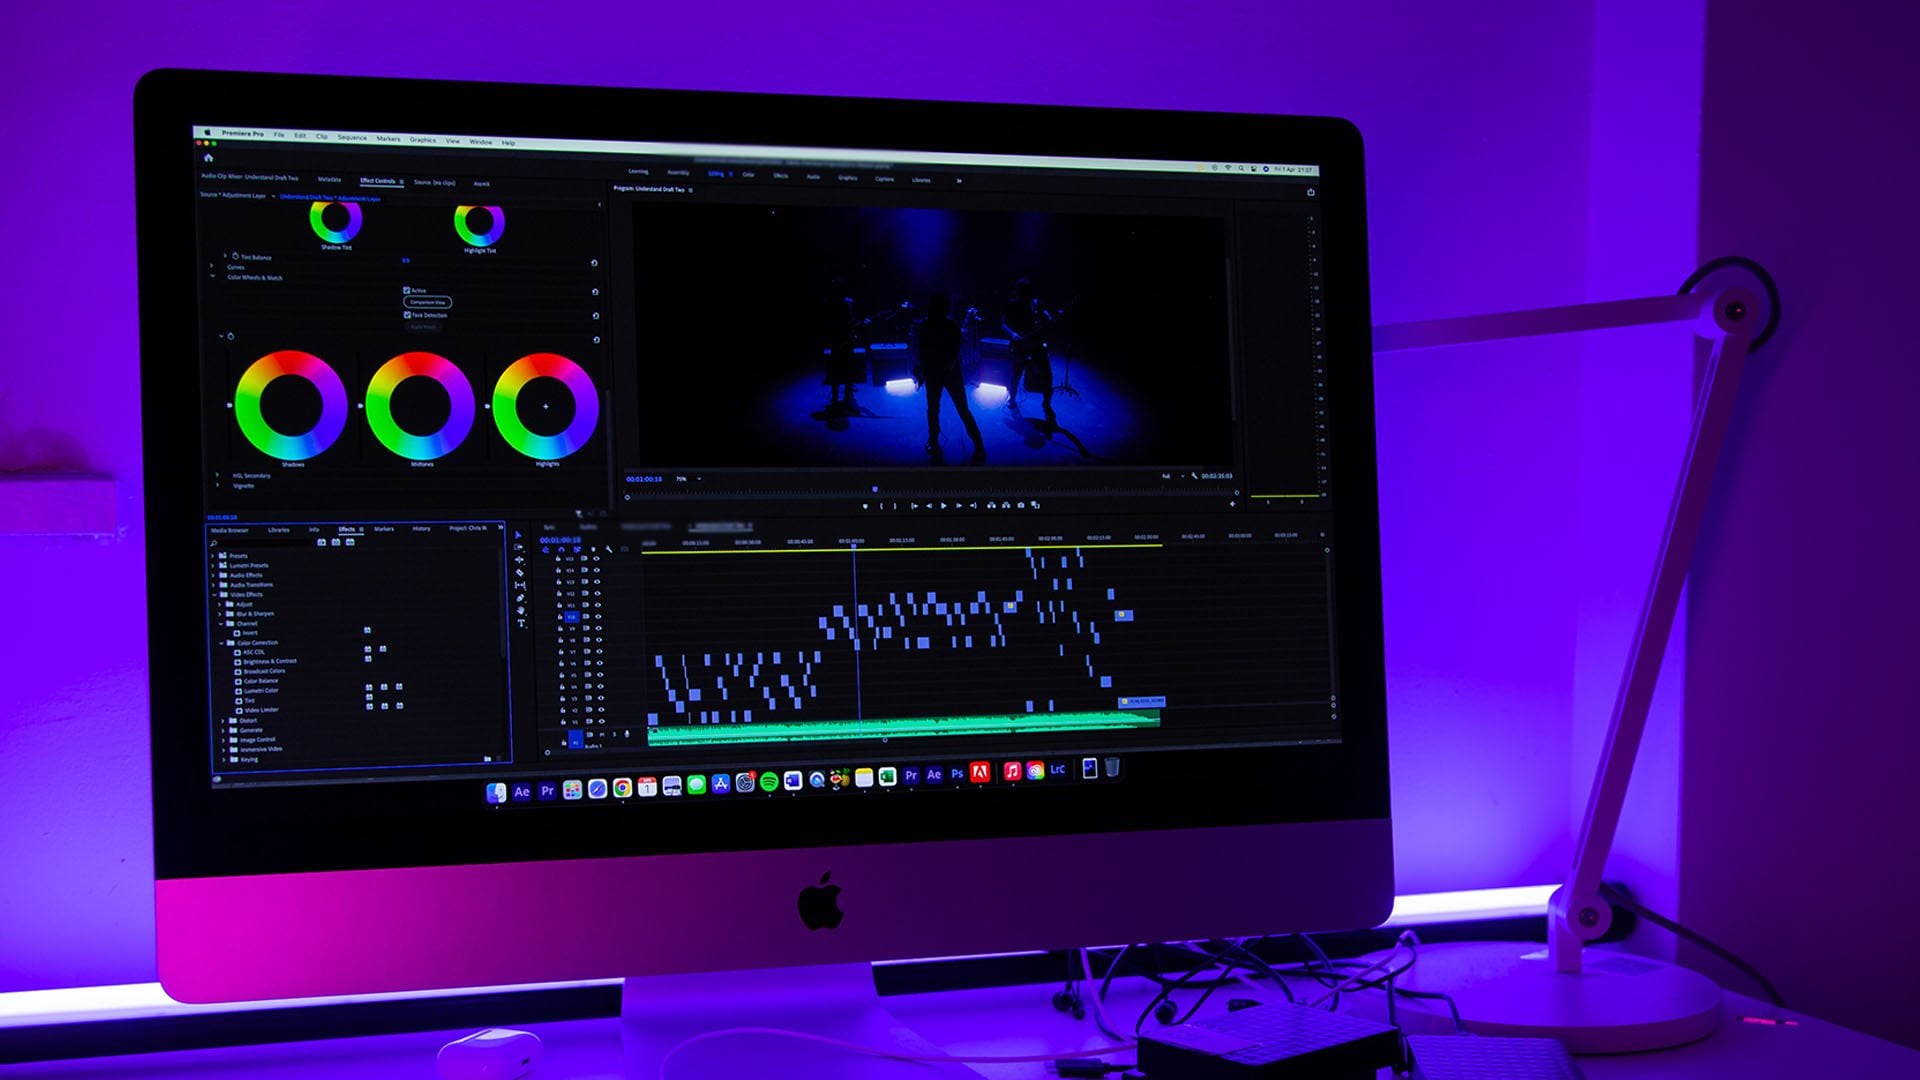
4. Colour Grade, Effects & Adjustment Layers!: Welcome to the third and final class. In this one we're going to be looking at effects and adjustment layers. Let's say you wanted your video to slowly fade in. You can head over to the editing panel. You can click on Effects, and then you can click on video transitions. There's loads of effects play around with these learned about the effects and so on. But a very common one is let's say cross dissolve. Now if I drag and drop this cross dissolve clip at the star my video, you can see how a slowly fades in. Whereas before if I delete that by clicking on it and pressing Backspace, it was a very harsh awakening. Awakening. So you might want to play around with these clips, see what happens if you choose different templates and effects. Because by adding these templates and affects, it really adds another dimension to your, your videos. One thing I've learned is that these cross dissolves work really well at the end of the video or the end of the clip. So let's say if I was, you know, changing, submitted, finishing the video on my cross dissolve out as such like that. If you did want to add a cross dissolve between two clips in the middle because for whatever reason you wanted to add a transition, get the razor tool out by clicking on the razor tool, split the clip, and then choose your transition. I flip over, drag and drop. It makes sure that the flip transition is over both the clips. It's on the left side, on the right side, then plane, and then boom. So that's quite good for little funky transition if you're staying in the same location with the same backdrop. If you're changing backdrop to a different location, I'd recommend using the cross dissolve or the templates we talked about last lesson. And then finally in this bit I'm gonna talk to you about how to color grade. So when your color grading, what you wanna do, head over to assembly. Then you want to click on this little new items section here. Click Adjustment Layer, then click Okay. And then it pops up here, drag and drop this adjustment layer on your timeline. And we probably want to have this under, we want to put the graphics and stuff above the adjustment layer so that the adjustment layer doesn't affect the graphics because the graphics already sorted out. I'm going to drag and drop this adjustment even longer. Click on the Adjustment Layer, head over to Color. And then we can play around with the basic correction as such, you can see I'm making a woman that's to whom I'd recommend. I'd recommend using the creative panel, having a look at the built-in templates such as this one. And then it looks a bit too strong. So then once you've found a template you want, often you wanna kinda take it down to about 30 intensity, just so it's not too overpowering. You might want to increase the fade, you might want to increase the colors, and so on. It's all about playing around with these filters until you get exactly what the look you're after. I quite like as well, possibly adding a bit of fading and having about 13 intensity, increasing the shadows, slightly, increasing the contrast, slightly less obvious, you hide in the shadows maybe a bit warmer, make it 2.1. And then nice and pink just I scold and minus 5. So it really is about playing around with the colors you want. Let us say if you wanted to different adjustment layers, you can always get the razor tool out, splits it up, click on the second part of the adjustment layer, and then change it. So you can see that then I've got two different colors on two different, on the same clip and so on. So that is how you color grade. And now finally as well, when editing, another great effect is if you change it between audio clips, you can head over to the editing panel, effects, audio transitions, crossfade, constant power at it onto your clip. And now help smooth out the transition between one clip to the next. And essentially once you play around with this enough, you'll get something that looks like this. So I've, so I've given you all the fundamentals of what to do. As you can see right here, he said there's music on this one. To add music, you simply drag and drop the music file. As such, then you'd reduce the volume of it and so on. But let's just say look, I've given you all the tools you need to make something like this. So you can see all of this in action. All the stuff I've told you in the class is in action right now I'm going to play this clip. You can't hear it, but here I'm talking about stuff. I've got a color grade on. As you can see, I've got a nice little pop-out I downloaded from the Adobe Stock ones, which you can. And then coming up, There's going to be some more pop-ups of you see right now of an image, of another graphic and to add images as you drag and drop like anything. And then coming up, hey, we're gonna see a nice little transition. I've also had unloaded. So you can see how really these factors and this sort of the color grade, the transition, the screenshot and the graphics, and the smoothness by chopping and sorting out the audio make a huge difference in terms of quality to a video.
5. Exporting Your Video In Adobe Premiere Pro!: And finally, I'm going to show you how to export your video. To export your video, once you've made all the adjustments you need. Here's an example mockup video down below here from the intro class. You head over to the file section at the top. Go scroll down to Export select media. And then it brings up this new window with your video. May show that this number here correlates to the actual length of your video. For example, this does for me because that's where I want the video to stop. Starts all in line. And then by that number being the same length as your video on the timeline while you was at it's here. I'll ensure that the whole video, I guess exported the format should be H.264. And then you can select a preset. I like to upload my videos to YouTube. So I always select the YouTube for HD version. Then I take use maximum render quality for maximum quality. Then I click on here to change the output name. So I'll just call it test. Choose the folder I want to save it in. And then I click Export, and then it starts exporting, and then your video ends up in the photo. You choose to save it on, and it's all done. Your video is completed.
6. Class Project!: All right, So for the class project, I would like you to edit a video and use the tools I've taught you today. So I want you to add a color layer to it, a color grade. I want you to smooth out all the audio and stuff like that by adding effects and making sure that you've cut it in a very smooth manner. I will need to add some pop-out graphics, some text, and a transition thing. So let me know how you get on with that. If you need any help with it. Feel free to ask me anything in the discussion. If you're struggling with anything, again, feel free to ask me in the discussion. I'll then provide feedback on the clip you send me about maybe, you know, the positioning of the graphics about, you know, oh, stuff like that, about what works, what doesn't work. And hopefully there'll be very useful for you and your editing journey.
7. Thank You! :): So thank you very much for watching today's class. I hope you did find it very, very helpful. If you do want to see more classes, I'll be bringing out some more editing one, some more computer science one's very soon, but take care. Enjoy your editing. Editing is so fun. I'll stress again, I think editing is all about coming up with your own style. Today, I've taught you the tools that you'll need to work with in order to make videos, in order to make content. But you've got to now find your style about what graphics do you like? What fonts do you like? What text you like? Why is your style is a very abrupt, has a very smooth. There's so many things that make an edit so unique. And now you've got the tools to go out and find your style. I hope you do that. Thank you very much for watching. I appreciate it.
 Millennial Creatives ✅, Learn Skills from the Future