Transcripts
1. The Cactus Room: Intro: What's up, guys? Welcome.
My name is Dave Reed, aka drug-free Dave,
and I'm really excited to bring you
this new 3D course. It's sort of interior design, which is something that I
never really thought I'd have any interest in doing in
3D and on Skillshare, but I had a blast
with this class. You can make almost anything
just with simple shapes. So there's actually a
lot of applications that are useful when you can do like interior designs because you can make your characters and
things like that. Now you can actually
make it in a space and lighting that space
and creating a mood, all that stuff, Everything will make your 3D art work
that much better. So I'm really glad
that I actually made this class because
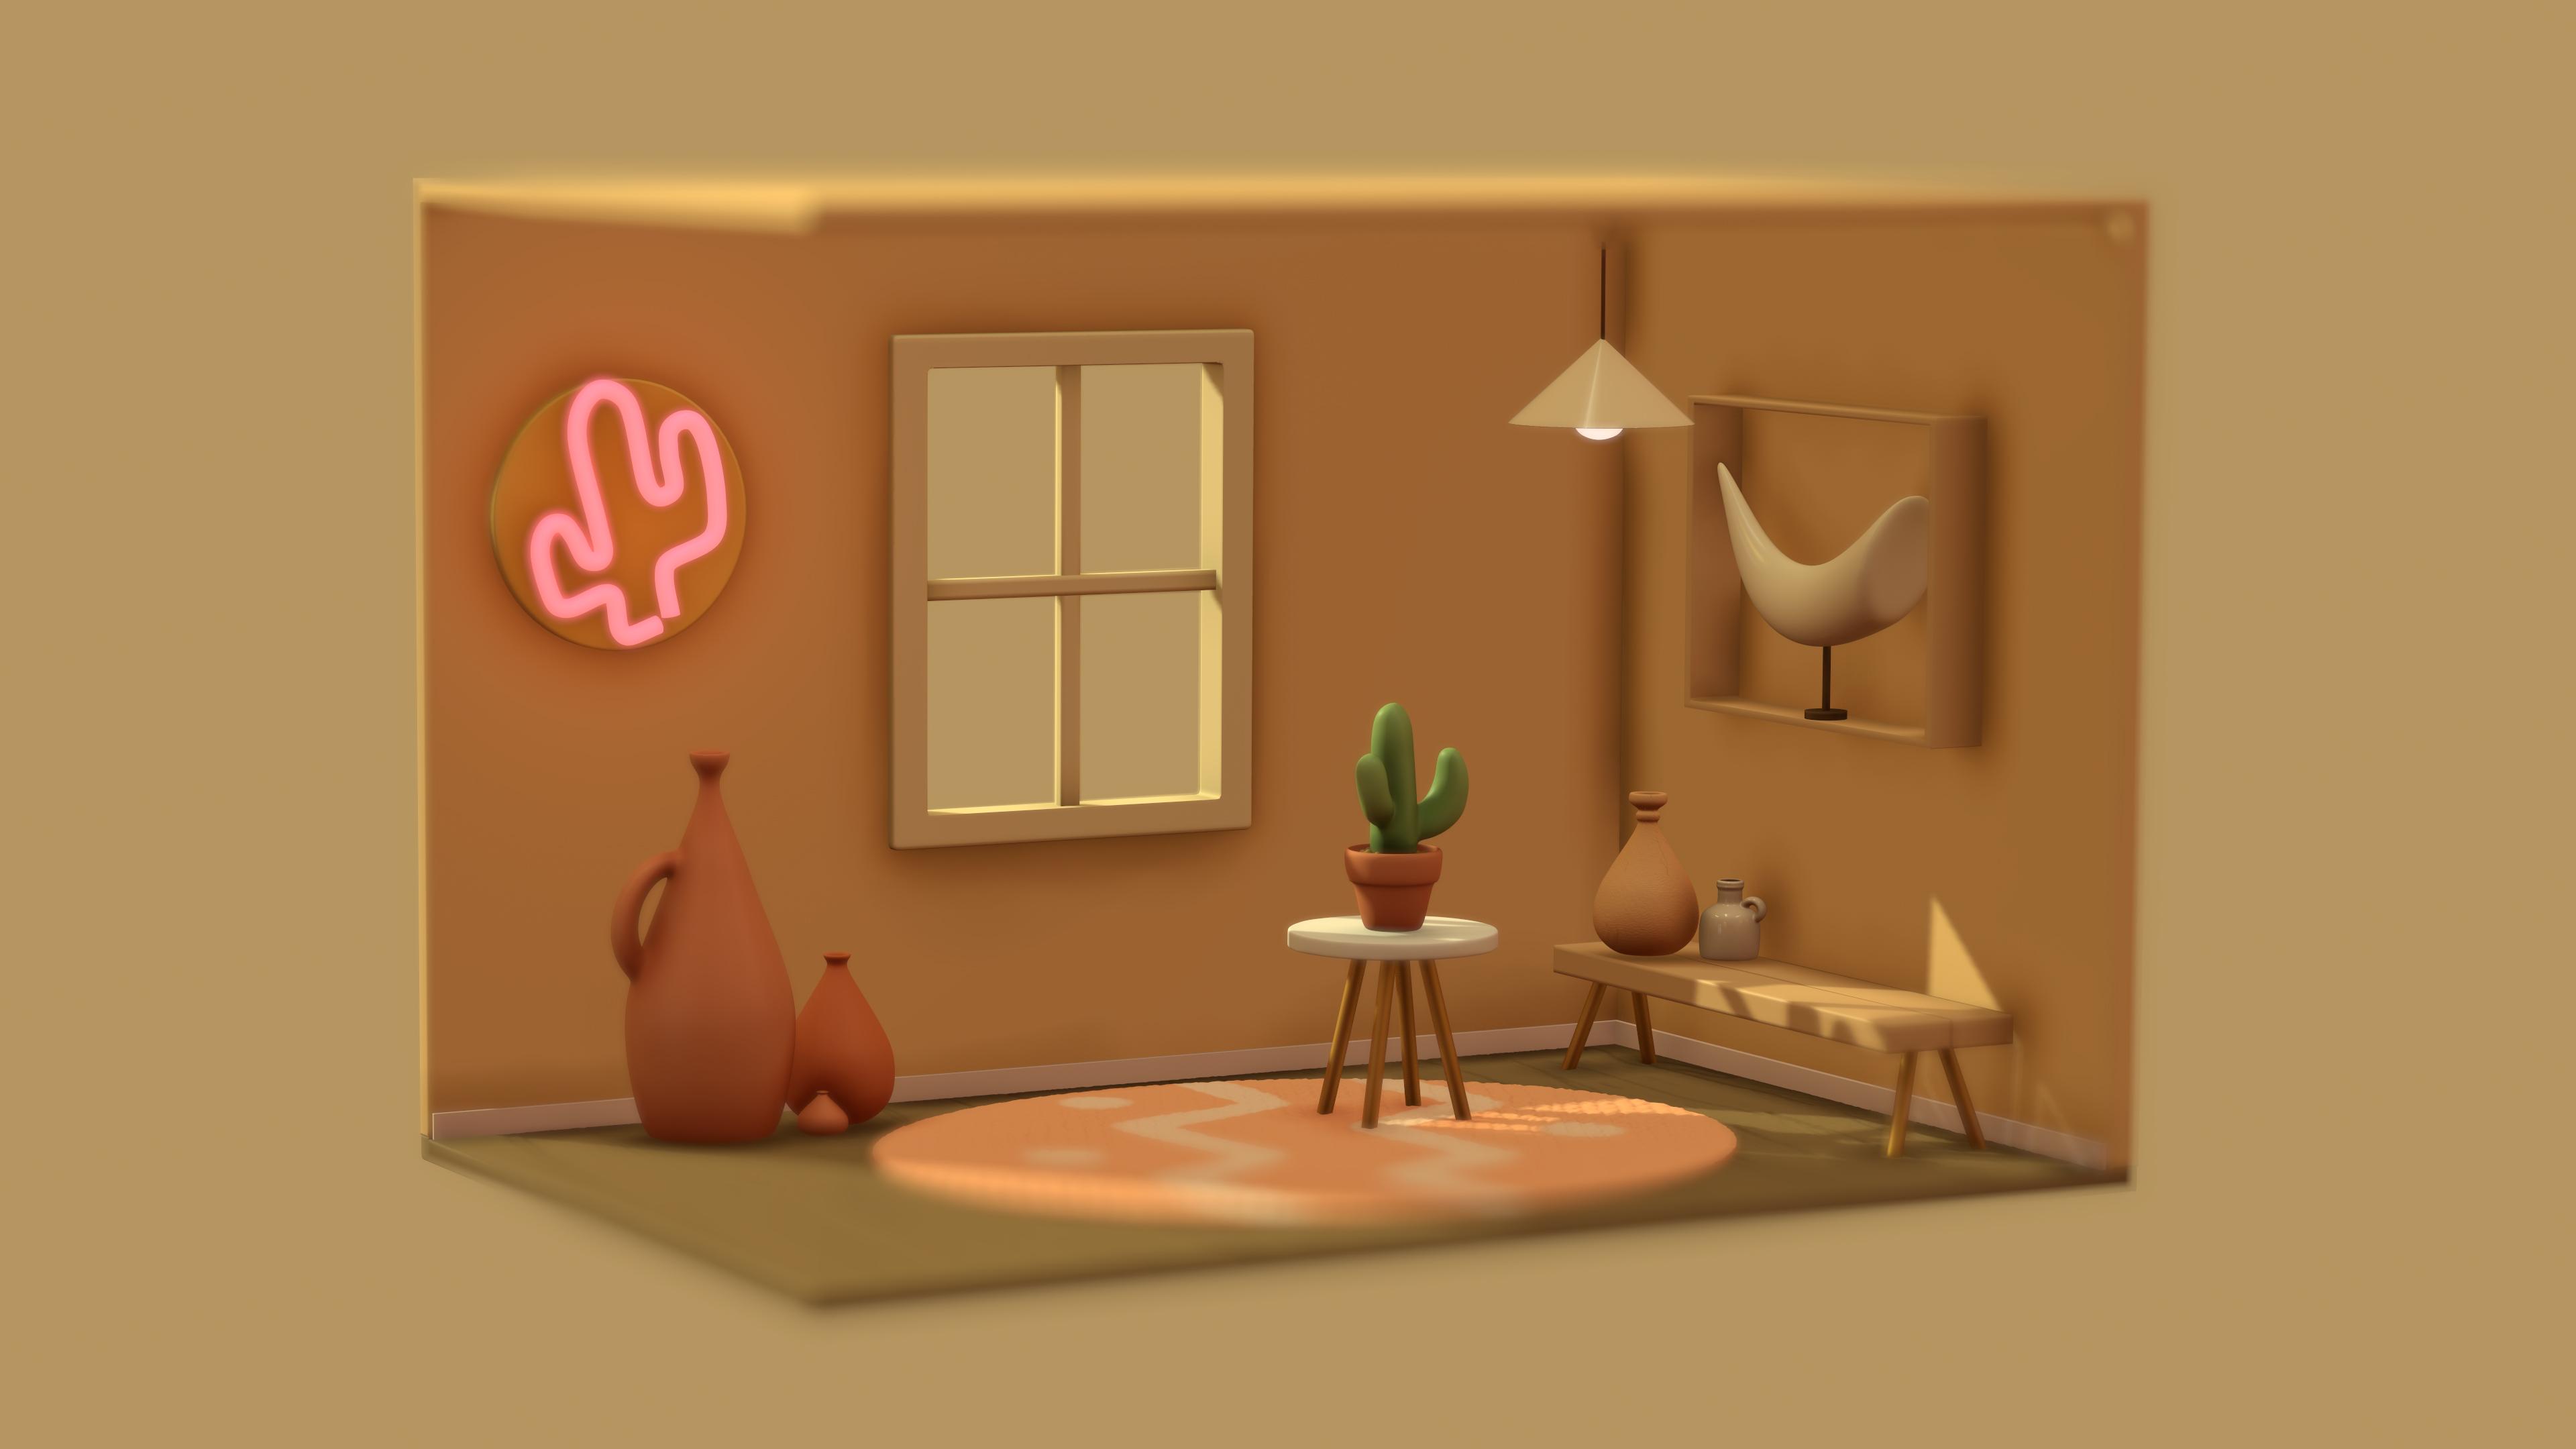
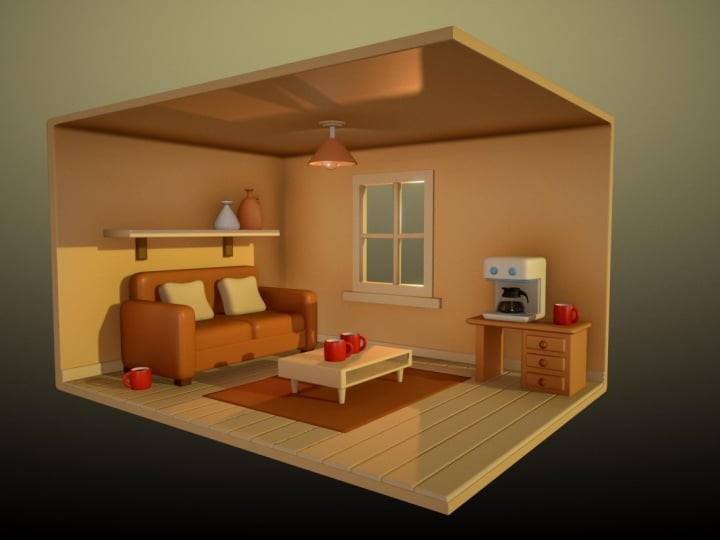
I learned a lot from it. So we're going to build
this room from scratch. We're going to create all the
elements in it, the table, the cactus, we're gonna
make the room itself. Nothing too complicated. It's just a lot of fun
and it's very easy. It's actually very good for beginners because it teaches you how to take simple shapes, make individual objects,
and this atom altogether, litem just went up
looking awesome. I had a lot of fun with it,
and I know you will too. Alright, so let's
get right into it. The next video is gonna
be the class project. I will see you there.
2. Class Project: Alright, welcome to the
class project video. Exciting. As always, I know. And I'm sure you know what
I'm already going to say. You can be as
creative as you want, because you can be as
creative as you want. There's so many
things you can do that or differently. You
can light it differently. You can make different furniture,
you can add furniture. You can take furniture away. You can make a different
sort of plant. You can make a
different style cactus. You can make a huge cactus. You can make a baby cactus. You can do whatever
you want to do. And you'll see where
I'm going along. I kinda get carried
away with things. But that's that's what
makes it fun for me. So fortunately or unfortunately, that's what happens like
with my classes when my tutorials I have ideas on, I have to flush those ideas out. And I want you to
be able to know, like I want you to know that you were able to do that as well. Like there's no right or wrong. I want you to flesh things out if you think
about something, throw it in there because
I can't wait to see it. Alright, so let's get started. The next video, we're going
to start from scratch, opening up nomad and
Christina go from there. Alright. See you
in the next video. Getting Started. No, it's
not getting started. I think it's the table. The table. We're
gonna start with. Dave. See you there.
3. Table: Alright, so let's go ahead
and open up nomad scoped. And you should get a
scene similar to this. And of course, you
would just want to make the screen comfortable for you. You can always change
the color by going here. You can change the color
to anything that you like. I think the first thing we'll
start out with is a table. And that's gonna
be pretty simple. We're not gonna get too, too crazy with the table. We don't need this sphere. So I'm gonna go ahead
and delete this sphere. So I'm gonna go to the sphere. I mean the, the Scene menu here. This so the second icon, and you'll see our spheres here. So you can just go
ahead and delete that. Now on that same menu, on the bottom,
Here's our shapes. And I'm going to make
a cylindrical table. Of course, you could
always make like a, a square table if you want to. But I'm just going
to make it like a small little side table. We can put our cactus on. So I'm going to tap that. Let's save the project. I'm going to name
mine Southwest vibes. I don't know why
I'm even if vibes, I might go ahead.
I might put a Z. Why not? It's Friday night. Okay, so now we have
our cylinder there. It's very big, too big. So let's just use this green. You can see is we turn. You can see are our options here we have these main arrows. Those are the, those are what you really want to
pay attention to. So there's the main
arrows that way you can move it in
different directions. We don't have to
move it right now. We'll just keep
it in the center. It'll make it easier. But this little cube here, this will help us to. So that's how we'll know
we're in the front. And another thing that
will make it easy, see how you can see the
perspective right now. Let's change that. So I'm gonna go up
here to where is it, I think as this
little camera icon. I'm going to tap that
and go to orthographic. So now we're in orthographic. You can see that grid is now just a white line
because we're not seeing the perspective that will help us to keep everything level
and things like that. So usually will start
in orthographic and then at the end or later on we can change it to perspective. So I'm going to tap front. That way. It's perfectly, perfectly
lined up with the grid. I'm going to use this
green circle here and just bring it down like so. And you can see it's
a little like shaded. And the reason why it does
this is because it's, it's using the least
amount of polygons, which means it's just, it's not really
that well-defined. It's very, very primitive. So it's a very primitive shape. But I want it to look
more like a table. So let's see. We'll go to this grid. Just tap on this
grid and you tap on flat subdivision,
right here, perimeter. And then post subdivision. We're just going to slide
that too. Can we do one? We'll do two. So it will
slide it to two. Like so. That looks pretty good. I'll bring it up a little bit. So I'll go ahead
and validate that. So that's pretty
much our tabletop. And we can note I
have to color it now. So there, that's our tabletop. Simple. We might smooth it out later on, but that's the tabletop for now. Okay, so now let's make
some legs for our table. So I'm going to hit front. So it's nice and perfect loops. Here we go. So now it's nice and perfect. So we're just going to
make some regular legs. I'm not gonna go too
crazy with the legs. So when I'm making these scenes, I just think about what shapes
would work well for legs, of course, you can use a
lot of different shapes, but I think we're gonna
just gonna use a cylinder. So we'll use a cylinder, like so, same thing. And for this one, I'm just going to shrink
it down like that. I'm going to hit mirror up here. And there's actually two
ways to stretch it out. And you can stretch
it out like this. It's a bit slow. But if you really
want to, you want to, if it's too slow for
you can hit Edit. And then you can take
one of these little ends and you can pull it really fast. So let me just tap front again. You'll notice I do that a
lot to sort of keep it, keep it nice and clean. So I'm just going
to line that up. It doesn't have to be perfect. It just shouldn't be obviously popping through
the table on top, but it doesn't have to
be perfect right now. Okay. So remember we hit mirror. So now that we hit mirror,
I'm going to take this arrow and slide it out like that. And obviously we don't want the two legs right
in the middle. So let's turn it to the right. And then we'll just
slide this back. Like so. Okay, so let's go
ahead and validate our legs on the one side. So we'll just hit
validate right here. Now we have our two
legs and they're solid. So the next thing we
wanna do is we want to we can just duplicate let
me just duplicate the legs. So we'll go here to our scene. And just to, just
to be thorough, let's name, let's
label these layers. So this will be table top. This can hit the little I, if you want to make sure that
you're on the right thing, will change that two legs. Okay. So now there's a few, let me uncheck these options. Sometimes I use snap. So I had actually snap. And if you want to
know what Snap is, like, if you wanted to change, if you wanted to turn
these Ninety degrees, you could hit Snap
and then you can type in whatever
degree you wanted. And you can take this red. You could flip it and it will
just stick to that snap. I use that a lot
and I use that when I was sort of going through this class before I started teaching and
talking to you guys. I'll kinda went through
and I did a bunch of stuff to make it easier. Okay. So now we
have our back legs. So let's just duplicate them. And that's the
easiest thing to do. Just duplicate. Just go to our shapes here, which is duplicate that. And then we can
just drag it over. It doesn't have to
be 100% perfect. That looks pretty good. I
think that works for me. Like that and we can hit View, sort of see our table. I
think that looks great. Our table does look a
little remedy a little bit, so I can probably
just smooth that out. So we'll use the Smooth tool
and we'll keep symmetry on. That way. We don't have to do
double the work. Just softly smooth it out, not to press too hard because my warp the am I work
the shape a little bit. For example, if I press hard, it will warp it. So just be careful. If you do want to if you a
way to get rid of that would be I can tap on the tabletop and let's see which one is it? Here we go. I could go to the grid again and then I could sub-divide it. So when you sub-divide it, see how it made it
a little thinner. And it just makes the
clay a little less soft, a little less malleable. Actually like it
better like that. So I'll probably leave it. So all I did was I go back. All I did was make sure
I tap on the table. You can see that you can
see the layers here, or you can see the meshes. You can see each part here. So let's see, did I sub-divide? Okay, So basically
here's the tabletop. It's 20 K, which isn't that, isn't that a dense, which has good overall when
you're doing 3D stuff, you don't want it to
be super superdense. You need it to be
dense to do details. But you want to use
that sparingly. And the more you do it, the
more you'll figure out how to not make everything
is so dense at first. But sometimes you
need a little more, a little more, a
little more detail. So I'm going to make
sure that the table selected and I will
go to the grid. And then I'll just
do sub-divide. See now is 80 K, So now it's a little more,
It's a little more sturdy. So we'll leave it
at that for now. I think that works. I bring it to the
front. Always like to sort of bring it
back to the front. Just I don't know why. I don't have a good reason.
4. Table Fancy: And this is a little
something extra, like if you want to don't
be afraid to sort of play around with the legs and be more creative
with these things. You can do. You can, you can sort of
have fun with it. I'm just going to smooth
this out a little bit. I don't like when you
can when I can see those little like rivets ribs. So I'm just smoothing
smoothing them out. Top looks pretty good. What I was saying
is, for example, these legs, see, so
we have symmetry on. So when we go to this gizmo and if your tools are like this, sometimes you might miss
things that are on the bottom. You just tap on the tool thing
and I'll make it smaller. I like using it like this. So you can tap on the
gizmo for the legs. Which two legs are these?
Those are those two legs. So let's say you
wanted to bring them closer and you
wanted to tilt them. Like so. Let's stretch them just to
make sure they're going through the ground eventually
we will make floor here. But say you want to
do them like that. You could try to match it, but I would probably
just delete this one. Then I would take
this duplicate it. And I would. So there's two ways to do it, and you can do the snap method. So you can hit Snap. You can type in 90
degrees and then you can just twist it twice. You can go you go around
twice and then bring it over. You could do I feel like
they should be a little bit further in the middle. But I do sometimes I get in the weeds with
stuff like this. But I think it's fun.
Let me go off of snap. Is that table look better? So there's a lot of
different ways that you can sort of play
around with it. And That's where I find a lot. That's where I have a
lot of fun just playing around with your table
and things like that. You can kind of go on forever. But I'll leave it
like this since, you know, since I
spent some time on it. I also feel like I want
to make the table a little a little thinner. So I'm on a table again, I'm just going to use this green to sort of just make it fin. Here we go.
5. Cactus Pot: Now let's make our little
cactus pot and do that. We're going to use
the laser tool, which is here, leaf. I remember when I was first
playing around with the leaf, it was very confusing. It's not that confusing. You just have to
get the hang of it. And it's actually very, very useful for things
that would be very difficult if you didn't
have the lake tool. So we'll use the curve. So we'll tap curve here. You see that nice line that
shows up in the middle. You don't have to. I'm just putting it there
just because I'm OCD. I think you don't have
to put it in the middle, but it just kinda, it gives me the vision of
where I want the the pot. So we have the curve and
see, that's what happens. So what happens is accidentally hitting undo or
redo or something. So this center line is
everything's gonna be mirrored. So if you're doing any shape, you just wanna do
it off to one side. So let's say you're
doing like vase shape. You could just
come up like this. Then you could come up and you could just do
a shape like this. So now what you wanna do is
not go back to the line. This is gonna be the inner wall. So you just make
the outline of it. You make the shell of it. See that. So that's the
shell of what we're making. Now this late tool is going
to bring it all around. So it's almost gonna
look at this is almost like a slice in-between. And the tool is going
to do all the work. So now we have that, and this is, this
is what we made. And of course you
can play with these. You can change, you
can really change the shape with these things. It's actually a really fun
tool to play around with. And really quickly. You can move these if you
see when they're red, that means they're going to,
they're going to disappear. So that's just another
way to edit your shapes. And let's see, maybe
I don't want it. See you can sort of make like a little There's so much
you can do with it. I think that looks
pretty decent. So if you want to have
more of an opening here, it all depends on how
thickly you made the shell. See, how, see how small
this this opening is. So you can actually
bring the inside. She's sort of make it
a little bit thinner. And it should start
to open that up. Does affect the shape out here. So you just have to
be cognizant of that. Still want my little I want
that little shape there. But obviously this isn't a, this isn't a flowerpot. But I just wanted
to show you kind of the fun things you can
do with the late tool. But since we have this, let's just go ahead
and validate it. And we'll just
keep it for later. So let's call this
vase, vase one. We'll keep this for later. We'll put it up on top. And what we hit the
little eyeball. So, you know, it's
so it's hidden. So now we can go
back in and we can make our leaf with confidence. So let's see, late tool. We already have it
selected curve. Now we have our line
pops up. Perfect. Now let's make our little pot. Do I want it to around
one or do I want to do? I don't know around what
that might look nice, but I think I'll just do a traditional,
traditional shape. I do have anxiety because
there's just so many options. I want to do them all. So we'll bring it out or
bring it up on an angle. And then usually puts have that little lip will
make the little lip. It does take some
getting used to sort of thinking
about its shape, the way that, the way that a piece of the inside
and outside would be. But once you just
start using it, it kinda makes sense. It's kinda fun to do mugs
to things like that. So you, of course, again, you can sort of edit this if you want it to
be a little thinner. But as long as the
outside looks good, that's all you really,
that's all you really need to pay attention to. I think that looks pretty good. So I'm gonna go ahead
and validate it. And I think that's
a pretty good pot. And I'm not sure why it's
not on World Center. Let me figure that out. Let me 1 second. I'm just gonna sort
of figured this out, but I might as well
just leave it in so you can so I can show you my thinking and why am
why am doing certain things. I noticed that when
I made the table and when I made the pot, it's not it's not centered. Like you would think that
everything would be centered. And I'm not sure
if I made the pot. Not in-world center. World center is when
you make a shape. When you use this and I make a sphere, That's World Center. This is the very center. Anytime you make a new shape, It's going to show
in the world center. You can see how it's perfectly
in the middle of this. The legs are probably
off because I think I I did move those around. But that's what World Center. Worlds center comes into
play when you start messing with the symmetry and
things like that. For example, this is
the symmetry tool. This is the same
thing here, symmetry. So when you tap that, you have some options here
and it can be very confusing. I'm not gonna go
into a lot of it, but World Center makes
a big difference. You can see already
that plane comes up. You have our planes. So those all come into
play when you when you when you need to. Anyway, I'm getting
in the weeds here. So I noticed the pot
wasn't world center. So I'm in the gizmo. I think I can tap on the gizmo. And you see move origin. I think this will bring
it to world center. There we go. So I'm gonna get
rid of this sphere. I don't need it. So I'm going to delete it. So now our pot is
in world center. And just let me put it
in the middle again. Make sure that it's nice and kind of going
into the table. You don't want it to
be too high up because that would be like a
little I mean, it's fine, but I like to like to put it
into the table a little bit. Just a little bit. Okay. So now it's at now to
World Center. We're good.
6. Cactus: Okay, so let's make
our little cactus. And for the cactus, I think I'll use,
we'll go up here. And could use a
cylinder or a sphere. A sphere would be easier. So now we have our sphere. I'm going to bring it up. And I'll bring it smaller so it fits inside our little pot. And I'm going to use this green and I'm going to stretch it out, make it a little smaller,
something like that. It feels good. And I want to I'm going
to bring it fairly low. I'm gonna keep it long. I'm not going to put it up here because I
don't think I don't think a cactus gets I don't think it tapers
at the bottom. So I'm going to bring it down lower, somewhere
about there. I think that's
pretty good for now. Maybe I'll make it a
little make it a little taller, something like that. So I'm going to go ahead
and validate that shape. I'm going to label it cactus. Okay, and also this
is the flowerpot. Let's label that pot. So now I'm going to tap on the cactus and I'm
going to duplicate it. Now we have two gizmo. Bring this one out
and up a little bit. Now I'm going to use
the move tool to sort of give it that nice
cactus arm kinda look. So the move tool up here, one of my favorite tools, I want to make it really big. And now I'm just
going to sort of manipulate this by pushing. It can be kinda tricky sometimes. So I'm going to pull
it up a little bit. I don't want it to
get to misshapen, which he kinda kinda did, but that's okay.
We'll make it work. So something like that
is decent for an arm. I think decent. You can probably do
better than this. So that'll be our arms. So let's go ahead and use our gizmo and we'll
bring it back to, let's make it smaller. We'll bring it back to the
cactus using our arrow. That looks crazy. So we're going to use see this blue line, this blue, these just rotate. So this will rotate our mesh. Now we can use this arrow to sort of put it
in the right spot. Still pretty big. Let's bring it down some. Okay, that's not too bad. You can also use your
move tool and just sort of you can stretch
it if you need it. If you want it to be
a little punchier. Like maybe you want
your cactus arms to be a little bit punchier. Don't be afraid to do that. Another thing that
I'm going to do is use a flattened tool. I really like the
flattened tool as well. I'm just going to flatten out, I'm going to turn symmetry off. I'm going to turn flat on
a flattened the top of it. Just so it's nice
and more round. You don't want it
to be I don't think they're very sharp at the top. I'm going to tap on the middle
one and I'll do the same. Don't want to do it
now. Yeah, I'll do it. I'll do it. When I did the test one, I made both of the arms and
then I flatten them out. But that's okay. Okay. It looks more like a
more like a cactus. So I'm gonna take this
arm on a tap on this one. I'm going to duplicate
that as well. Back to gizmo. And now we're going to
make one on this side. But we want to make it
smaller, maybe taller. We can still use these
these kind of things. And maybe we'll
just pull it out. So it's not, so we'll make
it up a little higher. Over. And of course you can put
these wherever you want. No real rhyme or reason,
just whatever you think. Looks nice. This one. I always like to make
it so it's a little bit asymmetrical when it's
taken out very, very far. So I'm going to tap
on that one and just bring it back
in a little bit. Here's another quick tip, another fun little thing. If you don't really
like the shape. Another way to kind
of there's lots of tools to sort of get these
shapes how you want them. Now of course we did, we did a lot with the move tool. You can tap on them and sort
of move them like that. So there's a lot
you can do there. I hear a raccoon outside. There's a lot you can
do with the move tool, but you can also
use the clay tool. You can hit subtract
or add even. So I hit the little
subtract here. So that comes up that
takes clay away. So if you feel like it was
a little too thick there, you can just sort of go over
it, something like that. Or you can take the trim tool. So the trim tool here, you can use lasso. So Trim Tool, lasso. And then you can
just draw like you would in a new drawing. And whatever is inside
that circle gets deleted. And if you have this issue, if you see that I think
that's caused from let's see. I think that's caused
from hole filling. So these are the options for the trim tool and
check hole filling. And now that shouldn't
happen again, Let's see Let's see
if I'm wrong or from right. Here we go. Yeah. Okay. So I just
wanted to show you a couple a couple
of little things. So once you have your
cactus, how you like it. We can go ahead and we
can simple merge these. So we have worked three
cactus parts here. Simple merge,
simple merges away. That you're not, you're not
physically connecting them, you're just sort of
organizing them. So it's sort of like
they're in a folder. It's not as easy to two, It's not as easy as a folder because it's just one thing now. You can color the whole thing. But if you ever
needed to, if you wanted to change something after use simple
merge, which is this. You can go to separate. Then we have our three
cactus parts again. So that's the benefit
of simple merge. But what we wanna do is voxel merge them
with voxel merge. That means that they're
actually merged. And they're merged for good. So just make sure that you
have it, how you like it. When you voxel merge.
7. Cactus 2: I might use the clay
tool, not subtract. So just regular. And I might make the top a
little fatter, little rounder. So the clay tool just adds clay. So I just think this
thing at the top can be a little little wider. So I'm just rotating and
just adding some, you know, just adding some clay, adding some mass to it. Like so. Okay. And it looks we're now,
but it won't look weird once we add some to this to see this is why this is the problem. When I tried to
keep things simple, I started having fun with it. So hopefully you guys don't
mind me kinda showing you these little these little
tricks and things like that. Whole arm needs to be wider. So why not just going to
make it a very wide I don't know how it
got so flat. Okay. I think that it looks
it looks weird now, but trust me, we'll fix it up. Yours definitely won't
look this weird. I'm going to share it
like me and you just want to like experiment. There's nothing wrong with that. Okay, so now let's take, let's select our cactus and
we're going to voxel merged. So we use voxel merge. We're going to bring it to 200. So we're just going to
slide this up to 200. So that'll, that'll
solidify them together, that'll glue them together. But it'll still be 200 is not going to make
it super high density. So the clay is still
going to be soft. So I like to box
emerge things at 200 before you have any detail. You don't wanna do
that when you have a lot of detailed things. But right now when
you're putting shapes together to hundreds
of good bet. So let's voxel merge. Now these are one. So now we have one
cactus smooth tool. We don't need symmetry on because it's not a
symmetrical shape. And smooth can be
on pretty strong. You can apply it fairly liberally and sub-divide
our voxel remeshing it. 200 is nice. It keeps the clay nice and soft. So your cactus can
be nice and pretty. Even though we made, we made those really ugly marks on it. See it's nice and soft. And if you find that, it's still a bit lumpy. One thing that you can do is so before we can voxel merge when we
were doing the shapes, now you have to go to
the grid and voxel. That can be kind of confusing when you're putting
two shapes together. You can voxel merge them here. But if you just want
to rematch this, like say you, you say, you want to add
like we did before. Like you want to add clay, you want to add some
more clay to it. And you're like, Oh, it just
needs to be bigger here. Or it needs to be higher
or something like that. There's two ways to do it.
You can do that or you can do the move tool as well. But let's say you just
wanted the cactus to be a little wider. But you made some marks. If you notice this is
going to be grayed out. So just remember to
go to the grid and then remember it doesn't sometimes it won't go
back to where you had it. So you might be like,
Oh, where was voxel? Where it was voxel. So
just remember the grid. And then it's one step over. And then you can remember
it back at 200 3D mesh. And then you can smooth
it again until it's nice and smooth and
professional-looking. And sometimes I'll take
the flattened tool and I'll just sort
of flatten out. Like if I want the top
to be nice and round, I'll just use the flattened
tool and I'll flatten it. There's any lumps or
something like that. It's flatten it out. And then I'll use
this move tool and just, just smooth it. Usually doing a combination
of that works pretty well. I eventually get it smooth. And you see the little
tip of the cactus coming down from the bottom. So make sure that your
cactus is selected. And you can just
do the trim tool. And you can do lasso or
you can do rectangle. Let's go to the front again. See if you see this
little tip here. And you can just, if I'm in a triangle
or a square, I can just make a square
till about there. And it's gone. That just, that just cut out
the bottom of our cactus. But I think it
looks pretty good.
8. Pot Fill & Handle: Now, I think I want to put maybe little pebbles
or something in here. But we're going to have to sort of figure out a way to make
it a little bit easier. So I think the first thing
that I'm going to do is I'm not sure if I want to
use a sphere or a cylinder, but let's hide the
cactus for now. I'll tap on the pot. Maybe I'll try a
cylinder or a sphere. So new sphere, move
it up, make it small. Just sort of put it in
our pot a little bit. So bring it up. Okay. So I'm just I
just want to make it so it's right inside our pot. Okay, That's good. So the next thing is maybe
will flatten it like this. I think that works. And actually move
it up. Cylinder pi would have been pretty
good, be honest with you. So now I'm looking at it at the top view and it needs
to be a little bit bigger. Here we go, That's too big. So I just want to make sure
that it's touching the sides. I think that's
probably pretty good. So I'm going to go ahead
and validate that. This can be like our base. So I can use flatten. Just sort of take it off symmetry and just
sort of flatten this out. I'm not too worried about
this looking really, really perfect
because I think we'll come back and maybe
put some pebbles. Like maybe we'll make
a couple of spheres. And then we'll just
duplicate them to make like a I think it would be like a rocky cactuses are usually
in like a rocky environment. So I think something
like that is just fine. Let's see how it looks
with our cactus. I think that's fine. So you might need to do
some maneuvering, but it's also good
practice to get things to fit inside other shapes. So I would say that
looks pretty good. It's pretty good for now. Looking good. So since we were talking about
I'm mugs and stuff before. So if you want to make, if you want to use
the Lasso tool to make something like
that, like with a handle. Here's what you do. So late tool, curved.
So let's see. I'll try to make one
of those like so like a bootlegger container. I think. I don't know. I don't even I don't
even drink alcohol. But let's say we want
a container like this. Remove it so we can see
it a little bit better. Um, I don't know if
this would be the best. Yeah, something like this. So if you want to if
you want something like this and you want
a handle on it, whoops. Come into solar. And if you miss what I did,
I just hit Solo down here. And my symmetry was off. My symmetry was a
little bit off. It's wonky. Let me do that
again with symmetry on. And let's just see, we did there just change? No, it didn't. Let me do the late tool again
with symmetry on this time. So let's see. Maybe
something like this. These look crazy. Let me solo this. Okay, So we have, we
have our bottle here. And that's actually
better with symmetry. So note to self, make sure the symmetries on because it looks
better with symmetry on the mean. Okay? So now I'm gonna go ahead
and validate our jug here. Now, you can just use
something like it. Tourists. Bring it up. Bring it over. Remember we use snap before. So let's do snap
just so we don't have to worry about it
being perfectly 90 degrees. Now we know it's
perfectly 90 degrees. So snap. So let's line it
up with let's line it up. Now it looks too thin, so make it a little thicker. So I'm going to use
this green is tricky. I'm not, I mean, I honestly, I don't really know
what all of these like. I don't know what
the pink one does. Oh, oh, that's what it does. So the pink is
like, interesting. I actually never
knew what that did. Let's see what the blue does. Oh, I feel like this might be I think this
might be the inside. So if we were to cut it, So let, let's, let's do an
experiment here. So I'm going to
open this up with the pink one and the blue one. The blue expands
that in the middle.
9. Rug Room: So now let's make a little
cylinder rug type thing. So we'll just use will go here. We use cylinder and we'll
stretch it way down like that. Make it bigger. Actually don't know
how big I want. It. Will stretch it down again. And we'll bring it down
with this green arrow, will bring it down to the floor. I'm going to do the same
thing I did before. I'm going to go to the grid. And I'm gonna do
flat subdivision. And then two is fine. Then I'm gonna go
ahead and validate it. So now we have a little
rug rug type thing. It maybe, maybe it wants
to be like an oblong rug. Give it some little
bit of personality. So now we have our
little rook. Okay? And now let's make, I think we have enough to
sort of make our room. Now we don't really
need the grid anymore. So let's go to the Options
here. This little cog. And let's just tap
Grid. Get rid of that. We don't need we don't need
a grid anymore, no grids. So next, we're going
to make our room, but we're gonna make
it open on one side. So what we need is a box. Box. Make it real big,
larger than life. We can always, we
can always make it and you can always
edit it later. So I'm gonna do the same
thing, grid, flat subdivision. And I'll do too. I think twos, okay.
So we'll validate it. Okay, so we have our box. Now. Let's duplicate the box. And I'm going to name
the top box wall. So we know we have wall box, they're essentially the same. But I want to go to box. And then I'm gonna
go to my gizmo. And you see when I make it
bigger, you can see it. Once I make it smaller
than our other box, you can no longer see it. Right when you get to wear it, when it stops moving. Just want to bring it down
a little bit. Not much. Then you then you want to pause. So you want to shrink it. So it's just a little
bit inside our box. So it should be good. Here we go See like that. So now what we're gonna do
is we're going to use that. We're going to use the
box in the middle to hollow out this room. So we select both of them, the wall in the box. So both of our squares,
both our boxes. But now I'm going to hit the little eyeball for the box in the middle
for the smaller box. So once I hit that, I'm going to rematch them. I'm gonna go I'm gonna go
crazy and remission at 300. Check keep sharp edges. So before I do this,
I'm going to save. It's always safe to save. Hopefully you've been
saving. I haven't been. So I'm going to save. So now we're good, now we have the box and now we can go back. And luckily our settings
are still there so we can just foxhole
merge did emerge. What happened? I think it
froze on me. Oh, here we go. Woo, woo, catastrophic failure,
system error. So we'll go back. Okay, so I did the
same thing again. It might he got
caught in-between like an autosave or something. I'm not sure. But that's okay. Got it. So now I'm just
going to hit front, so it's nice and perfect. I'm going to use the trim tool. Now. I'm going to
trim the sides. I'm going to trim this side. We can see inside. Now I'm going to turn
it to the right and I'm going to trim this. So now we can see into our room. And our room is room
is actually huge. So I'm going to make the
room a little bit smaller. So you just tap on it. You can make it
smaller like this. And it's still quite big, but we're getting there. I'll make it a little smaller. Like so. I think that works. And so now we have our room established
and we can actually bring the room up
to meet the cactus. Just hit front so we know
it's nice and perfect. We just want to rest our rug. Here we go. Tap on this box again. We just want to
rest it on the rug. Rug doesn't have to be
that far off the ground. That's good. So something like that
and you can position it wherever you like. If you want to move it
up a little something or move the cactus
deeper into the room. Things like that. Another fun thing that you can do is you can still
use these stretches. So you can stretch the room out, some, something like that. So now we have a good little
cutout room for our cactus.
10. Window: Okay, so let's put a window in. So there's a couple
of ways we can do it. We can do trim the rectangle
and we can just trim out, trimming out from the wall. Like say we wanted to
do something like this. And we can trim it
out from the wall. And it looks okay. It's a little, little, little weird, but possible. You can also do what's
called the Boule, the Boolean way, which is
the same way we did the, what did we do that way? We did the room that way. So I'm gonna hit front. I'm gonna go here and
I'm gonna add two boxes. So the boxes are going to
play our Windows tab edit, so I don't have those
extra controls. So I'm going to turn sideways just so I can make sure that
it's going through the wall. Doesn't have to be that thick. Looks like an air conditioner. So now you can sort of make your window
bigger or smaller. You can just kinda stretch it. And you can have a
pretty good idea. If seeing where your
window is gonna go. Depending on where you
want your window to be. I'm thinking maybe like here. I don't know if I
want It's so big. We want something like this. Let's take a look
at the front view. I think I want
something like that. Maybe a window in the
middle of the room. You can do to Windows. So since I'm going to use this square root
cut out the window, I wanted, I want this
square to be of a higher, of higher detail
or this, this box. So I'm gonna go here.
Should I validate it? Let me go ahead and
validate the box. Now, right now that
the box is 4,762. I'm just going to sub-divide it. Also divided again 76 K. Okay, so now we're looking good. And so we have our, where's our, where's our wall? So we have our wall
here, we have our box. So again, you just
select the wall and the box and then you
click the little eyeball. And then you can, you can. Box will merge, will box emerge, it will moocs emerge at 200. Let's see what that looks like. It looks pretty good. So voxel
merged at 200. That works. So now you have your window. But I do want to show you
something a little bit extra that I was
thinking about doing. So I'm going to undo that. And I'm just going to go back, go back a step so I
can actually see it. I kinda wanna make
a window frame. So I'm gonna make this, I'm going to duplicate this box. So let's duplicate it. And this one can be framed. Okay, So for the, for the frame, I'm going to make
it a little bigger. And I don't want to just
take out really that far. Now it's going to stay here. So I do want to pay attention
to how thick it is. So I'm just kind of
skinny skinny using it up so that it maybe
sticks out on the, on both sides a little bit. Tap, right? I can get
an inaccurate view. Okay, so that's our frame. That's looking pretty good.
Here's our window cut out. You can see here the box. So that's gonna be
our window cutout. And actually, I can
probably make this smaller. And just make sure that
it's makes sure this is thick because this needs
to go through both. And this can be a little
skinnier this way. I think that makes sense to me. It looks like a window. So since I think I might want
to color this frame, I don't want to connect
it to the wall just yet. And hopefully this doesn't
get too confusing. So essentially, I'm gonna, I'm gonna, I'm gonna make a
T-shirt that says almond. I say that so much. So
I'm going to take this, but I'm going to take this
box and duplicate it. So now we have two. So one of them. So this one, I'm going to
select the wall in the box. So the box is the window cutout, which we have two of So now I'm going to hit
the little eyeball and I'm gonna re mesh at did I really miss it to 50 or
200? I don't remember. I have the box and the wall and I unchecked little
eyeball for the box. Now I'm going to voxel
merge those two. I'm just going to
save it just in case, just to be on the safe side. So now I'm going to take the
second box and the frame. So I'm going to select
those two and I'm gonna do the same thing,
uncheck the eyeball. Then I'm going to
voxel merge them at the same number to 50. Keep sharp edges. I'm going to voxel
merge those two now. So hopefully that made sense. Now we have a decent little
frame, decent window frame. And I think this is, this might be a little bit
of the wall showing through. So I should be able to just click on the frame and then make it a
little bit smaller. And let's see if that goes away. Yeah, let's make it a little
smaller than that one right away. So we're good. So the only thing left to
do with this window now is to make the the x, you know, the, the cross beams. So we can just make, we can do that pretty easily. Which is go ahead and
use we'll do box. Bring it up in the
middle, fairly close. Then we'll just make it flat. We'll make this flat. Make it a little thicker here. Okay, I think that looks good. Okay, I'm gonna do
edit so I can just pull these up quickly. I'll just kinda bring it in. Like so I hit front so I can just make
sure it's in the middle. I'll just eyeball
it, isn't it to be super perfect, super perfect. Snap. I still have snap. So I've been going back and I've been I've been duplicating this. But there's actually another
way that you can do it. Just make sure you're
on the right thing. There's actually another
way you can do it. You can just hit Clone. Now. You can see I still have snap, so I'm just going
to snap the clone. And once you move
it or transform it, then your other one
will show here. I can, I can invalidate
both of these. They if they've done
their their part. But this one is
taken out very far, so I'm just going to shrink it. Just so it's in
the window frames. Here. The one looks pretty good. See how it looks
from the outside. It looks pretty
good. The only thing I see is that this one's a little further back. We want them to be sort of
in the middle of the frame. I'll just move them
back like this. That's a pretty decent window. And of course, using the various methods
that I've showed you, you can make like the
little accoutrements. You can make like the little
thing that goes above. You can make like a
little ledge here. There's tons of things you
can do just using the shapes. So feel free to do those
and experiment with those. Before we jump into
the next video.
11. Bench: So I think it might
be nice to make a little bench over here. So let's see. Let's use make a box. I wasn't actually
planning on this, but I just have a lot of
fun making these things. So I'm just using a square. I mean, I feel like I don't
really have to explain too much of what I'm doing now
because I'm keeping it very, very, very, very simple. You can do one long. Maybe I'll do. I don't think I want
to make for them. There's just a lot
of space here and I think I think a
bench would work. Bench can be kinda low. Make it a little thinner. Move it away from the wall and doesn't actually have
to span the whole wall. I don't think that's a
good that's a good plank. I'm going to clone it. And then I'm going to drag it over. So we have two, so we have a bench like that. I kinda wanna do three though. Now. Now I kinda wanna do three. I think two is
good. I'm getting, I'm getting too
crazy, too crazy. So these, I'm going to
simple merge them together. And let's call this bench. Now we have these
other boxes here. Let's take a look
at what those are. I think these are
just the cross beams. So these are just
the cross beams. So we have the frame and the cross beams I
think would all be white. So I'm going to simple
merge those together. I'm just going to
call that frame. Okay. So now back to the bench. My fiance would probably be upset and if I didn't
have matching furniture. So let's clone one
of our legs here. Bring it over. We'll
slide it down to the end. Let's bring it down. Something like that and
maybe we can just shrink it. Bring it up, shrink
it a little bit more. Okay. So something like that, it
looks actually not bad. Make it a little bit
perfect or more perfect. I don't think perfect,
there's a word. So let's clone, will
clone that one. And then we'll spin
it 90 degrees, once, 90 degrees again. And then we'll take the blue
and we'll bring it down to the other the other side. We don't really
see it that well, so I'm just going to trust that that's in
the right position. Now we have a little bench. And I think I want to
make a little frame two, to go on the wall. So let's add box. We'll bring it over to the wall. We're bringing it
up, make it bigger. And since this is
more horizontal, Let's make this a little
bit more vertical. Bring it up a little higher. And it's quite high. It's so funny with the shadow. It makes, it looks like it's
not. It makes it look wrong. Anyway. So let's do this subdivision
type thing again. So flat subdivision
to validate it. So we can skinny this up. Now let's go ahead. And how many? So this is 129 K. Okay, so now we have our frame. Let's duplicate it. Let's make it a
little smaller here. And then we'll use the arrow to bring it out from the wall. So then we can kinda see, we can see where it's at. We can actually stretch this. We can actually stretch it. So that's a good size frame. It can be one of those
frames that we can maybe put stuff in
later if we want. I think that's pretty good. But we want it to go all
the way to the wall. So we want to make sure
Let's stretch this. Okay, so that's good. So now we have our frame, it looks like a good shape. We're gonna do the same
thing that we did before. We're going to highlight both. But we're going to
take the smaller one and click the eyeball. 200. Keep sharp edges. Save. And then we'll go
back and voxel merge. So now we have a nice
frame on the wall. I can put stuff in. And while we're here, how about we go
back to our shapes? Let's go to vars one. And maybe we want, maybe
we want to stretch it a little bit and put
it on the bench. Slide it down to the end. So if you have other shapes and stuff you can, you
can put them in. I think I'll just
play around and maybe add these other faces. Vases like this one
is not straight. Might have to do this one again. I'd like to put put
one on the floor. But I might do this one again because it doesn't
feel like it's right. I'll just
delete that one. Little syrup jar. And this one might
actually be cute. If I make it small. I'm still on me, take it off snap so I can move it freely. So this one might
actually be cute up here. Might be a little too, maybe a little too big. I think I like it, so I don't want to
make it that small. So let's make it
a little bigger. And let's just add it to our
little collection down here, our little home jug collection. So we'll put it a little
bit closer to the wall. I think I want to make a big
one over here on the floor. I think. You can also put I don't
know what they're called, but they're like a bottom like a white thing that
goes along the ground. There's so much that there's
so much that you can do. But I think this
is good for now.
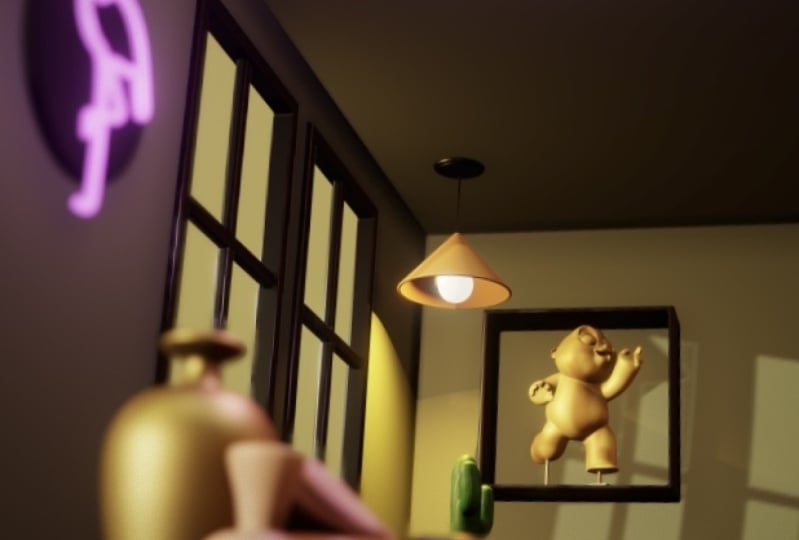
12. Wall Art Horn: So you definitely don't
have to make this, but I think I want to make like a like a horn on a pedestal
or something in there. Like a horn shape
doesn't have to be. It could be like
ceramic or something, but just like a horn shape, I think would be kinda
cool to go in that space. So I think, let me save. I think I'd like to use cone. So we use a cone first, bring it up, stretch it. And I think we can, I think I can go ahead
and validate it. So now I'm gonna, I'm gonna, I'm gonna slice off the top. I don't want it to be
that sharp at the top. Now I'll just smooth. That made it look weird. So when it looks weird like that, I'm going to go ahead
and box will merge it to 200 remission. And I'm going to actually
chop a little bit more off. So trim me, take
it off symmetry, we don't really need symmetry. Okay, that might be good. So now let's smooth. Okay, that's better. Because the horns,
I don't want it. I just really didn't want it
to be super, super sharp. So now I'm just
smoothing it out. Okay, that's great. So now I'm going to use
the Move tool and do the same thing we
did with the cactus. Make it really big. And then I'm just going to push it and pull it a little bit. Like so. That looks good. Now I think I want to trim
what do I want to do? They're going to trim
the bottom street. You bring it up a
little bit more. And it's gonna be on that wall. So I'm gonna go ahead
and I'm gonna do snap, turn it once and
turn it once again. I think I want it
sort of like this. I'm going to smooth this out. I can still see a
bunch of artifacts. So let's see if this
3D mesh helps to 100. Ramesh should allow me to smooth it out a
little bit more. Okay, Yeah, I think
it looks great. The only problem is it's
a little fat for that. Let's see if we
can make it work. So now I'm going to drag
it down into our space. Make it smaller. Skinny it up some. I think it looks okay. I feel like it needs
more of a bend. I just want to make sure
it's not into the wall. Oh, no, it's not until the wall. That's good. That's great. So
something like that. Maybe it will tilt
it a little bit. I'll take it off snapping. Want it in the middle. And two, hold it. I think. I'll do a small
cylindrical platform. Really gone off the walls here. I'm so sorry. Really gone off
the off the wall. But this is all like this is all such simple
such simple things. And let you know when, when you're doing, when
you're doing 3D stuff, it can feel a bit daunting, but you just have
to think about it in terms of like okay, like I just have to
do one thing and then onto the next and onto the
next and onto the next. It looks like it's in
the middle, pretty much. So we'll do that and then
we'll do another cylinder. And then I'll just be like
the poll that holds it up. Just like a thin just a thin pool that
kinda like holds it up. I feel like that makes sense. We'll just put it in the middle. I'm bringing this up. Notice I keep tapping, right. So I can make sure that
it's, everything is perfect. And we'll validate. So kind of interesting,
kind of weird. I'll probably take it out later, but that's okay. Okay. Nice.
13. Extra Decor: So I'm just going to make
a couple more things to go in this room. I want to use the laser tool. Validate that. Okay. Don't want it in the wall. You could also put like flowers
or plants in this thing. Like if you want to just
spend the time to really, to really make the
rooms special, you can just spend some time and make some other things
that go along with it. I recording, yes. I get nervous. Sometimes they
start talking and I'm like, wait a minute, did I hit record? Because sometimes I can I
can just sort of forget. Next thing, you know,
15 minutes goes by and I've been
talking to nobody, wouldn't be the first time. Let's make it a little smaller. Okay. Okay. I thought it's something, I think we just need a
little piece of art here. I'm just going to
use a cylinder. Do the same thing. Just lasso division two is fine. Validate. I feel like it should
be on the wall. I wasn't sure if I wanted it. There are in this wall
over here is better. If you really wanted
to give detailed, you can put a little thing with how it's hanging or
something like that. But I think that's good for now. I think it's good. Just
a little something to just offset it a little bit. Okay.
14. Color: So now let's do
like a color scheme and then it might help to
actually just Google like south-west desert,
like kinda colors. I kinda have a color
scheme that I think I like. The color things. You just tap on them. We tap on whatever it is and
you can just color here. I think I like actually not bad. I kinda want like a light sandy for the room. Might change. My change until like a pale
could change until like a pale pale orange could change into
like a pale orange. That feels, that feels right. The cactus, obviously greenish. Put a little bit, a little bit muted. I think that looks like
a good cactus color. Now the part, go back here and I have some
hypothetical is fairly close. Something like this. Looks pretty good. And I think these are usually pretty they're not
usually shiny at all. So we'll make sure that
that's nice and rough. If you notice when
I do the paint, I play with the roughness. So the Tableau. I feel like that can
be, it could be white. The only problem with weight
is sometimes it's not. But should that match the bench? Not isn't really have
to match the bench. Do like a little bit of
gloss on the tabletop. For these legs. Do we want like we won't like a, like a light sort
of wood ish color. I want to pair both
of these legs. So let's go to the legs. I'm going to simple merge
these McCulloch table legs. Let's make sure I didn't. There we go. Table legs paint all. Because we could also
do something crazy and do like a nice sort of brushed brass sort of feel. Turn the roughness
up a little bit. Fiance has encouraged
her a little more brown. Could do something like that. It's a little too, is
that to modern maybe. I mean, this place
is kinda modern. So I'll take the other legs. Make sure I have the right ones. A simple merge those bench legs. And we will do the same color. So now for this bench, I feel like this bench would
be does it have to be white? I feel like I don't really
want it to be white. I wanted to be a little
more of a whitish color. But maybe I want the roughness
to be down a little bit. Frames. I was originally
thinking white. But what if there were like What if they were like a
bold and more bold color? Maybe that's nice. Maybe an off-white is nice. Okay. So now we have the rug
actually grays and bad. But I feel like I want a warm make it a little lighter. Now for these guys. Let's push you a little
bit more towards the wall. Let's stretch you
out a little bit. There's two here and
there's two here. So let's switch that up. And clone. Let's just move this
c. I can know I'm here making more details. If the code is, I feel
like a similar color to the you go to the paint here, hold your finger
down and you can sort of get the same color. This can be a little bit of
a different color, I think. What color, what would this be? Maybe we'll make
this a refraction. So let's go up here to
this little sphere. And let's make it a fraction. Bring the index of
refraction down. Pink glossy. So then it sort of
looks like it's clear, you know, just to add a little something
different in there. But if you want, of course, you can just make
it a color. Whoops. If you want, you can just
make it a color by just going back here and
back to opaque. And then you can make it
whatever color you'd like. Maybe this is a glossy white. Instead. I like the glossy
white for the frame. I feel like the frame
would be sort of brown and maybe even the same
color as this. Let's see. I feel like I wanted it
to be its own color. Feel like I want it to
be a brownish color. I think I want to be kind of dark, darker color. This can be a kind of a
darker color as well. Just really switching
it up. It's all it is. So for the cone will do like an off-white like that. I think that looks pretty good. For this. Maybe like a maybe like
a different color, something that's just not
really in the rest of the room. Maybe like an orange. There is a decent amount
of orange in there. Guess it would help if
I can actually see it. We'll do this color for now
and we can always paint that. Excuse me. I think that looks pretty good. We want the floor of the
same color as the wall. So that's a different story. And I will think about
it and get back to you.
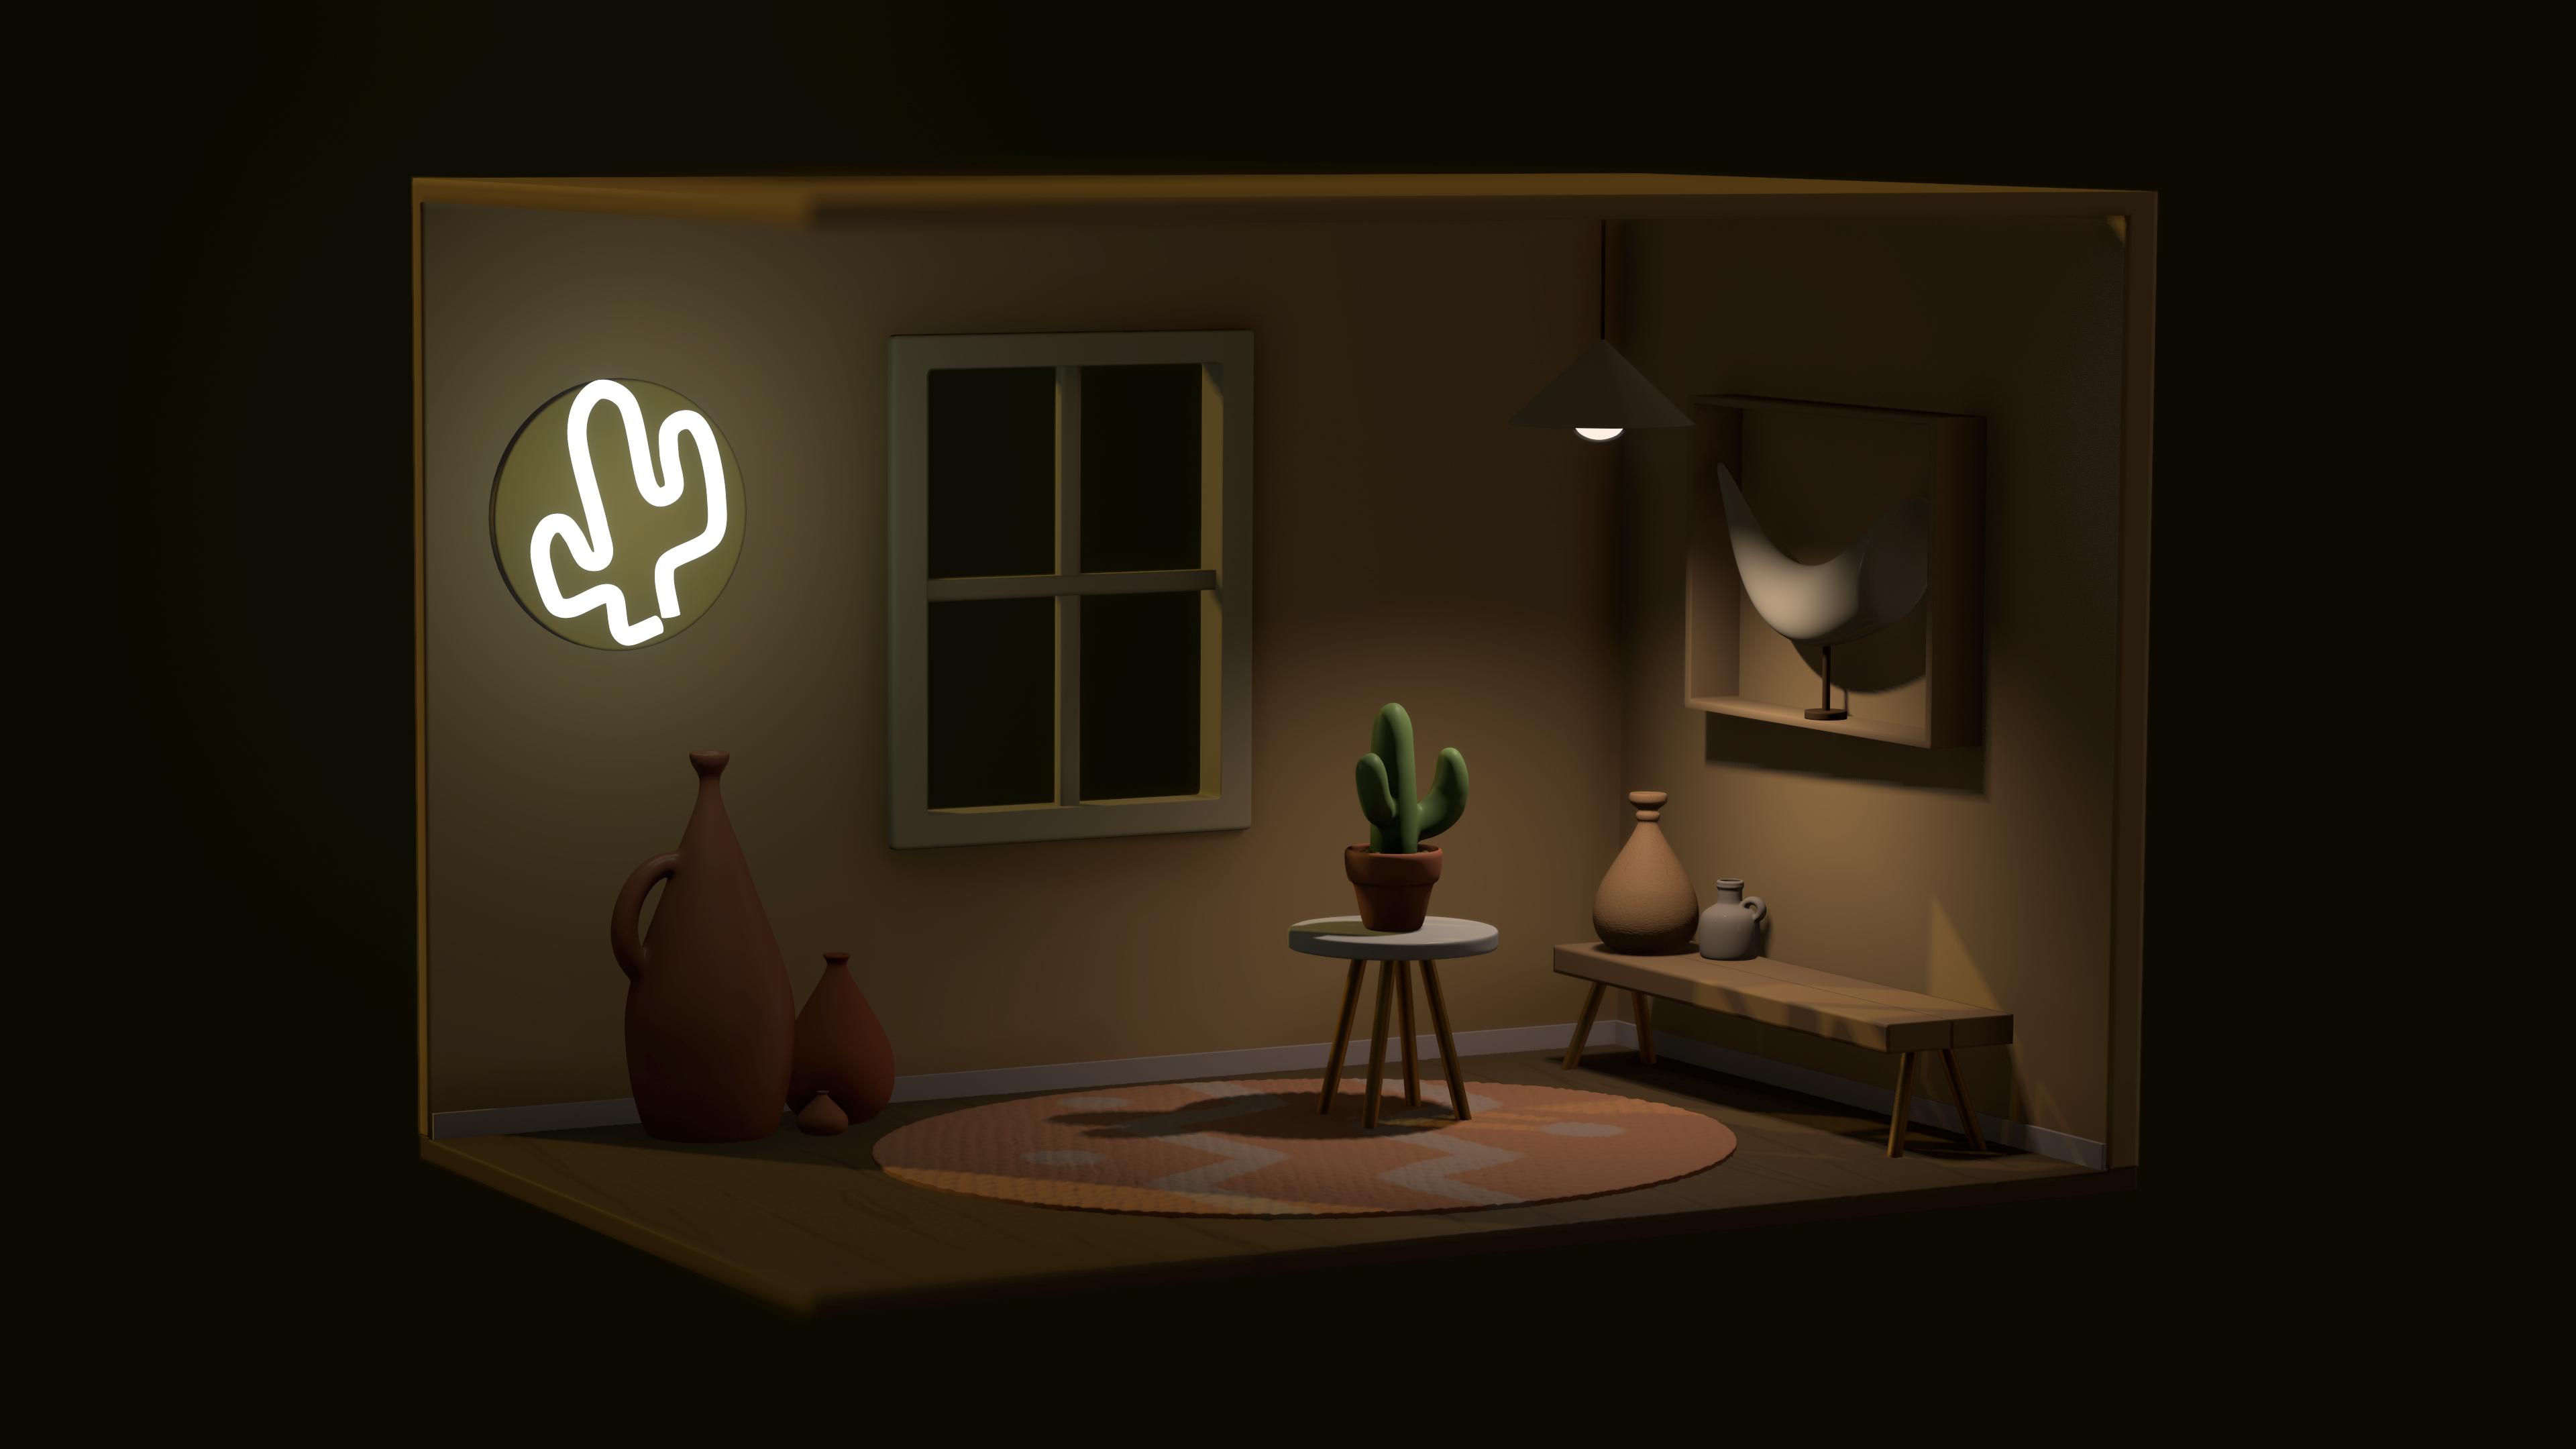
15. Light Bulb: Okay, so I always like
to add a little bit of light to a scene. We're going to light
this pretty soon. So we're going to have
a light outside of it, sort of like a world
light sort of like the sun is going
to be coming down. We'll have some light
coming through the window. Because why not? And we'll do some other lights. But I like to make a light
source inside and we can do we'll do a safe, we'll do a safe type light. We can do that pretty easily. Let's use the cone. So this will be the safe light. C-flat. We play air, safe flight. We place so upset I had to get a how do you get a chip in my window
fixed the other day? Well, this is like
maybe last year. I know maybe it was this year, earlier this year. I'm not sure. Annoying. Okay. So we have a
let's make it a little bit squatter and wider. So I'll validate that. So just a regular cone. And I think I like, I like to make it my
lights a little fancy. So we have our cone here. I'm going to, I'm going
to sub-divide it. So I'm gonna hit
the grid, the grid, I'm going to
sub-divide it because right now it's at 4,933. I'm just going to
sub-divide it once. So let's now it's 19.8. And then I'm gonna go here. And I'm going to duplicate this. So the bottom cone, I'm going to bring down and maybe bring it in a little bit. Something like that. I'll just move both of them up so
you can see them better. There we go. So we
have the two cones. I'll make the other
one a little omic, the bottom one a little
bigger because we don't need that much room.
Something like that. Okay, So now we're gonna
do the same thing. We're just going to hold this. We're going to remove the shape. So we'll select both cones, and then we'll uncheck
the bottom one. And we'll do a
simple merge at 200. We'll do keep sharp
edges. Voxel marriage. It would go. And we can make this light. Color will make it will make
it the same color as well. Make it the same color
as the abused the rug. We'll make it glossy. I feel like it should be glossy. So I'll just tap the paint. I'm going to turn the
roughness down so it's glossy. Paint. There we go. Now I'll just drag it
down with the gizmo. Will make it small.
And where would it be? We'll put it on this
side of the room maybe or maybe just in the middle of the
room? I don't know. I can't I can't decide. So you can position
it wherever you want. Ruby like, and then I'll add a tube with maybe
with a darker color. So we have our
little lamp there. I'll add a tube,
cylinder, a cylinder. And I'll just make
it really small. Just because I
want it to be like hanging from
something, you know. So we'll make it really small. And we'll color it
like a darker color, like a dark brown. And I'm going to, I want
to just select those two. So I'm gonna select the
cone and the cylinder. And then I'm gonna
hit Solo down here. Just so I can only
see these two things. I want to make sure that
this is right on the top. So I'm going to
tap, tap up here. That will give me
the very, very top. So now we're going to
have to touch the peace, make it a little bigger
so we can see it. Now it's directly on top. Just so it can be hanging. And I think that's pretty good. So now let's do some,
let's validate that. And let's simple
merge these two. Simple merge and
we'll name this lamp. Her no, not lamp. Lamp is good. Cone lamp. Lamp. So I'm going to hit Solo again, so everything comes back. And then we can just move it kinda where we want it. Okay, so now we have a
little lamp in there. And of course, if you want to be if you want to be proper, you can add another cylinder. Add another cylinder will
make it really small. Flatten it. We'll make this one wider. Then let's clone it. Or bring the clone low and then bring this one is
smaller in the middle. Bring it up some, a little bit bigger, something like that. Then let's just go ahead
and simple merge these two. Now let's bring it
up to the ceiling. Slide it over. Sometimes
it's a little tricky to sort of find your get your bearings, but that, that'll
just come with time. Here we go. We could just have it
hanging on to the ceiling, but it just doesn't feel. I get I get I get I get
locked into the details. That looks pretty much
like it's in the middle. Let's hit the view. That's pretty good. Game doesn't have to be perfect. It'll make it a little flush
up against the ceiling. Let's color it
white, glossy white. And I also want to
add another light. So this is more of a fun light. See, I made this artwork before. This is just a cylinder
that I put on the wall. But I'd like to, I'd like
to add a more fun light. So in the next video, we'll, we'll go ahead and
use the tube tool and we'll make our light.
16. Neon Light: Okay, So this next part is just some little extra
funding that I want to do. I want to add a neon
light. Think it'd be fun. We can make it glow. And why not? So we'll use the
tube tool and curve. So I'm just going to use this, this kind of circular art
that I put on the wall. And I'm going to try
to make like a cactus. I'm just going to do like
a sort of cactus shape. So what if I start here? And we'll do one
arm of the cactus. Again. Another arm of the cactus. So something like this. And I'm going to leave this
because I want it to look like neon, those neon signs. I like that. If you want, you
can go ahead and and you can show to
straighten out your cactus. Like I feel like I feel like the cactus is a little bit too. I think it looks nice when you, if you get rid of some
of these little dots, just by these little nodes, if you bring them together, they turn red and then
they will disappear. Like if we want to just put couldn't make the curve
a little bit cleaner. And I like this, but this is
just a little bit too close. So I'm just going to move, I'm just going to sort of
systematically move this over. I think something
like that looks good. Just like an interesting
kind of neon light. So I'm gonna go ahead
and validate it. I think I'm going
to validate it. And I'm just going
to make sure that it's a wanted
against against it, but not not too much against it. It looks good. I'm just sort
of center it a little bit. You can also make it
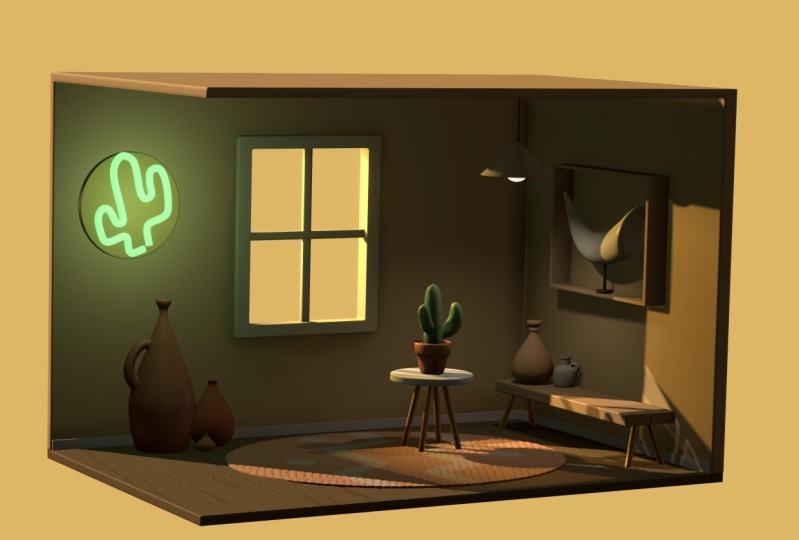
bigger if you want it, but I think like fairly small. So something like that. Now if we want to make it glow, I'm going to do like sunlight. It's gonna be daytime, but I
just like making stuff glow. So we'll see if we can work
this in later bit later. So for now, we have our
tube, I'm going to nickname, I'm gonna change
that to glow cactus. So let's glow cactus. And let's go ahead and
change this to add additive. So essentially, we
ever go cactus, we're gonna go to this
little sphere here. And we're going to
change it to additive. And always unlit. We can sort of pump
that up a little bit. Okay, so you can see
it's bright white now. We'll add some color to it. Maybe a light, kinda yellowish. I don't really need
much roughness but we'll just do pain all. So we've made it that color. Now let's duplicate it. Duplicate, we'll
name the top one. Glow cactus. Add. In the bottom one
will go back to this fear and we'll just
put it back to opaque. And we'll uncheck Always unlit. So now we have two cactuses. One that's additive and always unlit, that
was the other one. And now we have the
regular glow cactus That's just opaque, not always unlit. That might be a
little confusing. Just remember that there's
two of the same mesh. And one needs to be an
additive and the sphere. And one needs to
be always unlit. The additive is always unlit. So hopefully that makes sense. Add the equals unlit. Okay, So that looks pretty good. Let me make something
just changed the other one that
the same color. So I think I'm on
the glow cactus. I'm gonna make that one
the same color panel. I think I might have
already done that, but just in case I forgot. Which wouldn't be surprising. Okay, so now look
at our little room. I think it looks great so far. And we can start to
add some lights into the scene and maybe change the color of the background
and things like that. But so far, I'm liking it. I think it's cute. And we can, we might actually, if I don't add anything else, we might be able to hit this camera button and
change it to perspective. And then we really get
to feel it a little bit. But I think that
looks good so far. We're at one million thirty-two, which isn't that's
not too bad at all.
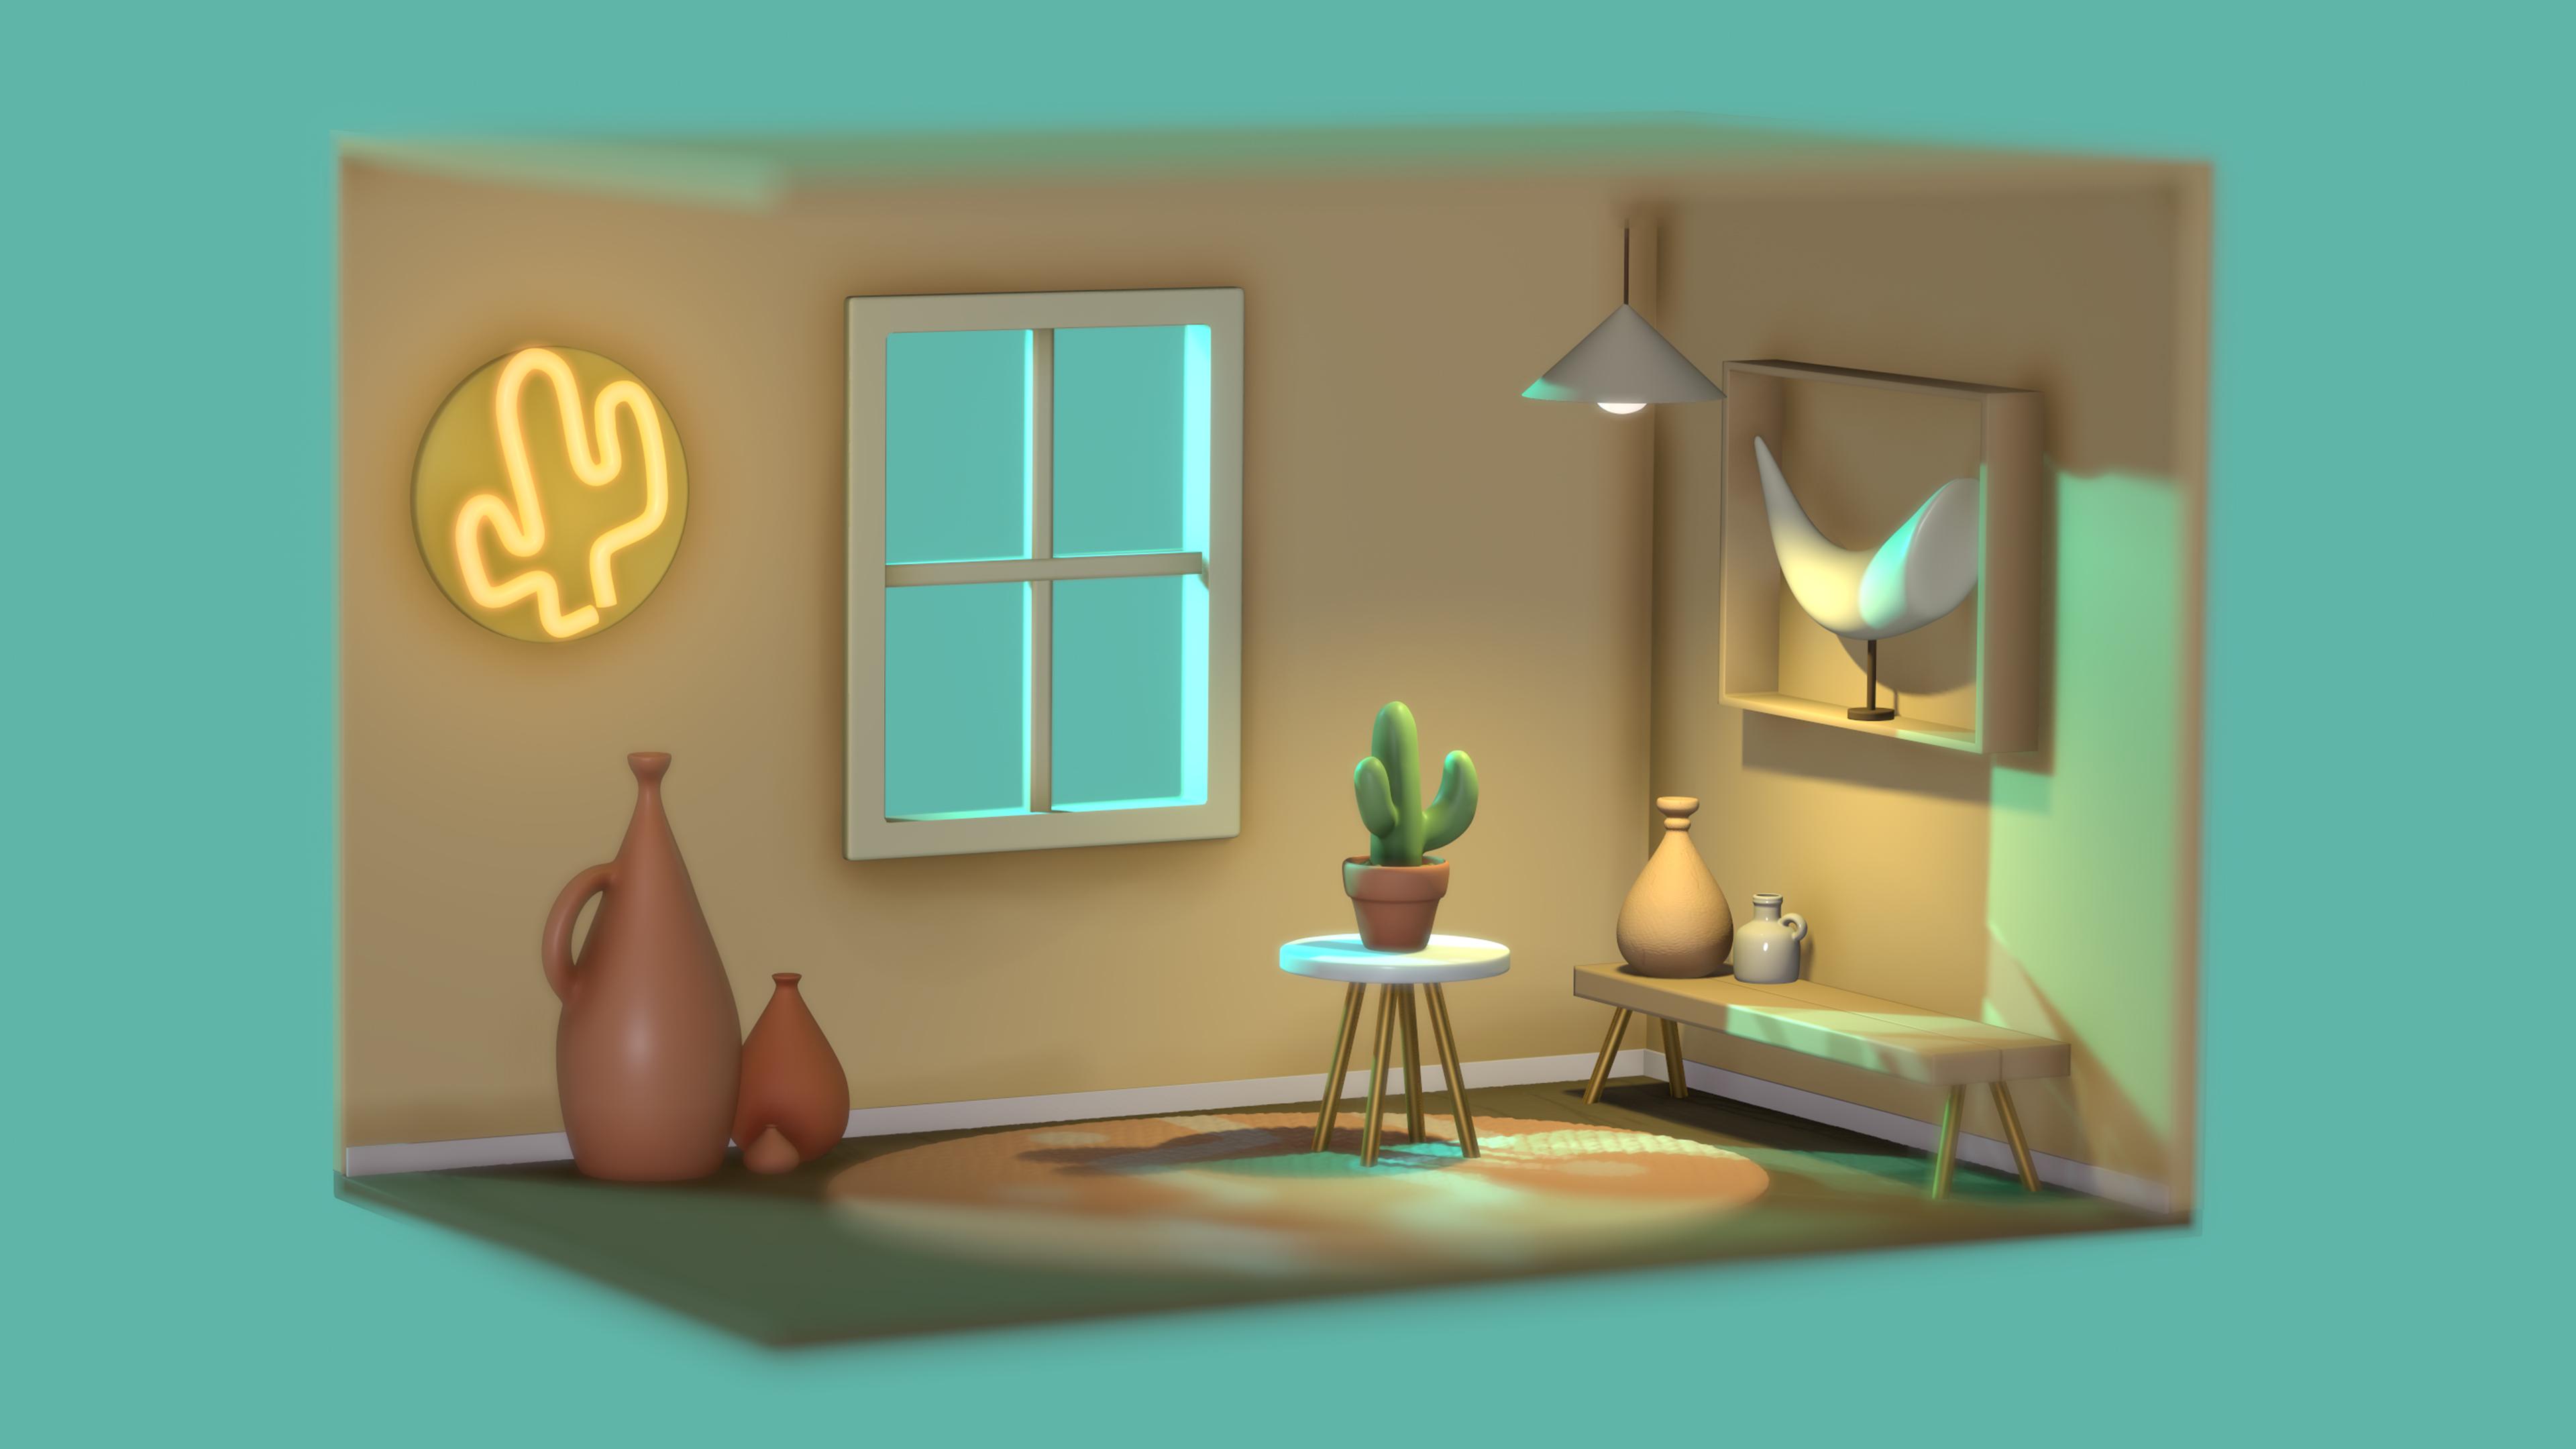
17. Lighting the Scene: Okay, so now let's
light our scene where my favorite things to do
is play with lighting. Especially because it
means that you've done all the hard work and you're
finally up to this point. So first what I'd
like to do is go to this little icon here. It looks like a little sun. And I turn off the environment. Everything should be black. And that's how it's
supposed to be. If you want, you can go to this little background
thing. You can change this. I don't know what exactly what
color I want to change it, but I know I want
to make it warm. So maybe we'll start with Let's start with
something like this. We'll just start with like
a kind of an orange, light, yellowish orange. I think
that looks pretty cool. Actually. I like that. So now that we have
our environment off, we can add some lights. So this light, we'll make
this our sort of bicarb sun. You can see it kind of comes in. Now it's coming in through here. It doesn't matter where
you position this right. So when you tap on it and you see you can
position it anywhere. But I like to bring it up over. But it doesn't really
matter where you position this light because it's
like a world light. So it's like the sun.
So it doesn't make it, it doesn't really
make a difference. As you can see. I bring
it down a little bit, so keep it in frame. So we have our scene here. And you can see as I bring the sun in different
positions of the world light. You can see that it
makes a big difference. Now you can see the window. You can see the shadow. Really, really fun stuff. You can change the direction
of it, something like that. I actually think that
looks really nice. I originally wanted to
wanted dislike to be coming through the window, but actually it looks nice. Let's see. So we want
to be able to see our, wanna go to see our cactus. So we might use another light, will see, yeah, we'll see
how we want to play it. Because we might use a, you can also use a
spotlight for this. But for now, we'll leave
this light like it is. You can tap on this
little options here. There's two ways to
mess with the lights. So obviously we have
our light here. You can go back here and
then you can tap on this. And this brings
up a little menu. You can see it's a
directional light. Your intensity is here. Which obviously if you bump that up and it
gets a lot brighter. And here's the color
of the lights. That's very, very important. And I'm going to make it the same color as the background. Just to kinda keep
everything the same. Temperature, maybe a
little, maybe lighter. I don't want it to
be too too yellow. Although I do like I do
like the yellow though. Okay. So maybe
something like that. And I think that
looks pretty good. It looks pretty natural. It looks like the light is
coming in from outside. I think that looks great. So that's one light. So next, let's add a light. Let's add a light inside. So you can see it's
pretty dark in there, but we put that
we put that bulb. Actually, I forgot to I
forgot to make a bulb. I did. Let's see what's the most
easiest way to do that. Maybe a leaf. I forgot to make a bulb. So
let's do that really quick. Let me turn on the environment
just so we can make this, this bulb. Let's use leaf. I'm going to hit it so
it's perfectly front. I'm gonna go back to, no, I don't have to go
back to orthographic. So leaf, attempt front to make sure that it's
perfectly aligned. To curve. And think, let's just try to make a bulb. A light bulb. I think that's pretty
good. You know, I just sort of made the shape. I didn't make the inside. I just sort of made the shape will make it just like
an old-fashioned round bulb, something like that. So I think that works. I'm happy with it. So let's just flip
it upside down. But the gizmo, and then
we'll slide it into its home here in
the light fixture. Actually, I don't mind
it being kind of big, something like that and
it looks pretty good. I like it. I don't really like this,
this little bit at the end. So maybe I can just smooth it. Just smooth that
out a little bit. Good. So I'm going to make this
I'll make it yellow. Paint yellow. And actually, I guess it shouldn't be
like I guess it should be it should be like an acolyte. Kind of a, just a lighter color. And I'm actually going to, Does this feel off? Now that feels straight. Okay. Sometimes in perspective things don't look, might not look. Who it is, look like
it's a little off. Let's go back into orthographic. So I'm going to choose
this little camera here and go back
into orthographic. And let's do front. That looks now it looks perfect. So it should look
perfect inside. Okay? Okay, that looks good enough. So now let's do the
same thing that we did with the neon light. Let's make this one glowing. Kinda have a glow as well. So we'll name this light. And I'm gonna, I'm gonna
try to do this less confusing than the other one. So this is light. Now I'm going to duplicate it. So we have two lights. The top one, I'm going
to rename light. So I'm going to
take the add one, go to this little sphere here. Materials additive,
always unlit. I'll go back to the grid, go back to this one. And we'll just, we'll
just leave it as is. I can color it the same
color just by going to this little pink thing
and hitting paint all. And I think that's fine. So we have our little
light in there. Let's go back to perspective because it looks a lot better. And also remember that
things are going to change once we go into post-process,
we'll do this later. But I just want to
give you a sneak peek. At post-process. It always makes things
look really nice, but we'll do that a
little bit later. So we have our light in there. And now we can turn the
environment backlog. So let's go to this little sun will turn the
environment backoff. Also want to note if you're not doing this on an iPad Pro, you might not be able to
turn the environment off. So I can't remember. I think it might stay on. If that's the case, you can just turn the exposure
all the way down. I had someone in another
class have that issue. And I think that's
how we resolved it. So instead of turning
the environment off, which wasn't an option, you can just turn the
exposure all the way down. So it's the same type of thing where I had the exposure.
I think it was like ten. Okay. So back to
what we were doing. Son environmental off. So now we have one light
and now let's make this light back to the sun. Add light. Now this light will, will
make kind of white X. Well, let's make it
a little warmer. So it will just make
it a little warm. And let's make it a point light. So we tapped point now we just have to find it here it is. So we tap on it. And it's very, very bright. Let's tap on this little
option here to bring up the menu and we'll turn
the intensity down. Now let's bring it right
into this light socket. Although I do see
that it looks like it might be shining through the the ceiling or
through the lamp shade. We turn it down. So I really wanted that bright. It looks like it's
shining through. Let's try to position
it as close as we can. Underneath this. May have to make
it a little lower, maybe even lower the
intensity a little bit more. I don't want it that bright. I just want it to be very low. So maybe something like this. So we might, again,
we might change this. I might change this
to a spotlight. That way we don't have
this on the ceiling. I should probably change it now. And we will have wanted
to show you guys that. I wanted to use the
point light as well. But I don't like that. It's changed. That shows through here.
18. Lighting the Scene 2: But I don't like that. It's shines that it
shows through here. So let's use spotlight. Spotlight is different
because with the spotlight, you can adjust the angle
of the light like this. So what we'll do is we'll make
it sort of straight down. We'll start with
it straight down. And then we'll go into this
little options window. And there's some
other options here. So make sure you kinda
play with all those. But the main thing
we want is let's make the cone angle wide. So it's sort of we want the light to sort of come off to look like it's
coming through here. So let me tap that
again and just turn up the intensity. Like this. Okay, so now it's right
under this light. Sort of looks like the light
is coming from that bulb. And I think that's
pretty good for now. I did like the other light but I just didn't like that it was
shining on the ceiling. But you can choose which
light you want, you prefer. Okay, so now let's add, let's see if we can
add a, another light. Let's make it light. That's trying to make
it a point light. So I'm going to tap on
this little gray box here. I'm going to make point. We're
going to try point again. And we'll make it green. So we'll make it
like a light green. Very bright. So now we have one light
here, one light here, and then this is our new
light, the green light. So now we'll just push this in to sort of where we want it. We want it to be
coming from this neon. So obviously we need
to turn it down, turn the intensity down to just like a nice glow,
and we'll move it away. See you, I can see
the reflection of the light in the wall. I mean, in this yellow thing
here, I don't want that. So I've tapped on that cylinder and I'm going to
change the color. So let's go to paint. So I'm gonna hold
down on this color. And I'm going to bring
up the roughness. You see as I bring
up the roughness, that that pop of
color goes away. So I'm going to bring
up the roughness paint all so it's the same color, we just don't get
that reflection. This will look more natural, like the light is
coming from the glow. So I'm just gonna, I'm
just gonna make it a little brighter because
it kinda looked better. A little bit brighter. I couldn't like that. Okay, so we have three lights. And we want to add
let's add another Let's add another spotlight outside. And we'll sort of pointed
inside the window. So let's add our last light. Oops. Add light. Now we'll tap this box. We want to make it
again the same, sort of similar temperature
to outside of this color, even though we might,
we might change it. I don't know. Spotlight. So now this is the
new spotlight. So just use these
little nice to sort of to position it. Of course, let's bring it back. Bring it back maybe up. Like it's coming in
on an angle back. And you'll get used
to these these controls once you use them. But I, i they're pretty
easy to control it. Just give yourself
some time to get used. So I think that
looks pretty good. I'm just going to scroll
to the inside angle so I can sort of see
what's happening. I'm going to tap on
this and then I'm going to have the light go
away and then come back. Go away and come back. So it is a pretty
big difference. Let's turn the intensity up. And let's make the
cone angle bigger. I'm going to change
the color to make it a little orange and a little
more subtle integrated. I want it to be
like, I want it to be a warm color coming in. I think it looks great. So the only thing that I am, I might go back on
is this light here. I might change this, but for now, tweak the lights. And if you want to
get rid of them, Here's a good way
to end this video. Just hit the COG and
then hit lights. And then tap on your screen and you can see what
they look like. You can see what your
scene looks like without the light icons.
19. Housekeeping: So we're gonna do more
with the environment, but there are a few details
that I forgot to do. So like the inside
of this cactus. So I'm going to tap
on that mesh and I'm just going to change it to sort of like a dusty color. Any color you can use, any
color that you want really, I don't think I want it to
be too glossy paint all. So now you can either
leave it that way or if you want to. Let's just, let's grab our, let's see which one
is this called? This is the sphere. There we go. So our sphere, we'll
call this sand. So we have our cactus
or sand are pot. Let's grab those
and then hit Solo. Wait a minute. Yeah. Okay. So now I'm just
going to tap on the sand, just just makes
sure that the sand is what's selected and you can do a couple
of different things. I think I'm just going
to use the inflate tool. Intensity really high. Make the the radius fairly low. And I'm just going to
pull up some on this just to kind of give it
some life and amount. You can see I'm not too worried about making it too perfect. I just want to give it
some, some pebbles. Something like that. You can always change the color of this as well if
you want it to be. Let's go to Paint. Make sure we're on that color. You know, you can always make
the color a little darker. So let's hit Solo
again, bring it back. Whoops. Hate when I do that. Just so it has a little
something in there. The next thing I
wanted to do was go to the lighting again,
the shading menu. And now, so there's all these
different environments. This is the environment
that I use, which is, you can see
it's very, very bright. But you have all
these environments. What I like to do is bring
the exposure way down. You see how you've lived it, because you've already
lit the scene. But this can just fill it can feel certain things because
you have a lot of options. So make sure you go through like maybe you want it really, really warm and then bring
this one down really low. And then bring it
up a little bit just so you can see what
it's actually doing. Because you don't
want it really, really bright is
just going to ruin your scene unless you want
your scene to look like that. So it all depends on how
bright you want your scene. We have a lot of
different options, a lot of different color tones. So just go through, go through these and just figure
out one that you like. You can see like these, some of these
changes a whole lot. They really have a
certain look and feel. And this is just
one that I made. I'll include this in the class. This is just one that
I made in Procreate. And I usually use it
for my, for my scenes. Mostly for like characters when I do eyes and
stuff like that. But it still gives
that ambient light. So it looks good. But I think I might even like
something warm. I think I like this
warmer, warmer tone. You can see it just kinda
makes it a little bit lighter. So you can sort of see more of what you've done
in your little room. That looks good. So next up, we'll just do I might mess with the
lights a little bit more. Next I will do I do like it. I can so I could so torn with
these really, really do. It's so hard to choose
one that I like. Because I went up
just wondering, I just wanted to experiment
with all of them. Bring them light
up a little bit. That's pretty good. Megan, meet this, make this
light a little brighter. So let's go back to light ad. We'll go back to the circle. Just see if we can make
this a little brighter. Didn't really show that
it's that it got brighter. So a lot of that
when we do post, post-process right here,
this will affect it a lot. So this will be the
next thing we will get into post-processed
in the next video. But I'm really liking this. I think it looks really cool. I'm gonna do the four finger tap to get rid of everything. Just so you can kinda
just see the room. I love it. I think it looks good.
20. Post Processing: Okay, so now let's just
do the last thing. We'll do some post-production, which is one of
my favorite bits. So we've made
everything, it's lit. Now once you hit
post-process, it, really, putting everything to work really makes
the scene real. I always do max samples
for resolution, reflections, things like that. Go through all of
these and this one. I don't really know
what that does. I'm not really sure something
to do with it, reflections, but we don't have a lot
of glossy materials. So it's not really going
to affect us that much. Ambient occlusion. You can just play with and things that I noticed
where that makes a difference. So let's see if we go and close. Let's see if we can turn it up. Turn it down. I can
see a little bit. It's kinda hard to see, but it does affect
things like corners. I see the dark
around the corners. See it kind of goes away. It just affects like the shadows and things like
that, their size. So there's all these
different things that you can sort of play around with. Just get them to
where you like it. Really the scene is good
to have a lot like it, like dark and moody. That's ambient occlusion,
experiment, depth of field. Obviously we turn that off. Everything is clear. When you turn it
on, then you have that nice depth of field. See you have the beginning. And with depth of field,
obviously far blur. Things farther away are
gonna be more blurry. Near blur. You can
get rid of that. You can make it
very, very blurry. So you can play
around with that. Do it how you like it. Bloom. I'll turn the intensity
up and bloom. See that really makes
it like a blowout. So all of our lights will
get very bright with bloom. So just be careful and
cognizant of that. Because it will make
everything softer. That's the only issue. It will make your whole
scene a little bit softer. You can sort of just play with, play with the options. Tone mapping. You know that you can adjust all the exposure
contrast, things like that. You can adjust all of that. Color grading. Obviously, you can adjust the hues of your scene if you want them to
look a certain way, that might be nice. If I do like a night scene, that's beautiful, I love it. Might have to come back
to that curvature. We don't really need, you
can play around with it. It just kind of a lot of
these things are just, if I want it to be like a nice like TV like vapor
wave type look. Vignette. Obviously.
I do like vignettes. Yet might actually work
well for this scene. Grain. Obviously you've got
some green there. So That's pretty much that
I'm not going to use, not going to do too much
of that for this scene. I think it looks good as it is. I'm liking it. And of course, if you want to add views like if you have a view you like, like if you have a hero view, like this might be a hero view. Let me turn the, let
me turn the front. Let's see post-process
depth of field. For the near blur, I'm just
going to turn it down. It's a little too blurry for me. So I'm just going to
turn that down some. I'm going to tap on the cactus, That's the main draw. This will be like my hero pose. So I'm going to add view, the little camera at view. And you can name it if you want to, if you want to name it. Pull seen. Maybe you want to do one
that's like cropped in. I can do the four finger swipe to the forefinger just
to kinda get an idea. So maybe this is like
crop to crop seen. So we'll add view. Cropped whole scene. You can, you can look
from different angles. You can look in side view. Now. You can go in and you can get like floor
angles and things like that. All sorts of different. Let's make more Let's make
it more of a near blur. Since we're in close here. And don't forget, you can
always reposition some of the, some of the things inside too. You can get some real, real cool angles and views
and things like that. Maybe this view
like a side view. I could always change the cactus if I didn't like the cactus. And that angle, let
me take it off snap. Wanted to change
the angle to that. I kinda like that angle is kind of a nice view a little bit and everything
like this view. This is pretty much
that's pretty much it. This is like one of
my first scenes. I did a play around with
a couple of scenes, but nothing really
too, too serious. I really liked this one.
It's really, really fun. And there's so many
different options you can do for lighting and
things like that. So I'm probably just
going to experiment with more involved this
extra information. But I hope you guys had fun. I hope this was very useful. I really enjoyed. This was a fun one
for me and it's just something that
I don't normally do. So this is how I learn. I really like doing new
things and expanding. And this is really easy, like his whole really
easy elements that you just sort of put together
in a thoughtful way. So hopefully this, hopefully
this inspires you to make different types of rooms
look up different themes, colors and things like that. You can even make like
an, like an outside. You can add another bench
outside or something like that. I might play around with it, but I think for
now, this is good. I don't wanna go too
far in the weeds. But yeah, I think I think
I'm going to call it a day.
21. Thank You!: Alright, welcome back guys. I hope you had a good
time with this class. I can't wait to see what you've created and feel free to
go back and adjusting. So you're free to
go back, change things, switch things up, play with, play around
with the lighting because that's what I did a lot. And as you saw in the
end of the last video, I had to play around
with the lights and stuff to get the thumbnail. So I just wanted to show
you some of those as well. The there's so much
you can do with it, even just with lighting. Like now's the time you've
done all the hard work. Just play, just continue to play with it,
continued to go on. And speaking of
which is set right, so we can have which over
on YouTube I actually made some videos where I
go further with this. I'll show you how to put
textures in on the rug. I play with the
lighting a little bit, but there are extras
to this class, but I, I can't add everything because otherwise the class we'll just go on forever. And I want to do
that to you guys. But if you're
interested in seeing more of what I'm
doing with this room. And you want to learn
how to put in some textures because I put it in a cool rug and
this was that all I did. I think that was
the one main thing, but I might do some
other things too. So just keep posted with me on YouTube
because I do a lot. I'll probably go
back into the scene and work on it even more. I already did one. So I'll probably do some more, especially if people are
interested in that and you want to see more or you want
to see something different, then let me know because
I'm happy to do that. And especially how I'll do
it on a live video too. So be sure to check me out
on YouTube because I go live a lot and the 3D stuff
I do there is really fun. I also do other tutorials
on YouTube as well. Make sure you follow
me on TikTok. Tiktoks, like the
latest thing that I'm really, really enjoying. It's really fun. All of this video stuff. And I do a lot of time lapses, the fun time lapses
and things like that. Instagram is cool. You can follow me on Instagram, junk food aid, drug create, 3D. That's where all my 3D stuff is. But TikTok, I'm really focusing a lot on
posting a lot on TikTok. Yeah. I think that's about
it. I appreciate it. I appreciate you. Make sure you take out
check out my other videos. I have a lot of 2D
videos and I have some other 3D videos,
including a really, really from the beginning
scratch nomads, sculpt beginners video as well. So make sure you post
it to the class. I can't wait to see. As always, it's such
a pleasure working with you guys and
watching you work cut. I mean, not like watching
you work, That's creepy, but seeing what
you guys produce, I love it and it
means a lot to me. And you guys mean a lot to me. So as always, keep drawing, keep sculpting, and I will catch you all in the next video. I feel like I had to stop
doing that. I don't know. Like I don't like it's
just like a I don't know. We'll see.
 Dave Reed, 2D & 3D Illustrator - Brooklyn, NY