Transcripts
1. INTRO : What's up, guys drug-free Dave, here and welcome to 3D for beginners with nomad
sculpt part two. So if you haven't already taken my original 3D for beginners
class, then take that one. That way you can get
familiar with nomad scoped because I go through all the
tools and everything else. This class, we're gonna
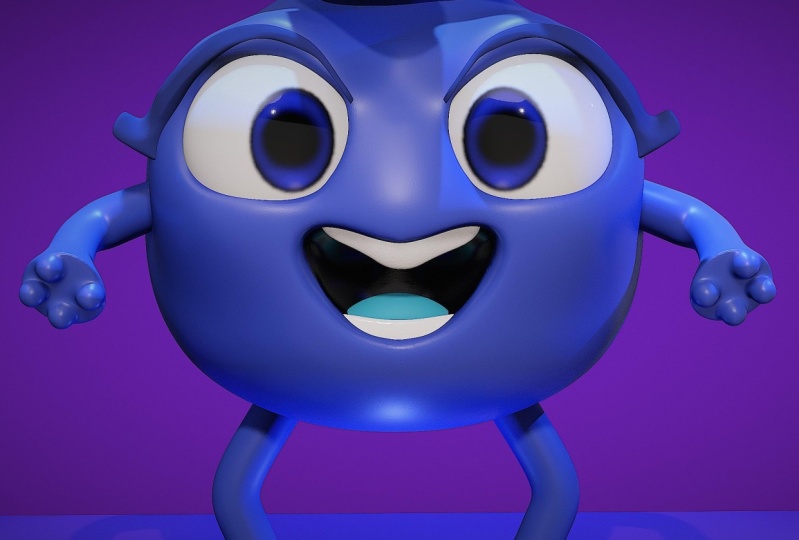
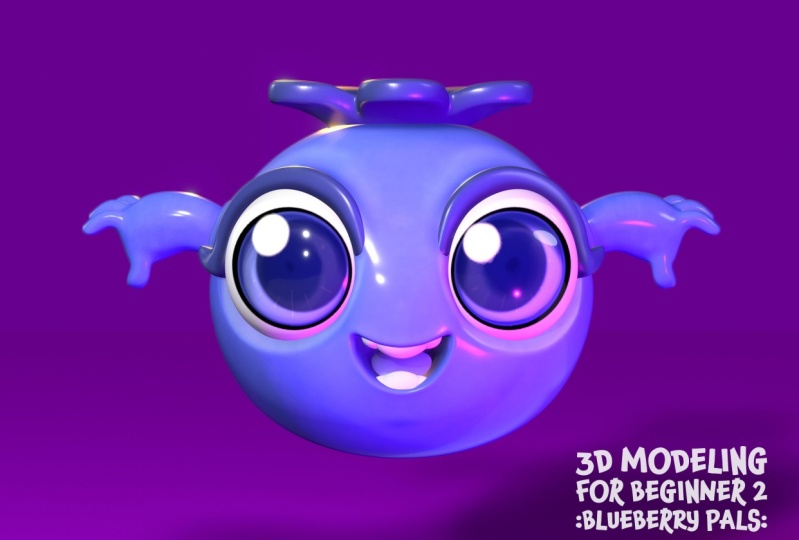
go a little bit further. I drew this blueberry
in Procreate. And that's the beautiful
thing about nomad sculpt and about 3D is that you can
take all the drawings, all your characters,
whatever you want, and you can turn it into 3D. And let me tell you
it's addicting. I'm kind of obsessed
with the app. It's just opened up
a whole new world. And I've been just sculpting
and just 3D modeling. And I'm gonna be honest
with you, Two years ago, I wouldn't have imagined that
I would be getting into 3D, that I would be doing 3D art. Artists nowadays. We have two evolved, he is. And I'm really glad nomad
came along at the right time. And it will just change the
way that you view your art. It will help you
improve your 2D art. And there's just a lot
of benefits to this. Expand your knowledge and
expand, expand, expand. I don't know. I don't even
know what expanding is, but we're going to expand
this blueberry into a nice, beautiful 3D character
in this class. And one more thing if the
only thing stopping you is thinking that you
won't be able to learn a new application, crazy 3D, super-complicated
application. It is complicated, but we're
gonna go one step at a time. And I've only been doing
this for about a year. I started March in 2021
with nomad scope with 3D. If I can do it, you can do it. And I'm gonna help
you every step along the way in this class. Let's get to it. Let's move to the next
video, the class project.
2. Class Project: Okay, First things first, make sure you download
the reference image. So this is my
blueberry illustration that I did in Procreate. You can download it
in class resources. There should be
three attachments. One is the reference
image, the blueberry, and the other two are environments that we'll
get to a little bit later. Once you get to the
environment window, will those in if you want. There's a lot of options.
It's just extras. Don't worry about
them right now, but when you get to
it, you'll get to it. Okay, So as for
the class project, of course, we're gonna
make acute blueberry. The same thing that I always say in all of my class projects. You don't have to
follow me exactly to the T If your learning yes. If you're not that familiar
with the application, yes, then follow me. But once you start to get
going and once you get in a groove and you
want to be creative or you want to change the color, you want to make it a tomato
instead of a blueberry. Or you want to do something
else like that and do it. This is for you, this
is for you to learn, and this is for you
to be creative, not to be constrained
into one thing. So this is all about you creating beautiful
artwork for you. And as usual, be sure to upload your project to the
class once you're finished. I would love to see, I'm
sure other people would love to see what you
make in this class. Once you finish,
if you change it, if you do some other cool stuff, post those to also
social media drug for Dave through the tag me because I want to see your
work and I'd love to share your work with my
audience on Instagram. You can tag me drug-free Dave, 3D and regular drug-free. Dave, I'll share. Both. Put you in my story and
give you a shout out. Alright, so thanks
again for joining me. Let's jump into it. Let's get to the next video. Getting started. I almost
say Class Projects again, getting started. All right.
3. Getting Started: Import Reference & Boolean Operation: All right guys, let's
get started making this cute blueberry in
3D using Nomad scoped. So first things first, you want to open
up nomad scoped. You're gonna get
something like this. Just so you remember, you can always change the
color of the background. If yours is a little
bit different, you just tap on the
little picture icon here, you'll see background. You just tap on the color. You can change it to
any color that you want to go with a
more neutral color. The next thing we want to
do is notice that the grid, you can tell that it goes
back to perspective is seen. That will affect
whatever you sculpt. It's usually best to
sculpt in orthographic. Just tap this last little icon up here, this little camera. And you'll see it says
camera and orthographic. Now, this little cube here, you can always turn it. You can, this is how you know what view
you're looking at. This is front and you can
see this is straight, so there's no perspective. So when you model, it's better to just
do it in this view. That way, you're not
kind of skewed by like how things looked
because of perspective. Another thing if you
want to get rid of the grid down here, all you do is go
to this little cog over here and hit grid. I'll leave it for now
because it might be easier for you guys to know
what the bottom is. The floor, the ground. Let's get started. Just going to tap front so it's
perfectly to the front. We don't have to do that much
work with our blueberry, but I'm going to move
it up a little bit. So I'm going to use the gizmo. The gizmo is one of
your most used weapons. The green green arrow, read our red arrow,
the blue arrow. Then you also see
this green sphere, blue sphere, red sphere,
the spheres 123. These cones I don't usually use, I don't usually use the cones. Fears just stretch and pull
those stretch and pull it. Gonna go back to regular sphere. Make sure that I'm
in irregular sphere. Then the arrows will
go like up and down. You can move it up and
down, left and right. That's the main, the main
movements of a sphere. And of course, if,
let's say you, you move it or you
accidentally do something good that you don't want and you
feel like you can't get back. Let's name this blueberry. If you get stuck on your
sphere or something happens, you just go into the
scene right here. You can just delete it and
make a new, brand new sphere. You're going to hit
validate right here. Validate just means that you
can now you can work on it. When it's not validated. There's a few more little
options that you can do to set it, to set it up. And then once you validated, then you can use all the tools. Another thing that I always do is I change it to a Metcalf, met cat is you just tap on this little sun
icon. Looks like thing. Pbr is what it'll be,
what the default is. I'm just gonna go to mid-cap.
What a mech happy is. It disregards all the lighting outside of what
you're working on. So it's very consistent. So it's just easier to see. So I like to work in med caps. Let's bring in our photo. We want to tap a little
photo icon here again, and we're going to
check reference image. And then we're gonna hit
the plus Important image from it'll be in your photos, probably all your files. Just make sure you download them from the class resources. I had photos, I hit
our little blueberry, and then I had ADD is huge. So we're gonna go down
here to transform. Now we can just, we can
just change the size. So that should be pretty good. Notice that mine is a
little bit lighter. I must have the alpha on. I must have the Alpha. The Alpha is just the main, the main image
that you're using. So I'm just gonna
bring it up to a 100%. And now it should be clear. Okay, so let's start
with the eyes. We're going to make
two more spheres. And to do that, we're just gonna go
to this little icon, the second icon we're
going to tap on that. Then we're going to hit sphere. Now we're going to
bring this fear up with the green arrow. We use this orange ring
to make it smaller. Kind of gets buried in the head. So we're just kinda tilt and use the blue arrow
to bring it forward. As you can see, the blue, red, and green arrows there
directional these little spheres that will just
stretch and pull. We don't have to
do that right now, but we'll do it in a second. So this will be one,
this will be one i. We can go ahead and hit mirror. This way we will take the red arrow and we'll just move it over and
you see the ghost one. This is the mirrored sphere. So now we're working
with two spheres. We want to put them roughly, let me tap the front. We'll put them roughly where
they are in the image. A little bit further
away from each other. And it looks like
actually we can just make them a
little bit smaller. A little bit bigger. That's good. Now I'm going to tilt it this way
and I'm gonna use the blue circle
because I want to, I don't want them
to be super round. I mean, I want them to be round, but I'm going to actually going
to take some of this off. So I'm going to squeeze
them together a little bit by pushing up on the blue circle. Think
that looks pretty good. Now that I've done that, I'm going to go
ahead and validate. Now we have three
spheres in total. And now it's a good time
to label our meshes. The eyes are one mesh and
the head is one mesh. Messages like the clay
groups, so to speak. I'm going to tap on the head, go to here and label this head by tapping
this little pencil. Already labeled it. This fear. You can
tap the little eye to see exactly what it is. I'll just leave with his eyes. Once you have it labeled, I'll just hit front again. What we'll do now is I want to, I want to make the impression of these eyes and I
want to solidify it. I want to remove this shape from the head.
In order to do that. I'm going to tap on
this and see the eyes. I'm gonna make a
duplicate layer. Now I have to, I'm gonna
hit the little eye. So essentially we
have our eye layer, we have our eye layer here, which is these eyes. We have a second one that
I've just made invisible. Notice that's checked. I'm gonna check head. Now. The head is checked and the invisible eyes voxel merge. I'm gonna bring it
up to about 250. Then we'll hit voxel merge. Essentially what that does. Let's go ahead and hide our
eyes that we're left with. C, it made these depressions in the head and those depressions
or where the eyes were. So I'm going to tap front, bring back our other eyes and see if the eye's
fit perfectly in there. We'll end up bringing those. I'll use the blue arrow. We undo that. I'm going to be one of the eyes. Use the blue arrow and just
bring them back a little bit. Something like that. And you notice a bunch of
divisions are a bunch of texture in the head. In order to get rid of that, you just want to make sure
you tap on the head. We'll take our smooth brush. You can go ahead and just
smooth out the whole thing. Just smooth it out. There's always multiple
ways to do this. Actually meet xy, recorded a
different way to do this and then kind of realized that I felt this way was a
bit better. I started again. But there's always more
than one way to do things. Let's see if we can
clean up these edges. They're not super, super clean. We want to use the pinch tool. I'm gonna put the
intensity up to a 100 and bring the brush
down to about 80. I'm just going to go
over the the creek or the the corner. It'll sort of pinch it together. The best part is, I'm
still using symmetry, so it's automatically doing
everything to the other side, whatever I do to one side, it happens on the other side. That looks a lot that
looks a lot cleaner.
4. Shaping Eye Sockets & Tube Tool: Now let's put some
eyebrows on this guy. This little blueberry. In order to do that, we're
gonna use clay again, but we're not gonna,
we're gonna make sure that it's not on sub. We're going to keep symmetry on. And brush is, since I
was about 130 or so, 140 with our clay, we're just going
to sort of go over it like it's makes
sure your mixture, you're, you've
tapped on the head. So you're on the right layer,
you don't want to do it on the IE layer. We're on head. I'm just going to
go over like this. Just sort of make nice
little round eye socket. Make it a little thicker. Sometimes I actually make
it a little too thick. Because when you use the Smooth
tool, what it does is it, It'll the clay is very
soft so you have to be careful using this
smooth tool because you can almost smooth it down till, whereas it's almost like you didn't even put
anything there. So we'll use smooth. I like to keep my smooth it up. I always keep it up at
like 100% intensity. Sometimes I'll just
press bless hard. So just kinda go over it. I'm not pressing completely. But I'm just going
over it just to smooth out and just make it look like it's part of
our initial sphere. Just slowly, just smooth it
out until it looks natural. So let's take our eyes actually, let's tap on the layer, will tap on gizmo. And let's squeeze the
eyes in a little bit. There. That looks
better. Let's see. We might tilt we might
tilt them a little bit. Let's see how that
looks. That looks good. So that way they
look nice and round. I don't want him to
look angry at all. I'm going to add a
little more clay. And of course, just do this. You can have to make a judgment
call on how yours looks. But I feel like mine looks a little he looks a little angry. So I'm just going to add
a little more clay here. And then the smooth it out. And let's see, let's just
see what it looks like. See if that helps. And lots of smoothing.
I really like my 3D models to
look very smooth. It looks all right. Now I've taken the
flattened tool and we're still on symmetry. I'm just going to
go across the top, make it a little bit bigger. So I'm just going to go
across the top here. See how that looks. The way that you have, your, the way that it's turned, the way that you're
canvas has turned is what's going to dictate
what actually flattens out. This isn't bad. Bad. I really liked the
flattened tool because it enables you to have really nice planes like this flat
plane going around, which I really like. And also another thing that I like about the flattened tool. I'll make it a little smaller. You can actually go
across this way. See it gives it that
nice, nice ridge. I loved that. I think I think it just looks really nice and really clean. And see this seems to
be a little lump here. I'm gonna take the move tool. I'm going to make it fairly big, maybe around two hundred and thirty hundred
percent intensity. But I'm just gonna I'm
just gonna slowly, softly touch this, make
it a little smaller. Gonna touch this back. So it's straight.
I'm a stickler for details like that.
It is what it is. I also feel like these eyes
aren't sufficiently round, minor a bit cut off. So if this is happening for you, if that's an issue, remember, you might not, might
not bother you. So you don't have to make a completely exactly what I'm doing the way
that I'm doing it. But I really want to match
the slope blueberry. I'm gonna use the move tool. Again. I'm going to
make it really big. And the reason why you can
make the move tool sort of big is this way it does a
nice consistent push. Won't just push
like a small piece. It pushes everything in unison. Make it big, and then I'll
make it smaller as needed. I'd rather have this. I have a little more
of my eye showing. I'm just going to
use the Move tool. Make it a little smaller. And I'm going to just
slightly push until it's, until I sort of see
those round eyes. And I get that nice round shape. Nice. Here. The bottom, I'm even gonna
push up a little bit. Too much, though,
too aggressive. There we go. I think
that looks perfect. The next tool we'll use is the tube tool that
is right here. I'm going to tap that M and
tap curve on the left side. The path just uses points. Curves also uses points, but we'll add them as needed. We'll just use the
regular curve. Okay, so he has, if you notice these nice
little eyelash type things with the little little round
boop on the left side, which is something that I
always do my characters. I'm going to tilt this a little bit just so I can have a
better view of the whole. So we have our two
tool selected, we have curves selected. Now I'm just going to draw
from right about there. I'm just going to trace this path will end about
where the drawing ends. So something like that. You can see the two, the tube is kind of like
lost behind the, the mesh. But you see these paths,
you see these dots. All I'm gonna do is you see, how, do you see how our, the top of our eye, where we made from the head
that's sort of sticking out. Just use that as a pathway and bring these
little dots outside of it. Now that the dots, if they turn black, that means
it's like a right angle. That's what you
don't want. So just tap them again and make
sure they're white. When they're white, then
you have a nice curve. When they're black,
then it starts to do like a sharp angle. We will use a sharp
angle, but not right now. Now the tubes in a little
bit of a better place. You kind of get, you kind
of get where we're going. So let's take the radius up here and the two options
we haven't validated yet. So we'll take the
radius, will tap that. And now we have
another one here. There's a yellow one here
and a yellow dot here. This. You can make it
bigger on one side, smaller on the other side. And that's exactly
what we want to do. Something like this. Bigger on one side and smaller
on the other. And also you can see this ridge. So you just want to sort of figure out where the best place to kind of hide. Really high. But you want to just I'm
going to keep this sort of even just try to make it
as clean as possible. Let me bring this out a
little bit more. Bring it up. Just so it's like resting. So you have a nice
curve on the eye, a nice curve behind or
like above our tube here. I'll make this a little smaller. Bring this out a little bit. I'm actually going to
sort of push this into our mesh so that it disappears. That gives us a nice point. I'll just have view so you can see it gives us a
nice point here. Sometimes you can just
adjust it is you'd like make it a little bit, a little longer. If you want to add another, like if you feel
like this is too, you want it to curve more, you can just tap on
the line and add another curve as well. So let me just melt
this back into the eye. Here. This is my, this
is my perfection. There you go. I feel
like that's a nice clean. I'll just
show you what I did. I feel like this is nice. It just pushed it so it goes into the side of the eye socket. Just so it's nice and clean. It looks, it looks
a bit natural. Natural as a blueberry
adding eyelashes can look. The next thing we'll do, we
still haven't validated. I'm going to tap to begin, my options come back up. So I'm going to extend this a little bit and
then I'm gonna add a dot in the middle and I'm
going to tap it so as black. And then I'm going
to curve this up. And now you can really
see that right angle come into play before we, before we sort of like maneuver
this and make it round. Make it round. Let's just hit mirror so that our other
side is taken care of. Once you have some good arches, good clean arches, then you
can go ahead and validate.
5. Voxel Remesh & Leaflets: Okay, so now let's
Vauxhall remeshing our lashes also to label it. These tubes. Tubes, lashes. I call my last cheese, but
you can call yours lashes. Now let's tap this little grid. We're gonna go instead of from multi-resolution
to go to a voxel, the enrichment to put it to 200. And just rematch. Then
take our Smooth Tool. And we can sort a
smooth this out. Make it nice and round. Clay soft so should
be fairly easily. And also I'm just going to
smooth out this right angle. Smooth that out a lot. You can even take the flattened tool if you want to sort of flatten it out a little bit. As long as it's
sort of like that. Now I'm just going to
take the Move tool like I do with pretty
much everything. I'm just going to sort
of maneuver it and just pull it and
just make it round. See, mine is sort
of just curls up, grows up a little
bit in his round. I'm just going to
match that. Curl up. We go, That's pretty round. That looks pretty good. Flatten out the back
because why not? If you want to go
the extra mile, you can use the flattened
tool and you can make a nice ridge that you probably won't ever really see because we're
gonna make this black. But I don't know. I like to use a flattened tool. I like to make ridges. And that's just how I do it. Just use smooth to
just smooth it out. I'm obsessed with the
smooth tool. Be honest. They're a little bigger than the ones I made in the picture, but feel free you can make
them smaller or bigger. It can be creative. That's how user cylinder to make our
little leaflets on top. Let's go ahead and add a
cylinder to our scene. Bringing it up. And I'm gonna go ahead and
want to mirror it or not. I think I'll just validate it. Don't need to mirror it. Now, I'll just make it smaller. There we go. So we have
our little cylinder here. I'm gonna use the green to sort of just make
it a little bit thinner. Something like that. Now I'm going to
tap the top view. Have you want you can just solo way to fix this if it's easier. Now I'm going to use the
Move tool and put 315. So fairly big. I'm just looking at
this shape of it. And it just looks a little
bit like something like this. If this end was the end
that's sticking out, it kind of looks like
something like this. I think that's a different
that's a decent shape. Now we descended,
make about looks like maybe about five of them, five or six of them
will go with five. So I made sure to sort
of keep this flat. So now we're in the front view. I made sure not
to move it around too much because that'll make it easier when I go to the
gizmo and then I clone it. Now we have one here. Doesn't matter what new corneum, the clone, the middle one again. Bring it here. Then I'll just make five clone. Clone. Now we have our five pieces. Will just need to
sort of put together. Okay, so what's the best
way to put these together? Here's the first one. Let's
go to the second one here. And we'll just rotate. It will just sort of
push it into place. There. We'll do the same
thing with this one. We'll tap it, will use
the green to rotate it, and then we'll move it down. Something like that. We'll just do that
with the rest of them, will just use these tools
to bring them closer, rotate, and just take
the time you need. Sometimes this can be tricky. Just take the time you need. Let's tap on this one. Let's rotate it from
here. Now let's move it. It actually looks pretty good. Let's bring them a
little closer together. Excellently hit something. I think that looks pretty good. Once you have
something like this. Again, doesn't have to
be exactly perfect. But you just want
something like this. I think that's a nice,
that's a nice shape. Now unfortunately,
like with the gizmo, it will be a bit too hard
to sort of angle them up. We're gonna do it
a different way. Let's take our cylinders, so let's make sure we
check all of them. Then we'll voxel merge so we don't need it to
be up that high. Let's go to select 250. Will voxel merge all of
these together at 250. Now we have one whole shape. I'll just do a little bit of a smooth going to lower the intensity actually
on the smooth. A little bit of a smooth,
just so everything is nice and not so jagged. Which can happen after a voxel. Remember, that looks nice. Let's bring back our
little head here. Little bug-eyed blueberry. Now let's bring it
over. A little smaller. We're bring it down. We'll find the general spot where
it's going to be. That's kind of funny looking. This is closer to the, closer to the size
it's going to be. Now let's use the Move
tool and let's see if we can just bend it the way
that we want it to go. Now I'm just going to sort
of push down on the edges. Let me take it off symmetry. See if that's easier. Now I'm just gonna
twist and I'm just gonna softly push down on the edges, the inside edges. Just to get that nice, nice dip. Hopefully this makes sense. I'm just twirling and
kind of pushing down. That might actually be good. Let's look at the front. Looks decent. Now we'll tap on it
and we'll bring it down a little off axis. But let's see. We might have, we might have tilted it,
so I'll just fix it up a little bit. Like so. Make it a tad bigger, push it down a little bit
more, something like that. Now you have little
leaves on the top.
6. Plumping & Mouth: The next thing I want to do, I noticed that I blueberries
a bit plumper. Here. I want to do that
before we move on. So I'm gonna use the
move tool, really big. Max out that move tool. And I'm just going to
tap on the bottom. Make sure you're on
the head. Tap on the bottom and bring
the bottom up a little bit on the sides. I'm going to pull them
out a little bit. Just so he's a little bit wider. Little bit plumper. There we go. I want to I want to
edit the eyes a little bit because they do stick out. Make sure they are sticking
out a little bit far. Let's make sure you
tap on the eyes. Make sure you're on gizmo. And press the blue and just move the eyes back into the
head a little bit. So what's going to happen is you're gonna see a
little bit of space now on actually
doesn't look too bad. It doesn't look too terrible. Let's take a wider look. That actually looks okay. I think I want to bring it in a little bit. That
looks all right. Now I'm going to
just stretch it. Stretch the eyes a little bit. Yeah, I think I don't think I like that a little bit better. I'm actually going to
stretch them a little. I'm gonna stretch them this way as well with the red sphere. I'm just going to
stretch them a little bit, glue it over. There we go. I like that. There's no gap or
anything over here. I think the eyes and I think
the shape look a lot better now. I'll just
make this smaller. This is just a little
minor details, but they're things that I
noticed like for example here, I just want to push
this up a little bit. Feels a little bit better to me. Smooth it out. Just to kind
of even out a little bit. That looks yeah, that
looks a bit better. Let's make his mouth. To do this, I think it'll be
easier to use cylinder very similar to how we made these little leafs
will go up here. I'll tap this, will
add another cylinder. Let me save, let's save.
Make sure you're saving. And also we didn't name this, Let's name this rooftops. Now we have our cylinder here. I'm just going to bring it
out front of the model. You say bring it up, I'm going to bring
it out with friends. We're going to do pretty much
the same thing that we did. Let me see me go to the grid. Flat subdivision. I'm going to tap flat subdivision
and then post division. Well, let's leave it let's
leave it for now and see what happens. I want to
leave it for now. Let's validate. I don't want to make you
guys do any extra steps that are confusing if
you don't need to. Now let's make, let's make
similar to what we made here. Let's make sure we have a
nice view of the mouth here. Now I want to turn it.
Makes sure we hit front. I'll just turn it so that cylinder is facing us like this. Make it smaller. What we're gonna
do is we're gonna remove some space for the mouth, just like we did the eyes. And there's actually two
ways that you can do this was probably a lot of ways, but let's use the Move
tool and let's make. This is really far
away, isn't it? Who use the gizmo and just
bring it a little bit closer. And I'm going to make
it a little thinner. Something like that. Let's use the Move tool. Now let's see if we can kind of maneuver
the shape of this. Push down, push up. And we should have, we should
have just want to kind of fashion that mouth shape. Like this, smiling, something like that
looks pretty good. I'm going to try to use
flattened and see if we can get a flatter edge on the ends. Didn't really work. See if
we can smooth this out. Not bad. Now I'm going to
tap on this match. I'm gonna stretch it out. I'm gonna turn it,
stretch it out some. This is one way to do it. And I'd actually don't know if I might try the
other way as well. Because I think that way might might just be a
little bit better. I'm gonna hide it. Then I'm going to select
the head as well. Actually, I shouldn't have
a shin have hidden if yet. First I need to bring this back. Kind of where I
want the mouth to be, something like that. Make a little taller, smaller, little higher up. We want to make sure that
it's in there halfway because that's going
to there we go. So we make sure it's
in there pretty good. Now we can hide it. Hide that one, and we'll
also select the head. Now they're both selected. And we want to voxel marriage. Now we get that
space for the mouth. We'll try another
version, two as well. Just so you can see a
different way to do this. I do like this one. I think that was actually pretty decent. I think to be safe, I'm just going to keep
this hidden for now. I'm going to tap on the head. Here's another way
that you can do it. You can use the layer. Make sure you're
on sub, subtract. I'll make the brush
pretty small. Symmetry. You want symmetry. So then you can sort
of manually just match whatever you want. That's another way to do it. You can take it again
and it'll make it go a little bit more deep. You can do it again. Obviously. You can
just keep going. Like so. Then let
me just go ahead and smooth all this out. Be flattened will be
a little bit better. We just want to figure
out how to get those. Get the mouth nice and smooth. Let's try smooth again. There we go. Now it's moving a
little bit better. Just very strong, smooth. Just be careful, don't press too hard when you're
smoothing it out. For your really
like windy populate the shape of the
shape of the mouth. Maybe we'll try to
flatten it out. That's also another way that
you can kinda do the mouth. You can, whatever way is easier or you think
is more exciting. Doing it manually or doing it. And notice I'm just using
the Move tool now to sort of just shape around
them, around the mouth. Because I want to make
it make him smiling. This is another great
thing about the move tool. So many uses. That's a little bit better. Kind of like this. Just move this in a little bit. Something like that,
I think is good. By that. Still want
to smooth it out. I told you I'm obsessed
with smoothing my meshes to be dumb smooth. I'll take that.
7. Teeth, Tongue, & Planes: I like how this is a
flat in the image. So I'm just going to take my
flattened tool symmetry is on, make it about a 100. And I just want to try to
flatten this out a little bit. I'm just going nice and slow. I'm just trying to
keep it consistent. With a flattened tool. Yeah, that's nice.
With a flattened tool. I always like to keep it
as consistent as I can. Sometimes just going
nice and slow. Feel like something is
a bit weird. Like this. Dip is a little weird. So then I experiment
with the move tool. Because sometimes you can
just sort of clear that up. The teeth and tongue.
We're both going to use more spheres. So let's go ahead and
save what we have. Then we'll go right next to
it and then we'll add sphere. Make it very small. We'll bring it up to the front. Bring it up. Now this one, we're
going to shrink this sphere and we're going
to shrink it down like this. Then we'll take the green
and we'll shrink it down. Like this. Even that way. Why not? It can make it a little thinner. Let's go ahead and
validate that. Now we'll just use
our move tool. And we're just going to risk
going to move the ends up. Each end, we're just going
to drag up like that. Can push this down a little bit. Just move that up.
That's essentially going to be our teeth, both upper and bottom teeth. Another little trick that I do. Make the move tool brush
a little bit bigger. And I'm just gonna push SCM sort of looking
at it as a side, a side view so I can
see the backside. I'm just going to
push a little bit just to give it a little bend. Like so. Not too much. Here we go. Now I'm gonna make sure
I'm tapped on that. I'll use the gizmo
and I'll just slide that in right there. Make it a little smaller. Bring it up. Maybe a little Smith
sick of the image. Bring it up higher. Looks good. Let's see if we can fake that. Those secondary teeth. I'm using the drag tool now
let's see if this works. Kind of works. That's kind of what they look
like in the art. So it's either like that or
you can just leave them. We can sleeve them
round like that. Now for the bottom teeth, Let's just switch this. So let's use the gizmo clone it. We'll bring it down. Now let's try to flip it completely vertical,
flip it vertically. So let's go to Symmetry appear. This can all get very confusing. But I think if I
tap this green one, I untap the red. I think that deals with why don't you explain to
me like I'm five, if you have an object
that you want to flip symmetrically from the
top to the bottom. Go to the symmetry tool. Here you see that red plane. You can scroll all the way down and you can hit show plane. That way you can actually see the two halves that are
gonna be symmetrical. The red X is left and right. So if you want to flip this symmetrical from top to bottom, and we need a plane that
goes straight across. So good assymetry. See these planes will just hit
the middle one, the green. Why? We're going to turn
the red X off. So now our plane is separating
from top to bottom. We wanted, we want the green y. Now, we just tap on this mesh. We tap on Symmetry again, make sure that we're
on the y, the green y. Now we can do flip object. And of course, if you
need to duplicate it, instead of flipping it, just duplicate your
layer. Go back. Flip object. And now you have two symmetrical objects
from top to bottom. So all I've done
was go to Symmetry. I'm in the gizmo tool. I've gone to symmetry. I've tapped the screen. See how these are
all like not lit up. I have the green wind lit up. Now I'm just going to go
back down to flip object. It should flip on that plane. Okay, We got it. It flipped it, and now
it's on that plane. So now we have the
bottom teeth as well. What's up, guys? So it's Dave in
the editing room. When I was making the video, I was talking a lot about
how confusing symmetry was. This was before I made that
short little quick video to explain it a
little bit better. So essentially here, just
position your teeth on the bottom and the lower
jaw as you see fit. That's all I'm doing here. Make these teeth a
little bit. Here we go. I want to just sort of and use the Move tool
and just bring these. Is the symmetry now working now. Oh, let me see, maybe
I have to go back in. Go back to the dx. So that deals with
lefts and rights. I think I got it now. I don't want don't don't got it. It looks like we need a
little bit of a curve even to this. Like so. There we go. Now it looks more like the art for the tongue will keep
it very, very simple. Just add another sphere. So we're in this
little icon sphere will bring it up.
We validate it. Since we're not doing
anything crazy. It's used the blue
hour to bring it up. We'll just make a
little flat. Flatter. Not too flat, will just
shrink it using the spheres. Let me get a little smaller. I'm gonna do that
little push-up thing to get a little smaller. Now I'm gonna do the thing
where I take the move tool, make it really big. And I'm just going to
push up on the bottom. Just to give it a little bend. Here we go, See how it has
a nice little bend in. It. Just looks a little
more natural. Let me just a little touch more. I'll push up from the back. Good. Now easy-peasy would
just take it down. Move it into the mouth, the mouth full area. Make it smaller. Tilted forward a little
bit. I think that works. You might need you
might want to take the clay and tap on the head. You can always take the, take the clay u sub and you can always kind of like
make more room in here. Something like that. You can take the smooth you can sort of
just smooth it out. It will bring some of it back. But overall, you want to be able to see
his little tongue in there. So even in inside the mouth, I'd like it to be nice
and smooth and clean. You can see the
tongue, can see it. My need to use the gizmo
and I bring it up, maybe even make it a little bit wider with this
circular thing. Not something like that. It's perfect. Touch more good. Now he has his little
tongue in there too. This is just an extra
little step you can do. From looking at my drawing, I noticed that this
sort of looks flat. And I don't usually make
the eyelashes flat, but let's try it. I'm gonna tap on the
eyelash, my flattened tool. Let's just see if I
can flatten this out. Slow and steady. All along the front section. Actually think that
looks pretty good. I kind of like that. I'll make it flatter
here as well. Just because there may be just a little bit of
a soft smoothing. Just a little bit
of a soft smoothing and maybe even pinch, maybe the pinch tool. Let's see if that, Let's
see what that does. That's sort of gives
it a nice kind of cleans it up a little bit. It's a little jagged here. Little jagged. Not sure. Let's see. If I can fix that. Smooth doesn't really fix it to, well, let's see if I can
flatten it a little more. Let's see what that'll do. That does sort of cover it. Sometimes I really
want to have going in really close and just seeing how the tools either
work or don't work. I can try subdividing
this by going to this grid. Sub-divide. And let's see if that helps. Let's see if I can flatten
out at the top here. Those look pretty nice. Let me just do a
little more smoothing. I'll take that again. This
is going to be black. It doesn't have to be
super-duper, perfect. But I kinda like, uh,
kind of like a flat. I don't usually do that,
but I kinda like it. Just another option of
something you can try out. If you want to.
8. Coloring & Eyes: Okay, so let's go
ahead and color this. We can work on the eyes
after we color it. Firstly, let's go back to
our little symbol here. We'll tap that and
we'll go to PBR. Now it's white. I'm going to tap on this
little video camera. I'm going to hit Add view. And I'm just going
to name this base. You don't have to
do this, but if you want to like if you, whenever you have a view, a camera view that you like, you can go to this little
thing here and you can hit Add view, and
then it saves it. So if something happens and you accidentally go
like this and you're like, oh, I had the perfect angle. You can just go back. And it'll bring your view back. Just a little tip. I wanted to change it to PBR. I wanted to take
another screenshot. The paint tool is right here, this little theme with the little yellow mark,
that's the paint tool. Here's our color that we're on now these are all our colors. I'll keep this pretty
simple and I'll just let you play around with this. This is easy to figure out
once you play around with it. I tap on the head as we're
gonna call her first tab here, I can go to this blue. I can find the right blue. I found the right blue. Then I'll just hit paint all. Paint all. Let's see if I can
grab this color. Actually, I can I
can grab this color. Let's see what it
looks like if I cleared that same color. Once you once you
long press like if I just long press on that, then that's what shows up here. Now I can just click this and
I can just hit paint all. Now it's closer to this color. Even though I actually
think I like it more, a little bit more purple. Because blueberries are very,
very interesting color. I think I like this color
better for our blueberry. Now let's paint everything else will just happen. This mesh. I think I want this
a little darker. So we'll make that a
little bit darker. We'll tap on the eyelashes. And we'll make those. We want to make those
really dark blue or black. I usually use black, but I feel like a
very dark blue. The very fitting for him. I'll take the roughness up. We'll paint all. We're looking good. So he has little light
blue tongue will and and make his tongue a little
roughness down a little bit. Painful. Teeth, even though
they're white, I still like to
paint them white. No roughness. Same thing with the top teeth pain all
same thing with the eyes. Now we tap the eyes, go to the white, make them extremely glossy
takeaway all that roughness, paint all sooner,
rather nice and glossy. And looking beautiful. Like that. I'm just going to
show you how to do the basic thing first. And then I'll make
another video where we go into the details. You want to tap on the eyes. Make sure the eyes are selected. And now you want to go up
here to this little grid. Now we're going to
sub-divide once 49.1 K, sub-divide again when
90 SIPC selective mask, that's the cell mask. It's an indexed to
the regular mask. So cell mask and then go to
the circle, the ellipse. I'm actually not sure if
I want to use symmetry, I'll keep it on for this. But I might take it off. Now we're just
going to make that ellipse right in the middle, but a little bit closer
inwards towards the other eye. Not directly in the middle, but more towards the
middle of the face. Let's try this. That's not bad. It's actually quite, quite good. It looks quite cute. You do see these little these little squigglies
on the outside. You could depending
on your system, like I have an app
hide Pro and we're not using a lot of memory
right now on this, on this little blueberry. If I wanted, I could
sub-divide again. Then I could do it. And it will be a
little bit crisper. Let me try to match his eyes. His eyes are a little
bit more like this. So let's say we like this, what our eyes to be like this. So we're using selective mask, so we'll go to the
mask options here. And then we'll do invert. Once you do Invert, now you go to your paint tool. Tap on this. You want to
go on a walk, go to black. And you want a glossy
two, so black glossy. Which means you
take away all that roughness, nice and glossy. Make sure the intensities
all the way up. Now you can just
call her in because you've made a mask
and you inverted it. So it's only going
to cover what's inside, What's not masked. Now we go back to
selective mask, backup the options and clear. Now you have your pupils there. Okay, so let's do a little
bit more exciting eyes. I'll try to do this as
quickly as possible. But it's art. I can't really, I can't really go there quick. I don't have any
layers right now. All we have is
just a plain eyes. I'm just going to
color back over this. I just by going to the White. Did was click on this. I go to the Y and I just take
away all that roughness. I just do paint all and it
just repaints the eye mesh. Now I'm gonna go up
here to the layers. Layers are great
because they're layers. So you can add a layer on top and then if
you don't like it, you can just hide it
or get rid of it. So add layer. We're gonna make this blue eyes. Actually, I probably
shouldn't have named that blue eyes because we're gonna
do a few different layers. But, oh, well, we'll
live blue eyes. And I'm gonna add another layer and we'll bring it below that. Just by using this
little, this little tool. And I'm gonna name this black. Now, we have the base, which is just the white, and now we have these two layers. So let's start on black. We're gonna do the same
thing that we did before. Cell mask ellipse. Now we want to put in our
eye just going to start, try to start a little
bit on the middle, but then a little bit closer
to the center of the face. So the middle would be here. I'm gonna go a little
bit over here. Unless you see. Sometimes you just have to do. I mean, that's pretty good. Now I'm gonna go
ahead and go back up here to the options Invert. Now let's go to paint. Let's go to black. Glossy. Tap on that thing, tap on the eyes in black. Now we're just
going to go back to our cell mask and
we're going to clear. So now we just have our black. Now we're gonna go
back into cell mask. We're gonna go into our layers. Now we're going to do blue eyes. Let's go to blue eyes. We have black. We'll go to blue eyes. Now we want to make
the same shape, but we want to leave a
little black edge around. So we want to try to
go in the middle. This is gonna be
a little tricky, but we want to kind of go in
the middle of the eye and just make another mask
see how mine is off. It's not in the center. We want to try to go you want to try to get
it in the middle? It is tricky, it takes awhile. It is annoying. I agree. There we go. That one was good. Now I'm going to hit the cell mask and
I'm going to invert. Now we're at, we're
in the middle, we're actually in the very
middle of black circle. And remember, we're
on a new layer now. We're not, it's not touching the black that we already made. And he didn't even know you can't really see it right now. It's just because it
has black behind it. So that's why you can't see it.
9. Blue Eyes Blue: We're using the paint tool now. We've taken our color that
we want to be the base. We've turned symmetry off. We're going to turn the
intensity way down. Maybe like ten. And we'll try to, let's try to get it
matched to this. To this I remember our
mask is still selected. We are on a layer, we're on blue eyes. So this is where
we'll add the blue. It's lighter here. It's lighter right here. It kind of gets darker as
it goes around this side. So lighter here,
darker this side. That's all. Let me raise the intensity a little bit since
I don't see it. There we go. I'm just doing really, really
lightly. Really lightly. Around the edges. Right here is where I'm gonna take my Apple pencil
off the screen and tap. So every time you do that, it will make it a little bit closer to what the
original color is because we lowered
the intensity. So it's going to make it a
little bit brighter here. I'll raise the intensity
a little bit more. An oxy raise the brightness
a little bit more. Raised the brightness. And I'm just going
to concentrate it right here and lower the
intensity a little bit. You just want to get, you just
want to smooth transition. You want it to be
lighter in this side, we raise the intensity
a little bit. Just try to get it a
little bit lighter. Right at this point. A little bit much. And I'll make it a little bit brighter, even still a raise the opacity. Just right here. I'll add some more brightness. So you want to do the same
exact thing on this side. We'll start again
with this color. The base color were
lower, the intensity. I think I had it to
around 15 or so. We just want to do
the same thing. Just slowly, make the
brush a little bigger. Slowly brush in this side, I hopefully it's not
too hard to see. So slowly brush in on this side. And then you can go around
maybe once or twice. But you don't want
it to get really, really light on that side. But it's okay because we can
always add in some black. After we've finished
with this gradient. After we finish with the blue. Then we're just going to start concentrating on this side, you can see I slightly tape, take my Apple pencil
off the screen. Then it starts that it kind
of builds up that layer. Let's make this a
little brighter, actually was just
raised the intensity. So erase the intensity. You can start to see a
little bit of a difference. Maybe we will raise
it a little bit more and just see what we get. Nice. Now I'm gonna go and raise the, raise the brightness
a little bit. See what we get. Nice. Brush a little bit bigger,
lower the intensity. Just kinda make it a
little bit bigger here. Now I'm going to raise this
color a little bit more. Raised the intensity. Just to get that
nice, lighter pop. It looks like there might be
a little bit of a brighter. I'll raise the intensity just a little bit
just to kind of make, give it that nice
bright pop right there. So it's a slow process. But you just have
to sort of build up and you just want to keep it as smooth as possible. Let's see, let me
rotate my whenever you see this and I want
to kind of get like I made this environment. This is gonna be, this might
be a little confusing. You can change environments. Here. Where is it? Here? You can change environments. And I, excuse me, I created this one in Procreate because I
liked the way it looks. So this is another
one that I created. Obviously you can see it
kind of changes the tone. So environment's kind
of changed the tone. Again, that's in, that's in the shading menu,
this little light here. These environments
at the bottom. Obviously you see all
these environments that you can go through. And they add just a
general environment. So they add different colors, different lights,
different reflections. That's what environments are. I like to use this one. And if I want to get
this off the eye, especially so you guys
can see it better. I can change the rotation. If I change the rotation, it does change the lighting and changes the
color quite a bit. Maybe I'll just leave it there. But if you want to get
that out of your way, you can do that. But we haven't added
added any lights. So you can see it gets
very dark in some spots. So we'll leave it there because I want you guys to be able to see
what we're doing.
10. Blue Eyes Blue 2: Okay, so now we have a
good little colored glaze. Now I'm going to
take the smudge tool and go about 120
or so on the size. Now we just wanted to
sort of just sort of clean up what we've painted. So we're just going to smudge. It would be nice
if we could blend. But we can't really
blend because there's nothing really
else on this layer. So we're gonna have
to use smudge, smudges and my favorite tool. But dissent justice,
just clean up. Just sort of make our gradient
a little bit smoother. So that's all we're
doing. We're just kinda like smoothing this out. See how jagged this is. Like this is very jagged here. I'm just going to use smooth and just slowly just sort of try to make it a little bit of a smoother transition by
going back and forth. This is the same thing
that I would do in Procreate oppose using like an airbrush or
something like that. Just sort of go back and forth and just try to smooth it out. Just try to make this
gradient. It's smooth. You don't really, you
don't really want to see any of the color transitions. I'll make the brush
a little bit bigger. That's what I'm, what
I'm trying to do. Just trying to blend all this
together a little better. Again, this is just me
being a perfectionist. I think I might just
want to make it a little bit darker on this side. So I'm gonna go back
to the black color. Go to the paintbrush. I'll make the brush pretty
big and I am just going to lightly go over the dark end, the dark side up here. I'm just going to go
over that a little bit. There we go. Now it almost looks riper. We want to have, we want to have the nice black
round pupils. So in order to do that, we're going to just
make another layer. Now we're gonna do add layer. We'll name this one. Pupils were still on eyes in order
to stay on eyes, sometimes it's easy to
tap the head by accident. And then when you're painting, you won't see anything happen. That's because it's happening
behind the eye on the head. So you just have
to make sure that your eye is always selected. Now let's clear our cell mask. That's what we hear. Cell mask. Tap this up here, clear. Now our eyes are looking good. But now we want
to add a new one. So we're still on Ellipse. Make sure that we're on
the right layer up here. Pupils. Now we can go ahead
and add the pupils. Another note for this, as you want the pupils to
be closer to the inside. So obviously it's nice if
we can get it perfectly. But we don't want them, we don't want the pupil to
lean more to the outside. We wanted to lean more to the inside because it'll
just look better in general. Hopefully that makes sense. So I'll do an extreme example
of what I'm talking about. Like if we do make it,
we want the pupil to be closer to this side. Obviously not this extreme. Rather than rather than
mike closer to that side. Because that that's gonna make
it look like his eyes are looking in these directions instead of like this direction? Does that make sense? I don't know. We'll start out trying in the middle. Actually
not too bad. I have to do it again because
I have to turn symmetry on. Symmetry can be tricky. Sometimes it tries to get me. He just did. I think
that looks pretty good. Now we're gonna do
the same process of going back up here. We're on cell mask,
we're gonna go back up here, tap, invert. Remember where on pupils. So now we're just
going to use black. We're going to keep it shiny. Better go to the Paint tool. Keep it shiny. Shiny black, glossy black. Now we're just
going to color in. Let's turn ours, their
intensity all the way up. There we go. Now we've
covered that in black. Just make sure
everything looks okay. Now we can go back to sell mask. We can tap on the
options up here. And then we can
just go to clear. Now we have our eyes with a
little bit of that gloss. Now I'm just gonna go
over the jagged lines with let's see,
let's try smooth. Let's see if smooth works. I'm gonna start with
the bottom one. I'm going to start
with the black. So that's that outer layer. I'm gonna start with the black. And let's just see
if I can just do a nice smooth stroke all around. Because even though
it's a little blurrier. I think it looks, I feel
like it looks nicer than having that jagged,
that jagged edge. See. First of all, I love you guys know that
song. It's a jagged edge. So now we're gonna go
to the blue and let's see if we can still
use the Smooth tool. I'm gonna make it
a little smaller. And actually don't know,
we might have to do like smudge on how it looks
like it's smoothing. I'm just going to
smooth around that too. I might just smudge. There's a little
bit of it, there's a little extra space here. So I'll think I might just smudge just to kind of like just to kind of get
it closer to this edge. I'm just going to smudge this just to sort of get it a little bit
closer to that edge. That's again me
being me being me. I'm gonna take it off. I'm gonna take it
off sym symmetry. I'm just going to
smudge this on its own. Because sometimes the
symmetry they did, sometimes the different
sides look different. You know, there's different lighting
and different things. So I'm just going
to smudge this, smudge this on its own and make sure I'm
on the right layer. Little bigger. There we go. Now it's doing something. Look a little bit better than it looks a little bit better. Let me smudge this. I'm just basically smudge actually works a
little bit better. Essentially, I'm just
making it so that everything is nice and smooth
and blurred a little bit. So it just feels a
little bit more natural. So same process with the pupil, backup to the pupil layer
and see how this is jagged. And let's see if we can
use the Smooth tool again, smooth has been coming
through in the clutch. Just do a nice smooth
transition symmetries off. So we'll do this one. We'll do them manually. Looking pretty good. If you want to get really crazy, you can go back into paint. You can go to your
layer up here. You can go back into blue. You can get that color. You can bring it
all the way up to even a little bit
of a lighter color. You can really like
the intensity down. You can make us some
little marks like this. Really get a little bit
of a light, a light pop. I'll just smooth it
using the smooth tool. Just kinda smooth
it a little bit, make it feel a bit more organic. Then you have a little bit
more of those light pops. But you want to
just make sure that it's smooth so you
can look at it, zoom out and it doesn't
look unnatural. Something like that I
think looks pretty good. At the end of every video, make sure to save your work.
11. Details & Adjustments: So here's another little trick. I sort of feel like the eyes
are a little too far apart. There's little too
much like whitespace. This is, again, this is
something really extra. But I always notice all
these little details. So I'm gonna tell you about
it and teach you about it. So obviously I can't go back
and move what I've painted. Unfortunately. I'm gonna do another little trick
with the eyes. So I'm gonna click on the eyes. I'm going to use the gizmo and I'm going to stretch
using the red. I'm going to stretch the eyes
a little bit, not too much. And then I'm going to
bring the eye closer with the arrow. Something like that. I feel like that's a little
bit well, let's see. Maybe a little less. There we go. Just
a tiny bit closer, I feel like makes a big
difference, at least to me. I'm a stickler for details. That's just another
creative way to sort of fix something that
needs fixing in my eyes. So there's always a
little creative ways to just always keep thinking about small details. And there's always like a
creative way to fix it. Just takes a while
to sort of build up those problem-solving skills and then to fix whatever you
think might, might look off. Okay, so now let's just
add a little bit of final touches to the colors. I think I want to make
this a little bit darker, so I'm going to tap on that. Go to my paint tool. Let me grab this color. I just think I went I
wanted a little darker. There we go.
Something like that. I want to add some a little
bit of a lighter blue. So I'm going to tap on the head. I'm gonna add a little
bit of a lighter blue. So I'm gonna grab
the blue that it is. Just bring it up a little bit. I'm gonna take a little
bit of the roughness away. Just a little bit of
the roughness away. Now I'm going to make
my brush a little bit bigger and lower the intensity. Because these are just
like small details. Now, just like we
did with the I, I want to add a
layer on the head. This is gonna be whitish. Now, let's just go
ahead and add in some little pops of white. I'll make the intensity
a little bit lower. I'm just going to
kind of very These little bit over his skin. The next step, let's just match this orange
color in the background. So we'll go to, let's see
what's the easiest way. Will go to this little
picture image here. And we'll click on this color. And we'll just try
to match the orange. Actually, it might
be easier if I just I guess we can
do it this way. That's a pretty decent
match. I think. You can do suggest it to your own your own tastes,
whatever you like. But I think that's
a pretty decent, It's a pretty decent match. So next, I don't really
think we need the, the reference image anymore. So let's get rid of
the reference image. We're going to tap
on this image icon. And we're gonna click on
references, reference image. We also don't need
the grid anymore. Let's just tap on the COG over here on the right that settings and
we'll get rid of the grid. Now we're cooking. I'm going to hit front. Even though he's a he's a
little lopsided really. But that's okay. Now let's
add in some sort of floor. We'll go to our primitives. Maybe we'll just add a plane. A plane, which is a
flat square plane. Let's make this bigger. So I'll just bring it back a little bit. Something like this. This might be tricky depending on your lighting and
things like that. But we just want to color this
will wet and validate it. And I'm just going to color it, so I'm going to tap on it. I'm gonna go to the
Color option down here. Let me see if I can. Let's see if I go to paint and see if
I can just grab this orange. I can. I'm going to tap on that. Tap on the paint. Paint
all as you can see, it's a little bit
it's a little bit different because
of the lighting. So we'll adjust that later on. Let's make it bigger for now. So tap on it. Gizmo.
This little orange ring will just make it
bigger for now. Then let's just zoom in. And actually we can probably
change to perspective. I was real close. This now we're in perspective. You can see he looks a
little bit different. You can adjust to taste. Click on the little
camera button again, and you can actually
adjust this. The focal, the lens. It's almost like
a different lens if you're looking through it. So if you noticed, you can
go up and down like this. You can just play with that and just
make sure you have it. Ray-like it thinks
something like 20 or so is works for me.
Makes sure to save.
12. Lighting the Scene: Now we'll just do some simple
lighting and we're pretty much clear from here. So we'll just do some
simple lighting. So we want to tap on. Where do we want to tap on? We're going to tap
on this little icon, the little sun icon
for the shading menu. And the first thing that I like to do is get rid
of the environment. So now we're gonna get rid of
the environment completely black all shadows because
there's no light. There's only the orange from our background. Let's add light. This is a, what kind
of light is this? Directional light? Doesn't
matter where you move this. It's not contingent
on where you move it. I like to bring it
up for some reason. I like to bring it
over my character. But whatever direction this
white arrow is pointing. So it's kinda hard to see. There we go. So see how there's
green, blue, red, and then there's this white
arrow that's pointing out. Wherever that is pointing is where the light is coming from. This light so you can change it. Now it's pointing this way, so all the light is
coming this way. You can angle it down and the light is coming from up top. In our reference, are lighter. A light is coming from up top. But you don't always have to use this kind of directional light. Because there's some
other lights that we can use. Although this is not bad. For now, I'm just gonna take this light here, see
this little box. I'm gonna click the
little box and I'm going to make it go away for now. Let's add a second light. Here. I'm going to tap on. This is the second light. I'm going to tap on this and
I'm going to just change the color a little bit to maybe something just white. I'm just going to use just
completely white. That way. It's kind of a neutral
neutral color. I also want to change
the type of light it is. So I'm gonna click here. You can either click
this little box. So if you click on the
light, you can click this little box or you
can just go back up to here and click on the
little color square. I'm gonna change
this to spotlight. Spotlight is pretty
basic, pretty simple. I'm gonna move it in
front of our character. We could all areas later
always fun to work with. So I'm gonna move
it to one side of the character up a little bit, and I'm going to turn
the lights on him. Move it back some. Now I'm just going to go into the options by clicking here. And I just want to turn, I'm
gonna turn the softness up. Cone angle is fine. And
here's the intensity. Obviously you can adjust that. I'm going to bring
it back a little bit more, bring it up. Something like that.
So there's one light. Now, I want to duplicate this light and put
it on this side. So to do that, see if
I can do it here yet. I'm click on the Light. Click on this little box
with the three dots. Clone. Same thing with a mesh. Now there's two of these lights, so I'm gonna bring
this one over. And obviously it's facing
in the wrong direction. I'm gonna bring it
over to this side. Then I'm going to
use the green ring to just slide it over. Now he asked me bring it up. So now it's pointed at
him from both sides. And we can always adjust
these slides later on, so don't worry too much about them. They're a little bright. So I'm going to turn the
intensity down to 20. On both of these lights. He's looking pretty
good, looking cute. Now I want to add another light. I always like to add a different kind of
light from behind. So there's some other
light to light up, a light up the bottom of him. Okay, so these are our
two cloned lights. Let's add another
light back here. And we'll color this one. Let's clear this one orange, almost to match the background. Might change it later. So
here's the orange light. I'm going to bring
this light behind him. I'm going to change it to let's experiment and make
it a point light. Kind of hard to see. I'm
going to tap this light. I'm going to tap this. Now we have our
three lights here. So I'm gonna go to 0.
Really, really bright. Really bright. But now he's lit from
the back as well. We could take the
intensity off of that. But I think I want to
make it a spotlight. So now let's make
it a spotlight. Let's point it back towards him. This actually might
be a good job for the directional light. Let's see. I'm gonna bring it behind him a little bit off to the side. Take your time with
working with the lights. It can be a little tricky and a little confusing at first. But essentially you just
want this cone facing him. If it's not wide enough, you can make the cone
a little bit wider. C can make it wider. Turn up the intensity a bit. I'll move it back a bit. Maybe I'll move it a little
bit more off to the side. Something like that. So we have that nice that nice pop of light on the side of his,
on the side of his head. And actually I
might want to bring it around a little bit more, so let's just bring it around more to the side of his face. Something like this. Let's see how that looks
from the front view. Again, to make it easier, I'm gonna do this
front view like this. And then I'm going to,
I'm going to add view. Now I can always go
back to this view if I mess with the lights. And I want a pseudo
looks like from the front, I can just do add. I can just do my view.
Okay, So now what he needs, it was going to have to
figure out how to make this the colors a
little bit closer. So it doesn't look like a
plane and then the background. But also he needs some of this orange to
bounce off of him. Let me try to figure out
how I want to do that. So there's two ways. We could always bring back the environment,
which is very bright. So let me, let me lower the
intensity of the environment. So back we just clicked on here shading and then we
scroll to the bottom. The exposure can bring
the exposure down some That's sort of helps, helps a bit bring it down. We'll even a little bit darker. We also have this light
that we can work with. But let me think about the best way to do
this so I can keep it concise for you all.
13. Extra Lighting: Okay. I've come up with a plan
for our lighting setup. I think it will involve
turning one of our 21 of our two spotlights off. We can either turn Let's go
into the lighting up here. Return this one off. I'm actually going
to bring this. I'm just going to bring it in so it's easier to get
to when I need it. I'll bring it closer to him. Right now this one is off. What I think we
need to do is turn this light back on. Show. Then we need to need it. We need to make
that nice shadow. So let's turn back on
our reference image. So we go to the little picture
to my reference image on. Now we can see him and he has this blur right here below him, but he also has
orange on the bottom. That's what I want to try to do. I want to try to, want to try
to make the shadow below, but also this ambient light bouncing off the bottom of him. One thing I see
first is I need to, I need to lower this. I've clicked on the plane
and I'm going to lower it a little bit like that. That looks like a decent
decent space away from him. I'm also going to make
sure that this is rough. The roughness is all the way up. Maybe not all the way
up, maybe 2.6 something, maybe 0.700 in whatever,
something like that. We just want to
make sure that this is, that this is rough. You can also, let's see
if any colors will help. The colors don't really help. I can sort of match it and
make it a little bit closer. Back to our light that
we just adjusted. Whereas that light,
I can't even see it. This is our, this is our
directional light up here. I'm just going to
move it so the shadow is underneath him. Something like this, I think is good and we can play
around with the intensity. The intensity really who
we can almost match. We can almost match that
color with the intensity. Nice. Brought the intensity up. And actually let's
see what happens. I don't think it matters
if we bring this away and I don't think there's changes if
we bring this away. I'm not really That's
actually not too bad. Let's see if we can edit
the color of this base to match a little bit better. Almost make it disappear. Just try to almost make
it disappear if you can. Something like that. I think works. Now let's try to angle this
light and it's kind of hard to see the light,
but it's stuck there. I wonder if we can angle it so he doesn't have
so much light. Bit bright. Very bright. Let's see if we change
it to a spotlight. What we can do. Now if we bring
this intensity up, cone angle, really,
really wide softness. That's sort of
another way that we can kind of pull it off. But I would like. Let's see if we can move
it back. It's kinda nice. So I just wanted to get that
shine off of his forehead. And since we move the light
back, kind of helped. Let's take a look at our view. That's not bad. So I might have to change
the color of the base again to see if they're to see if I can
get it a little closer. So let's just try. Not really. That's okay. Not the biggest deal. Just try to get a close
as close as you can. And we'll go with that. The next part that I
wanted to try to do is sort of get a glow
on the bottom. Now we have three lights. We have the one
spotlight up here. We have the colored light back
here shining on his side. Then we have our
one spotlight here. But we have the other
one that we turned off. Let's go ahead and turn that on. Oops. Let's rotate it so it's
like looking upwards. I'm going to change the color
to that same bright orange. Like that. I'm going to try to bring
it right underneath him. Now I'm just going to
use the gizmo to move this light underneath him. I think it'll be a shadow. If I go below the plane. I have to keep it
above the plane. But I want to make this angle, the cone angle bigger. Want to make the cone
angle really, really wide. So that way I can stay low
and still be underneath him. I'm trying to get it
directly underneath. Of course we can we can adjust the intensity
and things like that. But I just want to get it so
it's right underneath him. Something like this. Maybe a little bit on the
eyes actually looks good. We still have the shadow, but now we have this
light underneath. Let's adjust, bring down
the intensity firstly. We do have the shine
from the light. Unfortunately, I don't
know if we can get rid of that. Hide it. We might be able to angle it. Maybe we can bring it far
back and actually angle it. So let's take the
cone angle back down. Let's pull it away. Make sure it's
facing in front on. I just wonder on
the bottom of him, what I'm gonna do is
I'm going to bring the cone angle even
down even more. Because I just went
on the bottom. Now I'm gonna raise
the intensity up a little bit. Right
in the middle. Maybe even maybe even
tilted down a little bit. Just so we have some of that orange coming
from the bottom. That's not that's not bad. If you want to hide your lights, just go to this cog up here. Lights can turn them off. You can turn toggle the icons, the light icons off and on. So white is off. I think that looks
pretty decent. Now last but not least, we'll just do some
post-production. In the next video.
Make sure to save.
14. Final Touches: I know lighting can
be very confusing, but it might be easier to just
take one light at a time, move it around,
change the colors. You don't have to do exactly
what I'm doing to the t. But I hope to I hope to just impose the reasons why I
make certain decisions. I think that's even
more important than actually like what I'm
technically doing. Because you can easily learn
that by playing around with the lights once
you get used to it. But the part that I really want to show you is my thinking. Why am thinking about
different things? How on problem-solving, like why I want to get this shine? Because when something's in
are completely orange space, the orange is going
to bounce off of him. So that's why I was doing all these things
with the lighting. I wanted one light to show
the shadow down here. And then I wanted a little bit of a shine
from the orange. Because if the
environment is orange, then that's going to be
like more realistic. That's going to feel more real because the
environment is orange here. If I change it to blue, I'd have to change these other
lights to a more blue hue. But also sometimes it's nice. Let's, let us say, for example, if I want to change this back
color to something else, like maybe it looks better
as like a lighter color or even like just a maybe
a blue or a pink. Sometimes they can look
really, really nice. Just to have if I could
different colors shining in, a different color coming in. Sometimes that can
make a really, really big difference
and just look pretty. You know, it doesn't always have to be completely perfect. But like, it's nice when
things just look pretty. And sometimes it doesn't
even need to be a color. You can just make it like white. Like a white shine,
something like that. Let me move this over here
so I can see what I'm doing. But we'll keep it sort of
hokey, but oranges for now. Okay, so now let's do
some post-production. So up here, post-process,
Let's just click that. You can obviously go
through the scenes. This is looking really,
really clean here. Maybe you can get this to match. Notice when I touched this, this went out of focus. You have all of these options. Go through and play with them. I can go on forever about
trying all of these things, going through them with you. But it's better if
you just play with them and just see what they do. Otherwise, these movies, videos, we'll just keep going
on and keep going on. Depth of field isn't, isn't a very important one. That see how this far edge
of that is blurred out. C Now it's not
blurred out. So far. I always like to do the
far blur, near blur. We don't really have something that's like in
front of his face. So it's not as important,
but play around with them. Bloom, play around with
because bloom can affect like how bright
certain things are, how bright or in glares are. The next, it looks pretty good, so we'll bring it
up a little bit. All these things you
can play around with, they're just more
exposure things and color grading things. Meaning changing
the overall color. If you wanted to be
a little more blue, you can kind of
play with it here. Whoops. There's lots and lots of
adjustments or reset all. There's lots and lots of
adjustments you can make bright, you can make them by playing
with that. Kind of nice. Maybe I'll keep it. Lots of fun things you
can do here to play with. Vignette is just the
darkness all around. I kinda like, I'll turn it off. Why not? But experiment, That's the main
thing is experiment. I have an iPad Pro, so
my app Wipro up 2021, so it's powerful, so I
always keep these on. The other. The last thing I wanted to do is see if I could change
the color of this. So I've clicked on this plane. Now I want to go back in
here and just see if this, any of this makes a difference. Doesn't really. Another thing I can
try. If I do paint all. Another thing I can
try is to match the background to that color. Let's see if that works. I clicked up here
on this picture, and let's see if I can change the background to that color. Pretty good. It's a
pretty good match. I'll click on him again. Now our background is
very close to that color. The only thing
that could change, It's a little dark back there. Wondering one of the ways
that I could get rid of that is if I brought one of the lights to light up
the back of this plane, or if I maybe shorten the plane. So let's tag, Let's
click on the plane again and maybe we
just shorten it. So let's see, let's
see if this works. Now I'm gonna take, I'm just gonna bring it forward. Bringing this plane forward. And let's see if the
lighting changes. Now you can see it's a
little bit brighter. Let's go back to our view. Click on him. And it's a little bit better. A little bit better. We can change the background
color to match a little bit. Little bit better, I think. Little tiny bit closer. You see there's a shadow here. You can go into your lights. You can kind of see where certain shadows are coming from. That shadow is coming
from this light. Let's see which light it was. Let me just tap on there. There we go. So now we can see light
isn't Oh, it's this light. That's our spotlight. If we want the
shadow to go away, we can bring this
light down a bit. We can angle it little bit. That way. There's no shadow from him
on the edge of the frame. That's where the
shadow is coming from. The last thing that I
always do that I like to do is go through and I like to turn off my lights and just make sure there isn't
something better. When I'm not using my lights. I seemed to like
everything so far. The environment, I'll
turn the environment off. That's also a really nice look
with the environment off. So when I liked the way it looks with the environment off, I usually do the middle
and I'll just lower the exposure a little bit. We are kind of get the
best of both worlds. Let's go back to our view. Here. I almost forgot there was one more little step
that I forgot to do. So I'm gonna dial
everything back. I'm gonna turn off post-process. I'm gonna zoom in to the mouth. Make sure I'm on the head. I just forgot to meet me, grab the color, let
me use my paint. Grab this color and I'll
just make it really dark. I'm going to turn that
roughness all the way up. I just forgot to add a layer here and do inside mouth. Make sure I'm gonna paint tool attorney intensity
all the way up. I just forgot to color in
the back of the mouth. So it looks like the
color this in darker because I don't really
want shadows and things like inside the mouth. I think just making it
darker is the solution. There we go. Now let's see if we can
actually smooth this. To smooth it. Get rid of some of those little jagged edges. I want to just keep it
really dark in the mouth. A stickler for details, save. One of the options
as good as cog. You can turn up render resolution
mine is already at two. I think the default is 1.25. Now you can export. You just go to your folder here. Scroll down export PNG and export this fork. The export resolution is high. Anytime you see this makes
sure that you have it saved first because it's
just a very high. It will take a lot of RAM
and your app might crash. So I see this all the time. So don't be too scared about it. Just make sure your
project is saved. If you've saved it,
you're good to go. Click OK. Might take a couple of seconds. I'm actually going
to make it perfect. So I'm going to extend
the side of this. I'm just going to
hit Done because I don't want to export it yet. I'm going to tap on this. Now I'm just going to
stretch that even more. Then I'm going to
click on him again. Now I'm just gonna
do the same thing. I'll go to the
folder export PNG. Now it should now panned
all the way across, and I liked that better. Now I'm gonna hit this arrow. Save Image. Click on him. Then we have our
finished project here. All right, great job guys. This was really fun to do, was fun drawing this. And I've always wanted
to make it in 3D. I'm happy that you guys are here to kind of go
through this with me. Hopefully it was helpful. Hopefully I just
explained the way that I think because that's the key takeaway is why I
am doing certain things, why I'm make certain decisions, why I'm making
certain decisions? That's what's more important, the technical stuff I guarantee you will learn if you
keep playing with it. It's the y, it's the, it's the details and it's the y. I'm doing certain things
that really makes 3D character designing and things like that and
lighting special. Just knowing why certain
things are happening. All right, so I'll
see you in the alto. Let's get onto the next video.
15. THANK YOU! : Alright guys, we did it. Thank you so much
for joining me. I hope you had a
good time in class. I hope you learned a lot. I hope that you take my yapping and that it sticks with you. It's all about thinking
creatively and just thinking on
the fly and being able to see changes in spending the time to get the
result that you want. That's the main thing
about these classes. That's the main thing
about what I tried to teach and what I
love about teaching, and what I love about Skillshare
and what I love about you guys joining me in class. It's all about you and just growing your creative abilities, growing your
technical abilities, especially with this class because that's something that I had to do recently
with nomad scoped, which has continued to build
up my technical abilities. And even when making
these classes, it helps because it makes me explain things really,
really clearly. Kind of like the symmetry thing. It helps, it helps me. And it's very rewarding
also when you share, when I get to see your work, when I get to see
that you're engaged, that you had a good
time when I read your reviews and
things like that. All that stuff helps
me, keeps me going. So please drop a review, shout me out wherever I love to share your work
on my social media. Drug for Dave drug pretty 3D. Check out my YouTube. I do YouTube Live videos where I just sculpt so you can
come and just watch. Obviously you just heard the
way I think for a long time, but I make live videos. You can ask me questions,
we can interact. I have a Facebook
group for Procreate. If you're also a 2D illustrator. I have a Facebook group,
procreate tutorials and guidance. I'm on Tiktok. I'm trying to do
a lot on Tiktok. I feel like Instagram
is sort of ligand, but Tiktok is like Tiktok is
where it's at these days. So find me there drug-free Dave. Youtube.com slash
drug free Dave, drug-free Dave and drug
for David 3D on Instagram. I think I think that's it. I think that's it. Skillshare. We're
already at Skillshare. I think that's it. Please share your blueberries. I can't wait to see you them. And I can't wait
to teach you guys. Again. I appreciate each
and every one of you. As always, keep drawing
and I'll see you all. I messed up. I messed up. All right. As always, keep drawing,
keep sculpting. And I'll see you all
in the next video.
 Dave Reed, 2D & 3D Illustrator - Brooklyn, NY