Transcripts
1. 3D Modeling for Beginners with Nomad Sculpt *NEW: What's up, guys
drug-free? Dave, here, welcome to Nomad
scope for beginners. Updated version. So if
you're brand new to 3D, brand-new to know Mexico, this is a great place to start. This is an absolutely
beginners class. So if you have never used nomad, if you're just getting into 3D, I'm going to explain everything step-by-step slowly so
you can follow along. I'm going from the
absolute first step, which is opening nomad scoped. So we're gonna make
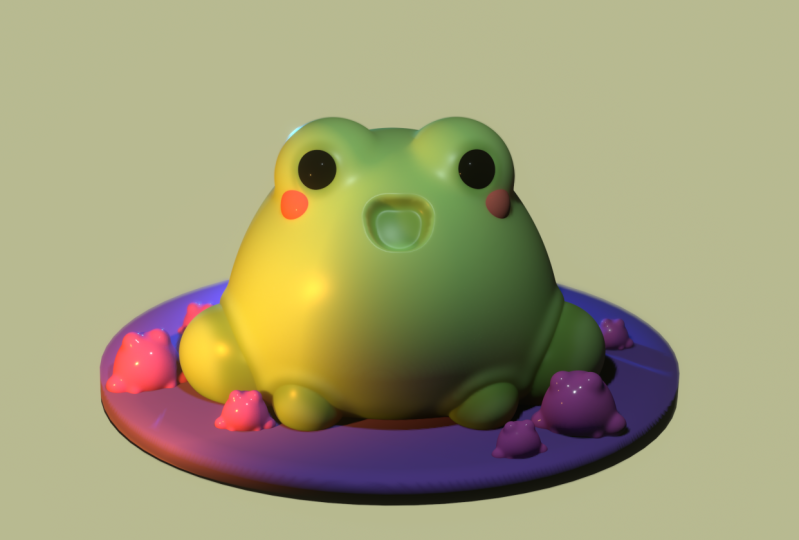
a little 3D frog, but it's not really
about the frog. It's about all the steps
that go into making him. There's lighting,
texturing materials. Some of the new features
that are really loved nomad scope are things like
subsurface scattering. Subsurface scattering
is when you can see light through the mesh, which really gives
us an opportunity to make scopes look a
lot more realistic. See the red that you're seeing
is subsurface scattering. There's also things like layer hierarchy,
updates on lighting, shadows, ambient lighting, a reflective lighting from
things that are around. There has been some big changes. So that's why I wanted
to make this new class and also just ushering
all the new 3D artists that are discovering
3D yard like I did on the iPad Pro
or on Android tablet. That looks very confusing. But once you start
doing it more often, it just gets easier
and more fun. And you'll be able to create just about anything that
you want to create. Amazing 3D application. Anyone can learn 3D and
here on skill share with me is a great place to
start. I'm glad you're here. So let's move on
to the next video in the class, projects.
2. Class Project: Hey guys, welcome to
the class project. So of course this is
a beginners course. Of course this is the
beginning of course. We're gonna go through all
of the technical aspects of nomadic scoped. Well, maybe not all of
the technical aspects We're gonna go through enough to where you can get started. You can make shapes. You can sculpt those shapes into simple things that you
might want to build into more complex things later. So all you have to do is make a fraud doesn't have to be
exactly the way that I do. It, doesn't have to
be the same color. And you'll see at
the end of this, I make a bunch of
different colors. I changed the textures
and materials. That's where the
fun comes into it. That's where you
really learn a lot, is playing with nomad scoped. So I'm just sort of giving you a pathway that you can follow. Because there are some
things that you just might not think about if you've never used the
application before, then some things will be
tricky to figure out. So I'm going to walk you through those more important
things. That way. You can open it up and be
confident and you can start playing around and
really exploring nomad. But yeah, I think that's about
it for the class project. We're just going to make a frog. We're gonna, we're
gonna light them. We're gonna do the materials, we're going to change the there's there's some other
little frog nuggets. There's a lot of fun stuff
there we're gonna do. So just follow along, have fun. Try not to get overwhelmed. I'm going to keep it relaxed. Luckily, I'm sort of
naturally relaxed. So hopefully you will
be two and you'll have a lot of fun with
me in this class. Alright, let's start sculpting. Let's move on to the next video. Getting Started.
3. Getting Started: Hey guys, So I'm
gonna run through this as simple as I can. It'll be a lot,
it'll be confusing. But trust me, the more
that you work in Nomad, the more you get
used to the tools. It will just get easier and
easier every time you use it. If you get stuck, reach out, or go to the Facebook group. You can find a lot
of help there. And the nomads gov
website has a ton of resources and frequently asked questions and things like that. So you can find your answers online for short
if you get stuck. Okay, so first-off,
opening nomad. You want to download
it, obviously. And we opened nomad. So it opens to a sphere, which is great because I use
a lot of spheres in my work. When you're doing 3D, when
you're thinking about 3D, think about shapes that
make up other shapes. So e.g. if you're
going to make eyes, you could just clone this. You would have two eyes, a base to start with. And there's other shapes. But I'm just going to
go down the line here. So we can just get
these squared away. And there's not too
much on the interface. But it can be confusing. Obviously if you're
not used to it, but it'll come in time, so don't get overwhelmed. So we'll start with the
project menu first. That's this little
folder up here. So we'll tap that. And we have our projects, so that's what we're
working on now, the name of it is blank
because we haven't named it. So then you have
Save, Save As rename. And these are pretty much
the same as other programs. Saving it will just save an updated version
to whatever you do. It'll just save it, Save As we'll save a
separate version. So if you change the color
and you are like, Oh, I like the old color, but I
want to save the new color. Then you would do Save As
rename, just renames it. And open is where you can
open another project or open, open something else to
go into this project. Add the scene so you can save, if I save this sphere separately,
we won't get into it. But if you scroll down,
you can export to different different 3D formats. Like an OBJ is something
that I do normally. If I made a nice little face or shape and I just wanted
to save it for later. I would export it as an OBJ and I would just
export the selection. Then you can bring it back in. You can just bring it back into the scene or in a new scene, you can bring something
that you've saved. But don't worry about
that too much now. But I just want to
move through here. So of course sometimes
I have to explain some more complicated actions. Delete, deletes new, you
can start a new scene, and so on and so forth. So these are all pretty
self-explanatory. We have our sphere here, so
that's pretty much this menu. If you go down, render
is where you save it, like you save the image. So obviously transparent
background show interface, screen 7201080. So these are all sizes. You can make your
own custom size. The screen is plenty big for me, so it just kind of
exports it like this. I'll do the four finger tap
and get rid of the menu. It will export it like this. But the files are pretty big. So that's pretty much
this first menu. The first thing that we
should do is we can just save this and we'll
save it as demo. Okay, so once you save it, then you have your first
save project called demo. We can get started. So the next option
here is the scene. So you have add, delete or clone join, which is grayed out because
we only have one shape. So this is a sphere, it's a shape, a mesh. It's a 3D object. There's lots of names
for things in 3D. So sometimes I might go back
and forth between different, different words,
but any object or anything that you
make is its own mesh. If I had two of these, I would have to sphere meshes. Meshes or two sphere shapes. Sometimes they can get
confusing when you're watching tutorials
or watching videos. Because sometimes people refer
to it as meshes, shapes. I like to say clay is mama
name CLI, have a holistically. So in the Scene menu, in the same menu they were on, add something that you're
going to use all the time. And primitives are
these primitive shapes. So this sphere is
a primitive shape. So let's say I delete it. So let's go to scene and see
this little trash can here. I can delete this sphere. I can go to Add, and
I can make a box. So you'll notice that this little cubes here and
this will help you. So let's say we just have front that will go to the
front of our box. So I'm just going to make
it a little smaller. You can move it around,
you can look at it. It's just a nice clean box. One other thing that I probably should have said
at the very beginning, you'll notice that my mesh, my box right now is sort
of a reddish color. And that is because I like
to sculpt in met caps. So a Metcalf, we're
just going to jump over here to the shading menu. This little sun, yours is here. So this is probably this is
the default, the lit PBR. That's just regular,
That's just normal. Mat cap is it's kind of like
a baked in lighting system. And for me it just makes
it easier to sculpt. You can change it. If I wanted to do
like a darker color, something a little more like
clay or more like whatever. But I just like to do
this normal makeup. I just think it's easier to see. So again, that was just
in this little sun. If you're just here,
I go to my cap. One other thing that I always
do when I'm first starting to sculpt and get into
it is now we were here. We're going to jump over to this little film thing
here, the camera. And I always sculpt
in orthographic. Orthographic is Here's
perspective and orthographic. Orthographic basically gets
rid of their perspective. So when you have
perspective, e.g. the, the, the ends
of these boxes would be closer and because
it's further away. So let's see. So for perspective, you
see that it's different. And you can actually, you can actually move it to
the perspective is a lot. But that's something that
I'd like to do later on. After Horace, after I've already sculpted what I'm sculpting. But to begin, I go
to orthographic, it's easier to sculpt
and you won't get confused with your perspective. You won't get confused. So just to recap, if your mesh is white and urine lit and
you can go to met cap. That's how I like
to sculpt and make things to start out with. And also go to your camera and go to orthographic
rather than perspective. I just think it's a
good starting point. When you want to get started
in 3D and when you want to get started making
whatever you're making. Okay, so let's jump back to our Scene menu because
there's a lot here. We have our box, which
is right here in yellow. And again, when you
add a primitive, primitives are all these shapes. So we have a box,
we have a sphere. I'll move this, move
the sphere over. And we can add some
other shapes too. We have a torus,
something like that. And so these are,
these are your shapes. Now you notice that I moved
them around pretty easily. So let's start from
the beginning. So we added our square here from going to this plus
the squares of primitive. Primitive is just a basic shape. So that's all a primitive is. You don't really have
to think too much about that word. Just a basic shape.
4. Gizmo / Symmetry / Mirror: When you start a new scene,
when you make a box, it will have this funny-looking
thing called a gizmo. Gizmo green, red, blue. Very confusing in the beginning, but it's actually quite simple. So it gizmo just helps you move your object around in space. Of course, you can drag like this, you
can move it around. But it's really just
moving the camera angle. It's not actually
moving the shape, it's just moving where
it is on the screen. So one thing that is important with the
gizmo is you'll notice that the green is facing up and these arrows are facing
in certain directions. And what can help you
with that is this cube. And notice as I tilt it, the cube also tilts. So you can hit front to know that you're
exactly in the front. So the gizmo, the green
arrow up and down, the red, left and right. And then there's a blue
that you can't see because it's facing towards us. But if you turn it, then you can see the
blue arrow as well. So that just moves your
object around in space. And notice that I'm
double tapping undo because I just want it
to be in the center. And this is one side note. I want to add when
I do my sculpting, I like to use symmetry. So symmetry is very
important with a lot of the things that I make when
I'm sculpting a character. And it has two arms, two legs, two eyes. And I want to do things symmetrical because it
cuts the time in half. Rather than, let's say e.g. if you were making a
character with two eyes, rather than making one eye and then making
the opposite eye. That takes double the time. So that's when, that's
when mirror comes into it. So if I tap mirror and
then I tap this red arrow, you see that there's
two of them there. So essentially
that's what this is. So I've mirrored it. It's in the front and I can
make what I want to make. If I wanted to make two arms, two legs, I could
just use the mirror. So that's why it's important. That's why I always undo. Because I want to,
I want my shape to be right in the middle. And what happens if I move it? If it's not mirrored
and I move it off. And then later on, if I want to, let's say if I validate, validate is it's not
a primitive anymore. Now you can use
all of the tools. So it's a set shape
in your project. Once you use him,
once you validated, then the symmetry
can be a little different because we're
not in the center anymore. So I would say to sum that up
and make it less confusing. When you're starting to sculpt. Don't move things left and right too much like
up and down is okay. Even forward and backwards. But you're probably going to
want to use symmetry a lot. So just try not to move it
that much in the beginning because symmetry is
very important for 3D. Okay, so back to the gizmo. These arrows, move it around. We've already gone over that. See this orange ring. That's just your scale. And they have these cones
which I never really use. There's also this flat plane
that I don't really use. But these spheres,
see the spheres here. Those stretch it. And
let's say that you, you know that you want
this to be the bottom, but you want to just
make it taller on top. And you can use edit. So if you tap edit up here, you see all these other
little tiny dots. So that's just how you
can have more control. Oops, let's make it
a little bigger. Let's say you want to
stretch just the top. You can just grab this loops. If you tap on it, you can
put in a numerical value. I'll just cancel that. But you can just
drag it up and down. But for now, I'm just
gonna get rid of the edit. We don't need it. It gizmo is just
something that you'll get used to over time. And all it is, it just helps you move your object in space. So let's say we wanted to add
a sphere on top of our box. So pretty simple.
We just go here. We go to add, and then
we find our sphere. And you notice the sphere is inside the box at the moment. So we're going to use our gizmo to lift it up over the box. Now we have this sphere
on top of the box. If you wanted to lift
the box over the sphere, then you just tap on the box. So you can tap on them. You can lift the box up. He wanted to box to
be behind the sphere. You can move it behind. So that's pretty
much just the gizmo. Let's bring this fear
on top of the box. And let's make the box
a little more squat, sort of like a like a like a little platform will make it will make
it a little bigger. So let's say you wanted
to add another sphere, but you wanted to
make two of them. Maybe one here and here. That's pretty simple as well. We can just go back here. Hit Add. We'll go to sphere. And we can bring our
sphere up with our gizmo. We can bring it forward. And then we can slide it
over and we can shrink it. So right now we have our one
sphere to the left side. But that's okay because
we haven't validated. We haven't really talked
much about validating yet, because right now we're just
dealing with the primitives. So you see everything has
this Validate button. And, but we're not
gonna do that yet. So I'm gonna take this, I'm going to tap on this sphere. I'm going to hit mirror. So
then it's going to mirror it. So right now the symmetry is
set right down the middle. So anything that you hit mirror, it's going to mirror
it on the other side. Like this. Symmetry can be very
confusing at first. But just know that when
you're in the front view, the default is right
down the middle. If you want to see where
your symmetry line is, you can go here to
symmetry and you can't even really see
them until you validate. So let me just do
that real quick. Just so you can see, I'll validate this big sphere. And then I'll go to Symmetry. And then I'll scroll all
the way down to show line. Here we go. Once I tap on it,
then you can see the, the line down the middle. Okay, So we have a
few shapes here. We've gotten started
with our 3D object. So let's kinda dig in
a little bit more to the Scene menu because
there's a lot going on here. So we have our box and I think we can validate it and we don't
need to mirror it. We don't need two boxes. We can just go ahead
and validate it. So we'll just have
validate and you see it turns white. And that's our box. And if you want to rename that, just tap these
three little dots. So you have instance
clone in name. We'll just hit name and
we'll call it base. We'll call it the base. So now we have the base. And you don't have to worry
about these too much. Obviously delete clone. If you wanted to
make a second one, you can just clone it. And then you have base one. And that's just a
second version. So now we have another,
another sphere. And if you want to
delete it, you just go back in here and hit Delete. So that's the base. We have our sphere here
which we validated. So we could see the lips, which we can see the line. The sphere is already validated. And basically once
you validated, all that means is that it's
a set part of the project. And now you can use all
these other wonderful tools that we'll get to in a bit. If you make a mistake and you validate something like let's say you validate it and
you didn't mean to. You can just undo. And then you can write back
to an invalidated shape. We have them, we
kinda like where they are so we can validate them. When you look back here
in the Scene menu. This is the sphere. If I touch the eye, it kinda just hides them
and brings them back. You can see that they're
underneath mirror. So that means that
there's still mirrored. It's still fine. You can still move
them as though they're sort of like a mirrored unit. Okay, so just tap this. We have this mirror here. We can actually rename it arms. So now that we have
a few objects, Let's look at this
little menu here. So you can see RAM. It has the used 52 mb free, 6,170 seen vertices 16.3 and
then in parentheses 22.4. In our scene, we
have a mirror here. So it's actually just
mirroring this one shape. So it's not quite double because it's
mirroring the one shape. So you want to keep
an eye on the scene vertices 16.3 is fine. You don't want to get
up into the millions. My system can go up until about five or 6 million
before I start having issues. I try not to do scopes
that are that big. So just something
to keep an eye on. So right now it's fine. Scene vertices 16.3, all these shapes are
made out of vertices. There's all these weird
terms that I don't really want to get into because they can get very confusing. But there's like polygons and vertices doesn't really
matter at this point in time. Just know that scene
vertices is how big. Scene is how big
your project is. And the higher that number is. Like once it gets to
about 34 million, then you can have some crashes. The system might crash. There's different iPads, there's just different Android tablets. And they all have
different strengths. And they might have
more RAM or less RAM. So it's hard to say
definitively where your point, where it'll be too
much because there's so many different devices
with so many different specs. So rule of thumb for now, if you're starting to
go over like 2 million, tries to try to keep
it as low as possible. So let's jump to clone. So if we tap clone, then we just cloned these
two, these mirrored spheres. So let's do that again, just so you can sort
of see what we did. So right now, undo it again. There we go. So if you're on a mesh, like if you tap on a mesh, then you go here and hit Clone. Then it'll double that. So let's say we wanted to make some shapes on the
top of this sphere. Yes, this is gonna be
like a little frog. So let's make some eye shapes. So let's tap on the sphere. Will go here. And we could do clone. Actually don't know if that's
the best way to do it. We could do clone. So now we have sphere three and let's name it so we
don't get confused. Let's let's name it eyes, even though it's only
one eye right now. Just so we don't get confused. So we're on this layer.
We can bring this up. Same thing will shrink it, and then we'll slide it over. So now we want, we want the symmetry back because the AI should
be in the same spot. So let's go back over here. So we have I selected, we want to do the mirror. So let's go add again. And then we can go down and we can tap mirror, see these red. So we contend mirror.
And then it mirrors it. So then it's almost the same. So it's sort of like
we're sort of going backwards so you can mirror
it before you validate it. But then you can also
just take the eyes, go to Add and do mirror. And it's the same thing. So now we have this mirror
here, we have eyes. And I'm just going
to name the mirror. Instead of mirror, I'm just
going to name it eyes. Okay, so now we
have our two eyes. Do we like where they are? I think that's
pretty good to me. Come pretty close to each other. And we'll turn our Canvas and maybe we'll just move
it back a little bit. Okay. I'm tap front. Okay. So the eyes you
number it's still a mirror, but we like the eyes. I'm not going to do
anything else with them. Let's get rid of
this one bracket. Because know-how I tap
here and then like it's two brackets and that
can get very confusing. But we don't need it right now. So we'll go to this one
and we'll validate it. So once you tap validate on
this red than on the mirror, it'll say join children. So that means that
we're going to join these two spheres
together as one. Doesn't mean we're going
to move them together. It just means they're
going to be one shape. So we hit Join
children. Confirm. Now we just have eyes. And I know that can be
a little confusing. So just practice. If we wanted to make, if
we wanted to double this, we wanted to take these
eyes. Let's tap on them. Ok. Oh, oh, this is
another weird thing and this is specific to this
this particular update. I don't know why. But sometimes
the gizmo will just go to someplace that's
not on the mesh. So e.g. I. Was tapping here and I didn't think that
the gizmo would control this, but it does. If this happens. Now,
this can be very, it confuses me often. If that happens, just
go over here to pivot, just tap pivot, and
then tap Reset. And tap pivot again. So a pivot is essentially the
point at which your Gizmo, like the center of the
gizmo, is your pivot. So e.g. if I tap pivot again, this is a little
advanced, but I mean, I'm here so I might as well
just tell you what I know. So if we tap pivot, notice that we have our, we have our rings here
and we have our arrows. So let's say we
wanted to make this vertical or tilted
vertical for some reason. You'd have funny-looking eyes, but you can actually move the
pivot point to the center of one of the eyes like that. And you can move in
any way that you want. But then you would just tap
the pivot button again. So now the pivot point
is in the center. So now it's going to turn everything from
that center pivot. So that's all a pivot is. If I want it to move. If I wanted to put the
pivot point there, then it would just, you know, so the center is where
the pivot point is. So hopefully that's
not too much. I'm just going to undo and bring the pivot point right back to the middle,
that's where I want it. So another thing
I think is really important is keeping
track of your scene. Reorganize everything from
the bottom up to the top. Doesn't have to be that way. But I think that's
just the more, the most clear and
efficient way to do it. So we have the base. We have these arms. Here. There we go. So there's
both of the arms open, actually have the base. So notice I have all
of these checked. So if I, for some reason, if I tried to hide one of them, the other ones high too, which is a little weird, but I guess that's what it is. We're happy with our legs. We can we can validate
this as well. So we'll validate join children. And then we just
have our arms here. So we have the base,
we add the arms. We have this sphere, which is kinda like the body. So that's up here. So let's rename it so
we know what it is. Body. Then let's bring it down over the arms and
under the eyes. So we'll just long press
it and drag it down. And also be careful,
there's always like these parent and
children sort of links. And we didn't really want
to link anything right now, so we'll just keep
them separate.
5. Join, Merge / Remesh / Reapeaters: So let's get rid of this box and let's make it a cylinder. Let's make it slowly
sitting on sort of a lily pad type cylinder. So we've tapped on the box, go to scene and we
can just delete it. So we'll tap on here and delete. Or you can just
delete from up here as long as your
base is selected. Delete ad. So then we have a cylinder here. Doesn't really look like a, it looks cute, but isn't
really like a lily pad. So let's shrink it. Remember the green
moves it up and down. Let's shrink it with
the green sphere. And then let's make it
larger and shrink it. Or he could make it larger
and then shrink it. So something like that. Let's just go ahead
and validate. So now let's drag this up. We'll tap front on this little cube,
will just drag it up. So it looks like he's sitting. Next. I want to use join and voxel mesh here in
the Scene menu. So here's join. It's grayed out
because I don't have two or more selections made. Now you can see join
and also voxel Ramesh. So these two things
are sort of similar, but they're very different. In order to use the joint
and the box with the mesh. First, let's make the shape
of our little frog here. So notice that right now
we're in the front and let's spin it to the left or
to the right maybe. So you want to see left here? Now we're just gonna use one
of the tools on the body. So we'll take the Move tool. And right now my move
tool is the radius is, let's do about 200. So you see these options here. And this is going to
be wherever you are, whatever tool you choose. And we'll go through
the tools now so don't get too confused about it. We're just using move. We're just going to
use the, these 2 bar. So this is your size. The radius is just
the size of the tool. And this is your intensity. So this is just how
hard the tool is going to do whatever it does. So we have the intensity
here and the radius, which is the size. And you also have symmetry. So remember, the symmetry
goes down the front. So let's tap on the
sphere, which is the body. And I still have
my line there so you can see my symmetry line. So if I want to use
the Move tool at radius 250 and full intensity, I can choose symmetry on or off, off one side of it. Undo symmetry on. Both sides. Actually haven't done
a frog like that. So that's actually quite good. So let's bring the
radius up a little bit. So we're just going to make
it a little bit bigger. We're using the Move tool and we'll just slide
it out like this. And notice I'm
going to just slide my mesh back to the,
back to the left. And I'm just going
to stretch this out. And it's actually pretty good. We don't need to go
too crazy with it. You can make it a little smaller and then just pull
out the bottom a little bit. So something like that. It looks more like a
nerd, like the candy. That's all we're gonna do with the move tool at the moment. But we do want to join. So let's go back to our scene. And we can actually use
like the arms or the legs. Let's use the arms. So the arms are
already down there. It's a little easier
to just use the arms. So we're going to clone them. So we'll tap on the three dots. Clone. Tap on the three
dots again and just rename them so we
don't get confused. And we'll I'll name mine fees. Okay. So now we have the fetus
will go to our gizmo. And again, the gizmo is lower
than what it should be. I don't actually know
why that does that. So we do pivot, reset pivot. And now the gizmo is, it makes more sense. Okay. Now you notice when
I moved it over, it actually moved them all over. When we really want
them to be symmetrical, we want them to move out. We wanted to mirror each other. So I'm just going to
tap Undo symmetry, move them out of the back. And we can make them smaller. Let's I'll just move them out so you can kinda see
what I'm doing. So I'm going to make
them flattered as well. And we just want to tuck
them into his sides. Definitely don't ever have
popcorn when you're shooting. When you're trying to shoot. Because then one will
get stuck in your throat and it will keep you from
talking when all you need to do is talk and it'll
keep you from talking. Still can hardly talk. Can I talk? And my back. Okay. I'm back. So we'll just sort of tuck
them in. Kinda like this. I think that looks pretty good. If you want it to make them longer or something like that, you can make them longer. You could turn so
that there were more forward, things like that. Using our gizmo. Going to make them
a little smaller, move them back a little
bit, something like that. And I think I like ok, so now he's got his little feet. So we can actually do the first thing that
I wanted to do. So we have the fetus, which is selected here
with this checkmark. We have the body and
then we have the eyes. So I don't actually
need to join them, but I just want to show
you what that does. So we have the eyes, the body, and the fetus. So now I'm going to tap
Join and you just see eyes. And that's all of them together. So join and voxel merge. They bring things together in two fundamentally
different ways. Join, which is what we just
did, brings them together. But you still have the
ability to separate them. So you would just
tap on these three dots and go to separate. Now you notice this is blue now. And I can touch the bracket and it just his
eyes, eyes, eyes. You do lose your naming. But it's still has all
the separate shapes. So that's join. Join you can use still it preserves everything
that you've made. If you join things together,
everything is preserved. You can always separate
them at a later point. So now let's undo. Okay, so now we're back. I just wanted to undo that. Now the difference between
join and voxel merge. Voxel merge actually joins
everything together. So e.g. I don't know if I wanted to box will
merge the feet because I don't need to. But let's box will merge
the body in the eyes. So we'll go into our scene menu. Eyes. Body will check them both. And we'll go to voxel Ramesh. A voxel merge or voxel
Ramesh, same, same thing. So voxel emerging, that's going to bring
these objects together, but it's going to
fuse them together. So sort of like you're soldering these, these things together. So they're gonna be one piece. You can't separate
them unless you undo, which is just backing
up a few steps. But once you voxel merge, then they are together. The meshes are joined together. So what's really important with voxel remeshing is this
number, the resolution? I never use the
build resolution, so I'm not going
to go into that. And I don't usually use keep sharp edges because
normally when I sculpt, it doesn't, it doesn't
seem to really. So it says this option
is mostly useful for simple primitive
Boolean operation will introduce distortion
in some areas due to the points being
snapped on the edges. So basically what this
little thing is saying, that it's good for a
Boolean operation. I know that's really weird term. All that is is, if I wanted to do
that really quick, just as an example,
I'll make a new sphere. So we have with the sphere
and we have the body. So to do a Boolean operation, you're essentially just taking one shape and subtracting
it from another. And the way to do that. And this isn't, you don't really have to worry
about this right now. But the way to do it,
because eventually you will, is, so we have these two shapes and we're
gonna do a Boolean operation. We're going to
remove the shape of this sphere from the body. So we go to our scene. We have our sphere here. We have our body,
so you select them both and then you hide. Again. I don't know why it does that. I'm a white hides both. But you select them both. You hide the shape that
you want to subtract. And once those are
both selected, then you voxel, you
voxel merge them. And my rule of thumb is I
usually voxel emerge at 200. So we voxel merged at 200. And now you see that it
is subtracted that shape. So that's a Boolean operation. Boolean operation. So let me just undo
this unneeded sphere. We can go back and
essentially voxel remeshing. Again. It just brings
everything together. So I do want to voxel Ramesh, the eyes and the body. And the reason I do 200. So I'll show you why. So we'll go to glue
back to our scene. The eyes and the body
are both selected. Voxel box will merge. Let's do 200 like I always do when 99, 200,
same difference. So now I'll voxel merge. So once I've voxel merged, you see that everything is joined or whatever I
emerged to his joined. It's a little, it's
a little weird. You get these
little weird marks. Now introduce the second tool, which is the smooth tool. So we'll tap that will make our Smooth Tool bigger with
this radius, radius, slider. And the intensity I usually
keep around 80 or so. Now we'll just smooth it out. And voxel remeshing it. 200 keeps the clay, I like to call this clay. It keeps it fairly soft. So that way you can get
this nice smooth mesh. It'll be nice and smooth. You do have to go over
everything sometimes when you ramus because you
get these artifacts. But that's okay. You just keep symmetry on. We just use Smooth Tool and you can make
your mesh really, really smooth and
really, really clean. I do spend a lot
of time smoothing. And if I have any issues, sometimes I'll just remeasure it the same number and
I'll smooth again. Okay. Why do I voxel remains at 200. So I found that voxel remeshing it 200 keeps it's soft and it's easy to smooth and sort
of move the clay around. It keeps it malleable. It keeps it does a good
job of smoothing it out. But I can still it's still
malleable in a sense, like I can still move it. The only difference is if
I was to voxel remission. So let's go back to our scene. So if I was to voxel, remeshing it at a high number, that would add a
lot of polygons. It would add a lot of size, a lot of density to the clay. So the higher you go,
the more density. If I had really fine details, I might, I might voxel merge
it at like 300 or 400. That way it will preserve
those very small details. But I don't have any details. And you kinda don't want
to work on details at this point when
you're still making things because you
don't need them. So just keep the number low. And 200 seems to be a good number for me when
I do my voxel merging. If you do it too low, then it will be too soft. And when I was smoothing
the top of this, these might start to deform. So when you emerge at
like 50 or something, it might be a
little bit too low. And which is good for
the size of the project, bad for trying to hold
shapes and details. So that's the only difference. So 200 is like a good
rule of thumb for me. And I would say that, I would say to use that more
often than not. The next thing on our
menu is instancing. Instance is very
much like clone. So if I tap instance, you see body one. It's very much like clone
will go to our gizmo here and we'll slide it over. The only difference is
since it's an instance, it's like a copy of this one. So if I take move, It's kinda move both of them. Now they're dancing.
That's instance. And since we're here, I'll
show you some other fun updates with this this version. So we have our, our body, our arms, our feet. So just for fun, let's highlight all of these. Maybe not the cylinder. We don't need to
highlight the cylinder, so we'll, we'll check off
the body, arms and feet. And then we'll tap clone. So now we've cloned them all. And unfortunately they
clone one after the other, which is unhelpful from
you at the moment. So I'm just going to
bring them together. And then I'm going
to select them all and I'm going to join them. So this will be frog clone. Now we have frog clone. I'm just going to
hide the other ones. So now we just have
our frog clone here. So let's go back into
Scene menu, add. And then we'll touch
will try array first. So array gives you this menu. And notice there's two frogs. Now, we have read The
Count X offset x, count y offset y count z of z. Very confusing, but
here's a cheat sheet. So if you use the gizmo, notice that you have
green, blue, and red. And notice that the
red is at number two. So that's how you know which direction that
array is going. So you can slide. And I've made seven of them. And they all went out
towards this red direction. So that's how, you know, seven count X red. And it's going in
that direction. The offset, all that is is the space between,
just like the song. So the offset, oops. We'll slide on the offset and
it just spreads them out. Green goes up. So if I take, if I go
here, I keep touching it. If I go here and I
multiply an hour, I just slide to the
right, change the offset. That's all that is. Z. Go like this. So now I have a bunch of them. But notice that my scene
vertices are huge. So if I was to validate this, the app would crash. Because if I was to validate it, that would make them
all real innocence. You don't mean like right
now they're just kind of repeating off of one. But if I was to validate it, it will make them all real. And then my scene would be 18.8 and it would
definitely crash. So that's where you
have to be careful. And I'm not going to I'm
not going to validate. I'm just gonna go ahead
and delete the array. And then we just goes back
to our regular frog clone. So we'll go back into our scene. We're still in frog clone. Add. And then curve. Curve allows you to repeat
the frog on a, on a curve. So if you don't see this white line here
which might not show up. Just tap edit. So let's say we wanted to make
a couple of ways to do it. I mean, you can just tap in the middle and it'll add nodes, which allows you to curve. You can add more
nodes or less nodes. You can bring the
nodes together. And when they turn
red, that means that they kinda go away. So if you wanted to make
our little rainbow arch of frogs, and up here again count and there's no
red, green, and blue. So the count is
where you bring up. Now there's three,
there's four or 56, and so on and so forth. And that's essentially
what happens. Closed. You can see it just closes up. Our curve. Spline, spine just keeps
it nice and curvy. If you don t have spine,
then it's kinda ugly. It's kind of it's
kind of rudimentary. Spline makes it nice and curvy. But those dashes,
that's just extra. Okay. So, but it is
a little confusing. But at least, you know, if you need it to
make a frog rainbow, at least now you
know how to do it. If you learn anything
from this class. Probably won't be
a frog rainbow. Now I kinda wanna make
a frog rainbow though. I think that would be cute. Now I'm definitely going
to make a program file. So next up, go back
into seen frog clone. Add. Next up will be radial, which is one of my favorites. So we'll tap radial, radial. These can be a little
confusing because you still have the radio and you
still have the frog here. So radial is where you set how many frogs will
radiate from one-point. Say, let's say the point is
in the mid, is in the middle. And if you use radial
and you make five, then they'll all spread
out from the middle. So we're on radio here. You see, you have, we do have the red, green, and blue, but essentially you just
want to use the green. You can see the four here. That's made it very
funny looking. I could bring it to one
and then it's normal. But once I go to 45 or six, then it just starts
to make like this. The radius, you know, everything is repeated in
a radius going around. So if I wanted to
spread these out, I have to go back
into the scene and go here to the actual frog clone. Once I go there, I just use the gizmo and
I just pulled them apart. Kinda cool looking. So that's the radius. Pretty much. You can still spend them look like they're doing
a little dance or something. So you can spin
them. Obviously, you can still move them up and down. But that's radius r radial. Very, very useful. I'm just
going to delete it to go back to my regular,
normal frog clone. Next is mirror. So very simple for
our clone add. And then you have
Mirror. Mirror again. It does the same thing. Loops. So we're going to go back in
here and go to frog clone. A mirror again, you can just mirror your frog.
However you need. That's mirror. So let's delete our mirror and just go back to our
regular frog clone. Actually, let's just delete it so it's in the right,
in the center. There we go. I
want to keep it in the center. Like I always say.
6. DynTopo / Lit(PBR): So before we move on
to the next section, I just want to edit
his little legs. And let's see if you can
figure out my issue. So we'll tap on the legs. And you notice that
they don't turn purple. And that's obviously because
we're still on frog clone. Will hide frog clone and
we'll just go back to our regular frog with
the three sections. And I'll just drag
the frog clone underneath and keep it hidden. So now we can tap on the arms and we'll
use the Move tool. And right now they just
looked too much like spheres. So I'm actually going
to just drag them back into the body a
little bit like that. Now let's move on
to the next menu. Here. Looks like
a little pyramid. You have multi voxel den
topo, dynamic topology. And then you have deci UV. You have primitive. Actually never tried
to tap on that before. So multi-resolution. I never really use it
or pay attention to it, but I will do sub-divide. So if I was trying
to add details to this and I felt like the
clay wasn't dense enough. You can sub-divide it. And it will actually divide
all of the vertices into. So if there's 25 of them, if you sub-divide, I
think there'll be 50. So it'll just get
that much more dense. But if you notice, right now, let's go in the body. So the body is quite big at 142. So we'll go into this
little pyramid menu. And if we do sub-divide 142 k, we subdivided, it's 568
k. So that's a lot. So we can make some
really nice details, but we sacrifice making a
really big, heavy, dense mesh. So I'm just gonna go back. So that's multi erase. What's also similar? So voxel is the same thing
that we did on this menu. It's the same thing here. So if you notice this little
pyramid actually changed. So voxel is the same thing
that we did on the other menu. So we've already covered
that dynamic topology. You don't really need
to worry about it now. So let's say if I
wanted to add detail, but I didn't want to
make I didn't want to change the multi-resolution. I didn't want to make
it a really big, dense, heavy piece of clay. You can use dynamic topology. And once you enable it, you can add details. And they will be, they will be more
clear because it will just add the vertices
around whatever you're doing. So e.g. let's say I want
to use the crease tool. And let's turn off dynamic
topology and see how it looks. I'm just using the
crease tool here. So now let's undo, will turn on dynamic topology
and do the same thing. It actually looks
pretty much the same. So luckily, our
meshes and too low, our meshes, quite big. 142. If it was a lower mesh, then it would be a little
bit harder to see. So e.g. that actually
goes into the next thing. So this is called decimation. Decimation will lower
the vertices in a mesh. So if you get to
1 million and you have a bunch of frogs and
you're like This is too big. My, I don't want my, my tablet to crash. What you can do is decimate. So decimate will remove
some of the vertices. It will make the meshes smaller. It will make your
sculpt smaller, but you will sacrifice
some detail. So e.g. I'll hit decimate. Now it's 71 K. Decimate, it's 35 k. Still actually
looks pretty good. So now let's use the
crease tool again. I don't have dynamic
topology on. So let's use it again. Still, not terrible. Let's see what it
looks like with dynamic topology on enabled. It looks better, it looks
like it did before. So that's dynamic topology. It's a bit advanced. I didn't really
learn what that was until I had been
sculpting for awhile. But It's there, so I wanted
to show you what it is. So again, that's
dynamic topology. And what that means is you
can add detail without adding a lot of density and
a lot of size to the sculpt. It will add the size, but it'll just add it right
around what you need. So it's sort of like it's creating a detailed
mesh as you go along. So that only this part
looks very detailed. So that's dynamic topology. Once you start sculpting a lot, you'll definitely run into situations where you're
going to use that. Okay, so I tapped undo. So our body is back
to where we started. It's at 142 to k. And so
this next option here, the material, the body. This will come into play once we're not in makeup anymore. So we're just going to
stay in Metcalf for now. Because there's a few
details I want to do to the frog before we move
to that next step. The first thing I wanna do
is add some eye sockets, eyes, and then some skin folds, and maybe a little tail. So let's do that real quick. This will also be a demo for some of these tools
that I use often. So make sure that
you're tapped on the body will use clay. We still have symmetry
on you can see. And clay adds clay, tap Undo, or you can hit
sub and it takes clay away. It's actually kind of cute. So I'll tap Undo. So these are the eyes. So here's my size. My radius is about 85. Intensity. You can raise the
intensity up a little bit. I'm staying in sub one, b sub. And then we're just going
to make some eye sockets. So essentially I'm just
going to make some circles. And again, it's not, you
know, no real rocket science, just, just try to
make some circles. Once it's at a place
that we're, we're happy. We take the smooth tool. Same settings as before. Maybe make it a little smaller. And I just like to
smooth everything out. I'm always smoothing on one side because we have symmetry. So we don't need to
smooth both sides. Although sometimes I
will go into the side. But it's probably just
a human brain thing. So now we have some eye sockets. Let's quickly add
some eyes in there. So we'll go back
to where we were. This is a good practice. So we'll go to the scene, we'll go to Add, and then we'll
want to add some spheres. Spheres always start
in world centers, so that's below our frog. So we'll just drag
them up or drag it up. We'll make it smaller.
Move it over. You can just find the right
spot for your sphere. We don't want it
sticking out too far. A little more,
something like that. So once you're happy,
you can just tap mirror and the other one will
show up exactly the same. Again, this is the big reason
why I really like symmetry. It really helps with
things like that. Then once you're happy,
you can just have validate and you have your eyes. Remember to name them. So we have our mirror and our sphere will just
validate the mirror. And then we can just
rename it so we don't get confused eyes. So now let's use
the inflate tool. Another one of my
favorite tools, radius can be about 80 or
so, intensity, around 70. So in Fleet will just drag
right around this outer loop. And this is a good, This is a good exercise to
and whatnot to do. See I forgot to tap on the mesh because I was
still on the eyes. So you notice when I'm on the eyes won't do
anything down here. So you have to tap on the mesh
that you want to work on. So now we're back in
inflate or on the body. And we'll just drag this around. Is it a legs? You
can double it up. So we just made some
little skin folds. And notice it's kinda ugly. So you can either do it again
and see you until it looks nice and just give it
a little smoother. With the smooth tool. I like to smooth everything. It just keeps your
mesh nice and clean. So we'll take, we'll
go back to inflate and just do the same
thing over as little CDs. Smooth it out a little bit. And I think that
looks pretty good. And also I want to give him a
little tail so you can take inflate and you want to stay close to that,
to the center. So now he's got a little tail
and we go back to smooth. I'm just lightly smooth it out. So he's got his
little tail there. If you want. You can even put you can use the inflate tool and you
can do the same thing. You can make a little. Oops, little skin fold
over his little tail. Notice this is the
reason why I didn't join the feet and the body. Because now you have that
nice clean separation and it's hard to get when you
voxel merge them together. So this is how I
sort of hide that. I keep them separate
and I add the skinfold. Notice on the tail,
which I just made. It's hard to get that crease. But you can manually put it in. It won't look as good. So we'll take the crease tool. Also. If your
toolbox looks like, if your toolbar looks like this, just tap on it there. So we'll take the crease tool. Radius is about 30,
some 30-something. Intensity is pretty high. Remember we have symmetry on. So we can start from here, bring it around to the center. So something like that. If you want to add a little more detail with a little tail. And then after that, I'll just take the smooth tool again. And notice you'll notice I do it almost automatically
before I do anything. I take this move
tool and I go over it just to make it a
little more natural. I think that's pretty good. Let's give him a mouth. And there's a few different
ways that you can do this. One way that I like to do
really, really big mouse. So I'm turning him to the left. I'll tap on left. And there's the trim tool. Trim tool is really great. And you can easily
figure it out. Lasso. You can lasso it. Polygon is a little
more difficult. But essentially you can
just add these dots, then hit the green
and it goes away. And I'm just showing,
showing these to you quickly because
these are a little more advanced and I'm going to go through
the tools one-by-one, but I don't want to get bogged down on the tools
because there's just so much line. Pretty much cuts
the whole thing. Rectangle does a rectangle. Ellipse, does an ellipse, sorry, poor frog, that so rude to do. So, we'll just use the
lasso for the first option. And I'm not gonna
do it this way, but I just want to show you. So we're using the Lasso. We've turned to the left. And then you just draw a
really big mouth like that. Then he has a really big mouth. So that's one really
easy way to do it. Another way, a more subtle way, is you can use layer. So we'll tap on layer. And let's turn our
intensity up to about 60 and our radius
to maybe around 50. You want to make sure
that you have sub checked symmetry and sub. Now you can figure out how you, why you want to make your mouth. You can give them a
really small mouth. At the top. You can give him a bigger mouth. When you use layer,
just remember to keep keep the pen on, keep the pencil on the screen. Because when you let it
go, it'll go deeper. So once you have a mouth
that you're happy with, then we can go take this move tool and we can just smooth out the mouth so
it doesn't look so jagged. I'm not pressing too hard. You can always load
lower the intensity as well because this is
going to be quite soft. So just smooth around the edges, Can smooth on the inside until it looks a little cleaner. Okay, I think that
looks pretty good. Maybe I can clean up
inside a little bit. Okay. And I like to add, I like to add some
little details to this. So I'm just going to take the inflate tool and I'm
actually going to add some. Let's go in closer
is add some little, you know, I know
it's a it's a frog, but he can have
some you can have some details that just kinda make them a
little irregular. You don't have to add them. But that's the
sort of thing that I just like to do for fun. And it's always fun to
stylize what you're doing. And again, I take
the smooth brush and smooth everything
over to make it nice and unnatural looking. But this is, this is where you can really
have fun with it. And you really start to
develop your own style. Like for me, I like to add
those kinda like skin folds. Even sometimes they
might not work. And then I just, I
just delete them. But just remember
that you can go ahead and experiment with this. Because that's the only
way that you really figure out what
you'd like to sculpt and what really keeps it
interesting and exciting. Because that's a very
important part of all this is you don't want to
think too much about it. Obviously you guys
are starting out, so you're gonna, you're gonna be thinking and you're
gonna be overthinking. But once you know how
to use some tools, think about ways to use those tools to really
make it stand out. Use them to the best
of your ability. I mean, that's what I do and
that's what I like to teach. So I think those are good. He brought his need, those little skin things
will just keep it normal. I kinda like that. So now that we're
happy with our frog, we can take them out of mat cap. Again, you have to make sure
that you don't want to put anything else around him, put anything on him. You just once you're
happy with him, then we can switch
it from Metcalf two. So we go here to this
little option here, shading and see
it's has met cap. That's what we've been
sculpting in this red. So we're going to
change it to lit PVR. Pvr just means regular. It's a base, white, whitish. And then we can start getting
into the next levels. Then we can start messing
with the materials and the lights and things like that because you can't
light it and makeup. So I just use this
for sculpting. Now we can move on to lit, PBR.
7. Surface / Environment / Lighting: So now that we've
changed to lit, PBR, this is essentially our
model and it's just plain, it's just the base white. And what I'd like to
do is change this, change this to a
more matt coloring. And it's just a
preference of mine. But I find that I
like to change it to a more matt white coloring. And then I'd like to light it. I like to light it before
I start adding the paint, before I start painting, anything like that,
I just change it. So in order to change the color, in order to color our sculpt, essentially, I'm gonna
go down here too. Sphere. You can see it has
a line through it. But if you tap on it, brings
up the stroke painting. Now this is the same. So the painting menu is pretty much the same.
It's also here. If you go to the Paint tool, you'll see that
these options are up here and you go to this
little paintbrush. So this is the same
sort of thing. This is the material. Right now. It's a black sphere if you tap on it and you have
all these other spheres. So these are all
sort of materials. Different glossiness
are different matte. If I wanted him to be gold, I can tap on that. You can tap on these and change
his color pretty easily. So once you choose a
color that you want, I don't really want this
color, but that's fine. Once you choose a
color that you want, you can do pain all. And it paints your sculpt. So like I was saying, as nice as this red is and
it's actually kind of nice. I like to just do
it a white color. So let's just go here.
I usually go here. Same sort of thing. But you also have all
these options here. So we have pain all force pain all I never usually have to use force panel. I just do regular panel. So the roughness is we don't really have a lot
of lights on it right now. But roughness really
plays a role in how rough the the meshes. So right now it's
not that glossy. If I were to make
it really glossy, I would turn the roughness
all the way down. And now it's still sort
of looks like porcelain, like it's really glossy. So I can bring it up to
really, really rough. And then when it's really rough, almost no light, almost no
light is reflected off of it. But again, we're using red
and I want to go to white. So I'm going to use this
color window here to bring the color all
the way to white. So it didn't it didn't change
because I didn't hit penal. So just remember to hit panel. So now I just want to test
where I want it to be. You can either use
this sphere or you can use the actual mesh. So I think that's a pretty
good spot point for 50 or so. And then I'll do pain all. And I'll go to his feet. And then I'll tap on this and I'll tap pain
all again because it stays the last paint whatever the paint job
is, it stays there. So now I can touch his arms. I can go here and go pale. So also, if I wanted to, I could go up here to the scene. And I could select all of these. Then I could paint. I could paint them all and they would all change the same color. So that's pretty
much how that works. But you'll notice
I didn't change. Let's uncheck these. Somehow. I'm on frog clone. Uncheck that. So his eyes, I
want to be glossy. I tap on the eyes. Then I tap on here and I'll just bring the roughness
all the way down, all the way down, all the
way down. Here we go. And paint all. So now the eyes are glossy. And Lina, what, let's
give him two teeth. So I'm just going
to use the eyes. A good or a scene. And I'm gonna go to the eyes
and I'm going to clone. So now that I've cloned,
I have eyes one. I'm going to tap the three
dots and rename it to T fees. You can just call them teeth. Teeth if you like as a TIF. So now that I have Tethys here and I'm just going
to use the gizmo. Again. I don't know why the
gizmos all the way down there, pivot, rosette, pivot. Another backup. Now we can just move these
down and move them out. And then just take the scale
and make them smaller. And then you can
just use the gizmo to position them
where teeth would be. And obviously, we need
to stretch them back. I'll bring it out so you
can see what I'm doing. So I'm going to stretch
them back because teeth aren't gonna be like gumballs. They're gonna be
more like mentors. Like this. So maybe a little further apart. And maybe we can squash
them down a little bit, something like that. Then we can move them
back into his mouth. Then we can use the
tilt on the gizmo. We can use this tilt to
get them into position. And that's going to take some
time to learn how to really use the gizmo most effectively. Let's make it a lot, Let's
make them a little smaller. We can bring them down. So maybe something like that. And you can even make
them smaller if you want. So something like that. I don't think they need to
be as glossy as the eyes. And this is something that I
think is really important. Textures like the
roughness and the mat. They really pay, play a big
role in how your scope looks. So try not to, unless it's something that
all of the material matches, like everything is glossy
or everything is met, then it's good to use different materials,
use different surfaces. It'll just make it look a lot more professional
and a lot nicer. For the teeth. I do like the gloss, but i'm I'm going
to just ease it back a little bit so
it's still glossy, but not as glossy as the eyes.
And then I have pain on. Another fun thing
that we can do, since we made our other frog
and we made it a shape. Let's go back to our scene. We're frog clone is. And let's select it. And let's just move it
over and maybe shrink it. Something like that. It's just an easy way to just add something else in the scene. If we want, we could
even voxel merge. We can voxel merge it together. So let's go to our
scene and go to voxel. Will voxel merge it or
read voxel remits Ramesh, both pretty much the same. And let's just smooth. Let's just smooth out
our little frog here. I don't know what we're
gonna do with him. But That's the fun part. Sometimes it's just
fun to have pieces. And this just kind
of like enhances our scene because it
adds something there. And if you want, you
can even give them a little tail by using
the inflate tool again. And you can just
give them a little give him a little nub tail, then use smooth to just
kinda smooth it out. So it looks a little
more natural. Now at least he has a
little nub tail as well. You can even cut it up
to them to if you want. You can tap on it. You can
cut it up next to him. Almost like they like
it's a little buddy. Of course, if you wanted to use this frog, you could
do the same thing. You could select all the pieces. You could clone it, and
then you could shrink it, and it would be the same thing. So now we can start
to light our scene. Let's go ahead and
hide our frog clone. Because we just want to
concentrate on lighting this guy. And because later on we can
bring back the frog clone. But I don't want him to
get in the way right now. So for lighting,
this option here. So this option here is
the same place where we changed from
Metcalf to lit PBR. We can jump down to lights. So this is where you add
lights to your scene. Lights are very important to
make your scene look good. And to make the textures
and everything looked good. Lighting is very important. So here your lights,
here's your environment. Environment is also
very important. And this, this environment is actually one that I made in Procreate because I want
it to look a certain way. These are all the environments that are included in Nomad. Again, you just go to
the shading window here, and then you go
down to environment and you can click on it. It has all these environments
that you can use. This is the one I'm using, but you can see it
really changes the look. And this is basically all
just the ambient environment. Because the environment is what really dictates the
light and how things look. If we're inside
some place that has warm lights, it'll
look like this. So that's pretty much
what the environment is. It's just the atmosphere. It's like if you walk outside,
that's the environment. That's the that's the light. If you walk outside
and you have glasses. The environment around
you is what's going to be reflected in your glasses or in your eyes,
things like that. So again, we'll tap on it. And we will tap on this route, this environment here,
which is the one I use. And if you don't have it because I've included
it in this class. So if you need to import this, then make sure that
you've downloaded it to your iPad or that you've downloaded it and send it to your iPad since the
image to your iPad. So just go to import photos
and then just find the photo. And you can, whoops, you'll be able to add.
Then you hit Add. And it will import to
your environments. And you can use anything
as an environment. It's just, I did a lot of
trial and error and I think this looks nice for
what I need it for. So this is the environment. But first, we're just
going to turn it off by checking this
box, this box here. So now it is black, it is dark. And that's what we want. The background you
can see is gray. So let's just change that and just make that
darker as well. So I'm gonna go up here
to this little picture. You have background and
then you have color. So we want to tap color and
we want to bring the color down until it's a
little bit darker. Something like that is good. Okay, so now we can
start lighting our frog. So we're gonna go back to
the lighting menu here. This little light. And we'll jump down to where
it says lights. Remember it's black because
our environment is off. So this is where you add
a light to the scene. So this first light
shows up here. And this is a world light. Or I think it's,
it might be called directional late, a
directional light. So a directional light
is sort of like the sun. It just comes from
a certain direction and it's sort of
lights up everything. It's not very it's
not very focused. It's just like a basic
light coming down. So the light will show up here. In the old version, the gizmo would automatically
show up for the light is. But now you have to tap the gizmo in order to
move the light around. So we're just going
to move the light over and up just so it's
a little easier to see. But with this light, with a directional light. So with this default
directional light, it doesn't matter
where you place it. That's not what dictates
how the light works. You can place it anywhere. The only thing that
dictates it is where this white point is pointing. So e.g. all of this red ring, this blue ring, the screen ring. So if I move this, the light moves
wherever that is. Even if it's coming
from underneath, from below and coming up. So that's pretty much
how that light works. So I'm going to
delete it because I want us to have
the same setup. So I'm gonna delete that light. Then I'm going to
add the light again. Because now we know this is the default place that
the light shows up. And I think we'll just
leave it there for now. I'm just going to move
it over and move it up. But I'm going to leave it in this direction so
that we can have the same light setup
at the moment. So let's go back in
the lighting menu. You have the eye obviously, so you can turn the
light on and off. And let's rename IT world. And also, if you
tap on the light, you have all these options. Here. You can change the
color of the light. Like let's say we
want it to be cool. You can bring it up to a blue. And you can bring
it over depending on how cool you want it. Something like that. You can change the intensity. So right now it's on one. You can bring it up until
it looks ridiculous. But we'll leave it
at one for now. We'll leave it at one. And this is just the shadow
so we can leave everything else where it is. So let's make a new light. And remember, that's why I always name these because I can, sometimes it's hard to
know which is which. And the second light right here. Let's tap on this little
icon on the left. And let's touch spot. So this is a spotlight. So this does matter
where it's moved. As you can see, I think for
this light we want to put it behind him when I
shine it on his back. So you can sort of see it on this side because this side is very dark and we
want to lighten it up. Maybe give him a nice
rim light or edge light. So you might have to
turn your Canvas to make it easier in order to see the directions
because the light it, because sometimes it can just
get a little bit confusing. So I like to turn it on the top and then you can move it in the
place that you want. So we'll move it here, maybe over a little bit. Okay, now I'll just
move it back around. Then we want this part
to be facing him. So let's use the red so
we can sort of move it. And right now obviously it's not pointing in the
right direction. So I'm just going
to continue to move this until it's where I want. So maybe down over, maybe back some,
something like that. So now that it's pointing
to the shadow side. So when we look at it this way, you can see that nice, that nice light right here. And now you can just dial it in until it's how you want it. And I think that
looks pretty good. Maybe I'll bring it
a little bit closer. Actually looks better, a
little bit further away. So something like
that works well. You see it's shining on
his back a decent amount. But when you look at
it from this view, then you see that nice lighting. This sort of eats
into the shadow. Here we go. I think this looks
nice and this is a good point to save this view. Because it's good to have
a view that you want to continue to work
with that way if you turn it and change the lights, you can always go
back to this view. And this is really
easy. You just go to this camera and you
just hit Add view. So we'll change the name of
this one by pressing here, and we'll name it front. And also while we're here, we can change it from
orthographic to perspective. I like to put it on ten.
8. Illumination & Color: So now maybe we want
to add another light, maybe coming from the
top looking down. So I'm gonna move my
scene back a little bit. I'll go to my lights. And we didn't name this one. So I'm just going to name
this one edge light. So let's add a new light. And we'll change this by tapping here to a
spotlight again. We'll go to our
gizmo so we can move our light around and
we'll move it up. Then we'll just position
it will change our Canvas, whatever makes it
easier for you to kinda get it in the right spot. So we just use the gizmo and just try to get it to where
it looks pretty good. You might want to put
it a little bit loops. You might want to put it
a little bit in front of them or a little bit behind him. Whatever you think
looks it looks nice. I think I like that. I feel like it might be
a little bit too bright. So I'm going to tap here. Anytime you're on a light, there's always these
little black box. So that's sort of a
shortcut to your details or to your light settings
for each individual light. So for this top light, I'll tap the settings. And here I can lower the
intensity a little bit. If I think it's too much. And maybe I'll change this
one to match the other light. I'll make it a little
bit more blue. So now I'm gonna go back into my light panel and I'm going to change the name of this to top. Top is fine. I should've said
overhead, but that's okay. And just to show
you the last light, I don't know if I'm
going to keep it. But just to show you the
last light will add, it, will tap the light. And that's a point
light. It always starts out super bright. So I'm going to scroll
down on this intensity. And maybe I will just
change the color of it to maybe a yellow. So for this point light, maybe I'll move it
down and move it over. And I'll go to my settings and just turn down the intensity
a little bit more. So the only thing that I'm
not that I don't like about the point light is I don't feel that it respects the shadows. And it looks like that that might be something
that's changed in this in this update. Let's make the
light really bright and just check, check to see. It does look like it's
sort of respecting them, but I can still see
if the latest here, it really shouldn't
be inside the mouth. So that's the only thing
that I have issues with. But you kind of get the point of a spot
of the point light. I don't feel like
the shadow would be the light will be so deep in the mouth from
all the way down here. But that's spotlight. I don't usually
use it that much. If anything. I'll just use
it as a I mean, excuse me. That was the that
was the point light. The directional light is the
one that I do use often. If I wanted to add a little
bit of flavor to the side, I'll just use my gizmo
on the spotlight and just sort of maneuver it. Maneuver it over to
the side of him. Maybe move it out a
little bit further. And also with the spotlight. And there's a lot of
options with the spotlight. You can change the softness, really soft or really hard. And you can change the
cone angle to really wide or really small and concentrated if I
make it really small. And then I take
away the softness. See it's almost like
a stage spotlight. I usually like it to be soft. Maybe we won't make it so
yellow will just make it warm. Okay, I just want to
raise the cone angle. And this is a little advanced, but you'll notice these dots. These dots are the same
thing in the menu. So if you go to the lights, if you go to this spotlight, it has softness, cone angle. And these lights sort of work
the same way as you see. This kinda just
points the light. I'm gonna go back
to where it was. So that just points the light. Beige one is how wide the
lightest, the cone angle. And this is the hardness
and the softness. So that can all be
a little confusing. You'll learn more about that. But the reason why I told you
is because I want to I want to I had the cone angle a little small and I just wanted to lighten
up the whole thing. So I just wanted to make the
cone angle a little bit big and I'm going to just show you
everything that I'm doing. So what we've done so far, if you remember, I may dislike cool and I made the
world like cool. So I have two points of cool light and then I have
one point of warm light. And actually the back we
can probably make warm as well if we tap on this light. And it's already a
little bit warm, but we can make it
a little warmer even because it's nice to have two different temperatures
hitting on both sides. So once you get your lighting
to a place that you like, we can add the environment back. So we'll go back to
the lighting menu. We have our environment. Now it's gonna be
really bright at first. So we're going to have
to lower the exposure. So now that we have
the environment back, you can see it's very light and we have exposure
and rotation. So the exposure we
just want to bring down because we've already
set up our lights. So now the, the
environment will just, it'll be like a fill light. So these spots that are
really dark and it's sort of just will level out
your your sculpt. Sometimes I use it,
sometimes I don't use it. So let's just bring up the exposure to a
place that we like. I think that's pretty good because it lightens
it up a little bit, but it's still keeps the
nice shadows. So e.g. if I was to go a
little bit more, it starts to get a little washed out and we lose some of
those nice dark shadows. So that's why I'm so crazy
about finding the right spot. Because I want it
to be, I want it to be lit and easy to see. Now some of those dark
shadows, those dark shadows, or what makes it look realistic? I think 1.38 is a good spot, but, you know, give or take. This is also a preference. Okay, so let's color the frog. But first let's just change
the texture of the base. So if tapped on the base, and we're gonna go to our
little pink circle here. And let's just, let's just darken it a
little bit and turn up the roughness to about
phi, about half 0.5. And then we'll just hit panel. There we go. Alright, so now we can paint
our little frog character. This is where the fun begins. It starts to look like a real
3D painting. I do love it. I like the white and
the matte white. But painting is always fun. So first, we can type a little camera and we can
go back to our front view. So this is the view
that we liked. And notice that I actually saved it while it
was still an orthographic. So an easy fix for that. It should just go
to perspective. And I'm going to bring
this back down to ten, where I liked it. Now see this little arrow
pointing down in the circle. I'm going to tap that and
it's going to update it. So now we have it exactly the way we want it
in perspective. And with the vertical foot
FOB field of view is at ten. Also. Let's save. So we're going to tap this folder here and then we're just
going to save. Okay, So now, now our
little frog is saved. Okay, so let's color. Tap on our frog or
a little base here. And we'll go to our
little color circle and we'll figure out
what color to make him. And I usually like
to bring it up here. And you can scroll
through the colors. You can color them any color
that you want, of course. But I think I'll stay traditional and keep them
with the sort of greenish, yellow, yellowish green,
something like that. So we'll go paint off. And now we can tap on the eyes. I was thinking about
making mine just black. So we'll go to black and we'll
turn down the roughness. So they're super glossy. Okay, so now the eyes are black and of course you can make them other colors if you want. You can make them yellow,
something like that. But I just want to keep it simple and just paint
them black for now. Because once you start getting into making
really elaborate eyes, it gets very complicated. And I want to try
to move through this without confusing
you too much. So now he's little Tethys. Tap on the little teeth. Wood or a little color window. And let's make these. They can be white or they can
be a little bit off white, which is what I tend to do. And you can tell that I'm
a stickler for details. So they're a little bit
off white and paint. Now we need to match
the feet and the arms. So an easy way to do that. You can tap the little paint
circle and then you can tap this little eyedropper here. So we'll tap that and
then touch the paint. So now it is back to
whatever color you touched. So we can go to the
legs or the arms. Will tap this one at pain all. And same thing with
the little fetus. Will tap this phenol. Now he's nice and colored. And you can change the
color of this as well. So let's say we want to if we want to give
them a background. Well, I guess we did
want to make this sort of like a lily pad. So maybe we'll just use
another color of green. Another shade of green. Not sure what Lilypad
color would be, but I feel like
it would be dark. Like lily pads are sort of dark. Maybe something like that. You can play around
with the roughness. But I think that's I
think that's pretty good. Okay, So a few things that
I noticed that I kinda wanna change as I want to bring the teeth up closer to
the edge of the mouth. And I want to maybe change
the background color. So the first thing I'm
gonna do is change the background color
by touching here. And we had made
it a darker gray, but I think we want
a bluish color. I think that will look nice. I think I like
something like this. Make it a little bit lighter. So you can pretty much choose
whatever color you want. And now that I've
made the background, sometimes it's nice to
add a light to match. Now we made these
lights pretty cool. But let's see what
it looks like if we add this backlight. If we change the color to a blue that's sort of
matches the background. So I'm gonna go into
this blue color. And let me just go
into it again because I noticed I kinda did
that a bit quickly. So we're going to touch
on the backlight, and then we're going to
touch on the shortcut. Then we grab the color here. And let's just make it
more of a blue color. You can even bring it darker to make it a little more rich. Something like that. You can press the X and maybe
even a little more intense. So this looks sort of
give the illusion that the environment is affecting his bouncing off of
our little frog here. Let's do the same thing
with this top light. So let's touch here, and let's just make
it a little more, a little closer to the
background color blue. Now for the teeth, I'm
going to touch the teeth. I'm going to open the gizmo. Ever useful gizmo. And I'm just going
to bring his teeth and closer to the
front of his mouth. Just so we can see them
a little bit better. Alright, so let's change
the material of his skin. So we're going to
tap on the body. And then we're going to go
to this round globe here. And we have our materials. Opaque is just the
regular default material, which you can't see through. Then we have blending. So if he tapped blending, you can change the opacity. See he becomes see-through. Except for his little
legs. Poor thing. We have refraction. Refraction is almost like a like glass or
like frosted glass. Then you have things
like reflectance. We can change how
reflective it is. You can paint a glossy here. If you wanted it
to be like glass. You have absorption. So there's a lot of options
you can play around with. With refraction. There are very, very useful surface glossiness,
interior roughness. So all of these you
can just play around with and they will give
you a very different look, your frog and they can get, they can make it look
really, really cool. So that's refraction,
really fun. Subsurface. Subsurface is more of a subsurface will
get you the most realistic because the
light coming through, we'll actually shine through it. So let's go to sub-surface loops and look
at some of these details. It looks like it got really
glossy for some reason. I'm not actually sure why. But it seems like when
we set the refraction, it seems like when we
set the refraction, the glossy paint sort
of sort of took over. Because now the subsurface. But a way to do that again is we can take our little eyedropper, grab the color of this. And then we'll go back into the color and we will bring up the roughness until we get
it to a place that we like. And I like it to be too where you can just see
these highlights. I think that looks
most natural to me. So now we'll do pain all. We have a nice material. I want to show you the
beauty of let's do this. I want to show you the
beauty of subsurface. So we're going to touch on this light that's coming
in from the side. Let's bring it really close. Then let's tap the options. And we'll just raise
the intensity. So see you in the mouth. You see how we
have that redness. And that's because you can
see through the material. This isn't really the best. Let's see if I turn
these lights off. When I turn the
other lights off, you can see that certain places, the light is actually shining
through the material. So that's one of the great
things about subsurface is that it gives it
a realistic look. And it's and it's see-through. And it just makes sure it gives you a sculpts
a very nice look. You can tell that I'm really excited about subsurface case. You were wondering let's
put the light back. I'm just going to undo. Okay.
9. Explore Break / Subsurface / Post Process: So I hope you guys are enjoying the class and I hope
you're having fun. I hope it hasn't been
too overwhelming. I just wanted to sort of take a little mental break and
just kinda have fun with it. If there's anything you want
to change or any colors. And there's always
things that I want to change what I'm
doing, these scopes. And of course I just wanted to record them all so you
can see what I'm doing. So the color of this for
some reason is bugging me. So I'm going to use my
eyedropper, touch the green. And I guess I must be still on the eyes somehow.
So what happens? So I'm still in the
pivot mode thing. So let me get out of the pivot. I think I just wanted
more of a matte. I think I like more of a
more pastel looking colors. I think that's what it is. So maybe something
like that is better. And then the blue
and the background, maybe I'll just make
it a little more gray. I'm actually don't
mind the blue, but I think I wanted
a little more. We want a yellow. I
kind of like yellow. I kinda do like the yellow. But I also like to match. Sometimes I like to
match the background and the so if I do yellow, I might just do a yellow
for the lily pad as well. Even though it
doesn't make sense. And actually it's
gonna be hard to match that color, yellow. It would be easier to match the background with the Lilypad. So let's see what
that looks like. It's kind of an art in itself
to sort of try to find, find this colors and make it, make they look kinda seamless. But I can already tell that
doesn't really look right. Well, I feel like
I'm getting closer. But sometimes it's
nice to have the back, the backgrounds and
stuff sort of matching. But I usually don't usually
can't make up my mind. Or maybe a more, maybe that's a nice That's kinda nice. Let's stick with that. So I just changed
the blue color. And since I did
that, I'm going to change the color of this as well because I want to
sort of match the blues. I like to match the sometimes it's a bit
hard to even like find the right color. Let's play with the
overhead light. This light, That's
the top light. Let's see what happens
if we make that white. White actually looks good. Let's see what happens
if we make it warmer. Now I think just
white looks good. I don't think it's too bright. Maybe you can bring the
intensity down a little bit. And then we have
our world light. Let's see if we change
that to just white. I don't mind a little
bit of the blue there. I think I want it to
be a more purply blue. Closer to our backdrop. That's white. I kinda
like white though. Maybe just the
slightest bit of cool. I think I like that better. We have our sidelight. Let's see what that
looks like. Just white. With a little more intensity. I kinda like that. I think that looks
nice. And these are the kinda things that I that I spent a lot of time on. And the more you sculpt, the more you'll, you'll sort of figure out
little nuances. And look at my work, look at other people's 3D work. Look at 3D work that
you really like, that you really enjoy. And try to, try to really
hone in and figure out what it is you like about the lighting or what it is
you like about the scopes. That's the only way that
you really learn how to do what you wanna do and
how to make the scopes look how you want them to look. So he's lit pretty well. We changed the body to
subsurface scattering, but we didn't change the back, legs and the arms. So let's go to our scene and will go the
arms and the feet. So we have those
selected and we want to change those as well
to sub-surface. Okay. So while we are while we've just changed
those subsurface, let's go back to the scene. The arms and the
feet are selected, but let's select
the body as well. Now all for all
three of them are selected and they're
all subsurface. So there's a lot of
things in this menu. When you saw it before. The inside you can tell
was like a reddish color. And that's this
color right here. Let's see if there's
a way that I can. Let's turn off the environment and let's turn off
the world light. Okay, so I've turned off all the lights
except for this light. And I'm going to try to
turn up the intensity. And I'm going to move this light behind it so you don't
have to do this. I just want to show you
some of the options here. So I'm just going to move
this light behind him. Whoops. Move it towards him. Maybe I should turn the
environment back on. Okay, so now we can sort of see through him That's subsurface. So you can see underneath
It's a reddish color. So if we go back to
sub-surface, whoops, let's, let's get our feet,
arms, and body. So let's select them. And we'll go back
into the materials. And this is that color. So now we can cycle through
and you see that it changes. So if we put it to
a greenish color, then that shine is going to come through as green underneath. We put it back to
that reddish color. It's going to be that
orange-ish depth. You can play around with this. This makes it more or less, more or less dense. So now you can almost see
through the whole thing. Although it's as though it's
made of wax or something. Then there's translucency where you can turn it down
and it's solid. You can turn it up
and it's the most translucent it can get. So that's pretty
much subsurface. So now I'm just
going to back out and bring it back
to where we had it. Okay. Okay. So now we're back
to where we had it, where his body is subsurface
and he's looking happy. Okay, so let's save, first and foremost,
let's save our project. Once we've saved, we can
go on to post-process. Now I think he
looks pretty good. And there's a few other
things that I would do, but I don't want to
over-complicate it or do too much. One of the things being is, I would color in sort of along the edges
and along the bottom. I would color it in darker. I feel like I should do it now
that I'm talking about it. I guess you're here. If you want to learn, I guess I'm just gonna do
what I would normally do. So with each mesh, the eyes, the teeth, you can add layers. Layers are very, very useful. Let's say you want to
paint a design on it, but you're not sure
if you want to, maybe later on change the color. You can use layers, just like Procreate or any other thing where
you can use layers. So let's say the body
will tap on the body. And I want to do
some darker accents. Maybe like around the edges. So I'm gonna go to my paint. I'm going to go to
the Eyedropper. So now I just touched the skin. I'm gonna go back into paint. This is the same exact
color of his skin. So now I'm going to drag
this and make it darker. So once that's darker, I'm going to go to
the Paint tool. Now I can paint on him. But the thing is, is I don't want to
paint right on this because what if I want to
change the color of him later? Or if I want to do something
else to his paint, his color or something, I don't want this to
be directly on skin. So undo. I'll go up here to this
stack. Right here. Layers add a layer. And now we have our layer here, and we'll go to the name
it and I'll just put it, I'll just make it darker. Now we have a new layer. We using our paintbrush
radius is about 66 or so. And now we can color in. I'm just going around the edge. Maybe back here. Symmetry is still on. Maybe along the edge of that. And maybe along the bottom. And maybe around the edge
of the eyes, eye sockets. So I think that's pretty good. Here's another pro tip. Now that I'm a pro,
but the smooth, Let's tap on smooth. And we want to smooth
out this color, but we don't want
to affect the mesh. So intensity can be
brought all the way down. But before we do that, tap on the smooth and hit Clone. And then you can
rename it, say Clone. Or you can just rename it to color smooth or
something like that. Color smooth. Now on the bottom you
have color smooth. And this is just a clone
of the smooth tool. But in color smooth. Turn down the
opacity all the way. And now we have our radius. We can go in here, and then we can smooth out this color into
a really nice blend. So this is just blending the color, make it
a little bigger. I'm just blending in that
color along the bottom. And we can also blend
in around the eyes. So having that color, color smooth is
really, really useful. I use it all the time. Now I have an extra one. Mine's called smooth color,
but it's the same thing. So I'm going to delete this one because I
have smooth color. Now I'm just gonna do
the same thing with the front legs and the
rear, that little fetus. So I'm going to tap on it. I'll make a new layer darker. We'll bring our tools. And then I'm going
to touch paint. Symmetry is still on and I'm
going to go around the edge. And maybe along the bottom. Same thing with the feet. Tap. Add a layer darker and you don't really have
to name them anything. I'm just kinda doing it for so it doesn't get confusing
and stay consistent. But I don't think
I'm going to do anything else with these feet. So it's not like I'm
gonna get confused. But I just want to do
things to stay consistent. So you'll know what I'm
doing and why I'm doing it. But since I do it so much that there are certain places where I know
I don't I won't have to. When I go back to
these front legs, the darker layer
is still selected. So I'm just going to paint a
little bit more back here. We go. And I also need
to go back to the body. Whoops, let's go back to the
body and paint right here. Because I noticed that was
sort of bear smooth color. Make it a little bigger and
then just move this out. We'll go to the
leg. Smooth it out. That's a nice smooth. The reason why the leg is
smoothing out better than the body is because the
arms are only 12.2. So that's not very dense at all. So the clay is still very soft. And that affects how
the color blends. The body is 142 k, So it's still smooth. It's just not as blended
as the legs and the feet. So what I'd like to think
of what we just did is sort of manual
ambient occlusion. So it's sort of manual. Shadows that, you know, like the skinfold
would have a shadow. So we're just adding in those small manual
details that are going to help us later on. Okay, so now let's jump to the greatest tool of
the mall post-process. So this will make your look. This will make you look,
this will make your work look like the final
render would. So this is processing all the lights, the
colors, everything, and making it look the
best that I can look. So first let's just save. So now we'll go back to
this little shutter looking icon and we'll tap post-process. And as you can see,
some things are like sort of out of focus
and things like that. I like to keep these on Mac samples full resolution
because I dislike, I like it to be the
best that it can be rendered resolution I'm
going to raise to the max. And let's tap on our
little frog here. And I noticed that sometimes
I have to tap in front of him for him to be
completely in focus. If I tap on him, he looks
a little bit out of focus. But if I tap right in front, then he gets it
comes into focus. And we'll get more
about that in a second. I keep both of these checked. Both of these options I keep
checked ambient inclusion, which is sort of what I
was talking about before. If you turn it off,
you can see that you lose some of those shadows. But he turned it on
and then you get that deep shadow in the
mouth and things like that. And you can adjust these
and play with these. But I usually like to keep them. I just don't keep
them this high. But that actually
looks good though. So sometimes you just have to play around with the
levels and see what you like. So that's ambient occlusion. Depth of field of course, just makes it in the
whole thing and focused or it blurs out the back. And also depth of field looks, the less you have, like if we hide, if we hide the
back, the Lilypad. By touching that, then you see the depth of
field is much more. It's just doing
the depth of field on what's well we can see. So if we touch any part of this, his legs are out of focus. But if we bring the lily
pad back, where's it at? For bringing the cylinder back? Then there's a lot
more to work with. So you can see the back
of the lily pad is way more out of focus groups. And you can see the near blur. You can turn that
down if you want. Just the back will be out of focus or you
can have the back-end, the front, which actually
looks pretty good. Then you have Blum. Blum just deals with like the reflectance bike
off of the surface. So if I turn it off, you might not be able to see
too much of a difference. But if I turn it on and I
raise the intensity a lot, then you'll see that it
starts to get sort of shiny. So that's bloom. I really don't know how that,
how that looks. I don't think I want
it to be that blew me. So we'll bring it down. And I kinda wanna make it
be a kinda want to make this blue color more
of a blue color. I'll do that in a
second. Okay, So that to post-process,
there's tone mapping. So if I turn it off, It's
a little bit lighter. And you can play around
with this until you get the settings that you want. You have exposure
contrast, saturation. You might have to dial it in until it's where you like it. Yeah, I guess I had
mine on income. I like it off. Color grading the same. You can change. It actually looks
cool. You can go to each of these colors and you
can play around with it. And it will slightly change the way that your
whole scene looks. And then you have
some other options here that you can sort
of play around with. Vignette that makes that
darkness around the edges, which usually looks pretty nice. You can turn it off
for this scene. Then you have all these other options that you can
play around with. But we don't really need to
mess with those right now. These are the main ones. And the only way that you'll learn it is just
to play with them, see what they do, adjust
different things. And especially on this model since we've made it this far, this is really simple, so you can play around with all this stuff and
see how it works.
10. Glowing Frog Nuggets: Let's add back our, Where is he? Frog clone? So we have our frog clone here. Let's, let's instance. So we have our frog clone. And I'm gonna instance him. And I'm going to keep that one. And you notice I just dragged it up so that it's linked with the frog clone
nominees, the gizmo. And I'm going to move this
one, maybe back here. And maybe I'll even
make it smaller. And then I'm gonna go back. And I'm going to
instance, Whoops. So maybe you need to
instance that, there we go. So I did another instance. Let's just make these
a little different. We'll go back up here
will instance again. And maybe we'll, we'll make
this one really small. So we'll make that really small. And will instance again. Maybe we'll do one here. Just trying to keep them sort
of random instance again. And I'll drag one all
the way over here. I think we need one.
Maybe looking that way. Maybe we'll make
this one bigger. Okay, That feels random. I feel like we need
another small one. I want to make this one big. You can tell now I'm
just kinda going crazy. K, It looks good. And I'll just add another
small one over here. Maybe looking off the other way. Okay, so now he has
some little friends. They're all instance. Let's select them all. And maybe we'll make them
like I want them to be pink. Okay, so they're all pink. Let's say we want to make them, let's really go crazy. Let's collapse this altogether. And then I'm going
to clone it again. But this one, I'm gonna go into the material and
make it an additive. So now they're sort of bright pink and you can
do always unlit. And that actually
makes them glow. If we wanted to make them glow. So if we go into
post-process now that we have like these really
cool looking, glowing pink. Let's go back to our ys. This all of them.
This is all of them. Let me go back
into the material. You can, you can adjust, you can make them brighter. But I think that's kinda fun. Didn't really need
to be glowing, but I just wanted to show you
show you what that's like. If they were glowing, can sort of make it dark
and have them going, there's just so much you
can do. So much fun. But I get here, I just have so much fun
with all this stuff that is really hard to stop. So we have the
original frog clones. Let's change the color
underneath to a darker pink. Roughness. You can get a different
look. You change it. Let's change the
ad, the additive. Let's change that color. Maybe a pink like that. So I just wanted to bring you
in on that on that process. Now I have to change the
colors of these back to penal. Oh, actually, I mean, we
can save our project, but let's make sure
post-process is on. All this is on render
resolution is up k. All this looks good. So to save, go to this folder. Scroll all the way
down to Render. And we can just do
screen for now. We'll do screen export, PNG. That'll sort of count up to 50. Then we have our sculpt. So we'll press this
little Export button and we can save image. And now it's saved to our
computer or to the iPad. That's a nice view, so we'll
add that view as well. Then I just want to
make it brighter. So I'll turn back on the environment which I
forgot to turn it off. Just make it brighter. I think that looks nice. And I'll export this to. Okay, so then we have our frog, and now you have it all saved. And now you are
well on your way to making great nomads scopes.
11. Awesome Eyes! : But now we're going to continue
to play and mess around. So I'm gonna make this
a little brighter. It might even be nice to make this a spotlight. Let's see. I need to back this
lineup. I think. Let's grab the color. Let's see, maybe
I want to change, make it more rough because the light was
shining on it a little too. Now, not my, not to my liking. This is way too bright. Is that this light? Now it is. So I just want to kind
of get that light off of the off of the ground
and off of the background. The bat the ground
in the background. So I'm going low with
it and pointing it up. And I also, I don't know if
I want it necessarily as bright because then you
can't see the blue. I want to be able to
see the blue in it. That looks better,
at least I can sort of see it a
little bit better. Let's make this a
little more mad. I don't think I
need to see that. Gloss. I did want to I
didn't want to change his eyes, which I love doing. So I do have a few
issues with the eyes, so let me turn off post-process. Then let's go to clay. I kinda wanted to just know what they need
to be on the base. I'm on the bass sub. I wanted to do that. I
wanted to flatten out. I wanted to flatten
out the wrist flat. Make it nice and flat. I think that looks
better. I wanted to drag. Sometimes you can
drag the corners of the mouth up a little bit. It looks nice. Okay, Let's make really, really cool, interesting eyes. So we have our spheres. And the first thing I'm gonna
do is change the sphere, change the material
to refraction. That's number one. I'm going to tap absorption. I'm gonna go to the
absorption color, tap and go all the way to white. So now I'm going to
change the color, the stroke painting
to white as well. And I want glossy. Alright, so now they're white
and now they're glossy. On the body. We're going to add a layer. And this is going
to be I whites. And we're actually going to
paint all of this white on the body behind our
little clear sphere. And to make it easier, you can actually
hide the eyeball. And I'm gonna make it yellow. Should be a little more precise, but it feels good to
paint them quickly. It looks pretty good. And you can go around
the edges and you can erase it if it came out
around the edges anywhere. Especially since I
used that gloss. I don't want it showing. Right, so we're doing good, doing good so far. Now, let's take our, we can actually take the
eyes and clone them. And then we want to change
the clone to an opaque. And we want to color it black. And we want to paint it
clever it rough, pain all. Now we take our gizmo
and we shrink it. We move them over like this. And I can actually see
there's some issue with the mesh behind it. So what I'm gonna
do is I'm going to, I'm going to go
back to the body. I'm going to go to the base. I'm going to smooth that out, make sure post-process
isn't on, okay, it's not. So I'm just going to
smooth this out here. I'm not sure why
it was like that. I'm just smoothing
it out a little bit. So now we'll hide these circular
eyes that we just made. So we just go to
P1, will hide them. And I wanna make plus
shape eyes and eyelash. I mean, obviously frogs
don't have eyelashes, but my frogs always do. So it's kinda look like this and it's going
to look like this. So in order to do that first, we're going to add a sphere. We can bring it all the way up. I do have a light up here,
That's why it's so bright. And we can paint this black. We want to bring the
roughness completely up. So we have our sphere. It's not validated, but we
can go ahead and validate it. So now we're just
going to tap symmetry. Now we're just going to pull, pull the sphere until we
have a nice pill shape. Something like this. We
can turn off symmetry. So now we can do pivot,
pivot, reset pivot. And now our pivot is in the middle, which is
where we want it. And we can make are you can make it a little bit smaller
because right now it's huge. And we'll bring it down. And now we just want
to clone this one. So we're going to
clone it. You can do that here in the scene. You can do it here. We can go to the
sphere that we're, that we've just
made, let's call it, Let's rename it to Pill
Hill H for horizontal. So we could go
here and clone it. But you could also just clone it from here. Contempt clone. And then I'll use this
blue ring to spin it. But that's actually a
little less precise. So I'm going to undo. Here's
another little trick. You can go here to snap. So we'll tap snap
and you see this 90. You can change this number
to whatever you want. But 90 degrees will only
change it. 90 degrees. Well, we forgot to clone
it. So let's clone. And now we'll do at 90 degrees. Then we have our r pluss. Go into the Scene menu and
we can join these two. So we'll make sure
they're both selected and then we'll hit Join. Now we have our let's
rename it to pill. Eyes. Let's put it right next to P1. So we'll just drag
it up right by P1. We can go to our gizmo and
then we can just bring this down and place it
right inside the eye. So I'm going to place
it on the left side and we'll have to just
manually mirror it. But we know how to do that. So now I'm just
going to shrink it. You can see it in there. Now I'm just gonna move it back until it touches
the back surface. And I want to tilt it back
because it's obviously you can see that it's tilted
forward a little bit. But I just have to remember
to turn the snap off. Otherwise, it won't. It'll only go 90 degrees. So we'll turn snap off
and then we'll just tilt it until it's nestled
lightly in his eye. But I tend to like
my eyes a little more towards the center. You want to have the
eyes a little more towards the center and you
always want to do that. Whether you're sculpting,
whether you're doing 2D, when you make eyes, don't make them
directly in the middle. Put them a little bit
closer to the inside, that whether looking straight. So we'll go back here. We're already on pill
eyes will do add. And then we'll
just go to mirror. And it's still mirroring down the front half because
we never moved our frog. So it's just mirroring
directly on the other. On the other side. I'm gonna go ahead and
validate the mirror. And I'm just going to
rename it to pill eyes. It always takes the name of the mirror, which is annoying. So now let's see if we
can pivot, reset, pivot. Now it's where it should
be and I'm just going to bring the eyes up a tiny bit. So now we'll just add
some quick eyelashes using the tube tool. I love using the tube tool. So that's right here. I'll tap that tube
tool. We'll go to Path. Now we can just bring it
in a little bit closer. We can start right about here. So we'll place the Apple
pencil down and then drag up and two
points will form. So I can take the
Apple pencil off the screen and then go
back on the screen. And another point will form once I start to
drag a little bit. So that's another one. I'm going to let go,
come back and drag comeback and drag comeback
and drag comeback and drag. Now I'm going to bring one off of that surface and I'm
going to tap this one. When I tap this node, that just kinda gives it a
right angle versus a curve. Now we tap the green. So let's tap radius. Now we have an orange dot
here and an orange dot here. So we can essentially
control each different side. So that's when you press
radiants the first time. And there's the two dots
that controls the front and the head and the back. So let's just move in and
let's make this part smaller. So something like that. We can even bring
it up a little bit. Now let's hit spline
so we can see a little bit more to what it
would normally look like. That makes it nice and curvy. And I also feel like it's
a little deep in the eye. So what I mean by that is I kinda want the tube to sort
of show a little bit more. So I'm just going to bring all
of these little nodes out. This can be tricky, it'll take some time
to get used to. But once you do, it's fairly easy
and very useful. The tube tool is really great. So I'm just bringing all
these nodes out a little bit. So they're not so
deep in the eye. Perfect. Just angle this up a little bit. I just raised I thought my eyelash came a
little too far down. So I just raised it
up a little bit. And now I'm going to go through the same process with
mirror and painting it black because it was just
a little bit too low. Like this part was
like way down here. So now I'm just
going to validate. And OH, here's another
crucial step that I forgot. It's a good thing we came back. The other crucial step is to zoom in to this thin edge and kinda hide it inside
the mesh. Like that. This way just looks like
a clean seem. Perfect. Now I'll just go ahead
and validate and smooth. This. Looking good. Turntable usually
doesn't work well. I can ever get a good turntable. Okay, So maybe I can
make this maneuver it. That's pretty good. I don't touch the edge, don't touch the edge.
So that's pretty good. There we go. So we've got
a little turntable too. Alright, keep drawing,
keep sculpting. I'll see you all
in the next video.
12. Thank You! : All right guys. Thank you
so much for joining me. I didn't want it to make
this class for a long time. There's some
fundamental changes, changes for the better. So if you run into issues, you have the discussion here, but you also have the
nomads gov website. There's a forum. The creator is very much
in touch with the artists, with people using application. Our response to
them makes changes, works really, really hard. And it's actually
quite amazing how close-knit the 3D nomad
scoped community is. Also, there's a nomad
scope Facebook group. You can find me on Facebook. You can check out the
groups that I follow. But the nomads scope
Facebook group is really, really amazing. It's a great community. You can post your artwork. You can get some tips, see tutorials and
things like that. Speaking of tutorials, I
do live videos on YouTube. I do tutorials on YouTube. I do 3D stuff on YouTube, 2D stuff on YouTube. I love Procreate. Also. I have Procreate
classes as well. So 2D and 3D. I love
all that stuff. That's on my YouTube,
youtube.com slash drug-free. Dave, do you want to see more
of my 3D work then check out my Instagram,
instagram.com slash drug-free. Dave? I'm on TikTok and yeah,
I think that's it. I hope you had fun,
please let me know. If you have issues, let me know things that you're
confused about. It's tricky when
you're first getting into it because
it's overwhelming. I know. The more you, the more you
get into the application, and the more you try to make
things like just try to make little cute things like
this frog is very simple. Try to make things like that. To start out. I really tried to introduce you to the things
that are simple, but also make scopes with good. Thank you guys all for
being here. As always. Keep drawing, keep sculpting. I'll see you in the next video.
 Dave Reed, 2D & 3D Illustrator - Brooklyn, NY