Transcripts
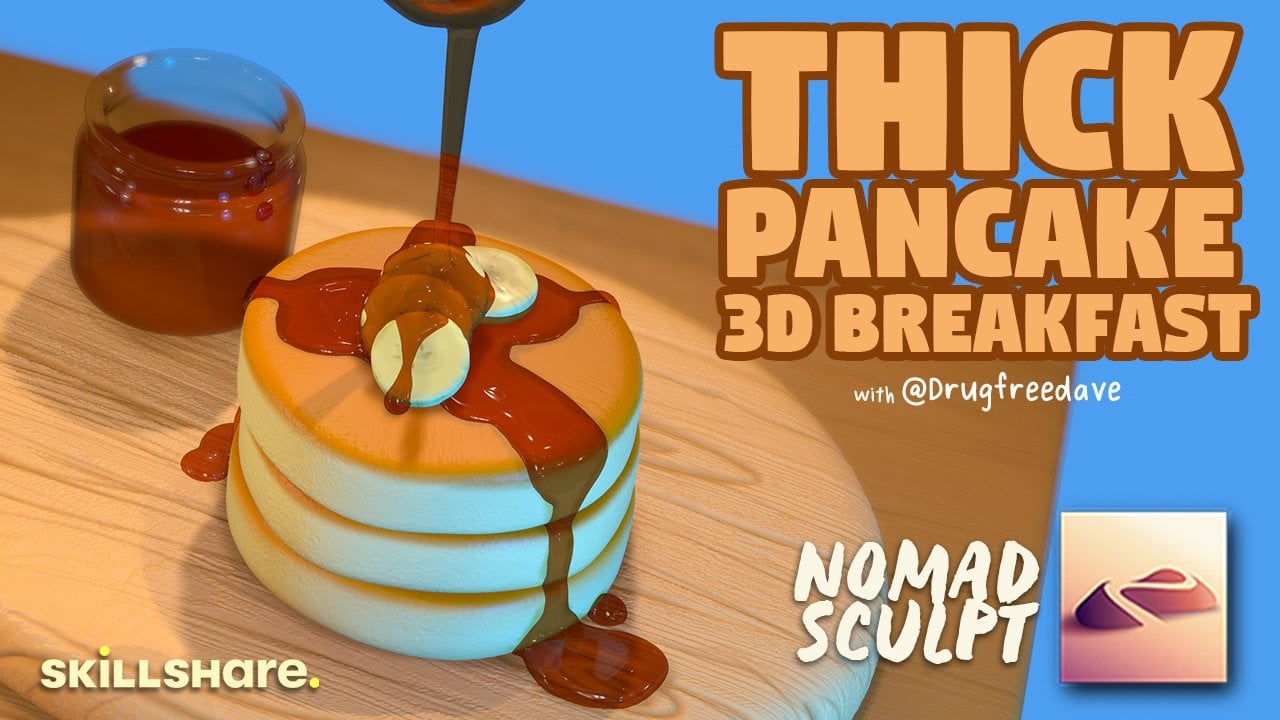
1. 3D Breakfast for Beginners! : Welcome to three D
breakfast for beginners, a KMT Sculpt crash course. I'm Drug Tre Dave, a
digital artist and content creator living
in Brooklyn, New York. I'll be your
breakfast Yoda today, and you guys can all be
my little baby Yodais. In this course, you'll be
introduced to MAD sculpt. A three D sculpting
application quickly rising in popularity that has become an everyday staple with
three D artists like me. It's ease of use is unmatched when it comes to
three D programs. And I'll show you how to become comfortable and
more familiar with creating three D art on your
iPad or Android tablet. There's no better time to start learning three D than
right now with me. Drug Free Dave. Let's
turn your anxiety into eggs and your procrastination
into pancakes. I look forward to
seeing you in class. Sometimes I try to make I try to end the video with as cheesy a sentence
as I can get. I think that one
was pretty good.
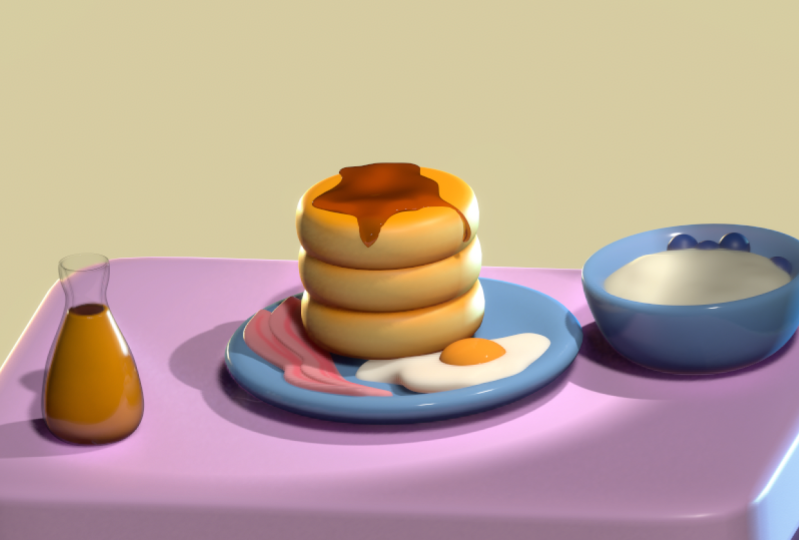
2. Class Project: So, in today's course,
we're going to create some really simple
breakfast foods? I personally love
breakfast foods, but I also wanted to cater to some people
that might want to model foods and just very
practical things like that. So we're going to cover
pancakes, eggs, some jars. So we're going to be using the
lathe tool, the tube tool, different things like
that that are going to be useful for making
other three D scalps. We'll start with
a brief breakdown of where everything is in nomad, and then we'll just
jump right into it. So, what I'd really
like to see from you is to put yourself
into your project. Are there are certain
things that you eat? Are there certain
things that you drink? There are certain
plates that you have? Just be really creative. You can go through
the course, but it's always nice to go back and add new things and just try out new
things and experiment. That's what I really love to
see for my class projects. I'm also including all of
the extras that I made. I made, like, a fork a knife, some napkins, a little
booth, things like that. So I'm going to add those into the class just so you can
play around with them. I didn't want the class
to go to too long, so I didn't go over making all of those utensils
and things like that. But they are included,
so make sure that you download everything from
projects and resources.
3. Getting Started (Table): All right. So here's
our default sphere. The first thing I want to do is delete this sphere and just add a new one because this one is the number is very
high and it's very dense, and we don't need
such a dense sphere. Tap here. This is
the scene menu, and here we have the sphere
that we're seeing here. Let's just delete it and
let's add a new sphere. That's how you add shapes to
the scene you just hit add, and then you have all
your primitives here. Now that we've
added a new sphere, you'll notice that
there's a menu here and let's
just hit validate. So now we have a sphere
and it's validated. All validated means
is that we can now use all the other tools
that we may want to use. And just to show you
if it's not validated, you can use a few of the tools, but you can't use everything. So let's also go up to this option here,
this little camera. Let's make sure that
we're in orthographic. One thing that I
like to do when I'm sculpting is change
this to a Mt cap. We'll hit this little
sun right here in the shading and we'll
change from lit PBR to Mt. That just makes it easier for me to see when I'm sculpting. White is a little bit
difficult to see. I'm using PXG clay. If yours is something different, say if yours is
something random, tap the image and
then find PXG clay. I think it's right here.
And then you're good to go. Let's start out with
making a table. I'm just summing out a little bit so I have some more room. This is a snap cube, and this is an easy
way that you can tap to the front
of your project. Let's hide the sphere, and let's add a box that we can
use for our table. We'll tap the scene menu. We have our sphere here,
we'll tap the little. Now the sphere is invisible. We don't have any other
three D meshes in the scene. Let's add a box. We have our little box here. Let's tap these
three little dots. I think I want the box
to have a softer edge. Let's take post subdivision
and turn that up to two, and then we'll take the division x and just scroll
that down a bit. Let's bring the
subdivision to four. That seems pretty good. Your box should be 2402. I think that looks pretty good. We can go ahead
and validate this, and then we're going to
move it with our gzmo. The Gzmo is a controller. We're going to use that a lot. If your tools are on the side like this, you
can press them like this. Here's the gzmo yours might
be in a different spot. But the gzmo is just
our controller. We have the larger orange
ring bigger and smaller. Those little spherical nodes, they stretch it, and then they have these
rings which turn it. There's one other quick
thing I want to note. Just in case yours looks
different than mine, There's a thing called
smooth shading, which I have on automatically. I think you can change it
in your settings to make auto keep it on or
auto keep it off. So mine is on, but
let me show you what I mean in case yours
looks different than mine. Okay, we're in the material box right here. Smooth shading. You see it has a
line underneath on. That means my auto has
smooth shading on. If your smooth shading is off, you'll notice it
looks like this. This is what it
actually looks like. It's just not using
the smooth shading. If you ever have a shape and it looks like this and
you don't know why, it might just be smooth shading
on, then it looks smooth. It can look a bit
different for each shape, but hopefully you can
recognize that when you can see pixels or it's very blocky, it might be smooth shading. For our table, We have a box. Let's tap these three little dots and
we'll just clone it, and we'll call this one leg. Just tap the three
dots again, name, leg. This can be table. Okay. Let's hide leg, so we'll just hit
the little eye. We'll bring up. We'll use this little green node to
bring it down like this. Maybe we'll bring it
to maybe about there. And then we'll put the
little legs underneath. If we scroll down, you can see you can change the
shape if you want, if you want to make it
a bit of a thin table. You can go like that.
We'll hit front. So now we have our table. Let's make the regular leg visible again, and
we'll shrink that. I was on the table.
Got to be careful. Make sure we're on the
leg. Let's shrink it. So if you want to make a
kind of like a fancy table, you can do it where it has
the legs kind of like this. Make it a little
shorter. You can you can have a table like
this if you want to get fancy with it or you
can just have regular legs. T I'll just do regular legs. So we'll put one here. Make
it a little bit smaller. Something like
that so the top is going right at the edge.
I think that looks good. Now we'll just take
this leg and clone it. You can move it here. Now let's join these two legs. We'll join these two, we'll select them both and
then just hit join. Then we can that and we'll
just bring them over here. Okay, I'll make them for
a little bit more even. Maybe something like that. I think that's a pretty
cute little table. Now let's take both of
these legs and join them, and let's select the table and let's move everything down
to this little red line. I'll just move it right down to that red line because
that'll be our horizon line, so that's the floor. Let's take this grid and turn it off because we
don't need it anymore. Let's make a little area
underneath the table, and we'll just use the tabletop. We'll go here, and
we'll move that down. And we'll use this orange
ring to make it bigger, and then we can make it flatter like this and we'll move
it right up to the edge. So now we have a little
area for our table.
4. Lathe Tool: So now let's use the lathe
tool to make a plate. And we can probably also make a jar or a glass or something like that with
the lathe tool as well. So if we look over
here in our options, just find the lathe tool. I'm not even sure where mine is. There we go. Here's the late tool
and you see this line. And here are my settings for the late tool just in
case yours doesn't match. So what you need to do is anything that you
were going to make, if it was going to
be a bowl or a mug, you just want to make the
inside of it as well. Then it just forms like this. Let's make a plate. So
plate is mostly flat, and there might be a little lip. Okay. Like that. I
think that looks good. There's other little
options you can do here if you want to make
it a harder edge. You can tap on these nodes, and then the edge
gets a bit harder. If you tap on again,
then it's more of a soft plate or not
soft but a round edge. You can also make it thinner here by pulling these nodes in. It's it's all about this
profile and what you see here. We don't really need this many, so let's drag them
into each other. There we go. These as well, was kind of drag them
into each other. Okay, I think that's
a pretty good plate. Make a little bit more
of a pudgy plate. Okay, I think that looks pretty good. Once you have your
plate, how you like it, we can go ahead
and hit validate, and now we have our plate. So for now, let's put our plate directly in
the middle of the scene. As you can see, it might
not be at the center. For example, if I
hit the grid again, you can see it's not
really at the center. I should be looking
at the front. Let's just tap on the
plate, go to our tools, we'll go to the Gizmo,
and we'll go to the Gizmo options up here
and just put move origin. Now it's in the very
center of the scene, and we can just use our Gizmo. We'll use the green arrow
and we'll just bring it up. Maybe we want to shrink it, so it's not so huge. Then we can just make sure it's just at the level of the table. Feel free to use the lathe tool to make some other things. I want to use curve again. Maybe we'll make some
sort of like a picture. So I'll go straight and maybe
something like this. Okay. And if you have
something like this, that just means that it's showing the backside
of the model. Let's see, how can we fix this here. Here we go. Sometimes the lines can
get a bit messed up, but be able to work it out
if you just There we go. What happened was
once I made it, if this part comes out, then you see the
inside of the model. So you just want
to make sure that your paths are just normal. If they get all
messed up, then you might just have to
straighten them out. It can be a little confusing, or you can just try it again. I don't think I've ever really
had it get that messed up. I'm not sure what I did
wrong, but it happens. I'm just making the
inside a bit cleaner. I think I like that,
and don't forget to experiment with for example, this little neck here.
You can bring that up. You can tap these. I'll go straight,
so you can make some really interesting fun
shapes with the lath tool. Also, I don't know if
I mentioned you can add nose just by tapping on the. Okay. Sometimes it's really
hard for me to just make something just regular. I always get a little
too crazy with it. The only thing I want to do is make this inside a
little bit thinner. Yeah, I think something like
that looks pretty good. Once you have something
that you like, you can just hit validate. We'll go here and we'll
look at our tools, we'll go to Gizmo and
do the same thing. We'll go to the Gizmo
settings and move origin. That way, it's just at the
very front of the scene, and we can move it
up and move it over. Let's take the ng ring
and just shrink it a bit. Okay. That's nice. Maybe we'll make a bow as well. So use lathe curve. We'll make a cute little bowl. Looks good, and
we'll validate it. Let's take the Gizmo. We'll
go to the move origin, and now it's in the
middle and we can just move it with our table. The nice thing about
doing these shapes with the lath tool is that the
pivot point is on the bottom. The pivot point is
just the middle of this gizmo, that's
the pivot point. If we were to rotate it, notice that the pivot
point stays where it is. That's good because
if we have these on the table and let's say
we want it really small, it's going to stay on
the edge of the table. As long as it's directly on the edge, then
it'll stay there. I think that looks pretty nice. Feel free to make other
shapes with the lay tool once you know how to use
it, you know how to use it. You might have auto save on. I don't keep it on, so I
have to save every so often. Make sure you save after every, every video, even during
the lessons, save often. Just tap the folder here. Save this is going
to be S k breakfast. And next we'll do pancakes.
5. Hot Cakes: All right, so let's make
the little hot cakes. My favorite thing
to make you know that if you've seen some
of my other videos. So we'll just use
cylinders for that. So let's tap the scene. Add cylinder When
you add a cylinder, you have these nodes here. We haven't validated it yet. You have a lot of options here if you wanted to do
things like this, like make a cone, or if you want to make a hole
in it, things like that. You can make a lot of
interesting shapes just from the cylinder. I'm just going to two
fingertap to undo. There's a little
hidden gizmo here, so I'm going to use that. With this, I'm just
going to shrink it. Bring it up. Make it smaller. Maybe a little thicker,
I like souffle pancakes. I want the edges to be round. So we're going to
use that same method we did for the table. We'll just tap here. We'll put the post subdivision up to two, and then we'll bring
the division x down. Maybe we'll keep it at 17:30. I think that looks pretty good. We'll make it a little smaller, but I think that looks nice. Let's validate it. We'll use our gizmo
and now we just bring it down to the plate Okay. When it touches the surface,
I think that's good. And we'll add three for now, but I think later we'll delete them because once we paint it, we'll just paint one and
then we'll clone it. That'll be easier.
But just for optics, let's change the name of this to I'm going to
call it a hot cake. Then we'll tap the
three, move it up. And then we'll take this and clone it and we'll move it up. Now we have our
little hot cakes. To keep things organized, we can long press, and then we can nestle these in the little hierarchy like that. Now they're all together. Let's take a moment to go
ahead and label all of these. This is the table top.
This is the floor. The lath is the plate.
This is the bowl. And the other one
is the jar jug. Let's go ahead and save, we
tap on the folder and save. Now we'll make this
isn't straight. Let's work on the egg now. Maybe we'll do the
syrup as well. Let's hide the pancakes. Tap on one of the pancakes, go into the scene menu, and we'll just hit this little
e and then it's hidden. What we want to do is
let's tap on the plate. We're going to use the mask
tool to make the eggs. There's lots of different
ways that you can make them. So we'll tap on our tools
here, we have the mask, if you look at the plate
because we're going to make it, we're going to extract it from the plate. I
know it sounds weird. If you scribble on
it, it'll show up something like that. Let's undo. Let's turn off symmetry because we don't
want it symmetrical, we'll do it right around here. But there's a tricky thing
when you're using masks, and this will help you
moving forward with anything you do with masks and painting and
things like that. If you paint on this,
you have to make sure that the underside isn't
getting painted as well. I'm going to hit solo so
we just see the plate. See how it paints the
underside as well. We don't want that. I'm going to undo. And here's
what you can do. We can go into the
mask settings, and let's see where is it at? Oh, there we go. You have mass settings here, and this will be I'll usually look like a
little paint brush. You want to go there, and then
you want to go to filter. Filter. Just to do that again. We're using the mask tool and you want to
hit right next to the mask and you
want to use filter. Then just hit front
facing vertex only. That just means that whatever
side is showing to us, that's the side that
it'll paint on. If we hit this and
we paint here, shouldn't go through
to the bottom. Let's slow this. We'll do. For the eggs, we'll just make a
sphere around here. That looks good. We'll
make it a little bit. Just give it a something else, maybe a little bit over here. Maybe it's going over the edge
of the plate a little bit. Okay, so we have a little
shadow on the plate like that. So now we just need
to extract it. So again, here, we're
going to go into the mask settings and you have all these confusing
looking settings here, which is fine. The first thing
you want to do is tap this until it's just a plus. Okay. So when that's just a plus for smoothness, I
have it at four. This I have all The height, the height is very important. The plus just means
that it's going to extract adding over the surface. If we were to do if we
were to do do minus, then it would go
the opposite way. If we were to do both,
then it would both come up and go the opposite way. We just want it to
be above the plate. We just want the plus.
This is a new feature. Now when we adjust this,
we can see the height. There you can see the height
of whatever the shape is. Here you can see the smoothness. I think that looks pretty good. I'll move it to six. You can experiment with all
these other things. But once you have it pretty
much where you like it, let's just hit extract, just so you can see
these options here, I'm using shell, so I extract, and then we have
our shape there. Okay. So I'm going to hit clear. That's going to clear
the mask from the plate. So clear all let's
label this eggs. So we go to the scene and
we'll label this eggs, and let's voxll remesh it. VoxalRmshing, see how this shape doesn't
really look that clean. When you voxalRmsh it's going to recalculate
the vertices, I can all be really confusing.
But this is how you do it. So we go up here, Vox mesh
let's put it at 1:50. Here's the resolution is one 50. Now, if I do this more often, I usually go down
here and I swipe up. It's just a shortcut,
but it's the same thing. We'll put it back
to one 50 or so. Then once you hit remesh, you'll see that this will
change a little bit. You can see it got
a little weird. But that's okay. Let's
just smooth it out. We go to the smooth option and
we can smooth out the egg. Then it's the nice and smooth. Okay, now let's
take the move tool. And we can just move
around our egg. So if we tap on the egg, we can move around the egg
just to make it look a little bit more eggy. So I'm just pushing it
down with the move tool. And you can also
spread it like this. I'm just making sure that it's nice and close to the plate. You can make the move
tool a little bit bigger. Of course, there's
other ways that you can make this kind of thing. You could do it with spheres
and move them around. There's lots of different ways, but I like using the mask tool, and also when we do the syrup, we can do it a very similar way. I think that looks pretty good. So I'm going to smooth it out. I also want to make
it a little smoother. So you can also ox remesh down. If you slide your
oxalRmsh to one 15, I'll show you what it's
like up here, VoxleRmsh. If you bring it down
to one 15 or so and then hit remesh,
when you smooth it, it'll be a little bit softer because we're making
it less dense when we Voxmhw then it starts
to look really nice. Okay. Okay. And this is a
little too high for me. So I'm just going to pull
this part down. Okay. I might just pull up a
little bit in the middle. I just want the end
to go over the plate. Make sure the rest of it's
down where these edges are, I'm just going to
pull up a little bit. I might go ahead
and box remesh it again and then just
smooth it again. That's pretty much how you
can make the shape of an egg. Feel free to adjust it, feel free to take move and give it a little bit
more shape if you want. But I think that looks good. Now we'll just add a really
simple sphere to the egg. Let's add sphere. It's going to be a big sphere. Let's use our gizmo
and we'll move it up and shrink it and
we'll move it over. Let's shrink it again.
Shrink and shrink it. We want to place it in
the middle of our egg. In the middle. Because that
would be the very middle. That's a spherical. So we'll just use that node and we'll make
it more of a yoke shape, and then we can just
rotate it a bit. And you can adjust the
size and things like that as you desire. I think that looks pretty good. Now let's do the
same exact thing. We can validate the yoke
and let's make sure that we label it just
so we don't get lost. Okay. And we'll save. Let's do the same thing
with the top pancake. So what we can do is just add Let's bring the pancakes back and we'll touch
the top pancake. All we need to do is use
the mask tool again, remember this is going
to be on symmetry, so we'll turn symmetry off. You use the mask tools make
a nice circle and then we'll have maybe some parts
that come off like this. Now we can go into the circle of the mask tool options, plus. You can do height,
maybe a little less. You can also adjust the
smoothness and all that stuff. I think that looks good. Also, if you want to be more
specific with the shape, you can always hit unmasked, make this really small and you can try to get a
little more shape. And we'll hit unmask again
to add a little bit more. Okay. It's pretty good. And we'll put a little
bit over the edges too. Something like that, and then just go ahead and go here plus, and then you can
set the thickness. Then we'll hit
extract. Looks cute, we'll hit clear all,
clears the mask. One thing I'd like to
do is use the Gizmo and bring it down a little bit into whatever it's supposed
to be on top of smooth it. Just be careful because
it's still very soft, so you can see it
smooths out a lot. I'm actually going to undo
this box will remesh it. So maybe 1205 or so. Remeshing the syrup that way, I can smooth it and
it's not going to lose I'll lose a
little less shape. Again, don't forget
you can just use move to make the shapes a
little more. Cute. Push this over the edge. Anytime there's an edge, I always like to use the move tool and
just make sure that it's hugging the edge
a little bit better. This might be cute actually
smaller. I guess I like that. Here's another side, another little extra
thing you can do. You can add let's
say we add a sphere. Okay. We'll move it up. You can add other shapes
to it, kind of like this. Things like that. If you want
to bring those together, so it's nice and smooth, you just tap on the scene. We have our sphere here
that we just added, and then we have where is this? Okay. Let's go ahead
and label this syrup. That's why it's important
to label things because it's easy to get lost. We have these two spheres, and now we'll box remesh, but we'll box
remesh both of them together. We'll do 1205. Now you see that
they're both together. And what is smooth. Okay. Trying to keep everything
nice and round, if you're wondering why I keep going over this 1 million times. I want to keep everything
nice and round. I don't want any points. Okay, that's good. I also want to make
sure that it's fairly even full length. That's what happens when
you have loud neighbors. Also, one more little
extra thing is you can always rotate
the syrup as well, since the pancake is
pretty much circular, so you can just rotate that. Once you have everything, how you like it, you
can go ahead and save. It's all on top of
each other for now, but we'll move it a
little bit later.
6. Easy Bacon: Okay. So now let's add some
easy bacon to our plate. So for this, we'll
use the tube tool. Here we have the tube tool. Let's use path and make
sure we have snap on. So for the path tool now, we'll place our stylus
or apple pencil where we want it to start and then drag where
we want it to end. Something like that. We want to give it a nice little wave. So I'll add a node
here in the middle. And here. This goes down, this will go up a little bit, and this one can go down again. Something like that. Oh good. It's still there. I accidentally hit
something over here. Then we just hit this
green little dot, and we have our nice tube. Let's turn this into bacon. I don't know where this
middle one attached. That's a bit strange.
Let's move that down. Move that down. There we go. Now we just
need to make it in more of a shape of some pudgy bacon or bacon substitute
for some of you, and we'll hit profile. That gives us a nice
square like that. Let's hit this profile option, and right now we're
seeing the square. We want it to be a little
bit more rectangular. I'll just drag this up, so it's a little bit
more of a rectangle. Something like that, easy So now we just need to
stretch it a little bit. So let's use our Gizmo. And it wouldn't be that
easy to stretch it here. Let's move this pivot
point to the middle. So we hit pivot center pivot. So that'll make it a little bit easier to kind of stretch out. I think I'm going to use
this little red one here. So we'll just kind of stretch
it out a bit like that. I think that's good.
Now we'll press these three dots since
we haven't validated it. And I'm going to
put the subdivision up to two and then turn the division down to ten. You can also twist if you need
a little bit more control. You can hit twist. You can hit a little line here if you
don't see your little nodes. Just hit the little line there, and you can twist it
we'll go left handed. I think this might be a first, so we'll twist that although
it made it a little funny. Let's twist it first. Then I'll go to the gizmo, the
little hidden gizmo there. Pivot center pivot. Now let's try to stretch it. We want to stretch it this way. Here's another little
quick tip that you can do. You can change the pivot. We tap pivot when it's like
a light color like this, then you can just adjust it. That makes it really easy. Now I've adjusted it so that red arrow is facing the way
that we want to stretch it. We hit pivot again
to lock it in, and then we can easily
stretch it like that. I'm going to go back
here and just loosen up this curve a little bit. It's a little too curvy, a little too windy.
I think that's good. Now I will hit Oh, let's see. Two, ten, boom, and
now hit validate. That looks much better. Now I'm just going to go to
smooth and just maybe smooth off the
ends a little bit. I think it looks pretty
good. I do want to clone it. So I'm going to hit
pivot center pivot I want to let's name
this bacon. Okay. And I'll clone it for now. But I want to move it.
Let's change the pivot. So we tap pivot
and then we rotate it like this, but pivot again. So now the clone will just
move straight out that way. Maybe we'll just move
it a little bit like this. All right. Let's save.
7. Juice Jar: All right. Now let's put
some liquid in this jar. Let's change we go to the
little sun and change from MCP to lit PBR just so we can
actually see what we're doing. I'm going to add a sphere, and we're pretty
much just going to add it inside the glass. Let's tap on the glass, and let's change the material
from opaque to additive. Also, I want to
change the color. We'll tap the little
sphere down here, and's probably white and we'll
just change that to black. And we'll hit pain all. Now you can see
through the glass. Let's go ahead and add sphere, and we'll just rename it liquid, we'll rename it, we'll
rename it liquid. We can go ahead and validate it. Now we'll take our
gizmo and we'll move the liquid to the glass, shrink so we'll just line
it up. Looks good. Okay, so it's pretty
much lined up, so we want to use
the move tool and let's use symmetry to help us. Instead of moving one
side, we can move both. The reason why
symmetry isn't working there is because if
you look in symmetry, it's still on the world. Let's see, what's the
easiest way to explain this? Right now, the world symmetry is the center of the image.
So it's like the grid. This is the world symmetry. But we want the
symmetry of the sphere. We'll go here and
change it to local. Now it's on the sphere. If we want to see
the symmetry line, we'll go here and then just hit show line. Now we can see. If we're going to
stretch this up, It would be easier to use this symmetry and
also this symmetry. We want a blue line
going across this way, then it's lifting up four
points at once instead of two. For example, right now, it's two, so I can lift
it and I can fill it. But let's go ahead
and go to symmetry. Let's see. Z is the one
we want. We're on local. Now when we use the move
tool and we lift up, it's going to lift up
the middle together. Everything that we do is going to happen on
more than one side. That'll just make
it easier for us. Just move the liquid
until we want it right on the edge of
the middle of the jar. That's what we're
going to aim for. We'll hit front. I'll make
move a little bit smaller, even these little sides
and you can use the Gizmo two to move it so it's
directly in the middle. Because that'll
just make it easier on the left side too.
That looks pretty good. Basically just
fill the middle of the container with the sphere. Even these bottom parts, just drag down until it just
nicely fills up everything. Okay. I think that's pretty good. The next thing we want
to do is you can see where you can see where it's actually touching
the glass on the outside. Just use smooth. Let me see if I change the
color, if that will help. Yeah, I'll make it orange. Let's make it a nice
Tropicana orange color. So we'll paint that. Now you can see where it actually looks
like it's inside the glass, but we don't want it
outside the glass. Just take smooth and just smooth it so that it's all
inside the glass. Okay, that's a little bit better. Now we don't see any of that texture outside
of the glass. Once you've done that,
we'll go back up to here. We have our liquid
inside the glass. We have our jar. Let's
select them both. We'll take the jar and clone it. So we have jar one and liquid. Let's take jar and liquid. Okay. And let's go ahead and hit the
little eye on Jar one. Again, we have the regular jar, we have jar one and
then we have liquid. Jar one, we hit the eyeball
and then we hit Boolean. We tap Boolean and then we tap. I actually worked,
but I want to show you what happened
in that situation. It was actually
right, so we have Jar Jar one, and liquid. The thing is jar
one is an additive. The liquid is opaque. The liquid Okay. There are two different
materials. That's what happened. When we take jar one and we
hide it and we have liquid, it doesn't matter
about the other jar, you can hide it as long
as you have these two selected and you have jar
one with the eye closed. Then we have Boolean. And it
gives us this weird thing. I confused me at first,
but then I remembered we booleand with a mesh
that was an additive, so it probably just turned
this into an additive. So just turn it into opaque. Then you can just go back to
the color, hit the color, and just hit paint all, and
then we have our liquid. Let's use the scene and let's
bring back the regular jar. Let's rename this to liquid. Okay. Let's use trim. And let's see. Let's
just use rectangle. So we're using trim and
rectangle and you just make a box and whatever's in the white, we'll just get cut. So make sure you're
on the liquid. There you go. That looks good. I'm going to go ahead
and box remesh it, maybe like one 50. Okay. And that'll clean up
that edge on top. You can probably smooth
it a little bit, but you want to be careful that it doesn't alter
the shape too much. This jar looks pretty good. I mean, it's see through Nomet isn't the greatest
of doing glass, but let's try refraction
that might look better. If we change the material
from additive to refraction, remember we set it to black,
Let's see what happens. If we go here and
we set it to white. I think that looks pretty good. I think it looks
better. We'll hit pain. Of course, you can
adjust the roughness, If you want, but I think that looks pretty good it's glass. The only problem now
is the orange juice, it doesn't look like the
glass is thick enough. It makes it you're on the jar. Let's go to the
material settings and let's bring the index
of refraction down. Maybe something like
that. I think works. 1.076. I think that looks nice. Okay, so maybe you want to add some berries or
something in the bowl. You can be creative here and
just add something random. I think I'm going
to make a sphere. I don't know if I was
eating breakfast, this breakfast seems like it could use some
grits or something, maybe some oatmeal with
berries might be nice. So I'll probably just start
with some sort of base. And by base, I just mean like, you know, something that kind of fills the bowl a little bit. Okay. Maybe something
like that. You can flatten it out as you need. Actually, I like
how it was before. I like this a little bit better, a little bit deeper
into the bowl. You can clone this little sphere and you can make
other little spheres. You can tle in there, can validate ce Okay. Yeah, you can you can put
some things in a bowl. I think that will look cute. Also, if you want to give
the bowl a little texture, you can do something like clay. You can just use the clay brush, maybe you want to's validate it. Forgot to validate that sphere. Once you validate it, then
you can give it some texture. Maybe smooth it
out a little bit. Okay, I think it
looks really good. The next thing that
we'll do is just give everything some nice soft color, and then we can light it and
we can turn on post process. Let's make sure to save. Okay. Okay.
8. Breakfast Colors: Oh. So you can go ahead and color this
anything you like. I'm just going to do a
quick little color job. Not sure what I want
to make anything. So the floor, I think
I'll do a beige. I'll add a little
roughness to it. Table I don't want to be too close to the pancakes. So maybe just a brown will work. We'll do brown for the
table and the legs. You just tap on the
mesh, and you can tap the color and
just hit paint all. The bowl I actually
like the color it is. I like white, but we'll make it like a light
pink and maybe glossy. We turn the roughness
all the way down for glossy and
then we have paint. The plate, I think I like white. But maybe we'll give it
a little bit of color. We'll keep it glossy. Okay. The bacon will make a lighter bacony
red color. Okay. I can't think of what
color bacon should be. Is it more of a fuchia now, maybe it's more of a red. I think we'll land on
something around there. Still want it bright. Definitely want to
add some roughness. And we can adjust
these colors later. So we'll tag the second
one. Color that the same. The eggs keep that white, but I think I might want
to add just a of color. But I don't want it
the same as the plate. So obviously, it can be a little
tricky for picking out colors, but it's
very important. It's very important to spend time and pick out
the right colors. This will make this
rough. That looks good. Okay. Okay. And for these guys, I guess we can discolor
them separately. First, let's turn
the roughness up. Maybe about a half roughness and we'll do something light. We'll do a light color. Actually, I think it'll be
easier to just color one. Let's take the hot cakes
and just long press them, and let's just separate them. This is the syrup.
We'll bring that up. So we'll separate all of them. This is the syrup or
syrup, as I used to say. Here's the hot cakes. Let's just delete
the two bottom ones. This one will make We want nice and
golden on the top. We get a nice golden color, we use paint, and we
can use symmetry. I want to be able to
see the symmetry. So there's a symmetry line. We use a nice brown on top. Oops. Sometimes I get
a little overzealous. Actually, I have
made these as well. We have a nice brown on
top and you can take the smooth tool and turn the
intensity all the way down, you can use that to smooth
out the color a bit. Let's do the same
thing on the bottom. You can hit so low. So
you just see the bottom. Then we use smooth with zero
intensity to smooth it out. That looks good and
play around with your colors until you get
them how you want them. Once you're happy
with the color, we can go ahead and
clone these again. C we use gizmo and
just move it down. And then we c again. That looks great. Now that we have everything
pretty much colored in. Obviously, we can adjust these
once we light the scene. But we can actually
move them around. Let's take the hot cakes, and let's just join
them together. Forgot the syrup. Let's
take the syrup two, we'll select both of those, and then we'll just
move them over a bit. Maybe right around
there. You can always adjust up and
down to if you need. Then we'll take the
egg and the yoke. And these we pretty much
can't move too much, but we can take move, and
if you're on the egg, you can take move and then
just adjust it a bit. Just remember to keep it
nice and flat on the plate. Okay. Smooth it out
a little bit too. Again, I'm not really
going for realism. I wanted to be able
to read what it is, but I'm not going
for super realism. Also, you can
probably copy these. You can take both of these, clone them, and then you can use your gizmo
and if you want, you can add a second egg. You'll just have
to adjust it and play around with it until
until it looks good. Until it looks believable, I should say. Let's
take the yolk. And I'll probably just
move it a little bit. Just give it a little
bit of adjustments, so it's kind of
around the pancakes. Okay. And then just
adjust the yolk as well. And then adjust the bacon until you have it pretty much
where you want it, as well. So let's add a little
detail to the bacon. Just tap on the bacon. Let's
voxllRmsh around one 50. That's okay. Then let's take the inflate tool and
go to your color, grab the little eye dropper and pick up the
color of the bacon. Now, let's make it like
a lighter pink and let's make it a little more of a orange color, maybe
something like this. So now we're going
to use inflate. Doesn't need to be too big. Radius is maybe about 33 or so. Let's just make some
little marks on the bacon. And the reason why we had to voxoRmesh is because if
we try to do it without, you see it doesn't
look as clean. So we'll do the same
thing with this one, we'll Voxomesh around one 50. And then we'll take
the inflate tool and we can use the same color. And we'll just add some
detail to the bacon. Let's make this a make it
like a nice at mealy color. We can take these
little spheres. How about let's
join them all up? We'll just join them
and maybe we'll color them a nice blue. Blueberries are a bit
darker, but that's okay. We'll keep them a bit
lighter here. All right.
9. Lighting: Okay. Okay, so let's go
ahead and light the scene. After we light the
scene, we'll do the yup. So we're already in it PBR. The first thing we want to do is turn our environment off. We go here to the shading tab, go all the way down
to environment, and just tap this environment. Then we can add our first
light. Looks pretty good. One thing we want to do is
let's turn on post processing. That way we can
get a better idea of what the scene
actually looks like. Just go to the next one over, and let's just hit post process. And I have my own personal
settings that I always use. So I'll just tap on DFD two, and I'll just show you
what I have checked off. Now, you can put
this all the way up to have full resolution, but I'm just going to leave
it down to 1.5 for now. I have reflections on.
Global illumination is at ten, ambient occlusion. I don't have depth of field. I do have bloom, and then
I have some tone mapping, and you can play around with it, but you really don't have
to at this point in time, just play around
with it if you want. It looks pretty good, actually.
It looks really nice. I think that's all I have
on for, I have these two. Those might be on by default. So let's go back
to the lighting. So this is our first light. I'll press the gizmo and
move it over this way. And you'll notice
I have it slanted. And whenever you set
the first light, however your scene is, it's going to be different depending on how your scene is. So I kind of like the way it looks here, kind of
slant it forward. So that's why I added
the light while it was already. Already tilted. This white arrow is where the
light is actually shining. If I was to go like this, you'll see that the light actually
changes direction. I'm just going to undo.
This is a sunlight. It doesn't really matter
where the light is. All that matters is
how it's rotated and where this white
arrow is going. Let's put this number to two. Okay. Looks good. We'll go back to our lights. Let's just rename this key. This is our key light. We
can go ahead and here. We'll go ahead and clone
this light and we'll name this one rim light
or edge light. This is going to
be the edge light. Let's move this light over here. And down. Let's make sure I'm on the
right, correct light. Oh, t's also turn
on the light icon so you can see all your
little light icons. Now, just take this
arrow and point it so it's coming from back
here, pointed towards us. We tilt it that way, but we
also have to tilt it up. Okay. If you find a view you
like, you can just save it. You can just press the camera. For example, that's a nice view. That's a nice view. I'm
going to update this one. I'm going to move it down and tilt it a little bit like this. Then I'll go back here,
then I'll go back here, and then I'll just
update this by pressing this arrow and hitting yes. Now one will be that.
Let's take this light, and we want to see it
on the edge over here. There we go. Maybe we want
tilt a little bit more. So maybe something like
that, I think I like? I do like it pointed
down a little bit. I just want to see I want it to shine nicely
over on this edge. I like it hitting these
pancakes a little bit. I like that. We can turn
the intensity up on that. Maybe about eight or so, and let's make it nice and warm. Let's tap that white color
and just make it nice and warm. Everything looks good. Let's go back to our
lights and let's this one, let's name this one R two for it's going to be a
light on the right side. Let's move it back over here. Now this one point it this way. It's hitting the side. Not exactly the same as the rim, but just but also
hitting the side. My maybe around here, maybe point it down a little bit more, something like that. Looks nice. But I think I
might want to make this blue. I'll tap the color
and make it blue. Let's see how that
looks interesting. Okay. It's interesting
to have the two colors. It might be nice
to actually switch them as well. Let's try it out. We'll make this one warm, can probably turn
this down some. Let's try making
the other one cool. Okay. Okay. That looks nice.
Turn it down a little bit. Now for the last light,
let's add a light on top. So we'll go to our lights.
We'll add another light. This will be TD for top down. And for this light,
let's switch it. If we tap sun, we have
some other options. Let's change it to spot.
Let's make this small. We'll move this up and over, and then we'll use the blue ring to point it right
at our breakfast. Something like this. Let's
go back to our view. So we can make sure
it looks okay. Want it off to the side
and coming from an angle. I think I like that. Let's
go back to our view. Everything is looking very nice. So I'm going to do
a quick save. Okay. The only thing I
see is these eggs look a little bit too rough. They look kind cute, but I
think I might want to make them a little bit glossier. So I'll just turn the roughness down on
those a little bit. Paint, and then I'll
tap the other one. Sometimes you have
to tap something else and then go to There we go. Color that a little
glossier as well. Now let's do the
syrup really quick. I think we want to go to the
materials and do refraction. Let's change the color to
something a little more syrupy. That actually looks quite nice. This color. We do have it rough, but we can make it
a little glossier, if we bring that down. You can also up let's paint all. And while we're here,
let's go into the Okay. The syrup in the
jar. There we go, and we'll paint that the same and we'll make
that a refraction. Actually, we might just leave that Because if we
make it a refraction, I don't know if we'll
be able to see a refraction through a refraction. I'll I'll make it
a refraction now, but I'll double check on that. This syrup actually
looks decent. Let's go into the
materials tab and let's see if we want
it glossy or not. Surface glossiness Let me
make sure I'm on the right. Oh, I wasn't Okay. I want to go back to syrup and just adjust the
surface glossiness. We have index of refraction. There's also some other
things down here that you can play around with Inverse culling. No,
we don't want that. Asi think absorption
looks pretty good. We can adjust this
color here as well, bring it down to
something like this. It might actually look nice
with some interior roughness. Then you can adjust the
index of refraction as well. Find what looks best. I think
that looks pretty good. Now this orange
juice in the glass, I notice is another issue that hopefully we
can figure out here. Is this mesh the juice? So let's change the
name of this to juice. Let's go into the colors
and see if we can find a better color for it. So it's really about
seeing through this glass. Let's click on the glass, see if we can find some way A shows There we go. Cash shadows is what
was making it darker. If we have it on auto, it's on. But I think I'm
just going to leave it off because now at least we can we can see the liquid, although it looks a bit funny. Let's see if we go to the juice, we might just be able
to smooth it a bit. If we smooth it a bit, it pushes it away
from the very edge. That makes it look a lot. Okay. Okay. Also, we have the syrup. Okay, so I'm not sure if we do absorption and change this kind like we
did the other one, it actually looks okay. Index refraction, that makes it look a
bit more like syrup. Can turn up the reflectance. And I think I like it glossy, maybe a little bit of
interior roughness. To side edge. No,
we need that on. Cast shadows. Doesn't look
like it makes a difference. Okay. But I think it
looks pretty good. Let's go back to our scene. Last but not least,
let's go ahead and turn back on the environment. It's going to be
very bright, so just turn it down a little
bit, if you want. You can change the color
of the background too. We just tap this little
thing here and then we can adjust the color
of the background, make it a little bit lighter and a little bit more breakfast. Feel like blue seems to
go well with breakfast. You see these eggs and
the pancakes and things. There's these shadows
and they're very dark. They're black shadows and
usually black shadows don't look that realistic because usually shadows actually
have color in them. Or at least the bottom reflections
and things have color. So what I like to do is
let's say for the eggs, go here and change
the two subsurface. Now you can adjust the
depth, Change this one too. But what I really like about subsurface is it really gets rid of that really dark shadow and makes them look
more realistic. So you can try that with
the pancakes as well. We change it to subsurface. I'm going to move the
depth down so it's not so see through maybe
something like that. But now the shadows are
a little more orange. We can try the bacon as well. Let's just make sure
we turn it down so it's not to see through. We'll do this piece as well. So that will make things
a little more realistic. And you can actually do it
with things like this as well. So another tip and really
making things look a little bit more not realistic realistic
but fun realistic. Once you're ready to
export your scene, just make sure that you have
post processing on and that your quality is
all the way up and just make sure all your
settings are correct. Then go over to
this little folder. I like to save before I
export, just do a quick save. Just in case you get any crashes, you
won't lose your work. It then screw all the
way down to render, and you have all
your options here. If you'd want a
transparent background, you can just tap here. I'm just going to do ten 80 P. So you just hit Export PNG. And this will go to as many
samples as you have set and the sample these samples are
the samples in post process. Max frame sampling, you can set this to
whatever you want. I usually do around two 50. And then once you have exported and it
shows you the image, then you can just hit
the little share button, and then you can save or
send to other software. So there's tons of other
things you can do to this. Please experiment. I've included all these extras as files so you can play around with them
and adjust them, and I really can't wait
to see what you do. Please add what you eat,
what you like to eat. You can make muffins,
cinnamon rolls. There's lots of other
breakfast things that you can make French toast. Just have fun and experiment. Uh, All right. So I will
see you in the next video. Maybe I'll show you this
I'll show you the render. I'll probably work a
little bit longer on this. I'll show you the render,
and then maybe I'll show you the render if I
bring it over into blender. All right. See the next video.
10. Result! : So, welcome back. I hope you
really enjoyed the class, and I hope you learned a lot. Again, I really look forward to seeing what
you add to the scene. I hope that you
experiment and have fun. There's lots of
different ways to make certain things
in no Med sculpt. So as you gain more experience, as you work more in
the application, you'll just become more
and more efficient, and it'll just be
more and more fun. And of course, then
you'll start doing more and more complex sculpts. There is an extra
for this class. So it's going to be on YouTube. It's going to be called
a companion course. And essentially, I'm just
going to upload all of the things that were the time lapse of
me making the fork, the knife, the spoon, some
other elements of the scene. So I'm going to put all of
that on YouTube in real time. So if you want to watch that, then you can watch that. I didn't want to add it in class because it just took
me way too long to do. But if you are
interested in that, just head over to YouTube, and it will be available there. Of course, I'm also on
TikTok, Instagram, Facebook. All of that is Drug Free Dave. I think Facebook,
I'm just Dave Red. But if you make some
cool art and you tag me, I love sharing my students
work on my stories. Also, be sure to rate
and review this class. It really helps me out, and
I appreciate the support. I appreciate you
hanging with me. Also, be sure to
upload your projects. Even if it's just what
you finished in class, if you experiment and
make some weird stuff, I love to see that too. So don't feel weird about posting it or other
people seeing it. We're all in this together.
We're all learning together, and I can't wait to
see what you do. Alright, so I think
that's about it. I'm going to let
you go, continue to work, continue to have fun, continue to explore and
continue to experiment, because that's the best
and easiest way to learn. Keep drawing, keep sculpting. I'll see you all
in the next video.
 Dave Reed, 2D & 3D Illustrator - Brooklyn, NY