Transcripts
1. 3D Pancakes - INTRO: What's up, guys, Welcome back. My name is Dave Reed,
aka drug food aid. And this is my second 3D
class with nomad scope, will be going a lot more in
depth and building upon what we learned in the first-class
3D for beginners, you just want to be familiar
with the application, familiar with the way that the application works,
things like that. But of course I'm
still gonna be going over the going over
everything that I do, showing you everything
that I do, why I do it. And we'll still be doing all
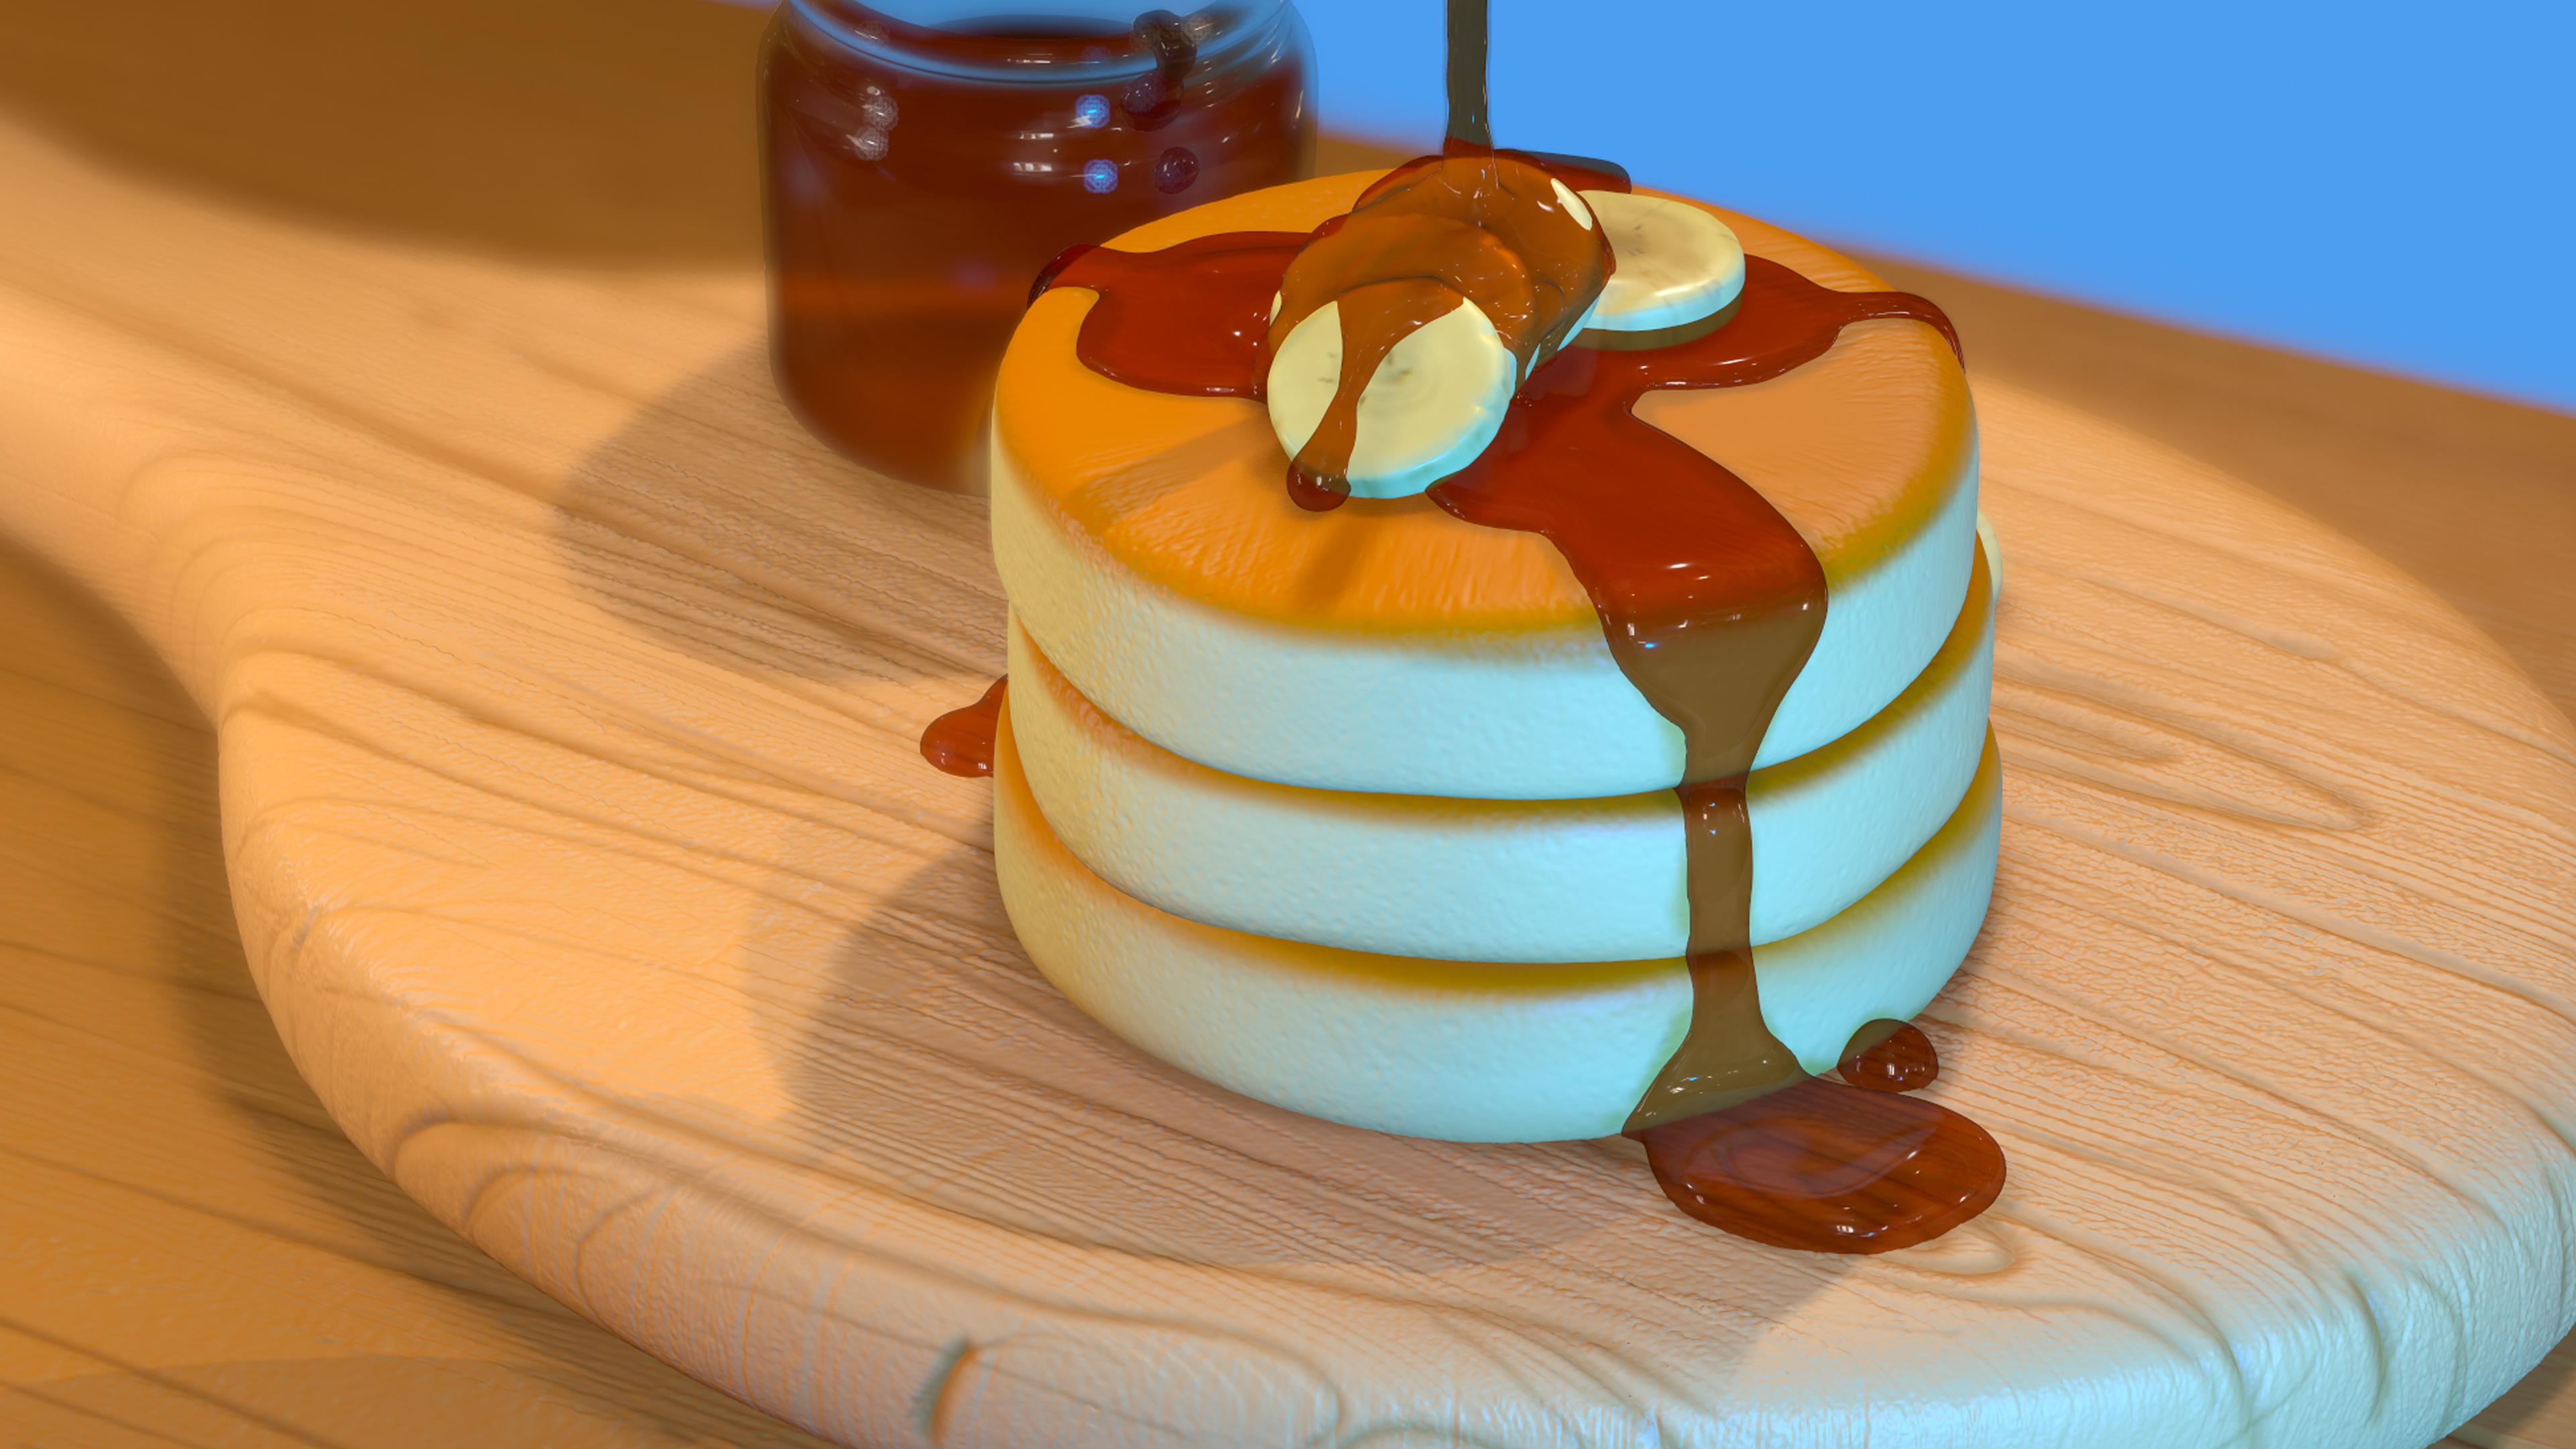
the actions step-by-step. It's not just about pancakes, It's about using textures. It's about making different
3D meshes looked like liquid. It's about using a
lot of the tools. There's so much to this
application and there's so much that is really exciting and really quite groundbreaking and
phenomenal. For the iPad. There's so much to learn in, there's so much to get into. And you can create
really amazing results. And I'm looking forward
to see what you make. Alright, so let's get started. The next class is just gonna
be the class project for, of course, you're gonna
make some thick pancakes. Well, I mean, you can really
make whatever you want, but, you know, I
like thick pancakes. All right, Let's just go to the next Let's go to the next video.
2. Class Project: By now you know that I
don't go too much in depth. In the class project. We're gonna make
some thick pancakes. We're going to exceed it. We're going to make
the wood cutting board that I'm gonna call a paddle. I don't know why we're gonna
make a little wooden table. But really that's two,
that's to get used to making textures and adding colors to the textures and then
enhancing the textures. We're going to protectors on the pancakes and color
the pancakes and use layers. We're going to make the
syrup, we're gonna make it refractive so we
can see through it. We're gonna put it
in a glass jar. We're going to use
the masking tool. We're going to extrude. There's so much that
you're going to learn in this class that you'll be able to use in
other applications in 3D. So that's the class project. I want to see your
fat thick breakfast is when this is over. And I also want to
see all the other amazing things that
you're gonna make. I'm looking forward to it. It's really exciting and I'm glad that you're
here with me. Let's move on to getting started with wherever we get
started with first, which is the next video. Let's go, let's do it. This is keeping worse and worse.
3. Getting Started: First things first,
let's start with a fresh canvas and
we'll import our image. To import our image. We want to go to
reference image here. And then your reference
image options will pop up, hit the Plus photos. We'll add our little scene. Now that's very big. So we're
just gonna make it smaller. So we just go to Transform. That's, that's probably good. We don't need the hand
in their simple tap to exit and transform mode. There we go. Just in case my settings
look different than yours. You can tap this little
picture icon and you can change the color of
the background here. That's how I have
this gray background. I just liked my background
to be sort of neutral. Let's get started. I
would, I would try. The first thing is
gonna be the table. And really we can only see
that it's a rectangle. That's all we're going
to use. I'm not gonna do the legs of a table, but obviously you can
do them if you want. I'm just going to delete
this fear. We don't need it. And I'm going to do a box. And of course I have
it in orthographic. Now we're just gonna make
the box into a rectangle. Will just shrink it. Top view. We can stretch it
out a little bit. I'm actually going to make
the whole thing bigger. Just because I tried to, I
tried to sculpt a bit bigger. Nowadays. We haven't
validated it yet, but I want these to
be flat right now. They're a bit rounded or
they look a bit rounded. Let's try these settings out. Flat subdivision. Here we go. And then I just
move that up one. So that's in this
little grid here. Perimeter, post-op division
three and flat subdivision. It looks pretty good. I'll
go ahead and validate that. Now the next thing
I'm doing, I'm just going to turn it into a Metcalf. Just because it's easier for me to scoped using the Metcalf. I can just see
everything a bit better. Okay, so we have our table. The next thing we'll do is make this sort of roundish
cutting board.
4. Paddle Making: So for this one I
think will use a, we'll use a cylinder. Want to move this cylinder up? We can see it clearly. We have to make this
sort of oblong shape. And we might even put
a little handle on it. Maybe we'll see, we'll
see what happens. So firstly, I'm going to shrink
it to the desired width. I'll make it a little
fatter, a little thicker. I'm going to stretch it out. Actually, it looks pretty good. I'll make it bigger. It looks pretty
close to the image. We'll bring this down, we'll
place it on our table. I'll move it up over
here because I think our camera view or wind up
being about here, maybe. And then we'll have
the pancakes here, and we'll have our jar here. Maybe we can actually tilt it. This is actually
tilted a little bit, so we're going to use this
green to tilt a little bit. Let's make our box
a little bigger. That'll be a good view
right around here. Okay, so what should we do next? Let's start with our
pancakes and i'm, I'm actually not gonna make
them really, really flat. I like I just like the visuals
of like a thicker pancake. Do we want to put a, want to
put a little handle on this? Let's try a little handle first. We'll try a little handle. And then we'll do this
little honey type thing, which I was, I've never used, but I think they
look really great. Let's try a handle. What's the best way to
make a little handle? So actually I'm thinking, let's clone this
clone right here. And then we'll take this
blue and we'll move it out. We'll shrink it. So what do you use? This outer orange line
will shrink it down. And I'm going to tap left just so it lines
everything up nicely. And I'm going to bring this out and I'm going to stretch it
so it's as thick as are. Maybe a little bit. Stretch it so much as
thick as our cylinder. I'll squeeze it together. I think I want to
make, I'm gonna make these sides and melt into this. I want to make these
sides melt into our wood and we bring it up, squeeze it a little down. I don't want it to show
up over the top of it, so I think that's good. Now I'm going to look
at the top view. And I'm gonna use the Move Tool. So I think this is a good size or should
we make it bigger? Maybe we'll just stretch
it out a little bit more. We have it stretched
out a little bit. I'm gonna validate it. And then I'm going to
use the Move tool. I'm gonna make sure that I'm
on this our cylinder here. And when they
labeled this handle, make sure it's the right one. I always have to check to make sure I'm on the right layer. I oftentimes in not handle. We'll just call this
the base for now. We'll call our box table. Of course, you just go to
the little pencil thing with these layers and just label
them just so we know. It's always a good
habit to do that. Now we'll go to our handle. Run the move tool right here. We want to use symmetry. I'll make it fairly big. We'll do the top view. Hopefully see how that moves. They both move at the
same the same way. So just move it out. Move it out wide. And then sort of interesting. Sometimes when this happens, when it's not actually doing symmetry on the
right, the right way. Then I have to go in here and
check that I'm check local. When I check local, then that's gonna use this local shape
instead of the world, instead of the world's center. The world's center being, it could be the center of
everything right here. Instead of locally with the
shape that we're using. Now that were local. Let's see. Now there were local. Everything is happening
in conjunction with just the shape that we're that
we're trying to maneuver. I'll do the same thing
again, bring it out. Make this a little bit bigger because you want everything to be some slowly moving and out. And then I'm trying to here
we go, Something like that. I'm going to solo this. So I'm going to hit
Solo down here. Just so I can go to
the, the underside and sort of do a
similar movement. Now we'll just
flip it back over, un-solo it just so it's nice and thick at
the bottom as well. That's, that's
actually really good. Now for this side, I also want this to be rounded. So I'm actually going
to try it on this side. That might be a little easier because it'll spread
the bottom and the top does have to be careful about bringing
it up like that. So I just want to make
sure that it's down to make this nice and round. There we go. I think something
like that looks good. I'm going to solo it
and turn it over again. I'm just going to sort of
bring out the bottom as well. Now I'm going to un-solo and
just make sure that it's flat or at least at least
touching the base and it is.
5. More Wood Making: I noticed it's not exactly
flat as everything else. So you might have
to just just tap lift so you're seeing
it pretty straight on. You might have to
just use the Move tool and just slightly, just slightly adjust
until it's pretty flat, doesn't have to be perfect. But I think that's better. There we go. Let's
figure out how to make this little wooden
honey syrup type thing. Then I'm going to
make mine, Sarah, I'm a syrup guy. First. This little wooden
part is pretty simple. We'll just use a cylinder. I'm just gonna
rotate it by using this red line and just
rotate it like that. It will just stretch it out. Huge. So let's shrink it down
some notes about the right, the right width or so. Still pretty big,
make it smaller. Something like
that, I think works a little thicker. Just because we're gonna
make everything would. So it's kinda nice to be able to show all the
wood grain we don't want, we don't want the
stem that small. So it will be
something like this, which tripping over the pancakes will just do the top view. We can position it right
over the pancakes. If our view is going
to be Zoom in. Because our final Zoom is probably going to be
something like this. That will help us choose
where we want it to go, how we want it to look. I do want to look at it. I'm gonna go ahead
and validate it just so it's easier
to work with. Here we go. So baking it, if you
saw what I just did, I clicked on this tool
and then I clicked bake. And that way now I can move
it up and down easily. It'll stay at this axis. So that's one of the
tools in the gizmo tool. Big view is going to be something like this. And I'll probably wind up
making the table a lot bigger. Table needs to be a lot bigger. I'll just use these,
don't have to replace it. Stretch it out like that. And then I'll stretch
this out like this. Just move it so this
is on the corner. It'll be easier once
we switch, later on, once we switched to perspective, it'll be a lot easier. Not have the front
part of the table in, but for now we'll just
keep it in orthographic. What he said to move
this back over into the middle and we'll make it smaller. It looks really big. I think that's
pretty good for now. We can we can
adjust it later on. But I think that works.
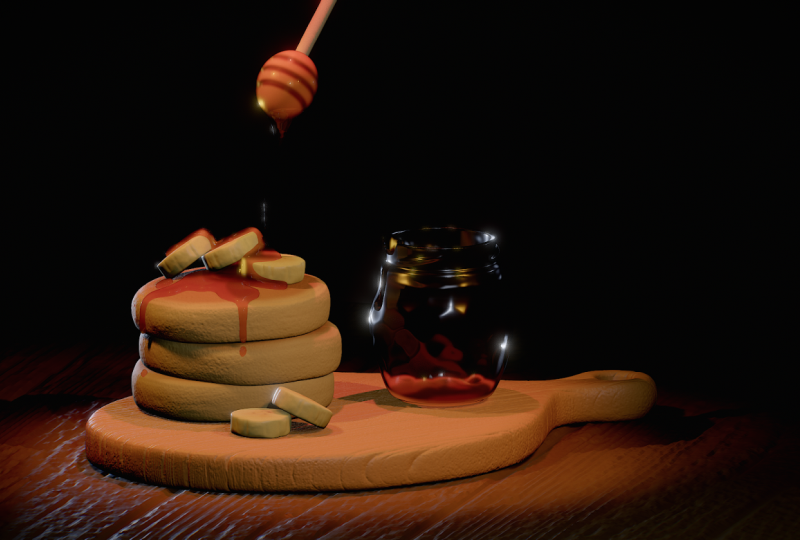
6. Honey Stick (aka Maple Stick): Okay, so to make the
little round bid here, we're just going to add a
sphere and just stretch it. It's pretty much the shape of
an egg. Looks pretty good. I'll go ahead and validate it. It looks like it
has some creases. Looks like there's three
in the middle. First. Before I do that,
I think I want to duplicate our little
wooden thinking here wherever it's called. So I'm gonna
duplicate our sphere. I'm going to hide the duplicate because I want to make the
inside of this as well. It looks like there's there is there are breaks but
they're not that deep. So there's obviously something
in the middle as well. And I'm just going to use the
same shape for the middle. But for now, we have
our little egg here. We will. First,
let's sub-divide it. Let's go here. Let's just sub-divide it once. And then we can try
out our next step. I think I'm going to use trim. I'm gonna use trim. The rectangle. I think we can make
these sections one of the middle, one here. Let's see what, let's
see what symmetry does. Asymmetry doesn't
really help us there. I'm just going to take it off. I'm gonna start with
the middle one. Didn't like that. Go. That looks good to me. I also, since we're
doing this now, I'm just gonna go back
here and I'm going to unhide that other sphere. I'm just going to shrink
it. This orange line. You know what? Unchecked solo. You see the other one as well. Now you can shrink it. I think something like this. Think something like that works. Another thing that you
can do if it looks like our mind actually
look a little thick. So I'm gonna go on
that outer layer. See this sphere here. This one. Let's see if I can just
shrink it together. See how that looks. It looks pretty good. I think
that looks pretty good. And just play around with it
if you wanted to be a little more refined or a
little less refined, or if you want to
make these bigger or thicker than feel
free to do that. But I think that's a
decent way to sort of get that shape. For the
end of the stick.
7. Honey Stick 2: Okay, so now we'll
just attach this to the end of our stick here, the end of our stem. I'm just gonna, I'm just gonna
highlight both of those. Make sure nothing
else is selected. Now it's just maneuvering it so it's at the end of the stem. Oops, I accidentally
clicked off of it. We'll move it down. I guess I shouldn't
do it. Spin this. That looks pretty good. I'm just gonna make this bigger because I liked that
this is really big. So when we work on it,
It's nice and big. As I've been saying, I've
been trying to sculpt everything a little bit
bigger and then shrinking. Later on. I think working
bigger helps with using the using textures which were rich we're gonna
get into in a little bit. I think that looks
pretty good. For now. I'm just going to
simple merge these. So that, and I'm going
to I'll just label this. I don't know what the
actual term is for it, but I'm going to call
it a honey stick. Weird. Now when we want to
shrink it or do anything, It's all going to work together. That'll just make it
a little bit easier. It looks strange, it looks
very weird from this angle. See how it looks
with perspective. Still looks a little
bit off. It is off. If you need to just go
back and adjust it. You can just tap
on this layer had separate and it'll
separate everything, including all the
sections interesting. Then just adjust it however
you need to adjust it. Let's see what's the
easiest way to adjust this. This way, maybe this
view is the best way. I can make it straight. And it should be
That should work. That worked. Because I because I angled
it and things like that. You can see that it's a little Did it became a little bit off? But I think the best way to do it is to sort of
angle it straight, looking straight at you. Let me make sure that
I'm on orthographic. Let me go back to my make
sure I'm on the stem. I'm going to get
rid of gizmo edit. Now I just want to
make sure that it's just as a regular circle. So that will mean that
it's straight. Here we go. Let's see how that looks.
That looks pretty good. Let's, let's go to our gizmo. Let's bake it. Now. I'm just going to
move a straight down. It looks like it's
in the middle. These are some of,
these are some of the more difficult things that it's good to work through
and it's good to figure out. And it's good to
look at everything, at all different angles and just make sure
that they're straight. Now. Now I feel
like it's straight. Always check everything. And sometimes you will have
to problem-solve and figure out how to adjust certain things. And
that's just part of it. Now that I liked that
I'm gonna go ahead and simple merge these again. Since now our Honey stick is straight. It looks a lot better.
8. Pancakes : Okay, so let's
make our pancakes. And for this we're just
going to use cylinders. And I'm gonna keep
it pretty simple. I'm not gonna make
them flat like this. I like thicker souffle
style pancakes. Let's just add our
cylinder here. We'll shrink it down. Can probably make it
a little bit smaller. I think that's a good size. That's acute size. Maybe a tad smaller. Now I'm just going
to sub-divide. I'm gonna validate it, and
I'm going to sub-divide it twice 22.1 K. I'm
subdividing it. This will make it easier
for us to work with, so it's not so
super, super soft. Now I'm gonna hit
Solo down here. Smooth. I'm just going to
smooth out these edges. You notice symmetry is on. And you can see there's another just doing half of
the work for me. The other part of the symmetry
must be on local world. Oh, you know what it
is? It's, I think it's because when I
made the cylinder, the cylinder is
still in the center. All I did was move it up. I didn't I didn't move it. So local should be
the same as world. I'm still getting
used to the symmetry and the x axis is accesses acts. I didn't used to all that stuff, but for the most part I know enough to be
able to figure it out. I'm not going to soften
soften the bottom too, too much because this is also the bottom pancakes.
This looks good. I'm going to un-solo it. And
then we'll bring it down. And we'll slide it
over where we want it. Whoops. Let me spin, spin this around here
to our angle again. I think to make this easier, I'm gonna move this again. I'm gonna move this out a little bit more that way,
a little bit that way. I'm just going to
save this angle so I can always go back to it and so we can look at
it from this angle. So I'm gonna go to this camera option here
and just hit Add view. Now let's move scoot this over. Make sure there's enough
room for our jar here. That looks pretty good.
Now we'll just clone this. Clone it, bring it up. And clone it again. Bring it up. Of course, you can make as
many pancakes as you'd like. I think I like three. I think three words for me. I'm going to make the
bottom one slightly bigger. For the middle one,
I'm going to slide it over a little bit. For this one, I'll slide it
in a different direction. Slide it off this
way a little bit. I'm going to take move. I'm going to try
going to puff out the pancakes in certain places and add a little
variance to them. Just so they're
not super perfect. Of course you can choose
how much you want to, you want to do this. But one thing that I
think is very important is these pieces have, these pancakes have a
little bit of weight, so I just like to puff out. Puff them out a little bit. Yes. So you just want to
add these little these little differences
so they don't look like they're the
same pancake duplicated. It's never, never a good thing. Unless you want them
to look, duplicated. These little areas where
this is very even here. So I'm gonna pull
this one off and just push it down a little bit. Bring this one down to I want all the wait to feel
like it's moving downwards. You get the idea. You can
feel free to do as much as you like that type of thing. But I think it just gives him
a little more credibility. Even the bottom one, I'll drag the bottom one
out a little bit. Especially on the bottom. It looks nice.
9. Bananas : Okay, so now you want to
make something bananas. So we're gonna do
the same process like we did with the pancakes, but just smaller
and it looks like the bananas are a little more. Well, we can deal with the details when we
get to the details, but we want to do
some more cylinders. Essentially. Cylinders
are gonna be the MVP this tutorial. Okay, so here's our banana. Think that's a
good, good height. Looks like a banana shape. Let's see if I smooth
it without subdividing. When I move it, I have to. I'm on track ball. It helps if I if I'm back here and it's
sometimes it moves a lot, but if I'm actually on it
and then it's a little bit easier if I'm on something
else than it does that. If I try to stay
right on the banana, total easier to manage. Just another little tip. So I'm just smoothing out
bottom of this a little bit. Now sub-divide it,
labeled a banana. Banana. And I'll sub-divide it. Let's see how, see if
once is enough for now. Solo it. So I can
see it clearly. The cat on the scratching posts. If you can hear that. Maybe I'll just flatten. I think I just like using
the flattened tool. Really do this puppy up. That looks pretty good. Now
we'll just maneuver it over. Go back to our view. Our view. Go back to our view. And just figure out where we
want to make it a little smaller. Look on there. So we have to tilt this, tilt this guy up. Then we'll do clone. And actually I'm
going to bake this. So I'm gonna go to
the gizmo bake. That will make it much easier. It's still cloned. I'm going to tilt it
a little bit more. Then I'm going to clone this
and I'll bring that out. Make it a little thinner. This a little thinner to be careful because it's
not in the right angle. So to sort of stretch them. But this looks pretty good. Just banana slice. Bring this out a
little bit more. Later on. After we
make all the bananas, It's sort of maneuver them. So I think three
will do one more. So I'll clone this one. Bring this one out and
kinda lay this one flat. Lay that one flat. Just sort of adjust
these a little bit. That looks pretty
good. Also, another thing that you can do,
look a little smaller. Let's make them all
a little bit bigger. Here we go. Bring them all up a little bit. I don't actually
don't want them to be all in a straight
line like that. To me, it looks a
little too symmetrical. So I'm actually going to just add a little bit of
a curve to them like that. I want to make I don't
want them all to be the same the same size. I'll make this one smaller. Stretch it out a little bit
and just make it a little thinner. I think that
looks all right.
10. Bananas 2: Now I'll just go to each one and then just sort of remove
them where they overlap. I'll tap on this. Just sort of move
it a little bit. I want to add a little
bit of a I mean, it gets bananas are
fairly fairly stiff, so I don't need to add too
much movement in them. But I think I want to spin them. Maybe. I want to have a lot of work. I'm always paying
attention to to try not to have
things symmetrical. Lot of times that's what,
that's what I'm doing. Maybe I'll just smooth
this out a little bit, little bit more. I don't want their edges
to really look the same. But I do, I do tend to
overthink things. Lot of times. It looks pretty good.
Decent bananas. Bananas, Wow. This guy. Make sure it's
resting on the pancake. Think that's pretty
good for bananas. If you want, you can even
add a little to the side. What am I do that?
I'm gonna go ahead and clone this banana.
I'll just duplicate it. Bring it over here. I'm gonna bake it so I can
just go straight down. Maybe one there. Then I'll just clone that. I'll do another one next to it. Spin it. This will just use flattened front
of flatten that out a little bit. Little divot. I'll just use move. Just poke it out. Good. Flatten. I'll just do that. Here we go. We have some little
extra, extra bananas. Now that I'm doing this, I
think what might have been a smarter thing to do
is make one banana, paint it and texture it. And then, and then
remake all the bananas. But it doesn't really matter in this scenario because
I think it's good for you to practice duplicating
and cloning and just doing, doing it the hard way I think
is good for a tutorial. But it might have been
easier for me to just do one banana painted texture
it and then duplicate it. But now you'll know for next time there's just
sort of thinking that way too. There's always ways to
make things easier. The more you do it, the more you'll figure out ways
to make things easier.
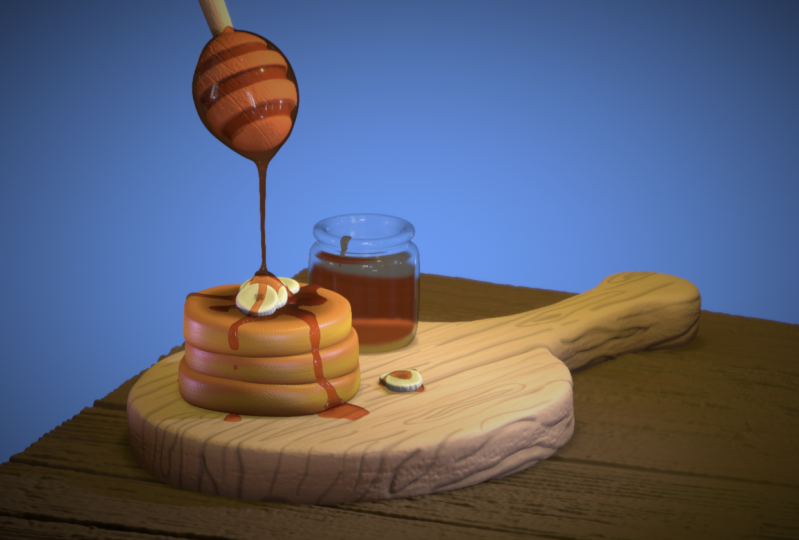
11. Syrup Jar: Okay, so now let's
work on the jar. Will equal, use the Lafe
tool to make the jar. One thing that's important that I've often
learn the hard way is you want to make sure
that you're in orthographic. You want to make
sure that you're not off kilter like this. You want to be straight when you use the usually THE tool. Zoom in so I don't need
it to be that far out. There we go. Just make sure that everything is straight
and that you've tapped whatever direction
is easier for you to see. I have left. We'll use the length tool and I'm
just going to use the path. So there's this line that
comes down the middle. And I'm going to start
with the first dot here pretty much on the line. I'm going to go out to here. And I want a little
curtain, whoops. Little curve in the end. Like so. And then add another
dot up here. When you tap on it, it just adds another, another little dot. Then I'm gonna go like this and add another curve
sort of coming in. And we can change
these two curves later if they're black, that means it's like a, it's
an angle, a straight angle. But we can always come
back to that later. I'll go up. There's another little
lip on the top. It's almost like I'm drawing
a the inside layer of a jar. We got, so I'll make
the straight down. This is the inside
the inside layer of the jar that you want,
something like that. It doesn't have to be perfect because we're not going
to validate it yet. We're going to move
all these little dots around until we
get what we need. So then you press
this little green and you have sort of looks like a jar and
it's just a little, it's a little fat for our needs. Will just skinny it up. Sometimes it's a little hard. I found to. There we go. I'll make it bigger helps. Now I can skinny it up. We have a decent size, something that we're
looking for and we'll bring i'll
I'll bring it over to stretch it there. Bring it over. That way we
can get the right size. I think I might make my I make everything a
little bit bigger. I guess I can just
make this smaller. I'll make the paddle
a little bit bigger. Go ahead and use our gizmo on a little paddle here.
Did I not validate it? I don't think I ever
validated that, but I am going to need
the handle as well. Forget about that.
So let's just simple merge those for now. And I'm just gonna
call it a paddle. It looks like a paddle. Why not? I'm just gonna make this
bigger. That looks good. I'll just make it flatter. Looks pretty good. I'm going to adjust just the bottom of it. Let's see. Actually
looks pretty good. I don't want the bottom to
go too much into the table. Now we have our little jar here. I think we can make
it a little bit. Let's see, a little bit smaller
and a little bit taller. Something like that
looks pretty good. Read up a little bit. Let's go back to our view. And I think we're
going to want it like right around here. Oops. We'll go ahead and validate it. Lexi. I don't want to validate it yet. I'll just maneuver it
a little bit and then we'll get to work on the shape. Although it looks pretty
good as it is, I must say.
12. Syrup Jar Adjustments: Make sure it's straight. So it actually does look pretty good. I like the round like
to keep it round. Let's take a look at the inside. Inside looks pretty good. Let's see what happens
if we make these round, rounds out our jar. That actually looks
good. There is a hard, hard line around
this, around this. I think that looks pretty good. There are some ridges. This is a little
it's a little thick, but maybe it's not bad. Not bad. Once you get a jar to where you like it, you
can validate it. There is something
extra that we might do. We might put a little
handle on this. Might be, there might be in ice. But for now, let's validate. Once you have your jar,
do whether you like it. I think that looks pretty good. We want to add those ridges. I just thought of a nice cool
way to add those ridges on. We're just going to try
to keep it really simple. And we're going to add,
let's call this glass, or let's call it char master. I'm gonna make a total. I'll use to tourists. I'll just use one for
now and then a clone it. So I'm gonna do left. I have the exact lift. Whoops. Now I'm gonna hit
whole. That way. I can, I can I can make
it bigger or smaller, whereas the noise, I think
that's the green one. There we go. Now
that I've hit hold, this green line will make
it bigger and smaller. Let's make the whole
thing smaller. Make that a little bit bigger.
Now since we shrunk it. Oops. Want to use left again? Actually maybe will
flatten it like this. I think that works. Now
let's do the top view. Will move it over
the top of the jar. Please excuse the
extraneous noise. Let's see how we're
looking here. It looks pretty good. I think it looks like it's
touching all the way around. It looks like it's touching
all the way around, which is exactly what we wanted. So I'll validate that and
then I'll just clone it. Bring it down. We have two. I'm going to
simple merge these two. Let me just make sure that
Let's move this paddle up. Now we have our glass jar and
we have our two tourists. And I'll just simple
merge them for now. I think that looks great.
13. Paddle Remesh: Okay, so now let's rematch
our little items here. We'll start with the paddle. I'll make sure that I'm
on the paddle layer and I'll just hit Solo. We want to join these together. First. We will rematch
them together. About 450, I'll make it, it'd be exactly 450, but around 450 were remixed. That will make it really ugly, but it will join these together. The next, the next thing is the paddle isn't really
going to be straight. So the symmetry tool
is gonna be a problem. Because if we hit symmetry here, you can see that
this is way off. This is the world center. If we hit local, then it's
still, it's the same. So this is the local center. This is the local center. So what you can do because it's easier to use
symmetry when we're doing things like
trying to smooth all of this because it's a
symmetry to symmetrical piece. I'm just going to put it as
straight as I can like this. I'll go to the symmetry tool. I'll go to the bottom. Gizmo edit. This allows us to
edit our point of symmetry. Right now it's way off. So I'm going to
choose this green. And I'll just sort of
move it like that. And then I'll move this over. That feels about in the center. That actually seems pretty good. Usually it takes a little
bit more maneuvering, but that actually looks like it's pretty much in the center. Okay, So that looks good. And as you can see, the bottom is a little bit the bottom is a little bit of a different it's a little wider on the bottom, which is okay. But from this point forward, when we do symmetry, let's work on the top
and the bottom together. This will make
sense in a second. So let's hit symmetry again. We'll hit Y. Now you see this
green flat plane. So that deals with the
top and the bottom. The top and the bottom
are also going to be symmetrical.
That's what we want. Let's take an out gizmo edit. Now when we use Smooth, make sure symmetries on here. As you can see, both
sides look pretty good. I can bring the intensity down a little bit because the
clay still a bit soft. I'm just going to smooth
it a little bit like this. Just move them
around a little bit. Not too much pressure,
not too hard. Now I'm actually going
to sub-divide it. I'm going to sub-divide it once. That way. So it's a little harder. Now I'm going to up the
intensity on our smooth. And you can sort of smooth all this out a little bit more. Since this is sort of
a weird shape here, It's not exactly the
shape that we want. I'm gonna use move. Let me
just take the symmetry. It's still in local, everything
is still how we said it. Now I'm just gonna move
this out a little bit. Just make it a little
more of a nicer shape. See if I can push
these in a little bit. I'll make it really small. Just sort of push that
in the tiniest bit. Now we can use a smooth, we can try to smooth
out what we can. See if we can use flattened
here before we remission. Make the flat to a really big. Let's just see how that looks. I just like to do flatten and
then smooth and just gets, gets rid of those wrinkles. Now to get it a
little bit smoother, we're going to remeshing 300. I'm remeshing it this way. It's sort of like it loosens
up the clay a little bit. So now the smooth
will smooth out much. There'll be a much
stronger smooth tool because everything is at
the clays a bit software. You can see it's really, it really pushes
the really pushes the clay. Looks pretty good. I think that looks a lot better. Now I'm going to actually
take it off of this y plane. I'll leave the other
plane as it is. But I don't want to really
work with the bottom anymore. I just want it to be nice on the top and I want
it I want it to be nice and round on the top. I'm just going to
keep smoothing. Keeps moving until our
wood little cutting board is nice and smooth. My favorite part is this
smoothing things out. I think this looks pretty good. Okay, I think that looks nice. Let's un-solo it and
see how we look. Everything looks like
it's still resting on it. It actually looks pretty good. Now we have a
pretty nice paddle.
14. Jar Remesh: Okay, so now let's join. We have these tourists,
we have these sort of the lid sort of
things on the jar. We want to bring up this whole glass jar together so we'll refresh it and
literally mesh at 300s. So it doesn't have
to be exactly 300, but will rematch at 300. The voxel mesh, which is always next to you
just so you know, he's next to their
rematch. It at 300. Looks really ugly. And
we'll go ahead and smooth and we want to make sure
that our symmetry is local. Just check the symmetry. That looks pretty good. I'll make the symmetry
brush a little smaller. I'll just smooth away. It's okay that it actually
flattens them out. I think it looks more natural
when they're flattened out against it. Make
it a little bigger. We want to smooth the rim. 60 new detail over here. What if it's just the light? Oh, you know what it is? So this bit right here is just a little
bit closer the jar. So a way to remedy that
is you can separate. Oop, not the paddle. I didn't
minutes up with a pedal. The glass jar separate. Find that find that piece. You can make it a little bigger. Now we'll just choose
our glass jars again. Simple, merge them together. And I'll go back to, and I'll do the same thing that
we just did so I can fast-forward and basically just getting to do
the same thing. I will Vox emerge at 300, the mesh. And then just smooth
everything out. Honestly like it's not
really that big of a deal. I probably could have because this is gonna be glass anyway, so it probably wouldn't
have been noticed, but it's just good to good
to know how to fix problems. I think that's one of the most important things
in art illustration. 3d stuff is just the
ability to fix issues, to see a problem, to recognize a
problem into fix it. Very, very important. Looks good. Once you're happy with that
and you can un-solo it. We have our little jar.
15. Adding Textures: Let's make our
woods surfaces now. We'll start with the table. So we'll click on the table. We're going to use brush. We're going to go down here
for our brush settings. To add the brush texture. You just had this little
plus here, go to photos. And wherever that photo of the wood is, you
just click on that. And it will show up down here. And then it'll,
it'll show up here. That's the texture
that you're using. Let's solo our table. Check out these brush settings. Should probably be
indicted. Normally. I changed the falloff
to just this flat here, this flat line Screen project. Everything else
should look like. This. Scaling is one tiling is one. Mid value is 0. Just want to show you my settings in case
something happens to be a lot different
than yours. I think this was on 13. I did adjust that on a ten, but I don't think that really makes too
much of a difference. It's very strong in the middle, but it's faded all around that. So let me take a minute
and figure out why that is fading outside of our center. I needed to check
front-facing vertex only. That pretty much cleared it up.
16. More Wood Textures: We have our wood grain for
the base for our table. So we'll do one, Sol LeWitt. And then we'll do the
same thing for this would hear the wood panel. Make sure we're on
our paddle layer. And let's go ahead
and sub-divide it. Sub-divide just 347 k. Using the same brush,
same wood thing. See a lot of nice detail there. Bring the wood all the
way down along the sides. More straight down. There we go. Later on we'll add some mixin
things that'll just make the world a
little more realistic. Give it a little more. It looks pretty good. I think before I do this,
I'm going to smooth it out. So we'll just jump to the
next video before I get into kind of cleaning these up and making it
smooth and things like that. And we'll see what
we have to do with our little little syrup dipper.
17. Honey Stick Details & Textures: Now for our little honey stick, I think I want to
take it out of PBR. I want to get some color. I think I'm going to
add some color to this. I think thinks something
like that is pretty good. I'm just going to hit
actually, you know what? First going to separate it. I'm gonna separate
the Honey stick here. I basically just want to
this is the middle part. So I'm gonna take all
the parts above that. And I'm gonna paint those. This color will go rough. I'm going to paint
all those that color. Now, let's take the middle part. And as we can see
on the reference, the reference here, it's darker. These middle parts, the
middle part is darker. Make that darker here. Darker. It gets a little, little reddish. That
looks pretty good. Now, let's go ahead and take all of these
over the honey sticks. We can box them, merge them
as fox swimmers them at 400. See what we get? I think
that looks pretty good. I'm just going to save it just
in case something happens. Now, I'm going to
smooth all of this out. Let's make sure that if
they're all, they're all one. So let's just move
this out here. Actually, I don't know
where this symmetry is. Let's see. The symmetry is
acting really weird. So I'm just going
to take that off. Don't really need the
symmetry for this. I'm just going to spin solo. This will be, can
see all the angles. Make sure we had this thing
nice and smoothed out. Different angles. Looks pretty good. Because smooth out around here. Now I usually put easily
to a layer first. Let's see how the layer looks. Once we add the wood grain. Let's go back to brush. See how, what is this? 139 K. Let's just see how our
wood grain looks on this. It's actually not bad. I think it'll be too I think it'd be
too big if we sub-divide it. Let's see. That's not too bad. Let's see what the wood grain
looks like now. It looks really pretty. I think. I think we'll stick with this. We'll just add this
nice wood grain. Then probably should've
stretch this out some. But that's okay.
We'll just leave it. Now we have a nice-looking
wooden thing. I'm Bob. Now we can also color. Let's see what we
want the same color, maybe we want the paddle,
the similar color. I'll go to paint here. I'm going to hold here so
I can grab that color. Let's see what this looks like. With this color. A little
bright but not bad. The table. Maybe we want a
little bit of a darker color. Let's go back. Let's go back to this color and then we'll
make it a little dark. There. Were in this we can
maybe we'll just match. It. Could always match it. Let's see what that looks like. Doesn't a bear. I do like the
resolution of this. I think it just looks
a little clearer than my table. Let's take a peek. Actually looks okay.
Actually not bad. Sometimes I take a peek at
the post-process just to get a better idea of how my
elements are gonna look.
18. New Table: We're gonna live crazy hair. And I just want the table to be a little bit more
defined than it is here. So we're gonna make a new table. I am going to make a new box. Make it bigger, make it smaller. Stretch it out. Stretch it out here. Keep it nice and thick. I'll stretch it out. This way to denote this
way, we have a new table. I'm gonna go ahead
and validate that. Now I'm going to sub-divide it. One sub-divide to subdivides,
three subdivides. Let's see how our
wood grain looks. Brush everything look good. That's about where
we were before. I'm going to
sub-divide it again. Now we have a subdivided again. Now it looks really nice. It looks, that
looks a lot better. Just looks a lot cleaner. Since we, since we
subdivided that, let's go ahead and sub-divide
the paddle as well. Just be careful, make sure that you're
saving these things. Because, because now the numbers are getting a little bit high. You just want to make sure that you have everything saved. I'm gonna get rid of
wood on the paddle. Going to sub-divide it. I'm actually going to
smooth it out because apparently I have
some apparently I did some some wood grain
right on the surface. I'm just going to smooth
it out a little bit. Now I'm going to take my brush, solo it so we can
see it clearly. That's a lot cleaner. Now we have that nice
wood grain there. Make sure you add these
details all along the side. I just want to be
careful that you don't go too high with it. So let me me, me, me, me, let me get a little bit smaller. Want to make sure that
your grain doesn't really interfere too much with the top. The top section of your would
you want to keep that nice? Wouldn't look on the top. Actually on the sides can be a little bit more. Horizontal. Looks pretty good. Little more in front
facing vertex. Little more definition
where I don't see a lot. We'll add some on
the bottom just because our paddle looks a
lot better now I'll un-solo. It will do the same thing
that we did before. We'll just make some
more lines going down. Table. For the sides. Again, I'll just do horizontal. Be careful, I don't go
too far or too high. Then for this side, we'll
go horizontally again. I guess we'll add some
to the bottom as well. Little bit. We don't really need
too much on the bottom. I feel much better about that. A lot of times I do have
to problem-solve and just kind of figure
it out on the go. That's one of those times
and I do make changes often. Do you have to be
okay with just making changes going through
that process? Let's color this guy. Clearing them a little
bit of a little bit of a darker tone. Not bad. You know what, we
can bring this over. We'll bring this over
to our like I said, is just high, isn't it? Just really high and really big down just so we can see it. Now we can start kind of
just coloring and working on jar and our pancakes
and our bananas.
19. Adding Color: Okay, so let's color, let's color our pancakes and
our bananas really quick. These are pancakes.
This will be p2, p1, and p three. Those are our pancakes.
I like to make. You can color it your pancakes, any color that you want. I tend to like to
make the middle nice golden yellow color. Maybe something like that.
Color. These the same. We have our little bananas here. For our bananas will go
with a much paler yellow. Bring us a little closer
so we can see it. Looks good. Just paint over all
of our bananas. Here. We go. For our jar. Let's make our jar. See him go to the
little material window. And we'll make
that a refraction. We have our, we have
our cylinder in there, which is fine. We can leave it. That's
actually a pretty good. It looks pretty good so far. We can change the color
of this liquid inside. Let's make that a
refraction as well. So we'll go to our material, will make it a refraction. But we want to, you can hardly see it now. We want to make it
a bearish color. Maybe something like this. I want to glossy paint that. Now let's just figure out
how we can see through. I figured out what was, what
was wrong with the syrup. Basically, I just grabbed the glass jar and the syrup
and I brought them both up. And you see the syrup
actually goes way down. So I want to make sure that our syrup is just
within the jar. Hey, that looks a lot better. Now let's bring everything
back down and see what we have. It looks a lot better.
20. Syrup Adjustments: Now we can actually, we can actually shrink our
syrup a little bit more. That looks okay. I'm just gonna, I'm just gonna play around
with some of the settings for the glass index of
refraction of refraction. We'll see how that
looks. We'll see if this looks better or worse. Kinda makes it look a
little bit unnatural, like it's floating in there. Pink, lossy. Obviously this makes the
glass glossy. Will undo that. I kinda like it when it's
not super, super glossy. Absorption, we can just
take a look at that. I know I don't usually
use absorption. Cast shadows. Leave those on two-sided. Let's see what it looks
like when it's on. It looks a bit strange
with two-sided on. Leave that off. The only thing that we had to change back
was the index of refraction. We make it a lot then
he gets a little crazy. We'll just do something like
something like that is good. Now, do we want to
make it Frost ear, surface glossiness,
and then we have the inner glossiness,
interior roughness. It's kind of nice when
it's a little rough. Let's see what
surface glossiness. That's kinda nice. It looks, it looks decent. Maybe I want to see a little bit more of the liquid in there. I'll bring that
down a little bit. Can also adjust the syrup alone. Just shrink it up. Wherever
you want to shrink it up. You want to move it
away from the edges.
21. Pancake Color: So that's a good start. I might make these. I think this is a good
place for our pancakes. Solo. This one. I just want to paint
the top of it. Darker brown. Let's go to Paint. Make it a darker brown. It looks pretty good. I'm going to actually going
to add a layer. Now let's just paint this guy
and see what it looks like. In turn symmetry off. It doesn't look bad. I need to make this a
little darker actually. See how that looks. If you notice, I don't
really have it to two glossy or
anything like that. I don't really like
too much gloss. Especially for things
like breaded treats. Only want a lot of gloss. Looks pretty good. Now I'll
just use the smudge tool. Just sort of it just sort of soften
around the edge. That looks pretty good. I might actually want
the base to be a little more, little more golden. There we go. I think
that looks better. Make it a little more golden. That's the beauty of doing
everything on these layers. Because even if I wanted to
try a different color now, I can just add a layer. And it's always great to
use layers because you never know if you're gonna
change your mind on a color. This color I think
is pretty good, but maybe another
color would be better. Just let me go back to paint. Like this orange color. It looks a bit nicer. Like this. I like
this orange color. I think it's a little bit nicer. The yellows, nice and bright. Because at the end of the
day it is a visual thing. I always encouraged
kind of trying out different options because even though something may feel right, sometimes visually, things
that you might not expect, one of looking better. Whereas I wasn't
really thinking of such a drastic yellow and
such a drastic orange on top. I think it looks way more. Just pretty as a pancake. This 3D, 3D world. Just smudging the, the edges, making it nice and make this it smaller. I think that looks okay. And a darker layer on top. See what that looks like. Sometimes it can be
very indecisive. When trying to figure
out what color I want. I want a nice golden brown. I think. We go, I think that's
a good median. That's a good
median right there. But of course, you'd
have to figure out what, what you like, what you prefer. Can you make them blue? You
can make blueberry pancakes. I'm just going to
erase a little bit. Just wanted to keep it
keep it on the top. Have a little separation. So I'm just erasing
little bit of this. See how actually not
that, not that different. But I think that works for
now for the bottom cake.
22. More Pancake Color: Back to paint. And let's paint
all these the same color. Now we'll just solo
and then we'll paint the rest of our little pancakes. Let me grab this color first. Add a new layer, smooth it out. Same process. Smooth out this
line a little bit. Smudge this again. It looks pretty good. I'll take a peek at post-process iPad. That's the base colors. And alpha c, we can
sort of work on a little bit of more
details as we move along, but it's nice to have just
the base colors of everything down so we can pretty much
see what we're working with. Feel free to adjust
and change things and just work the colors. And so you get them to a
place where you like them. I might have to change this. Bananas a little bit. Greenish. But again, that's the beauty of
what we're doing. Let's see how that looks. It looks good.
23. What is Post Process? Why Pancakes?: You may have noticed
a couple of things that I do on while I'm working. One is hitting this icon here
and hitting post-process. And the reason I do this
is just to kind of get a better look at what I'm working with and
what everything looks like. You see I get a better
view of the wood. It just looks a little
bit more rendered. Then when I don't
have post-process on. Now these are all these are all different settings that
you can play around with. I just use it just to get a quick view at what
everything is looking like. I kinda make decisions on
color and things like that. And after looking at this color, I do want to actually change. I'm gonna make it. I think I like it a little more saturated, Something like this. Maybe actually make this table a little more like a light, lighter wood or
something like that. I think I'm going to I think I'm actually
going to color in. We have the top of
these pancakes, sort of this brownish color, the golden brown color. And I think I want
to add that to the bottom of the
pancakes as well. So I'm just gonna
choose the pancakes and big brush, low opacity. I solo the pancake. How solo it? Let me make sure that I'm on that brown, golden brown layer. I'll just add some brown
to the bottom as well. Let's see how it looks. Not so load and you
can actually lock it. Now this lock icon
might not be here. If it's not here, it's
in this menu here. And then you see these add
shortcuts to the bottom. So lock selection
takes a shortcut away. You just click it and that
shortcut will pop up. If you're looking
for that, remember, it's in these three lines. That's the cat running around. It's in these three lines. And that's where
you get that Locke. Locke is great because once you tap on the
pancake and hit Lock, then you can take your
brush and you can just, you're locked to that layer. So it's not going to go to a different layer and
kind of mess yet. That way you can see
what you're doing. You want to add that little
bit of color to the bottom. You can see this isn't
really working out great. It might be just easier
for me to solo it. But Locke is very useful
in certain circumstances. I do like to add these little details like
shading in the bottom. So it's like, you know, obviously if they're
pancakes or griddle cakes, then you cook them
on both sides. Even though minor, really fat. But I just liked I liked
the way that looks. I don't know. I just
like the way it looks. Smudge. I'm going to do this. I might, I guess I
won't speed it up. But you can feel free to add some shading underneath and go ahead and you
can do what I do, just paint it and
then just smudge it until it's something that
you think looks good. I like to have everything
nice and soft. It doesn't look
like a paint job. I wanted to look very natural, like something was naturally
cooked on a on a grill. I'll do the same
thing for this one. Make sure I'm on
the right layer. Determine paint. I don't want it to be as
dark as the top. I just want to add some life, my pancakes, some some, some life to the bottom edge.
24. Pancake Color Details: I did want to, I did. I was excited about
painting in procreate. But the times I tried it, It just wasn't really
what I expected. I thought I would just have
all of Procreate's tools to my what's the what's the term? Disclosure? To
disposal? Disposal. I thought I'd have all
procreates tools to my disposal and be able to paint in because I can
paint some really, really cool things in Procreate. Procreate is a great
program for illustration, for painting, and that is all. It's great. But it just wasn't where I was. It wasn't where I
thought it was gonna be. At first, he was tough
to bring 3D objects in and then painting on UVs. I'm just not, I'm not, I don't really
understand it enough I think to take advantage of it. So I decided that
I was going to use the tools that are in Nomad to achieve the things
that I wanted to achieve. And sometimes that's just
what you have to do. Now do the same
thing to the top. I did think, think about
making blueberry pancakes. I got this photo from pixels. And pixels is sort
of like pixels, but it's a PE LES pixels. But they have a lot of, a lot of really great free images
that you can use. This photographer
actually has a lot of images of things like this. I thought this one was
really pretty and there was some with some
blueberry pancakes, but I just felt that as beautiful as they
were and Ben may even be. It's really gets a little weird, like promoting, like making, making pancakes and they're like an interesting bluish,
purplish, greenish color. As plausible as
Blu-ray pancakes are. Just feel like regular pancakes is good bet for the masses. But I did look at some
other, some other pancakes. I do like pancakes
XE I loved pancakes, but I can't seem to make them like I hop, which
is my favorite. I do like to make. I have actually illustrated recipe book with the way
that I make pancakes. I never, I never really
got the book finished. Print it. I got all the images
done, but I just never liked went ahead with it. It was more just
like a fun project. But I don't really
make pancakes that much anymore. I guess. I kind of made them
a little too sweet. And I wind up eating too
many of them. Too much. Yes. So then once I get really, really full and he too much, then I'm kind of
off of pancakes for awhile. That looks good. Yes. Yes. The bottom one needs the bottom
one does need some more brown on the top. So I'm gonna go ahead
and go back to that one. Just fill it in a little bit. Just needs some more brown. But as you can see, I always go back and
i o I always check my I wish just check to
see how things look. I mean, it's a simple thing. Sounds really simple. But it's really important
to just zoom out, you know, sort of step away
from it a little bit and see what you think. And that's why, that's
why I make changes. I think making changes
in the ability to just analyze your own work
and make necessary changes is one of the biggest tools
and the biggest assets that you can have that will make your work better and
really elevate your work. I'm not perfect when I do. I'm fairly new to 3D. I've taken to it quite well. But I'm still new to it. There's a lot of things that I tried to figure out and
there's a lot of things that I've even done a month ago that I would
do differently now. But it just takes doing it. It takes, it takes
doing it and it takes figuring out better, faster ways to do
what you need to do. The only thing, the only way that you're gonna
do that is like his time is the time
that you spend doing it. Sometimes it's tedious. I'm sorry. I'm sure
sometimes a lot of things that I do in
this class are tedious. And that's just, that's just the nature of
it, but I find it. I enjoy it because I know that. Let me try with I
think I have to, I think I have to merge,
merge this layer. But if you merge the
layers, smooth works. I don't know if smoothest
gonna work here. Oh, it looks like it's
actually working. I haven't quite figured out I thought that I would
have to merge, merge everything
down to the base. But I mean, it looks
like smooth is actually working and smooth is nice. Smooth because it gives a nice
smooth bass. I'll take it. But I'm trying to figure out
because I know I've used smooth a couple of times and then sometimes
it didn't work. But yes, smooth, smooth,
he's worth nice. Let's see what it looks like. That's a little better. I just wanted to see that brown. I wanted to see that
brown on all of our, all of the pancakes. Very important to see, see the brown and add a
little bit of darkness. I like adding that little bit of darkness to really give them that little bit of more
of a realistic feel.
25. Color Adjustments : Okay, So I've
actually just changed I decided to change
these colors again. Might not be the last time. I apologize, but
I can't help it. Maybe there'd be quiet. I'm trying to make a class here. You're gonna be quiet.
What was I saying? Oh, yes, So I wanted
to change the paddle. I wanted to match this again.
I've matched that again. I'm actually going to make
this just a little bit warmer. Something like that.
I don't know why, but I do I go through different changes and
I just I just and just do it whenever I feel something is not
right and I want to change it, then I
just change it. Even if I've even if
I've gone further like you saw when I
remeshing the wood, this is gonna happen, so feel
free to change your colors, make them completely
different colors. Yours, yours is for you. You don't have to match
everything I'm doing, but the concepts is
what I want you to sort of just get familiar
with the details. If there actually is another color thing that
I wanted to change. I might actually, for now, I'm going to simple merge them. Because there's no really
there's no real reason for them to be separate. I think it's six bananas. So I'm just going
simple, merge them. That way I can change the
colors all at the same time. I was looking at
the reference again and the bananas are
actually quite a bit paler. Yellow. I was kinda worried that
they would be close to the yellow and the pancakes, but they're actually
quite a bit paler. I think there are
something like this. Actually has little closer. It's kinda nice kids. It's a different, it's
a different yellows, a different hue than the
pancake. So that works for me. Okay, so now we can
sort of figure out how to do this syrup, which is, which is a
whole thing in itself. But I think syrup is fun. That's probably, it's
kind of weird to say. But I think making dripping
things as sort of fun.
26. Syrup Talk: Okay, So I think to tackle this, we're gonna make a
mask on the pancakes. We don't have to worry about, I'm not going to worry
about this year of actually hitting the bananas and doing
all those fine details. We're going to do a
mask on the pancakes and then we're going
to extrude it. And that will give us
our syrup on pancakes. And on the roof. I'm busy, baby. I'm busy. Busy. Then we're going to
make we're going to put a round thing like
a sphere over this. And everything is
gonna be the same, the same hue as the syrup,
which we have to figure out. It looks a bit, oh, it actually looks nice
there in that view. What do you have to
figure out a good color? But it's all gonna
be that same syrup is gonna be refraction. So we're gonna be able to
see through it and have this nice gloss and
everything else. So the first thing I
think we'll do is make a sphere to go around this
and that will be the start. We can pull it down. Let's figure this out together. Actually learn a lot from working on these
classes as well. To be honest with you,
I don't think I saved. No, I didn't save. It
would've been nice if I saved that inner sphere because that would have
actually helped me out. Give me 1 second, let
me make it too much. No. People, my God. I can't give you his neck.
27. Making Syrup: It would've been nice if I
saved that inner sphere, because that would have
actually helped me out. Okay, so let's go ahead
and make a sphere. Let's save first. Always remember to save. Make it part, make it a habit. Save even more than I'm saving, will go ahead and
make our sphere. And I'm actually going to choose the color
I'm gonna go to. I guess we can, we
can validate it. I'm gonna go to the
color of this paint. I just went to the
paint icon and I just held my finger on
this color of the paint. I'm gonna make this refraction so that I think
that'll be easier. So we'll be able to see
exactly where it is. We'll be able to see through it. So let's go to this
little sphere here. Refraction. What does do paint glossy. And put the index of refraction. Put it down to one for now. And paint all. That looks actually nice. Now we just need to, it looks like it's over
our little thing here. Let's use our gizmo
and we'll just move it around it like so. And we want to completely
covering we can you can adjust it so that it's
completely covering the. Now let's try out this
index of refraction. I just want to see how
that will affect it. Let's see how it
looks in the photo. I don't think I
want to use any of that because I think
it takes away from our beautiful honey
stick that we made. I'm actually going to turn this. Let's see. I'm just tilting it. We've stretched it out. So now I'm just going
to I'm just tilting it. I want the air. There we go. I just wanted to figure
out how to get it. It's sort of around
the base two. Then we can start
working with it. Now this is obviously very big. It's actually, it's quite huge in comparison to the pancakes. So I'm gonna go ahead
and bring it down. We have our sphere, which
I'll name syrup one. We have our syrup pole here. And then the honey stick. Bring the Honey stick down. Since we're gonna
meet, we're going to check both of those. So now we can just sort
of make it a little more. Going to position it
over the pancakes. It's very close to our pancakes. We don't want it that close. I think something
like this works. And actually let's
twist it would take this red one and
we'll just twist it a little more like this. And I think that works. We don't have to be to clinical
with the syrup sphere, which is very helpful. So I think now I want
to drag this down. Let's try and drag this down. See how it, see how it looks. You know, maybe, maybe
an easier way to do this is to actually
make a, make a tube. I think that'd be the
best way to do this. We'll make a tube. I'll just use path. See if I can go to
the gizmo just so I can make it perfectly on the left and I'll
go back to tube. So I'm gonna put one there. Isn't one down here. I'll put another one. No, actually, you know
what, I'm just going to use two because I wanted
to be straight. I wanted to be straight down. Now I'm gonna hit
this little green. Now we have our tube and we have to sort of position it
so it's in the right place. Let's check this out from all the different
angles and just make sure that it's
straight down. It looks pretty straight to me. And it's right on the
right on the bananas, so it's a good,
it's a good spot. The reason why I
wanted to use the tube is you have all these options. So let's tap radius. We have Edit Selected
Edit is what gives you the ability
to edit our tube. Now that we have
the the tools open, we can go to radius. We click radius once
and now we have, we can adjust it at the
top and the bottom. We can make it bigger and wider
at the top of the bottom. If we tap radius again, let's say we add
some points in here, then we can adjust
these points as well, which we don't really need. The other points we might eat, we might need to, Let's see. If I spread this. It sort of spreads
the whole thing. This is not exactly beneficial. I'm going to add point here. I want it to be pretty straight. I want all these to be
straight. Actually. I'll add a point here. And it's really fat. So we want to, we want to
make this thing smaller. We'll make it smaller here. We'll make it smaller here, but just moving these in. I want to make it a little
smaller on this side. Now we have something like this. Just makes sure that it's straight from these
different angles. I just wanted to I just want
it to be straight down. At least straight enough. Looks a little it looks a
little not straight there. But that actually might be okay. If we have our syrup kind
of coming from this way, then it could be like
we're dragging it across. So I'm actually okay with that. It can be straight
down, but I'm okay with that as well
because that's sort of gives me a path as though like you're dragging this
honey stick from here and then it's
drooped a tripping over the pancakes.
I'm okay with that. I think this is a good
spot for our tube. I'm gonna go ahead and if I
need to do anything else, going once, going twice,
I'm gonna validate it. I think it looks good. I
think it looks pretty good. Now, let's do the same thing that we did with the syrup ball. Will go to the sphere,
will go to refraction. Index or refraction
was bringing all the way down pink glossy. And then we'll go to the
color and paint all. I think that looks yeah,
that looks the same. That doesn't look bad.
Okay. So let's see. I think I just want to
I want to merge them. I don't think I want to
merge them just yet. That will be our syrup dripping. Next, I'm going to
hide these bananas. I'm going to make a
mask over the pancakes. Save.
28. Mask Making: Okay, so we're
rocking and rolling. So the next thing
I want to do is simple merge our pancakes. That way we can put the
mask over everything. P1, P2, P3, pancakes,
simple merge those. So now we just have pancakes. Now Let's do we
want to sue them? No, I think we just
want to hide the is. We'll hide the bananas. And now we can kind of see
where our syrup is hitting. I'm gonna go to mask here. I'm gonna bring the
brush radius really low. Take it off symmetry. Go to our pancakes. Interesting. This
is interesting. Clear. Okay, there we go. I never actually
seen that you can tap the whole thing
and the whole thing. I've never actually
seen them before. Interesting. But anyway, we want our, we want to be able to
see our mask like that. Actually looks a bit. Let me save this. And our pancakes. We sub-divide them. Let's see what our
mask looks like. Mask loose, whole lot better. So sub-divide the pancakes. And that'll make our
mask look a lot cleaner. Now we're just going to
make some masked syrup. Let's take a look at our bananas again
just to kind of have an idea of where
the bananas are, where we want our syrup going. I think I wanted
like, like that way. Actually we can just
I'm gonna leave. I'm gonna, I'm gonna hide them. I'm not gonna tap the pancakes. So we won't see
Europe to be here. Make my brush a little smaller. It usually makes the
edges a lot crisper. I think I just want to
make a nicer like round, sort of a cute little round shape
that will be 0. We can have the seer
pointing down the side. Maybe pulled up here. You can have a little bit here. Some there. I attended. I tend to get a little crazy
with the pancake syrup. It really can just be straight
down and thinner too. I feel like my mask
keeps getting quite fat. Let me get thinner. I will
pull it up here at the bottom. Mix them here. We want someone this side. Let's do, let's do a
nice little bit here. We can do some coming down here. Oh my God, look at
that. My syrup isn't even touch. That's okay. I think the bananas are there, so that's probably why. I
think that looks pretty good. I don't think we need it
over the whole pancakes. Although we could, let's make, we don't want what we're
here to kinda look boring. Let's just make a
nice big round. Will make a big round
bit over there as well.
29. Extrude Mask: Once it's all figured out, we want to go to the
Select tool here. And then we'll mess with
some of the mask settings. We have engrave emboss, extract. Extract is what we want. Shell for these closing actions. I think we want none. Pretty sure we wanted none. Shell thickness. I'm gonna bring in
thickness up to three. We might have to adjust
these as we go. Let's see. We want to hit extract. Not bad, That's actually a good size. That's
looking pretty good. That's a pretty good size. What that actually does
with that actually did that actually made
it into another mesh. Right here. We're going to
name that mesh syrup too. I think we have syrup 12. So I'm gonna put this up
next to our other syrup. I'm going to name the tube. What am I going
to name the tube? I don't know what I'm
going to name the tube. Tube syrup. Now we're gonna do the same
thing with this new mesh. I think it's syrup to, I
forgot what I just named it. But first let's actually
get rid of the, let's get rid of the mask. So just go back up to the
mass settings and hit clear. Otherwise that mask will stay underneath and we'll be very
confusing in the future. Go to syrup T2 and we'll
go to the sphere up here. Refraction, index paint glossy. And oh, it looks like
it is the same color. Paint. It just to just to be safe. It looks like it's
frosted a little bit. Oh, you know what, I'm
still in the mask. Let me just clear the mask
and then we'll go into paint. Now let's just paint that again to make sure that it's
right because it looks, it looks frosted here. Let's go back into our settings. Pink glossy refraction. But this is the step, this is the stuff,
surface glossiness. We have to turn
that up. I wonder what that was all that was down. There we go. Surface gloss override painting. Although the painting is
depending isn't rough at all. So I don't know. Sometimes that happens. Sometimes it's it's kind
of weird like that. But anyway, we figured it out. It looks very dark inside. Let's hide this. It looks like there's
a mask underneath. Let's go to the pancakes. Will go to the mask and clear. I could've sworn I cleared it before, but I must not have. So now we have our
syrup being poured. It looks pretty good.
30. Smoothing the Syrup: Okay, so we need to
get these ridges at our syrup because it
doesn't look natural at all. So the first step, I'm gonna remeshing it at
300 and keep sharp edges. I'm just going to do that again. So when you remeshing it, make sure that you check, keep sharp edges and
rematch it at 300. Rematch. So now it's a 146 K. Keep sharp edges was checked. Now I'm gonna, I'm gonna
smooth it from the top. I'm going to smooth
from the top. And I'm just going to
try to not press too, too hard, but I just want to get those ridges to
sort of melt away. This is one of the only
reasons that I want, only ways that I
figured out how to do this with like syrup because those ridges look pretty bad. In a totally, totally
ruined the look of serum. Silly ridges. We can actually add more syrup. If it gets too, too
thin as certain place, then you can add more or will go into move and just sort of stretch it out again
if you need to. But usually it winds
up looking okay. Even though it's sort of like takes away a little bit of what? Little bit of the shape. But I find that actually sometimes it really
makes it more realistic because
sometimes it has to make my syrup really fat, I guess. And I'm not sure why, but I always wind up
shading from the top. I've just felt like
that kind of helps it along versus going on the side and sort of pushing
inwards for a second. I thought I forgot effort. I thought I forgot
to hit record. I would've been very upset. This syrup is
looking way better, way, rounder, less jaggedy. No one wants to, no one
wants almost to eat. Jagged seer. Can pretty good. Just keep rounding groups. So just keep rounding
out your syrup. Remember I have do I have as locked,
shouldn't have unlocked. I have that locked. I don't accidentally
mess up anything else, but it's really smooth tool so it wouldn't
actually be too bad. But it's always good to lock
this little round guy here. He's almost melted
away to nothing. If I wanted to. If
he got too small, I would just do a sphere. Sort of connect it.
It'll jagged e's. Get rid of these jagged ease. I love the way that looks. There's plenty of ways to do. You can do manually, you can sort of make these
shapes and things like that. But the first way that
I learned shout out to quintillion on YouTube. This is the first way that
I learned with a different, I think it was with a doughnut
or something like that. But I learned a lot of things from other and a lot of
things from the Internet. And I just sort of
had to figure out ways that they make
them work for me. I also think it's
good because it's nice that it fills
it in the gaps. I think that looks pretty good. Now, let's put some
syrup on the table too.
31. Syrup Puddles: I think I'm just
going to use spheres. I'm going to add a sphere. Small, bring it up, flatten it out a little bit. Something like that. I'll actually I mean, I really don't need to slice it. I think it's actually fine. But I'll go ahead and trim it. Why not? I'm trimming and
I'm using the rectangle. I'll do that again. I'm
using this rectangle here which is I use it's
pretty much Ward. I usually use the trim tool. That's why it's already set. I'm just going to trim this. Then I'll just bring it
down and place it here. Then we'll do the same thing. Refraction, make
it a refraction. Index, way down. Pink glossy paint all
I'll do force paint all. I'd like to switch
it up every now and again. That looks pretty good. Now we have our syrup. We can use the Move tool
and we can sort of move it around as we wish. Even pull it up, pull it out. Pull it up off the
wood a little bit. Now we do have our bananas. Let's see where the bananas,
the bananas are here. You can make, you can make your, your kind of syrup puddles. However, however you'd like. I'm gonna take this sphere. Whoops, I didn't
mean to push it. I'm just going to take
that sphere and unlock. Sometimes I forget
that I'm unlock. I'm gonna take that sphere. And let's see. I'm going to duplicate it. Then I'm going to kind of
bring that one over here. We have a pre-made
sort of syrup puddle. You can make it
smaller or bigger. Bring it out a little bit until it's just whatever you whatever you
think looks good. And I like to make some I like to make some
little ones too. I'm gonna go ahead and
simple merge these two. And actually I can probably
simple merge with this as well because we'll bring those altogether
at some point in time. But I noticed that
I actually made a glossy again are
emitted a frosty again will turn up
that since we figured, we figured out that that's
why it was doing that. Let's make another sphere. It has like little
like syrup balls. Push it up against our will. Go ahead and do the
refraction process again. Pink glossy paint. All. I said, Oh, Sarah
Ball, or validate it. If we want, we can clone it. We want to put another
one somewhere else. Maybe on the other side. Spin our pancakes around here. Maybe if we wanted to give this a little bit some love to, we can make it bigger and we
can kind of flatten it out. Clone it again. Just make a little just like a little connection
or something like that. All these fears, I'm
just gonna go ahead and make sure that
this is all syrup. I'll just simply merge them. Now I'm going to
save since I did all this and go to View, did all this is looking good. I'm gonna go ahead and save.
32. Syrup Jar & Memory Dump: Okay, So I want to make a little bit of
movement in the syrup. Almost like there's
some syrup kind of around the edge
of the jar inside. So I'm just gonna make sure
I tap on the syrup mesh. And I'll use the move tool. Not too big because
I don't want it to be I don't want it to
move the whole thing. Maybe just like
Something like that. I think kind of just shows that there's a little
bit of movement. Syrup is sticky. So just a little bit of
movement in the jar. I'm gonna click on the jar. And I wanted to do
the mask thing again. So I'm gonna go to Mask. I'm going to make it smaller. And let's just say that the syrup is sort of
on the lip of the jar here. And it's coming down. Be careful with the mask tool because even if
something is far away, if you go over it, it will make a mark and it will
affect your mask. Maybe something like this with a nice drop, nice droplet there. I think I like that. Maybe we'll do a
droplet on this side. Hopefully it doesn't come
through to either side. It might. It doesn't. Good. We'll do slight SU-8 droplet
here to something like that. Maybe we'll just do
a, a cheeky one over here. That looks pretty good. Let's go ahead and go
to our mask tools. Everything should be
the same as it was. I'm going to make the show
thickness a little bit more because I know we're
going to lose some. Let's extract. Let's make sure that
we're on that mesh. We can go ahead and paint all. We can go, we can go our refraction settings and do everything that
we did before. Interior roughness we don't want will turn the glossiness up. That looks pretty good. Another trick, if you
noticed I have my my undoes. I have it down to 500. And I'm actually
going to save this. I'm going to hit Save. Then
I'm gonna close out of nomad. Make sure that you have it
the way you wanted before you do this because you
get rid of your undoes. I'm going to close out
of nomad and make sure that it's gone there. Nomad as officially closed. I'm going to open it back up. That's going to free
up that memory. So that's going to free
up the memory that my, the iPad has to think about. So now that that's freed
up, I'm just gonna, I'm gonna, I'm gonna,
I'm gonna keep going. Alright, so what
did we do before? Once we had this we remeshing
were rematch to it. I think it was at me. Make sure that I'm
on the right mesh. Won't be on this mesh. We want to rematch that to 300. We want to keep sharp edges. We remapped it
keeps sharp edges. Then we go to smooth. And we do that, that
whole smooth thing again. Where we smooth it out. We get rid of those
jagged edges. Used to like that group. Back in the day. Shout out to anyone
who remembers, knows about jagged edge. Now I'm just gonna
go ahead and just keeps smoother than this. Just try to get those
edges nice and smooth. I'm actually okay if it, if it sort of shrinks my
work, I'm gonna lock it. It really helps that wobble and I'm not right on the mesh. Here we go. So I'm just
going to smooth and smooth and smooth and get
everything nice and round. Can't get in there too deep. It looks good. Smooth this out. That looks good to me. Turn symmetry off. You don't really need
symmetry for this. Okay, So that looks pretty good. Happy with that, I'm
going to make sure that I go to the glass and turn off the mask clear. Pretty sure that
mask should be gone. I'm just going to smooth
this out because it's a bit, I feel like I can still see
sort of a crease there. Mister smooth it out
a little bit more. Just so everything
is nice and round.
33. Extra Syrup: The only other thing that I
was thinking was maybe adding a little more syrup
over these pancakes. This mesh, I'm gonna go ahead and simple merge
with the sphere. This is going to be the
majority of our, of our syrup. I'm gonna go ahead and add
I'm going to take it off lock because I had it on
lock as I always do. It will make our
sphere lot smaller. I just want it to be
over our bananas. So I'm going to actually just
place it over the bananas. Then I'm gonna do,
I'm gonna go ahead and do our refraction. Turn that down. Pink glossy. I'm going to go to this
paint thing and paint all. I think that was
it. I think that's all we needed. I
don't think we did. It looks glossy enough. Now I'm just going to
manipulate this so that it's looks like it's
on the on the syrup. I'm gonna go ahead and validate
it, will make it smaller. And I'll just use the move tool. My favorite tool. I'm just going to sort
of stretch this out. I don't think anyone's
gonna, we're gonna take this class and be so long. I'm just going to stretch
out my syrup a little bit. Actually really liked
that break in it there. But it's a bit I
don't want it to be so I wanted to be
flat. There we go. Because I don't want
it to be too like bubbly because it's
flat and it'll it'll flatten out on whatever it's whatever
it's landing on. I just want to be
very aware of that. And I just want to leave
like a smooth film of syrup in a little bit. That looks okay. I'm gonna go ahead
and mash that in with our simple merge
that altogether. Autosave. I'm gonna save it. We actually could do the
same thing with, with this. We could add a sphere.
Maybe that's what I'll do. I'll just add another sphere. Just because we want, we do
want some syrup on this, stretch this sphere out. This way we have, we have more mesh to work with. I'll flatten it out,
bring it up a little bit, flattened it, I'll make it
bigger, make it flatter. Just so we have a good amount
of syrup to work with. Put it over in the middle
a little bit more. Now let's do our
refraction thing. So we go to the sphere
refraction, turn that down. Do paint. All. I see, I didn't even
need to do paint glossy. Let's see if it makes
any difference. It doesn't. Surface glossiness, it doesn't I don't
know why the other one was not working out the
way that it should have. For some reason it looks
like the color is different. I think it might
be just the angle. I'm not quite sure. So I'm gonna go to paint and
I'll go over this color. This color is not
showing up as glossy. Very interesting. But
this is interesting. So we use move and you just have to manipulate
this syrup on the wrong. Let's go to our sphere
here. Validate. I'm gonna walk. So I don't accidentally move. Other things that I
don't want to move. I want to flatten this. Sorry about that. I'm just gonna flatten it
and I'm going to try to make it fall as though
it's like liquid. So this is good, but I want to
really make it look like it's going into
those crevasses. I'm gonna make the
move to really small. Really like sort of push it into the crevices a little bit. Because I just feel like
that's what we'd be more natural to bring it up a little bit. Here we go. Like this. I'll bring this down and leave in mind if
it doesn't all connect. I'm okay with that. I think that actually
looks really good when it doesn't
all connect. Let me try to scoot some
of this over enough. We're losing our mesh
a little bit here. I'm going to rematch it. We mesh it at 200. That way we don't, that way our mesh doesn't
really fall apart. We remembered them a kind of makes it a
little bit stronger. You can continue to
move and manipulate it. And let's, let's make this a
little bit come down to you. Let's make this spill down. Bring a little bit of this out. Feel like I don't
want this to reach. I just wanted to
sort of hang over.
34. Syrup Details: I might have to go ahead
and adjust this some more, but I want to, I want to
really marry them together. Oops, I'm gonna, I'm gonna do a ticker on how
many times I say, Whoops. In this video alone.
Let's try them. Try to mesh the set look like I want to bring
a little bit of this up. One, a little more volume
on top of the pancakes. So let me bring, bring this up a little bit more and
just bring it out. I think that looks
I think that looks better. Same thing here. I'll just bring it
up a little bit. Since there's a lot of, there's a lot of syrup underneath. There means that there will
be a lot on top as well. Like we need a nice
little drip here. I'll add another sphere. Just because I want
that little drip. I do get obsessed a
little bit with details. But I feel like
you really have to go all in with your details. You really can't skimp. I guess you could skim.
Going to take a class, then. We're going to learn some stuff. Let's do our little
refraction paint all. You want to get a
validated paint all. Here we go. Go back to our move tool and just a
stretch this over like this. Probably should've just
did a better angle. Lock it so I can go
back to this mesh. Maybe make this smaller,
something like that. Okay, with that, save.
35. The Perfect Pour: Okay, so now let's figure out
if we want anymore edits. Like for example,
what this syrup ball, it's a little, little, little much on this side. I think I'm just going
to just use Move tool. Really big. Make sure I'm on the syrup one. Let me make sure I'm
gonna write mesh. I don't think I want
to do symmetry. I don't know, I don't even know how symmetry is gonna work. I just want to sort of
push this analytic a bit because it just
feels like it's a little far out from the
piece, from the wood. And here, here as well. Now that I've now
that I've turned it, it just looks a bit
it looks a bit far. I think something
like that looks good. I keep turning it to see if there's areas that just
kind of stick out, but I think that's okay. I'm okay with that. Now I'm going to want this
to all come together nicely. So I'm just going to move, move this onto the tube, which I can see it's not
exactly in the middle of that. But I think we can just
sneakily just slide it over the QC. We can spin a little bit
and just slide it over. I don't think anyone will notice the name
will notice that. Let me go back to our move. We'll go back to up here. Sometimes you have to make
those little adjustments. You just don't tell anybody, don't don't show anybody. Especially not in as a
tutorial. I'm just kidding. I show you all my,
all my mistakes. It's important, and
mistakes are important. And honestly, you learn the most when you figure things out. Like I'm sure that your
prompt that things are probably going
wrong and things were probably happening
differently than they're happening that you're
seeing on my end. But obviously a you can reach out and I will
try to help if I can. But also like sometimes you
just have to figure out like either What's
different or what's making, What's making it not
react in the same way. In figuring those things out. Sometimes they can be
infuriating, but they really, really help. And
they really help. You can see I'm doing, I
want to do a little bit of a as though the syrup is pooling in getting
heavier here. That's why I'm making
this little this little bit of stretch. They're almost like
there's more is going to fall from here because
it's I don't know. It just feels right.
It feels right. Okay. So that looks good. Let's take our syrup,
our tube syrup. All of these little
spheres that we made. I think we want to do, we want to simply merge
them are voxel merge them. Let's try simple merge first. I'm going to bring
back up the glossy. I noticed that this
went frosty again. So I'm gonna bring up
that surface glossiness. And I also let me long press on. We go to paint and
long press on this. Now I just want to, I'm
just gonna do force paint all I want to make sure
everything's the same color. Just wanted to make sure
everything is the same tone. And sometimes I like to
do like a little test. Like I'll move everything around and move it to like
a random color. Like we'll do like a
weird color like this. Then I'll just do paint all. And I'll see what's different. Like see it's very interesting
that that's different. I really don't know why. Very strange. I'm a I'm a bit at a loss.
36. Problem Solving Syrup: I figured out what was probably
the probably the issue. That was the layers I happen to. I can't remember why
I changed the layers. But once you do,
once you rematch, once you even remeshing
certain meshes, the layers will still maintain
some of their function. I'm actually just
going to, excuse me. I'm going to take
this. I'm gonna click on this right
now we're on, we're on our syrup,
and these are the layers on the syrup. What I'm doing now is dragging
them all to the base. I flattened, I merged
all the layers together. So now everything
is one layer that something I had put on a
different layer was why it was having this separation. Now when I do paint
all it's fine. Now I have to go
back to this color. So now I'm going
to just touch on that color and then
just do paint all. And now we know that
everything is the same color. And I'm actually going
to connect it with this. Maybe I really did. Did
I already know I didn't? Let's also, where's
our, here's our syrup. I'm just gonna simple
merge that with the syrup. So now they're altogether, all of our syrup is together. And we are in a happier place. Because all of our
syrup is together. I don't know if I like that. Now let's just go through
and see if we need to smooth everything
out with our syrup. We want everything to be
nice and round and smooth. Make sure everything is together
in pretty even up here. Remember we rematch this together so we have to come
up and just smooth it out. Just make sure everything
looks good and smooth. Accident mine at
this gets a little a little thinner. I'm
okay with that. Smooth some of this out. Sometimes this
happens because of the because of the wood grain. Let's see if we
can pull it out a little bit and see
if that helps it. I'm going to use the Move tool. Sometimes when you pull it up. Can sort of help
that a little bit. Didn't really look like
look like it helped. But it's because
of the wood grain. So I'm not too
worried about that. See if we can smooth that actually smoothed
out quite nicely. Move this down. See if we can smooth
around here too. Maybe we can work some magic. Let's try flattened. Didn't really help. That's okay. It's only from certain angles
you can kind of see that. Let's go around and I haven't
really touched these guys. I just want to make sure
that I smooth them out, make sure they're nice and good. Make sure everything is
how you want it to look. Really made this
little drip here.
37. Final Touches on Syrup: The only thing it
looks weird, this looks a bit weird to me. We're just going
to add a sphere. Syrup is 347 K. That's actually not bad. Mesh is 5.39 million, which is a lot, but we just have a lot
of details going on. A lot of details coming on. We're just going
to add one more. Because if I don't add it, it's just going to bug me. Stretch this out. I'm gonna validate
that. Go here. Refraction, index, paint all. I'll just simple
merge it. I think. Syrup, simple merge. Simple merge. I don't think I'll be able
to smooth them together now. But don't think I really need
to voxel, merge it again. But let's see what happens if I do never give up a
chance to learn. So let's see if I wanted to
box summarize this again. At 300 C, it really, really affects all
of the other meshes. See that really makes
it like a very jagged. Let me save it. Were saved. Now let me see if we
refresh it to 600. I think that's what
we did before. If we met, we measured at 600. The rest of our syrup
isn't really affected. Looks pretty good. This is together now. We can smooth that. Smooth that in it
looks much better. It looks much, much better. Just go through and
just make sure that everything is still smooth. The way that you wanted. I think we're looking
pretty good with this here. For now. I'm going go ahead
and save it again.
38. Crease Texture: Okay, so now let's
add some textures to our table and to
our paddle here. Maybe we'll add a little
bit to this stick to, but it's very flat
without some texture. We have to be pretty certain, fairly certain of the color
that we want. Our table. Do we do We wanted this color? Do we want a lighter? So it might be, it might be who view to sort of just make sure that you
like it that color. See if there's any
colors that you, you I want to try out
or something like that. Because when I add the when I do add the
texture on the wood, I'm just going to use, I'm
just gonna go by this color. I think, I think I'm happy with this color turned this way, so it's a little easier
to see. What I mean. What I mean by more texture
is, Here's what I do. So I'm gonna use crease. I'm gonna go ahead and hide all this other stuff
except for our box. I'm gonna change this to
table. While I'm at it. I'm gonna change this
sphere to syrup. Autosave, always auto saving. Let's go to our table. I'm gonna put that on the bottom because the
tables on the bottom, I'm going to hide
everything else. We're just on our table and
nominees the crease tool. But I'm gonna lower the
color a little bit. Just a little bit darker. What the creases. I don't
want them to be too big. Let's see how this look, see
how that gives us a nice deep would groove.
That's what we want. I'm gonna make it even
smaller than that. Now I'm just gonna
go through on this and make sure symmetry
is not chosen. I'm just going to essentially accentuate some of
these would grooves. Some will even make very dark. You could even go a
little bit darker. I just do this to
sort of give the wood a little bit more, a little bit more personality. I even go down on
this inner Golgotha, make little notches
on the sides. Bring the creases
all the way down. I don't keep it uniform either. I just sort of keep it very loose. But sometimes you have
these nice grooves that that are already there. So I just sort of
make them nicer. Let's go a little bit, a little bit darker and a
little bit richer. Actually. Let me make this smaller. We'll give it some really like
some really deep grooves. Loved making those little
notches on the corners. It goes to wood, has those little circles. Sometimes. I'll just use the natural grain in the
wood to make it look better. Let me be a little overzealous. We'll just do a circle here. Vary the placements,
some nice notches. We can actually get
rid of this grid. I'm gonna go up here to this little cog here and
then just undo created. We don't need the grid anymore. I don't think we do. Famous last words. Just do some nice
textures down the side. Nice Nixon, the wood. Sometimes they're these
little spots will show up. So I usually just go over them. Just make like the
groove where these are, those little spots are. See this little spot here. I'll just kind of go over them. A load immediate me
three little spots. Maybe make like a deep groove. Couple of really deep grooves. That is the cat you here is what we call a classic
case of the Zoom ease. Now we have some nice wood, nice deeper greens in our wood. That's just gonna
give it a nice, this is going to
give it more life. It's all about giving this, giving these things more life. You can see I accidentally
go overboard with it. Now I'm just gonna do the
same thing with the paddles. So let me un-solo it. Not solo. Bring everything back. Nervous for a second.
39. Paddle Crease Texture: Whereas our paddle, that's the only thing we need
now is our paddle. I'm going to grab
this color darker. And now we're increase again. If you think that
you're going to mess up or if you're unsure about it, you can add a new layer as well. That way, if you
add a new layer and you do something you don't want at the end or you
want to change it. You can add a new layer
and you can do some stuff. And then if you don't want it, you can just get rid of it. Since I mentioned it,
I'll add a new layer, some depth to our paddle here. This tool is actually
still quite big. Petal was pretty big, but actually not so bad. I'm just going along
with the green. Check my colors. My favorite things to do is just kind of do these
little details. Some nice swirls on here. Am I not? This is where some of the
creativity comes into it. You can make it as big or
as subtle as you want. Don't feel that you
have to do every little nook and
cranny that I do. But I just have to show
you how I do things. They do take a long time. But I feel like I have a very high standard for the work that
I do for myself. I just feel like I need to show you exactly how I would do it. This is actually a
little crazy over here. Wonder if I can smooth
some of them are like smudges, little
crazy over there. I could always go back
to my other paint. Just sort of just
lighten it up so it's not so not so strong. It's easy to go overboard
with the details. Sometimes you see a lot. I think that's fine. Let's
add another little curl. Just one more little curl. Maybe over here. Maybe another one. Here we go. I think that looks pretty good. Let's bring everything back. You can decide if you
want to add some details to the stick here. But it's just the same thing. Crease. Honey stick.
Really small. And you want to grab
the color of that and then just go a
little bit darker. You can add some. We lock it. We should
be able to add some nooks and crannies, even under our syrup layer. You can also hide this year
player if you wanted to. That's pretty good for now. Save. What do I do? Save?
40. Shadow Paint: Okay, so now let's add some, some shadows underneath our, underneath our objects here. First we'll add one
underneath the pancakes, so that'll be on the panel. Make sure we're in
our paddle here. And I'm just going to add,
what does this layer? This layer is our, as
our, we'll call it text. It is texture will
add a new layer. And this is gonna be
the color underneath. So I'm gonna grab this color
and make it a little darker, similar to what we did with
the the grooves in the wood. I go to paint. Be pretty big but not too harsh. I'm just going to lock
the paddle so I don't accidentally paint
on the pancakes. I can't really see much of it.
There we go. I can see it. I'll bring the intensity
up a little bit. Basically, I'm just making a shadow underneath
our pancakes. The lights will make
shadows as well, but I like to paint on some, some kind of like foe shadows, make it a little darker. I want to keep it
around that edge. Add some here too
from the bananas. Just do a little bit of shadows
underneath those bananas. Very light. Very light and careful to
keep it close to our objects. This is just like a
touch of details. We don't really need it to
be too crazy of a shadow. It's just a little
extra details. We'll do the same
thing with the jar. Actually pick this up
from just watching, just seeing the work
of a lot of 3D artists on Instagram and
things like that. Just kind of seeing little
details that just made their work really pop
and really stand out. And this was one of the
things I picked up on is coloring in certain colors. Just little details like this. You know, little colors like little color changes on here. Color changes like when
we do the bananas. I'm not actually sure how
we're gonna do that just yet, but things like that. The neighbors, Rome,
happy Valentine's Day. It's Valentine's Day
at the moment here. Okay. That looks pretty good. We'll do the same
thing. I'm unlock it. So we'll tap on our pancakes. Will lock the pancakes and I'm
gonna grab this color now. Oops, make sure we're on the
right color, right texture. Now I'm gonna make
it a little darker. And I'm gonna do the
same exact thing for these bananas appear. We can't really see
a difference on the pancakes. Let me see. Okay, so the pancakes, I was probably doing
it on the base layer. We have these layers
from our pancakes. See this, this is the
extra layer that I did. This little button
here is going to merge them together
because these are, these are both on
the bottom pancake. So we're going to
merge those together. That's the bottom. I'm
not sure what this is. I don't see it doing anything
that might have been the other color
that are tried out. Probably what that is since
it's nothing is changing, I'm just gonna get rid of it. This is the middle pancake. This is the top pancake. So these are all our top colors. Merge them all into each other. Now, this is all the top colors. Now what's very important is we may want to change the color of our pancakes at
some point in time. Maybe make it a
little more Premier versus little more yellower. So I'm gonna leave this and
I'm just going to label it. Golden tops. Just in case I'm going to add another layer and I'm
gonna call it shadows. This will be the
shadows that we're gonna put on top of everything. I was probably doing
it on the base. Let's see. I was painting it on the base. That's why we weren't
seeing it before. But now we're on the right
layer, we're on shadows. So it will show up. Show up, good, shows up. We'll do a little shadow there. We can actually just
do a little shadow around the syrup as well. I might actually do a different color when I go over the yellow
because it's not gonna be the same exact
color as I'm going over this golden brown. It
looks pretty good. Now let's see. Let's add, I'm going to add a
little bit here. That looks really need. I was going to add some
in this little crevice, but I think it actually
looks pretty good. I'll add a little bit, a little
bit in this crevice here. I'll do the same thing here. Just add a little
bit in this crevice. Do the same thing over
here a little bit. Now I'm going to
take this yellow. I'm going to go a little
bit darker with that. We'll just add middle
false, false shadows. Although I really cool
and fall shadows. Very light, almost
imperceptible. But you know, it's there. Almost imperceptible.
41. Shadow on Table: Last but not least,
let's add some on the table from the paddle. Grab this color. Make it darker. Like we're still in the pancake. Or whenever in the
table. Grab this color. Grab this color again
and make it darker. I'll just lock it. Let's add
a new layer on the table. In some of this dark
shadow from our paddle. Your lights, we're also going
to give us some shadows. But I just like
to have something there regardless of the
lights and everything else. Probably just because
I'm an illustrator. That's probably what this is. I can't help it, but
to add some shadows, really wanted to live
in its own space. Let's save.
42. Pancake Textures: Again, if you want to add this texture
that I've included, you just go down here. You add photos, and then
you add the bread texture. Now let's add some
texture to our pancakes. Make sure we're on
a pancake layer. Pancakes. We're going to use the brush. Let's sub-divide the pancakes. So we have a little more detail. We're going to sub-divide. So we're going to use the included texture
brush for the pancakes. Very lightly here,
low-intensity. My brushes fairly big. If you want, you can add another layer above
on the pancakes and call that text texts texture. I'll make the brush really big. And then slowly just add
some texture like this. I saw on brush. Take it off symmetry. I don't want it to
be on symmetry. I'm slowly adding in
some texture here, very, very light, very light texture. But it really changes
the dynamics.
43. Banana Details: Okay, So let's add
some details to our bananas were almost, we're almost there,
we're doing so well. Let's go to our bananas. Bananas there we are. Let's solo them. We saw our bananas here. We can actually
separate the bananas. Let's separate them. They're all here. We can just work on
them one-by-one. The first thing I see is there's a slightly
different color. It is a slightly
different color. I think I'm just going
to take the paint. And also there's a
little bit of a gloss. I'm going to add a little
bit of a gloss to this. Maybe a little bit richer. I'm just going to loosely
go over all my bananas, which is very loose
and kind of haphazard. Then I'm going to use crease. I'm going to make some kind of dashes and feels, feels right. Kind of have some dashes there. Oops. Don't want to
get too crazy with it. Something like that. Maybe we can smooth it out if
it's a little too much, just send a smooth
it out a little bit. I think. Something like that and
I'm gonna use crease. I'm going to go to
a darker color. It has these sort of darker, a little sort of seeds in there. Make this smaller. Kind of has these dark seeds a little darker in the middle. So I'm just going to
paint it a little bit darker in the middle. I think that actually
looks pretty good. Once you find, once you find
something you're happy with, you can just jump
to the next banana. I'll start by making a creamy
again, that creamy color. Some gloss. Worried about their
Mexican added here. I'm just going to hit the Plus. Now that color is here. I can actually get rid of, I'll get rid of this color. That way. I can also add the darker color. Probably has a little
more roughness to it.
44. More Banana Details: Start out with
paint. This color. It might even be. We'll try something out. If you notice I'm
using new ways to sort of color and New. I'm sort of experimenting
with new ways. I always, I always do that. Like it might be easier to go in stages and do different
things with the banana color. It maybe color all
color in waves. A little bit darker, just kind of had
that middle bit. And if it gets a little too
crazy, I'll just smudge it. Bring it back together.
Rather than n. Here we are. We'll start with this color. I don't see anything that was on smooth. So let me go back to paint. Might be nice to
add a little bit of a texture to the banana to, but I'm not sure
what texture now. But hopefully when I edit this, the texture will
just magically show up a little bit. Go back to paint. Darker bit in the middle. Nice little paint on the sides. Much trouble for
a little banana. This darkness in the middle. I don't think I actually
did that to the other ones. Let's see. Let me go a
little darker in the middle. Darker in the middle. The rest look pretty good. So
let's this one looks good. We'll go back to this one. We can add our little
seed type things. I guess their, I guess their
seeds. I don't really know. Anyone knows they can be making the crease
with the color. I want to add the color in here. Okay, so once you hit it, then the color, if you don't want it, then you
have to uncheck it. Once you tap it, the
color comes through. One thing I was
thinking is do we want to do it the opposite way? Actually, sure. The opposite way actually looks pretty good too. I don't know which
way it looks better. I'm also noticing
that there's a little more a little more sort of striations coming out. What it looks like. I'll add these
creases on the side. The creases will
not be subtracted. They want to be regular crease
where you where it goes into the into the side
but maybe not this dark. Here we go. We don't need
the crease to be that dark. Looks good. It's a little
crazy right there, so I'll just smudge it out. Looks good. Move down
to our next banana. I'll just start where
we, where I left off. I'll just start
maybe not crease. Started the crease. Save some time by adding those striations
with the crease tool. But just really lightly.
45. Final Banana Details: This is a little funny looking. So I'm gonna, I'm gonna smudge some of these because it's a little dark and starts to
look a little bit too. Not like a banana. I just want to lighten
that up a little bit. Now I will just add some
scenes, some seeds. So we'll do crease and
we'll do it really dark. I'm going to add
a little bit more roughness to the seeds. Looks good. Banana ago. This must be
one of those bananas. I'll start where I left
off the darker seeds. Then we'll go back to this
for the striations paint. Then we'll crease on the sides. Actually want to lower
the ad more roughness. Side creases. I think that looks all right. Now our final banana,
some striations. Remember this the next time I think I'm going
to add bananas. Just smudge some of
these a little bit. Let's go darker. Little seeds with the crease. I'm actually going to I'm
going to use the paint. I'm gonna take a little bit of the shine off of that middle. I'm going to add a
little more roughness. Little shiny. They're going to take a little bit of
the shine off of it. Now I'll add the seeds in. I think that looks pretty good. For our bananas. Save.
46. Adding Overall Detail: Okay, so it's looking
really, really good. Now's a good time to just add any extra details that
you might want to add. For example, I might add some, some little ripples
to this syrup. Um, I use clay. I'm gonna make sure that I
have that same color and glossiness by going
over the color. Let me take it off symmetry. Now I'm just using
clay and I'm just going in a circular motion around our round our
little spout here. The bananas we can
actually bring the, Let's uncheck syrup. Will simple merge uncheck table. Just make sure
it's just bananas. And just bring the
bananas together. Now go back to the syrup and
let me just hide the table. And the paddle way it shouldn't
have those jumps anymore. I'll go back to Clay. Maybe just add a little more. Just so it's a bit
of a ripple effect. Just to add a little bit to it. You can use inflate. You want to inflate
some of this. Inflate, some of this
from the bottom. You can also use clay
and you can just give it some autosave. Again. I am noticing that unfortunately with this, in order to get rid
of that and you can turn two-sided off. But the problem with that, if you turn two-sided off, which actually like better, you can't see through this jar. Which is really interesting. It might be worth it to
actually make a new mesh for our syrup that's not
connected to this syrup. Because this looks good
with two-sided off. I'm going to hide the jar. Hide the glass jar. I think I'm just going
to take split rectangle. Now let's see if
I can just split this into a whole nother mesh. So we have our syrup here. Now we have our syrup here. For this syrup, I'm going
to keep two-sided at auto. Now I'll bring back our glass
jar. I think that's it. That's a good way
to mitigate that. Now we have our glass jar. And speaking of the glass jar, I think I want to change
the roughness of it. I'm gonna make sure that
I'm on my glass jar. I'll go to the
refraction options and I think I just wanted to be
a little work loss here. It can be frosty inside, but I think it is one of the
little glossier like that. There we go. I think
that looks a bit better. Feel free to add any more
details or do anything like that that you feel necessary. Maybe you want to move some
of go back to the syrup. Just sort of move some of this. I want to be careful not to not to mess with
the wrong layer. So let me make sure
I'm on the syrup, no mineral lock it. That way. I don't have that issue again. Just add a little bit a
little bit of something. I think that looks good. Any other details that
you think you want to add? Now's the time to do it. Maybe you want to add a label to this that you want to just paint on or
something like that. But I'm pretty happy with how
it looks, how it looks now. I think I'm going
to go ahead and get rid of our reference. Let's go here and
uncheck reference. Now we just have a background. We can start adjusting
the post-process, which is really
going to make this stand out and really
make it look pretty. So. Once you're finished
with your details, just go ahead and save it.
47. Lighting the Scene: Before we get to post-process,
we should light it. Let's get rid of our
environment just to add light. Now we have a dark environment. I'm just going to save it.
Save our dark, the blackness. Now I'm going to add a light. Our first light. We'll probably change the
type of light that this is. Maybe we'll see. I think I tend to like
to use a spotlights. Will change it to a spotlight. Then we'll just aim it on
our little scene here. Kind of get where I am in space. I'll open up the
cone little bit. I'm gonna go ahead and
duplicate this light. Clone. Move it over here. I'll swing the beam over. Now we have a second
beam on our pancakes. Now let's add an
interesting color. I usually at an interesting
color to the back. I'm gonna go in lights
here. Where is it? This Is it. Add light. And I'm gonna change the color just so I know what
this slide is. I'm gonna go with I'll go with
the orange light for now. Just to play around with it. Let's make it a what is this
light called? Point light? I think for some reason
I thought it was a pin light. Point light. For now we'll put that we'll
put that high over here. We might change it to a, might change it to a
spotlight. Later on. I'm going to bring
this slide down. I want them to be sort of
level at the same height. Now, it's a lot of
experimenting really. It's a lot of experimenting, changing the colors. Let's see. I'll make this one
a little warmer. And I'll bring up the
intensity a little bit. This one or maybe let's see what happens if I make
it a little cooler. Play with the angle. Now lights are there are
actually a lot of fun. I really like. I really enjoy
lighting the scene. You can get some really
dramatic effects. I don't want to go too cool. I think I'll just go like that. In this light is interesting. Almost kind of reminds me
of like a, like a sun. So don't actually looks
quite nice I think. But it's probably
a little harsh. I still have post-process. I don't just for the heck of it, let's throw in a
different light. It's thrown another
light will make it. Let me get like a
pink pink color. We'll make it a spotlight. We'll drag it behind. Probably hide this light. But sometimes I
just think it's fun to kind of add some dynamic
lights to my scopes. Sometimes they work,
sometimes they don't. This is a little warm to
slide. Here's a little warm. I'm going to just go.
48. More Lighting: I think this lighting is
actually pretty decent. I don't really have
any lighting on this though, so let's see. I want to get that maybe
I'll go a little closer to want to make sure that that is also
nice and golden here. Maybe we want to
change this slide. If we need the pink, the pink looks, it
looks nice though. This where I kind of
get torn sometimes because I think
lighting is just fun. It adds so much
expression to a scene. Sometimes it can be a
bit hard to pinpoint. What you like. It's a bit too bright. You can actually
undo the lights too. I think I like it where
it wasn't the beginning. I think I like it
just off like so. We have it lit. We can always
change the lighting later. We have you just want to
make sure that you have all your elements lit decently. This is okay because
we'll bring back in environment will lower the, I like to lower the exposure a lot of the environment and
then slowly bring it up. We have just the right
amount of light on it. Not too much. Not too little. And also you can tap on it
and you have different ones. So right now we're in
a Venetian crossroads. You can choose a different one actually looks pretty good. What's important
is to look at how these glares affect your scene. This one looks pretty good. I think I like it warm. I think this warm. I think that looks pretty good. I'll go with wooden lounge. 1k. Makes sense. Wouldn't lounge. Now our background. I'll change the color. Let's see if I'm gonna
make it a little warmer. Could do something like
that. Could even go. Or I could do like a nice
complimentary color, like a nice light blue,
something like, then. We have a nice color. You can also add a backdrop the same way we
did the reference. You can add a background color, just add your photo here. Now let's get to
post-process. Let's save it.
49. Post Processing: All right, Let's go ahead
and really get into it. Really see what we look like. Giraffes, she looks a
lot better post-process. It's nice with that
blue coming in. So it's a very, very, very warm. It might actually turn onto this off bloom
color grading. I'm gonna turn all this off
reflections we can leave on the quality can leave
on obviously post-process. We'll leave that on. But I don't think it
needs any warm lights might need you might
actually need cooler, cooler lights because
everything is very, very warm. I'm gonna see what it looks
like if I add cooler, some cooler, lights, cooler. So we'll go to the blue. Let's add some blue to that one. Let's see where this is. Our layer over here on the left. That's pretty cool. Top light. That's
actually cool as well. If everything looks cool, but he's still fuel, it's warm. In another option that you
can do is color grading. Color grading will
change the whole, this will change some
tones on the whole scene. For example, right
now, I'm gonna, I'm gonna reset all of these. Are reset them all. And let's see blue. We'll add some blue to
the overall tone green, add green to the overall tone, red, and so on and so forth. So we really have some, you have a lot of leeway in
what you do with your image. Curvature. I don't usually do unless it's something
that's really, really, this is like a creature. I don't really do it
because it adds these sort of lines on it. And it looks really
good for things like scales and things, but it doesn't really
look good here. It makes it look a bit too
cartoony. Turn-off curvature. You can mess with
these vignette. I really do like
a nice vignette. Just gives it that nice, that nice darkness
around the edges. No vignette, vignette. Bloom is, you can see bloom is really gives it that shine. So you really want to
be careful with bloom. Because sometimes it
can be a bit too much. You just want to get the nice, nice sweet spot with Bloom. Not everything is
too, too sparkly. Ambient occlusion really
affects those shadows. Can make them very dark. Again, you just choose
whatever you think looks nice. I think I want to make
this block smaller. The table. Let's go ahead and
just make it smaller. Whereas my gizmo, I
think I'll bring it in, squeeze it together. Then luckily everything
moves with it and doesn't really change too much. So it doesn't look bad. Do you have to be careful
with those shadows though? Might just have to do
those shadows again. See the shadows underneath. I'm going to slide it off. Hopefully I did that
on his own layer. And I didn't. Actually good. So I can show you what I would do
in this scenario. I didn't do it on
a separate layer, which I should've a way that I can get around
that and I get around it. But a way that I
can work through that is to go to the paint, make sure it's not on a race. I can choose the color. I just have to paint. I just have to do
like a cover-up job. I just had to paint
and be mindful of the marks in the wood. Sometimes you might have to add more details if you erase the
details that we had added. Once I finished erasing this, all I did was slide
this back over. I'll probably just
add another shadow. But I'm not going to do now. It's fine. Was I go
through the lights and I turned off this light because
as great as this looks, I think it's a
little more dynamic. If that light is often
it's just the light coming from this one side. You have the little bit of
light coming from here. I lowered it and turn
down the opacity on this light because it
was a little bright. I don't like it when it's
when it gets too bright, then it's just sort of
shines over everything and lower the intensity
a little bit. Brought that light down. And I think it's
still looks good. Now the pink the pink light. It does add a little
bit of a flavor to it. I do like it. I want to see I want to
see what it looked like. If it was a point light, if it was shining some
more on the whole scene, just kinda see what that's like. If it was maybe if
it's over here. I think that's
pretty interesting to put it up a little higher. I think I kinda like it low, but maybe lower the intensity. I liked the pink. Let's see what that
would look like with it, with a different color. I'm going to get back into it. Looks nice with the blue. Blue sort of feels nice because of the
background, I think. And it's a little less drastic, but I don't mind
it for this scene. I don't think it has
to be too too crazy. I kinda like that. Let's see if we made
it a little more blue. That would look like brought
the intensity up like that.
50. More Post Processing: Okay, so we've covered all
of these bloom tone mapping. I do have my saturation up because sometimes my sides before my saturation
was a little low. But I think I like it
a little brighter. Got it up to 18, but there
might be a little too much. Be something like 12. Little bit better. Going to bring this
a little lower. Maybe a little further away. Little further away, a little
further back. There we go. I'm very, I'm very
happy with this. So the last thing that I want
to do is depth of field. Depth of field really gives
it a nice, a nice feel. Makes it feel very real. Very, very sparkly. Let's see if we can dim down
the spark of a little bit. Now I'm not sure if it's bloom. Still sparkling
without the bloom. I'll turn the bloom back on. I can find it will lower
the intensity of the bloom. Kinda like it with
that, without, without it being too intense. Because it kind of brings
an overall brightness to the scene that I
don't really want. I'll leave that off for now. And it could just be because
I have such a strong blur going that might cut
down a little bit. I liked the blur. I like
far blur and the near blur. The blur I always put
a little bit higher. Now we just have to find
some nice scenes that we like. You tap on. Wherever you tap
on it is going to be going to go into focus. We can turn our lights off, the light icons up here, this cog and then just hit lights that I'll turn
that off it view. It'll get rid of the gizmo. I think something
like that's a great, I think that's a great shot. I'm going to add a
view here. Add view. Also. I like to export my files at a very
high resolution. So that's where that's
why I was in debugging. It's actually this cog. Again, display settings,
render resolution. I'm just going to
save it just in case we're saved and
now render resolution. I'm gonna move that up to that is that makes it gives us a higher render resolution. And that's what I like.
51. Saving Views: Now we just have to find some
more views that we like. Think something
like that is really nice sitting that's
a nice for you. Accidentally hit U1 instead of saving the view that I liked. But that's okay. We can find that again. That's a decent view. View. Let's spin it around. Go different angles. Oh, this looks really nice. Look at that. That's a great view. View. Let's look, let's see what this looks like if I
was to render it. So I'm gonna save just
because I made those views, I'm just going to save it
just in case there's a crash. And these are actually,
they look very yellow, so I might actually make
those a little more creamy. The pancakes. Now we'll go here and
then we'll just go to we'll go to four k.
Will go to the pool. Yeah, we'll go to
four K. Why not? Well, if dangerously,
then I will save it. That's a really nice for you. Sometimes there's such
nice views that you may not even think
about when you're, when you're rendering, when
you're doing your thing. But then they just
sort of show up. Let's see if this one too. You can also see if
you can also look for things that you
might need to change. Like for example, I'd like
to smooth a lot of this out. A lot of this syrup just
looks a little too lumpy, whereas I feel like
syrup is very smooth. This is his coming across
a little too lumpy. You know what, I'm going to
bring the render resolution back down to 1.25. And I'm going to turn
post-process off. I'll have an easier time
smoothing all of this out without it
being so high def, let me use clay and try to add. Just want to make this thicker.
52. Breakfast is Served: Okay. I'm officially
calling this done, made it a few little changes. I just wanted to make
the bottom of this a little thicker, a
little thicker. I just had one of the lights. Show you. I just did this light which was over here, the one
we turned off. I just adjusted it so
that it's shining down on our on our little stick. Just to give a little
sticky little light on that side of the Honey stick. Syrup, stick. I love making
syrup and things like that. I hope you guys enjoyed it
a lot and that was a lot. But there's so much to it and
it just takes step-by-step, little by little, building
up something that you like. And I've been wanting
to really use textures. And also one more thing. Very important. Go to your camera here and
then go to perspective. You want to go to perspective because Earth
Orthopedic is cool, but perspective
is always better. I think. Turn off my lights. I think that looks
great. I'm so excited. Then I'm also going
to turn my iPad. This way. Get a nice view. I'm also going to save
it vertically as well. Save, done. Alright. I will see you guys
in the next video. I'm just gonna say some
quick Editor's Notes. Some thank you's
might cry a little. We'll see All as
well in our pancake. Heaven. Right now. It's been a pleasure. Hopefully it's been a
pleasure on your end. You put a lot of work into it. I'm very, very proud of
what you guys are doing. They use hung with me this far. I'm proud of the
pancakes and proud of your pancakes and other
gonna look great. I can't wait to see them. All right, I'll see
you in the next video.
53. Thank You!: What's up, guys? So I just wanted
to thank you all from going on this
journey with me, such a long journey, such a long class. But we made it. And this was sort of my journey
that sort of started out really simple things and
then started making things with textures and trying to
do liquids and infractions. So I wanted to do a
scene that would sort of melt all that
together because these are all the skills and these are all the
things that you're gonna need when you
decided to other things. Other things other
than pancakes. Although I probably
still wind up doing pancakes because
I just think they look, I don't know, there's
just something about 3D food that I really love. Hopefully some of you were
like 3D food lovers do, is I'm into it. But anyway, I had a really
great time making this. I'm glad that you were with me through this whole journey. Please share your artwork
with the group if you'd like. Also, you can tag me drug-free
Dave and drug for Dave 3D. On Instagram. I made the new 3D one because I've been doing a
lot of 3D work. Facebook, procreate
tutorials and guidance. That's my Facebook group. I'm on tiktok drug-free, Dave, and I'm also on YouTube as well. I post a lot of tutorials
for Procreate and for 3D stuff and everything between lots of great
stuff on my YouTube, lots of grade nomad
scope resources. Also want to shout
out the nomad scope. A group on Facebook. It's a really,
really great group. I picked up this program
in March of 2021, so I've only been using
it for less than a year. I'm really excited to see the things that you
make in the future. And I hope that I was a part of your journey and that this
class was helpful for you. Alright, so keep drawing, keep sculpting, enjoy
those thick pancakes. I will see you all
in the next video.
 Dave Reed, 2D & 3D Illustrator - Brooklyn, NY