Transcripts
1. Welcome to this Class: Do you love landscapes but find it hard to paint foliage? In this kill share class, I will share with you three simple techniques on how I paint trees. Hi, this is Bianca, an aspiring watercolorist from the Philippines. And I am happy to share with you what I've learned for the past 2.5 years by painting daily, attending online classes, joining workshops, and participating in competitions and exhibitions. Classes are presented in real time so you won't feel lost. I will share with you the materials that I use. How to paint a smooth background. Three simple ways in painting trees and foliage. And finishing it off with details. Whether you are a hobbyist, a beginner, or would just like to explore watercolor. I hope to see you in this class. Let's start painting.
2. Materials: Here are the materials that we will be using for this class. I have here three 5x5 inches watercolor paper by Hahnemuhle. Watercolor paints from Holbein and Mijello Mission Gold. A size 10 mop brush by Mont Marte. A goat's hair, Chinese brush and smaller Chinese calligraphy brush for details. Of course, a palette where you will mix your colors and a water jar where you will rinse your brush, pencil, and eraser to create your guidelines. And we'll also be needing your regular kitchen plastic or cling wrap. When all set, I'll see you in the next video. And let's start painting.
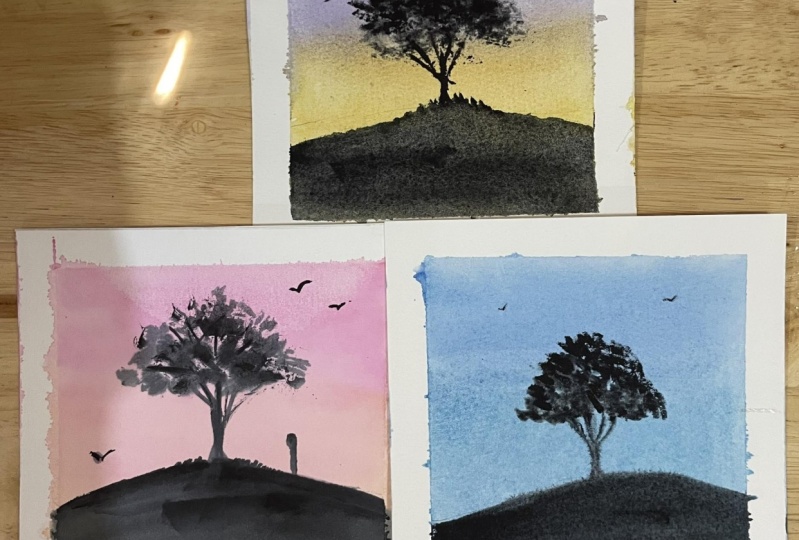
3. First Tree - Background: For this painting, let us cut a small piece from our plastic wrap. Then crumple it to a small, manageable size. And let's set this aside for later use. The colors that I will be using for the first painting are Naples Yellow from Mijello Mission Gold, permanent violet, and neutral tint from Holbein. It's not visible in the camera, but I also have a bigger jar of water. where I will rinse my brush and a rag where I will tap to excess water from my brushes. You can also use tissue. Start by drawing a horizon at the lower third of your paper. Then let's mix our pigment with some water. We will be using the wet on wet technique to achieve a smooth blend for our back ground. You don't need to have the exact colors that I am using. As long as you have one yellow and one Violet, then you're good to go. Then with a clean brush, wet the paper with clean water, not soaking wet, but wet enough for the pigment to blend by themselves. Let's start laying down the colors for our background. I will begin by painting in my Naples Yellow, and covering two-thirds of the paper with that color. I will rinse my brush, grab my permanent violet and start at the top, going down to meet my Naples Yellow. If you want to add another layer to make your background brighter, you may do so. But make sure that your paper is still wet when adding another layer. If it is starting to dry, then I suggest that you leave it to completely dry before you add another layer of colors. To avoid unwanted blooms, make sure to wipe the excess water around your paper. Let's leave this to dry and work on our foliage in the next video.
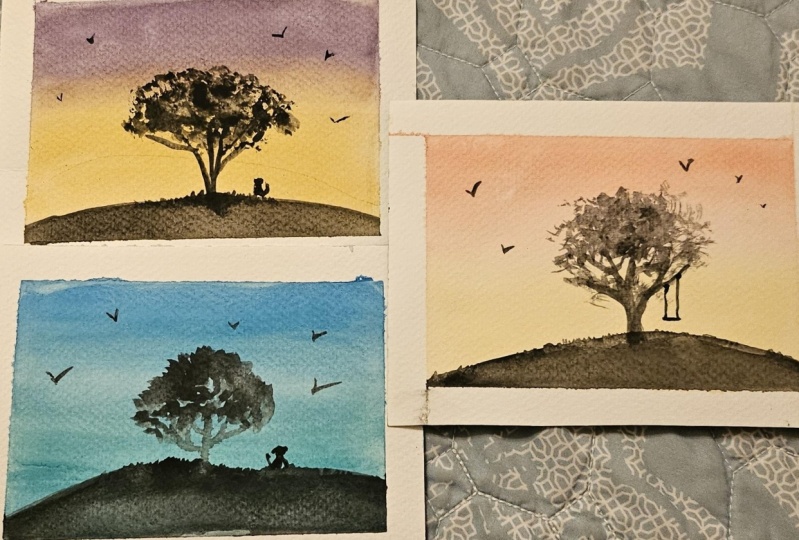
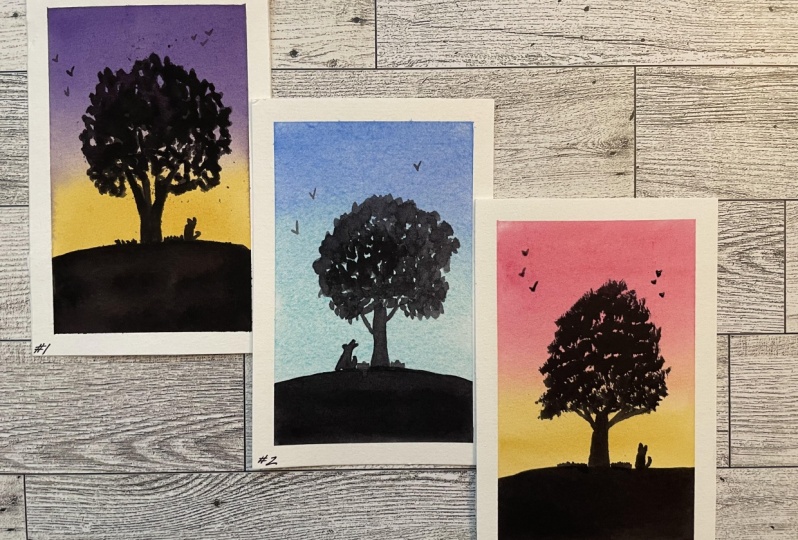
4. First Tree - Painting: Now that our background is dry, let us prepare our neutral tint color by mixing it with some water. Then let's pick up our plastic or cling wrap and start painting. Make sure to crumple it into a manageable size about this big, dip it on your paint and dab it on your paper. If you're unsure of how this will turn out, I suggest that you grab an extra sheet of paper and practice. I will continue doing this until I'm satisfied with how my foliage looks. For me. This is the easiest technique in creating foliage. By using this method, it's also easy to leave space for our sky holes. You will also see me rotating my plastic wrap every now and then to create unpredictable marks. You'll get their fingers dirty using this technique, but all's good. Once you're satisfied with your foliage, you can now grab a smaller brush. I am using a Chinese calligraphy brush. And since some of those leaves look like they're floating in the air, I will just connect them with the foliage. And also paint in some branches peaking through the sky holes. I'll continued downwards and paint in the trunk. Now I'll switch to my bigger brush and paint in the hill. I'll cover the hill area with the same color. And going back and forth with my brush until I'm satisfied with the overall shape of the hill. Now switching to a smaller brush again and with a quick dabbing motion, let us paint our grass. Looking at this landscape, I could imagine a dog sitting under the tree and waiting for its owner. So let's paint him in. If you want, you can change the silhouette and do a cat, a person of bench or even a fence. And finally, let's finish it off with some birds flying in the background. I will carefully peel off my masking tape. And here's our first mini landscape painting using a plastic wrap. I'll see you in the next video and let's prepare for our second painting.
5. Second Tree - Background: I hope you enjoyed our first mini landscape painting. This time, we will only need our watercolor brushes to paint in the foliage. The colors that I'll be using, are neutral tint for the silhouette, cobalt and turquoise blue for the background. Let's draw our guideline for the hill or our horizon. And remember to place it lower than the center of your paper. Now, I'll grab my mop brush, dip it and clean water and wet my paper thoroughly. I will also prepare my cobalt blue and turquoise blue by adding in some water. Once the paper is wet. I'll paint in the colors of the back ground, starting with cobalt blue. I will drop in my turquoise blue color and go back and forth on my paper until it is fully covered. If you don't have this color, then feel free to choose any paint that you have on your palette. Again to avoid unwanted blooms or cauliflower effect, I will wipe the excess water on the corners of my paper. Let's leave this to dry and start working on our foliage in the next video.
6. Second Tree - Painting: Checking if the background is dry, then I will re-wet my neutral tint paint on my palette. Grab an extra sheet of watercolor paper, and practice how I will paint the foliage with quick dabbing motion. And using only just the tip of my brush, I will slowly paint the foliage. If needed. I will also rotate my brush to paint and the lower right of my tree, like what I did earlier, I will slowly build up the foliage with quick dabbing motion. I'm using a bigger brush here since I find the tip of this mop brush to produce a lovely brush mark. If you're using a different brush or you're not acquainted with your materials, then I suggest that you do the same. Grab an extra sheet of paper and see what kind of marks your brush can make. Unlike the cling wrap or plastic wrap technique, the marks that the brush will make are pretty much predictable. You might get too carried away doing this and enjoy the repetitive dabbing motion, but make sure to leave space for your sky holes. In painting the trees and the trunk, I will now switch to my smaller Chinese calligraphy brush and connect the foliage with branches and the trunk. Once done with that, I'll go back to my mop brush and paint in the hill. Like what we did with our first painting. I will also suggest some grasses growing beside the tree. And I'll do that with a smaller brush as well. Again, let's add in some character in our painting, another dog, but this time with a different pose. And finally, let's finish it off with some birds in the distance. Carefully peel off the masking tape, especially if you're not using 100% cotton paper. And here's our second mini landscape painting. I'll see you in the next video and let's prepare for our final painting.
7. Third Tree - Background: Now we're onto our last painting, and this time we will be using a Chinese brush to create the foliage. Use your pencil for the horizon line. This time I will be using Naples Yellow and quinacridone red for my background color, and the same neutral tint paint for the silhouette shapes. Let's prepare our paints by mixing them with a bit of water and using a bigger brush. Wet the whole area thoroughly. To prepare our paper for the wet on wet technique. Make sure that the paper is thoroughly wet to achieve a smooth blend. Once the paper is wet, let's paint in the colors of our background. I will start with my Naples Yellow, and cover about half of my paper with that color. Loading my brush with quinacridone red and mixing it in with Naples yellow. If you don't have these colors, feel free to use any yellow and the pink or red from your palette. Again for unwanted blooms, make sure to wipe off the excess water at the corners of your paper. Let's leave this to dry. And I'll see you in the next video where we will finish our final painting.
8. Third Tree - Painting: And we're on to our final painting. To create my foliage for this painting, I will be using a Chinese brush with goat's hair. I will simply dip it in my neutral tint paint and carefully dab it on my paper. Now since my brush is a bit big for my paper, I will need to hold the hair of my brush this way. So it's easier to manage and predict the kinds of brush mark that this will produce. Now if you don't have this kind of brush, then maybe you can check your materials and find any brush with a stiff hair. This technique for me is the most challenging. But if you have mastered this one, then you'll enjoy painting loose foliage and landscape. For this technique. I will continue dabbing my brush on my paper and loading it with paint until I'm satisfied with the shape of the foliage that I have. Now, I'll switch into my smaller brush for the details. I will paint in branches, peaking through the sky holes and the trunk. To paint in the hill. I will grab my mop brush and paint in the rest of the landscape. Switching again to my smaller brush, to add grasses. And my dog. Again, feel free to change the shape of the silhouette that you want to add. on your painting. It could be butterflies or flowers or a signage. Then I'll finish it off once again with birds flying in the background. And here's our last mini landscape painting. Which among these techniques are you going to try? And which one is your favorite? I hope you enjoyed this SkillShare course, and I'll see you on my next class. Stay safe. Bye!
 Bianca Luztre, Watercolor, Productivity, Color Mixing