Transcripts
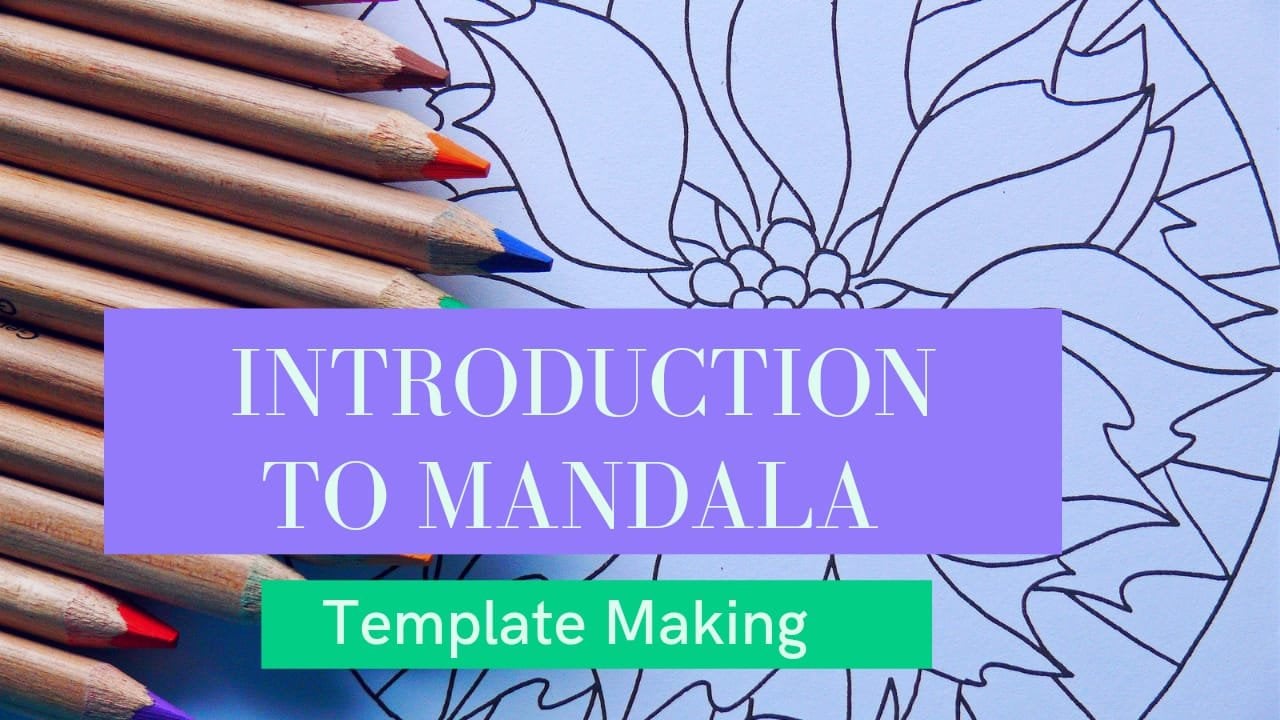
1. Introduction: Hello everyone, Welcome to my class. I'm Jody, other value. And this class is about it's entangled templates. And my other class designer owns entangled templates for beginners. I explained about various domains such as blocks, space fillers, and many more. I also explained about templates and then need in detail along with them bonus tip. So it's entangled. Templates are new to you. I would suggest watching the class closed and then come back to this class. But in case you don't want to watch that class buzz, you can simply continue with this class. Every term used is self-explanatory in this class to talking about this class, it includes the process of grant-making For template, and then 18 unique designs that are explained already. Anyone who wants to tags and tangling or want to learn some more unique and objectives and designs can join this class. So this class is for all levels. Also, at the end of this class, you have a project work.
2. Material Required: For this class, I'm going to use a plain white A4 size sheet, a Rolo, a pencil, uni-ball micro black pen, and an eraser.
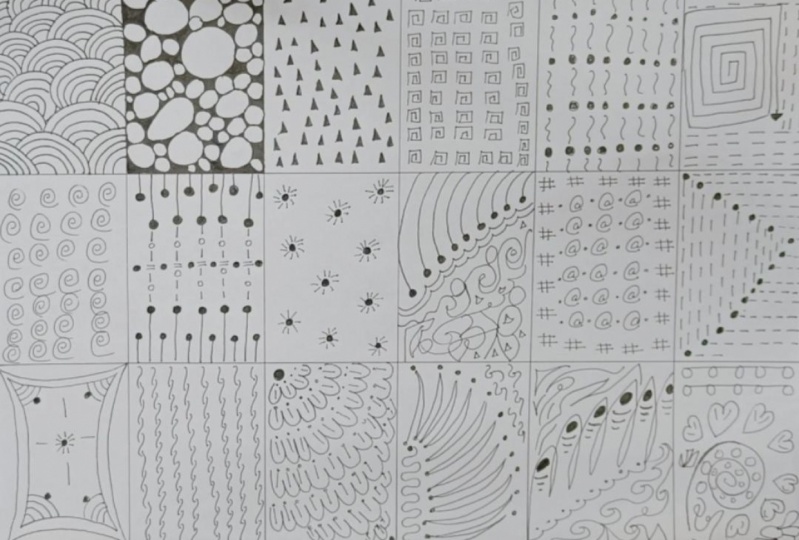
3. Making the Grid: To make the grid refers to have to measure the size of the sheet Hill using the ruler. I'm going to measure the size of the sheet. That is approx, 30 centimeters right now. So we have to divide this into a particular and a decent number. So I think 506 will work best for me. And you can do that according to your sheet. So I'm making six parts of five centimeters and making six parts. But this is totally optional. If you want, you can make only five parts of six centimeter. That depends on the number of entangled desires that you want to include in your templates. I am now done with the market. Let us draw the lines. I'm using a ruler. So this ruler is a little different from basic rulers. This is known as the Rolo because this helps us to draw parallel lines. And you can also use anything like that. If you have and if you don't have, then you can draw parallel lines using your normal ruler. Also. I'm drawing the lines using the and then directly. But if you want, you can draw the lines using a pencil first and then outline them using the append. Am using the pencil marks that were left on the sheet while levels outlining it. So I'm just removing that knocking on. Now we have to change the direction of the sheet because we have to measure the another side of the sheet fill while measuring, I get to know that it's about 21 centimeters. So I'm going to divide it with seven into three. That is seven centimeter, three parts of seven centimeters. Now again, after marking, draw the lines very much straight and parallel, tried to make these trade and bandwidth elsewhere. You can also make some curvy lines that's totally up to you because these as intangibles and then tangles are never, ever with the mistakes. As I always say, there are no mistakes and then tangles that totally applies in this entangled templates. Also. Now if I count it as 623, that is 18 blocks, I have it in dogs and my template.
4. Circular Design: Let us start with the first entangled design. We are going to draw it. And the first block of this entangled template design is a circular design. And in this, I'm just drawing some part of so-called, not a complete circle, but some part, we can say the arc of the circle. Notice that it's going the complete design. That is, we have made five rings. So we are going to make these five sub cooler rings while over the another, and we'll keep on changing its direction. You have to fill this complete block using the same design repeatedly, but in different direction. This design is ready, really easy to draw, as well as to color. And it looks really beautiful in both the ways, whether you are drawing it or you're coloring it. Our first then dangled design in our frozen dangled template block is complete. Let us now move on to the next one.
5. Bubbles: Now let us start with a seconds entangled design. This is known as bubbles design because we have to draw so many circus that we have to cover the complete, complete block, the complete area that we are walking in. But in this template, you have to cover the entire blog making so many bubbles. These bubbles can be drawn by making different sizes of circles. That is what I'm doing you. Now, once you are done with drawing all the bubbles or the circus, we just have to fill all the left of the space that is left between these circles by just filling them completely using the same bin. As we have to call it the complete template. This may take time. Many of you will find this very meditative. Make sure to fill all the gaps between the cell goes, that our template design looks really good. You have to be very carefully life Linda spaces so that you don't destroy the design by making any logs into the bubbles that we have drawn. Enjoy the process. And most importantly, trust the process because that is the key enzyme dangles to get to the final result. Here, I'm using the same pen that I use to draw everything. But if you want, you can use a pen that is of a mode toughness so that you can complete the design within a shorter duration of time. We are now also done with the second design. We move on to the third design in the next lesson.
6. Triangles: Let us now start without third is entangled design. Fathers. We have to draw a lot of triangles. We have to fill the complete block using these tiny triangles. Only. I'm drawing these in random manner. If you want, you can draw them in a particular manner or in any particular sequence that is totally up to you. Drawing in a particular sequence makes it look neat and clean. Whereas drawing in a random manner, as I am drawing, the design will look at and may excite many of yours. However, this totally depends on the Creator, how they want to be present their work to their viewers. You can also notice here that I have drawn all the triangles heading up, meaning one word takes upside and two. And the base For this is my design for myosin dangled, but this is not compulsory. You can draw these battle dating these invaders directions also. So I failed these triangles altogether after finishing withdrawing. But if you wish, you can color each triangle as you draw them. So this was all about the thirds entangled design. Let us now move to the fourth one in the next lesson. So see you in the next lesson.
7. The Square Spiral: Now the fourth design, and these are drying these squares patterns. These may be called something else at your place. But I chose this name for this design because these words are linked to the drawing. I do this repeatedly at the bottom first and then do more of squares pattern inside it. If you want, you can go with any other particular packed in our sequence. The choice is yours. We are now done with this one. We'll move to the next and then we'll design in the next lesson.
8. Mixing: Let us now start with our next them dangle design. This one is very much common as a space filler design. Drawing too curvy lines connected with a big solid dot, dot as very much solid and is filled completely using the same black pen that I'm using to draw the design. This design is not so complex to draw. But as for a lot of patients, the name I chose for this design is mixing. And that is because we are mixing the design of curved lines with the big solid filled dots. We are now done with this design, will move to next and dangled design in the next lesson.
9. Big Square Spiral: For this particular design, we have to draw one big squares pattern starting from the center of the block. Simply an gradually keep on drawing this. I'm told us space from a lease to one single site gets over. Now for the rest of this Bayesian, the block using dotted lines, these are horizontal lines. So the choice again is yours. This design is also complete. Move on to the next design in the next lesson. So see you in the next lesson.
10. Spirals: Now, for this one, I'm drying spat in his repeatedly. These are very basic circular spirals. I'm drawing these into rows and columns, but this is totally your choice. Real ways you can draw these randomly. So it's again your choice. This design is now complete. We'll move on to the next design in the next lesson.
11. Lines, Dots and Symbols: Let us now start with eight. Zen design does design in globes, lines, dots, as well as symbols. Firstly, you have to draw a small line ending with a solid filled big circle. Now, big line and solid filled bags circle. And now keep on repeating these depths in the end. Hi. Now from all the big lens, we have to draw this combination of lines and circles and other root on it into a complete design. Now, make a symbol of equal at each pagans end and repeat the patterns as I am doing. Now. Make big, so close that are solid felt at the end of each backbone need drawing all the so close to the base. And now make smaller lines. Solid foods, midbrain, these big lines. This will look like the mirror image of the design. Now, complete the design by adding dots at particular places. This design is now complete. We'll move on to the next design in the next lesson.
12. The Sunshine: For our ninths then dangled design are making doc, solid fill dots randomly and the complete block, but these are drawn at some distance between them. Now to done these dots and those solutions, I'm going to draw these small lines around these dots, around all the dots. This'll make it look like small x1. This design is beautiful and is one of my favorites too. This design is complete. Now we'll move on to the next design in the next lesson.
13. Levels and Zen: Now this design is alleging special and as close to my heart as the name of the design suggest levels. And then I'm drawing so cooler out Ponzi guiltily. But one level up at each. Each arc that I'm drawing is bigger than the previous one. After drawing, these just make a big solid dot at the end of each eye. Now bag the area by making this super bumpy line toys according to the shape of the leverage of ox drawn by. Now, don't block below, which is left blank, dangling in it, making that little lines and curves to complete the design. I have done this random designing hill, but if you want, you can make the leveled up with opposite direction, just like a mirror image of the design remade. This design is now complete. We'll move on to the next design in the next lesson.
14. Dots and Symbols: Now this design is inspired by radius symbols. The symbols are very much common and you can also use any other symbols in this design. If you're wrong. I'm using one symbol to do the border of the block. You can use more than one symbol for this if you wish to. Now using another symbol to fill the block, this time, I'm drawing these symbols in a particular manner, in rows and columns, but you can draw these in random manner. Drawing symbols in particular, or random manner depends on the types of symbols to keep the final look in mind. Now to fill all the space that is left in the block and drawing big dots all over, everywhere between symbols. This design is now complete. We'll move on to the next design in the next lesson.
15. Dots and Lines: In this design, I have made these dogs solid dots in such a way that it forms a triangle. And then I filled the rest of the space using small dotted lines. Outside the triangle, I have drawn a horizontal line. And inside the triangle, the lines are what to call.
16. Round and Round: For this design, I'm making round sides. We can say that these are codes belt over the rectangular block whose ends are same as if rectangle. Now make one more model similar to this one, but do not touch. It's called node to any. Now I'm making four rounds. That IS, goes at all four colors. You can make mode code lines if you want. That's totally your choice. Make big dots on all four rounds that are closest to the center of the block. Now makes them Shen design and the center of the block. And make four lines connecting the center to the sides of the block without touching the site. Does design is now complete? We will move on to the next design in the next lesson.
17. Chains: For this particular design, I'm drawing these lines logically, one touching the resulting into a chain line design. This design is super easy and looks fantastic. The grace of this design is unreachable. It for borders are be it first place, pillows, hell, I'm showing you how you can use this as a space below. Also, I showed you this design in a vertical direction. But if you want, you can draw these horizontally to. That depends on the design. You are creating. This design as best for the spaces that are very sleek and for borders that needs some elegance. This design is now complete. We'll move on to the next design in the next lesson.
18. Half Flower: For this design are firstly, make a big circle and fill it at the top left corner of the block. Now, gradually make layers of flowers, just like I'm drawing. These are not the exact flowers, but are the better and depictions of the flowers. Drawing this kind of interpretation is not compulsory. If you know any of those similar flood drying, you can choose that over this one. That's up to you. After these layers till the end of the block, I'm drawing these really small lines in each cov of the flat pattern. You can observe, know that these are really small and large even take these kind of tailings are rotted that make those entangled design more attractive and meditative. The lines, I added dots on the top of each line to make our design look more detailed. This design is now complete. Watch the next lesson to dive into the next design.
19. Strong Spikes: Let us now start with this design. This design, as the name suggests, is very much powerful and impactful. I use this as I naught a lot, making level spikes that to take and bold make this design unique in itself. After reading those bikes, just make both beg dots on the points of each spike without damaging the spikes. Make zig-zag patterns at all does base that is left and log-log around us by adding dots to this side of this bikes 2k. This design is now complete. We'll move on to the next design in the next lesson.
20. Flexible One !!: For this design and drying these big loops hill. Now on the upper side of these loops, I'm adding a random coast. And then each lobe, I'm making these big circles. Now for each cell body completely using the same pen. If you want, you can color these circles using any other shape to make sure to color these delta is really very dark and bold so that the design looks very much detailed. Now, drawing these lines below each circle, these will make our design look more detailed. Now, at the bottom, Oslo am drawing some random designs to complete the block. And lastly, adding dots to make it look more detailed. This design is now complete. We'll move on to the next design in the next lesson.
21. Spiral and Hearts: Let us now start without laws entangled design of this class. Fadh, this, I'm drawing a very big spiral starting from the bottom of this block. Now I'm drying radius around this battle. You again know this hertz are not of same size and are not drawn at any particular Aragon. Now, on the top of this, I'm drawing this gear design of lines and circles. After this draws more lines in HR to make this MOOC super cute. Add circles inside this battle so that it looks more detailed. Add some random designs, some lines goes our shapes in the space left to make design complete. The final look of the Zen timeless doublet that we have made is shared in the next lesson.
22. Final Look: So guys, here's the final look of this entangled tablet that we have made in this class. All the designs are unique and especially in their own ways. I've used black pen for the complete Zen tangled template, but if you want, you can use colorful pens also. That is your choice. So this was all about this class. Your project work is in the next lesson.
23. Project Work: So guys, head is your project work. Try designing a Zen DEM plate only Arun, you can recreate the template that I have shown in this class. Or you can feel your own designs and the template you get onto increase or decrease the number of designs that I had to be filled and the template. After filling your template, click expected and upload that picture and projects and resources section of this class. I'm really excited to see your templates, so please upload soon.
24. A Word with You: So guys, this was all hope to see your project works really soon. I also encourage you to review this class so that I can meet my future classes based upon those reviews. And if you want to get notified every time I publish a new class, please click on the Follow button on my profile. Also, if you post your work on Instagram, don't forget to tag me. I would love to share your project and stories and my own stories. Thank you so much for joining. Keep learning, keep creating, buh-bye.
 Jyoti Aggarwal, Art and Craft Teacher