Transcripts
1. Hello & Welcome!: Do you ever look at
a blank piece of paper and suddenly
feel completely numb? And you just don't know
where to get started. Or perhaps you're too
afraid of the end result? Well, if all of this
sounds too familiar, then let me begin by saying that this feeling is
completely normal. Whether you're a
professional artist or an absolute beginner experiencing creative
blocks every now and then is
completely normal. It happens to the best of
us. But let's face it. Nobody wants this feeling to last. We want to get back to our creative juices
flowing again and we are always itching to create
something new with full productivity and
creativity, right? So this is where the Zentangle Method luckily helps us all out. Hi, my name is Ridhi and
I'm a filmmaker and a multi-disciplinary artist
and an art educator from India. I'm also a certified Zentangle teacher, which basically means that
I'm able to bring to you the most authentic and
updated information when it comes to the Zentangle
art practice. I've been a Skillshare teacher
for quite some time now, and this is my ninth
class over here. This course covers
everything you need to know about
the Zentangle art method as a beginner. We will start by understanding what exactly
Zentangle art is.. A little bit about its
history and the reason why creative professionals can benefit from this art form. We will then move on to talking about the right supplies
for this art form. And together we will create a beautiful piece of art
in a step-by-step manner, during which I will
also introduce you to the Zentangle terminology
and principles. Along the way, you will pick up many new skills and techniques. And at the end of the course, I will also highlight
the differences between Zentangle art,
Mandalas and Doodles. So overall, this course is
designed to give you a holistic understanding of how the Zentangle
art method works, as well as a strong
foundation in it. This course is
perfect for students of all age groups
and skill levels. Whether you're an
experienced artist or a complete beginner, you will find that the Zentangle art method
holds value for everyone. So whether you're looking to build a serious hobby or improve
your drawing skills, or simply want to
have fun and relax, well, you're in the
right place! So come and join me in this wonderful
transformative journey where I help you to create
beautiful pieces of art in a step-by-step manner using
the Zentangle Method.
2. Let's Start with FAQs: Hi and welcome to the course. I'm so glad that you
decided to take this step. I simply cannot wait to share all of my
knowledge with you. Before we dive into the course, I would like to answer a few frequently asked questions about the Zentangle method. So first up, what
exactly is Zentangle? Well, Zentangle
is an easy-to-learn, relaxing art method
that was developed by Rick Roberts and Maria
Thomas in the fall of 2003. These two founders believe
that every person is an artist. And that with the
right approach, we can all tap into that inner artistic potential and create something
beautiful every day. And I quote this directly
from their website, when I say that life
is an art form, and that each person is an
artist. The Zentangle Method is an elegant
metaphor and model for inspiring a
deliberate artistry in life. Now notice the usage of
the word "method" over here. This is because the
Zentangle method is literally a system or a process with specific
steps that help you to draw structured
patterns in a relaxing manner. So it is a very
all-encompassing, non-restrictive
approach, which can be applied to many different
creative practices as well. Whether you're someone who
likes to work with watercolors or colored pencils or any
other medium for that matter, the Zentangle art method or the Zentangle process will bring a transformation within you, in the way you
perceive yourself as an artist and how you go
about making your artworks. And all of this will
make a lot more sense once you understand the 8 steps
of the Zentangle method, which we will be
diving deeper into once we get into the
actual drawing process. Now, the next question
that I'm often asked is whether you need
any prior skills to learn the
Zentangle art method. Well, the great
thing about the Zentangle art method is that it works wonderfully well with beginners as well as
experienced artists. It doesn't matter
what age group you're from or what kind of
skillset you have. The Zentangle art method,
holds value for everybody. And in that sense, it's a very, very
unique method. The foundation of the
Zentangle method actually lies in what we call
the elemental strokes. These are i, c, s, and o. This means that if you
can write the alphabets, i, c, s and o, you're good to go. Now some people get confused
and think that they need to write I, C S and O in an
excellent handwriting. Well, that's not true. It doesn't matter how
your handwriting is and whether or not you have made
any kind of art previously. Just as long as you can write these four alphabets
comfortably, you're ready to get started
with the Zentangle method. Now, if you're a
professional artist, you might say that if all that is required for
you to successfully work with the
Zentangle method is the ability to write i c, s and o, then probably the
method is not meant for advanced artists that work
with complex compositions. And this is one of the biggest
myths that I love to bust. The Zentangle art method
holds such wonderful scope to accommodate artists
of all skill levels. So if you are an artist who likes to work with complex
compositions, the Zentangle framework
will allow you to make your compositions
complex depending on the types of material you
want to use and depending on the types of design influences you want to showcase
in your work. So even though the method
breaks everything down into simple strokes and a
step-by-step methodology, it holds a lot of scope
for you to personalize your work and go as deep
into it as you like. So let's say you are
looking to develop complex artworks that you can actually sell later and maybe even make a full-time
career out of it. Well, don't worry, the method
will not disappoint you. Moving on... The next frequently
asked question is, Is Zentangle art
always black and white? Now if you've probably tried searching for Zentangle
art ideas or inspiration for beginners on websites like
Pinterest and Google, then there is a high
chance that you have seen a plethora of black
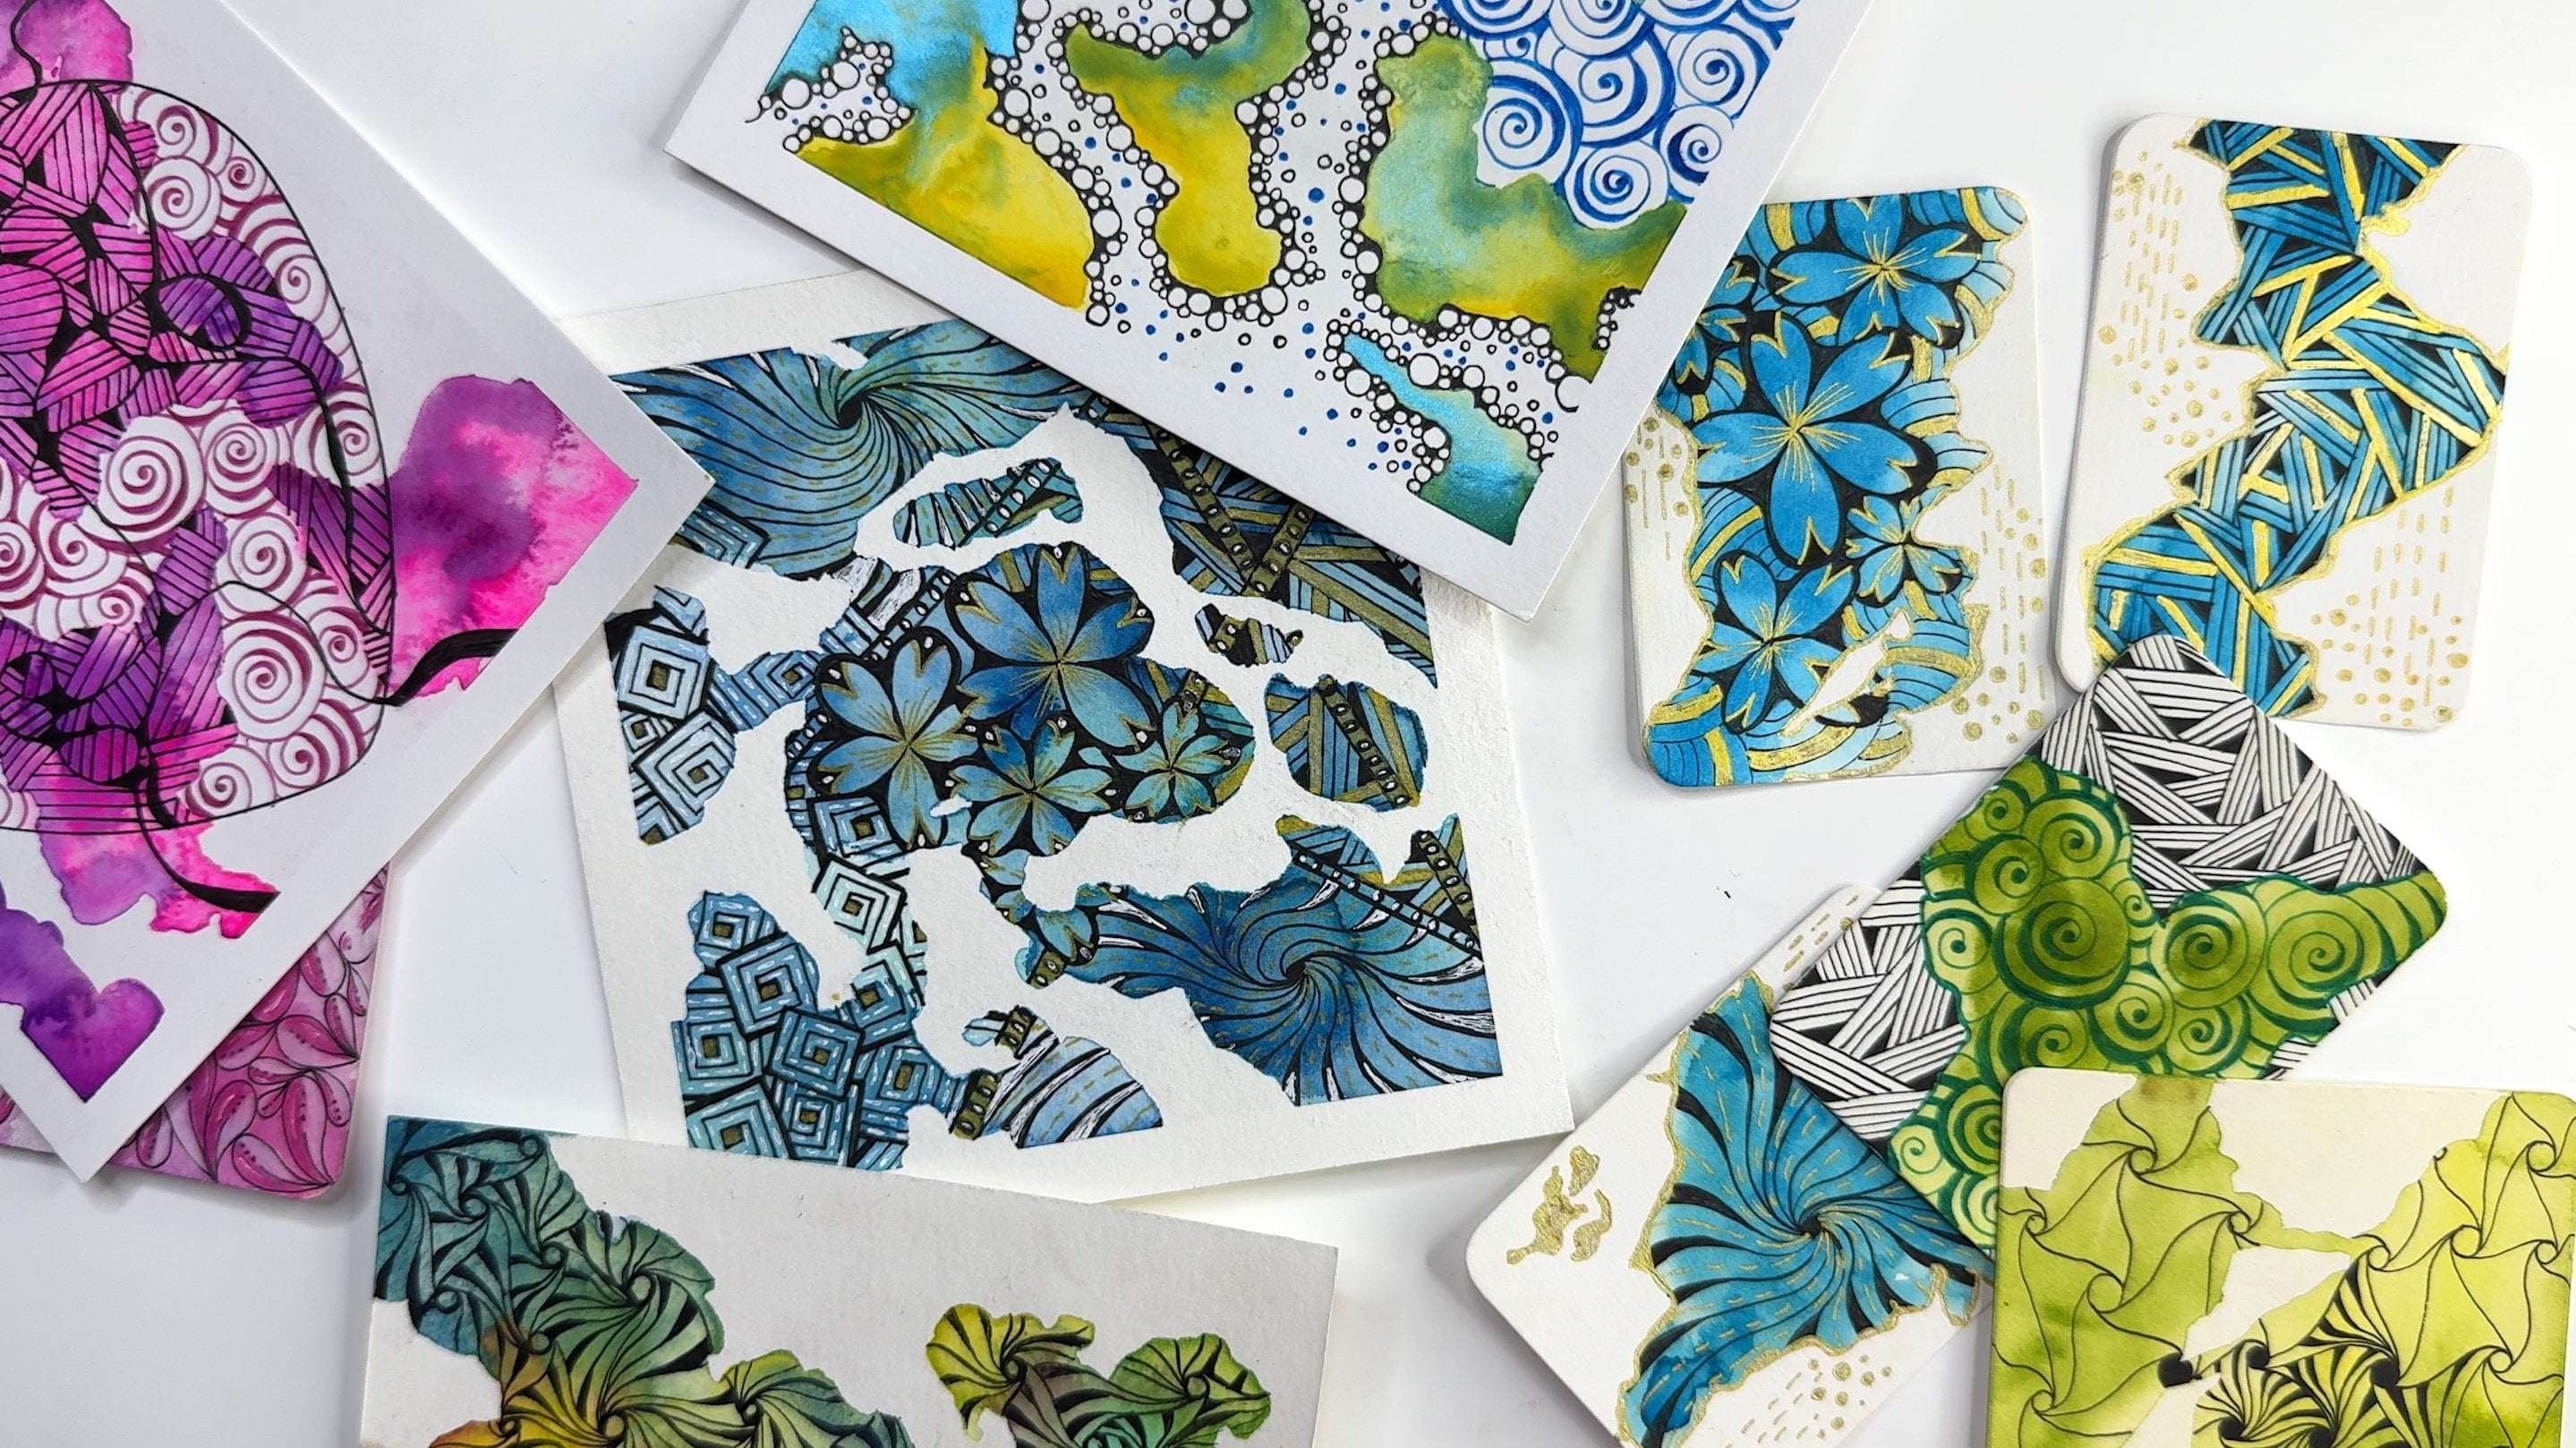
and white artworks. But if you love
colorful artworks, don't let these
images dishearten you. When learning
the Zentangle art method, the beginners module is
taught in black and white. But as you learn more about the method and progress
to more advanced courses, you will be working with color as well in
your Zentangle art. However, like I said, the beginners module is
usually taught in black and white because as a
Certified Zenatngle Teacher, my focus is first to
introduce the method to you and for you to have
a strong foundation in it. As you progress to
the advanced courses, you will be introduced to color and many other different
techniques as well. This approach is also at the core of the philosophy
of the Zentangle method, where we don't want you to get
overwhelmed with decisions about color palettes and
metallic accents and other kinds of embellishments
and ornamental details, right in the beginning itself. We want you to first focus
on the method itself and experience its benefits without complicating things for yourself. Because once you get
trapped in that never- ending cycle of
questions and criticism, then you basically lose focus and forget the
actual purpose of Zentangle. And that often makes you give up on your art
practice and experience disappointment. The
Zentangle art method is designed to help you avoid
that disappointment. It is designed to
open up the gates to your inner creativity in an
easy and relaxed manner, regardless of the tools and resources that you have
available with you. Which is why starting with
black and white artworks is a good step to acquaint yourself with the process
of the Zentangle method. And then you can
gradually move on to more colorful,
complex designs. Now perhaps, you still
have a few more questions about the Zentangle method and what the actual
philosophy of it is. Well, that is
exactly what we will be discussing in
our next lesson, where we talk about
common blocks that we face in our creative
flow as an artist.
3. The Creative Flow: You've probably often heard creative professionals
use phrases like, "I'm in the zone", or "I'm experiencing my
creative flow right now." Well, so what exactly
does that mean? It basically means that they are completely immersed in the
activity that they're doing. That they are confident of their ability to do
the task at hand. That they are enjoying
themselves while doing the task. That they know that
this is going to have a beautiful end result. And that they know that
this is going to be appreciated by others. So basically, I
have just described the best-case happy scenario for every artist in the world. But let's face it, to get to that happy state of mind and to get to that
level of confidence, we often have to overcome
a lot of creative blocks. Now, once I start talking
about these creative blocks, you're probably going to
relate to a lot of them. So for e.g. the first common block that we have is Self-criticism. We often doubt ourselves too much or think that our
work is not good enough, and end up looking at too many
flaws in our own artwork. Then there is the
fear of failure. We wonder what's going to
happen if this piece of artwork that I'm working on doesn't turn out to
be good in the end. Or what if people don't like it? There's also lack of immediate positive feedback because
we're not constantly surrounded by supportive and encouraging people all the time. And that creates doubts in our head of whether our
work is good or not. Then even if you do try to pick up a new skill or
learn a new technique, there's always this frustration with lengthy training periods. And we keep wondering, why am I not learning
this fast enough, or why am I so slow? Why is this creative technique taking so long for me to learn? Is there no shortcut? There are also times when we simply just have a
lack of inspiration. Even with constant browsing
on the internet for ideas, we just don't know
where to get started or what the idea or focal theme of our project is going to be. Then even if you do get yourself the best supplies and end up creating something
beautiful and nice, then you worry whether
someone is going to buy that piece of art or not. And that is basically you worrying about
the final outcome. Then let's say somehow miraculously you overcome
all of these things. The other common problem that
artists experience after that is an unclear vision for what they're
going to do next. Do they continue working
with the same style or do they learn something new
and evolve their techniques? And basically, how do you
grow as an artist from here? So the Zentangle Art
method is basically designed for you to overcome
all of these creative blocks... For you to develop art in an easy and relaxed manner so that all your best potential can be brought down
to the paper without any fear of judgment or any kind of
inhibitions whatsoever. Regardless of where you are
in your creative journey, the Zentangle art method will help you to overcome
these blocks. So whether you're a beginner
who believes or has been told that you are not
capable of creating art. Or whether you're a
professional artist who doesn't know how to actually nurture
all your creative potential, the Zentangle art method
will come to your rescue. It inspires creativity with
an elegance of limits, which basically means
that while there is a given systematic
structure and method, you also have the liberty to infuse your own
creativity in there. Think of it like a perfect
recipe for something. When you're making a dish, you have these specific ingredients that
you're supposed to work with in a certain order
or a certain sequence. But even within that, there is scope for you to
alter things here and there and to customize the experience
according to your taste. So for example, if you like to
have more spicy food, then you're definitely
going to add more chillies on the recipe
than what was recommended. Similarly, in
the Zentangle art method, while you have a perfect recipe or a framework for yourself, you're free to alter things according to your own
design preferences. What this approach
eventually leads to is an uninterrupted
creative flow where you actually make something
tangible very intuitively, using the best of your
creative potential. Alright! So now that I've given
you a basic understanding about the philosophy of
the Zentangle method, let's get to gathering
our supplies. And I'm going to
show you how to make beautiful art using minimal
tools and supplies.
4. Tools & Supplies: Perhaps the most
wonderful thing about Zentangle art
is that it can be created with minimal
tools and supplies. Unlike many other art forms that require extensive supplies
and large setups, Zentangle supplies
can be easily carried in a small pouch or in a small
compartment of your bag. And then all you need is a quiet corner to sit
comfortably and draw. So the first thing that we
need is a surface to work on. And Zentangle Art is
usually created on these square, 3.5 inch paper tiles. We call them tiles
because you can assemble them into
beautiful mosaics. I have the official
Zentangle tiles with me that have a plain front
surface for you to draw on, and a logo at the back with a little bit of space for
you to make some notes. These are made of acid free, 100% cotton heavyweight
fine artists' paper. Now as explained by the founders of the
Zentangle method, the die cut edges echo the natural deckled edges
of handmade paper and enhance the overall
appearance when you place several tiles
together in a mosaic. Now if you don't have
these Zentangle tiles available with you, that's
completely alright. You can use artist tiles
of any good brand, just as long as the paper
is at least 180 GSM thick, so that it can take on layers of inky details as well as
graphite shading. Most of these artist
tiles which are available in the market are
also acid free, made of 100% cotton
and are usually heavy-weight fine artists' paper. So you can use mixed media paper or any other paper that can take
ink and graphite details. Now, let's say you don't
find tiles at all, or you prefer working
in a sketchbook, then you can simply
draw a square of 3.5 inches in a sketchbook
of your choice. And you can practice
Zentangle on that instead. So really there are no rules when it comes to these supplies. You can use whatever is
most easily available to you and whatever is most
convenient for you. Next, we need drawing pens. Now the recommended
pens for Zentangle are these Sakura Micron pens that
come in various nib sizes. The recommended size
for beginners is the 01 nib from Sakura, which is around 0.25 mm thick. And then to color large areas, you can use a 05 or 08. Now if you don't have
the Sakura Micron pens available with you, that's totally alright. You can use technical
drawing pens from other brands such as Snowman, Faber Castell, Brustro
and many others. Next, we need a graphite pencil
for shading our drawings. The Zentangle graphite pencils are usually made with HB lead. So if you don't find
this in your area, you can simply use an HB pencil from any other good brand. We also need a tortillon, which is basically a small
rolled paper tool with a nice pointed tip, to get into those
fine corners of your drawing. As an alternate, you can
also use blending stumps, which are easily available
at art supply stores. Now, a very important point that I must mention over here is that there is no use of an eraser in the
Zentangle art method. This is because Zentangle art follows the philosophy
of no mistakes. Just like our life has no
eraser or delete button, we don't have an eraser in our
Zentangle tool set as well. Our so-called mistakes or
unintentional strokes on paper, are simply an opportunity for
us to make new discoveries. It might lead to a new pattern
or a new composition idea. And sometimes it might lead to insights that you'd
never gain otherwise. So basically, no mistakes. So that's it for the supplies. And as I always say, don't let the lack
of tools or supplies stop you from creating
beautiful Zentangle Art. Start with whatever you
have available with you and simply
enjoy the process.
5. Setting Up for Tangling: The Zentangle method focuses
on total absorption. This is because unlike
other art forms, there is no subject in
front of you to study or a model for you to look
at for instructions. In fact, once you start tangling, you get so immersed
in the process that you hardly ever look
away from your tile. Now you can make this
experience even better for yourself by making
sure that you're setting up a quiet
corner for you to draw. This means finding a spot in your home or office where
there are no distractions. Look for a place,
preferably with natural light that
energizes you. And make sure that
you switch off your phone and laptop
notifications so that you're able to focus
completely on tangling. Some of my students like to put on light meditation music in the background to help calm them down and put them in a
relaxed state of mind. And one of my close
friends also keeps healing crystals of
various kinds on her desk. She feels that they put her in the right frame of
mind for tangling. Some other things that
I like to do before tangling are to surround
myself with fresh flowers, and light up some scented candles. So basically surround yourself with objects that
give you a feeling of positivity and create
an atmosphere for yourself where you are
completely focused on tangling. Most importantly, find yourself a place where you
can sit comfortably. Your posture plays
a huge role in putting your mind
and body at ease. And you must find a place
where you can sit in a comfortable position
for at least an hour. Now of course, you don't have to do the exact same things as me. But basically, take
your time to set up a space that helps
you relax over the next hour or so without any distractions
and disturbances.
6. Gratitude & Appreciation : As I had mentioned earlier
in one of the videos, the Zentangle method has been
designed to open the gates to your inner creativity
so that you can create beautiful art in an easy
and relaxed manner. For this reason, we have
eight steps in the method, which are often referred to as the "ceremony of the
Zentangle method." And as we progress along
from one lesson to the next, we will be experiencing
the benefits of this ceremony one-by-one. The first step in this ceremony is gratitude and appreciation. Take a moment to think about all that you're grateful for. Maybe you want to close your eyes and take
a few deep breaths. Or maybe you even want
to say a small prayer just as you would
before starting something sacred or important. Appreciate the subtle texture of the beautiful
paper that you have, the wonderful tools you are
about to start working with. And most importantly,
be grateful for this wonderful opportunity to create something
new and beautiful. Life has finally given you
a moment to breathe and relax and to enjoy this class and learn
about this method. By taking these deep breaths and allowing yourself
to clear your mind, you're also opening yourself
up to make new discoveries. With your eyes closed, take as long as you need
to calm your mind, to think of all the
things that you're grateful for and to get ready for this wonderful and
transformative journey that you are about to undertake.
7. Corner Dots: Do you remember that at the
beginning of the class, I talked a little bit about how we all fear a blank
page sometimes? Well, the second step of the Zentangle method is designed to tackle that
problem specifically. All we need to do is take our graphite pencil and with a
gentle touch of the hand, lightly make four tiny dots
at the corners of our tile. There is no such rule on how far or how near these dots
need to be to the edges. All we need are plain
and simple, four dots, one on each of the corners with just a slight gap. Guess what? Your paper isn't blank anymore! You don't have to fear
this paper anymore! And most importantly,
you just did the second step of the
Zentangle method, successfully!
8. Border : Now we move on to connecting these dots with a light touch
of our graphite pencil. It doesn't matter
whether these lines are straight or curved or wavy. We just relax our hand
and let the pencil glide on the paper from
one dot to the next, making somewhat of a
frame on the paper. This is the border. It doesn't need to be
like a perfect square. It just needs to be
a frame on the tile, an abstract shape you
might like to call it. Now this border defines
an area for us to work inside of and prepares
us for our next step.
9. String : The fourth step of the Zentangle method is the
laying down of the string. Now I have an empty
tile over here with me along with
a piece of thread. And I'm just going to drop this thread on this blank tile. Do you see how this
thread has formed small sections over
here on the tile? We don't really
have any control on the way the thread
falls once we drop it. Let's try this once again. Again, I'm going to
drop the thread. And again it's going to
take a shape of its own. And this time we have
different sections. So this is exactly
what a string does. By drawing a string on a tile, we get separate
sections to work on, which we can fill
later on with tangles. Now there are various types
of strings that one can draw. And as you immerse yourself
in Zentangle further, you will understand more about strings in some of
my future classes. But for today's lesson, we're going to start
with a basic Z string. I will rotate my tile like so. And with a gentle touch
of the graphite pencil, I'm just going to
draw a Z over here. So again, this is just like
writing the alphabet Z, but we do it with one stroke effortlessly and without
thinking too much. So now you can see that
with this Z string, we have four sections over here. Now there are various types
of strings that one can draw. These can be single-line
strings, multiple-line strings,
and so many more. But the key thing
to note is that these strings always divide
the tile into sections. The strings are always done
in pencil because they act as guidelines for us
that eventually disappear. The pencil strings also
gives you the liberty to combine two sections or sometimes go beyond
a given section, which might not be
possible when you draw the strings
with a pen instead. So basically a lightly
drawn pencil string offers support and a pathway for your drawings instead of
making things rigid for you. Now that we have these four
sections ready with us, we're going to move
on to our next step, which is to fill up these
sections with tangles
10. Tangle: In the Zentangle vocabulary, the word Tangle is used to describe the patterns
that we draw. These tangles have a
predefined sequence of the elemental strokes that are then repeated to fill up the sections of the tile
created by the string. These tangles are
always drawn in pen. Here's an interesting fun fact from the Zentangle Primer. Tangle can be both
a noun and verb. Just as you dance a dance, we tangle our tangles on the
sections of our tile. Now you might wonder, who creates these tangles? Well, tanglers, of course! The Zentangle headquarters launches new tangles every now and then, which are also known as
the "official" tangles. Apart from this,
there are tangles created by tanglers from
all over the world, as well as by certified
Zentangle teachers. These can be easily found on tangle collection
websites online. I've added links to a couple of my favorite websites in the document available
in the resource section. Now you might also be wondering, why do we need these tangles? Well, imagine if I give
you a blank sheet of paper and ask you to come up with 50 unique designs of your own. You're probably going to feel a little overwhelmed
by that, right? But what if I gave
you an encyclopedia or maybe even a collection of
previously drawn patterns? And all you have to do
is just alter them a little bit according
to your own taste. That sounds easy, right? So one of the key features
of the Zentangle method is the constant development and addition of established tangles, each with their own
step-by-step guide, so that you never
experience the pressure or the overwhelming
feeling of what to draw next. By not having to worry about what to draw
next or how to draw it, you experience an uninterrupted
creative flow. In today's tile, we're
gonna be working with four tangles because we have four different
sections on our tile. Now, keep in mind that this
is not a hard and fast rule. The number of tangles
that you draw on a tile is not always equivalent to the number of sections
on your tile. You can always work with a
single tangle or two tangles. But those are slightly more advanced concepts which
we are going to be exploring in our future
classes. For now, we're going to start
with our first tangle, which is called Hollibaugh. I'm going to start working
on this section over here. But you're free to choose any
other section on your tile. In fact, I highly
recommend that you try a different section
so that you can see how the same
tangles can lead to completely different
results when we place them just a
little differently. So start by making a
set of parallel lines. Then rotate your tile slightly. And draw another set of lines
coming out the other end. Then we keep repeating
the same step. Each time you reach a
previously drawn stick, just lift your pen
ever-so-slightly, and then touch it
back on the tile for it to come out
the other end. And then you rotate the tile again and repeat the same steps. Rotating the tile constantly ensures that your
hand is steady. So this means, you're not the one struggling to change your angle all the
time over here. And your hand and wrist
is stable on the table. Instead, it's the
tile that adjusts to the angle that you're most
comfortable drawing at. Now Hollibaugh is a
tangle made up of pairs of parallel lines which are crisscrossing
each other, pretty much like sticks
crisscrossing each other. One of the reasons why it is essential to practice
this tangle early on is because it teaches you
the principle of layering, which can also be referred
to as "drawing behind". In other words, you're creating
depth in your drawings by suggesting that
there are more of these sticks behind
each of the top ones. This almost looks
like an aerial view of highway roads crisscrossing. The best part is, there is
no wrong way to do this. Your sticks can be thicker or thinner as compared to mine. And you can keep going on
for as long as you want. I personally like to fill up the space as much as possible. In fact, as I draw the
smaller sticks behind, some of them stop just behind a previously
drawn stick. And I don't bring it
out from the other end. This is just something
that I do to keep building this illusion
of crisscrossing sticks. So take your time. Go slow with deliberate,
intentional strokes. And fill up this section
of your tile with Hollibaugh. For our next tangle, we're going to work
with crescent moon. Now, crescent moon is made up of curved lines or C-shaped lines. And it offers a
wonderful contrast to the straight lines that we
just drew in Hollibaugh. So we start by drawing
these semicircular shapes along the perimeter of
another section on our tile. And again, you're free to do this in a different
section than mine. Once you have these little
lady bug like shapes, we're going to color them black. And of course, you're welcome to switch to a thicker
nib for this. So a 05 or 08 or any
other pen that you have. It just helps you
to color faster. The coloring can often
take a little bit of time, but it is also
extremely satisfying. Adding inky black
details to your drawing builds contrast and enhances
the overall appearance. In fact, some of my most favorite tangles are the ones where there are a lot of inky black details because I really enjoy the
process of coloring them. In fact, sometimes these
kinds of tangles look so good as it is that you
don't even need to shade them. They end up looking so
dynamic and so dramatic, even without the shading. Alright, now with
the coloring done, we switch back to our thinner nib. And now we just sort of draw an aura around the
previously drawn shapes. Now again, just like Hollibaugh was all about drawing
behind a given shape, Aura-ing is all
about drawing a line around the image or shape
that you have just drawn. This is another principle of Zentangle that
we're learning. And notice how I keep
rotating my tile to support my wrist
in drawing comfortably. So after I do the first row, I start again with the
second row of auras. And perhaps you might also have a situation like mine
where you're not able to take those
auras all the way to the edge or to the
bottom of your section. That's totally fine. You can simply take it to that little crevice
and then rotate your tile around and
keep drawing ahead. So now you basically have this little abstract shape
that has been formed inside. And by the time we
reach our third row, we simply have to
follow that outline, so to say, and keep making auras around that newly formed shape. We keep going on
until we reach the innermost
section of the tile. And till we don't have any more space to draw
further in that section. You can also color that
little section inside black. That's something that
I just like to do to build contrast again
on the tile. Now, moving on to
our third tangle, you can now pick any of the two sections that are
remaining on your title. We're gonna be working with
a tangle called Printemps, which are basically spirals. You can draw them as big
or as small as you like. And you can draw
them clockwise or counterclockwise
depending on what you're more comfortable with. Really, there is no wrong
way to do Printemps. When you start to bump into previously drawn
shapes on your tile, then you can either
stop there or simply draw behind the
previously drawn shapes in a Hollibaugh fashion. So this is where the Hollibaugh technique really comes in handy. I usually prefer to do the
second approach where I draw several Printemps
and then I keep drawing behind
the previous ones. This way, I'm able to create more depth and
drama in my tile. We continue to fill up this
section with lots and lots of Printemps, joining them in
a Hollibaugh fashion. And don't be too afraid
if one or two of these Printemps go
outside the border. The border and the string are
drawn in pencil, after all, simply because we want them
to disappear after a point. And really they're
just guidelines and not rigid structures that
are stopping us in any way. So you can cross the border
if you feel like it. And of course, you will
still be left with some empty spaces here and
there between the Printemps. You can simply fill them with black ink and add more
contrast to your tile. Now for our final section, we're going to work with
a tangle called Cubine. This tangle looks
beautiful when shaded, and there are so many ways
that you can do this. We will be discussing more about the variations of a tangle
in our upcoming lessons. But for now, let's start by
making a few parallel lines in our last section. These can be as broad or
as narrow as you like. And then we're going to
cross them across like so. To make an almost
checkered pattern. So this tangle introduces us to the concept of grid
inspired tangles. There are many grid inspired tangles in the Zentangle method. Today we're just
working with one of them, which is Cubine. Now, once you have this grid, then we take one
of the corners in each of these small sections and start to make tiny little squares or
diamonds, in this case. Much like smaller versions of the shapes which are outside. This would probably explain
why we call this tangle Cubine because it almost
looks like a cube. Then we just draw a tiny
line across like so. So when we do all the
sections like this, it creates this wonderful
geometrical pattern. And of course, you can make the lines absolutely
vertical and horizontal to get
perfect squares if that's what you prefer. But I do believe that by curving the grid lines or by
angling them slightly, the way we have done just now, the tangle looks even
more interesting. Again, there is a mix of light
and dark in this tangle, which looks so dramatic
and so captivating. And it also sort of
balances out the dark areas that we had developed in
the crescent moon tangle. So overall, the tile is
shaping up quite well. Take your time. Draw
intentional strokes. And if you feel
overwhelmed at any point, take a break and then
just come back to your tile with renewed energy. Work at your own pace. And really just enjoy the process without worrying
about the end result. Alright, and with that, we have finished adding
our tangles to the tile, which means that we
are now ready for our next step, which is shading.
11. Shading: The next step in the
Zentangle method is shading. And it's almost like having the cherry
on top of the cake. Your piece already looks quite gorgeous with beautiful
tangles all over, but shading helps to
enhance it even more. It creates depth,
emphasis and contrast in your overall piece
and transforms your two-dimensional tangles
into three-dimensional ones. The best part is shading
in Zentangle does not follow the traditional
principles of a light source. So if you're someone
who doesn't understand how light and shadow
work, well, don't worry. Because shading in
the Zentangle method is totally subjective and there is no right or wrong
way of doing it. Now keep in mind that shading is a vast subject and I will dive deeper into it
in a separate class. But for now, we're
going to start with some basic shading techniques
on our current tile. So we're going to
start with Hollibaugh. And I'm going to locate the first stick that I
drew, the topmost one. And then I'm going to gently
apply a little bit of graphite on any one of
the sides of the stick. Now, you want to make
sure that you have a sharp pencil for this
and not a blunt one. So you can apply it precisely. And you want to make sure
that you're gently applying only a little bit
and not too much. A little goes a long way when it comes to this graphite pencil. And then I'm going to rotate
my tile and I'm going to keep applying the graphite to the rest of the
sticks the same way. Each time I rotate
my tile to find a comfortable angle to work
at, under my relaxed hand. And if you notice, I'm
basically applying the graphite to the right
side of each of the sticks. Just something that
I'm doing to make it easier for myself to
remember where to apply it. Although this is not a rule and you can apply it to
any of the sides. This is just something
that I'm doing to have a little bit
of fun while shading. So I'm rotating my tile. And with every new stick, I leave the left
side and just add a little bit of graphite
to the right side. In case you're planning to do
the same and you happen to apply it on the other side of
a few sticks, don't worry. Like I said, there's no
right or wrong over here. So it's totally okay if you ended up doing it slightly
different than mine. I'm sure even I've
got a couple of them slightly different
than the top ones. I'm probably going to
notice that a little later. Alright, now once we have
a few of these done, we're going to take
our tortillon and then start to lightly
smudge that graphite. This step lets the graphite
sink into the paper grain nicely and it creates
a nice smooth finish. Now you want to hold
your tortillon pretty much the same way you
held your pencil, which is at a slight angle. We don't want either
the pencil or the tortillon to be completely
perpendicular to the tile. Basically, if you hold
your tortillon at an angle, then it tends to last longer. And as far as the
pencil is concerned, if you don't hold it perpendicular and you hold
it at an angle instead, then you'll get slightly
more smooth lines as compared to the scratchy ones you get when you hold the pencil with the
tip against the paper. Alright, so now you
can continue doing this on as many
sticks as you like. And usually when you have
a very complex design, doing just a few sticks on
the top does the trick. But I like to go into
the little ones as well, just so that there is a little
more depth in the drawing. By now, you will notice that the darker areas in the
drawing seem to recede. And the lighter areas tend
to float up or rise up. And that is pretty much
the magic of shading! It creates this
wonderful sense of depth and so much drama
in a simple tangle. Now, another way to do
Hollibaugh shading is to add graphite on both sides
of each of the sticks. So maybe you could
try that as well separately to see if there is any difference in the effect. And maybe you can tell me your
findings and observations. Alright, so that
looks quite good. And now I'm going to
move on to Cubine. Again, since the darker
areas tend to recede, I can create a sense
of dimension over here by shading just one side
of the little sections. So when you hold the
tile at arm's length, you can totally see the
beauty of the Cubine pattern. It looks very three-dimensional after the shading is done. So once I'm done
applying the graphite, I'm just going to
take the tortillon to smudge the graphite. And at this point your tortillon already has a little
bit of graphite on it. So you want to make sure
that going forward, you don't apply too much
graphite on the tile because the tortillon will already contribute to making
your tile darker. So you definitely want
to factor that in when you apply more graphite
in the other two tangles. Moving on to Printemps. Now again, there are many
ways to shade this tangle, but I'm gonna do a sort of abstract dappled-light
effect on these. And I'm going to pretend
that these are some kind of metallic or shiny discs with light falling partially
on some areas. I'm just going to
add my graphite in this pizza slice sort
of manner where I'm just making little triangles and then just making
small sections dark. And then of course we blend, just spreading a little bit of graphite on the sides of
the triangle as well. To make it look
like it's a smooth, seamless transition
from light to dark. And now we have to be a little
careful here so as to not go overboard with the
application of graphite, because the shapes
are really small. And we do want some of
the areas to remain white for highlight and to
add to the contrast. Making everything dark
would make the image flat. And so that's something that
we have to keep an eye on. Alright, and now
I'm going to locate the top Printemps and go around them with my
graphite pencil. Almost like a shadow that they're casting on
the bottom layers. Very similar to what we did
with Hollibaugh as well. So we apply the
graphite all around the shape and then
we blend it further. So again, it will look like some of the Printemps
are on the top, while the others are
at the bottom layers. Moving on to crescent moon, I'm going to start
applying some graphite to the first aura around the little lady bug shapes
that we had drawn. I'm also going to be making these tiny sort of partition lines between
the crescent moons, pretending that these
are some kind of tubes that are stacked together
or smushed together. So when I blend, I'm going to pull the graphite in to make these
tiny little intersections. Sort of like, like I said, making them look like tubes. And so you can see that due to the nature of the
curves and the shading, it appears as if these
are bumps which are risen on the paper and
catching more light. Now, shading is something
that can be stopped or continued based on
your personal taste. So here, if you like, you can stop shading and the tile would look
quite finished. But what I sometimes
like to do is make the overall sections
also stand out. So till now we were shading
individual tangles. But now I'm just going to lift
up this entire section of crescent moon as if it is sitting on top of
the other sections. So I'm applying a little
bit of graphite all around that area and applying a little bit of pressure so
that it's a little darker. And then I'm just
going to blend that. And you can see it already
makes a lot of difference. So we can also do the same with the section
with Printemps. And it pretty much looks like
a little piece of fabric or a little piece
of printed paper which is jutting out slightly, maybe like a puzzle piece or something which is sitting
on top of the others. Now again, you can leave it
at this point if you like. And if you like this
slightly abstract approach and asymmetrical vibe
that this is giving, then this is totally a
good stopping point. But yet another thing that
you can do is to go around the outer border completely
and make a sort of frame. Again, it helps to make the whole composition
standout on the tile. So really the more love
you give to your tile, the more polished it will look, and the more drama you
will be able to add to it. So this is another
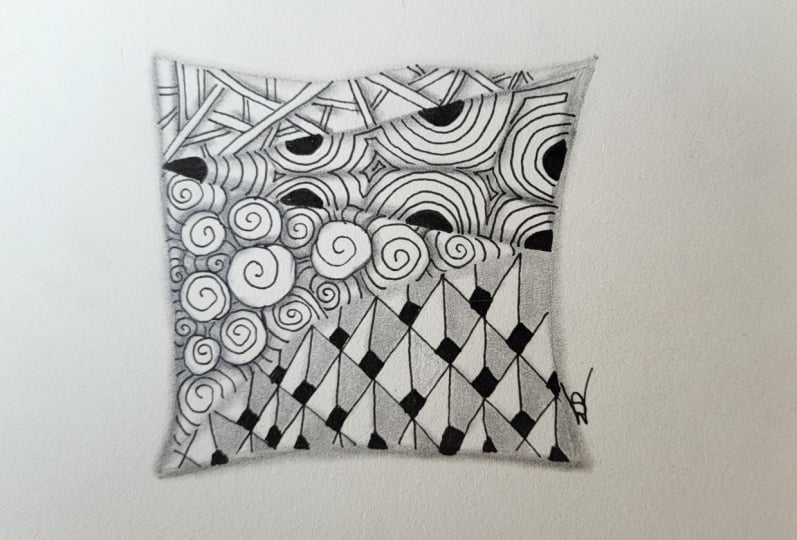
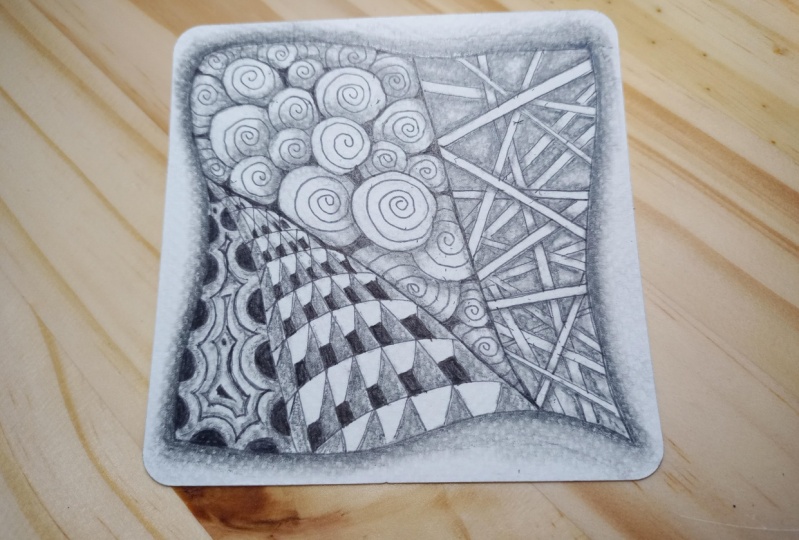
approach that you can try. All right, Now I want
you to take a moment and look at these two images
on your screen closely. At first glance, they may
seem like the same tile. And yes, they are the
same tile indeed. But I want you to notice subtle differences
in the images. On the left is the tile that we just finished
shading together. But I purposely left it at
a slightly early stage. So you can look at
your own work and analyze a few things that
I'm about to share with you. On the image on the left, do you notice some
white gaps that are left out between
the shaded areas? These are taking away from the illusion that we
are trying to create. To create a more polished look, I have added just a
little bit more graphite, blended it better so that the shadow looks
attached to the shape, instead of looking
inconsistent and detached. On the right you can see how much of a difference that makes. I've also added one more line, one more precise line of dark
graphite around the border, which just makes it
a little darker. And then I've just
blended it slightly more. So the whole thing is lifting
up even better on the tile. Now, these little
steps go a long way in making your tile look
finished and polished. And like I said, we will
be discussing shading a little bit more in detail in
one of my future courses. But for now, I want you
to look at your tile closely and see if there are any improvements
that you can make. Is there a spot that
you missed inking? Or maybe you just want to add a little bit more
graphite here and there to increase the
contrast on your tile. So take a moment and
reflect on that. And yes, another thing that you'll probably see on the tile on the right are my initials
at the bottom right. And I will be talking more
about this in our next lesson.
12. Initials : Once you're done with shading, the next step is to
acknowledge and celebrate all the beautiful creative work that you have done so far. There is no better way to do this than initialing
the front of your tile. This is your artist's signature. Your moment to claim
this beautiful tile as yours and put your mark on
your hard work, so to say. Now the question is,
where do you put it? Well, Zentangle art is non-representational
and subjective, which means that there is no
right way up for your tile. You can rotate it in
any direction you like, and it will still
look beautiful. All the orientations are correct. But for the purpose
of the initials, choose a side that
you most like, and then add your
initials over there. You can also develop your
own custom monogram or chop. for this purpose. I simply like to put mine at the
corner of the composition, sometimes even extending it from a tangle that
is drawn there. Then you turn your tile around and you have some
space here to make notes. So you can add the date of
your artwork, for instance. Or if you have a thought
in mind... a daily thought that you've been
inspired by, you could add that. One of the things that
you could do is mention the names of the tangles that
you have used in your tile. This, I feel is a very
important step in your learning journey. This way, even if you pick up
this tile years later, you'll know which
tangles you used. And some of the artists that
I know, including myself, go as far as writing
the brands of pencils and pens or watercolors
that they have used, along with a little
swatch at the back. So all of this is applicable
when you're working with a lot of different colors or
a lot of different media. And you want to remember
the exact techniques or tools that you used. And so really this
is just your space to add any helpful
comments for yourself.
13. Gratitude & Appreciation Again: The ceremony of
Zentangle begins and ends with gratitude
and appreciation. Take a moment to be grateful for the fact that you
were able to create this beautiful piece of art today and appreciate all the hard
work that you have done. This is truly your
labor of love. Your own unique masterpiece. Adore it, love it, share it with friends
and shout out from rooftops that you're
officially a tangler now! Congratulations
on successfully completing your first tile! I highly encourage you
to post a picture of your tile in the project
section below this video. You'll definitely see
a lot of love pouring in from fellow students and
teachers on the platform. And this is a great way to see each other's work and
learn from each other. I will also be sharing my personal feedback on each of the tiles when you
post them over here.
14. What are Tangleations?: Now you've completed your
first tile just now. And if I asked you to tell me how many tangles we learned, I'm sure all of you will answer correctly with
the number four. And if I asked you the
names of the tangles, I'm sure you'll be
able to tell me those as well accurately. But here's a little
fun surprise. We actually learnt
much more than that. We simply learned the framework
of four different tangles, which means we are now free to alter them and make
variations to them, and keep building them in
different, different ways. This is the power of
tangleations, a word, which is basically a combination of tangle plus variations. So let me give you an example. We learned Hollibaugh as a tangle, made up of parallel
lines or sticks, which are crisscrossing
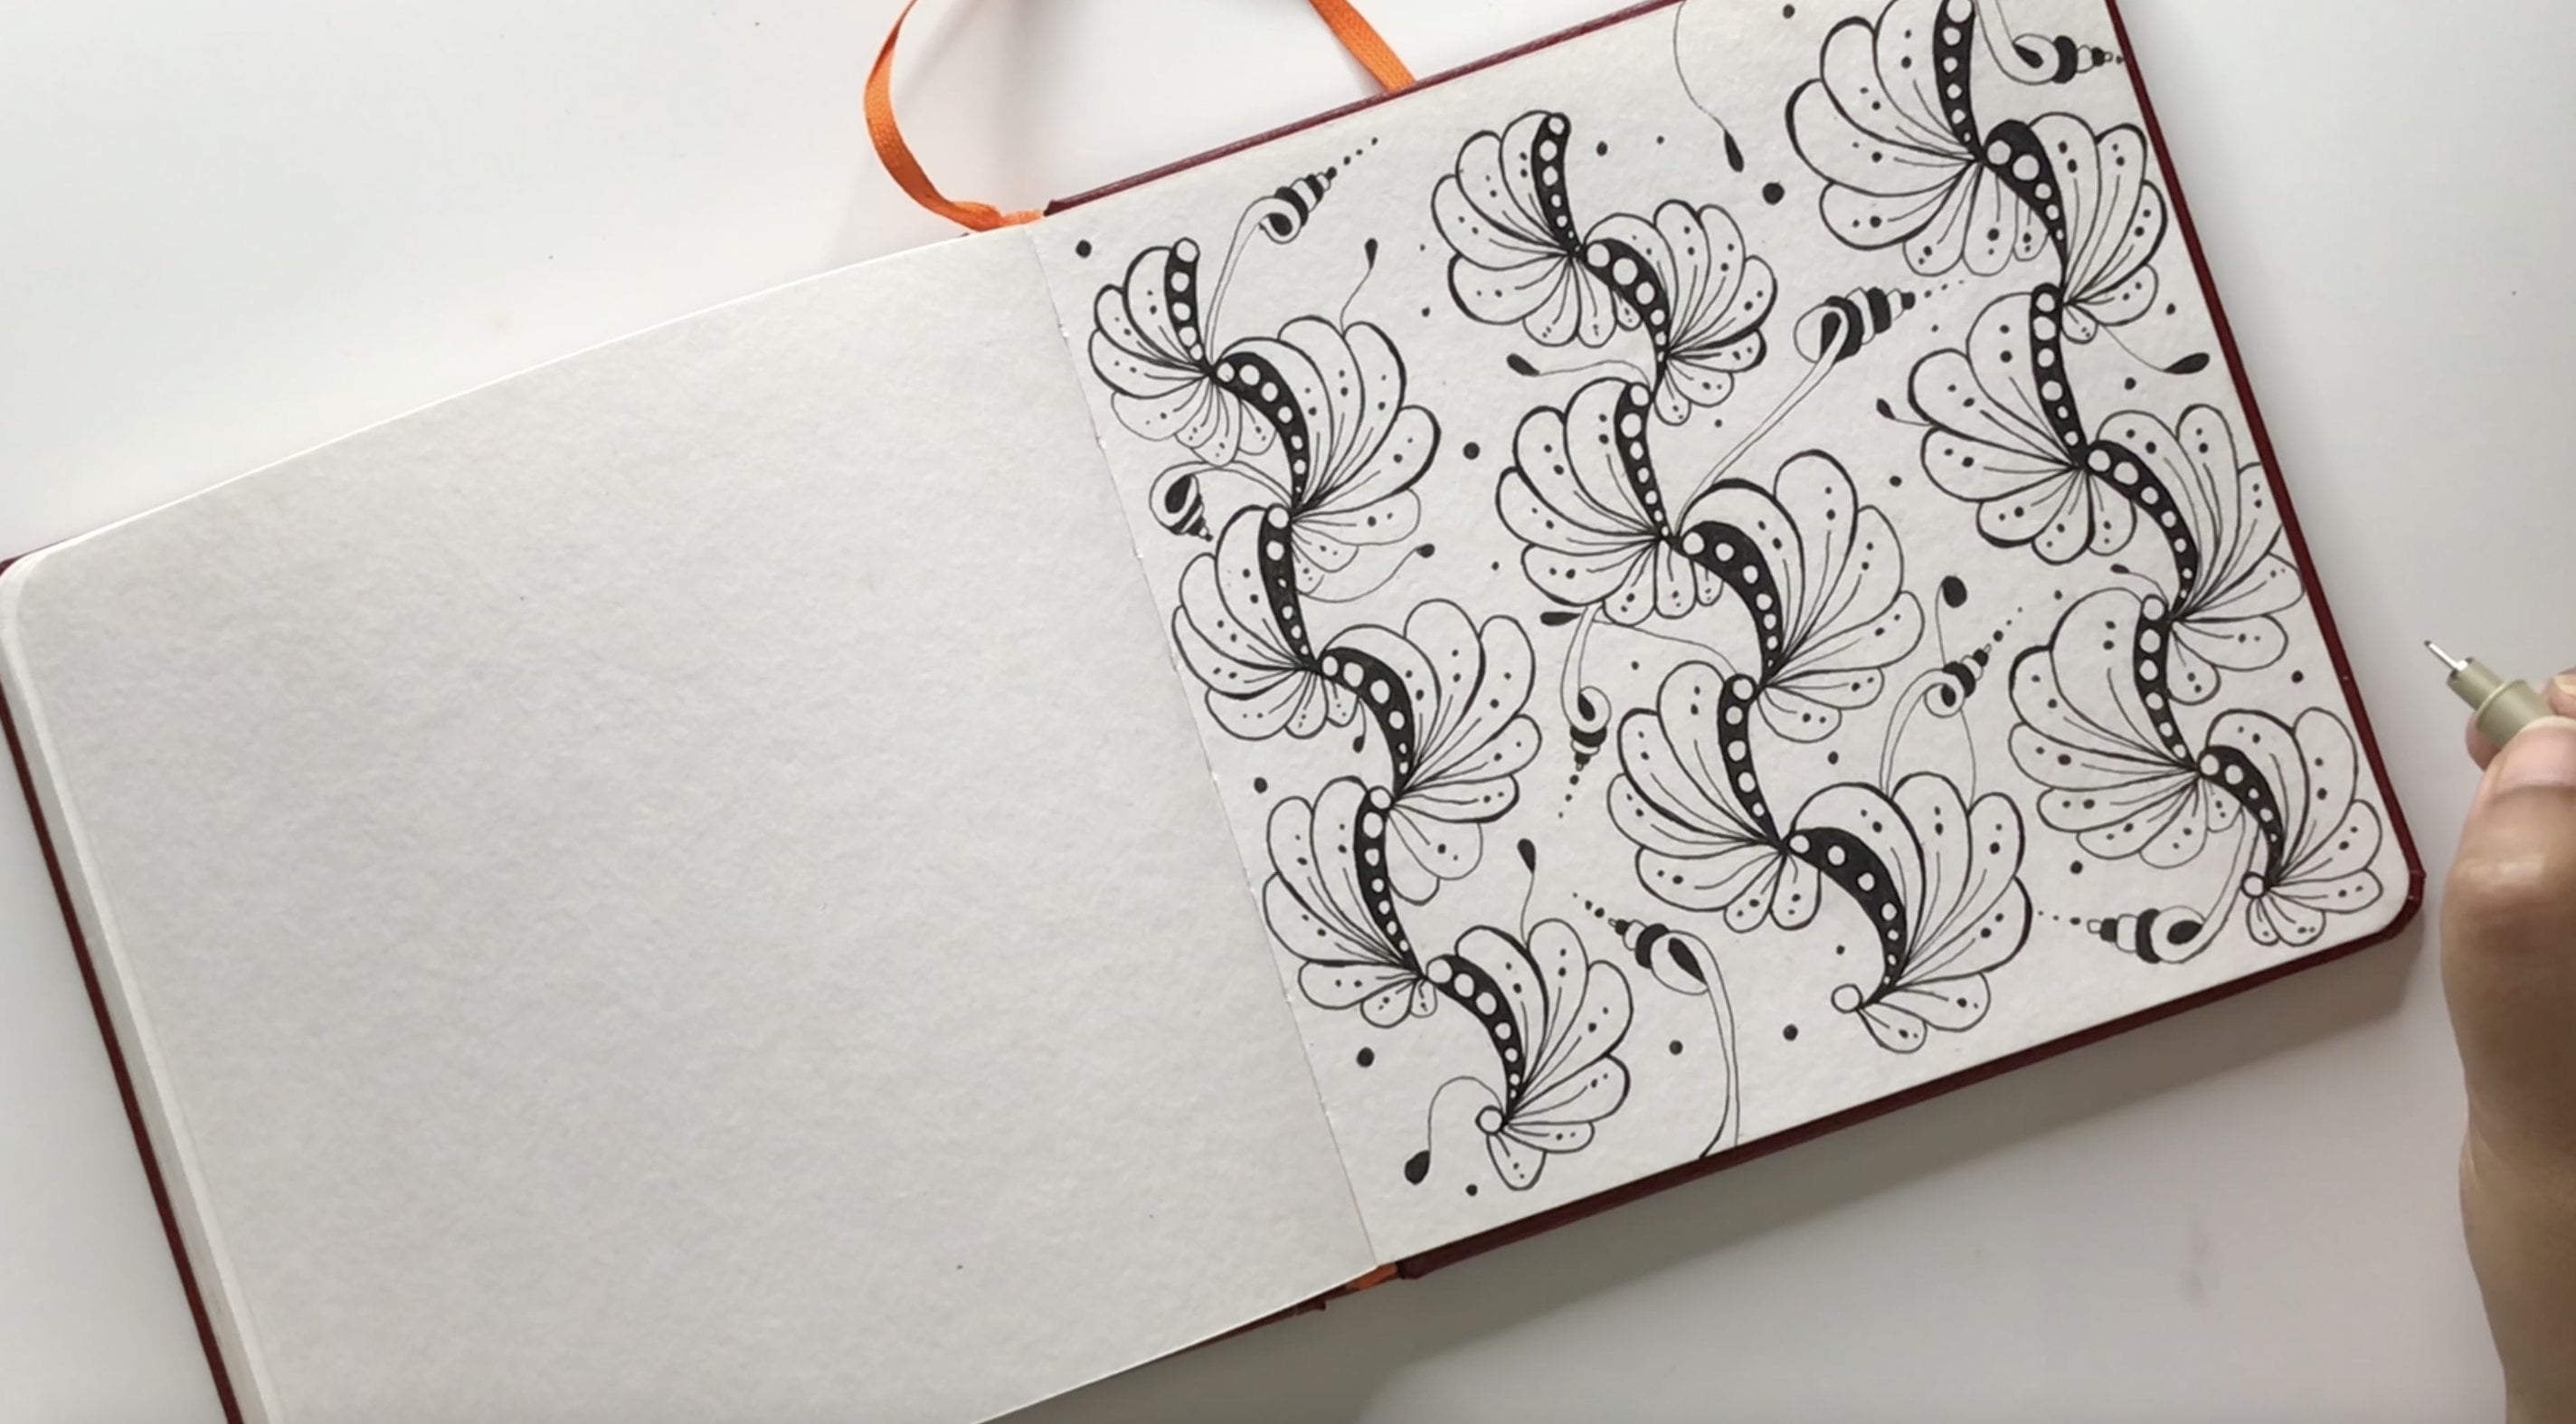
each other. And we basically
learned the principle of layering over there. But here in my journal, I keep a record of all the different ways in
which I can draw Hollibaugh. So not only can you experiment with the shapes of
the lines, e.g. the curved edges over here, or the entire line
being curved over here. But you can also play
with the backgrounds. So you can add the roundings and you can add patterns
to the background. You can even add patterns
to the sticks themselves. And of course as and when
you get more inspiration, you can also make a journal like me and you can keep
filling it out. So I like to keep these
little squares ready. And in these squares
I keep filling up any kind of inspiration
that I come across. And this comes in
pretty handy when I'm making new titles and
when I need new inspiration. Similarly, you can also make variations for all
other tangles. So e.g. for crescent moon, you can try layering
them in different ways. You can do crescent
moon symmetrically. You can do it crisscrossing. You can build it moon
upon moon like layers. You can play with the
number of auras. You can even add patterns to the auras and you can do
so many different things. So you basically take
inspiration from one tangle and then you can add many
different variations to it. You can add your own
personal touches to it and basically create as many
variations as you like. And so really in that sense, there is no limit to the number of tangles or the number of tangleations that
you can come up with. So I highly encourage you to keep trying different
versions of the tangles that we
have drawn today and build a journal for
yourself like this. And if you like, you
can also share some of those versions or images over here in the
project section. So that all of you can exchange ideas and look
at each other's works and build this entire library of tangleations within
the community over here. And that is a great way to keep inspiration flowing and to exchange ideas with each other. So I look forward to seeing
some of your pictures.
15. More FAQs about Zentangle: Now that you have tried
Zentangle yourself, I'm very sure that a lot of your questions have
been answered, but based on student requests, I'm answering a few more
questions here in this video, which I'm sure will be helpful
for artists of all levels. Once students have taken a
beginners class with me, they usually ask me this
inevitable question, which is, can you tangle on other things apart
from paper tiles? That is a big, big, big yes! You can use the
Zentangle approach on any number of substrates, ranging from canvases to
MDF boards to fabrics, pebbles, glass, acrylic,
or even go digital. Really, once you have
understood the approach, you can go as deep in it
creatively as you'd like. So literally, the
possibilities are endless! Next question is, do you always have square
tiles in Zentangle? Well, the Zentangle headquarters
is always coming up with new and interesting
ideas to make sure that Zentangle
is fun for everybody. In doing so, they have launched tiles in
four different colors, black, white, tan and grey. And you can find these
tiles in square, circle, triangle, and
rectangle shapes. To be perfectly honest, You can also use shapes
such as hexagons or hearts, etc, from other brands. So basically, there is no limit to the size and shape
of these tiles. The only idea
behind the tiles is that they can be
assembled into mosaics. So if you can come up with
other interesting shapes which you can draw on and they can be assembled into mosaics, then well, go ahead
and use those tiles. So feel free to use
whatever you like really. The next big question
is, can you sell Zentangle artworks
as an artist? Again, it's a big yes! When you make a unique
piece of art by yourself, you can totally sell it
digitally or physically. However, what is not
recommended is to claim any copyrights or ownership
to the Zentangle method, or to the individual tangles that you have used in your work. Wherever possible, you must credit the relevant
tangler or CZT, which is a certified
zentangle teacher for the tangles that they have
created or developed. You must also not copy any other artists artwork and
claim it as yours, which is a very basic
copyright rule. Apart from that, there
is nothing stopping you from monetizing your
Zentangle inspired artworks. And finally, the
biggest question, how is Zentangle different
from Zen-doodles or Mandalas? Well, first let's talk
about Mandalas. Mandalas are a circular figure, which is often a visual
representation of the universe. Primarily in Hinduism
as well as Buddhism. The circle with the center represents the basic
pattern of creation. It talks about how
we're all connected in the universe and how we are
all a part of the universe. And at the same time, how there is a universe
within each of us. From micro to macro, biology to geology, chemistry to astronomy, you can see radial and
circular patterns everywhere. And it is believed that
these are all some sort of sacred circular formations that are like mandalas in themselves. So pretty much like a circle
of life or a circle of creation or anything else that has some kind of
spiritual significance. Now of course, there
is a lot more to discuss when it
comes to mandalas. But for the purpose
of this class, I'm going to keep it concise. So by now you've understood that Mandalas basically have
a circular formation. And so all the
designs that we see, have a repetitive formation of elements in a circular
or a radial manner. When you compare
this to Zentangle, you know that the symmetry and formation or not the core
foundation of Zentangle. Mandala art is
created with grids, which often requires
additional tools such as a compass, a ruler, etc. But Zentangle is based
on the concept of strings, which are more abstract
and free hand. And they are done without
the use of additional tools, such as a compass or a ruler. And finally, in Mandalas, you can choose to add cultural symbols or motifs
with spiritual significance. But Zentangle is non-representational
and it is made of elemental strokes that lead to unexpected
structured patterns. So perhaps one of the
key takeaways over here, is also the understanding
of the word Zentangle. Even though it is
a combination of the words Zen plus Tangle, it does not have any kind of cultural or spiritual or
religious connection or significance to either Buddhism or Hinduism or any other
religion or culture, for that matter. It simply refers to a calm
or a zen state of mind and it does not have any religious
connections whatsoever. Now, taking the
conversation forward, how exactly are Mandalas or Zentangle artworks different from doodles or Zen-doodles? Well, doodles are basically like a reformed cousin of
scribbling, so to say. So a lot of characters, shapes, forms which have a
playful quality to them, can be considered as doodles. And there are many different
types of doodles to explore. But the key difference
between doodles and Zentangle is that Zentangle
is non-representational. A doodle can be a playful
version of a real life object. But that is not the
case with Zentangle. So there are no characters, faces, or objects in Zentangle. The focus of Zentangle is
only on structured patterns. Whereas doodles can be a
combination of characters, objects, patterns, text,
shapes, and much more. Now Zen-doodling,
on the other hand, is somewhere between
Zentangle and doodles. So just like Zentangle, even Zen doodles are
made up of patterns, but there is no specific
sequence of steps to follow. Moreover, the patterns in Zen-doodles are not
always repetitive. Whereas the strokes in the Zentangle method are always
put in a repetitive manner. There is a certain elegance to the Zentangle method
that the founders have carefully developed
over the years. Whereas Zen-doodling is
slightly more scattered in the sense that
while Zen-doodles also put you in a
Zen state of mind, the absence of crucial things
such as preexisting tangles and strings can make the process a little
bit overwhelming. Zentangle, on the other hand, benefits from the structure of the eight steps that it has. So if you remember, we spoke a little bit about not knowing what to draw
next or how to draw it. And that is a problem
that you encounter when you are not familiar with
the Zentangle method. Once you are familiar with
the Zentangle method, then you don't really have
that problem anymore. And so you are drawing the same patterns as
you would before, before coming across the
Zentangle method, so to say. But now you have a slightly more structured
approach to it, which makes you a lot calmer, and which basically gives you a sense of direction
and puts you at ease. So that is at the core
of Zentangle. Finally, I'm always
asked to give a proper explanation for what exactly Zentangle
inspired art is. Well, when you start taking inspiration from
the Zentangle method, but you use it in ways which are slightly different from
the method itself, You can call it the
Zentangle inspired art, e.g. here I have an artwork which may remind you
of a dreamcatcher. And yet it does not follow the exact radial or
symmetrical approach of drawing a dreamcatcher, because I have filled it up
with various tangles instead. So this is a good example of
the Zentangle inspired art. It is not really a
true piece of Zentangle art because you can't really
assemble it into a mosaic. And moreover, you
can make out that this is the shape and
form of a dream catcher. So we can't really call
it pure Zentangle, but we can call it
Zentangle inspired art, since I took inspiration
from various tangles and put that together in this silhouette or this
outline, so to say. So with that, I hope I
have answered a lot of your questions about the
basics of Zentangle. But if you still
feel that you have more to ask or discuss, you can always put
your thoughts in the discussion tab
below this video, and I'll be more than happy to take these discussions forward. I look forward to
hearing from all of you.
16. Closing Thoughts: All right, So congratulations
on finishing this course! And I'm so, so,
so happy that you decided to take this
journey with me. If you're keen to know more about the Zentangle art method and want to keep developing
wonderful creations, then I recommend you to hit the Follow button on
top of this video, which is right next to my name. This will allow you to subscribe to notifications on Skillshare. And every time I launch a new
class or plan a giveaway, or have any other
exciting announcements, you'll be the first to know. Remember the Zentangle,
art method is limitless. So as you go forward, practice is going to
be your best friend. It will allow you to develop beautiful creations
using newer techniques and new supplies as well. I would love for you
to post pictures of your wonderful creations in the project section
of this course, which is right below this video. If you choose to
share your creations on social media instead, I'd love for you to tag me. I truly hope that this class
has been helpful for you. And if it was, I'd love for
you to drop me a review about it and let me know how
this class benefited you. Also, if you have any other
suggestions or ideas, for future classes, I'd
love to hear those as well. You can put those in
the discussions tab, which is also right
below this video. So with that I say goodbye to all of you lovely
people out there. Thank you so much once
again for taking this class with me and I would love
to see your creations! I also hope to see you
in one of my future classes. Happy tangling till then. Bye!
 Ridhi Rajpal, Artist + Film-Maker + Educator