Transcripts
1. Hello!: [MUSIC] Hello, welcome
to this course on creatives Zen Doodles
and Zentangle-inspired art. Drawing repeat patterns that
put you in a Zen state of mind is one of the most addictive activities
in the world. It gives you an immense amount of happiness to put strokes on a blank piece of paper and then see a marvelous
result in the end. There are a lot of techniques
and effects that you can create with just simple
pens and basic paper. However, I know that
it might be a little overwhelming for someone
who is just starting out. I decided to come up with this challenge where I
can help you to overcome your fears and enjoy
the process of making Zen Doodles and
Zentangle-inspired art. With practice, anyone
can be perfect. If you make this a daily habit, then you will definitely
start looking at everything around you
with a fresh perspective. You literally start seeing
doodle patterns and design inspiration every
day and everywhere. I promise you that
it will become a lifetime hobby that
you will always cherish. In this class, we
will be exploring a lot of topics
ranging from tangles, from the original entangle
method to taking inspiration from everyday objects and
turning them into patterns. We will also be discussing
how to create balance, contrast, and harmony
in all your designs. Finally, we will also explore ideas on how to bring
variations in your designs. Remember that the class is best enjoyed when you work
at your own pace. You can take as many breaks as you like in the middle and can always come back and pick up from the point
where you left off. The best part is that the class is perfectly suited
for beginners as well as experienced artists
so that you can get a creative boost
on a daily basis. You will especially
find this class useful if you been looking
for a creative way of engaging in self-care and
mindfulness or if you have a creative block
and need some time off to indulge in
newer techniques. I promise you it's going
to be a lot of fun. Now for those of you who are attending my class
for the first time, my name is Ridhi, and this is my seventh
skillshare class. I'm a filmmaker, a
multi-disciplinary artist, an art educator, and a
creative entrepreneur. I ran two creative brands, The Color Birdie and Rariro, and with both of my
brands, I sell jewelry, home decor products,
surface design frames, stationary, wall art, and different lifestyle and
gifting essentials. I have been drawing and
working with Zen art for over a decade now and today
in this skillshare course, I'm going to be sharing some of my most trusted ideas
and techniques. If you've been around over
here on skillshare for some time and have been
following my classes, then you probably know
that I had also done a 30-day challenge similar
to this one earlier. That challenge turned out
to be a huge success. Students were posting
their work on a dedicated hashtag on
social media and I was so happy to look at the
pictures and the amount of progress that they've
made over those 30 days. This challenge goes
one step further. In the previous
30-day challenge, we had focused more
on basic strokes, but it is 45-day challenge, I'm going to be adding a lot
more complex compositions, as well as details on
how to mix and match tangles from the originals
entangle method. All in all, this course is
aimed to make you absolutely confident and comfortable with Zen Doodles and
Zentangle inspired art. Let's dive in and kick start this wonderful
adventure together. See you in class.
2. Supplies : [MUSIC] Let's talk supplies. Now, to be perfectly
honest with you, creating beautiful Zen doodle or Zentangle-inspired art work does not require a lot
of fancy supplies. You need something to draw
with and something to draw on. I'm basically talking about
pencils and pens and paper. Now when I first started out, I used to draw with
regular ballpoint pens or HB pencils and I used to use
printer paper to draw on. If you're a beginner
and you have these basic supplies
available with you, then you're ready to
begin the challenge. But let's say you are a
serious hobbyist or you're an art enthusiast
who is interested in professional supplies and you want to level up your inventory, then here are some of
my recommendations. For the papers, I highly
recommend that you use acid-free paper
that's at least 120 GSM thick so
that the ink from your artworks doesn't cause the papers to crinkle
up or buckle up. We're going to be
drawing a lot of complex compositions which have heavy inky areas and
we're looking for thicker paper so that the
paper does not get soggy. Now, standard zentangle
square tiles are usually around 3.5
inches in size. But you will a find artist
tiles from other brands as well that are anywhere between four inches to eight
inches in width and height. Now you don't have to
work on a square format. You can, of course, create your drawings in a sketch book, or in a drawing book of
literally any shape or size, just as long as you're
comfortable with it. Just keep in mind
that when you have a really large size of paper, then it might take you
longer to complete your artwork on a
daily basis and so you might feel
tired on some days because of the complexity
of the compositions, so try to stick to a size that's comfortable
enough for you and it also fits into the time that's available with
you on a daily basis. Now for the purpose of
demonstration in this course, I'm going to be working with this sketchbook from
a brand called, Menorah, which is easily available to me
over here in India. This is a six by six
inches square sketchbook and it's a comfortable size
for me to work on every day. It also has acid-free paper, which means that my art
work won't gets spoiled in the long run and I can keep these designs safe for a
really, really long time. Now coming to the pens. I usually use these
Sakura Micron pens, which are quite popular with illustration artists
around the world. These are also the same pens that the zentangle headquarters recommends and they include it as a part of their
training gifts. But if this brand is
not available to you, then you can look for
fine liner pens or technical pens
from other brands, such as Snowman, or
Brustro, or, Fable Castell. Now here's my pro tip. Regardless of the brand, just make sure
that the pens that you're buying have archival ink. Archival ink is a very
important feature, especially if you're
looking to maintain your artwork for a
long period of time. Now all of these pens come
in various nib sizes. For example, I have
the 08 pen with me. The number says 08, but the thickness of
this pen is 0.50 mm. Similarly, this
Sakura Micron pen say 01 and the actual thickness
of the nib is 0.25 mm. Basically, the numbers
that you see on the pen body are not really
reflective of the mm size. You have to look a
little closer to find the exact mm size, which is going to
give you an idea of how thick the strokes
are going to be. I usually use the 01 pen to draw my designs and then I use 08 for any large areas
that require coloring. It's just faster to work with a thicker nib when it
comes to coloring. However, like I said, if you don't want to invest in technical pens or fine
liner pens right now, that's completely fine
and you can follow along in this class with regular
ballpoint pens as well. Now, let's say you want to
color your drawings later on, then you can use color
pencils, sketch pens, markers, crayons, or any other coloring media
that you're comfortable with. However, just a word of caution, that if you plan to use watercolors later on
on your drawings, then make sure that your paper
is at least 300 GSM thick. Because when we apply
watercolors on paper, the paper tends to
buckle up a little bit. It's important to have 300
GSM as the people width, because then it'll hold
onto that water and the pigment really well and then your people
won't crinkle up. Now here is one more pro tip. When you buy watercolor
paper that is cold pressed, then you will not be able
to draw very smoothly on it and the nib of your
pen might get ruined. That is because cold
pressed paper has texture on it and so when you
try to draw on it, it's a little hard
for you to control the pressure because the ink does not come out consistently. Consequently, it causes the nib of your pen
to get spoiled. My recommendation is to
work on hot pressed paper. It's smoother and the pen
glides over it easily. Even if you're using
a really thin nib, it won't get damaged because the paper surface will be
smooth for you to work on. Now for all the supplies
and the tips and tricks that I have mentioned
in this video, I have also created a handy
checklist that I have included as part of the projects in the
resources section, which is right below this video. That's it for the
supplies and now we're ready to start
our creative challenge.
3. Day 1 - Let's Warm Up!: [MUSIC] Hello, everyone, and a very warm welcome to our 45-day creative challenge, where we are exploring lots and lots of different
patterns and drawing exercises to level up your Zendoodle and
Zentangle-inspired art. Today is day 1, and I thought we'd begin with a small warm-up exercise
just to help you get in the rhythm of
things and to help you get started and put yourself
in the right frame of mind. I'm all set over here with my sketchbook and my micron pen, and I'm going to be
using 01 size today. You're free to choose
any other size that you have
available with you. Now to begin the exercise, I'm going to pick a random
point on the paper and I'm just going to draw an
abstract doodly shape. It doesn't need to be too big. This is about two centimeters
or about an inch wide. Then we just go in it with
another little line inside, just imitating or shadowing the outline of the one
that's on the outside. Then we're going to add some straight lines inside of this. These can be in any direction, but try to focus on the lines to make them as evenly
spaced out as possible. When you're done,
we're going to do another blob right next to it. If you notice, this abstract
blob is basically trying to imitate the boundary or the
outline of the previous one. Then again, I'm going to
do another one over here, and I try to imitate those
little crevices and curves. I play around with the
sizes of these blobs and I keep on creating lots and lots of these all over the page. Every time you
create a new blob, just look at the outlines
of the previous ones or the surrounding ones and try
to match it accordingly, almost like puzzle
pieces which are fitting right into each other or they're placed right
next to each other but there's a little bit of
empty space between them. Work at your own pace, there's no hurry at all, and just enjoy the process. Then we go ahead
and we're going to start filling the lines. Every time you fill the lines, make sure that you change the direction so that it looks
a little more interesting. It will also help you to
get a proper warm-up. You're free to rotate
your notebook and your paper as many
times as you like. If you have a preferred
direction for your strokes, for example, left to
right or top to bottom, then rotating your sketchbook
frequently is going to allow you to work in
your desired direction. Now, the decision
is up to you on how you want to go
about filling the page. You can either do all the blobs first and then
come back and do the lines later or you can just complete each blob
individually as you go along, so do the outlines and then the inner lines and then
move on to the next one. You decide how you
want to go about this. Basically, just work on building up your
concentration and focus and just enjoy each
stroke individually. Just breathe and
enjoy the process. Now I'm going to
speed up the video a little bit to show you what your page is going to look like once all your
blobs are done. Remember that every time
you draw a new blog, you're basically just imitating the outline of the
surrounding ones. Once your page is
completely filled up, it's time to add
in some details. Now, there are two different variations that we can do for the details and
I'm going to show these to you on a
scrap piece of paper. One of the variations
can be to cover those borders in black
ink and basically have a thicker outline and then the other
variation can be to play with stripes
inside the blobs, so you basically
color them alternate. You're free to do any
of these variations in your design to bring in a
little sense of contrast. As for me, I want to go
with the thicker borders. You can definitely switch up to a thicker pen, for example, a 08 nib or even a brush pen, if that's what you have
available with you. You can use that to color
up the large areas. I am, however, going to
continue working with the 01 nib because I like to color at my
own pace and I quite enjoy the process of
working with a thin nib. Again, these are just
personal choices. You're free to improvise
any way that you like. There are some days
when even I have to switch to a bigger nib size, especially when I
have large artworks and large chunks of
color that I need to place or if I have a deadline and I need to finish
up the coloring quickly. It all depends on my mood
and the pace that I'm willing to work
at and of course, it also depends on the time
that's available with me. Now, once we are done
adding the contrast to the outer lines
or the inner lines, whatever you have chosen, we are basically done. This is an easy warm-up
exercise for day 1, where we are basically
indulging in line practice and also
playing a little bit with contrast to try and
build up your focus and concentration for
the next 44 days. I hope you enjoyed this simple, carefree, relaxing exercise
that we have done today. I look forward to seeing your work in the
project section. Tomorrow we're going to start working on some complex
compositions and I will be introducing more patterns and designs to
you as we progress further. I look forward to meeting
you real soon. Bye bye.
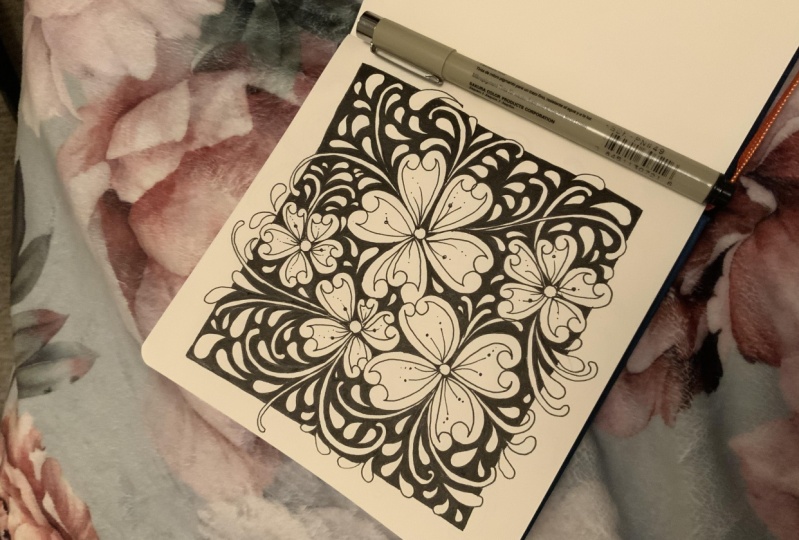
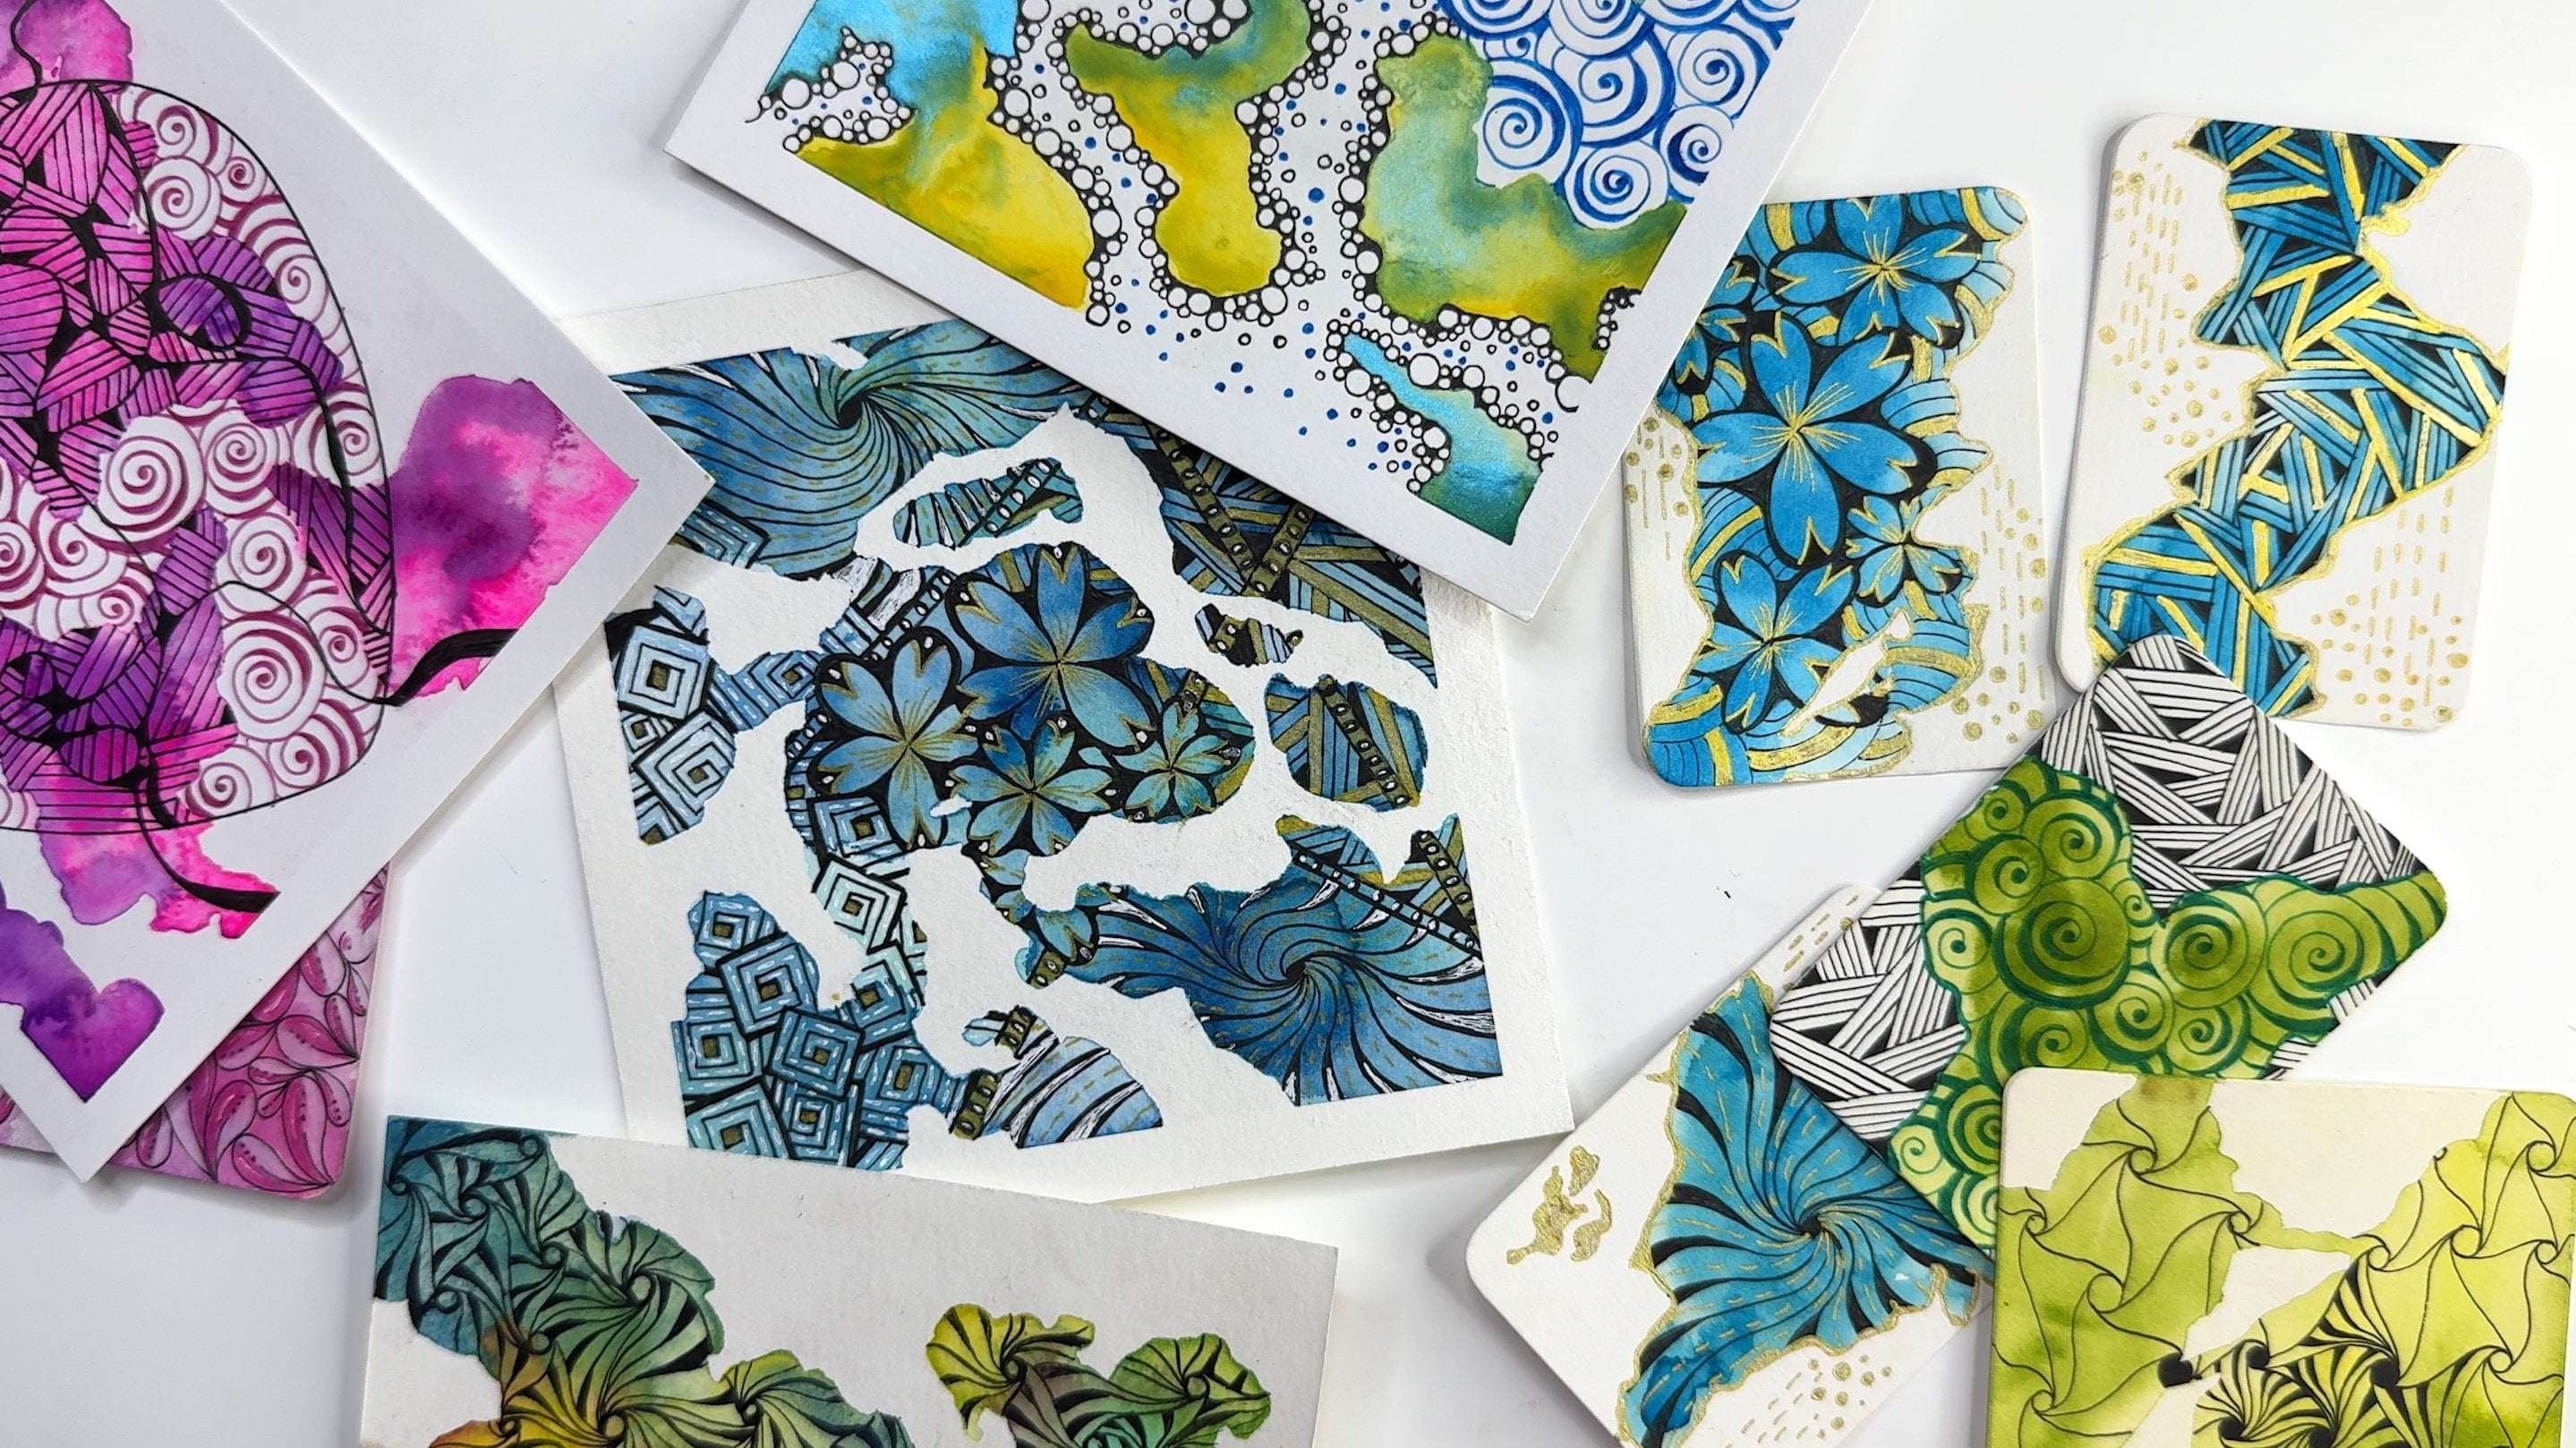
4. Day 2 - Fluxecho Blooms: [MUSIC] Hi everyone and welcome back to our creative challenge. Today we are on day two of creating interesting,
intricate Zen art. I'm super excited for
today's exercise because I'm going to be
introducing some of my most favorite tangles today. To start off today's exercise, we're going to be picking
literally any point on our sketchbook and making a tiny little circle over there. The next thing that
we do is basically create a teardrop
shape on top of it. Then we are basically
creating some echoes. The teardrop shape on the
top is actually known as the flux element and what we're basically creating on the sides is basically
an echo effect. As you can see, we're
basically going smaller and smaller and narrower
on each of the sides, creating a blooming effect. This is how we basically build this one tiny element
which is called flux echo. Like I said, the teardrop in
the center is called flux and then since we are
creating an echo effect, it basically becomes flux echo. This is a beautiful tangled
design by Lynn Made. I'm going to be
adding the details of all the tangles that
we use along with the people who've created these tangles in the projects
and resources section. In case you want to check out the tangles for
future reference, you'll have a handy
list with you. Now basically, I'm going to be creating more of these flux echoes in and around the one
that we've just created, so some are going to be bigger and some are going
to be smaller. The starting point is
always the little circle and then we create
a teardrop shape and then we keep
blooming outwards. You can see that as
you're going out, you're basically just hugging the previous element
and then just going narrower and shorter
on each of the sides. We're also going to be
overlapping these a little bit. You can see that every time that I want to take something
under the previous one, I basically lift up
my pen just ever so slightly to pretend
that I'm still drawing and then I
bring my pen back in contact with the paper and then it creates a
smooth transition to make it look as if the elements are overlapping each other. Keep rotating your sketchbook and keep drawing a few of
these flux echo elements. We are going to be
making a bunch of these. Let's say about eight or nine of these and all of
them are going to be facing different directions and they're going to
be of different sizes. Make some of them bigger, some of them smaller and
basically by the end of it, they're going to
end up looking like a pretty little bunch of flowers all facing in different directions and also overlapping each other slightly. Now it's absolutely
okay if you don't get the exact number of echoes
on each of the sides. So if you have the teardrop in the center or the flux
in the center and you have four echoes on one side and five echoes on the other,
that's perfectly fine. Just as long as you're going narrower and shorter
on each of the sides, you're doing perfectly fine. The whole point of using the flux echo in this
manner right now is to basically pretend
that they are like these little
blooming flowers. It shares a lot of characteristics
with floral tangles or floral designs and
gentle because flowers also have
a radial pattern. That's one of the reasons why
I like to use this tangle, imagining it to be
like a little flower. Now, we're basically
looking at a composition where these flowers occupy, let's say about 40-50
percent of your page. But they're not
going to be placed in exactly the middle of it, so they're slightly off-center. You can see that
mine are more on the left side of the paper and they're not
exactly in the middle. But yours could be more in the south direction or more up or more right and
that's completely fine too. Just as long as you have about
eight or nine or maybe 10 of these and a nice
bunch of these. Now once I'm happy
with the number of flux echos that I've created, I'm going to start coloring
the centers and this is just so that we can start adding some details and contrast
into our design. After I fill up the centers, I'll come back to the petals and I will start
adding some details. I'm going to start with
the center petal or the flux itself and I'm going to basically create
a small triangle over there using curvy lines. It's almost like writing
the alphabet we but in a curvy manner and I'm
going to color that black. Then I'm going to create
a little line going towards the center so it's
going to be like a dot, a tiny line, then a dot
and a tiny line again. This is just my way of
adding little details. You can choose to do
an exact straight line towards the center. Almost how flower petals
have veins in them. If you want to do that,
that's perfectly fine too. But what I'm going to do is just play a little
mix-and-match game here. I'm going to do dots and lines in my center, three petals. As the petals bloom outwards or as they're
getting smaller and narrower, in those outer ones, I'm going to do just lines. I'm going to curve them
slightly just so that they match the curve
of the echo itself. Basically, I'm just adding some details here and
there to make sure that the centers don't look boring
and that the flowers or the flux echoes over here have
a sense of detail to them. Once you're happy with the
detailing of the flux echos, we're going to move on
to our next tangle, which is called Hollibaugh. Hollibaugh is basically a
slightly more structured tangle because it involves creating crisscrossing lines which
give the appearance of being overlapped and they give the appearance of layering. We start off by creating a straight line and then
I'm going to pretend that this line goes under that floral bunch and comes
out on the other side. Again, I'm going to try to
move my hand in such a way that I lift it up just ever so slightly once I reach the floral bunch and
then I touch it back onto the paper once I
reach the other end. I'm basically pretending
that it goes under it. [MUSIC] We basically create these little sticks which are
crisscrossing each other. The best way to do this
is to keep rotating your sketchbook so that you can play with the
different directions. One of the things that I'm consciously doing
right now is keeping the top left of my
design empty or leaving that as negative space because we're going to be adding another diagonal
tangle over there. I'm basically creating
these crisscross lines more towards
the bottom right. You can see that some
of these are not coming out to be like perfect
straight lines, which is okay, because then they just tend to look
a little natural. Now once we have these lines, they are giving the
appearance of almost like having a little trellis at the back of these flowers, or like these flux echoes or almost like a creeper plant, which is growing on top
of a trellis or one of those bamboo or
wooden partitions that we often see in
gardens and balconies. So that's exactly the idea
that I was going for, and I'm glad that it's
shaping up quite nicely. So now once we're
basically done with the holly Bow lines, I am adding these
little orbs over here, which is basically a
tangle called tipple. Tipple is all about adding little orbs of different sizes. So big ones and small
ones next to each other, and whatever little space that I have between these little orbs, I'm coloring it black. Just so that, again, there is a little bit
of contrast and detail. From these orbs, I'm basically creating
these wavy lines, which are going to be
looped at the end. And this is yet another tangle, a beautiful flare
tangled called fescue. Now you can add as many
of these as you like. It all depends on
how heavy you want your design to look and how
detailed you want it to look, plus the size of your
paper of course. Now we're going to be
creating these tipples and fescues on most of
the meeting points. So I'm basically trying to
look for these little corners in these octagonal
and polygonal, triangular squarish
shapes that are formed between the
crisscrossing holly bar lines, and I'm looking for these little corners and filling them up with tipple and creating
fescues out of them, and the fescues are going
in different directions. I'm not doing it literally
all of the corners, because then it would end up
looking like too cluttered. So I'm probably doing it in
like two or three corners of each of those shapes
that are formed inside of those
holly bar sections. Again, these are
personal choices, and it totally depends on
what your paper size is, and how detailed you want
your design to look. I'm also adding a few
of these details on the outer edge of the
holly bar partition. Just so that they
don't look as if they're trapped
only on the side of the paper and that some of them are also going on
the other side. Once we're done with this,
we are going to move now to the top-left
corner of the page, where we're basically
going to introduce another tangle called poke leaf. Poke leaf is a beautiful
little tangle, where we start off with two tiny little sticks and
add a little cap on them, and then create a
leaf around it. Now, your leaf might look
completely different to mine, and that's completely okay. Because every person's drawing
technique is different, and everyone's
stroke is different. But the only thing
to keep in mind is that poke leaf is
an organic tangle, which means that these leaves can basically be drawn
in any direction. So you basically keep
rotating your sketchbook, and you keep overlapping
these leaves, some smaller and some bigger, and they basically come
from behind each other, on top of each other in
different directions. Think of it like a money plant, which has leaves growing in all different directions
or something like that. Now one of the things
that I like to do in my poke leaves is to add these little curved
lines at the edges, or only on one of the edges, to make it seem as if
the leaf is calling up. This is just a small little
detail that I like to add. You can skip it if this is something that
you don't want to do. But I think that little
element of adding a curve line somewhere
on the edge of the leaf creates a
nice cooling effect, which brings a sense of
detail and again, of course, contrast because we're adding more saturated black inky
areas and the design. To create a sense of balance, I'm adding a few little
fescues here as well. Because we have a lot of fescues happening on the bottom
right of the design, but we don't have any of
that on the top left. So just to create a
sense of balance, I'm adding a few of these
on the top left as well. And that's it. That's
our design for today. So we played with some lovely
organic tangles to create this beautiful little floral
bunch that looks as if it's sort of trapped on a trellis or is hanging
from a beautiful trellis. So I quite like
this composition, and it's actually a
lovely little composition to do on greeting cards, or any DIY project that
you're working on. So I hope that you enjoyed this and that you
will give this a try. And I look forward to seeing your work in the Projects
and Resources section. And if you have any questions, feel free to put those
in the discussions tab, and I'd be happy to
answer them for you. So that's it for today, and I will see you tomorrow with another interesting composition
that I have planned. Till then, keep
creating. Bye-bye.
5. Day 3 - Aquafleur meets Akoya: [MUSIC] Hi there, and
welcome back to the course. Today we are on Day 3 of our challenge where
we're learning how to create zentangle inspired art and
creatives zen doodles. For today's exercise,
we're going to be working on an abstract
composition with one big focal element in
the center and then some random flowing lines
around that focal object. To begin with, I'm going to
draw an abstract doodle like shape in the center of
my paper with a pencil. We're going to be
erasing this later on, so make sure that
you do this with a pencil and not a pen. Now grab a thin micron pen, preferably in of size 01, and make a dot somewhere towards the left side of this
shape that we have drawn. Once you have the dot in place, we start making lines. For the first one, I'm going to go slightly above the boundary that
we have created and make a small mountain like bump and then bring it down and
connect it to the dot. Then I make a small wavy line. Again, this is outside of the
border and then connected with a curving line back to
the dot that we had placed. Then again I'm going to be
making a little bump outside, bringing it like so, and then connecting it with
a line and bringing it down. Now those little
bumps that we had made we're going to
be coloring those off to make it appear as if they're coming from
behind the boundary. Then the gap between the
two elements is going to be connected by retracing the
original boundary line. Once again, we make the
original boundary line, then go a little higher, and then color up that bump. Every time that you color
up that little bump, it's basically giving the
impression that it's like a curvy fold which is coming from behind that
original boundary. We continue going further, creating more and more of these curvy triangular
like elements, connecting them to the
tail of the previous one. As you can see, I'm always
connecting the front of the new element to the tail
of the previous element. After I've done a few
of these elements, I vary the height and then
I start to go shorter, purposely making them
thinner and narrower, and then connecting
them almost as if changing the center point of these new elements
that I'm creating, and then they start to
give this appearance of being tucked beneath
the previous ones. Then once you reach
almost to the center, you are left with
this little orb like abstract doodle
shape in the middle. You have a couple of
choices on how to do this. You can either go about creating these little
triangular fragments and keep on building it inside, almost creating a spiral, or you could just
connect the tail of the last one to the
tail of the first one, making this little hollow
space in the center that can be filled with
another design later on. We're going to be following
the second approach, but first I'm going
to finish up coloring all these little toxin folds and also connecting
each of these elements. Now depending on the pencil
outline that you had drawn, there's a possibility that your toxin poles
might be looking slightly different than mine and that's completely okay too. As long as you have these
alternate fragments where it appears as
if one of them is coming from behind
the boundary line and then the other one is retrace on the
boundary line itself, you will have a
decent looking shape, and that's all that
we're looking for. Then now again, before we
come back to the center, we'll just add a few details on these little triangular
fragments that we have created. On each of the fragments where
there is a mountain bump, where it appears as
if the fragment is coming from behind the shape, we're going to be adding
these small little ovals, and you don't need to be
very perfect with these, it's okay if they're a
little doodly shaped and if they are slightly
asymmetrical, that's fine. Just try to be as
neat as you can. All that we're looking
for is that we go smaller and smaller as we reach the tail of each
of these sections. Work at your own pace and take as much time as you need
to finish this off. You can pause the video
or even slow it down if you want to take some more
time to finish up the details. Once you're done
adding the ovals, we'll come to the
center where we are basically adding small
circles or tipple, as you remember from
yesterday's exercise. I'm basically
making some circles which are of varying sizes. Some are small, some are big. I'm also coloring some of these black and leaving the others white just to create some interest and build contrast within that
little hollow space. Once you're done
with the center, we'll come back to the empty
spaces that we left out, and we're going to be
filling this up with lines. Now try to keep these lines as close to each
other as possible. Basically I'm just following the curve of the next fragment. That's all that I'm doing. It's almost like creating repeated waves which are
imitating each other, and so every new line
that you draw is going to follow the direction and the shape of
the previous one, just like shadowing the
effect of the previous one. You've probably noticed
that as I'm going along I'm also
re-looking at some of my previous lines
and redressing them and drawing over them just to make them a little
neater and sharper, so you're definitely
free to do that as well. Now at this point even though
this design that we've drawn has good
amount of detailing, what it lacks is depth. Now to bring depth
in this design, I'm basically going to
pick the hump side or the curvy side of each
of these fragments where we had done the ovals and I'm going to go in
with a thicker pen. I'm going to start to
make that edge bolder. It will basically add almost like an angle to
those fragments, and it'll connect that
hollow black mountain bump that we had created on
the top to the edge, giving it like a paper
fold effect or a paper calling effect and adding dimension and depth
to the shape. As you go towards the
center of this composition, or basically when you
reach the tail end, start to narrow it down. You start taking the
top and then you go narrow towards the middle. Take your time with
this step because it also acts as an
opportunity for you to fix the outer shape or the outer boundary in case
it wasn't needed before. It's your chance to
really observe the shape and give it all the
love and attention that you want to give it to make all of those little
fragments stand out. Now here, thanks to the
power of video editing, I can show you the before
and after pictures. You can see how much
of a difference the rounding basically
brings to the entire shape. Adding roundings that
almost appear like shadows to one side of
your fragments or to one side of your design
helps to bring in contrast and it also
brings in depth. Now going back to
our composition, the next step that we are
basically going to do is add in a few curvy lines
with pencil again, and again we are going to
be erasing these later on, so make sure that you do this
with pencil and not pen. I've created three of these, and each of them is
partially hidden under the main focal aquifer
that we have drawn. Now on these pencil lines, we're going to be working with another tangle which
is called akoya, which to me almost looks like a beautiful pearl
necklace as if like a princess had a
pearl necklace and this tangle looks
exactly like that to me. To begin this tangle, we are going to be drawing some small circles
along that pencil line. Then we connect each of these circles with a
curvy line like so. You go from the bottom of the previous one and connect it to the top of the next one. Once you're done
with this, then you come back to the first one, take another curvy line, but this time you give
it a slight more bend and then once you connect
it to the next one it basically starts to look like a little curly leaf or almost
like a jelly bean, I think. Then we again come back
to the first one and this time we start with
circles on the top edge. These are going
to go smaller and smaller as you reach
the next circle. Then again, you start with the big circle that's already
there and you start to go narrower and narrower and
all the way to the edge, and then you repeat the process. Basically it starts to look like a string of pearls already. Once you're done
adding these circles, you again come back
to the first one, and this time you start to add circles the other way round, but the process
remains the same. You still go smaller and
smaller as you reach the edge. Now when you're drawing
these circles you probably noticed that
there's a little bit of gap between the circles and the edge of those curvy
lines that you had drawn, so we're going to
go back and color those in with our black pen, and you can see that
it brings a lot of difference already
because it starts to add some more contrast into
the design and it helps to make sure that those circles or those little pearls
stand out more. Now the original akoya
step out has circles inside these little jelly
bean like shapes as well, but I'm going to be
improvising over here a little bit because I want this akoya tangle to be in harmony with the aqua flower tangle that
we have drawn. Just like we had done
lines in the aqua flower, we're going to be adding lines in the akoya jelly
beans as well. Then once you do the
akoya tangles on the other two pencil
strings that we had drawn, it's going to end up looking
something like this. You can see that
because of the use of tipple inside
the aqua flower, as well as the use of
lines inside the akoya, both the tangles are now
in harmony with each other and they have
similar visual elements. One more little detail that
I'm adding as I'm going along is that I'm coloring
the original circles black. The original circles that we had created to build the
akoya framework, I'm just inking them black so
that those anchor poles are darker as compared to
the other poles and that helps to add a little more contrast
to the overall design. Now in designs like these where there is a really
big focal element in the center that's filled with details and is
quite overpowering, I like to have a lot
of negative space around so that it just creates a sense of balance and that there is a little
breathing area around. But if you feel that your design is looking a little empty which is totally possible if your sketchbook is
bigger than mine, then you're definitely
free to add more of these akoya strings
around the aqua flower. Feel free to personalize
the design and you're free to alter a
few things here in there. It doesn't need to be
exactly the same as mine, and you're definitely
free to improvise and do your own little
touches here and there, and don't forget to erase
the pencil lines later on. That's it for today's exercise, and I'm super excited
to meet you guys tomorrow with one more interesting idea
that I have planned. See you, bye, bye.
6. Day 4 - Drawings & Toodles: [MUSIC] Hi everyone, and
welcome back to the challenge. Today we are on Day 4, and for today's exercise, I'm going to be
helping you design a cute little floral bouquet using a couple of organic tangles from
this entangled method. For the first one, we're
going to be working with this tangle
called drawings, which is a beautiful, flowery, flowy,
feather-like tangle. For this, we basically begin
with a tiny little circle and then make a weaving
line coming out like so. Then we twist it
around and we work in a radial manner to create a
few more of these wavy lines. Almost like a windmill, but like a little more
flowy version of that. It's almost acting like the center of maybe leaves
or petals of a flower. Eventually you're
going to be left with a flower like shape. You can do as many of
these as you like. I've done five, but
you can definitely do four or six or even seven
if that's what you prefer. Now, we come back to
any one of these lines, and we pick a point somewhere
in the middle of that wave. From there, we basically
make these little tiny Coby, scallop shapes connecting it
to the tip of the next one. Then we repeat the
process for the next one. We start with a couple of
these semicircular bumps. Then as you go to the last one, it just almost becomes
like a little feather, reminds me an angel wing and it becomes this pretty
little tip in the end. Now, some of these
are going to be bigger and some of these
are going to be smaller, and not all of your petals are going to be equally sized, and that's fine because
that's what we're looking for as this is a
very organic tangle. Now we're going to
repeat the process once more and create another drawings of flower under the one that's
already existent. Just be a little
careful when you reach the point of the previous one. Just as soon as your
pen touches that point, lift it up so that it
gives the appearance that your petals are going
underneath the previous one. Then we basically
just pretend that there is a hump that's
coming from there. Then we connect it like so. Without really
touching your pen on the paper, mimic the action. It's like you're drawing, but you're drawing like maybe a millimeter above the paper. The nib of your pen is not
really touching the paper. That's how you can retrace your actions or retrace
your hand movements and then touch it at
that point where you feel the ink needs to
now be put on the paper. That's how we can
achieve this effect where it appears as if one
flower is under the other. Anytime you're doing any of the tangles
when you're trying to create this effect where one is on top and
the other is underneath, just lift up your pen slightly, retrace your movements, and then bring it
back in contact with the paper the second you feel
that the layering is done. Now, what we're
going to do next is that we're going to
add a few details. There are a couple of ways
that you can do this. You can either bring
about a couple of curving lines like
so and then leave them midway or you could connect it all
the way to the bottom. Again, you can either wrinkle the lines or connect them
to the bottom all the way. Both of them have their
own effect and both of these techniques
look really pretty and you can choose whichever
one you like more. I tend to like the effect when it goes all the
way to the bottom, almost like creating
small little sections within the given sections. I like to have these
little teardrop shapes, but you're definitely free
to do the other approach. Then again, we come
to the next one. Either you take the curve
and leave it midway, or you bring it all the
way down to the center. Then again over
here, since there's a little bit of an overlap, I'm going to pretend
that there's a hump there and that
there's a connecting line. Similarly, I'm going to pretend that there's a hump
and then there's a connecting line and
bring it down like so. We continue the process for
the other two petals as well. Now once you're done creating the lines inside the petals, the next thing that we're
going to do is color the centers of each
of these tangles. The center circles
that we had created are going to be inked black. We'll come back to add a few more details inside the petals, but we're going to do
that a little bit later. First, we are going to surround these two flowers with a
few leaf-like patterns. For that, I have chosen
this tangle called toodles, which is a beautiful
little triangle, that looks like a pretty
heart-shaped leaf. It starts with a wavy line, and then we go to the tip of that wavy line and
bring it down like so, almost like retracing it. Then we basically create a small fescue-like
element on the right side. You probably remember fescue from the exercise
that we did on Day 2. Then we repeat that same process on the left side as well. It's okay if your fescue
is a little more close to the wavy line or far away from the wavy
line, that's fine. Now pick a point somewhere on that fescue and take
it upwards like so and then bring it down and connect it
to the other fescue. It's almost like
an inverted heart. You're definitely free to
rotate your notebook or your paper in order to
get the desired outcome. If you feel that you're
more comfortable drawing your heart in the
actual direction, like you want to have the
curves up and the tip down, you're definitely
free to do that. Whatever makes it easy
and comfortable for you. Now, for the second toodle leaf, I'm going to overlap
it slightly. I'm basically borrowing from the border of the drawings
flower petal itself. I'm basically continuing
from that same border, almost like both of these
tangles are sharing that line and then I
create my fescues. Since this is going
to be overlapped, there's a high chance that the other fescue
might just get hidden behind and I might not really
see it, so that's fine. Then we again, create that heart-shaped
leaf-like effect. I'm going to pretend
that it goes under the previous one, and then comes out
from behind it, and comes and touches
the tip like so. Now you can always
revisit your design. Now after looking at this, I feel like I'm missing the
other fescue a little bit, so I will come back
and I will add it, just like a hint of it, so that it appears as if that entire toodles leaf is
behind the previous one. You can definitely do these little changes in your design. Now we're going to be adding a lot more toodles
around the bouquet, but we're not going to go
all the way till the edge. I'm just going to
speed this up and show you how I've added mine. Depending on the framework and the size of the
paper that you have, you can definitely
add more or less. Yours don't need to
look exactly like mine. You can even make them
narrower and shorter. Once you are satisfied with
the number of toodle leaves that you have created around
your drawing flowers, we'll come back to the centers
of these flowers itself. Now as you noticed, we had a little bit of a fescue element inside
the toodle leaf. We're going to borrow that idea or take design inspiration from that and use that exact element to fill in the details
inside the drawings flower. We're going to basically
make it look as if there are a little fragments of pollen
coming out of the center. The reason why I'm doing this
in this particular order is because I wanted to show you
how my process really works. Sometimes when I'm working on a particular tangle or
a particular design, and I don't know what
else I can do inside of it in terms of details or I don't know
how to fill it up, then I move on to
the next tangle. When the other triangle is done, I basically look for a
particular element that can be added in the previous one so that both of them
look in harmony. It's like going a little back and forth
in terms of the design. But it definitely
works because this way even if you have two completely different
looking tangles, you can still make them
work together or you can still connect them well together and make it
appear as if they are from the same family by just creating some visual
similarity between the two. Now here, as you can notice, I'm basically playing with
the length of each of these fescue pollen-like
details inside the flowers. Some are short and
some are long, and some are facing clockwise,
some are anticlockwise. You can definitely play around in terms of
the variations with this and do your own
personal touches. [MUSIC] Now for the next step, we're going to start
coloring that center, vein-like element
inside the doodles. I think I will have
to keep both my pens handy at the same time. I'm going to use 08 for coloring and I'm going
to come back with my 01 to neaten out the tips
of each of these veins, just to make them look a
little more pointy and sharp. Again, at this point, you can decide whether you want the wave or the central vein
to touch all the way to the tip of the leaf or you want it left in limbo,
somewhere in the middle. You can take these aesthetic decisions even at this stage. As for my design, you can see that I've created a variety. Some of the stems or
these middle veins are going all the way
to the top of the leaf, while some of them are
just left in the middle. [MUSIC] Once you're done with the center lines
inside the doodle leaves, we come back with our
bold pen 08 or 05, whatever you have
handy with you. We start to basically add some dimension and depth
to the drawing's flower. I'm basically going to
make the outlines thicker. But as we reach the
edge of the petal, I'm going to make
the corner even more bold and even more thicker, and that's because it makes it look as if the
petal is curling. Very similar to
what we had done in yesterday's exercise
where we created an almost 3D effect by just adding a little bit
of an angle to the design. By doing this, the flower now stands out a little bit more. It appears as if
the flower is in the foreground and the leaves
are slightly behind it. Again, these little details
and adding a little bit of contrast help to build
depth in your design, because now there is a
sense of layering to it and the flowers definitely stand out more as compared to the leaves. Now I'm going to skip a
little bit ahead to show you what the next step is
going to be like so that you can plan a
little bit in terms of how you want to
structure your design. Now, once we are done
with the flowers, we're going to move
on to the next step, which is to basically add
these little branches around. This is yet another
tangle called Verdigogh. Now, Verdigogh is
a beautiful tangle where we basically start off by creating small
little stems like so. Then from each of the stems, we basically have more
stems coming out. These can be pointy
edged or these can be almost like a rectangular or curvy rectangle
kind of an edge. You can even have them
overlapping each other. You can have some going
up, some going down. Basically, once you have
the center stem and then some few other branches
coming out of it, you can add more
branches further and further and make
it bigger and bigger. It almost looks
like a close-up of a Christmas tree branch to me. When you look at
it, it almost has those really thin needles. But it's up to you whether
you want to keep them pointy or you want to keep the
edge a little more blunt. We basically create a
few of these around. You can have some
bigger, some smaller, just play around with the sizes, play around with the
orientation a little bit. When you're done adding these, it's going to look almost
like a top angle view of a pretty bouquet [MUSIC]. Then I'm just going
to add a few of these tiny little
circles on the branches, almost as if they're like little wild berries
or little seeds, or pollen coming out of
these little branches. You can just go about
placing these randomly anywhere along the edges
of those little branches. Since we are basically
coloring these circles black, they help to add in a
little more contrast. Then that brings us
to the next step. For the next step we're
going to be adding a few more veins inside
the doodle leaves. For this, take the thinnest
pen available with you and draw the veins very similar to how they are in real leaves. But when you reach the tip, just flick your pen almost as if just creating a
fading out effect. Basically, every time
you reach the tip, just try to release
the pressure. It's like an airplane
taking off the runway, so you just basically
have liftoff the minute you feel that
you want it to fade out. Basically what I'm
doing is that I'm starting close to that center dark vein but I'm branching
out as we go further out. I'm just making those
strokes lighter and lighter. This is actually one
of the things that I really love about Zentangle art. Even though everything starts
off in an abstract manner, you can bring in a sense of reality to it and
you can borrow from real-life elements and add them onto your existing framework. It's almost like that
meeting point or that sweet spot between
reality and abstraction. These are very personal
pieces of expression because the way I draw something is not going to be the
same way that you do it, and so each of us are going
to have our own strokes, our own imagination, and so each artwork really becomes very unique
in that sense. All right, now for
one final step, I'm going to just add in
a few more of these wavy, almost tentacle-like
branches coming out from behind the center flowers. Now I'm just going to go back
to those two leaves and add a little bit of
those dark curves that I like to add on my leaves, something that we did with our book leaves
on Day 2 as well. This is completely optional, if you don't want to add more inky details in your
design, that's completely fine. I personally like
to do my leaves this way and this has
actually become one of my signature little details
in every design that I make. You will always find coiling leaves in my
design and not flat ones, but this is purely optional. These are just little
ornamental details that you can add
if you feel like adding them or you can avoid if you feel that your design is good the way it is right now. With this, we come to an
end to today's exercise. I look forward to seeing
your beautiful versions and variations of
this wonderful, lovely floral bouquet that we have done today.
See you tomorrow.
7. Day 5 - Noodle & Springkle: [MUSIC] Hi everyone and welcome back to our creative challenge. Today we are on Day 5 and I have a very pretty design to
share with you all today. We're going to be working
with a tangle called noodle and then we're
going to be combining it with another tangle
called springkle. Both of these tangles are
very organic and very flowy and they have a pretty
garden-like wipe to them. To begin the exercise, we're going to lay out some
circles in a vertical line. They don't need to be
very perfect and you're certainly free to
rotate your notebook around to draw them in the opposite direction
if that's easier for you. Now, once you're done
with the first line, we're going to
repeat that process somewhere in the
center of the page. So you can see I've
actually managed to put seven circles or seven of these orbs based on the length of the
sketchbook that I'm using. You probably might have
more or less depending on the length of your sketchbook
so that's completely fine. I'm just trying to
keep them as evenly spaced out as possible. Now the next thing that we're going to do is that
we're going to start working on
some S-shaped lines. I basically start
with the first one, touch the second one, and then crossover and bring
it beneath the third one. Then I again go
to the third one, curve it like so, touch the fourth one, bring it back in the
opposite direction, and touch the fifth one. Then I start from the fifth one, touch the sixth one, bring it down and connect
it to the seventh one. Then we basically
repeat this process for the other two lines as well. Now once you're done
with all the three rows, the next thing that we're
going to do is begin counting the next set of circles
so earlier we did 1,2,3, and then 3,4,5, and 5,6,7. But this time we're
basically going to do 2,3,4, then 4,5,6, and so
on and so forth. Basically, we skip the top one and start from
the second one. I'm just going to show
you how this works. We basically go to
this second circle. Make a curve like so, bring it and touch it
down to the third one and then reverse the curve and
touch it to the fourth one. Then again we start
from the fourth one, bring down the curve, touch it like so, and
connect it to the sixth one. Then for the next
one we just wrap it around and leave it like so. Now it's okay if
the shapes are not to your liking right now and it's also okay if the shapes are looking a little different
from each other. They don't need to be
exact mirror images of each other so that's fine. [MUSIC] Now we'll
just come back to their tops and we'll just
close them like so and then the next thing
that we're going to do is that we're going to start
building out some echoes. Now, this step is
very similar to the flux circles that
we had done on Day 2, so you're basically
creating almost like a teardrop shape coming from
behind that center element and then you add another
echo and we do two of these on each of these curvy
fragments that we have. Then we do it all the
way to the bottom. Now once we are
done adding two of these echoes on
each of the sides, we come back to the first one and this time we start to add more echoes but we start to tuck them inside the bottom one. Again, very similar to
the flux echo effect. We basically start
to go in a circular, radial manner and
we go narrower and narrower and we tuck
them under the next one. [MUSIC] Once you're done placing all your echoes all
the way till the bottom, the next step is going to
be to add some details in the center, for others, we come back to this
little curvy shape that we have in the
center and start to add some circles and color
all the empty space black. Again, the circles
are going to go down in a descending manner. Then we come back to the
outer petals that we had created and I'm going to just retrace the first two
or first three petals to make them stand out
a little bit more. The first two or three
are going to be slightly bold as compared to the
rest of the petals. Then I'm just going
to add a curvy line and put in a couple
of dots in there. These are small little
details that will just add a lot of value to
your entire design. Again, we come back to the
next one and we start to add circles in a descending
size so they go smaller and smaller and then
I color the sections black. Then again, I retrace
the outer petals. I make the first two or
the first three petals slightly thicker and slightly bold and then the
other petals stay thin, almost creating a
fading-out-like effect. Then once you're done
adding the details, we basically repeat
this exact same process for the whole row, and then we do the
same thing for the other two rows as well. Now this is a fairly
repetitive process and it's going to take
you a little bit of time to finish up the detailing so if you feel like
you want to pause the video at this point and come back once you're ready,
you can do that. In the interest of keeping these videos crisp
and productive, what I'm going to do is that
I'm going to skip ahead a little further and this is what your design is going to look like once you
have finished with all the detailing on each of these three rows
that we have created. Once you're at this stage, we will be ready to start
with our next step. Now the original step out
for the noodle tangle is slightly more compact as compared to the version
that we have done today. The reason why I have decided to do a more
spaced-out version is because I actually want to introduce another tangle in the middle
of these empty spaces. This tangle that we're
going to work with right now is called springkle and springkle is a
beautiful organic tangle which is perfect to add to any floral designs and it's a great filler
tangle as well. Now the way this tangle works
is that we basically create a curvy line and then we
loop it in the end like so, very similar to
creating a fescue. Then we basically make a small curve from beneath
that teardrop shape. Take it around and
bring it down like so. It almost starts to look
like a little curling stem. Now once you have this
basic shape ready with you, we're going to add a
few caps on top of it and these are
going to be small, little semicircular
or rounded caps, which are going to
go narrower and narrower as you reach the tip. You can add as many as you like. There is no fixed
number over here and so what I like to do is
that I color them alternate, black and white and
then I also add these little dots on top of it. [MUSIC] Then again, we are going to look for another empty space somewhere
in our design and create another little fescue
and it's okay if the bulb or that
little teardrop shape on the top is not
exactly teardrop shape, that's completely fine. Yours can be narrower,
more circular, more bulky bigger smaller, there are no rules to it. Now, you don't always
have to use the top side. You can also make the caps facing in the bottom direction. For example, over here, I'm going to take
it down like so. Basically, the gist of
this is that once you have that semicircular
head on the top, you can use pretty
much any side of that semicircular ahead and create
your caps on top of it. The gaps can be facing in
literally any direction, just as long as they are
connected to that head on top. Keep rotating your
notebook and keep finding interesting areas where you can add these little springkles. We don't want to
add a lot of them. We just want to add
a few so that they look like they're coming
out of these floral stems. You can have some coming from
the edges of the design, almost making it look
as if the design is continuous and
it's continuing even beyond the paper
and you can have them facing any
direction that you like. [MUSIC] Then once you're done adding all of these
little springkles, the next thing that
we're going to do is add a few fescues, and the fescues can be
again put in any direction. That's it for today's exercise. This is a beautiful
little floral wine design that can be used as a border
to any other composition. Or you can simply multiply
these wines and create a beautiful pattern the
way we have done it today. You can use it for many DIY projects,
like greeting cards, or even pin them on top
of cushion covers or put them on top of your
notebooks or make stickers out of it and put
it on top of your laptops. There are many different
applications to this design. I hope you loved creating it as much as I love teaching it, and I look forward to seeing your versions and variations of this beautiful little
design that we've done today. See you tomorrow.
8. Day 6 -Borbz & Diva Dance: [MUSIC] Hello, and welcome back. In today's exercise,
we're going to be working with this
tangle called Borbz. The creator of this
tangle is Rita. This is a lovely,
beautiful bordered tangle. She decided to call
it Borbz because she says that it's a border
of squished orbs. She basically came up with
this wonderful little acronym. I think it suits the nature and the characteristic of
the tangle very well. To begin this
tangle, we basically start by making some orbs. All of these orbs are stacked
one on top of each other, or they are connected to each
other in one single row. It's okay if the orbs are
not all equally sized, and if they don't look similar to each
other, that's fine. We repeat the process
two more times, and then we reach
the end of the page. Now if you're using
a rectangle notebook and you're using it in
the landscape mode, then you probably
might have to make a few more rows,
and that's fine. Just make the number
of rows depending on the orientation of
your sketchbook and the size of the paper. Now for the next step, we
come back inside these orbs, and we start to
place smaller orbs. But these are going
to be colored black. I've basically taken my 0.8 pen so that it's
easier to color, and it's faster that way. As you can see, the inner orbs don't really have
a fixed position. You can place them
anywhere inside the big orb and you
can keep them left, right, bottom, top, just as long as they're
inside the big orb. Now step number 3 is
going to be to make an outer boundary or an
aura around the inner orb. Once you're done with the aura, we basically start to create these lines coming out of it, almost like sun rays. You can go clockwise
or anticlockwise, whatever's easier for you. These can be curvy or straight. Both of the variations
have their own appeal. They both look interesting. If yours are turning out to be slightly more curvy
than mine, that's fine. Now before I finish off
the rest of the orbs, I'm going to show you the
next step so that you can pause the video and finish
it up until this point. For the next step,
we basically pick one side of those lines
that we had drawn, it can be left or right, and then we start to create a curvy line and color that in. It's almost like creating a curvy tangle on top of those
lines that you had drawn. It's like adding a little bit to the edges of these lines. It's going to start
to look like this. Now in this particular orb, I have decided to
add the weight on the right side of the lines, but you can add it on the left
side of the lines as well. You can also mix and match
it for the rest of the orbs. You can do some with the
weight on the right side and some with the weight
on the left side. If at any point
you feel like you want to retrace
the boundaries of those orbs and make them
neater, you're free to do so. Now again, for the next orb, I've picked the right side. I'm just adding a
little curvy line and then coloring it in. Now, depending on the distance between each of
these lines that you have drawn radiating out
from the center orb, you might have a couple of places where there
might be overlaps. If the lines are very close together and you're trying
to add weight on them, they might overlap and run into the next one. That's fine. This is a very abstract
pattern and so there is room for
some inconsistencies over here because
that's the nature and the characteristic of
this particular tangle. It almost has a very
futuristic vibe to it. Almost like these
are going to be plants in outer
space or probably people in the future might wear jewelry which looks like this. This pattern is quite
abstract in that sense. Now once you're done
with these steps, we basically do the
exact same thing on the rest of the orbs. Just to recap, as
I'm drawing along, Step 1 was to draw all the orbs. Step 2 was to create
the inner orbs, which were colored black. Step 3 was to give
each of them an aura. Step 4 was to create all of those radiating lines
coming out of those auras. Then Step 5 was to add weight. Now, this is a fairly
repetitive process, so I'm going to
speed up the video a little bit to show you what it's going to look like
once all your rows are done. I'm actually just
going to finish the first row entirely and show you what it's
going to look like. Here, the first row
is completely done. I'm still going to work
on the other two rows, but I wanted to show you
the next step so that you have a complete picture of what the design is
going to look like. Now once your rows are done, the next thing that
we're going to do is connect these orbs by adding these semicircular curvy lines
and coloring them black. This is going to happen
all the way from the top. We basically draw
a small curvy line and connect it somewhere to
the edge of the next orb. Then we do this on
both the sides. Eventually, it's going to
start looking like there is a big thick black border and the orbs are
stuck on top of it. That is why this tangle works very well as
a border tangle. Now you can pause the video at this point and come
back once you're ready. Once you're done with all
of the steps on each of these little strips or
borders that you have drawn, your paper is going to
look something like this. Then we'll be ready to
work on the next step. For the next step, we're
going to be drawing lines which are going to
be mimicking each other. This tangle is basically
called diva dance. I basically start by tracing the outline of the tangle
that's already drawn. I'm basically trying to copy
the shape and the curves of the tangle that's
already there. Then I do it one more time. Now in the second line, I basically come back
and I start to add some black roundings like so. It's almost like creating
little bumps filled with color. Then the third line
is now going to follow the shape of
the second line. Since we added the curves
on the second line, the shape of the second line
has changed a little bit. Now the following line is going to mimic the effect
of the previous line. Then again, I do
the fourth line, which is going to mimic the
effect of the third line. Fourth line is again going
to have bumps in it. Now it's not necessarily
that you have to do one without bumps and
the other with bumps, so you don't have
to go alternate the way I have done these two. You can also have two without bumps and
then one with bumps. Or you could have
one with bumps, and then you could have
three without bumps. Or you could do even do
with bumps together. Basically, you can
play around with the variations in these lines. You can mix and match. Then we basically use
this tangle to fill up the entire empty
space on the page. That's it for today's exercise. Today we have actually combined two very interesting
abstract tangles. One is Borbz and the
other is diva dance. Both of them have a very
characteristic to them, which is why they complement
each other perfectly. For the Borbz, you can even improvise and not
use it as a border tangle. You can just use the
orbs separately, not connected to each other, and you can have them
floating around in different directions and fill up a space that you have in
a larger composition. That's totally possible as well. I hope you enjoyed making this lovely fluid
abstract composition that we have done today. I'm super excited to see all your versions and
variations of this design. I look forward to meeting
all of you tomorrow with yet another interesting
exercise. See you.
9. Day 7 - Balldox & You!: [MUSIC] Hi everyone.
Welcome back to the course. Today we are on Day 7 of
our creative challenge, which means we're
about to finish the first week of our
creative journey together. I thought that since
today we're about to finish the first week
of our challenge, this is the perfect opportunity
to level things up. Today I'm going to be reaching
your only one tangle. Then I'm going to be
leaving the rest of the space empty for you to fill it up with your
own imagination. The tangle that
we're going to work today is called Balldox, and it is created
by Karen Frank. To begin this tangle, we start with three dots and then we connect these
with these curvy lines, very similar to how we
attack the Akoya tangle. Then we again come back at the bottom and connect
it to the top. Again, exactly the same process as we had done with
the Akoya tangle. Once you have these
curvy lines in place, the next thing that we do is to build some teardrop shapes, also known as flux and then we basically
just echo them out. Then as you are building
more of these echoes, they will start to give an impression that
they're getting tucked beneath that circle
that we had drawn initially. We can also refer
to these circles as anchor points because they're holding the entire
design together. Depending on how you
spaced out the three dots, you might either have more
echoes than me or less echoes than me. That's it. That's how Balldox is created. Now you have absolute freedom
to do anything that you like in the center
as well as outside. Since we're about to finish the first week of our
creative challenge, this is a great opportunity
for you to go back and look at all your
previous designs and pick up some of the tangles
that you either find very interesting or the ones that you want to
practice a little more. Now use those tangles in this particular design and
build your own composition. Remember, there are no mistakes. Everybody's composition
is going to look different and each of
you are going to end up creating it with your
own personal preferences so there is generally no
right or wrong over here. Fill up the page literally
any way that you like. During the process, if you face any difficulties or
encounter any problems, make sure that you
write about it in the Discussions tab
where I'd be more than happy to look at your work in progress design and help
you carry it forward. As for me, I'm going to show you my complete composition tomorrow so that you don't get
influenced by my choices, and are able to make
a page which is completely uniquely truly yours. I look forward to seeing
you tomorrow. Bye-bye.
10. Day 8 - Oh well!: [MUSIC]. Hi everyone
and welcome to Day 8 of our creative challenge. Before we begin
today's exercise, let's have a quick
look at what I ended up doing with
yesterday's project. I basically kept the wall
docs in the center and then I added a few little orbs in the center to just
give it some contrast. I also added a little
bit of lines and dots. Then I proceeded to
adding dividends almost like three sections or three ribbons
which are coming out. Then I added some doodles. Now for the doodles, I decided
to add in some details by putting in these curvy lines inside and giving them
some weight at the end. For all the negative
space on the left side, I decided to add pork leaf and decided to
color the background black. But I did want to maintain
an abstract field overall. I decided to keep the
right side of my page as white and just added
some fescue over there. Then finally I added
some random dots around the fescue just to make that whole thing look
a little more full, and that was it. This was my version from
yesterday's exercise where I picked up a few patterns from everything that we've
done in the last week. Overall, I'm quite happy with the way this whole
thing turned out. It was quite a
relaxing experience for me and I'm sure it
was the same for you. Now that brings us
to today's exercise. Today we're going to be
working on a mono tangle. A mono tangle basically is the terminology
which is used in the zentangle method whenever we work with only one tangle. Today the tangle that
we're going to be focusing on is called Oh Well. It's a beautiful tangle
by Melinda Barlow. It has curvy lines
and straight lines. It's quite an
interesting exercise to do as a mono tangle
because it really builds your power of association when it comes
to shapes on your paper. Now, the way this tangle works is that we start by making a tiny little circle
and color it black. Then somewhere
under that circle, we create another tiny circle
of almost the same size, just a tiny little orb. Now we connect these two by
making a curvy line like so. Then we again make two dots. These are somewhere
on the right side of the previous two. Now this time when we're
connecting these dots, we touch the previous
curve just a little bit. Once you have these two curves, we close the top
and the bottom by adding another curvy
line, like so. Almost like adding
a cap on top of it. Then the inside is
filled with lines which are parallel to both the
sides of the curves. The easiest way to do this is to start with the center
line and then just go parallel and parallel to match the shape of
each of the edges. Now this tangle almost works like a constellation in the sky. You can just keep
connecting and building more and more of
these dots and more and more of these patterns by just adding
those curvy lines. For example, for this one, I'm using the preexisting
curve and I'm just adding another curve and
just putting in the dots and
connecting it like so. The beauty of this tangle
is that you can use the pre-existing curves
and just keep on building in any
direction that you like. There are no rules as to which direction
you should follow. I'm sure you've noticed that both the curves don't need
to be of the same size. Of course, if you end up having two curves
of the same size, there's nothing wrong in that. But I personally feel that
the tangle looks a lot more interesting when one curve is smaller and the other
is slightly bigger. Now we just keep building
in the same manner by looking for pre-existing
curves or looking for dots which are already there in our design and connect
them to more dots that we keep on adding or we connect
them to more curves that we keep on adding and we keep
on building step-by-step. Sometimes you might
even find yourself in a position where there's
already a dot nearby, probably as a result of the fragment that you
have drawn earlier and so you can always connect that existing dot to
create a new shape. The reason why I thought that this would be an
interesting exercise for today is because by
placing these dots and lines, we're actually really building our skills for association. Our mind and our eye
really opens up to what's nearby on our paper when
we look at our tangle. Especially when we're focusing
on one particular design, sometimes we get
really absorbed in it and we forget what's around. This is a good exercise almost like a
peripheral vision alive inside you so that
you can look for more shapes and build more associations
as you go forward. Of course, this is a
great exercise for line practice because the
more you draw these lines, you will build control in terms of your wrist
movement and you will have a lot more control in
terms of where to end the strokes because
you don't want them crossing over the gaps. This is definitely
good for that as well. Now I'm going to speed this
up to show you what it looks like once you've
filled up the whole paper. Of course, depending
on the paper that you're using and the size
that you are working with, yours might look slightly
different than mine, which is completely okay. Now once the whole
paper is done, what I like to do is go back
to some of these curves, especially the ones
that are overlapping. I like to accentuate some of
those lines by just going in with a thicker pen and
I'm using a 03 this time. This is very similar
to us adding the curling edges on Berkeley for the
doodles for example, that we've done in
exercises earlier. I just basically
build contrast by adding some dimension to it. That's it for today's exercise. I hope you found it
relaxing and fun. This is definitely
a good pattern to use in a lot of
complex compositions. Especially when
you have odd areas and you don't know
what to do with them. This is a good filler
pattern to rely upon. I hope that you
can also use this in some of your future projects. That's it for today and I
will see you tomorrow with another interesting
exercise. Bye bye.
11. Day 9 - Shapes Around You!: [MUSIC] Hi, everyone,
and welcome back to the challenge. Today, we are on day 8, and I thought that today, we are going to do an exercise in
improvisation once again, very similar to what
you had done on day 7. But this time, there's a
little bit of a trick in wall, and that is that
we're going to play with alternate black and
white segments in our design. So to begin the exercise, we're going to start by making some wavy lines and you can make them in any
direction that you like. I'm currently drawing
these from left to right and you can see that
most of these are diagonal, but you can choose to do this the other way
around as well. Get your sketchbook in a comfortable enough position and draw a few of
these wavy lines. As you can see, not all of them are going all the
way till the end. Some of them are merging
with the previous curve. That's how we're getting
good variety in terms of the sizes as well as the thickness of
each of these waves. Once you have the entire paper filled up with these waves, we'll come back
to the first one, and this time we'll start filling it out with
small patterns. Now for today's exercise, I want you to look
around you and try and gather some
inspiration for basic shapes. Everybody usually know
some basic shapes, such as circles, squares, triangles, and even ovals
and basic geometric shapes. But I want you to try and
go beyond that and look for certain motives or
certain patterns in and around your house. They can be on your clothing, they can be on your upholstery, and just try to understand and decode those patterns and
use them in your design. As an example over here, I have started with
basic circles. What I've done is
that I've taken the first wave and color
that entirely black, but I've just left the
circle inside as white. Then on the second wave, I did the exact opposite. I fill up the circles as black and then I left
the background as white. Then in the third wave again, I have kept the background
as black and I'm just adding some tiny little
ovals which are white. Now similarly when I move
on to the fourth wave, that one is going to have white background and then
again a black pattern. Basically, we're just
going alternate. That's the only rule or
guideline for today's exercise. Apart from this,
you're free to use any shapes or designs to
fill up all the waves. Now if you feel that
you're stuck in terms of creative inspiration, you can even borrow some ideas from
alphabets and numbers. You can use those
to break down into simple shapes and fill
them up over here. You can even use
some playful shapes like clouds and stars, or you could use
more complex shapes, such as drawing [inaudible] or maybe doing some
intricate flowers. The choice is totally
up to you but the idea today is to
basically open our eye, to patterns around us and to gather inspiration from
things around us and break them down
into simple shapes and use them to
fill up our page. I'm not going to show you the complete outcome of
my design just as yet, I'm going to show
that to you tomorrow. But you can see that I
have basically stuck to the black and white
alternate waves and I have used simple designs and simple shapes over here
to just fill up my paper. That's what we're
looking at for today. I hope you'll have fun in
doing this exercise where you get to explore
design inspiration. I look forward to seeing
what you will come up with. Tomorrow, I'm going
to meet you with yet another interesting
exercise. See you.
12. Day 9 - Reveal: [MUSIC] Hi, everyone. Before we continue with the
challenge further, I just wanted to
show you my output from the exercise that
we did yesterday. As you can see, I
continued filling up my page with various patterns. I filled it out with some lines and then
I took inspiration from alphabets and did
some U-shaped curves, and then I also
added some ovals. I also took inspiration from
the drawings flower and imagine what the petals
would look like if they were plucked
individually and added those. Then, I also added some
fescue along with some dots, and I also ended up
adding a few spirals. All of these elements that I had chosen were basically inspired
from objects around me, as well as from some
patterns that we have already drawn over
the last few days. I basically just played with contrast and went with the flow and just put on paper
whatever came to my mind, and that's how I ended
up filling up the page. Every few days I like to
do an exercise like this because it really makes me
aware of patterns around me, it really opens up my mind, and it really opens up my
vision to things around me, to design inspiration around me. I would highly recommend for you to also try this every few days. Now if you're done with your
exercises from yesterday, I definitely love to
have a look at it once you put it in the projects
and resources section. But if you feel that you're
stuck for design inspiration, maybe you can borrow some
ideas from here and hopefully, this will give you
an opportunity to finish up your design. With that, we move on to
day 10 of our challenge.
13. Day 10 - Pepper in Pepper!: [MUSIC] Hi everyone
and welcome to day 10 of our creative challenge. Today, we're going
to be working with this beautiful tangle
called pepper, which is actually
one of my go to tangles whenever I'm out of ideas on what to use next
in a complex design. I've already done
a little bit of this over here as you can see. It's basically a tangle which
is quite fluid in the sense that there is no defined
shape to the boundary. You basically have fluid-like
shapes inside which we add these thin lines and then
each of the lines are basically given a certain amount of weight towards the edges. The way I have placed
these is that I've tried to make them almost
look like cells, like microscopic
cells, which are sort the boundary of the
other cells around them. Each cell is fitting in the space which is left out in the middle by
the cells around it. So it's almost like fluid puzzle pieces which
are morphing into the space, that's how I've placed them. I'm just going to
show you a step by step process as to how
this tangle works. As you can see over here, I've basically drawn
this almost like a dotted dashed line with tiny hyphens are tiny
dashes over here. This is the outline
of the shape. Now, once you have the
outline of the shape, you have to imagine a center, which is going to be hollow, very similar to the centers
that I have over here. Now, this center is imaginary, which means that
you have to be a little mindful of where your lines are going
to come and stop. For example, let's take this
particular shape right now. Now, over here, I'm going to start by placing some lines, and I'm going to
consciously try to stop at a particular point, such that eventually
what is left inside or at the edge of those lines becomes
a hollow space. As you can see, what I've basically done is
that I have chosen the right edge of
each of these dashes, and I'm extending the line from the right side to the center. Once I have all of them
placed together nicely, I can just go back to each of the lines and add the width; very similar to how we've been
adding the surroundings so far in quite a few of
the designs earlier. It almost becomes like a little curvy
triangle at the top. Now, if you think
this is turning out to be a little tricky for you, then I do have a tiny hack
that can help you out. You can always use
a pencil to draw an imaginary fluid shape
anywhere in the center, it can even be off center, and then now this
becomes your boundary or your guideline where the
lines need to come and stop. As soon as they touch
the pencil mark, I know that that's
exactly where I have to stop and then I don't take the lines inside
that hollow space. Then that way, later on when
I erase this pencil line, I'll get a clean, nice-looking
shape over there. This inside orb can be as
small or as big as you'd like, there are no rules
to it and each of the pepper shapes that
you draw can have different sizes of
the inner orbs, so that's completely
fine as well. Now I'm going to do a
couple more over here, I'm going to start by adding
these dotted line shapes, then I'm going to
pretend that this is my boundary and I'm going
to add another one, almost imitating the
boundary of the ones nearby. Then I'm just going
to repeat the steps. Now, once you have a few of these in the
center of your page, then we're going to
pretend that all of these collectively together
are one shape. We're going to think
that all of these together are one
giant pepper tangle, or that they're
altogether grouped, and that they are
basically inside the hollow space or another giant pepper
tangle which is outside. To make this idea come to life, we basically need to leave some negative
space around these. Again, we can use a pencil to just draw an
imaginary boundary around this, and then once you have
that negative space, we're going to start drawing some lines which are going
to go out like this. Now, this time we're
going to treat the edge of the pepper as
the edge of the shape. The outer shape is
not going to be as fluid as the shapes
that were inside, we're going to start adding the weight on the outer
boundaries itself. Just like that, we
have a beautiful abstract pattern with us. That's it for today's exercise, I hope you enjoyed
creating all of these lovely fluid pepper blobs inside another giant pepper. I look forward to
meeting you tomorrow, with another interesting Zen
art exercise. See you soon.
14. Day 11 - Garlic Cloves: [MUSIC] Hi, everyone, and welcome back to the challenge. Today we're going
to be working with a simple and easy pattern
called garlic cloves. It's a highly relaxing pattern. Most of the times when people
see it in the beginning, they find it to be a little complicated because
it appears complex, but once you start doing it you realize it's
actually just really simple and once you break
it down into steps, it becomes really
easy to follow along. There are a couple of different
approaches that you can use to make this pattern, but here's the approach that
I find to be the easiest. I usually start by placing
around dots on my paper. Your dots don't have
to be this thick. I'm purposely making mine
a little thicker and bolder so that it's
visible on the camera, but yours can definitely be
lighter and they can just be tiny little
points on the paper. Once you have a lot
of these around, the next thing that we're
going to do is pick any two points or dots and connect them
with a straight line. Then once you have the
straight line in the center, we basically just start to add curves on each of the sides. These can be as
many as you like. You can have three
curves or four curves or even five curves depending on how plump you want the
shape to look like. Then once you're done
with one section, then we basically look
for another nearby dot. Again, at the center
straight line and start to build the curves. Now again, over here
we are looking for interesting areas where
we can form associations. We want to try to spread out the cloves in as many
directions as possible, so try to look for
dots that are at interesting angles so that
you can have a good variety. As you progress further, you will also notice that sometimes there's a dot nearby, and if you try to
connect another clove to it then it appears as if the clove is getting
tucked beneath some other cloves that you've
probably designed already. It adds to the depth of the design when you
make it appear as if some of these cloves are hiding behind
the ones on the top. Don't be afraid in case
you feel that some of your cloves are
getting partially hidden behind the previous ones. Just keep connecting
the lines and try to focus on each line to make
it as smooth as possible. This is again, a wonderful
exercise to develop control and to build up your drawing skills so
that you're able to work with your hands
and your wrist in general in a smooth and
comfortable manner. As you keep rotating
the sketchbook and build the design in
different directions, you'll notice that it starts to appear like a complex design. But really even though it
looks very complicated, it's actually pretty
simple as you just saw. That's it for today. We have a simple, easy pattern for today that helps you to
develop line practice and build control and it's a highly satisfying
and relaxing exercise. It's really a go-to pattern
for days when you're really tired after
a long day at work, or if you're feeling uninspired, then this pattern will
definitely come to your rescue and it'll help you relax and have fun
at the same time. Also, if you're
interested in trying another version of this tangle, you might enjoy doing this with a thick pen and a
thin pen alternately. Try doing one clove with a thin pen and then move on to another clove
with a thick pen and that'll help to bring in some interest and drama
into your design. In case you end up practicing
both the versions, do let me know which
version you like better. I look forward to seeing what
you do with this pattern. That's it for today. I will see you
tomorrow to continue our challenge. Have a good day.
15. Day 12 - Sparkle Sparkle!: Hi everyone, and welcome
back to the challenge. Today we're going be working with a tangle called sparkle, it's a beautiful tangle
that can be used as individual fragments or it
can even be stacked together. Today we're going to use
an approach where we use several sparkle fragments
scattered all around that page. The way we begin
this tangle is by drawing a curvy line like so, and then we connect it with another curvy line in
the opposite direction, so it almost looks like
a little eye or like a leaf with a
slightly pointy edge. Then once you have this shape, we basically go inside to
put a small o or a circle, and from the circle we
get a curvy line like so. Then we rotate it and
get another one like so, then a third one like so, and the fourth one like this. Basically we're just using
the existing curve of the circle and then continuing and drawing
four lines from it. Now, once you have
these four lines, we go inside each of these sections and start to fill in more
curvy lines inside, almost like they're fanning
out or they're radiating out. Once you have these lines, we go to the edges and start to add a little bit
of it alroundings. Very similar to how
we have done in our previous exercises
with pepper and doodles. Once you're done
with the roundings, we come back to the center, and over here we leave
just a little bit of white space in a
semicircular manner almost like a little Smiley, and color the rest of it black. So that little white spot that we have left basically acts like a little highlight and it makes it appear as if the
whole thing is sparkling, almost like a little gem, and that's how we
finish this tangle. Now we're going to draw
multiple such sparkle fragments scattered all around our page. You can even have
some of them towards the edges where they're
only partially visible, and basically we
just scatter them around in different
directions like so. Finally, once you're
happy with the number of sparkles that you have
scattered around the paper, we start to connect them
with these curvy lines, almost as if they like ribbons connecting each of these
fragments together, and we basically just
keep building it as if it's some kind
of a constellation or almost like a web where these sparkles are
caught in the center. Now there are a couple of different things that you
can do with the background, so you can either color
the entire background black and keep these
ribbons white, or you could even
color the ribbons black and let the
background to be white. You could even add
some extra patterns or designs inside
these empty spaces, so there are a lot of
different variations that you can try to make this
design look full. As for me, I haven't really decided what I'm going
to do with this, so I think I will have a cup of coffee and then
hopefully inspiration will come to me after that and whatever I choose
to do with this, I'm going to show
this to you tomorrow. I do look forward to seeing all your variations and
versions of this design. I will meet you again tomorrow with another
interesting exercise. See you bye-bye.
16. Day 12 - Reveal: [MUSIC] Hi everyone
and welcome back. Before we move on to the
next exercise, as promised, I want to show you
what I ended up doing with yesterday's project. If you remember while drawing
this composition yesterday, I was talking a little bit
about how this reminded me of a little constellation and how these sparkle elements
reminded me of gems. It just so
coincidentally happened that after I finished
drawing this, I was taking a little break and I found some
stickers with me, journaling stickers,
which were basically filled with astral
patterns and they had these beautiful
constellations on them. Then I just noticed how
spaced out they are and how they are very airy with a lot of
negative space around. It was actually these
little gems which were the vocal elements
where everything else was just left empty and these vocal elements
were stealing the show. I decided to take
inspiration from that, and I also decided to leave
a lot of empty space. I did end up coloring
the ribbons black. But then apart from that, the only other additions
that I did was to add these little
floating orbs very similar to the black
balls that we had done in the centers of
this backlit angle. Then I just added tiny little
circles here and there, and then I decided to leave the rest of the
composition empty. It's definitely a good change for me because I usually end up doing a lot of
design-heavy compositions, and I end up using a lot
of inky black areas. This was definitely a
change for me and it's good to have this idea
in one's portfolio. I think I'm quite
happy with this and if you've done any other version or variation of
yesterday's exercise, I'd love to have a look at it. Make sure that you put it
up in the project section. With that, we are ready to
move on to our next exercise.
17. Day 13 - Fun with Mooka!: [MUSIC] Hi, everyone,
and welcome back to the creative challenge. Today we are on day
13 of our challenge, and today we're going
to do an exercise with one of my favorite
tangles called Mooka. Now, Mooka has a couple
of different variations, and I've already drawn
one of the variations over here for you to
see as an example, but I'm going to show you a
step-by-step version of this. We're actually going
to be playing with both the variations of Mooka in the same
composition today. First, we're going
to be developing a few different
Mooka flowers based on the version that the CCT Stephanie
Jennifer had introduced. The way this works is
that we basically take a curvy line and we
loop it at the end, almost forming a board, and then bring it back all
the way to the bottom. Then if you wanted to
face the other way, then we repeat this exercise
to the exact same steps, but make the board or the top loop facing
the other direction. Similarly, now I can rotate my sketchbook and I create
one more curvy line. Form a pole at the end
and bring it back down. Now, every time two of
these Mookas come and meet, they form this little shape, almost a heart shape, and they form a
petal of the flower. Now, depending on the size
of the Mooka that you are drawing as well as how
you space them out, you can create a
four-petaled flower or five-petaled flower or
even a six-petaled flower, so it totally depends on you how big you want
your flower to be. You can also have your Mookas
tucked under each other. You can have one on
the top and one on the bottom or you could have them both at the same height. Now, for example, the flower on the left over
here that I have done, this is with four petals, and as you can see, each of the petals is different
in terms of thickness. They're not all consistent. If you end up with a flower
like this, that's fine too. One of the things that I did in this flower is that I used another Mooka inside
to act as a filler. But if you don't want to do that and use a different
filler instead, that's completely okay too. Another filler that
we can explore over here is to basically draw some curvy lines and put
dots at the end of them, very similar to how the
pollen is on real flowers. We're just basically putting in these little stems and then just adding a dot at
the end of each of them. One of the things
that I really like about Mooka as a tangle is that it has a very lovely
ornamental wipe to it. Once you add these
little stems inside, the whole flower blooms really beautifully and it starts
to look very pretty. Now, I am going to add
one more tiny flower over here, somewhere on the top. You're free to add more
flowers depending on the size of your paper and you're free to
change the sizes and create variations in terms of the number of petals as well. We're just looking to
fill up the central space of the people with a
few of these flowers. With this one, you can
also see that this is partially getting hidden
behind the large flower. This layering helps to
add depth in the design. If you also end up having overlapping flowers,
that'll be really good. Now, once you're done forming
a few of these flowers, the next thing that we're
going to do is have a few stems coming out of these. These are going to be the
other version of Mooka. In this one too, we
start with a curve, but we don't really form
the pod at the end of it. We skip the pod and we
basically just sort the line. We put a little curve and we
trace the line parallel to the original stem and bring it back all the
way to the bottom. Then again, these can
be in any direction. You can have multiple such stems coming
out of your flowers, Some can be overlapping, some can be partially hidden. We're basically
just going to keep rotating our sketchbook in order to get maximum comfort
while drawing these. We basically just
branch them out from each other as well as have them coming out of the flowers. Now, from my experience, I have generally noticed that drawing this version of Mooka requires a little
more patience and hand control as compared
to the previous one. Because with the
previous version, if you end up having a slightly thicker stem it
doesn't really matter because it eventually looks nice when you put all the petals
together of the flower, but with this version of Mooka that we're
currently drawing, where we're trying to make
them look as if they are winds or creep up lines coming out
from behind the flowers, we want to try to be as thin as possible so that
they look delicate and dainty as compared to the large flowers that we
have drawn in the center. Of course, if these
stems are thinner, that also means that
the focus stays on your main flowers and the stems don't really
steal the attention away from your focal flowers. Once you are satisfied
with the number of these Mooka stems
that you have created, the next thing that we're
going to do is come back to all these empty spaces that
we have in the background and we're going to add
these tiny teardrop shapes or almost these mini
Mookas or flourish elements to just add some drama into the composition and fill it up a
little bit more. These are not exactly teardrops, they're slightly curvy
and slightly bent, almost like flourish lines. We're just adding
them to increase the ornamental value or the visual value of
this composition. Finally, as the last step
for this composition, we're going to be coloring
the entire background black. Now, you can
definitely switch to a thicker marker pen if you have that handy and use that to color the background so that
it happens faster, or you could even use black
acrylic paint or gouache or any other material
that you have handy with you to color
up the background. This is completely optional, but the reason why
I like to do it in a composition like this
is so that the flowers stand out a little
more and so that they shine bright against
the dark background. You can also see that
I made a tiny mistake over here while coloring and I, by mistake, ended up going
inside the Mooka flower. But that's completely
fine because I can always go back in there
with a little bit of white paint or even a
white Jelly Roll pen and just color that section
white and it'll get hidden. With that, we come to an end to today's exercise
with Mooka flowers.
18. Day 14 - Mooka & YOU!: [MUSIC] Hi everyone and
welcome back to the course. Today we'll be completing
two full weeks of our lovely challenge and
since this is Day 14 I again decided to
challenge you guys with a partially done pattern
and I essentially want you guys to start getting
comfortable with the concept of strings and outlines as
we will be going forward. As a warm-up exercise
today I'm going to be showing you a tiny template and then you're going to be filling that template up with any of the patterns that we have learned over the last two weeks. Also fun fact I realized that I have not been using the
left side of my sketchbook at all and I think this happened subconsciously
because earlier when I used to fill up
my sketchbooks I used to write notes on the left
side and I used to draw the pattern on
the right side and without me even realizing
this I ended up doing the previous 30-day
challenge over here on Skillshare with all my drawings
on the right side and with no notes
on the left side. Essentially the left side stayed blank and that's exactly
how I've been doing the last two weeks of this
challenge as well but today I thought that I should start drawing on the
left side as well. For a change I'm drawing
over here on this side. Now coming to today's
template I'm going to be drawing a couple of
really large mucus over here which are almost going
to divide the paper into two sections and these are
not exactly halves so they are unequal sections one on top of the mucus and then
one on the bottom. Then of course you have an entire section within
these mucus as well. Now your job for
today is to fill up all of these
sections and basically form a composition of your own using any of the tangles
and the patterns that we have used over the
last two weeks or if you want to experiment
and you want to try some new patterns all
by yourself you're welcomed to do so but basically this is the exercise for
today and I look forward to seeing all your versions
and variations of this. I'm going to be showing
you my version of this template tomorrow when
we meet for our next lesson.
19. Day 14 - Reveal: [MUSIC] Hi everyone
and welcome back. I hope all of you
are doing well and are excited to continue
this challenge. Before we move on to our next
exercise, as I promised, I'm going to show
you how I finished up my page from yesterday. We basically started off
with a couple of mookas that helped us to create
sections on our page. For my first step,
I decided to go inside the mookas
and I filled up the entire section with flux and since fluxes
and organic tangle, I basically filled it up one on top of the other going
in random directions, but mostly facing
the top-right corner so that they're aligned
with the mooka. The next thing that I did was
that I added some dots or orbs on the mooka stem so that
it doesn't look so plain. I also covered up the entire
background behind the flux with black ink to increase
the contrast and the design. Of course, I added
the tiny circles on the second mooka as well to
match with the first mooka. Then I basically
sectioned out the paper, and decided to fill up the
bottom half with dividends. Then on the top-right, I decided to add doodles. I graded only one leaf
because I wonder if they're designed to look
slightly asymmetrical. I did not want to
use too much of the doodles tangle over here. For the rest of the empty space, I sectioned it off further by adding some holly bow lines. Then I went inside
those holly bow lines and I created some
rounding at the edges. Doing this step
also helped me to increase the contrast
and the design because there was more black
ink going on the paper and so it basically started to look a lot
more interesting. Finally, I decided
to add some fescue very similar to the way
we had done it on day 2. I basically put it at random
angles coming out from the corners of each of these holly bow
sections. That was it. That's how I finished
yesterday's exercise. Hopefully you've also finished up your exercise from yesterday, and I would love to see it
in the project section. In case you haven't finished it or if
you're feeling stuck, hopefully looking at my
work has provided you with some ideas or some
techniques that you can use. If you're still
feeling stuck and you want to discuss it further, you can always put a work in progress picture in
the discussions tab, and I'd be happy
to help you out. With that, we're ready to
move on with our challenge. See you in the next lesson.
20. Day 15 - A web of Betweed: Hi everyone, and welcome
back to the challenge. Today, we are going to
continue our journey further, and we are going to explore a wonderful tangle
called betweed, and we're going to
use that tangle to convert it into a wonderful web. Again, I'm going
to be drawing on the left side of my
sketchbook today. Because, as you can see, I have used my entire
sketch book while almost all of it
by filling it out, but with patterns from the 30-day challenge as well as some patterns from
100-day challenge, and I have never used
the left side at all. Today, I'm going to again
draw on the left side just so that I can keep my artworks all compact
in one place together. Now, coming to the tangle that we're going
to explore today, it is betweed, and I'm going to do a fun
twist to this tangle. The first thing that we're
going to do is basically draw five Cs and convert them
into this star-like shape. It's okay if some of the
Cs or those rounded edges are longer or wider
than the others. It's completely fine. I'm just basically using
a thicker nib to just darken out this
edge because this is going to be the
starting point of the composition that we
are going to build today. Now, the next thing
that we're going to do is create some straight
lines coming out of these pointy edges of this little five-C star
that we have created, and these are going
to be radiating out just like sun rays. It's okay. They're a
little bit wobbly. Just try to be patient with it and try to be as
smooth as you can. It helps to hold your pen from a distance and not hold
it too close to the nib, so then you will have a lot more control
over your pen and you'll be able to draw the
lines with a lot more comfort. Now, once you have all
of these lines placed, your page is going to be divided into five sections basically. The reason why I chose to
keep that five C shape slightly off-center
is just so that the composition looks a
little bit more interesting. We can, of course, do
the exact same thing with that star in
the center as well. But just to keep
things interesting, I thought it'd be nice
to keep it off-center. Now, the next thing that I'm
going to do is I'm going to go inside each of
these little sections, and divide them further by making triangles
inside of them. Again, these are not exactly
equilateral triangles. As you can see, I am basically just placing
them anywhere that I like and creating
these extra sections within the given
section already, and so some are narrow
and some are wide, and I'm basically just having fun by placing these
triangles randomly. Now, once the triangles
are in place, you will notice
that you will have some sections which
are again triangles, and then some sections
will become like this rhombus or squarish shapes, basically four-sided shapes, and we'll have a variety of shapes within the composition. We're going to be working with the triangular shapes first, and then we're
going to deal with the four-edged or
four-sided shapes later on. Now coming to the
triangle sections, let's take this biggest one, and we're going to fill
this up with betweed. The way it works is
that we basically take the bottom two
edges of the triangle, and we start by adding these curvy lines that land somewhere at the
edge of the opposite one. Then we basically
just keep going, alternate all the
way to the bottom. Now, you can of course make this thinner and
narrower as well. I'm doing them pretty
wide right now, but you can achieve more such lines by making
them thinner and narrower. Once you have all the lines done all the way to the bottom, the next thing that we do, is go to the curvy edge, and as you can see, I'm skipping the top
edge of the triangle, which is the outer boundary, so I'm not coloring that. But I basically come
to the first line or that first curvy
line that I had drawn. From there, my betweed
actually starts. That's where I'm adding a
little bit of this weight or this peppering technique
basically that we had learned while we were developing the tangle
called pepper, and so now this technique
is also called peppering. It's become quite popular in this entangle method
over the last few years. I'm basically just going
into those curves, adding the surroundings,
and coloring them in. Then we do the exact same thing on the opposite side as well. Now, today, since I have
a thicker nib size, I'm able to color this faster. But if you feel that
you're going to take a little bit more time
to finish this step, feel free to pause the video and then come back
once you're ready. Now what I'm going to do is, I'm going to take another shape, and this is where things
basically start to get interesting because we're now going to change the angle. We're going to take this thin
triangle now that we have. But this time, we are going to consider the top of the triangle to be in
a different direction, which means that the
bottom two edges are going to be these two. My betweed lines are going to crisscross at this angle now. I'm just going to retrace this one because
that didn't come out as neat as I had
expected it to be. Then I think I'm only
going to be able to fit in two such crisscrossing
lines over here because it's a
pretty narrow shape. Then I'm just going to add these surroundings
or the peppering, then I'm going to
come to this shape, and so this triangle
is already facing in a slightly different direction
than the previous ones. I'm just going to
take these two edges and keep adding the
crisscrossing lines, and just by filling up the
three shapes till now, we can see that the
entire composition starts to look like
a nice complex web. The interesting part
about this composition is that when you look
at it at the end, or if you show it to somebody who has not seen the process
of this composition, you generally feel
that it's very complicated and that there is
no beginning or end to it. Because it just looks like a whole mesh or a web of
interconnected lines. But once you actually
start making it, you realize that it was just a simple
step-by-step process that led to a complex result. Funny story, I
ended up developing this composition as the
result of a mistake, so I was working on this
entangled composition where I had lots and
lots of triangles. My plan was to fill
them up with betweed. But then I ended up drawing
a couple of the triangles wrong because I lost
control over my pen, and I think I just basically ended up messing up a
couple of the shapes. Then I realized that they turn into these squarish shapes, which could further
be divided into more triangles if I just played with some
lines over there. The next thing I knew, I got so engrossed in that
mistake of mine that it ended up leading to this
step-by-step web pattern, which now I use in a
lot of my artworks. It's funny how things just happen and then they lead
to such wonderful results. Now this edge that I
have on the right side, I'm just going to leave that
as is because I can come back and needing
that up later once I'm done with the
rest of the design. But I'm going to now come to this particular
triangle over here. As you can see now,
in this triangle, I don't really have a bottom edge at the
corner of the paper. I'm basically going
to draw two lines, and now my edges are going
to be these two corner dots that I have just established as the start of my betweed lines. Technically, this shape is almost like a
rectangle or a square, and it doesn't really have
a triangular edge to it. But I've purposely chosen to
work with these two dots, one which is already existent and another one
which is imaginary or created because of that line that I drew
from the right side. Now using those two lines, I'm going to build
up my triangle, and within that triangle, I'm going to fill up my betweed. Every time you land up
with a shape that looks almost like a square or a
rhombus or a rectangle, basically any four-sided shape, you can still use
betweed inside of it. If you just choose to work with three points instead
of four points, you just have to identify what those three points
are going to be. Now again, I'm just going to
add the weight over here. Then once I reach the
bottom of the betweed, I'm just going to leave that
extra space empty for now. That's going to remain as my negative space and I'm going
to come back to it later. Now again, I have this
squarish shape over here. Again, I'm going to
pick these two points as the bottom of my triangle, and so this becomes like my three-point shape that
I'm going to work with. I'm going to pretend
that my triangle is facing this way with
the top being like so, and I'm just going to draw a
couple of lines over here. Again, I have that little
odd space at the bottom, which is getting left out, so I'm just going to
leave that as is for now. Then I have this other shape, which looks like a
pretty good triangle, so I don't really have to imagine my three
points over here, they're quite easily visible. I can just create
my betweed easily. Similarly, I have now
this tiny section over here which is getting
left out near the center, and there's also a similar
one at the opposite side. I'm going to deal
with those later. I'm just going to try to finish up all the triangle work first. Now again, I have
this large triangle where I can choose
the direction, and this direction as
the top looks nice. I'm going to use this
to create my betweed. This is also completely opposite to the triangle which
is right next to it, so it's definitely going to add to the complexity of the design. Now sometimes if you feel that a particular area is very, very large you
might feel tempted to probably add another
triangle over there to create smaller sections and then add your
betweed further indoors, and that is also definitely
an approach that you can try. If you have a large piece
of paper, especially, and you feel that the number of triangles
that you have right now are not doing justice
to the composition and it's not looking
complex enough, you can definitely feel free to add more triangles and create even more smaller sections and build your betweed
web inside of that. Really just feel free to customize the process
to your liking. Now I've got two of
these shapes over here. I'm going to take
this triangle first. Then again, I have almost like a four-sided
shape over here, so I need to pick
my key points for the triangle and the
direction in which the triangle is going
to be facing North. For some reason, every
time that I'm working with betweed it reminds me
of tents and canopies, especially if I'm developing a complex composition like this, and it has a lot of
straight lines and then triangles and
these coby depths. I am always reminded
of camping tents and just the way they stand
with those rewards and the tents over it. I don't know why, but I'm
always reminded of them. The funny part is that I've
never even been camping, I have only seen lots
and lots of pictures of camping tents on
social media sites, and I keep saving them, hoping that someday I will go to a camp
site and have fun. I think that's just so
embedded in my head that now every time that I'm working on compositions
like this, I am reminded of them always. Now coming to all of these
empty areas that we've left, you can fill them up
with more betweed lines, or you can add
curves to them and then put in some weight at
alternate edges, like so. The reason why I'm basically
adding these scopes at some of the outer shapes as well as some of the inner ones, is just so that the whole composition
looks a lot more complex, and there's almost like an optical illusion
that's forming over here. You can't really make out where exactly the composition
begins and where it ends. Everything looks as if it's
getting tucked beneath the layers of the shapes
that are around it, and so you can't really make out what's on the top and
what's at the bottom. While I'm adding these
new lines and roundings, I'm also looking at
all the lines nearby, and as I'm progressing, I'm constantly retracing, fixing, correcting some
of the previous lines, just to neaten out the edges and make the
composition look sharp. Now, with all the line work
and the rounding stan, we come to an end to
today's exercise. If you feel like you want to
add more details into this, you are free to use any of the patterns that we
have learned so far, or even any new patterns
that you come across and use those to fill up all
these spaces over here. You can customize the design to your liking and you can build further on it anyway
that you like. Tomorrow, I'm going
to meet you with yet another
interesting exercise. Till then, keep creating.
21. Day 16 - Fun with Firecracker: [MUSIC] Hi everyone and a very warm welcome back
to the challenge. Today we're going
to be working with a very interesting tangle
called firecracker, which starts off with a
simple channel-like grid, and then you build further on
it by creating subsections. Now to create the channels, all that we need to do is
just create some wavy lines, and as you can see, each of them are different in
terms of thickness, so not really paid attention
to making them all equal. You can of course create the sections with
equal width also, both of the techniques
are correct and they give a different visual appeal, so anything is fine. Now we come to the first
channel over here, and we start to divide it into small sections by putting
in these curvy lines. As you can see again over here, I'm not really paying
attention to the thickness, so I'm just making
some of them thinner, some of them thicker. I'm purposely trying to keep almost like an abstract
field or this whole design. Now the step out for
the original tangle, which has been developed by Suzanne McNeill includes all of these sections
as equally sized. But I'm basically taking a
few liberties over here, and I'm just having fun with the tangle and just adding
some of my personal touches. I prefer to have these
sections unequal, and that's why I'm
creating them like this. [MUSIC] I'm also
going back to some of the channels and just making even more small,
narrow sections. Just so that there is
some visual variety in each of these channels, and so that they all
look interesting. Now once you are happy with the sections that
you have created, we come back to the first
channel or the first row, and now we start filling
this up with the pattern. However, now what I'm
about to do over here is going to be different
from the original tangle. In the original tangle, we basically have
small triangles in one of these sections, and then we have straight
lines and the next one, and then we have a plane one, and then so basically they are
like in the sets of three. We have triangles, straight
lines, and then plane. Then triangles, straight
lines, and plane. But over here what I'm basically doing is that I'm
coloring one of the sections black and then
I'm moving to the next one, where I'm creating these
small, curvy, U-shaped lines. Almost like a lace or a frill hanging out from
the previous section. Then I'm putting the straight
lines into the next one, and then I'm leaving one blank. I'm basically following a
slightly different approach as compared to the original
tangle step out. Now coloring the sections
sometimes takes a little bit of time and it distracts me
from the drawing process, so one of the things that
I like to do is that I just basically put a
small mark over there, which helps me
remember later on that that's the blob that
I need to color, and then I just
basically continue with the drawing process. That little mark basically just stays there as a placeholder. Now once I'm done with
the first channel, I'll come to the second one. In the second channel, I'm going to start off
with a plane section, then I'm going to do
some diagonal lines, and then I'm going to
put in some triangles at the bottom of the section, forming a little border. Then again, I'm going to leave one blank and repeat
the exact same process. You can do this in any
order that you like. You can either put the lines first and then come back
and do all the triangles, or you could go with
each section at a time, whatever makes it
easier for you. Now with the second
section done, I'm just going to finish the coloring of the
first one as well, so that you can see them
both together as a pair. Now once both of these are done, we're just going to repeat the exact same process in the other two sections
also that we have, so we're going to basically
repeat them in sets of two, but while doing so, we're going to do some minor
variations in the designs. What I mean is that
I'm not going to do the exact same pattern or the exact same order in the next channels that
I have empty with me, but I'm going to use
similar elements. As an example. I'm going to start off by coloring the first
section black, but now in this case, I'm going to make my curvy
lace facing the other way. Then I'm going to add
my straight lines, and then this time I'm basically not leaving any section blank, and I'm straightaway
going to the next one, coloring it black and repeating
the exact same process. Even though the design
elements are exactly the same as the first channel
that we had created, I have made slight tweaks
and variations to it. Using the exact same elements, I have still managed to change the look of this
particular channel, and I have not left
any section empty in this one [MUSIC] Similarly, now when I come to
my fourth channel, I'm going to make my triangles
facing the other way, and then the next
section is going to have my diagonal lines facing
the opposite direction, opposite to the diagonal lines that we created in
the second channel. Then I'm going to
leave one section blank after the diagonal
lines are done. Again, it's the exact
same elements or the same geometrical shapes that we used in the second channel, just that I have changed
the positions and I have changed the orientation
of these fillers. Then for the fifth channel, I'm going to start
with straight lines, do my lace as a border on the
upper side of the section, then I'm going to
color one black, and I'm not going to leave
any section blank over here. I'm simply going to go ahead and start doing the
straight lines again, and then the lace again, and then again, I'm going to color this section black and repeat the
exact same process. It's interesting to note
that even though we have the exact same
geometrical elements or the exact same design elements
throughout the design, we have just changed their
positions here and there a little bit and that basically changes the look of
each of the channels. Even though individually they're all different from each other, they all share
certain similarities, which makes the whole
design very cohesive. This is actually one
of the easiest ways to bring variations in a design. Every time you feel
that your design is starting to look a
little monotonous, you can simply switch the
orientation or change the order of the design elements and place them in a
different direction, and that will automatically spice things up and bring
in some visual interest. Now of course, the
design variations that I have done today over here using this channel grid and the firecracker
tangle are basically just my improvisations
to the original tangle, but you are free to do your
improvisations as well. You probably might have more
ideas or better ideas than me as to how you can
customize this tangle, and you're free to try
out your designs as well. If you want to create your
firecracker repetition in sets of three
instead of sets of two, or in pairs the way I
have done it today, you're free to try that as well. Whatever variation or version
you choose to work with, make sure that you put that in the project section so that
I can have a look at it. The best part is that, since each of you will
be coming up with your own versions and
variations of this, when you all put your projects together in the gallery section, you will basically be
inspiring other artist, and you will also get
inspired by other artist because there'll be
this whole library of new patterns that will suddenly bloom in the project section once all of you
share your ideas. Now, with the last
one, as you can see, I'm basically just
putting diagonal lines, keeping one block empty, then doing triangles facing
in the top direction, keeping another section empty, and then basically doing
that exact same repetition. With this, we come to an
end to today's exercise, and like I said, I
look forward to seeing all your versions and
variations of this tangle. Tomorrow, I'm going
to meet you with another interesting exercise
to continue our challenge.
22. Day 17 - Crescent Moon: [MUSIC] Hi everyone
and welcome to day 17 of our creative challenge. Today, we're going to
be working with one of the most classic
tangles of all time, which is crescent moon. Crescent moon basically
starts off with the semicircular shapes at
the edges of your paper. Now, today we're actually
working on a dual tangle, which basically
means that we'll be working with two tangles. The first one is going
to be crescent moon, and then we're going to combine
it with paper later on. Now, as you can
see, I'm basically placing these
semicircular shapes at the edges of my paper and some of them haven't
turned out to be very neat, but that's okay because we're going to be
coloring these later on. But we basically just
start by placing the shapes and then we're going to build
up further from there. Now, I'm just going
to color these up quickly and show you what it looks like once the first stage of
this tangle is done. Now, once you have colored all of these semicircular shapes, the next step would be to build an aura around
each of these. An aura in the
Zentangle terminology basically means an outline
to an existing shape. I'm basically taking
my thin micron pen and just adding these
outlines around the shapes. Now, you can see that
I have spaced out my semicircles quite a bit on the top and the bottom edges, but I haven't spaced them out so much on the left
and the right edge. That's because I personally
like to have them slightly uneven and slightly
asymmetrical, but if you are keen to make the tangle exactly symmetrical, then you can also make all of your semicircles
equidistant from each other on all
the four sides. Now, the next thing that
we're going to do is keep building further on these auras. The first couple of
auras are going to be very easy because they're simply just going to
outline the previous ones. But as you go ahead further, you will realize that
these auras will start meeting each other
or that they will basically start
coinciding with each other at some points
on your paper. When that starts to happen, we basically just merge the curves and convert
it into one large shape. Now, this point our focus
is to basically keep on building these
curves layer by layer, and even if you make a couple
of mistakes here and there, it doesn't really matter
because whatever next curve that you're going
to make will simply match the boundary
of the previous one. It will eventually become
a part of the design and your mistake won't really stand out so much as a mistake, it'll just get merged
with the design and nobody will really be able to make out
that it's a mistake. Just breathe easy,
take your time, and do these curves as
slowly as possible. Even if a couple of
them turn out to be slightly thicker
than you wanted them to be or if they are not as symmetrical as
you expected them to be, it's completely okay because
at the end of the day, this is a handmade piece of art and some amount of imperfections are always
part of the process. So don't be too hard on
yourself and enjoy the process. Now, as you go further
somewhere on the corners, you will also notice that it will start to appear
as if a couple of the curves are overlapping
the other curves and so some will
start to appear on the top and the others
will get hidden behind. We're just going to
basically continue making these curves in an
overlapping manner. Finally, once you're
almost at the center, we're just going
to do a couple of these auras in the middle
of the paper as well. Finally, we will have
this hollow space inside which we are going
to fill up with pepper. What we're basically going
to do is that we're going to place the small
horizontal dashes, which is the first
step of paper. Once we have those dashes, we're going to extend the
lines towards the center. Again, the trick to getting a good pepper center is to
know where exactly to end your lines so that the space inside stays clean and hollow. Then we just go back
to the edges and add the roundings or the weight at the
edges of the lines. Once you're done with paper, the next step is going to be
to add some contrast or inky details to the outer
crescent moon lines that we have created. My favorite technique
is to go alternate, where I basically color
some sections black and then I leave the
alternate ones white, almost giving like
a stripe effect. But today, I think I'm going to also play with a little
bit of mark-making. I'm going to color
some sections black, but on some of these
semicircles I'm going to add tiny dots or other little
details which are basically just going to bring
in some visual interest. Now, these steps are
completely optional, and depending on how closely you have drawn
the order lines, you might feel that
your crescent moon is looking quite detailed already, or it might be looking
more intricate than mine. If that's the case, then you probably
don't need to add the detailings and you can skip the coloring and all
of these other steps. But if you feel like you
want to add some details, then you can add any of the patterns that we have
used so far or you can come up with new interesting
mark-making techniques and add some little
details here and there. You're free to customize the design in any
way that you like. With this, we come to an
end to today's exercise. We will be using
crescent moon again at least a couple more
times in this challenge and I thought it would
be a good idea for me to introduce this in a simple
and easy manner today, so that when we include it
in compositions later on, it's easy for you to identify the pattern and
follow the steps. Hopefully, this exercise has given you a good
warm-up on this tangle. With that, we come to an
end to today's lesson. Tomorrow I'm going
to see you with another interesting exercise
to continue our journey.
23. Day 18 - Marasu & More : [MUSIC] Hi everyone and
welcome back to the challenge. Today we're going to
be working with a wonderful tangled called Marasu, and then we're going
to be combining it with another tangle
called scallops. Both of these tangles
have a rounded, curvy nature to them, and they go together very well. They're complimenting
tangles and I find them both to
be very interesting, which is why I end up using them together a lot of times
in a lot of my artworks. Now to begin Marasu, we basically start off
by drawing a spiral. Now, once I have this
spiral in place, I'm going to go in
with my pen and start to make a small
sections like so. These are basically
sections with curvy lines, and I'm basically placing
these curves in pairs. Two curves basically
make one unit. I'm also trying to
place them in a way that the curves on
the outer rings of this spiral do not touch the curves of the inner
rings of the spiral. They're going alternate, fitting in between
the empty spaces of the curves of the previous line. Now once you have placed
all of these curves, we're going to take
a thicker pen, and we're going to
go in and color these little sections
that we just created. After the colorings are done, the next step is going to
be to take our thinner pen again and to basically go back and add some other lines to these curves at the top
as well as the bottom. This is the reason why I spaced out my curves
in such a way that they don't touch
the curves of the previous in our
rows of the spiral, so that they all stand
out alone, independent, and they don't really marge with those sections of the previous inner circles of the spiral. That's why I space them out. With that, we finish Marasu. Now, the next thing that
we're going to do is work with another tangle
called scallops. Our scallops is a
tangle which can easily be stacked one
on top of the other, so you can keep building
further and further on it with no stopping
point really, and you can literally just
keep billing it to infinity. But today we're only going
to do one row of this. Basically, as you can see, we start off with
some semicircles, and then we go inside each
of these with an inner aura. Then we leave a little bit
of gap, and we come back, and we add three
more semicircles towards the bottom edge. Again, keep rotating
your sketchbook in order to get the
best possible angle. Once you're done
drawing these curves, we go to these empty
spaces that we had left between the outer
auras and the inner auras, and we start to fill
them with lines. Now I'm currently doing
them as straight lines, almost like sun rays coming
out of a center point. But you can also do
them as curvy lines, and even they look very pretty. Finally, we go inside these innermost shapes and
just color them black. That's how we get one
full row of scallops. Now, as I said, this tangle
is a stackable tangle, so you can keep building
further and further on this. But I have a little
challenge for you today, which is to come up with an interesting technique to
fill the rest of the space, which is not scallops. I want you to try to
challenge yourself and come up with a curvy shape or a curvy design that
complements all of these circles and curves that we have just drawn on our paper, and think of an interesting
way to fill up this space. Basically, this is like an
exercise and design harmony. I want you to try and stay away from shapes that
have sharp angles, such as squares and
rectangles or triangles. Try to basically work with
some curvy wavy pattern that complements these two
tangles that we've just put in over here and fill up
the rest of the space. I'm sure each of you
will come up with a lovely way to finish up
this empty space over here, and I look forward to seeing all your versions and variations
in the project section. Tomorrow, I will also show
you my completed page and the pattern that I
have chosen to finish up this empty space over here. Until then, keep creating.
Have a good day.
24. Day 18 - Reveal: [MUSIC] Hello everyone and
welcome back to the course. As promised, before we move
on to our next exercise, here is my project
from yesterday. I actually didn't end up doing a lot of detailing on this one. I first divided all
the empty space into small sections using
these curvy lines and I made them into
thick strips of black, and then I went inside each of those sections and I did lines. Then on the alternate ones, I put in these flux leaves. The idea that I was
going for over here was imagining Amaterasu to be
like a really big flower, and the scallops
to be the petals. Then I thought that
the flux would look like pretty little leaves
in the background. I imagined this
whole thing to be in a garden floral like wybie and that's why I went
with these patterns. Of course, it helped
because flux also has a curvy nature and it went in very well with the
scallops and Amaterasu. That was it, that
was my exercise from yesterday and I look forward to seeing
all the versions and variations that you
will come up with. With that, we are ready to
move on to our next exercise.
25. Day 19 - Nanalee Improvisation: [MUSIC] Hello, and
welcome back to Day 19 of our creative challenge. Today we're going
to be working on a mono tangle project again. The tangle that I
have chosen for today's exercise
is called nanalee. Nanalee is a wonderful tangle
inspired by banana leaves, and it has this very
nice luscious playful, bouncy quality to it, which I totally love. I thought that this would make a very good exercise for today. The way the tangle works is
that we start off by making a stem very similar to how
we make our muka stems. Then we just basically
go around it, making a wavy leaf and connect it to the
bottom of the stem. Then we go inside
and we start to add these thin lines very similar to the veins
on a banana leaf, and these are not
all equally sized, and they also don't really have a specific pattern to them, so you can go random in
terms of placing these. Now once these little
veins are done, that's pretty much all
there is to nanalee. However, in my usual style, I like to add some details, and so every once in a while, I like to make some
tweaks to the tangles. For this one, I like to
basically go back to those veins and put in
tiny little dots over there just so that it has an ornamental quality to it and it just looks
more decorative. Again, these decisions
are very personal. If you're the person who
likes to have tangles, looking like real-life
objects or you'd like them to be representative of the
source from where they came, then you can totally
skip these steps. But I like to push my
boundaries and I like to add some fantasy elements or some unrealistic abstract
elements to all my tangles. That's how I ended up with
this variation of nanalee. I also like to go back to the centers and color
those stems black, just so that it
increases contrast. In my usual style, every time that I draw a leaf, I basically go back
with a thicker pen and add some curling edges just so that they increase
contrast and make it appear as if the
leaf is curling. That's how I do my nanalee. Now for today's exercise, I'd love for you to apply the Hollibaugh
technique with nanalee. When I say the
Hollibaugh technique, it basically means that we
overlap with the tangles, and we keep some on the top and we keep
some at the bottom. I'd love for you to keep
rotating your sketchbook and keep creating many
such nana leaves. Once you've placed
all your leaves, then go back and add the little details
and basically just have a conversation
with yourself and see the details that you like. Try and take some
inspiration from real-life objects or
things around you and just try to incorporate
some ideas over here and see what all versions of nana leaves you come up with. I'd love for you to try this as an improvisation exercise and show me all the different variations that
you come up with. Once you have them ready, make sure that you
put them up in the project section so
that everyone can see your wonderful variations
and so you can also see the variations
put up by other students. This way we'll all
collectively be able to build a wonderful library of
variations from a single tangle. That's it for today. Tomorrow, I will see you with another
interesting exercise, which is inspired by sea life.
26. Day 20 - Mystery Eggs & Tearce: [MUSIC] Hi everyone and
welcome back to the challenge. Today, we're going to
develop a composition which is inspired by sea life. There are a couple
of tangles which I have been playing
with for a long time. Every time I work with them, they remind me of sea life and sea creatures and
different coral reefs, sea plants, sea weed,
and stuff like that. Today I thought we develop a composition keeping
that idea in mind. Now the tangle that
I have chosen to begin with is called
Mystery Eggs. The way it works is that
we start with a small oval and then we basically just drawing order towards
the bottom of this oval. Then finally we create a
plump body at the bottom by just going a little
below that order and making a semicircle like so. Then we come back to that
first oval and we color most of it black but we
just leave that one little section white, which is to act as
like a sparkle, and so that serves
as a highlight. Now, we're going to
be making a bunch of these Mystery Eggs in the
center of our page today. You can keep the composition slightly asymmetrical as well. If you want the whole
bunch to favor more towards the left
side of your page or the right side of your
page, that's fine too. Or you could choose to keep
it exactly in the central. Anything works. Now as you can see, while I'm drawing these eggs, I'm basically playing around in terms of the
orientation as well as the size so that the whole bunch looks
interesting together. They almost have this
very alien quality. Apart from looking
like sea plants or some organic creatures
found under the sea, they also remind me of
futuristic gadgets or probably maybe some
extraterrestrial creature has eyes like these, or maybe there are some plants on some other
planets which looked like this. There's a very futuristic
space like web also to this. I also use this design often in a couple of
my designs inspired by galaxies and just general stars and stuff
from the universe. I like how versatile
this tangle is. Now once you have a nice
bunch of these on your paper, the next thing that
we're going to do is add some details. Now there are many
different ways that you can add details on these. I have done stripes, I have done a small dots, and I have done small
hearts inside of these. I have also done little fescue
shapes inside of these. There are many different
variations that you can do. But for today, the filler
that I'm going to use is going to be these
little tiny dots. I'm just going to use
these on the edges of the eggs just to
add some texture and interests and to again give them that little alien-like
or plant-like quality. Then once you're
done with the dots, we're going to move
on to the next tango, which is called tearce. Now, tearce is a tangle which
moves in a radial manner, but I'm going to use it
slightly differently today. It starts off by making these thin ribbons
which are coming out of your focal point or
they could even just be a filler on a plain
piece of paper. Then we basically just
keep coloring them to make them thick strips
or thick ribbons. Then according to the
step out of this tangle, you basically draw these
thin lines coming out of it. Only on one side of the tangle, which I think they've
referred to as the hair, which is coming out
of this tangle. Very similar to how we did
the centers of the Nana Lee. But I thought that it
would be interesting to do the hair on both
sides of the ribbon. Instead of doing it on one side, I thought it'd be nice to
do it on both the sides, just so that it adds a
little more texture. They almost look like little
fiber threads coming out of these strips or ribbons. The ribbons themselves look like little tentacles coming
out from behind the eggs. Now, the next thing
that I'm going to do is use a little bit
of fescue over here. Again, this just goes to say
how versatile fescue is. Not only is it a great
tangle to use in any floral composition
or anything to do with a botanical or a floral theme but it also works
very well when you're using it in these underwater
inspire teams as well. Because it has this nice
tentacle-like quality to it. I'm just making a
few of these around. Now, once you're happy
with the fescue, you can also draw
some bubbles around, which can be like
tiny little circles just to give it an
underwater vibe. You can also fill it up with a few more dots of
different sizes, just so that the
whole composition looks full and interesting. But again, as always, this is an optional step. If you're the person who prefers nice clean backgrounds and you don't like too much of
details in the background, then you can leave it plain
as well so that the eggs and the tentacles that we have drawn standout a
little bit more. With that, we're done
with today's exercise. If you end up trying
any different versions or variations with
these tangles, I'd love to see them. In case you feel
stuck somewhere, make sure that you
put up your questions or your queries in
the discussions tab, and I'd be happy to
answer them for you. Tomorrow, I'm going to see you yet another
interesting exercise, which is going to be
on improvisation. Till then, keep
creating. [MUSIC]
27. Day 21 - Phone Cord Improvisation: [MUSIC] Hi everyone and
welcome back to the challenge. Today we're going to do yet another improvisation
exercise and we're going to start off by making
some curvy lines like so. Recently while I was developing anesthetic journal
spread for myself, I came across this picture
with old telephones and I saw these wonderful vintage
telephones with phone cords. Somewhere in the
'80s and the '90s these landline phones used
to be very popular with lovely spiral phone cords
and so I got inspired by that little curvy nature of it and I thought I'd convert
it into a pattern. I basically did a little
brainstorming exercise and I realized that this curvy
rope that we're doing right now can be converted into so many different patterns by just adding few details
here and there. Just to show you a
couple of examples. For the first one, I thought
that I'd color all the loops black and then I went back and added
some dots at the edges. Then this turned out to be a beautiful ornamental border that I thought would look
very pretty on greeting cards or any DIY project where I can put in some ornamental
designs and probably even color it with some metallic
colors like gold or silver and I thought that this would look really
pretty over there. So this was one of
the first variations that I came up with. Then I also thought that
these loops reminded me of little pendants or little gems hanging from a
necklace or earrings. Then I thought it'd be nice to sort like a curvy
shape around it, almost like a little
frilly border around it and then that led
to another variation. Then coincidentally
while I was making these variations in the
background of my TV goes on with news playing on it and it just so happened that during the time
of filming this class, the Miss Universe
Pageant was happening and India happened
to be the winner and so they were basically doing this feature on all
the different crowns that all Miss Universe women have worn over the
last few years. Then this variation
basically came after I got inspired by looking at one of the
crowns from there, which was I think the
Mickey motor crown. This was one of the variations
that came from there. I basically just played
around with a lot of different variations
and I decided to show you a few of
these in class. But basically you are
free to experiment with any other variations using this little phone cord
template that I have designed. This is basically like an
improvisation exercise like I said and I would
love for you to try and get inspired by
things around you and use them creatively
in your pattern. Later on at some point when
you refer to your sketchbook, this will serve as a
good resource for you to build borders or even
more patterns in the future and this is a good way to keep all your
things together at one place. I would love to see all
your versions when we meet tomorrow for our next
lesson and of course, as always I will also show
you a few more versions of mine and I hope you enjoy
doing this exercise till then.
28. Day 21 - Reveal : [MUSIC] Hello, and welcome back. As promised, here is my finished
exercise from yesterday. I wanted to include a lot of different ideas
on the same page, which is why I ended up doing
them individually instead of trying to do them as strips. These are all my completed
patterns from yesterday. I definitely like the ones with the frilly lace and even this version
when I tried to do a little bit of fescue inside. I am not very sure of
the one where I did a heart and then I did a little thick border around it and then I added three dots. This was actually inspired
by the design on a cookie. [LAUGHTER] I'm not really
sure I like this one, but it's good to have this as a reference for later on if I want to improvise
on this further. I do like these too. This one was inspired by
looking at some Easter eggs, and this one was inspired
by looking at a list again, which are these spiky borders. These two definitely
are something that I see myself
using in the future. This one, I had already shown you guys yesterday and I tried a variation of this
where I thought I could turn those spikes, all those little
sticks into curves, very similar to fescues and so maybe this is also
something that I will use. Then I tried a couple of versions where I
thought I could treat the teardrop shape as a flux and then I tried
to do the echoes. I did one facing south and the others facing north and
I think they're quite nice. Maybe I can do a little bit more finishing and
polishing to these, but overall, I think
they are quite nice. This one was just
a random thing. I thought what if I tried to do phone calls inside
as well as outside? I like tiny ones because the whole thing is inspired
from a phone cord, so I thought what would
happen if I included phone cords in and out as
well so this one was that. I don't see myself using
this a lot because it's a little more doodly and it's a
little more animated. But still, it's good to
have it as a reference. This one is inspired
by loose threads and so during the process
of filming this lesson, I'm also indulging in a little bit of
embroidery on the side. I had a lot of embroidery
threads around me and then this one just came
as an idea out of that. I think I was going for
a loose threads wave, coming out of a central
gem or a center piece. This idea came from that. Then I try to do
another variation of it where I did not
do the threads. This one's also okay. This one was honestly
inspired by Sunnyside out, just eggs on a banner. But it also reminds me a little bit of the
curvy nature of nano leaves and so that's
how this came to be. But I'm not really
sure I'm going to end up using this,
but like I said, it's again fun to just do
all these activities and just keep design ideas
for future reference. Then this one was
again inspired by hearts and this one
was just reverses. Out of all of these
that I have done, I definitely like the ones which have a slightly more
ornamental wipe because I see myself using these in combination with
other patterns. The others are slightly
more doodly and slightly more animated
than my usual style. But I didn't really
mind doing this as an exercise because
these are good for days when I do want to push my boundaries
and I want to work on slightly more animated
design so these will be good as a reference
for that time. These are all my
ideas from yesterday and I look forward to seeing
all your ideas as well. If you have any questions, feel free to put them up
in the discussions tab. With that, we are ready to
move on to our next exercise.
29. Day 22 - Gra-vee Bubbles: [MUSIC] Hi, everyone and
welcome back to the course. In today's lesson, we're
going to be developing yet another abstract
composition using duo tangles. Today's project is again
a duo tangle project, and the tangles that
I have chosen to work with are gravy and bubbles. Now to begin gravy, we start off with a wavy
line somewhere on our paper. It doesn't have to be exactly the same way as I'm doing it, you can do it in any other
direction that you like. Then we're going to
crisscross this line with another wavy line but notice the difference
between the two curvy lines. The second one is more like
a roller coaster ride, you can see there are
a lot of dips and curves in this line as
compared to the first one. Also my line has got a little
bit jittery towards the end but that's okay
because we're going to fix it in just a few moments. In case you also end up having
a slightly jittery line or you're not very happy with the shape right
now, that's okay. The reason why I say that
we're going to fix this is because we're
actually going to come back with a thicker pen, and we're going
to accentuate all of these dips and curves that we just created by going inside of them and
coloring them in. The idea over here is that
the most wavy parts of this new line that you have just drawn are going
to be colored in, and they're basically
going to accentuate those little curvy crevices and those little dips and
bumps that we've just created. That's how we basically
develop this gravy tangle. Now you'll probably notice
that the tangle is quite forgiving in that sense because when you're
doing this step, you're actually
getting an opportunity to fix some of those curves and you can actually
play around in terms of the thickness of these
little colored sections. Even if you ended
up drawing a line that you weren't happy with in the beginning, for example, the way I messed it up a
little bit towards the end, you can still go back and you can smoothen out the lines by adding these little
colored sections and it'll all get blended in. Now once you are done
making this first ribbon, we can move on to making more
such ribbons on our paper. The number of ribbons
really depend on the paper size that
you have with you. I think, I'm just going to
add one more over here and leave the rest of the space empty to fill up
with another tangle. But you're definitely
free to add more if you feel like your paper
is bigger or if you want to increase contrast in your composition and you want to have more of this tangle, you're definitely
free to do that. Now as always, the
coloring process can take a little bit of time so if you feel like
you want to pause the video and then come
back once you're ready, feel free to do so. Now once our gravy
ribbons are done, we're again going
to take the thin pen and we're going to come back and add another tangle
over here called bubbles. Bubbles basically starts off with three concentric circles, and you can make these
circles of any size. Once you have the three circles, we go inside the first one, and we just basically make a tiny C-shape over there and
add a little bit of color. If you notice that little
sectioning that we just created inside the bubble
to fill up the color, it's very similar to how we
have been sculpting all of these little dips and humps of the gravy ribbon until now. It's very similar to that. Again, even though
this entangle method or this entangled inspired
art is supposed to be non-representational and it
is not really supposed to be representative of a
particular scene or a particular plant or an
object or anything like that, I still feel that these two tangles basically remind me of ocean waves again, and they remind me of
electric currents, and they remind me
of water in general. That's why I like to take
both of these tangles together every time I'm
working on a project, I think they compliment
each other very well. One of the things
that I also really observe when I'm
selecting my tangles for a particular project is to observe the strokes
in each of them. If two tangles have
similar strokes, or if my hand movements are going to be similar
in both of them, then I know that they're
going to work well together. Now you don't always
have to use tangles in the exact same way as
they're given in step outs. Now after I've drawn some of these concentric circles and I'm happy with the way I
have used the bubbles, then I'm going to
basically just extract the innermost circle and
add a few more orbs around, which are just like zoomed in versions of the
innermost bubble circle. You can see here
in these circles, I'm not adding the outer
concentric circles. I'm not adding the outer
[inaudible], basically. I'm simply just
using basic orbs and just adding that little
C-shape in the center. You can always extract parts of a particular
tangle and use that as a fragment separately as a filler in your designs, just so that the whole thing is balanced and everything is
in harmony with each other, you're definitely free
to do that as well. Now to fill up the
composition more, I'm going to add a few
more hollow circles and then I'm going to add a couple more tiny
dots here and there. I'm also going to add
some black orbs so that there is a balance between the hollow ones and
the black ones. Basically I'm just going to randomly place these
all across my paper. Then once you're done with
the dots and the orbs, we come to an end to
today's exercise. From a distance when you
observe this composition, I don't know why
for some reason, it reminds me of jellyfish legs. It's almost like
this is a zoomed in version of jellyfish
tail or jellyfish legs. There a lot of these
water bubbles around, probably it's just in my head, it's my imagination but
you're free to think of this composition as anything
else that you'd like. If you do come up with any
other interesting ideas on how to fill up the rest
of the space or if you do any versions of
variations then I'd love to see them in
the project section. If you have any
questions as always, drop them in the
discussions tab, and I will see you tomorrow with another exercise
on improvisation.
30. Day 23 -Fun with Doodah!: [MUSIC] Hi everyone.
I'm back with another interesting
improvisation exercise for today and the tangle
that we're going to be playing with today
is called doodah. It is a lovely, beautiful ribbon
tangle and it is so versatile that it can fit literally into all compositions. The way that we're
going to be doing this is that we'll first study the original tangle
and then I'll walk you through some tips and tricks on how to create variations for it. The first thing that
we're going to do is we're going to start by placing a line and it can be very curvy straight
however you'd like it to be. We're basically just making a ribbon and then we're going to go inside the top and the bottom borders
and add the auras. Almost like a little banner. Then we go inside and we start to make these vertical lines. Notice how each of the lines are not touching the opposite edge. The length of each of the
lines is almost the same, but they're not touching
the opposite edge. Now you can do this in
any way that you like, so the method that
works best for me is to finish off the
lines for one side first and then rotate my
sketchbook and do the lines of the other side after that so really you can just follow any process that makes
it easier for you. Once you have all
the lines in place, that's pretty much it. That's all that doodah is about. It's a beautiful,
versatile tangle, which is quite classic
and it's quite elegant. But like I said, we're
going to be doing this as an improvisation exercise today. One of the things that I
like to do is to go back on the tips of these lines and
add little shapes over there. As an example, I'm putting
these small little squares, which I think adds a little bit of value to the whole tangle. You can of course, change this
to tear drop shapes or you can change them to circles
or even little hearts, so that's one way to approach this tangle and add
some variations to it. Then now to show you
the second variation, I'm going to draw another
doodah border right under this one and
just to save space, I'm basically using
the bottom edge of the previous ribbon and reading that as the top
edge of this ribbon. Basically that line in
the center is being shared by both of these ribbon. Now coming back to
the improvisations, the other thing that
I really like to do with my doodah ribbons is to go back at the bottom edges, and to add these little
round things over there and convert them into small, little rounded triangles. I think by now you can probably tell that
the reason why I like this technique a lot
is because it comes from one of my favorite
tangles of all time, which is paper and I'm
obsessed with paper, so no wonder that this
was one of the variations that I ended up using. Like I said, this is going to be an improvisation exercise today. I would like you
to further section out your paper and
divide it into these ribbons and basically fill them up with
the doodah tangle. But while doing so, I want you to take
inspiration from things around you,
objects around you, or any other ideas
that you have and basically just put them in over here and improvise on this given template and see what all versions and variations
you come up with. Now it's a good idea to
remember that the trick behind improvisation is to not let the tangle lose its
original structure. When I look at it later on, I should be able to make
out that it was doodah and you basically just
added some elements to it. The original tangle
should not get lost in the versions and
the variations that you create and it should still be visible through all the little design improvements that you do. It should not really lose
its identity, so to say. That's one of the
ways to go about your improvisations
and to remember not to go overboard with them and simply just add artistic
touches here and there. That's it for today's
exercise and as always, I'm going to show you
a few more examples when we meet tomorrow. I hope you'll have
fun hunting for design inspiration and doing improvisations on this tangle. I will see you tomorrow with
another wonderful exercise.
31. Day 23 - Reveal : Hi everyone. Here is my
exercise from yesterday. Again, I wanted to
include a lot of design variations
on the same page, so I ended up doing
them half and half, and I didn't really do
them as individual strips. For the first one it was
actually pretty simple. I just put in a few dots, and then I tried to put
an infinity symbol a little above the bottom
edge of each of the sticks. For the second one,
I just tried to put some semi-circles, and I tried to put
them in a way that they don't really
touch the sticks, so they are at opposite edge. For the third one, I
put in a few dots, and for the fourth one
I tried to do like a reverse C-shape again. For the fifth one, I
tried to do a little bit of a spike feeling. This was inspired by looking
at an Aztec pattern. And so I tried to do it with a little triangle on the
top and I made sure that the lines are double and they look like a
little arrow now. I like this. I definitely see myself using all of these
patterns and all of these design variations in combination with other tangles. In fact, for the semicircle one, I think it might also
look nice with an aura. This is something that
just came to my mind, so I'm just going to
quickly draw this. If I just put a little aura
above that semicircle, I think that would also add
to the value of the design. I think this also definitely
looks like a nice variation. I just have to be a little
careful to make sure that the semicircle is not touching the opposite end of the stick. There is a little bit of gap between the stick
and the semicircle, but all in all I think this is also a design
variation that I like. These are all the
versions and variations that I came up with yesterday. I still have a little
bit of empty space. In case there's anything
new that I came up with during the course
of a challenge, I will definitely add it over here and share
it with all of you. Meanwhile, I also look
forward to looking at all your versions and variations
in the project section. With that, we're ready to
move on to our challenge.
32. Day 24 - Tunnelvizion + Emo Ball: [MUSIC] Hi everyone
and welcome to day 24 of the challenge. Today I'm back with two interesting tangles
that go very well together, and both of them, again, remind me of aliens and
outer space creatures. They have a wonderful
playful quality to them. So the tangle that
we're first going to begin with is called
tunnel vision. We start off by creating
these mountain like bumps at the edges
of our sketchbook. It's okay if they're a little wobbly because they're meant to have a little lopsided, playful quality to them. They should feel a
little abstract. [MUSIC] Once you
have these bumps, we're going to go inside each of them and add some details. So for the first one over here, I'm going to make a tiny circle. Then I'm going to color
the whole thing black, leaving just a speck
of white over there. As always, this is going
to act like a highlight. In this entangle method, we usually refer to
these as black pearls, or we refer to them
as black orbs. Then there's a
little highlight or a little sparkle over there. So this almost reminds
me of cartoon eyes, of like Googly
little playful eyes. Which is why I feel that it has a very alien like quality. So once you have this circle, we basically just
keep on creating these auras one after the other. We try to match the outline. We go all the way till
the bottom of the shape. Now in this particular example, I have kept the eye at
the top of the shape. But you can place the eye
anywhere in the shape. It doesn't really have
to be at the top. So as I'm speeding forward
through the video, you can see a couple of
more examples of how I'm placing the eye at
different positions, and then the angle of the
auras changes slightly. So we just basically
keep on creating them, they'll be fill up
the whole space. Now it's important to remember that tunnel vision is
quite versatile tangle, even though in today's project we're using it as
a boarder tangle, you can use it
literally anywhere, even in the middle
of your composition. It can even be the
focal point of a particular composition
where you can have other smaller tangles in the background and you can have this one at the foreground. So it's quite versatile
in that sense. It's a very simple tangle and there are not a lot
of steps involved. It's not very
complicated at all. The trick to making
it look pretty is to basically just be a little careful of those auras
when you're placing them, and try to be as repetitive
in the motion as possible. The best thing to do would be
to just keep your wrist at a specific position and keep changing the position
of your sketchbook. Just keep rotating the
sketchbook instead of your hand, so that your hand can
develop muscle memory, and it will keep on creating those repetitive strokes while you move around the sketchbook and position it
according to your hand. Now once you're done placing your tunnel vision
around the borders, the next thing that
we're going to do is use this hollow space to fill
it up with another tangle. Now of course, you're free
to do any other tangle over here and you don't really need
to do the same one as me. But for the purpose
of demonstration, I'm going to show you this
tangle called EMO BALL, which is again, a
very playful tangle and it has an alien
like quality to it. I feel that it goes very well together with
tunnel vision. So EMO BALL has a lot of
different variations. But the variation that
I'm showing you in class today is the one where we make this tiny little orb
and then we give it an aura. But we don't really close
the aura at the edge. Then we just go at the bottom
and create a plump body. Now in the step outs of
this particular tangle, you'll notice that
the body is always drawn almost like
a perfect circle. It almost looks as
if that little orb is just sitting on top
of a perfect circle. But I have chosen to improvise the shape a little bit today. So instead of making a
perfect circle at the bottom, I'm basically just making this little jelly
bean like shape, which is slightly playful
and slightly more abstract. So again, EMO BALL is quite a versatile
tangle in that sense, and you can customize the inner orb as well as the
outer shape a little bit. There are versions
of this tangle where instead of the orb
in the center, you can create hearts, you can create an
infinity symbol, and so many other different
shapes which just basically change the nature
of the tangle completely, and each of the versions
look very pretty. So as you can see,
I basically created some small ones and some big ones and
placed them randomly. Once I'm happy with
their placement, I will just go back and add
a few more hollow circles, as well as floating
orbs here and there, just to fill up the whole space so that it almost looks like these tunnel vision borders are like big monsters or big
aliens on the edges. Then these little ones inside
are like they're babies. At least that's the
thing that comes to my head every time I
make this composition. Though in reality, if
these were some plants or some animals that
existed in real life, I would totally adopt them. They're so cute looking. That's pretty much it
for the exercise today. You're free to add as many
details inside as possible. Just to give you a
quick example of what the original
EMO BALL looks like. Here is an artwork that I
have developed in the past. You can see here somewhere on the bottom edge where
I have basically added a bunch of these EMO BALLS
all overlapping each other. So this is another
version of EMO BALL where the bottom of the body is
almost like a perfect circle. And instead of the orb inside, there is this little
heart like shape. So like I said, there are many different
versions of EMO BALL and hopefully somewhere in the challenge we might
end up using them again. So feel free to add
artistic touches to your project and customize
it in any way that you like. I also ended up
adding tiny lines inside the EMO BALL bodies just so that they look a little more interesting and they
don't look very plain. Also adding these curvy
lines made them genuinely look like little versions of the tunnel vision
on the outside. Because they just genuinely
look like little babies of the tunnel vision so
that when they grow up they develop more such lines. So it was just the
thing in my head. Maybe you have a
different vision and whatever your vision is, I love to have a look at it. So that's it for
today and tomorrow. I will see you with another
wonderful exercise.
33. Day 25 - Take a Chill Pill!: [MUSIC] What do you do
on days when you're extremely sick and you
still want to draw? Well, you make a pattern inspired by your
pills, of course. [LAUGHTER] But on
a serious note, all jokes aside, today I want to talk
a little bit about the importance of Zen art. Regardless of where you
are in your art journey, it's important to keep
reminding yourself that your art is first meant for
you and then for others. It's important to prioritize self-care and remind yourself that the whole point of
Zen art is to relax, de-stress, and have fun. Whether you are inspired
by this entangled method, Mendelow's, or any
other form of Zen art, you will always notice
that there is a lot of emphasis on repeated strokes and there's a lot of emphasis
on staying calm and being mindful of your strokes and basically just breathing
and taking it easy. Of course, every
once in a while, the madness of our life can take over even our
best-set intentions, and even I am guilty
of not giving myself the appropriate
amount of rest every now and then which is why I have
no shame in admitting today that during the process
of filming this class, I fell extremely sick and I literally did not know
how to recover from it because I had planned a lot
of work and I had taken away from my well-deserved
hours of rest and sleep. Of course, life sent me a rude reminder and
I felt sick and I was surrounded with
a lot of medicines and these capsules and tablets
of all shapes and sizes. I guess the silver
lining that came out of all of this was that I ended up developing this
cute little pattern which I'm drawing as
I talk to you guys. As you can see,
these are basically just small ovals inspired
by the shape of pills. I kept some of them true to
how pills actually look, so I kept half black
and half white. But then I just decided
to play around a little bit and added lines
in some of them. Then for the rest of them, I
decided to split them again in half but horizontally
instead of vertically. I did end up creating
a cute little pattern inspired by my life
circumstances. I also realized
that it serves as a great line practice
exercise so it's perfect to include it
in this challenge. But like I said, it's important for you to take a break once in a while and even though you're going to be doing this
today as line practice, I want you to keep this pattern somewhere in your
eye line and keep this as a reminder
for yourself on days when you're
extremely stressed, to remember that
you still deserve rest and that you still
deserve a good night sleep. That if you ever need to pause or if you ever
need to sit back, relax, re-evaluate, then it's completely
normal to do so. It's completely human to do so. You can always bounce back from wherever you
are in your life. I hope that this little
pattern will be there as a reminder for you to never actually see these
pills in real life. You should only just draw them and keep a stack of them on your paper but you
should not really have a stack of medicines
by your bedside. [LAUGHTER] That's it
for today's lesson. In case you end up
doing any variations or versions of this
pill-based design, I'll love to have a look at it. As always, don't forget to share your projects in the
project section and I'd be happy to have a look
at them for you and leave my feedback over there.
See you tomorrow.
34. Day 26 - Clob and YOU!: [MUSIC] Hello and welcome back. Today we are again going to be doing and improvisation
exercise. I'm going to be
introducing one tangle, and we're going to have a
lot of empty space around on the page which
you're going to fill up with tangles of your choice. The tangle that I have chosen to demonstrate today
is called clob. A clob is a fairly
simple tangle to draw. It's also quite
versatile in nature, because you can create a lot of variations with the
existing template, and it basically works
with the ribbon approach. You can have multiple ribbons
either clustered together, or you can have them floating
around individually. Basically, we're going to form an abstract composition
with these clob ribbons, leaving these odd spaces
empty on our paper. Once you have these ribbons either stacked together
or individually, we're going to go inside each of these and add curvy lines. Doing this might also
remind you of madison, the tangle that we
had done earlier in one of our improvisation
exercises. In madison, we also did a few of these curves black and then
we left some negative space. If you want to do that
kind of improvisation where you want to
borrow some elements or ideas from the madison
tangle and incorporate them over here in clob,
even that's possible. Then for the rest
of the empty space, you can fill it up with any
tangles of your choice. You can either do one tangle in the entire empty space or
you can do multiple tangles. I leave the choice to you. Like I said, if you want to do any design variations within the clob tangle also,
even that's possible. So feel free to have fun
with this exercise today, and take inspiration from all the tangles that
we have done so far. Once you're done with
it, do post it in the project section
so that we can all exchange ideas on this
improvisation exercise and see each other's work. That's it for today and I
will see you tomorrow with my finished exercise from today as well as a new exercise
for tomorrow. [MUSIC]
35. Day 26 - Reveal : [MUSIC] Hi everyone.
Welcome back. I'm here with my finished
project from yesterday. I'm sure by now you can
tell that I am a fan of using a lot of black
ink on my art works, and I like to have a heavy
saturated inky areas. In this design too, I have added a lot of
black backgrounds. But primarily, what I've
done for the clothe is that I've basically
just sectioned them out, alternate and gone inside and added these little
black accents, leaving a little bit of
whitespace in the middle, which makes it look
a little 3D and then it basically gives it
a little more dimension. Then for the rest of the
empty spaces that I had, I chose two sections
to be with just lines. Then for the rest of
the empty sections, I decided to include
bulbs over there. There were a couple
of things that I did different this time. Instead of sticking the
bulbs next to each other, I decided to leave a little
bit of space between each of them which made them spread
out a little bit more. Then instead of using my
usual patterning style, I decided to just match it with these sparkling details
that I've done over here. I just decided to match
the bulbs with that and decided to
color them like so. Another thing that I tried
was to skip the aura around the inner block
that I have done. Instead of doing the aura
around the inner block, in some of them,
I decided to skip it and so that gives
a different look. This is good to keep as a
reference for later on in case I ever decide
to do it without the aura because this
gives a different look, this gives a different look. I decided to do a little
bit of experimenting over here as well. That was it. That was the exercise that
I did from yesterday. Hopefully, you also
finished yours by now. I look forward to seeing all your wonderful versions and variations of this exercise.
36. Day 27 - Spoolies : [MUSIC] Hi everyone
and welcome to Day 27 of our
creative challenge. Today we're going to do yet
another mono-tangle exercise and the tangle that
I have chosen for today is called spoolies. Spoolies is a
wonderful tangle which incorporates one of the
most elemental strokes of this entangle method, which is the C stroke. Now using the C stroke, we're basically
creating a lot of auras around a center element. As you saw, the central
element is nothing but a large C-shape with a
little bulb at the end. It looks a little
bit like fescue, except that it's not as wavy as fescue and it's just
slightly more C-shaped. It's basically
just a large curve and then we keep on
building auras around it. Now when you're
creating these auras, you have two choices. Either you can start the orders somewhere
in the middle and let the shape look like an apostrophe or like
a really large comma, or also very similar
to quotation marks. This is the approach that
I'm following right now or the second approach
is that you can keep on building the
auras continuously. Then you will realize that
towards the end of it, it starts to build
into a circle. So if you keep on going
continuous with the auras, it'll eventually become
a really large circle with these little aura
lines inside of it. Feel free to experiment with both the approaches and see
which one you like better. Another thing that you can experiment with is
the direction of the auras and whether you like going clockwise
or counterclockwise. Today's exercise
is a wonderful way to find out what preferences
you have when it comes to drawing C-shapes
or curves and you will find out which direction you're
more comfortable in. Consider this to be almost like an intuitive exercise or
having a conversation with yourself and understanding
what artist you are or what movements you
like better and these things help you
develop your own style. Eventually, you will realize
there are certain things that you prefer more
as compared to others, and those will become
your go-to techniques. This exercise will help you understand what your
go-to techniques are. Now, even though this is
a mono-tangle exercise, I am going to probably add a few fescues at the end
just towards the edges to just balance out some
of the elements and also because the inner shape looks
a little bit like fescues. I'm probably going to do that. Also, as I'm speeding
forward through the video, you can see that I'm filling up all the empty spaces in
the middle with black ink. That is just helping
to build the contrast. If you like, you can also do some mark-making
over here or add some little ornamental details similar to how we did with
our crescent moon exercise. If you feel that your aura lines are turning out to
be a little too thick and that there is scope to add some
details in there. Then feel free to add
any little patterns or little marks inside
of those auras. Another interesting thing
about today's exercise is to practice the
Hollybow technique. When I say the
Hollybow technique, it's basically
overlapping objects. When you have some of these bullies on the top
and some at the bottom, you are basically creating
depth in your design. That's it for today's
exercise and I hope you have fun filling up
your page like this. If you are interested
to probably add a couple of other tangles
and customize the project. Please feel free to do so and try to find some
tangles which can go with the C-shape nature of the spoolies and that way you will have a nice
cohesive design. That's definitely something
that you can try. Otherwise, you can enjoy a
mono-tangle exercise today, just the way I did it. When you're ready, post
it in the project section and I'd be happy to leave my
feedback over there for you.
37. Day 28 - A Freehand Page : [MUSIC] Hi everyone and
welcome back to the course. Today we're going to be doing
a freehand exercise and I'm going to be drawing a few tangles over
here on the page. However, I would like you to try and use these tangles
in your own way. Unlike other improvisation
days where I show you only half
of my composition, today, I will show you
the full composition. But even within
this composition, I would like you
to try and change the position of the tangles
as well as the arrangement. Basically try to use this set
of tangles in your own way. Now for the first angle, I'm going to be
drawing m-anning. This is a beautiful tangle that starts with a small spiral, very similar to another
tangle called printemps. Then we basically create this little aura,
a partial aura. Then we start
creating more auras. But we connect them
to the first one. It almost becomes
like this trail of auras surrounding the center. It starts to bloom into this beautiful little spiral with auras getting
bigger and bigger. Then as you're reaching
towards the end, they start to get smaller. Then we basically
start to tuck them inside that spiral that
we started off with. Now I'm going to
draw another one over here at the bottom, and I'm going to try to
place this in such a way that it goes under
the previous one. While making these
auras which are more like echoes in this case
they're not exactly auras. You will realize that the touch point or
the meeting point of the first few of these echoes
is going to be the same. Then as you progress further, that meeting point will change. For some of those outer echoes, the meeting point will shift slightly and that's how
you'll be able to tuck them inside that spiral that
we had started off with. Now I'm going to
stick with just two. But you're free to draw as many as you like depending
on your paper size. Once you're happy
with the placement, we'll move on to the next
tangle, which is printemps. Printemps is basically spirals, which can be drawn either way. You can either draw them from out to in or you can draw
them from in to out. Once you start making
these on a regular basis, you will realize that you have a preference very similar to how we did these
Hollies yesterday. You will have a
preferred direction. You would either like
a clockwise or counter clockwise and so use that over here and try to
draw a few spirals around these m-annings things. Then basically we're
just going to ink all that remaining space
to build contrast. Now once you're done with
a few of these printemps, we're going to move
on to the next angle, which is inapod. Now inapod is a lovely
little wavy tangle, which basically reminds me
of jellyfish legs again. But once you start drawing it, it will also remind you a
little bit of the pods. We basically start off
with one wavy line, and then we criss-cross it
with another wavy line, forming these little pod
spaces in the center. Then we again come back
with another wavy line. That one is going to go
parallel to the first one. Then we do another wavy
line which is going to go parallel to the second one. Basically you end up
having four lines. Now when I say parallel, they are not entirely parallel. You can see that I have taken a few liberties
here and there. Also, you will
notice that there is this little gap which is forming between these wavy lines. You will notice these
small sections. In my case, it's like
a little triangle and a little square that's forming. We're going to talk about
this in just a few moments. But for now, we're going
to start filling up these little pods with orbs, and then we're going to color the rest of this space black. We're going to do the exact
same thing and all the pods. Of course you can change
the size of the orbs. I have drawn them right in
the center of the pods, but you can have them touching the edges
of the pods as well. Now once we are done
coloring, like I said, we have these little
small gaps over here, which are these little
triangles or squares, but we're going to deal
with that in a few moments. First, I'm going to draw another inner pod over
here at the bottom. This time, when I draw
my parallel lines, I'm going to make sure
that they intersect at exactly those spots where the first two lines
are intersecting. What that basically
means is that I am not changing the
intersection points. This way I basically
get very clean pods as compared to the open pods that we had in the
first version. Now according to the original
step out of this tangle, the bottom one is the correct
step-by-step version. However, the top one is my version or my
improvisation of this tangle. Both of them have their
own unique features and you're free to use any of
these in your designs. If you're more of a
classic tangler and you'd like to use
tangles exactly the way that they are drawn or imagined by the creators
of the tangles, then you can use the bottom one. But if you'd like to
have some variety in your designs and you want to experiment a little bit more then you can use the top one. The process of the
inner pods remains the same regardless of which intersection
approach you choose. As you can see, the bottom
one is slightly more elegant because you don't have so much of crisscrossing
lines happening over here. But with the top one, there is a little
bit of an element of fun because you get those little geometric shapes inside of those
intersection points. I would say both of these
have their own unique appeal. Now I'm quickly going to finish coloring my bottom inner pod. One more thing that you
can do over here is add even more
intersecting lines. You can see that just as
long as the meeting point or the intersection
point is the same, the pods can become
more and more plump. You can basically increase the thickness or the
rounding of these pods by adding even more of
these aura lines around. Now coming to the top one, I usually leave the
intersection points as is, and I don't really do
any changes to them. But since right now, I want to match the
top inner pod a little way to the
bottom inner pod. I'm just going to merge
these inner pods and I'm basically just
going to pretend that there is only one
intersection point. I'm just going to cheat
a little bit over here and just try to match it a little closer to the technique that I've used
on the bottom inner pod. Like I said, both the
techniques or great, there is no right
or wrong over here. But just that when I look
at the design as a whole, I want both the inner pods do look a little
similar to each other, which is why I'm just adding a couple more aura
lines over here and just changing the
intersection points. Now with the inner pod is done. The next thing that I'm
going to do over here is add a few Hollibaugh sticks and I'm going to
use straight lines. Hollibaugh can also be done with curvy lines or any other
shape that you prefer. But I'm going to be using
straight lines over here just so that they
add a little bit of contrast to all the other curvy
shapes that we've used so far so that there is some
variety in the shapes. Then I'm going to add
bubbles inside of this. If you remember, bubbles was basically three
concentric circles. Then we go inside the
innermost circle, and then we just put
a tiny C-shape over there and we color it black. Almost like putting a
little rounding over there. Now bubbles can
also be overlapped and you can apply the Hollibaugh
technique here as well. You can have
overlapping bubbles, circles, one on
top of each other. But I like to usually
have them next to each other with a little bit
of black space around. It gives me the
impression that they're all kind of floating and they're basically like
little cells in this large, gigantic vessel
filled with fluids. I like to have that approach, but you can definitely add the layering
technique here as well. Now in today's design, I'm not going to do bubbles in all of the Hollibaugh sections, and I'm only going to stick with the opposite ends
just so that they add a little bit of variety and contrast in the
overall composition. Then I'm going to
go ahead and add some details inside
the m-annings. One of my most
favorite methods of adding details inside
spiral patterns is to just place dots in an
ascending or descending order. I feel that they suddenly uplift the tangle and give it
a very ornamental wipe. But you're definitely free to do any other variation over
here that you like. Finally, as the last step, I'm going to go ahead and add some dashed lines over here. These are going to be tiny
hyphens or tiny dashes, which are basically
just going diagonal. This is one of my go-to
fillers for any design or composition where I want to
give the effect of water. Or if I want to
basically indicate some sea life creatures or anything basically
similar to sea life. That's it for today's exercise. Like I said, this is
a freehand exercise, which means you can alter the design anyway that you
like and you can shift around the tangles or add
some tangles or subtract some tangles and basically make a composition of
your own choice. As always, once
you're done with it, do post a picture in
the project section and I'd love to see
what you come up with. Tomorrow, I'm going to meet you with another freehand exercise.
38. Day 29 - Another Freehand Page: [MUSIC] Hi everyone and welcome back to our creative challenge. Today, we are on
Day 29 and we're going to be doing yet
another free hand exercise, very similar to the one
that we had done yesterday, which means that today also, you have the liberty to change the orientation
of your patterns, as well as play around
in terms of composition, as well as variations. Basically, take
inspiration from whatever I'm drawing here today and
then do your own thing. The first pattern that
we're going to start off with is meringue. It's a beautiful wavy pattern, where we start off by making
one single wavy line, and then we basically
create these auras and touch it to the tip
of the original line, almost like drawing lots and
lots of S-shaped curves. Then all of those S strokes
basically start to blend in together to make this
little feather-like shape. Now, we're going to be drawing, meringue on both sides
of our sketchbook. As you can see, I'm
basically doing it at the bottom edge for now, but I will also do a similar
one at the top edge. I'm basically going
to do two chunks of meringue and leave a little
bit of space in the middle, almost like they're like leafy patterns with a little bit of space empty in the middle, which we are going to
fill up with little orbs. Now, you can take
a few liberties over here in terms
of your S-curves. You don't have to draw
them exactly the same way. If you want to do S-stroke, which is the opposite
of an actual S-stroke, you can do that as well. Just as long as you have a wavy line or a line which is similar to
an S-stroke that works. Of course, as always, feel free to rotate your
sketchbook and get into a comfortable position in
order to draw these curves. If a couple of your
lines become a little wobbly, that's perfectly fine. Because as you keep on
creating these auras, you can simply just imitate the effect of
the previous line, and then the whole shape will start to look
nice together. Don't worry too much
in case a couple of lines go a little
here and there. You can see that even
in my sketchbook, even though most of the lines
that I've drawn right now are nice and in sync
with each other, there are a couple of lines where I could've
done a better job. They've gone a little wobbly. But they don't really bother
me so much because really, there's no right or
wrong over here. I feel that having a couple of shapes different to the ones that are already
there on the paper, just adds to the
whole variety in the design and just makes it look a little more
organic and natural. I'm always in favor of
shapes looking raw and organic as compared to them
looking absolutely perfect. That's just how my
style has always been and that's how I
prefer my shapes to be. Now once you've done a few
of these, as you can see, I basically connected them
with some smaller lines. It basically ends
up becoming like these three large boards which have these hollow
spaces in the middle. We're going to be filling
up these spaces with orbs. You can think of these as
similar to inner boards, except that these have
more number of lines and they're more S-shaped as
compared to C-shaped curves. It's slightly more wavy. But once we add the orbs, you will probably see
a certain amount of resemblance to in a board
with this particular tangle. Now, meringue can be used
in many different ways. Right now, I'm choosing to
use it as an enclosure, almost like there's a
board in the center. Then I'm basically choosing these meringue leaves on
either side of the board to just give it a little boundary or to
give it an enclosed space. But you can use meringue with stems and make
it look like leaves. You can also stack meringue
one on top of each other and make it look
like a beautiful border. It can definitely make for a nice border on reading cards
or any other DIY project. You can also just play
around in terms of the orientation and just find them all from
a single point. That can turn into
a lovely flower. You can use it
radially, as well. Basically, meringue can be
used in many different ways. Once you've got the
hang of the S-stroke, then you can play around
with this tangle quite a bit and place it anywhere that
you like in your composition. Now, once I'm done coloring all that empty space
in the middle, the next thing that I'm going
to do is I add a couple of mookas on the left side as
well as the right side. Right now, I'm just like
placing them in the center. But you can definitely add
them diagonally as well, and you don't have to keep it in this orientation the
way I'm doing it. Feel free to improvise and
change the orientation of tangles according to your sketchbook or according
to your preference. Once these mookas are done, I'm basically just going to come inside and add a few details. I'm going to fill up
this space with flux. I think you can probably
tell by now that I like to fill up
all my teardrop or flux shapes with
these little lines and dots inside of it. This is my favorite technique, but you are definitely free
to use any other technique. Then as always, I'm going to color up all the
empty space black, just so that it adds
contrast into the design and makes those flux teardrop
shapes really stand out. I'm slightly speeding
up the video to show you what the
process looks like. But you're definitely
free to pause the video and do it
at your own pace. Especially, if you're doing a slightly different design or a variation to the design
that I'm working on, you might need a
little more time to work on your sketch book. Once you're done with
it, you can come back and replay the video or just resume it
from the point where you left off and you'll
be able to catch up. Now, the next thing that
I'm going to do is add a few roundings to these
little corners here and there, which are like the meeting
points in our composition. Just adding these little
roundings can make so much of a difference to an otherwise
mundane composition because it certainly
adds a lot of drama and interests into the linework and these dramatic
transitions and these little bits
and pieces of ink here and there add the contrast, and they really bring in a
lot of depth in your design. The easiest way to figure out where to add roundings
is to look for sharp corners or meeting
points between two tangles and fill up those odd gaps with these little rounded curves and then fill them up with color. Now with this done, I'm going to move on to the next tangle, which is bulk leaf. Bulk leaf is
basically a stem with a curvy gap and then a leaf. As always, you are free
to play around with the shapes of the
leaves as well as the sizes and the orientation. I'm basically just going to add these all around the mookas. Once I'm satisfied with
one of my bulk leaves, I'm going to go back, and in my usual style, I'm going to start
adding some contrast because I want the leaves to
pop out a little bit more. I want them to give the appearance that they're
calling a little bit. While I'm doing
the contrast work, I'm also going to add a few
fescues here and there, just to add to the whole
garden botanical vibe that is happening with
the design right now. Yesterday's freehand
page was more of a C-like inspired page and today's is a little more
botanical inspired. You can see that even
though the tangles have similar strokes and they
look similar visually, they can still be used in combination with
other tangles and you can build a composition with a completely different look and a completely different
theme in your mind. Mixing and matching
tangles is a lot of fun. Then as my final step, I'm just going to go back to all these mookas and just darken the
borders a little bit, just making sure
that the edges are a little bolder as compared
to how they are right now. That'll make them pop a little bit and stand out a little bit against
the background, which is full of bulk
leaves right now. If you're doing
the challenge with the intention of coloring all
of your projects later on, then you probably might
not need to add so much of thickness and details to the mookas the way I'm
doing them right now. Because if you end up choosing
a different color for the mookas and a different
one for the background, then the mookas will
automatically stand out. But even then, I still
like to just give thick borders to
some of the elements and then borders to the
rest of the elements, so that there is a
variation in the design. It helps us to emphasize the
elements a little bit more. Again, these are small
little personal touches that you can totally customize and choose to add or avoid depending on how your
design is shaping up. With that, we are done
with today's exercise. Like I said, other
tangles that I have played with over here today are basically my interpretation
of a garden botanical vibe. I have placed them in this
free hand composition. But you are definitely
free to play around with these tangles and come up with your
own composition with a completely different
placement of the tangles, if that's how you like it. That's it for today.
I'm going to see you tomorrow with another
interesting exercise.
39. Day 30 - S Curves with Undling : [MUSIC] Hi everyone, and welcome back to our creative challenge. Today, we're going to
go back to basics. Every few days, I
like to go back to my elemental strokes and practice them in
interesting ways, to make sure that I remain
consistent with my work. Today, the stroke
that we're going to focus on is the S stroke. As some of you probably know, in the zentangle method, there are usually five
elemental strokes. The S stroke is one of them. The tangle that I have
chosen for today is called undling and the beauty of this tangle is that it
helps you to practice your S stroke as well
as a backward S stroke. We basically start off
with a channel like grid, very similar to how we had done with firecracker a few days ago. Then we basically start to fill the first channel
with S strokes, and as always, you
are free to rotate your sketchbook in an angle that is most comfortable to you. Then we basically fill up the first channel
with S strokes. Once you are done making these S strokes in
the first channel, we do a reverse S stroke
on the second channel. Now things start to get
interesting when you vary the distance between
each of these strokes. They also start to get
interesting when you make your channels slightly
asymmetrical. Instead of keeping
absolutely straight lines, I have chosen to make my
channels and curvy lines. You can see that
they are merging at a few places and they're
getting narrower at a few places whereas
they're wider at other places. All this really adds to the
drama in your composition, and even though this
is a mono tangle, the page looks quite beautiful, just as is even
without any shading or ornamental little additions. That's the beauty of undling. It's such a beautiful
and simple tangle, yet so powerful because it helps you to
practice your S-curve, and it really keeps you engaged as you are
mindfully putting those strokes and
trying to maintain the distance between
each of those curves. I remember the first couple
of times I tried to do undling as a practice
exercise for myself. I was exceptionally nervous in doing the backward strokes. But then I realized
all it requires is to basically switch around the
position of your notebook, and then continue drawing in an angle which is most
comfortable for you. Just like that, we continue
to fill up our page. Now you're probably
wondering why I've chosen to do an S
stroke exercise today after so many
days of doing a mix-and-match of
complex compositions. Well, the answer is
that we haven't really had much opportunity to
practice our S strokes, if we go back and look
at all our designs. We've done a lot of work
with straight lines, and we've also done a lot
of work with C strokes. We've also played
around with orbs, circles and ovals, and we've
played around with dots. But the S stroke hasn't been practiced much in
the last 30 days. Today's exercise is
dedicated to practicing this elemental stroke,
and going forward, we will be using this
in combination with other strokes when it
comes to pairing tangles, as well as when it comes to
creating freehand designs. Now as always, I'm going
to speed up the video slightly to show you what the
page is going to look like. Of course, you can vary the
distance between the lines. Though personally,
I would prefer that you try to keep them as close as possible in order
for you to squeeze in as many S strokes
on the same page, and for you to get a
good amount of practice. Also, if some of you
are interested to enhance this mono
tangle page further, then you can go in further
in the design and add these hatching strokes from the left as well as the
right side of the channel, and leaving a little bit
of gap in the center, almost like a beam of
light passing through, and that's the area where we are basically
showing the highlight, and it'll almost give a three-dimensional
look to your undling. Making it look like little tubes sitting next to each other, nicely cuddled together, and they will have this beam of light shining
through the center. This is also something
that you can try. Notice that when I use
this particular technique, I am basically leaving the sparkles a little
haphazard in the center, so that it almost gives an impression of these
being metallic tubes. The glimmer of light, or that shimmering effect is basically a
little more natural. That really helps to add some drama and interest
in your design. This is also very similar
to what I had done with my globs on the day when we did our
improvisation exercise, with the lesson that was
titled Glob and You. This is the technique
that I used over there to make sure that my
globs look like tubes. That's it for today
and I hope you enjoy making these S strokes. It is my recommendation
that you sit in a comfortable position to
practice these strokes. S strokes can turn out to be
a little more challenging than our conventional I
strokes and C strokes, and so it's important
to be patient and keep breathing as you go along putting each of these
strokes on paper. Take your time, go slow, and I'm pretty confident that by now you've got a decent
amount of warm-up, and you will definitely
be able to do this S stroke once you
put your mind to it. Tomorrow, I'm going
to meet you with another interesting
improvisation exercise. Till then, keep
creating. [MUSIC]
40. Day 31 - Lines & Orbs: [MUSIC] Hello and welcome back. We're going to be doing another improvisation
exercise today. But again, just like yesterday, we're going to go
back to basics. We're going to be doing an improvisation
exercise which is focused on straight
lines as well as orbs. Again, lines and orbs are some
of the most basic elements and strokes that you will always see in this
entangle method, as well as free-flowing
and doodle designs. Even if you are someone
who loves to draw mandalas or any other
form of meditative arts, this exercise will be useful for you because
it will take you back to the basics and it'll help you brush up
on your line work, as well as perfecting those
little orbs and circles. For today's exercise, we are going to be drawing
some doodle shapes, very fluid cells, which are basically just imitating
each other's boundaries. Very similar to how we
had done them on day one. Then we're going
to be filling this up with orbs and lines. Now I'm going to be
filling this up with this half and half style
where I'm going to have half of my shapes are
filled up with these lines, and then the other
half is going to have slight more contrast where I have the background colored black and then I have these
little orbs over there. But as this is an
improvisation exercise, I'd love for you to
try out a couple of other techniques
and see if there is something else that you can
come up with to fill up your shape apart from the combination that
I'm using over here. The trick to today's
exercise is to use a combination of
these fluid shapes, which are going to be
your outer boundaries. Then the inside of these
shapes have to be filled with a combination of
straight lines and orbs. Now you can use to do
it exactly the same way that I'm doing
it half and half, or you can come up with
your own technique. Today's exercise
is probably going to take you a little
bit more time than yesterday's depending on
how big you have drawn the shapes and how detailed your pattern inside
of the shapes is. Take your time, breathe easy, and when you're ready, put it in the project section. As always, because this
is a repetitive activity, I'm not going to be showing
you the end of my page today, and I will show it
to you tomorrow at the beginning of
our next exercise. That'll give you an idea of
how my page turned out to be. But I don't want you to be heavily influenced
by what I draw. Just using basic lines and orbs, if you can come up with
something different, that will be great. Let's have a look at all
your wonderful variations and versions in the
project section. Tomorrow I'm going to meet you with another
fun-filled exercise.
41. Day 31 - Reveal : [MUSIC] Hi, everyone, and
welcome back to the course. This is my finished
exercise from yesterday, and I had a lot of
fun doing this. It was quite relaxing to
draw all the lines and then putting in all the
orbs and those circles. Of course, the coloring
was quite intense because they were like these really tiny areas in which I needed
to fill in color. But I quite enjoyed the
process of doing that. Overall, this turned out to be quite a relaxing
experience for me, and I'm pretty sure it
was the same for you. If you are still behind
on your project or if you feel that you
are short on ideas, then you're
definitely free to do the exact same thing
that I've done over here for practice sake. Later on whenever
you come up with more ideas you can definitely customize the exercise and probably have another go at it. For now, even if you do the same thing that
totally works. I look forward to seeing
what you come up with and I'd love for you to post
it in the project section.
42. Day 32 - Zen with Bricks: [MUSIC] Over the last few days, we have taken a lot of inspiration from this
entangled method, and we have created beautiful complex
compositions using dangles by danglers from
all over the world. However, I just
want to point out today that getting
into a Zen state of mind is possible even with the simplest of
patterns around you. When we look around, there are plenty of opportunities
to get into a Zen flow by taking design inspiration from
objects around you. Even in nature, you
will see patterns repeating themselves in
the form of flower petals, in the form of trees, in the form of ocean waves. Any simple motif or any simple pattern
which is easy to draw, will instantly put
you in a Zen state of mind as long as you
keep on repeating it. Repetition is the key to
getting into Zen state of mind. That's exactly what
we're going to be getting into today with a very simple pattern of bricks. Many times we have
inspiration around us, but we never stopped
to think how exactly we can utilize it. But with a simple
pattern like bricks, I hope to open your eyes to
more inspiration around you. Bricks are nothing
but simple rectangles which are repeating themselves
over and over again. You can have them big, small, absolutely perfect or
slightly haphazard. It's totally up to you. In today's exercise, I want you to take a few
minutes and draw these simple straight lines
and then go inside each of these little
blocks and then add roundings on the corners. Once you add those roundings, the bricks will start
to look very natural. [MUSIC] Remember, even
though we are trying to put some realistic
touches over here, we're not exactly
aiming for realism. We're not going to
go as deep as using illustration techniques to make these bricks look realistic, but we are going to go
around the corners, darkening them a little bit
and probably adding a few rounding here and there to make them look a
little asymmetrical. [MUSIC] How do you like or how realistic you want the bricks to be it's totally up to you. [MUSIC] You will notice that
laying down the template for the bricks is not
very time-consuming, but going inside each of those blocks and adding
those little rounding and putting those
little details and the edges is what's
going to take more time. Now when you get inside each of those little breaks and you
start to add the details, you will get into a Zen state of mind because you'll be
treating each brick individually as an element
and you'll be adding the details and getting
immersed in the process. [MUSIC] This exercise
also goes to say that sometimes we
get so caught up in looking for inspiration
on the internet and they keep searching for
tangle patterns online, but we forget that
there is a lot of inspiration around us. Simple patterns
like these can be used in our compositions
to elevate them and make them look different from all the other compositions
that you might be drawing otherwise [MUSIC]
I remember when I first came across
this entangled method, all I wanted to do was go
online and download this step outs for literally every tangle
possible on this planet, but I soon realized
that that's not a healthy approach
because even though tanglers from all over the world are spending
a lot of time deconstructing these tangles and putting the step-out online, these are not the only
patterns available to you. Look for design
inspiration on upholstery. You will probably find some pattern ideas by looking at your
curtains and bedsheets. You might even find
some inspiration for our motifs and for
repetitive patterns when you look at buildings
very closely and observed the architecture
of buildings around you. Always try to be in the
moment and see if there is something that you can
borrow inspiration from. That is going to be
an additional design or an additional element
in your toolkit, which is going to be
very personal for you because you will have a
story associated with it. Here's a fun fact. This class is being filmed on Valentine's Day. I decided to just add a few fun elements here
and there and the design. There was so much of pink
and red inspiration online. I decided to just add
few pink cards today, very different from
what I usually do in these black and
white challenges, but today, just for fun sake, I decided to add these
tiny pink little hats. [MUSIC] Again, as you can see, I'm not really aiming
for perfection. I'm just using a very
simple brush pen over here and adding these hearts very quickly
in just one or two strokes. This is just to add a splash of color over here
on my sketchbook. Just to keep things fun and
interesting for myself. [MUSIC] If you feel like you wanna do something different, probably want to
write something, or maybe draw something else inside each of these bricks, please feel free to do that. I would love to see all your versions and variations
in the project section. Tomorrow, I'm going to meet you with another
interesting exercise. Till then, keep creating.
43. Day 33 - Lines with B Twixt: [MUSIC]. Hi everyone and
welcome back to our challenge. Today, we're going to go
back to line practice, and the tangle
that I have chosen for today is called B-Twixt. B-Twixt is a fairly
simple tangle, which is made up
of straight lines, and once you start drawing it, you will find similarities
between B-Twixt and B-Tweed. It's essentially the same
concept where we start off with a triangle and then
we take one of the points and draw
a line diagonally, and then we take the opposite end and draw
another line diagonally, which lands somewhere
on the first one. Then we basically keep
repeating this process until we get this little
weave-like structure. It's almost like there is
a little woven pattern inside the triangle. Now when it comes to B-Tweed, we usually go on these meeting points or
the intersection points of these lines and we start to add a little bit of
line weight over there. That is really one of the most recognizable
features of B-Tweed. But when it comes to B-Twixt, there are a number of different possibilities that
can be applied over here. Before we explore
the possibilities, the first thing that
we're going to do is basically keep stacking up more triangles and keep filling them with this woven pattern. You will also notice that one of the fundamental differences
between B-Twixt and B-Tweed is that B-Twixt is more stackable and it's like
a more buildable tangle. You can keep building
further and further on this. Whereas B-Tweed is more like a structure that has to be placed inside a
given structure. You don't really have a lot of opportunity to play around in terms of construction when
it comes with B-Tweed. But with B-Twixt
you can actually rotate your sketchbook all around and keep stacking these. I like to think of them
like little Lego pieces, little triangular
blocks that you can keep building one
on top of the other. They basically start to make this very beautiful
kaleidoscopic pattern and it starts to give
a very art deco vibe, and it becomes into this
beautiful little maze. Now when it comes to the
sizes of these triangles, you're free to keep making them bigger and smaller as you
progress across the page. If there are certain
places where you feel that there is a huge gap, you can just draw another
line in the middle and divide that gap
into smaller sections. Basically, you can keep building as many
triangles as you like and just keep filling up
the page by rotating it, and basically just have fun making these little
intersection lines. Now some people like to build this tangle all the
way to the edges, especially if they're doing
it as a mono tangle exercise. But I personally prefer to leave a few gaps here and there
empty on the edges, just so that it gives a sense
of balance and there is some breathing space
in the tangle. I'm not going to fill it up
all the way to the edges. But if you feel like
you want to fill it up, you're definitely free to do so. Once you're done
with the tangle, if you have extra time today, you can actually
take it up a notch by adding some details. One of the things that I
really like to do is add in these little tiny dots inside each of these
triangular sections. I basically try to put
them in ascending order. The smallest dot is near the center point
of the triangles, or a point where
all the triangles are meeting basically, and then I keep making
them bigger and bigger as they bloom outwards. That's one way to
add some details in your tangle and make it
look a little more complex. Another technique that I really enjoy is to add roundings. But notice that the
roundings that I'm adding over here are quite deep, because I'm basically aiming for almost a perfect C at the top of these
intersection points. They almost become
like this hollow, long, teardrop shape once I add the
roundings on the top. Another option is to
leave some sparkles in the middle and basically
leave some highlights. Again, I basically just put in some black strokes
on both the sides. On the edges I have
black strokes and then I leave a little bit
of gap in the center. I basically try to do this
on alternate sections. Again, we're not really
aiming for realism over here, so it's not like we are aiming for a perfect
light source. We can play around and just
consider this to be more like an ornamental detail as against a realistic light
and shadow exercise. Then another option that
we have is to fill up these little sections with orbs and color the
background black. Again, you can do this on
one side of the triangle, which is basically one half, or you could do it
alternate left and right, or alternate just on one side. There are many
different possibilities with this little step as well. These are the different
variations that we have when it comes to
working with B-Twixt. If you have any other ideas, then I'd love to
see those as well, and whatever you choose
to finally apply on your sketchbook I'd love to see that in the
project section. Tomorrow. I'm going
to meet you with another back to basics exercise.
44. Day 34 - Heart Plant: [MUSIC] Hi everyone and
welcome back to the challenge. Today we're going to be doing yet another simple exercise that helps us to
improve our strokes. We're going to be working
with hearts today and hearts are nothing but a
combination of two C strokes. Of course, they're
a little pointy at the bottom and a little
more plump at the top. But the basic structure of these curves comes from
a simple C stroke. Now I thought it would
be fun to do a pattern, where the hearts can be leaves. We can add some ornamental
details inside of these with curvy
lines and some dots. Very similar to how I usually add the details on
my flux tangle. Just like we had done on Day 32, I'm again going to
have some fun today, and I will play with two
colors, red and black. Here, of course, free to choose any other colors that you like or even use just
a single black pen. Now, the exercise for
today is really simple, we're basically just
going to keep connecting these hearts at various angles, stacking them one on
top of each other, varying them in
size and direction. We will keep rotating our sketchbook to get
the correct angle. As you're making these hearts, you will see some empty
spaces in the middle, which we're basically
going to color in. Now I'm going to color
these pretty randomly. As you can tell,
I'm not following a specific order
here and I'm just going with my
instinct and placing the hearts wherever I
feel they look best. I'm doing the same thing with the coloring process as well. Today, I'm actually not going to fill up the entire page. I will do this in a
diagonal composition, leaving some negative space on the top left and
the bottom right. It's almost making it look like a single branch of
leaves, so to say. For almost a single branch from a creeper plant or a wine, so that's what I'm going for. But if you feel you want
to fill up the whole page, you're definitely
free to do that. Now when I'm working on
patterns where I usually have some negative space
around the focal piece, I like to go back to
the edges and add some contrast by making some of these little
boundaries bolder. Just like I do with
my book leaves and other similar
organic tangles, I just like to go back and
add some curvy edges to my hearts as well and of course, any other style of
detailing is fine too. If you have a different
idea for the edges, you can definitely try that. That's it for today. I hope you have fun doing this wonderful, cute little exercise. This is, again, lovely pattern
to use on a DIY project, especially if it's
a greeting card that you're giving to a
special someone in your life, or even if you just want
to use it as borders or a filler pattern on any other composition
that you're working on. It's easy to make and it definitely looks pretty
with multiple colors. That's it for today
and tomorrow, I will see you with
another lesson.
45. Day 35 - Coffee Beans: Hi everyone and welcome
back to the challenge. [MUSIC] Today, we're
going to be doing yet another model tangle exercise focused on improving
our strokes. The strokes that we're
going to focus on today are S-curves and orbs. Today's tangle is actually something that I have
come up with myself. As you can see, I'm
basically drawing these ovals or orbs with
S-curves in the middle, and then I'm connecting
that S-curve with another S-curve that
almost acts as an aura. My inspiration for this
exercise was coffee beans. While there are many
different ways in which one can draw coffee beans, I found this to be the simplest deconstruction
of the shape. Doing this tangle on a
regular basis will definitely make you more confident when it comes to orbs and s-strokes, especially because we often
tend to stop short when closing the herbs because of the fear of crossing
over the line. But just like any other tangle, if you do this mindfully, you will be able to get very smooth curves
and orbs and you will definitely be
able to get rid of those odd gaps on the edges. The key is to breath
easy and take it slow. As always, focus on
each stroke at a time. I'm sure you also realize
by now that this is a stackable tangle which has many different
possibilities. Either you can go
around stacking them one on top of the other or connecting them the way
I'm doing it right now by turning your sketch book and finding
comfortable positions, or you can also just line them
up next to each other and use it as a boarded tangle
or as a different tangle, just like we had done with borbs in one of our
earlier exercises. You can basically play
around with this element and place it in any
formation that you like. If you're interested to try another variation
of this design, then you can probably also
apply the hollybow technique, where you can have some beans
hiding behind and some in the front and that will give a very interesting
layering effect, and you can actually create a lot of depth to
that way in the design. Similarly, even when it comes to details inside the S-curves, there are plenty of
different possibilities. You can either color
the entire bean black and leave
the inside white, or you could color that S-curve black and leave the bean white. You can also go
inside the beans and add a few details such as dots, or even straight lines or any other patterns that you feel would complement
this particular shape. Sometimes, what I also
like to do is go inside the S-strokes and basically create a charcoaled
pattern inside, which gives the sense of texture and it also helps to create a little bit of
depth in the beans. Like I said, there are many
different possibilities when it comes to
working on this design. As always, I would love
for you to come up with your own versions and
improvisations of this tangle. That's the exercise for today. I hope you enjoy making
your model tangles spread with these
little coffee beans.
46. Day 36 - Baton & Straight Lines: [MUSIC] Hello, and welcome back. Today we are back to some
straight line practice. The dangle that I
have chosen for practicing straight
lines is baton. Baton is a really simple tangle which looks very complex
in the beginning, but just like we've discovered with many other complex shapes, if you break it down
into simple strokes, you'll definitely
get a hang of it. It starts off by making a set of parallel lines and
then we basically just twist our sketchbook
around to find a different angle where we can create like
a mini triangle, and then create another
set of parallel lines. Now in order to bring contrast, I personally like to color
the little triangles black, just so that they give an impression of being
tucked under each other, and so it almost looks
like little fragments of triangles which are getting
tucked beneath each other. But if you don't want to color the initial triangles black and you have a different
approach to stylize this design, then you're definitely
free to do so. You'll notice that
the trick to getting a perfect baton tangle is
to basically keep rotating your sketch book and find a comfortable position
so that you're able to draw straight lines in an angle that's most
convenient for you. Sometimes you will also notice that as the
triangles get bigger, you will have a little bit of trouble making the longer lines. In that case, what I like to
do is basically just draw some extension lines which are going in random directions, and they basically
bisect or cut through the original triangular space and create too many triangles. This way, I get shorter
segments to play with and because the
segment becomes smaller, it's easier to
manage my strokes. As always, there is no right or wrong when it
comes to this tangle, you basically go with
whatever's easiest for you. You can have a lot
of straight lines or you can have a lot
of angular lines. You can either color the triangles black
or not color them, you can have the lines closely put together or spaced apart. You can basically
just play around in terms of the sizes,
the orientation, the thickness, and literally
any other possibility that you can think of to make
this tangle work for you. Now for today's exercise, you have two choices. Either you can fill up
the entire page with baton and consider it to
be line practice so that it becomes a monotangle
or you can mix and match the tangles and combine baton with any other
tangle of your choice, as long as it is also
composed of straight lines. You can probably do
it with holly bow or you can probably do
a checkered pattern or any other pattern
that comes to your mind as long as it is composed
of straight lines. You can even take
inspiration from some of the tangles that otherwise
won't go with tangles, for example
[inaudible] which was a combination of straight
lines and goby lines. You can probably try
a variation of that, which is composed entirely
of straight lines. Basically, just have fun and read today's exercise
as line practice and see what is it that
you can come up with and basically just try
to push your boundaries, try to come out of
your comfort zone and just see what is it
that you can come up with. Once you're ready, make
sure you put it in the project section so I can
share my feedback with you.
47. Day 37 - Ribbons & YOU : Hello, and welcome back. Time for an improvisation
exercise today. Today I will be giving you a template and I would love for you to fill it up with some
ribbon or border patterns. Now, the template is
actually pretty simple. I'm basically just
going to choose a point here at the
corner of my page. I'm just going to extend
some curvy lines from here. Just dividing them into
small little sections, almost like sun rays blooming out from one particular point. Just that they are curvy
instead of straight. Your lines can
definitely be more broad or more narrow
as compared to mine. Now once we have
these lines ready, we basically have
these little strips or sections which are like ribbons. We're going to fill
up these ribbons by taking some inspiration from some of the improvisation exercises that we
have done earlier. If you remember, in a couple of our improvisation
exercises earlier, we had played around
with angles like Duda, and then we had also done a phone code
improvisation exercise where we have
basically come up with different ways of embellishing
a given structure. Now imagine these to be like little strips or ribbons
floating around. The idea is that we basically
treat this template as a mashup of some of the improvisation exercises
that we have done earlier. Plus also combine some new
techniques today over here. You're free to
combine newer tangles and convert them into strips. Or like I said, you
can go back to some of those improvisation exercises
and take ideas from there. You can even add some
organic tangles over here and just make it
like a pattern strip. So for example one of the
strips could be completely filled with book leaves or it could be completely filled with flux and that way
it will basically become like a ribbon which has the same pattern
printed all over. I think the easiest way to
do this exercise would be to imagine these little strips
as small pieces of fabric, almost like swatches
from a fabric store. Think of these as
little pieces of fabric with various
prints and patterns on them and then mix and match them and let's see
what you come up with. If you're keen to
play with color, you can even try watercolors,
crayons, colored pencils, or any other coloring media, and then try to create some
variations in your designs. That's it for today,
and I will see you tomorrow with another
improvisation exercise.
48. Day 37 - Reveal: [MUSIC] Hi everyone and
welcome back to the course. This is my exercise
from yesterday. As you can see, I have finished this up
with various patterns. Depending on the number
of ribbons you drew, you might have more
or less patterns than me and that's totally fine. I had a lot of fun
doing this exercise. I basically tried to play with some existing patterns and tried to give them
a different look. For example over here, I have [inaudible]
and I thought, what if I add dots
in [inaudible], and this is the output
that I ended up with? This exercise is a great way to push your boundaries and see all the ideas that are
floating in your head and actually try to put them on paper and see whether
they work or not. On days when you're
feeling uninspired to do big compositions or you don't want to do larger artworks, or even when you just don't have time to do larger artworks, then just drawing a
few of these ribbons can still keep you in that
creative moment every day. At the same time, you
can practice some of your strokes and just
see design variations, and then this acts as a
great resource for you later on when you're looking
for design inspiration. I hope you've managed to finish
up your project as well. If you still have any questions about it or if you're
stuck somewhere, feel free to put that up in
the discussions tab and I'd be happy to answer your
questions for you. That's it for today, and let's move on to our
next exercise now.
49. Day 38 - Cadent and YOU!: [MUSIC] Hello and welcome back. Today's improvisation
exercise is based on the tangle gerund. Gerund is a beautiful
little tangle, which is basically made
up of a grid structure. In this entangle method, we have organic tangles
like poke leaves, which grow in any direction
that they feel like. Very similar to a money
plant or a creeper plant, which basically grows and
blooms in all directions. Then we have ribbon tangles. Ribbon tangles can be used to divide your paper into
multiple sections, or they can be used as a continuous ribbon floating
around through your design, connecting various
elements, almost like an actual ribbon intertwining
with different elements. Then we also have
border tangles, which as the name suggests, are basically four borders. Sometimes ribbon tangles can be used for border tangles
and vice versa. Then we also have some
highly structured tangles, very similar to what
we're doing today. These highly structured
tangles basically come out of the
concept of grids. Now, in this entangled method, grids are often referred
to as reticular. Then they are filled up with various patterns inside of them, which are called fragments. Basically, with multiple grids, you can mix and match
different types of fragments. That's how you come up with
a new design every time. Now bear in mind
that reticular and fragments itself is
a very vast topic, and I will probably
cover that in the future in detail
in a separate class. But for today I basically
want you to get introduced to the
concept of grids. We're going to start
with this simple tango called cadent, where we are basically
drawing these tiny little orbs and equally
spacing them out, almost like creating
a checkered pattern. Then once you have these
little orbs placed around, depending on the length and
the width of your page, we basically start connecting
them with a strokes. Now, I like to do all
my vertical lines first and then I do
the horizontal lines, but basically, I turn my notebook around for
the horizontal lines. Technically they become
vertical lines again. Basically, just feel
free to do it in any order or any
direction that you like. But I have noticed
that it helps to do all the same strokes in one go or the same line in one go. Then change the position of your notebook
once you're ready, and then do the next
set of a strokes. But really, this is
just my technique. You can feel free to
play around and see whatever method is more
comfortable for you. Now once we're basically
putting these a strokes, you can see that an almost checkered pattern
emerges out of this grid. It's almost like
little square banners which are interconnected
with each other, and you have this beautiful
template now with you. Now our job today is to
basically fill up this template. Now I don't want to
influence you with design ideas right away. I would love for you to
take inspiration from your surroundings or
from previous tangles, and try to come up with a method where you can actually create a square filler and put that
inside each of these blocks. Now if you're keen
to experiment, you can definitely do multiple fillers in each of the grids, or you can even do
different roles. For example, the top
row can be filled entirely with one pattern
and then the second row, and then the third
row each of them can have separate designs. That's one way to go about it. Or like I said, you can
basically just fill up each of these little
squared blocks with a separate pattern. I leave the choice to you
have fun with this tangle. See what are the
different fillers that you can come up with. Try different techniques, try combining the ICSO strokes, and see if there is something that resonates most with you. Then try to put that
on this grid and see what all different
versions and variations you'll come up with.
50. Day 38 - Reveal: [MUSIC] Hi everyone and
welcome back to the course. This is my finished
exercise from yesterday. As you can see, I have basically kept the motifs really simple. The designs are not
very complicated, but I did choose to play
with colors just to break the monotony of the
black and white designs that we've been doing so far. I basically ended up playing
with orange, brown, black. This was quite a fun
exercise for me. I'm assuming that you guys have done your exercise as well. If not, there's no hurry. You can finish it at
your own pace and post it in the project section
whenever you're ready. Just now as a side note,
while talking to you, I think that I can also go
back to some of these orbs, the orbs that we started off in the beginning and
maybe just put in some metallic gold or just some other metallic
color in there. Just make these orbs maybe pop out a little
bit more as well. Again, I'm doing these exercises in a
sketchbook is a great way to sort a conversation with yourself and basically just
put all your ideas on paper. Then from here you can actually pick out some of the
ideas that you think are going to work in larger
artworks and you can polish them and refine
them a little bit more. Then basically make a lot more
professional art works out of this brainstorm exercise that you do on your sketchbook. It's a great way to keep your
creative juices flowing and always brainstorming and just getting your ideas on paper. That's it. That's my
exercise from yesterday. With this, we are ready to
move on to our next exercise.
51. Day 39 - Relax with Gingo!: Hi everyone and welcome back
to our creative challenge. Today we're going to do a
simple relaxation exercise. Over the last few days, we've been doing a lot of
improvisation exercises, and I think we could all
use a break right now. So today's exercise is
all about relaxation and having fun with this simple
tangle called ginkgo. Ginkgo, as the name suggests, are basically ginkgo
inspired leaves. These are fan-shaped
leaves which have two see strokes
at the bottom. Then on the top, we connect
them with a wavy line, which is basically like a fan. Then as we go inside,
we add lines. These can be as narrow
or as thick as you like. As always, you're free to experiment and add your
personal touches to the design. Sometimes I even
like to add circles or little orbs inside each of these lines or inside each of these sections just to give it a little more
ornamental value. But really it's totally
your choice on how realistic or how imaginary
you want these designs to be. Maybe you want to
use this tangle in combination with
another tangle. In that case, adding circles or adding little auras
around the leaf, or even adding small lines
or other details might help you in trying to bring unity
and cohesion in your design. Or you could just do
it like a mono tangle, the way we're doing it today. You could keep it
absolutely simple and just let go of
all the stress. Basically just enjoy
the process of drawing these shapes and filling
them up with lines. One of the things that
I really emphasize upon in any of my drawing
challenges is to have fun and occasionally indulge in these
relaxation exercises. Because, well, if you
look at it logically, the words Zentangle and Zendoodle definitely have
the word Zen in them. [LAUGHTER] Keeping that in mind, it's important to enjoy that Zen state of
mind every now and then where you let go off all expectations where you're
not aiming for perfection. You're basically just drawing a project just for yourself, where you're letting go
of all the stress and basically just enjoying
your time with yourself. That's it. That's the
exercise for today. I look forward to seeing your versions and
variations of this. Even if you choose to
keep it simple and just follow the exact same process
that I have done over here. That's perfectly fine too. Whatever you come up with, make sure that you put it up in the project section for sure. Tomorrow I'm going to see you with another
interesting exercise. Till then, keep creating.
52. Day 40 - String & ICSO : [MUSIC] Hi everyone, and
welcome back to the challenge. Today we're going to be doing yet another
improvisation exercise. But the exercise that I've
planned for today is a little closer to the
originals entangle method. Instead of doing freehand
angles or mono tangles today, we're actually
going to be working with a specific method. For this, we are going
to take a scrap piece of paper to practice
a couple of strokes. The goal here is to
come up with a string inspired by the first
alphabet of your first name. For example, my name is Rethi
and the first alphabet of my name is R. When I try
to write it in cursive, I'm basically going
to write it like so. This is basically the
letter R in lowercase. Now imagine if I have to fit it inside this
square piece of paper, I will probably just
squeeze it in like. Maybe I can accentuate
the curves a little bit more and probably make
that arc a little bigger. Now once I'm done with this, I basically have
these little sections which come out after
putting in my alphabet. These sections are what
we're going to fill up. Now, let's say if your name
starts with the alphabet a then you have these
sections that come up. Then similarly, let's say if your name starts
with the alphabet h, then we put h like so and you basically have these
little sections again. Basically, we're
not really sticking to exact cursive handwriting. You can of course accentuate a few details here and there. You can exaggerate the
curves and basically the goal is to just fill up
your paper with a string. Now, in this entangle method, a string basically lays down the foundation for what
you're going to draw next. It divides your paper
into smaller sections and it takes away the fear of
an absolutely blank paper. Once you have these
sections with you, your brain is at
ease because all you have to do is fill up
these sections one by one. It doesn't matter what
you fill them up with, because entangle
is supposed to be non-representational and
non-figurative at all times. Even if you have tangles which resemble
real-world objects, they're not really
supposed to mean anything in this
entangle method. Now for today's exercise, I would like you to
lay down a string in pencil on your paper. It doesn't matter
if the shape of your sketchbook is
different than mine. It's okay if you don't
have a square sketchbook, you can definitely do this on a vertical rectangle
piece of paper as well. All I want you to
do is just take inspiration from the
first alphabet of your first name and put it
down in an interesting string. String is nothing but
basically just a guideline or a foundation which helps you to divide your paper
into smaller sections. We always put it down in pencil. Then I would like you
to go into each of these individual
sections and fill them up with any tangles
that you like. You can even come up
with your own patterns. Take inspiration from
everyday objects, take inspiration
from upholstery, your clothes, anything else that you like and
just fill it up. If you like, you can even consider this to be a
practice exercise for yourself where you practice
the ICES and all strokes. You can basically feel free
to put straight lines, curvy lines, S-shaped lines, small orbs, circles, ovals, dots, and basically just
practice your strokes. The best part about
this exercise is that even if I put 10 people
in the same room together and I
asked them to make the exact same string and
fill it up with patterns, everybody is going to come
up with a different result, because each of you will
have your own imagination and your own preferences when it comes to filling these sections. Even if I give you the exact
same set of tangles to use, you will have your own
creativity in terms of using a specific section
for a particular tangle. Not all of you will place your angles in the
exact same way. So this is a wonderful exercise to understand what
your preferences are, what kind of strokes you like, what kind of patterns you
are gravitating towards. And basically just to have fun and enjoy the process
of making Zen art. In the future, we
will be exploring this entangle method a
little bit more in detail. But for now, I just want you to get acquainted with
the concept of strings and how it can divide your paper into small sections and how you can fill it up. That's the exercise
for today and I would love to see what
you all come up with.
53. Day 41 - Cloves, Contrast & Detail : Hi everyone, and welcome
back to our challenge. Today, we are going to
stack up some petals. Now, if you remember, in one of our earlier exercises, we had done a tangle
called garlic cloves. When we were practicing
garlic cloves, we had basically created these oval board structures and gone inside each
of them to add lines. It was a great line
practice exercise. I'm sure it helped
you to improve your line precision and control. Today, we are going to stack up petals one on
top of each other. These are actually very
similar to garlic cloves. It's almost as if we are putting one garlic clove
on top of the other, instead of linking it
like we did earlier. Now, once you place
these petals, we are going to go inside each
of these with lines again. But today we're
also going to talk a little bit about
contrast and detail. I'm actually using
my thicker pen to make these petals today, I'm using a zero
eight micron pen. It doesn't matter if you
don't have a thick pen, you can still go ahead and
do this with a thin one. We can always make the outlines a little
thicker later on. Just start off with whatever
is available to you. We'll add in the
details later on. The goal is to fill
up the entire page with these little petal like structures which are going to be basically stacked
on top of each other. We're not really aiming
for symmetry over here. Some can be big, some can be small, maybe a couple of
them are angled, left angled, right. And that's completely fine too. You can see that I'm
basically just going in a random order and filling up my whole page with these flower petal
or leaf-like shapes. Now once we have these shapes, we are going to go inside each
of these and start adding lines pretty much the same way that we did
for garlic cloves. But while making
the lines today, I'm going to use a thinner pen and this one is going to be 01. Now you'll notice that when
you use a thinner pen, you obviously have to
draw more number of times to fill up
the entire space. When you put a lot of tiny
lines close together, it appears darker because you're putting a lot
of ink on the paper. Basically putting a
lot of lines close together is going to make the entire shape
a little darker. This is going to stand out in
comparison to other shapes, which probably have lines
which are spaced apart. Those are obviously
going to look lighter. Now while you're
placing these lines, I also want you to pay
attention to the tip. As the lines are
converging at the tip, that area is going
to look darker. That's where detailing
comes into play. Now you can accentuate this
by going back onto the tips and highlighting them
and contouring them slightly to make them pointy. You can even add a little bit of curl so that they
look like they are windswept and that
they are tilting a little bit to the left or tilting a little
bit to the right. You can basically
play around with the outlines and the
contours of the shape. Going back and making
the outlines ticker also ensures that each of the shapes will stand out
against the others. This way, each
petal basically has a unique individual identity as against all of them
getting merged and mixed together
in a bunch of lines. Now you might feel that
these little steps are not making too much of a
difference on a monotangle. But when you work on
a larger composition, these steps are great
to keep in mind, especially when you want
to create contrast. It's good to have
some areas where the lines are put close together so that
they appear darker. Whereas some other areas
where the lines are not so close together or the
tangles are more spaced apart. There is a lot of paper
white that you can see through from your designs. That way you'll
get a good balance of inky saturated areas, as well as lighter
paper white areas. Refining a given shape or tangle only takes
a few extra steps. But once you do them, I'm sure you'll
love the difference because they automatically elevate your design
and give them a very finished
and polished look. I want you to take your time and enjoy today's exercise to really observe and study how
the proximity of lines work. As soon as you
finish a few petals, you'll automatically
start noticing certain darker areas in your design because of the lines that are being
put close together. In fact, when you see your
design from a distance, it might even
appear that some of the lines are merging together. That's all the magic
of working with a thinner pen and putting in lots and lots of
lines close together. This detailing adds a lot of interests and drama
in a given tangle. You will notice that the
tangle almost appears shaded. Without even picking
up a pencil, we are actually able
to create a lot of dramatic effects
with just our pen. That's the beauty
of working with these micron pens because you get them in different,
different sizes. You really able to create these wonderful effects
of shadow and light by just playing with the techniques and just changing
the size of the nib. Have fun with today's exercise. If you make any specific
observations about your strokes, I'd love to know about them
in the discussions tab.
54. Day 42 - Zentangle Inspired Project I: [MUSIC] Hi everyone and
welcome back to the course. Today we're going to be
doing another exercise which takes us a little closer to the originals
zentangle method. Now keep in mind that
the zentangle method has a very wonderful
philosophy behind it, and the steps are
quite detailed and I will be diving deeper into
it in a separate class. But I wanted to take
some bits and portions of it and include it as
part of the challenge. Because I really feel
that these steps of the original zentangled
method can put you in the right frame
of mind as an artist, and they really help you
to overcome your fears and free you of all
judgment and self-doubt. So I wanted to
include some parts of it in the challenge
and going forward, I think you will find these
steps to be very useful. Now the first step in
the zentangle method usually is gratitude
and appreciation. We basically take
a moment to get comfortable and we take
a few deep breaths and we just basically
take a moment to be appreciative of the wonderful
tools that we have with us, the people, the pen that
you're drawing with, if you're using color pencils or any materials that you have, we just take a moment
to be thankful for the fact that we have
these materials with us, and for this
wonderful opportunity to be able to create
something beautiful. The next step is to put
in the corner dots. The corner dots are not really meant to create a boundary, but they're basically
supposed to take away the fear of a blank paper. The minute you put
your corner dots, you basically don't
have a blank piece of paper with you anymore and so you've crossed the first
hurdle that most artists face, which is what to do with
this blank piece of paper. The next step is to
add the borders. We basically connect
the dots with a thin, light pencil line and these lines don't really
need to be straight. Right from the moment your
pencil touches the paper, the zentangle method
allows you to embrace mistakes
and imperfections. So when you're
connecting the dots, it doesn't really matter
whether your lines are straight or curvy or wavy, it doesn't matter at all. Then comes the string, and I already gave
you an example of this in one of our
earlier exercises. In this case, what I'm basically
going to do is take it from the top edge and then
make a loop over here like so, and bring it back and connect
it to the other edge. Then comes step 5. Step 5 is basically to add
the tangles or the patterns. Now, in the zentangled method, a tangle is basically a
predefined sequence of strokes. Which means that every pattern that you decide to fill up in these spaces will follow a
specific sequence of steps, and that's what makes it easy for us to get in a Zen
state of mind because you're putting repetitive
strokes over and over again and so your brain basically
goes in a Zen mode. Now, as I've also
previously mentioned, patterns and the
zentangle method are usually referred to as tangles. We basically draw the tangles inside each of these sections using our micron pens or any other fine liner pens
that you have with you, and the reason why we don't
do this in pencil is again, because the whole concept of zentangle is to let go
and to basically just give your inner
creativity a chance to put things on paper
with absolute confidence. When we put things in pencil, then we often feel tempted
to go on a path of perfection and we tend
to erase things and we basically just get absorbed
in the process of perfection, which can sometimes really restrict the growth
of an artist. It's important to let go
of things every now and then and so when you are
basically using a pen, you are actually committing
to putting those strokes on paper and if
something goes wrong, well, the good news
is that there are no mistakes in the
zentangle method. If you feel that
any stroke that you were putting did not
go as you intended, then you can just work around it creatively and we
just basically find a solution and either we repeat the same stroke so that it becomes a new
pattern altogether, or we basically just
work around it with another tangle and
creatively find a solution to that little unintended
stroke that you've put. Just remember the
idea is that there are no mistakes and
whatever you draw in your pen is basically the final stroke that you're
putting on your paper. I think by now
you've figured that the zentangle method is very
forgiving in that sense, and it really lets you
accept and embrace your imperfections as you're drawing on your piece of paper. Now coming back to placing our
tangles in these sections. As you can see, I started
off with the first section, which is the loop over here, and I've started to
fill it up with flux. I'm basically just
filling it up one by one and progressing towards
the edge of the paper. Now, keep in mind that the
pencil lines that we have over here are not supposed to
act as strict boundaries. You can see that some of my flux elements are basically
crossing over the boundary and so what that
basically means is that the pencil lines are only
supposed to be guidelines, and they're not really
setting stone, so to say. When you're drawing
your tangles free hand, especially when you have specific shapes in
the tangle elements, don't try to walk them or
don't try to control them or cut them just so that they
can fit inside the string. That's not the idea over here. Now as I'm moving forward, I'm basically going to
just add a few mucus and I'm going to keep the
mucus on two sections. Again, like I said, I'm not really going to follow the pencil guidelines to the t. The string is eventually
supposed to become invisible. So I'm going to actually draw the mucus freehand almost as if there are no pencil
guidelines to follow. Now, I'm going to go inside
each of these sections and start filling them up
with different tangles. I think by looking at me, draw right now you've got
a sense of the process. Your exercise for today is to
basically draw this string, the looped string that
I just showed you and fill it up with
tangles of your choice. You don't have to do
the exact same thing that I'm doing right now. This is just to
give you an example of how the zentangle
method works, and to show you the process. But now that you've seen
me do the corner dots, the borders, and the
string, and the tangles, I would love for you
to try this with your own set of tangles or with your own
preferred patterns. Keep in mind that the pencil guidelines
should eventually be almost non-existent or almost invisible when I see
the final output. Again, of course, I will
see a little bit of the influence of it because
when you're drawing it, of course, I'll understand the influence of the string
on your particular design. But it won't really
be as really take hard boundaries or
outlines so to say. That's the exercise for today. You are free to choose
any other tangles that we have done over
the last few days, or you could even come up with your own tangles or if you know any other tangles from
the zentangle method and you'll feel like you want
to use those over here, feel free to mix
and match tangles of your choice and fill up the string and I'd love to see the composition
that you come up with. That's it for today and I
will see you tomorrow with my zentangle inspired
art project.
55. Day 42 - Reveal : Hi everyone, and welcome
back to the course. This is my finished
exercise from yesterday, and I think I showed quite a lot of it in yesterday's
video itself, but you can see some new
additions over here. You can see I've done some of these beaded lines
or these wires, and then I've basically done
like some abstract shapes on the top where I fill them up with lines in
different directions. Overall, I have kept the
motifs really simple, but I have played in
terms of direction, in terms of movement, and how the composition
is flowing overall. For example, if at the
bottom I've done a lot of spirals and there's a lot of paper white for
just showing through. I've compensated for it on the top by adding a lot
of inky black areas. Then because the
entire composition on the right side is inky
and heavy on black. On the left side,
I basically just added a little bit
of breathing area by letting most of it be white and then adding these
10 beaded wires, which are giving
a nice contrast. This is my composition
from yesterday, and I would love to see all
your compositions as well. With this, we are
ready to move on to our next exercise. [MUSIC]
56. Day 43 - Zentangle Inspired Project II: [MUSIC] Hi everyone and
welcome back to the course. I hope you enjoyed doing
yesterday's exercise and I hope that it gave you a
gist of the Zentangle method. Like I said, the original
Zentangle method has a lot of steps
and we've actually done quite a few
of them up until the point of filling
zetangles inside the strings. However, the original
Zentangle method also includes shading. As I said, we'll be
covering that in a separate class because
it's a wide topic and I'd like to give
a complete justice and so we'll be doing
that in a separate class. But now for today, I'd like you to try another Zentangle-inspired
project where I'd like you to
basically start off with your corner dots
and then connect them with the borders and it doesn't matter
whether they are wavy, they're straight, curvy,
it doesn't matter, just as long as we are
connecting the dots. Now, inside this, we're going to lay down
a string and the string that I have chosen for today
is the classic Z string. This is the string that
Zentangle beginners start off with it and we basically have four sections once we
place the string like so and now your
exercise for today is to go inside the
string and fill it up with four tangles that I'm
just going to show you. The first one is going
to be Hollibaugh. We've tried Hollibaugh
a couple of times earlier and it's basically a very simple tangle where we put these stick-like structures. This can be wavy or straight
and we're basically just understanding the concept of layering as we go along. We layer the sticks one
on top of each other. The next tangle that
I'd like you to try for today's project
is crescent moon. Again, we've done
crescent moon earlier, but here's a recap. We basically just put these little semicircular
structures and then we start to give them auras and
we keep building the auras right up until
the middle of the section. The third tangle that I'd
like you to try is toodles. Again, toodle is something
that we've tried earlier. We basically start
off with a stem, put two little
fescue-like elements, and then we create a
leaf round it and now this leaf can be as plump or as narrow as you
would like it to be. We've done many plump
versions earlier, so I thought I'd show you a
slightly narrow one today. Then the fourth tangle that
I'd like you to place in your Zentangle project today is going to be knight's bridge. Knight's bridge
is basically like a checkerboard pattern
and you can either do this with straight
lines where it almost looks like a standard
checkerboard pattern, like a chessboard or
you can do it with curvy lines and then the curvy lines can be
S-curves or C-curves. Here, I'm doing a version
with slightly wavy lines. Basically, we just fill them up alternate black and white. These are the four tangles that I'd like you to try today. Basically, the
goal is to fill up the Z string with
these four tangles. Now, the interesting
thing to note over here is that even
though I've given the exact same string and the exact same set of
tangles to all of you, each of you is going to come up with a different version
and variation of this project because
all of you are going to place the tangles
in different sections. In that way, a Zentangle is basically an
exciting art form because everybody comes up with their own version of the tangles that are
presented to them. Each of you will come up with your own unique versions and
I look forward to seeing all of those projects in the
student's projects section. Now, when you're
doing this project, I want you to keep in
mind once again that the strings are basically not meant to restrict
you in any way. Don't let those
pencil guidelines stop you or restrict
you when it comes to tangles that need to overflow or that need to cross
the boundary, so to say. For example, if you're
drawing toodles, don't try to warp it or
don't try to control it just to fit it
inside this Z string. If you feel like
your toodle leaf needs to cross
over the boundary, please, feel free to do so. Basically, just have
fun with this project. Take your time and just enjoy the process
and once you're ready, put it up in the project section and I'd love to see what
you'll come up with.
57. Day 44 - Composition Hacks: [MUSIC] Hi everyone, and
welcome back to the course. In today's lesson we're
going to be talking about some simple
composition hacks. Usually when I start working on a Zendoodle design or a
Zentangle inspired art piece, I allow myself the freedom to do whatever I want without
any prior planning. This truly helps me to get
into a Zen state of mind, and it takes away my
fear of perfection. I honestly believe
that any form of Zen or meditative art should
be done in the same way. But does that mean that I
completely switch off my brain? Well, honestly, no. Just like many of you, even I like to have at least some sense of violence and harmony
in my designs, which means that I want to have a free flowing
organic field, but at the same time,
I want my artwork to look slightly professional
and polished. Here are some hacks that help me in the process of achieving a perfectly balanced composition that I'm happy and
satisfied with. Number 1, choose a focal point. Now, if you're not
working on a mono tangle, and you know that you're
going to be working with a mix of patterns in
your overall design, then having some
tangles bigger than the others is a good
starting point. While doing so, I also get ideas on what complementing
tangles I should choose. For example, in the
composition here, where we did a manning, there was a spiral and circular language to
the whole tangle, which inspired me to
compliment it with printemps. Also having two big
focal elements helped a lot because had there been to many small m-annings
floating around, then the design
would have probably been a little cluttered and they would have all gotten
lost along with the print arms because
of their similar nature, and even the bubbles
for that matter, since the bubbles
are also circular. The design would have
looked a lot more cluttered than the way
it is looking right now. Number two, play with contrast. Now, very simply put contrast
is the arrangement of two opposite elements
in the same design such that they look
interesting and impactful. For example we can do
contrast of color, where we do a white
flower against a much darker background so
that the flower stands out. Contrasts can also
be done with size, very similar to
what we were just talking about a couple
of minutes ago. When you have one large element against other smaller elements, your larger element is
going to stand out. Contrast can also
be of texture, e.g. smooth textures against rough
textures or vice versa, and while we're
talking about that, let's also talk about
adding contrasting details. E.g. in the nanole, we did these hairy centers which were a nice contrast to the otherwise wavy smooth
borders or edges of the leaves. The bottom line is
that whenever you have opposite elements juxtaposed
in an interesting manner, your overall design is going to look a lot more compelling. This is the reason why I also like to have a
contrast of shapes. For example in this composition, we did a couple of shapes
which were more organic, so for example we
had the flux echoes, which basically have C strokes, and then we had organic
tangles like book leaves, which are basically floating
around like money plant. But to give it a certain
sense of contrast, we had a structure
tangled like Holly Bow, and so the straight
lines basically gave us a certain
amount of structure while the other designs
were organic and so the composition looks
a little interesting. All right, now moving on to my third tip, ditch the string. I know I've said this earlier
in some of our lessons, but this is a tip that totally
deserves another mention. Do not let your string
or any template restrict you in any way when it comes to filling
up your tangles. Let your tangles breathe
and let them cross over the boundaries for
your design to have a more cohesive feel. That when somebody
looks at your design, they should see a beautifully tangled and connected
composition instead of individual shapes. As you practice more, you will notice that some tangles can be
connected to each other, and you can actually
make the edges of your tangles a lot
more interesting. For example, here, I have a work in
progress artwork where instead of using the standard
crescent moon shape, I actually converted
it into black balls. The circular shape makes the overall tangled
look very interesting, and so now the string is
a little less obvious. Similarly, if you have a mocha
somewhere in your design, you can actually
use the stems of the mocha to start a
Holly Bow pattern. Or if you have a
pattern likes spoolies, you can actually go ahead
and start giving it some echoes very similar to the
way we did it in m-anning. Basically, feel free to
transition from one tangle into another by combining elements
of those different angles, or you can just come up
with your own designs as fillers so that when you move from one angle
to the other, the transition is smooth and the shapes or the strings
are less of this. Number five, sense of direction.
Now here's a heads up. In the pillars and
tangled method, the founders have emphasized on the fact that there
is no up, down, left, right, top, bottom, well basically no sense of
direction to your artwork. They are basically
made on square tiles, so that you can actually rotate them in any direction
that you like, and you can choose the top, bottom depending on whatever you feel like on
that particular day. Basically, what
that means is that Zentangle artwork
does not really have any correct way of framing it or any
correct orientation. However, I know that
there are a lot of artists over here who would want to use only certain portions
of the Zentangle method and would want to include it in their overall artistic journey, and sometimes it
does happen that you have a certain side up
or certain side down, or the correct orientation
of a particular artwork. In that case, having
a sense of direction in your overall design
definitely helps. E.g. now, in this particular
composition that we made, all the leaves are facing
a certain direction. Even though the flux echoes are basically all bunched
up right now. There is a sense of direction or a sense of
travel for the eye. When somebody looks
at this artwork, they would usually start
from the bottom right, and basically they would
see the direction as going top-left simply because of the way the leaves are put in
that particular direction. What this basically
means is that whenever you develop a large composition, you should be able
to guide the viewer in terms of their
viewing journey. They should know what
exactly the focal point is, and then from that, their eye should travel to the other lesser
important elements. It could also be that the brightest element could
lead to the dallas element, and so on and so forth. Of course, when you
play with color, then there are even more ideas on how to bring
sense of direction, which we will be definitely exploring in some
future classes. But for now, just keep
in mind that it helps to have a certain trajectory or a certain sense of direction to your overall composition so that when somebody looks at it, they know exactly what to focus on and how their
eyes should travel. Now your assignment for
today is to basically pick up an old composition
and rework on it. The composition can
be from this course, or it can be any
other design that you have made prior
to this course. All you need to do
is basically pick one composition
and rework on it, keeping in mind, these tips are hacks that
I've shared today. Try to have one focal point, try to have some
contrasting tangles in terms of shapes and sizes, try to have a decent
amount of variety. But at the same time, try to make your design look cohesive and all connected
with each other. Basically, just try to rework your old composition
with a fresh pair of eyes and try to compare and see how far along you have
come in your journey. When you're ready, I would love to see your work in
the project section. It'd be great if you could put the original composition as well as the revolt composition. It's easier for me to compare
and give you my feedback. If you want to do more versions are more number of reworks. You're free to do as
many attempts as you like to that same
piece of design, and I promise you,
every time you're going to come up with
different results. That's the project for today, and I look forward to
seeing you tomorrow with one more
interesting exercise.
58. Day 45 - Mooka Garden : [MUSIC] Hi everyone, and welcome back to our
creative challenge. Today we are on Day 45, the final day of our
creative challenge. I'm so happy to see all the progress
that all of you have been sharing with
me on social media, as well as over here in
the project section. It is always a visual
treat to my eyes to see all the wonderful variations and projects that you
keep on posting. I'm so glad that all of you decided to take
this journey with me. Now, for Day 45, I want to leave you with
something familiar, but also with a little bit
of room for improvisation. I thought we could
go back to one of our simpler tangles that we have done in the earlier
exercises, which is mocha. Instead of using a string today, we're actually going
to use lots and lots of different mochas as outlines or shapes that we're further going to fill in with
different types of tangles, patterns, designs, whatever
you want to call them, and whatever comes to your
mind when filling this up. Basically, the goal is
to draw lots and lots of mochas all around and keep rotating your sketchbook to create this entangled
mocha garden. Then once you have lots
and lots of mochas, just go ahead and fill them in with different types of
patterns and designs. Again, this is to remind you that on days
when you're feeling uninspired or on days when
you just want to unwind and relax and don't
really want to push your brain to think about a lot of different
creative ideas, you can always go back to the method of drawing shapes and outlines and filling
them up with whatever patterns come
to you intuitively, working with Zen doodles and the Zentangle method
should not be forced. It should really come
from within you, and it should really
happen intuitively. It should happen when you feel that you're in the right
frame of mind or urine, a relaxed state of mind. Or even if you're stressed, then the goal is to
eventually feel a little better or feel
a little relaxed. Basically whatever you put on your paper should
come intuitively, and it should be
free of judgment, and it should be free of
any fear for validation. I hope that you've had some wonderful takeaways
from this course. I hope that these
thoughts will stay with you as you continue
your journey forward. I really hope that
you all benefit from these exercises and include
them in your daily life. So that's the
exercise for today, and as always, I look
forward to seeing all your wonderful
versions and variations. With this, we finally come
to the end of our challenge. Thank you so much once again for taking
this challenge with me and I look forward to
seeing you in another course. Bye, bye. See you.
 Ridhi Rajpal, Artist + Film-Maker + Educator