Transcripts
1. Introduction To the Course: Hi there. My name is Sean Fowler and I've been a 3D freelance artists for ten years and a ZBrush
artist for almost 13 years. And I'm here to give you
an in-depth tutorial in ZBrush 2021, hard surface
sculpting beginner to advance a course designed to all levels for anyone
interested in learning or developing hard surface
sculpting techniques. Here, we'll take you through a basic rundown in the tools
needed for you to establish a foundation in your
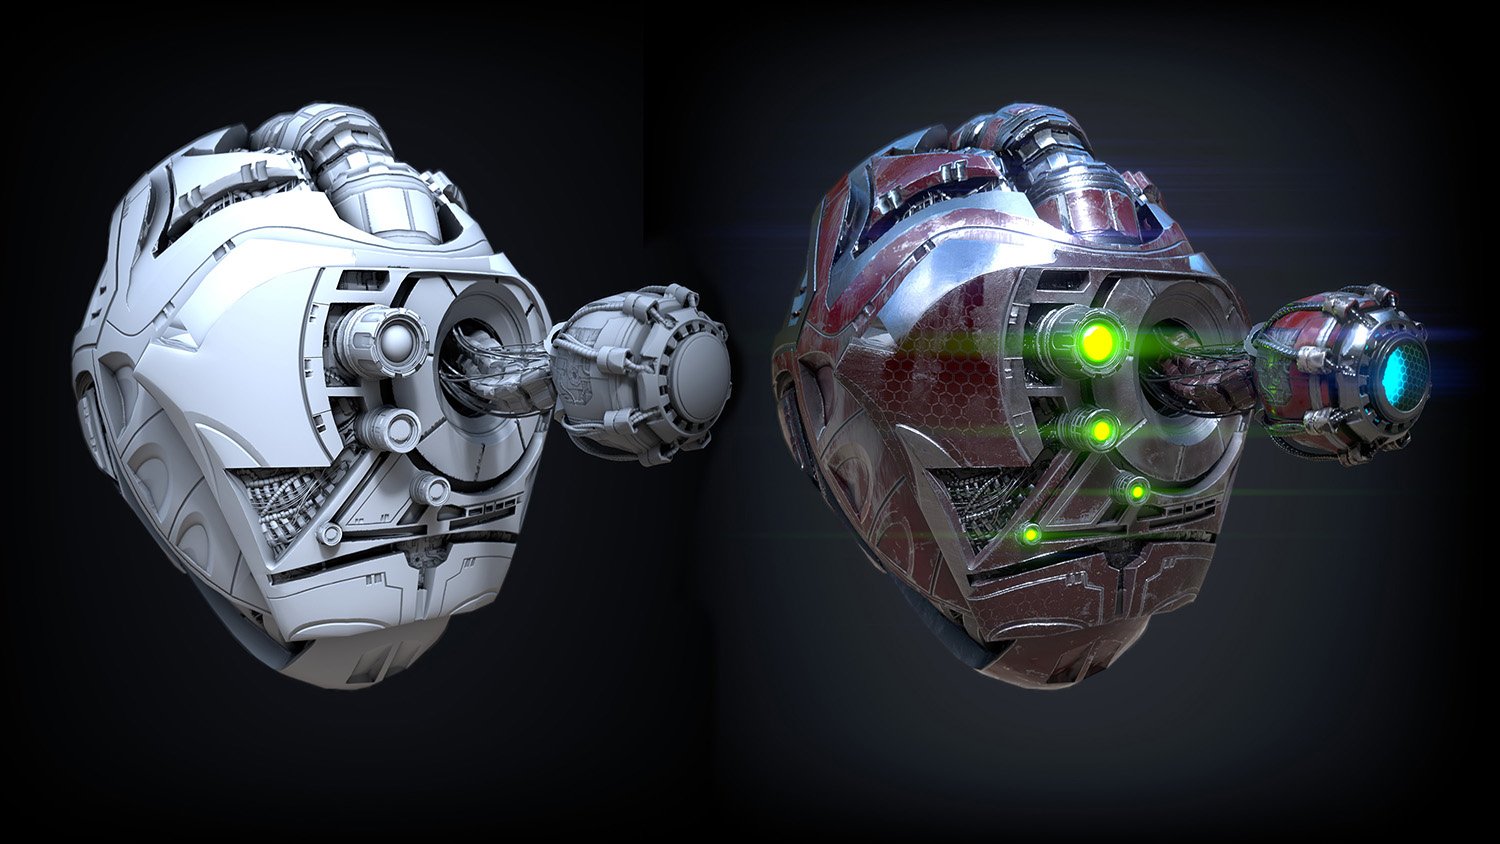
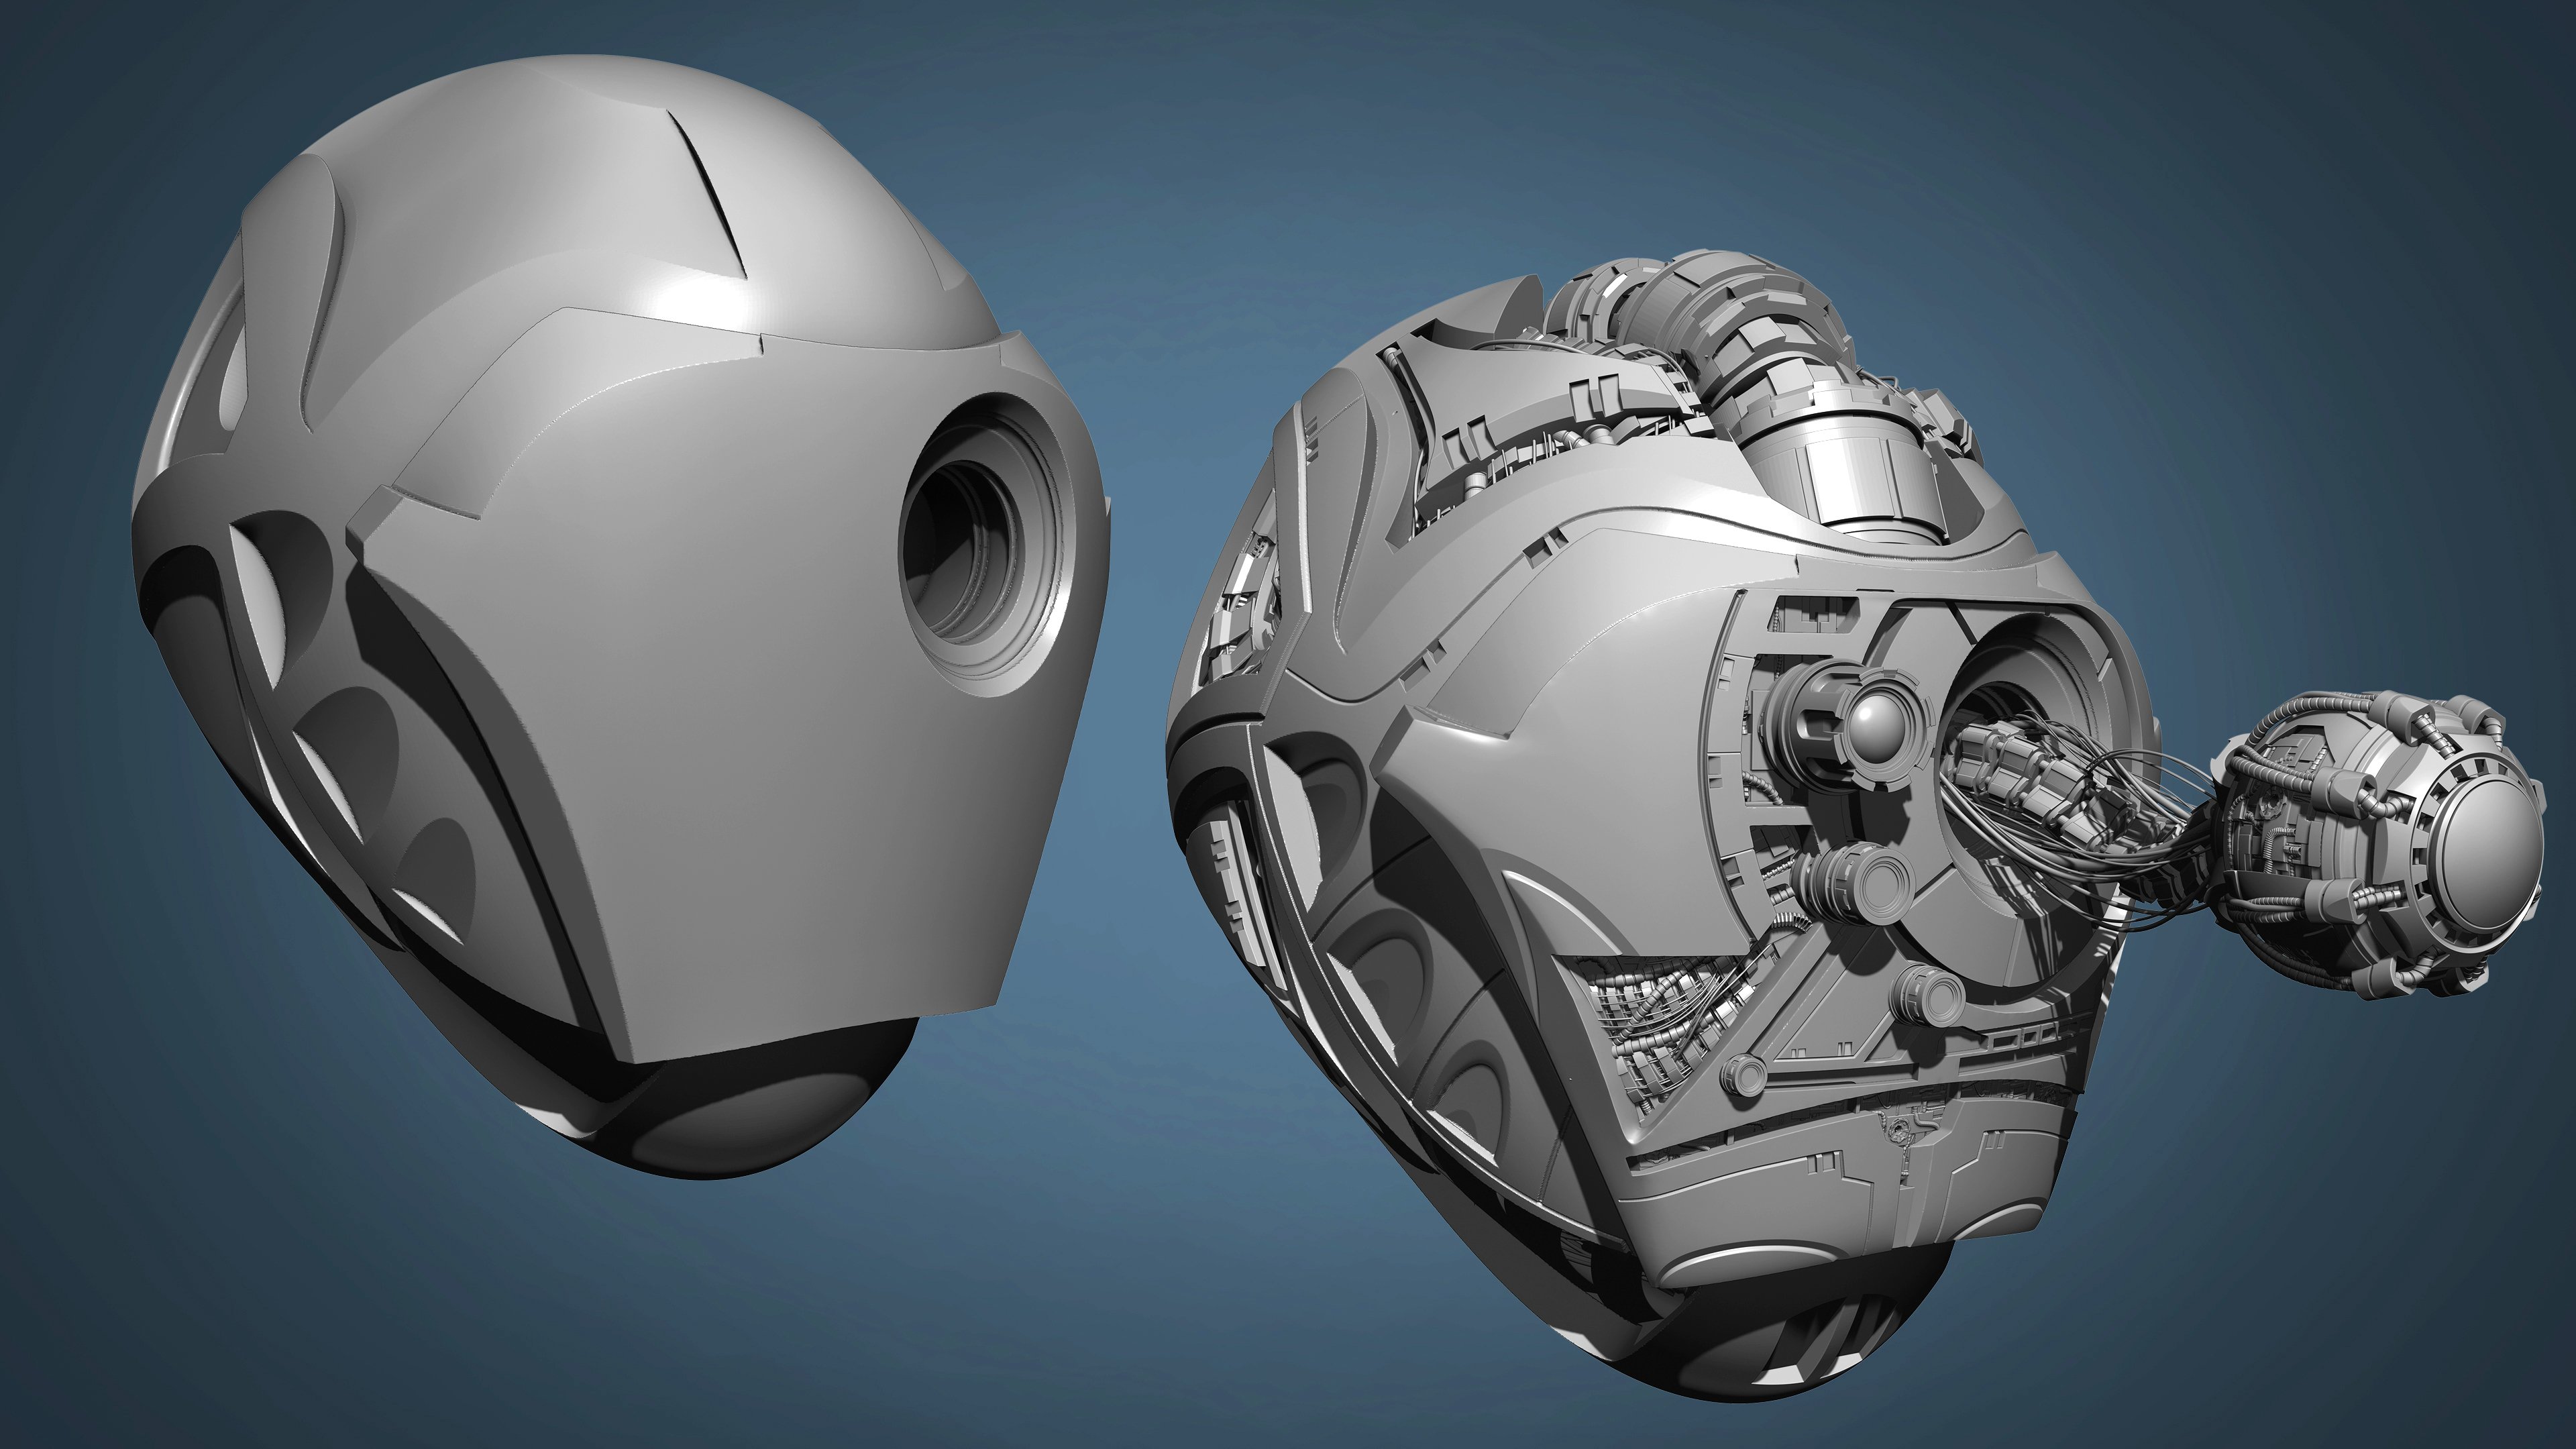
sculpting arsenal in order for you to craft your hard surface subject piece, the brave space turtle. Now to that end,
we'll supply you with a base mesh where
you will learn and practice all of our unique
quit sculpting techniques and tricks to reveal not only how easy it is to create
hard surface sculpts, but to also demonstrate
how modularly efficient it is to reuse pieces to
expedite your workflow. Now, some of the things
we'll cover are as follows. We'll start you off with
a beginner section to develop a solid foundation
in mastering in 0 measure poly groups and their relationship together
with other ZBrush functions. We'll go over learning the primary and
secondary functions of the new knife curb brush. And then from there we'll cover an understanding of the
gizmo transformed to formers and how important of a combination it is with
the knife curve brush. Now, additionally, we'll have
other things such as how to problem-solve 0 measure
through dynamic thickness. And finally, we'll cover some of the other
functions of ZBrush, such as hard surface
modeling tool Z modeler, along with a breakdown
to live Booleans. Now, by the end of this course, you'll have gained a
necessary knowledge and understanding just how
fast you can flush out a complex shapes through seed brush in just a
short amount of time, as well as half a
fully complete, brave and courageous
space turtle. Now with that said, let's go ahead and
start sculpting.
2. What To Expect Here: Okay, so let's get started. In this video, we're
going to outline our curriculum to help
identify what to expect. So you have a little
bit of context as you progress
throughout this course. And we're also going to assign some guidelines to help you out in terms of getting the
most out of this course. I in, I think to that end, we might just start with those three top guidelines
to help you out here. Now the first guideline is this. Please, please, please
re-watch the video. Now, that's an important one
to grasp because of this. And that is that this is
a video online course. So that means that
you're looking at the biggest
advantage about it is, is that what you're learning
can be set at your pace. What you're learning can
be stopped, rewound. And as a result, if you stop and rewind, you nine times out
of ten will pick up something new that you missed from the first
time he saw it. And I can't even begin to
stress how often that happens. If there's anything
that feels confusing to you about the video or
anything like that, please, please please consider re-watching the video again. It really, really does help. The next, the guidelines
that we want to give you is that we want to talk to
you about the Quick Keys. Now the quick keys in ZBrush are a process that helps
understanding the quick keys in ZBrush are process
that help expedite your workflow and helps get
you your results quicker. It makes sculpting,
quite frankly, a lot more fun as well. So as a consequence, you're going to hear
me constantly call out that narration of the quick
keys very often throughout. And that's just something that I don't mean to annoy anybody, but I just want to
make sure that as I do repetitions of calling
out the quick keys, that it gets really
ingrained into your head. So please forgive me if
I try to ignore you, but I'm always gonna be
calling out my quick keys out loud as I go throughout
the video of each course. With that said,
we're gonna be left with our final guideline and that is surpass the concept. Now, surpassing the concept is a very big one
because this is one that allows you to
grow the most as far as learning hard surface
sculpting in this course. So let me go ahead and
give you an example. What I mean when I say
surpass the concept. Basically in a nutshell, it means whatever I've
made in the video, challenging be advanced users. It doesn't necessarily have to be the beginner or
the intermediate. But if you're an advanced user, I am challenging you
to surpass what I have because I want
you to grow beyond it. So a good example of that
is in a earlier video, we'll go over
something regarding live Booleans and how we use live Booleans to cut into
the base mesh of an arm. But as we progress
further down the video, we'll go into how we
create a hard surface sculpt of a one of the
chest pads on our turtle. But you'll notice there are
no live Booleans on there. But that doesn't mean you don't have to put live
Booleans on there. You can take what
you've learned in the past and reapply it, or reapply the concept of what
you learned and maybe use a cube to do bevels
and certain angles. We just want you to get creative and grow beyond what
it is we teach you because that's a
very important part in developing your hard
surface sculpting skills. With that said, I'm going to
now go ahead and outline to you real briefly on all what to expect
throughout this course. Now to begin with, we have a section
one introduction. This is mainly for
the beginner user who has an ever really
opened up ZBrush. And it's just to help them
identify all the mate, the three main
sculpting features that we're going to be
using in ZBrush. And we're gonna talk about them. If you are long-time user
or an intermediate user, or even a beginner user
that's opened up ZBrush. You can, I would still recommend beginner
users go through section one, but if you want, you can skip section one. The only thing I ask is that you take a
look at lecture four, which is painting
brushes with accuracy. Because we're gonna
be working with the ZBrush 2021 feature knife
curved brush very often. That's a new feature in ZBrush. That's kind of a game changer for hard surface sculpting and being able to know the spacebar
trick of panning curves. That's gonna be a very
important one to go over. So with that said, let's go ahead and
move into section two where we officially begin our creation of
our turtle character. This is where we bring in
a base mesh and we use as sort of like our
subject piece to begin, all are hard surface
sculpting and. That are practicing of combinations of
different techniques. And we'll go over things like the knife curve
brush the detailing, how to create things like
array meshes will even find ourselves creating a
spare parts folder that we will be
reusing constantly. And also using to flush
out even new shapes upon new shapes with that
one's gonna be a pretty fun one to sort of
get your feet wet on. Moving forward. We're gonna move into
leg Construction, LLC construction is
sort of an eye-opener regarding how to teach
modularity with what you've made already
and how to recycle it to make a completely
different shapes. That's gonna be a very fun one because that by the end of that, you're going to learn how
you can get away with expediting your workflow and
cutting your time in half. Pretty fun one, and of
course we'll end at that one with how to do decimation
and mirroring over. Now, lastly, we're
going to start turning the difficulty up with you
by doing the chest creation. Now this one is going to have
a difficulty rating for you because what we're going
to do is we're going to challenge you more and more, where we're going to make
an example of a chest pad. And then we're going
to apply that pass the concept aspect to you on. And we're going to
try to get you to create a similar piece and give you the
designated shape that we'd like you
to make out of it. And then afterwards,
we're gonna compare notes between your chest
pad piece in mind. With that said, moving
forward in section five, we're just going to
take a little break and have a little fun
with doing creating shells and how we can duplicate mesh materials and be
a little bit modular. By decimating that down, we're going to kind of build off of our knife curved
quite often in this one, in its secondary feature. And how we can a lot of fun with plainer cut brush with that one. Now, finally, at this point we're coming towards
the end of Section six. This is where we're detailing
the head and helmet. And this is the fun
one where we can just have a little bit of
fun with the character. Put on some eyebrows, eyelids, and just have some
fun with a facial expression. Go over some Polly
painting techniques, and then of course, finish off with some
micro mesh for the cloth. And maybe do some quick
transparency demonstrations for you to help show you a
render setting for that. So with that said, that's the outline
of the course. And again, one thing we just keep saying this over
and over again is we are strongly adamant about you surpassing us and
experimenting beyond the video and combining concepts of what you've learned in
previous videos to apply overlain onto what we're
making currently because we really want you to have fun
with experimentation here. So with that said,
let's start sculpting.
3. User Interface Introduction: Okay, So let's begin this video. We're gonna go over ZBrush is user interface and how to
bring a mission and go over things like subdivisions
and some of the other tool palettes that we can actually
commonly used in ZBrush. Now, this is mainly for
that person who may never have opened up
ZBrush ever at all. So if you've already
know about this, then you might want
to skip this video. But for that very,
very first-time user, this will be a helpful
little guide for you. Now to begin with, when you open up ZBrush, you're going to
probably be met with this little tab shelf here. And what this is here
is the lightbox. And now the lightbox
is sort of like a feature built-in with ZBrush that compiles a system of folders that are
like resources that assist you in helping you create your sculpt no
matter what it might be. And it has a lot of varieties
from project folders. You can start off
with demo heads or even past brushes from earlier versions of ZBrush
that you can go through. We even have alphas that
you can cycle through. So it's a pretty nice
little spice rack to help you figure out
where everything is. Now. For now, let's just go
ahead and make that disappear so we can see
our full view port here. Now, to do that, we'll just either
left-click on lightbox or we hit the Comma key. And Lightbox, we'll just
go ahead and disappear. You can hit the Comma key to
bring it back and so forth. Now let's go ahead and
just talk to you a little bit about
bringing in a mesh. Now to do this first, let's go to the tool setting
and hit left-click and drag. Now you may think in your
mind that you can rotate around this tool by left-click
dragging into empty space. But if we do that, you'll notice that another
primitive comes up. That's just because
this piece is existing currently
in 2.5 d mode. And that's sort of like a
Canvas pilot mode where you can kind of do all sorts of
repeatable texture patterns. But that's not really what we're gonna be doing in this course. So to clear this, we can hit Control
N or Command N. Well, let's go ahead
and try that again. Left-click drag. And to make it a mesh, we can rotate around
into 3D mode. Let's just hit the T key. Once you hit the T key, you may think you're
ready to sculpt, but ZBrush has this funny way of having two conformations. And that is first you
have to hit the T key, and second you have to
hit make poly mesh 3D. If you do not hit
make poly mesh 3D, you're just gonna get a pop-up here that kind of shows you what you can and cannot
do and reminds you. Go over here,
left-click on that. So this is kind of how we make a mesh ready and able
for us the skull. Now, if you left-click
drag you notice you'll be able to manipulate
the mesh as you can see, but as you can see, we have a very low
resolution here. So what I'm gonna
do is I'm going to hit Undo on this by
hitting Control Z. And I'm going to give it a couple of
subdivisions by hitting Control D. Now when
we try to sculpt it, you'll see a much
finer resolution. And when you hit left Alt, you'll be able to sculpt inward or if you want
left option button. Don't forget if you
want to undo anything, just click on that
orange bar and left-click drag all the
way to the beginning. In addition, you can
hit Command Z or Control Z one at a time to
undo exactly what you want. With that said, that's
sort of just the basics of basics that we
could go over to. Last thing on divisions that
we'll talk about is is that we can also go through
if I hit Shift F, We can go into wire-frame. And from there we can hit Shift D to go to lower subdivisions of
which we originally had, and just regular d to go to higher subdivisions
of what we had. So if you're a beginner, just practice on this stuff. Just practice on getting to
know this stuff very well. Now, once you are
comfortable with this, feel free to come up to here and where it says brush
and left-click drag. And you will see a whole array of different brushes
that you can do. And what these do is basically displaces the geometry
very differently. To change the size of the brush, you can go up to
draw size like so. Or you can hold the
space bar down and make that draw
size bigger there. Because holding spacebar
will give us a nice little. A quick access to our draw size. In addition, there will be a intensity slider here as well. And the higher it goes, the more displacement
the geometry. We'll go. Be careful though. You'll see a little bit
of little bit of tearing. That's what happens
when you exaggerate it. But that's okay because
once you hit the Shift key, which is smooth, it will relax all that geometry
back down like that. That's a very important
part when it comes to things like
organic sculpting. Where you sculpt in a groove
and then kinda make it seamlessly blend into
its outer surface. I'm going to hit Shift
F to go out now. Or I could just simply drag the slider back to
a certain area. Now, we would say
we're gonna go over the user interface
plights, pallets. So what we're gonna
do here is we're gonna kinda go take
it over to here. The two areas that we're
going to cover the most are going to be
sub tool and geometry. Now, sub tool, if we left-click drag
will have a drop-down. And what this is is
it's like a way of arranging and organizing of all the different
separate meshes into their own unique editable state. For example, here we just have one sub tool because
we have one cylinder. If we go through and duplicate this sub tool and I'm
going to hit W key to access my gizmo to translate
this sub tool across. You will see I
made two sub tools and there are now two cylinders. In addition, I can make edits like turning this
sub tool on or off. Or I can turn this
sub tool on and off. Keep in mind when
you turn this off. If you're still on it, it will stay active
until you leave it. Now, the last thing we'll say
is that it's important to understand a quick key which
is left Alt or left option. And you can switch between
the different sub tools, which is a lot easier
than having to go through all the long list
of sub tools to find which one you're
wanting to go with. So keep that in mind. Now, there's gonna be
a lot more that we go over regarding sub
tools like merge. Boolean functions are gonna be another one that
we talked about. But this is a kind of
introducing you into it, easing you into a byte, getting just the basics down. With that said
that's the sub tool. Let's go over to the
geometry and finish there. Now the geometry pertains to the editing state
of the mesh itself. For example, we have a display
of our subdivisions here. And if we want just
as we hit Shift D to cycle through the subdivisions and D to go all the way up. We can also drag our
subdivisions up and down. One thing I'm gonna
have you take note is there is a delete lower button. And what that is is it's
a button that record that deletes the lower
subdivisions below it. So if this is your
highest subdivision and you hit Delete lower, well, that's probably
going to make all the subdivisions before
you're not gonna be able to. If you hit Shift D, you're not gonna be able to do very much. You can always hit Control D
and create new subdivisions, but add wouldn't really
make much of a difference. This is very important though, because Delete lower requires, there's a lot of
ZBrush features that require delete lower
to be accessed. So it's gonna be important
that you remember this button. Now with that said, we also have some other Pete, other pieces of the
geometry components such as edge loop, creases, which have concepts
like bevels that we can do. And we have a very
common one right here that we're gonna be
accessing very often, which is going to be the Z
remeasure function in ZBrush. Now this is a very important
hard surface feature because it reads 0
machine allows us to tap into things like CSI
modeler or clean topology, etc. So that's down the road again, like many other things, all we wanted to do though, is just give you a heads up to two things that a sub tool, geometry are going to be. The two tabs you're going to be accessing the most
throughout this course with poly groups
probably coming in at third place because you're gonna find yourself assigning
a lot of groups. And then fourth place
will be deformation. In there. You're probably only going to
be using mirroring because that's the only reason we
would use it is just a mirror, things like our
hard surface arm, hard surface legs, so forth. Now, again, we go over that
as the course progresses. This is just easing you in
very calmly into all this. All I recommend you do
for now is just get on an intimate understanding
in sculpting things. Maybe by pressing the B key, hitting one of the brushes here and just experimenting down and seeing their effects. Holding down the Shift key to
see how you can relax them. Holding left Alt key may
be giving more geometry, just giving yourself a sense of practicing all of these things. So with that said, we're going to cover our very first hard surface
ZBrush function, which is going to be
the knife per brush. With that said stick around.
4. How Knife Curve Brush Works: Okay, welcome back. In this video we're
going to go over our first major hard
surface sculpting feature, the knife curve brush. And again, this
is a 2021 feature here that we're going over. The knife curved brush
has a primary mode and a secondary mode in which
we're both gonna go over. So with that said, building off of
what we learned in the last video for
our beginners, we're going to just repeat again so that you
can be caught up. Now first off, I'm
going to clear my lightbox by hitting
the comma key. I'm going to left-click
drag on that cylinder and left-click drag
into our viewport. I'm going to hit the T key
to make it a 3D object and make poly mesh 3D to be
a sculptural object. From this point on, Let's access our
knife curve brush. First things first, I'll
hold Shift Control. And if you look up here, when I hold down shift control, you're going to see it's the switch from brush
to select rectangle. Let's click on that
and ridge us that to access our knife, a brush. Now, knife curve brush
has a activation state. Now if you can see
it's in standard, so it seems like
nothing's changed. But if you hold
down Shift Control, you'll see then the knife
curved brush is there. So if I hold down Shift
Control and drag out, you can kind of see it kind
of works like clip, curve, brush if you're
ever familiar with that, with one difference. And that is, is it cuts
off the geometry and fills in a poly
group right there. Now, there is another brush in ZBrush that does
something similar. It's the trim curve brush. However, at this one's a lot
cleaner because it gives us a cleaner topology in an
handles angularly better. In addition, it also has
symmetry mode as well. So knife curved
brushes, a very, very, very big step of an
improvement for ZBrush. So with that said, if we go ahead and
hit the X key, will notice that
when we draw it out, it does work in symmetry mode. But if we go into
the other side, it's symmetry mode
will be deactivated. And in addition to that, if we divide it a couple of
times and try to divide, you'll notice that it
will not go through. That is because again, if you remember on
the last video, what button to remember
under geometry, it's that delete lower. Now again, there's a lot of
functions in ZBrush that require you to delete the lower subdivisions
in order for it to work. So this is where one of those
functions, Let's hit it. And as you can see, we have our ninth curve brush. Now, in addition, if
should go without saying if you hold Shift Control down and we see that
curve right there, anything that's on
the shaded side gets subtracted and everything that's on the unshaded
side does is let the same. But if we do it
again, hold down Alt, It's, we can get an
inverse effect of that. With that said, let's go ahead and move on into
our secondary mode. Now the secondary mode can
be activated by holding Shift Control and spacebar down and a pop-up
menu will come up. This is where you access
and turn on B radius. And once that's done, knife curve brushes now in its secondary functioning mode, you may wonder what that is. So at would be just
best to just this show you holding Shift
Control and drag out. Except this time you're going to see a different behavior. And that's sort of like a
slat where everything is. Now, it may be a little bit weird and a little
bit wonky to look at. But the way this works is
that the width of this slat, which is carved out in defined through
wherever the line is, is basically based
off of the draw size. So in other words, a smaller draw size, if I hold down
spacebar and adjust my drawer size down
smaller and do it again. We're going to have
a thinner slat. I'll undo. And if we hold space bar down
and make a wider draw size, which can be here by holding
spacebar down or going up to here to draw size and
then do shift control. You'll see a wider slat. It should also go without noticing that if
you hit the X key, for some reason this is a feat. This might change down the road with later
versions of ZBrush, but in its secondary state, symmetry doesn't work
very well at all. So symmetry only works in a knife curve, brushes
primary state. Now the last thing
we're going to go over is we are going to go over the inverse effect
of the secondary mode. In other words, what
happens when we press the Alt button down? So probably just best to
show you hold Shift Control, draw out this time hold
left option or left Alt. As you can see,
that it basically gave us the inverse effect
where everything was. Now using this principle. We can also go ahead and hold spacebar down to make
the draw size smaller. And as a result, we can cut even smaller sweats
in using this principle, it's actually very advantageous for us because a
lot of features in ZBrush automated features
rely on the assigning of poly groups and wind
poly groups are automatically generated
for us like it is here, we can come up with some
interesting combinations for some ZBrush
sculpting down the road. And we're gonna show you
those techniques and how they work down the
road of this course. So with that said, this has been a demonstration in intro into the
knife curved brush. What we're gonna do next
in the next video is we're going to be practicing
curved technique. Now, I know a lot of people maybe a little bit
confused on what that is. And what we mean
by curb technique is that we're going
to show you how to create curves and also create angular curves of 90 degrees or more or less that are hard. And we're going to
show you probably the most important
lesson of all videos, which is the Space bar trick. In other words,
where you draw out a curve and then you
can pan the curve. All these things are very
much essential for knife to work out and handle knife
curved brush affectively. So think of the next lesson
as a way to mass as your way of learning how to master accuracy with the
knife curve brush. So with that said, stick
around and stay tuned.
5. How to Pan Curve Brushes: Okay, welcome back. In this video we're
going to go over how to pan a curve of our
knife curved brush, as well as manipulate the curve
itself in various angles. So with that said, let's get started to
give you an idea. I'm going to show you right now. So far we've been
doing straight cuts, but if I hold Shift
Control down, you'll just see
straight lines there. And as a result you get that. But if I want to do a
more of a curvature, how do we make that happen? Well, first I'm gonna
hold shift control down, left-click drag a
curve out, like so. But now I can release
Shift Control. And as long as I'm
holding left-click down, I can move this around
anywhere as I want. I can keep the curve alive. Now. I can, since I
released Shift and Control, I can now just tap
left Alt or left option to get sort of a
Bezier result out of this. Now, if you're looking for something with a little bit more of a different angle
may be a tighter angle. First we'll do the same thing. Shift controlled
drought the curve. Release Shift Control. Now you can just type
option or left Alt twice. So again, left option
or left Alt twice. And as a result, you now have a more acute
angle that you can work with. As a consequence to all of this, we can kind of see the
possibilities again about everything that we
cannot make on here. Now, using this concept, there is one final
important ability that we have to go over. And this ability is this
key button configuration has everything to do with mastering accuracy
with your curb cuts. And that is the spacebar trick. And what the space bar
trick is, is basically, it's a nickname to
say that how we pan the curve around
ZBrush because so far all you've been doing is
just kind of starting from this point and then making all your curves occur from this point that we
see right here AT. And it limits us. We almost have two
trajectories and project an idea of where everything is supposed to look just
from this point. But if we hold
Shift Control down, we can change that point. Which is actually very,
very advantageous. To do that. Hold Shift Control,
left-click drag out, and release Shift Control
with your left hand. And notice I'm
keeping it alive with my right hand by still
holding left-click down. This time I'm using my left hand to hold spacebar down in. Now as I move with
my right hand, I can drag this around. This one takes a little
bit of practice to do to manipulate panning, because there's a little bit of button configuration and you
gotta be able to be willing to do the work in order to
make all of this work like so. So kind of take a moment to practice all of that
because being able to use the space
bar trick to pan is a very important component for things like accuracy with
your knife curved brush. If I hold Shift Control down, you'll notice there's
a selection radical. The spacebar brush works also
with this if you want to do more accurate
selections, like so, if I hold Control down
and marquee select, maybe there's some
accuracy I want with this, again, the spacebar brush
works with the painting there. I mean, having
that accuracy is a very, very important concept. And now it's very important
to be able to master manipulation through
the space bar trick and through the Bezier is
by holding left option, left Alt or double tapping left, option, left, all
for a harder angle. So with that said, please take a moment to
practice all of these. And in the next video, we're gonna talk to
you a little bit more about what we just
did here with masks, isolate selections, and
finally poly groups. So with that said, stick around and stay tuned.
6. Introduction to Selection Tools: Okay, welcome back. Now in this video
we're gonna go over three functions in
ZBrush that are going to help us to understand our second major hard
surface sculpting feature, our second primary hard
surface sculpting feature in this video where
you got to learn a few different things
to help us get there. This video is sort of like
a preparation into that. And those three functions
in ZBrush are going to be the masking of ZBrush. It's masking tool system, It's isolates selection system. And finally it's poly grouping. Three things, masking, isolate selection
and poly groupings. So with that said, let's just get started now. To begin with, let's
go over masking. Now to do a mask. If you hold down
Control right off the bat urine Mask Mode
in its default state, it's, if you open it
up, it's on freehand. And if we hold, if we have a bigger brush here
and hold down control, you will see that the mesh
turns to a different color. This mean, this means that a portion of the mesh
has been masked. And what does it
mean to be masked? It's pretty a symbol if
you try sculpting now that which is masked
does not get effected. The wild that which is
unmasked is affected. Now. Alternatively, you can hold
down control and left-click into open space and invert
the mask selection, which will be a very
important part to remember. And like before, that
which is masked, gets unaffected, that which
is unmasked, gets effected. So you can kind of see how
this works in plays out. And of course, if you give it a couple of subdivisions
and try it again, the same thing works. Masking does work with a
whole bunch of divisions. It's one of the few things
that seems these days that doesn't get affected
by subdivisions. So that's masking. Alternatively, you can
hold down control and drag out a mask marquee
selection tool to make something more
sharper and you can use your space bar trick to kind of give yourself similar areas. Finally, there are two
more things to remember. Masking in. One is if you hold down Control, you can create a mask, but if you hold
Control, left option, Alt, just like with
the knife curve, you get an inverse effect where you can paint away a mask. Same thing goes when you
create a mask and open space. If you hold down control, maybe use the space bar trick. You can also hold left option
and you'll see that marquee select turn into a white mask
and you can subtract away. Some of this is basic knowledge. Some of this is easy, but we all want to make sure
we're on the same page. Of course finally, you can change the stroke
to something like curve and maybe do
like, for example, certain kinds of masks or
create certain kinds of patterns in the world is
your oyster in that regard. So you can have some
fun with all of that. Now, having said that, we're going to now build
into another feature, we're going to kind of explore
another feature and that's going to be the
next feature down, or I'm sorry, the next
function down in ZBrush, which is going to be
the isolates selection. The isolated selection is always set as your default
Shift Control button. If you hold Shift Control down, you will see select rectangle. And it's pretty simple. You left-click, you
will see it right there next to the knife lasso. And if you hold Shift
Control and you can draw out a green square. Now, whatever goes
inside this green square once it intercepts into the
mesh is all that gets seen. So sometimes this
helps if you want to, if you have a very
dense mesh and you can just work on just sculpting
just a portion of it. It's kinda nice. But if we can take that
a little bit further, if we hold Shift Control, kind of like with mask, if you go into empty space
and do a drag rectangle, you can invert the selection. Now, additionally, if you
wanted to all come back hold Shift Control and simply
left-click do not drag. And you will bring
the mask back. Now if you hold Shift
Control and then release Shift Control and then
hold down left option, the mask will turn
red and that will be it's subtractive state. Now this means we get, we hide the geometry
essentially. Hidden geometry is geometry
that we can't see. We can always bring it back
the same way where we either inverted or we just shift
Control left-click. But while it's hidden, it's important to know you can delete that hidden geometry. Under Geometry, modify Topology, Delete Hidden, which we will be doing quite often
throughout the course. So it'll get more examples
of that down the road. So the question comes, why are we learning
these two functions? Well, the answer is pretty
simple because they chain into what's coming next. And that is poly
groups. Poly groups. The last feature in
which word or I'm sorry, the last function in ZBrush
that we're going to learn before going into our second
major sculpting tool form, feature or function. And so what poly groups are, are basically ZBrush is way
of organizing the mesh in two groups of color that allow it to perform
automated processes. Sounds a little complicated, but let me give you an example. Let's first create a
poly group by starting, holding Control down and maybe changing our
stroke vector freehand. Now, right now it's a mask. But to create this and turn
this into a poly group, we're going to take this mask, make it a poly group
by holding Control W. Now it will have disappeared. But if we hit Shift F, we can still see
that poly group. Now, if we hold Shift
Control with our rectangle, we can isolate, select
that very poly group. So that means shift. Isolate selection also works
with poly groups as well. Again, that's going to be a very important
part down the road. Now, as I said before, what is the purpose
of poly groups? Will they create,
again function? They create, they help ZBrush in identifying the directions of functions in which
it's supposed to go. Zbrush has a whole bunch of automated functions that can be used and applied upon a mesh. And poly groups are used to help give it directions in
which it's supposed to go. Let me give you an example,
one such function. For example, in edge
loop under Geometry, they have a function
called group loops, which allows us to put a smooth edge flow between this poly group
and this poly group. Now, let me go ahead
and see if I can risk a little bit more of
a contrast color to help us see it easier. If we notice a jaggedy
edge that's going on here. Group loops can help us to
kind of smooth that out. But again, group loops relies on poly groups to exist in
order for them to work. So again, if I hit
Group loops right now, it will say multiple functions. So let's dilute lower. I'm gonna go ahead and hit it. You can kind of see
how a new edge flow was designated based on
the poly groups that we're giving it like
stage directions in how to perform it's
automated function. And now if we shift select, we have a much cleaner
line that goes around. And that's the point that
I would like to get that ZBrush has a lot of
automated functions, different kinds of
automated functions. And they rely often, quite often on having
poly groups give them the directions or roadmap or dictate the behavior
on which they act. Group loops, for example, put Group loop edge flow between one poly
group to another. So there's a lot of different
examples of this working. Another one is going to be the main ZBrush function that is going to
be coming up next. Then May our main hard
surface sculpting function. It's our second one that
we're going to learn. That one's coming up
in the next video. But first, let's
just go ahead and recap on how to
assign poly groups. Again, first off, you can do so through holding control and
maybe drawing a piece on. Or you can just go ahead and
designate, marquee select, and then you can just turn
those pieces 11 to poly groups by simply hitting
Control W. In addition, if you remember our
knife curve brush, we dragged out a piece and a poly group was
already created for us. So we can create poly
groups that way. If we wanted to. Let's go through sub tool. Let's go ahead and do
something different. Let's bring in a 3D
primitive to add to our existing sub tool by
hitting the button append. And we have a little
bit of selection in which we can choose. I'm going to choose a cube. I'm going to turn that
off and select this cube. If we look at this group, we can make poly groups by just dragging a marquee select and making a poly
group that way. Or we can do another way which can be going under
the Poly Groups tab and hitting the button group
by normals that we use the meshes normals to assign
different poly groups. So using this concept, we're going to segue into our next major hard
surface sculpting feature, which is going to be 0 meshes. So with that said, sick
around and stay tuned.
7. Learn ZRemesher and Polygroups: Welcome back. In this video we're
going to go over our second major ZBrush
sculpting feature, and that's going
to be 0 measure. Now, 0 measure is a
big one because of, it's probably more of an
important one because of knife curve brush because
knife curve has kind of opened a doorway that allows 0 mature to once
again iterate through a lot of interesting
shapes and then come out with a lot of clean
topology with it. So it's going to be important
to grasp the concept of 0 measure in
conjunction with what was learned in the last
video regarding poly groups. Now, to give you an
idea how 0 Mesha works, first of all, we're going to take the current
mesh that we have. And I'm just going
to first of all show you what it looks
like and what it does. But without any poly groups, I think I should
probably start by explaining what 0 measure is. First of all, because I've just said all
these things about it, but I never explained
what it actually does. So let's just start there. 0 measure is a function
in ZBrush that takes an existing
mesh and aligns, reconstructs the edge flow of its topology to a
cleaner outcome. So for example, you
see this mesh, well, it's a default shape
right now and it has a very clean topology as it is. But maybe we don't like
this area of here. So if we go through
geometry and then we go through 0 measure and
simply hit 0 measure. You'll see the entire edge
flow completely changes. In addition, you're
also going to see it turn into one
singular poly group. You can kind of see
how it made it all uniformed and
everything like that. But this is what we really want to focus on
regarding 0 measure. That is, if you look at
all these corners here, you might want to
take notice that it kind of scrunched in a bunch of topology that's not really
necessary to go back into it. Maybe we want something
that's a little bit more efficient and a
little more uniform. Well, within 0 measure,
under Geometry, 0 measure we have
a whole bunch of different features that
we can kind of go under. And what we're gonna do
in this video is go over the preset settings you
should be operating on as a base starter
for all of this. So with that said, those presets are, you're
going to just simply hit, keep groups on adaptive
size 0 and smooth groups 0. And that's it just
for a starter. Now, with that, go
ahead and hit 0, measure one more time. Maybe I'd like to actually
get rid of this scrunched in little two-star
junction edge flow and make something that's
a little more cleaner. Now as you can see, it just behaved in a way
that is a lot more uniform, in a lot more easier
to recognize. That's, and you
also noticed that the poly groups that we had, and I'm using isolates
selection to shift Control, left-click to go
through each of them. Each one is a very
easy and sculpted mesh that we can work with. Why is this important? Why? What's the
potential with this? Well, if you remember, there was an opportunity like let's say let's
scrunch the sin. If we remember and go back
to our knife curved brush, we can maybe work with something
like, for example, this. And notice that
there's poly groups here and there's
poly groups here. And if you're, hopefully you're
seeing the potential and the possibilities of where
I'm getting at with this, we can hit 0 measure and just
get a nice clean outcome. And if one thing I
will say is this. So let's just take a moment to think about
this for a second. Sometimes, and
this is a pitfall. Sometimes 0 measure doesn't
give us a clean out outcome. And that's because this is
again, an automated procedure. So if you're trying to
do what I just did in the video in your result
came out differently. First thing I would do, change the poly count, then try to go again, and then try to change
the poly count again. And then in the
existing same state, if it's a little bit
better, change it again. Because a lot of times we like to hit 0 measure
of few times under the same settings
so that it works out It's algorithm
to be cleaner. Now, if that still
does not work and you are still having issues in
your 0 measure is tearing all over and it's not working even though you
have keep groups on, smooth off, all smooth
groups off adaptive size 0, but adaptive on, well, if it's still not working, Here's something
else you can do. Shift Control,
left-click on here. Now we've isolated and
hidden knowledge Geometry, modify Topology, Delete Hidden. Now go through
dynamic subdivision. We haven't talked
about this yet. We haven't done any of this yet. But first we're going to turn on dynamic subdivision
smooth groups on and go to
adjusting thickness. Now, why is this an
important concept? Because if we turn dynamic subdivision
off, we deleted all. You can do a pretty Z remeasure should basically have
a much easier time of giving you a cleaner
mesh if it doesn't have any corners is what
I'm trying to say. And then when you turn
on dynamic subdivision, you can rebuild your
thickness out this way. Once you're done with that. Remember this is
just a projection. It's not actual geometry. But then you can just go
ahead and click Apply. Don't forget though, the thickness is all
one poly groups. So you may need to
go through and kind of reconstruct your
poly groups once more. That is just sort of a
breakdown to 0 measure. And how that works again, it's just a very nice
little clean form of topology with it, with this clean now, you may ask yourself, why do we need clean
form topology? Well, there again, that
goes back to there are functions like CSI
model or which is z brushes built-in
modeling program which you can just
access by hitting the quick keys, the zm. And if you wanted to, you could go through and do like a bevel function all around
here using 0 measure. You can, because this has such
clean edge flow topology, you can actually go through and Bevel like that because we also kept our topology
the same poly groups. We could crease the poly groups and then do some divisions. There's a lot of things
that can kind of go through with all of this when you have 0 mesure on your corner and you're
working it like this. A very useful thing. So what I'm going
to ask for you to do is if you're a beginner, just try to take a couple
of practices in trying to cut up a piece
of our cube up. And then going through the
settings that we went through with and making sure every
plane has a poly group on it. Making sure 0 mesure has keep
groups on smooth groups 0, adaptive size 0, and
just go through and problem-solve and rebuild
meshes to clean edge flow. Just keep going through and practice rebuilding edges
to clean edge flow in, again, you have trouble with 0 measure giving
you a clean result. Just and it's on these settings and every plane
has a poly group, but it's still tearing
and for whatever reason, just again, isolates,
do what we did. We isolate selected, we went through modify
Topology, Delete Hidden. We went through 0 measure, and then you go through and 0 mesh this piece
as a flat plane. Very easy. Then we go through
dynamic subdivision, turn that on, go through
smooth subdivision level 0. And then we're going
to go ahead and adjust the thickness and
conclude with apply. That's a lot of steps. I know. I know that's
a lot of steps like, but it's probably why I say
repetition is everything. You may not have to
go through that. If 00 measure may
actually work just fine. And quite frankly it
will work just fine. You don't need to do
all those steps to rebuild the geometry
through dynamic thickness. You could just rebuild the
steps through technically, if I did delete hidden and you just simply went through and deleted hidden in hit 0 measure like so you could technically, technically, you
could just simply do a Q mesh and then set it to all polygons and then
extrude it like that. You could do that as well. It's not your only option. But rebuilding pieces of geometry because we
were at this point. And I'm going to use
the undo slide, slider. Show you we were at
this point here. Sorry. Let me find where it was
that we scrunched it. Maybe we didn't get to that. We went from this point
to this point right here. This point to this point. We just constant. It was just basically
rebuilding an entire mesh using everything that we
learned in the previous videos. So I want you to
please take your time. Just practice on just trying to do something similar to this
where you cut into a cube. You maybe scale the
Cuban and then you hit by hitting the R key
and accessing the gizmo. And then you make sure every angle has
appropriate poly groups. Make sure 0 measure has the settings that
we have right here. And again, if you
fall into any issues, just the poly count size, just keep practicing
and then hit 0 measure. And then if you have
to clean the edge, blow up it's 0 measure again, keep going and keep going. And if you can't just isolate, select the piece and
go over the steps of creating a dynamic thickness
out of it instead. And again, the video
of this shows you already what to do if
you want to rewind this, I strongly recommend
you do because this one is very
important to practice. We very much would
like you to get a good foundation on this
one before advancing forward into the next
major hard surface sculpting feature which
builds on this piece. So with that said, stick around and stay tuned.
8. What is Gizmo Deformer : Okay, welcome back. In this video, we're
going to conclude the beginner level section
video tutorial by introducing you to the last of the three primary hard
surface sculpting features we go over in this course. And that's the gizmo deformer or the gizmo transform types. Now, this is to
explain what this is, is it's basically a
feature built into ZBrush that allows us to deform the mesh in a variety of different ways that
and as a consequence, we can flush a lot of
interesting iterative results of hard surface pieces that we can once again reuse and modularly. And that's a very important
part of this final step. We can even go through
and get creative and circle around and after deforming the mesh
and so many fun ways like we can
then turn and go to the knife curve
brush and add more additional detailing by
cutting in certain angles. It really can never end
once you add this into it. So it's probably best if I
give you a demonstration and show you first let's
hold Shift F down. I'm going to change my material to Matt so you can see
it a little bit easier. Now, in this particular case, I'm going to go ahead
and hit the W key. And I'm going to turn
off x for symmetry. And when we hit the W key, we bring up our transformer
or gizmo transformer. Now, it has a whole bunch of different menu options on here. But for starters,
when we want to take this pivot
point and center it, we click on this little
upside-down tear trough. If we hold left Alt or left
option button and drag, we can recenter
the we can adjust the rotational pivot point or the translation pivot point. And again, if we want to recenter it
upside-down teardrop. And you see with this
little circle rosette mesh orientation arrow hold, left option to unlock it, and then reset the orientation. So that's sort of a
breakdown of that course. You have the toggles where
you can move it around, scale it like so, and scale it bigger or smaller. But where we're really
going to look at is this Customize button, which is symbolized by
the COG on the left menu. If I left-click up,
you're gonna see a whole bunch of
options for you. And one of the
first ones we try, we can do a whole
bunch of these. So I really do, I really do want you to
experiment with all of them. But bend arc is going to be
one of the easiest to grasp. Ben dark again is just something that bends
the mesh to your will. And we primarily use the green
cones to make this happen. You can kind of see like so. And as a result, we get a clean mesh. If you double-tap are, you can bring it back
into here and you can kind of see how the
meshes deforming. And if you feel that it's a
little bit low res geometry, we can always divide it, but remember, we have to make sure to have our holding
edges all the same. So we may need to do something
like crease poly groups. So let's go through geometry, increase and increase pg
for crease poly groups. One thing we will notice is that the end corners here
did not get crisps. So I'll just go ahead and
with my SI model or brush, I'm just gonna go ahead and
just hold spacebar down. Look for crease and bring a
crease on every angle here. So you don't have to do this. This is just my thing. So now when we divide this up, there will, it won't collapse
on the bevel edges there. Now when we go back, let's get back here now. Let's do a bend arc. And we'll notice again, oh, subdivision levels are canceled. Once again, this is one of
those features where we got to remember at the
very first video, we have to hit Delete lower. We got to remember that button. Let's click back into Ben dark. And again it's the green cone. And you kind of see a
much smoother result from all of this. Then if I double-tap are
kind of scale the sin. So that is how one example
of a bend deformer is. And when you're happy with it, go ahead and hit Accept. And we can go ahead and
do another deformer. And one I like to
try is extender, extend or doesn't
have any green cones. So you're gonna have to
experiment with the orange cones. Now that doesn't really
make any changes. But if we want to extrude, That's where the magic of
standard kind of works. Just don't extrude to foreign. We can kind of see already some interesting and fun
results out of this. And yet again, another
deform or can be taper. You can kind of see
already how we're crafting this hard surface piece already. This can be something
that might be very interesting for you. So like for example, we're going outside of the beginner level stuff to do some late stuff that
we do down the road. We can draw in a couple
of pieces like this. This is just showing
you the potential, how we combine it
with other pieces. Here are other functions
that we have yet to go over, one of them being booleans. So this is sort of a
demonstration. Preview. Williams are basically
meshes that to subtract in the lower. They are very fun to use. Kind of see how
I'm playing around with it. Let's see. I'll just try and trim curve. Sorry. Mask them. Kind of see
already how we're having a little bit of fun
with just simply having some experimentation
out of all of this. It's just sort of that
on and on approach that we can just keep going and going
and going and going. We can create something
pretty fun down the road as we are going
through all this. So that is an example of how we manipulated the
bend deformer like. So. Take a look at this image here and I'll see you can kind of
see how it looks. And we went from
this all the way to just flat plane right here. You can kind of see how
bend if our transform, the gizmo transform to formers
just made it look like a completely different
hard surface peace with a combination of techniques
from boolean to extender, to taper, and to bend arc. It's that ability to identify the combinations that we
have to practice and learn. And that's what this course
is going to now go into. It's about practicing
the combinations. With that said, this
is kind of like your graduation out of
the beginner section. In the next video, you're going to officially
start working on your turtle to practice all your
different combinations. And then from there, you should have a much
stronger understanding, too hard surface techniques and hopefully a better Arsenal. You are equipped with in all the zebras sculpting
that you can accomplish. So that said, let's get
started on that turtle.
9. Importing Practice Base Mesh: So let's officially get started. In this video, we're
going to begin our hard surface sculpting
with our turtle character, a space astronaut turtle that
we're gonna be working on. To get started, we're
going to need to be able to bring in a base
mesh of a turtle. And then we're gonna be doing some additional base mesh
hard surface pieces that we're going to be
sculpting that will go onto the arm
of the base mesh. To get started with that, we'll go onto the
arm of the turtle. I should say that
we'll start off with, it's gonna make a little bit
more sense once you see it. The first thing I'm gonna
do is I'm going to hit the Comma key and I'm going
to bring in an import. And you want to look
to the right for that Resources folder for less
than one turtle base OBJ. So don't forget
to download that. And I'll just
left-click and drag and I'm gonna hit the T
key to bring that in. And if you hold left-click
and hold Shift, you can kind of snap that
right in front of you. Now that we have this, what we're gonna do is use this character here
as a template to fit all our secondary
base mesh pieces that we carve out with. And that's going to
start with using a combination of
gizmo deformers, knife curve brushes, and a whole bunch of
fun with 0 measure. So let's just go ahead
and get started. Now to begin with,
all change out my Mac cap here to
a basic material. I'm going to go
through sub tool here. And to begin, I'm just going
to bring in a primitive. Go under sub tool, hit a pen go cube, and we have ourselves a cute. Now from here I'm
just going to hit the W key and we can
toggle and translate that. As you can see, I'll begin
by just trying to get a fairly rectangular shape. I might even turn off my, the visibility of my turtle just temporarily so I can just
kind of focus on this. Now from here, I'm going to
want to give it a couple of subdivisions and then
delete those subdivisions. Now the reason for
that is because knife curved brush is going to be the first thing we
work with on here. And it doesn't
really function too well with a bunch
of subdivisions, so we got to take care of that. So to begin with, I can go through and just
go through turn off SMT, maybe divide this a few times, three or four times. Then afterwards we're
going to hit Delete lower. And again, this is
all under Geometry. Don't forget to turn
us emptied back on. Usually that just smooths it, but I don't really
need to do that. Now, the next thing
we're gonna do is hold Shift Control and go up here and choose our
knife curved brush. Now this is one of the
most common features that we're gonna be using
through the course. We're gonna be
identifying a lot of opportunities to flush out
fun pieces through this. So to begin with, I'm just going to go ahead and show you a little bit of this. We just hold down Shift
control and left-click and I'm going to drag a straight
line and you can kind of see that
poly group there. Let's do the same thing again. I'm going to hold Shift Control and I'm going to
drag a left-click down and then I'm gonna release Shift Control and then
hold the space bar down. And I'm still holding
left-click down as well. And you can see me pan
around this as well. If you want to make any
adjustments with the curve. But I'm just going to
keep it right there. And now I'm going
to release Spacebar and double-tap Option key and go that will give us a nice angular cut line
instead of a, the Bezier line. And we're just going to release. As you can see,
we've got ourselves a pretty clean surface here. Now, at this point, we can have a whole
bunch of fun. But first things
first, I'm gonna just kinda clean up
a little bit more. Let me see if I can
hold Shift Control. And this time I'm just
going to pan this around. Just tap left Alt or
left option once. Because we don't
need a hard line. We can just have sort
of like a Bezier curve. And we can have a little
piece just like that. Now, I can just sort of make
my adjustments on here. Anything you want. So if you can get to a shape
like this, that's fine. This is a good stopping
point to go into 0 measure. Now we're going to do 0
measure for a specific reason. And the reason is, is because you remember when
we divide it earlier on, if we tried to divide this
and you can kind of look at some of those little tapers that we get on here
when we try to divide. And that's because you can
see that when we knew, when we do do the
knife cut brush, it gives us a lot of tie-ups. Now. That's a little bit of a pitfall
for this clean topology. But the real advantage
about this is, is when you're using
knife cut brush, it is a very clean cut. Unlike trim curve,
which just has a very malfunctioning
algorithm, or clip curve, which does a lot of non
manifold mashing of geometry in there that
causes errors for us. This curates a very
clean edge flow topology of poly groups that 0 measure it can
actually work with to compute and remeshing
a cleaner edge flow for this whole piece. So what we're gonna do is we're going to mesh
this and we're gonna give you a good start off
preset for 0 measure. Now again, this is what you
want to start off with, but you don't want
to over rely on it. You might need to
do some tweaking. And if you still get issues, you can go through polychaete, target poly count and do different iterations
and so forth. But we're going to do keep
groups and we're going to do adaptive size to 0
and smooth group 0. Now if we do it like that and we do a little bit
of a 0 measure. This will be the result. Sort of clean little result, but you kind of see it
kind of tour into here. And that's because this
is one poly groups. So it didn't give it, we
didn't give any information here for these two to be
separate poly groups. So let's turn these into
two different poly groups. So 0 meshwork and once
again have an easier time. Again, let's just go
through poly groups and start with just something
simple group by normal. And you can see already we're getting
some nice and clean. Now. Let's go through geometry and let's go through
0 measure again. And as you can see,
we get something that's a little bit
cleaner because now that line just gave us a
nice clean little spot. Now if you see a little
waviness right here, just go ahead and hit C
refresher one more time. And it will just
kind of give you something that's clean and that's what I always like to do. I like to hit 0 measure
a couple of times. To get something like that. We're halfway through
this base mesh. Let's go ahead and just finish this off with some deformers. Again, this is how we find an iterations of our shape and have a little
bit of fun here. So to begin with, I'm going to hit the W
key to access to formers. You're going to want to
go up to this cog here. And our first two former
we're going to work with is that bend arc deformer. Again, with the bend
deformer, the most common. You see all these cones here. Well, the most common
one is going to be the green cone that
you see right here. So keep that in mind as
you're going through. Also, if you went once, you can also make
that a little bit thinner and then do a
quick little z Ramesh. That way when you do the
bend deformer again, might be a little bit easier. Something like that. Now, once you have
something like that, just click right
back on that cog, hit it, hit Accept. Then from here, let's work
with a second to former. And for that we'll
work with taper. Now, taper is just
pretty simple one. There is no green
cones for this, but we will be working
with these orange cones. In this case, I'll be
working with this cone. And I'm going to work with
this cone right here. Go ahead and see if you can try to get to this
point right here. This is actually a pretty
good stopping spot. I may do one more little
piece right here, One more bend arc, and I might just try to
do it on this angle. That way we have
ourselves a good clean base mesh arm
to work off of. And you know what
I might even do. I think I might even have a
little bit of fun with this. I think I might
just go ahead and hold Shift knife cut and just simply go through and make my own little
piece right there. I wanted to, I could
even 0 mesh that. Do it a couple of
times to clean it up. So again, that is sort
of the basic start off. So what we have here is a good start off in base
mesh for you to work with. I want you to just take your time on this one
because this is gonna be a good foundation for you to prelude into your next video. And we're going to be building
off of a whole bunch of applications and practicing these combinations
back and forth. And we're going
to explore deeper even to our ninth curve
brush by working with the secondary features that cut slats into any
piece of geometry. That's going to be very fun too. With that said, stick
around and stay tuned.
10. Creating Shoulder Base Mesh: Let's continue. We made our first
base mesh using the knife curve brush in combination with the
gizmo deformers. Now we're gonna go
ahead and show you another combination
of a technique to make some base meshes. Because again, what we're
gonna do is we're gonna take these very blank detail, this low detailed meshes and
we're going to reassemble them all the way over to the arm and we may even
reuse these pieces. That's why I had a folder made, which I did at the end of the last lesson and
put those pieces there because we're
going to store them and duplicate them and
take them out. So let's just go
ahead and keep going. What we're gonna do
is very simple one. It's going to be
just sort of like a simple short
shoulder plate mesh that we're going to be reusing. And this time we're going
to show you how to combine it Gizmo to farmer
with a blight Boolean. So let's go ahead and
just get started. I'll turn the visibility off and we'll do
like we did before, and we'll append
that primitive cube. This is all just repetition and learning through repetition. We go through sub tool, a pen, and choose cube. I'll turn the visibility
off of the folder with the spare parts and
left-click onto my cube. And now for this one, I'm just going to hit
the R key and we're just going to a scale
that in like so. Nothing too crazy on this 1. First off, I'll go ahead
and rematch this guy. So beginning with going
through and adding some poly groups to each angle because remeshing
something like this, poly groups helped to
tell ZBrush which area, where all the borders are so
we can have clean edge flow. Let me give you an example. Like for example, if we
want a poly group here, a poly group here, a poly group here, here,
basically every side. Let's go through, That's
what we have to do. Let's go through poly group and we're gonna go
through by normals. And again, we're just
going to hit it. And you can kind of see there is a new poly gurus that is
represented by every piece. And in case you're
wondering, I'm holding Shift Control
left-click to isolate, select to kind of show that. Now that we have that, we've given Z brush a way of identifying in which
we can rematch this. So let's go through if you
remember the last lesson, we had our settings
act keep group. We add adaptive size down to 0, smoothing groups down to 0, and we simply just hit C Romesh. And because of that, the
poly groups on ZBrush, we're told this is
how we want to define our borders all nice
and clean like this. So with that said,
let's continue on. Hit the W key. And like before we
click on that COG, we're going to really
exercise into that Ben dark primitive again,
repetition and learning. The Bandar primitive we're
going to be using again, if you remember, it's
the green cones. And then we're going to use
the green cones like so. Kind of see how it works there. Now, one thing that I can say is if you
want to divide this, take a look at if
I hit Control D, you can kind of see
it kind of gives us this round little piece that's because it's kind of
smoothing out and collapsing. Control Z and undo. If you want to keep
those edges hard. Let's go into crease and then
crease poly group borders. And when I hit Shift
F to show you, you can kind of see a crease
just appeared out of here. If you need to
rewind and see that. Now if I divide it few times, you'll see that it
holds its border. Since we're gonna
be using Booleans, going to go ahead and delete
the lower subdivision. Now that we have
that taken care of, Let's go ahead and give you your first applicable
approach to life Booleans. Once you have everything
that you want, for example, if you want to reconstruct
the subdivisions or you want to go
into Move brush, hit the X key and hit symmetry. And you want to make this like
a little bit more rounder. Feel free to if you want to use the Trim curves to cut
something that is different, by all means go for it. But once you are at a comfortable spot and you
have the highest subdivision, click lower, we're
going to now use a light Boolean to cut
a sphere into this. So to do that, let's
go into sub tool. We're going to hit a pen, unlike before when
it was the cube, It's the sphere this time. And we're going to
left-click on that sphere. And as you can see,
it's just a normal mash right now as it stands, nothing special about it. But in order to bore, you need to make this a Boolean. And what this Boolean
is is it's going to cut into this piece using its mass. It will make more sense
when we show you. But before we can
do any of that, I'm going to give it a
couple of subdivisions. And I'm going to go up here
where it says Live Boolean because we have to enable
Live Boolean mode, then we have to go into render. If you don't have any of that, you can kind of see
where it is right there. Finally, let's go
ahead and click and turn this sub tool into the desired size Boolean
piece that we want. Now, one thing to note
that if you're not in wireframe or Shift F and you go into Boolean mode,
it's going to disappear. Just hit Shift F and if you'll
be able to see it again, hit the W key and you
should be able to see it intersect into
this piece like so. Now feel free to mess with the Boolean or the gizmo to give us sort of, how shall I say it? A kind of unique shape. If you want to call it. You can kind of see,
I'm just going to go with something very simple. Might left Alt, left-click. Bring it in like this. Another thing you
can do is if you delete the subdivisions
of the geometry, you can start combo
showing up things that you've learned
from the last lesson. That's what we're doing
where you can go into knife, curb brush, hit x symmetry. And if you want, you can
do things like this. There is nothing wrong with
that as that is an option. But for now, I'm going
to keep it like this. Because by keeping it like this, I kind of give myself the option of changing anything further. Now, we're going to try one more example of a Boolean
with a different shape. And that's going to be
the sub tool for acute. For that, we're going to just simply do as we did before at the original
going to sub tool. It depends. Choose a cube, select the sub
tool of that cube. And then we're just going to turn that cube first
of all into a Boolean. As expected, It's
going to disappear. But if he had shifted
up, you'll see it. Also makes sure you're
very keen to understanding the order here
because booleans only affect the sub tools
that are above it. If there's anything below
a Boolean sub tool, it will not get
subtracted or affected. So kinda keep that in mind. If I bring that in like so. You'll see something like this. Now, you can mess
around, scale it. Or if you don't like the width, you can mess around with that. You can give it a couple of
subdivisions if you want. You can just keep it
like that if you want. Now a cool little trick
about duplicating meshes is that we've been doing so far duplications through sub tools. But another way we can
duplicate the geometry without duplicating the sub tool is simply by hitting Control and hitting toggling the
transpose button around. And if we do that, we duplicate this mash and
we have a second mesh. Notice that the
original mesh stays in place and it's masked, which is gonna be
pretty important. That's kind of give ourselves that extra
little finite detail. And you can marquee, select and control off to clear the mask and clear the
whole thing if you want. Now, if you want, you can go ahead and
duplicate this sub tool. Turn that duplicated sub
tool into a Boolean and hold Shift left-click and you can kind of snap that's
around like so. And as you can see, we have our first real
little mesh piece. So from here, we can do
all sorts of fun things. If you're ready to turn this into an actual applicable mesh, you can, because you've got to remember what you're looking at right now is a projection. It is not the actual
finished piece, it is not an actual piece. We could turn these Booleans off and it wouldn't
mean anything. We got to convert this
now into actual geometry. That's pretty easy to do
because all we do is just go through sub tool down
to where it's Boolean. And we can go ahead and hit make Lynn mesh
when you're ready, which I'm gonna go
ahead and do right now. It doesn't show up in
your sub tools where typically shows up is
going to be right up here. So to get this into
your sub tools, hit append and select
the desired piece. Then from there you can disable all the pieces because
it's going to show up at the very bottom of your piece. So this is R. This concludes our sub
tool for this piece. It's going to be a reusable
piece that we can use.
11. Detailing Arm Base Mesh: Okay, so let's continue. In this video, we're
going to begin to start detailing out some of our
base mesh that we've created. And also we're going to do that by bringing in a 3D
reference to help, aid us in giving
us an idea on what something's supposed
to look like. And more importantly,
we're going to be learning a secondary feature in the knife curve brush to aid us in creating and
detailing that forearm. So let's go on ahead
and get started. Now before I do anything, I'm going to first
of all go into sub tool here and I'm going
to go ahead and start to clean up what I've
made because I have a few Booleans and
base meshes leftover. And of course my
finished product, which I've yet to put
that in my spare parts. So I'm just going to
kind of first drag and drop that in and go through and delete all these excess pieces because we want to keep
this as thin as possible. Then I'm going to go
ahead and click off into cylinder because I want
to bring in a new piece. And if I kinda important
OBJ file over this, it's going to replace it. So let's click off into that cylinder and
just click Import. And you're going to look into the right side of that
resources folder and look for a download per lesson
arm reference OBJ. We're going to bring that in. You can kinda see a little
bit of a different looking our forearm that's different
from our base mesh. And that's because I went on ahead and detailed this one out. Now, we're going to use
this as a visual reference, but do not think in
your mind that you have to get tunnel vision
into what you're seeing here. You don't have to get
the exact proportions or anything like that on here. It's just important that
you learn the techniques. So with that said, let's click back
into our turtle base and bring that OBJ over. To do that, just go ahead and go through sub tools and hit a pen and find your imported file up
here in the Quick Pix. You can kind of see the placing
them or that all that is, usually it's on the
bottom of the sub tool. Now if you hit W, Let's go ahead and center
that in there. Kind of gets started here. I'm just going to kind of move
this guy off to the side. Let's go into spare parts now and bring in our
first base mesh. I'll duplicate this
guy and then I'm gonna hold shift left-click on this down and over button so
that it kind of goes to the bottom because
now that's going to bring us to the bottom
order of the sub tool. And let's close out our
spare parts and get started. Like I said, as you can see, one thing that is very
noticeable is that this piece, base mesh shape
is different from the silhouette based mesh
shape of this piece. It's a little bit longer, a little bit flatter or
a little bit rounder. And I just wanted to kind of get you to understand
that you can still continue to make
some adjustments interests to help find the piece
its rightful place. So I'm gonna do a little
bit of adjustments, but I want everyone to know
it is not a prerequisite to mirror this or make this
look exactly the same. So first thing I'll do is
I'm just going to line it up like so and shrink
it down. Like that. We're just kind of going through getting sort of idea where all this is
going to go through. Then I'm just going to mess with the deformers to
help me out here. Let's see here, I'm probably
going to hit the W key. Let's click on that cog. And we can start with a Bandar to make this
kind of round out a little bit more like that. It's already looking a
little bit the same. Let's right-click on that
clog and click on for taper. Now let's take some things out. Like so. If you wanted to move
some things in or out, you can do that as well. Feel free to kind of do some
of your own experimenting, to see some own
shapes if you want. We, we've usually been
working with the side, but it's not like a sin to actually go through and
find some interesting pieces. Once you have that,
just go ahead and click that CAG again and hit Accept. Let's go ahead and just make some final adjustments
with the Move brush here. For that, I'll just
bring this in. Just hit V for the move brush. Make your drawer size big. If you want, you
can just kind of Bring in a couple of spaces and you can kinda
see how it's kind of lining up a little bit similar. Again, this piece, how it is grouped in here has done a little
bit differently. If you want to, you can make some
adjustments with that. For example, you can go
through Z model or an extrude out a little bit more lengthened 0 mesh
everything back. You can do those
things if you want. There's no rule or
anything like that. Just remind yourself
that this isn't a game about mirroring
what you're seeing. But understanding technique and the tools that we
are demonstrating, that is probably the
most important thing that we want you to understand. Now, when you get to a
nice comfortable spot, the next thing we're
gonna have you do is we're gonna
have you divide it a couple of times and
then go through geometry. Go in and delete the lower. Hit Shift Control, and go up to the left and select
your knife curve brush. Now we can get ready to get
started on cutting this up using a secondary
feature in knife curve. Now this is an important
first applicable step. So let's take a look. Now, if I lower my brush size down and
I hit Shift Control, you'll see that whatever is beyond the shadow line up here, it gets subtracted.
We know that. But what we don't
know is that if you hold Shift Control and Spacebar, little bit of a finger
twister and click, left-click on that be radius. And we do the same thing again. We're going to find that we have a new behavior
where only the lot, the line basically
excludes everything outside of the
radius of the brush. Like that. This is a pretty useful feature because you can actually start finding ways to look for
duplicating sub tools, finding booleans here, and then going to the
original sub tool and using that Boolean that you made to kind of
cut in perfectly. There's opportunities
of all sorts when you take this approach. But what we don't know is also that in addition to
doing it this way, if we hold Shift
Control and then release and then hold
left Alt or left option, we can cut into it now again, we can change the width of this by going to smaller
sizes, like so. You'll see a smaller width. That's how we got these
slants here and so forth. So using this concept, let's just go ahead and do a small demonstration
with making a slant line here and
then a slant line here. And again, don't get
tunnel vision and into perfectly copying
the reference. Honestly, I would just
rather you have this because you're going to rack your
brain if it's a first-time, that sort of a slam like that. And again, take practice
swings if you have to be in the mode of just do your first slant and
then that's all you need. Feel free to go through. You can kind of see there's some new patterns
that you can emerge. And if you want, you can just
practice them only want or you can make the
smallest draw size. So you can make a
thinner line here. You can just see all the opportunities that you can kind of go through this. Again, this is also
why spacebar is a very important part to
learn in all of this. The space bar trick where
you're holding Shift Control, dragging out a line,
holding down left-click, but you're releasing
Shift Control and then holding down spacebar and moving the mouse
to pan this around. That's like a
complicated thing to do for a beginner because they don't really go over it a lot. But that little trick, it's so very important to learn. It really is an important one to learn to get accurate curves. I'm just going to kind of I'm sorry to constantly
reiterate it, but it is a very, very, very, very essential tool
to learn here. With that said, once
you feel comfortable with a line pattern that you
want and you'll remember, I'm just doing a whole bunch of different line patterns
to kind of show you like all the potential
opportunities that you can get through this. But once you feel
comfortable with what you want and once you have a pattern that you want and are comfortable
with its shape, just go ahead and
just bring it in. We're going to do next
then is we're going to go through and we're going
to do a Z modeler arms, a split two parts function. I'll just go ahead and
just make my piece now. Something like that.
Just a nice simple line. Now that we have
these three pieces, these are basically become
three separate parts. Then we go into sub
tool and then we go to Split two
parts because again, these are three
separate parts because of the secondary
feature of knife curve. And what's going to happen is we see three sub tools arranged. Now we can work on these
pieces individually, rematch these pieces
individually, and do separate work
on each piece without having to worry about it
construed other piece. One area is going to be doing the slang curve in
conjunction with Booleans. The other one's going to
be doing sullen current in conjunction with bevels, Z modeler, Booleans,
and the chisel brush. And then of course, the last one is going to work with showing us some dynamic thickness
as a fun little feature. And so that's kind of how the roadmap is going
to work on this one. So with that said, stick around and stay tip.
12. Sculpting Base Mesh Fin: Okay, so let's continue now
that we've given ourselves an opportunity to look further and set ourselves
up in detailing our arm. We're going to start with
the thin piece here first, since that's going to
be the easiest piece, it's expanding on
what you learned in the last one with
some more practice. Then the next one is gonna
be about Booleans and how we combine what we have there with the planar cup brush. And then the next piece
down is going to be sort of like an advanced
version of how we can bring in and cut up even further more pieces in learn Dynamics,
subdivision thickness. So let's first things first, let's just start with this fin. I'm going to left
or left option. Click to click on
this fin sub tool. And what I'm gonna do
is is I notice that there's a hollow cavity
in-between here. I'm going to use the
night cut brush to create almost all of this. So you can kind of see a
knife cut brushes here. A thin knife cut
brush width is here, and even a thin knife
cut brush was used here. What I'll do first of all is
I'll go through sub tool. I'm going to turn off
the visibility of everything so I have a
little more concentration. And so my main finch
be the only thing. I'll even move that down
to the very bottom. I'm going to make two
versions of this. I'm going to duplicate
this sub tool. We go and I'll turn
one of them off. The first thing I'll do is I'll create this little
thickness that we see here. Now if we do it
the original way, you'll notice it's in
its secondary mode. So let's undo that, hit Shift Control and
hold down spacebar. Again, that's how
we access between our primary and secondary modes of knife cut, curve brush. Let's turn that off. Now let's go ahead and try
that again. We wouldn't. All we're gonna do is again, practice a little
bit on some things. Here. See that's
the desired result, but feel free to do something
like taking practice swings on identifying where you
should be tapping left Alt. Because again, this does require a little
bit of practice. The whole spectrum
of everything. Let's see. Something like
that. It's probably going to work just fine for me. If you want. You
can also 0 mesh it. Probably not, but I am
going to do one thing. Go into my solo mode, or you can click solo mode here. Let's go into our
secondary mode. Just to kind of create a
little bit of a slant there. Let's get out of secondary
mode by hitting solo, which is right there. Now let's get back
into what we have. Now. That was our first piece. Let's go into our
second piece here. Turn the visibility off on the original piece
that we just did. And now make sure again
you're in secondary mode, so that's Shift Control and Spacebar be radius is turned on. What we'll do here is
we're going to cut some slants in. To do that. We're going to go on
ahead and just adjust the draw size radius to a practice swing to see if that's the right size
radius you want. Yeah, that's all right. We're going to hold
Shift Control. Then tap left Alt, and then hold down left Alt. We should have
something like that. You can turn on your
piece right here, your secondary piece,
and you can click on it. Hit the RW or IQ and center that in and scale it in a little bit
so it can kind of show a little bit of
thickness for you. Slept Alt left-click
onto this piece. We can switch into
it. Try that again. And again. It's just
holding down shift. We're in secondary mode. We're holding down
Shift Control. Tapping left Alt,
left-click and releasing. Then if we want, we
can pan by holding spacebar to measure the space. Then we can hold down left Alt to do subtractive inverse state. Now, something like that might work like a lot of buttons. And when you say them out loud, when, like when I'm
doing, it sounds fair. It sounds very
complicated, doesn't it? It's one of those things. It's almost like a video game. If you've ever tried to narrate what all the buttons you're
pressing of a video game. A video game will come
off very complicated. But if you develop the muscle
memory of all the buttons, then it's going to be a
lot easier to remember. Because your thought moves a
lot faster than your voice. Let's left Alt, left-click. Go into Move, brush, B&B, bigger draws size. Let's go ahead and
bring that in. Like so. Left outlet. Or I can just kind of cut in
here and its primary mode. So hold Shift Control Spacebar, turn the radius off. Let's do transparency to
help me see a little easier. Go, something like that. If you want. Transparency off. That's basically what
we did right there. You can turn on the other pieces and
see how they function. If you look around, you can also, and see if
you need something thinner, feel free to go into transparency mode and just
carve out something thinner. It's not wrong concept. It's not like a it can only
be done a certain way. There's no such thing
as the right answer at all in any of this. So once you have
that taken care of, You can also do
secondary thinner lines, but that means going back into b Radius holding, Shift
Control, Spacebar, toggling be radius on, make a very small drop size. Kind of see me go all the
way straight down to one. Like I said, the most
important thing about this is not mimicking
the original piece. It's about learning the
technique because quite frankly, it's going to come to you a lot quicker if you
grasp the concept. People like to spend their
minds getting racked on how to make this look exactly
perfectly a certain way. I don't want perfection of trying to copy
something to take away from somebody trying
to understand the important tools
in the process. So we have ourselves, our secondary pieces. Now, this is going
to go ahead and conclude the first part of this. If you want to make any more
adjustments, feel free. You know, it's not wrong
answer or right answer. In any of this. The kind of the how shall I say? It's the getting the tool down in getting your
fingering and memory. Pretty much in sync
with the controls of the keyboard are probably the most important
thing to grasp in here, developing the muscle memory. This is the most
important concept. As you can see, I did
more so like for example, I did more slants than this one. Here. You could do more,
you could do less. You can do just one. There's no such thing
as the right or wrong. It because like I said, if I did that, if I went
through and took a long, long amount of time, then I my videos would probably be tripled the
amount that they are now. So I'm probably going
to leave it at that. Now that we have
what we got here, we're gonna move into
the center section where we're going to
work with Booleans in conjunction with the Z
modeler and see if we can show you a little bit on how we do some fun stuff with
the plainer cut brush. So with that said, stick
around and stay tuned.
13. Constructing Mid Forarm: Okay, welcome back. In this video, we're
gonna continue into the middle section. One thing I forgot to mention is this green stuff
that you see here. We're gonna be doing that
down the road when we do the shoulder section
because that's sort of like a reusable asset that we want to
illustrate example in demonstrations of
modularity and reusing things kick bashing purposes. So one thing that
we're going to do now is we're gonna work on
this center section that you see here. And for that, we're
going to have an opportunity to kind of look into Booleans being used to create some of
these pieces here. And how we can rematch
these and add some bubbles, it as well and finish off
with some plainer cut. With that said, let's go
ahead and get started. Now that we have that
first piece created, let's go ahead and first off, I'm just going to hit Shift F. I don't really need to
remember that anymore, so I'll just make
that one poly group that way if anything happens, I can do a split
two groups section. And I'll just go ahead and
merge these two pieces down. Merged down like so. And there we're gonna create
a new folder for that, and we're just going to
call that folder arm. That way we have a place to
put all of these things in. Now, let's just go on ahead
and move to this piece. Let's turn off the third piece. Now, what we need to do is first put some Booleans in here. So first thing we're going to do is I'm going
to hit the B key. And I'm going to look for
an insert mesh brush. Particularly insert
mesh primitives makes sure you're not
choosing primitives. H go for just
regular primitives. Once that happens,
you're going to have a whole selection of meshes
that you can insert in here. In particularly this
mesh right here, the cylinder is what
we're going to go with for having us having to go. And what we're gonna do
is we're just going to left-click drag right in
the middle there, cylinder. And as you can see,
everything is masked. And that's a good
thing because that gives us an opportunity to, because what we want to
do is we want to make this cylinder its own sub tool. So since it's already masked, we can go to Split, split on mask because
this piece is unmasked. And let's go into
this a cylinder. Now this piece like the original shoulder
piece that we did, base mesh is going
to be subtractive. It's going to be used
for Boolean like we did with the sphere on
the shoulder piece. I'm going to simply first of all enabled like Boolean mode, which can again be
done in render. Render Booleans Live Boolean. And now we have to make a
choice on what it is we want to have for this Boolean
in turned into, and since it's this sub tool, return this sub tool
into Boolean mode. Now, if you, depending on whether you
have shift f or not, it's going to disappear. But if you just kind
of push it in like so you can kinda see
already the results. Don't feel free. Feel free to give it a couple of divides to kind of
smooth that area out a little bit about three. Now take your time. Just go ahead and hit R. And if it crunches
in a little bit, just kind of push it
in a little bit more. Now you can go ahead and
do whatever you want. With this. One thing I like to do
is just hold left Alt or left option while adjusting
the rotational value. I'm going to just bring
this along here like that. And if you remember, we can duplicate the Mesh, not the sub tool, but the mesh by simply
holding down Control and toggling the translate
button of the gizmo. Now, that's not going to
work if you have division, so make sure you delete the
divisions and then do that. Kind of see the result. One more time. Feel free to check your spacing
and if you need to do a split departs to
edit all of these, feel free to go ahead. There is no such thing
as the right thing. But you'll notice as
when you do that, that the rest of
these get masked. So if you want them
all to scale is one, just drag off and cold Control and drag
off in an empty space. Here. Kind of see the results. This one feels a
little bit too far. I might just bring that
in a little bit more. Now, this is something
I'm going to show you is not necessary. But if you feel like you want
to do some extra work on this with a trim curve or a knife curve to kind
of manipulate shapes. You can do that. These Booleans, as long
as the divisions are cut, you can kinda cut through here, or cut through here. Cut through here, through here. You can do things
like this, AP want. There's no right or wrong thing. But I'm going to actually advise against that
because we're gonna be doing a bevel and having
these pieces intersect is going to kind of get in the way of a clean
Z Romesh process. Even if you do things like this, where you just bring out
the piece like that. Like I said, all of that
stuff that I'm showing you, That's just a little taste
of what's down the line for the chest section
when we get there. So now that you have all this, the only thing left to do is just simply make this a Boolean. So let's go up to sub tool. Let's go into Boolean and
do a make Boolean mesh. And it should give
us too much trouble. And then let's append
that new piece. You can cut up. One thing I forgot. Oh God. You need to have
everything turned off else when you do a
make Boolean mesh, the new boolean bash will
include any visible geometry. So my bad on that. Let's turn that piece off
and do a make Boolean mesh again. It looks like it did it. So let's append
and bring that in. Like so usually goes all
the way to the bottom. Let's turn off our pieces. Click and take a look
at her new piece here. You can kind of see
poly groups are already laid out for
us, which is good. It looks like
there's a little bit of weirdness going on here. Hope, hoping that happen. But if you need to feel
free to kind of bring that in like a weird little
piece right there. And it looks like
there's a little bit of a glitch going on. Not gonna be too
much of a hassle. Now that we have all
of this taken care of, one thing that we
can do is if you run into issues like
this and you try to do a 0 measure and
get some really ugly. One thing, I'll show you
some fixing so we can do, let's make sure we get this
right and keep groups. Turn it up. Let's do Smoothing Groups off. I expect everything
except this to be fixed. So this looks like a very anomaly looking
thing right here. Let's see. We go straightening out a
little bit, getting better. Now that we have a little
bit of that taken care of. Let's go ahead and I'm just going to try that
one more time now. I'm Laura, I'm
trying to do is I'm trying to do a 0 measure. Sometimes won't we
get is a little bit of ugliness because of the
Thai offset happened here. And when that happens, sometimes we just need to change our polygon count to help us. If you start off with a
too low of polygon count, you're gonna see some tearing
like you saw up there. So I'm just going to try to
do some a little bit cleaner. And it looks like it's
getting a little bit clean. Once you get something
that's a little bit clean, you can then ensure
way down again, like I'm doing as you see, and then do a couple of 0
measures with that division. And then maybe inch away down a little bit more just to see
if you can get something. Because you should
never rely on that. Then what we're gonna do is once we have a nice clean spot, Let's go ahead and put
some bubbles on here. First thing I'll do is
I'm going to hit B, z, m, access our Z modeler. And remember it has three
selective components that C model or brush. So let's make our draws
size super small. And like for example, the face will give
us one set of menus. The edge will give us
another set, then a point. We'll have another set of menus. So we want to go with the
edge with the set of menus. Let's choose Bevel and Bevel complete. We can kind of see. If we can find
ourselves drawing in a little bit of a nice
little clean bubble in all of this. So now if we divide it again, you're going to
have that problem. So let's just go ahead and
increase the poly groups here. Honestly, I'm not too
worried about it. I could just simply
trim curve that off, but it's not gonna
be my problem. I think I found an anomaly
through crease poly groups. Now if you try
dividing that out, those bubbles should
hold just fine. Now if you have any
issues with anything, just go ahead and just
remind yourself you can always just cut it
off with a knife curve. We got ourselves a
little bit of a bubble. Remember there's more than
one way to bevel anything. Even the crease has its bevel
width, which is contingent. I've not having any
geometries and you can kind of go that route if
you really wanted to. And that's also a possibility. Go ahead and show you
what that looks like. See you can kind of see how it kind of has
something like that as well. Never really tried it this way. So I'm kind of
experimenting right now just to kinda
see what that does. That wouldn't do too good. In any event. One thing that you
have to remember about the bevel width is, is that you have to hold down control in order for it to work. And even though it gives you
a nice clean edge loops, you still got to do the next. He's still got to do a
crease poly group on there to get what you want. Alright, so we are
almost done with this. We just need to now
just simply add, do a plainer cut into our p.sit. So let's go into sub tool
in turn on our reference. Help us out. Just a little bit
of a slant there and nothing really too special. And let's just bring that in. Something like that. If we announced the plainer
cut brush is a brush that is used in that is accessed
through Lightbox. If you go up here to lightbox or hit the Comma key, you
will bring that up. This is sort of like our
shelf are cooking rack of ingredients that
ZBrush stores for us that it can't
cram into its fast, quick fix brushes,
pop-up brushes. So let's first of all
click on brush up here. Click on planar, double-click on that and we're gonna choose plainer cut thin. This is a fun brush because it gives us some fun opportunities to kind of test the waters
of what we want to see. A pretty nice little brush. Quite frankly, I found in here, you can access it all you want. Two, it gives you sort of a
different pattern based off of what location
you draw off of. So unlike right
here on this piece. And you can kind of see, I can kind of create sort of
a fun little piece there. Maybe I want to actually
do something like this. I can do something like that. I pretty much have full
rein to just experiment. All I want just to kind of, it's just fun to look for like a fun little spot
for any of this. Like there, That's a good spot. Now that we have that
one last thing we'll do is we'll just go over
quickly as the chisel brush. And that's just
hitting the B key. And we're going to go ahead and select chisel right there. We'll choose something
like brush tip. And we'll just go ahead
and just lower this down and do a couple
of practice strokes. And if it looks like
it kind of just go ahead and if it's too deep
or it looks to jaggedy, kind of lower the
intensity down. And you can kind of just sort of see how it works
a little bit. It's kind of a fun brush, but it takes a little bit
of time to get used to. The big problem about
this brush is that it has this deal where
you do require a bit of geometry
to make it work. It's not a brush
that works very well without a crap load of geometry. And it's definitely not an easy brush to
work with the mouse, which is what I'm
doing right now. It's kind of a friendly
shall I call it, say say whack them tablet
friendly brush. Best way I could
probably put it for you. That kind of concludes our
little bit of our air, our demonstration here
on the midsection. Now as I said, you can have fun with this as
much as you want. You can take as many
practice swings as you want on things like
the plainer cut brush. Re-establishing your pattern
as many times as you want. Just make sure you're
hitting Control Z and you should find everything
that you need on there. Like I said, I like
to just constantly just look for all
sorts of fun places. It's a very cool discovery and catch lightning
in a bottle brush. It's pretty neat. I like that one and more
evenly interests here. So now when I do a
chisel brush and might have some little bit
more evenly spread. Go ahead and work that
out in the next one. With that said, we're pretty
much done with this piece. The next one we're going to do is going to be
finishing up by showing you dynamic
thickness and how it relates to knife cut
brush on this third piece. And we'll be done with this. And then we're going to
be moving into creating some extra little more
advanced abstract stuff that we can use for both
the midsection here, as well as how it will
go to the shoulder. So with that said, stick
around and stay tuned.
14. Finalizing Forearm: Okay, welcome back. So now we're on the last
part of all of this, which is going to be
the third section. On this section,
you're going to notice that if we look on
the reference here, you see that there's a different thickness
than there is here. And we're gonna work
with dynamic thickness and also give you a
little bit more of a feel for the bevel width
feature under Geometry crease. With that said, let's go
ahead and just get started. Now. Again, one of the
first things we'll do is, is that you can see I
redrew my chisel brushes and just hold down Shift to draw out a chisel line like so, just kind of straight around. So now we're gonna go ahead
and left Alt, left-click. We're gonna take our
midsection piece that we made and we're going to put
that in the arms folder. Let's go ahead and
turn that off. Actually, what I think
I'm going to do is maybe turn that on because
I'd like to see some, I'd get some ideas of where
this might work best at. My planer cup brush is
intersecting right there. So I might just go ahead and just give it a little
bit more of a womb. Like we did in the
original piece. We cut some slant lines in here. So we'll start off by
doing the same thing. We'll cut some slant lines
in here of varying degrees. So first things first
hit Ship control, select your night curve brush, go into its secondary mode by holding down Shift
Control Spacebar. Now, let's take a couple
of practice swings. I'll try to start off
where this area needs. So it kinda makes sense. Now let's just show where
that looks and that's about, that's fine by me right there. Of course, make the draws size a little bit more pronounced, a little too much. We'll just go all the way here. Then we're going to
hold down left Alt. And that should give us
something like that. Now what we're gonna do is
we're gonna take that piece. I'm gonna hold shift control to bring it to the very bottom. And now we're going
to do a split apart. So now this piece is separate and this piece is separate and that's
how I want it. Now, using this idea, we're going to now go back
to the original piece. And we're gonna do
different widths here. For that, I'm going to bring a, since this is a bigger
width than this, I'm gonna make my drawings
size a little bit bigger. Like so. You get something like that, which is kinda keep trying
just keep redrawing. I noticed that there's
an extra piece here, but my piece cuts off. So one thing I can do is I can just do a little bit of a piece
like this, like that. Make sure it's in the
same lining angle. We can just do something
like that if we want. Because we did sculpt this
little bit differently. Just go ahead and make it
look a little bit like that. Once we have that
all taken care of, Let's go ahead and go through the whole process of maybe doing just a quick little
0 measure on all of this to kinda help clean
all these pieces up. Because next what
we're going to do is try to delete the top. So here's what we're gonna do. This piece right here
that you're seeing. That's pretty thin
compared to this piece, but this is very thick. So what I'll first do is I'm going to select the
sub tool for that left Alt, left-click, hold Shift Control, left-click to isolate,
select that poly group. And now that it's been isolated, selected in all the other
poly groups are invisible. Let's go through
modify, delete hidden. Next up, let's go
through 0 measure. We're going to just
clean this up. See if we can get
something fairly clean. And click on 0 measure
just a couple of times to work out all the tears and the tangles and
things like that. Once you are comfortable
with something, let's go ahead and I think what I'm going to do is
I'm just going to experiment with some
lower resolution. Something like that
will work for me. Now. I'm going to add, create a new
thickness a mountain. Now we can do this
in a couple of ways. One way is that we can just extrude this out
through the modeler, but I'd like to do this
through dynamic subdivisions. So let's go up here to geometry. Dynamic subdivisions. First thing we do is
activate dynamic. And what that does is it gives us like a projected view of what it looks like as
if it were divided. But it's not actually divided. Let's go through
smooth subdivisions and turn that down to 0 so its silhouette
doesn't really change. And now we see thickness slider. This becomes available
when dynamic is turned on. Let's go ahead and add. Once we kind of
slide that through, we create a very clean
thickness line there. And that's what we want
to learn for this one. You go ahead and you
just pick your piece. If you have to 0 mesh this, if there's anything that
doesn't look pretty, feel, feel free to kind of go through the whole thing as
many times as you need to until you're comfortable and confident
with the 0 measure, then go into dynamics,
subdivisions, turn on dynamic, turn
your thickness up. It's up to you how
you want it to be. And then just go
ahead and hit apply. And what that apply
does is it turns that projected mesh into actual
sculptural low-res geometry. So now we have a separate piece. Let's go into our
solo mode when you kind of see all the
separate pieces there. Now if we divide this up, it's going to collapse. So we need to get a poly group here and a poly group here. So we can tell it to put
creases here to hold some holding edges
like we did before. We go to Poly Group,
group by normals. Let's just try it like that. It looks like it got most
of them right there. Let's go ahead then and go
back up and do geometry, crease, crease poly groups. And it looks like we
got what we want. Get out of solo mode. Go ahead and go back to
my lowest subdivision. And I'm just going
to go ahead and just simply look at the bubble
width which is under crease. Now remember you're holding
down control for that. I'm not going to really
give it a too terrible of a bevel can be enough right there. Let's crease those poly groups. Just going to go ahead and
hold it out like that. Now we got ourselves a
little bit of what we did over here onto here. There's anything
that you don't like, just go through ninth curve
brush if you don't like the spacing or one a
little bit more spacing. There's nothing wrong with that. Do something a little
bit, even a little bit. Make sure you're going
through geometry and deleting the lower subdivisions is ever set in stone
with any of this. Then let's hit the W key
frame out so we can see our gizmo and bring that
in a little bit closer. Maybe even use the Move brush. Adjust over here. Then we can do the
same thing over here. So that's how we do that. If there's any questions
about how we can do that, we've now know how the
bevel width works increase. So if we want to make some adjustments between
here and the bottom piece, we can, and we can go back here. If we want to, we can make
a matching pebble pea size. No, I want to go too thick
obviously because of that. We're going to have to. Eyeball it or do something like this
where we kind of match the bevel width and then left all left-click work with a
different type of move brush, which is moved topology, not move brush but
move topology. That is a different
brush right there. What that does is
that just simply moves the individual pieces around without affecting
and joining pieces. It's like a move
to parts pieces. Now we've got ourselves a
little bit more detailing. Started with here. If you want to go
back to this piece and do less slants if you want, you can definitely do that. You can recreate that piece
as many times as you want. One thing I always like to
do is sometimes I like to keep backups for all
of these pieces. But now that we have our
first starting piece, what we're going to do is we're gonna work
on our shoulder. And then we're gonna do
secondary sculpting pieces of that underneath here, which is going to be
gribble like wire pieces, which will then be placed underneath here and
underneath here. As sort of the fill-ins. We'll finish up with the backside of this arm
and then we'll finish up with a little bit of a bicep to fill in all the
pieces right there. Once you're done though, just go ahead and put all
the pieces in the arm. And remember one
thing if you want to, this is broken up in a whole
bunch of pieces if you want, because they're
all in one folder, you can hit transpose set. And what that does is
that makes the whole, first you click on the folder, click on the cog,
hit transpose set, everything will turn gray. And then you just hit
center point and you can chess move everything. Let's go ahead and see
if we got, if we go. One thing that might be
masked in all of this, going to have to actually
be a little bit careful. We go, It's probably that. In other way we can do a transpose said is
simply by hitting the W key and do transpose
all selected tools. But I prefer going through
and doing the folder to transpose set because now
you can just adjust things. Hold left Alt, maybe
adjust the, the gizmo. So this is a little
bit more like that. Or remember, Ben dark? It doesn't really work if you
have multiple subdivisions. A, you know, it's just one
of those things that you can just toggle with on and
on infinitely with. So with that said that's kind of the rough breakdown
on how you can do it. This was one interpretation, but don't be constrained
with getting it to look exactly the same as the original
concept piece. I am so much more focused on you just learning
the tools and getting the practice with your
curved techniques like panning them through the
spacebar trick, etc. So with that said again, I'll finish by saying next up is the shoulders
and the greebles. Stick around and stay tuned.
15. Detailing Base Mesh Shoulders: Okay, welcome back. Now in this video, we're going to go ahead
and start working on the shoulders and
some green label here. And this is gonna be
a very simple video. It's going to build off of the last video with
dynamic thickness to help us recent meant what we've learned and it's also going to give us
some opportunities. Start practicing
transposing multiple sets as we go along. So with that said, let's just go ahead
and get started. Now, before we begin, let's clean up our sub tools
here that we haven't used. For example, we have
some face meshes, still, some booleans. Let's go ahead and
delete them off as we don't need them anymore. So let's just hit delete the d. Now let's take out that
second base mesh that we had. That was that big
guy right there. And it seems to be
double transpose. So I'm just going to click
this little spot right here where the
checkmarks are, gizmo. And let's just bring
them up like that. This is gonna be
our piece that we use multiple times
as shoulder piece. First thing we're going to
go ahead and do is we're going to just simply duplicate
this piece, like so. And then we're going
to go Shift down. Take it out. Now, this is where
I keep re-frame, rephrasing with people
about getting creative. We did the forearm piece for so you could get a
little bit intimate with understanding the
secondary features of the knife cut brush. Now it's your turn to decorate this in your way
because we really are hell-bent on getting you to
go outside of what you've learned from a video to what you want to make
for your own design. For example, your
own slants or your own cuts that you've had
practice with the forearm, you do here now. You can do anything you want. And now it's, it's
pretty much yours. So if you want here, if you want to work with
secondary features, I will say this. There's one thing
I should say is secondary features don't
work well on symmetry. Only the primary features
of knife curve brushwork. If you want to fix that. The one thing you can
do is just go ahead and do your cuts that you want
and then go through Geometry, modify Topology,
and do a mirror and weld and you'll get
everything you want symmetrically placed
on the other one. And then from there
you can go from 0 measure beveled this area, but don't bevel that area. It's all the world is your oyster as far as
where you want to take it. And now it's all up to you. You can do something like that. Just make your own pattern
and have fun with it. It's really that simple. So having said that, the after you've finished
doing your own unique pattern, which I'm doing the same here. I'm just making my own
little unique pattern. I did do that again except I'm going to turn symmetry off and bring it across like so. There we go. You get your pattern
down and what you like. Go ahead and feel free to do a deal where you go
through sub tool, duplicate that
pattern, sub tool, turn one of them off. Then ship control. Just like we did
in the last one. Now it's just builds off
of what we did before. We do a delete hidden. Now we can go through
and we can do an extrude or a, a project. On here. I will say
this trying to 0 mesh, this may not give you some accurate results
to be fair because you have no poly groups to
separate everything you want. So kind of bear that one
in mind. If you want. You can always try
dynamic subdivisions, but don't go too deep because you'll start seeing some tears. Just kinda keep that in mind. Like for example, let's go
through dynamic subdivision, turn on dynamic, makes sure the smooth sub-divided or is low. And you can give yourself a
little bit of a thickness. Just to have some fun. If it gets a little too wonky, just do a quick little BPR render to make sure
it comes off smooth. That's all right. It's a little bit, little bit messy, but
I'm okay with it. The thing we can do is ECM. I'm just experimenting
right now. We do down extrude Poly Group own. Extrude those. The only way we can fix that and the reason that is is
because all the tie off, since we have to do a 0 measure, that's definitely make us
lose our pieces a little bit. Not as much as I thought. It's actually relatively
clean. Dynamics. So Division, try that again. Go with their thickness
and our thickness. B that. Now let's just go
ahead and bring it in. Hit Apply what we can
do poly groups all. But I don't think
we're going to be, Let's do poly groups because
we may want to divide this and it's going to
collapse in like that. So let's just go ahead and do poly groups,
group by normal. Let's take a look and
see if that gave us everything poly group
and every corner. Good. Because now when we
try to do divide, we first go through geometry. And you can see we're
repeating all the same places, but we're going a
little bit faster now. Increase PG. Now we've got a nice clean
little piece here. So that's kind of
how we do that. We got a nice
little clean piece. It's kind of building off of this principle by
adding one more thing. And that is that we
did in isolate select, we did a 0 measure, and then we did different
poly groups by assigning different poly groups
on there so that when we did a crease
Poly Group function, when we divided, the corners
would still be held. Now let's go ahead and turn
on our original piece. Let's go ahead and just
bring this up like so. And you can just do
this deal where you can either bring
it in like that. Then if you want, you can kind of go
through undo and just sort of have this guy kinda
have its own little pattern. Like so. Now it's a little bit different, It's a little bit unique. Maybe you want to
do something here where you want a 0 mesh this, well, that's okay too. You can do that. Again. Maybe we want to
do a bevel on here because that's the
most common reason we do when we do 0 measures, we'd like to bevel. Again, all very
possible geometry. 0 measure. Let's start off with keep groups and turn adaptive down and
smooth groups down. And let's just
see, it looks like little leery about it and it's going to probably
be a fun one. That's what I thought
I'd try this though, since our goal is actually
to do poly groups. Let's try to just simply do a
poly groups through crease. Do pebble with don't want the
center to be poly groups. So we're gonna have to kind
of mask everything out. Except for the end In. This might be easier. Isolate, select mask,
isolate select Mask. We're going all around
isolate select Mask. And I'm again, it's all
holding Shift Control, left-click mask,
invert the mask, then go through bevel. Looks like punches
it out in front. So let's just kind
of bring it back. So now we've got something that's a
little bit cooler, a little bit more of a unique, distinctive edge to it. That keeps us from dealing with the headache of
the 0 meshing tear because trying to Z Ramesh
this so you can get a bevel. You can, there's a different, a dramatic difference in
topology here that it's going to make a massive nightmare for
0 measure to figure out, I mean, like I said, it's an automated program
automatic remeshing system, so it's not going to, you don't have complete control. You only have the power to
manipulate the control. Now that we have that, let's just bring that
out a little bit more. Like what I see. Since I'm done with this. I'm done with that. I'm going to turn this into
one single poly group. That way I can isolate
the whole thing out from this because I
want to combine these two. And I'm going to turn this
into one poly group while maintaining all the
poly groups here because there might be
something I want to do extra. I'm just gonna go ahead and
merge these pieces down. And now they're one sub tool. And maybe if I've decided
this is too far away, so isolate select because
it's all one Poly Group Mask. Now let's bring it in
a little bit more. You can do these things. Alright, so now we've got a
piece. Let's bring it in. Like so. And maybe I feel like the
curvature is not enough. That's okay because again, there's nothing that
says we can't go in here and do something
about that. Curvature is a little
bit too shallow here. Let's go into solo mode
if you want to see it, or you can turn off
all the visibilities, go with Ben dark and make it a little bit more Ben
dark easier here. Then let's hit Accept solo mode. Actually, I kinda like that more than my original piece book. Ones counting. Maybe we can do it like
this and then hold down control and bring down and
go for a smaller piece. And maybe shrink it in a little bit more so
that way we can have some and we'll put
some gravel in between here to kind
of help us out. But this was all just to help us along the way,
establish our pieces. And I'm going to go ahead and do a split mask on this guy. We have two sub tools. Kind of see, it's kind
of coming together. Now what we've got
to do is we got to start functioning normally, put some gravel in-between
here, here, here, and here to kind of
fill out the volume because this doesn't
really sell unless it has the secondary details of wires and underneath a
smaller things in there. So with that said, let the next lesson we're gonna work on
creating sort of like agreeable strip that can be moderately you modularly reuse. So with that said, stick
around and stay tuned.
16. Learning Array Meshes: Okay, welcome back. In this video, we're
going to create sort of like a field of array meshes and gravel in here so that we can kind of fill
in some of these gaps that are in here and here
to help us out in identifying all these pieces like we did before at
the very beginning, we're gonna need
to start off with a base mesh just as before. And we're going to
use the sculpting, brought the knife curve brush to help us establish all
the shapes that we need. And then from there, we're going to go ahead and show you a little something
about arrays. So let's go ahead
and get started. First thing I'll do is I'll
go ahead and just turn off everything that I want
so that we can get started. And then I'm just like before going to go into my sub tool, I'm going to append a cube. And now I'm going to click on that cube From this point on, like I said, make sure
everything's turned off. Make sure you also have knife
curve brush established. And then just maybe just divide
this about three or four times and go through geometry and just hit Delete
lower and let's get started. One of the first things we'll go with is that I'm just going to kind of hit W key
and scale this around. And that's because we
have a little bit, we have a little
bit of more mass. This is sort of a lengthy piece, so that's probably why we're
going to do this this way. So I'll go ahead and start now, I'm going to hold Shift Control. Drag a line across here and
it's on the shaded side. So maybe that's the wrong side. Hold start from the left. I'll go ahead and drag
a line that's right across there and do
the same thing again. Except this time I'm going to stop probably halfway there. And then double-tap
left Alt or Option key to make a little hard cut. And then once again, maybe something like
that double-tap left. Then we'll just kind of
go across like cell. So we kind of see
what we're getting. Now that we have that, let's just go ahead and make a thin barrier across like so. Again, it's the same
thing as before. Double-tap left Alt. Like before double-tap left Alt. And just see if you can
get it to evenly spaced. Then we'll start
cutting off some pieces here that we have something
that looks completely square. From here, let's hit
the R key and maybe scale that in just a
little bit like so. Maybe give it a little
bit of width so we can do a little
breathing room on here. Now that we have all
this taken care of, Let's go ahead and add
some modifications. So like, let's make
this area a little asymmetrical from the
top, a little bit here. Like for example, you don't
have to get tunnel vision. I keep saying this
over and over again. Don't get constrained by what
you're seeing in the video. You can do your own thing and I encourage you to
do your own thing. It's just kinda go
all the way down. Maybe. Something like this. Perhaps just to kind of
experiment with what we got here. Maybe I'll do it
like this and just kinda bring it through. Go something like that. Maybe. Let's see here. I'll just make my adjustments. Kinda see what I'm doing. Ourselves. Little bit of a case. We can always just keep on
going if we like what we see. You can just simply likes. So you can kind of see I'm just making
my own shape again, it's not mandatory if you want to do something
completely different. It's absolutely fine. And it's absolutely encouraged. Just makes sure that
when you do this, that you are getting to
know the tool. Essentially. You cannot make your own unique
little shape right there. Now, we need to
do in case you've guessed it is the do
some Z remeasure. So like we've done before, we got to make sure
every angle has a nice, clean, hard surface cut. This one isn't
completely angles, so we'll make a poly
group right there. We've got to make
sure every angle has not only a hard surface cup and a poly group to go with it. I'm not using poly groups
by normals on this one. I'm just doing some
manual work on this. Just holding Control down
and doing a what is it? Control W to take what is masked and turn it
into a poly group. Alright, so let's go through 0 measure and
reshape this piece. And again, remember our presets, all we do is just simply hit Keep group turn adapted to 0, smooth groups down to 0. And let's just go ahead and just see what our default gives us. It gives us something fair. Not too bad, not too insane, little bit wonky here. So maybe we should add a poly group there
to see if I can. It's not really to mandatory. It's more like nitpicking
this point ahead and just hold down Control
marquee select over and then hit Control W to turn that into a poly group. And try this one more time. Little bit cleaner. That's pretty much all
that we need to do there. It's not really all
that complicated. Again, if you want,
you can go through crease and bevel it
if you would like. Just to kind of give yourself something a little bit cleaner. I'm not really sure if I want to do the bevel in
this whole process because it's not that big a deal for me as of this moment. But what we're going to do now is that we're
going to make sure that when we're going to first increase the poly groups
and or geometry increase. That way. We can sort of have ourselves a little bit
of a cleaner edge. If you don't like this
round thing here, we can always just kind of
go through and just isolate, select this piece here, this poly group here. And then we can just sort of
go through whole control, make poly group out of that. We'll control make poly
group out of that. And that way, when we 0 mesh, again like we did before, we can go through and get a
little bit of an area right here that will have clean topology that
we can increase with. Now if we go through
increase poly groups, increasing will happen there. And when we divide, we'll
have a little bit more of a crease section there. With that said, that's going to be a simple little piece
right there for us. And this is, like I said, it's a piece that you are going to be experimenting
quite often with, especially on the deformers. I could give you an idea. Let's first of all go through sub tool and duplicate
this in turn, one of them off and
recenter the pivot point. Click on a cob and look at
what you can do with taper. Don't forget to
delete the lowers, the lower geometry history. One thing that you
can actually do is I like to experiment
a little bit on this, is just kind of working with trying to have a little fun in seeing where you can take it. Like, for example, this is
one way you can take it. Hit Accept, then make
it a little bit longer. That way we can do another
curve like so or vice versa. Then go through. And I wanted to just show
you how we can flush out shapes by thinking like this. Except kind of see where
I'm going with it. Again, that's just
like for example, another shape we can do. Then we can restrict
this out like so. Then maybe if you want, you can do a bend arc. Bottom line that I'm
trying to make here for everyone to look at is, is that I am not committing
myself to anything. I'm not I'm basically just flushing out shapes,
essentially. Going through an iterative
process to look for shapes. Like here's one shape right
here that I can work with. Maybe I find this to shorten. I'd like it to be thinner. Up here. Again, a process that we
can do is just look at, see how this all looks. Don't commit or
get tunnel vision. I'm just simply having fun looking for an
interesting shape. And once I'm done, I'll just go ahead and
just hit Z remeasure, see if I can get
some of this back. Well, that's gonna be ugly to try and get on the first draft. Some a little bit clean, little bit off here
on the wonky Venus. Let's see if we
can first of all, fix that by changing the
target polygon count, that might help a little bit. Did you can kind of see because we have all these
different places we can work with something. Again. Once you have something
that's clean, then you can work your
way down a little bit more and work your way
down a little bit more. But quite frankly, I
kinda like it like this. My best draft result. Now remember, just like
we learned before, if you want, you can go
through and isolate, select all of these
into one group by going through and first of all, hit
Control, left-click. Just isolate, select, invert
the selection, bam, bam, invert selection
again, hold Control, Command W. There you go. Then from here you can
just go through and do geometry and delete hidden, which is under
modified topology. Then you can go from there into dynamic subdivisions
in case you forgot. And then we can just go ahead and work with the
thickness again. Then have the thickness be our way that we
control everything. That too is an option for you. So I'm just reminding
you of your choices. If you have something
that's too thick, you can problem-solve it. With that said, we're
going to now move on into, now that we have a little
bit of a cleaner piece here. Might go through and do a little bit more
editing, like right here. Maybe. I might even do some
right along here. It's kind of a
nicer, simpler look. Once you have what you want, remember that you
can then go back in. And this is kind of
like an abstract piece. But once you have what you want, go into bend arc and you've
had some fun with it. And you've constantly explored
every piece that you want. You're going to use
this abstract piece to create array meshes. Now this is the last
part of the lesson, so I'm just going to show you the what array meshes
are and what they are is basically they duplicate
the geometry in a line. And they turn that
instance looked, looking duplicated geometry into actual geometry probably doesn't make sense when I say it. But so let me allow
me to actually do a demonstration that said
measure one more time. That way we have a
clean line here. First thing we'll do
is under Geometry, we're going to see a ray meshes
and to activate it first we're going to do array
mesh by clicking on it. Now this is a new feature. We didn't do this yet. So what we're going to do then is first thing we
need to do is we need to offset one piece
off from the other. And you can see there
is a XYZ amount. But what we want is to toggle the z or I'm
sorry, the z amount. Now, once you have that done, you have it looking like this. You're going to want to go through and you're going to want to toggle with the
repeat process. And the repeat process kind of gives you an interesting look. As you can see. It's kind of
a fun one and you can again, just kinda mess
around with that. You can, I encourage people actually to do this
as this trips work with the scale to kind of
see how it affects things. I would say it's probably the most important
thing to do is to just practice by doing just by pressing
buttons a little bit. And once you are at a
comfortable angle, like I am, you're going to then
duplicate this into a make an actual array
mesh out of itself. That said, I'm just going
to do one last bend arc on all of this. Then. Keep it like that. I think I'd like to try as
skewed former just to see because kinda want that to
reach out a little bit more. Once you're happy with that. Let's just work with array. You can kind of see how that
works a little bit more. Feel free to rotate it around, both on the X and the Z. Probably the y is
the most prevalent. Let's go ahead and
go back to offset and probably bring it
down to about this. And I'm just messing
around them, just not I'm not committing to anything and I don't want you to get to lined Intuit either. Just mess around and look for a little bit
of an easy shape. That's like in very
good shape right there that can work pretty good. Do your best and not try to
intersect with anything. Let's just do a few more things. One of them is going
to be just seen what this looks like
with less repeating. And I think I like
what I'm seeing here a little bit more. I think I like that
frequency in that pattern. So what I'm gonna do is is
I like this one the most, but at the same time, I'm also seeing that it's
little too short for me. Probably going to then offset
to make this a little bit longer and then go into repeat to fill in
what I've offset ID. We go something like that. Now, let's turn a ray
mesh off real quick. If there's anything you want
to do with this piece more, makes sure you do it now. Because we're going to get ready to convert this piece
and we don't want to be without any
hiccups when we do so. Like for example,
if you want to go through and divide this to give it some
divisions before go. And so let's go
through geometry. It creates crease poly groups and divide it a couple of times. Want to delete the lower
if you want to add any bevels to it through the crease like with
the bevel width, just to see what it looks like. You're welcome to
do that as well. Just like so. And that's certainly
not a problem either. If there's anything else
that you want to put on it, this would be the time to do so. With that said, let's just go ahead and then go back
to our array mesh. Turn that back on one last time after we've
checked everything, one final Go and make sure everything is
sort of in its place. Let's go ahead and do make
mesh at the very bottom. And what that's gonna do is
that's going to turn these all into actual
pieces of geometry. And now that kind of concludes
our array Mesh Builder. So now what we can
do is we can go the center point, hold left Alt. We can scale these down
a little bit more and we can go through and
maybe push them in. And these can all now be
used as wires to help us out in creating are
under gribble areas. And remember, it doesn't
have to just stay like this. You can do all sorts of things
like marquee select line. I've put a little bit of a
groove in the center here. And you can do all sorts of
things on it if you want. You can also work with some other deformers just
to see if you can have fun. Anything from taper, for
example, is an option. Or if you want to really just
get Iranian experimental, you can also work
with the extender. And that's actually kind of
an interesting tool as well. Although I would say
that the extender is a tool that is
meant for practicing. It's got probably the most, the most pieces on
here all put together. Some of them you can get some
interesting results from, and some of them you
just got to kinda take your time and learn
like this piece right here. You can kind of have
some fun with that eye. Really not going to work
with the extender because of the fact that I want to keep a default setting
on all of this. Like so. That's just gonna be the last setting piece
that I want to go with. I mean, I can
always do something like this and have
some fun with that. And that can be like
a fun little piece that we can add in there. But what we're
gonna do is now add some wiring underneath here. And this is going
to serve as sort of like a gribble piece that is gonna go in
the under shoulder and within some of our
detailed base Gulp. So with that said, stick
around and stay tuned.
17. Going Over Wire Creation: In this video, we're going
to continue on and draw in some new wires to our newly created array
mesh that you see here. To begin with, we're
going to go ahead and hit the B key to bring up our brush. And we're going to look at some 2021 features that were
added in earlier versions, which is the extrude
profile and extrude profile to now
extrude profile to kind of if I select that you're going to notice a
whole array of meshes here. And I can just choose right
now circle for example. And if you see there's gonna be basically a circle
created there. If I want to change
the width of that, I can always just change my drawer size and right-click on the curve and the width
will just be reapplied. Now, as said before, there are two brushes, extrude profile
and Stroop profile to just to give you that idea, this is extrude profile to it doesn't really hug air
taper onto the piece. It just flatly is parallelly drawn end-to-end
Without no taper. So that's just a quick
breakdown of all of that. Now, since there are not as many profiles as there are
in the first extrude brush. We're going to go ahead and
resort to the original one because I like to work with
this random square brush. What I'm gonna do first
is I'm going to choose this random square brush and
extrude profile brush one. And then I'm just going to bring this down like so and
have something like that. Now nothing to and say
nothing too crazy. And I can probably be
satisfied with that. I'll hit our key
and recenter this all and bring this
in to about here. Now you'll still
see your curves. So if you want, you can
make that disappear by clicking off onto a mesh. Now what we're going to
do is a couple of things. We're going to use the Move topology brush to kind of rearrange
all these pieces. But before we do that, let's go ahead and get rid
of this little taper here. And I can just do that simply
by holding Shift control, making sure sit select rectangle is their biggest going to drag off and then hold
left Alt button to turn it red to
make that disappear. And then we'll go into Geometry, modify Topology, and
delete that hidden. Now from this point on, I'm going to try to
make this look a little bit like wires. First thing I'll do is
I'm going to select my move topology brush or
if you want to nickname it, the move parts
brush, which is BMT. Remember we're not
selecting the Move brush, just the topology brush. And I might also, if I want, I can hold Shift to make
this collapse or better yet. I can. Well, let me see here. I can just go through all of
this and what I'm seeing, I'd like to go
through and remove this sub tool so that these frame here and the wires are two
different sub tools. That way when I divide, it's going to actually smooth
out a little bit more. Let's go two sub tool, go to Split, unmask. It looks like we have a
partially hidden I must have undone undid too many
times. Do that again. Now we have two sub
tools broken down. So now if I divide, it's gonna kinda now let's
go to kind of break out into a little bit of a
smoother area like so. I'll hold Shift to smooth
out a little bit more. And then I'm gonna
hit Delete lower. So now we can begin. I'm just going to use
the Move topology brush at this point to kind of bring in some, make the wires basically. How shall I say I'm gonna, I'm gonna make them
kind of essentially, I'm just moving them around. You can kind of see how that works and you kinda
get a feel for it. And if you want, you
can bring them in here. Move them around in
different angles which are trying to do is to get them from looking uniformly straight
or perfectly aligned. I want these to look tangled. Basically. If you feel someone this is too
small or too big, one thing we can do is we
can hit our center this in, scale it down so the wires are a little bit more like this. We can reapply, once again. What we have. Then go back to kinda tapering out all
these pieces like so. It's just sort of a process where you just kind
of have a little bit of fun trying to make it look like
very disabled looking piece. Now, another thing that we're going to go
through showing you is that we would like to add maybe just a little bit of
variety in these pieces. By first of all, adding a secondary
wire into all of this. So first things first, I'm gonna go ahead and place this a little bit
closer to home. Then. Just bring it in like that. Bring hit the B key and take a look at
this piece right here. The inserts cylinder
and extension. It's very similar to
the last brush we did, except it's just a
single cylinder. And you can kind of see
how it works like that. And the reason it's
all wiggly like that is because it's kind of
the curve is set to snap. You can always change
that by the way, by going up to stroke a
curve and turning off snap. And it won't give you
as much of a pull. And you can kind of
just kind of work your way to a little piece here. So what I'll do now is I will
incorporate this inserts cylinder into it to help break up and create some
different pieces as well. So first things first, I'll just bring it out like so. If I want to change the width a lower my draw size and then click on the
curve to readjust. Like that one. I'll go with that. Let's make that curve disappear by just
clicking into the mesh. And we'll just bring
this piece in. Like so. What we're doing is we're just adding some variation
to these wires. Essentially. We're just kind of
giving some flavor, if you will, will give
one more of wire, just the same here. Except this time we'll make it a bit smaller than that
one for the sake of variation. Let's see. Maybe mess around with the
curve a little bit here. Do a combination, perhaps
do a little bit of a curve, and the Move brush, Let's click off the curve. Let's click the curve out. Bring this guy in
a little bit more. We're just working on just
having some fun here, just doing some randomness. That's all it is. Once you get to a kind of a comfortable spot of gribble
that you feel good with. Now, like I said,
this is going to help cover up some areas. Go ahead and then just take all of this because these
are a bunch of poly groups. And if we left Alt click, we can see these are a
bunch of polychromy. I'd like to combine
these into one sub tool, but I'd like to be
able to mask and independently control
them in one sub tool. So the way I'm gonna do
that is I'm gonna take, I'm gonna take let's
see. I'll go with this. I'll go with the frame pieces, hold control over it and drag a mask over it
and hit Control W. So it's all one single
piece. That way. When I want to do some
isolating select moves, I can select one that frame and invert the mask to make
any more adjustments. Now let's go to our wire. It remember if you
want to add more, there's nothing wrong with that. Again, you could always do the
same thing you did before. I don't have a whole lot
of polygon count here. You can just hold down Control. And if you wanted,
you can kind of manipulate it by
rotating it around. Maybe you want to do
something like that. You can there's no real law that says you absolutely
cannot do that. It's certainly up to you. What you want to do. There's no real law that says
what you can or cannot do. But you can kind of see, we have a little bit agreeable. They're in the process. So once you get to a comfortable
spot with your piece, take a moment to kind of process which you need to make
any more adjustments. Like maybe you want to put
something like this on here. You can always do that. But once we're done, let's just go ahead and combine
the sub tools together. Now. I'm going to hit Merge Down. Let's turn everything
back on again. So our turtle base mesh, our arms and our shoulders. Let's go back into our table. Let's center the pivot
point and rotate it. Now that we have this arm piece, Let's scale it down. And now I'm just going
to duplicate it. And I'm going to put
one of these pieces into the spare part
folder because again, I might find myself
we're using this and there's absolutely
nothing wrong with that. Now at this point I'm
going to left, I'll click. I'm gonna make one of
these guys disappear. Like that. Oops. There we go. We're just gonna do a split
mast to take that piece off. And then I'm just gonna go ahead and just
delete that guy now, I don't really need him anymore. He's just served his
purpose. Goodbye arm? No, no. Just hit. Okay.
Now let's just go ahead and go back down to our
original Greek world peace. And we'll start filling
in some of the gaps here and make some adjustments. Now, let's just go
ahead and bring this in and bring this guy in. Like so. One thing you can decide which way
you want to have it. You want to have it like this, or do you want to
have it like this? There's no such thing
as a wrong way. I'm kind of partial doing it. Like I said, I'm kind of
partial to doing it like where I can move the pieces a little bit inside so we get kind of like
a spoke little bit. Maybe I don't want to mess
around with this a little bit more and just have some fun. This is again, this is sort of the experimental
phase and there's no really wrong way or
a right way to do this. In all of this, this is just sort of
a sort of you having fun with it is the best
way to describe it. Mu, you can just enter it
in this way if you want. Or you can enter it
in the other way. Little bit on the
fruits ON either way. So I think I might actually go with maybe something like that. Just for now. We don't have to
commit to anything. I'm going to go through
with a transformer by clicking on the cob. Make sure that the
transformer is aligned to the same alignment as wherever
it's facing before you go into the transformer cog
and click your bend curve. And again, we can just mess
around with this and kind of give ourselves a little bit more of a adjustment,
if you will. If you need more curves, just click on that
orange cog and you'll put one curve
between everything. Like so. Just keep that in mind. I'm thinking of bringing it more and get a better idea. Like it a little bit like that. You've got to remember this area is going to be played it off. So we're going to have
this taken care of. I need to and I have to put something between here I will. But again, I'll just kind
of startup here maybe. And again, this is
all just finagle. This is just just You taking your time and figuring out what
works best on here. Maybe you want to
do a little bit of a taper. You can do that. Maybe a taper in
combined with curve. You can do that. There is no right or wrong way, but I will say this, there is a reason why we
wanted to do this on here. Why we wanted to duplicate
a lot of all this. I'll just go ahead
and bring this in. Maybe pull on here to
rotate the value here. Bring this down just below. Kind of see how we're
kind of having fun, just kinda bringing this in and having this kind of come in. Don't worry. Again, we're
going to take that out, play that into something very
different down the road. Kind of continue. We never really talked about the rotational value
of anything here. When you click on any dots, you're gonna get an
extra orange dot on top of this dot up here. Cool. Pulling on that will have a rotational twist value
as a result of it. So just food for thought. To help you align. You can kind of see how
I'm having fun with this. Again, this is a practice
for the deformers. That's all this is. And it's a practice
on how we can flush out interesting
shapes in the process. Let's add another just to
see what things look like. So let's just do a test
with that and hit Accept. Then I'm going to hit Q
and just bring things. And now we're getting until a little bit
closer to home base. Looks a little bit better. I think what I'll do
is I'm going to have the chess piece intersect
in underneath here. For now. I'm gonna go ahead and
be satisfied with that. There is one thing you
can do, like I say, you can always feel
free to change anything out that you feel. If you wanted to. For example, you
cannot add like for a Boolean like we did with
an insert cylinder here, you could do an
insert cube and do a Boolean that actually
goes across here. Like I said, we
want you to be in this mindset of a,
how should we say it? Having fun experimenting
is what we want you to do. Like right now, I'm going
outside the realm of this as we speak
just to have fun to experiment with
what I'm doing. Just doing something that's
just out of rank, just edge, kind of show you off the bar just like how
much fun we can have. If you want to add
like a little bit of a little too much. I wanted to add
something like that. You can certainly do that, but I would rather just do probably if I had
to go through this, I could split a mast and then go through and do more cuts. But I'm not going to do that. I think I'd like to
actually leave it like that. Let's see. You can kind of
see already why I go through and advocate to
the idea of having this, having the outer braces be
sort of like one poly group here because I can do
independent control here. We're kind of taken ourselves
a little bit closer. We're getting a little bit
closer into hard surface here. So now what we're gonna do is we're going to apply what we did and now just fill
in some blanks here. We're going to fill
in some blanks here and then do a couple of more base mesh
sculpting creations for the hand and the bicep here, and then move on into the light. So with that said, stick
around and stay tuned.
18. Creating Finger Base Mesh: Okay, welcome back. In this video, we're going
to continue to move on, work on our hands
and a little bit more of filling out some
of these pieces here. So to do that, we're going to create yet again another base mesh
to start off with. As you can see, I made some adjustments to
my piece a little bit more just to kind of experiment out what I
like and don't like, just to have some fun with it. But like I said, it's just one of
those things where you got to feel
pretty comfortable in just experimenting as best the way I could
say putting it, just constantly,
move pieces around, see how they look and how all those fun things you gotta be able to have that fun. So I encourage you to
continue to look for fun, looking positions and shapes to help you out with making this. If you want to do some
detailing like around here, you can maybe like a strip line. You now have enough
knowledge with the knife curve brush
secondary mode of subtracting to put
a line divot in there as you see fit
if you would like. And I may do that
myself down the road. So with that said, let's go ahead and
just take a moment to figure out what we're
going to put next on here. Now, the one thing I'm thinking that I'm going
to do is I'm going to probably go with a hand
that's gonna go around here. And to do that, I'm probably June
of first of all, work a little bit
of positioning of all the pieces that
they're not too long out. I'm readjusting and making sure that everything is
where I want it to be. Just kind of in conjunction
with everything. It just want to make
sure everything is just kind of just right as far as like seeing the right
position and so forth. Once you are at
that satisfy point, let's go ahead and
turn off all that. And let's just go ahead
and do is we do before and hit append and bring
in a cube like so. First thing I'll do is
turn everything off. In this cube is going to act like a reusable piece
for many things, from a finger to
maybe a foot tip, a whole bunch of things
I'm going to use this for. So let's just go ahead and have some fun with it. Let's see. I can probably go with want to turn off the
visibility of everything. Go with guns. Just kind of making
it fairly block-like, like so give it a
couple of subdivisions. Then let's go ahead and go to the geometry and do our
delete lower because that's what's required in knife cut brush and hold
Shift Control. Let's go to knife curve. Let's start flattening about all these pieces so they're
nice and clean cut. Like so poly group on every end. Now I'm just going to
go through geometry, keep groups adaptive
size to 0 and smoothing. And let's see if we
can get something that's fairly, fairly uniform. We go nice and clean. With that said, let's go
ahead and just sort of, you know, this is just
sort of a default state. I kinda liked this block. So if I want to
kind of duplicate it and delete the
lowers, I can do that. But let's just go
ahead and get started. Now. We never did symmetry on this. I'm just going to hit X. Maybe do a couple of
practice swings on here. I think I'll try
it from the top. Like I said, don't watch
the whole tutorial. Don't just be in the mindset of this copy as you
go along the video, watch the whole
tutorial from the end. I like that one a
little bit more. You can never see
a cut go through. It's because it's partially
ending in the middle. In order for that to be fixed, you kind of have to kind
of be outside in an area like that kind of works. It's something we
can work with here. Let's combine these
two poly groups. Like so. I'm just holding Shift Control
left-click to isolate, select these poly groups, masking them and
then hitting Control W. Now let's go through our 0 measure
and see what we can get. We can get some a
little bit cleaner, a little bit messy, but we can maybe
work out the pieces. The sides claim,
the sides claim. And this is kind of
like you're seeing these jaggedy edges and this
is the downfall about what 0 measure has to offer
is that you got to be able to
problem-solve when you start seeing things like this. Where you see the jaggedy edges show up and to problem-solve, one thing we do is we
change out some of the settings in order
for it to work. Like. For example, one way to
change out the settings is to try it with different
target polygon counts. Sometimes you'll
get a completely at different edge flow
algorithm as a result. Another way to do it is to
simply turn symmetry off. Sometimes that kind of helps. When it comes to things
like this though. That is something that is
a little nuisance saying. So let's just go
ahead and cut it off. We can turn to think why
that will be that way. Here we go. Let's try it again. We've got
some a little bit cleaner. Now let's hit x symmetry
and try it again. Now that we've got some
a little bit cleaner through. Good enough for me. Let's just keep going. Maybe got a little bit shorter. That works. Now that it's starting
to come along, we can do certain things. We can bevel it we can go through and do certain levels
just on top if we want. I might do the crease beveling
process with bevel width. Since this is all very, very clean, we can just kind
of deal with it that way. Don't forget to go through
poly group and do a crease. Normals. Now again, like 0 measure poly group is an
automated feature so you might not get the perfect
example of sets you want like right
here to right here. And that's just the name
of the beast right there. Let's see if we
can change it out. There we go. So I did
a full solid circle, changed that out, go ahead and then use
that to our advantage. By doing a geometry. Go through increased
poly groups, kind of see them, may
consult them right here. It's starting to look a little
bit closer to the peak. And now if you want, you cannot change this
any way you see fit. But now that we have that, let's put some Booleans in here, or let me think on
how I want to do. Let's work with the bevel. First of all, let's,
let's work with the farmers and see what
we can get because we're, we got to shape now we've
got an interesting shape, but we still got
to flush it out. So let's delete the
lower subdivisions. Let's go ahead and hit W and hit X to turn off symmetry so we can center
the pivot point in there. And let's do bend arc for our starter just to
see what we can get. Liked that look a
little bit more. I think I'd like
to top taper that. So let's accept that bend arc. Now let's taper the
top a little bit more. Probably going to be
all right with that. Kind of like it a little
bit like that too, might be able to get an
interesting shape out of that. Let's just keep pushing it a little bit more just
to have some fun here. Start skewing in. Doing is I'm just looking for some fun interesting
shapes here. This could be an interesting
shape right here. This is a nice little skew. Let's go ahead then
and hit Accept. And again, this is
just getting you into an iterative thought process to experiment with shapes
here and how we combine them with
things like Booleans, knife cuts, 0
meshes, bevels, etc. Hit the B key. I don't know. Like I said, I have no idea what I'm going
to make until I make it. So I'm just going
to drag in a cube. Then I'm gonna hit sub tool. Then I'm going to go ahead and
go through split unmasked. You can kind of see I'm using the same techniques we go over, over and over again. So now we're going to
turn this cube into a Boolean by going
like William mode, turning that sub tool, particularly into a Boolean. Let's see how this looks now. Bring it into about yay width. Then duplicate it
by hitting Control. Nice, but we all needed to be doing kind of like it a little bit like that, but something like that. Now we have sort of like
a start off base mesh. So let's go ahead now and
just bring it through. Let's see, we can do a couple
of things now with this. Let's just first of all, I'm just getting the feel of what this all
looks like right now. It looks acceptable. So I'm just going
to temporarily turn that Boolean off
and just make sure, and go back to my
original piece, makes sure I'm like finalized
with all the deformations. Like for example, there's any last minute changes
I want to make. I'll make them right here. Kind of like how
you see right here. I like that shape even more
than I like the other ones. So we can kind of
do something there. Then I can go back
into my Boolean. And the reason I'm doing this, making these last minute
changes before the Boolean, is it because I don't want
the deformation of the make Boolean mesh to change
that shape basically. So let's bring something
like that would work. All right, so we'll
do it that way. Then. We'll just go
ahead and do Boolean. Make Boolean mesh. Let's append that in
because it's up there now, let's append that into R
sub tool stock. Like so. We should then turn off
everything and we can kind of see our newly constructed
Boolean piece. Now we're not going to 0 mesh or anything like that on here. We may do or like a
crease poly groups, but honestly I'm pretty content about how
this is on here. I mean, if we do anything, I'm probably just going to, first of all, if I
need more geometry, I'm going to turn
off smooth divide. That way. I don't have
any weird collapses here, and we can just do it that way. Now, one last thing we can do, if we wanted to, we can first of all turn this. We can still work around
this and continue to do things like Ben dark on here, something like that. Maybe more tapers. We can do something like that. If you didn't like you
notice when we did bend arc kind of tore up here. The reason is, is
because the density of the Boolean is very different from the
density of the mesh. When it fills in
the geometry there, it's going to actually be a lot different than
the geometry on top. And also the edge flow of
it is all pointed off. So I might do
different Booleans, I might do different pieces. So I'm going to correct
that right here now by deleting that piece, turning my boolean back
on, my other piece, back on. This time. Going to go through, I'm going to go through solo and I'm going to rematch this, see if I can get
something cleaner. So like for example, poly group, which is going to be right, they're grouped by normals. Let's just see if that works. Every piece has a normal. Good. Let's go through 0
measure now, Geometry. 0 emission. Quick little 0 measure
of everything. It looks like everything's good. Let's divide it. First. We go to crease poly
groups and divide it. More crazy Probably groups so that it doesn't collapse in. And then we're
deleting the lower. Let's bring that baked
into our Solo Mode out. And now let's go ahead
and do a make Boolean mesh and append that mesh. Let's take a look at it now. You can see there's a different form of
geometry right there. Also, if you wanted
to 0 mesh this, you could, it's going to
be a little bit difficult, a little bit tricky because it's got a little bit more complex
surfaces for it to handle. I think I can probably
still get away with it, but I'm kind of
leery against it. You don't have to, you don't have to see regression
if you don't want to. But one thing you'll take
and look is when I did that, you notice that tearing in the center is now
no longer there. That's because it has more evenly uniform geometry to work with and not
that weird edge flow. That is that we got ourselves a nice little
start off piece. Again. Feel free to constantly make any more adjustments
on here for this piece. Like I said, I probably will be making it a little
bit like that if I want. And I might even
settle just for this, because this might fit my
needs for a base mesh. And it might actually work pretty well actually
for what I need to do. But like I said, you, after this point, if you're going to
try to 0 meshing, I don't recommend
it because again, that center part is pretty
complicated for it. In theory it could, but it's gonna be pretty
hard with these settings with keep group and adaptive off and theories still could. But let's just try it to see if we can get this
to have a clean result. Just see in tests 0 meshes resolve. That's what I
thought it would do. That is what I
thought it would do. Just something really
weird, really wonky. Figure out where it went wrong. But that's why I don't
do anything more. With 0 measure is not
meant to handle like really complex
forms of topology. Don't like overburden it with
complex pieces like this. This was probably a good example of why you don't
do it like that. Just kind of a learning the
strengths and weaknesses of 0 measure learning when to
quit while you're ahead. So when you're done with that, you can go into decorating
it any way you want. You can go into
knife curved brush, and then go into
its secondary mode. Maybe put a little divot or
something or a line in there. You can work with
that a little bit. Kinda like how I do right here. It's a bit of a thin line
vote. Do symptom like that. Again, I'm using the space bar
trick to kind of hold out. Then if you want,
you can kind of do the split two parts thing
like we did with the forearm. You can do that with
this is if you want, I'm not going to do something
too dramatic on this. What I might do is
just something as simple as chisel brush. And that's about
it quite frankly, I don't really need
anything else. I can just simply, for example, divide this couple of times. Well, that's
probably all I need. Then maybe make it a
little bit bigger chisel. And if you see it's
a little jaggedy. One little thing about
chisel brushes is that they require
a lot of geometry. Because of that, I
might be tempted to avoid that 4.6 million cell. Let's go back down to two and
then maybe split two parts. Let's see here. I'll do a split two parts. I'm going to hit Okay, let's
take a look down here. What we split, we split
the centerpiece from the top piece. Turn that off. Let's go ahead and
take a look at it. Let's just go ahead and Let's just go through geometry, modified topology and
mirror and weld this. And let's bring
back our piece so it's kind of above it, like so. Then you can do a deal where
you can merge this down. You can do something
like this if you want. Now, make sure you have exactly what you
want before you sign off. What I want you to do
is something like this. I want you to make
your own pattern. And if I had to
make a suggestion, I would make a
pattern thinner than the drawer size of
eight, maybe like four. And if you want you can
do downward like so. Or if you want, you can do straight
across like so. Bottom line is this, I want you to iterate
and get creative. And then in the next video, I'm gonna show you my
version and you're gonna see your version. All right, don't forget
once you're done, you're gonna go
through Geometry, modify Topology, mirror weld, so it gets to the other side
and then see how it looks. So again, this is that experimenting
iterative exercise and I'm gonna be giving you. But that said, stick
around and stay tuned.
19. Establishing Finger Placement: Okay, welcome back. In this video, we're
gonna go ahead and start placing all the things
that we've made. As you can see, I made a little bit
of a pattern and that was basically the same thing
I did in the last video, except I chose straight lines. And again, I
challenged you to go ahead and do your
own line design. And from there, There's
no right or wrong way. There isn't anything we haven't done that we haven't taught. This was just sort of
giving you the opportunity to exercise what you
wanted on your own. Definitely surpass the top. What you're looking
at here, if you can. If you want, as these were
two separate sub tools, you can kind of
mess around to with this or change out the shape if you want or make
something that's a little bit different
like so if you want, this is going to act as whatever
you wanted to look like. And you can see already that maybe you want to sort
of like a sharp tendon, fingertip piece like
this for the turtle, that would be a pretty
good piece again, this all comes
down to you having fun and you experimenting
with what you got. So just bear that in mind. I kind of liked that
idea what I was doing, those scaling iterative and I may find myself
circling back to it. So what I'm gonna do
is I'm going to go ahead and make one
of these pieces, probably this one here, a single poly group. Because I might
find myself wanting to separate these
two pieces off. And I can't do that
with separate departs because it will separate
all these pieces here. But if I isolate, select this whole singular
poly group and mask it, I can separate that powered off and start going
into scaling again. So I'm just going to make
that one poly group for now and then recombine these two
tools back together again. Let us just see it
merged down it. Okay, now let's just go
ahead and hit Duplicate. Bring this duplicated
piece all the way into our spare
parts because we're gonna circle around
and reuse it. Now with that said, let's
start filling in some areas here and let's go back to fill
in in like we did before. So first things first, we have this new piece
that we can work with. And we have a couple of
other pieces as well, like the shoulder pieces. We also have a lot of
excessive sub tools here. So we're going to have
to work with that. Don't forget, we also
have agreeable piece. Let's don't forget to put
that into the arm section as well as the two
shoulder pieces. And as for these three pieces
we use to get this piece, Let's just delete
those off. Like so. You should have two now here, one that is here, and second duplicate is in
the spare parts section. Now let's just go ahead and see if we can add some
combinations for some fun. First thing I'll do is I'm going to work with creating
sort of like a hand. For that. I can kind of just kinda go through and I feel
like it's a little bit Nabi. So maybe I can make
it look like that. So it's kind of has
a little bit of a tendon, cartoonish claw. Then we can just kind
of, if you want, you can scale and
adjusts like so. And we'll reuse our
shoulder piece to kind of play Legos with our pieces. So let's go into spare parts and duplicate a piece and
hold Shift Left Control. Bring that back down like so. Now let's just bring
this piece in, combine these two pieces
together like so. Let's just bring that in. You know, one thing I
look at when I see this as I feel like I want to
just do some experimenting. Like for example, I wanted to
do an inverse selection of a Boolean to kind of round out the edges here and have an experiment like
with a similar shape. To give you an idea. We didn't go through this
app ever with you guys, is that you can do
inverse Booleans, which is where we append
a Boolean or append a sub tool in we choose
a sphere, for example. And everything that's on the inside of the
sphere basically decides the shape of the matter instead of what's
outside of the sphere. Give you an idea here. By doing that, we click
on the third topic. And you can see already you get a little bit of a
new unique shape. That's kind of a cool looking
shape and I kinda like it. That's kind of neat to see
how we play around with it. A little bit to have some
fun with it and maybe make it a little bit more
rounder are down here. And that kind of works
to our advantage too. So let's go ahead and
the one more Divide. Turn off all the other
pieces real quick here. Turn that into a Boolean, but going to do one more thing just to
have some fun here, I'm gonna actually selected my plainer cut brush
from my lightbox. And I'm just kind of, well, I'm just experimenting and
looking for fun pieces here. Or better yet. You can do a line cut brush, which probably is going to be something that we'd
go across here like so. I'll go ahead and just try it. First of all, like this. Let's go ahead and do a Boolean. Then make William
mesh real quick. Let's append that new
Boolean in there. And this is kind of going
off the script because we just loved to
experiment and iterate. And if you want, you can go ahead and then go into
your knife cut brush, turn your drawer
size down, like so. And you can kind of see how fast I'm going through all this. I'm just having some fun looking into new
ways to innovate, experiment with kind of like catching
lightning in a bottle, sort of to speak. Something like that. Maybe that can be used as a
piece we can use. Let's go ahead and
bring back everything. Turn on our character
and our arm. Let's bring back this piece. Now what can we do
with this piece? This piece is gonna be
like the nugget knob that holds the fingertip in. Let's bring this guy in
personal its center, the pivot point
because it's Boolean and resets itself at the point. Let's go ahead and just what this is all going to be
now matter of placement. Maybe you want to
do an adjustment like a bend arc at this point, I'm hoping to ****, that you guys are getting very
comfortable experimenting with the potential
possibilities that this has because that's
what this is all about. It's kind of just
experimenting and finding your comfortable finding iterative shapes
through the deformer. Here. One thing I
liked about this, you remember how we did
that poly group thing at the beginning or we
could just do this. Marquee select, do this, and now we're going to do
something similar to that. Maybe bring it a little
bit more in here. Like so. This is going to serve a
little bit like a kinda like a diaphragm sort of thinking maybe
something like that. Can fit in a little bit easier. Something a little
bit like this. And scale it in
around one more time. This is just sort of
a patient game we're playing right now
with ourselves. We're just bringing
in a Boolean, then scaling it in like so. Let's go ahead and
just make a folder for this so that we can transpose
this a couple of times. So for example, let's go ahead and just simply click
on one of these pieces. Hit New Folder. I'm going to call this hand. We're going to bring that
nugget in there like so. Now way when we
hit the W key gene much transpose this
particular set. Now we can scale this to these
two together. Like that. And in addition, since
they're one piece, we can work with the bend arc. This piece. Kind of see now how I'm just
kind of fluctuating between all the different things from
deformer onto transpose, set back to the
individual piece, having that synergy to go back and forth in
all those areas, very important to
grasp and get down. That's why I say learning the keystrokes is
everything as far as maximizing your speed
in a flushing out of shape can standard good, a little bit smaller. Now I'm going to do
is split to unmask, just to keep these
guys segregated. We'll do one more time. Count, angle and out
a little bit more. Men remain a little bit. Then a little bit. You can kind of see how this is. This is all like I said, just the process
of kind of working and constantly adjusting to
mix a little bit of sun. So you got to be a little
bit patient with it. Just keep moving it until
it begins to make sense. Spacing on that is everything. So now that we get that, Let's just go ahead and do
just one more piece here. That's going to be I
think what we'll do is I'll have him we're going to move him over
just a little bit more. We have an empty
negative space here. So what is going to
have to happen is, is that we are going to need to fill the gap in with
that, with something. Maybe it might be a good
opportunity to work with practicing the gizmo
to former I'm sorry, the extender
deformer. Like this. I like the pacing
placing of these two. So I might emerge these
temporarily so that we can keep it as one. Let's bring it over
just a little bit more. What we're doing is
we're just trying to make a little
bit of room here for our third finger. Duplicate that one
round, bring it in. The reason why I wanted to
kind of make it one sub tool, holding left Alt and
left-click to rearrange the orientation of
all of this as well. Now that we have all
of that taken care of, what we have left to do
is something for here. We also have a
little bit more work to do for filling in the pieces, but we're almost
done with our arm. That's the good news. With that said in
the next lesson, we're going to talk to you
a little bit about how we make little bit of a extender piece and
how we can reuse our gribble to fill
in all the gaps here. That said it's the
ground and stay tuned.
20. Finalizing Finger Placements: Okay, so let's go
ahead and continue on. We're going to go ahead
and see if we can fill in the gap here using a
new type of deformer, we didn't go over too much on, and that's gonna be
the gizmo deformer. So let's go ahead
and get started. For this one, we're
going to kind of take a little
bit better break. We have our hand done and we have all the fingers that
are placed in the hand. Let's go ahead and just
bring that up like so, and disable the visibility just temporarily until we
can find what we want. Now what we're gonna
do is we're gonna bring in a cube just
like we did before. And that's under the
tool and append. That's going to be right there. Let's take a look at doing,
getting things started. Let's first of all, let's just go ahead
and just want to hit the R key and just frame it up. Probably something like that. And then let's go
ahead and just quickly go through and get a
clean Z Ramesh out of it. Let's just go through geometry. See remeasure. Make sure to keep groups, adaptive size, and
smooth groups. It's an unclean. We do. Let's go ahead and just
get started with this. We cannot do this
many different ways, but one of the simplest
ways is first off, I'm going to go with a
taper curve to kind of taper in a little
bit of the piece. Actually, you know
what, I'm looking at this and I got an idea, like to go ahead and start
with something simpler. Let's do a knife cut brush
on its primary function, where we can work with a
little bit of symmetry. Let's take a moment to
kind of give ourselves an opportunity to something like that. Then for you to do
one more 0 measure, see if we can get
something fairly clean. Then let's just cruises
poly groups actually increase all we have a
little bit of a wonky notice here, right up there. Let's just kinda cut that out. Try again. There we got something cleaner. And that usually happens
again because of symmetry. So now that we have that, let's just go ahead and
increase those poly groups, divide them up a couple of times and then delete the lower. With this said, let's hit the
W key and do a taper now. And again, all I'm
doing is just flushing out and looking for
pieces out of this, just looking for
interesting shapes that I can do from this all. Let's turn into a then dark. And you can kind of
see now I'm combining all the deformers to get
something that I want. Like. So once we like what we see, let's accept now let's talk
about the extended to former. We haven't done that one yet, so let's just have a little bit of a quick
tutorial on that. If we go into our
transform types under the cog in
our gizmo deformer. We're going to go ahead
and see extender. Now extender is a
pretty easy one. If we hit Shift F, the main cogs that you're
going to work with on here are the orange COGS as they
are extending basically. So from any direction
you can kind of see all of these
things happening. And in addition to that, to the adjacent orange COGS
is a white cog and that gives us kind of a cool little
bevel to work with as well. Using this concept, we can also do other things like
in the top corner, we have a white
cone which actually helps us with the extender here. And that kind of serves as an extrude or as it's
labeled in an inflate. And you can kind of work
with going in and out. You don't want to press
this 2D because in certain, in situations like
you see right here, you're going to get some, well, how shall I say
at some wonky Venus. Now that we have that and
you can kind of see how a hard surface pieces being
flushed out and all of this. You can try, I wouldn't
try to 0 mesh something in extend or mode because it does create artifacts
like right here. I kind of liked them
because they kind of add to the the hard surface piece, but I kinda like to keep it
just pretty simple for now. Now. Once you feel like
you're a little bit more comfortable with
this, you pardon me. You can go ahead
and just simply hit Accept and you can do whatever
you want with this piece. Like if we go back to our sub tool and bring
up all our pieces, the arms, the hands, etc. First thing I'll do
is I'll duplicate this piece and put it into
the spare parts folder. Then we'll work with this piece. Here is our piece. Let's just go ahead and
scale this down like so. Let's bring this in like so. And I want you to think about how in everything
that you learn new, always think about how
you can combine it with the things you
already learned in what I mean by that
is it's like things like the slant of the
secondary mode and the knife curved
brush and how you can create some cool pieces with extender on that and do
group split by parts, or how you can do Booleans
and put it into that. It gets to be a point where
you have to start thinking beyond and going beyond
the script of the, pardon ME, the video. That's the main goal, aim. Alright, so as we can see, we're lining it up like so. Let's just go ahead
and just bring it in. Then let's just do some more adjustments
with the Ben dark. Maybe do a little
bit down this way. Except we can then make
further adjustments. Kind of see how it
all falls into place. Like right here. We'll go ahead and select my
Move brush now DMV. And let's not have it
intersect with this. So let's just go ahead
and go into transpose. Cut some of that off like so. Actually scratch that. I'm going to first of
all do a duplicate. Cut this off, duplicate, undo to the original piece. Then we'll have
another piece go for the back side. One more time. Except kind of see how I'm
throwing in all the pieces, how we're iteratively
getting through all of this. Now this is getting to
a point now where we're hitting sort of repetition, placement in everything
that we're doing. This is kind of a hidden piece. So that's kind of
why I'm not going to go to insane or crazy. But reuse this piece modularly as you want to fill in
the gaps underneath here. Like so. Let's see now that we
have this, at this point, we have a couple of more
things to do and that is just simply add some green into the areas that we have
here and then maybe do a little bit of adjustments
with what we've done so far. So let's see. We got this piece, Let's duplicate this piece off. And let's bring this
to the very bottom. Let's go ahead and maybe go ahead and take a look
at how we can fit this in. That's probably
why it's not two. It's a little bit far away. That in we're going to have
it in a couple of places. One is going to be right here. Then we'll duplicate it, and we'll have another
one right here. Will duplicate it and have
another one right here. Let's turn off. Go through one at a time. All right, so let's
just do this time. Let's do get the excess off with lasso because there's
so many separate meshes. Night curb brush doesn't
handle that very well. It only cuts off the geometry of one piece
at a time if it's separate. But we can go to ship control, Isolate, Select and
select rectangle. And just again like before
we're holding Shift Control, left-click drag,
releasing shift control, but still holding
down left-click. And then we're just going into holding left option or left Alt. Then turned transparency off. This stuff in a little bit more. Maybe even scale. It. Got some gribble going on there. Let's go ahead and
go through Geometry, modify Topology, and delete that excess so it doesn't
need to really be there. Do the same thing
for the next piece. That's going to be
this piece here. Probably need to
make a little bit of an adjustment either with a bend curve or a bend arc. I'm going to choose
curve for now. Since it might be
a little bit more of a customizable piece, Let's add one more dot curve by pulling on that
piece right there. Then let's just go ahead and
hit accept and bring it in. Flattened it a little
bit like before. Let's get rid of that guy. I'm using the Move
topology brush to kind of pull out
all these pieces here. Just kinda dragging them out. There we go. And then we can move all these
wires as a whole. Then do the same thing
in the back here. We could just cut them out, which is a lot easier. We got some more pieces. And last one is going to
be right through there, kind of an interesting one
that we're going to go with. Decide how you want
to make this for me. I'm just going to
wing it a little bit. Kind of see how I'm just kind
of going through all this. Just enough to bring it in. Just give it a
nice little sheen. Look. We got this here. Change this into
quick little lasso. Only thing that I feel
that we can work with is. I'm just making some
adjustments now to the the taper area here. I mean, nothing
really too insane. Just simply do either
detail little taper, maybe just to kind
of experiment to see where something looks like. Because I just think that you always want to have fun playing around with this. You always want to
be in a state of mind where you can
kind of see where something looks like if you just take the time to view it. Now that we got all
that taken care of, we have a little bit of an arm. We're going to have a
little bit more work to do as we go through all this. But one thing that I will say is that I really want you to be in the experiment mode of
thinking to yourself that this is just about noxious, is just mainly about learning hard surface
sculpting techniques. What we're doing right
now is we're taking abstract pieces and
reassembling them, kind of like Legos
in some manner. That's what's
happening right now. I was just taken your pieces and just simply reapplying them, seeing what they can
bring out for us. That kind of stuff is kind
of what's going on here. When you're done with everything that you
are comfortable with, what she will do then is this, you'll just go ahead
and kind of go through the process of
cleaning everything up. Then any excess pieces you're going to add into the folders. Make sure your hand only
includes just the claws and the arms include
just these pieces here into the arm section. So, but that said, we're going to now move
into the next piece, which is going to be
into the lake section. We're going to show you how
we go through the process of of reusing some of our pieces that are the same
pieces here into how we can apply them for pieces that are
been made already. In other words, like this piece here will read decorate to be a completely
different piece for a big part of the shin, etc. That said sick around
and stay tuned.
21. Foot Creation: Okay, welcome back.
In this video, we're going to continue on into the leg and working on the foot. Now as you can see, I've made some more adjustments to
this arm piece and did some more adjustments to all
of the leggings and such. Once you've gotten to
a comfortable spot, I've done some rework and just simply finagle with
moving things around. But once you get to
a comfortable spot, start doing is we've
dumped for and reorganize your folder by moving all the
pieces into separate areas. Like for example,
this is the arm piece and this is the hand section. And now we have it all kind of keeping our sub tools claim. Now once you have that, we're gonna start with making
a little bit of a foot. And this time we're
gonna kind of show you some ways we can be modular and our asset creation and
continue on. From there. To begin with,
I'll just go ahead and turn on my spare parts here. And you can kind of see all
the different spare parts we made so far. Right now I'm gonna go ahead and go with this piece right here. So I'll just go ahead
and duplicate that. And shift left-click in here, which should bring this
all the way to the bottom. And that's this piece. Now that we have that again, we're gonna work on the foot and the base mesh of the foot. We reusing pieces
that we've already made so that you can
get some more practice in on other forms of
defender extenders, such as the five. I can get myself jumbled. Other forms of gizmo deformers such as the extender deformer. Mouthful. What we'll do is we'll take a look at this
piece that we made here in the previous one and
see if we can flush out some new shapes and get some
more practice in their. First thing we'll do
is I'm gonna hold shift control and left-click
and go into knife curve. And like before, remember, if you hold down shift, take a cut piece
and you hit X key and enables local symmetry. You can go into work
in symmetry mode. Again, anything that
you want to make, you can make pretty easily. Another thing you can do is
go into your secondary mode, which is what I'm gonna do. But remember, it doesn't
work with symmetry mode, so we have to do a mirror and weld operation after we're done. So let's hit X to
turn off the X key. And I'm just gonna
see if I can carve a line here and here. To begin with, I'll just
go a little bit small, take a little practice run and see if that's what we want. Maybe go a slightly wider somewhere around three.
Yeah, that works from it. I'll just go from up
here and across here. I'm using the space
bar trick again. I don't like what I see. You can always undo. We'll go with a
double-tap on the left Option key to make
a angular cut. We got that. Let's go ahead and do the same
thing over here. Double-tap for the
angular cut for up here. Now let's do a mirror
weld operation. See if we can do something
easy there. Let's see. So that's gonna be
under Geometry, modified topology,
mirror and weld. Got our pieces looking good. So far everything is lining up for us if there are any additional pieces
that you wish to do. For example, do you wish
to do something like this? Where you're just
kinda wanting to do two patterns.
You can do that. Sometimes we like to do
that just this sort of test the ground and see how
something looks a little bit. I like it a little bit, just simple like that for now. Now, again, we mentioned
the extender deformer. So one thing we can do on here is we'll just go
ahead and hit the W key, choose our cog to go
into our transform type. And let's choose extender. And now we've had
a little bit of practice with making this piece, so we already know
what we're expecting. Now extender is a
little bit interesting. Again. Its default state, it doesn't extrude anything. If you wanted to
extrude something, then it's this white
corner at the end. But you're going to
always be operating off of something like this. Now having said that, don't don't forget
to do things like experimentations with how
we combine everything. For example, what does it look like when we combine this look? With the taper look that we've
had so much practice with. It's kind of an
interesting look right there that we can
kind of flush out. You can do a quick little BPR render to kind of see
if you like that. Or you could do the opposite. Just kinda go z back and do an inverse version and then do the taper and see
what that looks like. Again, the no such thing as the wrong answer
in any of this, I like this look, this might actually serve something uniquely
different for me. In the center, the
kneecap going up. So I'll keep this
particular look in mind. Alright, so go ahead and I can just kinda see the
possibilities little bit there. Let's see if we can extend it. Here. Maybe. Let's just go
ahead and do an except. Let's go ahead and do some tapering are a little bit more. Now. Can taper the bottom. We can taper the top. Just do a little bit of
having some fun exploring some shapes that look
a little bit more. Let's see. We can just kinda
push something out here. As I'm looking at this, I'm not making any
commitments into any shapes. I'm just sort of, what I'm
doing is I'm just looking for a shape to inspire me to
go to the next shape. So this part right here, just looking at this,
this inspires me. So what I'm gonna
do is I'm gonna make a little mental
image of what this is. This time I'm just going
to hit cog except, and I'm going to
cut this piece in half and see if I can
get the same piece. Again. To do that, we can do it several ways. If your knife cut brush
doesn't give you good justice for whatever reason on here. And then we can just
kind of keep in mind. And remember we have other
brushes, hold Shift Control. Sometimes knife
cut brush doesn't work very well with
extender and you have to go back to older tools like trim curve to help you out. Just go ahead and have
that, take something off. And of course, even
if this doesn't work, we can go with something
pretty simple like, let's see, like delete selection tools. Let's try that again now
without the B radius. There we go, Much easier. We have that taken care of. Let's go back to what we
originally remembered here. So we did a taper. Like so I'll do that. Now I got similar, it looks like like that. So let's do it
originally like this. Then hit Accept. Now let's go ahead
and divide this off. We have a nice flat piece. If we want, we can keep going. Bend curve here is add a
little bit of curvature. Long doing is just sort of
flushing out a shape here. Not going to recommend
any one tried to do a 0 measure when it's gotten, this mesh has gotten
this complicated, so just bear that in mind. But if you want to do things like add more to the trim curve, you can take a shot at that. I'm sorry, not the
trim per curve, but the night curve in either it's primary or secondary mode. Certainly take a shot at that. Now that we have
that taken care of, let us go ahead
and do a sub tool, duplicate and go into
deformation and mirror this guy. Now let's go ahead and do a sub tool and merge
these two down. Now let's hit the W key. First, we'll center it, then we'll hit the X key. Then we should get
a even mesh here. So now we got something new. Make sure local
symmetries on before anything if you
do this approach. Now that we have that we can also scale this to be different. Much further, we can
do more tapering. So we can hit X recenter
the position, hit the COG. And then let's see if we can flush out more interesting
shapes rounder. It's kind of like
that a little bit. In all I'm doing is
I'm just iterating. I'm just kind of just taking it and looking for
interesting spots on this. Once I have what I need, just go ahead then. Let's find some way we can combine the foot
into this, the tip. Now, we're gonna go
into spare parts. I'm going to take that
original piece right here, duplicate it again. That's one of our parts
that we're making. And I'm going to now
deform this piece. Piece. Kind of see
where I'm going now. Maybe few tracking
the original piece. Don't forget if you
intersect in with this, you're going to have a problem. So be careful you never
intersect these two pieces. I'm just kind of play
around with this and essentially just looking for
a fun and interesting shape. And sometimes it can be
an iterative process, but once you
understand the curves, it can also be a little bit fun. The uncertain not to the
curves but the deformers see. I can kind of see where
I'm going already with where I'm
going to make this. Don't be afraid to
do anything that is an opportunity
to explore any. Like take for example, if I had shoot,
trim curve brush, don't be afraid to kind of go in here and do something like this or duplicate that. That's kind of a fun shape. We may have just caught
lightning and bottle on. So I'm going to just redo this face and then go back
to my original sub tool. Kind of see where I'm going
with this because it's now seen some potential
possibilities here. So I'm just going to go ahead and go with it and
take a shot with this. Delete the hidden. Then we're going to recenter
it and see if we can have some fun with
these two new pieces that their bring it out like so. Then turn transparency off. Let's see if we can see Transformers requires
symmetry mode to be off. Forgot about that. I will say though is that we will be
covering the back part so that can kind of
the, for now excluded. Let's see if we can
bring this guy. This is, this is just sort of arriving at the shape
from 1 to the next and doing experiments on seeing what something
looks like in the whole process. There we go. Now that we have our piece here, Let's go ahead now
and see if we can do just a little bit
more work with things like just kind of touching
up certain areas here. For example, if you, this is all stuff that's
going to be covered up. So it's kind of pointless
that I'm actually doing it. But if there's anything
more that you want to put, you cannot keep going
because like I said, this is just all things that
you can just constantly, constantly keep on
putting on here. So what I'm gonna do now is
I'm going to put a foot in here folder for the foot
to hold everything here. And then I'm just gonna go ahead and transpose the
set of this foot now onto the location of the turtle. Scale it in length
so I'll but be careful don't hit to do the
scaling and symmetry mode, you're going to run into
all sorts of problems. Now the nice thing is, is when you transpose this set, Don't forget to take your time as far as going through and just kind of setting it exactly where
you want it to be. And if you want to affect
the deformers as a whole, the one thing I'll probably recommend if you
want to kind of do some sort of an affection of like tapering
everything as a whole. My get my recommendation
is take every sub tool, make it a single poly group
by holding Control marquee select over the entire
sub tool group and hitting Control W and
hitting poly groups. So that, that way you
can separate them and merge them together as
one sub tool seamlessly. Kinda see what I'm doing here. I'm just kind of bringing it in. Toggling in-between. Might even shrink it
down just a little bit. Just to have some fun. Like what I was saying before. Go through sub tool. Let's turn off the
transpose set. Go into solo mode or better yet, just turn off so you
can see it easier. Go into sub tool here. This is all going to
be one poly group. This is all one poly group. And this is all one poly group. Then you would go
through merged down. Like that. Oops,
partially in geometry. All of it is partially. Make sure that before you
merge everything that you have gone through and deleted all hidden geometry by
going through Geometry, modify Topology, Delete Hidden. Then from here, you can
kind of do continue on, for example, doing
your taper like so. Or if you want, you can go ahead and switch
off into your bend curve. Like so. You can do
all those things. This is all coming from just slight doing just
this piece here. Don't be afraid to just
go into one piece. And then just working
with that as well. Like for example, I
masked everything out even though these
are all one sub tool. So now it can be just this piece that I can affect if I want to, in any way from
normal scale down to just a normal taper or reversing
the taper if I see fit. Just for this area. That's again why we
do the poly group. We can actually create like an interesting
little silhouette. Going on here. Let's go ahead and turn or twist on scale this guy back up. I'm just going to cut
some of this geometry off so we can see what we got
here a little bit better. Maybe even go into a Move
brush with my editing, the B and V tool. All we're doing is x2
now you just trying to get ourselves are
established foot. Like I said before, this is all iterative. This is all just a process
where you just take your time. Just like with the arm. When we were doing
the placements, it's just a iterative process. We're going to leave it there. This was a little
bit more of a longer one because we wanted to show you the possibilities and the potentials you
could take with it. If there are any. Like I said, I want
you to feel free to enjoy or experiment with different places,
different shapes. I want you to really just kinda see what
I'm doing right here. For example, I'm just
constantly moving the pieces around so that I could continue
to have some fun here. Like so. I'm just constantly just enjoying
looking at that. Probably do them on
a little bit more. But on the next one after this, we're going to work on the knee and then we're going to work on the back
area and I'm sorry, not the knee but
sort of like a area of like gravel basically. Then from there,
we're going to just have a good time just
trying to figure out the, the chest and how we can go over some new techniques
in the process. So that said, stick
around and stay tuned.
22. Creating Shin Base Mesh: Okay, welcome back. In this video we're
going to go ahead and continue on with
our leg and reuse some of our base
meshes to demonstrate some more modular opportunities to reuse the same base mesh and get more practicing
making different, different sort of designs
using the knife curved brush. So let's go ahead
and get started. So if you remember, this is the base mesh that
we use for this piece. So we're gonna
reuse it again for a lake piece based mesh that
we're going to decorate, but we're gonna try to do
a different pattern of things on here so that
it looks different. Just so you can have
some it just so we can show a little
bit more opportunity of the possibilities of what you
can accomplish, so forth. So I'll go ahead and go
into my spare parts folder. And then I'm just
going to duplicate this sub tool and hit
Shift left-click, bring that all the way down, and then turn off
my spare parts. I'm just going to work with just with this one in this lesson. Let's just go ahead
and see if we can now find an
interesting place. And like we did with
the last lesson, we demonstrated how far
we could take things with the deformer and just how far we can keep
pushing something. I'm gonna do something that's
a little bit similar here. We're just going
to be working with the deformer and the scaling to just find that sweet spot
of what we want to do here. Let's just go ahead and just see where we want to take it
and maybe that might work. Like this area here,
what it's showing. But I feel like I needed it needs to wrap around
a little bit more. So let's bring it up
a little bit further. Let's go into our Solo
Mode, which is right there. Or I can do my quick key, do a quick little bend
our current around. This angle. Kind of wraps around like so. We'll taper that top off. Maybe this around. So you're free to just mess around and continue to work with this
further and further, if you want to see
something else, definitely take a
moment to look, looking at this right now and then dark to
kinda go this way. Then maybe we get in like that. For now. Let's bring it back in. And I'm gonna go ahead
and use this piece in, kind of duplicated
twice and then mirror one side to
be on the other end. Will do something like that. Let's go ahead and
shrink this guy in. Like I said, this
is all just like placement and
funneling right now. Left-click to just do a
little bit of reorientation. Hear. Fact. Might do some sort
of a deal where I kind of just might just make this whole piece
just for now and just disappear either
through the trim curve or through what is it called? The Night curb or isolate select curve just to
kinda get it too. Because I feel like
it's kind of getting in my way of opportunities
where I want to take this long doing is just shown a little
patience and working the mesh. Like I said, all
this is is just kind of just kind of working
with adjustments. Don't get too tunnel vision. In some there's a
couple of things. First off, don't get
too tunnel vision with how this is all supposed to like play out in terms
of how it's connected. Remember you have
grateful that you can create to assist
in that juncture. Also, don't be afraid
to go into brute the Move brush if you wish to help you out with
anything that you might see. See, maybe a taper up
there is what we need. Then followed by
a bend arc to get a little bit more curvature. And then see how that works out. Kind of see how I'm just
kind of working through the shape, finding
my iterations. Just going to take a
moment to just sign a, see how that looks on the
other side when it's mirrored. So I'm just going to
duplicate sub tool, mirror it and bring it
onto the other side. That's where I know over here. So just sort of bring this guy little bit forward like so. Say this part right
in the center. We're going to go ahead
and just fill in with some of our array meshes
to help us out there. Want to bend the
arc a little bit here to actually keep it like that. Maybe It's getting slowly, slowly working its way
in, which is good. We'll have some more base
meshes going underneath there. But right now I just kinda one to take my time on this one. Let's see. Again, this is all
just me working in shape in and just experimenting
with the deformers, constantly looking
for a refinement. And remember if there's
anything I don't like, I can just simply take it
and Z back. Essentially. Kind of like that a little bit, little bit nicer
than the other side. So see if I can go
through to sub tool, which is turn that operate now. I'm going to duplicate
that and then bring that over to
the side and see how that looks in the mirrored interpretation of that one looks like me to make
some adjustments. Further. That's the case. That's alright. Again, I'm rearranging
this by changing the rotational pivot point by holding left option
and left Alt. That just simply changes
things a little bit more. Could do something like that. That can kind of work. That's a little bit of the starters point
of the base mesh. Looking right now at the placement and the
practice placement. And I just want to have
something that's fairly even. I'm gonna have to read duplicate this over when the time comes, but right now I'm pretty okay
with that being the case. Just sort of like getting that blank canvas started
and in its place. So that helps a little bit more. With that said, we'll go ahead and put a pause on
that and we're going to work on just filling
in the center here and put in some
gravel underneath it. And then after that, we'll move into decorating
the sides here. And then work on the back. That said stick around
and stay tuned.
23. Blocking Out Center Shins: It's continue. In this video, we're going to go ahead
and work on filling in some of the center part here, the center green part, and just kinda give ourselves
a headstart into this. And we're going to once again reuse some
of our spare parts to help us out and see if we can reform it to look like
some different areas. So with that said, let's
go ahead and get started. Now let's just go ahead and turn on our folder, spare parts. And I kind of liked this
little area right here. So I'm going to
just see if I can duplicate this and maybe flush out another
shaped through it. Like so. So what can
I do out of this? I'm looking, just duplicated it, shift left-click and
re-center piece. I'm just going to go
ahead and duplicate this sub tool one more time. Just in case I need
to circle back. Looking at this, I can
probably say right now, I just want to focus on
just the spine areas here. You don't necessarily
need to have wires. I'm just as we did
when we made this, we made the wires all one poly group and then I just
isolate, select, draw a mask over it, go into split, and
then split unmasked. Now we have two sub tools. And now we can do
some experimentation. So we cannot do a
couple of things. We can do something, for example, like split parts, or we can go to an
individual piece and then modify that piece and create
a new system of race. This. Or we can do something
similar to that and then work with the farmers in
conjunction with race. I want you to in that mindset of understanding the options and the choices and all the
different directions you can go when you're
making something new again. So let's just start
off with one BMT. Let's just go with
a single piece. So I took move topology and I'm just going
to go ahead and draw a mask over this one piece. And then I'm gonna go ahead
and hit Split mass piece. Then I'm going to go
through a little bit more. The forgot that when I did that. Try that one more time. Just going to go through
and split masked point. Now we can just bring this in, maybe on do this
all the way back. Lots of interesting
little glitch. Here. We're seeing
the work like that. Try one more time,
Split Mask piece, take that one piece. Now let's work with
this singular PC. If we can now draw
something more out of it. Let's see here now let's just go ahead and scale it
up a little bit. Work with the tapered to
experiment with some shapes. Maybe we can find
something more out of it. Kind of like the Batman
look a little bit on here. And I see a potential for a heel piece a little bit on it. Let's go ahead and
check the other side. See if we can taper. Now I'm starting to see
my potential piece. It accept. All I'm doing is just working with new
pieces, new extenders, new fun looking areas, just having some fun
flushing out shapes. That's what all this is. It's just practice to
flushing out shapes. So you can keep
enjoying just kind of the potential that you have
possibilities on this. Let's go ahead and take this, see what this looks like. So let's do that again. You can kind of see the process
and going through them, just going through
quick iterations. Now that we'd like that, Let's bring it back in. I'm gonna see if I can cut
this a little bit short now. More time up here. Perfect. Now let's go
ahead and duplicate this and do a deformation
to the mirror side. And we're gonna go ahead and
build off what we did in the last tutorial video where we mirrored the two pieces and then see how they looked in conjunction with one another. I kind of liked that
one a little bit more. Now that I see that, let's go ahead and turn
the visibility off there. You can kind of see how I'm just constantly experiencing the bar, just going through and just redefining all the pieces and the opportunities
that we can make out of this duplicate
again, Deformation Mirror. It's probably on the other side. You can kind of see just how we are kind of going
through all of this. Just kind of how we get to a
different shapes so quickly. Let's go ahead and
combine these tools and start looking for some
more shapes out of it. We're gonna take
these two sub tools, merge them down now. So I'm gonna hit the W key, make sure local symmetry is on. Hit the X key and recenter
these guys back in. So now we can work
with something. Remember, you intersect
like this, you get this. So it's kind of a cool concept, but I'd rather have
a separate piece of geometry that were the case. Let's see if we can. Little bit, I'll have
separate geometry for it. Alright, so now we've
got something that's a little bit more closer to home. Let's go ahead now and take this and bring it in
a little bit closer. Turn off symmetry mode, go into center point. And now let's keep the
ballroom rolling here. Now. What else can we do here? We can take this piece and
maybe we can go into bend. We can flatten this
out a little bit more and then just see if we can
go with the bend deformer. I'm sorry, I bend arc two
former, something like that. Just go ahead and just keep making all the adjustments
that you want. Now if you want to also do
anything extra, for example, maybe you want to go with
adding more pieces to the box. You can pull something
further from spare parts. Maybe one of these pieces
can do something for you. If you remember this
piece right here, you can actually use this as
a nice little centerpiece. It's just all about combining all these areas again
and again, like so. But I'm kind of on the
fritz to just simply go on here and just simply
do an insert mesh piece, like a separate little piece. Want to over rely too
much on my spare parts. So bringing the sin x, let's separate this lake. So now if we hit the B key, remember we bring, brought in
Booleans to kind of put in. We can do an insert
multimedia primitive. Make sure you don't
choose the H1. And we can just do
a cube right here. Let's go ahead and
rotate this cube fairly to make sure that guy, if you want, Let's make sure we can get a good clean mesh out of this
because you're gonna see, so if we bend this around, you're gonna see some
weird wonky tech geometry. Geometry. Duct poly groups, poly groups by normal. And then let's go through our geometry 0 measure and
then keep poly groups. Our settings are all
there at this point, you should know your
settings on the measure for this whole course. Let's see. Oops, we've got one thing. We need to keep this
guy separate from the sub tools else we're
gonna match everything. That is way too
complicated to get down. So split, unmasked. Try that one more time again. Geometry. Now we've got
something a little cleaner. Let's see what we can
do with this guy. I'm going to go into solo mode. Remember, solo mode is
right below the ghosts. I have it on my quick
keys right here. Let's make sure that it's
perfectly level like So. Hit X key makes sure
local symmetries on. You can go ahead and
have some fun with this. And just sort of invent
your own little piece. And keep a 0 meshing it out
so you can get some clean. If you don't get
any clean measures, turn off x symmetry
and try again. Sometimes that helps, but you won't have even topology
in the process. So bear that in mind. So I just keep going, not going to stop. It's going to creases. Do a little bit of a bevel. Though it looks like
without the bubble. Or better yet, let's
just see what this looks like without any geometry. Then let's control
the thickness. Here. Dynamic subdivision
turned on smooth subdivisions, go into our thickness
and see if we can find something a little
bit thinner than convert that into geometry
by hitting apply. Keep in mind, that's going to make the poly groups
the same all over. So if you need to do
any 0 machine are reassigning of the
poly groups or if you foresee any
future Z remeshing. I'll just go ahead and do a quick little poly
group by normal. I think we'll be fine. Symptoms wonder if just
the simplest of shapes and easiest to grasp. Let's just mess with, this, might have
something easier here. Let's just go ahead. Mess again with the taper,
turn-off x symmetry. Go ahead and go into centering this just flush out shapes. You can kind of see
where we're going. We're just constantly just
looking for that shape and having some fun experimenting and doing iterative processes. All this is about practicing, finding all the
limitations of what you can accomplish with a, these tools in conjunction
with everything. It's really like a
quest to explore. That means mandatorily. If you really want
to learn all this, you got to, got to take the time and be willing
to go outside the norm. Let's see, we'll hit Accept. Let's have some fun, just some final fun with this. Maybe we want to put a quick
little two former on here. You can do that. Split unmasked. And this May 1 not
work to our advantage, but we'll have some
fun just to see, just to have some fun and see
what something looks like. Let's go out of solo mode
so we can see everything. Will put some Booleans in here. But if we're gonna put
Booleans into here, remember the rules, It's all about remembering
the rules here. Everything has to be disabled, all visibilities have
to be disabled so that you can make
everything work correctly. So let's go ahead
and go back here. We're going to now see if we can work some Booleans in here. To do booleans, you've
got to remember the rules, Live Boolean. And just going in and turning that sub tool with the
cylinders into a Boolean. Let's see. Remember I
have x symmetry on and local symmetry so I can manipulate the
scale individually. Like so. Hold Control, left-click, hold
Control and click. This is just simply,
there's no plan. That's just simply
having some fun. Looking for the pieces. 11 for all the opportunities. Exploring everything here. Point this a little bit weird. Anything I could
probably elaborate, it's how fast I'm arriving
at these shapes. So quickly. The selection seek, we
can do something here. Figured. This is local symmetry. So let's go ahead and
turn local symmetry off. We can move this as one piece. The pivot point. We might be dealing with
turning X off that my work. And we do that, we got to return back to kind of see sort of the fun
that we're happened. Again. I have some
fun with that. So let's go ahead and do a
Boolean and do a make Boolean mesh out of that pen
that in like so. Sweet get that made. And then let's disable the sub tools of everything and checkout what we got here. Which is alright, I'm not going to do too much more on there. Now let's go back into
our piece and then see if we can fit this back in. We can do all sorts of things. We can make it up this way. You can make it upside down. You can scale it, which isn't a bad idea. We can do a couple of
more things on here as I'm looking at work here. Once we have all
that taken care of, what we'll do is I'm gonna
to Holly group on this. I always like to
add a poly group and just turn it
into one poly group. That way I can sort
of kind of turn this all into if I need to separate everything or
mask a certain section, it's just easy with
isolates sled poly group. Now you remember that sub tool, we combine these two on, Let's hold Shift left-click to bring it all the
way down to make it easier when we hit Merge
Down and hit Okay. Now we got this tool, sort of like our next tool. Let's go ahead and center
the pivot point here and feel free again. Take it any direction you want. Maybe this is the
direction you want. That's fine too. Now
that we have this, you can keep going.
Like I'm doing. Or you remember when I did that poly group wanted
to get a good example, holds left shift
click Shift Control, left-click to isolate select whole control into empty
space to marquee select, and then hold Control into empty space to invert
the selection. That way, we can just control this guy right here. Like so. And maybe you feel
this is too much of a bend arc and you just want
to manipulate just this. You can do that as well. Now that we have that, I did say I was gonna
do this on an array. I'm still not sure if I want
to do it that way because array meshes are notoriously difficult sometimes to get it. If you have two options, we're going to duplicate
this down into a strip. And we can do that either by manually one piece at
a time or with an array. Sometimes a little bit difficult to do things with an array because you got to get it right. And sometimes I just like to do this manually one
piece at a time. Might go with something
a little bit. Something just a little bit
more simple, I should say. Let's go ahead and do this on the left side as this
might be easier. Geometry, Mirror weld. We know that we know
all these rules. Let's go ahead and
go through sub tools and turn everything
that we have back on. Bam, bam, foot, leg guy. All right, so let's
just go ahead and take this cool little piece
that we made here. This guy is right here, can be either upside-down,
right-side up. I like it a little
bit like that. And we're going to do is we can just bring it in a little bit more like this. Bring it in like so we can eat. I'm going to say we can either hold Control left-click and
duplicate it out like that. I'm a little bit
hesitant to do that because you might want to have the option to separate this off. And having sub tools might
be easier for you on that. Let's experiment to see
what this looks like. An upside down. Kind of like that. Once you have what you need and kind of bring
it in a little bit more. Just take your time with
the placement here. I might get rid of the
thickness of these pieces. When we begin to callin, all of this will be
taken our time there. But again, as I say, this is the most
reoccurring thing about it is as you look at how I kept going as
far as pieces go, I'm going to duplicate
this sub tool. That way. Bring it here. Let me get pretty small. This is probably why it was not a good idea to do
this with an array. Because if you try doing
this with an array, trying to get this lineup
might be a nightmare for you. Trying to get a
single strip that is also having that
kind of control just to simply do one piece at
a time is advantageous. Then duplicate
this one more time and have this guy
come up like so. You can kind of
see how it's going and it's an iterative process. We do things again
where we're going to be adding more to it. As in other words, adding stuff underneath it. As we've done before. Again, we might circle back,
rechange the thickness. We already did a demonstration that with dynamic thickness, width under dynamics
subdivision. So we can keep going with that. We have our first start off, we got our first
plates, started off. In the next lesson, we're going to go ahead
and start working around this center piece by tailoring these
two base meshes, the sort of detailing them
out so that they fit in coincide with the centerpiece
a little bit more. With that, we're hoping you
can get again more practice, more exercise into all
these different areas. So with that said, stick
around and stay tuned.
24. Detailing the Shins: Welcome back. In this video, we're gonna go ahead and
tackle into the base meshes and start carbon
some detail in here. And we're going to show some different patterns in here just to kind of
give you an idea of just all the different
ways we can make one the same base Mish look completely different
in different scenarios. So with that said, let's go ahead and get started. I'll go ahead and use this
piece and then we'll just read duplicated over once
we're done here. Let's go ahead and go into the C. Let's go for
now into solo modes. We can take a look
at it without having to get our hands dirty here. We add Shift F. We
can kind of see all the anatomy of this in
the poly groups that are out. For now. I'm thinking what I'll do is I will keep the thickness
the same just for now, divided a couple of times. And then we'll just go ahead and need be smooth some
of this stuff out. Then if you haven't guessed it by now we're going
to just cut into this whole area
using this secondary features like we did before
with the knife curve brush. Let's hold Shift Control
and select our knife curve. Like before. We'll
just cut into doing a slant right about here. But don't forget to enable, make sure you have b Radius
turned on by hitting Shift Control Spacebar and adjusting this should do. Let's just go ahead and take
a couple of cuts in here. Then of course uses
Space bar trick to realign this if you want. This aright, but a
little bit hard to do this when you're working with Beziers because you just
don't know exactly where. Spot my work. Where to do a Shift. Tap. Left Alt on a
good place right here. So feel free to do a couple
of practice swings on it. Let's see if we can do
one little bit over here. Just take a couple of go do one right there. Like what I see so far. Go ahead and just kind of look at all the pieces that we have. So far that might
work just fine. So now let's go into sub tool. Make sure this is on
our bottom sub tool and shift left-click. That way we can
navigate onto the boat. When we split this off, it will be the bottom
three pieces and we won't have to go through all these different sub tools, figuring out which one it was. We'll do our clean up on
this a little bit later. I'm just looking
at this right now, seeing where I would
like to take this. Let's go ahead and do a
split two parts and hit. Okay. Let's go ahead and just do something like that, maybe. Something like that. Just
go ahead and mess around, have a little fun just making
something out of this. So once you have that, let's go ahead and cut
some slants into here. I might even thing where I might just make these little
wider and try again. Like all I'm doing
right now is just sort of experimenting
with what I got here. Still a little bit, little bit too big. Let's just go ahead and let's turn on all
the other pieces and soup that kinda looks
like in retrospect, might need to turn
everything off so we can get a better idea here. So what I'm gonna do is just
disable the visibility of everything so we
can see things a little bit better because
we need these other, we need to see how this
looks with the other pieces. And so far it's
we're getting there. We're slowly, slowly
getting there. Just got to keep at it. Now that we have
that, what we need, Let's go back into solo mode. From here, let's go into
our primary function. Just take a moment to
look at what we have. We might get some issues
with cerumen shown here, so I might have to do some
editing, but that's okay. Now, let's go ahead and just do a quick little 0
measure on all this and see if we can get
something clean out of it. Gonna be a little
bit messy here, but we'll see what
we can work with, because this is all
about problem-solving. We'll do a 0 measure. I figured we'd get some
weirdness like that. We tried to do a
0 measure again. Just remember a
couple of things. If we get weirdness, just go all the way to the back. We get any kind of weirdness. One thing we can
always do is to remind yourself that this
is part of the problem-solving 0 measure
is an automated program. Sometimes you just need to
change to the polygon count to see if you can get it to
land on something easier. Even if you have to just tweak it or move it just a little bit, give it a couple of tries. See, this is the cleanest one. We got a little
weird artifact here. But if you ever see like collapses in here and
you might just want to undo and just keep kind of trying to find get 0 measure
to behave in a proper way. If you can't get it to do, if it still keeps
fighting with you, then the next thing
I would do is do a Shift Control left-click. And then with that, we can just go ahead
and do a Geometry. Modify Topology, Delete
Hidden of that stuff. And now try to 0 mesh. Now that it has less
to work with here. Like we have right here, something a little bit cleaner. Redo it again, give it a
little bit more uniform. Now let's take that polygon
count size down to half. See if we can get something
again a little bit cleaner. And you can kind of see
the cleanness of this. This is, this is because
it has less corners. It doesn't have any
corners to deal with. So it's making the automated
process a little bit easier in calculating what we need, which is a good thing. So maybe just a
couple more hits. Go, It's getting cleaner there. And then once we
have what we need, we go to dynamic subdivision in, we rebuild our thickness
out up with this. Now remember hitting
dynamic subdivision means that we're going to get
a little bit of collapsing. So we got to turn that smooth subdivision levels
down a little. It looks like that. Then let's go through thickness. Thickness is only
giving us a projection. We're getting something
that's pretty good so far and a little bit decent. Let's go ahead and let's
hit Apply on this. Now that we have this, we need to start applying poly groups so
that when we divide, because remember when we
divide a kind of collapses, we need to have poly groups on these corners to hold the edges. Let's start off with, because when we'd go
to crease poly groups, those holding edges and
those corners will hold. We might have to work with
see modeler in some of these areas because
groupby normals may not be too friendly and certain areas actually not that bad
here Let's see what we get. It may have just looked out crease poly groups
and see the damage. Just kind of going
back and forth looking for where
I see collapses. A little bit cleft see here, but not that bad. And I think that was intended when I divide it a
couple of times, bam, just as I want. Now let's go ahead and bring out a solo mode and see how
this is conjunction. And kind of see the
place where it is. So we're going to repeat the same thing now
by holding lip, left, Alt and left-click. And we're going to
rebuild this piece now, the same way we did
the other piece. Let's go into solo mode. And we can do the same thing, even we can trust
try to do 0 measure. Might be a little bit
easier with this one. Maybe. Let me see here. I'm assuming that's poly group. Good. Let me again, just
keep going through. Don't resort to just going through and just
deleting all of this. Do a couple of tweaks to the target polygon
count because again, this all comes down to
problem-solving skills. Alright, that's good. Actually getting clean. Once you got to clean, go ahead and go for
a lower subdivision. Not too bad. Work with that. Little bit clean. Something here. What
do we have here? Something that
happened much better. You can kind of see 0
measure doesn't get it right perfectly every single time you got to work with it. A little bit, like this is
one example right here. Kind of see how it
plays around with you. Messes with your mind. I can actually make
this work. Maybe not. Since I'm fighting
this incredibly a lot, I'm just going to
go ahead and just I've taken my best shot at it. I'm going to have to
do is I did before. Just rebuild it
from the very top. Because again, 0 measure has a much easier time with
less corners to deal with. Just looking for
something that's good. Easy. Target polygon count, a good clean topology for dealing with. There we go. We got something that's working
a little bit easier now, you can kind of see how I'm
going through all this. We've got something
that's clean. Now, let's go through edge loop. Or I'm sorry, not edge loop. Let's go through and do
dynamic subdivisions. Turn that back on.
Remember the rules we need to go through and turning
subdivisions off. Let's turn in mess around
with that thickness. This is going to be a little
bit off because again, the thickness is going to go, is going to be
elevated and raise. So we're gonna have
to bear that in mind. All right, and we'll hit apply. And we're going to have to do some rearranging now because it's raised up a little bit.
I'll show you what I mean. You can kind of see. Actually I like it a
little bit like that. It helps a little
bit to my advantage. Let's just add some poly groups to this like we did before, so that when we divide this up, the holding edges
will stay the same under a crease Poly
Group function. So you can kind of
see the pattern here. This is all about
repetition because there's a lot of steps in
trying to figure all this out. So we got to keep repeating
and reinforce the same thing until it's solids
on poly groups. See what the default
groupby normal is. We got a good state here. Now that we have that, let's take a moment to just have a little
bit of fun with this. I'm thinking doubling. Lets go z model or brush. I can choose the
traditional way, but I'm thinking I'm just
going to take a moment to go and do it differently. Hold my brush over the
space bar and hold space bar down and
choose a bevel. Then let's just kinda see
what that looks like. Little bit like that. A little bit like that. And it's kinda just taken my moment here to
look at what I like. I think I'll light up to an
outside bubble for here. I could bevel everything but then maybe I might just
bubble everything here. Got to remember to
crease these two areas. I'll just go ahead and do a manual crease and that's
a Z modular feature. We'll do one right here. Hold down spacebar
to crease edge 12. For the same on the bottom here. We probably These areas just
creasing the areas that the poly groups by
normals didn't catch. I forgot. Here. We don't really need that and we're gonna do
a crease poly group there. Alright, so now
that we have that, we're just gonna do a couple
more things on this baby. Hold down Shift F,
and hold spacebar. Let's just put a couple of
insert edge loops on here and then go through and bring
a couple of these in. Then let's extrude
just that section. It's just gonna be
poly group all. Now, Holly loop. I'll just go through because they like it a
little bit like that, but that means I'm gonna
have to do a little bit of crease poly groups
geometry after that, let's just go with sub tool. Not so tool but geometry, crease, increase pg
for poly groups. Let's just divide that now
and see if we caught that. Looks like we did. Let's just go ahead
and hit the W key. Looks like my
rotational values off. Let's just bring this
guy out like so. Now that we have
that taken care of, the last step will be to work on this secondary state here. If there's anything
more you want to put on here, you can, if you want to have a
little bit of fun and add more to it by combining or maybe you want to do slants on
here with the knife curb brush with some simple
stuff like here, here, here, here, and here. You can do that. Just feel free to just take it wherever
you want to go. Because again,
this is all about, it's not about trying to mimic the exact work that
you have here. It's about just giving yourself opportunities
to practice, how everything works here. So with that said, We're gonna go then to finishing up this side
and the fin here. And then after that we'll
just go ahead and just kind of move on into the backside of the green ball underneath that said stick
around and stay tuned.
25. Finalizing the Shins: Welcome back. In this video, we're going to go ahead
and continue on just finishing up a little
bit of detailing using the plainer cut brush and a couple of slants
to help accentuated. And then once that's done, we'll merge all this
backup again in reduplicated off to the
other side and move on. Now with that said, we have our pieces here. If we divide this up, it should come out pretty
fairly clean like selves. So we, right now I'm on move topology brush and I'm just
holding the space bar and just kind of ensuring that there's some
fairly even space in everything here so that it
looks roughly proportionate. How this all kind
of measures up. It's just a game of
phenylalanine and kind of tweaking and just
moving stuff around. Once you get to a
comfortable spot. Let's go back to dividing
this a couple of times, maybe three times. And then I'm just going
to go ahead and they'd go through geometry
and delete lower. From there, I'm going
to hit comma and I'm going to go into our brush. There. We're going to go
in and mess around with our planar folder and
choose our favorite brush, the plainer cut brush. Now, this is the one where we have to start at different spots in the whole area just to
kind of get what we want. So just bear that in
mind like right here. If you've I'm thinking
that when I do this, I'd like just this
piece effected. So what I'm gonna do
is I'm gonna make sure this is on the very bottom. And I'm going to do a
split two parts once more so that I can
just affect this area. I could do that
with poly groups, but I got to like all sorts
of poly groups all over. I'm just going to
hit Split departs. Now, when I mess
around with this, I can affect that one. And also when I divide this, it's just this piece
being divided. So I'm just messing
around looking for a fun little angle to get this to kind of
fall in line too. Interesting. Look. That's
kind of interesting as well. This is what I like about
this brush is that you can really have a lot
of fun with it and just experiment with it. Look for different areas. To get this to
fall. In line with. The downfall of this brush is
that you don't normally get a choice too much in terms of where you start
and also the what is it? The diameter, radius has a big deal in where
you go as well. It right here. Sometimes you got to compromise
a little bit with it. Because it kinda like this look, but let's just keep
going because what I'm gonna do is I'm
just going to go ahead and keep looking for
that fund spot here. Let me see something
In else here. Let me just start off
here just to kind of, you know, what I'm
thinking also is that this particular piece
might be just too thin. So I'm gonna go ahead
and delete that one. Couple of geometry delete. Then let's just go ahead and reapply the thickness to this to be a little bit
thicker so that when we do this, it won't collapse. Let us see here. Just to make it a
little bit thicker. Course, because this is
an indifferent location. Find our little guy here. See, this is again part
of that problem-solving. We've got to kind of keep
them in mind, width. Now let's mess around and see if we don't
and shouldn't get as much tearing and
collapsing in, That's better. Back to the road again. I'm holding left Alt to
get this pattern here. Let's see here. Go with trim curve. Turn off the radius. Real line. Just to kind of have
a little bit of fun. Then we'll go from here. Dynamic on this. That way we can get a
little bit smaller. Lines. Dynamic will
sometimes do that too. Yeah, that'll kinda
mess around with you. Now let's click on the fin, give it a couple
of subdivisions. And I hit the B key and
go in your plainer cut. We can just mess
around here. Now. There we go. Probably not going to work when you, if you never see that
plainer cut work too well, it's probably
because of the fact that something is usually mast. You have subdivisions on your dish. Here we go. Interesting. Kind of thinking
actually because I'm have to fight with doing
this on the other side. Maybe I'll just go
with chisel brush. Couple of practice strokes. Take about half of
the intensity down. Trying to do this with a
mouse and not a Wacom tablet, by the way, is very,
very difficult. That's good enough
for me because this is going to get covered up. Now that we finished that, let's just go ahead and just
return on everything again. That's why I didn't do too much emphasis because I knew that was going
to get covered up. Let's go ahead now and
Rio, align our pieces. Let's go ahead and
merge all these back into one sub tool again. Now that we have that piece, Let's go ahead and
duplicate that piece. Deformation. Go to mirror, bring it
over to the other side. Recenter that pivot point
when you hit W key and click on that
upside-down teardrop. Now we're just gonna
go ahead and rearrange this. I know what I did there. I have something now masked out, so let's just try that again. We're gonna go ahead and
take that upside-down teardrop piece and just replace it back in there to
our original piece. If you need to, you can use your original
base mesh to help you out in where
you're putting that. Just to kinda help you
get to your bearings and just simply just taking your time
doing the placements. We go we need now we're gonna fill in all this stuff
with some grateful. We'll fill in now
the center part of here with the little
bit agreeable. And what we'll finish off
as having a piece like this kind of fill in
for the back side here. And then now we'll have some additional areas
which will fill in using one of our other
pieces to just flush out some more of
the former shapes. So with that said, we got the outer
side taken care of. Now that's all that's
left is filling in the back and the inside. So that said sick
around and stay tuned.
26. Creating Leg Greeble: Okay, welcome back.
In this video, we're going to see if we can
fill out the back side here. And we're going to go ahead
and go with something very simple like one of our
modular pieces right here, and see if we can get some
more practice on a deformer and even if we can maybe fill
in some of the wires here. So let's go and get started. Now. Again, like
before we're going to duplicate and choose
this pieces or backside, and then hit Shift
left-click to bring it down. Then after that, we're gonna go ahead and just
bring this guy in, turn off our spare parts here
and work with this piece. So let's just go
ahead and deformer it up and maybe do a taper on here. We're just going to kind of
work our way out on this one. Just kind of work this like
everything else in iteration. Overall, it's not a really
too complicated piece here. This is pretty simple
to former stuff compared to what we
were doing before. Just hit Accept, bring
that in like so. Just taper. Then we'll just do a bend arc. Then we can just go ahead
and just after we do that, we can just simply hit Accept
and maybe placed this. That might actually be something that we
can work with here. This is might be a
acceptable piece to go with Ben dark here. Bring this back in. Maybe taper this
just a little bit more wider towards the end here. Now we got a little bit
more to work with here. Let's see if we can
just bring this now in. Just have this fill in the
back part of the mesh here. Remember we were using the deformers to cultivate
our beginning aspect, but we don't have to normally
settled just for that. We can go ahead and
use that move brush. If we want to sort of give ourselves a little bit
of an easier time. If we want. We want to just mess around
with the extenders. Just give ourselves a
little bit of a fun little momentum piece here. Do that. Said don't
just settle for the, the deformers on face value. Work with everything
from Ben curve. Just learning to combine
because everything here is just thematic to one thing and that is practicing combining things. Taper n. Alright, so now that we have
this taken care of, let's just go ahead and fill
in the inside here with some green label so we can
finish out this piece here. This is going to be pretty easy. If you recall, we did
something all the way back up here with one of our pieces. It looks like it got a
little bit to hammered, so we'll just go ahead and take this piece and go
to the very bottom. We're gonna do is
we're going to just sort of like before duplicate this and just simply see if we can mess
around with it a bit. Kind of looking at it right now. Gonna be a little bit similar to what we did with the
centerpieces here. And let's go ahead and just
get these wires taken off. Then let's get back into
our original pieces here. Then I'm just going
to kind of work with. First off, I'm not going
to go with knife cut. I'd like to get rid of these
just to try but knife cut with a whole bunch of separate meshes doesn't work as well. So let's try trim curve to see
if we can get rid of that. It doesn't really do
too much, doesn't. That's okay. The reason right there. Yep. Alright, so let's
try that again. Let's go ahead and delete all this stuff because I
really don't care for it. Don't feel like I can get
anything good out of it. Go old school. And we're just going to bring in a cube and then we're gonna
move a little quicker here. Bringing into this cube
highlights select, Let's go into poly groups here. Groupby normal. And now let's go
through our geometry. 0 measure. Keep the groups, turn the adaptive size to 0. Smooth groups is 0.
Remeshing, awesome. It's just kind of going
through here again, just breaking it in back
into our net curve. Let's see if we can just kind of doing something very similar
to what we did here. See where I'm going with this. I'm just trying to once again, kinda greatest similar
design as we did before. Don't need to go any further. Mesh. Will probably be all we need. Just real quick maneuver
on an extender, maybe further too
far on the extrude. Something me see,
something simple taper. And all I'm doing is just sort of coming up with
something pretty easy, pretty quick and simple. This point, I'm gonna
do a quick Save. Then I'm just going to,
I always like to do a quick Save before I
go into array meshes. So once again, when we activate
a raid meshes to do that, we just go ahead and
hit array meshes. And then we're just
going to offset this somewhere on the y to
about right around there. Then let's go ahead and go
through and toggle our repeat. Maybe something like that. Maybe toggle. Like so. Might be a little too dense. So again, I'm okay with that. And we may even have this piece, so be another extra piece
that we put into here. Just sizing
everything up really, I'm just making like I said, we can go ahead and just read
change the order of this. You can just mess around
with these things. I think maybe that's
something 13. And then once you
like what you want, go ahead and make
it into a mesh. We have ourselves a piece here. I'm going to do a
couple of things. So I'm just going to center the points here
and merge this in. Emerge these two pieces in. Make sure one of them is an entirely singular
Poly Group way you can make additional edits in one sub tool and when they're
on top of each other, Let's go ahead and merge
these two down, like so. And now I'm going to duplicate this piece here because it
kinda like what do we want? And let's see if we
can put it to use. Maybe we can put this in
with the spare parts. One thing that we
can do with it, as it's in the spare
parts is this. This is, we can align
this with other pieces, other array meshes, so it has a little bit of a
change in the table. So let's go ahead and bring
this in here like so. Now it's just one of
those things were those small little details
count for everything. You can use this to kind
of fill in the gap. Here. It's not really that heavy
on the polygon counts. Fortunately, we can not
do some things with it. Maybe you want to do
like a little bit of green here and
duplicate the piece out and just kinda go through
duplicate more pieces in. You can always do that. And then of course
you can do things also like maybe scale it, bring out a little bit more of the pieces when it comes to the side just to make it
look a little bit different. You can do that as well. Just as you are mindful to
make sure that, you know, you're going to
obviously need to cut out all this geometry,
trim it out. This extruding geometry. Let's go ahead and do that. Now. I'm going to hold
Shift Control and do the drag rectangle process. So again, that is pretty easy. Just kinda shift
control and then go through Geometry,
modify Topology, and delete hidden
transparency again. Let's poke some of
that back into there. You can always
combine it up with the combined what we have
with the other spare parts. Maybe you want to
have just this piece agreeable as well in here. Oh, just to kind of see
what it looks like, you can do that too. Just to experiment, if you will. Maybe you want to put this stuff in here underneath
just to kind of fill in any kind of volume
on here. You can do that. Just want to fill in all
sorts of mechanical parts. Maybe just to kinda
have some fun with it. Hold Shift Control. Do the same over here, since it's buried
out a little bit. Just kind of fill in
in the volume here. We're just going to
find in some shortcuts and showing you
some modular use. Here. Let's go into transpose
and then once again, let's just delete some of this
stuff that's holding down Shift control and left-click
drag an open space, it's going to turn
green and then hold left option to make it
all disappear again. Kind of see and just kinda
cutting away at it here. Then we'll just
delete the hidden. Looks. Got a little bit
of a render issue. Usually that happens
when I'm kind of in a process of
taking up memory. I'll need to reset that, but it looks all right to me, just doing a quick
BPR render inside. Once that is taken care of
what we're gonna do now is we're going to move into
the next section here, which is going to be
the body section. Now this is going to be a little bit more
challenging for you because one thing that we
do on the body is that we, well, we kind of do this deal where we're going to give
you an example of something. And then we're going
to go ahead and have you follow the example
and do it yourself. So we're gonna make a
piece like around here. And then we're gonna have you do the next piece to see
if you can retain it. So with that said, we're also going to be
doing a little bit more of a demonstration of
customized Booleans to help you out with this. We haven't really
typed into that. But at this point, you want to go ahead
and take the time to kind of round out
your guy a little bit more to your specifications and makes sure that heat kind of looks just basically
just want to kind of do some adjustments
and things like that. That said, that's
our second half are completed tutorial
for the leg and the foot. But now that we've kind
of done all of that, we're going to also
talk to you a little bit more about micro
mesh a little bit. And how we can drive that out in conjunction with
everything we've learned. Because right now
this has been mostly about getting you to learn
the knife curve brush and the deformers to a T. So that when we start going
into more advanced stuff, we can now reapply it here. So with that said, what we'll have you do next before moving on is
this we want you to kind of go through
here and clean out your, your sub tools here. So I would say go
ahead and be very careful and do a quick save
in case you delete something. First, go ahead and just
kinda go through and delete all the pieces that are invisible that you
never ended up using. Anything that you thought like, Here's a piece, maybe you
want to save that piece. Well then you just bring it into that spare parts section. But then just keep going through and deleting all the things
that you're not going to use. Then of course all the
things that you do have kind of just go through
and bring it all out. Don't forget to load all your completed work
that you have here into your foot section so that we can keep
everything nice and neat, kind of fairly clean. Like when we clear off of that, we can make our adjustments. And then once we finish
doing the foot or I'm sorry, once we've finished
doing the chest, will circle around
and start cleaning up our file size a
little bit more. That way. When we do all this, a true, It's going to be able
to duplicate this across to the other side because we still have
everything on one side still. Unfortunately. That said stick around
and stay tuned.
27. Decimating and Mirroring Meshes : Welcome back. In this video now we're going
to move on into the chest. But before we do that, we got to get these arms
that we've made and bring them over to the other
side and duplicate them. Now, before we do that, there's one thing I have to go through with you and
that is that you've got to make sure at this point
that you are at a clean stage of where you are completely resolved with where all the
poses are in everything. Because what we're
gonna do is decimate the meshes before we
duplicate them over. And that's going to help with keeping our polygon count low, so it's not being
overused, if anything. I'm gonna do some
demonstrations of that by duplicating the mesh out
and then mirroring it over. And then after I do, for example, I'm gonna
do this for the arm. And after we do that, and we're going to go ahead and go through the
process of having you do the same exact thing I did as I took you through
the arm of decimating it, mirroring it over to this side. For this arm, you're gonna do the same thing now on
your own for the legs. So that said let's just go
ahead and get started here. First thing I'll do
is I'll select into my arm folder here and I got all the sub
tools I got to work with. And what I have to
do is I have to go through each of these sub tools. And I'm going to have to go
through and decimate them. Now to decimate them, what that means is we're taking the polygon count in
significantly reducing it while maintaining its
sculpted, sculpted state. It's like optimizing it, but keep in mind
once you do that, you can't deform the mesh. You can't sculpt on the mesh. It's no longer sculpted will, unless you do something
like DynaMesh, fuzzy Ramesh in project
or something like that. But that's not what we're doing. To begin with, let's
go up to Z plugins. And let's dock this over here and you'll see a tab
called decimation master. And for now we can
do either preprocess all or pre-process current
and preprocess currents. Just going to go ahead
and pre-process a piece before you can go ahead
and hit decimate current. Because the way we do this is when we decimate
a mesh first we hit preprocess current for
it to kind of go through a process of commutating
all the areas. And then we hit decimate current to go after and
reduce the count. So it can kind of
look right up here. This is our target poly count. We preprocess current and
then hit decimate current. You can kind of see it
just goes down like that. So we're gonna go
through all of these. Some of these will take
longer than others depending on how much
geometry you have. Keep in mind another very important
fact and that is this. You got to make sure you go through Geometry,
modify Topology, and delete hidden on
all these sub tools before we go through
pre-processing. That way everything
is kept clean. I'm just kind of going
down the sub tools here. Just making sure we
have everything kind of reduced down. There we go. Let's go through this one. This is a pretty small ones. It's not really I'll tell you anything that's 0.5
million to a million, definitely over a million. You want to go ahead and
decimate once you're finished. But truth be told, I don't normally go below
0.5 million for preprocess, but just gonna be thorough
for the video here. Now, you can kind of see why
I'm having you do the arm or the leg on your own
because this is basically the exact
same repetitive state. Over and over again. We're just going through the sub tools, hitting
preprocess current. I can do preprocess
all but the thing about that is that sometimes you get a
little bit of an issue. Some errors. Every ZBrush
version has its fixes. Ipad errors like this
happened before, but just going to play
it safe for this video. I want to really doesn't
need to be decimated nor neither one
button bringing over. And then we're gonna
hit destiny current. Alright, so we've decimated
all of this down. And so what we're
gonna do is we're gonna take this folder and we're going to go ahead and click
on the cog of this folder. And then we're just going to
go ahead and hit Duplicate. And it's going to give
you a little warning sign you just want to hit. Okay, Let's turn off
one of these folders. And what we're gonna do
is this time around, we're just going
to go through and mirror all these pieces across. So let's go through
like we did before, one sub tool at a time,
Deformation Mirror. And this time I'll
just hold left Alt, left-click and
just hidden mirror function cannot be
applied because the mesh has multiple
subdivisions. So that means we are going to have to delete the
lower and higher. Let's go ahead and go
through Deformation Mirror. Here. Just holding left Alt,
left-click mirror. All these pieces, they've
already been decimated. My job on all of this is done. Just go and left-click here. Mirror. Then the course will go down. We haven't touched
into the hands or we haven't decimated
the hands yet. Believe that is another folder. So now if we turn
on the arm again, it looks like this piece right here wasn't put into a place. We didn't decimate that. Let's just go ahead
and duplicate that Deformation Mirror and assign these pieces in
the correct folder. So that's this fee. So we bring it in here and then we bring the
other one in that piece. Now the only thing
that's left for this is just going
through here now and I'm just going through the sub tools and going
through a pre-process current. And we're going to decimate
all these pieces back down because the handle
is a separate folder, not part of the arm. I'll just go ahead. Do the same thing again. We're just going through
this time, the hand folder. Just a couple more terms. Then we're going to go through this current one less time. It's just a repeat again. So now we're just
going to go ahead and after we finished
decimating that piece, Let's go into that
**** like before we duplicate that folder, it okay. Now we have two folder hands. Let's turn one of them off. And let's just go
ahead and left Alt, left-click on each
piece in mirrored over. So deformation backup again,
hit mirror, Deformation, Mirror information,
mirror sub tool, bring it back up again. There was one piece
that I forgot to get out of there. That's okay. Sure. Why I kept the visibility
on that one out. We'll just go over here. All right, so now that we
have all that taken care of, Let's just check
through our sub tools. Everything's looking
good so far. So now that we have done that, what I'm gonna have you do is, is we have all of
these pieces in our folder once did now
it's your turn to learn. It's your turn to take
what you've gotten out of this and reapply and don't forget to go
through and don't forget, I should say, is to
delete this guy off. Like so. That means
split massed point. Instead of base mesh kind
of stand in that we just used to give us an idea where
our mass is going to be. I'm just going to
delete that off. Now that we have that, our next piece is going to be
the chest after you've done on your own this time
duplication of the arm, the leg, and the foot. Over to the other side
just like before. Again, you're going
through one piece at a time with preprocess
current to decimate current, every sub tool within the
folder, that is foot. And then after you're
done with that, you're going to duplicate that foot folder and then turn the visibility of one of the folders off
and then left Alt, left-click each
piece and go through deformation and hit mirror
and bring it on over. Pretty simple, lots of steps. Once you get enough practice in, it becomes easier and
easier, I promise you. That said or going to move
on into the chest area here. And that is coming up. And it's going to be
a little bit more challenging because we're
gonna put more on you. As we go through. That said
stick around and stay tuned.
28. Creating Chest Piece Base: Welcome back. In this video, we're going to continue on
into the chest section. Now as you can see, I've already duplicated and did the legs and
mirrored them over. So as I said before, you should have been able
to do the same thing as I did in the arm. And I hope hopefully you were able to accomplish
the same things. Now we're gonna use that
same concept where I do an example of something
simple like that and then leave you to make the follow through with
repeating the steps to the legs. We're gonna have you do
something similar to that with the chest where we create
the pads of the chest, then then you will be
doing something similar, a similar techniques shown
to make a secondary pads. So that'll make more sense
once we move along here. To get started
here, I'm going to show you what to expect. Now in the chest section, what we got is it's
going to be comprised of eleven-sixteenths padded
hard surface pieces. So it's going to be like a piece that's kind
of be like this. A piece that's gonna
be kinda like this. And of course it's
gonna be a piece, it's kinda like this and we're
gonna fill in some gravel and fill in the cavities
around here like so. What we'll do then is I'm gonna go ahead and do an
example of one pad. And then we're gonna
have you do in a, follow those steps to
do the second pad, which will be the center
piece right here. And you'll be doing
a shape similar to this shape right here. So we'll show you
how this works. And then like an activity, we're gonna have
you turn it over to you and show you how you do it. And then on the next lesson, we can kind of compare notes that kinda see where we land. So let's get started. So first thing we're gonna do, like we've done
nothing different. We're just reiterating and repeating process,
getting everything down. I'm going to append
and bring in a cube. And then I'm just going to
square that cube in Gleick. So scale it down. It's gonna be kinda
like a strip like so. For now I'm just going
to keep it centered in there and I'm looking
at it and all. I'm gonna hold shift control, make sure my knife curve
brush up here is selected. And I'm going to then
go through geometry. Maybe turn off SMT and just
give it a couple of divides. Turn SMT on, and then we're
going to delete the lower. Now I'm just going to go ahead and just hold Shift Control. And we're just going to go
ahead and make some pieces. Again. Take your time
on this secondary mode. So make sure you're
in the first mode. Kind of see him just to
kinda working out the piece, working out the mesh. Looking for some iterations. Something like that,
to start off with. Something like that perhaps. Then. All right, so as you can see, I just made myself a little
bit of a piece right here. It's got poly groups
on every angle, so it should be fairly
easy to 0 mesh. We shouldn't have any
too much problems. I'll just go through 0 measure, turn my key groups on, turn my non my poly
account download probably, probably keep that this
similar to the same. Smooth groups and adaptive
size are gonna be turned off. And let's see if we can
get a 0 mesh out of that. If you run into this again, again, 0 measures and
automated features. So that means that you're not, you don't have a lot of control
over where it takes you. If it takes you into weird
wonky little areas like this, you can keep hitting Nazi Ramesh receiving, get something clean. Or you can just
sort of maybe cut down and give it
another go at it if you want or if you want, you can kind of, um. Adjust the target poly count to see if you can look
for something cleaner in there and give that
a couple of tweaks. And if you're still
running into any trouble, you can always just hold Shift left-click control,
hold Control, and then marquee select, Shift, left-click and empty space, then hold Control and tap
left-click to invert selection. Then I'm going to center point. I'm just going to kind of
bring this in like so. Then from there,
anything else I can look at it just kinda looking
at all the opportunities. So the pieces we got a little
bit of weirdness all over. Let's see if we can go through deformation
and we can also do things like polished by groups. That also has a way of kind
of cleaning up pieces. Go ahead and see if
we can kind of get a little bit more out of this. I'm just gonna, I'm just gonna kinda keep working in this piece until I can get
something fairly clean. And if I have any
problems and I'm not I'm still not able
to make anything work. I can just simply reapply and
resubmit the whole thing. And you can just see I'm
just constantly trying, I'm just constantly add it. Don't forget, you
can also isolate, select, delete the hidden
0 mesh just with this, and then go into dynamic
subdivisions and then give yourself a little bit
of thickness and then reassign the poly
groups of all the ends. You can do things like that. So don't forget all
your options here. So let's just go ahead and now that we have some little
bit cleaner here. Established clean
mesh, we can then change the target polygon count. And finally, we would
need to divide it. But if we do that and it's going to collapse in like that. So let's go through crease, increase poly groups
and now we divide. We should get some fairly smooth delete the
lower on those. Now what I'm going to do,
you know what I'm gonna do? I'm actually going
to take this piece. I'm going to undo that. Go to my lowest subdivision. And I'm going to go ahead
and now just shrink it out. I'm going to use the Move
brush to kind of help me find something out of this. Because I kinda like this top
side will be a little bit more even, something like that. Because again, this
is all going to be sort of like the bottom piece that we're
going to be working with. Now. Let's divide it. Delete lower. Let's go through sub tool
now and duplicate that. Now from here, we're going to duplicated this
into two sub tools. That's because one
of them is going to be become a Boolean. So go up to here
with Live Boolean and just kind of move this
guy out a little bit. This is the bottom
sub tool we're on. Make sure you're using
the bottom sub tool, convert that into a Boolean. You can hit Shift
Up to look at it again and then just
bring it back in. Of course, you're not
gonna see very much so scale that end so we can get a little bit of
thickness going on here. Then from here,
let's just go ahead and mess around with
our final piece. So from this point on, what we're going to do
is a couple of things. We're going to first of all, we're going to let me bring it in and then see
if we can make it like this. I'm going to first
make it like this. I'm also going to take
the original piece, that's this piece that's not being affected
by the Boolean. I'm gonna duplicate that. Now we have three sub tools. It's gonna be very
important that you do that because we're going to
use this piece again. I'm going to turn
the visibility of that original sub tool off. And then I'm gonna go
back to my boolean. And I'm going to
hold Shift Control. And I'm going to go
into the secondary, probably the secondary
function of NYC curve, brush. That way I can do
something like that. And the reason we're able
to get that kind of look is because we're
affecting the Boolean in its secondary mode. When it's not subtracting, it's basically filling in all the pieces of
its default state. So let's go ahead and use
that to our advantage. Have some fun. You can carve out all sorts
of pieces here. Take your time, feel it around, get a good spacing
out of all of this. That one's a little bit getting, not just a good spacing, but also Barely good
amount of angling. Then once you have
what you want, we need to turn this into a
solid mesh for the Boolean. So lets, the rules are for
making a Boolean mesh. We got to turn off the
visibility of everything. Like so. Now it's
just this piece. Let's go ahead and go down to Boolean and hit
make Boolean mesh. And now that should, an extra
tool should appear above. Once we hit Append, we have now a new piece. So you remember that
extra piece we made. Let's go ahead and turn that guy on and turn the other
two pieces off. Now, this extra piece here, we're just going to
go ahead and isolate, select the top poly group, and then go through geometry, Modified Topology,
Delete Hidden. We can reconstruct the
subdivisions a little bit here, or do a 0 measure
to make something of a little bit lower polygon
based off of this account. Like to go with some pretty low. The reason why
we're doing this is because this little
piece here is gonna be like a little bit
of a micro mesh on Dynamics subdivision. And that's what we're
gonna be working on upcoming in the next video. So you can see we did a
couple of steps here. I'm just going to
kind of put that underneath here, like so. And even scale this. And so it's a little
bit like that. We kind of see what we
have here. Not too bad. Now that we have
all this, you can, you can attempt to 0 mesh this in case you're
looking to bevel it. I wouldn't try doing any
bevels on the inside, but you can go ahead and just have fun and challenge
yourself with a 0 measure. Remember 0 measures
automated and therefore, it's going to be something you don't
have any control over. You can only manipulate
the best possible result. It, you can get out of it. But you're never gonna
have complete control. So the results are the
best that you can make it. And it looks like we got some
fairly clean out of this. Also allows us because
it's so clean we can work with bevel width a
little bit if you want. Maybe just make something
small. If you want. You can also like we
have a little bit of an issue where our centerpiece
guy messed up there. We can also kind of play this a little bit centered.
You can do that too. You can take a
shot at 0 measure. But having bubbles on here
is not like a prerequisite. It's sort of like extra
credit if you can do that. At this point, try to
get to this point. And then in the next video
we're going to show you some micro meshing
and how we can create some plainer cut
overalls that kinda go over this and some plainer cut
pieces that go under it. So with that said, stick around and stay tuned.
29. Sculpting Secondary Chest Piece : Welcome back. In this
video now we're going to finish up our piece
in this video, we're gonna go through
our new feature in ZBrush to help
fill in this area. And that's going to be the
micro poly feature in ZBrush. So to get started with, we're going to cover this
like a crash course. It's a little bit similar
to dynamic thickness. Therefore, it's
going to be resided under Geometry,
dynamic subdivision. And like dynamic thickness, we're just going to
first turn on dynamic. And then instead of thickness, we're going to hold
down micro poly. And as you can see, we get a whole bunch
of little programs, alphas that can give us a pattern to what we're
looking for here. You can click on the up
arrow to kind of see all the sort of different unique patterns
that we can go through, which is kind of
interesting and fun just to kind of see what
something can look like. If you do anything
like click a line, you can also alter out the
features a little bit, which is a little
bit more fun too. So like we said, just kinda go through and
find a pattern you like. I'm just going to try to find
something that kinda makes sense to a hard surface piece, maybe like a film or of some kind to seek out That's a little
similar to what I want. But once I'm with circles, maybe I'm just going to
keep going through here because it's a
little interesting to see how all this works. As you're going through. Vortex is close. Thinking. Like to go with maybe
a little bit closer, if not what we want to ninth just kinda going through here. Claim probably doesn't
work very well on. Let's take a look
at what we have. X plane. It might be something that works well
with what we want. So just take a moment to
kind of look at everything. See if you have everything
that you want now. You can do if you
adjust the scale, you're not gonna see anything. If you want to adjust the scale of everything you're seeing, you can kind of go through
and adjust it like that. Probably going to check it out a little bit like that
might work for what I want. Let me some a little bit like that just to make it
a little bit bigger. Kind of taken a
look at what this would look like at a distance, might just go a
little bit bigger. Now probably will work. All right, so once you
have what you want to get the proper scaling to it, just go ahead and hit Apply just like you do
with the thickness. And then we can
just cut everything off either through
something like trim curve or like just kinda going through ray cutting out all
the pieces that you want. Or you can just go
through and do it through selection tool and just bring out sort of like a
cut in everything. Kind of see how we're
doing and then maybe finish up with trim
curve on here. You could do knife curve, but I-V curves a little
finicky when it comes to things like this. For example, do the
delete hidden knife curves a little bit finicky when it comes
to separate it meshes. Usually it just only separates one single mesh and
that's about it. After you get that
taken care of, Let's go ahead and
go through sub tool. And you remember that
third piece that we had. Let's go ahead and duplicate
that piece or I'm sorry, not duplicate, but let's just go back to that piece in
hit Shift left-click. And this piece is gonna
kinda go underneath here. What I'm gonna do is
I'm gonna work on trying to carve out
a little bit of a pattern with the
plainer cut brush. And then from there,
we're going to, while we're gonna see if we
can have a little bit of fun with creating some slants
to kinda go around it. Like it's a little bit off slow. Go. Now to do that, let's go ahead and
hit that light box. You can go into our brushes. And let's look into
the planar folder and find our planar
cut brush now, because it's flat, you're
not going to get a lot of interesting pieces on here. It's a little bit hard to get something
interesting on here. Flat. I like to just
maybe give it a, a couple of subdivisions. Before I do that. I can do that, Give it a
couple of subdivisions. And then just afterwards, go through geometry
to leave lower end. I'd like to bend arc it
because that will help me find some interesting shapes through the planer cup brush. See if we could find
something interesting. This Here's an interesting shape. Let's see if we can
do something like that and it's a
little bit inverted. I'm just taking my time. You need more realist
straight to get over here. So I'm going to go ahead
and do some improvising. Let's turn on that body
mesh and bring this guy in a little bit more so I
can have a little bit of volume to work with here. Right there. Now. Let's get back into it. You can kind of see, I'm
just fishing for my piece. Looking for an
interesting shape to kind of flush into little bit more, better piece right there. Then let's go ahead and trim curve that did that. So let's get back
into night curve. Here. Try something here. Now that I got my pattern, Let's get back to this guy back here and serve its purpose. Now let's take a look here and now I'm just
going to kind of, alright, so what I'll do
here now is I'm going to go through and isolate,
select this group. Geometry, modify Topology
and delete hidden. Then let's just see what
we can get out of this. Dynamics subdivisions. Turn on. Turn that to 0. Let's see how we can get
something clean out of that little bit cleaner. Now, we're trying to get a
little bit of a clean room because our mesh kind of
tore it up a little bit. Let's hit Apply. Now let's go ahead and
hit some slants in here. So the radius, Let's turn Dynamic off so we can
get some smaller lines. Just do a couple of
practice siblings here. Kind of see what I'm doing here. Get off of there. Right now I'm just practicing. I'm just looking for a
fun looking shape here. Manchus go here. Do some Anything you
want, pretty much. There's no right
or wrong on this, but it's sort of like you just invent your own
pattern if you want. Like right now, all
I'm doing is sort of experimenting with
some fun shapes, some fun shot shadowing
patterns here. So you can do anything
that you want on this. And then maybe if you want to do some small subtlety details
to, you can do that. So like for example, let's put some insert
permanent meshes in here by just dragging a cube in, going through and split in
that off under split unmasked. Bringing this in and going
up to Live Boolean to enable the mode and then making that sub tool a Live Boolean. Just bring this in like so. You can do things
like maybe you want to carve a very
interesting pattern with Booleans on here. I'm not really
doing any of that. What I'm doing is
it's just simply bringing in a piece and just having a
little bit of fun with just adding just a little
bit of a hex detail. Nothing really too crazy on it. Maybe do a couple of them. Stuff lay nothin
wrong with that. But this is sort of the idea that I want to
kind of get you into is that even the
small details matter in crafting some of this stuff. Once you do have that, just go ahead and make
Boolean mesh out of that with the Boolean under
sub tool, make Boolean mesh. Once that's okay, go
ahead and hit a pen and see your new tool right
there and bring that in. Let's turn off everything except the three pieces
that you created. We should have now three pieces. And we're gonna have now
a fourth piece made. That fourth piece is going
to be a duplicated piece. So what that means is that once you have this all
kind of accentuated out, maybe you want to flatten
it a little bit more. Want you to take this piece
right here, the frame piece, and go ahead and duplicate that sub tool and bring it
just a little bit behind. Maybe just bring it out a little bit and flatten it out
just a little bit more. And just scale it in
a little bit more. With that one piece. I want you to
carbon some slants. So it's gonna be
holding Control, Shift and slants
like this basically, but let's make them a
little bit wider so that they can fairly spaced. Just want you to kind of
bring in some slants here. All this is, is,
this is practice. This is like finding
practice in how to utilize the pieces
further and further. And also how to get fast
button configurations. Oops, that's not right. So now we've got
something like that. What you're gonna do next
is make sure that these are all now singular poly groups, but you can just merge
all of these down. Once you do a merge,
just hit Okay. You've got your first piece. Just remember you can go ahead and separate
any of these pieces. Like here's one piece. It was all know, it's not single
poly group isn't. We can always go through
and do a split parts. In fact, one thing I'm
going to say right now is that when you go
through all these pieces, if you do a split two parts, make sure everything
is split here. Like for these three pieces
here, everything that's here. I'd say go ahead and go through the process of what is it? Trying to make this
one poly group, that was what my mistake was. Merging these three pieces down would probably
be a good idea. Then making sure that they
are all one poly group. Because you're going to want
to do like adjustments in such as for all
these pieces here, these are all
separate pieces made by the mesh that was made. Let's bet sudden we got
everything that we needed. Probably this piece right here. Once we have everything, Let's go ahead and
bring this guy in. Let's go back into this guy. Quick save. Because I don't
want to lose my spot. Just going to bring this
in a little bit closer. Like it to line up. And that's part of why I wanted this to be
one poly group. Because you may find
yourself doing things like making adjustments
so that this fits in a little bit easier,
like right here. Or you might want to do
alignments with everything. One thing I will say is that
if you do do any of that, you might need to go trim curve because should say Move brush. Because this is a little bit easier to
process everything. There. She is. Wondering what went wrong. There was on the wrong piece. Like right here. Either one do trim
curve or an I-V curve. Just kind of helps you
to line up everything. Looks like because
this is a Boolean, just a heads up on this. Got to be careful
because you lose your center pivot point and you gotta kinda bring it back. Let's bring that in. Bring that in. Kind of see, it's just a kind of a
work-in-progress all of this. But this is also kind of what your task is pretty much for. Doing all this stuff is, is that you got to
this time around, you're gonna have to go through and make your own unique piece. Now, we've outlined this
piece for you here. This is a padded piece
that you're gonna be working with like agreeable
paddled padded piece. What we'll do here is I'm going
to go through the process of re-emerging all
this stuff down, which is going to
be a nice long, little kind of fun to look at. Like a fast forwarding
stop-motion. Once you have all of these
pieces taken care of, what we're going
to have you do is, is that you're going to be
doing the next piece on your own using the
exact same technique. What that means is that
this piece right here, this piece is going to be going right here on the
lower bottom segment. Okay. Now, using the same techniques that we did where you
carved out the frame, you're going to be doing
the same thing in here, except the shape
is going to look a little bit more like this. It's just going to probably
give you more resolution. Let me go ahead and
outline the look. A little bit more harder shaped. Also, we want to see
you get it fairly close to about the center here. Let's got to look
something like this. Now, once you do that, once we so like I said, I'm going to repeat this
because it's very important. We want you to now your
exercise, your assignment. This is your kind of your
graduation to everything you've learned is to
recreate this piece, which we've already
done and shown you. That's where we go through. We use a Boolean, a
carve-out in the center. We carve through the
Boolean to carve out slats in between here and do
a make Boolean operation. We go through and
duplicate this and put it underneath hearing create
slats underneath all of this. We take a duplicated piece of the original base mesh
that we carved out. And we use planar cut
to go along here. We use knife curved,
go along here. And then we use Boolean. It kind of cut some small
little details of gravel into. We use poly mesh two with a flat plane where
we go into geometry, dynamic subdivision
and turning on micro Pali and we find a piece of pattern
we like of holes, scale it appropriately through a combination of dynamic
subdivision in the scale. And then going ahead and applying it and converting
it into a mesh. We're just reviewing
all this stuff. Then we go through and apply by reshaping the little piece
of the little plate, the outer plate
with in some trim curves that move around. You can see. And then finally we merge them. But I will say this though, when you're merging
everything makes sure this is a single poly group
before merging everything because
you want to be able to have that flexibility of being able to readjust
this for different segments. Like I said. Now that
you know how to do this, go ahead and try to
make this piece. The final area on this is
going to be a bend arc, which will just show
you real quick. Just a very subtle little
bend arc on both ends. Then we just bring this in to the centerpiece
here into the body. Now, like I said, we want you to do this
exact same thing. Your assignment is to do
this exact same concept, but with this shape instead. So with that said, I'm probably going to then
on the next video coming up, you're gonna see my
version of this, this shape right
here, imported in. And you're going to then compare notes on how we differ
and probably come to the one conclusion
that is that there's no such thing as
the wrong piece. There's no such thing
as the wrong kind of geometry as long as
you've got something similar than good job,
you did it right? So with that said, good luck on trying to create this pattern using the techniques
we use to create this. And we'll see how you
do on the next video.
30. Chest Pad Placement: Welcome back. In this video, if you did what I
instructed correctly, you should have had something similar to this kind of a shape using the same principle of techniques that
we did before, like on this piece here, you'll notice it's just
simply a different shape, a different variation,
but the same concept. So that was sort of like
your assignment to do. You can compare
notes with this one. I'm gonna go ahead and export this one piece out
so you can have a little bit of comparing
of notes to this piece, to the next as we go through. So this is what you should've
been able to come up with. And now, if we go
out and solo mode, we should have two pieces
here for you ready to go. With that said, we're
gonna go ahead and move on to our next pieces. What that's going
to be as is we're gonna do a Boolean now. Now a Boolean is we need to kind of carve
out some cavities here. We can give a little
more real estate for our pads before we
can reuse them, duplicate them, replace them in different areas and all that. So What we're gonna
do is going to use a customized Boolean and
get you introduced to that. If you go through to
your resources folder and click off to the left for an empty space
and click on Import on there. You should be able to find a OBJ titled sci-fi Boolean and just go ahead
and import that in. And it should look a little
bit like this now this is like a customized Boolean, so to help give you some
grievous surfacing detailed. So it's a little bit different
than what we did before. But what the way this
works is we're gonna kinda stamp this into the chest. We're going to turn
this into a Boolean and stamp it into the chest like so. So let's first of all go back
to our main character here. Let's just go ahead and hit a pen and click on
that sci-fi Boolean. And let's just go
ahead and then bring this Boolean or the sub tool. It's not a Boolean
yet, but let's go ahead and turn
on light Boolean. And now we hit Shift F, can't really see it. Looks like it might be
inside the mesh there. There she is. Let's center up the pivot point. And now we're just going to
turn this into a Boolean. Now we kind of hit Shift
app, we can see it. But notice that when we do this, kind of covers up everything. So let's go ahead and look
for our chest piece here. I'm just going to put
the chest piece at the very bottom here because I think the folders
might be getting in the way. Make sure it's on top. Beautiful. Just put when you
get the Boolean on here, make sure the Boolean
is on the very bottom. And then just go through
and make the sub tool hit Shift left-click and then put it just above the
sci-fi Boolean here. Now, we have a little bit
more wiggle room here, but we don't want the
Boolean to affect our pads. So what we're going to
do is we're going to move the pads below
the sci-fi Boolean. And now it won't. Anything that is below a Boolean is not going
to get affected. Everything that is above a boolean is going
to get infected. So with that said, let's just do some
quick little deformers on here so we don't have
to punch in so deeply. We'll start with this one. Maybe a little bit more rounded. I'm just going to
leave it like that. So it's a little
bit more curvature. That looks like a little bit
of a mechanical machine. In some ways. We're just kind of right
now just punching it in, make it a little bit bigger
for my own purposes. Now that we have that, let's just go ahead
and carve it out just like we did before
we did Booleans, we carved out Booleans
in the last video. We're going to do it with
a customized Boolean. So hit Shift Control and
hit the knife, lasso brush, turn on local symmetry, hit X and just kind
of do your own thing. And you can kind of see the
carvings kinda go throughout. There isn't a right or wrong
way on how to do this. But I would say just take
your time in all of it. Let me see something. I think right now what I might do is minimize
my carvings. Be just something like that. Something like that.
And like I said, all of this is going to
get covered up anyways, but I just want to have little
bit of wiggle room space. Now that we have all
of this taken care of, Let's take a look at some of this little bit of
an artifact here. Must be from a mesh, from a base mesh on
another sub tool. Not too worried
about it right now. That's going to get covered up. But for now, let's just go
ahead and just keep going. You can go ahead
and take your time and kind of carve out
everything that you want. If you also would like
to go through and do like a mirror
weld and just do one side if you're having trouble and it keeps
going on one side, you can always just simply
turn symmetry off and just kind of carbon
to it this way. Errors, no rule against that. So with that said, what we're gonna do now
is we're going to kind of just simply take our pieces in, re-scale them around. Like so. If I have to, I'm just going to basically
be reworking everything just like slowly one
piece at a time, which is kind of
nudging everything. And so that has a little
bit more room to grow. Now we can move this
guy a little bit down. Bring him across a little
bit more like a game. I'm just nudging. Nudging. Because I'm just thinking
about how I'm gonna make room for that
top part there. To make that top part, I'm just going to
be modular here and duplicate that piece above. But don't move it. And let's see. We're going to have to
mirror the symmetry. Go through geometry,
deformation. Let's just go ahead
and hit Mirror, its center point and
rotate this around. Now it's on the outside
here and a curving in. And I'm thinking that I might deciding should I go under or over the seven trapeze? That's sort of a
design choice by you. You can just sort of fill it out and see for yourself
which you like the most. It's a little bit protrusive
and just got to decide. Do you want that to go over? Because if you do, you're going to have to push
some of this stuff in. You're having trouble
switching to that and you can just turn off your Boolean. Go ahead and see back. Try to go underneath. And I gotta be honest, I kinda like it a
little bit over. We'll see how it goes. Maybe try to do the
best of both worlds. Scale it in. This is just sort of placement. My work, something
out like that. Let's just bring it in. See how it's all just
one piece at a time. It's just one piece at a time. One after the other, one after the other. And that is a twilight
zone reference. If you can guess the
episode it's from, I will give you ten points
and acknowledge you. Go ahead and move this
a little bit more. Let's just kind of a
bit more like that. I know it's been bothering
everybody covered up. So you can probably guess now we're going to be
going with this. And that is that we're going to take this piece now and bring it to its duplicated state
by mirroring it over. So that's pretty easy. So we're just going to go
ahead and start with this one. It's duplicate. And then we're gonna go
through and do deformation. And we're going to do mirror. And then we're gonna do
the same thing, duplicate. And then Deformation. Mirror. Looks like one of the
pieces was turned off. But that's okay. Do
something about that. I didn't I just
didn't duplicate it. Let's try that again. Then Deformation. Mirror. Once more. Now that we have it like this, Let's organize the
two pieces together. So I want these two
pieces to be a sub tool, these two pieces
to be a sub tool, these two pieces to
be the sub tool, that's where that
helps me to rearrange everything both in
scale symmetrically. So let's go ahead and start
with left Alt, left-click. Put this to the very bottom, left or left Alt
left-click on this piece, It's Shift left-click to put
this in the, on the bottom. And now we're just going to hit Merge Down on these two pieces. Do the same thing
for the center, left Alt, left-click shift, left-click, left Alt,
left-click shift, left-click. And then we're just going to
merge down these two pieces. One last time. This time I won't
be calling it out. We can just merge them. I'm doing it this way, that way. So I can have turn X key on your local symmetries
on at the center. And now we can just
sort of scale, make adjustments
further on here. Remember if it goes to
the center like that, it means that your, your piece is what its pieces. It doesn't have symmetry turned on if it goes to the center. Last but not least. Now keep in mind another
thing that we didn't do is we didn't make this into
a converted Boolean mesh. What we have left to do now that all this
is taken care of is we can just simply fill in the back area
with some gravel. And then we'll just go on ahead and turn this piece into a
Boolean mesh along with it. And then we'll be finishing
up into the shell. So with that sets the
ground and stay tuned.
31. Chest Greeble Construction: Okay, welcome back.
In this video, we're going to
continue on adding in some detail within the cavity of this chest to finish off. Now, if you haven't already
went through and change my basic material to basic material to just have a little fun
and change it up. But first thing I'm
gonna do is is I still have an active
live Boolean here. What I'm going to
probably do is turn off everything and
I'm going to go ahead and rearrange everything so that it's just
the chest piece in the Boolean that
our own visible. So I can do a make
Boolean operation. But before I do that, let's go ahead and go
through and create a chest folder for these
pieces to hold into. So I'll click on one of
my pad folders and hit new folder type in chest. I'm just going to drag
everything in here, like so. And then I'm gonna take off
the visibility of that. Then I'm just gonna kinda
go through and delete any excess unneeded sub tools and then turn off
everything else. Like so. Now we'll just got this piece. Let's just do a quick little Boolean operation on this guy. Then it's just gonna be,
uh, make Boolean mesh. A little high poly count. Well, I'll hit Append,
bring that in. Now I can go ahead
and just delete both the Boolean in
the original mesh. Now, we have our new piece, so we bring in our
chest again and we should have something back
to what we originally had. Now that we have
that taken care of. Let's go ahead and fill
in that center area here. Now, there's a lot of
ways we can do this. We can start off like kind
of similar what we did in the piece with where we put
just a bunch of green wires, for example, I'll give
you some opportunities to kind of show you
what I mean on Here. We go through our spare parts. You remember our
second gribble wire? We can work with that one, maybe in, duplicate that
guy shift left-click, maybe go through and bring this all out to
the center like so. And just kind of habit lay
in and overlay out like so. Scale it, give it some depth. Now, you can also scale this
one out a little bit and just work with a little
bit of green will work here and just work
something like that. And just simply having fun, just kind of going through. Another thing we can do is B&B. Give ourselves a little
bit more cavity. I might push this back a little. Just a little. Then we can just work with
something like this. This is a pretty
low poly council. I can do some fun
stuff with this. Maybe you want to do a deal
where you can bring it through and then bring
it through like so. Then clear the mask and once
again reset the orientation. Bring it through like so. You can do something
like that. Even. You can now work with some of the other Greenville
pieces that we have. We have that good old fashion one that has a little
more volume to it. We can do Shift left-click, center of the pivot
point back over here. We can just bring
this guy in Q1. Just see if you can experiment
with it and just really modulate your
pieces out of here. Do a deal where, which is kind of meshes in a little bit more. This one has a little bit
more density of wires. So it might be an interesting
little grumbling piece that you can work with. Let's see here. Let me soon. Definitely going to need
to read our rematch. This guy, I'm sorry, decimate this guy out. If it gets a little overly
noisy as it is. Here. One thing we can do is
we can always try to break up the Gradle. To do that. We can just start by, I'm just doing some quick
little examples here. One thing we can
do is first off, I'm going to clear off
some of this stuff. To do that I'm going to choose my Isolate Select and
then just delete some of this excess geometry,
transparency, excess geometry. Then we're just going to go
through modify Topology, our Geometry modify
Topology, Delete Hidden. I don't really need to do it. I just have it on a
nice little pad here. One thing we can
do is as though to kind of break up the
pieces a little bit more. If this gets a little
too excessive or it gets a little too noisy in any way. You can always do a
deal where you can just put some stuff
over it to break it up. For example, like
how we did this pad, you can kind of do like a simple little rudimentary
shape piece if you wish. Like a square. Trying to think
of a good example of something like
something like this. If you wanted, you
could always do that. Just something that
helps break up the pad just a little
bit more. Like so. Just kind of helps suck, kind of give it its little. Allies, say,
Principles of Design probably could call it takes away noise is the best way to probably do something like this. Now, remember how
we cut this out. We cut this out by doing a series of of trinkets. But you can do a
different pattern. What we did before,
everything here was just an exercise to that. You can kind of see the hard
surface kind of meshing in a little bit more now that
you have a little bit more of a idea how this works. But you know, this whole class
or this whole course here. It really is not just
about modularity, it's not really about cheating. It's about also getting you
to be more experiments. Now, take this piece right here, for example, maybe you
don't like that piece. Maybe you want to
experiment with a different kind
of piece on here. What kind of piece do you
think could fit closer to an intersection like you have here that has less
greebles detail, but it has a little
bit more playing. You could take something
and go through sub tool. And like I said, I
keep saying this, you got to practice by doing, you can take something and bring another cube in
here, go into cube. Let's see, we can go into solo. And if this is going between
four pads here and now, you can go through, and once again, just go through the whole process of first hitting local symmetry. First going up to Transforms, maybe you want to
go with y symmetry as well as local
symmetry like this. And then see how we can work with the knife
curve in this manner. You can keep going
and going and going. I don't want you to think
in your mind that this is not something that
is not possible. You have to just sort of, what I would say is you
would have to just sort of experiment and break
your boundaries. Take this for example, we learn knife curve
doesn't work very well. For, you know, even
though symmetry is on, it will only handle left
and right symmetry, but not up and down symmetry. So two forms of symmetry
at the same time. Yet again, we taught you
what mirror and welded. So that's a
problem-solving feature. And in order for mirror
and at weld work, you'll first find that it
really only works across x. Why did it do that? Because x was only turned on. So I'll undo and this time
I'll also turn the y-axis. And now we have
something like this. Now, using this concept, I can kind of go
through and just sort of pretty much go through and do the same
thing I've done before. 0 mesh geometry. And this is all what I'm doing
right now is just simply just trying to give you again more ideas of where you
can take that centerpiece. You don't have to
reuse another piece. You can just sort of just keep going and going and going
and design your own area. And this is the most
important part because you cannot learn just by
copying the video. That's, that's been sort of
like my mistake as well. So if you can please
please please, please try your best to get like a back to trying to talk and also speed and same terms like simply put the most difficult
thing on the planet. But it's just trying
to simply say that copying what you
do on here is not, is no longer good enough. It is simply not good enough. You cannot just
simply copy on here. You got to explore and
experiment beyond the course, go beyond the lessons
of the course. Like we've everything
I'm doing right now. I'm not doing any new features. It's just nothing we haven't done that we've done already. You might want something
like this, for example. Something like that. Maybe you want to go ahead and
just make the knife curve. First off. Just like so. Just see, once again, what do
we do from here? Whatever we want to do, we want to do extender,
go for extender. Want to go with extender with
some extrusion, go for it. One to go ahead and do a symmetry transform with
slats go you know what to do. It's primary mode. It's measured by the
diameter of your brush size. And you can take a couple
of practice swings. And again, if you are reminded, you've learned that secondary
mode symmetry doesn't work. So what does that mean? It means that you go through modified topology and you go
through mirror weld again. It's just sort of
that same concept. If you want to
experiment further with it and you can
just keep on going. You can kind of bring
in more tapers to it. For example, you can
just keep going. It's the same concept as we always been doing nothing new. You want to, you can go
ahead and do the bend dark. Then just simply hit Accept. Going solo. You can just make yet again
another piece right here. Maybe this piece can be
then done through arrays. Maybe you want to do
like a string of arrays, and then you want to
run wires on each side. You can do that. What does that look like? Do you think I want you
to take this experiment? I don't want you to wait
for me to do it on. Here. I want you to actually kinda show me what
that looks like. See if I can bring this. I'll just go ahead and bring these guys
back just so I can kind of ring hand forward
a little bit more. Kind of see yet again, it's just another Boolean piece. Of course, quite frankly, while that would look
cool wires on both sides, it might also construed a little over noisy with all degree bill. You might not see. In other words, very well with all the gravel
that is behind it, it won't contrast out very well. So that's probably
one. Do you want to it but that doesn't mean
you have to do it. You can still
haven't yet, again, an extra part for you to place On to use for other
wires in other locations. Kind of bear that all in mind. The possibilities are
truly endless on what you can and cannot do just
because I'm using this one piece doesn't mean
that can't use other pieces. That said that's kind of
going to finish up our chest. So what we'll do next is we'll
go into the backside here. And again, that's just
going to be like as before, a where we create one piece and then we're gonna
read duplicate the piece. The chest is going
to be a little bit easier and a little less
steps than you might think. It's gonna be a fun
little tutorial trip. And then from there
we're going to move on into the head and have some fun making some
coolness out of that. So with that said, stick
around and stay tuned.
32. Establishing Shell Piece Sculpt: Hey, welcome back. In this video we're
going to tackle into that last major section of the hard surface body and
that's gonna be our shell. Now the shell is going to be a little bit easier than the pad, but we have been thinking
hard about this and we want now to give you less and
less holding your hand. What we're gonna do
is we're gonna get an acceptably cool
looking pattern where we're just going to create a single pad and we're
gonna place it along here. But we're really wanting
to reinforce this to you that if you want to add
more beyond what we're doing, you should be at a point
where you can do that, where you can sculpt
additional patterns. We also very much
would like to see any screenshots are
pictures that we can kind of look at
critique because we really want some main reactive
engagement on all of this, because this is about where
we start to graduate you to your own creativity going
beyond the course's concept. So let's go ahead and get
started with the shell. So to begin with, I'm going to go ahead and
go through and first off, make sure all my sub tools
are arranged appropriately. So we've got a chest folder. Let's bring in any
excess gribble in here. That way. That's
all taken care of. And it looks like we
have a little bit of a stray of disproportion
in our geometry. I'm just going to fix that
with the quick mirror weld. Like I said, this is nothing
more than a base mesh, so it's not like the absolute crux of
essential things here. Now that we have
that, let's just go ahead and go through sub tool and we do it so many times
we append a primitive. How many times now it's like our first tool that we ever use. With that said, we can
choose any kind we want. So I'm going to go with, as always, my cue. I'll select that cube. I'll just scale this guy down. Maybe scale them in. I could 0 mesh at this point. But thinking I'm gonna
hold off just for now. Hold Shift control
and left-click up on top of here and get
our knife curved brush. And I'm just gonna give a
couple of divisions here. Turn SMT off, back on and then delete
the lower subdivisions. Now that we have that,
let's go ahead and take a look at what we
can do with this. I'm just looking at
all the opportunities, just going to finagle
and it have some fun with just kind of looking for
fun shapes in all of this. That's actually not too bad, but I think I prefer that
way a little bit more. That's a little bit more
turtle like we'll just go ahead and turn off X
and realign this again. Then I'll reset the orientation
by holding left option, left Alt and click on that
little circular square. Now, you can just go
ahead and if you want, you can add in just a little bit more to just kind of
bring it out a little good. Now at this point, you
can do a 0 measure. Just remember when you 0 mesh, if you get tearing or
anything like that, not a big deal. We can just go ahead and delete everything except the
top surface and do a dynamic subdivision off of
it and just do it that way. So let's just go ahead and hit Shift F. Let's go
through 0 measure. We know our settings at
this point, keep group. And we're going to
do adaptive size 0, smooth down to 0. We can kind of see the
looks that we get. Looks like this area right
here is one poly group. That's why kind of
collapsed then. So let's go ahead and see if we can do
something about that one. Now, let's go through poly
groups and group by normals. That should do just fine. Let's do 0 mesh one more time. It's a little bit cleaner, a little bit easier, a little bit uneven there. Let's see if we can go ahead and give a couple
more 0 measures on this. And one thing that I always, always find, that might
be why it's that way. Let's go back. Little tricky one, right there. Looks like we missed
something here. Isn't this fun,
something so simple. Now, fix that. Let's try this. Let's go ahead and
go to the bottom. Culprit been found. Looks like the group by
normals didn't do much. I should have gone
to a lower setting. You can do that though. We can go through poly groups, group by normals to 27, see if we can get
everything we need. Looks like that, did it?
Yep. Poly group on each end. Make sure there's one there. Yep. Alright, let's play
again three times the charm. Again. If you get something that is a little
bit off-putting, either try to, then
the best thing to do, and it's just simply
hit Delete Hidden. Then go through and
get a nice clean mesh. Even go through and
see if I can flatten this out with clip. One. I normally do curves sort of my take my time on this one. Let's go on and off. We'll go through now dynamic
subdivision, turn that on. Rules are that it's 0. And let's do some thickness. Let's see if we can get
something that's clean. We do have something
that's clean. So let's hit Apply, get some group poly
groups on there. And now what should have
taken a longer time, had to go through a
whole process in. But it's good because
this actually tells us in 0 measure is never going
to have work a 100% for us. We have to have backups to help us out and getting
everything that we need. Are dealing with
a fun day to day. One. I am wondering sometimes if I have people that are watching this
having similar problems, we go, I'll poly group to
separate everything. Beautiful. So now we got our shape. Let's just go ahead
and do some creasing on these little fellows here. And let's just go
ahead and do that. Crease poly groups. We divide this a
couple of times. It should hold its edge, which is what we want. Now that we have all
of that taken care of, we can do some testing here. Let's go through sub
tool and duplicate this, will turn this off. For now, I'm going to disable the visibility of
everything that we have. Now. If you haven't done this
already and you have to read, download your sci-fi Boolean. Go on ahead and do so. But what I'm gonna do now is I'm going to make
this into two parts. One is going to have
the sci-fi boolean on the bottom and then
we're gonna have a different plate on the top. This is a little bit
different than what we did before where it was
micro poly mesh. So I'll append and bring
in a sci-fi Boolean. And bring that in. We remember how to do
our sci-fi Boolean. We go to Live Boolean and we
enabled the sub tool to be a Boolean by clicking in that center and we can
hit Shift Up to see it. And let's just scale this out. Like so. We have ourselves
a little green piece. Make Boolean, like so. Then append that new piece on. Right there. Let's turn off
the two existing pieces. Don't forget you
duplicated that twice now. Now we're going to
center the piece. Let's go back to
our original piece. I'm thinking I'll make
this piece thinner. Maybe. Go as much to sail bevel it, which requires me to delete my Subdivisions a little bit, then give it a
couple of divisions. Let's keep it like this for now. Do our bevel, this kind of looking at this right now and just finding sort of like
a little happy spot. Don't forget you're
holding control and you're doing the bubble. Sometimes a lot of people
get stuck with them. Now that we have
that taken care of, we just have a couple of
more things to do and just simple things like going
through our knife curve, going into its
secondary function and turning that brush size down. Do a couple of practice swings. Work. We'll do maybe
a slant like that, and then do a modified
topology mirror weld. I think we did it on
the other side though. So let's that's because
we're facing backwards here. Now I just have
to decide whether or not I want this on
the top of the bottom. I think I'm gonna
have it like that. Then. Last but not least, let's go to a bend arc. I'm just going to
bend this guy out. Just simple. This one's simple,
using similar concepts. And then finally go through
and do a plainer cut. So that's comma and brush. Planar. Planar cuts are hardest
brush to practice with, but it's our funniest
one to practice with. Those for me. Kind of see, we kind of got a little bit of that size of this
down and try again. Beautiful. Now that
that's taken care of, we can do whatever we want. Now, if you want to add any
extra pieces and you can, we can also scale it in like so. You can do that. Not to be a rocket scientist
science on this one. Just going to be you just
having fun with your piece. I'm going to go ahead
and bend arc this hip, except don't be afraid to do anything
you want to do on here. If you are wanting
to do something like something similar to this, maybe you want to do
an extender on here just to have some fun again
and explore some shapes. Definitely go for it
we're reaching now the point where you
should feel very, very comfortable at this point with whatever you want to do. Including just kinda going through do something
like that even now, right now I'm kind of going outside of this and this is sort of the I wasn't planning
on doing this part, but I can just do
this to help give you some ideas for you
if you want to. Like, let us see that. This is just nothing
more than examples of things that we want you to
kind of get practiced with. Want you to get acquainted with the
the mirror weld. The idea of practicing
with 9th curve. Even in the smallest of
areas like right here. That was kind of when you
get that invert like that. It's probably because you're
holding down left Alt, which is an easy habit to get into when you're
in secondary mode. So try not to do that. This mirror weld this again. Man, I keep doing
that. It's a habit. I'm just doing this simply
to kind of once again, experiment to show like these are the things you can do to experiment with your geometry. Don't worry about it being
symmetrical because again, symmetry sometimes
when symmetry does this kind of deal where we're intersecting
to the other side? The knife cut doesn't
work very well. Kind of keep that in mind. Again, on and on. I want you to just feel free to break out of this in any way. You want to start
really start hitting into practicing techniques,
practicing patterns. Practice understanding
that we do mirror and weld on this particular
scenario because secondary mode doesn't
work very well. We didn't mirror on weld because when we did
the primary mode, because of the fact
that when you do knife curve brush intersecting
into the other side, it has some wonky results. So we have rules that
we have to oblige into. Kinda keep that in
mind. If you want. Also don't constrain yourself
just to the knife curve, get in there, have some fun
with the other brushes. Maybe you want to
do something with this piece and start to
forming it along here. It's now getting
to a point where we do less and less
and it becomes more about you and what you want
to do for this whole turtle. Because it's very, very
essential that you practice and grow beyond the
concepts that I teach you. Because that's the only
way you can learn, is if you're growing. That said, just going to go ahead and just do a couple
more fun things on here. Then I'm going to
turn it over to you. Now once you have your
flat panel piece. We'll have the next lesson. We're gonna go ahead and do a
sort of how shall I say it? Like a placement is what
I wanted to go with. Just sort of like we're
going to go ahead and duplicate these pieces across. And just simply go through
and do one piece at a time and place it throughout the shell that we can
have a little fun. Then again, this is all
stuff from using one. This is just, for example, an example of what I mean also like just
having a little fun, just doing your own thing. Maybe you want to make it a
little bit thinner or make it go in there, you can do that. No. Nothing wrong with that is
just it's all about you. You can take what we
did in the first arm. You remember the split split
two parts idea that you had where we did where sorry that I had that when
we did the arm, we did all these
split cut tools. While if you split apart, you're going to have
a sub tool for here. In a sub tool for here, you can 0 match that and then do some beveling right here. Or you can go with z model or edge loops
and do some extruding. The possibilities are
constantly endless and that's what we have to
get through to you. Is that the possibilities
keep on getting endless. With that said, once you're
done with everything, go ahead and merge all this into one sub tool and we'll see
you in the next video.
33. Adding Shell Sculpts to Turtle: Okay, welcome back. In this video now we're
going to continue on with making our peace and doing some placement with it and
trying to see if we can find some good locations
for all of this to be a little bit
easier for the shell. Now, a little heads
up here that if you have something that's a very high poly count and you're gonna be
duplicating that. You may want to either a, go through the process of making sure you have this
deformed exactly as you want and go through and
decimate this down as we did when we copy the arm all the
way over to the other side, you might want to do
something like that. Another thing that
you can do is is that you can just
leave it as is. And then when the
time comes for you to go through and combine
it all into one mesh. You can kind of merge it all down into one
singular piece. You can always do that. Just kind of be a little bit on the wear of all these things. We have to be modular in
trying to keep this clean. So I'm just going
to go ahead and I think for now I'm just
going to keep as is. And then I'll go
through and merge these because they got
a feeling that as I'm going through all this, I'm going to probably run
into a lot of scenarios where I'm going to need
to move this around. And if you have a decimated, it's just going to kind
of fight against you. So I don't want to really
have to deal with that. I will just for now hold on, hold off on decimation
and maybe just do decimating all this mesh
down as it goes through. But that is what I'm gonna do. So let's go through
and I'm going to duplicate the sub tool. Bring it up here. Just repeat the whole
process like that. Maybe find not afraid to go
through and maybe just rotated around
just to kind of see. There's anything interesting
to look for here. Little bit. I'll just
keep it like this. Then just bring it in like so. Do it a little bit
more like that. I'm going to hit B
Empty Moved topology and see if we can mess around with moving the topology of just the underlining pieces
that are underneath. That way it kind of sinks
in a little bit more. Then I'll just go ahead and scale this guy up
a little bit more. Actually, one thing I
might do is just bring him forward and then bring
this guy forward. So do that. Just see, I'm just taking
my time and this is also a little bit off different
from the original concept. That's okay. Let's
duplicate them again. This is going to, like I said, this is going to drive
up your poly count. So be ready to go through
decimation master under z plugins and go ahead and decimate this down once
you have everything placed. If it gets a little too choppy, turn the visuals off on
everything. That way. You can kind of work through. Just one thing here. Get some frame
rate of this down. I'll even scale this up. We'll do that one more time. Duplicate. Bring the guy. Maybe since this is
the bottom piece, I can get a little creative and maybe do something
where I can just kind of go through and maybe do a taper at the bottom so it kind of pinches
off a little bit. Again. Nothing wrong with that. Now we got something that
looks a little bit more of the mesh that we
originally started with. Now that that's the case, we cannot go through and
just sort of repeat, rinse and repeat this by duplicating it
to the other side. Now, of course, this
piece here can probably just wrap around right here. Not sure for wanna
do move topology. I'd just might want
to do the basic move because I'm just moving
that individual part. Like to move
everything as a whole. Duplicate this guy. Just sort of Pete the pattern. This is just sort of a, it's just you taking your time, making sure it all lines up. It's a good practice for practicing your
Gizmo, deformers. The move, rotate and
translate, or the Scale. Gizmo. I'm just
holding left Alt, left-click switching
back and forth between different,
various sub tools. Just do that maybe
couple more times or maybe keep them like that. We can just sort of see
how the pattern goes and we don't have to replace this and go through
the whole process. Again. We can just simply, once we get one side, we can just simply mirror
it over to the other side. So once said that this
has to be too hard. I might even do some tapering for the bottom and that's probably
another reason why we don't want to decimate before doing all this
is because decimation is going to put us
into a situation where we're reducing
the geometry. So because it's
reducing the geometry, we're going to see essentially tears in
like resolution tears everywhere on the mesh. It's kind of hard to describe. You'd have to decimate a mesh to know exactly what I'm saying. Decimate a mesh and
then sculpt on it to know exactly what
it is in referring to. Now we're getting closer
towards the end here. We can just go to bring this in. And this can also be like another cool
looking pad as well. It's kinda neat. Like it's look. Gonna go over we're above. More importantly, it's a good moment to quit save here. Like that extruding now. So let's just go ahead
and bring that guy and a little bit more depth to that. Like that. Let's go
ahead and keep going. Duplicate that. This is a good place to once again antiquated yourself into bend arc in case anything
gets out of place here. Let's go ahead and
turn on the arm so we can kind of see
in retrospect where everything is because
I don't want to be duplicating things that
we're not going to see. Go ahead just a little bit more. We're almost done with this. Looking to terrible looking. Remember, this is
just one piece. If you feel that you want
to do something more, or if you feel like
you would like to, like right here it's a
little bit odd silhouettes so we can just kind
of break that out. If you feel you want
to make variations. For example. Like a good example would be taking the centerpiece here and making another
centerpiece and not making that strip there
and just making that strip either exclusive just
to these three areas. You can definitely do
something like that. Sexually, something I may push for doing down
the road here. See, it's just a
working progress. It's just something we got to be a little bit sensitive to. And of course you
can always just be empty move topology and see
what just kind of go through and see just what
something looks like when you kind of go about Moving of
meshes out like that and just give yourself an idea of what something
looks like here. Because again, moved apology
moves different parts. Now, at this point, just go ahead and go
to your Move brush, that's BMG and left Alt, left-click and just
sort of go throughout all of these to
kind of like look for areas here and maybe just kinda give
it a little bit of a peek and look for areas here. Like this area right here
is an intersecting area. So I'm going to have
to actually rework a little bit of
this around it to either be above
the shoulder piece or below it so that it
deforms in some way. Another thing that we can do is like we haven't
done this one yet. We can do a twist to former, where we can just kind of
make it twist like that. And then see if we can get that to work its way around
the shoulder mesh. Twisting is a little
bit more how I would say complicated and a little
bit more challenging to get. B. Be careful with it, take your time and
have patients with it. That's pretty much
how that looks like. It's straight though. Just thinking. Not that bad, just
like that though. I think I might just
leave it like that. But another thing you can do is. This would definitely be a nice little hard surface piece. Go into solo. Nice little hard surface
piece that we can actually save if you would like to
save and then add more. So let's just put that
in my part section. You can see potential
like I'm recruiting. Now. Some of you that
are more experienced, My come to the conclusion that this is similar to kick
bashing and it is actually, but we're kind of
doing a little bit of a beginner's basic
because we don't want to, we want you to kind of, um, while it can be used as kip bashing if they're
your first pieces, I don't really recommend you actually save them permanently. I recommend you get
more and more practice. This is all about practicing
techniques in ZBrush. So now that you have
everything taken care of, what you're going to
do is you're going to duplicate this piece, deformation and hit mirror. And you're going to mirror just about
everything that you've done onto the other side. Again, duplicate that's
Control Shift D if you want, as it says right there. But I kind of prefer
having the visual cues. And again, you're gonna see the polygon count
definitely goes up. So once you are done
with all of this, go through and we'll
do one together. Go through each shell and duplicate our go
through Z plugins, preprocess current, and
then decimate current on each sub tool that
of these shelves. Just go ahead and do that one. So I think that's just about it. Now that we have that,
I'll give you an example. If I left Alt,
left-click on here, I'll hold Shift left-click. Bring this to the very bottom. We're gonna go through. And you got to, like I said, make sure you're done
with everything. As far as this goes. You're gonna go
through Z plugin, decimation, master
preprocess current. Let it analyze the mesh and it'll give you a
quick little turnout. Then we go through and hit decimate current and you'll
see that sign go down. And then after that I'd
call it a new folder shell. Then we're gonna go
through and then just to repeat the whole
process with all of these. That said, that's our
shell piece. Not too bad. It's pretty much a
enjoyable thing. Like I said, I don't
want you to be too hung up on design of
one spectrum area. Like for example, this is the
only as far as I took it. But if I was wanting to, I could take this
ten times farther. If i1 like, for example, I could make a
different pattern here, or maybe I can
make overarches of plates that kind of
go segmented like three horizontal arch
segments that go across each place I can keep going and going and
going and going. Because that's just
what we want you to realize is that you can keep going and going
and going and going. And as you do that, you're gonna learn
more and more and more and get better and
better and better through it. So these deformers, these Trim cut techniques of the primary,
secondary functions, the Boolean features,
how we combine all those three
width 0 measure to get clean babbling techniques
or Z model or techniques. All of that is used to drive out shapes and explore
different shapes so that they can be
stored in your mind. So when you do it
again next time, it just comes to you like that. With that said, we're
going to now move on into the next piece, which is going to be the head section and
have some fun with that. So with that said, stick
around and stay tuned. Here's a little BPR render.
34. Adding and Detailing Eyes: Hey, welcome back. Now that we've finished everything that we
were going to do in our character for
hard surface sculpting, we thought we'd have a little
bit of fun with the head, just give it a little
bit of character to it by showing a little
bit of poly painting. Now again, very important. This course is a hard
surface sculpting course. And that the base mesh
you were given was kind of like a prelude to help establish and practice are hard surface
sculpting techniques to. So again, this course is about hard surface
sculpting techniques. This is all basically extra
fun stuff that we're doing. It's not like a character course or character ZBrush
character creation course. I have another course
specifically for that. This is all about getting you to learn hard surface sculpting. So we're just going to
have a little bit of fun with this guy and just
give them a little bit of personality so that we can just kind of give you a
nice little send off. So I'm just going to keep
things simple for the beginner. Our first off, I'm just going
to simply append a sphere. And we're gonna go to
the bottom of that guy. And I'm just going
to divide that until it looks
completely smooth and go through geometry
and delete it. I'll move this up
a little bit more. And like we always done
hold Shift control, we're gonna do knife curve. And I'm just going to cut
all the way across like so. Just as we've always done, let's go ahead and
0 mesh that with our typical Z remeasure
start off settings. Again, this is all just, just having fun basically, that's all this is. It's just something that we want to do as a fun little
send off for you. Just to have a little
bit of fun to give it a little extra pop and
personality as well. That let's take a look. Yeah, that's two poly
groups, they look similar, but now I'm going to divide that a few times
and I'll delete the lower. These guys are going to
serve a little bit as a fun little group
for our eyelids. First things first I'm
going to go through sub tool and I'm
going to duplicate this guy just in case because I always like
duplicating new meshes. Let's just bring
this in like so. And bring them in, scale them down because
this is going to be like a lower eyelid that we're gonna have a little bit
of fun with here. Just going to, now
all I'd say is that just have some fun
with the move tool and craft your own unique
interpretation of a fine here. C, have a fairly clean
curvature on it. Again, we might just
circle around this. Like so. Then we'll duplicate this, go through Deformation
Mirror that went across. Maybe a little bit. Maybe do some asymmetry on here. One is bigger than the other. Just having a little bit of fun. Next. One in feel free again to
pause this anytime you want just to kind of do your
own interpretation. Now after we do that, let's go all the way back here. They like to just
have so much fun. Once we do that, if we shift
left-click onto our head, I want you to go ahead and
go through sub tool and go split two parts. And it's going to
divide up our mouth, eyes, and head into three
sub tools typically. And so go ahead and start
with finding the eyes. Now, once you're
on that sub tool, let's go ahead and
color those in by first signing a material to it. Let's click on our
material and let's look for toy plastic. We're going to look
for toy plus YC. Where would that be at? Let's find our cylinder smart
materials, toy plastic. Now to assign that to it, everything changes to that. But to assign it to a, two things have to happen. First, you have to
make sure you hit M or M. Rgb probably would
be the better choice. And then go through color
and hit Fill object. Now that you have that, let's just go ahead and go back. Let's just go ahead and
switch this to RGB. And let's just switch
this the black, like so. Just turn all z. Go through quite a few
settings for them. Now that you have all
of that taken care of, Let's go ahead and talk
about the color here. Now I first off would start off by going through and
finding your brush, standard brush or hit BST. I changed the stroke to free. And then I change
the setting to RGB, which means you're just
affecting the color channel. Finally, I would turn off Ziad and make sure you don't
have any alphas enabled. And when you do that, you should finally end
with selecting your color. Now, notice that everything
turns to that color. If you do that. Again, two, That's because all these other pieces don't
have any assignment to them. So for example, let's go
ahead and go back up. We shift left-click to this. This doesn't have
like a color signs, so we can just go ahead
and just hit RGB and just hit color fill
object or I'm sorry, Let's go ahead and
go through mapped. Then M RGB. Now we're assigning the material and we're assigning
the color to it. So now when we switch it around, it's not
going to change. So let's do that real quick. Let's go through the eyelids. Do the same thing. Color, fill object,
do it one more time. Color, fill object. Now, once we've done that, I don't know why my
visibility on my eyelids. You can kind of see
that everything has now changed to be the
same except the eyes. That's because again,
the other ones we assigned a mat two. And with the, while we continued to stay
on key with this piece. So we assign the basic
material to Matt with M RGB, and we also assign
the color white. We assign the basic material to Matt and the color white, again, doing all of that with fill object as we did
originally with this, which was toy plastic and white with M RGB and
color hit White. Like I said, just take a moment. It takes a little practice. But the nice thing is now, once we go through, things will obviously
stay the same. Well, let's just go ahead
and go through color, the logic one more time. Get back into our eye. Now we can add some
color to this. Now the reason it
looks like this is because we have M RGB because we're assigning a mat material of basic and I don't
want to do that. I just want to assign
the color. Now. We have that nice little sheen. All I wanted to do. Just want to just kind of making little
tiny circles here. Have a deer in the
headlights look, or you can have
your own looking. I, I think quite frankly, the shape of the
eyelid is probably the most important part
in all of this. Let's go. Maybe break turquoise. Go, something like that. Maybe just Polly painting handled a little bit
of fun with this. And that's all. Mean, very gentle
and very subtle. And I've been holding left-click
down on this whole time. Then just go ahead
and maybe go with something like this, like that. But I'm curious to see
what full black would do. We want to have a
little bit of a deer in the headlights look like? I'm not really sure
about any of this. Not too sure if this is a
good idea to come up here. Now. So take your time, have a little fun
with the shape. Again. The one thing
I will say with character design of
cartoon characters is that the shape of the eyelid probably constitutes as the most
influential shape of all. Sorry, the influential piece of expression for
cartoon characters. And also like a little bit
higher might look like crazy, a little bit swollen, may look like he's been beaten. There's a lot that can
be done with a shape. Again, the eyebrows are
probably also saying, saying you can take your time
just moving this around. Like so. Let me be even angle the shape a
little bit more like this. We might even want to have
some fun with the mouth. It's just kinda want you to find a little bit of an
experiment out of all of this. Just have some fun. That's all I can tell
you is have some fun. Kind of like the
default like that. Now that we have that
till taken care of, the next thing we're gonna do is we're gonna work on
maybe putting a little bit of cloth around the guys
instead so that he has a little bit of an astronaut
looking at helmet on. So with that said, stick
around and stay tuned.
35. Making Cloth Hood: Welcome back. In this video, we're
going to continue on where we left off and
we're going to finish off our head by
making some cloth around him in a helmet
to go around him. For our courageous
space astronaut turtle, This will be pretty easy to do. It's just the step-by-step. So what we're gonna do
first is, is in this video, it's gonna be about the cloth that kind of goes
around the hedge, sort of like a
partial cloth belt. The customize this turtle so that he can sort of
three the little bit. So to do this, let's just go ahead
and first off, just go through and go into solo mode to get this section. I'm gonna hold down
control and select circle for masking options. And then I'm just going
to kind of mask a piece off and just see how
that looks for now. I'm just going to be
taken a couple of practice swings with it. Maybe something like that. Just got to kind of look
at that and just kinda see how much real estate of the
cloth I want to see on here. Maybe something I can
risk, Something like that. I'm not afraid to go through and do this
a couple of times. Maybe I want the
band appear to be visibly seen a bit
more. I could see that. What I'll do is,
is then I'll hit Control W to turn that
into a poly group. And as we see, we have multiple,
multiple poly groups. But one thing I want you
to do is don't ship down because that's going to ruin the nice little clean
line that you have. Keep it always on the top
resolution the moment you have a poly group made and then
just go through Geometry, modify Topology and delete, hit R, I'm sorry,
geometry delete lower. And now that we have
two poly groups, Let's go under edge loops. And I'm going to isolate, select one edge loop and
kind of invert this. I'm going to put some
group loops on there. Now that we have some group
loops on there and we have a little bit of
a cleaner divide, if you will, just to make this a little
bit easier for us. Now if we see we have a little bit
more of a cleaner line. Let's get this now to kind of look and expand a
little bit more out. And we can do this several ways. But I'm just going to kind of do my own little interpretation where I'm holding Control
left-click to soften it, Control Alt to
really sharpen it. So it's sort of like that. Then I'll go down
through to deformation. I'm just going to
just experiment to see if we can do
something with inflating. As you can see, it
kind of gives us a little bit of a
bump and that's okay. I'm just going to now hold shift and take a couple of strokes and kinda smooth it out
like so afterwards. So I'm just going to go
ahead and go and hit B&B. Bring this. Well, I'm thinking I'll bring
this in a little bit. Actually bring this forward. So I'm going to want to
do something like that. We want to bring it in a
little bit more and then I'm gonna hold shift again
to round that out. Then hold left doll to, of, taper this out. Then I'm gonna hold shift to constantly move
that out like so. And then maybe inflate
just a little bit more. Just to kind of get
something going and get the ball rolling for us. Just left Alt and just
making my piece. Like so. We have something
that is fairly like, like a little bit like a
thick cloth a little bit. Then maybe if you want to do
the bottom in the same way, you can certainly
do that as well. I kind of was against the idea of doing it that way because I liked the idea of not
having a mask on there. I could do it that
way because again, the mouth is a
separate mesh cell. I'm just going to
repeat the same steps. Go through, make
a mask on there. There are two masks,
so the geometry. And then I'll go through
group loops, multiple subs. Try that again. Group loops, mask that piece out. Now let's go to cleaner mesh. Hold controlled,
soften the mask, sharpen, do it the
other direction. There we go. Now we're just going to inflate this through
deformation. Start with. In flight. Then move
it up a little bit. Give it a little bit
more of a punch. Hold Shift to smooth it out. A little pinch, won't flake
that a bit more like so. So now we've got something a
little bit more like that. So we're almost done. All we need to do now is
we need to get this into its own sub tool because we
want to do a little bit of a micro mesh on here. So this is a poly group. Let's hold Shift Control
left-click to isolate select. Let's just drag a mask
over all of this, like so. Then hold Shift Control in empty space is left-click
to bring everything back. Let's go through split. And we're going to go Split Mask now that pieces its own piece. Now that we have that, one thing we can do is is
I'm going to use micro mesh. And I like using micro mesh
with a lower poly count. And I can't reconstruct my subdivisions since I
put edge loops on there. So we're just going to
simply go through 0 measure. And maybe just, I'll start off with something default
with the symmetry on. I didn't turn any poly groups on because there isn't any
Something like that. Something clean is okay with me. Let's do a couple more. Let's kind of didn't lose our
silhouette to launch delay. Alright, so now
that we have that, let's go ahead and go through dynamic subdivision
and turn that on. And let's turn on
poly micro mesh. Now, don't forget
subdivision division is 0. And I'm kind of looking
through all these thinking. I'm a little prone to just simply do like just
kind of a cycle through kind of shop
for what piece I want to mean I can
do thick cloth. I would say the
best bet is to kind of go through and just simply just simply go through and just look for
what works best for you. There's definitely if there's one thing I can say no
right or wrong answer, It's just what kind of fits
for a good synthetic piece. One kind of works a little bit, but it does bring up a pretty good point about
one thing and that is that kind of see a little bit
of debiting in all of this. I might turn micro
mesh little bit off. Just do it like that. I'm just going to go ahead and just say screw it and not just shop around for what I want. Let's see, let's
see a good piece. Let's find a good piece. That's kind of a
cool looking piece. Well, if we needed a night, this would definitely line
up just right for us. Certainly isn't enough looking chain mail pieces out here. I kind of link that kind of like that look a little bit, but I think we can do
a little bit better. That looks fairly synthetic. And I'm just going through
one also looks here. The closest we've got. I think so clop one is one
that I might keep a ion killed took I think
I like bumps. Most of all. Probably bumped three. That's probably the one. Okay. So let's just go ahead and change the scaling
down on this one. And then maybe turn
that off just a little bit so we can give it a subdivision and try
them one more time. Alright. That's probably
going to be my mesh, my cloth space
cloth looking mesh. So I'll just go
ahead and hit Apply. Good time to hit quick safe. And if you want, then it's just a
matter of reapplying the same concept as you did for where we're holding
Shift left-click, holding down mask over
and then going to split masked sub tool that you
have this piece here. And you have this piece here. Now you can just go
through geometry. Think I want to
solve one piece now. Geometry, we can do a cloth. First off we go, we need
clean edge flow topology for our micro mesh
to work fairly well. Let's see, that's fairly clean. Now I'll just bring it
down a little bit lower. Now, same thing as before. Let's go through and
give it one subdivision. And then we're just going
to go through Dynamics, subdivision rinse and repeat
with smooth subdivision, turned off, micro
poly turned on. And then we're looking
for something to match similar to
what we had before. I believe it was the bump piece. Look like it
actually shows here. Are those three. There we go. We've got something that's
a little bit more there. All right, Then we'll
just hit Apply. All right, So that concludes getting the cloth
section of this done. If there's anything
more you want to do before you go
on to the helmet, you can, for example, this is bonus extra
credit ideas. It's not just about
following the course, It's about having the ideas
and the concept done. Maybe you want to go
through spare parts and take this piece right
here and maybe just duplicate it and go Shift
left-click down and have this function as some sort
of a prelude to an earpiece. You remember how we did some of the earlier stuff down here, and we went through
our iterations. We had fun with finding something with the
taper or the extender. Where are we kind of went
with a deal like let's see, deal like here. Then going from here to taper. You can go, are going from here to something similar to
what you did before. You can definitely have
some fun with that. Maybe you want to just like make a little earpiece and
then Habit reach around. I can give a good idea. Go with here. We can do something that's either taper where we then
just kinda go through, makes some sort of It's a little bit of a kind of
like an ear plug piece. From here to here. Go from here into the dark. Except it down. You can, this is just again, giving you those ideas to be creative. Probably go with that one. Then we'll just go. To make my point. You can kind of have this guy like as your
earpiece right here. Since Ben dark
screws up our taper, we can readjust this by
doing instead of bend arc, we can do something
like Ben curve. Maybe put them in, then have our slink into it. Then maybe if you want, you can then just
have fun making like a little bit of a reach around
wire that has a headphone. That is something also
that can be done. And I hope quite frankly you
are thinking about doing so. Like for example,
I can hit Append. And we'll go into this
piece right here. You want to make it a little bit mechanical with the extender. To have some fun with
that can certainly do so. Give it a couple of
subdivisions since it's so low, delete lower. Then finally, maybe you want
to have a little bit of a microphone or something
fun with the like. Just to put at the very end. We said we were gonna do the cloth but I
couldn't help myself. I just had to just have a
little bit of fun on this. Oops. Accidentally
hit to save geometry. Delete the lower subdivisions
and you can see it's just all kinda fun
looking shape. Kind of see how it just kind of plays into part right here. Now if we take this law
whole piece right here, I'm thinking that
might actually work. Let's just go ahead and
combine these two pieces. Will hit Merge. We did more
than we were supposed to do. That's okay. Cancel. Let's
go back to this guy here. We want to make sure this
is something we can edit. So I'm making it one poly groups so I can isolate, select, and mask off that
one piece and invert the mask selection merged down. Okay. I couldn't help it. You can just have ourselves
a little fun piece to bring in like an extra
profit before we move on into the final piece. Okay, so maybe you want to
just do something like that? Certainly. Okay. Just make sure you're having
a lot of fun with that. Said we're going to go ahead
now and work on trying to get a helmet that kind of
goes around this guy so we can finish up what we're doing here with our courageous, brave astronauts space turtle. So with that said, stick
around and stay tuned.
36. Creating Helmet and Rendering: Okay, welcome back. In this final video now we're just going to make
our helmet and we're gonna show you some real
quick ways and we're even a land you a challenge
for the helmet that is meant to be very
thematic to what we have been really stressing throughout the whole video,
the whole course. And that is for you to
grow beyond the course, grow beyond the concepts,
surpass the concept. We're going to go ahead
and give you an outline start and then you go beyond
it and add your own details, patterns, slats,
planar, cup brushes, Booleans, micro poly meshes. You have to now grow beyond
the concept and make your own design so that something can be
obtained through all that. So with that said, let's just get started now
we're gonna make a helmet. And this helmet is going to just start off with going to append. And we're just going to
make a sphere in place. We'll bring that
sphere up like so. I'll just go ahead
and bring him right around there. Just for now. Little big but oh, well, from here, I want you to go undergo some look for
your solo button. And it's all my quick
key button right here. And I'm gonna make sure the
face is looking this way. And I'm going to hit the X key. Don't get local symmetry
if you need to. Now let's just turn Shift F off that a couple
of divides like so. Then let's go through
geometry, delete lower, and then I'm going
to turn that head sideways because it's hard to know which point
of view that is, we're using our head
as a reference. If you're still lost, you can always just
go out of solo and make sure this is the point of view you're supposed to be. Now, hold down Control and I
want you to try and choose four drag rectangle
and now hold down Control and just drag
a nice little spot, carve out a nice little
spot in empty space. Maybe something like it
doesn't have to be too far, but maybe something like that. Then hold down control and
change rectangle to curve. And now we're going
to use a mask by holding down Control
and drawing a mask. Don't forget your
space-bar trick. Hold left alter-ego subtractive. You should be able to subtract
some of that mask off. Do the same thing over here. Like so. And I think I
did it the wrong way. Like so. You can now make
the eye make this a little bit higher so that we can see a little bit more
of the face on here. But one thing I do like
to do is I like to well, first off, when a hold shift up, if you can see
everything's masked, I'm going to turn that
now into a poly group. Hold Shift F to turn that off. Now let's hold Shift
left-click control just to make that disappear. And what I'm doing
is going back into solo mode and making
sure everything is visible on the face and kind of aligning the face up
to make sure it's all looking like I can
visibly see everything. So in this case, you can't really tell when you can't see the back face calling. Let's go through display
properties and turn on double that way that's a
little bit easier for me. Might just move this back. And we might just
move this forward. We might just move this down. I'm thinking, you know
what I'm thinking? I'm thinking could risk a
little more real estate to look for the chin a little
bit more because it kind of like having to see his
lower chin a little bit. Kind of Xen back, going back into my solo mode. This time around. We're going to z back into here. This time I'm just going to
kind of essentially just trying to drag a good amount of masking in here to give
me the best view port, if you will, of the face and the lower body
because I want to be able to see the top of his hood in the head and I want to
be able to see as chin. Let's see how that looks
a little bit better. Let's go down a little bit more. Back a little bit more. It's got a little bit easier. I think the top button is
probably gonna be my best. It's maybe something
like that and maybe just lining it all up and just trying to
find the right spot. Just sort of an iterative
process to look for all this. Once I do all that, I'm gonna be alright with just sort of something
like that to go with sort of view taking your
time with placement here. Alright, so I'll go back
into solo mode now. This time I'm going to kind
of undo what I did here. Everything was fine. Now what I'm going to do is after I've found all
the places I want, I'm going to then go in. You got to make
sure your geometry and delete lower is taken out. We're gonna put some
group loops in there now. That's going to be under
edge loop, group loops. And I am going to choose
three on this one. And that's going to put
some nice clean little group loops right around there. Then from here I'm
going to hold Shift left-click control. And I'm going to isolate, select this piece,
hold down control, change back into my rectangle, drag a mask over if chip left-click control
to bring everything back, invert the piece back. So we now have these
nice clean lines and all the group
loops are also masked. Let's go ahead and
do Isolate, Select. And now let's go down to panel loops under edge
loops within geometry. So don't forget to make
sure double is off. And first we'll do double. Make sure double is on. I'm sorry, not off. We're going to just go ahead and hit panel loops to
see what we get. Now this looks like the default, and it looks fairly good, but I want to get something
a little bit thicker, so I'm going to turn it
up just a little bit. I'm just Xen back and hitting Undo going forward,
hitting undo. I think I like
this one the most. I can work with that one. What I'll do next is I will
then just go through and simply might go a
little bit thinner. Indecisive me. All right, so once you have what you want, Let's go ahead and
we're going to separate the mass piece
into two sub tools. So first things first, let's go ahead and
do split mass point. And you should get
this piece if you have a little ripples that
are going on here, I'll just go ahead and go
through either deformation. Polished by features
are polished. Blake groups try either one, but I kinda like Polish by
features a little bit more. And that's sometimes helps
clean up everything. And you can try
Polish by groups, but sometimes I get a little
bit of an issue with them. That actually was just fine. It's cleaned up a
little bit more. Now that we have all
of that taken care of, The only thing left
is I'm going to hold Shift Control and turn my
knife curb brushed out. And I'm going to go into hold Shift Control Spacebar
to go into secondary mode. And this is gonna be the
last times we use it. Then just going to
draw out some slots. I think I'm actually going
to keep it like this. Because unlike can see
the bottom and I'll like losing
everything like that. Now that we have
that taken care of, Let's go ahead and hit W
center the pivot point. Let's work with extender here. And now let's just go ahead
and kinda drag out a piece. And then if we want,
we can go ahead and find our corner white cone, which we have to
kind of drag around find will have ourselves a little bit of a
piece right there. You got to go through and
make it wider. Gone ahead. Afterwards you're
going to hit Accept, bring back solo mode and
scale this back in. Like so. See if you can even move
it forward a little bit. So it's intersecting in. Now that that's taken care of. Now, from this point on, you can go ahead and do
a whole bunch of things, maybe work with plainer cut. That's your assignment is
working with the Booleans, working with ideas
that you worked with, with the chess piece on how
you carved out these patterns you can work on and try to
do that same thing here. This is where you
begin to experiment. That said, what we're gonna do next is we're gonna
go into sub tool. We're going to go ahead and hit new folder and call that helmet. And then we're going
to drive our drag our globe in here as well. Now, when we do that, let's go ahead and
turn off the globe. Now, let's keep it
on Transpose set. Let's just bring the sun hits. Now that we have all that. And let's go ahead and do a transpose set and
click on there. Now that we have all these
things taken care of. One thing that has
been bugging me already has been
that deformation. English, my features. I just kinda wanna have
to have to clean that up. Alright, so now that we have
all that taken care of, now that that's taken care of, we need to make this little
globe here a transparency. So what we'll do is we'll go
down to display properties. We're going to turn on
under BPR settings, transparent shading, BPR
transparent shading. Now I'm gonna turn
this down to 60. Now we're not done yet. We need to assign a good material because this
is going to look like a flax looking glass
with basic material. So let's go with reflected
maps, smart material. And remember how we did
it before with the eye, we just turn on the map
while we did I'm RGB, but we just need to do
material this time. Then let's just go through
color and say fill object. Now I'm just going to
go into this right here and just do a quick little
renders, see what we get. As you can see, we got ourselves a nice-looking
piece here. He's now all rendered out. It looks pretty cool.
It looks alright. I might even make
some adjustments on here, like for example, the adjustment of the chin
a little bit. As such. Now remember, this is all been entirely about learning hard surface
sculpting techniques. Okay, So what that
means specifically is that you were meant to use this base mesh to develop
your and practice your skill sets of things
like the knife curve brush, primarily the Z remeasure
and the deformer. These three things in
conjunction with each other can flush out all these
different pieces. And the supportive features and ZBrush like dynamic thickness. Let's see There's a clip curve, trend art or things like that. Edge loop crease poly groups. Those are all
supportive features, panel loops like we just did. Those are all supportive
features to help accentuate and combining with
those three primary ZBrush, hard surface sculpting features, even z modeler, we did a
little bit of with beveling. With that said, I hope you
got something out of this. I really do. I really had a lot of fun working
with Yana all of this. If there is anything else
you want me to teach, go over in ZBrush. Please don't hesitate
to ask again. This is all been entirely a hard surface
sculpting technique course. To develop your hard
surface sculpting skills. It's not technically a
character creation course, although one could
argue it is, it's not. With that said. I
hope you enjoyed it. And as always, keep sculpting.
 Sean Fowler, 3D Instructor