Transcripts
1. Intro: You don't need to buy a text animation preset pack
for tons of money, even if you have never
touched After Effects or any other animation program
before and just about 1 h, you will be able to create
all of these animations and suddenly make your
very own preset pack. Hi, I'm Marcus, and I
started creating videos for YouTube more than
ten years ago in 2012, when I was still
going to school, which in the end led to me studying media and
computer science. And here I am ten years later creating a course
about texts animation. When my very first
YouTube intro back in 2012 looked like this. Yeah, it was downloaded from some random preset page and
it looked absolutely awful. In this course, we will cover the very basics
of After Effects. And I absolutely
mean it when I say, you will be able to
follow this course, even if you have never
touched After Effects before, it would be beneficial
if you knew your weight around Premier Pro at
least a little bit. But that is also more of a nice-to-have and not a definitive requirement
for this course, we will cover every single step from the basics
of after effects, the basics of texts
animation up until the creation of your very own texts animation preset pack, which in the end you will
be able to use directly in Premier Pro to enhance your videos with modern
text animations. I am really excited to share all my knowledge
with you because I would have loved to
know all of this already when I
started back in 2012, because if I did,
my intro probably wouldn't have looked half
as bad as it actually did. So let's get started. I hope to see all of
you over in the course.
2. Class Orientation: Hi, welcome to the course. Our class project
will be to create our very own texts
animation preset pack. So the only thing you need
to follow this class is, well, Adobe After Effects. But since you click
on a course that's specifically mentioned
After Effects in the title, I guess you probably
figured that out already. That's it. You don't
need anything else. And even if you have never
touched After Effects before, you will be able to
follow this course. I would highly suggest though, that you don't just watch this course for the
sake of watching it, but that you actually open After Effects and
play around with it between the lessons to actually try out the things I'm
about to teach you. In the first two lessons,
we are going to cover the very basics of after effects and the very
basics of animation. So what is the composition? How to create one? What
does a keyframe do? And so on, that we're
actually going to start with texts
animation, again, cover the basics first and then create some beautiful
animations together. And towards the end, I
will show you how to export these
animations to create your very own texts animation preset pack that you can use
directly in Premier Pro. So if you follow the
course until the end, you will end up with a text
animation preset that you can then extend further to include all of your
favorite animations. Now, I would say, let's
not waste any more time and actually get going with
our very first lesson.
3. Getting started with After Effects: Alright, before we actually get into the nitty-gritty
of text animation, there are some basics we need to cover because as promised, we'll be able to
follow this course even if you have never touched After Effects or even any other
animation program before. So if you already have
some experience and you already know what
all of these words mean, then you are allowed to
skip this lesson and already proceed to the next
one. You're still here. All right, Then
let's get started. When you first open
up After Effects, this is what you are
going to be greeted with. In fact, that is the light. The very first thing you're
going to see is this. I've already gone ahead and
click on New Project because I feel like that's step is
kinda self-explanatory. Alright, what do we have here? As you can see, our
window is divided basically into four main areas. On the left here, we
have the project window. This is where we will
gather all of our assets. So we could, for example, import some video footage if
we wanted to animate that, or we could import
some graphics. This is also where we'll
find our compositions, but I'll get to all
of that in a bit. Basically, the project,
we know it works like any other file browser you most likely already know from
your operating systems, such as the Explorer on Windows
or the Pinder on MacOS. So you can create
folders, sub-folders, rename things,
move stuff around, and overall just
structure your assets. And I know this is a
very boring thing to do, but I highly suggest to keep your projects structured because otherwise you'll end
up searching that one graphic that you
are sure you import it, but you just forgot
the file name. Trust me, I've been
there. It's not fun. Right next to the
project window, we have our composition window. This is where we will actually see what we're currently doing. And it works basically like
any other media player. So if I were to
import, I don't know, for example, Star Wars, then you could watch Star Wars. And here, down here
we have our timeline. And this one is
actually a bit more complex than your
standard timeline. You might know from
your media player, especially since
we're working with a layered approach
in After Effects. So down here, we will be able to stack our different
layers onto each other. You can think of in the same way as if you were
stacking some papers. If, for example, I worked as a green paper on
top of a red paper, then it would cover up
some parts of the red one. And over here, our last of the four windows
has a bunch of different segments that contain a bunch of different settings, such as, for example, this one called
effects in presets, which contains well
Effects and Presets. We will be using some of
those windows, not all, but I'm going to explain them as soon as we actually need them. Alright, I've already talked
about compositions twice. First, when I said that those compositions will be
saved in the project window. And then again, when I call this window the
composition window. But what the ****
is a composition? You can think of a composition as a container for
your final video. So each composition consists
of a timeline where we can actually compose our
different elements to create our final video. So our very first step is
that we're going to need to create a new composition by clicking on this
button down here. By doing so, this new
window pops up where we can adjust some settings
for our new composition, we will leave most of
this is the only thing. You might want to change out the composition size where we can define the pixel dimensions, the height and the width
of our final video. And down here, arc length, we will go with the pixel
size of 384164 now, which is exactly four
K and the length of 20 s. If you're working on
a somewhat weaker machine, you could of course
reduce this, for example, to full HD since working
with work a footage, of course always a bit much
to handle for your computer. And before we actually click Okay to finally create
our composition, we first want to give it a
name because to put it in the words of the very awesome After Effects
YouTuber Ben Mario, we always label our layers. With that being said,
we click on Okay, and we have our very
first composition. So to summarize, we have four main areas
in After Effects. The project window, the
composition window, the timeline, and an area with
a bunch of other settings. And the most important object in your After Effects project or your compositions
which are essentially a wrapper for your
individual animations
4. Fundamentals of Animation in After Effects: Hi, Welcome back. Now, in the last lesson, we created our very first
composition together, but it's still very empty. So let's populate it with
our very first object. To do so, we'll select our shape tool up here
and just drag and hold on are still blank canvas to create our very first rectangle. And as you can
see, this not only created a rectangle appear
in our composition window, but it also created
our very first layer down here in the timeline. This new layer has a bunch
of different properties. The most basic ones being those that you can find
here under transform. So as you might've
guessed, if we, for example, change
our rotation property, then our rectangle
will be rotated to whatever well,
we've inserted, okay, but how do we actually
animate those properties now, to do that, we need a
so-called keyframe. A keyframe is basically the main building block
for any animation. And it describes
three properties. What, when, and the Bellevue
sounds a bit complicated. I'll give you an example. Let's say we want to
animate the position of our rectangle that already
answers the what question. Because what we
want to animate is the position of a
rectangle for the win. We'll just choose the
1 s mark for now. And the value in this case
is where we want to have it, since we are animating
the position tonight, actually add our
very first keyframe, we just click on this
small stopwatch icon left to the property
we want to animate. And as you can see over
here in the timeline, this small diamond
shape appeared, which is exactly what I was
talking about the whole time. It's our very first keyframe. Now, with a single keyframe, there is no animation yet. We need at least a second one. So we move our timeline to, I don't know, let's say 5 s. And then we move
our rectangle to our desired position at
5 s. Congratulations, you've just created your
very first animation. Because if we hit
Play now to that, a rectangle is actually
moving left to right. Because by telling After
Effects that we want to have the rectangle
on the left at 1 s and to the right at 5 s. After Effects is now
automatically calculating everything between the one
and the five second mark to move our rectangle from the
first to our second keyframe. And that's basically animation. Thanks for attending my
course. I'm just kidding. We're not done yet. If you have another look at the simple animation
we just created, you might realize that
it is a bit choppy. It very suddenly
starts moving and it also very suddenly
stops moving again. That is due to the
fact that what we created is in fact
a linear animation. There is even a way
to visualize that because if we click
on this icon up here, we can open the
so-called Graph Editor. If we now again select
our position property, precisely see what After Effects calculated for our animation
for the y property, there is actually
no change at all, since we're only moving
from left to right. But for the x property, we can see that it
suddenly starts moving and then it also suddenly
stops moving again. To make that a bit smoother, we can just select
both our keyframes and press F9 on our keyboard. This will automatically
apply something called easing the keyframes, which as you can see, it just means that our animation is not as abrupt anymore, but we'll slowly start moving them gets a little faster just to then slow again before fully stopping at the
five second mark. Using the graph editor, we could actually adjust the easing exactly to our liking and exactly control the speed of our animation to how
every we want to have it. But in most cases, just automatically applying the auto easing by pressing F9, we'll create a decent
results, okay? Okay, Okay, I hear
you're complaining. This is a course about
texts animation. We are to lessons and we have not even created a
single texts so far. Don't worry, we'll get to
that in the next lesson. Let's quickly recap though. We learned what a keyframe is. It describes what,
when, and it felt you. We also briefly learned
about the graph editor, but mainly you what
easing is and how to apply automatic
easing to our keyframes. So give it a go and
play around with some keyframes before we dive into text animation
in the next lesson
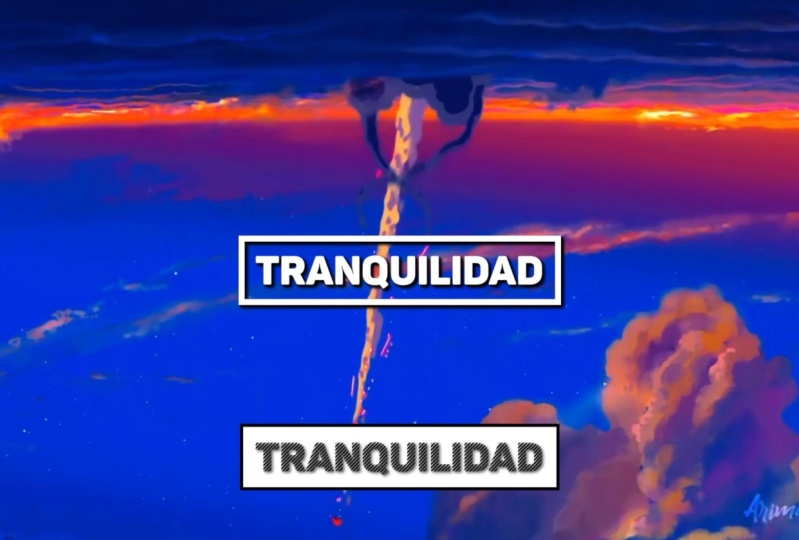
5. Introduction to Text Animation: All right folks, welcome
to the next lesson. In this lesson, we're finally
getting to the good stuff, which is of course
next animation. Don't worry if you're a bit
nervous because there's always risk starting
from the very beginning. I've already gone ahead and
deleted our sample rectangle. So the very first
thing we're gonna do now is adding some texts. To do that, we'll
select the Text tool from the toolbar and just click on our
composition window to create a new text layer. You can then type in whatever
text you want and format it however you like using the options in the
character panel, I would assume that you know how that voice from your
favorite Office program. Okay, so now we have some texts, but how do we
actually animate it? Well, let's create our very
first simple but elegant, faint in animation, which will look like this once
we're finished, because this animation is
actually very, very simple, We will only be animating the position and the
opacity of our texts. So just as we learned
in the last lesson, we could open the
transform properties of our texts layer down here. But let's advance
even that a little bit because we can
immediately opened the position property
by selecting our text layer and then
pressing the letter P. Now we do basically the same thing we did
in the last lesson. We create a first keyframe for which we moved the
text down a little. We go a couple of
frames forward, which we can do by clicking on the next frame
button up here. By the way, we create our second keyframe for which
we move the texts back up. Then we press on the letter T, which will close the
position property and open the opacity property. Instead, we create a keyframe
again at 100 per cent, go back to the start
of our composition and create a second keyframe
at zero per cent. Now, yet another shortcut, we press on the letter U. This will actually
open all properties on a layer that has
keyframes on them. So it's a very handy shortcut to find all of our
keyframes at once. And once again, just as we
learned in the last lesson, we select all of our
keyframes and press F9 to apply the auto
easing to our keyframes. And there we go. We have our very first pretty
text animation. I hope this makes up for me
not talking about texts at all and covering only some basics and the
first few lessons. Because with all those basics, this was actually very easy and a very quick process, right? But what if we want to go from this animation to
this animation? I mean, it is
basically the same. The only difference is that
for the second version, we target specific
words of our texts layer instead of the whole
texts layer at once. To achieve this, we need a
so-called text animator. So let's remove our initial
keyframes we created. And let's add a text
animator to our later by clicking on the
animator button here, the properties we want to animate are actually
exactly the same. Let's add an animator pull the position and another
one for the opacity. Now, without
creating a keyframe, let's set these two values to our initial state by moving
the text layer down by, let's say roughly 200 pixels. And let's set the
opacity to zero again. But Marcus, didn't
you tell us that we always need keyframes
to animate things? Indeed we do, but the keyframes need to be in a
different position this time because by setting the values on the
animator we just created, we are essentially telling After Effects from that
offset I just gave you, I want you to move back to your original state
and we can animate that moving back to its original state up here
in the range selector. If we expand this, you'll see another property
called Start here, which is currently set to zero. And if we start playing
around with this, well, you'll see
exactly what I mean. Because at zero per
cent or layer has the full offset we
put in at 100%, it fully converted back
to its original state. And as you can see as well, our animator is actually targeting each
character individually. So if you want to replicate the animation I
showed you earlier, we need to tell the
animator that we don't want it to target
individual characters, but individual words instead, we can do that by opening the Advanced section of
our range selector. And here we have this
drop-down that we can adjust from based on characters
to based on words instead. And as you can see, the range
selector suddenly does. We want it to do tonight? Actually create the animation. We still need to create our keyframes by clicking
on the stopwatch icon, moving a couple of
frames forward and then setting our start
value to 100 per cent. And once again, you know
what is coming now, we select our key
frames and press F9 to apply our other easing. And there we have it pretty cool texts animation
already, right? So what did we learn
in this lesson? We learned how to animate
some basic properties, but we also learned about the text animators and
about range selectors. And we even apply
that knowledge to create these basic
texts animation. So go ahead and play
around with it a little. Because with that
basic knowledge, you can actually create some pretty advanced
animations already
6. Creating Simple Text Animations: Alright, since you
now know about and understand the basics
around Keyframes, easing and text animators. I want to use this
lesson to actually create some different
text animations. Actually, these three
Textanimations to be precise, the process of creating
these will cover some more basics on how to
work with After Effects, such as, for example, masks. But we'll get to those as soon
as we actually need them. Okay, let's start with
our very first animation. And the very first
thing we're gonna do is create a composition. We once again set it to four K, which is 3.41, 60. We set it to 10 s, and we
call this composition track. Because once again, I have
to cite Ben Mary you, we always label our
layers and click on Okay, to create a composition than we grabbed the
Text tool once again, our sample text into
our composition. Now, the main
property we want to animate here is the
so-called tracking, which describes the distance
between our letters. Since there is no such property on our basic transform options, we Once again need to
utilize a text animator. So we click on animate
and then on tracking, which we'll add our
tracking animator. If we now slightly increase
the tracking amount, you can see this just moves
our characters further apart, which is exactly what we
want since in this case we don't want to target
one specific characters or one specific words. We're not going to touch the
range selector in this case, but we'll animate our
tracking amount directly. So, you know the drill, we create a keyframe
at, I don't know, let's say 30, move a couple of frames forward and
set it back to zero. Now, we want to
animate our texts. We don't want it to
suddenly appear. So once again, also animate the opacity will let it
start at zero per cent, move it back to 100%. I think you know how
that works by now. Now, there is one
more thing we want to do to add a little
more visual interests, which is scaling down
our text layer a little after we press S on our keyboard to open
the scale property, create a keyframe just at the position where our
tracking animation ended. Once again, move a couple
of frames for what and decrease the scale
to, let's say 90%. Then we press the shortcut again to see all Keyframes
we have on this layer, select all of them
and press F9 to apply our auto easing
Once again, there we go. Animation number one is done. That was pretty easy right? Now, let's continue
with this box reveal. The first step is
once again to create a new composition, same
settings as before. And we're going to
call this one box reveal that will create a
box with the rectangle tool, add another sample texts
with the Text tool. This time it should be
black line everything just the box size to
perfectly fit our text. What we'll be animating now is actually just the width
of our rectangle. To do that, we opened
our rectangle properties and specifically
the rectangle pack. Here we have the size
property which we can use to adjust the size
of our rectangle. The only problem is if we change either of the two values
for width and height, it will automatically also
adjust the other one. But we can easily fix that by clicking on this
small chain here, which will separate
the two bulbs. And what we're gonna do now, I'm pretty sure you guessed it will create some Keyframes. Let's move a couple
of frames forward, set a keyframe for the size, moved back to the style,
and set our width to zero. Then Once again, we
select our Keyframes and press F9 to apply
some auto easing. Now, this might look like we
already have what we want, but there still is one issue
which you'll be able to see if we overlay the animation
over some actual footage, because the black text
grows out of the box, which we obviously can't
see on a black background. But luckily, there
is once again, a quick fix for this. Unfortunately, that quick
fix currently is still hidden from us because there are two views for our timeline, which we can toggle by clicking
on the Toggle Switches, Modes button down here. After clicking that,
we suddenly have a new checkbox right
here with a small TI. If you hover over it, you can see it describes this feature as preserve, underlying
transparency. You can think of this somehow as a reverse cookie cutter probably because it just means if we
enable this for a layer, this layer will only
be displayed if there is something to
display it on top of. So as if we took the
bottom layers as a cookie and cut them
back through to the top. Okay, yeah, that's a
pretty bad analogy, but I think you hopefully
get what I mean. So if we enable this for our text layer than
our texts will only be shown if there is the box below which exactly
what we want. Let's get to Animation
number three. You know the drill, new
composition, same settings. And we call this one stroke box. And then we Once again create a new text layer with
some sample text. Now, you might think
that we're going to utilize a regular
rectangle for this again, but actually we won't, because what we're
going to use to realize this animation is an
effect called stroke. And the stroke
effect needs a mask, or more specifically, a
path that it is applied on. Now, what is a mask? A mask is somewhat similar to the cookie cutter we use
in the last animation. That it won't choose
which part of a layer to show based
on what's below, but based on whatever
shape you want to cut out. So actually this one is probably more of a cookie cutter
than the other one. Now, to create such a mask, we need to select our text layer and then choose
our rectangle tool again and draw a rectangle
while our text is selected. Now, this will not
create a new rectangle, but a mosque in the
shape of a rectangle. And as you can see, this mask
will only reveal everything that is within a rectangle
and cut everything else off. But how do we get
that stroke now, we just go into our Effects and Presets window and search
for the stroke effect. Drag that right onto
our text layer. By doing so, you might've
seen that here on the left, our Effects Controls popped up. These Effects Controls actually display the exact
same properties. We can also access directly
in the Layers window. So that's why I haven't
covered that window so far. And that's also why
we're going to ignore it for now and just use the
Layer window instead. So let's hop into the
Layers window and open our Effects properties and
below our stroke properties. As you can see, there are
a couple of properties, most of which I think are
pretty self-explanatory. By adjusting the color, we can adjust the color of our strokes by
adjusting the size, we can increase the width
of our stroke and you can just adjust all of these
exactly to your liking. The property we actually
care about for now that we actually want to animate
is the one being labeled. Because if we slightly
decrease that, you can see our stroke
actually gets a bit shorter. We can actually
do the same thing with the start property as well. This would just shorten our
path from the other side. Instead, we do with
the same as always, we create a keyframe on the end property with zero
per cent at the beginning, increasing to 100% at the end. And then we select
both are Keyframes and we press F9 to apply the auto using our stroke is being animated
the way we want it. But if you have a look at the animation we want to replicate, you'll see that the text
is also moving into frame. The problem is, if we try to do this animations using the position property
of our texts layer, actually move the
whole layer and thus our mask and
our stroke as well, which is not exactly
what we want. So you might have
guessed already, we're going to use a text
animator for that again. So we click on animate
at a text animator for the position opened
that animator and animate our position value, starting somewhere
out of the frame and moving back to
our initial position. And we also apply our
auto easing again. I guess you should know
how that works by now. We go, we just created three beautiful Textanimations
for it to be precise. Actually, five of them, since we already created these
ones in the last session. But how can we now actually use these in our video content? Well, we'll cover that
in the next lesson.
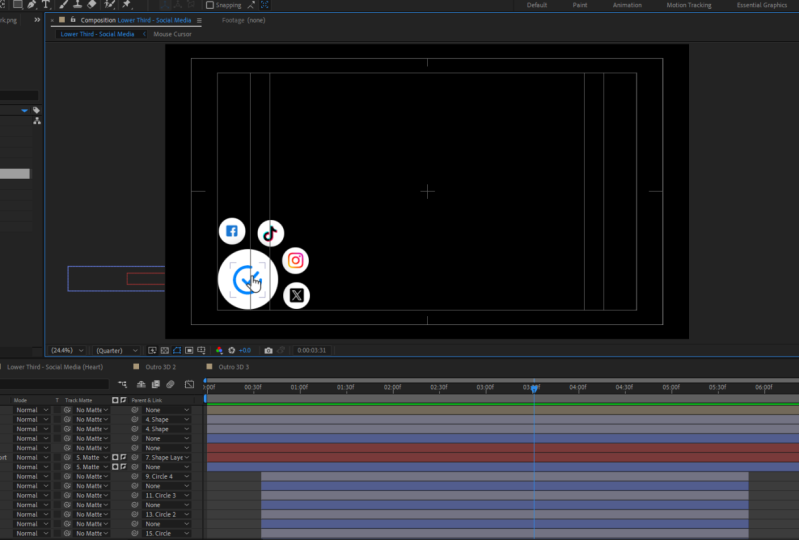
7. Integrating Text Animations: So in the last few sessions, we learned how to create, and we did create a couple of
different text animations. But how can we use
those animations with our actual footage to get those animations
into our actual, for example, social
media content. I'm going to show you two
different ways how to do this. Both of which have
their pros and cons. And the first one
I'm going to call the After Effects, right? For this version, we're going to import our video content into After Effects and overlay or animations directly
within After Effects. To do this, we can
actually just drag and drop our footage into
the project window. Now, my suggestion would be, if you choose this version, you'll either first cup your
final video in Premier Pro, export that video and then import that video
into After Effects to overlay your final animations
as the very last step. Or you choose your clips
that you want to have animations on directly
within Premiere, then right-click on those
clips and select the option to open that clip as an
After Effects composition. Either way, you will end up having your footage
that you want to put a text animation on
directly in After Effects. Now, if you opened
it from Premier, then after Effects will actually auto create your composition. If you import your
final rendered footage, that we still have to create
a new composition for it. But I'm pretty sure you
know how that works by now. I am going to show you
a little trick though, how we can speed that up when working with actual footage, because you can actually
just drag and drop your imported video file on the composition Create button. And After Effects
will automatically figure out the size and
length of your footage. And it will create a composition that will fit that perfectly. Now, we could of course, just create our text
animation we want to overlaid directly in this new composition
we just created. But there's actually
an easier way to do this because
we can just reuse our compositions
we created earlier and those into our
footage composition. So I'm just going to
drag and drop one of the animations we created
earlier onto our timeline. And as you can see, this
creates a new layer, which is in fact
just our animation. We can treat this layer
just as any other layer. So if for example, we're not happy with
the position of our animation and we
wanted to move it. We can just open
the transformation properties and move the layer. And if we wanted to adjust something within our animation, we could just double-click
on this layer, which takes us directly to the text animation composition. We can just adjust
everything as we wish. And as soon as we have all
the texts animations we want, we just rendered with
this big composition by clicking on composition, add to Adobe Media Encoder queue and then render everything
using the Media Encoder, which I assume you probably know from working with Premiere. Now, the advantage
of doing it this way is we still have
full control over our animation and we
can still tweak and adjust things to make it look
exactly the way we want. We could even leverage some other features
of After Effects. And for example, track our animation to follow
a specific movement on screen or to follow the
camera movement to make it look as if our animation
was floating in the air, the negative aspect
of this version, it can be a bit tedious
because we always have to open After Effects to
actually use our animation. Because there is
actually a way to make our texts
animation is usable by directly from within
Premiere Pro using a so-called motion
graphics template. And this brings us to
version number two, which I call the premier route. Now to create such a
motion graphics template, we first need to open the Essential Graphics
window and after effects, which we can do by clicking
on Window Essential Graphics. Now, the first thing
we have to do in this new window is to
select the composition. We want to turn into a
motion graphics template. Now, let's select, for example, our trek in animation
we created earlier. And let's also give our motion
graphics template name. We'll just call it the
same as our composition, which is track in. What we have to do now is
drag all properties we want to be able to edit in
Premiere into this window, the most important property for a text animation is probably the content
of our texts layer. Since I assume you
probably won't need a text animation saying
sample text that off. So we can make sure
we will be able to edit the text and
Premiere Pro by opening the text properties of
our layer and dragging our source texts property into the essential
graphics window. Now, you might not only want to adjust the content
of your texts, but probably also the font
being used or the font size. And we can make sure this
is possible by clicking on the Edit Properties
button and setting the checkmarks for an able
custom font selection, as well as enable
font size adjustment. And now you could
basically dragged and dropped nearly
any property of any of your layers into this window to make it
editable in Premiere. But for now we'll just keep
it at the text itself. So to actually export this
motion graphics template, we'll click on the
Export button. After Effects will tell us that we need to save our project. That is completely fine. Let's save it. Now,
in this window, we can select where to
actually save our template. Because what this Export button actually does is it creates a MOG RTF file that
contains our template. Mog RT is actually just short for motion
graphics template. Now this MOG RTF file needs to be put in
a specific folder. Premiere will then be able to read it and apply the animation. So by choosing the option
local templates folder after Effects will
actually put it automatically into
the correct folder so that premiere on the same
machine can read it, but you could of
course also choose the option local drive to save the file anywhere else
on your drive if, for example, you wanted to
share it with your whole team. So all of you have access
to the same animation. We will choose the
local templates folder for now though, and click, Okay, alright, now let's
switch over to Premier to see how we can actually
use this animation. Now, the first thing we
want to do in Premier is open the Essential
Graphics window, which we can do
again by clicking on Window Essential Graphics. Now, you can see there is already a ton of
different templates here. Those templates are actually
delivered with Premier, and you could also use some of those by dragging them
onto your timeline. But most of them
looks something like this beautiful animation, right? So let's switch back
to our browse tab and search for our track in
animation that we created. And let's drag that
onto our timeline. And there we go. That's our animation
directly in Premier. And we even have
the editing options we defined to adjust our text. So what did we learn? We learned about two
different ways to use your animations
with actual footage. First by importing your
footage into After Effects, and also the other way around by exporting your animations from After Effects into Premiere. So I would say, go ahead and create your most
favorite animations and export them to create your very own texts
animation preset pack
8. Conclusion: Congratulations everybody. You should now be able to create your very own texts,
animation principles, including all of your
favorite animations ready to use directly
in Premier Pro, we covered the very
basics of after effects, the very basics of
animation including what a keyframe is and how we use
them to create animations. How to ease our keyframes to
smooth and our animations to create texts and how to animate the text using
texts animators, we then apply that knowledge to create some actual
text animations and we export them as motion graphics templates to
be used in Premier Pro. In fact, you shouldn't only be able to create text
animations now, you should actually
be able to create all sorts of different
animations with After Effects. It's the basics we
covered in this course. Not only worked for
text animation, but are actually
the basics of After Effects for any
kind of animation. With texts animation,
we just dipped our toes into the big
borders of motion graphics, actually using the
key basics from this course and a
bit of practice, you could create animations
like this or this. So if there is one main thing to take away from this course, It's that all of
these animations and come down to just
a bunch of keyframes. I promised. In most cases, these animations look a lot more complicated than
they actually are. And I really can't wait to see all the amazing animations
you will create. Once you have them
ready, remember to upload them to
the projects and resources tab on the class page so I can actually see them. Thank you so, so much for
watching because even though I've been on YouTube
for more than ten years, this was actually the very first complete course I created. So I'm really looking forward
to all of your feedback. Be it good feedback,
which is awesome for pushing my ego,
or even better, some negative feedback
or some things I can improve to make the next
course even better. See you then
 Markus Vogel, Content Creator + FullStack Developer