Transcripts
1. Intro Watercolor Galaxy Bauble: Hello, I'm Nina, also
known as sicart. I'm watercolor artist
specializing in loose style, which means painting
without pencil sketch. And also, I'm art therapist. Welcome to my new
winter Watecala class, where we are going to paint some very special
Christmas card. We are going to paint
Christmas Galaxy bubble. So grab your materials, and let's dive into painting.
2. Materials: We come to the
class. Just prepare the materials which
you will need. That is watercolor paper. My one is 100 cotton paper, and the size is 14 by 19. Watercolor paints is the
colors which you like. You will need pink, bluish violet and indigo. Watercolor palette,
brushes, round ones, the ones which you usually
use for watercolors. So it could be size six, eight, and maybe number four
for tiny details. We will need an old toothbrush. And if you have metallic veins, also, that would be great. I will use as well,
white guash and water, two jars of water and salt for creating
beautiful effects. So prepare your materials and
let's dive into painting.
3. Watercolor Galaxy: Are you ready to
start our space trip? So let's start.
Prepare your paper. And with the help
of masking tape, I past have created a circle, have nearby salt that we will need it.
Prepare your colors. We will need some
kind of bluish, beautiful bluish,
pinkish colors, as well as some kind
of bluish, dark ones. No, and twilet. So I'm just dabbing with water. Different places
that we are going to use wet on wet technique, which means that our
paper is going to be wet, and we will be adding
quite diluted paint. Yep. Okay. So let's start. I will start with some kind
of beautiful pinkish colors. I can add a bit of
yellow in some areas. Different shade of pink and
as well, different blues. Violet. And a bit more of pink. And probably I will add
a bit of a mint colour. Also, if you have
some olive green, it could be beautiful. Also some kind of green shades. And here a bit of olive
green in some areas. And now let's switch to
darker shades that are going to be different
blues and violets. It could be also some indigo
on these kind of colors. And we are going to place
them closer to the border. Ly. Just choose those colors which you like,
which inspire you. And also, you need to
quick quite quickly because in these areas, we haven't placed water, so we need to connect quite smoothly that part where we have edded water and with
the one which is dry. So it's this one. And we can add a bit
of darker shade. That is Pain's
gray, for example. In my case, now I'm adding. And also, it could be indigo. For example, for here,
I will add a bit of oh. Depends on your paper.
If you see that, your paper get dry
quite quickly. Then make it wet
till the border. I haven't made it wet till the border because I like this, if it's dry that area, you can control
better so that it won't go out out
of this outline. But yeah, feel free
to make it wet first. If you see that your paper
gets dry quite quickly. So probably I will
add some more indigo, maybe for here so that to
connect and to make it a bit looks like space to add
this kind of space effect. And for here because
it's all violet. So let's add a bit of
indigo to make it darker. And then it would be also
beautiful contrast between these really light
areas and really dark. And by the way,
also, you can get this really beautiful
watercolor bleeds. So just play and have fun. I'm sure that your
galaxy bubbles also are going to
be so different, you know, like
people that for me, it's like, each person
is like a galaxy. And so this is also
the way how you can represent that the
person is a galaxy. And each galaxy has its
own the amount of stars, colors, character. No. Protection bleeds. Yeah, so I think that
while you are going to make to paint this
Christmas card, maybe keep in mind a person
for whom you are creating it. I sense so that it would be
that person is a galaxy, so that you are creating
a galaxy of that person. That could be really beautiful. And I think that also to show to another
person that how you see from outside that
like his or her universe. And now we will need salt. So have it prepared. And we are going to add. That would be really nice
to get some salty effect, and we are going
to add it just in those areas where
there is dark colors. So then salt will remove
some parts of pigment. And I really hope that
we will get some really beautiful like this
kind of dreamy, foggy effects. But let's see. Then there are also two options that you can leave or salt at least for a
while the way it is. Or you can use a hair dryer in order to
speed up a bizza process. But I would ask you
just several minutes, leave it the way it is. No. And also, you
see that some salt, it may be absorbed
quite quickly. So maybe you need also to know the moment when
you need to place it. It could be already
paper too dry. Like here, you can see that
my paper is already too dry. Okay, no, because I wanted to add something over
here a bit darker. But no, I think that I will leave it or maybe I
will add a bit of let. Yeah, that just check your work because your one could be different than my one. But I think that,
yeah, I would like to add a bit of let
so that it's here, it's really gray, blue, and here With violet, it could be really, really nice. And even here, I have dry paper. I can make it like this
to bleed make it smooth and wet This border where one part
interacts with another. And maybe over there, I can place a bit of blue. Yeah. I think that
is a good idea. So like this bit by bit dabbing and do
not get over excited. So here because this
is really relaxing and very interesting to observe
how the paints interact. So just know when the right moment when
you need to stop and just let it get dry. So see in the moment once
my work will get dry, and we'll see which
effects salt has created.
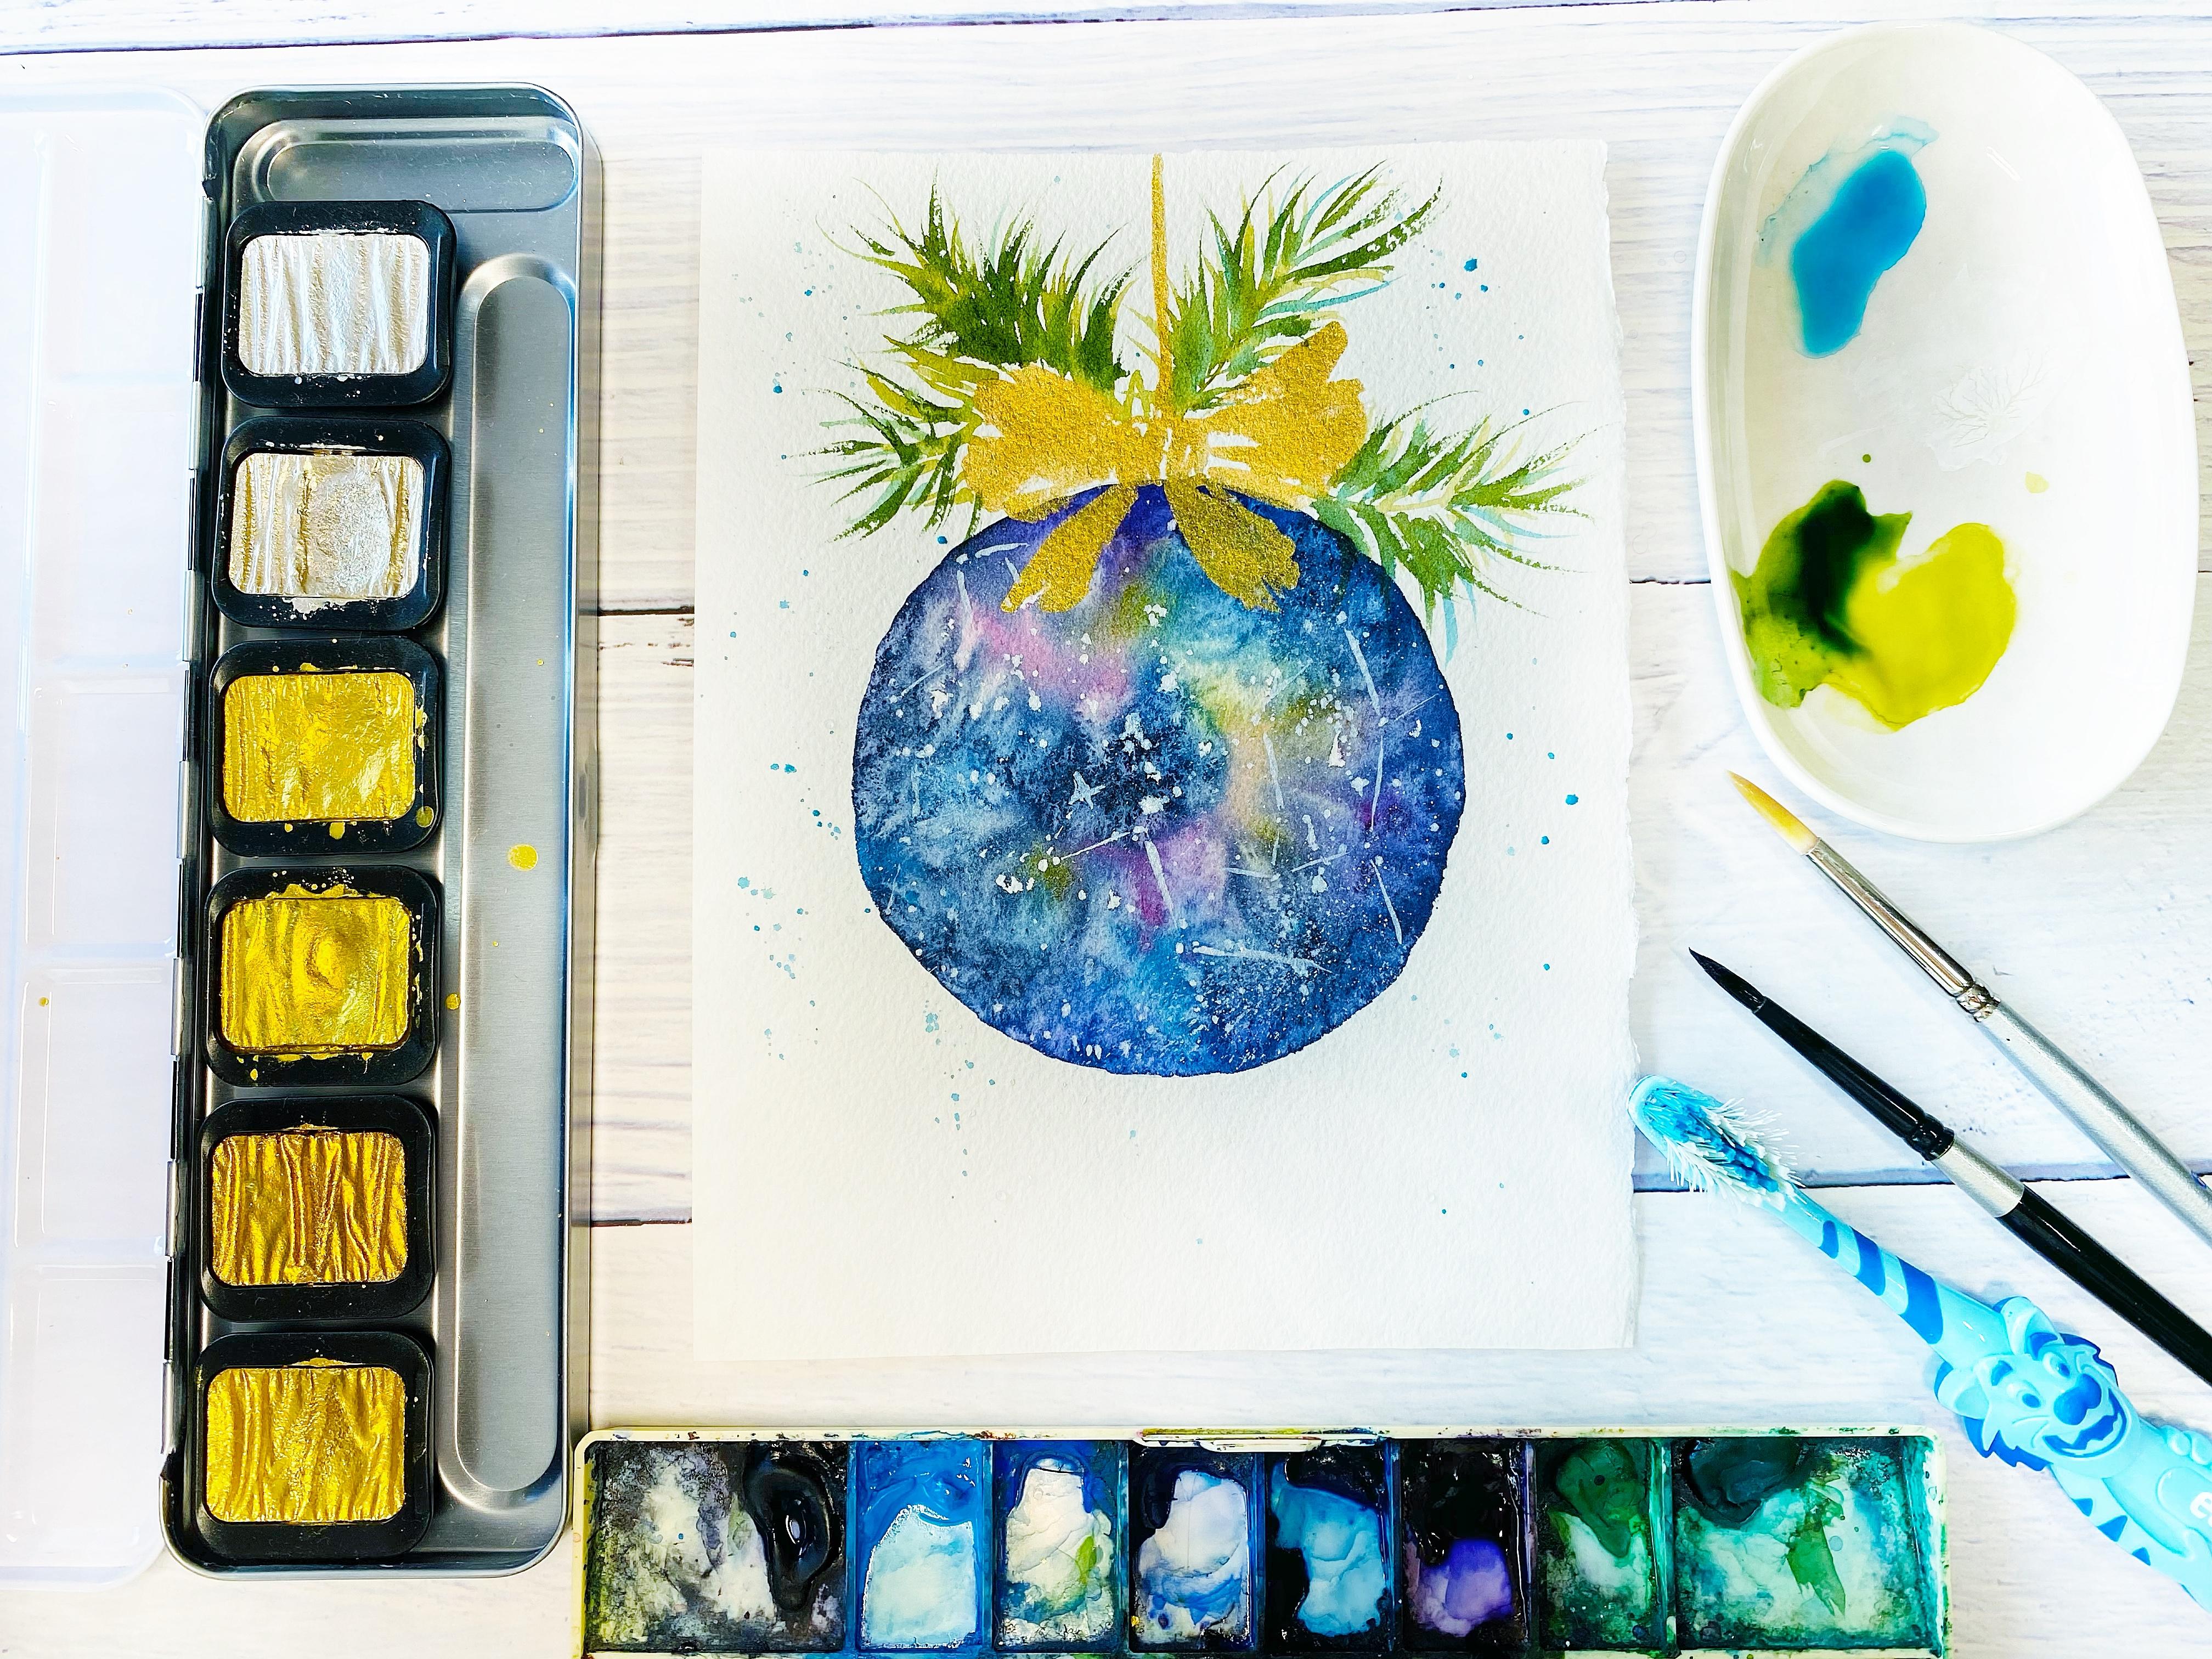
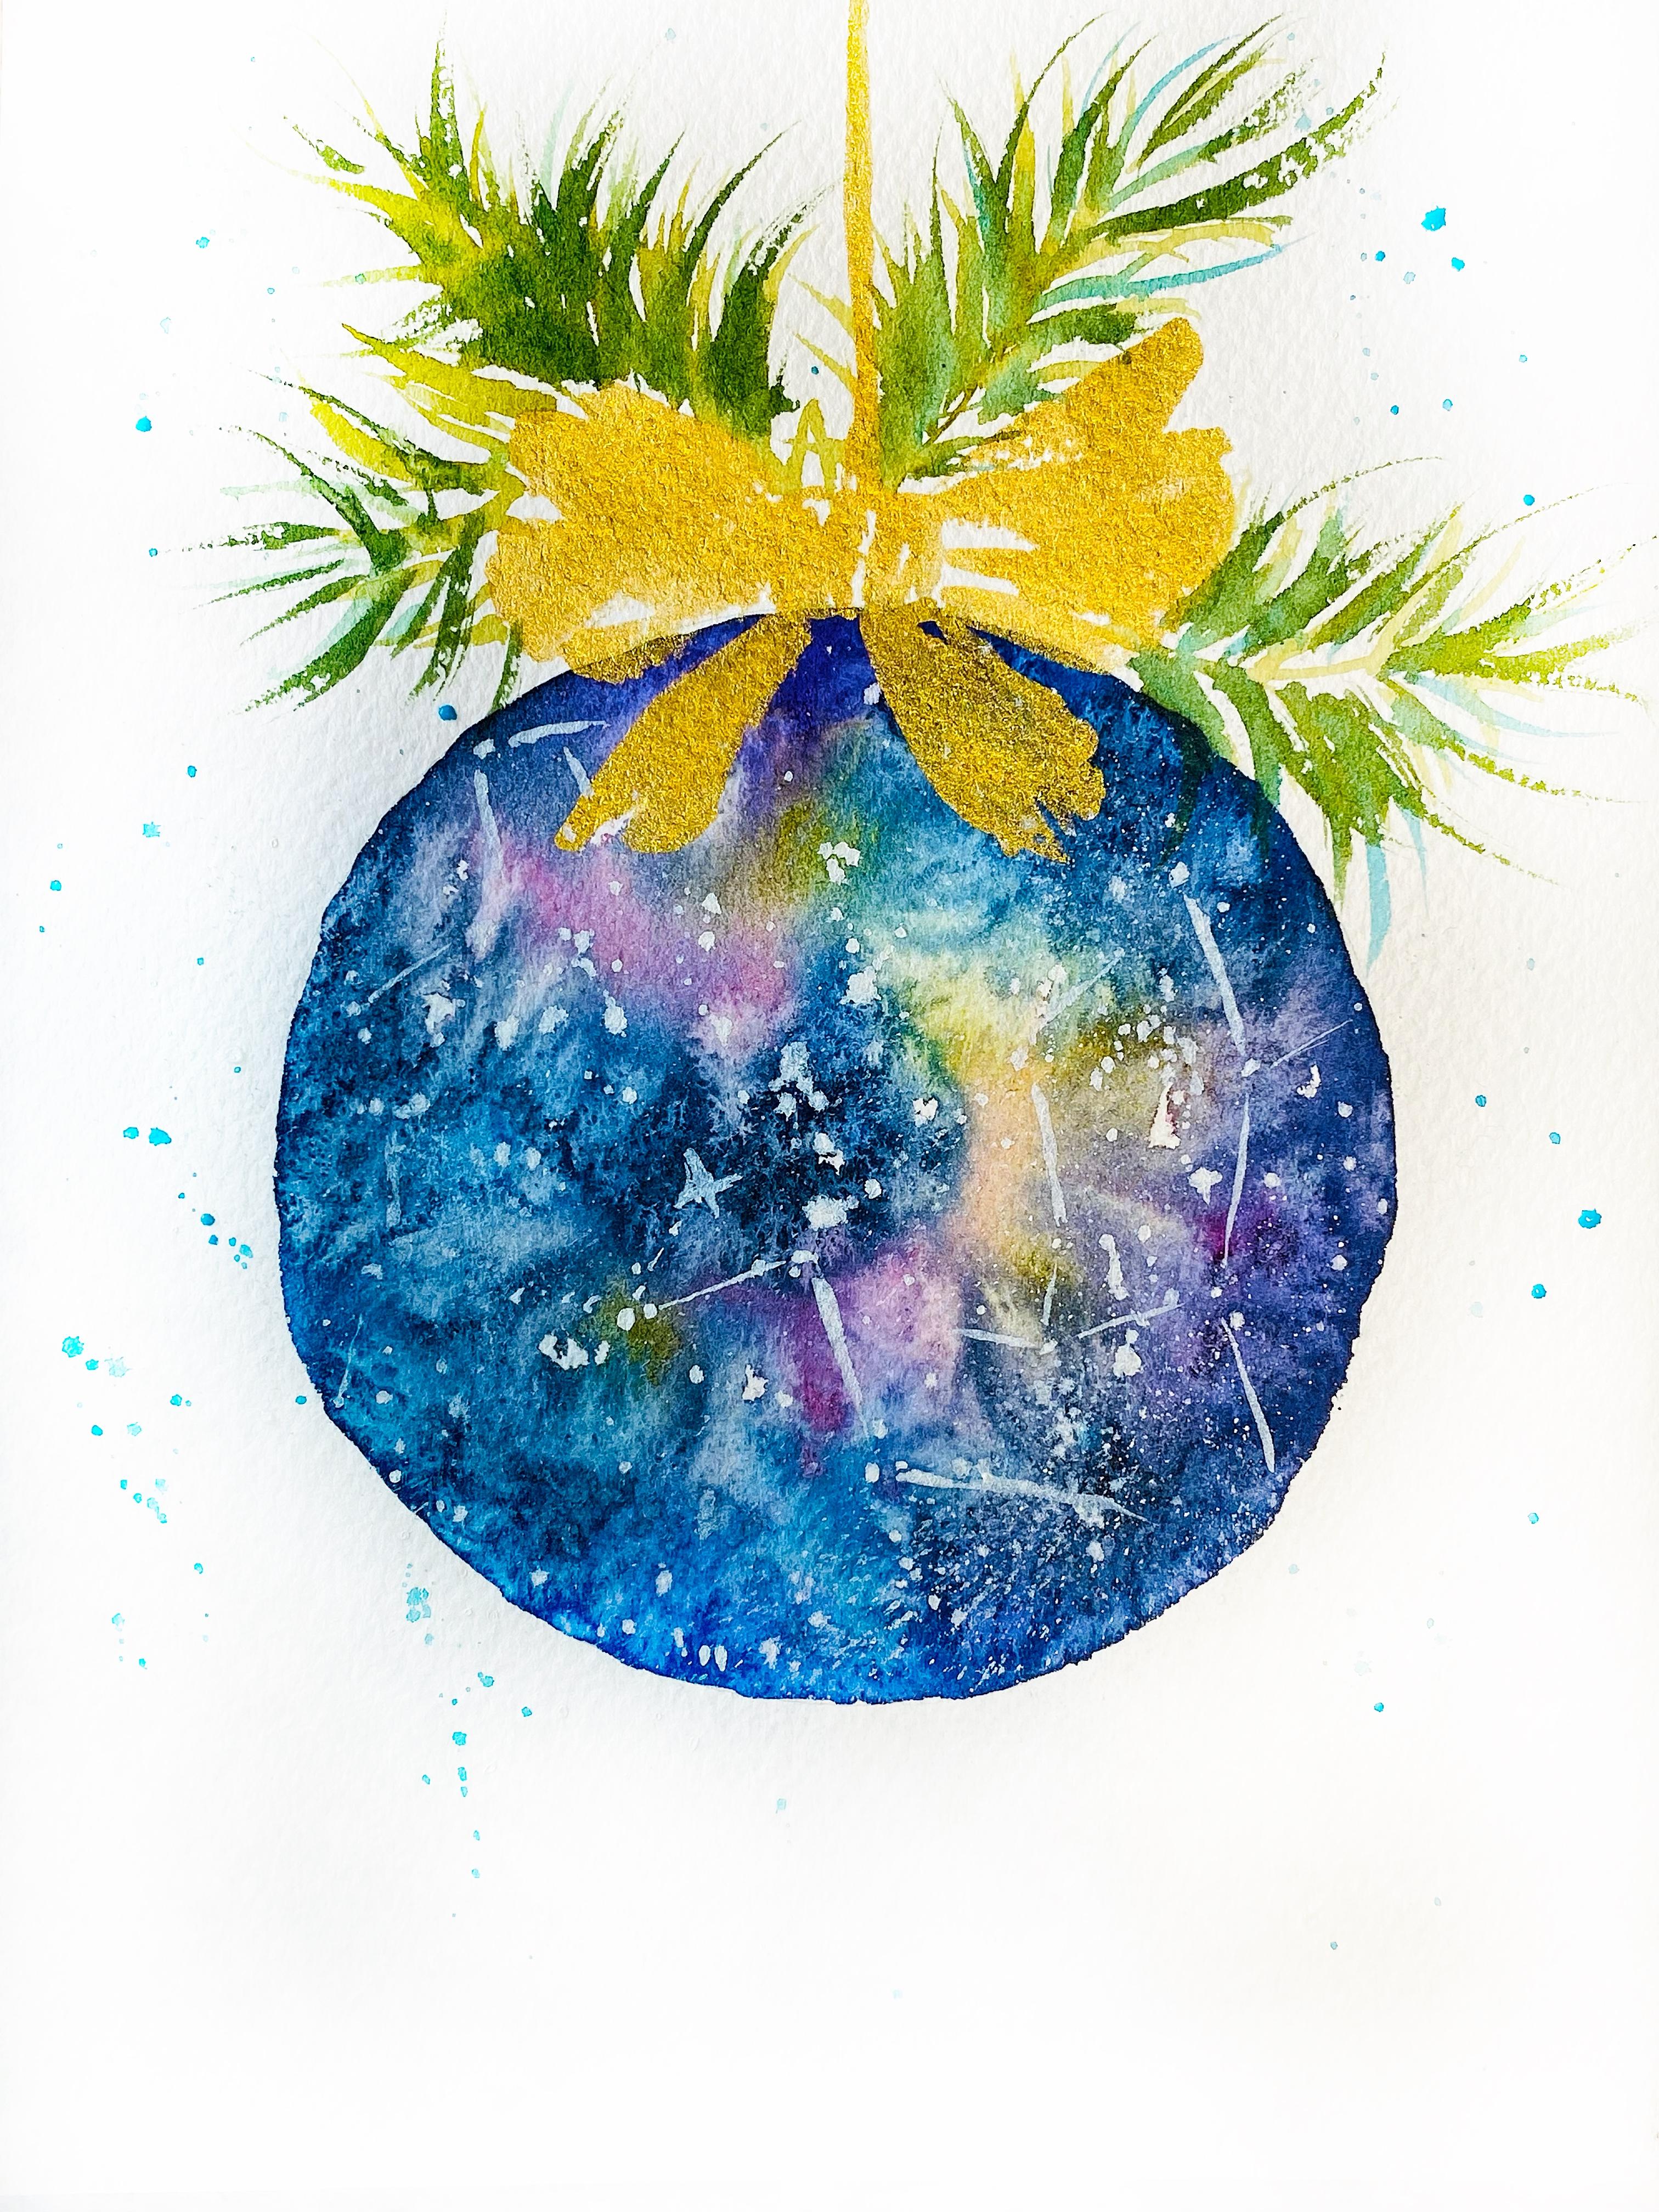
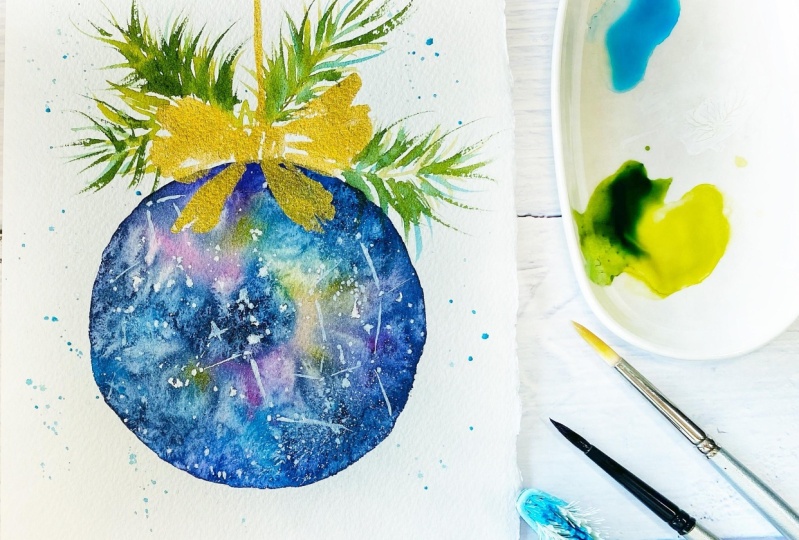
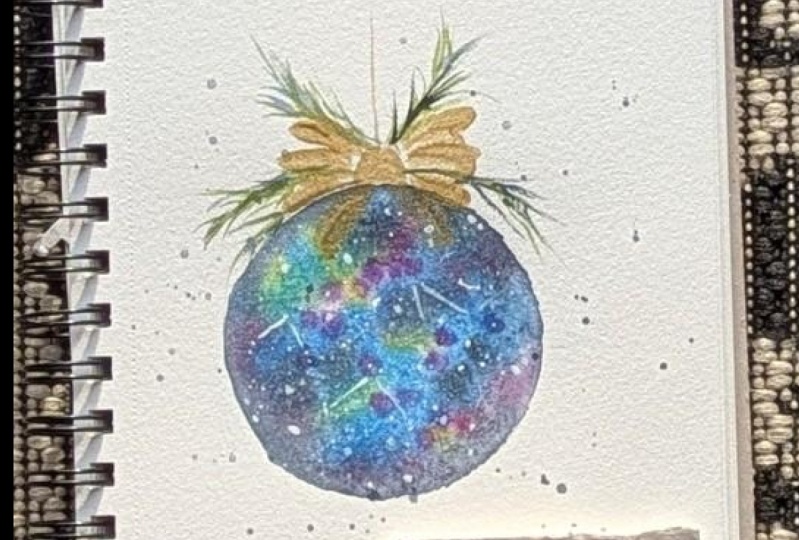
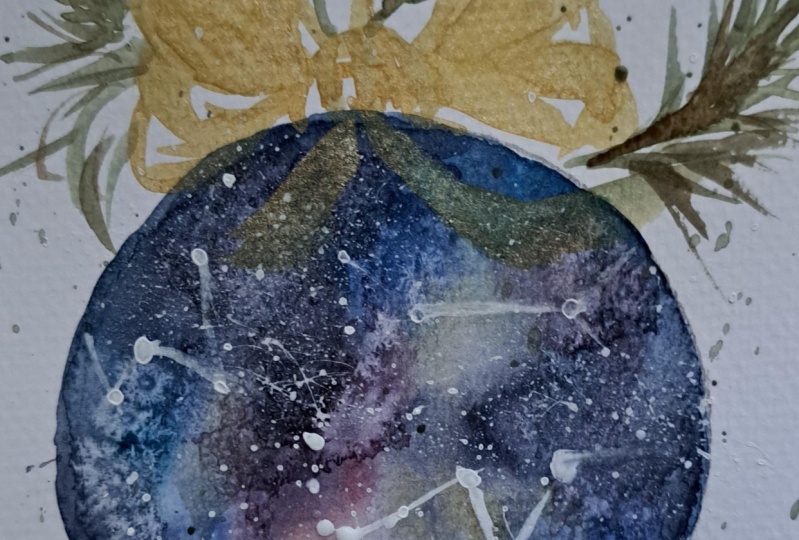
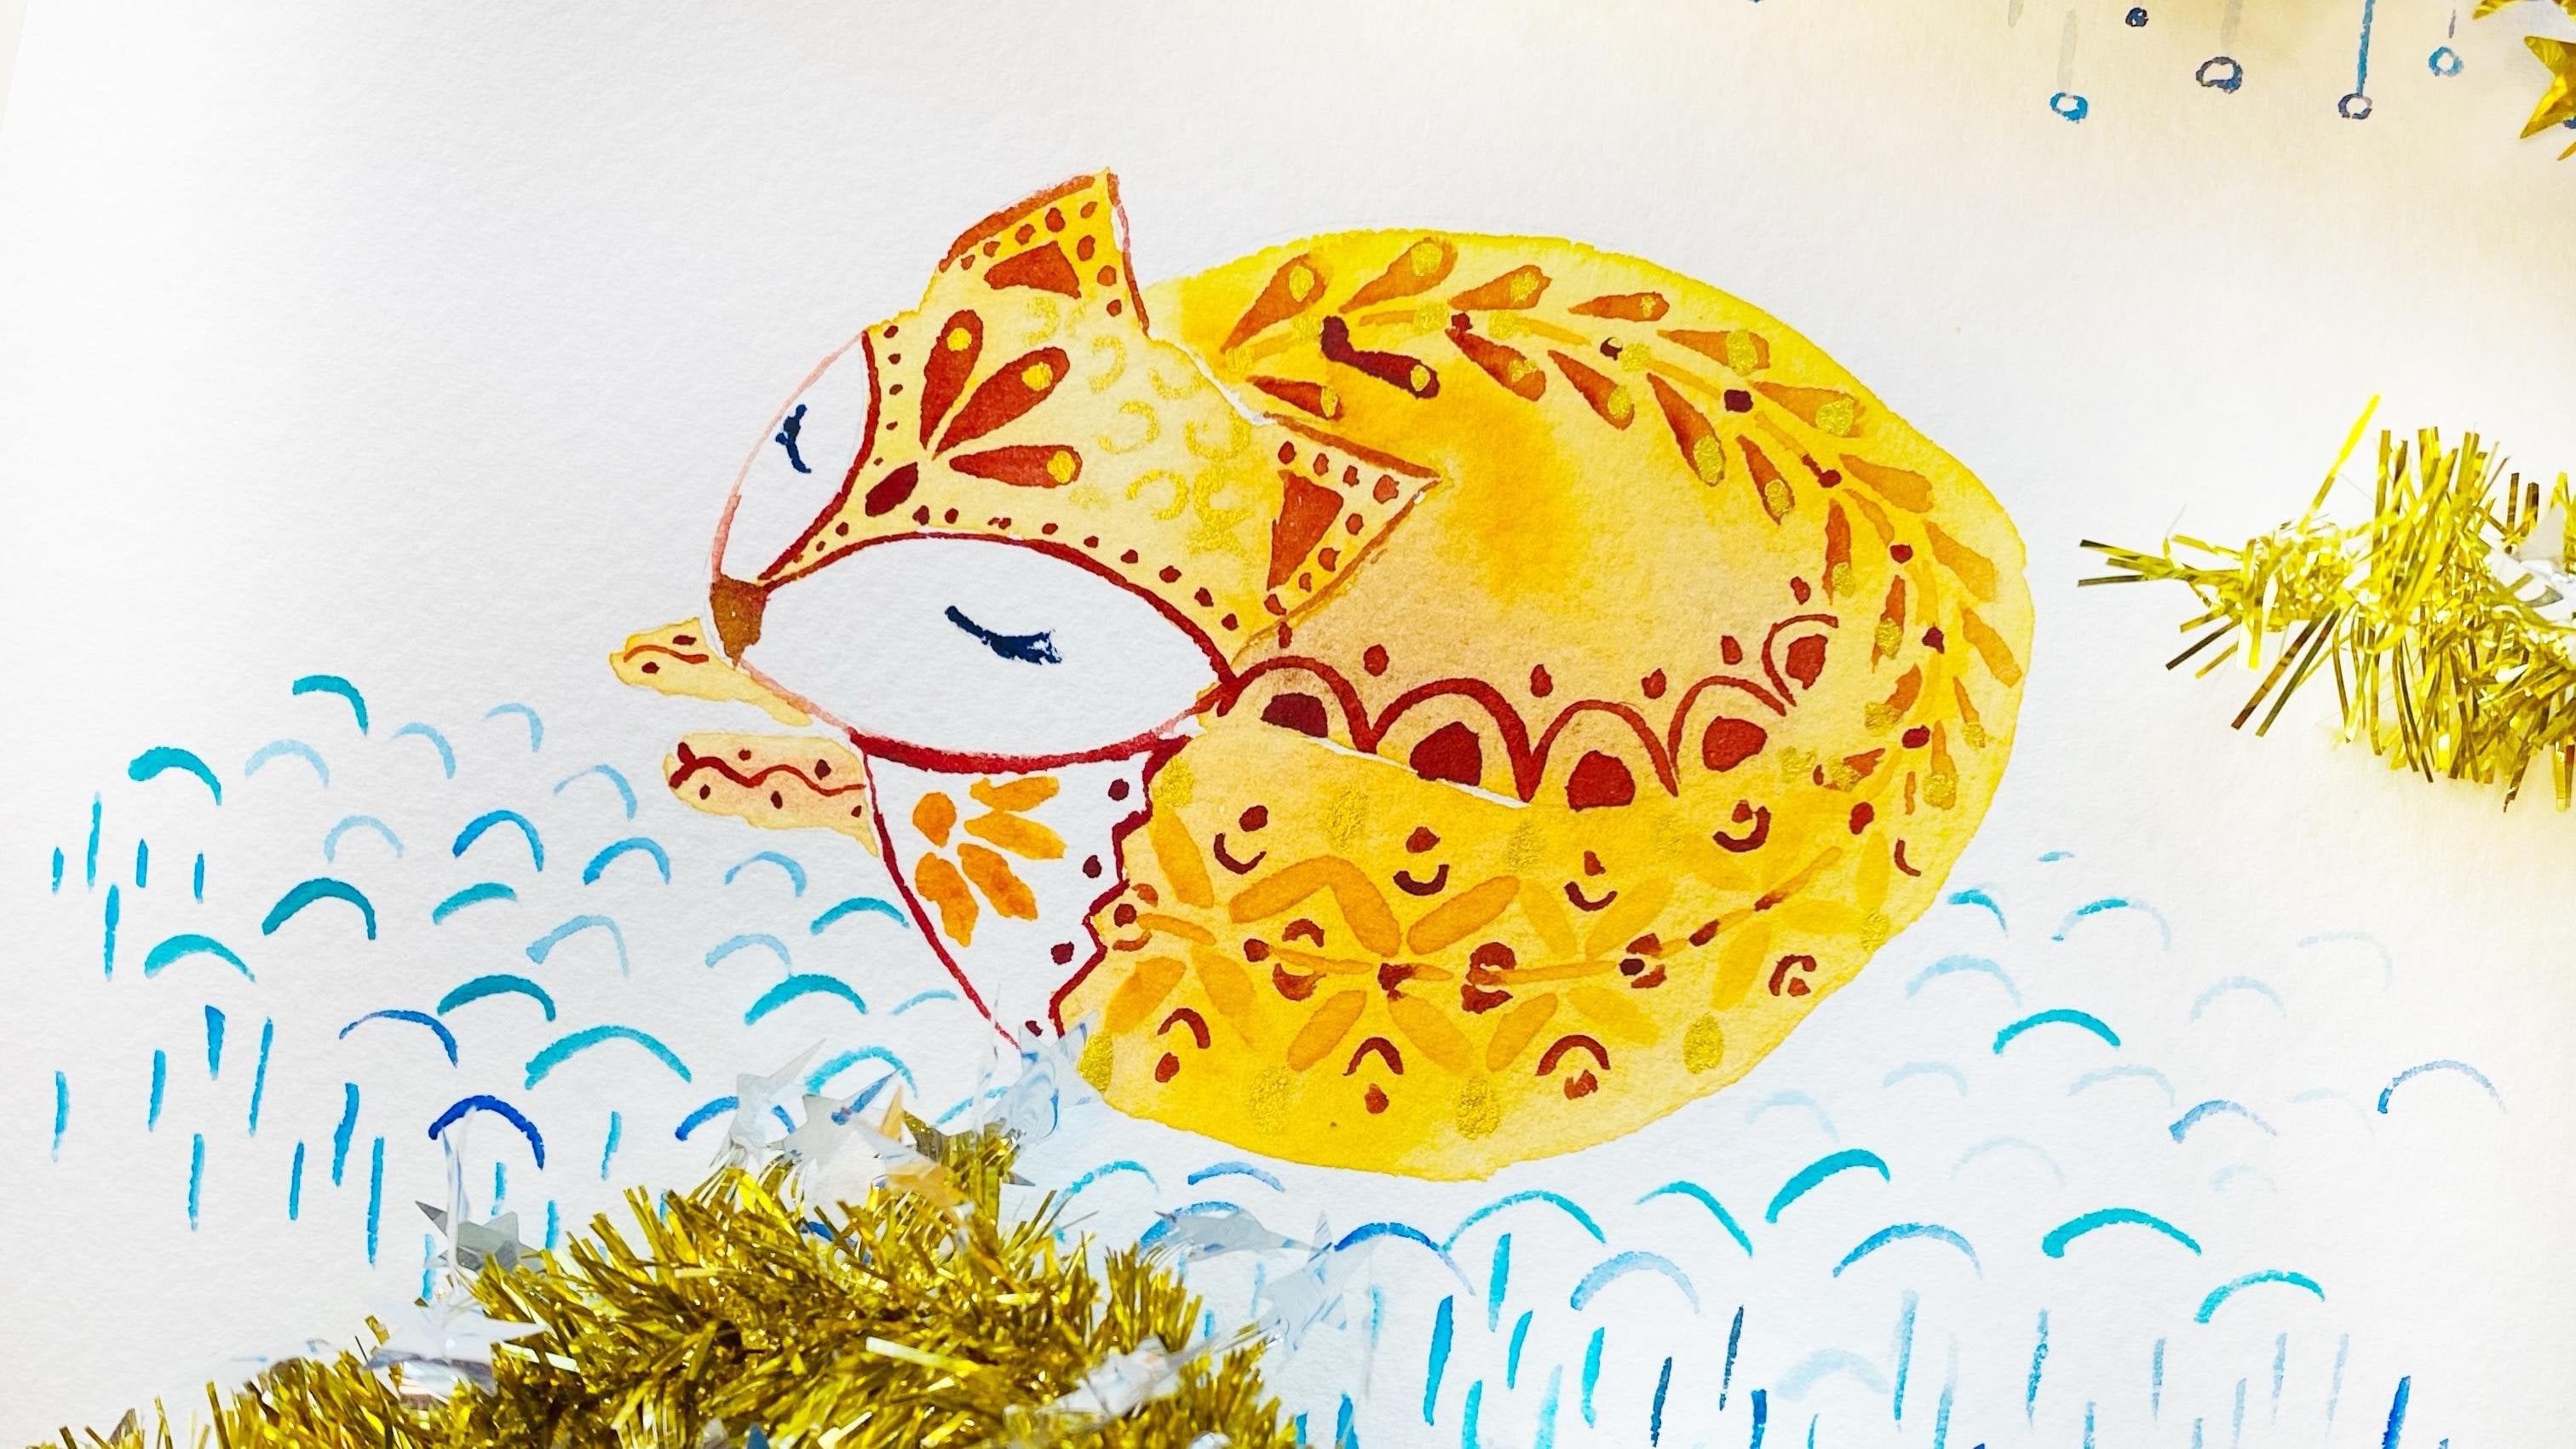
4. Adding Decoration: Wow. It's really impressive that my salt has got dry and you can see
this kind of really, really gorgeous
textures which I have got that it's unbelievable. I mean, that you can get such a beautiful
textures with salt. I'm really excited with my
treasure, with my galaxy. And next, what we are going to do that to add some decoration, some details, I will use metallic Watercolors,
Golden ones. If you have, I also invite
you to add this touch. If not, you can just
with normal colors. I will use this one, which is the color called
Arabic gold, I think. And I will add here a ribbon. So I will start it like this
from the center to have it and So with brush strokes, it won't be perfect, but it will remind the most important
thing so that for our mind, that this shape will
remind us of something, and I think that, it
reminds me, at least, I feel, that it reminds me of a ribbon and for
here, another one. Mm hmm. So here we have. If you want you can add
a bit more of this gold. Yeah. Oh, that is really
exciting to paint with this. Like, to get this
golden glowing. Yeah. I'm getting
excited. Mm hmm. And here that it
would be hanging up. I think a bit Mm hmm. So here we have. Now let's move to
another exciting part. That is to add some stars. For this, I will use
some white gouache so that it is the color would
be more dense and opaque. So here I have. And let's see how
we fall my stars. So here I have
some bigger stars. Mm hmm. And now I will let also some smaller
stars. Tiny ones. You know, that
there are millions, millions of stars
in the universe. So here is going to be my
these tiny, tiny stars. So I use for this, you will need some
kind of toothbrush. But if it's old one, so that it has hairs looking
in different directions. And let's see. Okay, here. And
mainly I will add them in those dark areas. Yeah, I think use is perfect. Yeah, we have tiny
stars as well. Perfect. What we are missing is to add some constellations. For this, also, I
will use white guash. And to add just several. Take some small size
brush so that it would have tiny like this, for example, here to add
some like this star. And over here, I
can add some more. One more constellation. I think it could be
really nice wish to write something like, let's like, wish to have one more year with you to
explore this universe? No. So that our beloved ones
would stay and we will stay with them for one more
year. That would be nice. So here, and I think enough. Otherwise, it's going to be
too many constellations. Okay, and I think it
would be nice to add some pine tree branches to make this card brighter
and to look more cheerful. I will use olive green. And then we let here
behind several Oh, it's not enough water. So let's add a bit more
water. And for here. So yeah, now I have enough water so that
it flows and I can make this kind of Hm mm. So for here, just play and add this kind
of festive feeling. Mm hmm. And for somewhere
for here, maybe. And a bit I think, a bit darker shed. I will add also some bluish
color in order to connect. That is I have two colors. I think it's cerulean
and mint color. So if you mix them, you get really beautiful color. I really like it. So let's
add also several. Mm hmm. So you see that it's really,
really fresh color and it connects really well. Our space colors,
which we have some blue and with this
warm olive green. So here we have. And what I wanted also
is to add some darker green and that could be green mixed with
some kind of brown. So I to it would be warm green. And in my case, that is marsh brown over here to
add some darker ones. So this will add a
bit more of contrast. Mm hmm. Here. Maybe darker one. I think perfect. What else we can add is
to add some kind of snow. What do you think?
Let's add some snow. Just symbolically. That could be done by blue, and we can just add
some splutters. So to show that it's snowing Here we have our Christmas card and
our Christmas bubble. I think that it's great. And I hope that you have
enjoyed painting it with me. For sure your galaxy will look really different
from my one. So feel free to share it. I'm looking forward to
see class creation.
5. Final Thoughts: Congratulations on
finishing the project. I'm so glad that you
have painted with me, and I do hope that you have enjoyed
this creative process. I'm really glad to
see your galaxy. Please share your creation
in the class project, and I will be happy to
leave you my feedback. If you're going to share
your artwork on Instagram, please do not
hesitate to tell me. If you have enjoyed this class, please leave me a class review
because then I will know that you have enjoyed the
short and quick classes, and I will create more. Meanwhile, have fun, explore more watercolors and enjoy
this creative process. Tell my next class?
 Nina Nyusikart Watercolor, Artist| Art Therapist | Loose Watercolor