Transcripts
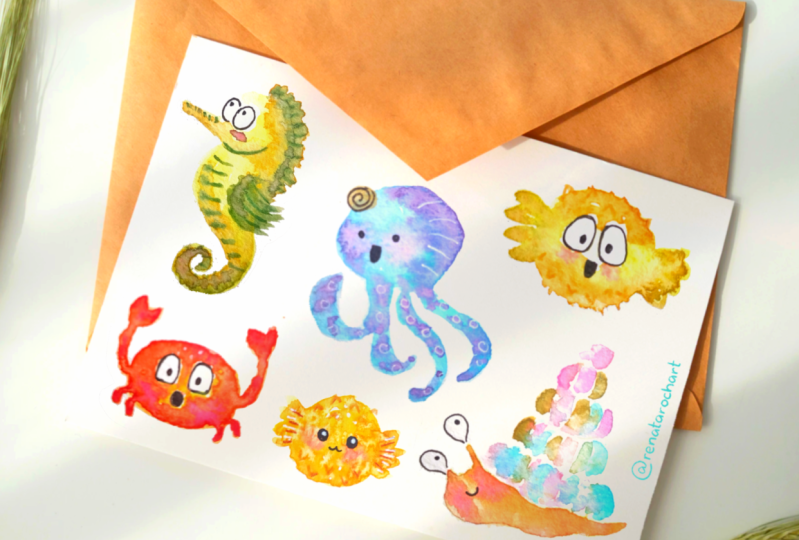
1. Watercolor Marine Animals Trailer: Are you looking for a sound
Quick and easy projects to paint just for practicing essential
watercolor techniques. And to have fun
playing with colors, then painting the cuties
will melt your heart. This class offers you a wonderful opportunity
to learn and practice essential watercolor
techniques while painting fun and
easy marine animals. You will explore brush
control, color mixing, and color blending effects, wet on wet techniques. And how you can add those stunning textures which will help you to create
the illusion of volume. Hello, I'm Nina Also known
as Music art on Instagram, water color artists
specializing in loose style art educator and
art therapist in training. I'm a full time watercolor
artist teaching watercolor art both
online and in person with a special interest in those
art techniques which are benefiting our mental and
emotional well being. My mission in all my
watercolor classes is to share with you the joy from
painting with watercolors. And the joy from the
creative process. What a color can
be or well mean, if you are just starting out. That is why my goal is to
help you to feel relaxed, playful, and enjoy this medium
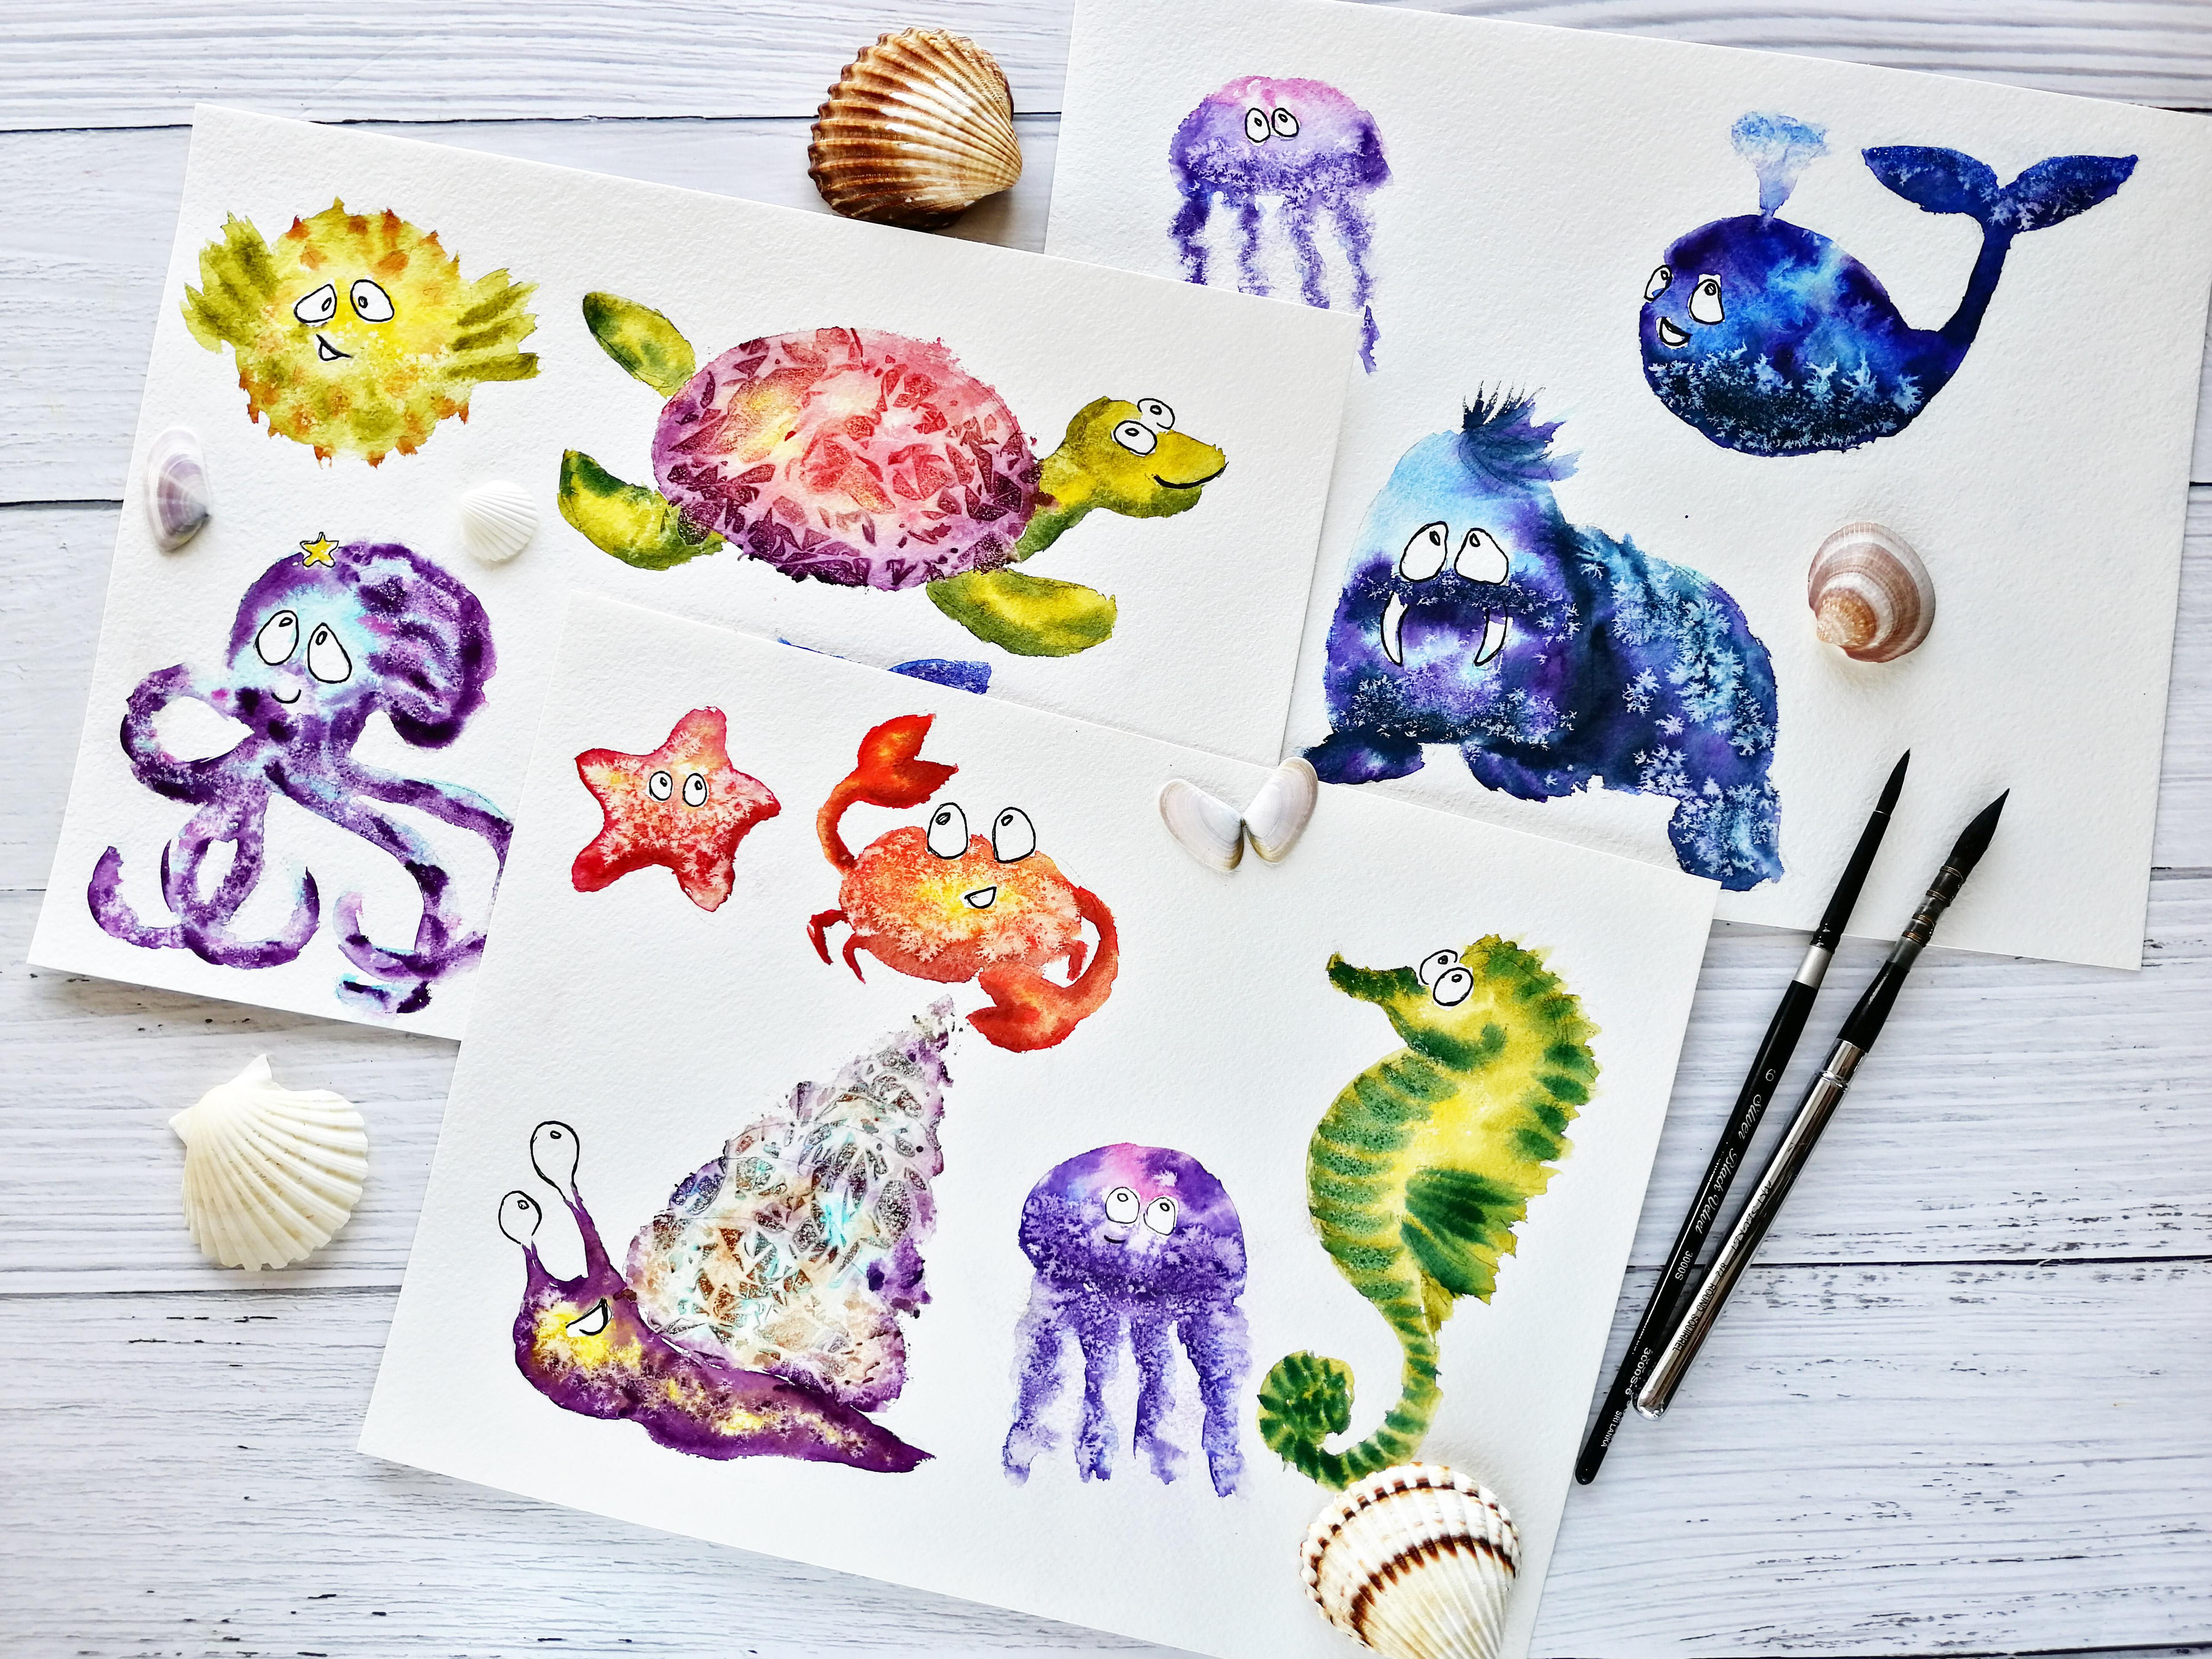
in a step by step manner. In today's class, you will find a wide variety of marine
wildlife to paint. And the lessons can all be done or you can
pick and choose. Each lesson is self contained so there
is some good variety to work with and to put your quota cal
skills in practice. All lessons are in real time, so you can paint alone with me. If you find this class
too easy for you. I have a variety of
classes available at different skill
levels on painting loose style without
pencil sketch, which you will find
especially helpful if you are looking to
loosen up your style. Throughout this class, I will be sharing plenty of
tips and tricks so that for sure you will manage to get these
gorgeous textures. If you have any questions
or need any advice, just post them in the
discussion board below. I'll be sure to read and to
reply every single post. Remember to click
the Follow button to be the first to know when I launch a new class and
when I post a new giveaways. Also, you can follow me on Instagram music card in order to see my latest works are ready. Grab your brushes and
let's dive into painting.
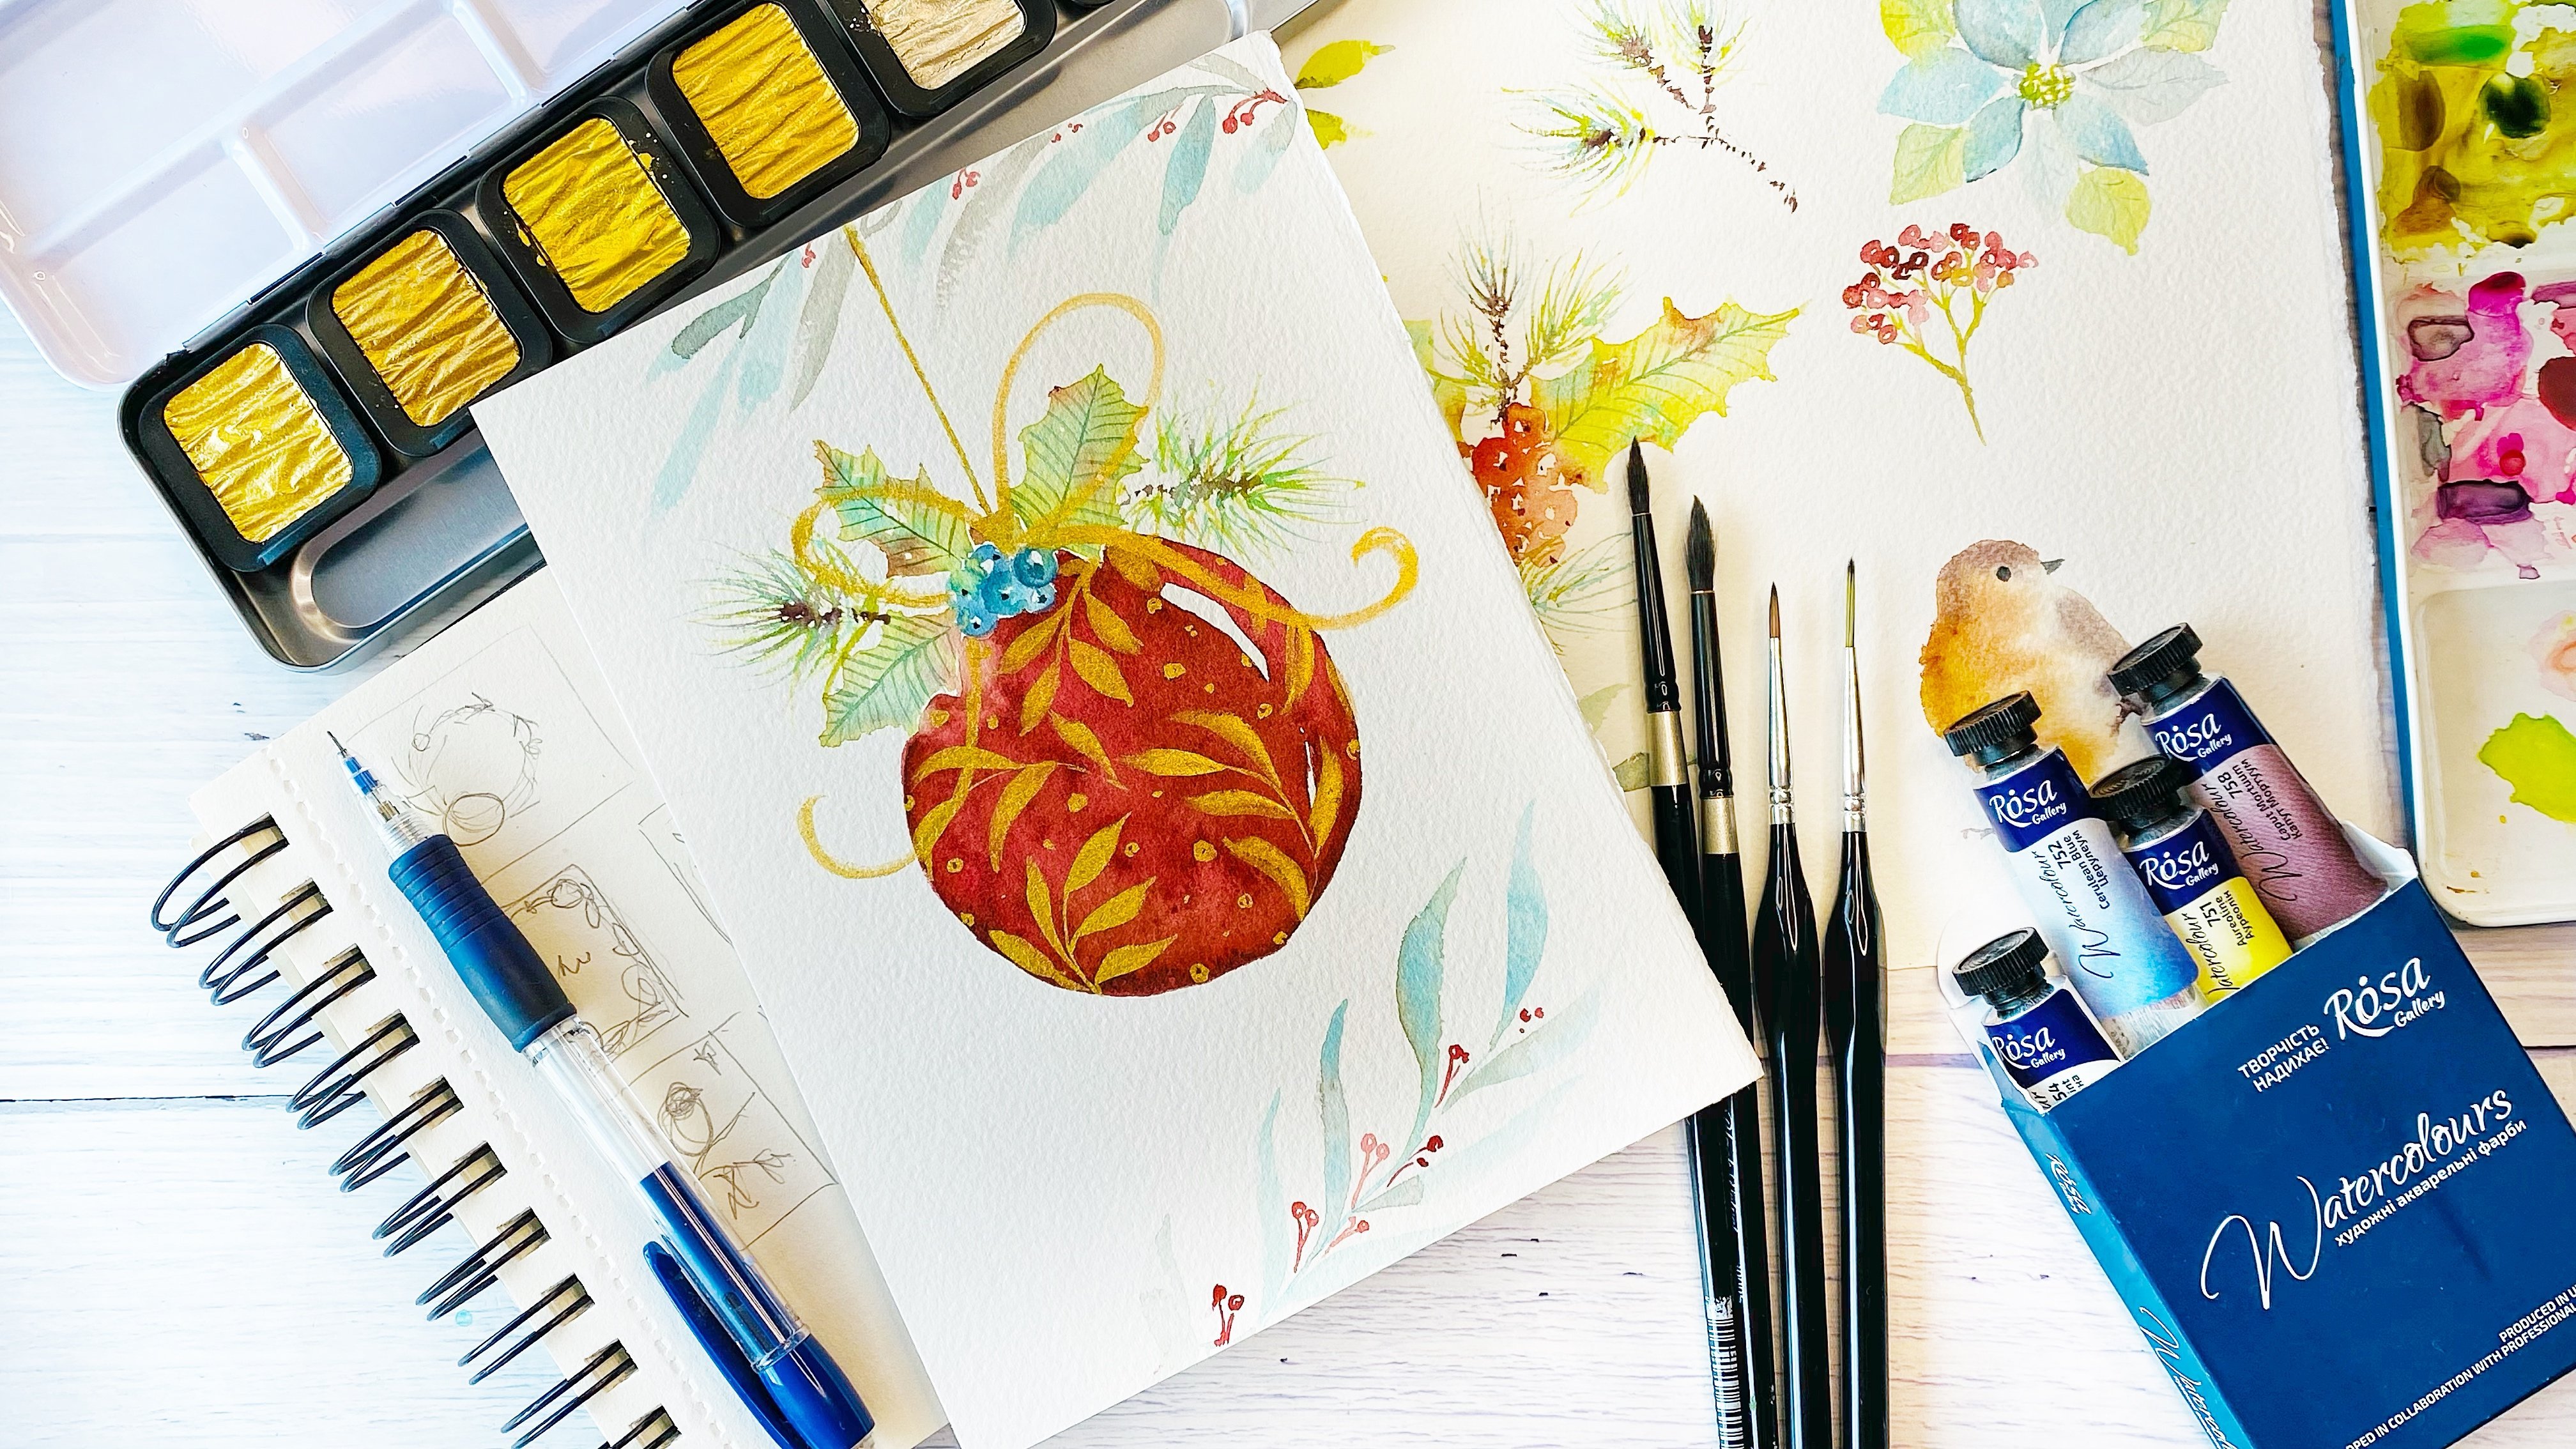
2. Materials: This class, I will
use watercolor paper, just a simple block of watercolor paper
that is cellulose. One watercolor paint,
watercolor palette. Then we will need
a pencil eraser, waterproof liner, or marker. Two brushes, one which
absorbs quite well water and holds that water to
make moisture in the paper. Another one for
introducing the color. Just two brushes, water, pot, better to use, two, one with clean water and another one for
cleaning your brush, kitchen towels,
the paper tissues for removing their extra
moisture from the brush. Then we will need salt. I'm going to use in sea
salt and a bit of clean. Just prepare all these materials and let's move to
the practical part.
3. Prepare Your Colors: Wet on Wet Technique: Before we'll start painting
our sea creatures. First we will
prepare our colors, which we are going to use. We'll make some fun
warmup exercise. Actually, we will create
this small universes. For this, I will use a
piece of paper that is just normal watercolor paper
that is cellulose one, I will use two brushes. One is for making wet area where I'm
going to add the color. Another brush is for
introducing the paint in such way like you
will avoid washing too much your brush and it
will be quicker the process. Let's prepare your colors
and let's get started. We will start with two colors
which we are going to use, or at least I'm going to use these colors for
my se, creators. And you can choose some
similar colors which you have or the ones which you
would like to use here. In this exercise, you
can try those pairs of colors which you'd like
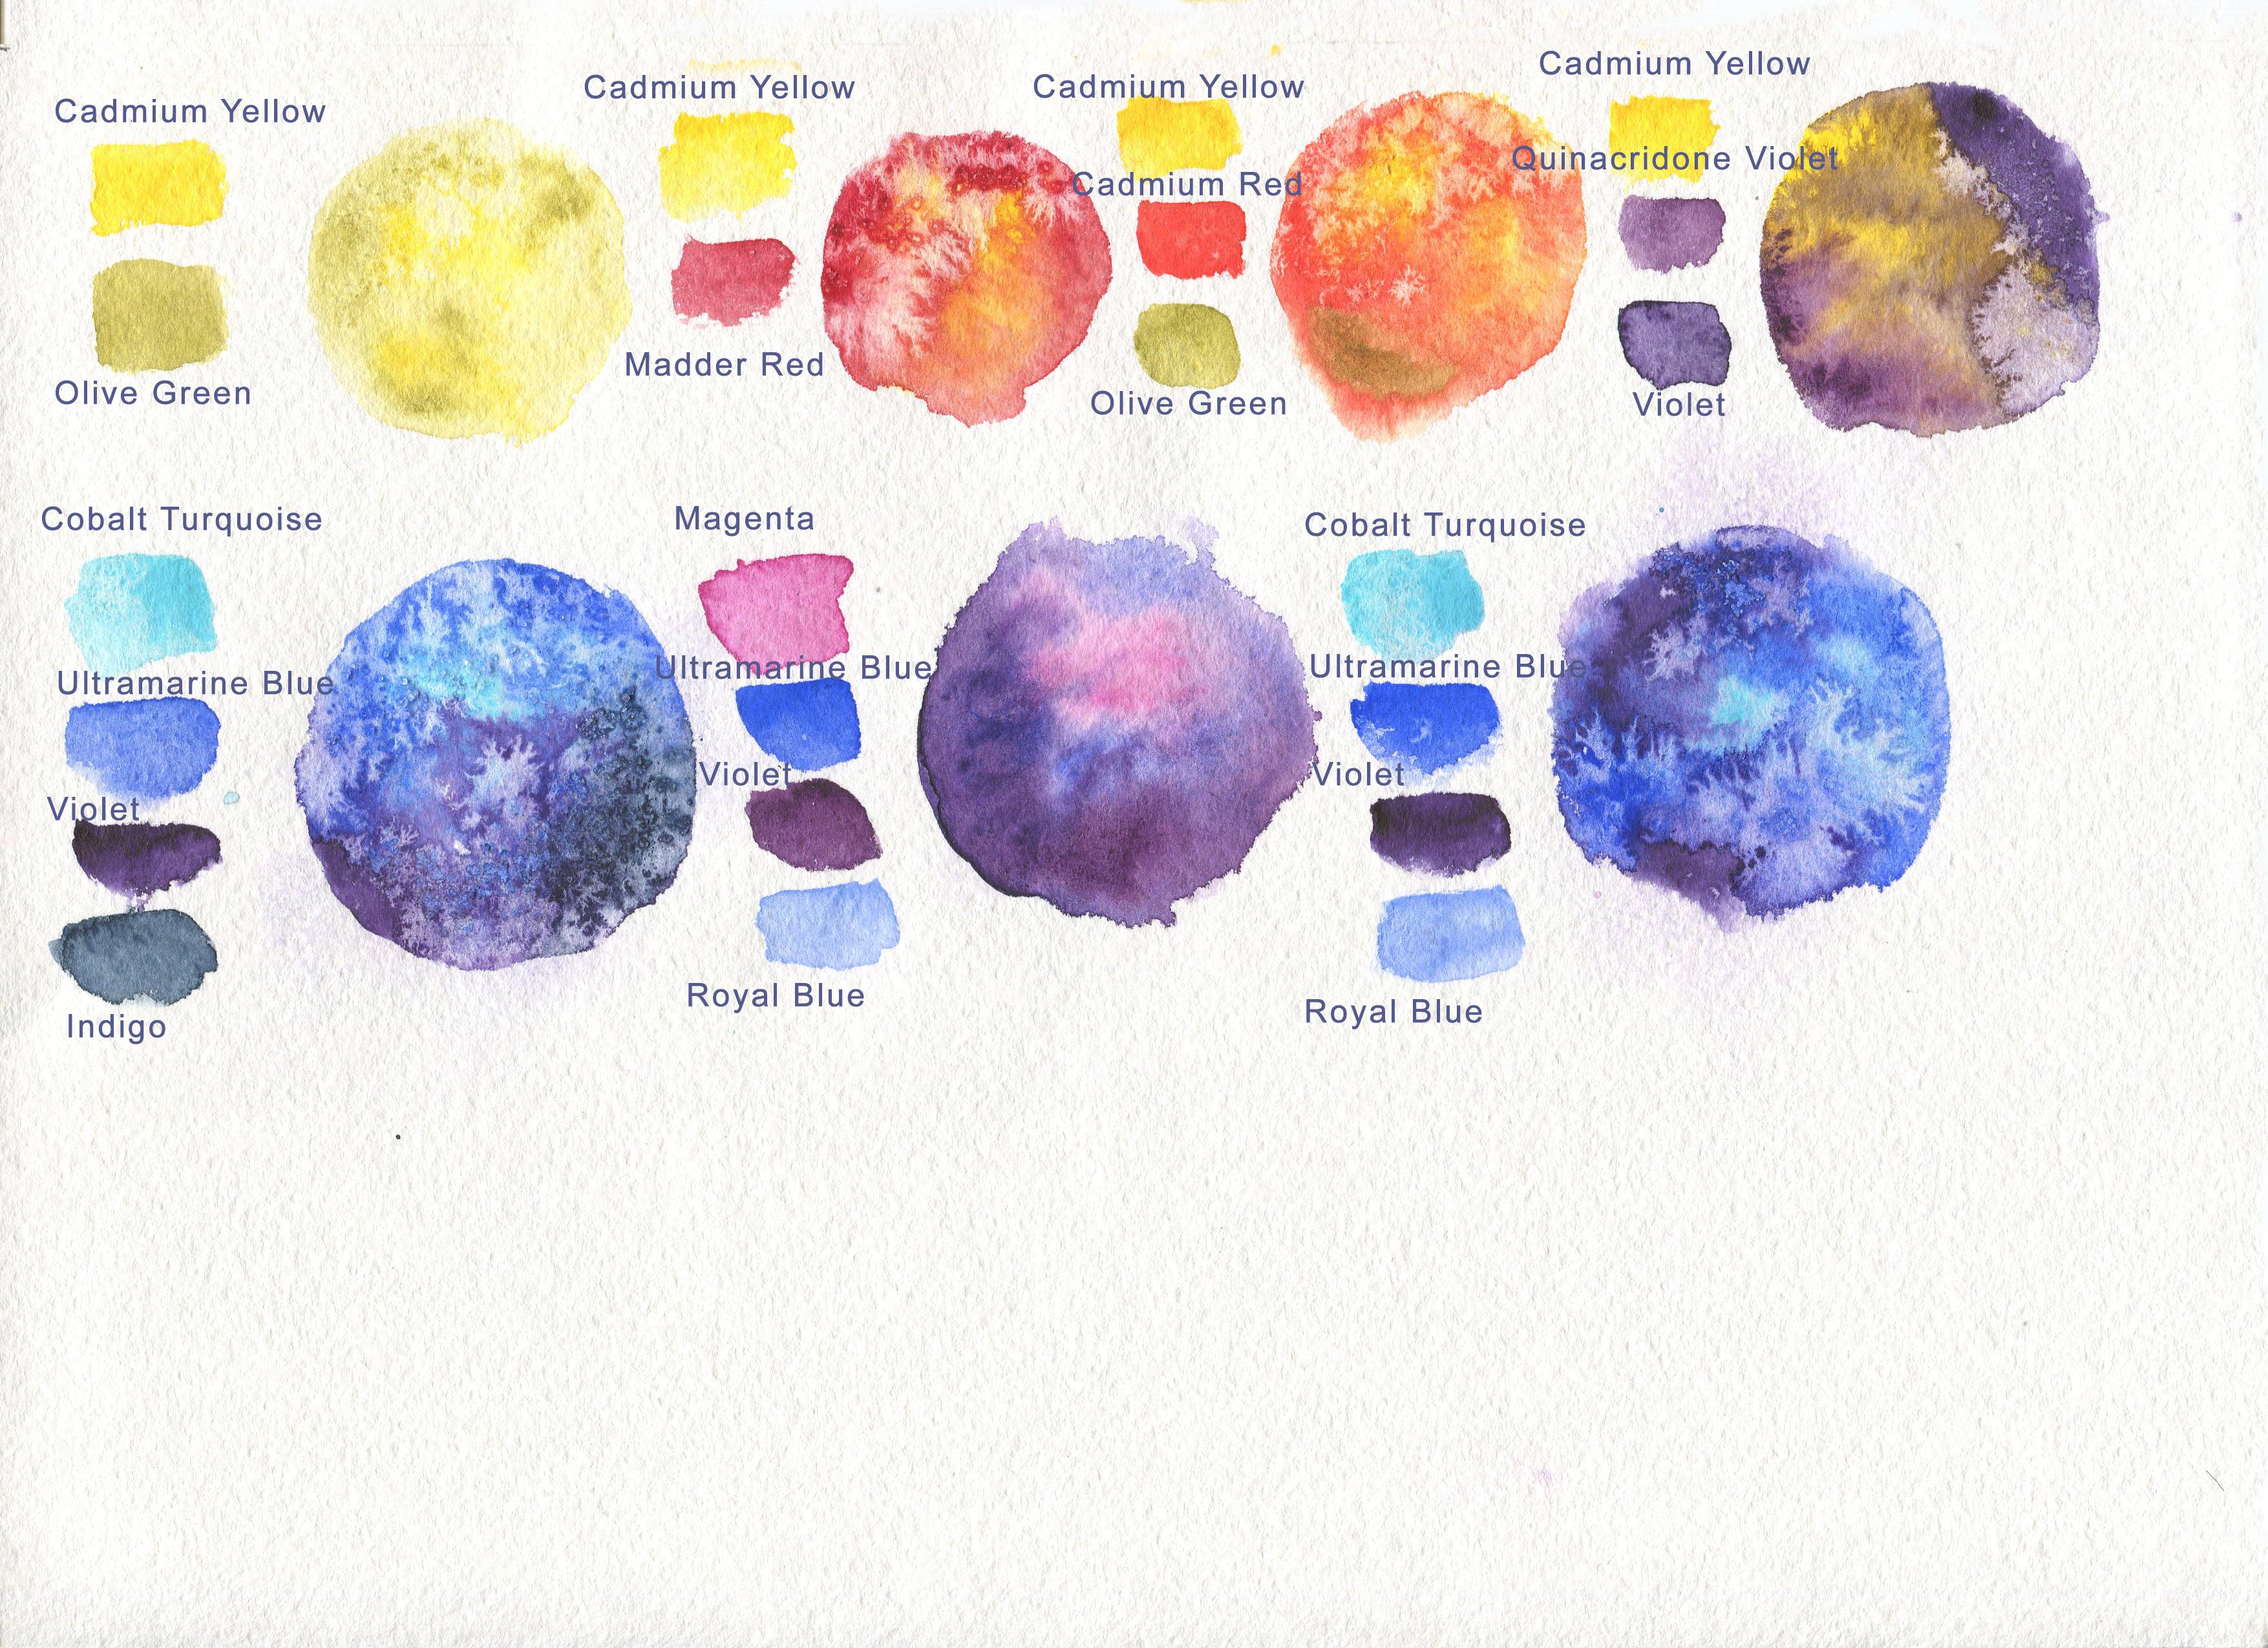
to use for se creatures. Here I will use yellow, that is cadmium yellow one color and another color
is olive green. Here you can take also one yellow which
you like and one green. The aim of this
exercise is to see how these colors interact
one with another. Which effects and which
color mixtures we can get. I'm moisturing this area of
paper just with clean water. I'm using two water pots. One is for cleaning my brush, and another one
with clean water, which I'm using for
moisturing my paper here. I have be careful not to leave here too much water so that it won't be
some petals in it. Now, just directly from the pen, I'm introducing the color first that is yellow, like this. Then with olive green, some are the sports, we can see how beautifully the colors interact,
one with another. One machine I wanted
to ask you to have prepared is also
a jar with salt. I'm using here fine sea salt. We can introduce it just
at some point and to see which effect it
can create like this, just in small part of this
circle or another circle, we are going to use the same. That is cadmium yellow med. Let's see how these two
colors interact the same. I'm moisturing this part of
paper just with clean water. Here we are, preparing the
colors for our sea creatures. Then we will also, after this warming up exercise, we will be able to
act quite quickly. We will know already which
colors we are going to use, then it will be also quite easy. We will enjoy the
process of painting. Again, I'm starting
with cadmium yellow. Just introduce it directly
from the pen like this. The second one is Med. Here comes, and again, let's introduce at some
part a bit of salt. I would like to
pay your attention that it's very important to add salt when the
paint is still wet. Then you will get more effect. For example, in the next circle, let's try to add salt
not immediately when, once we were
painted, but we will leave for a while
that it will get dry. Then you'll see that what
could be the result. For our next color mixture, I will use cadmium
yellow and cadmium red. Here we have used
cool version of red. And for this one,
like some warm red, just checking your
colors, which you have. And the same, let's
prepare the surface just with clean water like this. We prepare some circle
for this circle. We can use the third
color as well. Also prepare olive green. We will as well olive
green that we will. Olive green. That you know that green and red are complementary colors. By mixing these colors, we can create as well shadows. Now let's introduce the color. I'm adding cadmium yellow, then cadmium red, like this. And like this we see how
beautifully they're mixing. Also with just clean brush
and dry one that you remove, extra water with
paper towel you can play a bit and to help to move
the pigment if you'd like, we will introduce
as well a bit of olive green in that area
where there is red. Here we will introduce
a bit of olive green. It will create some shadow. We have talked with this pain. Let's wait a while, not introduce salt immediately. Let's wait till it will
get dry a bit here. Also you can see that I have one pedal from this
side and what I can do, how to remove this
pedal actually just with clean and
dry brush with a tip. I'm passing it for here and I'm removing extra paint like this. Meanwhile, it's getting dry. Let's introduce the colors
which we are going to use for our next color combination that is the same,
cadmium yellow. I have some really
beautiful color, which is Kinakredon violet. If you don't have this color, you can use just normal violet because the effect is
going to be the same, it's more like the shade
or into your violet, you can add a bit of rose color. Or for example, even
if you will add a bit of Medet or kardon, rose or magenta, then the color will be
similar to this one. Meanwhile, let's add
a bit more of salt. Here. I see that the
color has got a bit dry. And we'll see also depends at which stage
you're adding salt, that the result could
be also different. That the surface it contains
quite a lot of water, can create big spots. White spots in surface
contains less water. It can create like smaller
bits of We spaces. In this case, first you
will test your salt. How does it create
the salt effect? And another thing that you will know also
which effects you can create and which surface you need for creating
these effects. Meanwhile, let's make wet
one more surface for here. And let's check the
color combinations. First, I had cadmium yellow, like this quite a lot. And now I will
introduce Kina cre, Don violet for this side. It's like two colors
which are really active and they create
beautiful effects. From another side, I would
introduce just normal violet. Wow, that is really beautiful
color combinations. And also another
interesting thing, while you're adding salt, it's better to edit
in the darker areas, then the effect is
going to be stronger. For example, in this
mixture of yellow and red, it's better to introduce
salt in the red areas here, the same yellow and violet. It's better to introduce
salt in darker areas. In this case, that is violet, the contrast is
going to be stronger and the effect will
be more noticeable.
4. Prepare Your Colors: Color Blending: Now let's move to another
color combinations which I'm going to use for
painting sea creatures. In this time it's going
to be based on blues. Just check blue colors
which you have. Choose one which you like more. In case you have
a Serulian blue, then it's really beautiful
color, you can use it. In my case, I will base my combinations on
really beautiful color. That is cobalt turquoise,
it's like this. You can use any blue
which you have. And now you will check which color combinations you
can create with that blue, which you have chosen and whether you like these
color combinations. Another blue I'm going to use
that is ultramarine blue. That is easier,
probably you have in your color palette or
some similar blue color. Then I will need a wilet, which we have used before. I will use one more
color, that is indigo. Also, you can have
some paints gray. You can check that
color to mix it with blue or more or less
like this color. Let's prepare the surface here just with clean
water, making this circle. Let's start to
introduce the color. I'm starting with the light
one with cobalt turquoise. Also why I like this
color that it contains. I like granulating effects
and really beautiful, I really like this color. Then let's introduce a
bit of ultramarine blue. I'm adding all colors
directly from the pen. I do not dissolve them. They are quite concentrated then while adding wilet will
create really strong effect. Really nice, probably for here. Also a bit more of whilets, color combinations we are
going to use for creating our W. Then a bit of indigo to
add just somewhere here, here for this side. You can see that it's like
the darker value of blues. It's darker than violet and we will use this color
for some shadows. Now let's introduce our
salt in this dark area. You will see how magic
effects it will create, or I hope that it
will create here. Also in the light area, we will see what we will get
from the color combinations. One more color combination which we are going to use for this, I will use the color
which is called magenta. But also you can
use Quinacridone rose or any kind of
rose like Med rose. Some prose colors
which you have, they would be really perfect. Another color which I'm
going to use that is ultramarine blue and
Quinacridone violet. Let's make it the surface, yeah. Now let's start first
introducing magenta like this. Then let's add a bit
of ultramarine blue. You will see that
while mixing it can turn into some purple areas. And Kinagreden violet, that is also quite
nice combination. At some points you can violet
if you don't have incid. And gold violet
also would be nice. The color combinations
we are going to use for our jellyfish. One more color combination
which we are going to check, that is Cobal turquoise,
ultramarine blue. And why let, let's
prepare the wet surface. Now let's introduce the color. I'm starting with
Cobal turquoise. This, then I'm made in ultramarine blue violet. That violet is so active color, it creates so beautiful this watery effects
really beautiful. On this final one,
let's add a bit of salt in order to see all
the effects of salt. First, we'll have to dry all these circles so that
they would be completely dry. Then we will be able to see which salt effects
they have created. The paint has gone dry. And let's remove salt
just with fingers. Then we will see which
effects they have created. Let's have a look here. It's almost not noticeable
effect because also there are, both colors are light. It means that with light colors, the effect is not so
noticeable of salt. Here, we can see
that it has created quite interesting
effects here the same. But you see that it could be
also really different ones. For example here that the paint, I think that it
was drier than in this area and it has created
like this small star. While here, I assume
that it was still too much water in this part and that salt has got dissolved,
let's say like this. The same has happened, for
example, in this part. Just try play with
different paint and to see that still too much
water in the paint, then you can get probably
like this effects. Or if it's less amount and
it's getting already dry, then you can get this
kind of effects. We're done with
warming up exercises. Now let's dive into
painting our se creatures.
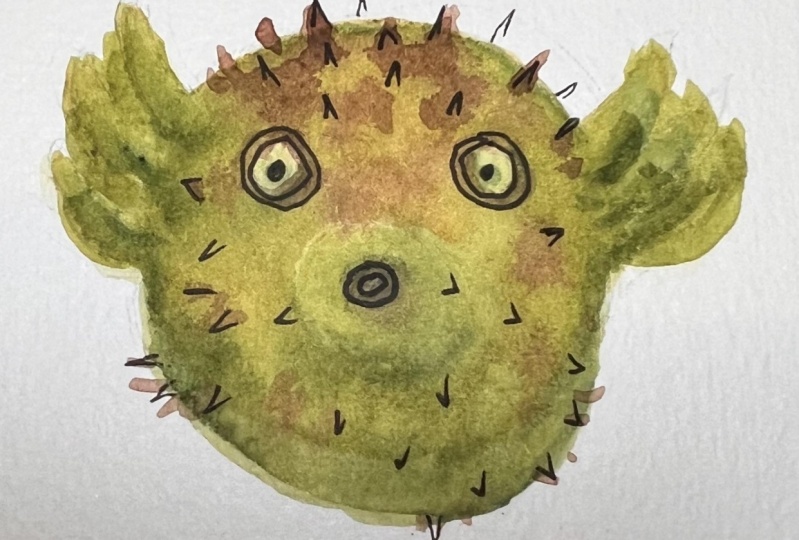
5. Watercolor Blowfish: Our new sea creature is
going to be blue fish. For this, we will
need cadmium yellow, olive green, orange. Or I will use a color which
is called Akinaerdon Gold. We will need also some salt, which we are going to
place in this area. Prepare the colors. Let's make under drawing
that is really simple. Just circle here is going
to be for here another one. And that will create some
funny ice like this. And they would be
looking more this way. Later we will place some of
this texture the way around. I will start with waterproof
marker drawing the ice. I remember to leave some
white areas for here. And the mouse, it's going to
be really funny. Bluefish. I'm removing some pencil lines. Let's start. I'm
using two brushes, one with clean water I
will cover the shape, and another one for
introducing the color. Let's start here. I introduced just a bit
of water in the area. We will be the parts and a bit more of
water For this site, our blue fish is
ready to get colored. Let's start with cadmium yellow. I'm taking the color
directly from the pen, and let's introduce
it for everyone. Let's have fun to play with colors like the Rodes here. Another color which
we're going to introduce is olive green. I'm start to
introduce olive green from outside towards the center. For here, I introduce more like this with some brushstrokes and more concentrated
olive green. What we need is more
concentrated olive green to introduce in these areas with
the brushstrokes up from this side. Now it's time to
add this texture. I'm using gold. Also, you can use
burn ciena triangles. I would say that with
burnt sienna it looks better all around the body, these triangles like this. So now it starts
to get the volume. Also, I will add a
bit of king yellow and here, and here. And let's add now salt, salt. We're going to introduce only in this lower part of the body. To create some texture for here, I noticed that here is
missing one part of yellow. I will cover it with yellow.
6. Watercolor Crab: Our next secret is going
to be a crab, funny crab. For this, we are going
to use cadmium yellow, cadmium red, and a bit of ultramarine blue for
creating this shadow. What I would like to pay
attention when we are going to prepare our under
drawing is that here, pay attention to
leave this space, it gives more dynamic. And also to make
some funny legs. That also creates some funny
balance and funny gestures to this crap, this claw as well. Try to make it a bit outer. If you're ready,
then let's start with our drawing
that is quite easy. We will start first with
some ellipse like this. Here we are going to
place ice quite big. He's looking a bit up. Here is going to be the mouse. Let's add color that he's
quite happy and telling us, hello, how are you like this? And for here, another clock, big one like this. And then some legs. Funny legs for here. Another one also have prepared the sea salt because we will
need for creating texture. We will need some sea salt. In this case, we're going to
introduce salt in this area. Leave in the bottom
this one solid color. Okay. Then let's start with
our waterproof marker. First, painting the eyes, this and the mouse. Then I remove a bit
my pencil lines. Also enjoy the
process that you can create a different type
of crap that probably, you know better or you have your own vision
how the crabs are. And that would be really
interesting to see them. Just try to make
really funny animals. We'll start just
with clean water. I'm covering the
body of the crab, so avoid to touch the
area of mouth and of eyes like this. Now we will introduce
cadmium yellow. Try to make mainly
a middle part with yellow because then once we will introduce
red, all everything, what would be left from yellow, it will play more like the highlights and
it will create also some additional
volume to our crap. Then I'm introducing cadmium red here that we will place
salt on the dark paint. And once it will remove
this dark pigment, you will be possible to
see that color which is underneath in our case that
is going to be yellow. And it also creates
some nice effects that really like texture
created by the sea. Now will add the
mixture of cadmium red with a bit of
ultramarine blue. It will create darker
value of red like this. This part will introduce
here at the bottom. Now let's add salt. Just place the salt
here in the top part. Let's see which texture
it will create. It should be really nice like
this effect of sea salt, which actually creates
usually on the sea shelves. Now let's move with
the clo, clean water. I'm making the areas that we will use the
same colors here. It has introduced a bit of
red in the area of close, we aren't going to
introduce salt. That's fine. Let's start with cadmium yellow. For here, cadmium yellow. Now, cadmium red,
also from outside, I'm starting to add
the color like this, like this end for
this site as well. Let's add more red color, and here a bit more red color. And the legs. And let's paint these legs here just
to cadmium red. Now let's introduce also
this darker version, that is cadmium red mixed
with ultramarine blue. Probably I will need to mix
a bit more of color here and a bit of ultramarine blue here. In some shadows here
from this side. You can add a bit
more to the legs from one side, from inner side. Then they will look more
like real legs with some shadows and with
some volume here, a probably for here. Let's introduce a bit more. If it's still wet,
then don't touch. If it has got dry,
then you can add a bit more of dark
lo in that area. Our crab is ready now. We'll have to wait until it
will get completely dry, and then we'll be able
to remove sea salt. And to see the effect
which it has created, it seems that my crab has got already dry and I
can remove the salt. Here we have a
really nice texture. I think that it gives
some of this hint that this crap is just
came out from seawater. Just having sun bing.
7. Watercolor Jelly fish: The next secreta, which
we are going to paint, is going to be jellyfish. For this, I will use
the following colors. Magenta, royal blue,
or also you can use ultramarine blue violet
or acrid on violet. Also, I will use salt. Have this prepared and let's
start with under drawing. That is going to
be quite simple, just half circle like this. And for here is coming
this part which helps to move jellyfish
legs, let's say like this. Okay, so let's paint also ice funny ones. Then I remove a bit the
pencil line to make it quite light with waterproof liner. I'm drawing the ice. I'm going to use two brushes, one with clean water just to
moisture this part of paper, and another one to
introduce the color. We will start first covering this area with
water, just clean water. Pay attention not to
touch this area with ice because otherwise the ice
won't be white like this. And this lower part, just some kind of
moments like this. We will start with magenta. We will introduce,
or you can take, any other purple
color which you have. Let's introduce in these areas. Next one is going to be blue. I'm going to use royal blue
here in the lower part. Introduce this blue when
mixing with magenta, it's turning a bit into violet. Do not leave white spaces. And here, just three
movements like this. Now we'll add the darker
accents with violet here in the lower part here
from this side, here in these areas. Now it's time to add
really quickly salt, salt. I'm going to place
in the lower part here like this and
also on the legs. Yeah, it seems that
this part we have done just that extra salt which
is not necessary now. We'll have to wait until the paint will get
completely dry, Then we will be able to remove salt and to see those effects
which it has created. Once the paint has got dry
and I have removed the salt, my jellyfish looks like this. I think that effects with salt. I like my jellyfish. I hope that your
jellyfish is also as, as my one good job.
8. Watercolor Octopus: Our music creature
which we are going to paint is this octopus. That we will need the
following colors. Cobalt, turquoise, or
you can take another. Any blue, which you have Magenta or Kinocdonrose or Med Rose. Then Kinocdon violet. And let also yellow for star, also will need salt. Also salt nearby. Let's start with
under drawing here. I start with circle, that is going to be the head. Then I just remove one part of this circle here is going to
be the head of my octopus. Like this. Then that
is to add many legs. Feel free to create your own octopus with as
many legs as you wish. The shape which you like, that is completely your
fantasy and how you imagine looks like your octopus. My one is going to be quite
thoughtful like this. What I'm going to
eat for dinner. One more leg for here, probably one more. This way it will get lost
completely with so many legs. You can create as
many legs as you wish the way you would like
them to be located here, we will add ice. Mmm like looking forward to that dinner here. Some little star just like this. My idea that here is
going to be like hair, it's my imagination of octopus, my one will look like this. I will remove some extra pencil lines that not to make them so thick that they won't
spoil the color painting. Just feel free to create any
shape of octopus you like. Then we create some
funny textures. I started with
waterproof marker, just making the eyes like this, the mouse as a star. Also, I will separate it. I will remove more pencil lines. Let's get started. First,
I cover with clean water. I'm going to use two brushes, one for covering with
clean water is a shape, and another one for
introducing the color. Here just with clean water. Like this here, the
legs, too many legs. Let's introduce
the colors first, which we are going to introduce. That is cobalti color, which I was looking for here. I'm introducing for the
whole body, this is cobalt. Introduce quite
quickly the colors so that the surface won't get dry. In case it will get dry. Just again, that area where you're going to
introduce the color, make it wet with clean water
and keep on adding colors. I will introduce a bit
more concentrated in some areas around the ice. Here the next color which
we are going to add that is going to be magenta
or Kinecdon rose. I will add mainly
here where there is I have octopus gold, let's say like this Here she has some really
beautiful hairstyle. Then in the spots this here we will introduce
salt in the area of legs. And here we need to move
quite quickly so that these surfaces will be still wet when we're going
to introduce the salt. Then I'm adding
kind violet here, this leg and also here. This area of, from this
side a bit for here. And the area of
here like this are here a bit darker. Occasionally, I have introduced some color on the mouse
and it has disappeared. I remove, just with clean brush, you just remove the color. It's clean. Dry brush
a bit more here. Probably now we need to move
quite quickly to add salt. I will add a bit more
color here and here. It's just like trying to
make some also dark accents and this will create the
illusion of volume for here. I'm introducing the salt
in this area, on the legs. I think that there is some special word for
the legs of octopus. But unfortunately, I
don't remember it. That's why I call
this legs like this. I think enough salt now. We will have to wait
till everything will get dry and we'll be able
to remove the salt and to see the effects
which it has created. And we'll finish
painting the star. I will paint it yellow. You can choose any color
which you like, like this. So our cute Octopus is ready. Okay, it seems like it has
got dry already, the paint. So let's remove the salt. Here is my octopus,
really beautiful. The only thing that I
would say that I have placed salt a bit too late, the effects aren't
really strong. But it gives some texture
and quite nice effect. If you haven't got any
texture from salt, it means that probably you have placed it already too late. Or maybe too early when it
was too much like water. But in this case, I
think it was too late. And just try again. And for sure at some moment, you will manage to create these beautiful
textures with salt.
9. Watercolor Sea Horse: Now turn of our new sea friend, that is going to be sea horse. For this, we will need
the following colors. That is, a cadmium yellow, olive green green,
and ultramarine blue. Also, we will use sea salt for creating some
interesting textures. Let's start with under drawing. It could be a bit more
complicated the shape, but for sure you will manage. We will start with ice white big eyes looking
for him and another eye, we don't see it completely. That is going to be like this. Then let's create more or less like this is going
to be the nose, the mouth like this. Then it goes lower and
finishes this way. Then going up, we are
making this shape for here. It goes on another line. It has this using half circles, actually, even a
bit more probably like this here, this way. And then his tail is
finishing like this. It's going to be like this. For here. Here they
have some wings, I'm not sure how
they are called, but something which
helps them to move for here is going to be some another hairstyle,
let's call it like this. I think that we are
ready with the drawing. Let's make with the
waterproof marker. Let's draw the ice. Another H. Yeah. Now, just with a razor, I'm removing some extra lines so that they won't be so thick. You can create your own
version of sea horse. I'm just showing how it's like my way of interpreting
the shapes of sea horse. Let's make the surface have
also sea salt prepared, we are going to use it
for creating textures. Let's get started here a bit more of clean
water like this. I'm just covering the whole
body with clean water. Now let's start with colors. I'm going first to
introduce cadmium yellow. Just with some free
brush strokes, just enjoy painting and adding the colors and to
see how they are mixing. That is really relaxing. Usually the best
results you get when you have really
enjoyed the process, then actually the
result doesn't matter, as it usually happens. Then the result is
really beautiful. You see how it has happened. I have enjoyed, I have enjoyed, and that was the most important, and I didn't care
what was the result. Here we're introducing olive
green, our second color. We're introducing
it, starting from the border and going more down like into the
depths of his body. Why is this here
more olive green. Here. Like this brush strokes, we're making the wings a
bit more from this side. It starts to get
dryad, my paper. We'll need to move
a bit quicker here. I'm just brush strokes
creating some, I don't know this
texture, this hairstyle, what has now we will need to mix olive
green or just normal green, which you have green
with ultramarine blue. That is going to be like
quite dark value of green. I will use it in the shadows. For example, here just
with some brush strokes. Then this part here to
introduce some lines here. Also some lines a bit more color and here as well
create some texture. One more is going
to be for here, for the wing and probably
let's add a bit more dark. This mixture of green with ultramarine green,
with ultramarine blue. Here I have, you can see the
paint is quite concentrated and we will add it
here in this area. Just the lines and free brush strokes here. Some lines as well, for here. Darker values just
with brush strokes for here, for here. Also to make it a bit
like to separate the wing from the body like this. Now let's add quite
quickly, salt, salt, we're going to add
here in this part, I'm afraid that it could
be already too late that it has got the paint. But let's see which
effect we will get here. We can add some other for here, but I wouldn't touch this part. Or you can try also
to place salt for this area and to see which
effect it will create. But I think that I'm
looking more for this effect in this
area where there is more interest in the texture then our
sea horse is ready. We'll need now to wait until
it will get dry completely, and then we will
be able to remove the salt and to see which
effects it has created. It seems that already
the pain has got dry. Let's have a look
at which effect we will get with the salt. Because it seems that I
have placed it quite late. I'm not sure whether it
will have any effect. Yeah, you can see
that in my case, I have placed salt too late. Actually, it hasn't
created any texture. But anyway, I feel quite
happy with my sea horse. I hope that in your case, you have got some texture. If not, just try once again and it's just to
catch the moment when you need to place
the sea salt and to get the interesting effect.
10. Watercolor Sea Shell: The next creature which
we are going to paint is a snail with such
really funny shell. For this, I have prepared
the following colors. That is, a headmum yellow
kind violet or violet, cobalt turquois, or any blue
which you are going to use. And also burnt sienna or
any other contrast color. It could be also red or
some orange colors which you can use for the
colors of the shell. Also have prepared
some transparent clean that will need it for creating
also some funny effects. Let's start with under drawing. For here, I will start with ice. Here is a really funny effect. When you are making
another eye a bit upper, it just looks funnier. Then let's make it like this here, it's going
to be like this. Then the main body, just the way you feel like this one is
going to be like this. Probably too big. I
don't know. We'll see. The shell is going to
be just like this. It's a really huge snail
I'm going to make. Okay. But then definitely for sure
that you will be able quite clearly everything,
all the process. I remove some pencil
lines with a razor, then with the waterproof marker, I'm drawing the dice. This here is another eye and what I'm missing
is the mouse. Like this, it's more cheerful and it will
make everyone to smile. Then let's remove some
pencil lines here. I would like to make
it more like this. Then it looks, it's for here that it won't be
noticeable thick pencil lines, otherwise it will be quite
complicated to remove them. Once we will place the layer of water colors, then let's start. We will make in two parts. First the body, we will
use cadmium yellow. I will use kind violet or
also you can use violet on. We'll place the colors, we will use some sea
salt for this area. Second part, we will
make the shell. We will introduce colors, which is going to
be, in my case, that is cobalt turquoise and burn Siena and a
bit of Kinocdon violet. Then we will place cling
for creating the texture. Let's start with the body. I'm using two brushes, one for covering
with clean water and another one for
introducing the color. Now let's cover with water the area of the
body of the snail. Be careful not to introduce the water into the mouth
and into the eyes, otherwise they won't
be white anymore. We will start with
cadmium yellow. Let's introduce cadmium
yellow, mainly. It should be in the
middle part here, a bit here around the mouse. Now let's introduce violet
or Kinocrydon wallet, if you have this beautiful
color. The same for here. Kinocrydon wallet, we
introduce starting from the border in such way it creates also of
volume like this. Also it helps to
separate one part of the body from
another like this to introduce just several
so that it won't be everything uniform here. We have already the
body of the snail. Let's play some salt here. Just on the body, it will create also
quite nice texture. I hope so. Like this. Meanwhile, let's move
to another part. I would like to ask you to have prepared the clink already. Otherwise, the clink we need to place even faster than salt. Let's start with making
the area of shell. Also, have prepared your colors. Some blue, Some
orange could be or red and purple, or violet. Or a carden violet. Or you can choose other
colors and create some beautiful
color combination. Okay, let's start with
introducing the color. I will start with cobalt Tq. Let's add quite
concentrated color because then with water, it will get completely like really clear light and
it won't be noticeable. Let's introduce quite
well the color. Next one I'm going to
introduce Burn Siena. I like the combination
of these two colors. They give quite
interesting effects. Just like creating the lines
or this here for this side, a bit more of Burn Siena, really cheerful color and also add it really concentrated. Otherwise it will disappear
and it won't be noticeable. Now let's add Kinocrydon wallet. Kinochrydon wallet,
mainly in the lower part. That also it will show a
bit like the separation between the layers
from this side. For here, from this
side I see that it's too much water and here it can create some dirty parts. I remove like this actually with Ingrid and Violet. I'm making now like to show the division between different
layers and to create a bit more volume to show that there are light areas and also
there are dark areas. I will add a bit more
of cobalt turquoise. It will be more concentrated. Now. It is time
to add our cling. Just make it with wrinkles. But it's better to make
wrinkles more like flat. Don't make, this won't
give any effect. The wrinkles should be this way. Then we start to
place our cling. Let's press it really
well, this way. Like this. It could be that the colors has go out from their outline. But we'll see here I
have placed my cling now we'll have to wait
till it will get dry quite well here, the colors. And then we will
be able to remove the cling as well to get dry. This part, this part
will take, I think, a bit longer then
we will be able to remove the sea salt and to see which effect it has created, It seems that now the
paint is completely dry. I will try to remove the cling, we'll see what we will get. A beautiful, I really
like how it has appeared, the pattern and really beautiful texture and quite
nice, I like it. I hope that you also has got some really unique pattern on the shell and looking
forward to see it also. Let's remove now the salt. We will see which effect
has created the salt. It just also some texture
and it seems nice. I think that I'm quite
happy with my snail.
11. Watercolor Sea star: For painting star, we will
need the following colors. Cadmium yellow and metal, red and olive green. Also, have prepared sea salt, some waterproof marker
eraser and pencil. Let's start first with
preliminary under drawing, I will start just from that. We will make five lines. There would be where the
skeleton of our C star. Then we're just connecting
them like this, like this. This one I have made a bit in another direction like this. Our outline of our star
is ready for my star. I'm using just normal watercolor
paper now let's paint ice looking in that direction. If you're done with
the drawing then with a soft eraser, need as. I'm just removing the
line so that it won't be so noticeable that it would be quite light line with
waterproof marker. I'm drawing the ice. Remember to leave
a small white area in the eye so that it
would be more alive, the effect that the
star is looking at us. Then I'm going to
use two brushes. One is for making wet
just with clean water, the area of the sea star. Another brush is for
introducing the color. Prepare your brushes. We will start with the fun part. Also have prepared
nearby sea salt or any other salt which
we are going to use that to introduce
it quite quickly. Then we start with
covering the surface. Be attentive not to
make wet the ice. That's why the color will get into the ice
and there won't be any more white ones like
this quite quickly. I see, for example,
that I have introduced some water into the
eyes of my sister. What you can do if it has
happened to you as well, just with the paper
towel like this and you remove this like this. You have removed already
this water which can spoil here like this. Now the surface is quite wet and let's start
adding color. First, I add directly
from the pen yellow. That is cadmium yellow, which we have used also
for our exercises. I'm covering the
whole surface with cadmium yellow, like this. Then I'm introducing
also quite quickly, second color that is made red. I'm starting to edit
from the outside, following the
outline of the star. It's really bright and cheerful. Here I add a bit more color, probably a bit for here. Now we will mix some color, which we are going to
use to show the shadow, to give more volume
to the star that is mixing madd with a
bit of olive green. The color is going to be a
bit more like brownish red. This, we will add
in this area here from this side
probably a bit more. And for here law
now really quickly, let's add some salt, salt. I'm going to add just in the
middle part that it will create some texture but it won't destroy the
outline of the star. I want that the
outline would be like the points of legs going
to be quite defined. The texture of the star is going to be more in the
middle part of the star. Here we can help to join the colors just
with clean brush. We are done. Now we'll have to leave our start to get dry. Once it will get dry completely, we will be able to
remove the salt and to see which effects
it has created. Now it seems that it has got
dry completely the paint. Let's remove the salt and see the texture which
it has created. Yeah, that now our star looks like from the sea
or from some ocean. Really beautiful this texture. And I really like how
it has turned out. I hope that you're also
happy with your stars.
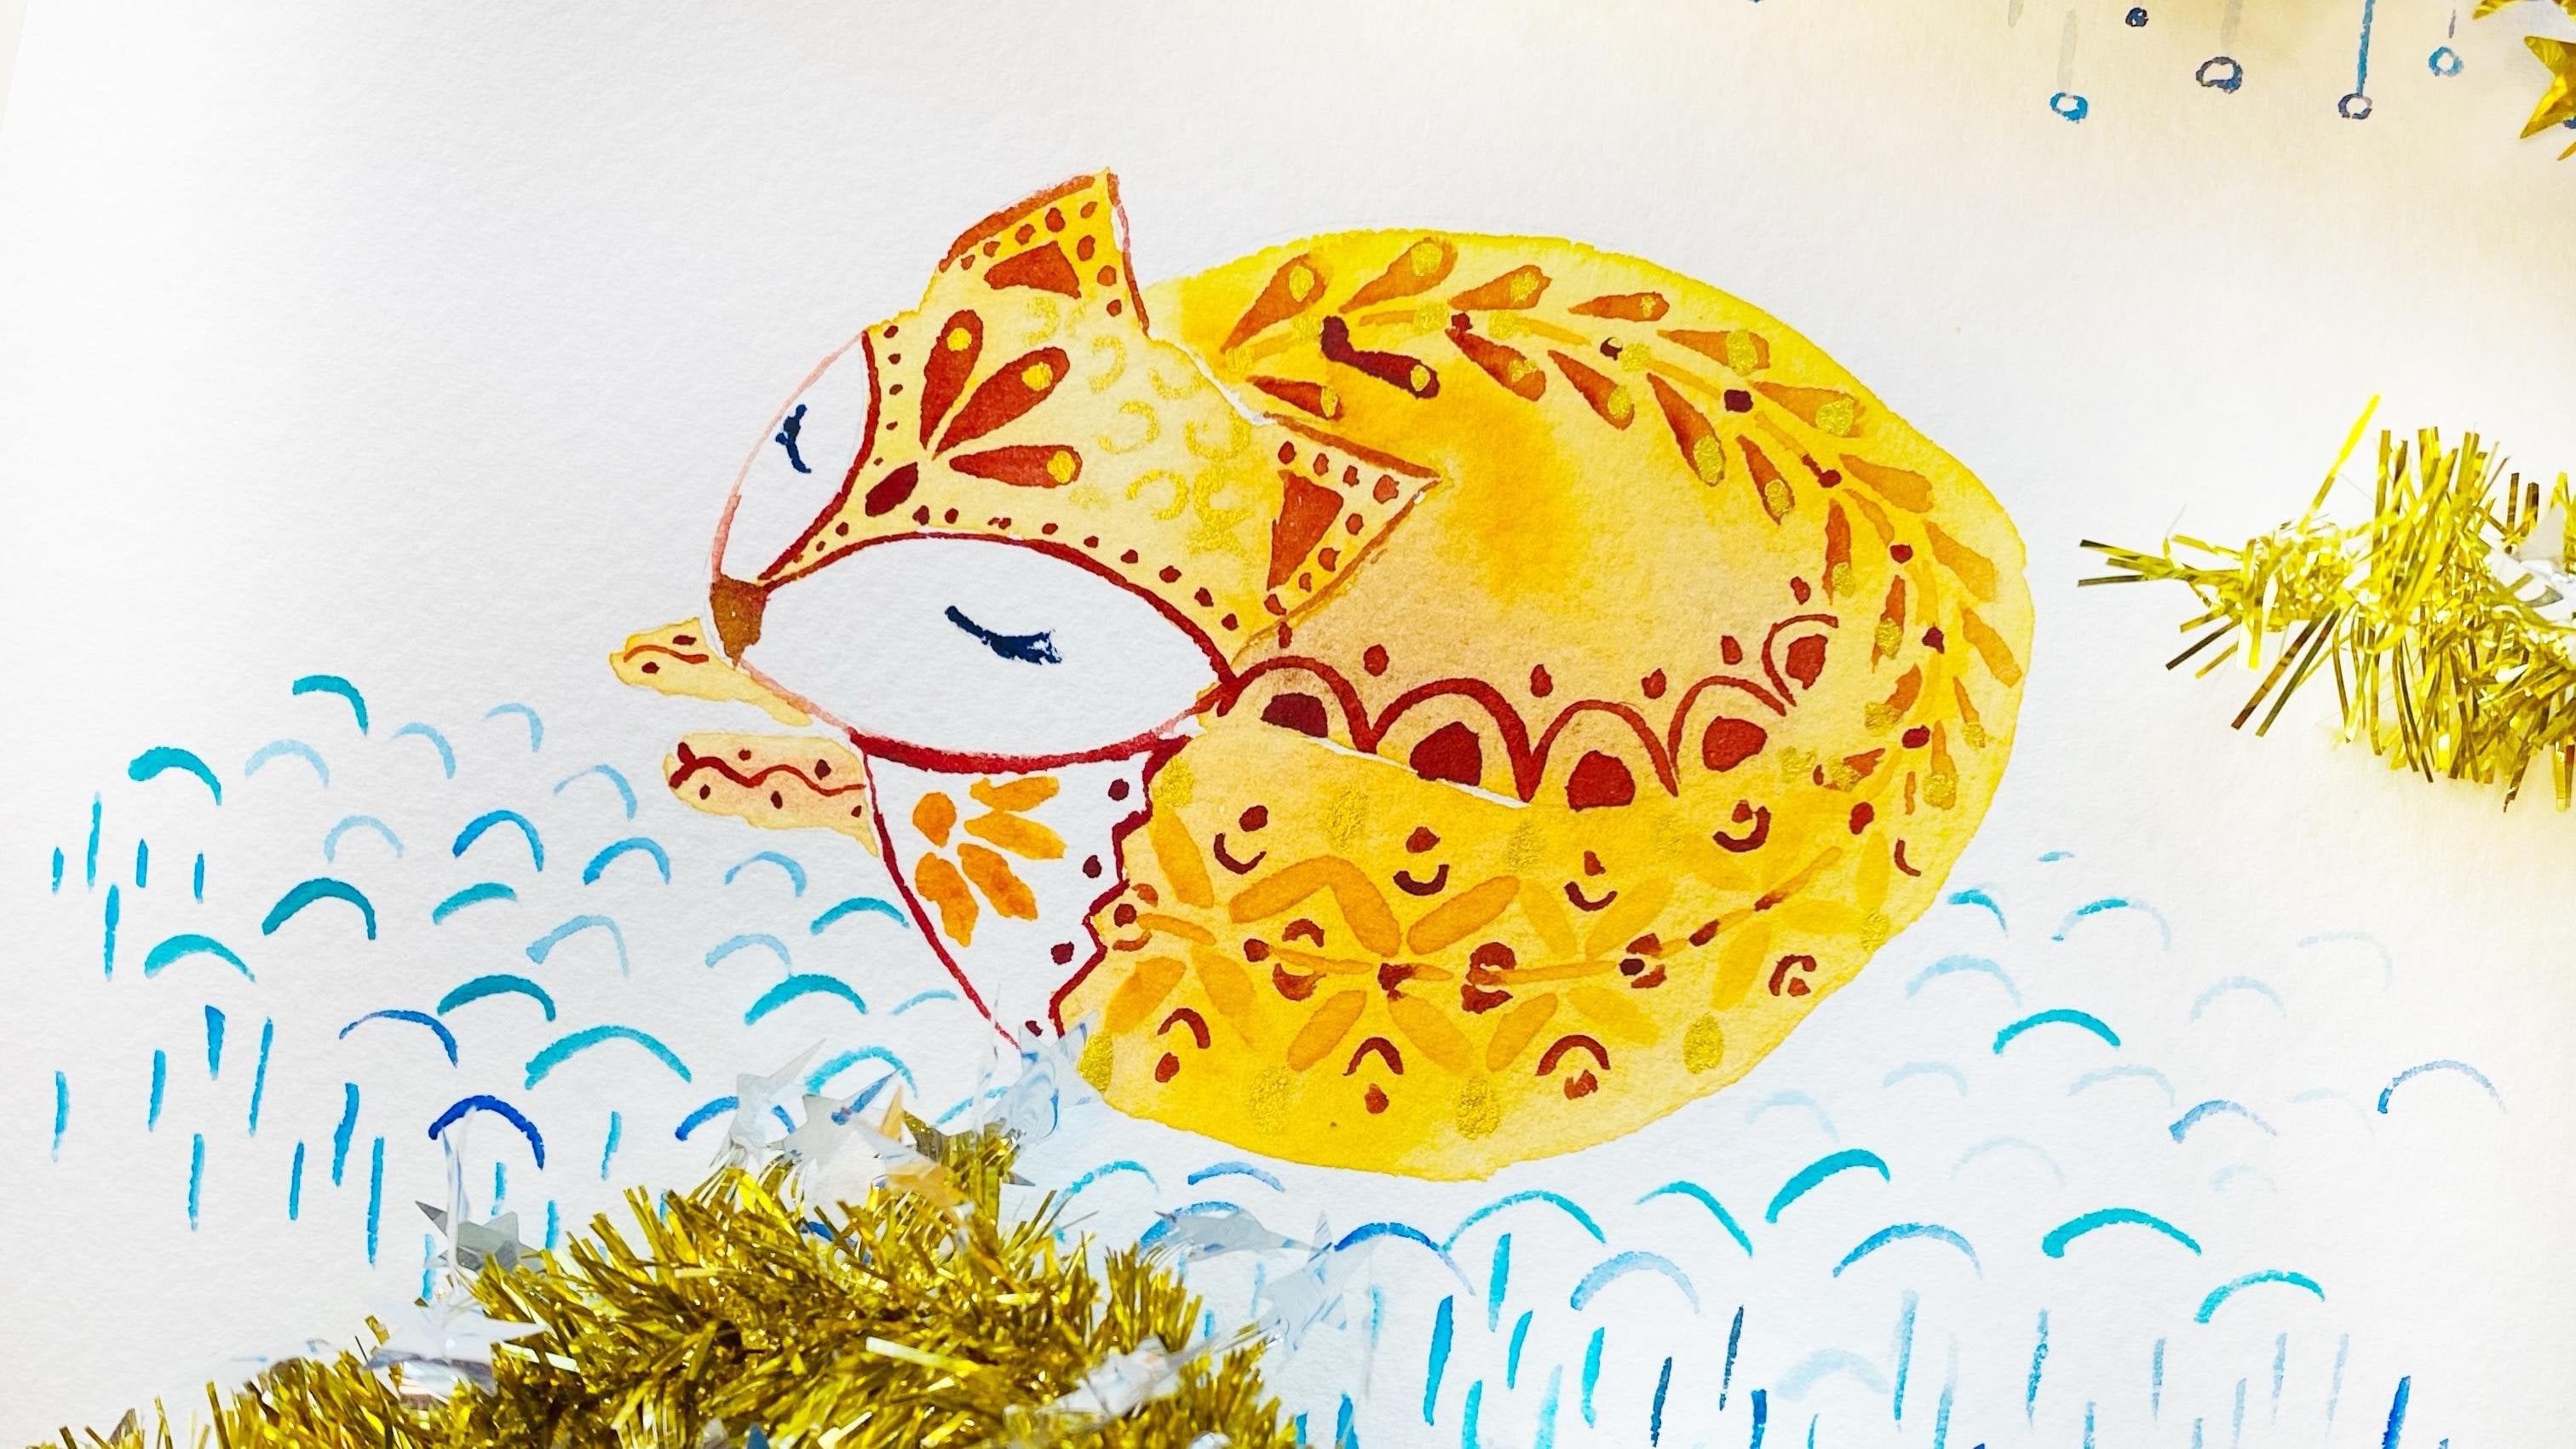
12. Watercolor Turtle: Our next se creature
is going to be Turtle. Have prepared the following colors which we
are going to use. That is cadmium yellow, olive green, ultramarine blue, metered and incred violet. Also have prepared a piece
of cling which we are going to use for creating a
pattern on the shelf. Just have prepared already. Let's start with the drawing
that we will start from the shelf like this or any
other shape which you like. And then the head and my turtle is
going to look in this direction and some mouse that my one is going to smile. She's really happy.
It's really nice, sunny day. She's enjoying that. We're painting here. Here
are going to be the legs. Another leg here on the first leg is just somewhere for there
and we don't see it. I yeah. More or less a bit smaller. So here we have our turtle. Let's start with a
waterproof marker. I'm making the dies and the mouse like this. Then I remove pencil
lines with soft eraser. We are ready. Let's start with
legs and with head. Then we will finish
painting the shell. I use two brushes, one for introducing the
color and another one for making the surface. Just with clean
water, we're covering the areas avoiding the area of ice so that not to
introduce the water here. The legs, let's make first this leg and then we
will move to another one. We'll start with cadmium yellow. I introduce quite a
lot of cadmium yellow. It's quite concentrated
directly from the pen. For here a bit more. Next one is going
to be olive green. I also take it
directly from the pen, it's quite concentrated color. I'm starting to introduce
it from the outer part, like this, my really
happy turtle, and then also the legs. We'll hear from this side, and now we will add a
bit like these shadows. For this, I will
use olive green, with a bit of ultramarine,
ultramarine blue. Then I will get this
dark area color. I introduce it just where. I assume that there is
a shadow just here. A bit more of this color
that is olive green mixed with ultramarine
blue here. Now let's move to other legs, this one just making
wet with clean water. And this one, let's
introduce the color first. It's going to be cadmium yellow. I noticed that I have
introduced lots of water. That you can notice
that it's like a pedal. I just removing it with
clean brush like this. Again, I introduce cadmium
yellow in this part here. Now a bit more of olive
green from outside, towards the center like this. For here, the turtle is getting happier
because it gets more colorful and full of life. Then I introduce a bit more
of this darker somewhere, probably here and here. Now is the funniest part that we're going to create
a pattern on the shell. For this, we will make wet this area and we'll
use three colors. That is cadmium yellow,
Madertkdon violet. Or you can use violet. And then once we will introduce the color,
we will use clean. We will need to
make the wrinkles. Also, pay attention
to make wrinkles this way and not like this. This won't work, it won't
create any texture. That's why I have also your
cling here somewhere nearby. To act quite quickly, then let's start to make
wet first with clean water, this surface like this. Try not to touch those
areas which have been already painted so
that not to move the paint. Now, let's add the color
first is cadmium yellow. Try to make, to edit more in
the top part of the shell. For here, like this. Next one, Madd, I'm also take
it directly from the pen. Let's here more color,
more concentrated color. Because later when we will add, the color will be removed partly by the cling and
it won't be so bright. That's why don't worry
to add quite a lot of bright color here. Now, violet or in
a crud on violet we're introducing here
in the lower part, also quite concentrated, really beautiful color here in
combination with olive green, it also looks really beautiful. And here a bit from this side, have prepared
already your clean. We are going to create
some really nice textures. Make the wrinkles. The
more wrinkles you make, the more interesting
mosaic you will get. Then let's start to place it. Also while placing, you can
create more and more wrinkles while placing the cling one, it seems like it has
been placed at the end. You have to press
it really well, so it will get stuck and want more like this. And now we will have to wait until the paint will get
dry and we will be able to remove the cling and to see which beautiful effect we have. Receipt Now, patience. And let's wait a while. Meanwhile, you can
paint another creature. It seems that my turtle
has got dry completely. And now we can remove the, let's see what we have here. A beautiful pattern. And it gives also some
volume to the shell. And I really like it. I hope that your turtle as well has really nice and
very unique shell.
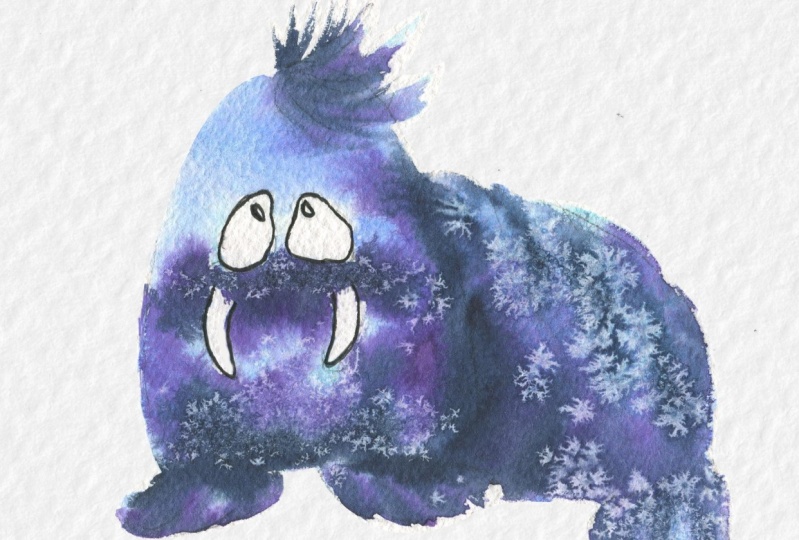
13. Watercolor Walrus: Now let's paint Walrus. First, let's prepare the colors which we are going to use. I will use the following colors. That is u, cobalurquoisen, I will use blue, which is called
royal blue violet. Also, I will use indigo
prepare some similar colors, or maybe you may
choose other ones. Also have sea salt prepared. Let's start with the drawing that is going to be like this, maybe a bit wider Here, I will make the F like this. Here will be a second part, and here will be the back feet, might be like this. And here we will make some funny ice outer teeth. Here, this mustache, I will make some funny hairstyle so
that it won't be so boring. Let's remove a bit pencil
lines with waterproof liner. I'm making eyes first, like this, really big eyes. And another now I will remove the pencil lines
so that they won't be so remarkable here. And also let's make
with liner the areas. I'm going to use two brushes, one for clean water to cover these areas with
water to make them damp. Another brush for introducing
the color quite quickly. We are making this area be
attentive not to add water in the area of is like this. And this part also keep an eye so that if one
of the parts will get dry, just make it wet again. But make it wet before
introducing the color. Introducing the paint. I will start with
cobalt turquoise. Choose any light
blue which you have, we'll start to
introduce it a bit. Funny hairstyle like this over here and then the backside
as well cover quite well. This is going to be like
the light part here as we can but not a lot
because these areas, we will make them darker
from the beginning. Here we have now
let's introduce, I will use royal blue, that is a bit different. That is a mixture of violet. That is a mixture
of violet and blue, ultramarine blue,
and also white. You can add other
colors as well, so other different
blues or maybe your one is going to be
pinkish. I don't know. Just try different colors. Use those colors which you like. Then for sure you will get
something really beautiful. Like this. Now I will introduce Wallet in the dark
areas, for example. For here I will start to
edit from the lower part and go in upper like this here. It's going to be this way. He also more in the lower part. Mm hm. And a bit more
of violet for here. This part is
starting to get dry. We need to move quite quickly. A bit of hair looks
much more beautiful. Here is some mustache. Let's say a bit
darker part for this. There probably I
think like this. Now we will introduce the
darkest color, that is indigo. Or you can use some black mixed with the ultramarine blue. So that is like some lines to show the volume for
here, in the lower part. For here, here some more lines separating, introducing now the
darkest color in order to create this
illusion of volume. I think we already done. Yeah, and here let's
introduce several lines. Now he looks really cute. Now we need to move quite
quickly and to add some salt, I'm going to add salt in this part where
there is Mustache. Let's see which,
in effect it will create just this line here. This line I'm adding salt. And here in the lowest part, for here, just in some areas, not many like this. And here I am ready
with my Waldr. Now we will have
to wait until it will get dry
completely the paint. Then we will be able to remove the salt and to see which
effects it has created. That's how looks my walrus
once I have removed the salt. Really interesting this
effect. What about your one?
14. Watercolor Whale: Now we are going to paint whale. For this, we'll need
the following colors. Turquoise, coal,
turquoise, ultramarine, blue violet, and indigo. Just prepare some similar
colors which you have. And we will start
with under join. Also prepare salt.
We will need salt. I'm going to use fine sea salt. That is going to be quite easy. That is more or
less circle shape. I will take it a bit for here. Then the tail just like this. My wail also will be from here there would be water like this. Let's make the ice. I see it like this.
You can create any whale and it's completely
up to your imagination. I will show only the colors and the textures
which you can create, but I'm sure that everyone
will get their own whale. Generally, all the creatures are going to be
really beautiful, happy, and full of waterproof. Adding the ice, the mouse then remove some pencil lines. We will start with adding color. Now let's start with painting. I will use two brushes, one for clean water to dampen
this area of the whale, and another one for introducing the color Just with clean water. We are making the
shape of whale. Be attentive to make the area of ice that we
need to leave them white. We will paint in two parts. First the body and then separately we'll paint
this boof of water. A my whale is almost wet and is ready to swim. We will start with
Cobal turquoise, or any other light blue
which you have here. Here, let's introduce
the color quite quickly. Because the water gets dry, the next color is going
to be ultramarine blue. So, and let's start to edit here in the tale for here. Now let's add violet. Just enjoy the process. That is the most
important thing. Paint the whale the way you see, the way you imagine all whales
are going to be different, but really lovely and
cheerful and happy. Just enjoy the process. I made the color mainly from the outer side and trying to live light areas in the middle. But it just your imagination. Now we will introduce
the darkest color that is going to be here in the lower part here. But before, let's
add a bit more of ultramarine blue in the
top part of the tail. More concentrated just in the
top part of the tail here. Now, Indigo, the darkest
color we will add here. At the very bottom. Yeah, But just a bit, not too much. And now it's time to add salt. I'm going to add salt
here in the bottom. Yeah, really nice. Then also, I will place
here on the top part of the tail that it
will create also the effect of drops of
seawater or some nice texture. That's it. I know probably I have
introduced salt too early. Let's add a bit more
salt for this area. Now let's move to this part. For this, we are going to use cobalt turquoise and
ultramarine blue. Or you can choose
any light blue color and a bit darker color. First, we will
make wet this area also have prepared the salt. We will place it here
in the top part. This part you can see that it's already has
introduced some water. This. Let's add cobalt quiz. Just a bit like this, mainly in the top part. And then a bit of
ultramarine blue also in the top part for here. And this more or less like this. Now let's place salt
on the top like this. Just the top area. Remove some extra salt
if it has fallen. Now it's the most
complicated part, to wait till it will
get dry in order to be able to see all those effects
which it has created. But here you can notice that salt started to
create beautiful effects. It looks really nice
once the pain gas, God, I have removed salt here. How looks my wall with the really beautiful
textures and salt effects. I hope that you have enjoyed
the process. Good job.
15. Final Thoughts: Welcome back and congratulations on completing this class. I do hope that you have painted
with me and have enjoyed the process and not just watching and if you
just have watched it. So now I encourage you to take your brush and just play
with colors with water, have fun, feel like this. This is time which you dedicate
to yourself and just to relax and to play with
colors and with textures. So it's really fun when you feel set. I really recommend
you to come back to this class and to create
some funny creatures. Let's have a look at what
we have explored together. In this class, we've
learned some of the most fundamental techniques
of watercolor painting. From brush control
and color blending, to creating stunning textures, capturing the essence
of the creatures. So I hope this
classo will help you unleash your creativity and develop your own unique style. The techniques
shown in the class, you can apply to
any other subject. Just let your
imagination fly and let yourself play with
shapes and colors. Remember what a
color painting is, not just about technical skills, but also about expressing your creativity and
personal style. So keep on painting
and experimenting. I want to express my
gratitude to each of you and everyone because it's really inspiring to see your artwork. So please share in the class
gallery your creations. And I will be glad to
leave you my feedback. If you're going to share
your artworks on Instagram, please do not hesitate
to tag me and to use this hashtag
paint with music so that for sure I will see your artwork and to
support you in your our journey. I'm really
excited to see what you have created and looking forward to hear about your
creative process. Please applaud your creations
to the class gallery. And share your feelings and
your observations during also difficulties which you
have experienced or maybe not during your creative process as well your experiments. It's really interesting to
play with these textures and whether they have managed to get those effects or maybe you have created new effects. So please share this
in the class gallery. If you have any questions
or comments about today's class or looking for any specific advice
related to a cola, please reach me out in
the discussion section. You can also let me know about any subject you'd like to
see in my next class on. If you found this
class useful, please, I would highly
appreciate if you take several moments to leave
me a class review. I enjoy reading
your class reviews and this is something
very inspiring for me to create new
classes for you and to make them better.
But not the least. If you enjoy this class, please follow me to be the
first to know when I launch a new class and when I
post a new giveaway. Thank you once again
for being part of this class and I wish you all the best in your art journey. Just keep on creating.
See my next class, Bye.
 Nina Nyusikart Watercolor, Artist| Art Therapist | Loose Watercolor