Transcripts
1. Introduction: When was the last time
you challenged yourself. Hi, welcome to this class
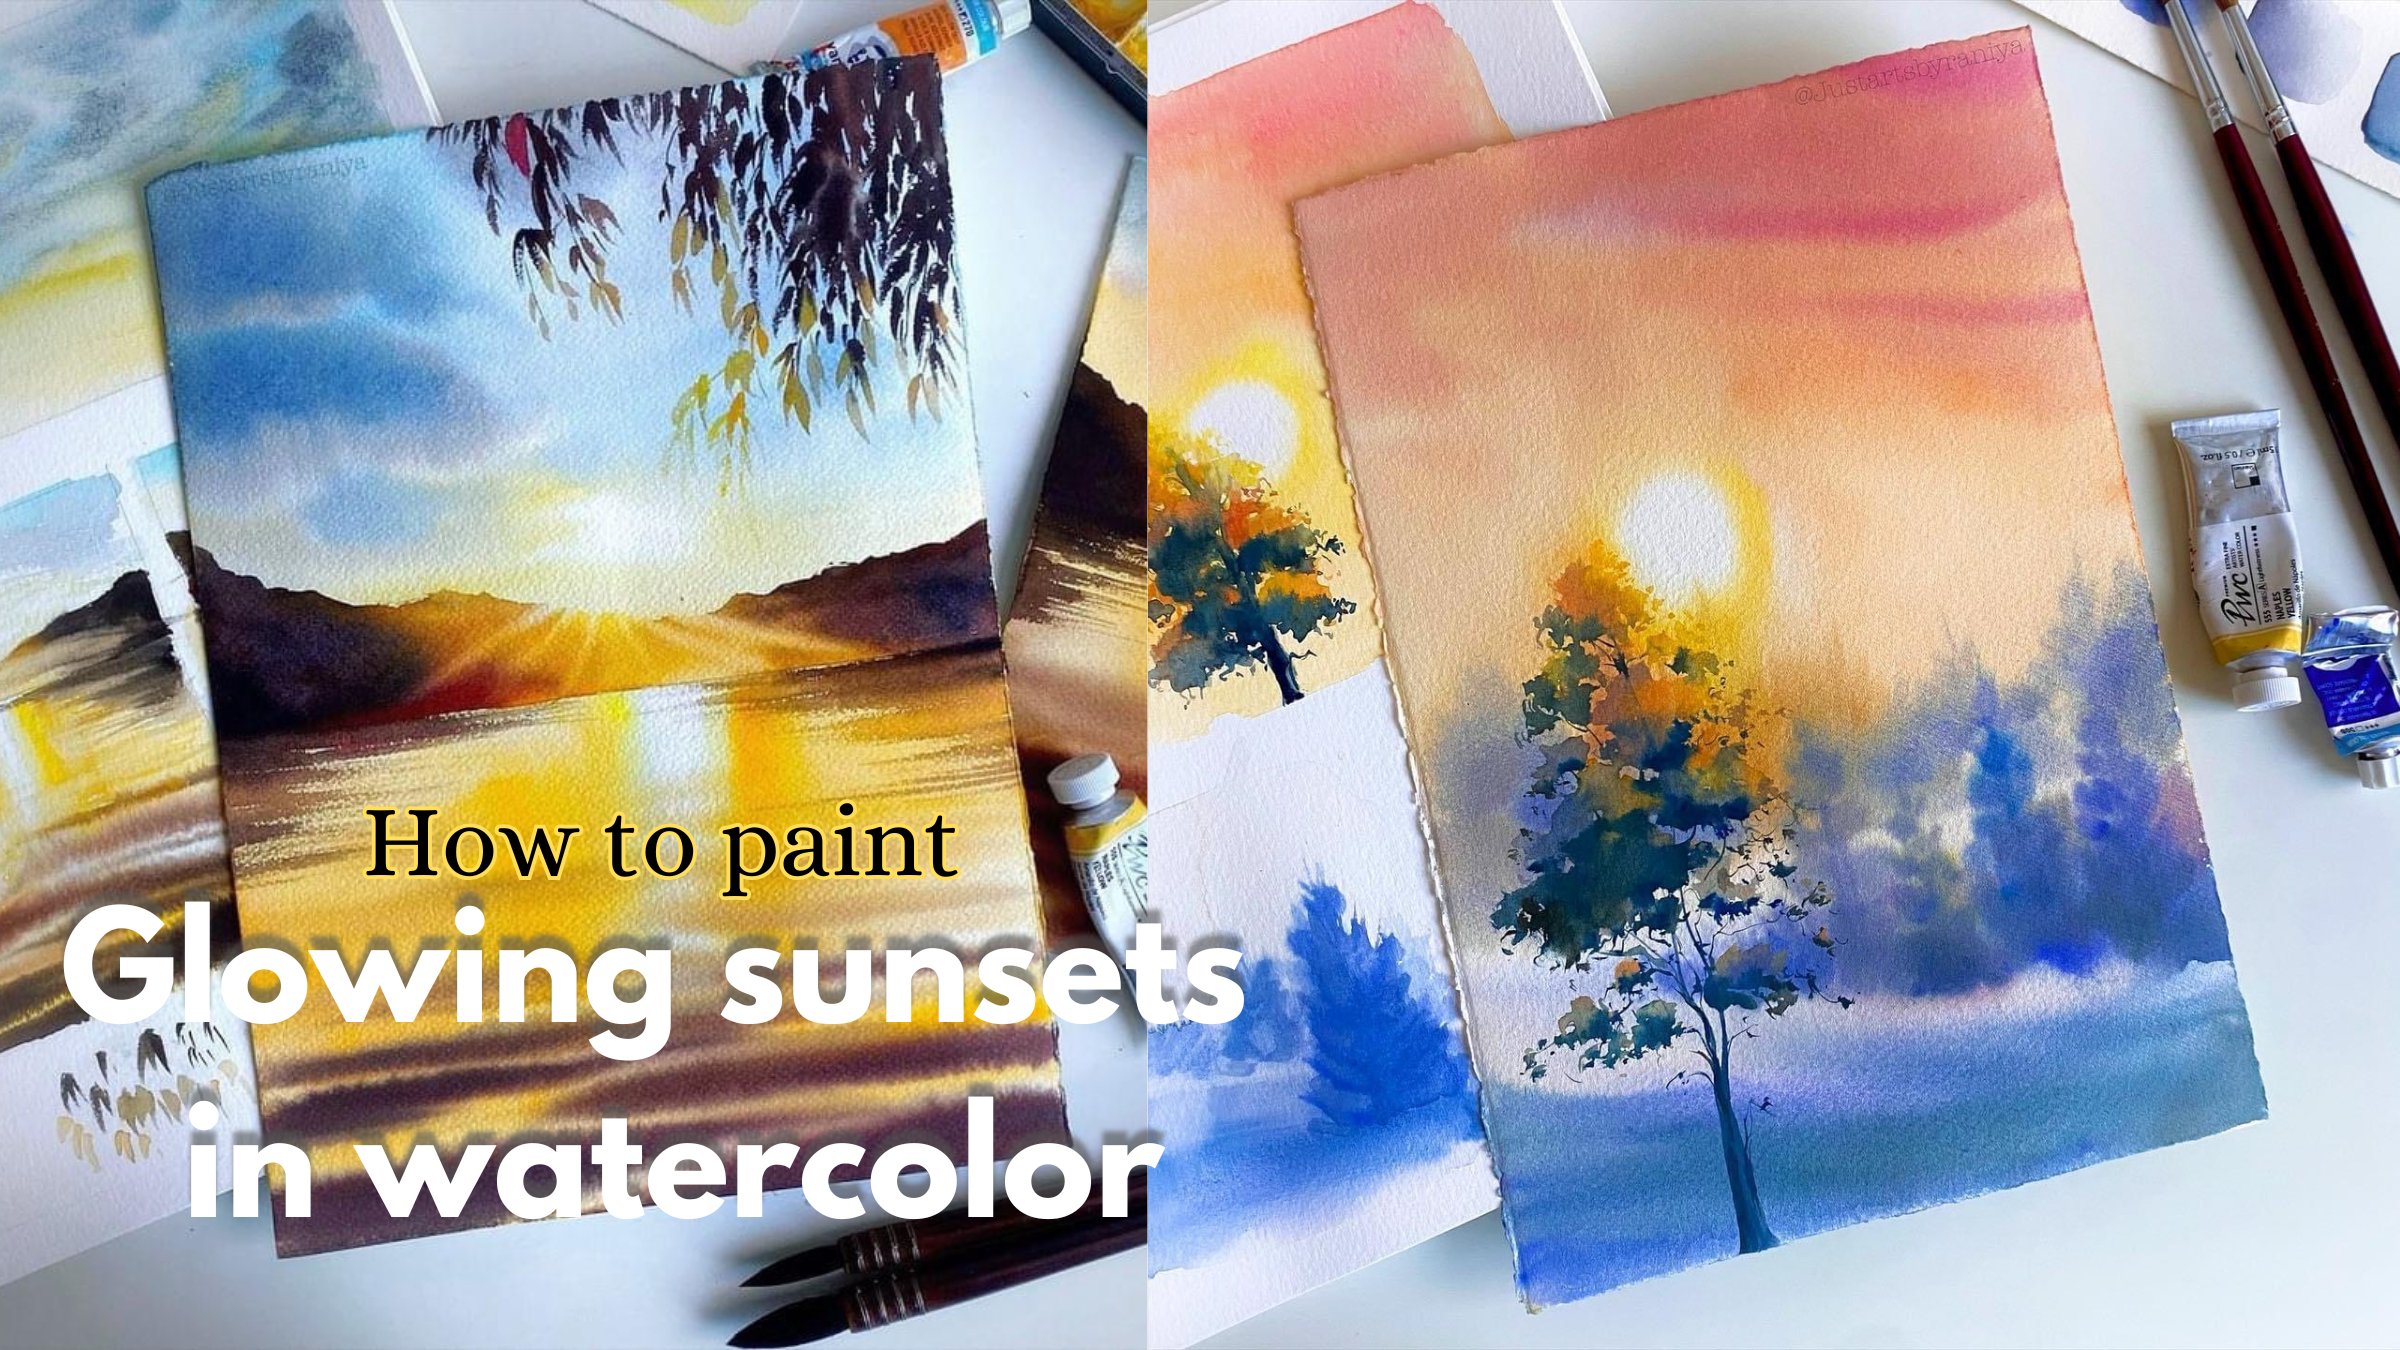
Winter Landscape paintings, a 12 day Watercolor challenge. My name is Rania. I'm
a watercolor artist and educator living in UA. I've been painting
for six years, and landscapes are one of my
favorite subject to paint. You can find me on
Instagram and YouTube where I share all my artwork and
also some painting videos. In this 12 day
Watercolor challenge, we are going to paint 12
beautiful winter landscapes. Each painting will take about 30 to 40
minutes to complete. Each class project,
we'll begin by analyzing the reference picture and
making simple compositions. Next, I'll share with you the watercolor techniques that I often use in my paintings
such as wet and wet layering, lifting and layering techniques and various other brushws. We'll begin our
daily challenge with simple pictures like painting
a terry Sky landscape, a foggy monochrome painting. Then we'll also practice advanced landscape
techniques like painting a glowing light and
reflection Sunlit trees in Sno landscapes, aerial view of a snow
covered village, serene winter sunsets and
northern sky landscape. By end of the challenge, you'll build a consistent
painting habit. Daily practice is one of the most effective ways to
imbrove our painting skills. In this course,
each class project is designed to introduce new techniques and
helping you build confidence and noticeable
progress in your work. This course will definitely push you out of
your comfort zone, but that's where growth happens. You'll need basic
understanding of what color techniques
like wet and wet, wet and dry to make
most of this class. Grab your paints and brushes. Let's get started. I'll
see you in the next video.
2. Materials you'll need: Now let's talk
about the materials we need for this class. In watercolor painting,
using materials has a huge impact and brings a lot of difference
in your artwork. Let me take you through
the materials that I recommend using for
painting landscapes. I always use and
highly recommend 100% cotton watercolor
paper in 300 GSM. This is fabriano artistico rough texture watercolor paper. I love this brand because
of its ability to hold multiple layers
of water and it's easy to work with muskin fluid and for scratching and
lifting techniques. A colors will look very
vibrant after dry. A watercolor block
glued on all sides. We can easily remove the paper from the block after
each painting. The size is 18 to
26 centimeters. You can use any
format you prefer, such as loose sheets, spiral bound pads
or sketchbooks. Now for the paints, I'm
using colors from Rembrandt, Vanco, Shinhan,
and Daniel Smith. We paint each artwork, I will show you the
colors I choose and I will also guide you for
color mixing techniques. But feel free to use
the colors that you have and also I engreage you to choose just a couple
of colors and you can also do color mixing to get a harmonious feel
in your paintings. Now for the brushes, I'll start with these
two hake brushes as most of the painting will
begin with wet and wet layers, so it's easy to cover larger
areas with hake brushes. Also I'll use these two
flat brushes for re wetting the paper during the process and also for some
lifting techniques. Then for the painting, mainly, I'll use this mob brush and also a size eight sable
hair round brush, this by golden maple. I will also use a small size of the same brush for
some dry techniques, maybe this size too. For adding details, I'll use this detailer and this
calligraphy brush for thin lines. Also I'll use some
other materials like muskin fluid and a paper knife for scratching and table salt, a hair dryer to speed
up the process and some cotton cloth tissues
for wiping and lifting, we need to water and
a mixing palette.
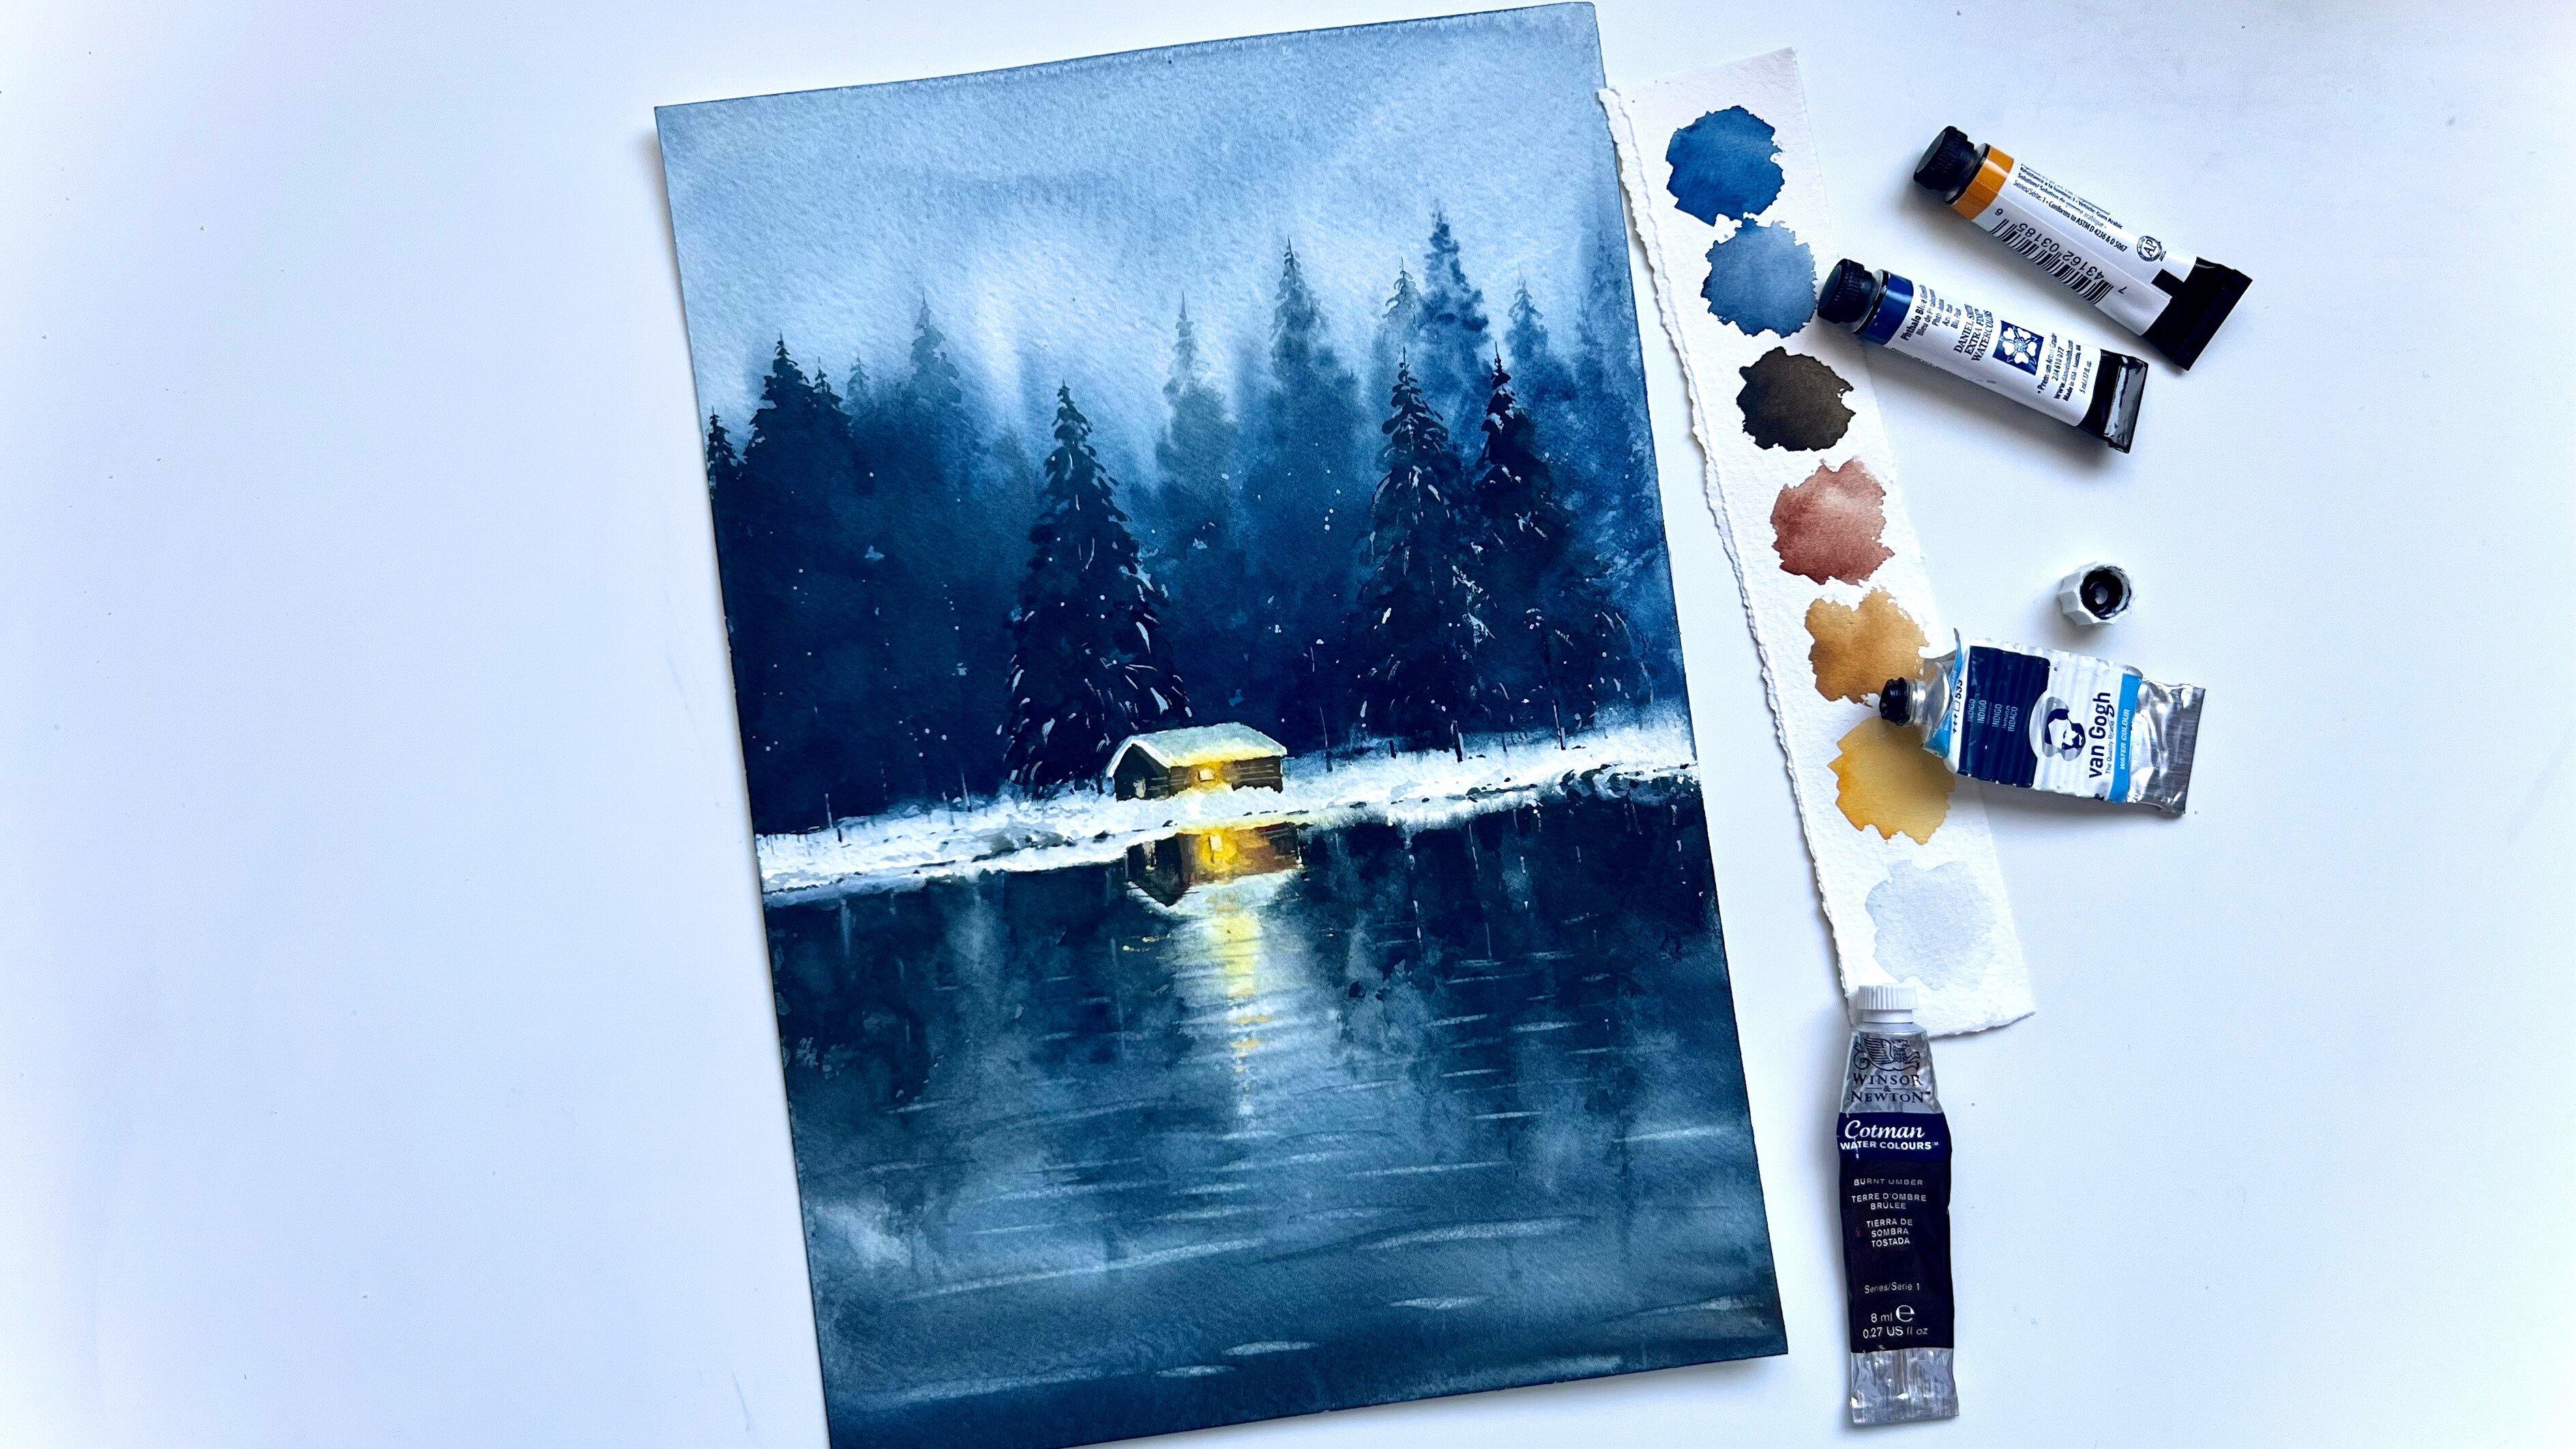
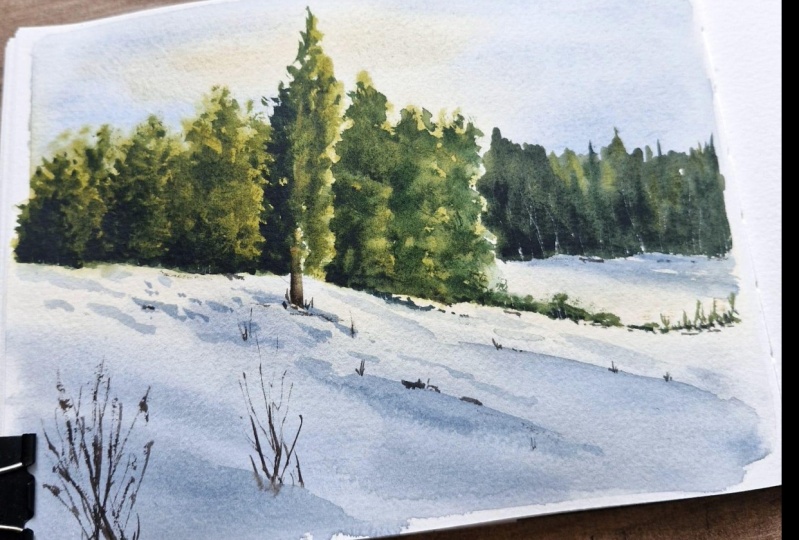
3. Day 1 Class project - Cozy Hut In Mountains: Hi, everyone. Welcome to our winter landscape
painting class. I hope you're ready
for this watercolor challenge with all
your materials and a fresh new mindset. So today, let's start
with our first painting. As you can see in the reference, it's going to be a very
simple nightscape with a starry sky and a house and some mountains
in the background, and also a warm light
coming through the window. So that's the picture we're
going to paint today. So first I'll start
with a simple sketch. We'll only sketch that house and some lines for the
mountain in the background. Most of the landscape is going
to be this starry sky and very little part here is going to be that
snowy land part. So I'm going to fix that
line for the land part, and it's going to be very low. We'll start from here. And also, let's make
it a little wavy, not a straight line. And I'm going to make it a
little higher to this side. Yeah, that's enough.
And in the cinder, I'm going to fix that house. Yeah. First, starting with
two lines vertically. Yeah. And then from here, I'm going to fix that Roof. Yeah. And also you can see
some snow on the roof. So let's add a line
for that snow. So yeah. Let's make it very narrow. Yeah, that's enough. And then I'm going
to fix one square here for that window. Maybe I will fix this roof
a little more thicker. You don't have to follow
the reference exactly. You can make some changes with your own idea
or creativity. Yeah, I will rub that
line in the middle. That's enough. Now, let's start painting. I'll place this box, to get my paper in this position to get a
nice flow of the colors. Yeah. Well, let's start
with painting the sky. I'm going to wet the sky part. I'm not going to wet here
because we need this part very lighter compared to the sky
and the house. So yeah. Around the lines,
I'm going carefully. I'll use this flat brush, and I'm going to
start from here. I'll take some ultramarine, and I'm just filling
that color around here. You can also go over the house like it's
going to be very dark. Comp to the sky again, you can see in the
reference. So yeah. Yeah. Let's make it
a little more darker in the very Background. I'm trying to make
some mountains as again see in the reference. Yeah. And this side also, you can make it very loosely since it's going to
be in the very background. So let's make it blurry
and not very visible. Yeah, and trying to make
some mountain lines. I'm using a flat brush. I think this is
size five by eight. This is wash brush by Princeton. Yeah, that's enough. Let's make it a little more
darker here and there. Paper is started drying. I think I want to make it
a little more smoother, so And as you can see in the reference, we'll also paint
some trees around here in the background. I'm just wiping that
color from the window. Sorry, the house,
but that's okay. We'll paint it with
very dark colors. Yeah. Now I'm going to fill the
sky with very darker colors. So I'll take this
big size wash brush, and before that, I
want to wet the paper. Paper is almost dry now. Yeah. That's it. And I'm going to take some indigo and just
filling that color. You can see very dark effect
around this part in the sky. And you can also blend
it around here a little carefully to make some
cloudy noise effects. I'm just blending it. I'll take my small brush and I don't want any sharp
edges or affix there. So I'm blending it
with dam bridge. Yeah. Now, I think I will apply darker color since watercolor
will dry very lighter, so you can go with multiple
layers to make it darker. It's looking very bright here. I think I want to blend it. You can see some
light effects here, maybe some clouds or some light reflections
on the clouds. Yeah. It's very important to work a little faster and a little more confident
breast strokes to get that smooth effect. You can see I'm not mixing this indigo with
any water or anything. I'm just painting it directly
to get that darkness. I'm going around the
mountain lines carefully. I think I want to
apply some more ultramarine for these
mountains. So yeah. I will mix it with
some indigo to get a little more harmonious
effect of colors. Yeah. That's it. Now, I'll
clean my brush. And I will blend that line to make it a little foggy and
blurry in the background. I'm just lifting some colors here and there to make
some mountains again. What colour is all about
lifting and adding more colors, playing with a lot of layers. So you can make some
very nice effects. And you can also use
a tissue paper or a cotton cloth to wipe your
brush in between lifting. I think I will add some blow
effects here and there. So I'm going to use
this small brush, and you can see
in the reference. So foggy effects. Yeah. I'm trying to create
some effects for the mountain. Th side also. Now let's move to paint
this foreground snowy part. So again, I'm going
to use my flat brush, and you can see
in the reference. This part is a little
darker around here and more lighter to
this from this side. So I'm going to use
this same ultramarine, and I'm going to fill
that color here. Yeah, I think my ultramarine is mixed already with some
indigo, but that's okay. And now I'm cleaning my brush, and I will spread it With some water and
very little paint, I'm just spreading that color. Yeah. Now, I think I will
wipe it from around here. I'm just blending that line a little bit to make it
a little more softer. I'm adding some more colors like this ultramarine and
Ithigo to the foreground. Yeah. To make it a
little more sharper, I'm using my small flat brush. Yeah. And again, I'm lifting. Yeah, that's enough. Now, let's leave it like that. Now I'm going to dry this layer, and then we'll
paint more details in the sky and also we'll finish that house and window and
also some trees around here. So first, I'm going
to dry this layer. Okay, now I'm going to make
some stars in the sky. There are many techniques
to make these stars. You can use a toothbrush
or something like that, and you can splatter, or you can paint it one
by one individually, or also you can scratch some paint with a sharp to like some knife or blade
or something like that. There are many ways
or you can also end it with a jelly roll
pen or a white pen. Here I'm going to make
it with this knife, and I'll just make
some spots like this. It's okay. You can even
splatter it with white paint. That's also fine. But sometimes I like
to do like this. I hope you can hear that
sound of scratching. Now we're done with the sky. Okay, now let's
paint this house. So for that, here I
have some born timber, and I'm going to fill born timber to this house
by leaving that window. And also, I'm using a
small size mop brush. And you can also leave
that snowy roof part. Now I'm cleaning my brush, and then I'm going to pull that colors to all other sides. As you can see in the reference, we need to make it a
little more darker. So I'm going to
add some indigo to this burn tumber and let's
make it a little more darker. You can also notice
some texture. Yeah. So I'm making some very tiny vertical
lines with indigo. And also, I'm going to fix that line of the
window in the center. Yeah. That's enough. Now I'm going to take some
more bun temper and let's make it a little warmer
around this window. Yeah. Yeah, that's enough. Now, let's fix that line
of the roof so you can see some shape for that
roof on this side. Yeah. And for some shadows
on the roof, I'm filling this
part with this black you can follow the
reference and try to create that effect. Yeah. Now I will fix that
roof with white quash. Okay, I'll use this
small size bridge and I'm going to take
some white quash. Yeah, and I'm going to fix
that snow on the roof. I'm making it very
narrow around this part. And let's fix it from here also. Yeah. That's it. Now, you can also see one line like this
in the reference. So I'm going to fix that, too, with some indigo
and burn temper again. And I want to blend it
downward a little bit. I will add some apa white to make it a
little visible here. Spreading that apa white
downward to make some texture, maybe Yeah. I think that's enough.
Now, let's add some trees around here. So again, I'll take
ultramarine and some indigo. Indigo and ultramarine. And I'm going to make some
upward strokes like this. And you can also paint it into some pine
trays here and there, but not in very detailed way. I'm trying to make
these lines in different sizes.
Yeah, that's enough. Now, let's fill this window
with some yellow colours. So I will take gamboge
with a very clean brush, and also I'm using a detailer, and I'm going to apply this gamboge to one
side of the window. Yeah, like that. And then I'll clean my brush and wipe it. And then with a damp brush, I'm just pulling that
color to other side. So we'll get a nice, transparent glowing
light effect. Maybe I will add
some born tumber to that gambos Yeah. That's it. Now, same like that. I'm going to fix
the other window. Yeah. Just pulling that
color to the other side. Yeah. And then you can add some dry paint to make it
a little more contrasting. I'm adding some
bon tamber again. Wet on wet. Yeah. That's it. I think I will add some details to that pine
trees in the background. So here I'm mixing white guash
with this ultramarine mix. Let's make some highlights or some details or
some snowy effects, maybe some lines on top of
that trees with white colour. Yeah. I think I want to fix this line between
this snow and house. Again, I'm taking some
born tumber and I'm trying to make it straight. Yeah. It's enough. I think I will add some tiny
details in the foreground. It's not in the
reference, but yeah, I'll add some leaves or grass or some winry dry stems like that. And you can also make
it in different sizes. Not too big again. Now we are done
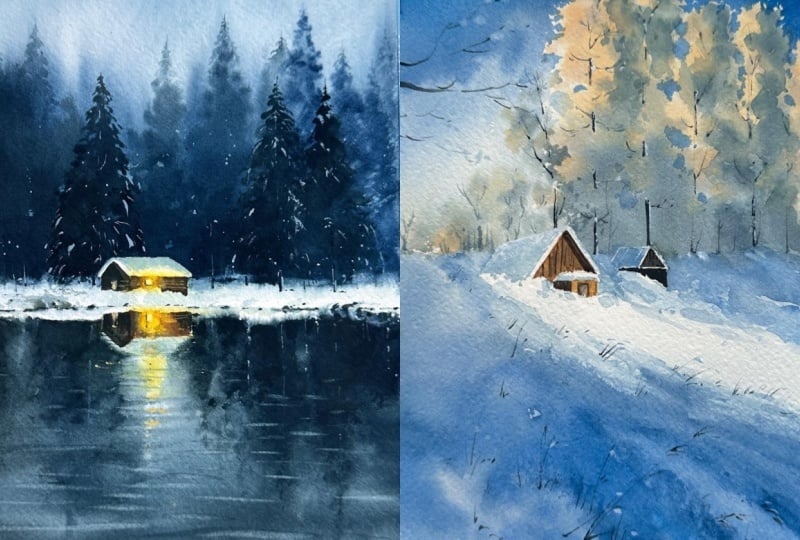
with the painting. Let's say the finished painting. Yeah, that's it. And that is a final look of
her first painting. I hope you enjoyed painting this nice stay sky with a house and some
mountains in the background. I hope you got some techniques, and, yeah, that's it. I like how it turned out, and, yeah, I hope it was simple
and easy to follow. So a seeing the
next painting. Bye.
4. Day 2 Class project - Foggy Landscape in Monochrome: I hope you're ready
for the painting. Let's start with a quick sketch. As you can see in the reference, it's going to be a very simple,
moldy window landscape. So we'll only use one color
for the entire painting. There's some distant
trees in the background, and a fence is coming
towards the foreground. And yeah, that's it. So I'll fix the horizontal
line first in the middle. I'm sketching it very lightly. And around here, I will do
an outline for the tree. Yeah, that's it. And this fence is giving so much perspective
to the entire picture. Make it bigger and thicker as it coming towards
the foreground. And also, I'll do this details and here we'll paint some details like maybe some stones or grass,
something like that. Around here, we don't want
to make it very plain. Yeah. And maybe around here, I will paint some more
small trees or something. And here, it's going to
be a foggy moonlight, um, a little blurry
kind of effect. Yeah. I think that's it.
For this painting, I'm going to use this bled
stone genuine by Daniel Smith. You can use any gray shade with a little granulation
effect or also you can use plain gray shades like
neutral tint or paint gray. That's also fine. But if you
have granulating, grays, that would be better
to paint this because with a little granulation
effect here and there, we can create some
depth to the painting. This oxide black bi vanco is also a nice gray shade
with granulating effect. Maybe that's also
an alternative. Or also, if you have a
granulation medium like this, you can also mix
one or two drops from this to your paint mix, and you will get a nice effect. That's also fine. Or you can also paint it with plain gray. Yeah, that's it. Let's
start the painting. So before that, I will take
my color to the palette. I'll show you the swatch. A very transparent gray shade. Yeah, that's it. Okay. Now, let's start the painting. I'm going to wet
the whole paper. Yeah. That's it. Now I'm going to wipe
it from around here so we can make it more brighter than the
sky and the trees. Yeah. Since we are
painting a snow landscape. Now, I'm using this brush. And first, I will fill the sky with a very
light mix of this color. From here, we'll
fix the moon light. So I'm going to make
a circle there. Yeah, that's enough. Now, just filling the color. You have to take very thin mix of the graci you can mix
it with a lot of water. I think I want to tilt
my pepper a little bit. So paint will not
stack here and there. We'll get more plain
kind of effect. Yeah. I think I want to make it a little more darker
around the moonlight, moon or sun, I don't
know, but yeah. Yeah. So now what I'm going
to do I'll take small brush and I will
take very thick paint. Okay? And I'm going to
recreate that tree shape here. Okay. Make it irregular and
more natural asymmetrical. I think let's add
some here, too, some very distant
trees or like that. I think I want to make it a little more darker
here and there, so I'll take more thicker paint and Yeah. I'm trying to make
more contrasting. Look for the trees like more lights and shadows
with more layers. A little more darker
here and there. I think that's enough. Let's add some color around
the foreground. So in the reference, it looks very plain
in the foreground, but I think I want to make some darkness in the foreground. I'm just wetting the
paper in the foreground. Yeah. And let's add some
colors here and there. I'm just adding some more
darker little darker colours. Um, around the fence, we are going to paint later. Yeah. Et's take some more color. Trying to make it more darker. Now I'm adding little
thicker paint. I'm not mixing it with
water, as you can see here. Adding more and more layers
to make it a little darker in the foreground and making it more narrow as it going
towards the horizontal line. Yeah. Now, I think
I want to make it a little more detailed
around the fence. So No. Yeah, I think that's enough. I made it a little more
darker and more thicker in the foreground and some
moment around the fence also, all wet and wet with the same color by
using multiple layers. So, yeah, that's it. Now let's dry this layer, and then we'll
paint the fins and some branches or
trunk around a tree. And more details maybe. Okay, that's it. Now I think
let's paint the fence. So I will take this brush. This is a calligraphy brush, maybe I think size two or
it's not mentioned here. I think it's size two,
so it's very pointy and let's take the same
color with no water, and my brush is also very dry. So we'll paint the
fence very dry on dry. Maybe you can mix
very little water to make it a little loose, and you can also adjust the
moist with a tissue paper. Yeah. And also, remember, you have to paint the fence very thicker and taller around the foreground and smaller and more thinner as
it going invisible. Yeah, that's it. Now, we already added
the pencil lines, so I'm going to follow that. And also, how you're placing it in the snow is
also important. So don't overwork. You can just stop it there. Now I'm going to make it here. Don't make it straight. You
can paint it like this. Yeah. Let's make it more thinner. And also, you can
make it more near to near as it going around here and you can increase
the gap around here. Yeah. Maybe for that, I will paint one here. Yeah. I think I want to
make it more thicker. I want to lift it for this one. I think it looks more thicker. So I'm using my flat brush and just lifted out that
colors with the dam brush. I want to make it a little
more taller. That's it. Yeah, again, I don't
want to overwork on it, so I'll stop it now. Yeah. So now let's do
this line for the fence. It's going to be very, um, again, thin and sharp. So yeah, I will come from here. Maybe you can use a fine
liner for this fence. That would be more easier maybe. Make it more thicker as it
coming towards the foreground. Yeah. I think you can see that dry
texture on these lines. Maybe that will give
some detailed look or some interesting, um, look for the fence. Yeah. Now, let's
paint some details on the tree. Just make them. Branches. That's it. We'll add some more here. Maybe I will add some
details around here, like some garage or yeah, some stones like that. Whatever you are
painting in the snow, you have to make this down
edge more plain or sharp. Like, half of this, I think, whatever element you
are painting like this fence or the stones, half of it is inside the snow. So yeah. That's enough. Maybe able to add some here. Now, I will paint some grass. Make it very sharp and thin. Some upward strokes and then
add some leaves to that. Yeah. Let's make some more bigger laser
grass in the foreground. I think we want to add some more darker spots
around the tree. So I will take this very thick
paint of this same shade. And you can already see some a little darker
spots around the tree. So I want to make it again
a little more darker. So painting dark on dark. And if you're feeling
like it's too sharp, you can just blend it
with a little damp brush. So I think I want to
blend it around here. And yeah. Yeah. And around here also, I want to make a
little more darker. I think I want to add some
more little spots here and there around the tree
with lighter colours. I'm trying to make it a
little more detailed. Yeah. A now I think I want to fix this
layer so I will dry it. I want to make some snowy
effect on the fence, so I'll take this same
shade with lots of water. Like I'm using very thin paint, and I'm going to make some
lighter effect on that. Yeah. Using the same shade, but with, um, very
thin consistency. Yeah, maybe now I will
do from here also. So, yeah, that's our painting. I think you got some
techniques for painting monochrome landscapes
also in watercolor. Like in monochrome painting, you can use layering technique by using different
color values and also maybe by using wet wet and wet and dry and
like that, many techniques. So that's it. I hope you
have enjoyed this session. So yeah, I think I loved it. I love the tree and this fence. It's like a simple painting. So, yeah. So let's move to
the next painting. Yeah.
5. Day 3 Class project - Part 1 - Winter Twilight: Hello. Welcome back. So today, we'll paint a very
simple winter landscape. As you can see in the reference, the sky is looking very dark, so we'll paint it in a
little more lighter colors, and we'll paint
some pine trees in the foreground and
some snowy land. So that's it. So I'll
fix the horizontal line. And from here, we'll paint
some background trees. And it's going to be a
little shorter around here. Yeah. And maybe in
the foreground, also, we'll paint some trees. So I'm just adding
this line only. Yeah, that's it. And from here also, maybe I'll paint some trees. We're not following the
reference completely. Let's make it loose
and more easier. Okay. Here, also, maybe
I'll paint a tree. So yeah, that's it
for this sketch. Now let's start painting. Again, as you can see
in the reference, this is going to be with a
very limited color palette. Maybe we'll use some indigo or paints gray or some
other gray shades. So here I'm going to
wet the whole paper. Yeah, that's it. Now I'll
wipe it around here so we can keep this part more lighter
compared to the dark sky. So, yeah. Yeah, that's it. I don't want the color
spreading towards this part. Yeah. Now, I'll take a
size seven sable brush. You can take a medium
size round brush. As you can see in the reference, the sky is a little lighter
towards the horizon line, and the part more near to
the viewer is more darker. So let's start by adding some yellow ochre
around the horizon line. So I'll take some yellow ochre, and I'm going to paint it
directly. I'm not mixing it. In the palette. And with the same color, maybe I will just make some reflections in the
snowy land. Not too much. Um, very lighter colors
for the snowy part. Yeah. That's it. Now, I
will take oxide black. This is a granulating, black shade by vanco or mbrant. So you can use any black shade, like any gray shade. Yeah. Maybe you can also
mix your own black shades. Yeah. I'm just tilting my paper like this and filling the sky with
this black color. And just spreading it with already painted yellow
layer, um, carefully. Just move your
brush horizontally, back and forth and make some very tiny narrow
lines as it coming down. Yeah. Now, I hope you can see that
transparent gray shade. I'm just making some
more darker color in the upper corners. As you can see here, I'm just making some clouds. Yeah. I think I will mix it with some indigo to make it a little more darker in the very upper corners. So yeah, this is oxide
black and indigo. Yeah. I hope you can see that very
dark indigo kind of shade. Maybe you can mix any black or little darker color
with some indigo, so you will get this shade. Yeah, I want to make
it like a night sky. You can see how I'm
moving my brash for the cloud kind of shapes. And trying to make it narrow as it coming to this mid part. Maybe I will lift
some colors from here to make some
light reflections. I think I will make some
more very tiny clouds. I'll use this size to brush. And with this same
mix of colors, maybe I will mix it with some ylocre again to make
it a little more warmer. You can always adjust the
moist with a tissue on your other hand and
paper started drying. Let's paint some small clouds faster to create some depth Yeah. Let's make some very tiny, narrow lines or clouds. Yeah. Okay, let's leave it like that because paper
started drying, and also we don't
have to worry about this part because we'll paint some background
trays there. So yeah, let's
leave it like that. That's enough. So before
it gets completely dry, let's paint some tree. So we'll get a little softer
kind of look for the trees. So I'm going to use
this same color. Indigo plus oxide black. So from here, I'll paint
some bigger trees, and again with more water, like I need a little
lighter shade of this gray. Maybe I'll mix a
little more water. And yeah, that is a shade. And maybe we'll add some details later for the
trees with more darker colors. Now I'll start with a
very lighter color. Yeah, from here, we have already fixed the
horizontal line like this. So from there, I'm
fixing the tray. I'm just starting with
some lines and then we'll shape this top
part for some trees. Now, let's make it
like some trees. Again, you can paint
it very loosely. Don't paint each and
every x casually. Um scratch your brush on
your paper here and there, so it'll get more
natural lose effect. And from here, I'm just um shaping it
into some low pine trees. A sometimes it's very difficult to paint loosely. It's very tempting to paint
more and more detail, especially when we
paint into trees. Yeah. Let's make it in
different um, heights. Maybe I'll make some
little more taller trees to make it in different heights. You can see I'm using
this detailer to make some tiny strokes here and
there for the pine trees. Yeah, that's it. Okay, now let's paint some more
very short trees. That is going to be
in the very distance. So yeah. Let's paint it very short. It's going to be in
the very distance. Maybe let's mix it with
some yellow ochre again, so we'll get more warmer
and lighter kind of effect. It's always like when we
paint distant details, it should be very light and with minimal details and also
more warmer colors. And as it coming towards the foreground or
towards the viewer, we have to make it more darker, more detailed, and more cooler. So like that, we have to choose the colors
for the painting. Yeah, I'm just making
some very distant trees. That's it. Now, let's paint some more little
more bigger trees. Is it coming to this spot. Now I'm going to paint
some more taller trees. Maybe you can use a little more bigger
brush for these trees. I think like that, you
can paint more looser, bigger kind of effects. That's enough. Now, let's paint some more
cooler kind of trees. So I'll take again this
indigo and oxide black. And also, I'm going to
start it from here. Yeah. Let's make it a
little more near to us. And we had to make it a little more sharper
and detailed around here, so we'll get that perspective. Yeah. Now let's work on
the very foreground. So I'm going to take this same color deco and oxide black, and let's make it a little
darker in the foreground. Mixing it with lots of water and Yeah, I'm just making it
a little darker. Maybe some shadows. And also, we'll paint some
more trees in the foreground, same like this, like,
with more details. So I'm going to add some
darker spots around here, maybe some shadows or some
kind of depth or details. And from here too. I don't want to leave the
snowy part very plain. I just want some moment or
some shadows here and there. So we can always paint some very lighter
colors here and there, especially wet on wet. So we'll get some nice
effect for the snow. It's enough. And here I'm
going to make some details. I don't want to
leave it like that. Let's make some maybe
some tiny leaves or branches or like that. So here I have mixed again. Paints gray and oxide
black and some ocre. And I'll make it like So very dry, wintery details. Yeah. And from here, let's make some darker
layer to these trees. You can also leave
this spot like with some dry texture here and there and also with some
wet on wet texture. So like that, we can
create a kind of depth when we paint
snowy landscapes. A
6. Day 3 Class project - Part 2 : Maybe, let's add some snow
here and there for this tree. So here, I'll take
some pack white. Yeah, let's paint it very dry. We're not mixing it with any water and some very tiny
strokes here and there. Maybe let's add this
trunk or You can also refer to the
picture we're following and let's make some dry texture. And it's also important
to not overwork. Like we had to paint it
very tiny and sharp. And maybe if you're feeling
like it's too bright, we can also just blend
it with some water or, again, this gray shade. Yeah. And also, maybe I will
paint some details from this snowy land, also. Yeah. I think I will blend
it a little bit. Since the sky is very dark, we have to paint the snow
also a little darker. I'm just blending
it with some water, like with a damp brush.
Not too much water. I will make some darker spots again to make it a
little more detailed. I want to make some darker
spots here and there. You can already see some
little darker spots. So I'm just making
it more darker. So it's dark on
again, dark layer. That's how we can
work on layers. Like, we'll get some very
detailed look for the painting. And also, again, these layers
also will, um, dry lighter. So yeah. That's it. And maybe I will add some, um, trunks to these trees
from this snowy land. Yeah. Like that. You can make some tiny, tiny lines like this in the distance and
more bigger ones. Yeah. I think that's it. Now, let's motor paint some
trees from here also. So I'll take this more brush, and let's mix some very
dark mix of these colors, oxide black and indigo. I'll paint some darker trees. We have already added some lines here for some foreground trees. So I'm going to start from here. Yeah. That's it. And you can also start some trees from the
very foreground and some trays from this mid part. Yeah, that's it. And
I'm going to shape it like some leaves or Same
like this we did here. And let's make it
some pine trees. You can make it very
sharp for the top part. That's it. Now from here, I will paint some short trees. You can always make it, um, irregular and in
different sizes. Yeah, and maybe I'll make a little more
taller tree from here. Yeah. You can just move your brush very loosely. Don't follow any
pattern or anything. You can just um
paint it loosely. Yeah. And one more short tree. I think I'll paint
one more here. Now, I hope you can see some very nice
layers of trees with some very light trees
in the background and some darker trees
in the foreground. So yeah, like that, we can create depth in
the landscape painting. And one last tree, which is very short. Oh Yeah. And let's make it a little
sharper around here. Yeah. Maybe I think let's blend it
a little bit around here. We don't want to keep
it like that sharp. So I'm just cleaning my brush
and just wipe it and make it very damp and blend
it a little bit here. Yeah. Yeah, they like that. Again, I'm cleaning my
brush and wiping it. Yeah, I'm making it a little
more detail here and there. Yeah. I think I will take this flower
brush and make it damp and Yeah. That's enough. And now
I think I will make some lighter spots
here and there to create some snowy effects. And again, I'm going to, um, mix this white quash with
this same mix of colors. So we'll get a nice
gray pastel shade. And with that, I'm going
to make some spots. You can make some
very tiny sports and also some little more thicker
spots here and there. So we'll get that natural look. And maybe I'll paint
some leaves or some dry branches or something
like that from here. Yeah, like that. And let's
paint for these trees, too. And again, like we did here, we'll blend it a
little bit here and there to make it a
little more softer. Okay. You can also see how I'm
placing these white spots. Mm. Like I'm not painting
it continuously. I'm just adding some leaves or something again
on this darker layer painted with very
thick mix of colours. Okay. Yeah. Blend it a little
bit here and there. So yeah. I'm not blending it completely. Just make some soft
effic here and there. If you're not
comfortable doing this, you can also leave it like that. I think there are many
techniques like to paint, um, snoy trees. You can use musking fluid or you can also use a lifting
technique or like this, you can paint it
with a pack white. Yeah. That's enough. And maybe I will paint some more details
with the same brush. Let's make some tiny
details here and there. Yeah. Yeah, and let's add some tiny grass or some windwy leaves or grass. Yeah, make it very tiny as it going towards the horizon line. Okay, to paint these
foreground details, you have to always be careful how you're going to
place in the snowy land. Here, you can see some very light sports
and some dark spots also. So you can start this little details
from the lighter spots. Like that, you'll get some
nice to your painting. And I think I will make some wet or dry spots
here and there. Yeah. Let's make it a
little more detailed. Just making some
wet on dry spots, and again, I'm blending it a
little bit here and there. Yeah. So you have to
be careful when you're painting this tiny
details in the snow. Yeah. You can always use this already painted snowy effect or these darker
and lighter spots, and you can place it
according to that. So you'll get some
nice effect. Yeah. Here, I'm painting some more effects in the snow below these
already painted spots. A I'm just making some shadows or some
lines like that. I think I want to
make it a little more darker in the very
foreground. Yeah. So I will take this gray
shade and let's paint it. And I'm going to make it softer. Now, let's paint some stars
or some snowfall maybe. So yeah, I'm going to, um, splatter it with
some white quash. You can also mix it
with some water. So yeah. So, yeah, that's it. And here's the final look of our painting. I hope you got the techniques
to paint layers of trees with some snowy effect
and a snowy land with some details
like some lights and shadows and also a
nice cloudy sky. And yeah, for me, it was a simple, um,
snowy landscape, and I like this
color palette, like, with some warm touch
of colors and with more grayish and cool
clouds and trees. I like that effect. And
yeah, I like the trees also. So, yeah, that's all
about this session. Let's move to the
next painting. Yeah.
7. Day 4 Class project - Part 1 - Winter Mountains In Sunlight: Hello, everyone. Welcome back. So today for the painting, we are going to follow
this beautiful sunny, snowy landscape, and you can see some very dark shadows and
a bright glowing sunlight. And yeah, let's start with
a very simple sketch. I'm going to fix that line between this mountain
and the sky. So I'll start from
Eat the middle, as you can see in the reference, and I'm going to draw that line. And yeah, from here, I'll fix the other
side of the mountain. And from around here, I think this part is going
to be a little higher. So from here, I'm going to do this line. Yeah, that's it. And maybe I will
also fix that line, like, between the shadows
and this highlight part. You can see in the
reference there is so much sharp and soft shadows. So we'll try to recreate that. But still, we're not going
to make it exactly the same. We'll just make it loose
and yeah, more easier. Yeah. You can see some sharp edge um, of that highlight part of snow. And it's going to be
very narrow here. Yeah, that's it. I think
that's enough for sketching. And first, we'll start
with painting the sky. We'll paint the sunlight. And once it completely dry, we'll paint shadows
and this snowy part. And also, you can see
some very dark stones or like that texture
on this mountain. So maybe we'll make
it dry on dry. And again, this is going to be with very limited
color palette. We'll use only
ultramarine for the sky. And then for the
shadows in the snow, we'll use indigo
and ultramarine. And for the dark details like stones and
something like that, we'll use some
dark brown shades. I'll start by wetting the sky
part only very carefully. We have to wet it
around these lines because this part is
going to be very bright and we don't want
to make it muddy. Yeah. Very carefully, I'm
witting around the lines. I think now you can see the
water on my paper. That's it. Let's start by painting that sunlight in the I
think it's at middle. Okay, I'll take ultramarine. Not too thin paint. We have to mix it like
maybe honey consistency. We don't want too watery paint. Yeah. And I'll make a circle here and maybe you can
also adjust the moist. Yeah. Now, let's just
paint around that. Remember to not spread colours
beyond this mountain line. Yeah. And also, we can make these both
corners a little more darker and we'll make it more lighter
towards the sunlight. Oh, I'm just cleaning my brush and I'm just spreading
that colors downward. You have to fill around
the lines very carefully. Yeah. And I think I will
make it a little more darker for these corners. So let's take some
more thick paint, like ultramarine and just
fill that for both corners. And, you know, my
very first class on Skillshare is almost same
like this class project, where I'm teaching a
snowy mountain again with some very dark shadows and lights and egg loins
and light like this. Again, I'm describing all
the techniques in detail. So now I'm going to make some sun rays from this sunlight. So here I'm using a flat brush, and it's not too wet or too
dry, it's perfectly damp. And also, I have a
tissue paper here, and I'm going to lift
colors to all directions. Yeah. After lifting each time, I'm just wiping it
on this tissue, since we don't want
to make it muddy, we just need very bright
sunlight and sun rays. You have to use a flat brush. I think that's enough.
It looks too sharp. So I want to make it
a little more gloy. So I'm just blending
that sharp circle. Yeah, I think that's perfect. And let's dry this layer, and then we'll move
to paint mountain. Okay, now I'm going to paint this foreground part of
this mountain or snow. So I will leave this part because as you
can see in the reference, shadow on this part
is very sharp, so we have to paint
it wet on dry. So before that, I will paint this foreground snowy
part wet on wet again. Just under this line,
I'm not going here. I'll take this mob brush and I'm going to
take some indigo. Yeah. You can adjust the moist. Yeah. And you can see a
little bigger shadow here. So I'll leave a little gap
here from this line to here, and I will paint it around here and make it
narrow to this part. Yeah. It looks a little difficult, maybe to paint these
snowy shadows, but I think it's actually easy compared to other
subjects in watercolor. Yeah. That's enough. And what I'm going
to do is this part is too bright or too white, so I will make a little darker
in the very foreground. So I'm going to, um,
take, again, indigo, and with lots of water, I will take very thin
and light paint. Yeah. And now I'm cleaning my brush and I will spread
that towards the side. Yeah. Yeah, we need to get a
continuation of all this, right. So I'm blending together, but still I'm aware of the color like the
darkness in the snow. Yeah, that's it. And
maybe from here also, I'll make some very light
indigo in the reference, you can see some texture or some very light
shadows there. So I just adding
some light colors. And here you can see a
little sharper shadows, so I'll take more darker
indigo and, yeah. You can just look at
the reference and you can try recreating
the shadow shapes. And also, you can lift the colors if you're not
satisfied with anything. Since the paper is wet, you can lift it. Yeah, that's it.
Maybe I will add a little more darker
shadows from here to here. So you have to be very careful about
the moist of your brush. I think I want to wipe it
a little bit from here. Yeah. Let's make it a little more darker in
the very foreground. Spreading that
colours a little bit. Yeah. I want to make it a little more contrasting for this shadow, so I'll take a small brush, this size two brush, and let's add some more
darker sports here and there. And I want to make it
a little more softer. And maybe for here too. Yeah, I think that's
it. Now, I'll move to this small space. So yeah, I'm just wetting. I need some water there, and then we'll again paint
wet and wet strokes. So again, I'll take
some very thick indigo. Yeah. Now we can see some dark spots there
again in the reference. Okay, I want to blend that. With very lighter
tone of this indigo, I'm just adding some
colors around the edges. Yeah, I think I want to
make some shadow here, too, to create that sharper
edge for highlights again. I think I want to make
some lines around here. Like, you can see some lines in the very foreground
of the reference, like some movement in the snow. So I think I want to make it. It's a rigor, and I'm just maybe you can do it with some paint, but I'm not taking any paint. Painting it with only
water. That's it. And later we'll add some
dark lines there, maybe. So now let's to dry this layer and then we'll paint
this mid part. Now, you can see in the
reference this part of the mountain is very
dark and very cold. So I'm going to mix some
ultramarine and indigo. And again, not too thick. I'll mix it with some water, and I'm going to
make that shade. I think that's too dark. I want to mix it with
more indigo and water. Yeah. And you have to be careful around this line. Yeah. Yeah.
8. Day 4 Class project - Part 2 : I'm going to spread that
colors towards this bat. I'm now taking extra
pain with some water. I am spreading that colors. Okay, now you can see some
very dark shadows again here, so I'm going to take a little ultramarine and more indigo. And You have to be very careful
when you are going around this line because we are also defining this highlight
part of this mountain. And here we can see some very
narrow and dark shadows. I'm just making some
darker spots here also. I think I don't want to
overwork on it, but still, I'm trying to make
it more natural. With more curves. Yeah. Now I want to make
this already painted shadows like wet on wet,
a little more darker. So I will take indigo and Altramarin again
and just paint it. On these darker spots
we already painted. And you can blend the
edges with clean brush. Yeah. Again here to If you're using 100% cotton
paper with some thickness, like maybe 300 GS, it's very easy to vet and, um, work on layers. Yeah. That's it. And maybe I will make it a
little more darker here, too, with the same mix of
indigo and some ultramarine. You can blend it. And also, you don't have
to blend it completely. You can lay some sharp
edge here and there. Yeah, I think I will make it a line very narrow here as a
continuation of these shadows. Yeah, that's it. And maybe I will add
one more line here. I think I will make a little more darker
shadows here and there. Let's make some very
sharp, tiny shadows. Yeah, you can just
look at the reference and try to make almost
similar shaves. You can also fix some highlights
maybe with white gauche. I should be very dry if you're painting with white
gauge for highlights. It looks like a little
bit overworked here, but, yeah, let's
leave it like that. Maybe I will fix it with
some white lighter. Yeah. And I will work on this line. Let's make it a
little more visible. Yeah, you can see
some lines here. I have lifted some colours
from there with a rigor brush. So I'm going to make some
very tiny little darker lines just around that. And don't make it too
dark or too thick. Yeah. I'm here, too. You know, again, we don't have to follow the same
exact reference. We can make some changes. That's how we can make
that unique artworks. Yeah, sit off. I think I want to make a little more darker
here and there. Yeah, I think let's top it
here and let's try this layer, and then we'll do some
dry on dry texture. Now, I think I want to, um, add some more white lines, so I will take
some a pack white. I want to fix some highlights. I'm not mixing it
with any water. I just need very thick paint. I'm going to make it here. No, you can see some
very sharp highlights. So here, too. You can see I'm using this
paint from the tube directly. I didn't mix it with water. Because, you know, when we mix water with white gouache
for these details, it will lose the brightness
of this highlights. That's why I'm taking
very thick paint. Yeah, that's it. And now I'm going to dry this layer again
for this white gauche. Yeah. Now, you can
see some very dark, stones or something
on this mountain. So I will take this brush. This particular brush
I use mainly for scratching, like dry texture. So here, I'll take setia sepia, or you can take any
little dark brown. Maybe you can mix it
with some indigo. Yeah. And you can see the
paint is very thick. It almost like oil paint
or yeah, that consistency. And I'm going to make
some texture here. Just rub your brush there, to make some darker spots. Yeah. You can see
in the reference, there is some thick
and too dark spots. So I'm just adding that and then just rubbing my
brush around that. Yeah. I think the details
will give a lot of details, a lot of definition or
effect to the painting. You had to paint it dry. Yeah. That's it. Now, I think I will
add some here. But again, I'm
making it very tiny. Yeah, that's it. Yeah, I think I want to fix
it a little bit here because there is some highlight of the very
background mountains. You can see in the reference. So if we are adding that, we'll get a little more
depth to the painting. I'll fix it again with
some white quash, and I'm going to make this
edge of this mountain. Yeah. And I'm going to add some
tiny white lines there. Yeah, that's it. Now, it looks like some
background mountains. Yeah. That's enough. So, yeah, that is a final
result of our painting. Yeah, I like how we painted these shadows
and these highlights, and also we fixed some more
details with white gauche. Allo, it looks nice, and it was simple to paint. But still, we need to
know some techniques to paint these dark shadows
to get that contrast. So, yeah, we are done with our fourth painting
in this series. I hope you are enjoying
this challenge. If you have any doubts, please ask in the
discussion box. I will replay. So, yeah,
that's it for today. I'll see you with the
new painting tomorrow. Bye.
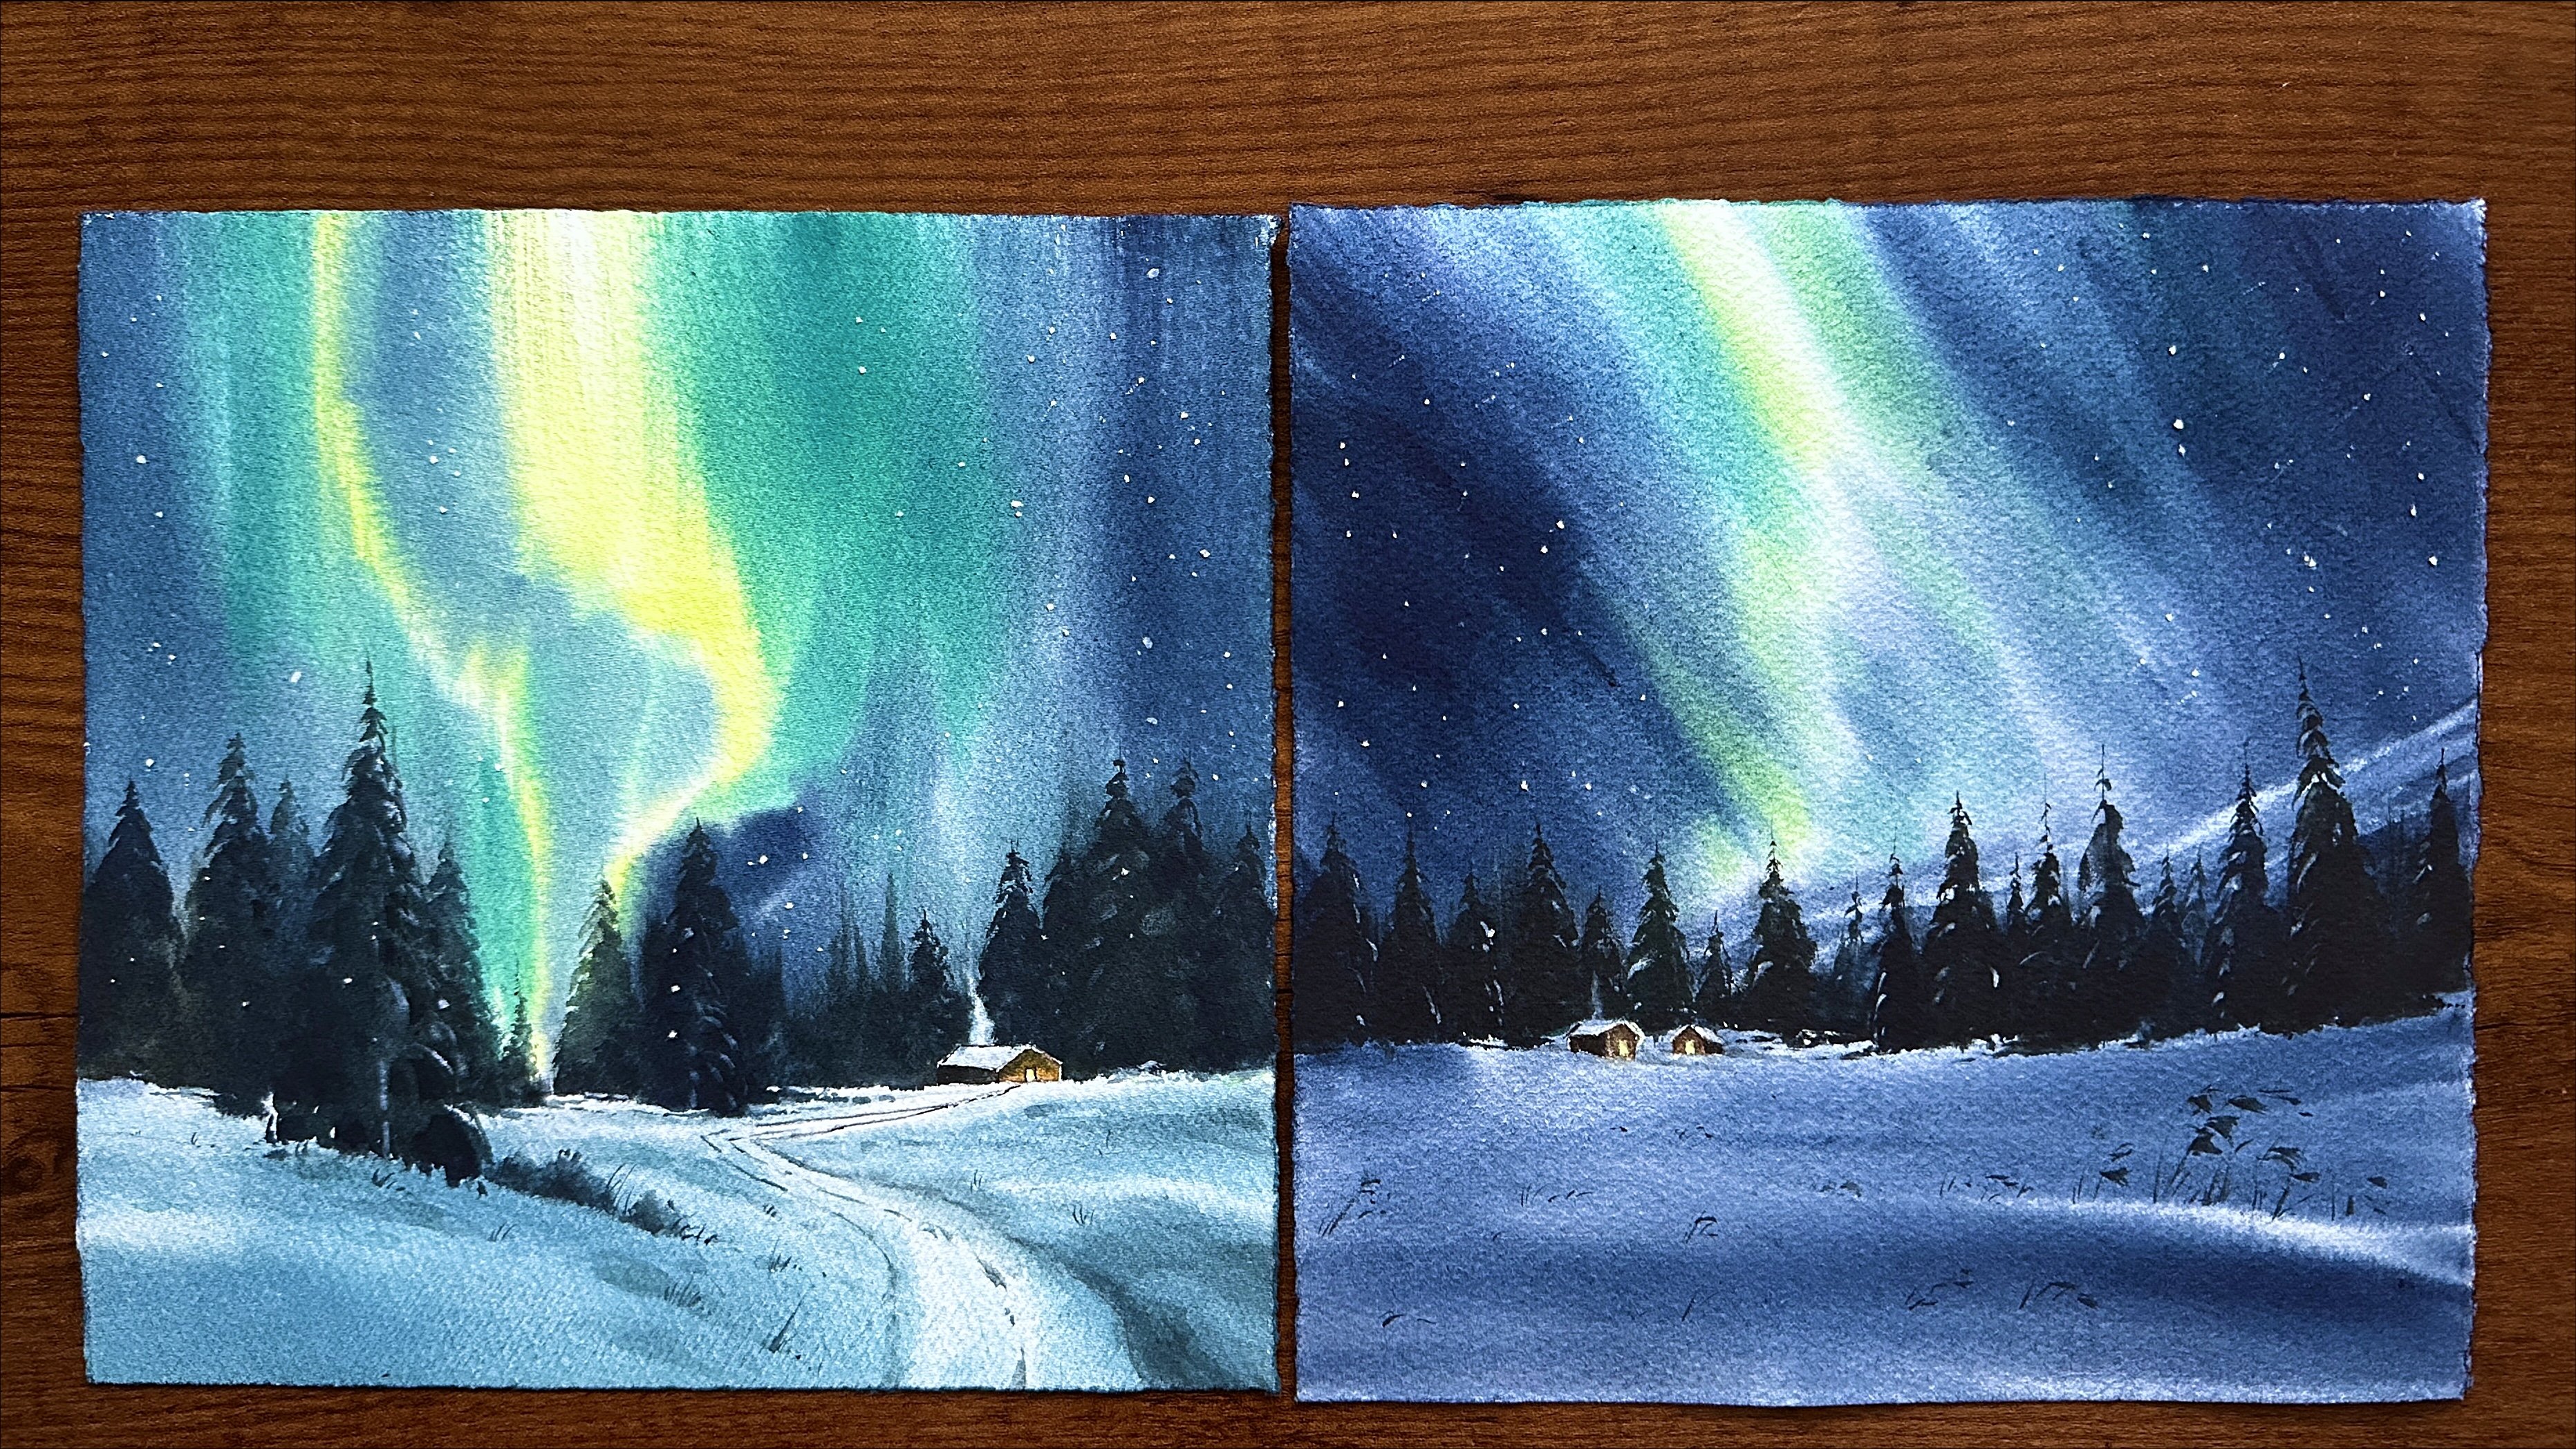
9. Day 5 Class project - Part 1 - Glowing Lantern: And r. Hello. Welcome back
to today's painting, and I hope you're
enjoying this challenge. And if you have any doubts
regarding any class or any painting or about
the whole challenge, you can post in the
discussion box. I will replay as
soon as possible. And, yeah. So for
today's painting, we'll use this
reference picture. You can see a glowing light and with a winter nightscape
in the background. And yeah, we have to paint
the lights and shadows in the snow and a blurry background with a night sky
with some trees. So let's see how to paint it. First, I will start
with the sketching. So to get an idea
about the composition, I'm going to fix the horizon
line in the exact middle. Yeah. And from there, I'll
fix one pathway. You can see in the reference. So yeah, this side will
make it a little higher. That line between the
snow and the trees, you can see in the reference. Yeah. And from there, I will fix one line for
the pathway for this side. Yeah. That's it. And, yeah, it's going like this, maybe we can also make some changes to make
it into nice composition. That's why sketching is very important in
watercolor paintings. Any painting you're doing, you have to plan the sketching. What elements you
are going to add or if you want to
eliminate something, you can do that. And if you want to replace something, you
can do that, also. Like that, we can create
a nice composition. Yeah. I'll do one more line for that pathway from
here. Yeah, that's it. And around here, I'll
fix one more line for that street light. Yeah, that's enough. And I'll use my ruler. And let's add that street light. Okay, I'll start
from here. Yeah. I don't like to use roller
for straight lines, actually. I like to do it freehand. But yeah, sometimes this is more convenient to
make very straight lines. Yeah. So I'll do
one more line here. You can see that reflective
part of this light post, and also the other
side is with shadow. So yeah, we have to fix
three lines for the post. And for this side, I'll make it a
little more narrow. Yeah. That's it. And let's fix
that details around here. You can also see some
snow there on the post. Yeah. So I'll make it
like small semicircle. And from here, we have to fix that the details of the light. So yeah, I'll start from here. Yeah. And also one more line. And also, there's some
snow again. You can see. It's going to end like small
curve there. That's it. And from there, let's fix
that lantern or that light. It's also covered
with a lot of snow. Now, let's fix that line. For the light, you
can see two squares, almost a triangle
shape, kind of square. I don't know how to. What
is the word for that shape? Yeah. And I'll end it here
like a very small square. And let's fix a small
frame for that. H. That's it. That's enough. And also, here, we
have to make it like some snise covered
on this post also. So I'll make it like a little curves or
something like that. Yeah. And also, there are
some more details around here. Yeah. You can just sketch
it very loosely. Yeah. And we'll also paint some
trees in the background. I'm just outlining
that too Yeah. And you can also see some
tree trunks around here. So yeah, this snowy land is going invisible
through these trees, so we have to paint
it like that. Yeah, that's it. Now I will rub this horizontal
line we added. Yeah. I'll make
it into a pathway Okay, that's enough
for the sketching. Now, let's start the painting. So first I'll start
with the light. So for that, I'm going
to wet the whole paper. Yeah. To get that moody winter
nights cap ambience, we will use some
cool blue shades. I'll use cobalt
blue and lavender. With a mix of both
these colours, we'll get a nice
evening sky color. Now, I'll start with
painting the light. First, we have to add some yellow colours
around that light, you can see in the reference. We have to create that
warmth around the light, and then all over the landscape, we have to make it more cool and more dark and winter
kind of effect. So first, I will take gambogello and I'm going to make it
just around the light. I just spreading that color
around this post also. You can see some
reflection on that post. Yeah. That's enough. Now, what
I'll do is I want to make some reflections of this slide on the foreground snowy part, you can see in the reference. So first, I'll take
John Brilliant, and I'll mix it with some gamboge to make it
a little more yellowish. Yeah. A very creamy yelloish shade. That is the color I'll
use for this foreground. I'm just feeling that
color in the foreground. Yeah. Yeah, that's it. Now paper is still wet. We have to paint the sky, and I'm going to
take cobalt blue. Yeah. And I will mix
it with some lavender. We have to paint
it with a mix of both these colors to get that
evening kind of sky effect, cobalt blue and lavender. Even you can also use cobalt blue itself.
That's also fine. So I will add this
colour to the sky. But I think it started drying. I want to spray some water. And let's go straightly
to fix this color. I'm going around the light
very carefully. Yeah. You can also see some shadows in this snowy part in the distance. So let's make it like that. Yeah. I'm just adding some shadows on top
of the yellow colors. I think I want to fix the sky with a little
more darker colors. Again, I'm mixing abal
blue and lavender. With more dark colors
in the corners, we'll get that glow and
focus towards the light. Yeah, I'm just covering
around that light with a little more
lighter effics yeah. That's it. Now, you can see some lines around
the foreground, like for this pathway. So we have to create that
before the paper get dry. So I'll use this
small size brush, and I'm going to
take this color. And we have already added some pencil lines
for the pathway. So I'm going to add
some colors there for that shadow or
that snowy effect. Yeah, I one more here. Yeah. Here also, we have added Yeah. And I think I will add some
more texture to the snow. Paper is still wet and
working wet on wet. Yeah. Let's add some more blue
colours in the foreground. I'm making some snowy
textures, maybe. Yeah. I use this brush mainly
for scratching like this. Yeah. Wet on wet kind of scratching. Like that, we can create
very natural snowy effects. Now I'm not following
the reference. I'm just going with the flow. Yeah, I'm trying to make that
more darker shadows here. Yeah. You can go very loosely. Since you are
painting wet on wet, you can make some nice
soft effects like this. Yeah. That's it. Okay, now I think we
have to paint the trees. So I'll take some indigo, and we have to paint it
with very dark colors. So I'll mix it with some sepia. I want to make my
own black color
10. Day 5 Class project - Part 2 : To make my own black color
with indigo and sepia. Even you can use
plain black color. Yeah, and paper is still wet. I'm just painting that
trees very loosely. This line is very important how you're placing the
trees on the snow. Yeah. I'm painting with very
thick consistency of paint. Let's make it into some trees. Let's paint it here also. I'm not touching
that light post, painting around that carefully. Yeah. Now we have to
paint it into some trees. So yeah, I'll mix it with this Kobal blue in the
Go Sepia and Kobal blue. And let's paint some pine
trees in the background. Some very big trees
and some small trees. Short and fat trees also. Again, you have to
paint it very loosely. You can just make some
upward strokes like this. I think I will mix it with
some more Kabat blue. With some kebal blue, I'm just spreading the
dark colors upward. I think you can see a little
more bigger tree here. I'm spreading that
colors with Kobal blue, making into some tree. Yeah, let's mix this john
brilliant with this tree. Yeah. Let's add some darkness
also here and there. Let's paint some more
foreground trees. Yeah. Now, I'm going to
add some tree trunks or some details like that
to make that depth. Yeah. We just have to add
some lines like this. Make it in different sizes also. And some tiny dots
here and there. So details like stones or something in the
very background. We are creating a kind
of illusion, maybe. I'm just making that shape of the trees a
little more defined. Yeah. Maybe we'll also fix
some more details for the tree dry on dry. Let's see how it goes. I'm trying to create
some moody effect for these pine trees, but still I want to make
it into some shape. Yeah. Let's add some more
details around here also. I always end up with
hobo king for the trees. So now let's stop it like this. I think I will add some more
branches from this side. You can see in the
reference. So I'm going to use my detailer, and I will mix a pack white with this bad blue
and some indigo too. Yeah, we need to make it into a little grayish kind of shade, and I'm going to make
some more trees, some snowy trees maybe yeah. Like that. Trying to make some
very thin branches. Adding some lines
from here also. And also, I'm just
scratching that paint a little bit over these branches. Yeah. Trying to make some depth for the painting by working
on multiple layers. Yeah. I'm trying to make some more
windery bushes or trees. Yeah, that's it. Now I'll
scratch some paint from here and there to
make some effects. Yeah. I'm just making a little
more brighter lines or details for that trace. If you're using 300 gm paper, you can always do
scratching also. Yeah. That's enough. We don't want to over on it. So let's stop it here. Let's start to paint the light. So before that, I'm
going to fix this layer. I want to dry. Yeah. Now, that's perfect. Let's start to paint the
details for the light. First, I will start from
this frame of this light. So for that, I want to use
some warm brown shade. So here I'm going to take some locre and I'll
start with this frame. First, we'll start with
yellocre and then we'll paint maybe with more
darker brown shades. Yeah. I'm just following
that pencil lines. You already added. Yeah. That's it. Now let's take some burn tumber and I'm going
to fix this line. Yeah. That's it. And then we have to
fix this small square. Okay. To make it a
little more glowy, maybe we'll add some yellow
colours inside this squares, like for this light. But before that,
let's fix this post. So for that, I will
start with ambos yellow again to get that
reflections on the post. Yeah. I'm just filling
that color here. Yeah. That's it. Now I will take some burn umber. Yeah. Okay, I'll mix burn tumber with some indigo to make it
a little more darker. I'm just trying to
blend that both colors. Yeah. And from this
upside pot also. Yeah, that's it. I'm just wiping that colors that is going
outside of the post. Yeah, with my flat brush. And around here,
we have to end it like some curves. Yeah. And let's add some
darker colours for the other side
of the post also. Burn tamber, and in the go. I think I will
wipe it from here. Yeah. Wipe that colour from
there to make it straight. I'm making that one
side of the post more lighter with lifting. Yeah. Okay, now let's
add that details.
11. Day 5 Class project - Part 3 : Tails. Yeah. From here
also, we have to paint I'm making it into some
snow covered effect. Maybe let's add some
yellow lines on the post. Yeah, with some white
gouache and Cambogello, I think I want to
make it a little more darker for the other
side of the post, burn dumber and indigo. Yeah. Now, let's add some
snow for this part. So I have back white. I'm not mixing it with water. Painting it with very
thick consistency. And for this part also, That's it. I think I want to make a little more bluish
around the light. So I'll take very light
mix of this bat blue. And, yeah. I'm just feeling that
color around that light, like the snow on that light
and blending that edges. It's adds some more blue then blend the edges. No, I think I'll add some
shadows to that snow. So again, I'm using Kobal blue and just
feeling that color. I'm just leaving some part like this for that reflections. Yeah. Now, I'll add some more
blue inside that light. So here I'm using gamboge, and from this side, I will add some color. Yeah. And then clean your
brush and blending the edges. Yeah. Seem like I'm doing
from this side also. Maybe I'll add some burn tumber to make it a
little more gloy. Yeah. Okay blending the edges. And I will fix some dark
effects on the frame again. A And just making some lines around
that light to make it a little more
sharp and visible. Yeah. Now, let's finish
some details here. You can see that black effects, concentrate on that and then make it into
almost that shape. S. I'll fix the snow on that by
adding some kobarblu again. Yeah. I'm painting Kobal
blu to the background. Yeah. And then blend the edges. Yeah. Yeah. Just adding some dots or lines. Yeah. Let's add some shadows to this post also. Let's make some little sharper
effects here and there. I think I will add some more
effects in the pathway also. And then blending that hot edges some kind of shadows or
some darker effects for the snow For snow, we'll start with
wet on wet layers, and then we can add more details with wet
on dry or dry on dry. I'm making that pathway
a little more visible. You can look at
your painting from a little distance so you'll know where you have to add
more details or more shadows. Or you can also stop it like that without adding
that much details. But, yeah, I love to do this. I enjoy adding more details
and bringing a kind of that life to the painting. It's very satisfying for me. But if you are feeling
like it's intimidating, you can stop it. Yeah. Yeah, that's enough
for the snow. Now let's add some splatter here and there around the slide. You can see in the reference, like, maybe some
snowfall or something. So I'll use Juan brilliant, and I'll mix it
with a pack white. Okay, now for some
more bigger dots, I will lift some colors. Like in a circular motion, I'm just lifting some colors and then we'll add
some paint there. A Yeah. Now I will add some white there. So here I have a pack white. I will mix it with
some John Billin. And then add one dot there and clean your brush and
then spread that white a little bit. Yeah. That's enough. I
feel like adding some grass or something
here and there. Yeah, my favorite part in
painting snowy landscapes. Yeah. So here I have a mix
of born timber and indigo, and I'm using my detailer, adding very thin
wines here and there. That's enough. So yeah, that is the
final look for painting. Yeah, I like how we
painted this reflections, light reflections
on the snow and the shape of this pathway
and the background trees. But I feel like we should keep that glow around the light
a little more brighter. But we have to fix
that glow wet on wet. But yeah, all over the
painting looks nice, and I like that nocturnal
feel of the painting. So, yeah, I hope you enjoyed
painting this with me, and you got some
techniques to paint snowy shadows and lights and
paint sparkles like this. And yeah, also by scratching, we have added some nerves
and lines here and there. That's also looking nice. So, yeah, that's it
for today's painting. See you with a new painting
tomorrow, till then by.
12. Day 6 Class project - Part 1 - Sunlit Pine Trees: Hi, everyone. Welcome
back to today's painting. Today we are going to paint
a beautiful landscape with some sunlight trees and some shadows and
some snowy effects. So yeah, painting
snowy landscapes with green trees and sunlight
effects is one of my favorite. I like that color
combination between white, snowy landscapes
with green effects. So you can see in the reference that foreground part
of the snowy land. I'm going to add
one line for that. I'll start from
exactly the half. And I'm going to end
around here. Yeah. And I'll fix that horizon line. You can see here. And you can also see some
background trees there. I'm just adding an
outline for that. Yeah, till here. And then from here,
I'm going to add that trees in the foreground. Yeah, I'm just adding some
outline, very rough outline. And there is one more tree that is a little
more near to us. I'll start from here. That trunk, you can see the trunk is very visible
with the sunlight effect, and then I'm adding its foliage. Like a pine tree. Yeah, that's enough. And also, here, you can see some effects like maybe some snowy
stones or some rock or some very small grass or
some small windy effects. Tree effec, yeah. And from here, I will add the branches. I'm just adding a very
loose rough outline. That's enough. And from here also,
you can see some grass or some flower seeds like that. That's enough for sketching
very loose and rough sketch. Yeah. Now we'll
start the painting. You can see some
sunlight effects around this part for this trees. So we'll start with some light
warm colors for this part, and we'll add more darker
green effects around here. Yeah. And also in the land part, you can notice some
sunlight and shadows. And around here,
in the background, also you can see some
sunlight effects and some dark shadows. So that's it. Now, let's
start the painting. As always, I will
wet the hall paper. Again, I'm just more
stunning the paper. I don't want any water
puddles on my paper. Yeah. That's it. Now I'll start
painting the sky and some first layers for the trees. First, I will start with
some Juan brilliant. Yeah. For some sunlight
effect in the sky, I'll just add this joan
brilliant here and there, for some warm
effects in the sky. Yeah. Now I'll clean my brush, and I'm going to take
some kebar blue. I'll mix it with this Jan brilliant to make it
a little more dusky. And I will add that color here. A Yeah, I'll add here also. Paper is wet. I'm working wet on wet. I'm trying to make some a little cloudy effects
here and there. Yeah. That's enough. Now, I'll move to paint
this foreground snowy part. So again, I'm going to take some this Juan brilliant and you can see some
sunlight effects there. I'm just adding this color
for that sunlight effect. Yeah. Paper started drying, so I'm working a little faster. Yeah. Yeah, that's enough. And I'm going to use
again this cobalblue. Maybe I'll mix it
with some indigo. Yeah. And I think I will
mix it with some water. Yeah. Very little color you
need on your breast and then I'm just adding that to the foreground
of the landscape. Yeah. Maybe we'll add more
effects for this snowy part, um, wet on dry. Yeah. So now we are just
adding some first layers. Yeah. And around here also, you can see some shadows. Yeah, that's it. Maybe I will add some more colors
in the foreground, a little more darker color. Remember to keep your brush a little damp so you'll
get this kind of effect. With too much water
on your brush, you will not get this kind
of wet on wet soft effects. So yeah, you have to work with a damp brush on almost
damp paper, also. Yeah. That's it. Maybe lift
some colors from here. I want to add some on brilliant again for that light effect. Yeah. That's enough. Now
let's stop it like that. Let's start to paint. The first layers for trees. So I'm going to
mix gambo yellow. Yeah. I want to make
it a little greenish. So I'm going to use
Oleive green. Yeah. I want to make it
a little dark but still warm kind of green effect. So Oleive green and gambo I'm going to add that
color for this trees. Paper is still wet. Yeah. For the edges, you can make it a little
detailed and sharp. Yeah. That's it. Now I'll go here. I hope you can hear
that sound of scratch. I'm not painting with
the tip of my brist. I'm just scratching with the
side of this bristles yeah. I'll just go like this
for some sharp edges. Okay, I think I will
wipe it from here. And let's add some more dots
and leaves here and there. You can see my brush
is very damp and I'm walking wet on wet
with this damp brush. So we'll get that kind of
controlled wet on wet effects. Yeah. Now I think I
will add this color for this foreground tree by
leaving a little gap here. Yeah. Let's make that tip a little more sharper.
Okay, that's enough. Now I'm going to make
this side of the trees. So I'll mix some indigo
and this olive green. I need a very dark green mix. Yeah. And if you're noticing
this side of the trees, you can zoom the
roughness picture. Again, you can see some lights and shadows for that trees also. So I'm going to paint
it like that. Yeah. Here, I'm going very carefully. Now, I'll mix it with
this Olive green and gambos and then I'm
adding some shadows also. Yeah. And then again, going with this dark green. You can make it like some trees by adding some
upward strokes like this. H. Yeah, that's enough. Okay, I think I
will make some more this indigo and olive green, and I will add some
shadows again. I'm making some shadows here by, again, adding some
darker colors. I think I want to add some more sunlight
effect for this trace. So again, I'm going
to take some gamboge. Paper is still wet so
we can work on layers. Yeah, I'm just
adding some gamboge. I'm not mixing it with water, adding it straightly
from the palette. I think I will make
it into some trees, again, maybe the stop part. Yeah. So more upward
lines like this. Yeah, I think that's enough. And maybe I will
scratch some paint from the trees for the
tree trunk effect. So I'm going to use
this small knife, and I want to scratch it
while it's still wet. Yeah. It's very easy to scratch
when the paint is still wet. You know. You know, I'll make some tiny
lines like this for some depth or some kind
of effects like that. Yeah. That's enough. Maybe I will add some more some kind of
ef fix here and there. Yeah, I want to get it
in this angle. Yeah. Now let's go for
this trees again. For some dark colors. We have to add some shadows. So again, I'm going to mix
some indigo and olive green. I'll mix more gamboge to this indigo and olive green mix so we can make it a
little more warmer. Now we have to add some
shadows to these trees. So I'm going to use this
my scratching brush. Yeah. And I will add
some effects here.
13. Day 6 Class project - Part 2 : Paper is dry and also I am
working with a damp brush. I'm going to scratch
it on the paper. Yeah, like that. I'm not painting with
the tip of my brush. I'm just scratching with
complete bristles to get that dry effects. Yeah. And maybe I'll add some more
indigo for the shadows. H. No, I will add some here. Indi gain. So indigo. Here you can see, I'm
leaving some gap for this highlight on
the trees. Yeah. I'm just blending the
edges here and there. Yeah. That's it. Maybe I'll add some more
indigo around this spot. Like that, we can create
some very nice sunlit trees. I hope you are following the technique by adding
the first layer with some warm colors and then going for some very dark
colors for the shadows. And then, again, we are
doing it by scratching, so we'll get this nice effect of some tiny details or
some leaves here and there. That's it. And later we'll also add some
trunks or branches. Yeah, we'll go around here. Then if you want to
blend the edges, you can do that, too. Yeah. You can also add some dots for the
edges of this tree. So yeah, we'll get a nice shape. Yeah. That's enough. Now let's go for this side. Again, I'm going with this
olive green and indigo mix. And I'm also leaving this tree. We will paint it later. Yeah. And also, I'm very careful about how I'm
going with this line. Okay. Yeah, I hope you can see that effect
of this dry technique. Yeah, now I leave some gap here for the highlight
of the trees. Yeah. By adding shadows to one tree, we're also shaping the
highlights for other tree. Yeah. The same time, we have to focus on both. Yeah. I'm adding
some dots like this, and I will blend it
get that soft effect. I'm adding some more shadows
for some background trees. Yeah. Now, I'll
go with this one. And yeah, we can make it
a little irregular here. You can see some effects there. So I'm just adding some dots or some very fine details
around here also. Yeah. Now I'll blend
the edges again. Yeah. And some dots here and there to make that
detailed kind of effect. Yeah. And here also, I want to make it
a little softer. And here you can see some
more that yellow effect. I'm again going to make
it into some highlights. So by adding some
more shadow effects, again, I'm using indigo
and olive green mix. In the reference, also, you can see some effects
there, some dark details. So yeah, I'll make it into
some grass or something. Yeah. And I'm leaving
some gap also. So dots here and there to make
it a little more detailed. And let's add some more gamboge. Yeah. And then I'm going
to blend the edges. Yeah. That's enough. Now I'll go with some more tiny details and maybe some sons or
something like that. You can already see
some pencil lines here, so I'm just following that. Yeah. Make it very tiny. Yeah. And then blending
there just again. Maybe some gambos I hope you can see the
shape of the bristles. I use this mainly
for scratching. Yeah, to get a kind of
dry and dry effect. I use this brush. You can see a little
more bigger details around here in the reference. So I'm trying to create that. And also, I want to blend
the edges a little bit. I don't want to leave
it that sharper. And also, I'm going to add
some tiny dots here and there. Around here also. And Okay, now I'll go with this tree. We have to add some
shadows to this tree, and also we have
to fix this trunk. So again, I'm going to use a little more darker colors
for shadows on the tree, compared to these shadows. Yeah. So I'll mix
indigo and olive green. And maybe I'll mix
it with some sepia, more indigo and olive green, and very little sepia. And you can also notice the
consistency of the paint. It's almost like oil paint
or honey consistency. Yeah. So don't mix it
with so much water. You can go with a little
thicker consistency, and you can use a
brush like this also. Yeah. Okay, you can
see this trunk here. I'm going to start from the
other side of that trunk. Yeah. Yeah, I'm just filling that color to
one side of the tree. Yeah, now I think I want
to blend the edges. Yeah, I'm cleaning my brush, and let's blend it
here and there. And I think I'll mix it
with this gamboch mix. And also, I want to leave some
gap for this trunk again. Yeah. That sunlight hitting
effect on the trunk. I'm just leaving some gap for that and then filling
colors to all other sides. Yeah. Here I'm making it a little
more detailed and yeah. That's it. Now, I think I will add this
gamboge and olive green mix. Let's mix both these colors. I think I will add some
more shadows here. I'm trying to make it into
some pine tree foliage. In the reference, you can see some shape for the trees here. Okay. Now I'll clean my brush, and I want to blend these edges. Yeah. With that very
little moist on my brush. Now, totally, we used three
colors for this tree. We started with very
lighter color and then we added some very dark
shadows to this side. And then we are mixing both these light and dark colors with the mid ton of
these two colors. Yeah. Now I'll fix this side. Maybe I will add
some more darkness. I think I will fix it here
a little more higher. And maybe adding some shadows, very tiny dots here and there. Yeah. Yeah, I think
that's enough. Now I will add some
colors for this side. I
14. Day 6 Class project - Part 3 : A Now, let's fix the tree trunk. But before that, I want to
lift some colors from there. Maybe I'll lift
some colours from here also for that continuation of the tree trunk. Yeah. I think that's enough. Now let's fix the tree trunk with
some yellow ochre. I will take yellowcre and
let's start from here. First we have to make
a line like this. Yeah. And then I'm adding
this color for this side. Yeah. And then I clean my brush and I'm going to pull that color to
the other side. Yeah. Now, I think I will add some
shadows to that trunk. So mixing some indigo
to this yellow ochre. Just adding a very
thin line there. Yeah. That's enough. Now
I want to make some shadows for this tree
trunk and this snowy part. So I'll take a very light mix of kebalblw and I'll make
a line like this. You can see in the reference. And from there,
I'm going to make a line a very narrow line. Yeah. Okay. Now I want to make some more shadows like
this on this part. So I'll use this mob brush. Again, I'm going to
take some koba blue, very light mix of
kabalblue let's add some more sharper
effects for the shadows. Yeah. And I will blend
it here and there. Make some lines here also. Yeah. Yeah. And like this, we can create a kind of
depth and dimensional look for this snowy land part. Yeah. And from here also. You can also add
some tiny effects. Yeah, I'm making some
very tiny effects also. And also, I'm
blending some edges. Yeah. Okay, now I will add some shadows
around here also. You can see in the reference. So again, I'm using bal blue, and we'll start from here. Yeah. That's it. And maybe I'll add some
lines from here also. Yeah. That's enough. Now we can see the shadows
and highlights very clearly. Yeah, that is the effect we
were trying to create. Yeah. Okay, now I'll, again
use this brush, and I want to add some
effects here and there. So darker effects, adding some
dots or some dry texture. It's not there in the reference, but I think I want to add some tiny effacs here and there. And maybe I will add
some details here. Yeah. So I'm going to add
some very fine lines. Yeah, you can paint it very thin and you can add some branches to different
directions, also. Yeah. That's enough. Okay, now I'll add
some flower seeds or some dry leaves
here for the stems. So first I'll take gamboge
for that highlights again. And let's add some
very tiny dots. I'm not covering entirely. I'm just adding some
dots here and there. Yeah. That's it. Now I will add
this shadow color. We have mixed indigo
and olive green. And let's add that color
to the other side. Yeah. Now, I think I want
to blend it a little bit. It looks too sharp. So I'm just blending that
dots here and there. I think I will make it a little
more darker to this part. Again, I'm using
this shadow color, and I'm using my mob brush. Yeah, I think I am
making it more darker. I didn't like that
sharper effect for that. A I'm making it more darker for the
very foreground part. Okay, now, I think I
need a continuation of this bushes around here also. Yeah, so I will add
some details there. It's not there in
the reference again. But, yeah. Yeah, now we are almost
done with the painting. I think let's add some more fine details with opaque white. Yeah. So you can see some snowy effects on the trees in the
reference here and there. I'm going to add some
very fine dots here. So tiny branches. Okay, I will add some more
details on here also. Yeah. There are some branches
here also in the reference. I want to add some
lines for that. You can see I'm just
using the very tip of my brush and I'm going loosely. You can start with
some pressure, and then you can release it. Yeah. So you will get that natural kind of
look for these branches. So, yeah, that is the final
look of our painting. I hope you enjoyed the session. I hope you got the technique
of painting sunlit trees and some fine details
and branches like this. We started with the first layer. Like we added some
warm colours for the sky and the snowy land pt, and then we added some
shadows and some sky colors. And then we started painting this background trees with
some shadows and lights again. We scratched some paint
from here for the trunks, and then we added um, some colors for the
sunlight trees. Like, we started
with first layer, mixing gamboge with olive green, and then we added some
shadows by mixing indigo. Yeah. And then we added some wet on dry effects
for the shadows, again, some fine lines
and dots here and there. And we also added some more
details for the foreground. So yeah, all over, we have painted a more realistic
kind of landscape. I hope you got the technique of painting sunlight effect
in landscape paintings. So that's it for
today's painting. So you with the new painting
tomorrow? Till then by?
15. Day 7 Class project - Part 1 - Golden Winter Sunset Over River: He Hi, everyone. So I hope you're ready
with your materials. So, let's start the painting. This is going to be a
simple winter sunset. You can see some
sunset clouds in the sky and reflections
in the water. And there are some trees in the background and in
the foreground, too. And also, we have
to paint the snowy and with some shadows and
sunlight reflections. So yeah, let's start
with sketching. As always, I'm going to fix the horizontal line
in the middle. Okay. And maybe from around here, I'm going to fix that line for the water like
river or something. Don't make it like
a straight line. So you'll get more natural look. And I think maybe from here, there's going to be
some foreground, little more darker shadows, as you can see in the reference, and maybe from here, I will add some more trees. And here, I'll fix
the bigger tree. And maybe this horizontal
line I'm going to fix higher. Yeah. And maybe let's add some lines for some odd
trace here and there. Let's try to make it
more simple and Yeah. Maybe around here, I'll fix one more bigger tree. That's it. And we'll also paint this
tree reflections around here. And for this tree here, maybe for this tree,
I'll fix it here. Yeah. That's enough, and we'll
paint the sunlight, a little more warmer,
lighter, sky here. So we have to paint that
reflections around here. First, let's start with the sky. So I'm going to wet
the sky part only. I think I want to
wipe it from here because we have to
paint some snow here. So yeah. Yeah. Let's start with
sunset colors first. I'm going to take
some gambogillo and let's start from here. Try to make it like
some narrow strokes. Okay. And like this, I'm going to paint some
more yellow strokes. You have to notice the direction I'm adding that yellow strop Okay. Now I'm going to take
some naples yellow red, and I will mix it with gambo yellow to make it a little
peachy kind of shade. That's the color
I'm going to use. Just here and there, I'm
going to add that color also. Make sure your paper
is not drying. I think I want to add a
little more brighter yellow, so I'll take cadmium yellow. Yeah. To paint it
around the light. That's enough. Make it a little more softer. You can just blend the
colors with your brush. I want to add some more
Napleslo around here. Yeah. Now I will paint some blue
colours from the top part. So I'm going to take
some cobalt blue. I'm trying to make
it more lighter. And also, I'm painting
it negatively. I'm not touching the clouds. We already painted, painting it around that and making
that shape with the clouds. And also, I'm trying to make some little sharper
shape here and there. And I'm also going over the yellow clouds here and there to make some shadows maybe. I think I want to
fix it around here. So I'm going to take
some more cobalt blue. Maybe I'll mix it with some maple salop to make
it a little more grayish. And I think I want to paint
some shadows to these clouds. Yeah, from here also, let's make it a little more
darker clouds here and there. Bar blue and nipple yellow red. And I'm trying to add
some more darker clouds. I'll take a smaller brush, and I'm also adding
some tiny clouds. I need to make it a little more brighter these tiny clouds. So painting it with
napleslo red again. Some narrow lines and
little more detailed look. Trying to make it more warmer and lighter
around the sunlight. I'm just going with the flow. I'm not following the
reference completely. Yeah, I think that's
enough for the sky. Let's dry this layer.
Okay, that's it. Now, I think we are done
with a beautiful sky. I like sunset sky
with some clouds. So now let's move to
paint the land part and also this sky reflections
in the water. So I'm going to wet the whole
land part again and we'll paint the snow and then
we'll paint the reflections. So again, I'm going to wet it. And also, I'm not going here. I don't want to reactivate
those colors we painted. So, yeah. I'm just wiping
that water going upward. Yeah, I'm going to take
some kobat blue again. As you know, snow
is again water. It's also reflecting sky colors. So we just have to make it
a little more harmonious by using almost same colors
we used in the sky. So here, I'm again
taking some cobalt blue. And as you can see
in the reference, I'm just creating some
shadows for the snowy part. You can just go slowly by adding some big strokes like this. So by leaving some
gaps like this, so you'll get some reflections or highlights of the sunlight. And maybe from here also, you can see in the reference, it's like a little
more darker shadows here for the sunlight. And maybe I think I want
to make it a little warmer for this part on the snowy
land for more reflections. A for more depth. Yeah. So I think I want to
paint it very bright here. So I'll take the
same naples yellow. Me me and some naples yellow. Yeah, that's it. Now let's fill again
this with cobalt blue. You have to use very thin
paint with lots of water. I'm adding some more cobalt
blue here and there. Now I will paint some
more darker spots for this snowy part. So I'm using this
cobalt blue again. And also you have to
paint it wet on wet. So if you're feeling like
your paper is drying, you can dry the paper completely
and then rewet it again. If you're using 100%
cotton, that's okay. We can work on multiple layers by wetting and drying
multiple times. And also here also, I'm making it a little darker. Like in the foreground, we
have to make it darker and You can see some nice effect in the snowy land now by
adding more layers. Like, you know, we don't
want to make it very plain. We can just make
some dimension or some movement in the snowy
part to make it more natural. So that's what I'm trying. And this water part is going
invisible through here. So I'm just adding some
details around here. Okay. I think that's enough.
We don't want to over
16. Day 7 Class project - Part 2 : Yeah, I'm trying to
make it a little more visible around this
part of the land. Maybe I think I want to add some more shadows
to the snowy part. I will take some indigo, and I'm mixing it with
some bar blue again, a little more darker blue shade. Yeah. I want to make more shadows. As you know, watercolor
will dry very lighter, so we have to work on multiple layers to get
that contrasting look. You can look at your painting
from a little distance, so you will know
where you want to add more shadows or more details or if you want to fix
something, you can do that, too, by maybe lifting some paint or maybe by
adding more layers, you can fix mistakes also. I think that's enough. Just
blending it here and there. Paper started drying. We had to fix it faster. I'm using same colors like
Kobal blue with some indigo. Yeah, that's enough. I'm
not overworking on it. So now let's paint this
water reflections. So before that, I
will dry this layer. As you can see here, the
sunlight is around here, so we have to make it
bright here, you know, and also, then we'll paint this bigger tray that
is overlapping the sunlight. So we'll make it
lighter here and we'll paint it more darker
from here to here. Yeah. So first,
let's wet that part. Now, let's add some
This gambo yellow. I'll paint it around here
and around here, too. And now I'll take some
Naples allow red, and let's make it a little um orangish or like
that here and there. And I think I want to
blend it around here. I will add some more
details like some clouds. Yeah. Let's make it a
little more warmer with more Camboc Yeah, that's enough. Now I'm going to
take some cobalble and bending it from here. Just blending those colors. I think I want to
make it a little more darker for the water part. So I'll take indigo and maybe
some naples silo again. I want to make it a
little grayish shade. And, yeah, let's add that
color in two corners. You can see by adding
this dark color here, we are also defining this
outline for this land part. So we had to focus on both. And from here also,
I will make it. Yeah. This water part is
going through here, so I'm just adding
some shadows there to Like some cloud reflections. I'm painting it. Yeah. Maybe I will blant it a
little bit here and there. I just adding some darker
spots like little gaps to make it more natural
for the water part. Just adding some more darker
sports here and there. Okay, that's it. Now, let's
paint some tree reflections here before it
gets dry. So yeah. From here and here, here, we'll paint
that reflection. Paper it's still a little damp. So I will again take this
indigo and some maple loo. It's like a cold gray shade. Don't make it very loose. You have to paint it with
little thicker pins. So yeah, from here. Maybe you can place
your paper upside down, so it'll be more
easier to paint. I'll add more layers to that. And maybe let's add
some yellow strokes here with the same mix of
gamboch and naples silo. Mm. And I want to
blend it a little bit. Yeah, that's enough. Now
I'll paint from here also. Paper is started drying. And here is also one tree. I will add some yellow
strokes like this here also. Maybe a little bit here. I think I want to make it like
some moment in the water. Let's spread it like this. Some narrow lines horizontally. Now, I think we have to paint this land reflections
in the water, as you can see in the reference. So now I'm mixing
some kobal blue to this already mixed colors for
the trees and water part, like with the indigo
and Napleslo. Now I'm mixing a little bit kobalblue to this and
also some opaque white. Yeah. And let's make it like some reflections
for this land part. You can make it a little
more white here and there. Let's make it more narrow. And here also. Here I'm painting
it with more Wapa white. Yeah. Almost done. Maybe I will paint some
details from here with the same colors
like more indigo. I will paint some winery grass or some leaves that's
overlapping this water part. And from here also, I'm painting it like
some upward strokes and then some very tiny dots here and there to make
it more detailed. Some tiny, tiny ones
here and there and more bigger ones also. Yeah. Now, I think I want to
paint the background trees, but I just want to fix
it completely dry. So I'm going to dry this layer. And maybe I want to add
some shadow around here. Now let's start
painting these trees. So I'll take the same colours and I'll start with
the straight line, and then I will
paint the leaves. And I want to make it
more lighter around here. So just clean your brush
and take some yellow and. Now let's paint these leaves. You can paint it loosely, so you'll get more natural
look for your pine trees. Just scratch it over your
paper and then shape it. Now I want to make
it with some yellow. Some darker spots around
that yellow again. Also, you have to be careful how you're putting this
tree on this land, but this shape is
very important, especially when you're
painting snowy trees. I think I want to
add a little more darker layer for the tree. So I'll mix some
indigo and paints gray and adding some wet
tone with darker layer. I want to paint some
trees around here also, and then we'll add
more darker details. A I started with more thicker layers for the
cener part and then adding some tiny strokes on both sides to make it more detailed
or to give a shape. Now I'm adding more
thicker paints here, more like darker paint. Let's add some yellow also to create some
reflections on the tree. Okay, now let's add
one more tree here. With the same technique. I'll start with
the lighter layer. Yeah, now I'll add a little
more thicker layer on that with indigo and
paints gray mix.
17. Day 7 Class project - Part 3 : With indigo and paints gray mix. Yeah. And maybe let's add some more trees
in the background. So I'll take this
small brush this size to again, sable brush. And let's paint some
background trees. So I'll start from here and then we'll make it more lighter
towards the sunlight, and around here, too. Yeah. Just scratching some paint to make it like
some distant trees. I think I want to
make it more lighter. I'm mixing it with the yellow
mixture we already made. I it's very important, like from where you are
starting with trees. Some trees are in
very distance and some are in between this part. I want to make some
around here, too. I'm going to mix it
with more yellow. That is gamboge yellow and
little pink gray and in the go Yeah. And with a little
more darker mixture, I want to paint some
trees like this. Some smaller ones and
some taller ones. Like I'm adding some dots
also here and there. And let's add some here also. To grade that depth
in your paintings, you have to be very patient. Like, we have to add so much fine details
in the very distance. So yeah, with more gambo
yellow and, again, a little indigo mixture, I'm adding again here also. When you paint
details like this, you have to control the moist of your brush very carefully, so you can keep a
tissue paper in this hand and you can wipe it in between the
painting. Yeah. Like some tiny, tiny trees
or details here and there. Yeah. Yeah. And from here also. You can see this brush tip is not very pointy. It's very dry. Yeah. So you'll get that
dry texture easily. I use this brush, especially for scratching,
some tiny details. And we had to paint a
little bigger tree here. I'm making it more
darker to this spot. And here, I'm going to paint it with little gamboge lomix. Yeah, then I'm going to add a little more darker
layer for that. A I think we are almost done. Let's add some more trees here and there around this spot. If you're feeling like it's
too dark, you can wipe it. I want to fix this tree again. So yeah. I want to add some more
details here and there. Maybe I will add some more
details with some white. You had to paint it with
very thick consistency. Some details to the
trees also like some sharp strokes
here and there. I And, yeah, that's the final
silo for painting. I hope you enjoyed
painting this with me. I love to paint a
winder landscape with some warmth and glowing
sun light like this. I love that colour combination of yellows and blue colours, and I love how it turned out. Yeah, thanks for joining today and see you with a new
painting tomorrow. Bye.
18. Day 8 Class project - Part 1 - Winter Forest In Sunset Glow: Hello. Welcome back. And I hope you're enjoying
this class so far here. So today, we'll paint this
beautiful winter woodland with a nice and warm sunlight coming through the snowy trees, and there are a
lot of shadows and some trees in the foreground
and background also. So let's start with
a simple sketch. Since it's a winter sunset, we'll use some soft
and peachy kind of colors for the sunset and
sunlight reflections. Yeah. So I'll start with that line for the
snowy for ground, almost like a resin line. And I'll start from here. And also, let's make
it a little wavy, not a straight line. Yeah. And around here, I'll fix the sunlight. You
can see in the reference. And I'll fix some lines
for some foreground trees. You can see one tree
here and there are two trees in front
of the sunlight. I will fix an outline for that tree trunks and we'll do more trees
in the background. Yeah. Again, don't make
it very straight line. You can make it like
some free hand lines, little shaky and wavy lines. Yeah. And sunlight is
going to be around here. So I will fix one
tree from here. And as you can see
in the picture, we'll paint the tree little
more transparent and warm, just because it's very
near to the sunlight and this tree is going
away from the sunlight, so we'll make it more cool
and a little more darker. Yeah. That's it. And from here, maybe I'll fix one more Yeah, that's it. And I think
I will fix one more here. Me thinner. And maybe one here. Okay. And also, you can see
some white space here in the reference picture
as we can see the sky through these t foliage. So here, I'm going to
do an outline for that. So we can keep that
space more lighter. Yeah. Just very loose and rough lines. That's it. Okay, that's enough. Okay, now, for the sunlight, I will use gambojello
and opera pink. I'll mix Opera pink
with gambo yellow, so we'll get a nice beach
shade for that winter sunset. I'll mix it. You can use any
rose or pink shade that you have and you can mix
it with warm yellow shade. That is a shade. So yeah. Now, let's start by
wetting the whole paper. You don't need too much
water on the paper. You can rub your brush
back and forth multiple times to make it a nice
thin layer of water. Now, I will use this size eight round brush,
a sable brush. So first, I'm going to take some gambogello and I'll make a circle here
for the sunlight. With the very tip of my brush, I'm going to make a circle. So now I have loaded my
brush with gamboge and just making a circle
here, wet on wet. Now I will spread
that color a little bit around that circle. Remember to keep this
sunlight very bright. So now I'm going to make
some opera to this Campos, and I'll use that color
just around the sunlight. I just really like that shade. That's it for the
sunlight colors. Now I'm going to
fill the sky with Kobal toilet and some
indigo, I'll mix both. I need a very light shade of
a bluish gray kind of shade. So here I'm mixing Kobal toilet. This is by Rembrandt and indigo. Yeah. That's it. We can use a violet
shade, maybe. And I'm also mixing a
lot of water to it. I need a very thin
and light shade, and I'm going to just
fill that color. And also, I'm not going here. We need this space more lighter compared to
the sky and the trees. So yeah. I'm just trying to make it
like a smooth transition of these colors since
the paper is wet. But yeah, it started drying. We have to work faster. Yeah. And down very we'll cover
this part with lots of tree and foliage with
multiple layers. So yeah, as again, seeing the difference,
we'll fix it later. That's it. Yeah. Hm. I think I will add this
color a little bit here to make it like some depth or some distant mountain or something that in
the very background. So here I will make
it a little darker. Yeah. O and also I'm
trying to blend it. I don't want any
sharp, just the Okay. I think let's stop it. The paper started dry. Now, I think I will
repeat the same colors for this snowy land since
snow is again water, and it will definitely reflect the colors of the
sky and the sunlight. So I'm going to again start with gambog just
under the sunlight. And I will use some
opera and gamboch again. Yeah. I just fill that color. All over the paper.
Yeah. That's it. You can use a load of
water and just spread it. I'm trying to blend
those hard edges. Now, I'll repeat this color around in the very foreground. So here I am again mixing
cobal toilet and some indigo, and I'm repeating that color in the foreground to
make it a little darker, so we'll get that focus
towards the sunlight. Some wet on wet narrow lines. Since I don't want
to make it very plain, there's snowy part. So I'm trying to
create some moment, maybe. Yeah, that's enough. Okay, now paper is still wet. I'm going to fix the first
layers for this tree details. So like this foliage, as you can see in the reference, the foliage is very dark but still cool and
grayish kind of look. So here I have indigo and cobalt twilet I'm
not making it very thin. I just need a little thicker
consistency of paint. Yeah, almost like
a grayish shade. And I'm going to
just fill that here. I'm using a size
two sable brush. I don't want to fill it
with a bigger brush, just because I need some texture like
this here and there. We don't how to fill
it very loosely. We can create some
texture like this. So we can make some background
tree effects, wet on wet. I'm trying to make it a little more darker here and there. And again, you don't have to
make very sharp edge here. You can make it a little
softer and not very visible. I think by doing like that, you will get some nice
depth between the trees. I hope now you can
see some effects like some lighter sports and some darker sports
here and there. For that, effect, I used
this um, small size brush. I don't want to fill it
with a bigger brush. You can just, um,
19. Day 8 Class project - Part 2: Scrub it over your
paper like this, so you will get
some nice effect. Okay, I hope you remember
we have added some lines here to make that sky
part more brighter. So I'm going to paint it
there very carefully, and also I have mixed. This indigo and
cobalt violet mix with a little opera pink to make it a little more brighter and warmer as it's coming
towards the sunlight. And you can also make
it a little sharper. Paper started drying. So yeah, you can work for sharper
details also. Yeah. Okay, I think I want
to use some gambogin, maybe some opera pink also
and very little indigo. Yeah. And make it more darker to the other side. With only darker affix, we will get that lighter
spots more bright and glory. Making it more lighter, but still that
darker colors here. Just some very tiny, darker spots here to
make it like some depth. Yeah, I will switch to
this detailer brush, and let's make some tiny
and thin details here. Okay. Now, I'll fix some more
darker spots here and there. People started drying,
so let's do it faster. I need it wet on wet again. So here I'm mixing again, koba toilet and some indigo, and let's work on some other darker layers
like some pine trees. Okay, later we'll add this
foreground tree here. We have added one line for that. So here, I'm making some, um, details for that tree
like little more darker and detail
sharper kind of effects. Yeah. Like that, we can create some nice
depth to the painting. Yeah. I will add some more darker
spots here and there. I need more thicker paint of this mix Indigo
and go Bal toilet. I'm just making
some tiny details here and there. Yeah. I think let's leave
it like that. Okay. Now I will fix this part. So first I'm going
to revet here. I'm using this flat
brush for revetting. This is size one wash
brush by Brenston. Yeah. And let's paint same like this. So first, I'll start with
opera and this gamboge. Yeah. Yeah. That's it. So now I'm going to make
it a little more darker. You can see how I'm, uh, moving my brush
for these strokes. Maybe I'll make some more
cobalt twilight here and there to make it more cool. Some more thin lines here and
there to make it detailed. It's very important
to not overwork. I always end up
with overworking. Yeah. Stop it like that. And again, I will fix this spot. And also in the
reference, you can see it's a little more brighter and, um, lighter around here. So we're not making
it that darker there. We'll just stop
it here like this and we'll bland it a
little bit downward. I'm trying to make it
a little irregular, and I'm going to blend it. We don't want that
sharp effect there. Yeah. I think I will fix some more
darker spots from here. So we'll get that focus
towards the sunlight. Making some darker
spots also here under. You can also paint all these
layers in your own idea. You don't have to follow
all this I'm doing. I'm just going with the flow, lose effects, like, yeah. I'm making some yellow
spots around the sunlight. Tiny lines or something. Yeah. I think that's it. Now, I think I want to make some more yellow spots
in between this foliage. So I will take
some a pack white. And yeah. I'm going to mix it with some gamboge and little opera to match this shade
of the sunlight. Yeah. Now I will mix this
apack white to this. And I do need to very
thick consistency. Maybe I will make
some more gamboge. My pastel shade of yellow or
some peachy kind of shade. And you can already see some little spots
here, here, like that. So I'm going to make it
a little more sharper. Yeah. That's how we can fake watercolor
effect. Yeah. But still, you have to
paint it on dry paper. Paper it's dry now, and also I'm using
very thick paint. You can make some tiny, tiny spots here and there. Yeah. You have to paint it
very sharp and thick. Otherwise, we'll lose
that transparent, wet on wet look of your
layers we painted. Yeah. And if you're feeling
like somewhere it's too sharp or too visible, just blend it down with
very little water like with a damp brush, Yeah. That's it. Now, let's dry this
layer completely, and then we'll paint
this snowy land and more details to the trees, some branches and
tree trunks, also. So, yeah. Okay, now, as you can see in the picture, the tree trunks are
black in color, but still it's a
little transparent, especially around the sunlight. So what I'm going to do is, I just need to lift some
colors from the tree trunks. So I'll use this five
by eight wash brush, and this is a flat brush, and I'll make it damp. I don't need too much water. Just dip it in water
and just wipe it. Okay. And from here, we have
20. Day 8 Class project - Part 3: It. Okay. And from here, we have added
one line for the trunk, and I'm going to lift that
cover from the tree trunk. You can just scrub your brush in that
space multiple times, so you'll get a nice
light space there. And also, I'm spreading
that colors downward here. Yeah. And later we'll add some darker paint to the trunks. But still, we need to make that light reflections
to the trunk. That's why I'm lifting
these colors now. Yeah. Just dip your brush
in water and wipe it and just do it like this. And you can also lift it with
a tissue like this. Yeah. And we have also
added two trays here, so I'm going to
make it here also. Do it very carefully. These trees are in
the foreground, so don't worry about
this foliage we painted. We can do it by
overlapping that. I think you need some
patients to do this. But if you're using
100% cotton paper, it will work because
lifting is also an important technique in
watercolor to get nice effects. I'm going with this trunk here. And here, I'm just
breaking it a little bit. I'm not going
straight like this. I'm also spreading that colors downward to get
that continuation. Yeah. That's enough. Now, maybe I will lift some more very thin lines
from here to make some depth You can see I'm breaking
it again here and there. I'm not going straight. Okay, now the paper is
completely dry and I'm going to fix the shadows for
the tree trunks. So first, I'm going
to wet this part. I don't want to make it very sharp lines for these shadows, so I will wet it. And after painting, the shadows, we paint more details
to the tree trunks. So I'm going to use
this flat brush, and with very little water, I'm going to just moist that. But I don't want to
reactivate these colors. I'm just wetting
it very careful. I'm not pressing it hardly. With very little water, I'm just going
very gently. Yeah. That's it. Now, for the shadows, I will use ultramarine and maybe I will mix
it with some indigo. And also don't make it
very straight lines. You can paint it like wavy according to this snowy
land we already added. So here I'm using a detailer. I need very thin lines, and then we'll make it thicker. So I'm going to use
this detailer brush, and I have here ultramarine. And for this trunk, I'm going to start Yeah. And then make it more thicker. For this, I'm going
to make it like this. Thinner, and then more thicker. Yeah. And for this also, here is one more tree. Yeah. Okay. And from here, I'll fix the bigger one. Now you can see some
more thinner lines here. So I'm going to make
it more thinner. I think we can add a few more lines for the tree trunks in
the very background. We're making it more thinner
and lighter in the color. And we have to fix
from here too, I'm going to make it sidewise. And also, you can make it a little darker in the foreground. Not too dark. And I'm using only ultramarine. I didn't mix it with
digo, any other color. Yeah. Maybe I will add some tiny details. Make it very thin and sharp. Okay, I'm going to
add shadows to that. Yeah. From here also, now let's stop it there. Now we are done with the shadows and we'll paint these
details to the tree trunks. So I'm going to take some burn tumber and I'll mix
it with some indigo, almost like a van **** brown. You can even use
Vandyke Brown also. Again, you have to paint
it with thick consistency. I'm using this detailer and
I'm starting with this trunk. And also sunlight is
coming from this side, so we'll make the
highlights here and more darker or more
shadow to this spot. So I'm going to start from here, and then I will pull that
colors to the other side. And also, you have to be
careful about this spot. We have to paint it a little sharper since this
trunk is going inside the snow or it is a
little cover with this snow, so we have to paint
it like that. So I'm going to make
a curve like this. Yeah. And then going upward. And again, you can paint it
irregular and little wavy. Don't make it very straight. You already lifted some
colors from there. So you can follow that. And then I'm just pulling it to the other side so we can keep that transparency
for the highlights. I'm just blending it. I want to get that soft effect for the
highlights and shadows. Yeah. That's it. Now, I think I will
take some indigo, and let's make some more
darker spots for shadows, maybe like some
texture to the trunk. We'll also paint some branches sidewise for these
fork down trees. As you can see in the
reference picture, we are following the trees or these tree trunks are
very contrasting, um, in the picture. So we have to make it
a little more darker compared to the background
we are painting. To make it a little sharper
and visible for this part, I will take this indigo again, and I'm going to fix it
with very thin line. Yeah. So that trees will be more visible
and more sharper. And also, I'm not
going straight. I'm just breaking it a
little bit here and there. Just some small lines. Let's make maybe a little
more dry and detailed here.
21. Day 8 Class project - Part 4: That's enough for that tree, and I will go with
these two trees, and then we'll go to these
trunks more transparent. I'm going to repeat
the same technique. A So, yeah, now I'm going
for these two trunks. So I'll take more yellowcre
and some gamboge also. Just around the sunlight, I will start with gamboge. Yeah. Also, the other side, I'm not painting to this side, and then I'm going with
born temper from here also, I'm going with burn temper. And as it going upward, I will make some indigo. Yeah, maybe we can add
some more indigo here. So we'll get that glow. Now I'm going to pull
that colors to this side. Making that thin line for this edges Now I'll
go with this one. So again, I'll
start with Gamboge. And then I'm going with temper. And also remember to make it sharp and in a nice
shape like this. And I will go with
ultramarine. Sorry, indigo. And let's break it here and then let's do this for
this lifted space. A. Here also. Mm. And I will spread that colors. I'll take some gamboge again. Yeah. I think I want to blend it
a little bit from here. Like I'm lifting
some colors from there because I need a
little more reflections or transparent effect there. Yeah. Yeah. That's it. Maybe I will
fix some highlights here. Yeah. So I will take the gamboge and opera
with opaq white. Don't make it too white. You have to use almost same
like the sunset colors. Let's go with these
two tree trunks. So again, I'm going to mix
some bun temper and indigo. And Also, I will add some more trunks
in the very background. So I'm going to use only this kobal toilet
and some indigo. And I also want to make it very loose and
thin with some water. For the thin lines, I'm going to use this
calligraphy brush. I think it is almost size too, and it's very pointy, so we can make some very
sharp and thin lines easily. So yeah, You can
adjust the darkness. Make it very sharp and thin. Okay, let's make
it some from here, so I will make it
more transparent with very little colors
like with more water. I'm trying to make it more
thin and yeah, transparent. I'm going to make some branches. I'll start from the middle,
as you can see here. I'm going to start from here and just make some downward lines. Yeah. And maybe I'll start from
the very side. Yeah. Here also Yeah. Okay, let's make
some little more brighter or lighter
branches also, since it's a winery
landscape and trees. So with this same brown mix, I'm also mixing it with some apa white and
yeah, like that. Now let's finish it off with some white spots here
and there for the sky. You can see the sky a little bit here and there through
the foliage and trees. So I'm going to make
some white spots there. So I will take this pack white. I'm not mixing it with anything. You can follow the reference, and I'm going to make some
white spots here and there. You can already see
some darker spots and lighter spots
here and there. So I'm going to fix that
lighter spots again. Yeah, like that. Make it very sharp and tiny. That is the final
look of painting. I hope you enjoyed
painting this with me. And also, you learned some techniques to paint
lights and shadows and glins and light with some
snowy reflections and also beautiful
foliage and tree effects. I think I liked it,
and I like the glow, especially on this snoyand part and also this tree effects. Yeah. So that's it. Okay, see you in the next video.
22. Day 9 Class project - Part 1 - Sunlit Snow Covered Trees: Hello, everyone. Welcome
to today's class project, and I hope you're ready
for a new painting. This is the reference we
are going to use today. As you can see, there are a lot of shadows
and highlights. So yeah, it's not a very
beginner friendly class project, so I hope you have that
mindset to work on it. Yeah. So let's start
with sketching. I'm going to fix the horizon
line in the chart middle. And let's fix that house. From here, I will start
the outline. Yeah. And it is covered
with lots of snow. So let's make that
outline for the snow. You can see some shadows here, so I'm giving a line for that. Yeah, that's it. And yeah, one more house
is here in the background. So let's fix that too. We'll start with a triangle
and then make the roof. And it's also covered with snow. And you can see a lot of winery, snowy trees in the background with some shadows
and some highlights. So let's fix the
outline for that. I'm going to fix that
line for the trunk here is going to be the bigger, I mean, the taller tree. Yeah, and one more here. And I'm going to fix that line for that
shape of the trees. Yeah. That's it. Let's add
some more trees here, maybe. And here, also some distant
trees or some bushes. And one more tree trunk is here. Okay, and it's going to be a lot of shadows
in the foreground. So yeah, let's see how it goes. And also, we'll paint
some grass or something in the foreground. That's it. Okay. Now, for the first layer, I'll start with
that highlights for these trees and here also going to some
sunlight reflections. So I'll start with that colors. Like, I'll use maybe some
warm colors for that. And then we'll paint the
sky and this shadow part. So yeah, let's start by
wetting the whole paper. You just need a very thin
layer of water on your paper. So you can rub your brush
multiple times on your paper, so we'll not have
any water puddles or too much water on the paper. I'm going to mix
some juan brilliant. This is by Shinhan and add that color for the
trees, wet on wet. And you can also see
some very dark shadows in the trees. So yeah. You can paint with the
tip of your brush, like for some tiny dots here
and there around the trees. Yeah, now I will take some indigo to make that
shadows on the tree. But also, I'm mixing it
with a lot of water. I don't need that
much dark color, and I think I will mix
it with some u and brilliant discolor
to make it a little more creamy and
lighter in color. I'll mix it with some
paints gray also. So we have a bluish
kind of gray shade. Yeah, that's it. Now,
paper is started drying, so I spray some water, and here I have lot my
brush with this color. So I'm going to fill this color. We have to keep the roof
of the houses white. So yeah, remember to not
spread these colors downward. Yeah. I'm just creating some shadows to the trees. Since the light is
coming from this side, I'm just making some shadows
from this side also. Maybe I will fix some more details to the
highlights of the tree. So let's make some tiny
dots here and there. Okay. So I'm spreading it
a little bit downward. Okay, that's it for the trees. We have painted some lights and shadows to the trees wet on wet. So now we'll straightly
move to paint the sky. So we have to paint it with some dark colors
from around here, and we'll make it a little
lighter to this part. So from this corner, we'll
paint it more darker. So here, I'm going to
take some cobalt blue, and I'm going to
start from here. I think it's too colorful. So maybe I will mute it
down with some indigo. What is the color. We don't
want that much vibrancy. Now, I'm painting
the sky by leaving this space for the trees, almost like negative painting. So you have to be
careful how you are placing this blue color
around these trees, that is the shape of the trees. Also paper is almost dry. You can make some tiny
dots around here. Like sky is so visible
through the trees. Make it irregular, like
some dots here and there. Also, you can create
some dry texture there. So you'll get some tiny dots. Yeah. That's it. Now I'm going to make it
light with some water. So here I'm mixing this already mixed blue
colors with some water. And yeah. Let's just fill that
color around here. Be careful when you're
painting around trees. Okay. I'll make it more
lighter with water. That's it. Yeah. I think I want to
make it a little more darker around this corner, so I'll mix more indigo and Yeah, that's it. Okay, now I will take this small
brush, detailer, and I'll make some more
blue spots here and there around these trees so we'll
get more shave to the tree. So, yeah, you can
roughen the picture. We're following and just make
some spots here and there. And it's also important
to not overwork. You had to make it
like some tiny dots. Yeah. I think I will make
some bushes here. Yeah. Just in the distance,
you can see some bushes. So I'm trying to
create that and also adding some shadows. Yeah. So, yeah, that's
it for the trees. And later we'll add this trunk
and branches to the trees. So I hope you got
the technique for painting white trees
in winter landscapes. Like, we'll start
with the lights and shadows to the
tree, wet on wet. And then we'll cover the
sky with blue colors by using maybe wet on dry technique to get
these sharp edges. Or also you can use wet on wet technique again
to paint the sky. So like that, we can create some white contrasting
trees in winter Bass caps? Yeah. Now let's move to
this foreground part. So first, I'm going to
wet the foreground part. He also, you can see some very
sharp lights and shadows. Around this house, it's
going to be more lighter and it's a little more cooler and bluish
in the foreground. So let's paint it like that. So, yeah, I'm going
to paint the shadows
23. Day 9 Class project - Part 2: In the foreground. I think I will use the same
blue colors we mixed. I have cobalt blue,
and some indigo. So it's like a light
sky blue kind of shade. So with that color, I'm going to fix the shadows. You had to move your brush
a little faster like this. Instead of painting like this, you have to move it
a little faster, so you will get
that straight edge between the shadow
and highlights. And also don't cover
the spot there. You can again see
some white spots here and there in
the foreground. So yeah, you can intentionally leave
some space like this. Yeah, that's it. And let's
make some shadows around here. Yeah. I think this house roof
is also under shadow. So let's cover that too. That's it. I'm trying to make that
shape around here. Yeah. Now I will add some
more dark color here, so I'll mix more indigo to
this blue mix. And, yeah. You can also make some irregular
shaves here and there. Yeah, that's it. And also, you can see around
this part behind this house, there are some shadows and also it's dark compared to
the roof of this house. So very tiny details that we almost miss to create
in the painting. I think I want to
make it a little more sharper for this shadow, so I'm going to lift
some colors from there. Yeah. It looks too
soft and blended, so I want some sharp edge there. Okay, now I'm going to dry
this layer completely, and then we'll
paint more details. Okay, now the paper
is completely dry. I will paint details
to the houses. So I'm going to take some
burn temper and also elocre. I'm going to start with
elocre for this house. You can use a detailer like
this or a small size brush. Remember to keep the
edges sharp and neat. I also like it's covered
with some snow like this. We had to make some wavy lines, not straight, since it's
covered with some snow. And now I will use
some burn temper. Okay, I think I will mix
it with some indigo to make it a little
cool kind of shade. And I'm going to make
some straight lines downward for that texture. I so I'm blending a little bit. Yeah. Now I think I will fix this little
more darker line. I Yeah, that's it. Let's make it a
little more thicker. Yeah. That's enough. And also, we have to paint some
brown colors around here. So I'll start with
this bond number in the go mix for this side. Yeah. Yeah. And I'll take some Ochre for
that French tails. Also, you can see a
small door there. Yeah. Yeah, I think I have to cover around
here for some shadows, so I'll take this blue again. And also, I'm blending it. Okay. Now, I will
move to this house. So it's very dark in color
compared to this one. I'm going to take burn
tamber and some indigo, almost like van **** brown. Yeah. And let's fix the
details for this house, starting with that triangle. Yeah. And let's add some
details around here. Um, Windlanscaps are almost like negative painting to
get that white effects. We had to paint other details
in negative technique. That's enough. And
I think I will fix this roof with
some white gauche. Meant to fix the roof. And again, I didn't
mix it with water. We need very dry paint
to fix these details. Yeah, here too. Let's add some
shadows to the roof also with some very
light blue mix. I'm creating some details there. And here I will leave some
space for that highlights. Yeah. And just fill that space. Yeah, that's it. Yeah, perfect. Now, let's add some
shadows here also. Yeah. That's it. I will also fix this line. Yeah. So let's add some
shadows to this spot. Yeah, that's enough. Now, let's add this dough. So I'm going to take
some brown and yeah. Adding colours to one
side and then pulling it to the other side with water. Yeah. That's enough. Now, I think I will fix some
details to this wet on dry. Like these lines, I'm making
it a little more sharper. Okay, now I think I will
fix some details in the foreground, for the shadows. So again, I'm going to
take this blow mix. And also, I'm using this size. I think it's size two,
Caligraphy brush. I have some nice point. So I'm going to make some spots
like this here and there. With light with
very light colors. Yeah. Like that, we can make
it a little more detailed. You can already see some
sports here and there, like light sports
and dark sports. So I think I want to make the
space a little more darker so we get that
focused towards this spot. So I'm going to add
some more colors there. I will use this same mix of
cobalt blue, and some indigo. It looks too light, so I want to make it a
little more darker. So again, I'm using this
flat brush, and, yeah. But When you're going around this highlight
part, be careful. I'm also blending it. I think I will add
some salt here. We need some salt
texture, maybe yeah. I will wipe it a
little bit from here.
24. Day 9 Class project - Part 3: Yeah. That's enough. Okay, now let's dry this layer and we'll move to
paint the trees. Now the paper is
dry and I'm going to paint the details
for the tray, and I'll use this
Caligrafy brush, and also I'm taking this
indigo and born timber mix. Yeah. For this tree, I'm going to paint that trunk. So here, I'll start And also, don't go straight. You can break it like this. I think I will mix it
with some join brilliant. And let's add some
branches sidewise. Yeah. And for this tree, I want to start from here. Break it down here and there, especially in the shadows. Make it very thin and sharp. Yeah. I think that's enough. I will add some more
branches or some details. And now I will add some white lines for these trunks to make
it a little sny. So, yeah. Okay, now I will take this gray shade by mixing
Joan Brilliant and indigo, which is a light gray shade. And I want to make some more very light
and thin branches here and there. So, yeah. Yeah. So distinct tree
details, are they? For adding this distant details, two things we have
to be careful. Like color we are using
should be very light, and also we had to paint
it thin and sharp. Okay, now I think I want to
work on this tree shadows. So I'm going to again
use this gray shade and let's make it a little
darker here and there. Sure. Okay, now I think I will add some
details in the foreground. You can already see
some white spots here, so I'm adding these
lines from there. Make it very thin and
sharp and straight. You can paint it in
different sizes. Yeah. That's it. I think I will make it a
little more contrasting by adding this blue
again here and there. And blend it to the other side. Okay.'s it. Now, I think I will add some white gosh spots
for these details. Some leaves or some snow. Yeah, that's it. I think
we are almost done. I'm trying to make some
more shadows here. Two. If you want to fix some spots here and there for some more highlights, you can do it with white quash. Okay, let's add some
branches from here, as you can see in the reference. So yeah. I'm trying to make
it very thin and sharp. And I think I will lift
some colors from here. Instead of using white case, you can also make some
white spots like this. Just grub your brush on your paper and create some
light spots like this. That is the final
result of our painting. Look at that beautiful
glow on these trees. I hope you got the
technique of painting sunlight passing through
a landscape like this. By adding some shadows, we can create that
light effect also. And also painting
winter trees like this. So yeah, I feel like these
edges are too sharp. I should fix some details
wet and wet again. But still, yeah, it
looks nice and gloy. I like that glowing effect. I also added this same
yellow color around here. For a harmony between
all these highlights. So yeah, and also we are
almost ending this challenge. We just have to
finish three or four, I think, three class projects. And yeah, I hope you're
enjoying this challenge. You are learning some techniques to painting watercolor
landscapes, especially winter
landscapes, and I hope you will use some of these techniques for your
future paintings also. So, yeah, if you have any doubts or anything
you want to know, you can ask in the
discussion box or you can contact me through my Instagram. That's it for today. See you with a new painting
tomorrow. Bye.
25. Day 10 Class project - Part 1 - Snow Covered Village: Hello. Welcome
back. Welcome back. I hope you're ready
for today's painting. It's a very sunny
day in my studio, and we are also painting a
sunny landscape picture. Yeah, you can see the reference. We're going to paint
a mountain valley with very bright
sunlight and shadows. And you can also
see a small village or some houses or
kind of aerial view. So let's see how to paint it. We'll focus on
creating that depth. You can see in the reference. There are some
very tiny details, and we'll also try to paint it in a little more easier process. So yeah, I'll start
with sketching. Foreground is going
to be very plain. You can see in the reference. So like that, I'm going to fix that line for the
foreground snowy part. And yeah, from here, yeah. From here, I'll start and
making it like a wavy line, and I'm ending it
here a little higher, almost half of this paper. Yeah. From there, you
can see some trees, though I'm going like
this for that details. And yeah, you can also
see that shadow part, like this snowy land part
through the trees. That's it. And from here, we'll fix
that line for the mountain. Don't be too bothered
about so much details. You can just go very loosely
for the mountain lines also. There are some highlight part of this mountain also visible. Yeah. And you can also see
some more mountains from here. That's enough. Now I'll sketch some houses
here and there. And yeah, around here, it's going to be very
tiny and very detailed. So we'll only sketch some houses that is
visible in this reference. Yeah. Yeah, I'll
fix one house here. Again, we have to make
it very small and tiny. I'm starting with that roof. Yeah. And then french side, and then the other side also. Yeah, that's enough. Now,
I'll add one house here, which is a little more near to us and comparatively bigger. Yeah. That's it. And let's add some more
houses here and there. I'll make it like a line. Yeah, and then add some houses. You can make it into
different directions, also. Yeah. And I add some roofs, maybe some houses
in the background. Yeah. And around here, we have to fix some more houses. I'm just adding some
lines like this for maybe some roof in
the very background. You can also paint
only some roofs. Let's see how it goes. Yeah. I feel like adding one
more here. That's enough. That's enough for sketching. Now, let's start the painting. As you can see in the reference, we'll paint the sky and this foreground part more
lighter and we'll paint this part more darker because this part is covered with a
lot of very strong shadows. So yeah, by leaving
some spaces here and there for these houses
and its roof and yeah, maybe we'll also fix it with
some white gauche later. So yeah, let's see how it goes. So first I'm going to
wet this sky part only. Yeah. Very carefully, I'm going around this mountain line because as you can
see in the reference, we have to paint that
mountain lines by leaving some spaces to make
that lights and shadows. Yeah, since it's snowy mountain, we have to paint that reflective
part of the mountain, also now I'll take Cobalt blue. I'll just fill that color here. I'm starting from this side. We'll make it a
little lighter here since the light is
coming from this side. And I'll clean my brush and then let's spread that colors around these lines we don't want to
make it very dark. Okay. But I think I want to
make it a little more darker. So yeah, again, I'm
using Kobal blue. This part we'll add some trees, so you don't have to
worry about that, but from here we will
add some mountains. You can see in the reference. Yeah Okay Yeah, that's enough for the sky, and now we'll dry this layer. Then we can paint the
mountain details. Before painting these details for the mountain and houses, I want to fix this
foreground part. You can see the foreground is very plain in the reference. So yeah, first, I
will wet this part, til this line. Yeah. And I will use a mix of
cobalt blue, and some indigo. And I'll start from here. Let's make it a little
darker in the foreground. Yeah. Now I'll clean my
brush and wiping it, and then just rub your brush
here to spread that colors. Yeah. Now, let's add some more
colors in the foreground. Mix in a baar blue and indigo. To make that, a little wavy
effect on this foreground, I'm just adding
some shadows and, you know, I always like to add some effects in the foreground in
landscape painting. I don't like to
leave it very plain. Yeah. You can also
wipe it from here there for the highlights, maybe. Yeah. Yeah. Let's leave it like that. I think I want to add some
salt for this foreground part. Yeah. That's enough. I added here and here. Okay, now let's dry
this layer also. Yeah. Yeah, that's enough. Now, let's start painting
these mountains and houses. So I'll use this mob brush. And you can also see some
highlight parts around here. Yeah. So we have to be very careful when you are painting
around the mountain lines. We'll paint the shadows with
ultramarine blue. Yeah. Okay. Now, you can see
some highlight part around this mountain
line in the reference. So we had to be very
careful when we are painting the shadows. We have to paint it by leaving some space for this white part. And also, yeah,
maybe we can also fix some part with
white gauche later. At let's see how it goes. And we'll also
paint these shadows around these houses
by leaving this roof. You can see some
light reflections on these house roofs also. So yeah, let's see how it goes. And also for painting
these mountains, we'll use ultramarine to
make it a little warm. Yeah. I'll mix it
with some indigo. I want to mix it with
some water also. We'll start with a very
light shade. Yeah. And I'll start from here. I'm painting it very
carefully around these lines. Yeah. Here, let's go down. And then blending these edges with more color and some water. Going around the houses
very carefully. Yeah. And also, you don't have to fill it entirely with this blue, you can leave some white
spots here and there. Yeah, like that, we
can create some depth. I think I will mix some
indigo for this part. Yeah. Yeah. Now I will spread that
color to other sides. And from here, it
started drying. But don't worry, you
can go over that. By adding more layers. Yeah. Now you can see some light
reflections around here, so I'm just going
very light to here. Okay. Now I'll
make my brush very damp and I just want
to scratch it here. Yeah. To create a kind of depth. My brush and my paper
is also very dry. Okay, now, I'll start from here. You can see some shadows
around this part also. And we had to paint this mountain also. Yeah. We'll also paint some
trees here. Yeah. Trusting the process is very important, especially
in watercolor. Trying to make it more smoother. Yeah, that's it. Now, let's
start painting some trees. Yeah. So for that, I will use a mix of
indigo and paints gray. Yeah. And also, I'm using
this size two brush, and you can see some trees here. You can just scratch
it on your paper. Don't paint all
trees separately. You can paint it very loosely. And then you can shape that tip of the tree a little
more detailed. That's it. Now let's add
some trees around here also. So yeah. To paint this kind of aerial per
26. Day 10 Class project - Part 2: This kind of aerial perspective, it's very important to paint the details very carefully. Yeah, let's go from here also. I will add one tree around this house. Yeah. Yeah, now let's add
some trees here. When we paint these trees, you can also see that land part, that snowy land part
through these trees. So we had to be very careful how we're
placing these trees. Okay. First I'll
start like a line. Yeah. And then I
will fix that part. And I'm going down
almost till here. And then very tiny upward lines for the distant trees maybe. And then I will add some
more color here and there. Okay, now I'll take my detailer, and let's add some details
here and there for this trace. I'm just making
some upward strokes for that pine tree effect. Now I'll add some
more trees here. You can also add some small lines here
and there separately. Yeah. Let's add some
more darkness here. H Yeah, I'm trying to make
some layers of trees. Yeah. Now, I think I will add
some more trees here. Yeah. Starting from here. Yeah. I just scratching it on my paper to get that
natural effect. Yeah. Yeah. That's it. You can also add some tiny dots for
some very small trees. Okay, now I'll add some
around this house. Yeah. I think I will make it into
some detailed trays. I'm just adding some
more tiny, tiny lines. That's enough. Now, I think we have to add some trees
around this part also. I'm just against scratching. And then let's make it like some pine tree effects in the distance. You can also go around
the mountain to I'm just adding one tree
just behind this house. I Okay, now that's enough. Let's start painting the
details for the mountain. So I'll add some very
light blue colours for this white part. Yeah, here I have kobal blue, and I'm mixing it
with a lot of water. Yeah. And then you can
follow the reference. You can see some
blue lines there. Yeah. Here also. Yeah. And let's add some here. Some shadows in
the very distance. Now, I'll add some darkness for this already
painted mountains. So I'm mixing cobalt
blue with some indigo. Yeah, you can see
some texture the And let's add some here also. Okay, now, I'll
fix up details for this white part with white gosh. You had to paint these details
very dry on dry. Okay. I'm adding some more lines here. I'm also adding some darkness for these background mountains in between adding that
white lines also. I'm again fixing that
lines for the mountains. Yeah, I'm trying to
fix that mistake. Like, I didn't like how we add this white paint around here, and I wanted to remove it. So I made it into a mountain
again. Yeah, that's it. That's enough. Now, let's
leave it like that. Maybe we'll add some
lines again there. Okay. Okay, now I'll
paint these houses, but before that, I
think we have to add some shadows here for the trees. So again, I'll take
some ultramarine and let's darken this already
added blue lines. Yeah. Yeah, I'm just adding some
shadows for that trace. That's enough. Now, let's
start painting the houses. So I'll use sepia. Yeah. And I'm just
filling that one side of the house by leaving this roof. Yeah. And, you know, we have to make the roof like snow covered roof. And I'll make it a little more
darker to the other side. O. Now I think I'll add some blue
colours for the roof. Very light blue, Kobal blue, and I'm adding some shadows. Yeah, that's enough. And I think I want to
blend that edges. Yeah. Now, same like this, I will fix all other houses. I'll start with sepia. I think I will mix it with some locre and let's
go with this house. Yeah. And then I'll take
some yellowcre again. And then let's paint this other side front
side of the house. And also, I will leave a small
square here for that door. I forgot to add it here. But yeah, we'll fix it
with a pack quite later. Let's add some darkness. Yeah. That's it. I'm shaping that roof by
painting the tree again. Okay, I will add some white for that other
side of the roof line. That's it. Now, let's
fix the house also.
27. Day 10 Class project - Part 3: I'm fixing some details
with Witch again. Like And also, I'm just adding some
brown tiny dodge. Yeah. And then let's add
some white gauge on that. Back white. Maybe like
some very distant tree, sorry, very distant houses. Yeah. That's it. Now
let's move to this side. And let's start from here. O. And I think I want to fix that
roof by adding some blue colours to the
background of that house. And then blending the edges. And a small door also. Yeah, I'm just making some part of this
houses a little more darker by mixing sepia and ultramarine blue. Yeah. Okay, now I'll add some more
details around the spot. We have to add some very
fine details there, maybe some houses and
some trees again. So yeah, I'll repeat the same process like we
painted these houses, but I'll paint it in a
little more smaller size. I'm going to paint
with same colors, sepia and some yellow. Yeah. And we have already added some
sketches for these houses. So I'm just filling that um, Yeah. And there is some more
houses here and there. One side of the house,
I'm painting with more warmer brown colors, and then the other side, I'm filling with some
light grayish kind of mix. Yeah. So we'll get that
lights and shadow effect. Yeah. Now I'll paint one more house, but a little more tiny one. Okay, now I want to add some more very tiny
houses around here. So I'm not going to paint
it like this completely. I'll just add some very tiny, dark dots or some lines here and there to make
a kind of illusion. So yeah, like that, we can create that
depth in the painting. Yeah. So here you can already
see some white spots. I will just add some very
tiny dots like this. Yeah. If you couldn't leave white
spots like this here, you can also fix it
with opaq white, and then you can paint it with some black color like this. So yeah, around here also, you can also paint some
very tiny houses again. We need very good
patients to paint such very tiny details. But you know the
effort really worth it because the end result will be very different by adding
this tiny, tiny details. Y Again, you can look at your painting
from a little distance. So you'll know, if you want
to add some more details, you can add that. Yeah. Yeah, that's it. Maybe I will fix some more
details with some white. Let's add that doors. I'm just making
very tiny houses. And maybe I will also add
some details to these trees, maybe some tree
trunks or branches, some windy effects
for the trees. Yeah. So very thin lines. Y. Yeah. Maybe I'll fix that trees. Yeah, I think we
are almost done. I'm just fixing some
more final details. Yeah, like this, you can add some more white spots here
and there for that depth. If you couldn't
leave it like this, we can also paint
it with whiteqh. Yeah. Now I will add
some white here also. Yeah. Now, I think I want to add some shadows around here. So again, I'll use some ultramarine and
just adding some lines. Yeah, that's enough. Now, I think I want to add
some more trees around here. Yeah. So again, I will use sepia and I will mix
it with some indigo, maybe some very small trees. And around here also. You can also add
some tiny bushes or some tiny dots here and there to make it a
little more detailed. Yeah. I'm just adding some lines, some dots. I think I want to add
some tree from here. Yeah. Maybe I will add
some from here also. Yeah, I'm adding some more trees in the very distance also. Yeah, that's it. Okay, now
I want to add this line, this foreground snow line
a little more visible. So I'm going to make some
very tiny dots there maybe some rocks or
anything like that. Some tiny lines for some
trees or something. So yeah, that is the final
look of our painting. I hope you enjoyed
this painting session, and you got some technique to paint some fine
details without being too concerned about the details
in a kind of low style, but still we can create
that kind of depth. So maybe when you are painting an aerial
landscape next time, you can use kind
of the techniques, like you can just add some houses or elements
here and there. And then as it going
away from the viewer, you can make it more tiny and more abstract and more loose. So, yeah, I hope you
got that confidence to paint some tiny details and to make depth
in your painting. That's it for today and see you tomorrow with a
new painting. Bye.
28. Day 11 Class project - Part 1 - Northern Sky Over a Cozy Hut: This is going to be a simple
northern sky landscape. I'll divide the paper into two parts for the
sky and land part. So I'll fix the
horizon line lower. And also, I'm going to
add a house around here. Yeah, first let's start
with the roof of the house and It's going to be a snow covered roof. So yeah, yeah, that's it. And let's add other
details of the house. I think I will fix the line for the foreground
snow part like this. Yeah. And just adding outline
for the pine trees. So taller ones and
short trees also. Some are behind house. And let's add one
door to the house. Yeah, that's enough. And
some details around here. And also maybe one
small tree around here. A blurry mountain
in the background. Yeah, that's enough. And also here going to be like a pathway or some footprints in the snow Yeah, that's enough. So that is the sketch, and I hope you're ready for the
painting. So let's start. Okay, so first, let's
prepare the colors. For the Northern lights, I will take cobalt green. So, yeah, I'm not going to make the Northern sky very colorful. I'll make it a little muted way. So I have mixed cobalt
green and permanent green. Cobalt green is by Shinhan, and this permanent
green is by anco. So with a little bit of this permanent green and
lots of cobalt green, almost like a pastel shade. That is the first color.
And the next color is going to be ultramarine. Yeah, lots of ultramarine. I'm mixing it with water. Okay, now I have prepared
the colors for the sky, so let's wet the sky part. I will use this hake bridge. We have to wet the sky
by leaving this roof part of the house
because it's going to be very light with the snow. So Even you can use a tissue paper to wipe out, um, the extra water that
is flowing towards, um, the space you want lighter. Yeah, that's enough. Now, I will start
with a lighter color for the Northern sky. Paint it around the
house carefully. I'm just making it like
some upward strokes. Yeah, let's mix some more cobalt green
and permanent green. Yeah. Yeah, that's enough. Now, I'll start with the ultramarine. That is downward. Remember, your
people have to be, um wet, um, to get this effect. Not too artery or, um, too dry. It should be damp. Okay, I think I need
more dark colors in the upper corner. So I'll mix some indigo to this ultramarine mix. Yeah. And Just making some straight
lines downward. Okay, I think I want to make
it more blended or floy. So I'll use my spray bottle and let's just spray some water. Let's see how it works. Yeah, now you can see
it's getting more blended and flo.
That's what we need. I think I will add some more
darker colours here and there to make this
light part more, um, attractive or to
create more contrast. Let's mix it again upward also. I think I want to make
more darker colour. And I will use the spray
bottle again to mix it. Northern lights are
a little tricky, but it looks simple when
we start the painting. But to get that correct blend of lighter and darker colors,
it's a little tricky, so water control and
the way we are applying the paint and the consistency of the paint,
everything is matter. So yeah, I think that's okay. Now, I think it looks nice
after drying this layer. Okay, let's start with
painting the snow part. I will just wet this
part for the snow. Okay, I think I want to wipe the colors from
this roof part. Yeah. Yeah. That's enough. Let's start with some
shadows to the snow.
29. Day 11 Class project - Part 2: O. Remember to make it very lighter with, I'm using this same mix of indigo and ultramarine
for the shadows, and I'm also thinning
it down with lots of water and making it a little more darker
in the foreground. And let's blend that color
all over that space. I think I want to
add more aka color. I'm just adding some lines
like this that is wet on wet with the same mix of um, ultramarine and indigo to make
some dimensional depth or, like, that effect
to the snowy part. I don't want to
make it very plain. So yeah. That's nice. And maybe here also. Yeah. Adding some darker
colors in this corner. Yeah, I think that's enough. And now let's add the
background mountain with the same mix of blue colours that is
indigo and ultramay. Okay, I will add the mountain. I did in this part, adding the layer of
mountain with wet on dry. Yeah, I'm painting around
the house carefully. Yeah. And also, I don't want this line of
mountain that sharp. So I will blend it a little
bit with clear water. Maybe you can skip this part, if you're okay with, um this
sharp line of mountain. I'm just blending it
with some clear water. I want to make it
a little blurry. Yeah, and around here, too, I have to blend it. Yeah. Maybe I will add some darker
colors to the mountain. Okay, now I'm going to add some pine trees with
the same indigo, and also I will add some paint gray to make
it a little more darker. Okay, I will swatch the mix. Yeah, that is the color, like, a little darker in the go. So, yeah. First, I will add a line like Mm. And then we can add the details. Make it sharper to the top part and Don't worry about this part. The mountain layer is still
wet and also I'm painting, the trees on top of that
before it's drying. So that's okay. Even you can paint these
trees after drying the previous layers of,
like, the mountain. I just want to
make it like this. Um, like some wet on wet trees. Yeah, I think I want to fix
this one a little more. Make your brush tip very sharp
without that much water. So you can make that
thin sharp stroks. I have a video on YouTube for painting snow capped pine
trees. Maybe you can watch it. Yeah, I think I'm adding more darker color
like wet on wet again to make shape to the
wet and wet pine trees. And maybe we will add some white gauche or a pack
white paint to make some snow in the tras Yeah. And also, I will add some
trees around this part. Start with the
vertical line and then add some sidewise around strokes in different
sizes for the pine tree. Make it very sharp
for the top part, and more softer acid
coming to the down part. Maybe I will add some
short trees around here. Paper started drying. Yeah, I'm using my
small size detailer for these tiny strokes
for the trees. Starting with the
vertical line and then adding the
sidewise strokes. Make it irregular,
not symmetrical. Um, um, the leaves or the
branches of the tree, try to make it very irregular to different
directions in different sizes. We can make it like that.
And maybe I will add and Yeah. And also, I'm going to
add one tray around here that is behind the house. You can make some thicker
strokes by bending the whole belly of
your brush bristles. Like that, you'll get some cute round kind of
shaves for this tree. Okay, so I'll take
some opaque white, add some snow to the trees. Just here and there,
add some strokes. And remember to not
overwork also. And
30. Day 11 Class project - Part 3: Remember to not overwork also. I think I want to mute
it a little bit with some indigo this white
gas with this indigo mix. Yeah. Now, I'm going to just blend it this white
gas here and there. I don't want to make
it that sharper. Okay. I will show you again how
I added this white gas, like opaque white to this dark pine tree because we want to make
it more realistic. We are not just adding some
strokes here and there, um, to make it white. So now it looks like more
realistic like snowy pine tree. So here I have painted the
first layer, same like this. So with very thick paint, like opaque white,
don't use water. And if this is the
trunk of the tree, you can paint the
branches or the leaves to different directions
like some like this and some like this. Like some are just leaning
down and some are sidewise. And also, it should be on top part of the
first layer like this. For this part, I'm painting
the snow around here. And also, in the middle part, we can paint it anywhere, but in different directions. And as it going
towards the top part, just make it very tiny. Yeah. Like you can paint it in
different directions. Like that. Not only
the snow part, whatever evergreen trees
are your painting, you can paint the
branches like this. So yeah. Now, let's add some more
snowy effects to these trees. And it's also very
important to not overwork. Sometimes we will just
paint it completely, and we'll cover it
with full of white. So that's also important
to make it to paint it. Um without overworking. And maybe you can add some more darker paint here and there to make it
more contrasting. If you're feeling like
you're overworked, you can blend it down
like I have done here. If you are feeling like the
white quash is too bright, you can mute it down
with some indigo. Yeah, I think let's add to this trees also,
these small trees. Okay, that's enough now. Let's motor paint the
foreground details. Maybe I'm going to add
one tree around here. Just adding the first line for the trunk and some
sidewise strokes. Y. Yeah, that's it. And now we have to add some details
around the foreground. So I will revet this part Revetting it very carefully with very clear
water and using a flat brush. And, um, do not press it hardly. You can revert it gently because we don't want to reactivate
the previous layer. Um, yeah. Yeah. Remember to make it very soft. Like some pathway
or some footprints, you can make it
some blurry lines. For this, I'm using
very light indigo. Now I'm going to add
details to the house. So I'll take yellow ochre and and just filling that colour to one
side of the house. And with mixing some
indigo and cre, I will paint this part of the house just leaving very thin line in between
those two colors. Yeah. Maybe I will make it a little
more darker with some burn temper around here. This down part line of
the house and, like, between the house and the
snow is very important to get the perspective
of the painting. Yeah. So let it get dry. In that time, let's paint
the snow on the roof. So I'm just wetting it carefully
without going outward. Yeah. And let's add
some snow effector. I'm taking indigo again and add
31. Day 11 Class project - Part 4: And some shadows. Yeah, I think I need to add some more colors
like some shadows. So, yeah, that's enough. And once it dry, we'll add more
details to the house. So now I think I have to fix
the footpath around here. And also, I'm going to add some darker dots for the
food path here and there, because we added the first
layer wet on wet, like, by vetting this part again, and then we add some
very light indigo. Now it's dry and I'm adding
some dark indigo, wet on dry. Yeah. Now, I think I have
to add some shadows, like to this tree
and some shadows to this house and some for the pine trees and
maybe from this side, I'm going to re wet
the paper again. I'm not touching the
footprints we added. And maybe I want some
shadows around here, so I'm betting the two
and also this house. And I'm going to
take some indigo and with some ultramarne with a mix of both and
with lots of water. And I'm going to
add some shadows. And for this house also. And this tree. You can see by just re wetting, I still have some hard edges for the shadows and
also some soft edges. That's what I want. M Yeah, I think that's enough. Okay, now I think I have to
add some stars in the sky. So I'll take this small brush and let's take some
loose white cash. And first, let's test it here. Yeah, I don't want to
big or thick stars. So yeah, that's it. Very tiny. So you can
take some thick paint. You can adjust the consistency. Yeah. That's enough. Okay, now, I think I have to add these details to the house. So I'll take some burn
tamper with some indigo. And I'm going to add the
shadow to this roof part. And I think I will add some
shadows around here, too, but with more with a little
more lighter colors, I'm adding shadows around here. Then I'm adding more dark
color blending that color. Now I think I will add the door just making a square or a little rectangle and then filling it with
some lighter color. I'm trying to make the shadows this side a little more darker. Yeah, I think I will
dry that layer. And let's add some details like some pattern or
texture to the wall. With very dry paint,
I'm adding some. And maybe this side or to And I'm going to make some lines like this. Paint it very faster
like these lines. So you'll get more
straight and loose lines. Yeah, I think I will add some white dots here
and there for the snow. Yeah. Maybe I will add
some white lines to make it a little more
detailed or visible. Yeah, I think that's enough. And let's add some details around here with the
same bone temper. I'm going to add that. And also just make it
a little more thicker. Yeah. And let's add
shadows to that. I think we are done
with the painting. That is the final look. Um, I think we have painted
it nicely with some light effect to
the house and snow and also some nice and
simple Northern sky. And with also some snow capped pine
trees with white gosh. Yeah, that's it. So yeah, let's move to the next painting.
32. Day 12 Class project - Part 1 - Winter Cabin By The Lake: Hi, everyone. Welcome back. And today is going to be
our final class project, and this is the reference
picture we are going to use. You can see a house and some warm light and its
reflections in the water. And also some winter pine
trees in the background. And all over the picture is
looking very moody and dark. And also the light is very warm. And yeah. So in this class project, we'll see how to paint
a warm light with a cool and moody background. Let's start with a quick sketch. I'm going to fix
the horizontal line first a little
lower from halfway. So around here, I'll
fix that line. Yeah. And you can see a small
white part there, like for that snowy land part in between the trees
and the water part. So I'm going to fix that line. Yeah, that's it. And from there almost in middle, I'm going to fix the house. I'll start with the triangle
for the front side. Yeah. Then I'm going
to fix the roof. Yeah. That's it. And I think I want
to fix that line for that snow on the roof. Yeah. And around here, we'll fix that window, which is also light
is coming through. So just adding a square
there. That's it. And here, I'll fix one door. It's not there in
the reference, but, yeah, I just want to
add one door there. And here, I'll fix that height of the trees
in the background. So we'll get an idea how long
we can go for the trees. Yeah. And from here, let's add that reflections of this
light on the house. So seem like this, I'm going to fix that
mirror image of the house. We had to paint the
light very bright, so maybe we'll use masking
fluid and we'll fix that windows and lights
and its reflections. And it's also a little
blurry and wavy. So yeah, we'll
paint it like that. Yeah, that's it for sketching. And now what I'm going
to do is I will wet the whole paper and I
will fix the first layer of colors for this warm
lights around this house. And then we'll dry
the paper completely. And then only I will
apply muskin fluid. Yeah. Then once the
muskin fluid dry, we'll paint the later layers. Like that, we can keep
that glow in the painting. So yeah, I'm going to wet the whole paper as I always say, just a very shiny thin layer of water you need on the paper
without any water bottles. Yeah, I'm going to start
with naples yellow. Um, you can use any
warm yellow that you have like gamboge or Indian
yellow or even lemon yellow. Any yellow with a little
warm touch, would be great. So I'm going to use just
very tip of my brush, and it's also loaded
with this naples yellow, and I'm going to fix
that color here. Yeah. And also for
the reflections. Yeah. And around that. Yeah. And also, I'm making some dots like this to make it a little wavy and more
realistic reflections. Yeah. I think I want to
make it like some lines. So yeah, I just
using my dam brush and just moving it horizontally
to make it more wavy. And also, I want to wipe it from here because as you can
see in the reference, we have to keep it very
white there for that snow. Okay, now, if you don't
want to use masking fluid, you can start straightly painting like with
all other colors. But I think I want to fix
this layer with dryer, and then I will put
muskin fluid there. So I can paint around
that more easily. So I'm going to
use my hair dryer. I think I want to lift some
colors from the roof of the house since the roof
is very white in color. So I'm using this flat brush, and I'm going to lift
it around the roof. I think by using lifting, we can fix any mistakes
in watercolor. Watercolor is also
a forgiving medium. Yeah, that's it. Now I will use my masking fluid. I'll take some to this. Yeah. But I'm going to fix that window and its reflections. Yeah, around this square. I'm going to fill that
with this masking fluid. Yeah. And for its
reflections, also, I'm going to add masking fluid. Just two squares,
but I'm also adding some more masking fluid
here for that wavy effect. Now, let it dry and then
we'll start painting. Okay, now masking fluid is completely dry. Let's
start painting. I will start with the sky
and these background trees, and then we'll paint
these water reflections. So I'm going to wet
this upper part only. I'm wetting it around
this house and this line for land
part very carefully. Yeah. Okay. That's enough. Okay,
now I'll start with a very light shade of this
indigo and thalo blue mix. So I'm just thinning it
down with a lot of water. Yeah. We just need a very
light shade for this upper corner effx
in the reference. Yeah, that is the color. So I'm going to just fill
that color here. You can come downward. That's okay because we'll
paint more dark trees here. Yeah. We can use some water to make it
very light in color, but still some little
darker spots here and there to make it like some
depth in the background. Yeah. That's it. Now I'm going to use some
dark mix of the same color. I'm going to mix some more
indigo and thalo blue. I think I want to mix
it with more indigo. Yeah. And I'm going
to start from here to make that trees. You can just start by filling this color very loosely and then we'll shape it into some trees. Yeah. Painting it around
the house very carefully, even you can use a detailer or a small size brush for this. Yeah. Or you can also use
the very tip of your brush. Yeah. And just filling that color here very loosely, we'll paint it to
some trees later. Paper is still wet. Yeah, you can just spread
that colors upward like this. I think we have to paint
it a little more higher. Like you can see
in the reference, the trees in the
background are very tall. Yeah. That's it. Now, what I'm going
to do is I don't want this sharp edge here, as you can see in the
reference and part is going invisible through
these trees around here, you can see that
in the reference. So by doing like that, we can create some
depth in the painting. So I'm going to make that
line a little softer here. Yeah. You can use a dam brush. Like you can dip your brush
in water and just wipe it on. A tissue paper. And you
can rub it here like this. You had to make
sure your brush is clean while doing this. Otherwise, we'll spread
that color and we'll ruin this brightness
of the snow. Yeah. We had to
paint some effects for the trees before
the paper dry. So I'm going to use
this detailer brush, and with this same mix of
colors that is tallow blue, and indigo, you can make
it into some pine trays. And again, you don't
know how to paint it very sharp or in
very detailed way. You can go loose and abstract. You just have to keep this
top part a little sharp. Then you can go
loosely downward. Yeah. Paper started drying and
my brush is also very dry. Yeah. Yeah, paper is still wet. You can see the
color is spreading. I think I want to spray
some water around here. It started drying. Yeah. I think we had to paint
some more dark, very dark
33. Day 12 Class project - Part 2: Reference. It's
very dark in color. And again, watercolor
will dry lighter. So we had to paint
it very dark, maybe. I think I will mix this
blow mix with some sepia. So maybe we'll get some
very dark effects. But I don't want to make
any greenish effect. So let's make some
more and they go yeah. I don't know if it's
visible through the camera. It is a mix of tallow
blue intego and sepia. So I'm going to add
some more trees. I'm just going very loosely. Remember to not paint all
these trees and branches separately, like in very detail, you can make it in
some loose way, like by rubbing your brush like this on your paper,
almost like scratching. Yeah, you can see
some edges here. So I'm going to make it like some tree that is a
little more near to us. Yeah. That's how we can
create some layers and Yeah. That's it. I think
let's fix it here also. Okay. I'll switch
to one other brush. This is a size dom brush. Now I really like this color by mixing it with some sepia. So, yeah, it looked
more darker and moody. So let's make some
more sharp tips for this background trees. You can also paint it
in different sizes. I mean, heights,
some small trees. Yeah. Let's paint
some more trees. Now I feel like I should
add one chimney here, but still it's not
in the reference we are following. Yeah. That's it. Let's fix
some lines here, too. Yeah, I'm trying to make some detailed look for the background trees
here and there. Yeah. Let's add some more trees here a little more darker. You just need some
patience to make it like, not very flat or with
some depth and dimension. Yeah. So you can paint it, like, with different color
values and more layers, like maybe wet on wet layers
and wet on dry layers also. Yeah, it's how we can create Okay. Yeah. Now, what is the next
step is we have to create some snowy effects
around these trees. So maybe we'll use
lifting technique and also we'll use some opaque
white or white gouache. So yeah, I think I want to make some little more lighter
trees around here. So I'm using very light
colour by mixing some water, and I'm going to make some Yeah. Maybe here. Yeah. Let's add some here, too. So to paint this effect, two things we have
to be careful, we can use different
color values. We can start with
some lighter colors, and then we can go
with darker colors. And also, one other thing is we had to paint these trees
in different heights, like some taller trees and some short trees as
it's coming near to us. So like that, we can make
some depth in the painting. So here I'm again,
sharpening some edges. And also, you can start by
this wet on wet layers. And then you can
go with maybe wet on dry effic and also
dry on dry effec Yeah, that's it.
Okay, now let's add some tree trunks from these
trees around this snowy part. So I'm going to take this
same mix of colors again, indigo sepia and somehow blue. And as you can see
in the reference, you can also zoom it
and you can create some For this tree, I'm going to fix the
trunk from here. Yeah. And for this one, also. These are the three trees, more darker in color
and more near to us. So, yeah. And also
one from here. And now I'll paint some more
trunks in the background, so I'll take a little
more lighter shade of this color by
mixing some water. And let's make some more
branches here and there. Yeah. Just some very tiny and
thin lines you can make. Yeah. And around here
also, Yeah. That's it. Maybe let's add some more tiny details
in this snowy part, like some snow covered rocks or some grass or
something like that. So I'm going to make some
tiny dots like that. Yeah, very tiny and
very sharp and dry. Okay. Yeah. And I'm just blending
it a little bit down. W. Now, what I'm going to do is, you can see in the
reference this noise, again, visible around this
house here on both sides. So I'm going to lift
some colors from there so we can
create that effect. So I'm going to use
this flat brush. And also, I have
one tissue paper, and let's lift some colors
from there, like that. Again, clean your brush and lift it from here and there
so you can create that depth. Yeah. That's it. From around
here also, let's lift it. Like the snowy part is a little visible
through the trees. That is the effect I'm
trying to create here. Yeah, that's it. Okay. Now I think I have to
fix some more tree trunks. Yeah. So I'm going to use
this same mix of colors, and from here, I'll
fix one trunk. And also, we'll make
it more visible, maybe with some
white quash or yeah. I'm also trying to make that foliage a little
more sharper, here. It now I'll use a pack white to create
some snow effects. So here I have a pack white, and I'm going to make some tiny thin white lines here and there. And also, we had
to be very careful and we had to do
without overworking. So maybe I will make it a little moody with some this
mix of blue colors. We already used here. We don't want that much
bright effects for the snow. Yeah. So I'm going to make
some lines like this, some foliage again, like
some snow on the foliage. Yeah. And I will fix that trunk so
it'll be more visible. Yeah. And also, it's very important to not
overwork now. Maybe we
34. Day 12 Class project - Part 3: And also, it's very important
to not overwork now. Maybe we'll cover it endirely
with this white paint. Yeah. And maybe for
this tree also. First time fixing that
trunk, you can see, I'm using very tiny
thin lines or strokes. Yeah, that's it. I'll
fix for this tree. For this effex, remember to use very dry paint. Don't mix it with
water to paint. These effix. Yeah. And maybe I will add some more
trunks here and there. I'm just adding some dots
here for some effet. Okay, now that's enough, and I'm going to splatter some white gash to make some snowfall or
something like that. And remember to not overwork. We just need some very tiny
white dots here and there. That's enough. So now let's start painting
the reflections. So I'm going to again revet
that part completely. Don't worry about these
yellow colors. That's okay. You can vet it completely. I will start with the
colors for this house. So I'm going to use sepia and maybe I'll mix it
with some inky go. Yeah. And I'm going to start from here for this
part of the house. Yeah. And also, I will lift the colors from
this roof of the house. Yeah. Now, let's fill that
space with this color. And now I will use some ilocre and I'm
going to fill that here. I'm just going around
that window very careful. We need some lighter effects as it going towards the window. Yeah. And maybe I will mix it
with some born temper here. Like that, we can create
that glow of the house. Yeah, I think I want
some more bon temper. Okay, now that's enough for the colors for the
house reflections. Now, let's move to paint
this foreground part. So I'm going to ret this
foreground part again. Yeah. Yeah, that's it. And let's use this
same mix of colors. So I'm going to take indigo
and Talobl and some sepia. We had to make it very dark
in the foreground. So yeah. You have to move a brush
horizontally here, and then here we'll make it vertically for the reflections, creating that moment in the
water like some wavy moments. Yeah. You can make it
a little more darker. And I'm going here also very carefully mix some more
indigo and alo blo and sepia. G here also carefully. Just covering around that house. And also, I'm not touching here. We have added that
light reflections here. So I'm going around
that very carefully. You can see I'm just
leaving some gap there and I'm creating the dark effects
around that. Yeah. And from here, I will
paint it downward. Yeah. And also, we have
to make that Um, snowy land part
reflections, also. So you can make it like
little wavy line here. Don't go like a
very straight line. Yeah. Now you can move away brush like this
to make it a little more smoother and paint around the roof of the house
very carefully. Okay, now I'll switch my
brush to this detailer. Yeah. And I'm going to make some tiny lines with
this blue around that. I think I want to lift it around here for that snowy effect. I'll use a flat brush. Yeah. Let's add some
more color around that. Okay. Okay, now, I don't want any
hard or sharp edges here, so I'm going to blend
it down a little bit for this roof and other
details of the house. Now, I will add some
more darker colors here to make that roof
a little more visible. You can see this tree
reflections we have to add here. So yeah, I'm going to just
create some effects there. Just you can create
some strokes downward. Yeah. Paper is still wet, so we can easily create
that reflections. And for this tree also, We can make it a little more
detailed here and there. Okay, now I'm going to
add some details around here to divide this little part, like for some reflections
and this land part. So you can see in the reference, there are some
very tiny details, so I'm going to make it very
dark with indigo and sepia, I can, let's make some
dark spots here and there. I'm just adding some dots. I'm not going straight. From here also. Yeah. Now what I'm
going to do is, I will spread that
colors a little bit downward with Dam Bridge you can see in the reference
the snow reflections are a little darker and moody
compared to this land part. So I'm spreading that
colors downward. Yeah, that's it. I think I want to make some details. Yeah. With very lighter colors, I'm adding some lines
here and there. Yeah, around here also. I'm adding some
more darker spots. Yeah. Maybe you can also
fix some details with some white quash. I think I want to fix some here. Yeah. And I'm also
blending it down a little bit because yeah, it's not that visible.
35. Day 12 Class project - Part 4: Yeah. That's it. Okay, now let's
leave it like that. Okay, I think I want to fix some more details
for the reflection. So I'm going to
make some lines for the tree trunks with white wash and this
sepia and indigo mix. And again, I'm making
it very thin and tiny. Okay, now I want to
fix some dark spots here and there to make the reflections a
little more visible. So I will take the
same mix of colors, sepia and indigo and thalo blue. And you can already see some
darker spots here and there. And I'm going to make that darker spots a
little more darker. So yeah, like that, we can make the reflections
a little more visible. And if you're feeling like it's too sharp, you can
also blend it. I'm blending it here and there. Here, these trees are very
visible and more near to us, so let's make more dark
reflections for that. Now, I think I want to
make some here, too. Remember to take very
dark thick mix of paint? Like, you know, I'm
trying to create that little sharper effect
for the reflections. But still water reflections are soft and more kind of blended. So yeah, I'm trying to
make an effect like that. Let's add for this tree. I trying to create that tree shape. Let's create some
more darkness here. I'm trying to create a mix
of darker and still again, lighter spots for
the reflections. Yeah. Now again, I'm going to
add that in for the trunks. Okay, that's enough
for the reflections. And now I'm going to fix this. So I'm going to take
again this sepia. Yeah. And first let's
fill this space, like the french
side of the house. And also, remember to create a little irregular shape here, since the house is also covered with some snow here and there. So instead of painting it
like with straight line, you can make it like this. Now I will clean my brush, and let's take
some yellow och to paint the other
side of the house. And I'm going to
start from here. Again, you can create
some sharp edges here for that snowy effect. Yeah, that's it. I'm not covering it end I
just need a little lighter, brighter effects
around the window. Yeah. Now I think I want to
make it a little more darker to these two corners. So again, I will take sepia
and some burn temper. And let's make it a little
darker for both corners. And again, I'm using
this retailer. Yeah. What's it? Yeah. Now I'm going to fix this roof with very
light shade of blue. So I'm going to take some indigo and mixing
with a lot of water. I just need a very light shade, and I will fill that color
here, only the upside. Yeah, that's enough. Okay. And I will spread that
color downward. Okay. And I want to make some
sharp edge here. Yeah. Since this light is also reflecting on
the roof snow part. So yeah, I'm trying
to make that sharp. It's with this blue color. Yeah, that's it. And it will fix one line for this
part of the roof. Yeah. It's enough. Maybe let's add some
blue colours for this reflection also Okay. Now, I'll fix one
door for this house. So I'm going to take a pack white and I'm mixing it
with some yellowcre. Yeah. And let's add a very
tiny square there. Oh, it's very bright. I want to mix more yellocre Yeah. Yeah. It's a Okay, now
I think I want to make this house a little more wavy according
to this water moment. So what I'm going to
do is I will take some this same color that
is sepia and indigo. And let's create some
tiny horizontal lines for that wavy effect. So yeah, here also such very tiny lines. Now I'm going to mix this naples yellow with some white quash. This is not white quash. This opaquite Bm Brand. I'll show you this is
the color I'm using. Yeah. And yeah, let's
make some sparkles or some tiny spots here and
there to make it wavy. I think I want to add some
dark lines around that door. And I want to make some
more moment in the water. So I'm going to use
this flat brush, and I will just
left some colors. Yeah. Use a dam brush and just rub it over your
paper like this. Yeah. As you can see here, you can
make it in different sizes. As you're coming
towards the foreground, we can make it
bigger and thicker. So tiny spots I'm creating here. O. Yeah, now that's perfect. Now, let's move to
the final step. That is removing
this masking fluid. So my fingertip is
very dry and I'm going to just lift it off. Yeah. I think I want to add
some lines around that window to make it a little more visible and contrasting. So again, I'm going
to use the sepia. And as you can see
in the reference, I'm going to make
some lines there. And let's make
some more details. I want to create that black
line reflections here. Yeah. Yeah. Now, I think let's stop it here, and I hope you enjoyed this session and you got
some techniques to paint some glowy lights and winter landscape with
some reflections. And thank you so much
for watching. Bye.
 Raniya Ali, Justartsbyraniya Watercolor Artist