Transcripts
1. PowerShell 01 Course Introduction & Environment Setup: Hello you, awesome people and welcome to this PowerShell
learning series. Anybody can script. My name is Vijay, and I'm going to
take you through these series of tutorials. Now, you may be wondering, why would I choose title
like anybody can script? Who ****, let me tell you, I got into this IT world after completing my graduation
in chemistry. So coming from the
background that had no direct relationship with any programming languages or
computers for that matter. If I can teach PowerShell, then definitely anybody, just anybody can script in
PowerShell, right? So that is the justification
of this title. Now, who this series is for? Where it is for absolute,
absolute beginners. I don't expect you to
know PowerShell at all. And after completing
this series, you will be having
a fair idea to be able to use PowerShell
in your day-to-day job. If you are my regular student, you might have already enrolled in my various
PowerShell courses, which are available on
different platforms. Right? Then already I have so
many PowerShell trainings. Why would I create a new one? And that two, for
beginners means I had to teach what I have already taught in
so many courses. Why not pick some
advanced topic? Well, the thing is
my existing courses, or for those who have at least some basic awareness
of scripting languages. While this one, I don't expect you to know anything
about scripting, right? So that is the difference. And another difference is when
I record regular courses, I have to do a lot
of homework, right? I have to prepare a nice
scraped presentation, then record the session, do editing and all. But this time I'm not freezing the Linda and neither I'm going to write the
script for lectures. So the sessions are going to be more of life and more fun. You know, you are
almost going to get the experience of
a live seminar. Whatever I have learned
from my experiences, I'm going to share
them all over here. So sit back and enjoy
this learning experience. Don't take that literally. On few occasions, no
harm in trying out the commands which are
being shown on your screen. All right, so on this note, let's get started with our
PowerShell scripting journey. So this is the official
documentation made available by Microsoft where you get all the essential things to
get started with PowerShell, I would request you to bookmark this page in your browser and visit it often whenever you need any help
related to PowerShell. For now, what you have to do is go to this place, setup
and installation. And depending on your
operating system, click on one of these article and follow it to
install PowerShell. If you are using
Windows like me, then there are good chances that PowerShell
is already there, but still by any chance
if it is not there, you can follow this article. If it is Linux, go for it similarly for
Mac and ARM, right? So it is a simple step. Please finish it quickly and then let's continue
in the course.
2. PowerShell 02 Why Automation: Alright, I hope you were
able to follow the article and install PowerShell in your system without
much of difficulty. And if so, let's continue. So this is my system. Now, how can I
launched powershell? Well, either you can simply
go here and type PowerShell. So depending upon your
system architecture, you might see 32-bit and 64-bit version of
PowerShell, right? This is one way and
another way could be, you can go to Run and you can
type PowerShell over here. What is this IC
will come to that, but for now, let's
concentrate on PowerShell. So you can hit Enter and
it will launch PowerShell. Right? Now, listen to this. Powershell is launched, but this is not launched
as administrator. So in performing several
administrative task, it will feel right, we will come to that
when it will fail. But for now, let me tell you, if you want to open PowerShell
in administrator mode, you can open it like this. So first go here, right-click, run
as administrator. And you can easily verify
from this title bar here, administrator is
clearly written, right? So you don't see that over here. So this is the difference. So if you have launched
your PowerShell as administrator on this
particular system, it will not fail because of lack of permissions
that is granted. Alright, so I'm staying in this regular PowerShell
non administrative user. And now let's talk briefly
about what we can do in this. So since you have decided
to learn PowerShell, I will not tell you why you
should learn PowerShell. What is PowerShell
and all that, right? Because I'm sure you have at least a slight idea about that and more details about it. You can always explore
from Microsoft documents. I don't want to make this series boring by including
theory section into it. So it's only going to
be live demonstration. Okay? Now what you can do
with PowerShell. So in your system
administrator's life, what various thing
we do in general. So depending upon your
role in your organization, sometimes you might
be interested in Event Viewer, medulla services. Sometimes maybe you
are interested in this desk space
related things, right? There may be some
application services which you want to
restart on daily basis. Maybe some processes which
takes higher memory or CPU, and you automatically
have to kill and restart all those stuff
like that, right? So for performing these various
activities, all the time, you have to first login into that server and then
perform those tasks. Now, what PowerShell enables you is instead of you do that task again and again in each server on daily basis,
you scripted out. You make it nice readable
PowerShell script, and just focus on doing
this task correctly once. And then you and your
team members can use the same PowerShell
script again and again. By writing these
PowerShell scripts, you are not just
helping yourself, but also helping
your team members in getting rid from
this boring work. Honestly, I don't see any fun
in logging into the server, see the memory utilization, and restart the
service accordingly. There's hardly anything
intelligent about that. Now, as I have a good
experience of working in different organizations
and different projects, I have sensed a genuine fear of automation among
people's mind. So the fear of
losing their jobs. So they have this
fear in their mind that if I'm paid for
doing the basic tasks, like cleaning up the disk space, restarting their services, performing basic
task in Registry, tasks, scheduler,
event viewer, etc. If I automate these
using PowerShell, then my dependency is gone
and I might lose my job. Well, this fear is then
no doubts about it. But this is only applicable for those who
choose not to learn. For those who continuously wants to learn and pick up new things, this fear is not applicable because work is going
to be there for sure. Powershell is not something launched the day before
yesterday, right? It is there for so long. And I do not see any scarcity of jobs created due to
PowerShell, right? So you always have to
keep yourself up to date and don't concentrate
on those boring, repetitive task which are not adding any value to
your life, right? It's not giving you any
mental relief as well. It's just taking some time
and making your life boring. Read. So I would say invest
in your carrier, learn a new skill, and then you should be
able to enjoy your work. Repetitive tasks certainly
doesn't provide that. So just remember, nobody can stop an idea
whose time has come. Alright, so this was a little
bit of GAN from my side. Well, GAN is Hindi
word for knowledge. Alright, my dear friend. I hope now you have your own reason why you
should learn PowerShell and automate some of your boring and repetitive
work on these naught. Let's end the lecture here, and let's continue to explore PowerShell in coming lectures. Thank you for
watching. Take care.
3. PowerShell 03 Launch PowerShell as Admin and Non Admin and PowerShell Execution Policy: Hello friends, and welcome to another lecture of
PowerShell learning series. Anybody can script. In this lecture,
we will understand the concept of execution policy. And we'll also try to understand the significance of launching
powershell normally, as well as an
administrator mode. Yes. So without wasting any
time, let's get started. I have seen many people getting struck at this first itself, which is you want to run
some PowerShell script which you have downloaded from internet and you want
to execute over here. Well, many people get stuck
at this point itself. And I will tell you why. If you try to execute any
script in your PowerShell, it has to be first allowed by your execution policy
of this shell, right? And what is the current
execution policy? You can execute this command,
get hyphen execution. And I can press tab for
the command completion. And you can see it
has auto completed. And now I can hit Enter. And you can see my current
policies restricted. That would mean I cannot execute my scripts in this
PowerShell, right? Because the policy is
not allowing that. Now, why would Microsoft keep this execution policy as
restricted by default? Well, because your system is directly exposed
to the internet. So it is very important that the hackers who
somehow got access to your system at
least should not be given administrator
axis of this shell. Because if they have administrative
access of the shell, then they can do pretty
much anything, right? So for this reason, by default, it is restricted. But this is not applicable
on your servers. Your Windows servers, which you keep inside your firewall, various antiviruses
that running. And then you have different layers of
security around that. Their power shells
execution policy is not restricted by default. So let's try to change the execution policy now so that we are allowed to
execute the script. So I will execute
this command set because I'm setting something
and then press hyphen. So this is, so this is verb hyphen and
then noun has to come. So it is execution policy. This is how PowerShell
commandlets are written. So verb, hyphen, noun, right? Sam giving space
and then pressing Tab button to see what
different options I have. So either I can give
all signed means, all different scripts
that are signed by a trusted certificate providers can be executed in this cell. Again, pressing Tab bypass will allow all different
scripts to be executed. They are developed
in this system or downloaded from internet. It will not differentiate on that default execution policy, remote signed execution policy. Basically, the scripts which are developed on this system
can be executed directly, but if they are downloaded, there has to be
signed descriptor, which is the default and current execution
policy as well. So like this, there are certain execution
policies defined. So if you want to know more
about execution policy, if you want to know more
about the execution policy, you can directly browse on internet or wait for some time. And let me show you
how to get help about different PowerShell
commandlets in PowerShell. Right? Now, let me set the execution policy to
bypass and hit enter. Okay? And I'll say yes,
hit Enter again. And oh, what is this? Access to? The registry
key is not allowed. Well, what is this? It is asking to run the
PowerShell as administrator. This is the same thing which we were talking about earlier. Right? Now you understand
why we have to sometimes launched
powershell as administrator. And some of the work we can directly do without even
Administrator role, for example, PowerShell things. There's no harm in showing
the execution policy. Current execution policy, right? There's no harm if
the user gets to know that current execution
policies restricted. So it allowed that
command to execute, but set execution policy. You are trying to change
the state of the system, which can make this
system unprotected. And PowerShell
didn't allow that. It said, first become
administrators. I can think otherwise, go away, right, get lost. So let me launch PowerShell again in administrator mode
this time. And there we go. So this time we are
administrator, right? I'll keep this aside and let me execute this command,
set execution policy. And I want to set as bypass, hit Enter plus y. Yes and yes. It's then get execution
policy is set to bypass. Now. Now you are allowed to execute the different
scripts on the system. How cool is that? So good execution policy has got this opportunity to
be the first command lit, which we have explored
in this series. How lucky is this
command lit, isn't it? Now, let me tell you if you have two
versions of PowerShell. Be sure in the version you
have said this policy, you have to check, right? Don't set the
execution policy in 64 bit version and expect it to be seen in
32-bit version rate. So this is depending upon which shell out of these
two you are setting, it will reflect
accordingly, right? Alright, let me close this now. Don't need admin session. So when it is not needed, when you are sure that for doing this task administrator
is not needed, you should not launch
an administrator mode. This is a very basic thing. You launch an administrator
mode when you really need it, because it is very
powerful by mistake, if you do something wrong,
it will allow that. So that is the thing
you have to be very careful if you come
from Linux background, it is like pseudo, right? Line X. People need
not to be told about linux pupil need not to
be taught about pseudo. At least from my side. I am a dedicated Windows lover. Hardly have worked in line next. All right, my dear friends, I hope now you are clear on
PowerShell execution policy, as well as you understand
when to launch PowerShell normally and when to run
it as an administrator. More details, of course, you can get from Microsoft
documentation anytime, right? Well, that's it
for this lecture. Thank you so much for
watching. Take care.
4. PowerShell 04 Beginning with simple Commands and PowerShell Alias: Hello friends, and
welcome to this lecture. I hope you are enjoying
the scripting journey. If you have any feedback for me, please consider
providing it to me so that I can accordingly at
just my way of teaching. Yes. Alright. Now, without wasting any time, let's continue to explore
PowerShell scripting. Yes. So for the comfort of your eyes, let me create this folder
on the desktop itself. Now, I want to switch, basically, right now, my present working
directory is this. But I want to come here. So first of all, I have to see what different directories
are already available here. So by convention, I understand the Windows
directory structure and I know there has to be
folded inside this with the name desktop inside
which I have created this. But I want to take a look at what different folders
are available over here. So I'll do this ls. And I can see there are certain folders and
desktop is here. So I want to change my
directory to desktop first. Let's say cd Desktop. Hit Enter. And now again, I want
to see the diet craze. And yes, I can see this
partial folder over here. So I again do this
CD, PowerShell, hit Enter, and I'm here now. Now what exactly we have done. So we were in this working directory and we switch to another one, right? Nothing great about it. But what I want you to notice is I have used ls
command over here. Alice is not a Windows
command as such. Again, Linux users
might be aware of it, but this is not a
Windows command. It says right in
batch script also, if you write ls, it doesn't work
because classically, DIR used to be the
command, right? Then how come these
ls command didn't throw any error and return
the expected result. That is what I want you
to think at the moment. Then CD. Cds also not a PowerShell
command, right? But it worked without
any problem, right? How is that working? And this is what we are
going to learn right now. Powershell has this
concept of LAS. So if there is some command
late whose name is very long and you do not want to type this big name
again and again, or for some reason, you are not comfortable with it. You can give your own name to that command lit and just
call with that name. For example, we are
doing over here like ls. So whenever you are
calling this ls, it is calling some
PowerShell commandlets, which is corresponding
to this Ls. Now let's see what
is that command lit. So I'll hit this gate Alias tab for auto-completion, hit Enter. And you can see this
list of aliases. Now, depending on the
different modules I have installed on the system, there could be a difference, but you can see this percentage is corresponding to
for each object, this question mark for
where object, and so on. So CD is corresponding
to set location. So when I did this
CD PowerShell, cd Desktop, actually I
was calling set location. So set hyphen location is
the PowerShell commandlets. But I never used it directly. I just use CD and eight
core set location for me, this is called aliased
mapping, right? So you can see they are more
relatable aliases, right? So copy item C, P or copy you can use, or you use copy item itself. Alright, so these are some common aliases which are there in my
system by default. And few came when I install
PowerShell modules. But that's okay. So these are the aliases
which I never created but came to me somehow with the PowerShell
installation itself. But can I create my
own aliases also? Well, definitely you can. Alright, now let's try to create our own LEAs and see
if it works or no. So let's say this ls
command is there, which is responsible
for listing down the different files
and folders, right? But I'm not comfortable with ls. I want to call it
something else. Let's see how we can do that. So set hyphen alias. Options. Naming is nice, isn't it? Hyphen noun that is
consistent across, which makes it very
easy to remember. Right? Now. I want to call
my ls command as list items. And I want to make it an
alias of LS. Hit Enter. Now I'll execute this command. List my items. And you can see it is behaving as if it was
there by default. But in reality, there's no such command as
list items, right? Still returns the
expected output. Why? Because let's see, get LES. And then what is the earliest, whose detail I'm looking
for in this my items. Pass it. Hit Enter and you can see it is the alias name of good
child item, right? But I never told it to
make alias of gates item. I passed LS. Well,
my friend because Alice is also doesn't
have its own presence, analysts is also an alias
of good child item only. So when you say you
become alias of this, you are actually saying
become the LES off gates. I'll item, right, this is the original PowerShell
command lit. So this way, we
have successfully created our own PowerShell
commandlets, LEAs. And now I can keep on using this instead of using
good child item. But is it fun in doing this? Can we do this all the time? A big nor, from my side, knowing a concept is good, but that doesn't necessarily
mean we should implement it. Also, write the alias which you are creating are
local to the system. If you make a PowerShell script using alias like list items, which we're not even there
in PowerShell by default, you yourself created them. So using these, if
you make a script, it will work fine
in this system. And you will think that
my script is great. But as soon as you send it to your friend and let him use it, it will fail in
his system, right? Which will give you unnecessary
pain of fixing it, right? So a good practices, always use PowerShell
commandlets and don't create your
own aliases, right? Alright, my dear friends, I hope you liked this
concept of aliases. And also we explored
two new commandlets, get alias and set alias, right? Let's continue to
explore PowerShell more in detail in
coming lectures. That's it for now.
Thank you for watching.
5. PowerShell 05 ISE & PowerShell Console A Quick Walk Through: Hello there and welcome
to this lecture. Let's have a quick walk through
the PowerShell console. We open the console
in the last lecture. So we need to go to Run and type PowerShell and hit Enter. Another way is
simply searching by PowerShell in and start
and hit the executable. So here we have our console. This console is mainly
used for executing their scripts and
one-liner commands. Basically, if you quickly
want to get results from some remote machine or your own machine using
a simple command, we can use this console. It is quite similar to our
command prompt or CMD. It is not a great choice for
development of a new script. You can customize it up to some extent from these
property options. These options are
self-explanatory and we need not to
go into the details. Why are we seeing this console is not a great choice
for development of script because you cannot
add multiple line at a time. This console limiters to
work in one line at a time, and that is not sufficient
for writing a script. Second, we are not allowed
to use Windows shortcuts like Control C and Control
V for copy and paste. Also, within the line, we have to navigate using
left and right key, which is irritating and slow
down script making, right. Overall, it doesn't look
great tool for development. So what is the solution then? It tastes smart,
integrated development environment that comes
along with PowerShell. And it is free of cost. Yes, I'm talking about Integrated
Scripting Environment, commonly called as ISC. To open it, you can
either type PowerShell underscore ISE in
them, or again, give a simple search with ISE
and click this executable, which will open up ISE. I highly encourage you
to go through this beautiful looking GUA and
try to understand it. I will quickly walk
you through it. So this is your script pin where we will write our
PowerShell statement. We can see the statements output in the console upon running. This console can also be used for trying new PowerShell
command quickly. So what happens when we
write a script at times, we are not sure about
the syntax and want to try typing a command and
check if it is correct or no. We can very well utilize this
console for that purpose. Then we have these three
important buttons. You can hold any button to
see what it is meant for. This button is for
running the whole script. Basically whatever
commands you have written inside this
is scripting area. It will execute all of them. But in case you don't want
to execute all the commands, you can use this button to execute the selected
statements only. And then we have this button to terminate
the script execution. In case you want to
open the console, no need to go to Run again. You can open console
from here itself. Then we have this very
interesting command button, which is meant for show command C and B
letter PowerShell. When we just write a command, let's say get service for an example and select the
command and click it. It will open up this. You're a form for us
where we can just fill few of these details
as per the requirement. And then we can either copy the command or simply executed. So we give inputs to a form and it creates
partial statement for us. We'd need not to remember
the parameters and syntax. How cool is that? In the right side, we are able to see this list
of modules and it's command. You can think module as a function library which has set of functions
defined inside it. And below this module, there is a list of functions defined in the selected module. When we select a command, it will also open up the GUI
of show command dialog box. You can adjust your view as per your comfort using
these buttons. I'm quite comfortable with this default view and
don't want to change it. Alright, that's it. Now I leave up to you to cover
these GUI more in detail. Please open your
IAC and explore it. We will start using it
from very next lecture. I'll see you there.
6. PowerShell 05 PowerShell Update Help: Hello friends, and
welcome to this lecture. When you are dealing
with any technology, there are chances that sometimes you get
struck with some topic, concept, command,
et cetera, right? So it is very important for us to know in the
starting itself how we can obtain the help
section provided by Microsoft itself for PowerShell so that we can understand
the different concepts, commandlets, syntax, along with the examples without
much trouble. So this lecture is
dedicated to PowerShell. Help. Let's get
started. Alright. So first of all,
launched powershell. And eversion is fine where you
want to update the health. And you can see your
PowerShell window is there. Now, we need to execute
this command late in order to update the update help. Now, what else you can ask for? How simple it is? Write update because
you are going to update something and what is that we are going
to update help? Simple. What I genuinely
feel is you must admire Microsoft way
of naming the command. Let you see update because you are going to
take some action, right? It could be update, new set like that, right? Then hyphen. And what is that
you want to update? Help, update, help work. Hyphen noun, easy
to remember naming. I'm big fan of
this naming style. To be honest, when we are
executing this command, it will create different
verbose messages if you want to see them. So you can pass this
switch verbose. Also, you can pass this another switch force in order to force the excellence, right? And next is add an action. So I do not want
to see any errors. So you can pass. Silently continue. What are other error
actions available? Continue, ignore, inquire,
silently continue. So by pressing Tab you can see all different
interactions that are available out of which
I am interested in. Silently continue, right? Let me hit the enter button
and see what it does. We can expect the
verbose messages. Yeah, so connection has been
with all that going good. So basically what it
is doing is reading some local configuration files and taking these URLs, going. They're downloading the
help section and making it available for you to use in your local installation
itself, right? You want to see
what is this URL. Looks like Microsoft has hosted the different health
related content on their Azure
Cloud blob stories. And we are downloading
it from there and updating our local
help files, right? This is very
essential step. Why? Because, you know, over
the period of time, Microsoft developers are also
updating their commandlets Related help section as and when they get bug reports
and all that. So periodically, we should
consider upgrading our help. Definitely, I'm not asking
to do it every day. But once in two months is a good period of updating
the help section, right? If you are very much interested, you can read the messages and
see what all is going on. So these are the verbose
messages which are coming because we passed
were both over here. Had we not patched the switch, it will not have printed
these messages, right? Looks like so much work
it has done, right? We don't even realize what
is going in the background. Alright, there we go. For me. It took around five minutes
to complete this update. And now I'm relaxed because my help
section is up to date. In case I have any
trouble, I can visit it. Alright, so in this lecture, we understood how to
update PowerShell. Help. Let's continue in
the next lecture and explore how to make use of this help when we
are in trouble. See you there.
7. PowerShell 06 PowerShell Update Help: Hello friends, and
welcome to this lecture. When you are dealing
with any technology, there are chances that sometimes you get
struck with some topic, concept, command,
et cetera, right? So it is very important for us to know in the
starting itself how we can obtain the help
section provided by Microsoft itself for PowerShell so that we can understand
the different concepts, commandlets, syntax, along with the examples without
much trouble. So this lecture is
dedicated to PowerShell. Help. Let's get
started. Alright. So first of all,
launched powershell. And eversion is fine where you
want to update the health. And you can see your
PowerShell window is there. Now, we need to execute
this command late in order to update the update help. Now, what else you can ask for? How simple it is? Write update because
you are going to update something and what is that we are going
to update help? Simple. What I genuinely
feel is you must admire Microsoft way
of naming the command. Let you see update because you are going to
take some action, right? It could be update, new set like that, right? Then hyphen. And what is that
you want to update? Help, update, help work. Hyphen noun, easy
to remember naming. I'm big fan of
this naming style. To be honest, when we are
executing this command, it will create different
verbose messages if you want to see them. So you can pass this
switch verbose. Also, you can pass this another switch force in order to force the excellence, right? And next is add an action. So I do not want
to see any errors. So you can pass. Silently continue. What are other error
actions available? Continue, ignore, inquire,
silently continue. So by pressing Tab you can see all different
interactions that are available out of which
I am interested in. Silently continue, right? Let me hit the enter button
and see what it does. We can expect the
verbose messages. Yeah, so connection has been
with all that going good. So basically what it
is doing is reading some local configuration files and taking these URLs, going. They're downloading the
help section and making it available for you to use in your local installation
itself, right? You want to see
what is this URL. Looks like Microsoft has hosted the different health
related content on their Azure
Cloud blob stories. And we are downloading
it from there and updating our local
help files, right? This is very
essential step. Why? Because, you know, over
the period of time, Microsoft developers are also
updating their commandlets Related help section as and when they get bug reports
and all that. So periodically, we should
consider upgrading our help. Definitely, I'm not asking
to do it every day. But once in two months is a good period of updating
the help section, right? If you are very much interested, you can read the messages and
see what all is going on. So these are the verbose
messages which are coming because we passed
were both over here. Had we not patched the switch, it will not have printed
these messages, right? Looks like so much work
it has done, right? We don't even realize what
is going in the background. Alright, there we go. For me. It took around five minutes
to complete this update. And now I'm relaxed because my help
section is up to date. In case I have any
trouble, I can visit it. Alright, so in this lecture, we understood how to
update PowerShell. Help. Let's continue in
the next lecture and explore how to make use of this help when we
are in trouble. See you there.
8. PowerShell 07 Performing Basic Operations Using PowerShell File and Folder Operations: Hello my dear friends and
welcome to this lecture. In this lecture, we will
explore how to perform basic operations related to files and folders using
Windows PowerShell. So here we go. So at this location, I have opened my PowerShell ISE and switched to this rate. Now I want to create a folder
over here using PowerShell. So let's see how to do that. Powershell commandlets for
creating a folder is new item. Then you have to give
the folder name. Or let's see what it has to say. Okay, it's asking for path. So if you want to specify
an explicit path, you can do that or
you can just say, this is my folder name. And then you have to go here. Powershell IntelliSense
is helping me in figuring out the
different options. I want item type. And then what is the
item type I want? I'm pressing Tab, so file, directory, symbol
link, link, junction. There are multiple
options out of which I am interested
in directory. That's it. I can hit Enter and go here, c, Check it out. Testing folder one is
created successfully, right? Similarly, if I want to
create another folder, but this time I want to specify
explicit path like this. So VSS then another folder subfolder I want to
create and then practice. So like this, I will specify a path and then I want
to get it created, hit Enter and see. Another folder is
created inside that. Another sub folder
is their practice. So this entire directory
structure gets created when you specify
the path like this. So it was not existing earlier, but when we executed this
command, it got created. This way, you can create
the different folders. Now, what I want is I don't want this folder neither this one. So, alright, sorry, sorry,
sorry what I'm doing. So this folder is
created by mistake. I want to get rid of it. How can I delete a
folder using PowerShell? So with the delete, what are different verbs
coming in your mind? I'm not sure how to
say this, but yeah, remove is one of the word
which might be coming in your mind when you think of
deleting something, right? So remove. And then what is that you
want to remove item, right? Because for creating
it was new item. So for deleting it has
to be item on the right. So remove item. And then what is it
you want to remove tasting folder one, right? Let's see. Hit Enter. And it's saying the item at user and recurs parameter
was not specified. So basically it
is asking because it recurs parameter
is not specified. It is not sure whether to delete all the sub
folders and sub, you know, the items
inside this folder. So whether we want
to delete or no, so we have to give so it is
asking for confirmation. What I want is cancel this and this time I
want to pass a recursive helping PowerShell understand
that I have got nothing to do with the files and
folders inside this folder. So you need not to
prompt me and hit Enter. And you can see the
folder is gone, right? So this is the beauty. Now, you are clear about
new item and remove item. Yes. Now, let's see how
to create a new file. So now you are aware how to create a folder and how
to delete a folder. Let's proceed to get let's proceed to create
a new file this time. So I'm clearing my screen,
clear host instead. So new item and
the file I want to specify is, let's
say PowerShell. Exam file dot TXT. Then. Okay, item type is, let's it. In case you are wondering
what is this name parameter. So basically, path
is supposed to be that folder location in which you want to
create the file. But if we specify this dot TXT and the
complete name here itself, then powershell will
understand that, okay? Okay, So with this name, you want me to create a file at the current
location itself. So it automatically
takes care of that. That is the reason we
are not bothered to pass this name
parameter separately. And I need not to repeat
this again and again. You are already
aware how to avail the help section about different commandlets
of PowerShell. So if you want to understand
all different parameters, what you have to do is
use Get Help command lit, and pass this new item to it. And you can explore the details of this
command late, right? So they're not to
bother about it at the moment. Let me proceed. And you can see this file
God created automatically. If we open this, of course, we cannot expect any tax to
be written inside it, right? Because we never wrote. So how to write
something into it? Well, there are simple ways. First one is, let's say
you want to write this. This is my force. Let's say you can just put a
pipe here and stay out five. Basically this is
the command lit, which will pick this input and write into the
file of your choice. So my file is this. Yes. Then what is that
you want to do? So let's say you can specify encoding
and all of these rate. So if the file is already open and you want to
force the action, you can use this false
parameter and all this. Now, let me execute this
statement and see PowerShell, this is my first statement. Now, let me go here again and I want to
write another statement. Let's see. So copy this, paste it here. This is not needed. This
is my second statement. And I want to execute this. Go there again, open it. This is my second statement. Find my second
statement is there, but I never asked PowerShell
to remove the first one. Why the **** it is deleting it? This is not something
we desired rate. What to do. So simple thing, it is
first-time when we execute this, it will create this file. Even if it is there, it will make it empty, and then it will type
this a second time. When you do this, it
has to do its own job. It has to do it same job, which is make the file empty
and then write the content. But your intention
was different. You want it to retain that contained and then
append at the end. So exactly what you
might be thinking. So append is that
switch that we have to pass in our file in order to retain the text of
this file and only append our desired
string at the end. So let me execute these two
statements in one shot. Go to the file, open it and you
can see this time, first, second, both
statements are available inside
our file, right? I hope you are liking
this file operations. And I am sure more than just
watching me doing this, if you will try it your own, you will like them even more. Yes. Okay. Another important thing,
while writing to a file, if you wish to
specify the encoding, then you have this
switch called encoding, which you can use. And you know, out of this, out of this list, you can pick one. And let's say if you
want ascii encoding, then you can use this, use it this way, and then you're encoding
will be intact. So this you can use, and there are more parameters
which you can make. Now, the next requirement is
we want to delete this file. So for that, what we
can do is remove item. And then the filename,
power example, file.txt tab for
auto-completion, hit Enter and you can
see the file is gone. So this is the thing. Alright. Now, in this
lecture till now, we created a folder
using PowerShell, then deleted it, then we created a file rod
content into it, and also learned how
to delete a file. Let's continue in
the next lecture where we will see how we can read a text file into PowerShell and make
use of its text. See you there. Thank you.
9. PowerShell 08 PowerShell File Read Operations Using PowerShell: Hello friends, and welcome
to another lecture. In this lecture, we want
to read a text file into PowerShell and then make
use of its content, right? So this is the file
I have created five statements in
total and line one, line two, like
that, I have given a number to each new statement, saving it and closing this file. Now, I want to read
this file rate. So first of all, living it and then, oh, okay. Okay, so for reading the
file, the command ladies, get content and then we have
to specify the path of file. So let's say this is my
file, Sample dot TXT. Now execute the statement. And you can see we were successfully able to
read that content or file into PowerShell Using
get content command late. There are certain more
parameters to this command lit, which you can make use
according to your requirement. For example, how many lines you want to read, total count, if you want to start
reading from the end or filter, include,
exclude, etc. I highly recommend you to
go through the help section and see what each of these
parameters mean right? Now, this is statement
helped us to read the file, but still the content we are not stored into any
powershell variable rate. So we cannot play around
with the text of this file directly unless we store
into some variable, right? So for this, what
we can do is copy this and make a variable
file content equals. And this time, now if we
execute this statement, you can see the file content. If I hit Enter, it
has stored all of these file content into
this variable rate. If I just show you the
type of this variable. Because each of the entry. So this file content
variable is of type and each of these lines
is stored as in entity. So if you want to see the
other file content, dot count. So it will tell you how many lines are there
in your file, right? So there are total six lines. Hence it is telling
you the count is six. Now, let's say you
have requirement and you want only first-line. So you can specify like this. If you want second line only, you can specify it like this. So because this file contains
variable is of type, all related operations are
applicable to it, right? Alright. Now, next requirement is we want to read the text
of this file and then only select those lines which satisfies our
criteria, let's say. So for this, what you can
do is we can use this commanded where object and then just follow your
screen carefully. So curly braces, then
dollar underscore. This represents your
current object. So this file, we'll read the file line by line and
each line as an object. In this right-hand
side of this pipeline, where are where object command late is sitting and
it is processing, and it is processing one-by-one. So this dollar underscore
is representing the line which is
currently in processing, basically first-line, then second line, like
that, it will do. So. On top of this, we want to add our condition, which is like line
for, let's say. So we want to read
in this file and get the line which has
this particular keyword. So let me hit Enter. And there you go. Where object has put this
condition that the content of that particular line has
to be line for somewhere. It could be in the end. It could mean they're starting, but it has to be there, then only it will
return it, right? So this condition is
applied and there is only one line which
satisfies this condition. That is why only this line
is seen in the output. Now, you might have
a question, okay, here only there was one line, but what is more
lines are there? Let's see right away why
to live in a confusion. So this time I'm removing
for this search criteria. Now these four letters line. So each of these lines
are having their right. So we should expect all of
the lines in output, right? So let me execute this time. We can see all of
the lines because each of the line is
satisfying this condition. So this way we can play around with the
text stored inside the file or make use of
it in a variety of ways. Now, last topic of this lecture, we used a variety of PowerShell commandlets
in this lecture. Right? Now. If you want, now if we want to see each of those commandlets which
we executed in this cell, there's a nice command
called git history, which we can execute. This gate history command
lit is very nice. It gives you the history
of each command. Let this we executed in our shell in there starting with switch
to that directory, then created a new
folder, you know, deleted the folder, and
then rod into a file. Each of these commandlets
are saved in history. So pretty much if you
want to script out, right, whatever we have
done in this lecture, if that fulfills a requirement and you want to script it out, you can pretty much
paste it like this. Get rid of these line numbers
and your script is ready. You just have to save
it as a dot PS1 file. And you got them, right. This way. History
is very helpful. Alright, my dear friends, I hope you liked what you
learned in this lecture. And if you did, please do let me know
in your feedback. Thank you so much for
watching. Take care.
10. PowerShell 09 PowerShell Modules Introduction & Benefits: I'm sure you are super-excited
to write a lot of powershell scripts and automate all your boring and
repetitive work. But hey, hold on. You need not to develop
everything from scratch. There are good chances that the problem which
you are about to solve using a PowerShell
script may not be unique. You know, maybe it was faced by some other PowerShell
script or in the past. And he or she has already written a script
for that, right? So in that case, you do not have to write
the script from scratch, but use the code of that person and
customize on top of it. Just for your fine
understanding, I'm giving you another example. You want to edit a photo and add effects
in the background. For this, you do not
write a software from scratch and then add
those effects, right? Instead of doing that, you prefer to use an existing software called
Adobe Photoshop, right? That perfectly makes sense. While Adobe Photoshop has
everything inside it, but still, it is
your creativity, how you use those
features, right? So your intelligence or your creativity is
still with you. Adobe Photoshop. It's just helping you in order to achieve
your goals quickly. Correct? Something very similar can be done in PowerShell scripts by importing somebody's code
inside our PowerShell script and speed up the
development process so that you can automate more
and write less, right? Let's get started. In. A module is a package
that contains PowerShell members such as commandlets, providers,
functions, etc. It basically allows
you to combine multiple scripts to
simplify code management, accessibility, and
sharing. Okay? Alright, with this
short introduction, now, it is time to do practical. So visit this site called
PowerShell gallery.com. And as you can see, this PowerShell
gallery is home to 70 thousand plus
packages, right? So they are pretty good chances that whatever you are
trying to automate, you will find some help related to that in
this repository. In this list, you can
see the packages which were downloaded in highest
number in last six weeks. Let's take a look at this. So looks like networking, desired state configuration
is quite popular. 6 million plus downloads here. Similarly, we can go
through this list and see what is popular
in PowerShell these days. Because these are the top downloaded
models of PowerShell. Write. While going through a list. If you see something
interesting, you can click on that
particular package. For example, I really want
to understand what is this carbon package which has got 946 thousand
downloads already. So I'll click on this. Alright, so this has taken us to this dedicated page
to carbon module. And we can understand
little bit about it. Carbon is a partial model for automating the configuration
Windows seven. Alright, so broadly, it is dealing with this stuff, right? Let say we are
interested in few of these tasks and want to get our hands dirty
on this module. So how to install
it in our system? Very easy. Here you can see this Install module option and you need not to even write a
command for this directly. Copy this, go to a PowerShell
and paste it right now, can you see carbon in this
list if it's not there? Right? So let me execute this particular statement in my PowerShell ISE and it failed. Why? Take a moment and think. Okay, it's pretty
straightforward. It failed because my
PowerShell ISE is running as a normal user and not as
an administrator, right? So I'll just close this, relaunch PowerShell
ISE as administrator. This time it is running
as administrator. Paste. The command. And execute. If you do not
want to see warning like this, you can pass force as a switch to this
command lit yes to all. And so it is installing the
package carbon completed. Let me refresh the list of modules and let me
search for carbon. Yeah, there we go. We have got this module, carbon in our list of
modules now, good job. This means all
different commandlets, functions, aliases, variables, et cetera, defined inside this particular modules are
now available to us, right? So this is what precisely
install module does. Now, if you want to know where exactly your module is
placed in your file system, because it is installed. So it must be having a
physical location, right? For this, you can execute this statement and
it will give you the list of locations where
your modules can be placed. So let me try to see it's empty. So note here. Then second is here. And yeah, this is the
location of my module, right? So this is what God downloaded
with this. Pretty good. Yes. In most of the cases, this install more
dual command lit will help you to download and
install the package. But in rare cases where you
need to use this module, but on that particular system, you are not allowed
to use the Internet. Maybe your company policy or
some other reason like that. So this command, it
will not work there. In that case, what you can
do is manually download this package on another system where you have
Internet connectivity. So you need to
follow these steps. So very simple steps. They are basically to
download the package and GP and keep it at the location like this where other
models are there. And then you can very well use your module inside
your code, right? So it's highly recommended to use this install hyphen
module commandlets. But in those cases where
this option is not working, you can go for men will
download method as well. Alright, going back to the main page of
PowerShell gallery. So in this, starting in order to show some very
popular modules, I took you to this list. But a better way of browsing
this side is like this. So go to packages and it will
take us to pay like this. Where firstly, we can search for the functionality
that we need. Let say, I am looking
for a PowerShell script or module which can help
me to manage my IIS. So I'll go here and
type IS search. Then we can use these filters. Let's say I'm not
interested in script, but I need modules. So I can uncheck
the script option. Then if I'm looking
for PowerShell modules specifically designed for Windows operating system,
I can check this. And let's say I don't mind filtering
based on the categories. So here are my results. I can sort it by relevance,
popularity, etc. Here we can see carbon is
one more tool which we previously installed
in our system and is helpful in managing IIS. Then IIS Manager is also there. And you can see who has
published this module. It's bed Garrity. How many downloads has happened when it was last
updated, et cetera. Right? So let's try to explore this carbon molecules
slightly in more details and understand what
different commandlets are there inside
it for us, right? So I'll go here in the list
of models, select carbon. And then, and then you will see all different commandlets
which are defined inside it. Another way of checking what
different commands are there inside your module
is this GET command, and then specify the name of module four which
you are searching. I'm interested in carbon module. Just execute this command mode and then execute this. And it will get us the list
of all different commandlets defined inside this
particular module, right? We install this
module because it has few commandlets that can
help me in managing IS. Let me search for IS and see what different
commandlets add there. So they have added this C
here because they want to differentiate from
other commandlets and see here basically
refers to carbon. So you can read this as get
carbon IS application, right? That is what my assumption is. If you have any prior
experience of IIS web server, you can find these
options as very relevant that can help you
in managing your IS better. Alright? All different modules
that you can see here are already part
of your session. This means you can use these modules inside
your PowerShell script. But earlier, this
was not the case. This feature is only provided starting with PowerShell
version three. So just in case you are using some older
version of PowerShell, you need to import a module in order to
be able to use it. And for this import hyphen module command
lit is your friend. So you just need
to execute this. And if the model is
available to you, it will be imported inside your current
PowerShell session. And from there onwards you can make use of this module, right? All right, my dear friends, I hope now you understand
what is a module, how to use PowerShell gallery to figure out the more
tools that can help you. And then how to install
the modules into your local PowerShell and make your life easy while
writing powershell scripts. Well, that's it
for this lecture. Take good care of yourself. Thank you.
11. PowerShell 10A System Process Management 01: When we use PowerShell for
automating repetitive work, very frequently, we have to deal with systems,
internal processes. So this is the right time
to learn how to manage system processes using our
good friend, PowerShell. We will spend a decent
amount of time on this topic and you are
going to love, it. Sounds exciting. Well, let's get started then. If you are a regular Windows
operating system user, and I'm sure you are aware
of this task manager. So when we go to the
details section of this, we can see all
different processes which are running in our system. Processes management
is essentially listing down these processes, creating reports out of it, or fetching some
essential details about the processes
of our interests, stopping the processes, or at times creating
new processes. We are going to learn all of
these operations one by one. Before we get into PowerShell, I want to show you
something very interesting. So by default, in this view, you can see only these
many details, right? But there's something
interesting. If you right-click on this and click on this
select columns, you can see there's much more to display Then what is available
in the default view. So you just have to
check and then click, Okay, and these details who's also be start appearing
in this view? For now, just keep
a note of this. Alright, let's get started with managing system processes
using PowerShell. First of all, let's
try to create a new process and add
to this list, right? So I'm just always on top here. Here it is. Okay? Yeah. So there's a command lit in PowerShell called Start process. And then I'm just typing. Can see this is a command
for opening calculator. Let me execute this. And as soon as we have
executed this statement, calculator application, which is running in our
system, has opened. But where is the corresponding
process in this? Let's try to figure
it out later. Dot EXE, right? So this process is
created over here. By default, this is start process command lit doesn't
return any details. But if you just pass this
pass through switch, then if we execute, it will not just
create the process, but we'll also return some
basic details about it, right? Hey, opening calculator is okay, but how to take benefit of
this particular command lit? Well, let's take a look. So this is my present
working directory. And I have kept a batch file at dislocation with simple
one-line statement porch. Right? Now, I want to start this command lit from my
PowerShell script, right? How to do that?
Let's make use of our Start process
command lit and do this. So start process, then file path is this sample dot bed. I'll just select this and
nothing else if I was to. So as you might be aware, batches scripting was very popular automation
tool for Windows systems. So at your work also, you might be having lot of automation scripts which are
written in batch, right? So in your PowerShell, you might sometimes want
to call those scripts. So you can do it this way. And if those scripts need any arguments to be
passed at the runtime, you can do it using this
argument list switch, right? I don't need it this time, so I'll just execute
this statement. And you can see it
was successfully able to execute sample
dot bad script. And my positive
statement is over here. I just need to press any button and it
will go away, right? So this is how you can take benefit of start process command late in launching any
application on your system. Let's take another example. So this is the location of my favorite media
player, VLC, right? So I'll just launch process. Vlc, the file and lunch. And you can see VLC
media player is successfully launched
using PowerShell, right? With this, I hope the concept
is very clear with you. Be it, another
business application that you want to launch on your system or another script
that needs to be triggered, or maybe your system's
default application. All of these can be launched using start process
commandlets, right? You can get more help about
it using the command lit, get help, and then just pass
the name of it with online. And particularly in
the health section, I request you to go
through the examples because this example will make you very clear
on the concept. I'm sure you will
definitely make use of help document available for
this particular command lit. At this point of time, I request you to practice
start process command lit by trying to launch a couple of applications running
in your system. And once you do that, Let's meet in the next
lecture to continue exploring systems process
management using PowerShell. See you there. Take care. Thank you.
12. PowerShell 10B System Process Management 02: Hey there, welcome
to this lecture. In my task manager, you can see so many
processes are running. Each of these process is assigned some certain
task and, you know, my system is behaving
the way it should, essentially because of
these processes, right? The agenda of this lecture
is using PowerShell. List down the processes in
which we are interested. For example, list down all the processes with
the name Chrome dot EXE. Sometimes it could
be leached down all the processes which are in suspended
state, let's say. Or it could be leached down
all the processes with peak working set memory higher than 35
thousand kilobytes. So there could be
various parameters based on which we want to
leech down the processes. So this is the main
goal of this lecture. Once we have filtered out
the required processes, we might want to take
certain actions on them. It could be fetching more
details about our processes. Sometimes we might want to create a report out
of those processes. In this lecture, we are going to perform all of these operations. I hope you are excited. So without any further
ado, let's get started. We have a command lit in PowerShell called
gate hyphen process, which returns a point in time snapshot of systems
running process information. Let me run this command lit without passing
any arguments. If we just run it, you can see all
different processes which are there in Task Manager. We are able to see TO here also. Now, what is this point in time? Well, good process commands. It returns all the processes which were available at
the time of running. Immediately after 1 second. If more processes are added, this output doesn't
get refreshed. This is the meaning of
point in time snapshot. Here you can see this list is continuously
getting updated. But this wouldn't
be the case with output of a gate process
command lit, right? I hope you are clear on this. Okay, Let's see further
use cases of this. So using gate process
command late, if we were to fetch all the processes with
name grown dot EXE, we can do it like this. So just pass name and then automatically it is suggesting what different
processes are there. I am interested in Chrome
and let's execute this. And you can see all
different processes with this particular name
are listed down over here. If you have a
different requirement where you want to list
down all the processes, not by name but by
their process ID. Even that can be done like this. So let's say you
are interested in the process whose
process IDs 10852. So I'll just write
like this, run this. And you can see this
particular process we are able to get, right. Let me clear my screen and I will launch another process
called calculator, let's say. So essentially this we create a process in
the Task Manager. Now, I need to catch the process responsible for running the calculator
application, right? How I can do get processed. And then it's name is
o calculator, right? So this way we are able to
get a particular process. We are able to see these
details over here, but I want to show you
something more interesting. Do a Select Object and star. So we want to see all different properties
available for this output. So let me run this. And you can see we didn't
have these many details. Instead, we have so many details available for this
particular process. So if you were to find the process working set
memory pays memory size, all of these details are
available to you, right? Moving on, you have already
seen this particular output. So all different processes with process name as Chrome
are listed over here. This output in console is
not very user-friendly. I hope you agree with me. So what we can do to
make it look better, I'll just put a pipe and
out grid view, right? And now execute the command. And you can see it. New window has been
created to us by PowerShell where we
can filter, let's say. I want to seize process
with ID five double 16. So I can just type
it over here and automatically it will search and give that particular process. Or also I can add the
filter criterias like this and just add them and then click
these will be added. I can put values over here. So we can apply the
filters like this. Not interested in a filter, we can just remove. This particular view is more comfortable for
working on the output. I'm sure you are liking
it more than this view. As we know, only
these many details are not available
for the processes, but we have so many
details, right? So what to do to get all of this information in
this particular view? So let's work on this. Just go and put here another
pipe and write select star. So basically, now this will return us all different
properties on the object. And we are piping it to out grid view in order to get
output like this. Make sense. So let me close
this and run this one. There we go. All
different information is available to us in nice-looking view where we can
work on the things, right? Okay, let me just make it clear. This out grid view is
a nice command lit, which I, Anyways, wanted
to show it to you. Okay, this don't get
confused that it has got something to do with
process management as such, there is no such relation. Okay? Alright, now, let's slightly make the
requirement complicated. So let's say we want to
leech down all the processes that starts with letter
C. So very simple, it is get processed. And names should be
starting with C. And then just, we can
put a star as a wildcard so that it will search for all different processes
whose first letter is C. Let me execute. And
yes, there we go. All different processes,
starting with CR here, right? Please notice in this view, we can see these
many column headers from where it is coming. It is decided by
PowerShell, right? I never specified that I
want to see process ID, SIs, CPU, et cetera. Right? So what is
happening here is these are the columns that
user wants to see as output. But we can very
easily override this. So let's say firstly, we want to see all different
properties which are available for this object of
gate process command lit. Here. Firstly, I want to see only one object and then all
properties on that object. So I've just made this
statement, let me execute. So instead of seeing
these columns, which are decided by PowerShell, I want to choose what I want
to see in my output, right? So let's say we want
to see the name, company, working set
handles and path in output. So we can prepare the
statement like this, select object and just tell the properties
which you want to see. Needless to say, you
can only specify those properties which are available for your
object, right? So let me execute this. Oops, why we are
seeing the output as a list and not as a table, which we were seeing earlier. What has changed? Look, this is not a problem. Actually. What has happened, we can see so many
details, right? Calculator Mike,
in these details, this particular item called path looks like very
long string, right? So what PowerShell is thinking, you user doesn't want to see such a long string
in tabular way. So let me show S list. But in our case, we definitely want to see it in tabular manner only, right? So what we can do is
force PowerShell to show this output table for this
just right format table. And let's say for the columns, I want to auto size. So let me execute
this statement. And this time output has come
in tabular manner, right? Okay? And sometimes when it
is coming as a table, but you want to
see it as a list. What you can do is this type format list here and output will
be shown as list. These are very basic
concepts of PowerShell. I just want to show you so
that you can learn by doing. If I was showing you this format list and
format table 30, Kelly, you wouldn't have liked. This is my assumption. Okay, I hope you are
very clear on this. Moving on. So on top of this output, let's complicate the requirement further so that we can understand
one more command late. Okay? So I want to fetch all different processes
that starts with C. And also whose companies? Google LLC, let's say
this is the requirement. So how to deal with this? Well, very easy. Just put a pipe and use
command lit, we're object. So now what will happen? All different processes
that starts with C will be returned by this
particular command lit. Then we have pipe, so objects will flow
towards right-hand side. And there we have this
where object command lit, which is there for us. And this will be used to filter
down the objects, right? So dollar underscore,
this indicates the current object which is
coming from left hand side. And then I put dot and I
want to filter by company. So let me put company here. And then I want it to be
having Word google inside it. This looks good. Let
me execute this. Okay. Well-done. So yeah, we have got all different processes which
has Google as company name. Why? Why the company name is not
displayed in the output? Because we never asked for it. If we want to say it, we just have to put
it like this right? On another pipe and
then like this and execute and definitely
it will come correct. We're not interested in it. So let me remove this
and clear my screen. And now I want to
execute this again. Okay, let me complicate
the requirement further. So this time we want to see
all different processes. So this time we want to see all different processes
running in my system, which starts with letter C, has company as Google and handles value should
be higher than 500. This is the requirement. So what to do? Well, very easy. Just put this inside
a bracket and use another condition
and use an operator called and then another bracket. And inside this,
we want to apply another filter called handles, whose values should be
greater than 500, right? And let me execute this. And there we go. Looks like there are only
two processes in this list which satisfies all
three conditions, right? If I just show you all different properties
available on this, I'll just write select star. And yeah, so far what we have learned in this lecture
is how to fetch the processes and filter down the output based
on our conditions. We learned this concept
using two conditions. One company being Google, and another handles count
is greater than 500. But you can apply so many more filters and just narrowed down the output
to your requirement. Like working shirt
should be higher than certain value or product version should be this like that. There could be so many
more filters that you can apply and just get the output
which you are looking for. Based on what you have
learned in this lecture. It should not be a problem for you to solve this assignment. And once you complete
this assignment, take it from me. You will feel yourself
very confident in doing systems processes
management using PowerShell. Now, it is time to move on to the last topic
of this lecture. I'm using Chrome browser and there are so many
processes created for it. I just want to stop all of the processes that are
under name chrome dot EXE. How to do this? Very
straightforward. So before even stopping
the processes, firstly, I want to list
them the processes. So get processed. Names should be Chrome, right? And this will list down
the processes for me. I just have to put
a pipe and pass it to another command lit
called stop process. And let me execute this. And you can see all the
processes with name, Chrome, argon, and the
browser is also stopped. All right, my dear friend, I hope now you are
clear on how to manage your system's internal
processes using PowerShell. Well, that's it
for this lecture. Take good care of yourself. Thank you.
13. PowerShell 11A Manage Windows Services using PowerShell 1: A Windows service is a computer program that
runs in the background. It doesn't have any
user interface. And it's similar in
concept to a Unix daemon. Windows service can be started
automatically or manually, and if not needed, they can be kept in the
disabled state as well. Okay, fine. But why are we talking about Windows services
in this lecture, which is supposed to be
for learning PowerShell. Well, there are many
operations involved in managing Windows services
where PowerShell can help. Confused, let me explain. Windows services are designed
to run all the time. Many times they start making the oral system slow
due to memory issues. So to keep the system healthy, we should keep on restarting the services at some
fixed reschedule. It could be once in a
day, on alternate days, or even weekly restart is
acceptable depending upon what kind of task
your service is performing and how much
load is there on it. Powershell can help
you in automating this very frequently
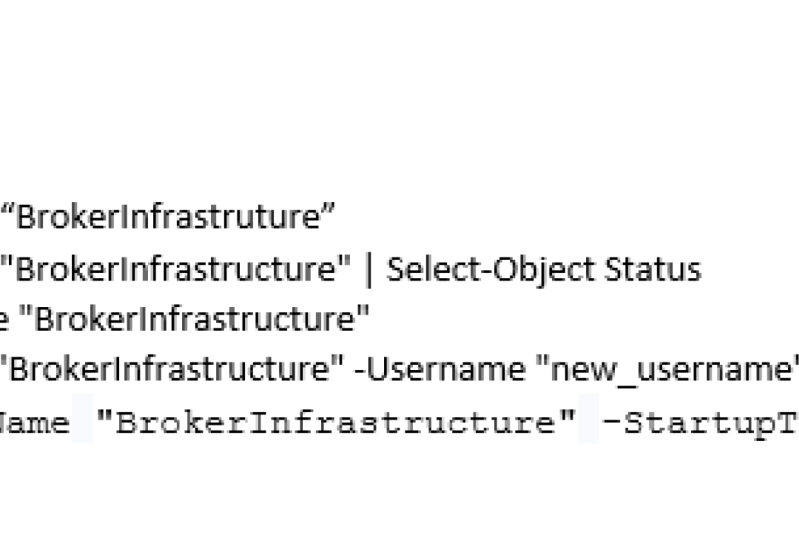
needed automation. Apart from this, PowerShell can be used to stop a service, start a service, changing the service user account or the startup type
of a service, etc. One big advantage of
using PowerShell for managing your services is
that using PowerShell, you can not only very well managed services on
your local system, but also on the remote systems. This means using a single
line powershell statement. You can change the state of a service on hundreds
of virtual machine. So PowerShell saves
a lot of your time. I hope you are excited. Now, let's get
started with learning how to use PowerShell to
manage your Windows services. Alright, first of all, to launch the
services application, either we can go to
the Start menu and type services and click here, or we can go to the run and type services dot
MSC, hit Enter. And this will launch this
particular application. If you want to manage the services on this
machine itself, that's fine because it is
already showing is local. So you can very well proceed
with your operation. But if you want to manage the services on a
remote machine, you can connect to
that computer from here and then
perform your tasks. In this application, you can see hundreds of
services are there which has been assigned
some task which they are performing either all the
time or whenever required. We can see there are many services which
are in running state, and there are many
others which are currently in stopped
state, right? And if we double-click on any service or right-click
and go to the properties. We can see these
advanced options. Here. You can see
some basic details about your service
path to executable. And it's a startup type, which could be
automatic, manual. Or if you're not planning to use the service in nearby future, you can even keep it
in disabled mode. And here is your service status which is currently running. And if we want to, we can stop it by clicking
this Stop button. If you go to log on, we can see the account using which this
service is running. So right now it is running through a
local system account. But if you want to change it, we can do it from here, right? If you have a
domain user account or a local
administrator account, you can just specify its
username and password. And then this service will start running through
that account. These are some basic
operations which you want to perform on
your Windows services. We have seen how to
do this in the UI. It's time to learn
how to perform these operations
using our friend PowerShell for
performing any action on any of the service
running in my system. First of all, what I need
is object of debt service. So let's start with PowerShell commandlets for
getting the service objects. And as we already know, PowerShell, naming of command
lit is very user-friendly. So it is a verb, hyphen noun because we are
trying to get something. So verb is good. And what we are trying
to get, It's a service. So get hyphen service
is the command lit. You do not need
much of efforts to remember such command
lit names, right? Let me execute this command lit. And you can see it has listed down all different services
running in our system. And you can even compare it with this particular
output, right? Most of the times we
are not interested in this output of all
different services. Rather, we want to
filter it down to get the objects for
our required services. Right? So now let's see
how to filter down this output to get only those service
objects, which we need. If you want to get the
service by its name, you can use name as
a switch and just specify the name of service in which you
are interested in. For example, I want the, for example, I want the object for this
particular service. So just specify the
name and execute. We have successfully fetched Windows Management
Instrumentation service. In this way, straightforward
VR able to see the status, name and display
name of the service. But do we have any other detail
about the service or no. For this, what we can
do is just put a pipe and type select star
and run this statement. And there we go. You can see apart from
these three properties, we have more properties. Like can sit down is true, can pause and continue
is true, and so on. Which can be utilized, right? If you want to get
the service objects not by name but by wildcard, Let's say you want all the
services that starts with VM. And then we have
specified wildcard here. So it will get us all
different services that are starting with VMI, right? And instead of these three, if you want to see
more properties, you can specify like this. Instead of seeing this
output in list format, if you want to see it
in tabular format, you can always specify format, table and execute
this statement. And you will see the
output in tabular format. And if you put this command
laid out grid view, you will get even
better view of this. Make sense. Moving on, let's slightly
increase the level of problem. So this time we want to get all different services
which are in running state, as well as their startup
type should be men. Well, right, So this
is the requirement. Let's see how to frame the statement for
this requirement. So we want all services
which are in running state. So let's break the
problem into two. First half of the
problem is this, right? So for filtering the
services like this, we can put where object
command late over here, just after the pipe. And then braces. Here we have to put
dollar underscore, which signifies the
current object coming from output of good service command lit wire, this pipe, right? And in which property we are
interested in, it is status. And what is the status we need? It is running status. So I'll say equal to. And then now we should verify if this statement
is correct or no, right? So let me execute this. And yes, all different
services which are in running status are being
returned in this output. Correct? So let's move on to the second
part of the requirement, which is the services startup
type should be men well. So since there is an
end in the requirement, we can very well put brackets over here and add
another requirement. Here we will specify the second
part of the requirement. And there is an operator
in-between of these two, right? And second part of the
requirement is start type. Should be men. Well, right? Yes, we have got the output, but since the startup type
is not in default output, we need to put another
pipe and then select it. So I won't name status of the
service and start typing. Right, let me execute this. Yep. So the statement which we prepare is working
perfectly fine and we are able to see the services which are
in the running state, as well as their startup
type is men will write. On a side note, we can keep on adding
these pipe and use more PowerShell
commandlets in order to continue working on
a single statement. But due to this, if this statement becomes
less readable for you, you can always break this
statement like this. So wherever you have
pipe, just press Enter. And now if you execute, you can see it continues
to work, right? And now, last topic
of this lecture, because I'm running my
PowerShell statements on the same system where these
services are running. I'd need not to specify the
computer name always, right? But if I was to fetch these services
from a remote machine, I can always specify the
computer name like this. So in my case, localhost
basically means my own system. And then when you execute
a statement like this, PowerShell will fetch you this particular service from
this particular computer. If we had provided some other server name
within the domain, then PowerShell
would have fetched this particular service
from that remote machine. This is how we can
use PowerShell for remotely managing
the Windows Services. Alright, in this lecture, we learned that command
lit called Gates service. I am sure you are
clear on how to fetch the services that you need
using the good service. Well, that's it
for this lecture. Let's continue working on Service Management using
PowerShell in the next lecture. See you there. Take care.
14. PowerShell 11B Manage Windows Services using PowerShell 2: Hi there. Welcome back. In the last lecture, we learned how to use good service command
late or PowerShell to fetch the required services into PowerShell that we need. So we can fetch the services directly by the name
or using the wildcard, as well as using other properties like
the service status, or they start type, etc. Now, it is right time to explore how to take
different actions, like stopping a running
surveys or starting a service, or changing the service
user account, etc. So let's get started. This is a print spooler service which is currently in
the running state, and I want to stop it. So what we can do is
simply put a pipe and place another
PowerShell commandlets or stop service, right? And just execute this statement. Now, go here and refresh. And you can see the
service is stopped, which was running earlier. Same can be verified in PowerShell also by
running this statement. And you can see
the services stop. Please notice my PowerShell
is running as administrator. So if yours is not running, please relaunch your PowerShell
in administrator mode. Now, we want to start the
service again using PowerShell. For this. What we can do is use
another command lit, call, start, service, and execute. Go here and refresh. And you can see the service
is now in running state. So using these commandlets, stop service and start service, we can change the
state of service. So if your print spooler service occasionally gets struck, you can always try
this option of stopping the service and
after a couple of seconds, you can start the service again. Please note there
is another command lit called restart service, which you can use this. And if you execute
this statement, it will automatically stop the service and then turn
it back into running state. But from my experience, this is not good. You should rather go buy this. And if you want to put, put some sleep time
of some ten seconds. So that first service
gracefully stops, then wait for ten seconds, and then start again, right? Sometime, restart service
doesn't behave correctly. This is from my
experience. Moving on. Right now, the startup type
of this service is automatic. This means whenever
system reboots, the service automatically comes
back in to running state. But if you want to change
this behavior and you yourself want to manually start the service whenever
the system reboots, you can change it using
set service command lit. So if I just execute this
statement and go here, refresh. You can see now the startup
type is manual, right? You can use the set service for performing multiple
actions in one go. So this time we are going to change the startup type
back to automatic, as well as we are
going to change the description from this
to this new description. So if I just execute this command and go
here and refresh, you can see, you can see
now the startup type of service is automatic and
its description is changed. Alright? Currently, this service is running through a
local system account. Sometimes organizations
have policies to follow and they want to run a particular service through
a domain service account. So let's explore how to change
the service user account. For changing the
service user account, we can again use set
service command lit only, but this is not available
in PowerShell version five. Currently, you can only use it in PowerShell version seven. So for performing this action
launched powershell seven, of course, we are changing
the state of service, so I should launch
it as administrator. In my case, I have
already created this test user as a local
user account in this system. In your case, if you want to run your service through a
domain user account, you can type your account
name over here, right? So I'll copy this line and
go to my PowerShell seven. Paste it here. It's asking for the
password. Let me pass it. Okay, now I'll execute
this second line. So based. And now I'll go to
my service, refresh. And you can see now the service account
is set to test user. So the user account for this service is successfully
changed to test user. Well-done. Now, as I told, this particular command of
passing the credentials to set service itself doesn't
work in PowerShell five. But for some reason, if you do not want to use PowerShell seven version at all, you can perform the same
task in these two ways. In your current version
of PowerShell itself. In first one, we are using sc dot EXE to change the
user name for our service. And in the second method, we are making use of WMA. Alright, my dear
friend, with this, I hope you are clear on concept of managing
Windows services. Using PowerShell, I urge you to complete this assignment
and test your knowledge. Well, that's it
for this lecture. Take good care of
yourself. Thank you.
15. PowerShell 11C Automation 1: Hello my dear friends and
welcome to this lecture. As we understand, if we are dealing with hundreds of servers and there are certain
Windows services that we want to
restart periodically, then powershell is a great
tool to explore, right? So in this lecture, I'm going to demonstrate to
simple PowerShell scripts, which are immensely helpful in restarting your Windows
services on scheduled basis. And the best part is you can use the same scrapes to restart services on various servers
on ad hoc basis, right? I am sure you are excited to
see how we are going to run a PowerShell script on a
centralized terminal server. And from there, it is going to restart the
Windows services on various servers remotely without having to login
into those servers. So without wasting any
time, let's get started. First of all, let me show you the different VMs that I have deployed in my
Azure subscription. So I have deployed
this terminal server. Then there are two App Service, app Service 0102, which I'm going to use
for demonstration. So we are going to run our
script on the terminal server. We will not logging
into these two servers, but sitting here, we want to restart the services
on these two servers. So this is a requirement, right? And now let's see how we can deal with this
using PowerShell. To deal with this requirement, I have prepared two versions of script with very
small changes, right? I'm going to explain
everything line-by-line. So don't you worry at all. Everything is going
to be crystal clear by the end
of this lecture. Yes. Okay, so firstly, let's
talk about this version, which is to deal with
requirements in which we have fixed window services
that needs to be restarted. But the liftoff server
names is not fixed, right? We have created these
servers dot INI file in which you can update
your server names, right? So if a new server
you want to include, just write its name
in the new line. And automatically it
will be now used by this script and it will restart certain Windows services
on this server as well. So this is a simple concept. Now, let's go
through the script. This is our base directory
where script is kept. Then we are creating
a log file variable. So that and because we have appended that date
in this file name itself. So this way you can get
one log file for each day. Right? Then we are having this
command start transcript. This is very interesting
command lit. So once we have
specified this file, it is going to write all different log messages
into this, right? So using this right
output command late, whatever statements
we have written, all of these will
be visible inside this because of this start
transcript commandlets. Right? Then here we are reading
the list of servers. Servers wrote INI file is here. We are reading these
INI config file. And then this area of servers will contain
all these servers. Right? After this, we have Services
least defined over here. So all different services
that we want to restart, we can specify here in
comma-separated manner, right? If very small change, which you can do if you have
requirement of this sort. If you want to keep this list of services outside of this script, let's say the way we have specified different
servers in an INI file, you can keep another services
wrote INI file also. And you can read these
services from that file. So benefit will be you
will not have to come and edit this file for changing
these services, right? So in this demonstration, we are going to
restart these services on this set of servers, right? Of course, you need to
replace these services with your application
services. After this. What we are doing is using PowerShell commandlets,
invoke command, and to compute a name we are passing or different
servers in one shot. So if 100 servers are there, then also we are
invoking our logic for restarting the services on
a 100 servers in one time. And then the logic
for restarting the services is written inside
this script block, right? Let's take a look at this logic. So sleep time we have defined as 30 seconds then for
this difference. Okay? So because these
services we have defined in our local host bird, we are invoking the
script on remote servers. This variable will
not be automatically passed to this remote
computer, right? So for this reason, we have to specify it like this. So this way, PowerShell, we'll know we're referencing
to the local variable, but we want to use the
value on a remote machine. Correct? So we are firstly fetching the initial
status of the services. Correct. So we are interested in name status and P
S computer name. Then we're invoking this
stop service command lit, and we're just passing the
list of services again. So we expect this will stop the services on all
different computers. After that, we are giving this thirty-seconds sleep time so that it can stop all
different services. And again, we're
checking the status so that we can see if the services were
actually stopped or not. Right? Then. Here I don't think this
lifetime is needed. After this, we are invoking start service command late to start the services again, right? And before leaving the system, we are checking
the final status, whether services came back
to running state or no. So for this reason, we are collecting
the final status. So this is the script
block which will be executed on the remote machines. In the end, we are
just to stopping that transcript and
script ends here, right? So it is time to
do the practical. Now, let me close this and we'll copy this code to
our terminal server. Our code will lie here, but we will restart the services on these two remote
machines from here, right? Alright, so our
scripts are copied. Let me go here and
launch PowerShell. And just, let's take a
look at the servers list. So it has got two servers on which we want to
restart our services. And which services we want to restart the services, right? So let's execute a script now. Hit Enter. So this is the initial status of services on
different computers. This is 01 and this is epsilon 0 to now it is stopping
the services. And remember, we have included some thirty-seconds sleep time. So because of this, you will see the delay. This is the time
we are located for the services to go
down gracefully. Right? And once the services
are stopped, we have checked
their status again. And on board the servers, you can see the
services are stopped. Right now. It is starting their services. And then again, because
for starting the services, it can take some time. So we are waiting
for thirty-seconds. And now this is
the final status. On server one. All the services are running on server to all of the
services are running, which means the
services were restarted gracefully without any
issues on both the servers. Right? Let me close this. And here. Let's say somebody reports
issue that on this server, this service is not stored,
something like that. Let's say app server 0 to
somebody reported issue. You can open this log file. So let's say you have been
reported and issue for this server related
to service restart. We can go to this
log file and see. Okay, so services were
running on the server, then they were stopped also. And then again came back
in the running state. So no issues with the
service restarts script. Correct. So this way we can make use
of this transcript, right? Alright, so this was the
first version of our script. Very easy. Just update your
services in the servers file and the list of
services in this variable, and you are done. Right? Let's meet in the
next lecture and explore second version of our solution to
this requirement. See you there.
16. PowerShell 11D Automation 2: Alright, let's take a look at this second
version of R script and this time instead often ionized based
configuration file, we have used XML
configuration file. Let me show you our
configuration file. Looks like this. Everything is inside this service
re-start tags. Inside this, we have different server and
service combinations. Visualize this. You have different
combinations here and you can just add your
servers like this. This tag excepts comma
separated values. So you can add your all different servers by separating them with a coma. And the same goes
for the service has also all different services that you want to restart should
be added like this. What is the benefit
of this approach is, let's say on this app server 01, you want to restart
spooler service. Whereas on this second server, you want to restart spooler as well as
this WP and service. Going by our previous logic, how you will deal with
this requirement, right? But here you can deal
with it very easily. In fact, all it
takes is just update the values here and
you are done right. Now. Here. Again, I
have used absolute 0102 only because I do not
have too many servers. But whatever your
servers are there, you can update like
this. This way. We can update our server
service combinations and then we have to
execute R script. So let me copy this code. Okay? And perhaps you
are already aware we should try opening
XML file like this. And if they open like this, we are sure that there's no syntax mistake inside
the XML file, right? So now let's talk
about this script. What is there inside it? Pretty much the same thing. It says that here, instead of reading the INI file, we're reading XML file and we're reading all different servers
service combinations. So let me execute
this script for you. So your XML content
looks like this. Then if we go inside this
and get grabbed servers, we get all different server
service combinations. And inside this, inside this, we have our servers and corresponding services that
we want to re-start, right? So one by one, we are reading
these combinations, splitting these values by coma and storing them
inside these variables. And from here, we are repeating exactly the same logic which we already discussed for
the version one, right? So let me clear everything. Screen, what is the average? Let's execute our script. So I launched powershell
and automation. Automation for plants
service restart version to hit Enter. You can see this log
file is created, which is storing our messages. And here, firstly,
pick those servers, spooler services getting
restarted on epsilon 0102, it's coming up. Okay. That's it. So all different services or re-started as per
our requirement. And we can take a look at this log file to understand
what exactly happened and what this mean to us is script is doing the
expected job, right? So definitely this automation
is a success, correct? Now, you do not want to come to this PowerShell and execute
this script every day, four o'clock in the
morning, right? So what you can do is say dual, this is script and
tasks, a jeweler. And then this task
scheduler will take care of executing your PowerShell script as per your defined schedule, as per your requirement. Alright, my dear friends, I hope both versions of this land service restarts
scraped are clear with you. So we had this simple
problem of plants surveys restart and
we figured out to unique solutions
which takes care of this requirement where you will write more than anything else. This approach that you know, what kind of
configuration file will be the best suitable
for requirement, and then how you should design
your PowerShell script. If you are learning this, that is the most
important thing. Rest, everything
else is secondary. I'm sure you are already
planning to use this script at your work for restarting couple of your
application services. On this note, let's
conclude this lecture. Take good care of yourself. Thank you.
 Vijay Pooja