Transcripts
1. Introduction: Have you ever looked at a blank piece of
paper and really felt intimidated by what to create. I used to feel the same way, but then when I hit 40, I decided to just let it all go. I didn't want to let the fear
hold me back any longer. I'm here to help you get
over that fear as well. In today's lesson, we're going to just work on mark making. We're going to use a variety of mediums from
acrylics to gouache, watercolors, crayons, colored
pencils, you name it. Whatever you have
on hand is perfect. And you know what
the best part is. You don't have to be artistic
to make marks on a page. To remember when you're
a kid and used to just have fun coloring
and creating art. Let's get back to that point. We're not going to stop there. We're also going to dive into
the world of color using a monochromatic color
palette to see how the colors blend together and
the different mediums work together to create some beautiful
abstract pieces of art. We'll experiment with layering
and blending and creating new textures using
everyday objects from outside your house. We're going to create marks and test them down
on the paper so that maybe you can
use them in patterns or textures later on in
different pieces of artwork. I'm Katie from perch handmade. I hope by following me and exploring these
different techniques, you'll be able to let
go of your inhibitions and just see what happens. So let's get ready to start the first
lesson where we'll go over the materials that
we'll use in class today. And just have fun. And remember, you don't have to have all the
supplies in the world. You just need something
to color with and some paper to put it on
to start with those, grab those and meet me
in the next lesson. I can't wait to see what
we create together.
2. Materials: Okay, friends. Are you ready to go on this
wild page adventure with me? We're going to
begin by going over our list of materials
will need for this class. Let me begin by emphasizing, you don't need all the
top quality anything. You just need something that's
going to make some marks and something to
put that mark onto, whether it's a canvas, a book, paper, what have you? We're just beginning with
the super basics, right? But I'm going to show you
the things that I use now and maybe it will inspire you to try
them out as well. First off, let's look at some paper that we can
put our marks onto. I began making marks and
painting using the Canson, the 11 by 15 watercolor paper. This is a really great
beginner paper for your watercolor or gouache or acrylic mediums because
it's nice and thick. It will hold up to anything. Come on, look at
the size of this. All you need to
do is tear it out and cut it down to your size. If you don't, if this size
intimidates you too much. I know about intimidating size. And so when I
started sketchbook, I'm using a sketchbook. I started with this
little small one from this one's from
Stillman and burn. And it's there delta series. It's kind of got an
ivory ivory color to the paints or to
the paper, Excuse me. But it's again, a really
nice thick quality. And it's all about just making various
marks on your page. For beautiful paintings. I love the drips. If you do want to go a little more adventurous and
the bigger size, Stillman and burn also
has the larger size. And that's what I'm
going to be using today for creating my marks. I'll also use the Canson
watercolor paper today. And one more kind of fun, tricky thing that I got into
doing is painting in books. And some people are like gasp, like, Do you really want
to paint inside a book? And for me, I've found some of the old books have
really nice paper. And it's fun to find
an old encyclopedia. This one is a flower
encyclopedia that I can create different
abstract works of art and we're gonna do
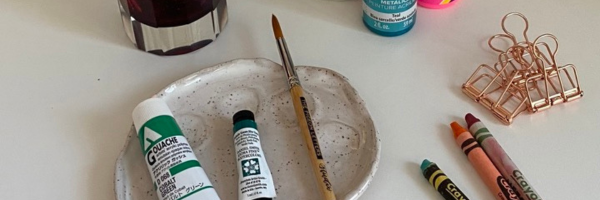
that today as well. Let's begin by talking
about the paints or color supplies that you
are going to use today. I'm going to use today. There's so many to choose from and it can get overwhelming. I understand that I first
started with watercolors. I love good watercolor palette. This is a beautiful one that
my friend created for me and painted all the color
swatches for me so I know exactly which
color is there. And it comes with
the handy palette to put your watercolors down
onto and mixed lunch you. Color pencils are
really fun as well. And I love these super Furby
colored pencils from Lira. They're from Germany and
they come in that fun tin. They're all solid wood, but they're really
vibrant colors as well. And I don't know if
you can see this. But the kind of have a triangular feel to
them or FIT, sorry. And so it's really
comfortable in my hand and it's a
bigger colored pencil. I really loved the
obese from Lira. And another special thing
that I've learned about recently is the crayons from Lira that our
watercolor paints. So when you color with them
and add water to them, you get a watercolor
look to them. But they're crayons. They're crayons. You guys. They're really fun. But like I said,
you don't have to have the really
expensive things. I have all of my
crayons down here. I have markers, I have pens. They're all on hand. I love if I want to
do just pen marks, the mono line pens from The Pigeon Letters
are really fabulous. I don't know if
you can see that. They're really nice,
kind of rounded tip. If you can see that as well. Which means that when you're writing on the page,
whatever angle, you're going to get
a good color to it instead of some some brands. If you tip it, it kinda makes a scratchy mark or
no mark at all. But I also have like gel
pens that are a lot of fun, lots of options. I also am really enjoying
acrylic wash right now. There. It's kind of like a mix of
an acrylic and watercolor. It makes a good solid color. And you can add water to it and send it
down a little bit. So it's kinda like a watercolor, but it's going to dry so
that once it dries it, you're not going
to mess it up if you add water to it later on. Having just good acrylics is something really
nice to have as well. I love the texture and the buildup that you
can get with acrylics. But again, just go to your local craft store
and pick up these for a couple of dollars and you can have so many
colors to choose from. I'm really digging the
fluorescence these days, which brings me to these
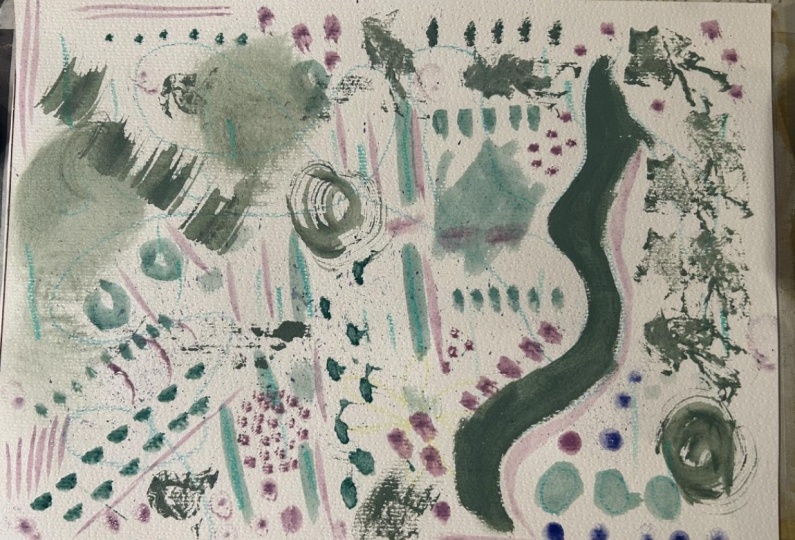
golden high flow acrylics. I don't know if you remember, but the page that I showed
you a minute ago has the drip marks and I'm really loving doing that right now. And that's the look you get with these the high flow acrylics. You can also use
your paint tubes. Watercolors. I use I usually
use Daniel Smith's or Windsor Newton's.
Paintbrushes. Paint brushes are
super important, but also not necessary. You can use your fingers as well when you're just
getting started there, your fingers will make
great marks on the page. But I love having
different shapes, whether it's a round
brush or if you've got the flat brushes
that are really nice. Old credit brushes,
really great. I don't know if you can
see that for creating, you can cut the tips on
them and it will make even better marks on your page. Just a lot of dimension to them. Another thing you can
do, go to your kitchen, find a spatula, and you can use the bat to dip through
your acrylic paints. Or this is a kid's toy. It's a little scraper
that I can use as a palette scraper for scraping
the paint across my page. Another great, great use for things that you
have around your house. If you have kids, I have multiple kids and I've had so many extra school supplies
at the end of the year. Use those watercolors,
use those crayons, use those colored pencils. They're gonna be perfect
for just getting started. And later on, you can
build your supply up like IF other essentials you're going to need for
getting started today, a paint palette of some sort. I have this cute little
one from Peggy Dean at the pigeon letters
that she handmade. And but you can also use just
Tupperware container lids, like the ones that
you're just going to throw away from your
dairy containers. Also some extra rags or paper
towels and some jars to at least two jars to have your water for cleaning
off your paint brushes. I like to have two
so I can put like clean off the cool colors in one and clean off the warm colors and another that when he
doesn't get quite so muddy, you can also just
use old extra jars. That's what I
usually use as well. But today I'm going to use that my son just made and
in his pottery class. So far, that's about what we're going to be
working with today. Have whatever you want to use on hand to get started
in the next lesson. Remember, this is just
a jumping off point. And you can jump off with
as little as you want. So if it's just crayons today, just get the crayons out. But if you want to
adventure into something bigger, get the paints out. Okay? Because there are a lot of fun
3. Wild Page Adventure: Part 1: You have all of your
materials ready. And we've looked through all of the different paper supplies
and different things that you can use to create on. If you happen to go to the
thrift store and grab a book, Why don't you grab your
thrift store find now? And we will get the pages ready and we'll get
started on that lesson. So using the thrift
store book that we got, I'm going to start
preparing the pages. You can paint directly
into the pages, but I like to start
with some Gesso. First, to create just a barrier to help it hold your paint better or
your art work better. Here's some of my drips. And even with the JSR, you can still see the
words coming through, which is something
I really like. I have some pages
already prepared. But let's go through
and I'm going to show you how to do this first. So I like to shake
it up a little bit, make sure it's all ready to go. They're usually
some directions on how to use it to
prime the surface. This one does say to take 24
up to 24 h for it to dry. But I liked doing
really thin coats and using a hairdryer
to dry it up best. You may use it on diluted, which is usually how I like it. And you can add water
to thin it out. Depending on what medium
you're painting onto. You don't need very
much for this page. But this is the Liquitex
acrylic Jericho. And just get a
bigger brush to just start painting over the areas
you wish to paint onto. And pay attention to how thin
or thick it's going down. And I like to just
go over the words. I love keeping the pictures visible and not
painting over those. But whatever your
choice is, is perfect. You know, whatever
you choose to do. And if you choose to just
paint right onto the page, you can do that as well. I like to just kinda feather
it out a little bit. And I like see how you can still see the
words coming through. I kinda like leaving the titles. So this is just a
little small spot to paint all the words. And then limit you this
page as well real quick. And then I'll get drier, hairdryer, the blow
dryer to dry it out. I mean, a tiny bit more
to finish this page. But you get a good amount
in that bigger bottle, which is better
price-wise to get. Because you can use it
on all these pages. Because look, I've got
hundreds of pages to go and sometimes they'll do a couple of pages
ahead of time. But mostly I'll just do one
at a time or, you know, the open folds together
and get them dried out. And you're just ready, ready to paint for your day. Like I said, I am
new to all of this. So if there are better
ways to use this, I'm sure there are, but this is how I use it. This is how I do it. And if you find a
better way to do it or learn a better way technique, then use that technique as well. But I'm just showing
you how I do it and making it really simple. I put my brush down, I'll get the hairdryer. This part is going to
be a little bit loud. So now you have your
page, it's all dry. Let you touch it another
and we're ready to get started on painting or making
our marks on the page, grab some binder clips. I forgot to mention
these earlier. Something that's
really great to have that just help hold your
page down while you're working and keep the page from lifting up when you add
the water or paint to it. Another thing, get
some music going. Find your favorite album, or scroll through your playlist. And I find something that
you really enjoy listening to and to have fun
and get creative
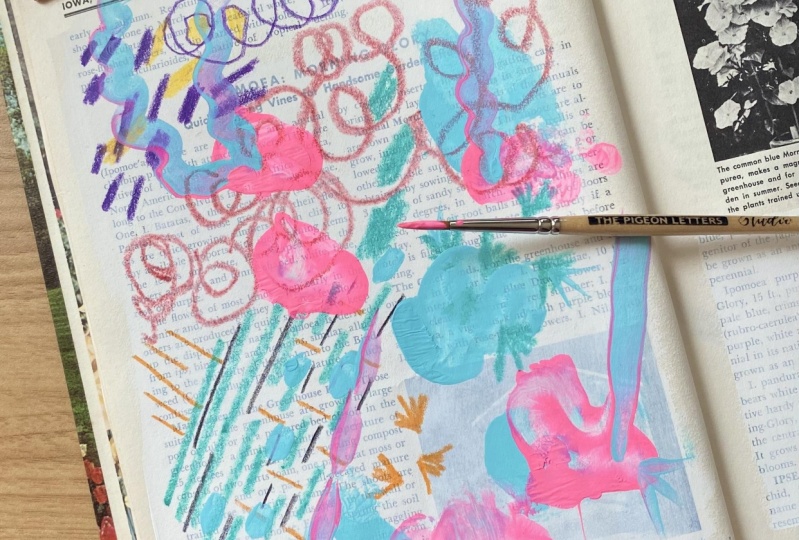
4. Wild Page Adventure: Part 2: Let's begin by just
creating marks on our page with our drier mediums. I'm going to use my
colored pencils. Those lyrics do prefer bays
and just some crayons. I picked a few colors. We're going to begin
by just making some marks on your page, right? I'm going to start off with maybe this nice purple and
start by just making lines. You don't have to stay on the Jess owed part
that we just painted. Used up your whole page. Go over the words if you'd like, because it creates a
different textured element. If you want thicker lines, make those thicker
lines as well. Another thing that's
really great is try holding your pencil from the end and creating
circles and see what happens. They're not gonna be perfect. And that's exactly
what we want, right? Or maybe you do circles
inside of circles, right? Just see what you can make
by letting it be loose. Because he can
always color those in and create a
different design later. And test how your
circles are when you are holding them down at the end where you're
more comfortable. See how the difference
in the colors. It's really dark and these
are really light and a little bit not perfect where these
are a little more perfect. I'm going to grab some color
and fill in some spaces. Because that's a
fun thing to do. Think of those days
when you were little and just coloring in the lines or color outside the lines
and see what happens. Make some wolves squiggle lines, or close your eyes
and see what happens. When you have your eyes closed. You have a little more freedom
on the page because you're not paying attention to where those lines are coloring, right? Try your less dominant hand. I'm right handed, so
I'm trying left-handed and seeing what happens, right? It's all about just
experimenting on the page. Sometimes you'll get making your lines and maybe you'll notice a pattern
beginning, right? And you can work
from there as well. It's just about being creative, listening to that
beat in the music. Maybe you got a really
great beak going. And you're sticking
with that beat. Just see where it takes you. Again. We're not emphasizing
on anything being perfect. In fact, we're trying to
not be perfect at all. Try holding your pen or crayon
in a different way, right? And seeing what happens. I think I'm done with the dry stuff now and I'm going to get started on some paints. I'm going to go with
something really bright to add to
this color here. And I'm also going to have another color that
I can mix it with. That one. I'm gonna
do this metallic. It's kinda fun. She come up a little bit every
once in a while. You don't need a lot on your
palette or tupperware lid, whatever you're using, right? And I'm going to begin by using Just my kids scraper, right? And letting my paint down on the page and
seeing what happens. I love acrylic because you get that thicker texture happening. And it's kinda fun to
just leave it like that and rinse off your
scraper. Sorry. Use paper towel or an old rag and dip into another color
and see what happens. I like pulling the colors through each other and
seeing what happens. Hello, how the colors are
mixing as I'm using them. It's always really
great since I've got these big thick
chunky pieces to find a smaller brush to
create some details. This is my number
four round brush. And then I can go in, make dots, create
texture that way. Maybe I'm dipping into another pink color so
that when I'm pulling it, I can see the different
colors pulling through. I really loved doing that and pulling it through other colors. Just makes me happy to
see those colors mix. Sometimes though, if you've
got too many colors mixed, it will get money. So pay attention to whether
you're using cool colors. These are both cool colors, so they're not going
to get you money. But if I use a cool
color and a warm color, and then the colors
might get money. But it's all just
about experimenting on your page and seeing
what happens. And maybe using
those little circles to fill them in
different colors. What happens when you pull your acrylics across
different mediums? You can do the same thing with your watercolors and see
what happens when you pull a watercolor
across your crayons. Because of the wax, it will lift off and it won't connect. I'm going to let this page dry. Another really
handy tip is using wax paper and trimming
it down to size. When you do close the
pages after it's dry, you can they won't
stick to each other. So let's sit tight on this one and move on to our next project, working in our, the
watercolor sketchbooks. Alright, so let this dry. Take a break if you need to, and come back in just a minute?
5. Color Study: You've just created
your first piece of mark-making in your
thrift store find book. So now let's jump into another project
where we're working on our colors and specifically a monotone color
palette. Let's begin. I've already picked
out some colors. I'm gonna go with
this green palette and various shades of green. And I have another
watercolor in my tin here. Pick out like three or four different mediums that
you want to work with. Whether it's gouache, watercolor, crayons,
colored pencils, whichever you choose,
we're going to work in a single monotone
color palette. So I'm just doing all different
shades of green for mine, but you can choose
whichever ones you like and have fun with it. What is your favorite color? What is the color?
Maybe you don't usually work with
chew something fun. I'm also working
in my Stillman and burn my larger
watercolor sketchbook. You could also work with the watercolor paper you
have for this project, but try to keep it at
a watercolor paper. That makes sense. You know what? I'm going to add one
more crayon in here. And it's going to be my
watercolor awkward real color. Crayon, watercolor
crayons from Lira. I'm gonna do that one as well. I'm just going to get
everything ready to go and get them onto
my color palette. This one, I already
have one picked out. I'm gonna go with
this cobalt green. And I'm going to take the little palette out here
to get this one ready. It needs a little
water added to it. And I have this
little spray bottle that's nice to get things. Add a little water to get it, get it going. Just to start. Then I'm going to add my wash, which is nice,
nice, bright green. And I don't need a lot because I will add water
to this as well. And I'm also going to use this fellow green watercolor
from Daniel Smith. I'm going to just
put that over here. This is just time to
get everything ready. And my awkward real
doesn't need any prep. My crayon for sure
doesn't need prep. I'm going to find a blank
page and open up to that. And this is when
those binder clips are really come in
handy to help keep your page open and flat. I'm going to go
with my dry first, which are my crayons and
this one will get wet. So I have to remember
that when I'm working with this one that
once I pull water through it, it's going to change how
it will look on the page. But that's the fun
part because I don't know while I'm first putting it down, how
it's going to be. Well, I'm going to
start with this regular crayons first and
maybe work this one through. And remember, we're just
making the marks on the page. I'm going to start
with some lines that I can fill in later, just making those marks. And I'm also going to put
some of these things to it. That's just kinda what
I feel like doing. See what happens. When
I add the water to it. This side, I'm gonna
kinda come across it in. See what happens. I'm going to take that brush
that I cut the tip on. You can see I just created just cuts in it so it will make a
fun little pattern. First, I'm going to add
some water to my gouache. Will always want to add
just a little bit and start out a little bit
at a time mixing it. I'm just going to
push that brush down there because I'll
probably use it, but I want this brush to
start out kind of dry. And I can tap it off
to see how it looks. And I like the little
marks that it's making This is how I make
patterns as well, but that's another story. It's just great to add some
texture to your artwork. I just dip that in water so the texture is going
to be different now. Okay. Love what it's doing. And because this is the gouache, I can add the water to it fine
and dilute it some, right? So you get a little bit more of a watercolor a feel to it, the more water you add to it. But once it dries, know if you could
see this right now, but the watercolor
crayon is blending out. And it's just about
experimenting so you can kind of mix the water with
this and the gouache. And they'll kind of be a little bit more like a
watercolor painting. With the blending out
that you can get from it. You can just kinda
let it do its thing, which is the fun part
about watercolors. See that one's starting
to dry already, so it's not doing anything
and blending as much. Now it's pulling up because of the wax from the regular
crayons right there. Start making lines here, two different swirls, textures that you can get
from different brushes. Traveling my smaller
pigeon letters brushes. Now I'm going to
add some water to this little green watercolor. One. I really want to blend down
a little bit and then C, or add water to it quite
a bit. See what happens. First is the other ones. I love the colors, I love green, it just
makes me so happy. I live in a very green
environment at the Oregon coast. And we have big forests
that go right to the ocean. So it's green all the way
to the beautiful blues. And some days you really see
the blues and the greens. Mixing together. Reminds me of this. Hello, what's happening here? With the mix of the
watercolor and the mix of the wash. And love seeing the water kind of repel away from the as well. Go ahead and get
your hands in there. Because it's all
about experimenting. Another thing that's fun to do, It's just getting water. On your page. See how when it mixes
with the watercolor. Crayons. Get that different lip there. It's really fun. You get that pretty
bleed that's happening. I think it's so fun. It's so powerful with these crayons because it just kinda pops. Let's see what happens when
I take this one that I've added the water to know
a little bit more. And then you can work
right out of the pot. Just make marks. Well, yeah, that's
more of a gray green. It's interesting because
this one said cobalt, but it was a different
manufacturer versus the gouache that also
says it's a cobalt green. Those are two very
different greens. It's just fun to play with your colors and get
dirty and get messy. How does it make you feel? Just sitting here painting away. Do you feel anxious because
you don't know what to paint? Or is it a little more
freeing because it can just be a marks of mess. I feel like it's a
little freeing having these marks of
mess on the paper. Because I'm not trying so hard. I used to try so hard. And I never thought I was a good painter or I
wasn't creative and artistic because I had thoughts of like museum
style paintings in my head. And of course, we're not going
to start that way, right? Nobody starts that way. Everybody starts as a mess. And I think a mess
is pretty beautiful. What's your favorite music on? And sit back, fill up
your page and have fun.
6. Foraging for Tools: Let's get prepared
for this next lesson. Our next lesson,
we're going to be working with items that we've foraged out in the wilderness for or just outside our home. Actually, some things
we would like to look for are twigs or leaves. It's a great time to get any
new plants or pine needles, anything you can think of. I live in the Pacific Northwest, so I can go searching out in the woods or I can go
searching out at the beach. Have fun exploring and
seeing what you can find to create different
marks on your page, you'll be surprised at how many different things you can find when you
just get outside. Another really quick
thing to say is if you do bring them inside or if you have a couple
of days in-between this picking them
out and painting, maybe leave them outside
and an open air container. So any little bugs
can get out, go free. Then you can work with
your items later. Have fun exploring. And I'll see you
in just a minute.
7. Foraged Object Mark-Making: Did you get out into
the wilderness? Did you just get outside
in your neighborhood? Let's be honest, maybe not the wilderness or maybe sometimes it feels
like the wilderness. I don't know where you live, but I hope you are able
to get outside and let's get ready to hop into
this next lesson. Now that I've chosen a
few of the items that I collected on my little walk through the woods
and on the beach. I've picked out a few
that I think would be great for making
texture on my page. Set those aside and
get my paper ready. Let's get our large
watercolor paper ready or whatever size
you have that handy. And I'm going to create
various little boxes on mine so that I know where I want
to have them separated. And I have 123-45-6789
different things. So that's perfect. I can put this into
nine separate boxes. And I'm just going to use
my acrylic paints for that. What we're gonna do
is make some patterns using, using your textures. And you can use them later
on in different designs. But that way, if we have them separated and using
a dark color, if you use it in a different
digital design later on, then you can really
isolate them better. So I get my paint ready to go. And I'm gonna do a little bit extra just because I have a
lot of different designs. And I can also
just really easily take a little brush and
leaving my smaller brush. Just have a quick, a quick line. So I'm gonna do each
direction into thirds. That'll give me nine boxes. Doesn't have to be perfect. Just so I know they're there. You could do it with
a pencil if you don't want to put it
down on page this way. But it won't be a part of my
design later, so it's fine. And probably do this spot here. I'm going to start out with
this cute little pine bunch. And for these, the best
is to kinda tap it off and just get the edges of your you don't want it
really thick and spots. We can just see
what kind of marks. Those may be a need
a little bit more. Love those little
dots It's making. And that's really cool for a texture or a background that I could use later on in
my digital designs. So that one went
down a little thick, but that's okay too. Like that. Alright, I'm gonna move
on to the next piece. So the next one is my
shell that I picked up. That one, I'm just
going to dip in and put on the page
and see what happens. I think this one works
a little bit better at an angle because of
that sharp edge. But I liked the lines
that it's making. Every side is gonna be
a little bit different. Put them in. These
could be really cool digital lines in a pattern
that you make later on. And maybe that's where you'll
find this later for me. I like to have a lot of
different variations of it. I'm also going to see what
happens when I tip it over. Can you use a different side? Because of the edge, it's not going all the way
down, but that's okay. Later on I could isolate
each of these in Affinity Designer in
the pixel persona. But it's fun just to see what
kind of marks you can make. Alright, Next, I really interested in this
piece and I don't know how it's gonna work. I would love to be able to get this texture
down on the page. But it might not work
the way I want it to, but that's where we're
just going to try it out. I'm going to take one of
my brushes and I'm going to apply the paint to the texture on
this piece of bark. And we'll see what happens. Of course all the
pieces are coming off. But that's okay. That's what happens when you're working with nature, right? Okay. Here we go, we'll
see how this works. You guys didn't quite work because it's got a
little bit of an edge to it. But what happens if
we do this side? Fill it all in. See what happens. Nice little layer on
it, not overly thick. Thick enough so it will
come off on your page. I kinda like the lines
that's happening here and then that slide
got a little too smushed. It can kinda see the difference in what
came off on the page, but I kinda like those lines, gives up fun texture. Alright, I got to wash
my hands off real quick. I'll be right back. Get the dirt off of page. And we'll go on to the next one. So this piece is a piece of charcoal from a
fire on the beach. So this one's nice because
we don't even need a dip. It, it's just going to make
some marks on its own. Fantasy that was marked
across the paper. I'm at C. That's the fun part of this. I'm going to get
rid of that excess. So those lines, so it'd
be really fun later on to use in a different
piece of artwork. Or maybe you're going to take this and make a
whole piece of art. So I also got these cute
little ***** willows. And I want to see what happens. What sort of shape I'm going
to make with the placebo? Cute little, its own
little pink brush. But the shape is really its own. It's creating this little
piece in the back here. Depending on how hard
I push down on it. You can also come in here and dip the edge of it and
do your own minds. Kinda cool texture
to them as well. Let me get that
piece out of there, those little piece of grass. All right. So what
do we have next? Oh, I'm gonna do these
little pine cones because these made me so happy when
I found them into words. The cookies, those
are, look at them. They're just tiny
little pine cones. Alright? And I'm going to dip a man, me, I'll put them in this side. That's a little bit. Be a little bit. Okay? This one almost looks
like a thumbs up. I like it when it
loses some of it. But it's all a lot of fun
little patterns that I can use. Lots of texture in all of those. Okay, What else do I have? This mosque? This one is gonna
be a little tricky. Maybe I'll dip it and
just barely tap on that. And when to use my spatula to
help in there a little bit. I think that's going
to be some cool color. Then then. Yeah. How fun is that? You can do that again. And it's just
experimenting, right? Creating textures on your page. Because that's all we're
doing is mark-making, right? Alright, I've got
two more slots. So have I done, I haven't done the graphs. I haven't done this
little little bee truck. I'm gonna do the
beat truck first. One. Let's see what happens
when I do all of the edges. It's just kinda fun. You feel like a kid
again went back at this. Let's see what happens
if they can make it go. Continue to go without
touching the edges, rolls around and get it to go. Getting messy. You guys
you getting messy. I feel like those lines as well. I don't know if you can tell
what I kinda like the lines. Think they're my
favorites so far. Oh, she's my rag because
we're on to the last one. I'm going to get messy again. Okay, Let's see what we
can do with this one. Wonder, I'm going to try
something different. I'm going to have it be a relief or is that
what it's called? Where I put the paint
down on top of this, I'm going to water this
down just a tiny bit. Someone was getting
a little dried out. Sitting here. They don't ever usually
have a problem when I add a tiny bit of water
to my acrylics. Okay. Remember that's my kind of crusty brush that I had earlier. And we're gonna see
what happens with the negative side of having the texture down
and painting on top of it. And what we get
when we lift it up. A little bit, a little bit
unpredictable, right? So I have some of
those lines in there. That's kinda cool. I'm going to try
doing that here. It's dragging its own
lines through it as well. All right. Gang a
little messy here, you guys, but here are
my different colors, my different patterns
by different textures. I'm really loving this one and maybe I'll make a Procreate
brush with that one. I loved these lines
which I think I will make some sort
of pattern with. And I love the texture
from the charcoal as well. I hope you had a lot of fun. Let's get cleaned up
and I'll meet you back here in just a minute to go
over what we learned today.
8. Thank You!: Great work everyone. You guys have done an
amazing job getting over that fear and getting
your marks onto the page. You've explored some
new techniques that I hope that you can take
into the future and keep creating and just letting your fear diminish and
your artwork grow. I hope I've inspired you with
my journey of getting over that fear and pushed you a little to step
outside the box. Sometimes just getting
those marks on the page is so much easier than thinking about
creating a whole artwork. I love abstract for that
reason because it's really how it makes you feel. Remember, the goal
of today's lesson was not to create the
beautiful works of art, but to just learn the
different techniques for mark making and to explore and get, get a little messy,
stick with me. And we'll go on a great
adventure of learning new things and
creating together. Follow me to stay connected. You can find me on Instagram
at perch handmade. And if you feel like you really enjoyed this
class Lieber referral, I always love hearing
how you guys felt. If you do post to
Instagram or social media, use the hashtag
creating with pH m, That's perch
handmade, then I can share your artwork
with my community. My commitment to my community is making sure that
we're staying connected. And I also give out freebies
every once in a while. So put your name in the box, check it off, join the list. I know we all have these lists. I promise I won't send
too much your way except for some freebies and
helpful tips on my blog. Make sure to also share
your project with the class because it's inspiration to everyone out there
to learn something new and try making those
marks on the page. You'd never know who
you're going to inspire. Thanks for joining me on
this wild page adventure. I'm Katie from handmade. I can't wait to see what
you create in the future.
 Katie Simmons, Digital Artist | Perch Handmade