Transcripts
1. 1 Intro & Project Summary: Hi, I'm Daniela Melon, artist and author. I love to teach and to create in this class whimsical watercolor whales. We'll take the basic watercolor supplies and make fun whale paintings Do you like to create ? Maybe don't consider yourself creative. Well, this class will walk you through the steps. We'll start by downloading a class list of supplies that you need basic supplies, watercolors, paints, brushes. Then we'll get started right away. I've included a template with three shapes of whales that you can download, cut out and create stencils for yourself. And then we'll get painting. I'll show you three watercolor techniques, and then we'll embellish. Are whales with fun prints and some accents? I've started a Pinterest board that has fun patterns. I hope you'll check that out, too. And lastly, I encourage you to post your progress and your project on the project board. I'd love to see your work. Let's get
2. 2 Supplies : I started thinking, Well, you to gather our supplies. We'll start out with paper. You can purchase mixed media paper or watercolor paper, and both are acceptable to use. Just check for the weight and you'll find that somewhere on the label, and this one is £140 mixed Media paper has a nice weight to it, so it's fairly thick, fairly stiff. This mixed media paper is very smooth. Some people like to use that when they're baiting with watercolor. Other people like a little bit of texture, but it's a nice option. This is another version of mixed meteor paper, but if you see here, it says £98 so it's much lighter. It comes in a pad and you can tear it off. This is good practice paper, but it buckles because it's so thin. So I would avoid using it for anything you want to keep long term, really the best and again, the more expensive is the watercolor paper, this skansen £140 it's very nice. It comes in a sheet. It's heavy and stiff, and it has a little texture, which I like when painting, But some people prefer the smooth look, then we'll need our paints. You can purchase paints in a pallet already filled in and dried. Most people think of them as the Crayola paints or the Children's paints, and these are very good. It's a very good option. It's just not artists level. The other option is to buy tubes of water color paint and have a palate than a palate can be. Anything from an empty dish to an actual for miss formal out artist's palette. Then you just squeeze in the color paint, and then you will add with a pipette, some fresh water to the pain. And you also do this toe to moisten your dry paints as well. You don't need a pipette. You can use one of your brushes, a chance for the water and just shake it off onto your palate. Um, I like to use different size brushes. I have a larger one. Um, it's number six right here. I have a number four right here again by different companies, but I do like the rounded tip, and finally I have a two slash zero, which I really like. It's very fine, and it gets into little areas. I use a mechanical pencil to trace my shapes, but number two pencil would be just fine as well. You got to trace lately and in a research, and finally, I like to have a paper towel handy that can dab up some brushes. It can clean up a spill. You could pick up some paints Marie paper as well as a larger clear water jug to start with , and it gets cloudy very quickly. And I'd like to have a spare, small little vial of water to just to clean my brush after it's been in the Big Jug. Or if I want to incorporate freshwater into my paper. And another option is to have a spray bottle. And this is handy if you want to make very loose paintings or if you want to just missed your palate as well. Okay, we'll get started
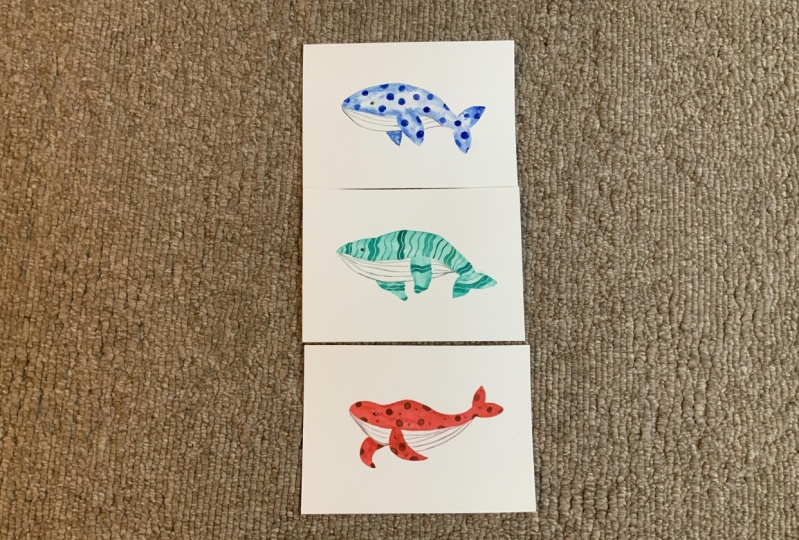
3. 3 Sketches: The first part of our painting is going to be to create this sketch that we use to paint you Can Freehand sketch a picture of a whale. Just the silhouette is all we really need to start with. Or you can download one of the whales I included in the notes section of this course. Then you print it out, cut it out, and then you can use it as a stencil or a mask for your painting. Here. I've done it ahead of time for all three of the whales and now we'll get started with our
4. 4 Whimsical Whale #1: for the first of our three whimsical whales will start with a red one now to make it whimsical, we'll have to have something original and creative about the whale and yet still be recognizable as a whale. So we'll do it. Read first, and then we'll build up layers as we progress. It's kind of a fun way to do it. I'll be showing you three different techniques. The first technique is going to be similar to a coloring book, so I take the color that I really like. And I just fill in between the lines. Watercolors. Very forgiving. If you keep the paint moving now, this is a wet on dry technique. You may have heard that phrase before. It means we're starting with wet paint, putting it on a dry substrate. In this case, the watercolor paper watercolor likes to move within water, so if there's no wet background, it doesn't move anywhere just wherever you place it, very similar to regular painting or acrylic painting or oil painting. So now I want to make sure it paint the body of the whale and the fins, and I'm gonna leave the underbelly white for now. But we might come back to. Then add something as well. Here we go, you know, And the fins, the more layers of water color paint you add. If we were at another layer after the stride right on top of it, it will make the color even more vibrant. Watercolor has a habit of when it dries. It drives lighter than you see here. Here we go. So now we'll let this dry and we'll come back and add another layer. Okay, the first layer has dried. As you can see, it's not solid. There are variations in the color, the red. That's because there was a lot more pigment on my brush in certain areas and more water and others. So there's more water. It becomes more transparent, more light and more pigment gives it a more bold color. Some people like the look of the different variations, and other people would like to fill it all in color it as if it was a solid layer of paint . I like the look of watercolor. I think that's one of the nice qualities, so I will leave it just like that now to make that to fill that in I use my largest brush, the six. For the next layer. I'm gonna use the smallest one, uh, the 2/0. So because it's red, um, I need another color to show up on top of it. I'm gonna make a darker red. Beginners usually add black to their red, but that's not the best way to get the darker color that tends to muddy the color. So I'm gonna take the red that we used at a little more water to it. And then I'm gonna add the inverse color. The complementary color, which is a green and just a little bit, will darken it up. Ah, lot will turn it to brown. And if you get more green in it than you want and it turns very dark, you just add more red. So they're starting to turn maroon. As you can see, it's actually a very pretty color. Almost a burgundy could add a little bit more red, maybe just a little bit more red there. I like that. So now, to make our whale a little more whimsical, I'm gonna add a pattern to the top layer. So I'm just gonna add kind of polka dots big dots here and there. You don't have to measure them, although you can if you'd like. If you're gonna be very precise just adding some nice round shapes and then everywhere I'm gonna make it almost as if it runs off whale. So it's not a perfect circle. As I get down to the final areas of the whale, the thinner parts I'll make the circle is just a little bit smaller, kind of keeping it in proportion to the size of the appendage that we're putting it on. And as we get to the face, I'm gonna just do a little bit later coloring as because I don't want to compete with the features of the eyes. So I'll take my outlining my polka dot at a little water to my brush and just let that filling, and that will give a much lighter color when it drives, says you'll see continue to add the dots. Now for variation, you could add different color dots. They don't have to all be the same color. You could add different size dots. Um, I like the simplicity of this pattern, but it would be nice to add maybe a few little dots here and there, not too much distracting from the overall shape it is. We still want to be known as a whale. But if I was to add a few little dots, maybe we'll add a few here and there. Smaller ones kind of like the way that's looking. Okay, so new. It's just the final touches for this. Gonna let this layer dry. I don't think my final touches went into fear with this layer, but I don't want to smear my work that I've already put into making the whales. So I left destroyed. And then I'll come back and add the final touches. Now that this layer has dried way. Just think what we want to do for the final touches. And this is where it's kind of fun to add a little whimsical area to the whale as well. We talked about how if we add green and red, if we had too much, we get a dark color or muddy color. Well, that's exactly what I want for the I. I'm just gonna take a little bit of the red, move it over here in a little bit of the green and here. I have a nice dark color, you know? Think about where I want the guy to go. Think I want it kind of low here, and I just wanted to be a little different shape in the dots, so I'll make this kind of like an egg shaped. There we go. And now another thing I want to work on is I want to make stripes underneath the whale. Um, I think baleen whales are known for their stripes underneath. It's actually think folds in the skin or something. So what I'll do is I'll take that dark color remade. I'll add a little water to it. That's how will lighten it. I wanted to be dark but not black. And then I will just kind of draw, just like I'm drawing with marker. First. We'll start with the outline, and then I'll go right in the middle, following the shape of the whale, adding a little water to my brush. Then I'll go to either side, and then I'll go here trying to keep the layers, the lines parallel but not not too perfect. It's kind of fun. I like how that looks. Hey, there's my whale now if you want that I to be a little darker as I'm looking at it, I think I will add Make that color again very dark and add another layer over the I.
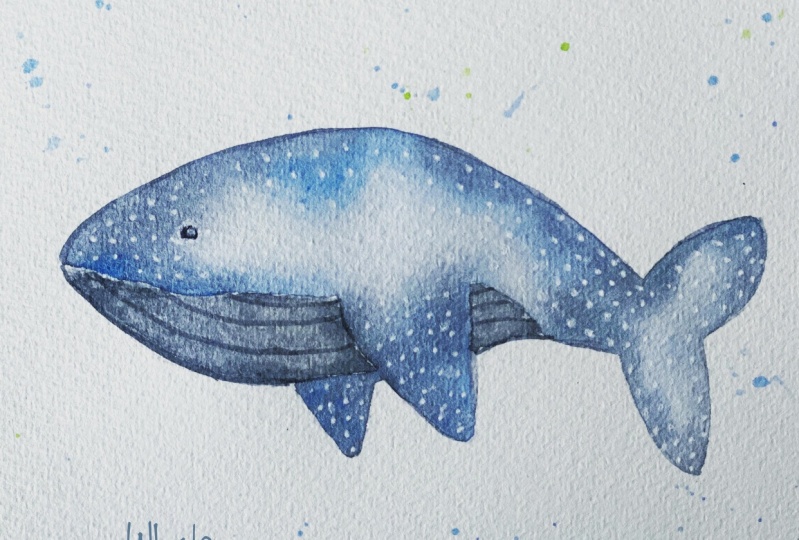
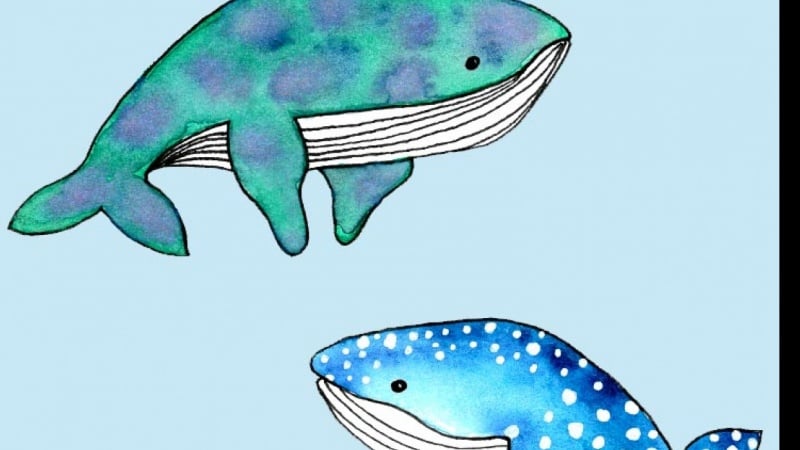
5. 5 Whimsical Whale #2: Now for our second whale, this'll one's gonna be a blue whale and will use more of a traditional water technique. And by that I mean we will color the parts we want to color in with clear water first. And then we will dab a little bit of pigment on it and let it the water do its thing. Now, this is a very fun technique, but it's also very unpredictable. And I like to say watercolor has a mind of its own. So it does what it wants to dio, and that means it flows where the water is. To some degree, we can manipulate that we can tilt the page, we can add an abundance of water, we can add just a little bit of water, but for the most part it does what it wants to dio. So here I am, trying to be fairly careful about keeping the water where I want my blue paint to be. I can make some corrections if I realize I missed a spot or if I went, I didn't go far enough for I went too far. But it's always easier not to have to make them if we can avoid it. Okay, so I turned the paper. I can see it's nice and wet, even having a little bit of abundance of the water again. You need to have good light for this and then I'll take my blue. I love this color blue, and this is just a slightly lighter blue in with my brush. Just dab and see how that water pull that color so it could be very interesting things. Now, if you don't have enough water, it will dry very quickly, for it will just not cover that area. As you can see, I kind of left a little outline some areas, so I'll go over that with the lighter of the two blues that I have squeezed from my watercolor tubes. And I'm not worried about getting every spot covered, but I am trying to cover right to the lines, at least the boundaries. Now, this is a very beautiful look, and if you add other colors, you get different effects. It's quite lovely. I'm going to stick with blue today, but feel free to experiment and try your own. I'd love to see your work if you post it in the projects Here we go. What kind of looks? Almost tied. I or she Bourey technique, Japanese art technique, dying fabric. It's mainly because of the color. So here we have the first layer of our project. It's a little different techniques in the last one. It leaves a lot of highlights. Some shadows. Um, I have a nice, nice effect up top. I really like it. And the tail. You can see where the water is pooling as well as over here on this Finn. Now, if I thought there was too much paint or pigment or water on the fin, all I do is I take my brush tip and I dry it. And then I go when I kind of absorb some of the pain. You can see it coming off, and that will prevent it from spilling out or making a mess on this one. There is a lot of pigment there. I'm going to see if I tilt the page. What it does. It kind of runs up the length of the whale. So that's kind of interesting effect as well. We're gonna come back to this after it drives. Let's see what we have and see the next steps. Okay, so our first layer is dry. Now, looking at this, I seem to have made ah little spot here like I did on our first whale. Let's see if I can repair that at all. So probably not because it's dry, but there is a chance. So what you do is you take a clean brush with your clean water and you're just gonna go over the area trying to absorb. Get as much water to absorb into the pigment as you can, and then you'll take a clean paper towel. Press down and see if you can't pick up some of that color. It's not a lot. It's nothing that I'm worried about, but it is a technique to pick up some of the color. Okay, so now we get started, adding our layer are pattern overlay. So in the last one, we did polka dots. This one, I think, will do hearts. It's very pretty, the way the colors dried. If you'll notice some white spots, some variation, some very heavy dark spots. So to do this, I'll start right in the center. I think we'll do a heart so make a around it v bottom. There's one heart, and this Bush might be a little big for this technique. Soft moved down to the four, trying to an upside down one over here again, this one's still a little big, so I go down to my even smaller brush. It gives me a little more control here. I'll just do the top of the heart. He will do the heart facing this way. So I want the hearts to meet. Facing different directions. Kind of make adding interest, keeping them all relatively the same size, although some are getting a little bigger than others again on the larger parts of the body . I am still trying to go for the larger size heart here look like just like the bottom of the heart is showing. Here we go, a few more trying to get the top of the hearts. Recognisable is the shape are going for again the bottom of the heart. Here I think I'll just do and they start heart. And then around here will start again. - Finally , a lab last two hearts. And then we will let this dry and finish with our final layer. Okay, are painters dried so Now we can start the final touches. Um, my painting, my palate has also dried, so I'm just gonna spritz it with water. Lighten it up. So again, I want to add an I I can either make another dark color with blue and orange, as I do here. Like is a nice, nice, inky black. Or I can use the When I already had I think I'm gonna use this one and again I'll add the I I could be a little more carefree with this shape of the eye this time. It's not gonna resemble our polka dot speak since we use the hearts and I really like that color, Just gotta lighten it a little. Okay? And now the same thing. I'm gonna create the little stripes skin running parallel to the original shape the length of the belly. Okay, so there we go. We have the end of our blue whale
6. 6 Whimsical Whale #3: for 1/3 wheel. We're doing a green whale. We're gonna use a similar technique to our 2nd 1 where we painted the body and the fins with clear water and then just dropped in pigment. We'll get a slightly different effect than we had with the 1st 1 that we did with this technique. So first, I'm gonna go through it, paint water all over the areas that I want to have some pigment, basically the areas that I'm focusing on first, and I'm gonna let the water color choose where it's going to go again. I control this somewhat by adding water the vehicle for a two paint and to move around on. So my goal for this one is to have a very light wash of green and then much darker areas. So using clean water on my brush and getting the paint toe consistency and color that I'd like and now I'm just gonna drop in just a little bit of color kind of around the boundaries of the well and again the watercolor will dry, lighter. It'll be even a lighter shade of this, which is already fairly light. And if I want to make it even lighter. I'll just drop some clean water in. Although I'm quite happy with how this is coming out. So if I wanted to even later take some clean water, just drop it in, and that will move the pigment around, creating much lighter effect. Okay, Now I'm gonna drop in some darker color just on the edges, and we'll see where it moves. I'm trying not to work with too much pigment. Really? Let it do its thing because the water is wet. It will have a nice blend when it does dry. Almost a Grady int from the darker, highly pigmented green to the much lighter in the center. Now, you could see here on the bottom. Flipper pain had already dry. There wasn't enough water, so it created kind of a hard edge. So I'm gonna add a little bit of water, hoping we can get it to soften up somewhat. There we go. And see that happens up here. Okay. Good. At just a teeny bit more green. I'm like this color. I like the way this is coming out. And just like with the previous video, we think we added too much. We can add some clear water because the pigment to move around. I really like that. All right, we'll let this dry will come back and start adding our pattern. Our pain is dried way have nice modeled color We have kind of a Grady in between the darker outer edge pigment and the lighter center. I really like that. Look, now just go take a racer and just go over some of the pencil marks and then we'll start our pattern. And there you could see the paint was still wet, so it created a little bit of a stain and see if we can't remedy that with some water. Here we go. All right, So now we're gonna make our pattern. We could do some wavy lines, so I think I'll start. The thick part center of this created a nice, wavy line. Make it nice and thick. I'll go over the outline with it, then I'll dip it in and some water. Little skip a nice big space and make another thick wave. Outline all sides. Add a little water with my brush. We'll do this again. A little water and for the tail go around the boundary. Fill it in. Go to the fin. And where do the fin, um, all around. Nice, thick line for the outline. Fill it in. Yeah, maybe right here at the base. Fill that in a swell. Turn it around. He By filling it in with the Clearwater, we keep up the idea of ingredient do one more. So it's not a solid green anywhere on the piece. And if some areas look a little too light, we can add a little more color just around the edges. And if you added color and it seems a little dry just gonna make sure to keep everything wet with a little more water, OK? We'll let this dry. They will add a final touch if you find Do you You know that players drive. We're gonna finish with our stripes at an eye and some strengths along the belly as well. So here I am. I'm gonna add two more stripes this time. Thin ones in between are nice and thick stripes. Just make sure the stripes go all the way to the edge. Here. Didn't quite make it to the edge, so I'll just backtrack. Just go slow and deliberately. Okay, Way don't want to forget that last flipper one down there. Maybe just a hint of one up here. Okay? I really like that. Look. And now we're gonna add the I and the stripes along the belly, so I'll use some of the darker color here, okay? And I'm gonna outline the belly, Gonna try and go right in the middle. Connect from right in the center and maybe two more. One layer. One more here, and one here and one more kids. So that's coming along nicely. And now we'll need that. I I really want to make that very dark color. So I'm gonna add a little more read a little more green until I get that pinky color and then allow tonight right here in the third wheel.
7. 7 Final Touches: Now that we have all three of our whales completed, I'm just gonna show you some final touches you could make in watercolor. We don't have white paint, so you can either leave the area pigment free. You can cover it up with something that will repel it or resist before you paint, which can be a little sticky and messy. Or, after everything drives, you can use a white gel pen to add a little white enhancements. I'd like to add a little reflection on the I, and some people like would add little white dots inside on the circles. And that white really gives it a little pop of color unexpected. And it's Sometimes it's hard to detect when you're looking at it, just what that difference is. So that's additional embellishments on the red whale on the Blue Whale. Same thing. How? Add a little reflection in the eye and maybe from highlights in the hearts. It breaks up the solidity of the blue and just add something fun to look at. And then we have the green again. It's a little highlight in the eye. I think I'll just add a little bit. I'm an additional stripe on the thick part. There we go. So here are three whimsical whales. Hope you enjoy them. And I love to see what you create. Please post it in the class project section.
8. 8 Bonus Lesson: now here's a bonus class of another whale you can use using are similar techniques that we worked on today. Again, we're sticking to one color for the entire whale and will and some different looks and different patterns. This one's gonna be purple, so I colored everything with some clear water. No and purple. - Here we go, drop in a little bit of kind of pinkish purple. Then you could add a little more purple. On top of that, we'll let this dry and add the pattern overlay. Now that the pigment is dry, add my next layer instead of a pattern that we used earlier. A set pattern pope itas hearts or stripes. I'm going to kind of let this flow and be very organic. Very, um natural. What? The paint do the work. So again, I'm just adding a quick water layer on top of all the paint without using my brush too much . I don't want to work the colors together because I do like the variation that already exists. And then I'm just gonna drops in color all the way along. Come here. Come here. Drop some more color gets a very vibrant look. Do the same thing with fins. And now, because it's kind of a, um, unstructured look, I'm gonna add a lot of splash of color. Start with my purple to take my brush loaded up, tap it, tap it, maybe one more time, do the same, the pink tap it It's nice. I'll let this dry and I'll come back and put the final touches on it just to make it really look like a whale. Okay, now that the paint has dried, I'll just add the final touches so it will need an eye for the whale and a little bit of an outline. I really like the way the splats is. Look, and I think I might add a few more. I want to get down with the mining, the belly, maybe one more Here, There we go. And in just a few more. Kind of like the way it looks on the whale is well, great. Hope you enjoy this class and you work on your project by creating
 Daniela Mellen, Artist & Author