Transcripts
1. Watercolor Popsicles Class Intro: Hello. I'm Daniella Melon and author and artist here in skill share. Thanks for joining me for my class to create six watercolor popsicles for advanced beginners. Each of the six Popsicles has its own chapter, with short 2 to 4 minute classes for each step of the process. And each Popsicle uses different techniques, with some a bit more challenging than others. Each Popsicle stand alone so you can choose to follow, along with one or all six. The first Popsicle is a dual pop with shadows and highlights. We'll add texture to the Popsicle stick in layers to create a realistic wouldn't effect. The second pop is a more classic one with a brilliantly colored base and a fund pattern. The focus is on highlights and using tones to achieve an interesting overlay on the pattern . Next, we have a Popsicle that is reminiscent of summer with watermelon coloring. We'll use what on what technique To achieve the highlight and variation in color. The fourth pop is a twin popsicle made with a sharp highlight and a gradual radiant throughout the pop. This one reminds me of childhood. Our fifth pop differs from the fruit colored ones and it is made to look like chocolate will create a rich color base and then in a glaze to modify the color slightly by adding a warm tone. Our Last Popsicle is one with a twist. We'll create a pop that resembles twisted rope with a beautifully rounded shape and contrast in colors. I'll also give some ideas for variations and show interesting backgrounds that make each image pop. I've included a class supply list in a page of Popsicle templates for you to download for your class project. Choose as many popsicles as you'd like to create and paint your images. You can modify the templates and use your favorite colors to make more personalized image. Take a photo of your work and posted in the project section or on social media. Be sure to follow me here on skill share to get notified of future classes, and please consider leaving your review. Thanks for watching
2. Class Supplies: So these are the basic supplies we'll need for our watercolor Popsicles class. Just a bowl for water for water, color pencil and an eraser. I have a pair of scissors that I used to cut out my template, but you can also use a light box as well, just to get the shapes. Or you could just refer to this and sketch the shapes Freehand if you'd like. I have some watercolor brushes, and I had my paper cut to four by six. This is £140 watercolor paper, which I think is a nice size. And then I have my drive watercolor paints in the tube. I've just squeezed them out into my palate, and then I'll let them and we'll get started in the next chapter. We'll go over using the template.
3. Using the Template: to use the template. Just select the image you'd like to use and cut it out, and then you have a stencil for your piece. If you'd like to modify the template, it's a great idea to do it before you cut it out. So if you wanted to make, say, this Popsicle, but maybe with a bite missing, you can draw your bite marks in it and then cut out accordingly. So for this one will just cut out this one on the end here, and I'll just cut around the Flynt's. And then from here, I'll just place it on my paper the way I want it. So in this one, I'll put it on an angle and I'll trace around. I'll use a light touch with my pencil so I don't scrape the paper, and that way I can erase the remarks later. So here I have a guide for my Popsicle, and then I'll just draw in those little straight lines here for the shadowing, and I can use my eraser to clean up any marks. But I didn't like if you don't want to cut out your images, but you still want the benefit of using the template. Just hold it up to a light source. Put your paper on top of it, and with the light source behind your image will be able to trace on top. The next chapter will start painting.
4. Popsicle #1: Painting the Background: to work on her first Popsicle. I'm gonna choose the colors that I want to use. And I think I'm going to use a cherry red and then a pink, and I'll make some variations here. What's interesting about this Popsicle is that we have these lines here that we want to use the shadows. In addition to the background. With this one, I'm going to start with the background. And so I'm gonna start with the number six brush, get my brush quite wet. And I'm just gonna go around the outside of my image here and just went my paper with clear water. When I have a paper nice and saturated, I'll come back and makes my color for the background. I want a very light hue, and I'm gonna go with a pink and a little bit of red here, just like echoing the colors that we have inside We're gonna do in our own Popsicle. So I'll start with the pink. And I wanted this nice, faint color. Just gonna drop that around three. Organic shape. It's a nice light color drop in a few more spots. It just a little bit of a darker pink here and there, and then I'll take a nice deep red reddish pink, so I'll make some red with some deep pink. Just drop in a few spots. I'm gonna go back, clean my brush and with the later pink that we use the first time, I'll just put some color right around the darker colors. We dropped in to give a nice little variation, and I want to keep this nice and wet. So there's a lot of flowing, um, pigment. At this point, I'll go in there with a wet brush, not quite as weather is when we first started, and I'll just move that pigment around somewhat, and we'll let this layer completely dry.
5. Popsicle #1: Layer #1: Now that our background layer is dry, I want to go in with my pencil and just create the light. The highlight marks. And this is just a guide for me to follow. You can also do this with masking fluid to preserve the whites. But I'm going to sketch it out and then try and avoid it with my paint, my pigment. So right on the right hand side here, right on the edge. Gonna make a little line right on these indentations. And I'm gonna leave that untouched on both of these sides here now because I'm gonna leave this side untouched. The highlight. I'm gonna do the darkest point on this side of each of these lines. So again, with my number four of my number six brush, I'm gonna go in there went my brush, but with just enough water to control it. And I'm gonna color those intends first. And I'm gonna bring the pigment right up to the edge of where I want the highlight to be. And we do this on both pieces. I'll go in there with some of my darker pink and a little red mixed in very carefully. I'll drop that color because I went the entire area. It's gonna run. And that's the effect I want. Clean my brush and wet it and just drag the wet brush over to the area where I want the highlight to be. Then I went my brush again, and I'll come over here on this side of the dark pigment again, making sure I preserve my highlight and over here as well. And now the color will bleed. If it does come in the area where the highlight on this take a paper towel, dry that area off. That's any areas. I think I got wet. Destroy those office well and we'll let that dry for a few moments, and we'll work on our stick the first layer of our stick. So make a little puddle of Clearwater at a little brown to that, a little burnt sienna dropping the color. And I want that left hand side to be even dark, darker than the right, a little bit of highlight on the right. For the first layer, we're gonna color it in very lightly, and we'll let this layer dry
6. Popsicle #1: Layer #2: So now that the first layer of the stick and the Popsicle has dried, I'm gonna go in and work a little more detail on the stick. I'm gonna use a smaller brush, and then my colors are gonna be burnt sienna and yellow Oakar, the first layer. Just We want a light color so any color will really do. But with second later, we're going to start to add a little more detail. So starting at the edge, I'm going to just make outline and I'll go right underneath. The Popsicle is well, they'll make, have a damp brush and go in there and blend those edges. I'll go back in with more burnt sienna, a teeny bit of blue, and I was dropped that in right on the edge. And that creates a nice little border. If I feel my line is too harsh over here, while it's still damp, will just drop in some water. I believe that just like that now, using the same small brush and number one, I'll go in here and work some detail work on my Popsicle. I could use my darker red here. It's a pinkish red called Crimson Lake and I'll go in there and again. The first layers are red are just fine or dark pink. Whatever you want to use. I'm using the Crimson Lake, but flip this around and on the area that I want to be darkest and get a lightly outline. Very small little strokes, barely touching my brush to the paper. I'll go back and pick up a little more pigment. Drop that in just where I did it already, and I'll add some water to my brush and blend this line out so it's not so harsh. I'll continue to go back in by dipping my brush in the water and blending that line out. Don't go back in with a clean brush and just pull that color right up to that highlight edge, and at this point, my darkest color will be right where I want it right of the depths. Here, I can go back in with a fairly dry brush and a lot of the Crimson Lake. Nice sharp point and just very carefully dropping some pigment. The darkest area again. Not too much water on my brush, and I'll repeat that procedure with the one on the right. - I'll let this layer dry
7. Popsicle #1: Layer #3: So now that are layers of dry gonna go into my eraser and just erase the pencil marks If I can around the stick here, I'm gonna leave the pencil marks around the ice pops here the Popsicle portion because I want them to stay to help us guide when we do our glaze. So taking my small number one brush getting used burnt sienna and some blue Get a nice dark brown In a very sharp point I don't want a lot of water on my brush I want a love pigment The very sharp point I'm gonna do the outline again, barely touching the paper. Go right underneath as well with a damp, clean brush Just blend this line out somewhat so it's a little smooth. Any spots around here that I think are a little too harsh will do the same thing when them out with a little damp brush, I'm gonna go back in with a very sharp brush and a lot of pigment, not a lot of water. And I'm gonna create just a little bit of indication that this is a piece of wood, so create little light lines. They're not gonna be fully attached, just like that. Next chapter will work on adding the glaze to our Popsicle
8. Popsicle #1: Layer #4: So now that this is dry When I had a glaze to the Popsicle here, going with the number six brush again and my crimson lake and I'm gonna mix it with just a little bit of that pink. I want to be a little wet so there's be a little more water and I'm gonna go and I'm gonna out. I'm gonna outline and I'm gonna color in everything except the highlights that we have here on our Popsicle. We want to keep a nice wet brush. - So now I've added pigment to the entire Popsicle, and I'm trying to make sure it's really smooth that there's no streaks. We're brushstrokes. Go right to the edge and we'll let this layer dry.
9. Popsicle #1: Layer #5: so Knapp, inner layers or dry will just at our final details with my eraser all trying to race any pencil marks around the Popsicle or the highlight. And then I'm gonna go in with a very sharp point on my brush and just create an outline on the Popsicle. So I have my number one brush could use my crimson lake, get a lot of pigment on that brush in a very sharp point and barely touched the paper. I don't want to create a harsh line. It just want to create a border, putting most my weight on my hand here that sits on the paper so my brush can barely touch . And then I rotate the paper accordingly and there we have our completed first Popsicle.
10. Popsicle #2: Background: for my second Popsicle. I'm gonna do a purple Popsicle with a little bit of a yellow background so we'll do a background similar to what we did in the 1st 1 And I'll start with a large brush this time of 10 and I'll let the paper saturated everywhere except the Popsicle. Then I'm gonna go in and with my color. This is a lemon yellow. I'll just drop in some lemon yellow now for this one. I modified the template like we discussed where I made bite marks on the Popsicle. So now I'm just gonna pull that color around, kind of in a haphazard fashion. And then I'll make a little concentrated part that I'll pull right very close to the Popsicle itself. Clean my brush So it's just wet, not soaking wet. And I'll just make that edge a little bit blurry, and we'll let this dry
11. Popsicle #2: Layer #1: So now we're gonna work on the Popsicle and I want to do that Nice purples. So the first thing I'll do is I'll mix my color, put some water on the palate and lots of purple and then I'm gonna mix in some blue This is a Prussian blue but I'll mix in good, nice color there. I'll make another section here with a little more Just purple without the blue Now give us a little variants of color Here we go. So I'm gonna clean my brush even though the water is somewhat purple And now I'm just gonna wet the entire Popsicle area. Gonna leave a little space between the edge so it doesn't run into the background And then I'm going to switch to a smaller brush. So this is a 10. I'm gonna switch here to a six, gonna go in with my bluish purple, and I'll start around the edges and let that color bleed out. Turn my paper around, Then I'll go in there with some of that deeper purple that's without the blue and add that right around the edge and with some clear water, drop it in the center and let that those colors bleed Naturally. I want to go back in with this purple blue mix a little bit deeper color and go over that edge again. Take my purple and that Prussian blue. There we go, Nice color, and I'll go around the edge and repeat that same procedure. I did it first. - I love the brilliance of this color, and I know that when it dries, it'll dry even lighter. But it's very beautiful. I'll go one more time in with my pure purple and just drop a little of that in a swell right around the edge, repeating the procedure We did the first time, and we'll let this layer dry.
12. Popsicle #2: Layer #2: for this. I'm gonna work on our stick here. So with my number four brush and just got a wet the whole area of the stick, Then I'll come over here and make some color. Takes him burnt Sienna. A little bit of blue, a little more burnt Sienna. Just tone it down with a very sharp point. I'll start underneath the Popsicle and drop in some pigment and then I'll go around the perimeter. When I have the shape that I want, I'll stop and let it dry. And just like that, well, let that dry.
13. Popsicle #2: Layer #3: now to complete our purple Popsicle here. What I would do is go in here and mix the color of purple and some deep blue. I wanted to have a lot of purple, however, and this is the number one rush that I'm using. Gonna go around the exterior, being very careful not to make too fickle line. Just a very light line. And then with my brush, I'm gonna go and make some squiggly lines. So I'm gonna pull the color up, down and back up again. I'll take another color in just 1/4 inch away. I'll repeat that nice and parallel. And then I'll pull that color in from the sides, clear my brush and pull that color trying to preserve the highlights that we have in the center of the Popsicle. Do the same thing just above it. We'll start with the outer side, you know, pull that color in the center. And now, since it's the biggest area of the highlight gonna go in which a very light color and pull that through. Take it clear brush, go over the edge as well. Two more stripes and then with a clear brush will just pull. Push the pigment around from the center of that highlight. And there we have our purple Popsicle
14. Popsicle #3: Layer #1: for 1/3 Popsicle. Him to do something a little different than we've been doing. We're gonna start with the Popsicle first, and I'm gonna make it Watermelon reminiscent of watermelon colors for summer. So the bottom layer will have a little bit of green. Then I'll leave it white, and then it would have red on the top or pinkish red. So start with the number four brush and I'll makes my green first swipe a little water here . Then I put a bright green and then a very dark green with that, until I get like a watermelon rind color. Once I'm happy with that, clean my brush and then on the bottom here with a clean brush and just gonna add water and wet about the bottom. Maybe an eighth of the Popsicle. I'm paying kind of careful attention to the borders here, so I don't overrun the Popsicle. Then I'll go back in, pick up the pigment on my brush, and starting at the base, I'll drop in that green. Now, even though I have wet the entire entirety of the bottom eighth of the Popsicle, I'm just gonna go in and drop the pigment on the sides and then I'll come back in at a little more of this dark green. Get a nice rich pigment at the base of the Popsicle, end up the sides and then I'll clean my brush. And while it's wet, I'll just wet it again upto where we originally wet the paper. The Popsicle waas I like I want this line to be a little bit more curved and even. And now we'll work on the top. I'd say 2/3 of it again. We'll start by mixing our color. So here I have a lot of water down. They had a lot of red good to go for a deep red. Then I'll clean my brush and I'm gonna wet the top 2/3 leaving some dry area on the Popsicle in between the green and the red that we're gonna put down. So now that my popsicles wet, we'll go in there and pick up the pigment on my brush And again, I'm going to start with the outline. But I'm not gonna outline the bottom of the interior of the Popsicle, so I'll start out here, drop in my pigment, and I can see it moving which is great. Pick up more pigment and drop even more pigment in. And then one more time I'll come in there with some more red and drop even more pigment, and it's kind of creating a natural arc. And I like the way that looks. I'm not gonna add color to the center. I'm just gonna let this dry as is. We can always add a glaze if we want, but I really like the way this is looking very naturally watercolorist sh There will be some bleeding of the color in, and I like the way that's looking, so we'll let this layer completely dry.
15. Popsicle #3: Layer #2: So now with this layer, I want to work on this center layer here, this white that we did. And even though I wanted to remain white, I still want there to be a little bit of a shadow there. So I'm gonna make a very pale blue Just take a little bit of blue in some water and then I'm gonna go in with a wet brush. Not not super wet, but just wet enough to wet the paper. And I'm gonna pull a little spot, maybe 1/2 inch or so from the edge. Switch to a small brush a number one brush and take some of that little bit of pigment. We made the very light color. I'm just gonna go over the edge here, and that's just gonna create a border without being another color. Really. Just a shadow from the white. We'll go in there with my clear brush again and blend that out and it's gonna dry even lighter, very faint. So now we'll work on the stick here. Gonna go in the here with my yellow car mix, that color up mix and burnt sienna. And with that and a little bit of this blue go back in with a little burnt sienna Gonna switch to a larger brush my number four and I'm gonna wet that stick. Then I'm gonna come back in with my smaller number one brush. Pick up that pigment and just create the outline. I'll go in there with a damp brush, blend those edges, and then pick up a little pigment and go right directly underneath the Popsicle and we'll let this layer completely dry.
16. Popsicle #3: Background: so I want the background of this to be just a loose as the actual Popsicle is. So I'm going to start with my large brush and wet the background. This is the number 10 brush. Gonna leave a little border on the edge of the paper quarter inch or so and I'm leaving a little border around the actual Popsicle is Well, then, still using my large brush I'm gonna go in here and with some of this blues is a light blue kind of a sky blue Could a drop in some pigments And I'm just gonna drop it in little splotches and let it run around again I'm leaving a little boundary between the background and the Popsicle You will come around up here as well and I'm gonna go in there just a little bit of the darker blue Here mix a little of the lighter blue and with its what coordinates and just drop in some splotches of that in groups Stick to a non number swatches, go back in with a lighter blue and just drop a little few swatches of that as well. Again, I'm trying to echo the highlight that we have in the actual Popsicle. And there we have our watermelon Popsicle
17. Popsicle #4: Layer #1: for this. Popsicles is a Popsicle. That reminds me childhood. We're gonna create two highlights on the side here, so I'll just pencil those in. These were just going to echo the shape of the Popsicle. These are areas that I'm gonna try not to add. Pigment do it here. In here. It's gonna be a little bit of a challenge because I want to do this two toned. So I'm gonna drop in color pigment from the top to the bottom and then from the bottom up. And unlike the Popsicle we did with the watermelon I don't want there to be white space between the two. I want there to be a nice blend, so I'll start by putting Clearwater down and saturating my paper. No, I'm gonna mix my colors. Gonna make You could pick up some of this yellow orange, get a nice, rich color, and then next to what? I'm gonna make a orange bright orange. I'm gonna take some of this orange that came from the tube and I'm gonna make some yellow orange into that. It's a little too dark for me. Look, here we go. Let's a lot better. Could have switched to a smaller brush a six, and it would start at the top here, and I'm gonna use that yellow orange, and I'll drop in that color because this is a twin pop. I want there to be a darker color in the center, and we'll go over that after our layers dry. So I'm going down more than half with this light orange, the yellow orange that we're doing, the lighter of the two colors, maybe 2/3 of the way down. Then I'll switch to that orange color that we mixed. Turn my paper and add that could add lots of pigment. And then I'll turn my paper down and let it run a little bit. Let these layers dry.
18. Popsicle #4: Layer #2: So now that our first layer has dried, I'm gonna go in there with my small brush, my number one brush, and with some of this yellow orange, I'm gonna create a little stronger outline and fix this so the border isn't is wobbly. It'll go in with this orange and just drop in some of that orange as well. Well, I have the orange of my brush. Get outline the bottom and I'm gonna create that darker color in the center of this twin pop. So there have outlined the bottom? No, I take that orange. Got a very carefully come up the pop the length of the pop it with a very sharp point. Gonna go around the entire perimeter with this orange very light handed. Leave it just like that. Gonna come in and work a little bit over here on these highlights as well. Again, I'll start with the yellow orange, tidy that up a bit. I'll go in there with a little bit of this orange and we'll let this layer dry
19. Popsicle #4: Layer #3: So now I wouldn't work on the sticks again, will use the same colors. The burnt sienna and the yellow Oakar makes a very pale brown, and I'll wet the area with sticks where they want them to go. And then I'll come in and just drop in some of that pigment. Well, that's drying. I'll switch to a smaller brush number one brush. Take a little more of that pigment. Mix it with some of the blue, so we still have a warm brown, and I'm just gonna add it to the exterior, the perimeter of the sticks. Then I'll just add it to the base right underneath the Popsicle. Now go back in and drop. Some of that will make mix a little bit of that burnt sienna and yellow ochre again, and I'll just drop some of that in, create a little variation. We'll let this dry and then we'll come back and work on the background.
20. Popsicle #4: Background: for the background here. I want to take my large brush the number 10 brush and let the background not touching the Popsicle but saturating the paper. Then I'm gonna take some of the screens bright green, and I'm gonna mix it with this lighter green. And I'm gonna drop that in sections, turn my paper so that I could get closer to the Popsicle and I want the deepest screen closest to the Popsicle. - Then I'm gonna take my clear brush and just blend the edges. And while it's still wet all going with a little bit of this deeper green very carefully just drop in some spots. I'll go back in with a lighter green, help that to blend. Then I'll take my paper towel and just dab at it a little, picking up some of the pigment. And there we have our twin pop
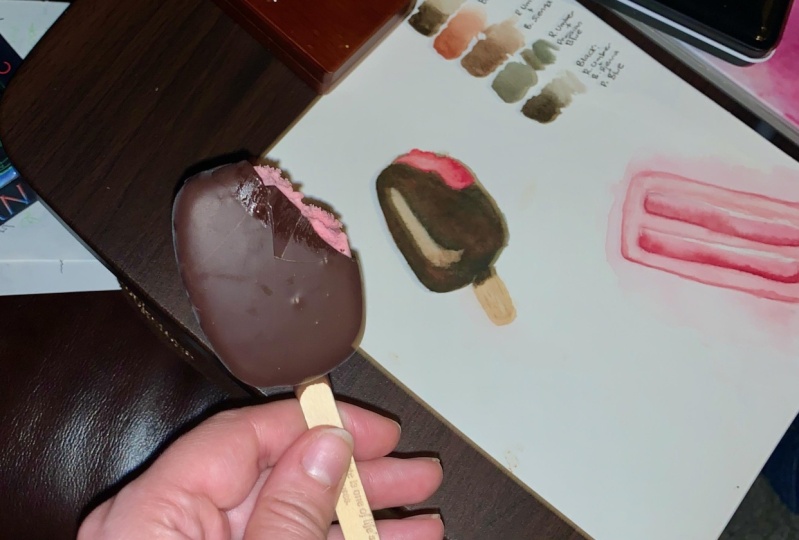
21. Popsicle #5: Layer 1: So popsicles from previously have all been beautiful, brilliant, fruity colors. This one we're gonna make look like chocolate. So first thing to do is add the Clearwater to the background of the entire Popsicle, and then I'm gonna go in with paper towels, and I'm gonna create with I'm gonna roll it around my finger and create this a little point and then just pull off the wetness in a crescent shape again, following the outline, the shape of the Popsicle itself again, I'm using a number six brush. I will go in here and I'll just choose my colors. So I'm gonna choose this Dark Brown. It's wrong number. I'll mix in a little Prussian blue with that, A little more raw number. We go, and I'm gonna create that outline here. I could see that it is a little too much blue in it for my taste. So go back in and a little more raw number. There we go. That's a little better to create that outline. And this is our first layer. So we want to try and respect that crescent shape we can while adding all this pigment just like that. I gotta go in with this wrong number, just the wrong number and dropping little sections of that. Then I'll go in with that color remixed and drop that in. I want a nice, rich pigment. I'll have a little black to that. I'll come back in my burnt Sienna, and I'll drop some of that in a swell. Get a nice, rich chocolate color going one more time. I'll go in there with that wrong number. Mix that with the burnt Sienna and drop that in a swell. Well, let this layer completely dry. It will dry, lighter, and we'll see what we're to do for a glaze.
22. Popsicle #5: Layer #2: Now that this layer is a dry, I can see that we got a nice, rich color. I really like the way that looks. And I think with one layer of glaze, it'll look even better. I'm erasing any pencil marks that remain around the Popsicle part the fudge ical fudge sickle part. And then I'm gonna go in and we'll start with stick, and then we'll add our glaze layer. So with the number six brush, I'm just wedding the area for the stick, and I'm gonna go in with its raw number and some yellow Oakar, and then I'm just gonna drop in the pigment. It's a very light layer, you know. Tilt that around. That looks good. Now we'll make star glaze. Sore glaze is gonna be a lightly pigmented layer that we're gonna apply over the entire fudge. It's fudge sickle area here. And so if we use our warm color like a golden color, it'll give us a golden sheen. If we use a cooler color with more blue in it, it will give it a cooler look. So I'm gonna take some of this. Ross Ienner. I'm sorry. This is the burnt Sienna. Gonna take some of those burnt sienna, and I'm gonna mix it with some of this raw number and then just one brush full of water. So that's a nice color. It's a little warm, but it has some nice rich pigment as well. Then I'm just gonna take it and go over the entire thing. Trying not toe work. The existing pigment that's on the, um, Popsicle here. And then I'm just gonna pull the color right over that highlighted area, and that will give a nice effect. Well, let this layer dry.
23. Popsicle #5: Background: So now this layer is dry. I want to work on the background a little bit with my large brush. Could come in here and just wet fairly close to the Popsicle without touching the Popsicle . And then I want to just a light color. A light, warm color is a nice contrast. So I'm gonna make some light orange could take this yellow orange, which is very yellow, is a beautiful color And drop in a little bit of the orange Add a little more yellow orange . Here we go. And I'm just gonna drop in some swatches of color, leaving a little space, a little white border around the Popsicle, and I'll come over here to the top, clean my brush and just add a little more color, a little more pigment closest to the Popsicle. And then I'll clean my brush and just pull a little color out. Not too much water, Just enough to make a soft edge. And there we have our chocolate lexical
24. Popsicle #6: Layer #1: for our final pop. We have rather fund pop. It's like a twisting pop. So for this one, I want the highlight section to be approximately here. So this is the area. I'm gonna try and leave the lightest Take my a racer and just erase some of the marks right on the edge is here. I don't want there to be lightness as much anyway, So for that I want to choose my colors. I'm gonna choose a blue and I'm gonna leave this other area white and then we'll just go in and create a shadow But I still wanted to appear white So I'm gonna take my number six brush I'll mix my blue first got going here with this light blue It's a beautiful blue And mixing a little Prussian blue with that Yeah, that's nice and brilliant. Then I'm gonna go in there and try and paint every other one with clear water but not the area that I highlighted. So I'm also gonna leave a little space between the edge as well, just so that I can control it a little better. So there I have wet those two leaving these three white gonna go in there with a smaller brush. I'm gonna actually use the number one brush. So I have a lot of control picking up a lot of pigment in a sharp point. And I'm going to start here on the left hand side, go around. I'm gonna pull that pigment all the way, creating that nice shape and they'll come back in a move that color Clean my brush. Keep it damp, though. Create that highlight by pulling the pigment up to the highlight, but not through it. Do that on this side as well. Gonna go work on the next one, pick up pigment a sharp point, but clean brush Clean that up, and then I'm gonna drop in pigment right on the edge is a little more. And I want to make sure I create that beautiful shape that rounded rope shape. And that's where my color is gonna be. The darkest but it till my paper back and forth just to create a softer blend. And then, while that's drawing, I wanna work on the stick while I'm waiting. So I'm just gonna wet that with clear water. And with burnt sienna and a little bit of raw, a little bit of raw number. Mix those two together with a sharp point. I'll just go around the edge. This will be a good first layer for the Popsicle stick. Tilt my pigment again and let this layer completely dry.
25. Popsicle #6: Layer 2: to work in our layer that I want to keep someone white. I'm gonna make it very, very pale per purple. So I'm going to start by wedding Pig wetting the paper where I want to drop in the very light pigment leaving the highlight dry And then I'm gonna makes a very light purple So I'll take my purple and mix it in here And I'm gonna add a little of that blue as well. Maybe a little more purple. So it looks purple, add a drop of water and then I'm gonna use a small brush My number one brush. And I'm just gonna add pigment to the perimeter, Start at the bottom here, clean my brush off and just soften that edge there. I have a little bit of shadow, but not too much color introduced. Same thing could add this to the edge That'll clean my brush off and blend that out and I'll do the same thing over here. I feel I've introduced too much pigment will just take my paper towel and blotted out. Might be a little dark up talk there. It's a little block that out and I'll go in and shut off that a little more now just a little bit of pigment and we'll let that layer dry
26. Popsicle #6 Layer 3 Background: So now I work on the background. I'm gonna add a deep purple background to this, and I don't want to come too far out from the Popsicle, but I do want it to look like it's bursting out. So with my clear brush and just go to create little pockets of sections that are wet radiating out from the Popsicle, we'll have more of an idea when I had the pigment, what shapes have gotten? So here I still have some of this is dried mostly, but some of the purple I'm just gonna mix more purple into that has a little touch of blue , which is nice. And then I'll start here on the right hand side and dropped my pigment in, leaving a little border of white between the Popsicle and this background, cleaning my brush and just blending that out. Go back in and Aaron any dry spots and adds more pigment, really emphasizing the shape of this swirly pop. I'll turn that over. A little pigment here is well and continue to blend that out. - Go back in, find that out. So there no harsh lines and we're almost done. Just a little more pigment right over here, and I'll just block the edge here with my paper tell. See some spots here that where the pigment is dr Quicker than I was just going there and add a little more pigment and we'll let this dry.
27. Popsicle #6: Final Layers: to finish this one up. Just gonna take my eraser and erase any pencil marks that remain. And then I'm gonna go in there with a dark blue in a very fine point and just create an outline throughout the entire pop, so create a very sharp point. Very light hand started the bottom. Here, create that outline. Create that nice shape, bulging shape here. So I see the the highlight is showing. But because I didn't have enough pigment on the area where it's white doesn't show is well , so I'm gonna make some of that very light purple e blue. Now go in there with a very sharp point and just follow that highlight right down and right up here. Then I'll wet my brush. Blend that out somewhat. So it's not a sharp edge. And there we have our swirly pop
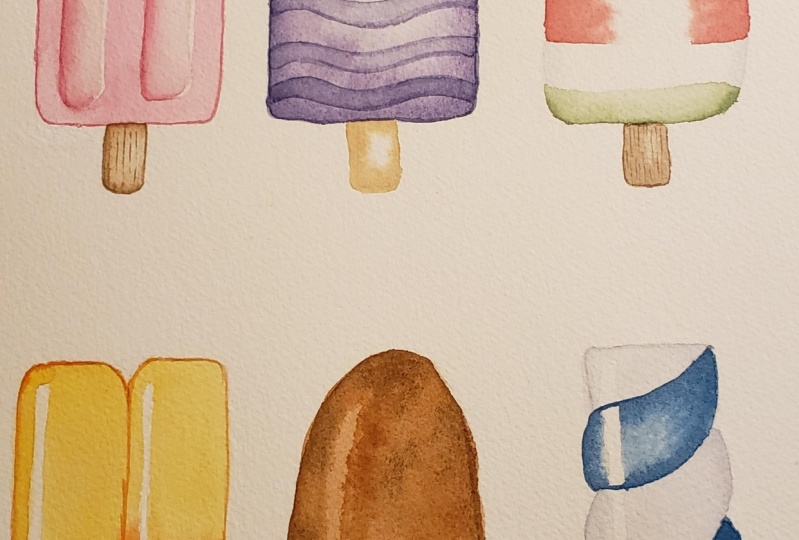
28. Class Wrap Up: So here we have our completed popsicles. We have our first Popsicle that we did with nice dark shadows and then the crisp highlights . And then we have our realistic Popsicle stick. We have our second Popsicle with our pattern overlay. On our very highlighted base, we have our watermelon Popsicle, reminiscent of watermelon colors with the rind and the fruit of the watermelon. We have our twin pop here with nice, sharp highlights. We have our chocolate Popsicle right here with the glaze that we did to warm up the entire Popsicle. And then we have our twisted Popsicle here. Um, with contrast ing colors, sharp edges and a beautiful shape. Also, I did some modifications for the third image here. I took the same shape of the Popsicle, and I just added a face and some different colors kind of gave a cute little image as well . I also altered the second Popsicle that we did here, and I didn't use the bite marks that we modified. And I changed the shape of the sticks slightly. And then I just had a bunch of variation of solid color blue. I hope Youll try your hand at a Popsicle and post your work in the project section or on social media. Please be sure to follow me here on skill share to get notified of future classes and please consider leaving a review. Thanks for watching.
 Daniela Mellen, Artist & Author