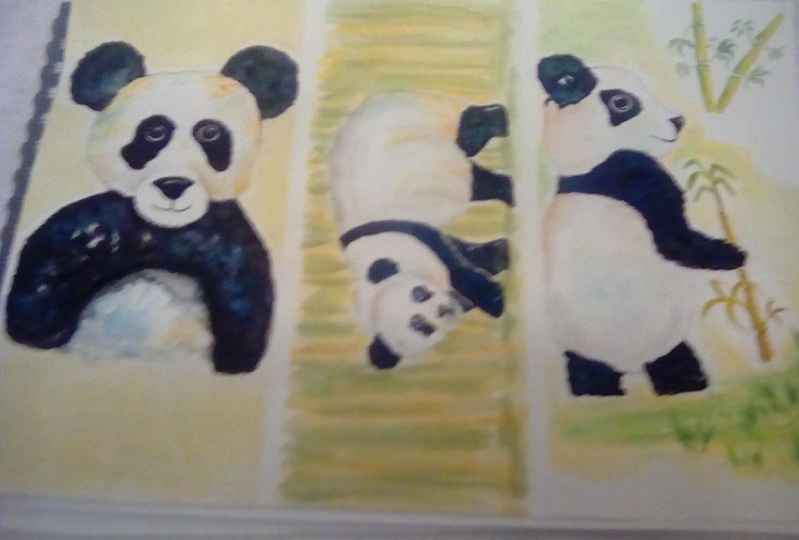
Transcripts
1. Class intro: Hello. I'm Daniella Melon, an author on artists here on skill share. Welcome to my class, Watercolor panda. Today's class is an in depth look at three views of a giant panda bear. Each of you has a series of lessons focusing on building up layers. This class is designed for intermediate watercolorist, with a focus on detail work. We have three images to paint, and each image is stand alone. The first image is a close up of the panda's face. The second image is a panda walking in a bamboo field. The background is abstract and colorful but still indicative of a panda's habitat. The last image is a profile view of a panda bear eating a bamboo stalk. While all images vary, they all start out with the same process. We will paint bright and colorful features such as the ears, legs and the dark stripe across the midsection. Memorable. Add layers of light colors to build up a furry texture and create the intensity of the bear size. We will start by downloading the two pages of panda bear templates that can be found in the project section of this class and there you'll also find a class supply list. Print out the template and select the image that you'd like to paint. Cut it out and use it as a stencil to sketch out your image. Or you can freehand your image as well. Then we will start painting by adding layers and colors Some elements we will use wet on wet techniques to create the preliminary layers. Then we will use wet on dry techniques. Toe add detail, work to the elements for your class project. Create your own pan damage and please take a photo of your work and share it with us by posting it in the class project section. Or, if you're on instagram, use the hash tag watercolor panda and I'll follow along. Please be sure to follow me here on skill share so you will be the first to get notifications of new classes and some quarterly painting tips. And if you've enjoyed this class, please click like or leave a review. Thanks for watching. Let's get started painting our giant panda bear
2. Watercolor Supplies: the class supplies that will need for our watercolor pandas class include the templates, which you can find the project section of this class. You can download them to help you sketch out your images before we paint, and you'll need a pair of scissors. I'd like to have a mechanical pencil in a little eraser, but any pencil will do. I sometimes use a gel pan after my paintings are complete. If I want to preserve some whites or use some highlights, I have a, uh, a bottle with clear water or a pipette thes air optional. I find them helpful, and then I have my brushes for the paintings. Today. I don't need very many use whatever you are most comfortable with. We want to develop sharp points on our paint, our paintings. So I like to use to very small brushes and to average size brushes of four and six and then , for the small ones, a one in a 5/0. I find these are all I need for these paintings. Today I have my watercolor paper, £140 that I cut into five by seven sheets. If I want to have a crisp five by seven. I might cut it just 1/2 inch wide, all around wider, and then I'll tape it down. But for today's painting, I'm not gonna tape it. I'm just gonna use my five. By sevens, I have to clear jugs of water. Ah, large drug to clean my brush and a small jug that I'll use if I want some really clean water on my painting. And then I have an empty palette and my paints. You can use any assortment of paints you'd like in the next video. I'll show you how I feel my palate for the class today.
3. Setting Up My Palette: because I have planned out my painting. I know what colors I'm going to use. If I was just painting for enjoyment or for fun, I would have all my colors out. But for today's painting, I'll show you the colors. I'm gonna use these air coy watercolor, but any water color will do. Um, I'm using over 1,000,000 Hugh, which is kind of an orange color. This is number 18 and I'll just put a little here. My palate. Then I have deep yellow number four. I like to keep that next to my orange and then a lemon yellow, which I like to keep right next to that one. Then I have my browns of my black, and then I'm gonna start with my greens. Next, I have a yellow green number 27 Meridian Hugh, which is number 31. It's a bright medium green, and then I have this one that I really adore. It's the deep green Number 30. It's a rich color on its own, and it takes other colors very well and still have the green in tenge that I really like. Could you use cobalt blue and then for this painting in particular. I like this oppression blue. It's a nice, rich dark color similar to my deep green, Um, and it helps me when I want to use darks and blacks, but I don't want to be flat or boring. Then I'll take my ivory black and for the pan Del used quite a bit of this, mixed with other colors. And then I like to use, um, Brown's. Here. I have a burnt sienna, which is a medium red brown. It's a very warm color. Ah, Van Dyke brown, which is very dark. I like this color a lot. It's very earthy, and then this yellow Oakar, which is more of a golden color. But I think it it lends nicely with a lot of colors, with oranges and yellows. Quite well. So this is the palette that I have. When I get started painting, I'll either spritz it with a few coats of water, or I'll just take my pipette and just drop in some water. I'll drop in some water in the empty pallets as well the empty slots. And that way, when I mix my color, I have some Clearwater down as well. Next up, I'll show you how to use the template
4. Using the Template: for the watercolor pander class. There are two pages of templates, so we'll have three images of pandas here and then some eucalyptus. What you do is you choose the one you'd like to paint. And if you'd like to paint the mall, you did the same procedure on all of them. If you'd like to use this as a guide, then I cut around my image just on the perimeter, and I created a stencil. So from here, I'll take my five by seven watercolor paper and I'll draw I place my stencil and then just draw around it for the image. Today, we don't want any straight lines, so you can cut it out is close to the sketches possible. Or you could just improvise by just drawing around it loose strokes not, you know, not going for perfection. After you have the profile done. I take my image off and I Then I try and piece in, um, the parts that are missing, obviously that I can't get to this way, so I always start from the outside because they seem to be easier to just sketch in those parts. And here I am making kind of a solid line, and when I paint, rough it up so I can go back there and make it rougher. And then the way the panda bear is shaped, not just around head, it's kind of one circle and then two big cheeks. So all kind of pencil in those big cheeks here and here, just roughly. And then that front snout pencil that in a swell. And here's where I can play with it to see if I want the snout larger, equal to the cheeks. Smaller, longer It's up to you what you'd like. So I'll just again go around the perimeter and then I'm gonna sketch. That knows. It's like almost a heart shaped nose with the mouth over here. And then when I do the eyes, I'd like to make peace circles of the eyes. Before I do the little mask, we'll kind of just sketches circle where I'd like it and then I'll do one on this side as well, trying to be somewhat, even somewhat close in size, and then I'll go back and do the mask. So from here, I I know I don't want a perfectly shaped mask. I want the idea kind of Belo out here. And then I want the mask to follow that imaginary snout and then on this side, I'll do the same thing. I don't want it to be symmetrical. So here I have a lot of lines, which I obviously don't want to keep in my painting. I like to leave the lines for the ears, but I might just go in and erase some of them. And then for the snout, I will raise the top line and the woman the sides. So on ley lines that are really showing will be the nose in the mask, so I'll keep it just like that. You could do the same with any of the images, trace them on your paper, and then our next step will be to start painting.
5. 4 Panda #1 - Ears: the first thing to do when painting are panda. Bear face isn't coming with some Clearwater. And I'm gonna paint um, one ear. I'm leaving a little hollow spot that's dry with no clear water right in the center. Kind of an oval shape, but not perfect oval. Just a little splotch of dry, dry spot on the paper, Then with my smaller brush This one is the number one brush to go in with others. Go take some black on the edge of the brush and I'm gonna create the outline I'm gonna press down and just draw around dragging my brush and leaving a trail of paint where I go So this is where it attaches to the head. I'm gonna come back in a little paint on my brush with a very sharp edge and I'm just gonna make a little rough edge around the ear. I don't want it to be smooth If you want yours to be smooth, don't just omit this step. I think the ruffled here is reminiscent of for that I'm gonna come back here and create the exterior where it meets the head and again I'll go back in, create the rough edge just like that. Clear off my brush and I'll go in with some of that deep, deep blue and I'm gonna drop some of that color in. I'm avoiding the dry part of the ear that we left on the paper and I want the color of the blue and the black to blend together. Do the same thing with some of that dark green. Meanwhile, pain is wet. I'll tilt my page around. Having the pigment moves somewhat. We'll go back in with the black and just drop in some color. In this way, the ear looks black but not flat. Could you the same process with it? You're on the right hand side first adding Clearwater, leaving a hollow spot dry on the paper, then going in with my black to create the outline and then going in the black, sharp black edge and just creating a little rough for the leaves and spots black. Here I'll go in with that blue, and then I'll drop in a little green. Well, let this layer completely dry.
6. 5 Panda #1 - Nose & Mouth: next will come in and work on the nose. So I want the nose, unlike the ear, which has the texture of the for the nose doesn't have for, so I'm gonna make that solid black and I'm gonna leave a little highlight. And the highlight is gonna be the same arc as the top of the nose. So I'll go around the top of the nose with just some black wet brush on the dry paper, and then I'm gonna just continue around the perimeter of the nose. Small little strokes. I'm staying on the inside of my pencil lines and then I'm gonna come over here and make a line underneath where I want the highlight to go. And then I'm gonna slowly fill out the color. I'll go back and sharpen my brush by twirling around in the wet paint and just create a little bit thicker of a line up top, leaving that little highlight. I don't like the shape I can go back in. And because I was so careful to not go over the pencil line, I could just very carefully at a little more pigment just like that. Then I'll come by with very thin brush and connect the mouth to the nose again. Short little strokes that I can go back and thicken, and I'll let this later dry.
7. 6 Panda #1 - Panda Body: now to work on the black of the body. Um, the bear kind of looks like he's wearing a little shawl. So we're gonna do this part here black and very similar manner to the way we did the ears gonna take my brush. And this is the number six brush. And with Clearwater gonna stay within the pencil lines in create ah, clear water background, leaving some sections dry. I'm leaving the sections dry, two lengths of arms and I'm leaving a little space of clear, dry paper between the face and the rest of this little body the shawl that we're making. So the first thing I did was saturate spots of the paper. I'm gonna go in with the black with the same brush, kind of sharpen the edge and just create a little edge by making short little strokes. And this way, it's not a solid line. It's a little bumpy line, and I'm pulling it in slightly going to be very careful with the same thing here, echoing the shape of the head. And I'm keeping quite a distance because I wanted to be neat, and I could go back in and add paint when I'm ready. But for now, I just want to create a little bit of distance. And I'm just working on that shape that I'm trying to create, so go back in, Not a little texture. And then I'll do the same thing for where it meets the belly. Gonna clean off my brush, not dry it completely, But just swipe off some of the water and I'm gonna go in with that dark, dark blue, that rich color right alongside where we did the black already. But I'm not going to do the entire body. I'll just do, say, this side here. Maybe a little down here to balance it out. It's okay if I leave little spots of paper underneath. It's a very water color effect, and I'll just tie in a little color there as well. I'll clean off my brush and just like we did in the ears, I'll go in with that deep green. And when the colors get together, they're still reminiscent of black. But yet there's a slight variance in the light that we see a little bit of the color. Okay, clear off my brush again. Keeping it somewhat wet, but not soupy. and uncontrollable, and I'll go back in with my black and try and get those colors to blend a little even further because a long, tapered brush, I can control that. There's more paint and pigment on the end of my brush and just wetness on the side. So when I push down, the tip has more pigment, and it's a little lighter on this part of the brush. By leaving some of the paper, White creates natural highlights in the for from where the oils would show in the reflection could have clean off my brush and I turn my paper on the side. I want to work on the side here because I'm right handed. I find it easy to work this way. I was left handed. I would just probably flip it around the other way. I could go back in with my number one brush in the wet black paint and a sharp point, and I'm just gonna pull up that line a little closer to the head, but still a rough edge. Nothing Smoothes could have turned my paper up front as well. And take another look here and see if I like the way the colors are blending. If I think it needs a little more blending, could add a little bit more of that green justice to some areas where I don't see very much green just so it ties in and I'll let this layer completely dry.
8. 7 Panda #1 - Eyeballs: So I've changed my water and now I'm going to start working on my eyes But take my very small brush This is the 5/0 Gonna turn my paper the side cause I find it easier to work with And I'm gonna just use enough water to control on my brush But I want to make sure I have lots of pigment I'm gonna make try and make a perfectly round circle for the eyes And right now all I'm gonna do is outline it. So here I have my outlines circle We'll go back in with more pigment and I'm gonna leave a little highlight. I want the highlight to be If I was facing it this way it like the highway white to be at like 10 o'clock and it's gonna follow the start at 10 o'clock and go to two and it's gonna follow the shape of the eyeball. So I'm gonna start by painting a line beneath where I want the highlight to be. And then I'll paint a line above it just like that. Now I'll turn it this way and color in completely beneath it to get the idol look nice and very black gonna go over very carefully with some more pigment trying not to change the shape, but just to fill in the pigment. There I have one. I try and duplicate that on the other side. I'll start by making the shape and then making the highlight. Gonna let those eyes dry before I work on the mask area around the ice.
9. 8 Panda #1 - Eye Masks: now work on the mask Could go to my number one brush and I'm gonna mix a little gray. So I'm just gonna use the black with a little bit of more water and I'm gonna create the mask shape very similarly to the way I created the ears. And the little shawl in that I'm not trying to create perfect lines is perfectly smooth lines. So I'm just gonna work around the perimeter and I'm just going to create that shape. If it's too perfect in certain spots, I might add a little texture. So right here we have a nice perimeter of the I could go in with a gray and I'm gonna make sure to leave just a slight edge around the eyeball. That's the only part that's gonna really be smooth. And I'm gonna fill in the remainder, leaving some portions of the paper showing again. We're still using a very light color right now. And then once I have that filled in, I'll clear off my brush, going with some very dark pigment and just drop it in and let it run so the wet areas will absorb and pull that color around by having it not completely solid by having little spots of the paper shining through. It gives a very interesting texture. It looks less cartoony, and then I'll do the same procedure with the other I. - Now that both eyes air done, I'm gonna go back in with a very sharp brush, not a lot of pigment. And I was gonna pull in just a teeny bit more of the mask closer to the eye, so there's less of a white ring. I want more of a heavy ring on the bottom, Exactly diagonally opposite the highlight. Do the same thing on this year I as well, and we'll let this dry.
10. 9 Panda #1 - Shadows: now using it gray. That was much, much lighter than the first level. We done the eyes working to start creating layers and texture. Somebody use some clear water That's even a little too dark, dropping a little bit more. I'm gonna add just a teeny bit of that blue. So the gravy has a little bluish tinge gonna start here at the base, and I'm just gonna pull some color, not in straight lines. Just pull some shadowing from the little area that I called a shawl into the body to do the same thing over here because I left a big white spot Just gonna try and add a little bit of pigment and just a little here to tie it in. I'm gonna flip my painting to the side, fill my brush for that light gray color, and I'm gonna be very careful. Make jagged lines to create an outline. The top of the head the side of the cheeks will work on the snout. Gonna go right around here is well where the ear meets the head. You put this over, do the same thing on this side. Middle. Come along the base here right now. I'm just following the outline that we made of the head shape of the head. And now again adding a little more water down pigment to my brush. Gonna create that snout. So this rounded base, I'm gonna follow that line up a little more than halfway. I'm just gonna create a shape here, and then I'll just pull out a little bit of color to the side of it. I'll have a few little dots up top not connecting everything but just implying where the snout goes. That I'm gonna take a little bit more water on my brush, create a little bit of texture here, and I'll do a little bit over here as well again. This is just a teeny bit lighter. Then the color we used and a little here, Well, that these layers dry and then we'll come back and add some more layers, just a little bit of a hint of color, and it will give our bear a little more personality
11. 10 Panda #1 - Colorful Shadows: Here's a step that makes our bear have a personality in a little bit of originality, and it takes advantage of the watercolor nature of the paint's. So I'm gonna take and make very light colors, put a little water down on my palette, and I'll start with just a little bit of this lemon yellow and I want a very pale color. And then I'm gonna choose an odd number of spots. I'll choose three, and I'm just gonna paint a little bit of color very lightly and much a very much organic shape. So not a perfect square, Nothing like that. And I'm just gonna add a little bit of that color. So I have a little on the forehead, a little on this chin, and I think I'll put a little here by the I. I'm gonna let that layer dry would do the same thing with a little bit of orange. It would take some of this orange, but it's very harsh, so I'll mix in some of this deep yellow with it a little bit more and then a little bit water and I'm gonna find a couple of spots again. An odd number of spots for this orange as well, because the very pale color it works, it creates a little bit of shadow. And then I'll take a little just add a little here to this part of the belly And again the shapes air sharp, kind of reminiscent of for and last they'll take a little bit of blue, make a very light blue, and I'll do the same thing as well. I got my two spots. And so now I'll just do one more. Maybe around this I. So now that I have are first layer down, I'm gonna go in with just a very small amount of each of the colors, but more intense. So with the yellow, instead of watering it down so much, I'll put a little bit on the edge of my brush very sharply and just at the top to be most top. I'm gonna add to some of that yellow again in an organic shape over here in to do it just on the very base and here I'll do it. Closest to that, I'd ask. I'll do the same thing with the orange. Get a little bit more of intense color just on a few spots of it. I'll have that intense color that creates a little variation, and it ties in with the intensity of our ears and our shawl. And lastly will do the same thing with the blue. It doesn't compete with shawl. It just echoes it, which is a very pleasing for the I. Well, let this later dry, we'll come back and do our background.
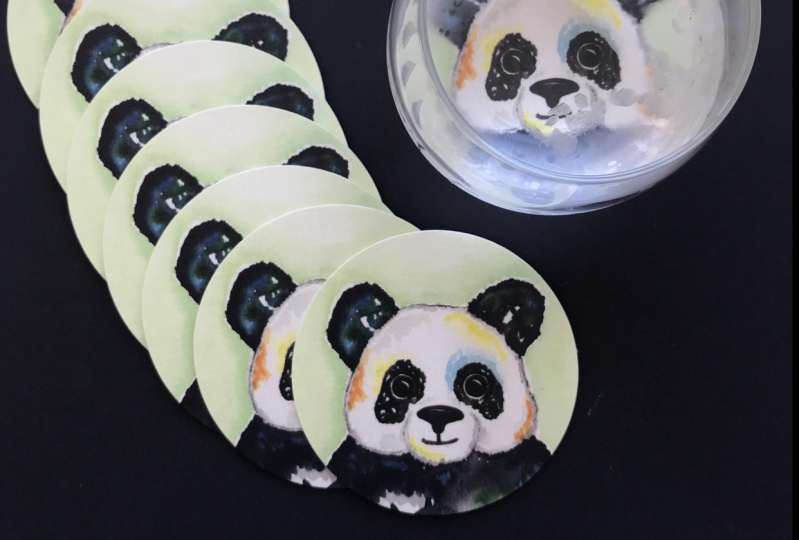
12. 11 Panda #1 - Background: before we work on the background. This is a good time now that everything is completely dry to go in with my eraser and erase any pencil marks that remain. Okay, Now do the background parts of where I want to put the pigment for the background or just gonna be around the bear here. And I want the color to be more intense, close to the bear and gradually lighten up as it goes away from the bear. Almost like a glow. However, that being said, I don't want the color closest to the bear to compete with this, um, coloring on the bear. So even though it's gonna be more intense than the furthest away from the bear, it's gonna be a pale color. I'll start that by flipping my painting upside down and using Clearwater gonna start on the right hand side and just paint Clearwater around the bare little probably just do half of it for now. Now that the paper is saturated, I'll mix some green over here. Just a little bit of that bright green and some more of that yellow green. And I'm gonna pull that color, drop it right in and then move it around. I wanted to be close to the bear but not competing with it. I'm going with some more water, and while it's still damp, I'll take just a teeny get more damp, more intense pigment and drop that closest to the bear. Then I'll go in and clean my brush and continue on with the background. Start with clear water, that light color background that we did. Then I'll go in with a little more intense color closest to the bear. I'll let this dry, and at the end we'll take a look at our finished result. I want just do one touch up to it with my tiniest brush, my 5/0. I'm just gonna take a little bit of the black pigment and create the finest little detailed line right around the edge of the face and just a little bit up snout. Just a set. A little difference. But I think it looks. It ties the peace in and settles it a little, even grounds it. So there we have our first image
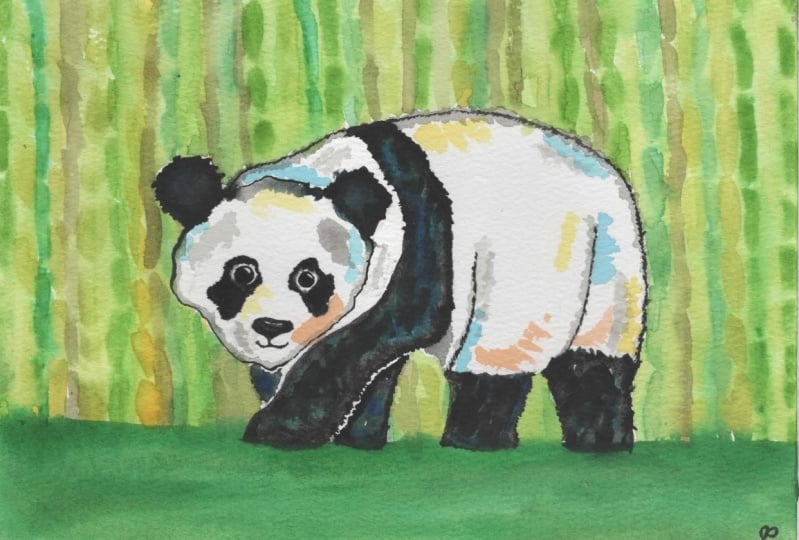
13. 12 Panda #2: for our second bear. I'm gonna start by coloring this, Um, the dark parts, the legs and this big stripe Here, men will work on the years later. So with clear water, it's gonna create a wet, saturated paper and then with a smaller brush, the number one I'll go in with my black, create the perimeter again, not trying to create a perfect line. - And then I'm gonna drop in some of those dark colors the dark blue in the dark green in areas, being mindful of leaving some areas, just the wet paper. They don't go in with a brush with a lot of pigment, a very sharp brush, and create just a little bit of texture on the edge here. And I'm gonna work on the other legs to the back leg first. And I want this shape to emphasize the belly dropping like pigment blue and the green. Then I'll do the same thing over here on this leg. I let these layers dry before we come back and work on the leg that is tucked behind the front leg
14. 13 Panda #2 - Ears: So now I work on the ears in the same way I worked on this black feet in first front leg. Gonna go in there with some clear water. Then I'll drop in my dark color first to create the outline, trying not to create a smooth line for the outline. I want to give the impression of hair and fur and the same thing. I don't want a straight line where the for of the ear meets the white of the face. It's very striking, the contrast from narrow dropping some of the dark blue and dark green.
15. 14 Panda #2 - Outline: So now I still have the leg to dio, but I want to work on creating a very pale outline for my entire panda. So I'll take some clear water and a little bit of the black to make a light gray Gonna add a teeny bit of blue to that. So it's Morva has a little bit of a blue sheen. Human, similar water. So it's a nice light color. I'm gonna create a very jagged edge all around the body. Nice sharp brush edges gonna show. And then over here I want because the legs in the back of the body are so powerful, I want to show that gonna create just a dash line. Then I'm gonna thicken that up in spots again, leaving it, um, very jagged edge. And I want to do the same thing over here with that line. I would do the same thing up front here, above the head, the body and around the face. This color will dry a lot lighter than it looks when we first set it down and I'm gonna try and leave a little edge of dry paper between the face and the dark leg. I gotta go back and right by the ears. I'm gonna add some of that light gray to add a little bit of water to this toe. Lighten it up further. Just add a few little spots here and there of gray little patches. Well, it is completely dry.
16. 15 Panda #2 - Eyes: Now that this layer is dry, I'd like to work on the eyes a little bit to take my smallest brush, which is the 5/0 and just enough black pigment where I can control it on the brush and I'm gonna create perfectly round eyes. I'm gonna leave. I'm just gonna work on creating the, um, the perimeter of the I. So I just wanna make the outline here, and then I'm gonna leave a little highlight and the highlights gonna be a little, um, crescent moon right on the side. Then I'm gonna try and match that on the other. I So there I have the eyes. While I had a little bit of dark paint on my brush, I'm gonna go around the edge creating just a tiny, very thin line again. Still jagged right where we did the light gray. It doesn't have to connect completely, but I do want to create an outline and then I'll do the same thing around the head. Very thin line. So now I have the outline of the animal. Doing over here is well of the legs, and I'm gonna continue up here with the haunches over here I'm gonna outline the mouth and I'll do the nose as well. Now I want to leave a little highlight on the top of the news where the light would be reflected and I'll let this layer dry.
17. 16 Panda #2 - Mask: to work on the I'm asking to take some Clearwater. I'll start with the mask of the left, Turn my paper around. I'm gonna paint it clear image of a clear coat of water. I'm leaving a little space between the eyeball and the mask, and then I'm gonna go in there with some of this color that was a little lighter than black . It was a little gray, and this could put dropping the pigment. And then I'm gonna make it a little bit, um, uneven, lying, uneven border. It will go in there with some more pigment, some dark pigment, and drop that in it may take my dry brush, smallest brush, and I'm gonna pull some of that pigment closer to the eye, but still leaving a little bit of dry paper. And then I'm gonna do the same thing here. First, I'm gonna make the shape a little more organic. Then I'll do the same thing on this side to create the outline. First on this one with small brushes. I have that in my hand and I'll go in there with some clear water. Pull out that pigment, leaving a little dry area around the eyeball. Turn this around and let this layer completely dry.
18. 17 Panda #2 - Colors: So now I'd like to work on shading the face and the body using the number one brush. I'm gonna go in here with some of this light gray. No answer. More water to it to make it very light. And I want to connect this haunch to this leg. So I'm gonna add a little more gray just like that. Then a little gray back here is Well, is it the same thing up here? Then I'm gonna come in here and create some colors. Start with yellow, take a little bit of yellow, a little bit of water. Maybe a little. This other yellow is, well, steeper. No, get a nice color going. And I'm gonna put in just some spots Organic shapes, spots of yellow in on numbers. So if I do, I'll do one or three or five. Do two more to a little bit Over here, the top of the head do a little bit underneath this. I they will take a little bit of the orange and lightened that up with clear water. Oh, putting a little bit here, the air. And I'll just do maybe three of the orange, Maybe on this side of the face. And then I'm gonna work with a little bit of blue. Good. Put in a little blue behind the head here a little bit on the tail end behind this, Legace. Well, I think I'll do a little just a little bit over here in a little on this side of the head. Yes. Well, okay. Well, let that dry, and then we'll work on the background.
19. 18 Panda #2 - Background: And now for the background. I want to create, like a bamboo very abstract bamboo background. So for that, I'm gonna mix my colors first I want some greens and then some grays. So I'll take the middle green one and a little bit of the orange to that. And then I'll take over here a little bit, a little green and the yellow green. I'll start with the latest color, this little yellow green gonna turn my paper upside down and starting from the base where the animal a panda is standing on, I'm just gonna create little shapes, long lines as if they were bamboo. So every now, every so often I'll put in different shapes and I want them to kind of, um I want one shaped to be large and in the next shape when it meets it to have a little smaller spot. Word tapers closer to it. Maybe even just creating a little space might be all that's necessary. We're not going for fine detail this case we're looking just to suggest, um, the bamboo and I don't want it to be symmetrical, either. Clean off my brush. I'll go in there with the dark color, - and then I'll go there with that green color. It's now turn it over, and because I don't want to look like stripes, I want there to be more of a blending. But it takes some of this lemon yellow and mix it with the green. So I get a soft color, quite a bit of water, just gonna add in some color, just some straight lines. It will warm up the background, and I'll give a nice contrast between the white of the body of the panda. - Then I want to just create a darker green background for the base. Well, let it dry, and then we'll come back and take a look at it. The class wrap up.
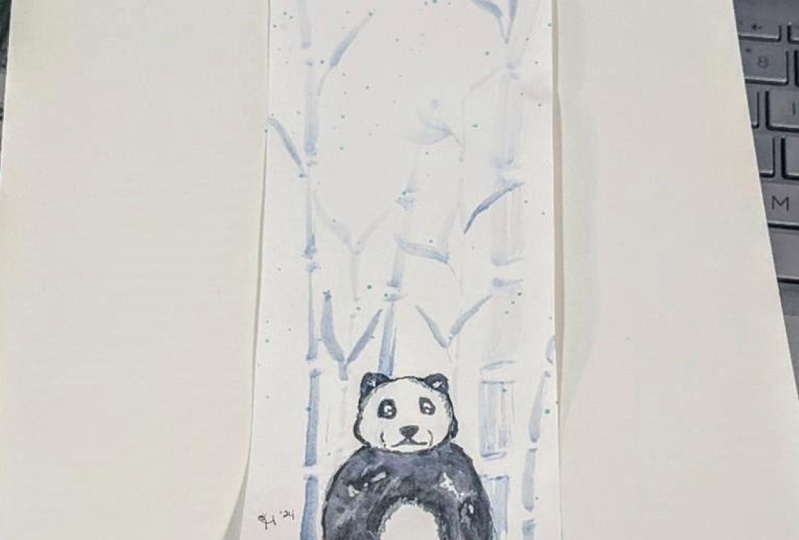
20. 19 Panda #3: for 1/3 bear. We're gonna start with the black arm first, just like we did in the other two. We want to create a white, already wet background, and we're gonna add pigment to it. We want to create a little texture, so the edges are not gonna be smooth. And we want to leave some highlights of the paper. Here I am using my six number six brush and I'm dropping in pigment. This is just the black for now, and I made my sketch of my bear and he's gonna be holding some bamboo. But I have not drew the bamboo. And yet take some of the dark midnight blue dropped that in, and I'll do the same with the dark green, but a drop in a little more black pigment and turn that around well, Let that dry will work on the ear and the legs as well
21. 20 Panda #3 - Legs: again using my number six brush and just clear water. I'm gonna saturate the paper where I want the dark legs to be and I'll go in there and drop in some black pigment and I'll go in there and are blue and are green as well. We'll let this dry, then I'll work on the ear and the eye next.
22. 21 Panda #3 - Ear & Eye: for the ear I'm gonna add a clear code of water leaving a spot on the paper dry Gonna take my smaller number one brush go in there and create the edge Dropping my pigment Oh, dropping just a little blue in a little green as well Now for the I I'm gonna work with my very small brush My 5/0 take just enough pigment that I can control in the brush And I'm gonna create a perfectly round outline Then I'm gonna leave a little crescent moon in the base It's gonna remain clear, unpainted, and I'm gonna leave a teeny little highlight in the top here. But other than that, I'm gonna fill the rest in the black. What, This completely dry.
23. 22 Panda #3 - Outline: using my number one brush. I'm gonna work on the outline of the panda, take some water a little bit of the black and go lighten it up with more water and just a little bit of the blue, maybe even one more drop of water to lighten that. And then I'm gonna create make a jagged edge all the way of the outline and I wanted to look like for so I'm gonna create nothing Smoothes for EJ little teeny brushstrokes. The only spots that is gonna be smooth is where the mouth and the nose are the on the outline. But other than that, it will just be a jagged edge. But it carried just a little bit of that mouth further with this light gray. And I'm gonna add a little bit of light gray Just a spot of it over here mixing a little clear water, echoing the shape of the hind legs a little bit over here as well, and I'll do a little beneath the ear playing this up, and I'll let that dry
24. 23 Panda #3 - Mask: using my number one brush. I want to work on this little mask over here around the eye. Gonna put some clear water up to the edge and leaving a little bit of dry paper around the eyeball. Then I'm gonna go in with a very sharp point black pigment and create a very ragged edge. I'll go back in with some more pigment on a very sharp point, and I'll try and create right up into the eyeball with a little space in between. Turn my paper around is needed to get that nice perimeter and want to change the shape a little. Here, make it very organic, just like that. Go a little higher up here. And there was a very sharp point. Come over here. Pull that somewhat closer again with my pigment. I'm gonna create the nose, and I'm gonna leave a little space for a highlight. The top of the nose. And then again, with sharp point of the brush gonna create that mouth, we'll let this dry
25. 24 Panda #3 - Bamboo: I sketched in some eucalyptus, and now I'm going to paint some layers using zero brush. Gonna go in there with some of this lemon yellow water down a little bit, and I'm gonna paint each eucalyptus segment each section, and I'll just paint the outline, not filling it in completely. But I'll paint some of this greenery or what will be the leaves. Then I'm gonna go in with some of this yellow green, make it nice and sharp on my brush, and I'm gonna go on painting the left hand side and let that color bleed into the What's the first layer of the eucalyptus? I want to go over the leaves as well, and then I'm gonna go back in. Take some of this bright green, mix it with orange, just a little bit of orange. We're gonna paint just the outline on the left hand side and let this blend that I'm gonna paint the base of these leaves trying to give a little shape. Gonna go back in some of this yellow green, make sure the colors blend out. Then I'm gonna take some of this yellow Oakar. I get very sharp on my brush and I'm gonna outline the right hand side of the Sikh um, bamboo, and we'll let this completely dry
26. 25 Panda #3 - Adding Colors: Now I want to work on adding some shading to the actual panda. Bear the white for essentially to take some white, a little bit of orange. Mix it with some of this yellow orange, and I'm just gonna paid in some areas here. It's a nice light color, and I'll just add some Clearwater to my brush and just blend it out even further. We'll do this in a few spots, trying to stick to an odd number, so I think I'll do three for this one again. Go back in with a wet brush, displayed it out, and I'll do a little, um, right up here in the top. Do the same with a little bit of yellow and a little bit here, right there around the ear and that shadow in a teeny bit here of the mustache. Then, lastly, I'll go with some blue, very light blue, create nice splotch of color here, my brush. I'll just go in and blend some of those edges out. Go in a little bit here and then I need one more section. I'll do the belly. We'll let this dry and we'll come back and work on the background.
27. 26 Panda #3 - Background: for the background. I want to use a deeper green than we have here. And any of the deeper green we're gonna focus opposite the bamboo. So I'm gonna turn my piece around with my big number six brush or the biggest one I'm using today. Gonna put some clear water around my bare, take some of this green yellow and drop in just some pigment a little bit more here and there. I'm gonna go in with a little bit of this dark green putting it opposite the but bamboo. And I just wanted to bleed into that yellow green Go back of the yellow green pink shorts in existence. There, take a little of that darker green on the base. So now we have our three spots of intense green. We have the bamboo over here Diane Lee across and then back down here can add a few little touches as well. Just to really play it up. And over here I'm gonna add another bit of Clearwater as I continue on my background, take a little bit of this lemon yellow. We don't go in here with this yellow green. Kim, It's okay to have a few spots of white showing through again with the yellow green. Then we'll take a brush that's just a little wet and try and bleed out some of these colors . Just so they're not such harsh lines, I would like. I want the background to look like it's the background. We'll go in there that little of that lemon yellow just dropping some color. It is a nice little contrast. And then I want to pull in some of this, um, yellow, green as well. And in some of this brighter green. Now, while the background is still damp, I'm gonna take their template that we cut out to use to trace around it. Gonna hold it over my image for this next step. Could take a little orange on my brush, make shorts very loose. And I'm gonna hold place this over my image and I'm just gonna spread spatter. And this will prevent the spatter from getting on the bare, hopefully just around it, and we'll let this dry will come back and look at our final products
28. 27 Class Wrap Up: and then we have our completed works. Here we have our first image of AARP, a panda bear looking straight at us. Um, we have our second image of our panda bear walking through the forest with the bamboo background. And then we have our final image of our panda holding on to some bamboo. Now, because templates are so easy to trace, their also reversible. While the first template wouldn't really change very much reversing it, The second template can obviously be switched so the panda could be facing the other way as well as the third image. So here I just flipped our template around and change the angle to get a different image for our panda, where I wanted the focus to be. So each image works on the background, giving it a little hint of bamboo, this one a little more so than the others. The others are just the colors, but this one has a nice bamboo image as well. A little linear lines. The colors here are green, indicative of the bamboo forest, the habitat of the panda bear. If you like this class, I hope you'll give a review or click follow and you'll get updates and you'll be informed of when new classes air posted, if you'd like. Please take a photo of your work and posted in the project section of this class. And if you are on instagram, please post it with hashtag watercolor panda and I'll follow along Thanks for joining me.
29. BONUS LESSON! Detailed Bamboo: in less than three. We added bamboo to the panda bear. Here's a bonus lesson for additional, more in depth, more detailed bamboo Taking my number one brush. I'm gonna just wet each segment. And this template is included in the panda templates as well. So you can mix and match or interchange or add your own a bamboo to your image. And then I'm just gonna go in there with some lemon yellow being somewhat careful to leave a space in between each segment. Then I'll go in with my yellow green, putting it right on top of the yellow, the first layer. I'm gonna make some of this dark green with the yellow green that we have and just a little bit of orange. When I put this on the left hand side and let the colors bleed in, I'm gonna go in with some of this yellow Oakar makes a little bit of that green in with it . And on the right hand side, I'm gonna put the yellow Oakar just to give a little contrast. Gonna go in there with a very sharp point. Adding a little more dark green to the green. We mix for the orange and I just get a very carefully outline, the left hand side giving a little more of a border. Just a little quick stroke for more time. I'll go in with the yellow Oakar and a very sharp point, and I'll do the same on the right hand side. Gonna switch brushes to my small brush my 5/0. I'm gonna go in with a little bit of this dark color and I'll start making the leaves. And the key to the leaves is to make the ends very pointy. Just gonna create a little hollow leaf in the little stem that I'm gonna go back, make sure my leaf is nice and pointy, and I'll go in with a little bit of this yellow green. Just feel inside the leaf. I'll do that on all the leaves. I'll let this dry and then we'll erase the pencil marks. And here's our completed bamboo. With the pencil lines erased, you could just put in your background color, just like we did in the lesson
 Daniela Mellen, Artist & Author