Transcripts
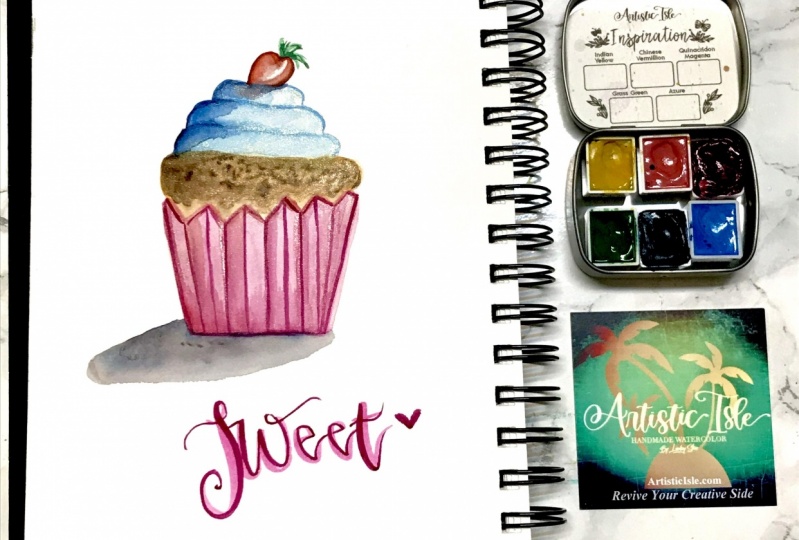
1. Watercolor Cupcake Class Intro: Hello, I'm Daniela Melon and author and artist here on skill share. Welcome to my class watercolor cupcakes. In today's class, which is designed for beginner and experienced water colorists, we will paint six cupcakes using basic watercolor techniques and basic supplies. The cupcakes will vary from classic to modern. We'll paint shadows, textures and, of course, luscious frosting. We will work on wet on wet technique to achieve intriguing color blend. Then we'll add additional layers, glazes and shadows to make realistic looking cupcakes. I've included a downloadable class template that will help you sketch out the cupcake images and feel free to modify the templates to make them all your own. I've also included a bonus lesson for an abstract cupcake, and it's also a sneak peek for my next class. The images you create will make a great addition to your art journal sketch pad or to make illustrations for your class project. Try your hand at one of the cupcakes, feel free to post your work in the class project section, or if you post your work on instagram, use the hashtag watercolor cupcake and I'll follow along. Thank you for joining me
2. Watercolor Cupcake Class Supplies: the supplies for our watercolor cupcakes class are your basic watercolor supplies with the addition of a few little items. I always have a jug of water and a smaller jug, one for a clean brush and one to clean my brush. I have an assortment of watercolor brushes. I have a pencil and an eraser, a spray bottle of Clearwater that I used to wet my paints. I also used an eye dropper or a pipette, and I can just take some Clearwater and drop it right in the paint's. I have my watercolor paper, and for the cupcakes, I've cut them into 4.5 inch squares. This is 100 and £40 watercolor paper. I find that works really well. Heavier paper is even better, but this is a nice practice on size. I have a permanent waterproof marker and a gel pen, and I used both of these for after effects. And then I have my template, which you can find in the class project section where you can download and pick your cupcakes that you'd like to choose to use for the class. What you do is you download and save the file to your computer printed out and you'll get a sheet just like this. Then you can take your scissors and cut out whatever cupcake you like and use that as a template. From there, you take your template, trace it onto your square of watercolor paper, and then you can get started with the painting. You don't have to do this part of the class. You can also just eyeball it are sketching out yourself. Either one will work, and lastly, I have an assortment of watercolor paints.
3. Lesson #1 Part 1 Shapely Cupcake: for first cupcake. We have a little kind of an inverted shape for the base and then three layers of frosting with around either cherry on top or a sugar gumball or something like that to really emphasize the top of the cupcake. This one's really important because it demonstrates just very pleasing shape. So to get started, I'm gonna start with the base, gonna put a clear coat of water and I'll take, um, a larger brush and just add Clearwater going almost all the way to the pencil marks, but leaving just a little barrier and then I'll decide what color I want. I'm gonna do like a red orange for the base, but you can use any color and to mix that will take my orange over here and get a nice, vibrant color. And then I'll just explain a little bit of red as well with that, Then I'll take my brush and just a drop in the color, creating the form in the shape of the base of a cupcake. Once I have my base, I'll go in there, just add another layer of pigment to the area. I've already, um, staying the paper and I let the water run right into the center of the cupcake. With that, I'll go in at a little yellow orange just to add a little variation around just the areas that I already colored in with the orange paint. And then I'll go back in with my orange paint and add some more pigment. I'll take the paper and just move it around. I'm not trying to fill the cupcake base. I'm just trying to move the pigment so that it's a nice blend. If there any harsh lines, I'll go in with a damp brush and just smooth them out. Now I'll start on my frosting. I want to be careful not to have the frosting and the cupcake run together to each other. So I'm gonna do the first layer, which is gonna be a very light layer. Good to start with the yellow layer. First step for that is to use a clear code, and I'm just coloring in the areas with a clear coat of water, and then I'll take a little bit of yellow a mix it a lot of water, and I'm just going to add the yellow. I'm not so much following the lines. Just there A guide. But I just want a very light coat of yellow. I'll let these layers dry and we can come back and work on some more for our next layer on this cupcake. We're gonna start with frosting, take my larger brush and very carefully I'm just gonna outline, go over the lines, really on the left hand side. Then I'll switch to a smaller brush and I'll go in there with a little yellow. This is a yellow orange, and I'm gonna create the outline of the entire frosting part of the cupcake. The areas where I introduced more water will blend and blur a little, which is a nice effect. And then I'll go in there with a little damp brush and blend him out a little more. And I want the ones on the left hand side to have more pigment in the ones on the right hand side. It's not enough. We'll go back in and drop in some pigment. I can create a shape with my brush by using the pigment on the damp area of the cupcake. And then over here, I wanna balance it out a little So I'm gonna come on this side as well and just add a little bit of, ah, being a pigment and with a wet brush a blend that out further So there's a little bit of pigment on the left, hands on the right hand side to balance out what's on the right. Leave that for now and we'll go in here and we'll work on our base. Gonna go in there with that orange color that we started with Maybe add a little more orange and a little dark red to that. The first thing I'm gonna do is outline very small light strokes. Not too much paint on my brush, just the outline that shape trying to keep my brush very thin and that just tidies it up a little. Then gonna add more payment to my brush will start in the center and I'm just gonna make a vertical line kind of straight down the cupcake. And then I'm gonna go either side adding more lines on the right hand side. I'm gonna have a slight lean to the lines and the left hand side of would have a lean towards the left, at least at the top of the cupcake. And this mimics the shape of this base. From there, I'm gonna add a little bit more The deeper red. This is a very subtle addition. Just gonna add a few dots to the cupcake days, get a switch to a different brush and I'm gonna work on this top ball here. Gonna have a clear coat leaving a little room for a highlight on the right hand side. And by that, I'm gonna leave it dry, and I'm gonna go in there with my deep red and add that to the left hand side, letting it run around. I'll go in there with some carmine red. Add that to the deep red. I'll let these layers dry. We'll come back and add one more layer.
4. Lesson #1 Part 2 Shapely Cupcake: Now for our final touches, we'll take the deep golden yellow on a very small brush with a lot of pigment. And we're gonna draw that outline one more time. That's to emphasize all the layers. And I'm gonna go in with a little bit of orange mixed with my golden orange Here. I just want to create a few little strokes right on the edge. And to balance that out, I'll just do a little bit over here is Well, then I'm gonna take a little bit of the dark, dark red outline the scum ball here going with a little bit red and then clear water to bleed it out. So there's no harsh lines. Then we'll take my brush, take a little bit of black and a little bit of the orange, since that was the color of our base. So it's a gray with just a hint of orange, and I'm gonna create, um, shadow. I have a little smudge up top, so take some clear water in a dry paper towel and try and pick that up. Thankfully, I got most of it up and I'll just go back in with my color. Finish that chili there. We have our cupcake
5. Lesson #2 Modern Cupcake: for our second cupcake. This is a very geometric looking cupcake. It's one of the one of those very gourmet cupcake bakeries. They tend to make the frosting instead of billowing and luscious swirls. They tend to do it in a just a perfect little almost cylinder on top of a cupcake. It's very interesting and very unusual. I thought it would make a great painting to start this one Gonna paint the base again? I start with my clear coat of water and I'm gonna add a very light blue to make this base a little interesting. And to really play with that geometric shape a little unexpected will use unexpected color in addition to the unexpected shape. So I take the blue, very light color. We'll just add this all way around. It will dry later, then once I have the shape of the base, I'm happy with that. I'll go in with some water and help the colors move around and bleed. Next, I'll work on the frosting part. I want this depart to be pink, so this is gonna be a lot of pastel colors. So again I do the clear coat of water and I'm using the thickest part of the cupcake frosting here, but I'm leaving a little white barrier on the top, and that's gonna be like a highlight. So I take my light pink and I'm just gonna do the edges here. I'm gonna do the base, not looking to get complete filling in pigment. Then I'm going to switch to a smaller brush and on the top of the cupcake where it's still gonna be pink. Get a color in that with a clear coat right to the edge of the pencil Mark and I'll go in there with my pink Let that color bleed around by leaving this little white area in creating a highlight between the top of the cupcake and the sides. I am a let this later dry for a geometric cupcake. Now that these layers air dry, I'm gonna erase some of the pencil marks on the frosting areas and on the base of the cupcake. Then we're gonna start, and we're gonna work on the adding the cake layer. So right in the centre, I'm gonna add a clear coat of water and with a smaller brush, make sure it's clean with a smaller brush I'm gonna add a little bit of cake color. We'll drop in the pigment and let it run their Clearwater. We'll go in with a little darker brown, Just a the base where it meets the cupcake bottom. What? These layers dry right now I want to work on the top. There's, like a little piece of funding or candy on the top of this cupcake, and I want to really play with the color. With that Somebody take my brush, make sure it's clear. I'm gonna go in and do a clear coat on top, leaving a little space between the top and where the side of the funding meat. And then I'm gonna go in with some yellow and and that right to the top here. Then I'll go in with my clear water again on the side of that fund int leaving the top a little dry so that the colors don't run together. And I'm gonna add my yellow as well. This time I'm gonna go to the base in the top and I'll try and leave the center just to bleed together. Not gonna force it. Well, let these layers dry and we'll come back and add our final layers. Now I'd like to add work on this cake part a little bit. So take a lighter brown or a little darker brown when we have here, and I'm gonna outline it with that color. Then I'll go in with a little water on my brush and lead that out and I'll go back in. Drop some worth pigment in any area. There's a sharp line. I'll just plead it out a little bit. I'm going with a little bit of that golden brown up top. Then we'll take an eraser in a race. Pencil marks off my little top piece of fondant, and now we'll work on that a little bit. I'll go in there with that yellow and a very small brush. Add another layer, seem color again, leaving some highlights, and they will go in there with a little this orange yellow just for the edges. Now, for the layer of the cupcake frosting I can see here, it's a little ragged, so I'm gonna go in there and just at a clear coat of water to the top of the side of the cupcake and then with my pink brush, I'll go in there, make that correction and then I'll go and bleed it out. So there's no harsh lines. I'll take a light pink that we used for the cupcake top and frosting, and I'm gonna add just a teeny bit of darker pink to it. So it's a little bit darker color. Create that outline and create a little shadow underneath the piece of fondant again with the damp brush blending it out. I'm gonna take a paper towel and just very gently dab the center of the cupcake. And with that darker pink that we mixed gonna create the edge, make it all makes a little more, and it's got pull some strokes following the shape. It's what's cylindrical right to the center of a cupcake. I'll take some of the color and the base as well in the top and at the base are blend blended out No for the actual cupcake wrapper Gonna take my blue, Make it just a little bit darker than lonely Mixed for here and I'm gonna make my outline. Then I'm going to My vertical lines will start in the center. Just pull that line right down and the little eyeball it go about 1/4 of an inch. It's from each side, that'll slightly at a tilt following the shape of the cupcake. How it comes in Now I'll take my bigger brush That makes a little gray for the shadow. So a little black and a little bit of that blue could add a little shadow on the left hand side. And there we have our geometric cupcake.
6. Lesson #3 Strawberry Shortcake Cupcake: here we have a strawberry shortcut cake flavored cupcake, which evokes images. Brilliant, brilliant colors. Will have a nice red strawberry with white frosting and then the yellow cake. So I'll start with the base and the cupcake wrapper on this base. I'm gonna make it pink. You can make it whatever call you'd like. Um, same technique. Just choose whichever color you'd like again. Starting with that clear code. Gonna make our pink a little deep, and I'll go and create that shape. Now, from here, the zigzag is the top of the cupcake holder. The cupcake paper. I'm just gonna take my brush with whatever pigment remains and create vertical lines coming down from that And what that layer dry? Then I'm gonna work on the my strawberry on top. So for the strawberry, I'm gonna want the main part of the strawberry that showing facing us to be kind of clear for a highlight. And I want the edges to have that really vibrant red color. So add my Clearwater to the edge, and then I'm gonna switch to a much smaller brush, and I'm gonna go in with some nice red paint, create my shape. Don't go in and take some orange as well again trying to leave highlights in the center of the strawberry. Then I'll clean my brush and with clear water and just gonna believe those lines a little bit. Go back in and I'll let these layers dry. Here. We're gonna like start by, um, using the layer of cake, adding a layer of cake next. So I'm putting a clear coat on the cake layer and then, with a much smaller brush, I'll go in there with some of this light brown golden brown. Really just create that shape. I want to create a darker right underneath the frosting so it looks like a shadow. And then I want to create it right by where it meets the cupcake liner as well. So those are my two areas of pigment, and I'm blending out any harsh lines. Now. I would take my smallest brush and work on some of the leaves for the strawberry. I'll go in there with a light green, create those angular lines, and then we'll fill it in. I don't go in with a little bit of dark green closest to the actual berry Drop that in and then just take a little bit an outline. Believes now I'd like to work a little bit on that strawberry to make it really vibrant. Take some of that red, get a lot of pigment on my brush. Not a really wet brush, but just a lot of pigment. I'm gonna go right around the edge. Now add some water to my brush and blend that out a little bit. I'll switch to a very small brush in my darkest red. Create the outline, the base and at the top. Here. These are the two areas. I want the darkest Carry it over just a little bit. Here, Clean my brush. No, I'm gonna go in with a little bit of purple. Drop that purple right up top here and right at the bottom. I'll go in and went my brush. Just so it's a little damp and blend that out and again. I created a little bit of a straight line and I don't want that. So I'm gonna had some red pigment and just pull it around all of these layers dry. The next stage in this cupcake is to work on a little more on that strawberry with our smallest brush going to take some of this gold orangy yellow, and I'm gonna make little lines where the seeds would be. And I'm kind of somewhat following a pattern from the top of the strawberry, which is on an angle all the way to the base, alternating it as if it was polka dots. And I'll just let that dry that will come in, get up a little bit of a turquoise blue just a little bit on my brush, and I'm gonna outline each of the layers of frosting and the sides. Then I'll go in with a big brush, clear water. Just blur those lines a little bit. I'll go into the base where it meets the cupcake, layer the cake earlier, and I'll add some of that blue as well again, once again with the Clearwater bleeding that out a little bit. Then I want to take my pink that we used for the base of the cupcake, but a little bit darker. And I'm gonna go straight up and down from each of the points on these angles and write down. However, I'm gonna try and start in the center, going straight up and down, but then at a slight angle as I go towards the sides. So right in the centre, I'm gonna go down, and then I'm going to slowly add some of an angle to it. There we go. Now I want to add a little bit of texture to that cake part. So it looks like it was baked, So I'm gonna take a little bit of darker brown. Just add a few little dots going to go in with a lighter color that golden brown. I'll do the same thing to create a little shadow here, my brush and a little dark color. And I'll mix it with a teeny bit of the pink, create the shadow, and then I want to work on one more part of strawberry, take my tiniest brush and a little bit of black. I'm just gonna go over those seeds with a darker color trying to leave that yellow part showing. There we have our strawberry shortcake cupcake
7. Lesson #4 Part 1 Vanilla Cupcake: for this cupcake. I was inspired by an actual cupcake right here. It has a cherry on top, multiple layers of frosting that are different colors, some colored Sprinkles and in the vanilla base. So I'm gonna start by making the vanilla base, get a paint clear, clear code. And then I'm going to make a little bit of a darker gold on the base, the very base of the base. And then it's gonna go lighter as it gets to the top, takes a more of that darker color, feed it into the base when will switch to a smaller brush with clear water and just go over the top a little. It'll make the color later, and it'll sharpen the edge. Then I'll pull some of that color down. Go in with a little darker color and with a clear brush just to bleed it out. So there are no harsh lines, and we'll let that layer dry. In the meantime, I want to work on my middle layer, which is this one right here. Go back to my larger brush and on the actual cupcake, it's pink. I'm gonna make it a little bit of a purple color, and I put some pink in it as well. But first I put my clear coat down. I'm gonna take my smaller brush. I have a little purple here No, and some pink to that don't create my shape. I'll drop in a little pink as well and let that way or dry. And in the meantime, I'm going to start in the cherry. I drew in a little highlight here, so I'm gonna try and keep that area dry. But I'm gonna paint Clearwater everywhere else and then I'll go in with a very bright red, Nice, rich pigment Create the shape of that cherry Once I have my red layer in my highlight created Get take my brush, clear it off and go in with a much darker red You can also use a blue or purple for this and I'm just gonna drop it in right where the cherry would create A lot of shadow would have a lot of shadow where it's right by the frosting. I'm gonna let that those layers dry and we'll come back and continue. So now we're gonna work on the additional layers of frosting with my brush My little brushing to take a little bit of this blue, Um, with just a little bit of purple mixed in and I'm just gonna create a little outline to draw the shape of the frosting roles. Clear my brush and I'm going with this a slightly larger brush and just bleed it out a little. Blend it somewhat before it dries, Take a little wet brush and just go around. In this way, the line isn't so harsh. Then I'll go back in, continue outlining my layer of frosting and the same thing here. We'll do this much lighter and then I'll go in with my clear brush again and just make that a little softer line with this brush will take just a teeny bit of the color. Look, these layers drive, not go back. I just want to work on my a purple layer a little bit. So I take a little bit of purple, an outline that as well, creating a nice, sharp edge on the outline. And then I'm gonna go in there and just create a little bit of dots here and there. Little clusters of them again with my small brush. Gonna flip it over and work on my cherry. A little. Take that. Dark red. Not too much water. This more pigment than water. Create the stem. Clear my brush. Just bleed that color on the interior. The stem. Then clear my brush again. I want to work on the base here. I'm gonna take some of this golden brown create the outlines appear I'll do the same thing , but creating the outline where it meets the frosting in with my brush. I'm gonna bleed that out a little bit, creating a little deeper color on the edges and again bleeding it out somewhat. And then I'm gonna take my brush with a lot of pigment in a little bit of water and just pull some vertical lines down. Well, that these layers drive, and then we'll come back and add our shadow and our Sprinkles.
8. Lesson #4 Part 2 Vanilla Cupcake: okay, We'll start with the shadow. Could take a little bit of the brand, uh, gray in a little bit of the gold and combined them. And then I'm just gonna create a little shadow here. Now, I want to work on adding some, uh, Sprinkles to this layer here. They're just round dots of color, so I'm gonna go in there. I'm gonna choose four colors. Will do pink. I'm just gonna create those dots. Come leaving them hollow. Gives a little bit of a highlight, and I'll just Adam and I'll add a few just on the ground as well. And now I'll do the same thing with some other colors, and I'll speed this part up, and there we have our vanilla cupcake.
9. Lesson #5 Part 1 Unicorn Cupcake: for a unicorn cupcake. We're going to go very rainbow color. I'm gonna use pastel rainbow, but we're gonna go very rainbow color. Very cute. See here on the first thing I want to do, though, is create the frosting. So in this layer, I'm going to take my Clearwater and brush it over the layer where there would be frosting. And I'm gonna make the frosting white. Um and that's because I want to have a lot of contrast between the flowers that are up top at the base of the horn. And I want to do a little shading to create the appearance of a face in the frosting. So the first thing I'll do is my clear coat of white of clear coat of water. And then I'm gonna go in with a very pale blue very light, Just enough to create an outline. It's color is gonna dry lighter, But it's gonna give a border to our frosting into a top of our cupcake and I'm gonna go in just create dimension between the layers and the roles of the frosting and let that dry for our unicorn cupcake The first layers dry Gonna go in there and add created grading. It's on the base here. We'll take a clear water, Um, on a bigger brush color that in. And I'm leaving a little space between the actual frosting part and the base here. Now that that's nice and wet, I'm gonna go in with clear water on my brush again and color in this horn with smaller brash. I'm gonna go in with this golden yellow kind of a little orange yellow, but it's very vibrant, and I'm just gonna create the outline of the horn. Now go over the lines here and let that layer dry. Now for a cupcake bottom, I'm gonna start with a pink right at the base. Here, I'll go up a little bit, maybe half inch or so. I don't want to go in with a soft peach. It's going to take a little bit of orange, a little bit of the yellow, orange and some water, and I'm gonna add a little layer here and this is to create Argh! Radiant. I'll go in and just add a little more pigment to the side here and then I'll go in with a yellow. I want that to be light as well. Pull some of that color down. It'll blend with the orange layer, take a little light green and then a little late blue. Well, let these layers dry for the base. Take a very small brush and just do a little work on the ears. I want the ears to be lined with gold or periods at their line with gold, so I'll take some more of that yellow orange color and just outlined them. Then I'll clear my brush. Can I just blend it out a little bit? Take a little more of that gold and right where it lines up against that cupcake output in a little bit of color. And then one more thing is I'm gonna take a little bit more of that blue. It will be a little darker than we used before, and this is just to create the outline of the frosting. But these colors dry, and then we'll come back and add another layer
10. Lesson #5 Part 2 Unicorn Cupcake: for a unicorn. Now that the layers air dry gonna go in with a little bit of blue again and again Another layers, One outline, cupcake. This time I'm also gonna give a hint of the different layers of frosting and let that dry to take an eraser and erase some of the pencil marks in this horn and on the ears. Then we take clear water on my brush. Just bleed out this line a little. It'll also lighten it somewhat and we'll work on the base of the cupcake. Now, I'm gonna go in with a little bit of this red and what makes it a little pink. And with outline the base of this cupcake and I'm gonna go in with some of that pink that we use at first the first layer. And I'm just gonna redo that layer on the edges. This makes it a little more vibrant on the sides and, ah, a little paler in the center, which creates a highlight. Do the same thing with the orange, clear my brush a little bit, blend that color. So there are no harsh lines, do the same thing with the yellow and continue all the colors that will work on the flowers. My little is brush That's clear. Gonna go in, create a clear coat the first flower and I'll do that in pink. Just dropping some color. I'll do it on sides here. These other two flowers and do a yellow and a blue. Well, let this layer drive with my smallest brush. I'm gonna make the unicorn. I's gonna go for a nice deep black, Not too much water. I want to be able to control this. I'm gonna follow the shape that I created. And then a couple at lashes. Maybe we'll make it a little thicker and I'll do the same over here trying to match it. Then I'm good. Clean my brush and I'll go with darker colors of all the flowers. So I'll go with the darker blue. I'm just gonna outline it. Flip it over here. I want to take just a little bit of Ah, light. Um Gray. I just want to create those swirls on the crown on the horn, and then I'll follow the outline as well that I'm gonna take a smaller brush on a lighter pink. I'm just gonna create a little bit of cheek shape and then we'll create a cash shadow. He's a little, um, dark color, black and a little bit of pink. Create a little shadow. It's a little pink for me. The shadow. It's not bad, though, for a unicorn, but I'm gonna add just a little bit of the darker color to that. And there's our unicorn cupcake.
11. Lesson #6 Part 1 Chocolate Cupcake: for our chocolate cupcake. I was inspired by the chocolate and the contrast between the raspberry and the blueberries on top. And then I was intrigued by this little cupcake wrapper. Very untraditional. Just folded paper. So to start with, I'm gonna create the rapper and I'm gonna create each section leaving a space between each section I'll paint with clear water, and I want to differentiate it between the chocolate frosting. So I think I'll do it a much lighter color. A much lighter chocolate color. Here I have my Clearwater on the rapper. I'll create that lighter color. It makes the Dark Brown with that burnt Sienna. And then with a sharp point, I'm gonna create that shape. We believe a lot of highlights in that rapper don't go to the next section, do the same thing. We'll switch to a smaller brush to work on the smaller sections. I want to be careful. They don't bleed into each other again. I'm just creating the shape with this layer. - And then while I'm here, I'm gonna take a very small brush in a very dark brown on what's gonna go and create a little bit of shadow? I want to create a shadow right here where it meets the cupcake. Same thing on this piece and then right on the underneath, where their shadow from the cupcake wrapper itself don't go back in with the color we created originally and just blend the two. I'll let that way or dry, and in the meantime, I'm gonna work on up top here on the fruit. I'll start with a blueberry and I'll start with the one in the back Could add my clear coat , leaving a little space between the blueberry and the other pieces of fruit. And then I'll go in and just add clear coat of water to the raspberry. Could it switched to an even smaller brush and I'll use my darkest blue and I'm gonna mix that with a little bit of purple, and I'm gonna create that shape of that blueberry in the background. I want to leave a highlight, but I also want to get him a little darker than the one in the foreground, so I'll start with that color for now. Let that dry. Take a little bit of the red and just do the outline of this raspberry amount lighting each segment, and then I'll go in with a damp brush and just blend some of these lines out. I want to leave highlights, but I don't want to leave it particularly sharp edges yet. Let those layers dry and we'll come back and work on the next layer.
12. Lesson #6 Part 2 Lesson #6 Part 1 Chocolate Cupcake: now that are rappers dry. I want to take my eraser and just erase some of the pencil marks for the rapper section. Then we're going to start on the frosting, The frosting We wanted to look chocolatey and rich. It's gonna be in the same color family as our base. But I wanted to look more luxurious, so I'll take our brown and I'll mix in a little red with that little yellow orange. More, but more. Here we go, can you to start with a clear brush. And I'm just gonna work at the base of each of the lines of frosting, creating just a clearer little section that's gonna be wet on the paper. The key is not to follow. Fill it, Ellen, all chocolatey and dark, but to have a lot of highlights. So then I'll go back in with the color remixed and just trace the shape. It'll bleed right into the areas that we colored with clear water that we went with clear water, which is what we want, the effect we want. And then, with outline that blueberry go in with a little wet on my brush, it was bleed it out and I'll come back here. So there we have our first layer of the chocolate, going with a smaller brush and a much darker chocolate color. And here's where I want to build up the layers, go right to the base of those lines that we had originally created and just add that color . - Then I'm gonna go in with my burnt sienna and build up a layer on top of that as well, blending that out again, always leaving a little white in between different layers of frosting, clear off my brush. And now, with a clear water, I'm gonna bleed that color right up to the top, leading just a teeny space. And while it's damp, I want a dark drop in some of that color remixed, dropping some of much darker color as well. Let that bleed, and we'll let that dry
13. Lesson #6 Part 3 Lesson #6 Part 1 Chocolate Cupcake: I'm going to take my smallest brush and with my darkest red could add some pigment. Not a wet, wet brush could create the outline of this raspberry. And I'm gonna be very careful. I'm gonna go in and create the segments I want to keep, leaving the highlights as well that I'm gonna go in with a little bit of that frosting color. I see here that I want a little frosting between the blueberry in the back and the raspberry. So I'll just add that in, give us a moment to dry and I'm going to take a larger brush and some of this golden brown a light version so more water than pigment. I'm just gonna go in and add some color right to the rapper. I wanted really to differentiate between the frosting part. So if I go in there with a glaze, it adds a different tone and it looks completely different that underneath it got a feeling with that tone just like that, we'll let this dry will come back and do the final blueberry and some final shading with a small brush. I'm gonna outline the cupcake wrapper all the different layers, so I'll start with the perimeter trying to make it one cohesive unit filling in the areas with the darker pigment that would have shadow cast on them. Then I'm gonna go and work on this bear. Blueberry right now could go in there with a deep blue on this side and outline it. I'll go in there with a little purple is well, no, lighten my brush to do this side And then I want to take a dark color and just kind of outline over here. Don't make the entire shape of that center piece, and I'll let that center blueberry dry. Then I want to go back here and I already mixed some purple was blue but I'm gonna makes a lot more blue into that Gonna leave a little space between the two blueberries. Gonna leave that one in the back Oh, and a little purple right there to create some deep shadow and let that layer dry. Then I'd like to create the cash shadow So I'll take some of the dark black and mix it with brown. Create a little shadow over here. Straighten out the shadow I'm gonna add just a teeny bit of a light blue just to this part of the blueberry. There we have our chocolate cupcake
14. Bonus Class! Sneak Peek from My Next Class: Here's a bonus class for an abstract cupcake. It's gonna have a lot of line work that will do after our first layer of watercolors dried . And it's kind of a fun cupcake to use to make a pattern. I'll take my big brush and just creating an irregular shape, keeping in mind that the base is gonna go here. So I wanted to fit within the base. It can stick out a little bit, but it's more or less within the base. I'm gonna have just a little bit of this burnt Sienna and a little bit of this gold here a little bit more of the burnt Sienna just to have the colors blend. But I like the variation that it's making kind of a model look. And then for the frosting area again, I'm gonna do a very abstract frosting shape. I'm gonna go with a clear code, and then I'm gonna drop in some light purple to create that shape. Maybe pull that shape down a little further closer to the base, and then I'll drop in some blue again, a very light blue, just to create some variation. And I think I'll drop in a little pink and that will again add more variation and emphasize the color. Well, let this layer dry, and then we'll come back and add our line work. So now we're layers or dry. If any pencil marks remain, I'll erase them and I'll add my line. Work the line work. It's simple. It's not meant to be perfect, but it is meant to suggest a cupcake shape. So for that, I'll start by making the base of the cupcake, and some of my paint will stick out of a cupcake base. I was making a simple line. They're gonna come over here, make the top of the cupcake paper. Then I'm gonna connect those lines to the base, and that's it for the base. Then for the top, I'm just gonna make, um, little scalloped edges and then for the top I'm gonna go down here is Well, so there. I have my frosting shape, and I'm gonna bring the frosting around and create lines in both directions. So it looks like it came out of a piping bag. Then some spots. I might just add little dots. And there you have an abstract cupcake
15. Class Wrap Up: So here's all our work completed with our cash, shadows and texture. We have some nice texture here on our strawberry shortcake cupcake and a vibrant strawberry as well. We have lots of layers of brown and chocolate for the chocolate cupcake with raspberry and blueberries. We have our vanilla cupcake with Sprinkles and a cherry are very fun. Unicorn cupcake with a gold horn in a rainbow base. Then we have our geometric cupcake with very unusual shapes for the frosting. Certainly very untraditional. We have our inverted cupcake very shapely and fun. And then we have our bonus cupcake on abstract version with lots of Leinart fun colors, I hope youll try your hand in a cupcake, making one of them and then taking a picture of your work and posting in the class project section. And if you'd like to post your work on instagram, please do and use the hashtag watercolor cupcake and I'll follow along. Thank you for joining me
 Daniela Mellen, Artist & Author