Transcripts
1. Introduction: Hi, welcome to this class
where you'll learn how to create simple textures for
your watercolor backgrounds. You can also incorporate these textures into
your subjects. For example, I use these
touches on my animals. These are some really
simple techniques that you can use within your watercolor
paintings to add lots of texture and interest. We're gonna be using some simple objects that you
can find around your home. And I'm gonna go
through those now. Plastic wrap, a crayon or a
candle, an old toothbrush. And of course you'll
paint brushes. Let's get started. And if you've got any
questions, just ask me. I'm here to help you
with whatever you need. Let's stick straight
into lesson number one, where I will show you
the salts technique.
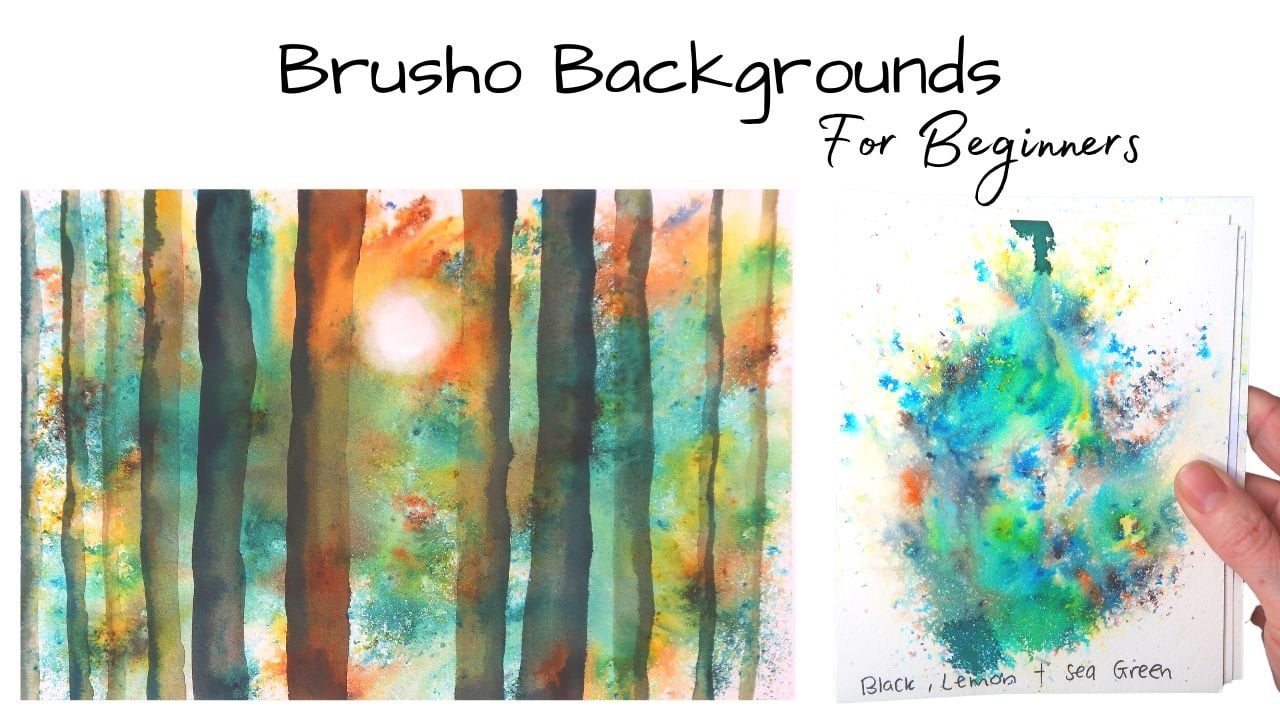
2. Lesson 1: The Salt Technique: The first technique for
creating texture is by Lena washed down first
and then we're going to use some salts
over the top of this. And you're probably thinking, I'm not having fish and chips. But trust me, this
effect is so gorgeous. And it's such a
simple idea by taking something that's easy to find
in your kitchen cupboards, you can create some
really gorgeous texture within your
watercolor paintings. This is lovely for
using on backgrounds, but it's also a great way to add texture to your
paintings in itself. So any subjects that you'll use in, I've got some salt here. This is actually sea salt, but you could use regular
table salt as well. I'm just going to drop that on while the paint is still wet, but it's slightly dried as well. So it's not completely dried and it's not sopping wet either. So you do have to grab
this at the right moment. So it's kind of
in-between drawing stage. So it's not completely dry, but it's not
completely wet either. So what I'm gonna do
now is leave this to dry completely before
I wrap the salt off. That's really important because if you rub it while
it's still wet, I'm just going to smudge
all that watercolor everywhere and
you're not going to get the desired effect. So make sure that
you let this dry completely before you
rip the salt off. And you do have to rip
the salt off really well. In lesson number two, you'll need some plastic wrap. You'll only need a
small amount of this. So grab a little square and let's get some straight
into lesson number two.
3. Lesson 2: Plastic Wrap: For our next texture, we're going to use some cling
film or some plastic wrap, cuts off a small amount
of plastic wrap, they down your wash of color. So this is permanent rose. If you're wondering
what brush I'm using, I'm actually using a royal
crafters choice, a brush. So this is just a cheap
brush that I got from a stationary shop
along time ago. Once you've got your
layer of paint down, you can take your plastic wrap and lay it down onto your paper. And then all you need to
do is push it down and you can move it around to
create little shapes. Whatever part of the cling
film touches your paper, That's what shape
it's going to end up leaving behind you. You're going to get a good idea of how this is going
to end up looking by what parts of the cling film or plastic
wrap all touching the paper. You can use your fingers
to press it and areas down if you want that
shape to come out, just press it down, leave it to dry completely. And once this is dry, all lifted off and
I'll show you what the finished result is
in lesson number three, you'll need a crayon. So I used a white crayon. You can use any color you want. It all depends on what
colors you want to use within your
watercolor paintings. You can also use a thin candle. If you've got a small
candle laying around, then that will
work just as well.
4. Lesson 3: The Resist Technique: You can actually use materials that resist
the watercolor as well. This is actually called
the resist technique. I'm just taking a
wax crayon here. So this is just a
white crayon and it would work with any
colored crayon, but I'm going to take a
white one just to show you how clearly this comes out. What's going to happen
is when you put down a pattern onto your paper, then when you lay down
the watercolor on top, this crayon is going to
resist the watercolors and you're going to get a
lovely pattern Left Behind. The only thing with the crayon
is you can't rub it off afterwards because you are putting the crayon
onto the paper, you're not gonna be able
to get rid of the crayon. So just keep that in mind. It's not like salt where
you can rub it off. But it does, oh,
I just broke it. But it says leave some
lovely texture behind. You can use the crayon
to draw pictures. I'm just putting some swirls onto the paper here
just to show you, this is a lovely
simple technique. You can get some
really lovely textures and patterns by
using the crayon. I found this crayon in my
little girl's pencil case. It was something that I had
any way on these costs. Penny, you can you see
how just by laying over of the watercolor
over the top, what a lovely pattern
we're getting left behind. So you can see where
I've drawn with the crayon box left behind that pattern that
I've drawn down on, like I said, you could draw
a picture if you wanted to. You could put some texture
onto your subjects. So for instance, if you
were painting animals, you could put texture
onto that fear. I think this is such a
lovely technique to use, but very effective as well. And how easy was that? In lesson number four, we're gonna be doing
a splatter effect. So all you need is your
paints and your paint brush. Full day's lesson.
5. Lesson 4: The Splatter Technique: The next technique you can
use is the splatter effect. I'm going to paint
on some violet here. So this is dioxazine violet
by Winsor and Newton. I'm just going to paint
a light wash of this over my paper just
to show you next, I've got my brush loaded up with some pink and this
is permanent rose. What I'm gonna do is I'm going
to splatter some of this onto the purple ones. Can you see because that
purple is still wet, paint is hitting that purple and it's becoming quite
fuzzy and diluted. So it's kind of blending
into the background. If you put this onto dry paint, you would get a completely
different results. You can see certain
areas where it's dried, so we'll get in more
of a crisp splatter. Then there are
splatters which are hitting the wet paper and bleeding out and
becoming a very soft and fuzzy and very
blurred and lovely. Actually, I'll really
loved this effect. This is a lovely, simple
effects that you can use. Just tap the end of your brush. And it depends on how big
you want the splatters. If you use a smaller brush, you will get smaller splatters. If you use a large
brush with lots of water as butters are
going to be bigger. And it all depends on how wet your paper is as well to how far those splatters are going to spread the wetter your paper, the further those splatters and bigger those splatters
are going to be as well. If you have dry paper than those splatters are
going to be smaller. So it all depends on what
effect you're looking for. I have a little think about what effect you're looking for and think of if you need to
leave that paper dry or not, and how long you need
to leave it dry for. What size brush you're going
to use in lesson number five will be mixing two
colors together on the paper. So all you need is your
paper and your paints.
6. Lesson 5: Mixing Colours On The Paper: Another great effect
you can use is by drop-in different
colors into each other. This is great for mixing
color on the page. It's also great for keeping
different colors separated, but also having the
merge into one another. If you want to have a
lovely blended effect, do this while you will. Paint is still wet, so I'm putting down some
cerulean blue here. Then I've got some
indigo on my brush on, can you see how when I drop that indigo into the cerulean, those two colors merge into one another further because
thought paint is still wet. You've got a nice
soft blurred edges with a blend into one another. Those two colors, those colors are also remaining separate. I use this a lot
with my paintings. I use it on my
subjects in itself, on my animal paintings
in particular. And they also use this
a lot in backgrounds because I got some really
lovely effects by using this technique in lesson
number five will be used in a technique that I call the tough brush technique
because that is so technical. All you'll need is
your old toothbrush, some clean water, and
your paint and paper.
7. Lesson 6: Tooth Brush Texture: The last effect is a
really interesting one. And I'm going to be
using this effect for the first time today because I've just
come up with it. I'm just putting down
some turquoise here. This is a Winsor
and Newton color really loved this
turquoise color. It's a lovely bright
turquoise, turquoise. He's actually my favorite color. That's why I use it a lot. And then I've got an old
toothbrush loaded up with water and they tapped off most of the water so it's
not dripping wet. What I'm gonna do
is I'm not going to use it to create splatters. I'm going to use it to brush across the page and see
what texture it creates. Luck. I said this is the
first time I've done this. I'm absolutely clueless. So what texture
we're going to get? If you use the tip of the brush, you're going to get
a different texture. Can you see how it's lifting off certain parts of the paint? And it's also dropping in
water droplets as well. So you got in Bloom's where
the water is pushing up the paint and creating these
lovely textured marks.
8. Showing You The Final Results: This one is the salt
technique that we used. You can see how lovely
that texture is. If you use logic granules
on wetter paper, you've got the bigger
marks as well. This one is the clean film. I'm just going to
peel that often show you the texture
that's left behind. How gorgeous is that? This would be really great for creating wrinkles
in skin if you're going to paints like an
elephant or a rhino, or if you just want
to simply add lots of texture to your flowers
or your backgrounds, this would be a really
nice way to do that. This is the crayon that we used. This one is the splatter effect. So it was the splattered
pink on top of the violet. This was using the
indigo on top of this really in blue while the
sucrose was still wet on. How gorgeous is this a kind of looks like
where you doesn't it? But this was me using a toothbrush to scrape
across the wet paint.
9. My Final Thoughts and Project: Thank you so much for
taking this course today. I hope you learned something new and I hope that you're
going to take away these techniques now to apply to your own watercolor paintings, I would love to hear about any further techniques that
you use to add texture within your paintings
because I'm always up for learning
something new myself as well. You'll project now is
to go away and create a painting using
these techniques that I've taught you today, I would love you to share
your finished paintings with us in the projects area. I always love to
see your paintings. Have a lovely rest of your day, happy painting, and
I will see you soon. Bye.
 Lindsey Dawn Art, Watercolour Artist