Transcripts
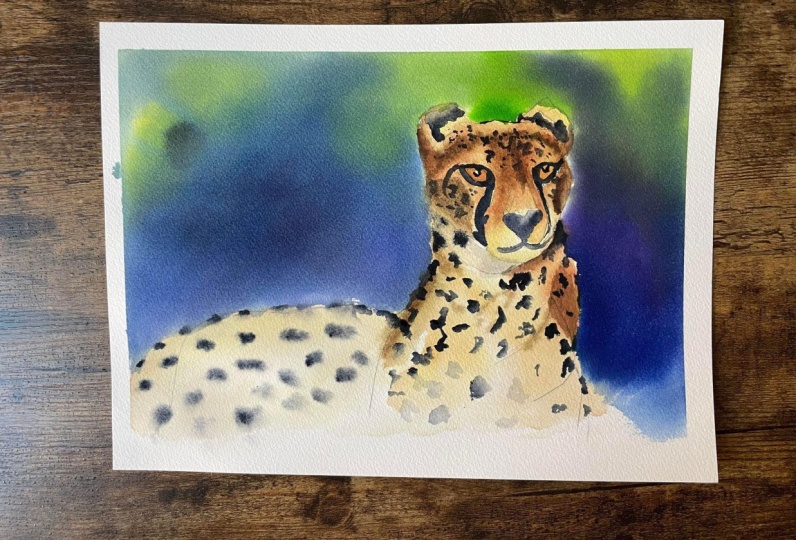
1. Watercolor Cheetah Tutorial Introduction: Hi, my name is Lindsey. I'm a self-taught watercolor
artists living in the UK. In this video, we're going to be painting a beautiful cheetah. I'm gonna be showing you
some wet on wet techniques. Will also be painting
wet on dry as well. I'll be talking through
my supplies and my colors and also the process of how I painted this beautiful cheetah. So grab your paints
if you're going to follow along with me today, I'll pop the reference photo down below for you
to have a look at. Or if you're going to enjoy the process of
watching me paint, grab a drink, and
let's get started.
2. Colours and Supplies: The paper I'll be
using today is by ash. It's cold pressed and it's £140.100% cotton and it's
known by 12 inches in size. I'll also be using a
non photo blue pencil, but you could use a
normal sketching pencil. This is a rupturing ticky. I'm gonna be using
an eraser as well, and also some masking tape to tape my paper down
flat to my board. I do this on all four sides. I've also got a
hockey or hake brush for large washes and
a mixing palette. This is my ceramic palette, is my favorite palette to use. We'll be using this today
and also some brushes. So use your favorite brush, but I'm going to be using
my silver black velvet, size ten and size
six brush today. And I will also be using some scrap paper to
test my colors on. I usually cut up old
paintings that I don't want. And I'm using an eradicate
or brush as well. For lifting. I'm gonna be using
some tube paints by Winsor and Newton and
Daniel Smith today. So these are my favorite paints, but just use
whatever you've got. I'll be using a container
of clean water. And I like to have two jars, one for rinsing off
my brush really well. And then I'll use the
other brush for either using a clean wash or for
picking up new paints. The colors I'll be using
today are Naples yellow, which is lovely, soft
and buttery yellow. I'll also be using
some burnt sienna. I'll be using ultramarine blue, which is a lovely warm blue, and also dioxazine violet. I'll be using Payne's gray on the darkest areas
of the cheetah. And then I'll be
using a range of greens for the
background as well. Some of these colors
I'm not going to use at full intensity. I'm actually going to
mix some of the colors together to get
more muted tones, just like this
dioxazine violet here. Next, we'll get
started on painting the first wash off the
cheetahs head and body.
3. First Wash: I've got my sketch of
my teeter, don't know. And if you're wondering
what pencil I used, this is a sketch or non photo blue pencil
by current dash. And I got these from Jackson's art supplies visa
is supposed to be really nice for sketching
because they're easy to erase. I'm going to just erase this area here because I
want to have that as a loss h. I'm using my masking
tape to tape down my paper. I just take my ruler
and I'm going to score down the edge of the
masking tape like this. The reason why I do this
is just to make sure that the edges really stick down tight to my board so that it holds the
paper nice and flat. On this makes the tape sticks so much better when I do this, I'm going to take my
big hake that I bought from Jackson's art
supplies as well. I'm just applying some
clean water all over. I'm going to apply it
over the cheater as well. Because we all gonna go over
with some Naples yellow. If you haven't gotten
Naples yellow, you can use a Hansa yellow or a lemon yellow
really watered down. Just a nice, subtle yellow. Even cadmium yellow will
be okay because if you water it down quite a lot and
use it on the first layer, although it's a
semi-opaque color, it doesn't matter because we're applying it to the first layer. I'm just making sure that
the paper is nice and wet. I'm going to smooth the
world throughout like this. So we got a nice
even layer and I don't want any puddles for men. Here we go nice and wet. You can apply a few
layers if you wish. So I've got my Naples yellow
and I'm going to apply this over the paper. This is a nice diluted
version of the yellow. I'm going to apply
it all over for most of the painting anyway. I'm going to just apply
it over the cheater, just in an area. And then what I'm gonna do is
I'm going to lift my board. I'm just going to allow some
of that paint to run down. So I thought I would apply
it to this area here on the right-hand
side where it's going to be slightly darker, just to play in a little bit of Naples yellow and
allowing that to run down the paper just give
a few interesting effects. You can apply a little bit more concentrated yellow as well if you want to darken
it up a little bit, just taking my cloth at the bottom and just
dabbing off the excess. Just quite catching all
the drips that drip down. I'm keeping my board
up for a bit just to make sure that that
color runs down nicely. We don't have any
puddles for men. I don't want any backwards. I want this to be a nice
smooth wash in the background. We're going to allow this to dry completely and we'll continue
working on the cheetah.
4. The Head and Body: Building Shape, Depth and Shadow: I'm going to wet the body
now with some clean water. If you're wondering what
brush I'm using this as my oval pointed wash brush. And it's a silver
black velvet brush. So in carefully
avoiding the face, I'm only taking that
water underneath the cheetahs chin area
and a little bit onto the background as well. Now I've got some
diluted Naples yellow. I'm going to start dropping this mainly over the
whole of the body, but you'll see me missing
little areas and leave him parts of the cheetah white. So I'm just preserving
bits of the white paper. I'm going to take that Naples
yellow over the chest area. And I'm also going
to start painting it over the back end of
his body as well. So you can see that there are a few areas that
I've left the white, so I've just skipped a few areas of the paper and
left them white. I'm going to start dropping in some diluted burnt
sienna as well. So this has got plenty
of water mixed into it, and this is neat. So I haven't mixed any other colors into the
burnt sienna for now. I'm just going to paint it onto the side area and also a
little bit under his chin. And then I've got the
Naples yellow again. I'm going to start painting
this onto the dry paper. This is just the face
area that I'm painting. I am skipping areas of his face where I want to
preserve the highlight. Particularly, I
can't say that word. Poke his eye where he is, I call it the eyebrow
is going to be white. So I'm going to leave that on
preserved the paper there. So I'm just taking this over his face and you'll
see sometimes I'll take a damp
brush and I will blend the edge just
to soften it out. I'm going to start dropping
in some burnt sienna as well. So this has got
water mixed into it, but it's probably a
coffee consistency, so it's a little bit thicker
than a tea consistency, is not completely transparent, but we all still going to see that yellow layer
showing through. This is going onto
the damp paper. So about paper hasn't
completely dried, it is still quite moist. You can see that I'm
taking a damp brush and blending out some
edges to soften them up. I'm going to start dropping this over the top of his eye area. And you can see lots and prone
to preserve the highlights above his eye where
I want his overall, I keep calling it an eyebrow. I want his eyebrows
to be lighter. So I'm going to take
that burnt sienna around his nose area as well, and also underneath his eye. If you're wondering
what brush I'm using, this is my size six silver
black velvet brush. So I'm using the smaller brush for smaller areas of his face. And then you'll see
me using my size ten. Then for larger areas, I am using this size
down here to blend out some edges on this
brush is damp. And now I'm taking
my eradicated brush and just picking out
some highlights. I'm lifting a few areas
where the burnt sienna traveled into areas which I wanted to preserve
as highlights. Now we'll build up some
color on the body. So I'm going to be mixing
the Naples yellow with the burnt sienna to get this
lovely orange brown color. It's like a reddish
orange brown. And it's a lovely
color actually. So I've mixed
mainly burnt sienna into this and then a little
bit of the Naples yellow. I'm going to wet this area
of the cheetahs chest. This is clean water going on. Again. You can see lots. I am wetting the
background as well. And we are going to pop a background into this
a little bit later on. But if you prefer not
to put a background in, I thought I would
show you that you can wear to the background and then allow some
of the color from the cheetah to seep
into the background. So you got a lovely sorts
of interests in effect, in an area of the background so you don't color in the
whole of the background. So I've got that lovely
orange mix that burnt sienna mixed with
the Naples yellow that I showed you just now. This is quite diluted, so it's got lots of
water mixed into it. It's a very light tone. I'm going to paint that onto
the back of the cheater then with a slightly darker
mix and it is very slight. I'm going to start dropping in this color into certain
areas of the cheetah, may need to build up the form and the shadows of the cheater. These lighter tones on mid tones will help to build up the
form of the t-test buddy. And we do want to get this lighter layer down
first before we start, are then darker tones. And that is going to
give a range of tones and really make the
cheater look more 3D and not so much of a flat shape is going to make it look more realistic as well. So I'm going to continue to
drop this orangey mixture in. I've mixed up a brown now with hookers green and a
bit of burnt sienna. But you could use another green, such as sap green or any
other queen that you've got. Just have a little practice
with the color mixes. So try your greens with
your burnt sienna. You do end up getting some
nice brands that way. I'm going to apply this
to the wet paper so that first layer that I put
down is still a bit wet. So I'm applying
this brown mixture into a few areas to build up the folds in the Cheater and also
to create the shadows. I've painted the brown mixture onto the side of the chest. That is to show that there
is a separation between his chest area and
his main body area. And because the chest is in kind of in front of the
back of his body, you are going to get a darker area where
it's creating a shadow. I'm going to wet areas
of the face now, so I've got some clean water. I am missing the eye
area and also the nose. I'm going to paint
this over the ears. And then I've got that
brown mixture again and I'm going to start dropping
it around the ears. We are going to add this into
just a few certain areas. I'm not going to put this
brown on all of the face. We are just going to get
those lovely brown markings that are on the cheater. So if you have a look
at the cheater space there is that brown mark and that looks a little
bit like an M shaped to me at the
top of his face. And I love that Mark and I loved the shape
that this creates. You're going to get that
lovely dark brown color down the middle of
his face as well, which goes towards his nose. We're going to just
paint that around the ears and also underneath
the eyes as well. So I'm going to continue
with this color. And if you find that I'm
painting a little bit too fast, then either pause this or
put this on a slower speed. And then you can try and
keep up with me. Then. I've painted on that brown and now I've got a clean brush. So this is dressed a
clean, damp brush. And I'm blending out the edges so you get to more
of a lighter tone. I'm also going to take a
bit of Naples yellow over the tops of the ears and
also onto his face area. So this is the Naples yellow mixed with a little bit
of the burnt sienna. And I'm going to
just paint that onto his cheek area and
also around his eyes. You can see that I'm just
using this opportunity to fix any outside areas of his face and then
taking a damp brush, I'm just going to
blend it all out. So it's sort of blends together and doesn't create
any harsh edges. Now with that darker
brown that we mixed use in the burnt sienna and a
little bit of Hooker's green. And I'm going to drop this
into areas of his face, mainly down the
middle of his nose where you've got that
lovely dark strip. I'm also using the tip of my brush to create
little hair strokes. You can use a very fine brush if you've got a
size 0 or size one, that would be perfect for this. And I'm going to continue
to line around his ears, also around the size of his face and there's
a few sort of darker markings on his
cheeks area as well. And this is going
onto the wet paper, so the paper is still most. Next we're going
to paint the eyes.
5. The Eyes and Building Depth on the Face: For the eye color.
Now, I've mixed the Naples yellow with a
little bit of burnt sienna. So you've got this lovely
orange creamy color, which is quite
similar to the color that we used on the
face earlier on. I'm going to start
painting in the IO, yet avoiding that
little highlight in the middle where his pupil is just getting the rough
shape of the eye really. And then paint in the
right eye as well. So this is a size six
brush that I'm using. If you wanted to use
a smaller brush, if you're more confident,
then go ahead and do that. And maybe a size two or a
size four would be ideal. Then I'm dropping in thicker paint while that
paint is still wet. So this is still the
same orange color and I'm just dropping it
in a little bit thicker. It Scott, not much water
mixed into it at all. I'm using my small
eradicated brush now to lift off a little bit of highlight just above his eyes because I accidentally
painted that in. So if you don't want to
end up lifting the paint, then just try to
paint around this. But I found this quite easy
to do with a stiff brush, just taken off a little
bit of paint to create a lighter area just around
certain areas of his eye, especially where his
little eyebrows are. Now I've got the brown again. So this is a lighter version of that brand and I just used. And so we're going to use
some dioxazine violet mixed with a little bit
of the Naples yellow. And that is to drill that
dioxazine violet down. So I'm just wetting this back
area with some clean water. And you can see that I didn't paint any water onto the body. And that's because I want
to get a hard line where this shadow begins
and the body is. I wanted to get a hard
line so I could pull up some hair strokes onto the body. So I'm pulling up those
little hair strokes onto the dry paper. Then I'm wetting this area
under the chin as well. So just a bit of clean water
with my size six brush. And then just run in last
dioxazine violet mixture, which was the Naples yellow and dioxazine violet
underneath the chin. And then I'm pulling up
some little hair strokes onto the dry paper to
create some little flicks. So that's going to
give the illusion that the cheetahs chin is fuzzy or fluffy and it's
going to look more like hair. Then I'm running some
of this underneath the chin and a little bit
underneath the right-hand, left-hand and right-hand
side chain as well. You can see I'm just
using the tip of my brush to make that
look more fuzzy. And then I'm using
a damp brush to blend out some of the edges. Now I'm taking the
burnt sienna and add in a little bit of Payne's
gray to dark and latter. And you're gonna get a
lovely dark brown eyes. I'm going to use this
on the face now. So there are some really
lovely dark brown markings that I wanted to get in. Some lovely shadows and shapes. Thoughts are really going to
create the form of the face. So I'm using a dump brush
in areas as you can see. So just running my damp brush along the edges to
really soften them up. But I'm leaning, laying
down the main shape first and then use my
damp brush afterwards. And that was because I wanted
to have a nice soft edges. But I did want to control
where that shadow shape went. Next, we'll be working on the cheetah's spots on his body.
6. The Spots on the Body: I'm using some Payne's
gray now for the body. So sometimes they're going
to be diluting this, so it's a little bit paler. I'm going to start off by wetting the back
of the body with some clean water and then taking a diluted version of
the Payne's gray. So it's got a little bit
of water mixed into it, but it is still really dark. I'm going to start painting
on these little markings starting at the top of his body. So I do want to make
these quote flat. So it looks like they're sort
of curving around his body. And I have painted
those markings up to the edge of his body because
his body then is going to look like it's more of a rounded shape rather than
a flat thing on the page. You can see that these are
more diluted and lighter. Now I'm going to be working
a little bit darker on the chest area and underneath
the cheetahs face. That's because I want that
area to be more in focus. And I want to draw the viewer's
attention to this area. So that's the reason why I'm
painting on the dry paper. But then sometimes I'm also
taken a dump brush and just blending out an edge
so it's a bit softer. So I am painting quite
dark and on the dry paper, like I said, just so this
area stands out a bit more. I'm brings it more
forward because I do want to make it look
like his boards ears. The background is a little bit, and then his chest
is brought forward. So I hope I'm making sense here, but you can see I'm
just randomly making these little marks
with my brush. Sometimes I'm pulling up a few little hair strokes up into the dry paper just to create
a bit of fear texture. And I'm just using
the tip of my brush really in areas
especially underneath his chin because I do want to create some of those markings
underneath his chin. There are gonna be some of
the markings underneath his neck and his chin anyway. So because that chain is
kind of over his neck, I do want to get that in there. And you can see
I'm not being too careful with these
brush strokes. I'm not making
them particularly. I can never say that word. Rounded shaped. So they are quite scruffy a lot is the reason why I
did that is because I wanted to create
some food texture and make it look
like the Tito is a little bit fury and
fuzzy and he is ferry. So I wanted to make
those markings a bit scruffy as I'm painting these markings on the
back area here as well, where his body is
more in shadow. We've got that darker
brown on the body there with these markings
at the bottom. Now I've made them
a bit paler so they are low diluted with water. And the reason why I've
done this is because I wanted the top of his body to be more focus and the
attention to be brought up to the face area and then the bottom where his legs
are or his pose. I want it to be a
little bit softer and more out of focus and
that's why they're lighter. You can see that I was
just using a damp brush to blend out the edges
of some of the spots.
7. Detail on the Face and Head: I'm watching the cheaters ear
now with some clean water, so I'm being very careful
just to let certain area. Now I've got some
concentrated Payne's gray. It's got a little bit of water mixed into it to get it flowing, but it is quite concentrated,
pigmented and dark. I'm just taking my brush here. So this is a clean brush and I'm running it along the
edge of that paint while the paint is
still wet just to get that lovely mid tone
and blend the edges. I've got some clean water
on the right ear now, I'm gonna run this paint
across the top of his head. The top of his head is dry and I wanted to make some little
darker markings like this. So it looks like he's got some dog food on
top of his head. I'm taking the paint onto
the other ear as well. And you can see it's a bit
softer where the paint, where the paper is wet. I'm going to start
painting in the nose now. So this is gonna be
the first layer. This is diluted payne's gray, so it's got lots of
water mixed into it. It's nice and loose
because I did want a lighter layer to start with. And then we are
going to build up the dark color on top of this. So in carefully following
the shape of the nose, and then I'm dropping in
slightly darker color. I am actually just fixing up
the shape of this nose here. I'm going to draw
up a darker color a little bit later on. And I'm painting in
his mouth burst. And we really careful
to make that mouth look very sort of irregular shaped because I don't like a month to look just
like a straight line. So you can see I did miss a little area there and then I'm just using a damp brush
to blend the edges. I'm just using a
dry brush there to sop up some of the paint with the paint went a
little bit wild. I've got some nice thick Payne's gray now
I'm dropping that into the nose area while that
first layer is still wet. So you can look at that lighter gray layer showing through. But you're also going to get a nice soft edge at the top
where the paint is still wet. And you can see that I am missing little
areas in the mouth. And that is to create a
bit of shadow and depth within the mouth and just
have it as a straight line. If you do look at
animal's mouth, is never going to be a
complete straight line anyway. You can see I'm
using some very dark Payne's gray now
around the eye area. So I'm being very
careful to paint those lovely markings
around the eye and nose. This is what's going
to give the cheater, the cheaters face
that cheetah looks. So we're going to be
very careful with this. This paint is really thick. You can see that I am walking
my paintbrush and lung. And then I'm just
using a damp brush along this edge here just
to get that mid tone, just to allow some of
that paint to bleed out a little bit so we
get a lighter gray. I am going to paint
this little area around the eye as well. You've got that lovely mark
in around the eye area. And then also some
spots on the face too. I'm going to continue with this dark paint around the eye. So be very careful to get that little flick
on the eye because the cheetahs eyes are very
sort of almond-shaped. I'm fixing up the
shape of the eye here. So you do need to be
really careful when working with such
a darker color. Because a dark color like
this is very hard to lift. And whatever make
mistake you make, it is really hard to erase. I'm using very thin strokes on the right-hand side
of that face there because his faces tune in
to the side a little bit. So you're not going to
see all that dark market on the one side. I'm using the tip
of my brush now to make these lovely
markings on his face. And I'm going to do the same
as I did with the body. These markings are not going
to be really rounded shapes. They're gonna be
scruffy and irregular shaped and just walk
little scribbles really using the tip
of my brush to make some tiny little marks
and little dots as well. So I'm making some bigger, some smaller to really change up the size and make this
look more natural. If you do look at the
cheetahs markings, they're not all going
to be the same size. They're not all going to be
the same tone and color. Sorry, the same darkness. And I am going to just paint in this lovely pupil as well. I'm preserving the highlights, so I'm not painting a complete
circle on one of his eyes. And you can see
lots of dead leaf, that little highlight
in the middle. And that's going to
give the cheetahs, I'm more of a natural look. I've mixed the Naples yellow now with a little bit of
the dioxazine violet. And I'm going to paint this
underneath the chin area. So I am painting this onto the wet paper and then bringing up some of the paint onto the dry paper for
little hair flicks. And then I'm also painting in the eyes with the
orange mix as well, which was the burnt sienna mixed with a little bit
of the Naples yellow, but it's a bit darker this time.
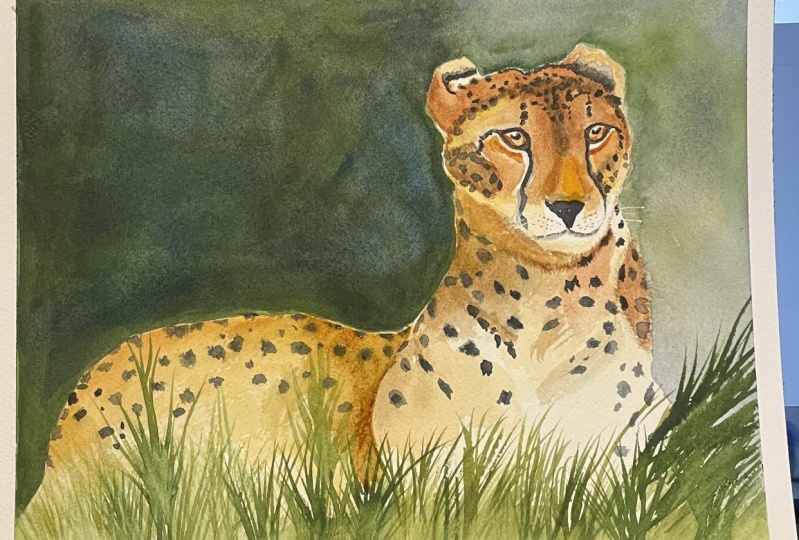
8. The Background: I'm going to start mixing some lovely colors now
for the background. So I've got sap green here and I've mixed in some
ultramarine blue to get this gorgeous gray
green color is lovely. And it's kind of
like a dark green. I'm going to
carefully paint that around the one side
of the cheater. You can see I'm being very
careful with my brush to not paint over
the cheetah's body, but I am being quite
rough with the edges. And then I'm going to drop
in some ultramarine blue onto color while the
color is still wet, that those two colors
mixed into one another. I'm taking my clean, damp brush now and just
running it along the edges to really lighten it
up on the edges so that we get a lighter color on the outside edges there. And it's also going to
help to keep up paper nice and wet on the edges so we
can work on it more as well. Maybe if I wanted
to drop in or if you wanted to drop in
other colors on the edges, then that paper is going
to remain wet or for longer and you're not going
to end up with a hard edge. I've got some of
the Naples yellow now and I'm going to
drop that in as well. So I'm just dropping
it onto the blue. And you can see where it's
mixing with the blue. It is creating bits of green in certain colors,
certain area, sorry. And then you'll also get in
the yellow mixing in as well. So you've got a range of
greens and yellows just from this one color go in down onto the page and mixing
with the blue. I'm going to dampen
this edge as well. Then using the sap green, I'm going to take that over the edges of the cheetahs ear. So you can see I'm carefully
painting around the ear as I am going to leave a
little bit of a highlight. So in a minute you'll
see what I mean. So I'm going to carefully leave a little white highlight around the edge of the cheetahs ear. And that's going to give the look of sunlight
coming behind the cheater is
also going to give the effect of some more
tear coming off is here, here, his ear as well. You can see that I'm dropping in some other colors as well. So this was a little bit of the ultramarine mixed
with the sap green again, you've got that lovely
dark green color. In. We go with a little bit
of ultramarine blue as well. And you can see that I'm popping up paint on while the paint is still wet because I want
those two edges to be wet so they blends
nicely together. I'm being quite scruffy
on the outer edges. You can see that we're
getting a little bit of a dry brush technique there. And that I did on purpose because I want lots of
texture in the background. I'm popping on some
sap green here, but do feel free to
use your own colors. You don't have to copy the
colors that I'm using here. You don't even have to Healon, you don't even have to
use blues and greens. You can use any
color that you wish. I think some pinks and magentas would look lovely
in the background as well. If you just want it to change
the color of completely, I'm leaving those edges
quite rough shaped as well. So they got some
nice hard edges. And then I'm also
adding some splatters. So I've loaded up my
brush with lots of green paint and some
ultramarine as well, and then dropping them splatters in while that paint is wet. In the next section, I'll be setting your project, so be sure to watch that.
9. Project and Recap of What You've Learned: I'm gonna give you a project now and that is to go away and paint your own cheats or using the skills that you've
learned in this class. In this class you've
learned how to apply paint wet onto wet. You've also learned how to
lighten and darken values. You've learned how you can
use a limited palette and by mixing a small unselected
amount of colors, you can mix those colors
together to get other colors such as browns and
grays and neutrals. You've also learned how to use complementary colors to suit and colors down and to get muted colors so they're
not full strength, such as mixing the violence
and the yellow together because yellow and purple are opposites on
the color wheel, so they are
complementary colors. You've also learned
how you can use other colors other than
black to create ducks. We used Payne's gray in this
video instead of black. You also learned how
to bring things into focus and push things
back into the distance. When we painted the body, we worked wet into wet and we also worked with
lighter values. When we worked on the
spots on the chest, we painted onto the dry paper. So those spots were darker and they were
brought forward a bit more. You also learned how to paint a fun and interesting
background. I would love to see your
projects posted onto this class. You can post them
in the projects and resources area that is the
tab underneath this video. I love to see your creations no matter what stage in the
painting process you are. As if you want
feedback and help, you can always reach out to me, That's what I'm here for. I will get back to you
as soon as they can. Have a lovely rest of your day. Happy painting, and
I'll see you soon. Bye.
 Lindsey Dawn Art, Watercolour Artist