Transcripts
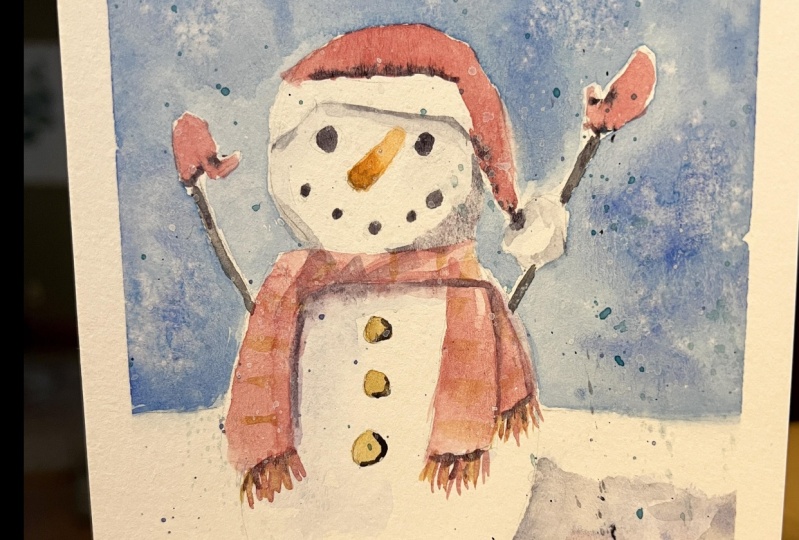
1. Watercolor Snowman Intro: Hi and welcome to this step-by-step
watercolor snowman lesson. We will be learning
step-by-step how to paint this fun
little snowman. Follow along with me
with your paint and learn how to paint
a lovely blue sky. I'm going to show
you how you can get texture in your sky
using some salt. And I'm also gonna
show you how you can splatter the water into the paint background as well to get some lovely texture
within your background. We're going to learn how to add some subtle shading and
color to the white snow man, because not all white objects
are completely white. There are lots of
reflected colors. There'll be painted nice
and slow for you so you can see exactly
what I'm doing. I will include lots
of up close shots as well of the facial
features and small details. Just so you can see
exactly what I'm doing. You'll also learn how
to add texture using paint splatters and also
plastic cling wrap. So we're gonna be adding some
lovely texture to the snow. And this is probably my
favorite parts of the painting. So what are you waiting for? Grabbed those paints. And in the next lesson, I'll show you how to
sketch the snowman.
2. The Drawing: In this lesson,
you're going to learn how to sketch the snowman. And I'll be breaking this
down into simple steps. So first of all,
draw a horizon line. So this is just gonna
be wearing my sky, is that at the top and the
snow is at the bottom. And then I'm going to draw
these two curved lines. So this is going to be
the snow man's body. I'm just dragging it up at
the top and the bottom. So it kinda looks
like a vase shape, two curved lines at the top. And this is going to be
this no man's house. And then I'm going
to start drawing in the snow man's hat. So I'm basically draw
in these lines over the age of his face and
then joining them up. And I'm going to give
him a little floppy hat. So he's going to have kind
of like a little Santa hat. I'm also going to draw
this circle shape. So this is going to
be the little bubble on the end of his hat. And then I'm going
to start drawing these long rectangle
shapes for the scarf. So you can draw the
scarf however you want. What I would suggest is having a look on places like Pinterest, Google, Places like Pixabay and Unsplash for some
ideas for snowman. Snowman, snowman is scarves because all scales can
be different shapes, colors, sizes, and lengths. But I decided to draw this
snowman scuff like this. I'm now going to draw
in a rectangle and K, if any, on the edges to make
it look a bit more cubed. If things are a bit more
curved rather than sharp, and they do end up
looking more cubed. I'm also going to add
three circular buttons. Okay, for him to circle eyes. So this is like coal in the snowman and then I'm
gonna do this upside down. So oblong shape. This is gonna be this
no-man's carrot nose. And then I'm going to do some little circles
for his mouth. Now you could just do
a regular mouth shape. So you can just draw a curved line if you
prefer to do that. But I liked the look of
these little coal mouth, then I'm going to start
drawing in his arms. So two little sticks for arms. And I decided to put
a little glove on EN. So I'm making sure that I draw a curved line to make it look like the sticks are
going inside the glove. And then I'm just going to
draw a simple glove shape. So this is just a mitten shape. I'm also going to draw
another stick arm on the left-hand side under making sure that those
lines are very narrow. Then I'm going to
draw the glove again. I'm making sure I draw the thumb pointing
in towards the head. Because if you have a
look at your own hands, your thumbs pointing
in towards your head, if you hold them up in
the air like a snowman, I'm going to use my Staedtler
Mars plastic eraser now because it's nice and
thin to erase these lines. So I'm just going to erase
some of my pencil marks. Then I'll use a very
soft brush to brush off the eraser pieces so I don't get the oil from my
hands on my painting. Next, I'm going to show you
the colors that are used.
3. Colours and Supplies: Now I'll show you the paint, colors and supplies that I used. I'll be using Daniel Smith
lavender dioxazine, violet. I'll also be using quinacridone, red and Hansa yellow. This is the deep. And I love this. It's by Daniel Smith. And also unify lesson, I'm gonna be using that
for the darkest areas and also Winsor and Newton
professional Winsor blue. Or you can use any
blue that you have, French ultramarine and cobalt, turquoise and nice to use. I'll also be using
some white gouache. So this is the designers
Winsor Newton Range. And I'll also be using 100% cotton Fabriano
artistically paper on a block. The size is nine by 12 ". I'll also be using my large
1 " oval pointed wash brush. Then for the small details, I'll be using a size two and a size six
pointed round brush, and these are by
silver black velvet. I'll also be using a size ten, and I'm going to use a spritz bottle to
activate my paint. I'll also be using some salt full texture in the background. Some plastic cling wrap. If you don't want
to use plastic, then you could use maybe a
brown paper bag scrunched up. I'm not going to be using
a mechanical pencil for sketching the snowman
and my trusty eraser. I'll also be using a ceramic palette for
mixing some cloths, for dabbing my paintbrush, and some clean water containers. And I do like to use three water containers
with clean water. Next we're go into
painting the sky. So grab that salt for texture.
4. The Sky: Adding Texture With Salt: In this lesson, we're
going to paint the sky. So you'll need your salt
for adding texture. But if you don't have salt, Don't worry about it. We are going to splatter
some clean water into the sky and you can add
texture to the sky that way. So it looks a bit
like snowflakes. I'm starting off with my large
oval pointed wash brush. I'm going to paint in the sky. I'm painting on dry paper. So I did a pre wet
the paper first. And this is the Winsor blue
That's going onto the paper. I also added a darker
color by adding the Lunar Violet in
with the Winsor blue. And if you don't
have Lunar Violet, you could use another color like indigo or Payne's gray
would work really nice. Just another dark color to add to the blue to darken it up. But that's completely optional. You feel free to
paint this all in one color if you feel
like that's best. And I did wish that I started painting around the
snowman features first because the way that I painted this Latin at
the top of the paper. And then working my way
around the snowman, I did find that more difficult. So I wish I had started painting around the
features first. So painting around the arms
and the hat on the face. And then moving onto the larger
areas of the background. I'm using my size
ten brush here. I love these brushes
because they've got a lovely pointed end. If you're not very confident
with using larger brushes, do use a small brush
around the areas of the snowman and you can get more control with
a smaller brush. So I'm just carefully
painting using the dark blue and also
the Winsor blue as well. I'm just painting carefully
around the snowman. I don't know if you noticed, but this dark color really makes the white areas of the snowman
really pop off the page. And that's because of
the contrast between the light areas of the snowman and the dark areas
of the background. This is a really good
way to bring out a white subjects and
make the white subject really stand out by adding a dark color next
to the light areas. I'm also adding another layer of the blue because I
needed to smooth it out. But you don't have
to do this if you've got a nice even
layer on the sky, you don't have to follow
what I'm doing here. I just felt like I needed to smooth it out because
I was getting a few backgrounds and
uneven drying marks. I'm loading my brush up
with some clean water now it's happy in that
water into the background. So I'm making sure that I tap this water into the background while that paint is still wet. Because if your paint such joy in this isn't going to work, you do need to have wet
paint before you do this. I'm simply just tapping the
back of the paintbrush. This adds little droplets
of water onto the paint. And it pushes the paint outwards and creates this lovely texture. I'm going to take my salts now. So this is sea salt. You could use regular table salt or any size salt that you have and apply this to the paint while the paint
is drying a little bit. So you don't want the
paint to be too wet and it can't be completely
dry or at work. And I'm just going to
allow this salt to dry completely before moving
onto the next step as well. So next we'll be painting
this no man's body and adding a shadow
around the scarf as well.
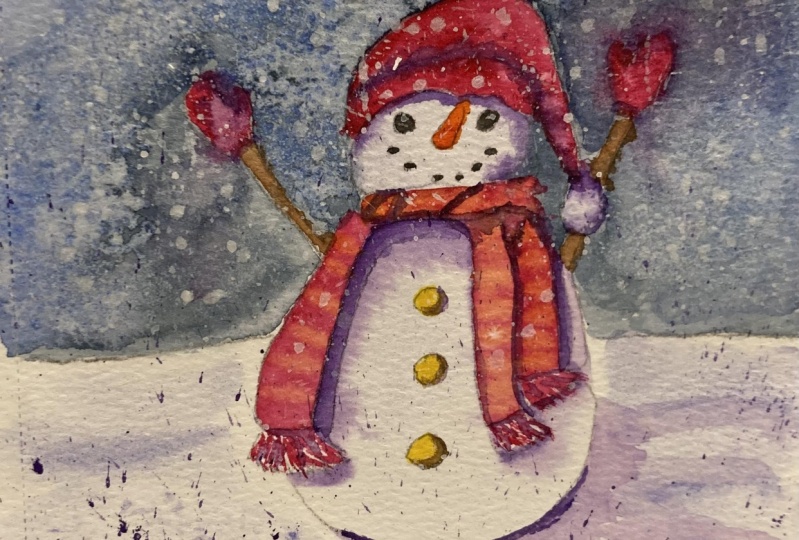
5. The Snowman's Body and Scarf Shadows: We're going to paint
this no man's body now. And although a snow
man's body is white, if you have a look
at a white subjects, even if you look at a snowman, you'll also see reflected colors in that white snow
man or white object. So I'm going to pop in a few shadows and I
didn't want to use a gray because I do want
this painting to be quite vibrant and fun. So I'm pretty wetting around the scarf and
the snow men's bodies. And I did paint over the
buttons as well with the water. And I'm taking my lavender. This is very watered down. And if you don't
have the lavender, you could use a very
watered-down dioxazine violet or a very light blue
if you have when. That was really nice as well. And I'm just going to
paint around the scarf. I'm going to paint on a
little bit of the body. So I'm not painting the
whole of this body. I'm going to leave lots
of the paper showing. And that's because I want to
have a really light body. I want to create highlights
by leaving areas of the paper showing
on that I'm going to take my damp brush. So this is a clean
damp brush and I'm just blending out the edge
to make it nice and soft. So you can see that I'm
just blending the year job. I'm keeping this
lavender very diluted. I'm very light because I
do want this to be light. The key to painting
a white subjects is to keep your colors really diluted and very light in tone. While the lavender is still wet, I'm going to start
dropping in some shadows using very diluted Lunar Violet. Now if you don't have
Lunar Violet, like I said, you could use a Payne's gray or a dark color like an indigo, or you could just use a darker
version of the color that you've popped down on
the snow man's body. So you could just
use it a bit more concentrated and that would
create a lovely shattered. Then I'm going to run this color down the
edge of the scarf. So because that scarf is coming
over the snow man's body, we're going to naturally
get a shadow there. So I'm just painting that
on using my size six brush. I'm also going to paint it
underneath the scarf as well. And then using a damp brush, I'm just going to blend that out because parts of this
painting has dried now. I've got more concentrated
Lunar Violet on my brush now and I'm
just going to run that down the edge of the scarf. So this is going
onto the wet paper. So that paint that
I previously popped down is still wet and you can
see it bleeding outwards. This is just going to
really bring that scarf out and make it really
pop off the page. I'm also going to add
a nice non diluted, so a very nice thick
mixture of the Lunar Violet just around this edge
here in the top corner. And I'm just going to
run it down a little bit down the edge of the
scarf, but not too much. Just a little bit underneath the scarf as well to make
it really stand out. Make it very dark where the scarf is hanging
over this no man's body. Next we're gonna be
adding shape and shadows to this no man's face.
6. The Head: Adding Shape and Shadow: We're going to add some shape to the snow bands head and face. Now. I'm going to add some
shadows to his face. I'm starting off with
some clean water. I'm painting carefully around
his nose because I don't want that dark color to
travel into the news area. But I have painted
over the eyes and also the mouth because
we're going to paint them in a darker color anyway. I'm going to pop
on the same color that I used for the body. So this is the
lavender very diluted. And I'm going to start painting that on the right-hand edge. And that is because
I want the light to be hitting the left-hand
side of the snow man's face. If we paint the shadows mainly on the right-hand
side of his face, that's going to
make his face look more domed or more rounded. And it's going to give his
face some color as well. So we're not just looking
at a flat blob on the page is going to make his face look
really interesting. I'm also going to
add a little bit of lavender to the bubble
on his hat as well. Now with slightly more
concentrated lavender, I'm going to run that
at the base of the hat. So this is going to
create a shadow. And also at the top
of the scarf as well where his head hits the scarf. And I'm also going to paint
this in a rounded shape. This is gonna give the head of the snowman a nice bowl shape. And I'm also going
to add that to the bubble on the hat as well. So I'm going to take
a damp brush and just blend that out to
make it nice and soft. And now taking some
of the Lunar Violet, I'm also going to run that
at the base of the heart, but you can see that I
missed a little area. So this is my knee go in into the depths
of the heart with the dips in and it might be
slightly more in shadow. I'm also going to run
a little bit along the side of the face
to really darken it up and make that
bull bull shape of the head look more rounded. I'm also using a size six
brush if you're wondering. So this is my
smaller brush again. I'm also using the Lunar Violet to add shadow to
the bubble is fail. So just a little bit
where it hits the hat and also around the edges to
make it look more rounded. And using my clean damp brush, I'm going to blend some
of that color out just to coax the color out a little bit so we get a bit of a mid tone. I'm also going to add some of the lavender to the
left-hand side, but it's very light
and then I'm going to blend that adjunct as well. Next, I'm going to show you
how to paint the snow and add some texture using
some plastic wrap.
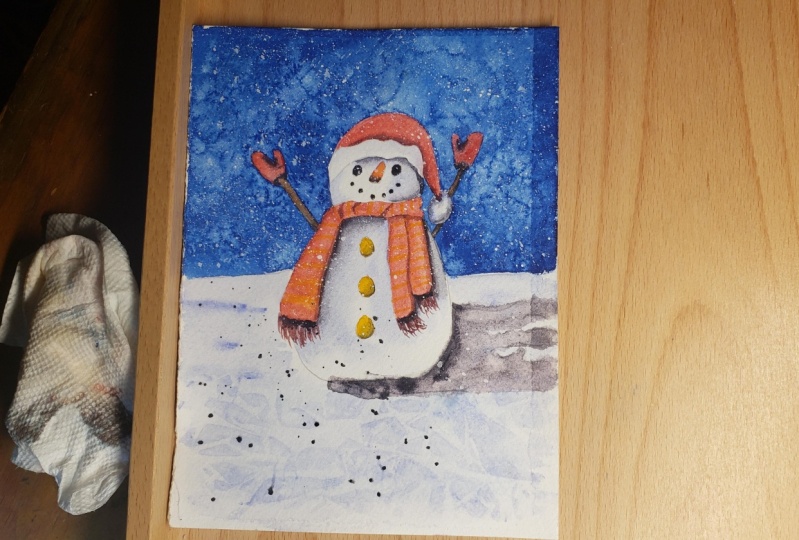
7. The Snow: Painting White Subjects and Adding Texture: In this lesson,
we're going to add the snow and we're also
going to add texture. I'm gonna be using lavender, and I'm also going to be
using some plastic wrap. So I'm going to start off with my oval pointed wash brush, laying down some clean
water all over the snow. I'm making sure that I carefully paint that water
around the snowman. And now I'm taking some very diluted lavender and I'm keeping this lovely
enlight to start with. We are going to build
the color slightly, but I want to keep the
tone lovely and lights because snow does look white, but we're going to
have reflected colors. And these bit of lavender
is just going to create shadow and depth on
a bit of form to the snow. So we are going to
leave bits of the paper showing I'm taking slightly more concentrated
lavender now, but it is very light style. So I'm just going to use some sweeping motions
with my brush. I've just picked up more
concentrated paint. So this has got slightly more
paint in it and less water, but it's still very light. And I'm just going to add
a few sweeping motions with my brush just to
add a bit of shadow. You can see that the paint
is not very concentrated. It has got water mixed into it, but my brushes not
dripping with water. So it's not spreading
really far, is staying where I'm putting it. But I am just going to use a few sweeping motions
in a few places. Now I'm going to scrunch
up my plastic, wrap, open it back up, and then lay it down on this
front part of the snow. Now I'm going to kind of squeeze
it and moving it around. You can move it around
wherever you want it to. And this is going to create
the patterns on the paper. So wherever you see the bits of the plastic
touching the paper, that's going to create
the pattern on the paper. So you'll see the
paint showing through the plastic wrap when
you put it down. I'm just going to use my fingers to move it around
and press it down. Now you want to
leave this to dry completely before you
remove the plastic wrap. And in the next
section we're going to paint the scarf, hat and gloves. If the snowman.
8. The Hat, Scarf ang Gloves: We're going to start
painting the scarf, hat and gloves if the
snowman in this lesson. So taking the quinacridone red, I'm going to start off with
a nice medium consistency. So this is lovely and vibrant, or quinacridone, I've
really vibrant anyway. So even if you add
quite a lot of water, those quinacridone red
colors are still going to add a lovely punchy
pop of color. And because they're very
concentrated in pigment. So this is a medium consistency. Like I said, I would say
this is milk consistency. So it's probably got 50 50% water and
paint mixed with it. So I'm just going to paint
the main part of the scarf. I'm starting off on
the left-hand side. And then I will come along
with my smaller brush. And I'll add a bit of
the yellow into this. Just painting on
some curvy lines while the paint is still wet. Then I'll continue with
the quinacridone red. I'm going to paint this over the top of the scarf as well. So you can see I'm just
taking my time with this because I don't want to be painting on some of
the snow man's face. First, I am coming
in a little bit at a time with yellow swap in my brush over and
making sure that I paint wet into wet while
the paint is still wet. You could always allow
the scarf to dry completely before you add
these yellow stripes. But I just liked the look of the fuzziness of these stripes. It made it look a little scarf, look a little bit more woolen because you had that
sort of blight outlook. I'm painting the top
part of the hats now using the
quinacridone red again, I've switched to my size
six brush because I just felt I had a bit more control in a smaller area using
my smaller brush. And I'm just going to paint that quinacridone red
all over the heart. Taking care of painting slowly. I'm quite a slow painter anyway. But take your time with this. There is no need to
rush this at all. Just enjoy the process. I love painting
with watercolors. I find it really relaxing. And especially painting snowy Christmas Eve
themes like this. I just find it, it gets me into the Christmas spirit a lot. Now with a bit more
concentrated red, I'm just going to run
that over the top of the hat and also just
along the left-hand edge. And I'm just blending some of that color out a little bit. I've got the Lunar Violet. Now. I'm going to apply
that to the heart, just the base here where it hits the fluffy
white parts of the hat. And that's going to
create a lovely shadow, just making it look
a little bit more. 3d. Unit also brings
up that color up. So it looks like there's
folds in the hat. I'm just going to read
some of that color down the left-hand
edge of the heart and also at the base where it hits the little
palm, palm as well. Now I get to painting
the gloves and I'm using my size six brush again. So this is just the quinacridone
red is going on again. Now I've got some
Lunar Violet on my brush and I'm going
to apply that to a little bit if the glove mainly around the crease of the thumb. And that's going to create
a lovely shadow and make it look like a 3D object. Also, I'm going to apply
some underneath of the glove where it hits the stick
of this no man's arm. I'm going to start
off this glove with the Luna file it because I
wanted it to be a bit darker. So I'm just going to start
off the glove like this. You could always do it this way. If you prefer, you
don't have to start off painting the glove
and then do the shadow. You could just paint
the underneath and then paint the red of the glove just like
what I'm doing here. So continuing to paint that quinacridone
red Lulu for the glove and using my
size six brush again. And then I've got the
Lunar Violet and I'm gonna run that down
the edge of the thumb, also around the curved
crease of the thumb, and down a little bit of the
side of the globe as well. So you can see here, I'm
just allowing that to bleed out into the wet
area of the glove. I'm now mixing up some
of the quinacridone, red and the hansa yellow. To get this lovely orange color, we're going to use this
on the snow man's nose. So I'm just carefully
painting that in using my small size six brush. And if you're not very
confident with using larger brushes to use a
size two or resizable, that would be a lovely,
nice small size to use. I'm going to use
my unify less on the bottom as well,
quite concentrated. And because we're
painting because I was painting that onto the
wet area of the nose. It is going to dilute that
color a little bit and that's why I was going in
with quite thick paint to create that shadow. Now I'm going to start painting
in this no man's eyes. And I left a tiny little
part of the eye white. So I just preserved a
tiny bit of the paper. If you're not very
confident with doing this, you could always go
in afterwards with a white gel pen or
white pencil or some white gouache or
acrylic paint that is completely up to you all
use some masking fluid. But I just decided to leave
a little glint in his eye. And then I was just painting on the tiny little coal mouth. I'm going to mix up a brown
now using my primary colors, which are the blue, red, and yellow together, I'm just going to
experiment with mixing different
consistencies of those three colors to get this lovely brown color that I'm using on the stake of the arm. Now, don't worry if you
don't want to do that, you could do is just use a premixed brown that
you've got, a burnt sienna. Burnt umber would
be really nice or sepia or Van **** brown, Something like that would work really well for this stick arms. But I just like to use
the colors that I'm using and it just is a bit more
challenging like that. I do like to see what
colors I can come up with by mixing the colors that
I'm using in the painting. I'm also using my
very small size two brush to run
down the left-hand, right-hand edge of the steak. And also at the base where his arm was hitting
the bubble of the hat. I just use Lunar Violet there and it was
quite concentrated. Then I've got some of
the lavender again. It's very diluted to keep this white part of the heart
more white than colored. But I did want to add a bit of a shadow to make
it look more 3D. And this is going
to create shadows. Add a pop of color, and it's not going
to look so flat. And next we'll be adding the finishing touches
for our snowman.
9. Finishing Touches: Let's add some last little
touches to our snowman now. So starting with the Hansa
yellow and you know, just painting the buttons. So using my size six
brush and carefully painting in these three cute
little rounded buttons. And then be very careful
with smoothing it out and making it look
nice and rounded. Taking the hansa
yellow now I'm adding the very smallest amount
of the Lunar Violet. And the reason why I'm doing
this is because yellow and purple are opposites
on the color wheel. And when they're
added to one another, they sort of dull
each other down. So I wanted to have a more dull version of the
yellow to create nice shadows. And so now I've got the
quinacridone red and also the Lunar Violet mixed together. So we want to create
a lovely dark red. I'm going to use this for
the shadows on the gloves. So I'm just painting this onto the dry paper just to run
the crease with them. And the main part of the glove, meats and also down
one of the edges. And I'm just carefully
painting that on. And then I'm just
going to also add some shadows on the
sides of the scarf. So this is the dark red
that I just mixed up. I'm just adding this using my size six brush down
the edge of the scarf. I am going to make this
shadow nice and thick. And then I'll come along
a little bit later on and I'll use a damp brush
and I'll blend it out. So this is my size
ten brush now, just nice and clean. And just using some
clean water running that brush down the edge of that paint while the
paint is still wet, it will bleed out and
create a nice soft age. Now we're going to add
some shadows using some diluted dark red that
we just mixed up. I'm just adding some
little triangle shapes and some curved shapes on the scarf just to
add a bit of depth and to make this graph
look a little bit folded. So what are the
most expert person to be creating shadows? Because I'm not that clued up with painting fabric
to be honest. But I did sort of guess at
where the shadows would be. And I'm just painting that
around the edge of the scarf. I did have a good look
at scarves on snowman online and got a
really good idea of where to put these shadows. I'm going to start off with a curved shadow around this
one edge of the scarf. I'm just printing that down the one age and nice thin
strip of the shadow. And then I'll take
my bigger brush loaded up with clean
water and it is damped, not completely soaking wet. And I'm just painting that. I'm running my brush
along the edge of that color to allow
it to bleed out. I'm also painting in that
shadow color underneath the top part of the scarf and
then blending the edge out. So I'm starting off
with a nice mixture of that dark red and then taking my clean brush and
blending the edge out. Now I've got slightly
more concentrated paint and I'm painting
a darker shadow. So I'm painting the dark
shadow around the edges of the scarf to really make that scarf and lift off
this no man's body. And creates a really
nice sort of 3D look. And it's going to
add more depth to the scarf and make it
really pop off the page. I'm also going to add a bit
of shadow to the bubble and then blending the edge
out with my damp brush. You do want to make
sure you don't have too much moisture in your brush. Because if you do, the water is going to push
the pigment out and you're going to get backwards and
cauliflower effects going on. I'm going to use some very
diluted Lunar Violet snail and running that along the
edge of this no man's face. I'm also going to use
some Lunar Violet just to edge parts of
the button as well. And that's going to
create a bit of a shadow. And I did make this
a bit too dark, so I just used a tissue, sits up the dark edge
of that button away. And I'm using a more diluted
mix of the Lunar Violet now, so I didn't want it too dark. Then I will come along
with my damp brush. I'll blend that out. I'm going to remove
the plastic wrap now. So make sure that you've allowed this to dry completely
before you remove it. But look at that
amazing texture. This is definitely the most
amazing part of the snowman. I think I just really loved that it really captures my eye. Now I'm going to use
some Lunar Violet and this is nice and dilute it. I would say this is probably
a coffee consistency, so it's got water mixed into it, but it's also quite vibrant. So you can see the Lunar
Violet quite a lot. I'm going to create a shadow. So I'm painting that around
the bottom of the snowman, around part of the
edge of the snowman. So if you think about the light hitting the left
at the snowman and then it's casting a shadow
to the right of the snowman. I'm going to just paint
that shadow coming off the right hand side
and off into the snow. So I am going to
leave a few bits of the paper showing in between. Then I will come along with my damp brush and I'll just
blend that color out so you get a mix of tones
within the shadow, then it's just going to
blend it out a little bit. I'm going to blend the
bottom with a damp brush. I've got more
concentrated Luna file. Let's now and I'm
painting that along the bottom of this
no man's body. This is going to
make it look like the snowman is
stuck in the snow. So it's creating a bit of a shadow where his
body is in the snow. I'm also going to add a
slightly darker Lunar Violet. And then I popped down
for the first shadow onto the wet areas of the
shadow that I've put down. This is slightly darker, Lunar Violet now and I'm
just using the darker shades because when a shadow is
right next to an object, it's always darkest right
next to that object. Now using some of the lunar
file and I'm going to start flicking on these
little splatters. I'm just brushing the
brush over the tip of my finger and then allowing some of the paints to
splatter onto the paper. So I like using my finger
because it's more, I get more control
with the splatters go. And now I've got dark
or quinacridone red. So I got this red again from the dark red we
mixed up code, yeah, which was the
quinacridone red and the lunar Phi Latin mixed together to get a nice dark red. I'm using my size two
brush here to sort of paint on these little
frills of the scarf. So this is gonna be
the Little Willie ends part of the scarf. I'm Kevin. Some of
those ends to make this graph have a bit of
movement on the ends. And some of those ends are
going to be a bit longer, some are going to be a
bit shorter to give it a bit of interests. Then taking some Luna file
as I'm going to paint that over the top to
create a bit of a shadow. And also, I'm going to paint
some of that Lunar Violet in-between the red wool threats. And that's going to
create shadow as well. They, so it's going
to give the ends of this shadow more interests
and more dimension. Next, we're going to
put some snow splatters and the backgrounds to
make this extra festive.
10. The Snowflakes and Your Project: I'm going to splatter
in the snowflakes now. So I'm gonna be using some
white gouache for this. So this is nice and creamy
mixed with a bit of water. I'm using the end of
my finger again to get some directional
snow splatters. So I'm just brushing the brush over the edge
of my finger and I slowed it down for
you here to show you that I'm splatter in that
over the background. I'm also splatter in
it over the snowman. So you can see some of
the slow splatters. A London on the snowman
scarf, face hats, gloves. This is going to make the
snowman look really christmas. C is going to bring the
snowman into his surroundings. And so it doesn't look like he's a cutout object on
a piece of paper. He's in a snowy scene
and the snow is covering him just as it
would be in the sky. So I'm just using my finger to make those snow splatters go in all
different directions really. And then I'm using the
tip of my brush to add a few little snow
splatters myself. You could always use the other end of
your paint brush and dip your paintbrush in some
watery paint like this. Then use that to add the snow splatters and that
becomes more rounded. But I did get better control, just use the ends
of my paintbrush. You could always use
a smaller paintbrush if you preferred as well. I think a size two or a size four would work
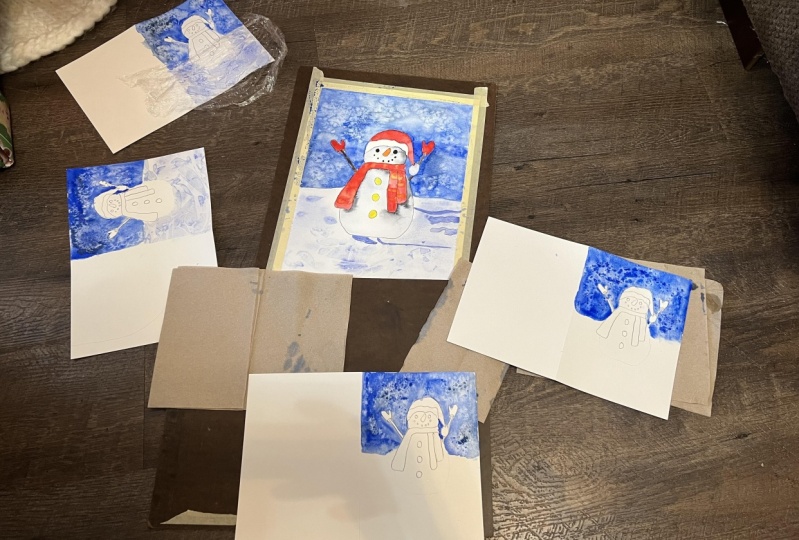
really well for this. Your project now
is to go and paint your own snowman using the skills that you've
learned in this class. Remember to share your
snowman pictures with us in the projects
and resources area. I'll give you some feedback
if you ask for it. But we always love to see
your beautiful creations in whatever stage of the
painting process you're at. Do remember to give
me a review as well because I love
having your feedback. And it's happy painting.
 Lindsey Dawn Art, Watercolour Artist