Transcripts
1. Introduction : Hello and welcome to my class. Episodes, save our project. Today we're going
to be designing beautiful watercolor
postcards on a special surface called
Hardy paper bindings. And Ryan, I'm a
graphic designer, straits and I advocates
and drawing on a daily basis to improve your
well-being, escape away. It's in the wonderful
world of art. Really improve and enhance
your artistic drive. This is the second episode
of the art projects series, where we will be creating a watercolor postcard to send
out to a special friend, family member, or a colleague, or somebody that you
haven't seen in awhile. You may or may not have
heard about cardiac paper, but you can tell,
but I'm excited, so I'm sure you're
gonna be excited. I'm gonna go through
the ins and outs of this wonderful natural rag paper that we know as Bacardi titles. You can follow the entire
process step-by-step. And we will start by
preparing our surface. And in this case, it
will be curvy paper. But if you don't have
car the paper you can use any watercolor
paper that you have. We will sketch out our
design using pencil at a bunch of beautiful,
wonderful watercolor. Do some painting outlining, adding some textures,
and then adding in some highlights with some
lovely white markers. And then finally,
we will be writing a beautiful message on
the back of our postcard. And then the final
step will be to put it in an envelope and
send it out to that wonderful person so that he puts a smile on their face. While you're waiting. Grab yourself a nice drink, get yourself a nice treat. Get your materials ready. Sit back, relax, and
let's get started.
2. Class Supplies: Hello and welcome back. Let's now start this class
by going through some of the materials that we need to complete this wonderful class. So let's start off with the mediums that we're going
to use for this class. So let's have a
look at this now. So firstly on the screen
I've got my watercolor and I'm gonna be using watercolor for this class in this project. So just grab hold of whichever
watercolors that you have. They can be any grade. They don't need to be
professional-grade watercolors. It can be just student colors or any watercolors
that you have, it makes absolutely
no difference. The next item is just a standard pencil to
do some sketching work. I've got a fine liner, just any fine liner will do. But if you have one that
has waterproof ink in it, then that will be much more beneficial because
we're using watercolor. But however, if you don't
then just grab hold of any finite as actually have
preferably in black ink. And then on the screen I've
got a white marker pen. This is one that you've
probably seen me use quite a lot in my
previous classes. This is just a standard paint marker pen
and it's in white. So if you have a gel
pen or white gel pen, you can go ahead and use that. However, if you don't
have a white gel pen or a paint marker pen that it's
not the end of the world. We can still carry
on with the class. Let's have a look
at the other items. We've got an eraser
just to robots, any pencil marks
that we don't want. And then we've got
this funny little tape contraption thing here. Now this tape is just scotch
tape that I use to kind of pull my paper down and tape it into place
when I'm using watercolor. So if you have washi tape
or any other type of tape to hold down your watercolor
paper or your surface, then just grab hold of
that so it's ready. And that's it for the mediums and some of the items that
we're going to use. So it's hardly any, Isn't it? So let's now move on to the most important part of the class and that's
is the surface. So let's have a
look at that next.
3. Surface: Okay, so for the surface, I'm gonna be using cardi PayPal. Now, I'm going to introduce
you to this paper in a bit more detail
in the next lesson. This paper is absolutely
awesome and you can tell I'm getting excited already by just saying it's named Hardy paper. However, I'm going to
go through the ins and outs of this paper
in the next lesson. So if you have this paper, then grab hold of
it to get it ready. And if you haven't got it, not to worry at all, just get hold of any watercolor
paper that you have. And if you want, you can go ahead and cut it
into a smaller shape that's similar to mine because we're gonna be
designing postcards. We want to keep them minimum
shape, nice and small. And then we also need
something to send them out in, and that is an envelope. So you can see here, I've got some C6 size envelopes. These are just plain
white envelopes that I got from the pound store. They don't need to be really high-quality
envelopes as long as they work and they can
hold your artwork. Just get yourself some
envelopes that are cheap. And if you haven't
gone envelopes, then we will have a
solution for that as well. But these are going to come into play towards the
end of the class. So if you've got them, get them ready and
put them to the side. So that's it for the
actual materials. So let's just see
what we've got. I've got it all mixed
up on the screen here. That's not very good, is it? It's all mixed up and mumble
jumble dopamine his green, but you know what it is? Again, the list will be available
in the resource sheets. So do check that out. If you want to have a look at an itemized list of what we're gonna be
using in the class. So just get your materials
and your surface ready. And if you have
watercolor paper That's really big or it's
in an odd shape, then just cut it down to size
so it's approximately A6. I'll leave the exact measurements
in the resource sheet. So do check that out and
we can now move on to talk a bit more about this
wonderful cadre paper. So let's move on to that next.
4. Khadi Paper: Okay, welcome back. Let's now have a look at the wonderful world
of cardiac papers. So you can tell I'm super
excited, of course I am. So let's have a look
at these papers. So basically, this is a very different type of surface to use in watercolor
and any other medium. It's referred to as rag paper and it's made in
India, in Karnataka. So if you haven't heard
of this paper before, this is basically a very
thick heavy weight rank paper that's made with 100% cotton. Now, this is produced
and made in India. So it might be a bit difficult
for you to get your hands on this depending on what parts
of the world you're from. Being in the UK myself, we are quite lucky
because we get quite a lot of imports
from all around the world. And my local art
store actually stocks this wonderful paper
and just tell it that I actually started using this
paper quite a few years back where I bought
the actual sketchbook. So if you see over
here, I've got the sketchbook comes in, sketchbook form, soft
cover hardcover. It comes in original
sheets like this, that's a pre-cut and it comes
in bigger sizes as well. So you have your standard A6. We have a five. It goes all the way
up to age three. And then you have these
oversized size sheets as well that you can
order in singles. However, when I did get this original sketch book and that's how I started
my career journey. I got this hardbound
sketchbook from car. They actually ordered it online, but I didn't really
like the sketchbooks. I'll show you here the
actual sketchbook itself. It's quite nicely made
in terms of quality, but the actual paper itself, it's a little bit too thick for my liking for a sketchbook. So generally, I use
sketchbooks quite a lot. If you've watched any
of my classes before, you know that sketch booking is one of my favorite habits. And this I actually was really excited about when I bought it a couple of years ago. But it just turned out
to be a little bit too thick to do
everyday sketching on. And for me, for my
personal preference, I didn't really like it. You can see here that I've done watercolor work, ink work. I've even used markers on there, so just normal
watercolor markers. It gives some
really nice effect. But personally, I just
didn't like using it, so I just actually
stopped using it. And I've got a lot of this left. It has this beautiful deck
old look on the edges. And if you go on to the actual
cardiac paper websites, so let's have a look
at this over here. So you can see on
the packaging you've got the cardiac papers
website down here. I'll bring it up on the screen. It gives you the ins and outs of what this paper is all about. It's really nice in
terms of its texture. Very unique. Watercolor
behaves on it slightly differently compared to your general watercolor
paper and surface. So if you haven't tried this, I highly recommend that
you do give it a go, get yourself maybe a small pack. They do, however, be quite expensive depending where
you're getting them from. So basically a small pack
like this, this A6 size. I got this for five
pounds, 75, which again, if you think of it in the
grander scheme of things, isn't really too bad for a
high-quality watercolor paper. So I'll just show you this. I'll just move these
out of the way. It comes in various
different GSM weights. So this blue one over here, I've got this one is 320 GSM, the red one is 150 GSM. And I've got it in both
sides is the A6 and the A5. The actual sketch book
itself, this one, I think the GSM on this one is a little bit heavier
than the 150. I think it's around
about 200 or 230. They also do a really
heavyweight version of this, which I think it's
more than 600 GSM or personally not
tried that one. So if you really like thick, heavy stuff, then
maybe go for that one, just try a sample of it. If you have an art store in your local area that
actually cell these, maybe ask them to just give you a sample so you can try it out. Because I do know some
people don't like this actual paper itself the way the watercolor
behaves on it. It might be something
that you don't like, especially if you're
used to using or the more standard
watercolor surfaces. So I'm just going to show you this, get this
out of the pack. So just move this out
of the way over here. Let's look at these
small ones because these are the ones that
we're gonna be using. So let's just take a
sheet of this out there. And I'll take another sheet
of the thinner one over here. So we've got the
thin 150 GSM here, and we've got the
thicker one over here. And you can see it's all
bumbling apart, isn't it? As just the nature
of this paper? It's got this beautiful, thick, really nice
texture on it. So I'll see if I
can bring this a bit closer to the camera. To give you a bit
more of an idea, let's get a Zoom is zoom in on. That might be a bit
difficult for you to actually see the texture
of it on the camera. I'll see if I can get a bit
more of a zoom in zoom. That might be a bit,
as you can see, it's very, very thick. Texture is absolutely gorgeous, and it's very raw. It's a very raw paper. This is not something that
you're going to find in your normal art stores unless
they specifically stuck. So that was the thin one. I'll show you the thicker one. So this is that 320 GSM. I actually prefer this
320 GSM paper over here. You can see it's just gotten this gorgeous Canvas
like texture. Absolutely fantastic. And what I do love about this, I love these deck old edges
that you get over here. So you can see you've
got this rough, nice deck old edge. It just adds to the overall
effect of the entire surface. And that's one of the
reasons I love using this. And it will come to see when we demonstrate this in
the next lesson. So that was just an
introduction to cardiac paper. If you really want to know the exact makeup of this paper, then I'll read off
some of the features. So let's just
quickly do that now. So cardi basically means hand loom cloth woven
from hand spun yarn. It's usually cotton, but it
can also be silk or wool. Cardi is associated
in India with Gandhi, who in the 130s attempted to
revive village industries, not just weaving and spinning, but also paper-making as a means of generating
employment. So I would say it's a very
community-based paper. It's absolutely fantastic. And the origins of this
paper are just great. It's great supporting
communities, building natural resources and creating gorgeous
recycled paper like this. Thumbs up for that all the way. So let's have a look at what
else it says on the website. So what is rag paper? Rag paper is made
from cotton or linen. Rags are woven cuttings, cardiac paper are
made from cotton. T-shirt off course. So basically this surface is just a t-shirt
because saying that was unwanted and the
old now using it. So it's great for recycling, great for the environment. Let's carry on rag paper, have long fibers
and a stronger and more durable than papers
made from cotton. Lint is, which are
the short fibers of the cotton plant usually
used in paper-making. I actually love the
thickness of this paper. I think it's just
absolutely fantastic. Once you're painting
is finished on it, it just feels so natural. So rho, very rustic and you can actually get this great
textile feeling from it. It's like haptic feedback
on your iPhones. If you're into iPhones, it's great feedback that you get when you actually
touch the paper. And I just think it just
gives a wonderful feeling. And it's just great to do these single sheet projects
on what is a deco edge. So basically, this is the rough uncut edge of the sheet of handmade
paper caused by the Pope slipping
between the mold and the removable frame that basically the Deco during
the sheet forming process. Now, there is quite a lot of
videos that you can watch online of how this
particular paper is made and it is
quite interesting. It's quite fantastic actually. It's quite a long process
and it's very manual. So again, when you're
using this paper, you can always think about all the brilliant processes
that went into it. All the love, hard labor
that went into it. And now you're gonna be doing
a gorgeous painting on it. So some things to think about
is this paper absorbent? The answer to this
question is no. The paper is size, which means glue has
been added to it. The Pope stage, this is
called internal size. And again to the surface of
the sheet, the tub size. This allows watercolor
and ink to remain on the surface rather
than so can get into the sheets like blotting paper. For painting in oils, you should prime the
sheets with acrylic jet, so just as you
would on a canvas. But because we're
using watercolor for this demonstration
and this project, we don't need to
prime this paper. We can use it as it is out of these wonderful
little paper packets with a zero plastic on them. So let's now get started
with the project.
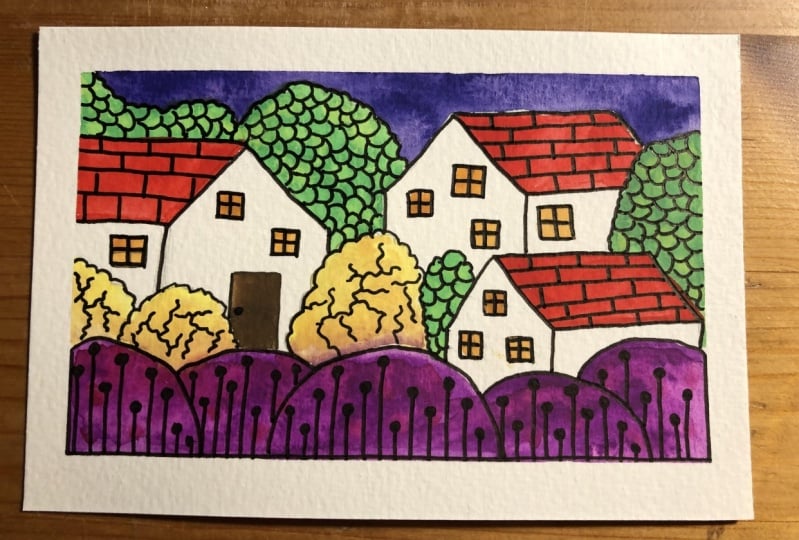
5. Pencil Sketch: Welcome back. Let's now
start our postcard project. So all we need to
do is grab hold of our paper and let's
start the first stage. So I've got my A6 cardiac paper here and the one that I'm
going to use is the 320 GSM. So I've just moved
the pack out of the way so it doesn't
get in our way. Then what I'm gonna
do is I'm just gonna go ahead and
I'm going to make my card a nice angle
on a landscape side. And I'm gonna get my
tape that I had before. And basically I'm just
going to tape this down on four corners so that we have it in position and so that we have a nice
border going around it. So I'll quickly do that now. Okay, so I've got my paper nicely taped down on
all four sides now, you don't need to do this
if you don't want to. If you want to paint all
the way to the edge, you can go ahead and do that. I've done that quite often, but sometimes I
just like to vary it so that I have a
nice white border. So you don't need to do this
stage if you don't want to. However, it does help
in keeping the paper in one place because the paper is quite heavy
weights as you know, and it does move around as you're drawing or painting on a. So let's start off
by doing our first, initial sketch, and
we're going to do this with our pencil, pencils. So let's do a nice
little drawing of maybe just a whimsical scene. You can draw whatever you want. You don't need to do the
same drawing as I'm doing. If you want to just
follow for a practice, then go ahead and do that. I'm just doing this nice
little whimsical style seen over here as I usually do. Because, you know, I love my whimsical art work
and illustrations. This is just my personality. Going into this postcard design. You can do whatever you like. You can do, maybe
something that you like to eat for the
recipient that you're going to send this to
something that they like or something that's a
memory that you both share, draw whatever you like. But for this stage of following
the lessons step-by-step, if you want to just
do a practice run and follow what I'm doing and
go ahead and do that. The initial sketch and all the stages of these
lessons are going to be in the
resource sheets that if you get lost while
you're doing this, if I'm going too fast for you, just refer to the resource sheet where you can go ahead and imitate the drawing
and then follow the steps again when
you get a chance. So let's continue with this. So I've just done these little
bumpy bumps out the front. What I'm gonna do
now is I'm going to drop in a couple of houses. So I'm just gonna go ahead
and do a couple of triangles here just to give
me an indication of where I'm going to have
my little houses, houses. And I always like to
work in odd numbers, so I'm going to have
maybe three over here, just keeping it really
nice and simple for this particular sketch
that I'm demonstrating, I'm going to do this
fairly quickly. So I'm just going to draw
the shapes coming like this, nice and easy and then just
drop them in like that. And then I'm just going to do
some lines going across for the roof keeping it
really loose and rough. Don't have to be
precise in this. This is just a fun little exercise so that you can produce some gorgeous artwork
that you can put on a postcard and then send it
out so that someone special. So let's just carry
on with that. And you can see,
I've just come up with this design here. Now. I'm going to go in
and I'm going to do some placements of
some more elements. Maybe some cool,
funky little curvy, ragged things like
this over here. Just like that. Just going
to place them in randomly. Now you don't have
to place these in exactly like I'm doing. You can actually go
ahead and place them in with your paintbrush if you're gonna be
using watercolor. But I always liked
the planet out. Sometimes it works out really
nice when you plan it out. But on the other
hand, it can also work out nicely when
you don't plan it out. Sometimes these emerging
paintings that you do, they just work out so nice. It's something that you
didn't even have planned. It just turned out
really gorgeous. So let's just do it like this. And I think that's
about enough for the elements we might add in a couple of elements later on. So I'm going to move
my pencil out of the way and I'm just gonna
get hold of my eraser now. So what I want to do is
I want to get rid of these lines that I've got
here, these extra lines, because I'm going to be using watercolor and I don't really want to show any of these
lines going through. So just over here, I've got a little
bit of a line there, a bit of an overlap. So if you just want to
get rid of the overlaps, go ahead and do that. If you don't, if you want
to leave them in and keep them nice and
roll and rustic, just like the paper,
then just leave them in. So I think that's about, say just a little
one over there. Fantastic. So the next step now is to go ahead and
actually add the pain. Sometimes what I
do is I go in with my fine liner first and
then I add the paint. But sometimes I just feel
like going in with a paint. There's Dan today is
that occasion where I just wanted to go
ahead with the paint. So let's get the pain or ready.
6. Watercolour: Good. Okay, so now I've
got my paint ready. I'm just going to be using my standard Winsor and Newton
normal colors over here, I've got a mix of colors here. I've added some in from
my professional colors, and I've got some from
the student range. So I'm just going to use a
nice mixture of these colors. Again, use whichever
colors you have available. Whatever watercolors
you have will work absolutely fine
for this project. You don't need to
necessarily use really high-end watercolor
paints or materials for this. As long as you've
got a nice range of colors that you can use, it will be all good. So what I'm gonna do is I'm
just gonna go ahead and give my watercolors a
nice little square t, square t of wet water
just to activate them. They can see some of these are actually getting a bit depleted. I'm just going to get me water. Now my waters a little
bit murky here, but you can't see that on the screen, so
it doesn't matter. So I'm just going
to wet my brush. So it's just wet the brush. And then I'm gonna
go in and just use the direct
colors as they are. So I think I'll start off
with maybe a bit of orange. I got a little bit of orange
in this well, over here, which is going to give
that a little bit of a mix on the brush. And I'm not going to
really bother too much about taking the
paint out and going ahead and mixing it in
the mixing palettes because I wanted to keep this
nice and simple and quick. Again, when you come to
doing your class project, than I do want you
to try working some beautiful magic with your watercolors or
whichever mediums you want. You've got a lot of
time to do this. There's no rush. But just for this demonstration, I'm going to do this fairly
quickly with the orange. I'm just going to go in
directly with the orange. Now. I'm just gonna go
in and I'm just going to go and start adding that beautiful orange into this front area of
my illustration. So just like that,
I'm just going to add that orange there. And I'm just gonna go
in with a little bit of water and just dab a little
bit of water on that. You can see using nice bits of moisture on there
and you can see that the paper takes it really well. It's not buckling up
or anything like that. And again, that's the
advantage of using this paper. You can really add a lot of water to it and a lot of liquid. And it really will give you
some beautiful results. I mean, look how gorgeous and
vibrant that is beautiful. Stop right now again, I'm gonna go in with
the orange all the way across on these
front bumpy bumps. Just take a bit more paint, a little bit more
water on that paint, and just going to go in and take as much of that as I can. And then again, I'm
just going to go in and I'm just going to fill
these areas in now. Okay, so now I've done the little orange
paths on the front. And while this is wet, what I'm gonna do is
I'm gonna give my brush a little cleaner, clean. So give that brush a nice clean. Then I'm gonna go straight
into the yellow over here. So you can see on
the screen I've got this gorgeous dark yellow color. I'm gonna go in with
quite a lot of water. And basically what I'm gonna do is I'm going to go in
and I'm just going to drop a couple of these yellow
dots on the top area here. You can see we've got a
bit of yellow going into that orange and it'll just
give it a nice blend of color. I'm gonna go into the water
again and get that yellow from my palette over here
from my lovely palate. And again, just going to
drop in some yellow the top while that water
and paint is still wet, just effectively doing
the wet on wet technique. Now, if you're new to
watercolors and you want to learn about the
basics of watercolor, then do check out my class
watercolors for beginners. It goes into a lot
of these techniques, wet on wet, wet on dry. And there's a lot of tips and tricks and hints in
that full class. So if you do want to check
that out, then check it out. If before you go ahead and
do this to come up with some really nice
effects in watercolor. But I'm going to
leave that as it is. You can see we've got
that nice melting of orange and yellow, creating that gorgeous
vibrant colors. So let's just clean
the brush now. Okey-dokey. So what we're gonna do now is we're just
going to wait for this front area to dry out and we're going to go
ahead and start filling in the other areas around the painting so that it doesn't bleed into one another. So that's the thing
about watercolor. You've got to basically plan out how you're going
to add your colors so that you don't
get this bleeding going from one area to another. If you like that effect than just leave it and just
start painting all over the place and you have this gorgeous abstract marble
look on your painting. But I'm trying not
to do that today. So I'm just gonna go ahead
and I'm just going to find different areas where I can
add in some other colors. So let's do that now. So I'm just going to use this
color that I've got here, this beautiful yellow
ocher color over here. It's absolutely gorgeous. This. And I take a nice
bits of that there. And I'm just gonna go ahead and I'm going
to drop that in, maybe onto this part. Over here. We've got this little
element and we're going to bring my arm over. So when trying to
blocking the view, because it's a bit
difficult to record and paints at the same time. So gonna go in with
that nice color there. And I'm just gonna go
in and add that in. Don't need to be exact. It can keep it as
loose as possible. You don't even have to follow the exact area of
your pencil sketch. You can go ahead and maybe just vary it a little bit if
that's what you want to do. Again, there's no
hard and fast rule on what you need to do for this. Just enjoy the process. That's what it's all about. M2 over there. I'm going to
have that color and then maybe I'll have similar
color down here. So I'm just going to drop
that same color down here. And what I'm gonna
do is I'm gonna be careful and not touch this area as you can see where
I've got the wet orange. I'm just going to basically
go ahead and I'm just going to leave a nice little gap over there and I'll just
stop it from going in onto each other and bleeding
or hover over the place. So I'm just going to
leave that one there. And let's just finish off
that edge while it's wet. Let's just get a bit
of water on our brush. And then what I'm gonna do
is I'm gonna go ahead and maybe add a little
bit of this nice, gorgeous brown color
that I've got here. One of my favorite colors, this absolutely gorgeous, this sienna, burnt sienna color. Look at that fantastic stuff. So just a bit of that. And then what I'm
gonna do is I'm just going to drop a couple of these drops of
this using that wet on wet technique just into the lower part
of this shape. Just to give it that variant and add a little
bit of interests. And again, it's going in with that and it's
going to go in. And I'm just going to add a little few dots on
here, just like so. And you can see it just
adds that beautiful, beautiful variants are just
going to clean my brush, pick up a bit more paint, and then just go ahead
and just add the tin. Fantastic, gorgeous
stuff that isn't it. I'm not sure if you can
see this on the screen properly because we've got
quite a lot of reflections. So let's maybe move
the light a little bit back so you can
see that a bit better. You can see that
a bit better now. So again, I'm just
dropping that in and you can see it's very wet and moist so you're gonna get a nice bit of blending going on. So just like that, it's going to drop it in at the bottom. I'm going to leave it like that.
7. Adding Elements: Okey-dokey. Now what I'm gonna
do is I'm going to wait for the paint to dry up and I'm going to start
adding in some green elements. Now I'm going to just
do this as I go along. So I've not done any shapes
for my green elements. I'm just going to add them
in wherever I see fit. So let's do that now. So I'm just going to grab
hold of my green paint. So just bring it on the
screen so that you can see gorgeous bit of sap green. They're just going to
add a little bit of water to get it nice and moistened up and activated nice bit of sap
green over there. And then I'm just going to
carefully drop in some sap green over here to just create a little
bit more interest. And you can see these areas
of now completely dried out. So I don't need to
worry about that sap green bleeding into that edge, although it might do if
it's still slightly moist. So what I'm gonna do is
you're just going to turn my hand around
and just going to bring it in like this
so that it works nicely. Just going to move
that paint out of the way so that it
doesn't come in the way. It's just use my hand
slowly to just add in these lovely little side
details that really will enhance the overall look
of this mini illustration. So again, I'm just
randomly adding these in. I'm just going to add a bit
more green and maybe have some of these elements over here just to vary it a little bit. So we don't look too
similar in all areas. And it's always nice to add
that and lovely pop of color, which always looks fantastic. I mean, color is just
amazing, isn't it? It's such a blessing colors. So just like that over there and maybe make this one a little
bit bigger down here. Again, you don't have to
do this if you don't want, if you want to draw these in at the beginning so that you've
got a guide to follow fine, to do it in whatever way. Like what you're
comfortable with. I always like to
add a little bit of random implementation while I'm going along just to make something a bit more interesting and it's a
bit more fun, isn't it? So we add elements like you didn't know
were gonna be there. It just adds to the
overall amazing experience as just continue doing that. So a bit more of the green. And then I might spread a
little bit of green here just behind these elements that I've got that I've got
to wait to paint. So just a few bits and
bobs here of green, sparkle that green all over
that gorgeous paintings. So just like that. Again, just creating
these little peaks. It looks nice and balanced. And I think maybe
that's about it. Or I might have
another one up here. Yeah, let's add
another one here. So just like this, I'm gonna go in and
I'm just going to add a little one down here that's coming up and kind of covering the front part of
the edge of that house. And then this can kind of
go down over this area. And it can kind of like overlap behind this particular shape. And maybe just have a
little bit more down here. Just like that, keeping it
really nice and simple. Creating these random
shapes that you don't plan. It looks absolutely fantastic. Now green is gorgeous. One of my favorite color greens, love green, lower bits of green. So chose like that there
maybe make these peaks are a little bit higher and maybe just drop in
a little bit more. You can do this as
much as you want. It's so much fun just to create this beautifully evolved
image that starts off with a pencil
sketch and then you just add so much
gorgeous color to it. So just like that, I'm going
to leave it like that. I'm going to go in now and I'm
going to wet my brush now. So just give a little
bit a spin on that. And then I'm going to
go in and I'm gonna get some blue from my palette area. If you can see on the screen, I'm gonna go in and
I'm gonna get some of this gorgeous Ultramarine blue. And then I'm just gonna
go in and drop this into the lower parts of
the green so that it comes up with a
beautiful blend, the blend color look at that. Fantastic, That isn't it. You can see it on the screen. Yes, we can look at
that beautiful stuff. So again, you're going
to clean the brush. I'm gonna do that same process
with the ultramarine blue. And I'm just going
to go in and just drop a little bit
of it on the base so that it creates a nice variants, create
something different. So we don't just have one color. We have a nice bits
of blue in there, which will melt
into that green and create effectively
like a shadow color. And it just adds to that
depth and that beautiful, vivid look of a
watercolor painting. So continuing with that, Maybe adding a bit more, just going to clean
my brush now again. Just pick up a little
bit more of that blue. Let's get a bit more
pigment on there. So again, just dropping that in. Really nice. As it's wet. This won't
work if the paint is dry. We're using this wet
on wet technique, which is absolutely fantastic. So just like that,
keeping it nice. And simple. So what I'm gonna do
now is I'm going to wait for this whole
thing to dry and maybe work on some of the
areas that we can still add paint to without
bleeding to the next area. So clean my brush. Okay, so now I'm
gonna do is I'm gonna get hold of this
gorgeous yellow, this beautiful deep cadmium
yellow color over here. Get enough of it on the brush. And then I'm just going
to basically go in and I'm going to paint
in this area with that gorgeous yellow and just fill it in because
there's nothing touching that on the side so
we won't have any bleeding, bleeding from one
place to the other. So just like that, going in with that beautiful,
gorgeous yellow color. And yellow is actually one of the colors that I started
growing on me now, I never used to
really like yellow. I used to prefer more
cool colors like blues and kind of like
the green shades. But now I don't know what it is. I think it's as I'm getting older and started changing
my preference on colors. Now, I'll actually started
like in all colors, so it's just fantastic
this yellow. So I'm going to do is
and just go in with that yellow and maybe just add
that yellow over here. But I'm going to be careful
and not touch the green. I don't want it to mix that
beautiful, pure yellow color. So just going to leave a little
bit of a gap over there. And then just bring this down
in this section down here. And again, bring
that all the way. Being very, very careful
not to touch that green so that we don't get
a horrible blady blady. But even if you do, I mean, if you're doing this and
you don't want to wait until the paint dries and
just go ahead and debit. It makes no difference once
it all dries up nicely, sometimes you can get a
really nice marbling effect from one color to another, and it looks quite nice. So again, there's no
right or wrong in art. Do it as you like it. So just like that with a yellow, I think I might just add maybe a little bit of yellow
to this area down here, just to brighten it
up a little bit. So again, just a bit, just a bit to that
same yellow going into this area over here. And I think that's
looking rather nicely. You've got these nice, gorgeous, warm colors all over the place. So beautiful, they
look fantastic. And I'm quite happy with that. So just like that, trying to not touch
that green and keep it really nice and easy. Fantastic. So we've now got a nice coverage of few different colors
bleeding into each other, creating a really nice, beautiful look on the page. What I'm gonna do is
I'm going to wait now until this completely dries. I think I might go make
myself a nice Yorkshire Tea. Actually started
drinking tea recently. I've always been
a coffee drinker. But the other day I
think I had a meeting at the office and
they run out of coffee and I'm really thirsty. He really needed
something to drink. And I ended up saying
to myself, Gina wat, Let's just have a
t. Let's just make a nice black tea and
see what it's like. After a few sips, it wasn't all that great, but then I started
getting accustomed to that taste ever since I've
started drinking, see now, so I'm on Yorkshire tea and I think I'm going to get
a bit a Yorkshire Tea out, have a little break, and then hopefully this
will all be nice and dry. And then we can continue
with our painting. So I'll see you after that.
8. Filling Areas: Oh, that was a gorgeous
bits a Yorkshire. See that, wow. Fantastic stove. Where have you been all my
life, right, so anyway, so let's just move this
Yorkshire tea out of the way. Put it on sides so
it doesn't interfere with our lovely painting that really hit the
spot that they had. Very nice indeed, I think I'll
become a tea drinker now. But don't worry, you
don't need to worry. I still drink coffee. Coffee is my morning fixes, so I'm having coffee in
the morning and I'm having teeth throughout the
day, so very good. Let's continue. Let's now just add a bit
of water to our brush. And why I've decided to
do now is I'm gonna go ahead and I'm going to
use a nice bits of red. So if you can see on the screen, I've got this gorgeous
dark red color, hair, fantastic color, that one, beautiful, vibrant, gorgeous red, so nicely
saturated on my brush. And what I'm gonna do is I'm
just going to drop that in, in this area over here and my green is still
a little bit wet, so I'm not going to touch that, but otherwise it's going
to become a bit murky. However, again, because
I'm doing this recording, this class while I'm
doing the paint. So I'm going to work
a little bit fast, just gonna get me hand above this so that it's easier for me. Again, when you tape down a
piece of paper like this, then you've got to work across the paper for the angles if you're not
comfortable doing it. So do bear that in mind. But in my watercolor
class for beginners, I do give quite a lot of tips
and tricks of using paper and taping it down and getting
it to the right angle. So do check that out if
that's what you want to do. But again, all I'm doing now is I'm just going
to add this red. What am I do is I might
just add a bit of red into this area over here
where we didn't actually have
anything designed in. And that's just to add a bit of balance to
the whole picture. I always like to work
in odd numbers in threes because it's just
a preference of behind. So I always like to have three elements that are similar
in color, three or five. I don't just like to have two. 3s and 5s work really nice
as far as I'm concerned. Just like that. Just going to
add in a bit of red there. And then maybe let's
make this one red hair, this nice big, big round, One thing that's
on the top over. Let's just make that red so I'm just going to bring
my hand over this. Don't want to do
a smudgy, smudgy. So nice bits of red, which will contrast very
nice with that green, and it will merge nicely with
that row color on the left. So just like that
carefully just adding this on and I want to just
leave this red as it is. I don't want to add
any more color to it. I just want that pure, vibrant, beautiful, warm red color. So it looks fantastic. So again, that green
is really dried off, so I don't need to
worry about that. So we're just gonna go
in and rarely carefully and just fill in that
beautiful shape. And just add in a
couple of dots here so that we have a
bit more saturation. And I think that's enough for the ready red color.
Okay, welcome back. So now you can see we have a beautiful partially complete
watercolor paintings. So all the areas are dry that
we had our watercolor on. The only things that
we've got left to do now is the sky area. And we've got these three
roofs of the houses. Well, I'm gonna do with
the actual house elements, the actual bricks of the house. I'm going to leave them as
the color of the paper. And so what I'm going to
basically do now is just go ahead and quickly fill
in these 34 elements. And once I'm done, then we can come back and start
looking at the next stage where we start creating some more excitement
with ink works. So I've just decided that
I'm gonna do the sky, just a basic ultramarine blue. And I'm going to do the roofs, maybe a purple shade
using indigo and read, or I might just go ahead and
do them really dark indigo. So I'm going to quickly go ahead and start doing that now. Okey-dokey, I'm all done now. I've painted sky area in
a nice ultramarine blue. And with the roofs
of the three houses, I've created this gorgeous
little dark purple shade using indigo and a
little bit of red. I'll just show you that
on my palette here. So that was just a
bit of indigo and a bit of red mixed up to
create this really nice, deep, beautiful purple color. And we're pretty
much done now on the watercolor part
of the project. So I'm going to let this
completely dry now. And then maybe I might
decide to do a final glaze of maybe a warm tone all over the entire painting
or I might not do it. It depends how it looks. Finally, once it's
completely dry, so let's wait until it dries, and then we can move on to
the next stage where we do some lovely inking work and
it gets really exciting. So I'll see you on the next one.
9. Inking & Textures: Okey-dokey, welcome back. Now we can see that our
lovely painting has completely dried and it
looks absolutely fantastic. So the next stage is going
to be the inking stage. And what I'm gonna do
is I'm going to use my lovely micron nought 0.8 pen for this just to go around the outline of all the
shapes in my illustration. Now, if you don't
like to outline your work and you just
like to leave it as it is. You can absolutely do that. Or if you want to use a
colored pencil that matches the actual color of the outline of all the shapes that you
have on your illustration. Then you might go
ahead and do that. It makes no difference. This stage is just a
personal preference. I always like the black outline. Look with my watercolor
illustrations. So that's what I'm gonna do. Now. I'm just going to start
off by using the fine liner. I'm just going over the
shapes just like this, just to create a nice
distinctive outline. So it gives it that lovely, sketchy look just like
that around the shapes. They don't have to be exact. And you can see over here, I've got this little
white gap where I left the gap so that the colors wouldn't
merge into each other. If you have that, just
leave it as it is. But if it's really
bothering, you, just go in with a little bit of water color and just fill it up. I personally like to leave these little, nice little highlights. And if you like these
accidental highlights, it just adds to the
overall feel and personality of
that illustration. So what I'm gonna do here
is I'm just going to go in, I'm going to draw on the
top area of that white. So it looks like that we went ahead and did this on purpose, so it wasn't an accident
and we did it on purpose. Well, your review is not
gonna be able to see that the person that is then there's two that are going to know. But you know, and I know
you can just leave. It looks fantastic. And we're gonna be adding
some textures to this. So again, if it really bothers you all these
little white areas, then just cover him up little bit more watercolor before you go ahead
and do the outline. So I'm going to continue
doing this now. So just over here is going to
go over this just like so. And then just fill in
the gaps where we have an outline and you
can see it's just enhance the look of that lovely, bumpy, bumpy parts of the
foreground of the illustration. It just gives it
that boldness and that unique kind of aesthetic. So again, all I'm gonna do now is I'm
just gonna go ahead and do that for all of these shapes that I have
for the actual Bruce, I'm gonna go ahead
and do the same. And where you can see, I've
got the pencil line here. I'm just going to
go in and just do the outline to close
all these gaps. So let's continue doing that and then I'll speak to
you once I'm done. Okey-dokey, We're now done. I've just completed
doing the outline for every single shape
on my illustration. And you can see it
gives it that Paul put that lovely little
boldness around the edges. And you can see over here
where we've got the green, where we just used the brush, the shape out this
particular drawing area. It just gives it that nice, roundish, very raw lock. It's an organic lock. It's not very straight and
it just adds to the texture. So you've got really nice
and straight curves here. And then we've got these
lovely organic style, kind of jittery curves over here that we created
with the brush. And overall, it just
gives it a nice look. So the next thing now to
do is to add some texture. So what I mean by textures
is basically hatching lines, cross hatching lines, stippled, and just coming up
with some patterns, these elements to just enhance
them a little bit more, to add that visual
interest and really make this illustration look
that next level, nice. So what I'm gonna do
is I'm going to do a variation of textures and I'm going to
use the same pen. So I've got my fine
liner over here. Continue using the fine liner, but I'm also going to use
the white marker pen. That's, I've got the
Posca paint marker, and I've got this in two
different line weights, so I've got a thicker
one over here, and then I've got a nice
thin one over here. And I'm going to vary this according to the
requirement that I want. So firstly, let's start off with maybe doing some lines
with the black ink. I've decided that what I'm
gonna do here is I'm gonna go in where the yellow
is the lightest colors. I'm going to use the black
on the lighter colors. So I'm just gonna go in and
I'm just going to create these nice little
wiggly patterns like this to just represent some lovely aesthetic to
make it look nice. So just like this, I'm just doing these
curvy, wavy lines. They're like little
stems coming up. And it looks rather nice. So you don't have to do this exact pattern that I'm doing. You can do any pattern
that you like, just come up with
a nice pattern to basically just fill
in that area and just add that little
bit of texture and to make it look a
little bit nicer, again. I'm just going to go in
and just go ahead and just create these lovely
little wiggly, wiggly lines coming
off one another. And it just adds that
extra bit of contrast. And again, that's
what it's all about, adding contrast so that
visually it looks pleasing. So with that similar pattern, I'm going to repeat
that where I've got the yellow, so
I'll do that now. Okay, so you can see I've got
this nice random pattern. And the kind of trick
really is to just make it flow organically
in a random way. Try not to. The same
pattern going across. It just gives it more of a more appealing
visual look when it looks random rather than
robotic or straight. However, if you'd like to do the more symmetrical
type of patterns, then go ahead and do that. This is your illustration,
your personality. So go ahead and do
whatever makes you happy. So what I'm gonna do now
is I'm going to move on to maybe this brownish
shade over here. So this, these brown ones and maybe these
ones at the back. And I'm going to
create a slightly different pattern on this one. So let's have a look here. So for this one, I might
just go ahead and just create these kind of
mosaic type shapes. There's just little
round bumpy bumps. So this kind of random style of pattern resemble like a
kaleidoscope style look over here where we've just got these little round
things coming up and just making up a little bit of texture on there,
just like that. And I'm happy with that. It looks like an
acorn doesn't say it just like this
acorn style pattern. And I'm going to repeat that
now for the ones at the end. Okey-dokey. So that one's done now, so we've just repeats it. That similar pattern that a Kahn style kind of
rough look going on, on those lighter brown,
earthy tones shades. So we've got this orange area, which I'm going to work on next. So for this one, maybe I
might start over here. And for this one I'm
just going to do these kind of straight lines. And then I'm just going to add a beautiful little
dots on the top. And I'm going to
create basically these little lollipops that are coming up from this
foreground element. And you can see it just adds that visual interests,
doesn't it? Rather than just leaving
it off for orange, it just looks really nice. So just like that, just going to add these
beautiful little lollipops. I'm going to vary them
different heights so that we don't have the same
thing. And that's it. So I'm going to do is I'm
going to repeat that now for all of these orange bars,
and then we can move on. So maybe the red one. So let's do that now. Okey-dokey, that's all done
and you can see it looks really nice with those
varying lines going up, but the nice little
lollipop heads on them. So we've nearly done most
of the texture work. Now, what I'm gonna
do now is I'm gonna go ahead and maybe just do a little bit of stippling
work on this area over here. However, I'm not going
to use a black ink. I'm going to switch now
to my white paint marker.
10. White Highlights: I'm going to use the thick one over here so you can see on the screen I've got my Posca
paint marker over here. This one is the
PC at 3M version. So I'm just gonna get this
argument a little shaky shake. And let's give this a pop open. So just like that, we should have a nice
amount of paint on there. And with this, what
I'm gonna do is I'm just going to go into
the red areas now. I'm just going to drop in
some lovely white dots. You can see beautiful
white dots. They're nice and
broad and thick. Just randomly dropping
them into place. And you can see that
little white highlight that we've got there, that
accidental highlight. It looks so nice with them. White dots underneath
doesn't say fantastic stuff, so I'm just going to continue doing that on the
red one here and on that red bond there. Okey-dokey. Now what I'm gonna do is
I'm actually going to use my white marker
pen now to add in some more details on
these edges so that it looks a little bit
more gel together. So like I said before, over here we've got this
nice little white highlight that were left over. I'm going to repeat
a similar pattern now on the red one over here, so that it looks more in sync with what we've
got over here. So let's do that now. Just lightly just dropping
in a little highlight there. Just like that. So it looks like we've
got something similar. And again, maybe we
just leave this one because this one's in the
backgrounds. We can leave that. We don't need to do
that there this way. It just looks like we've
done it by intention. So again, with the
orange areas over here, I'm just going to go ahead
and I'm just going to maybe just drop in
a little bit of white on the edges
there and maybe a little bit of white
on the edges over here, couple of dots there, and then maybe a little
bit of white there. And then just to finish it off, just maybe scatter a bit
of white on this edge. Again, this all depends how your painting turns
out once it's dried. If you don't want to do
this and leave it out, and you can just leave
it as raw as it is. So what we've got left now
is we've got the green. And for the green, I'm
going to switch to the thin point on
my paint markers. Let's get hold of that now. I've got my thin marker here. Now this one is the naught
0.7 millimeter tip. And I'm gonna give
this a shaky, shaky. Okay, So with this thin marker, which is really messy at the moment because I've
been using it so much. I'm gonna go ahead
and I'm just going to go in and maybe just drop in a few little dots over here where
we've got the green. So you can see we've got a nice variance where we've
got the thicker dots on the red and then we've got this really nice tiny thin
dots going on the green. It just adds that lovely
variants in look. So again, I'm just
gonna go ahead and repeat this on all
the green areas now. Okey-dokey, We're now done with the texture on all our
shape U-shape elements. Now, all I've got to
do now is maybe add a few cross hatching lines
on the roofs over here. I purposefully used
a dark shade over here so we can contrast
it with the white paint. Again, when you're doing your painting in
your class project, do think about the colors
that you're using. If you're using light colors, then you can add
texture with the black to give contrast and vice versa. If you're using darker colors
with your watercolors, then you can add contrast by adding highlights with a white. So just for this one, what I'm gonna do is
I'm just going to turn and tilt my
hand to the side. And I'm just gonna
go ahead and draw in some thin lines that
are just going across, just like this over here. Very thin, broken up
lines going across, letting it glide, giving
it that Jaggard look. And you can see that just adds that nice bit of
texture on the roof. So again, I'm just going
to repeat that now, going on the other two roofs, so let's do that now. There we go. We've now completed our texture work on our
lovely illustration. And doesn't that look nice? Now, I know you're thinking there's something
missing on here. Well, you'll be
right in thinking that because I can
tell you right now that we don't have any
windows on our houses. And I left this to
the end on purpose because it all depends
how the colors turn out, so I can place them accordingly. But if you want to draw in these windows right
at the beginning, you can go ahead and do
that For some reason. I just like to leave
them at the end so I can design in
some funky windows. So let's do that now, maybe
with just the markers. So we're just going to
use the market now. And again, this is
another reason to use waterproof ink because what I'm gonna do is I'm going
to use this marker, do my windows, and then
I'm gonna go in with a light watercolor
on top so that it won't Merck away
or muddy that market. But again, if you want
to go ahead and just do a pencil line and then put the watercolor on and
then do the ink over, then it can go
ahead and do that. It's absolutely up to you, but I'm going to go straight
in with my marker because I just want to have another cup of tea quickly. I don't
want to get this done.
11. Writing The Message: Okay, welcome back. So now our lovely paint
has completely dried out. Actually used a hairdryer
to dry it out because I just couldn't wait
because I was so excited. So let's now remove the
tape and you've got to be careful with the tape
depending on how long you've had the tape on
this cardi paper, because it does tend to
pull the paper quite a lot purely because of the fibers of the papers are due carefully. Remove the tape,
don't get too excited like me and just go ahead
and just yank gets off. We need to remove this
really carefully. So I'm gonna do that now. And you can see now
it's coming off really nicely and
taking it off very slowly at this kind of right angle motion,
just like that. So I'm just going to grab
hold of it from there, just pulling it upwards
and you can see we've got this beautiful line going all the way across
it just like that. Throw that away. And then going in the
direction of the other ones. So we have this big
side over here. And just taking that off
without trying to damage me. Matt, don't want to
damage my math now. Do I know so just carry on. So again, being very
gentle with this, you don't want to do
this big fast motion. So satisfying that isn't it? That sound. Okay, that beautiful
stuff again and again. Now we've just got
these ends over here. And I'm just going to
lift it off slightly from here before I go ahead and
start pulling on the tape. Just like that. Very carefully. Nice and easy. But four, look at
that gorgeous stuff. Look at our deck old ad. What a fantastic
edge, that isn't it. So again, I'm just going to
slightly lift it from here. And then I'm gonna go ahead
and start slowly pulling this tape all the
way while I've got the paper held down
with one of my fingers. And just like that, we can slowly get this off. And you can see it's taken away a little bit of that paper, but that's absolutely fine. So I said get rid of that. And Wow, look at that
gorgeous stuff over there. So doesn't that just
look fantastic? We've got this beautiful
little illustration with a gorgeous natural white
border around it with that beautiful deck old edge that you can find
with Cardi paper. Sometimes edges of the paper can kind of like come
apart a little bit, but that's just the
way this paper is. Some sheets might have
them glued down perfectly. Some might be a bit bumpy, but that's just the
nature of this paper. Each sheet in your pack
will be different, so it will behave
differently with the paint. But that's just the
excitement of it. It's because it's so on
balanced and kind of like very, very raw and random
the way it's made. Every area of the texture of the sheet is going to
be slightly different. So do enjoy that if
you've got cardi paper. So let's just lift this
up and you can see I've got a little bit
of a bumble over there. So just like that, we are complete now on this, I actually think I've
got two sheets it Oh, we'll get laughed at actually
got 23 sheets over here. I didn't even realize
that I went ahead and I just taped
down three sheets, but there you go. Three for the price over one. But I was wondering why
is this moving around? But then again, it just
made it so much more better because I had a
soft surface to work on. So don't using three sheets, just use one sheet now
I've got them two sheets to design for later
for my cost projects. Just move this to the side. And let's concentrate
now on our lovely. So you can see here
beautifully dry. It looks like it's being
pressed with a printer. I very high-end printer on a lovely little
sample of papers. If we just turn this around, you can see on the back, we've got no bleed through. It's not a dampened
or moisten the back. And that's the advantage
of this wonderful papers. So the only thing
we've got left to do is write a lovely
message at the back. Yes, because this is a postcard. I want you to write
a lovely message to the recipient that you're
going to send this to. It could be anybody, someone you've not met for a long time, a
friend, colleague, family member, whoever you like, just write them a
beautiful little message. I'm going to write
a little message. So once that's done, then we're pretty
much done and we can get ready for
our class projects. So let's do that now. It OK, So I've written my little message to
buy amazing students, of course So to my
amazing student, thank you for all your support
and for taking a class and sharing your awesome
artwork as always, all the best from your class
teacher that says May. So you may end up getting one of these in the post for me, especially if you complete
the class project. So the next part now is all
about your class project. But before we go
ahead and do this, Let's get our envelope and put our postcard
in our envelope, ready for it supposed out.
So let's do that now. So there we go.
Imagine having one of these come through the
pulse and you're like, oh, I wonder what this could be. Then you open it up and you get your gorgeous little
illustration handmade by someone special. And you get this beautiful
cardi paper rag finish and you have an
awesome little message on the back to port, a nice smile on your face. So what you can do with this, put it on the fridge,
put it on the wall, do whatever you like with it. But it's a reminder
that somebody has spent that time creating something
beautiful just for you. So that's basically
the entire class done before your class projects. So that's what we were doing. We were doing a watercolor
postcard on cardi paper. Now remember if you
don't have cardi paper, that's not a problem at all. Just use whichever
watercolor paper you have. But if you want to get hold
of some of this, then again, check out the
resource sheet where I've given you links to
where you can get this from. And you never know, I might end up sending some of this paper in the post
to some lucky students. So let's see what the
class project is all about and what that
entails on the next one.
12. Class Project: Okey-dokey, welcome back. Let's now talk about your
brilliant class project. I know you're excited
because I'm excited. So let's start off by
going through quickly the steps that you need to do in order to do your
class projects. So basically, all the
lessons that we've done in the class from the beginning
all the way to the end, just follow the steps in
the lesson to produce a practice postcard like Abdullah over here and do
some nice finishing on it. Give it a go. Try it out on paper. If you have cardiac paper, if you don't have cardiac paper, just use whatever
watercolor paper you have, cut it down to A6 size
and just give it to go. That's the first stage. Once you've done
your practice run, then stage two is to go ahead and do your own
postcard designs. So again, use similar steps, use watercolor, use any
other medium you like, and just build it in
stages so that you have a lovely little design on an A6, a piece of watercolor, and then flip it over
and write yourself a brilliant message like I did over here for your
intended recipient. And once you've done that, put it in an envelope
and post it out. But before you post it out, I want you to save some lovely
pictures of your art work and upload them on the
class project gallery. Made sure you upload
them so we can all see your wonderful work. And so we can learn
from each other and get inspired by each other. So that's basically it
for your class project. And as a bonus for the first five
students that complete the class and upload
their class project, there shall be receiving a wonderful little
postcard from me. So yes, first five students that complete the
class and complete the class project and upload their class project onto
the project gallery. They will receive one of these lovely little designs that I've personally
done just for them. So that's a nice little
incentive, isn't it? So again, the full
details will be in the resource sheets and in the class project
description of the class. So do check that out. And if you can also tag me
on Instagram once you've gone ahead and done your
class projects so I can see your lovely
class projects. So I'm just going
to quickly show you some other designs that
I've already done. You know, me, I love
to design every day and I pretty much do these
every couple of days. So let's have a look
on the screen here. So I've got the design
that we did in the class. Fantastic. I've got
this other design here, or care about. Lots of have one of
this in the post, comb through the post and put
a big smile on your face. I know you will get about
once a very similar, similar style to my
person, I would say. And then I've got this one here. You can see I've used a lot
of blue here and I've done the white dots with the white
paint looking very good. And again, another
one down here. Look at that beautiful
stuff, isn't it? I've done some crusty
cross hatching on there so you can see
crosshatching on there, some brick work on
those house roofs. And it looks a wonderful. And basically these ones
that I've got here, the ones where I've left that white border around and
I've taped it down. Also. If you don't like to do the
whole whiteboard of thing, then you can do like
this where you've got the entire painting on your cardiac paper or
whatever paper you're using all the way to the edge. And you've got this
beautiful painting that completes all the way to
that lovely deviled eggs. So that's another example. And the other
examples I actually got done all the
way to the edge. So it is another one that's a nice little bits of blend going on there from the yellow, the red and orange with some nice little stippling
white dots on it. And then I've got
another one over here, very nice autumn
theme over here, beautiful warm colors,
a mixture of textures. So just try out the texture work if this is the style
that you want to do. Again, if you don't want
to do this whimsical, funky style of mine, then that's absolutely
no problem. Do what ever
illustration you want, the type of illustration
that you like, or something specific for the person that you want
to send your postcard to. It's all good. As long as you start doing this, try working on it a
little bit by bit on a daily basis and you
just have so much fun. So I'll just continue with this. We've got another design there. You can see over
here, very similar, a lot of these elements
and colors and houses. Again, that's the theme
of what I like to do. So let's move on to another one. Very similar again. So again, houses and all these little patterns and designs
you can see on this one here, I've just drawn
these little circles to add a bit of texture. So just very it to produce different types
of designs and looks. And again, on this one
we've got a yellow sky. So again, just use
whatever colors you want. It can be as abstract
as you like. It can be as fun and
whimsical as you like. And again, another
one over here. So this is more typical of what we did in the class lessons. So again, we've
got the foreground and then we've
gotten three houses. And then we've got all these
lovely fantastic designs. And I've got another
one over here. So this one again
with the lovely, beautiful yellow sun, shiny sky. So again, just play
around with the colors, do the colors that
you like to do. I've got loads of purples here, some more cooler
colors on this one and then warmer
colors on the top. Play around, enjoy
yourself practice and just produce as many
of these as you like, and then just send them off. So those lucky people to put a nice smile on their face is
another few that I've got. These ones are the ones
where the borders here. So again, I've got ones that are taped down and I've
got this one here. This one's quite funky, one with some nice yellow roofs on them and some
nice criss-cross, crosshatching, a lot of
variance on those designs. And then finally, I've
just got this one, which has a
funny-looking one with some odd shapes on the houses. But that all God, so that's it Then. So basically, try your best to complete the lessons
and do a practice run, and then do your own version
and make sure you upload them on the class project
and tag me on Instagram, post them on your social media so that we can all have a look. And then the first five lucky
students that will complete it will receive one
of these in the post. So I'll hopefully see you on the next one where
we're going to wrap up the class and do
some final thoughts.
13. Final Thoughts: Okay, welcome back. Now, you should have completed all the
steps of the class, and hopefully you will have had a go at your lovely
class project. I hope you enjoyed this
process and as much as I did, and I hope it gave you that motivational push and that inspiration to
design something for some very special and
then continue to do this and post out your
lovely postcards. So please ensure that you
do the class projects. Follow the steps in the
class and make sure that you posted on the class
project gallery. And the first five students, like I said in the
previous lesson, receive one of these
wonderful postcards in the post directly
to them from me. And more details of
that in the class, project descriptions
of big check that out and what you
need to do to achieve that and be eligible to receive one of these
wonderful postcards. And you never know, you might
end up sending one to me. I might be waiting. So
let's just wrap the class. And hopefully you should enjoy this wonderful episode in
this art project series. To check out my other
classes where I go into a lot of details and how
to use certain material. Watercolors, pencil,
even soft pastel walls, alcohol markers, all
sorts of materials, all my classes that
haven't Skillshare, so do check them out if you feel that you want to improve on your skill level
or if you've never used these materials
or want a refresher, then it's a great way to start getting involved back into art and also follow me on Instagram and check out my other
social media channels. Have a look at my profile page on my skill
share where you can get all my other channels
and let's stay connected and please
share your artwork. Keep doing the artwork. Don't just stop at
your class project and produce as many of these
wonderful postcard. You can. Also, if you haven't
done episode one where we designed some
beautiful subject cards, do give that go and make
this a continuation. Improve on your level skills. Just start doing something
every day to keep yourself motivated and overall health
and improve your well-being, to just keep yourself
active in the world. So thank you so
much for your time. Thank you for taking the class. Thank you for listening to
me for such a long time. I hope to see you
on the next one. Take care of yourself.
 Imran Mughal, Graphic Designer & Illustrator