Transcripts
1. Introduction: Hello and welcome to my
class, Everyday Pages. Build a relaxing sketchbook
habit once bread at a time. My name is Imran. I'm a graphic
designer and illustrator. And if you watched any of my
previous sketchbook classes, whether it be the creative sketchbook or
sketchbook journaling, then you'll know I'm
a huge advocate of building good well
being in our life by creating a daily habit that will really give us a
way to escape away from the hustle and bustle of our daily life and enjoy
a little bit of time, a little bit of peace and quiet, creating beautiful sketches and writing our thoughts
in our sketchbooks. This class is a continuation
of my previous classes. But this time, what
we're going to do is we're going to focus on a specific subject or a topic
that you absolutely love. And that's what the entire
class is all about. I'm going to break
down the process that I've personally been doing for the last
couple of years, creating lovely spreads. This class will be
divided into six parts. And the first part, we're
going to be discussing what everyday pages are all about,
the thinking behind it, and the process that I want you to try following
so you can create the beautiful sketches in illustrations and writings
to put into your sketchbook. And then we're going to move
on to the class supplies. I'll go through some of the recommended supplies
that I've used, and then Part three, we're going to be concentrating on the subject and selection. That's where the fun starts, and we're going to explore all those lovely
topics that you like. I'll have a nice step by
step process for you to follow and narrow down
those subjects and topics that you may love to talk about or read up on or just have that lovely enjoyment time
where you're watching a video about that
certain subject. It may be vintage cars. It may be beautiful
old school camera. Coffee and cakes, one of
my particular favorites. As you well and truly know, if you've watched any
of my classes before. The fourth stage is
all about planning your spread in advance
in a nice kind of rough style so that you
have some direction and a bit of an idea of options
that you may want to explore. And then the fifth stage is all about the layout
and composition. Yes, I will be
providing you with a nice resource sheet that shows you
different layouts and possibilities across
different shapes and sizes of sketchbooks
so that you can print these out and use them as a reference for
inspiration when you can't figure out where I'm supposed to place an illustration or
a little bit of writing. Finally the final stage, where I'm going to
go ahead and do a complete demonstration of all the stages that we did before where I'm going
to do a bit of research, select the subject,
use digital method, and even go outside and gather some information on the
subject that I've chosen, and then amalgamate it all into a nice
little rough sketch, and then I'm going
to transfer it onto my sketchbook using the mediums that I absolutely love to use. So I know that you
can't wait to watch me do this so grab
yourself a nice drink, get yourself a nice treat, sit back, relax, get
your sketchbook ready. And let's get started
with the class.
2. Class Project: Okay, welcome back. Let's
quickly go through what your class project
is going to be all about before we
start the lessons. So this class is divided
into two main parts. The first part of the
class has all the lessons that will go through what
everyday pages is all about, the class supplies
that you need, and the step by
step process of how I create my spreads in my
everyday pages process. Then once we've done P one, then P two will
start where I will implement all of this
process that I've gone through from part
one and go through a real demonstration
step by step using my favorite materials
and supplies and selecting my inspired topics
and subjects that I love. Two part process and
then your class project is all about going
through P one and P two of the class and being inspired and creating
your very own first everyday pages spread of your favorite
subject, and that's it. And once you've
completed watching Part one and Part
two of the class, and you've completed
your beautiful spread of your chosen selected subject, using your favorite
materials and supplies, all you need to do is
take lovely pictures of the stages and your final
spread and upload it to the project gallery so
that we can all see your beautiful enjoyment in this journey of everyday pages, once you've completed that,
all you need to do is leave a nice review on the
class so other students can find this class and be inspired by your work so
we can all learn from each other and enjoy this
everyday process and bring it into our daily routine to improve our well being. That's it now. You know
what your class project is. Now you're in focus and you're ready to start
watching the lessons. Let's jump straight
into them next.
3. Everyday Pages: Okay, welcome back.
Let's now quickly go through what everyday
pages are all about, the thinking behind
everyday pages so that we can set the scene for the
next part of the class. What are everyday pages? Everyday pages is a
relaxing sketchbook habit that lets you enjoy your
favorite subject and topics. Through daily creativity, simple research and using
traditional materials. So let's now move
on to answering the question of why
everyday pages. So, number one,
everyday pages is a creative dive into
your favorite subjects, whether it be coffee, to nature, to vintage cameras, choose a topic that
you love and explore it through drawing,
sketching, illustration. And writings and even some of your daily journal
thoughts. Why not? It's all about that
creative journey through the subjects
that you love. Number two, it's a tactile, joyful way to create
any medium that you enjoy using or that's super satisfying for you to use, use that medium to bring your sketchbook spreads to
life one layer at a time. Number three, it forms a mindful routine into
improving your well being. Focus your mind, unplug
from the distractions, and enjoy the calming rhythm of working with
physical mediums, with your hands,
with your mind in focus and with your heart
and with a big smile. Finally, number four,
it will provide a gentle habit that builds over time with no
pressure at all. We're not looking at perfection or creating perfect
illustrations. It's all about creating and building this habit
over time that you can really explore and add into your daily routine and
reflect once you've created, revisit those lovely pages, and remember it all
with a smile because it's all about your
favorite subject. That's it. That's
the reasons for everyday pages and for you to jump into this class
and get ready to go. It's all about building that daily sketchbook habit where you actually go
ahead and draw something, write about something
that you love, and really build this
into your daily routine. So it provides you with a lovely escape for you to relax and improve
your well being. Let's now move on to the class supplies that you're
going to need in order to start designing and drawing up these beautiful spreads
in your sketchbook.
4. Class Supplies: Doke, welcome back. Let's now talk about the class supplies
that you're going to need for this class in order to do the lessons and do
your class project. Number one, yes, you're going to need a
sketchbook because the class is all about drawing and creating this
sketchbook habit. So yes, the most important
thing is a sketchbook. Now, I would advise that you get yourself a
watercolor sketchbook, preferably one that is 100% cotton at 300
GSM paper weight. However, if you don't have 100% cotton available wherever
you are in the world, then any good quality
sketchbook will do, but try getting a sketchbook
that has some decent paper inside it because
you're going to be using this on a daily basis, and you want it to be able to withstand your
mediums that you use, and on a particular day, you might want to swap
around your mediums. So it's really important
that the sketchbook can handle mediums that you go ahead and use
on a daily basis. And again, that's one of
the main reasons that I recommend using a
watercolor sketchbook. Now, these can come in various shapes and
sizes and formats. Whichever size you're
comfortable with, it makes no difference. But I do recommend
that you don't go too small with
this class because we are really creating a lot of details within the
spreads themselves. There's going to be so
many different elements, and you don't want
to squash them all together in a small space. Having a decent sized spread will really make the
job a lot easier, and it'll make it a lot fun. So I generally recommend
that you don't go smaller than an A
five size sketchbook. I personally like to use
A four and B five sizes. My personal favorite is B five, and that's the one that I've been using for the
last couple of years. I've particularly been fond
of using the Echa series. I've used a lot
of their books in different formats
in small formats, square formats, A five, and especially my
favorite one, the B five. I've tried out their ranges. They can be rather expensive. But I feel that having a decent quality sketchbook will really reap the benefits
of this entire process. Grab yourself a good
sketchbook and again, have a look at my recommended
class supply list in the resource pack, where I give you reviews of
which ones I've used and alternative to the ones that I used that are fairly decent. Two, you're going to need
some mediums to use to start filling in those beautiful
pages in your sketchbooks. Now, this is entirely up to you what mediums
you want to use. Generally, I tend to go with some pencils and then
some inking tools, and then some format of color, which most of the
times is watercolor. So whatever you like to use from a
traditional perspective, make sure that you've got your lovely mediums
and tools ready. If you're using colored pencils, they're nice and sharp
and ready at hand. It's always a good idea to
have all your tools ready. In your pencil case or in your container so that
you don't have to go running after your mediums if you can't find them all of a sudden when you're doing your beautiful drawings
and illustrations. And again, I've got a general recommended
supply list in that same resource pack, so do give that a look
and see which ones I use. But again, I'm going
to generally stick to pencil ink and then watercolor and then maybe some marker
work here and there. But I have to remind you that using markers can be
a little bit tricky, especially if you're
using alcohol markers, which I'm actually
saying do not use them for this actual class because
I don't intend to use them. But if it's something that
you really want to use, then maybe check out my class on alcohol markers and the types of sketchbooks that you can
use with those markers. But to be totally
honest with you, I'm going to say don't use
alcohol markers at all. Instead, use water
based brush markers. That's a medium that I use, and they won't have
any problem with bleed through that will
ruin your artwork. I would say avoid
alcohol markers unless you're absolutely
adamant that you must use them. In which case, you need to have a alcohol bleed
proof sketchbook, which can be quite difficult
to find at some point. Again, I'm going to recommend just stick to water
based markers. Some other useful items that
can help you along the way. I tend to use a lot of these, so I'm just going to
quickly list these out now. Sheets of plain printer paper. These are really handy to have, especially when we do the
planning stage of our spreads. We don't want to use
expensive paper for this. It's just to create
rough sketches and layouts so that we have
a direction and a focus. So a nice bunch of plain paper or even lined
paper, it makes no difference. Have them to the side.
It's a great idea. Number two, watercolor brushes, again, watercolor
brushes, you're going to need if you're
using watercolor paint. So it's always a
good idea to have a range of watercolor brushes, maybe some fine detail brushes, some medium round brushes. I tend to use one or two brushes throughout my
watercolor adventures, so I'll be using them. And again, it'll all be
listed in the resource sheet, the particular ones that I use. And alongside your watercolors
you're going to need. A jar of water, a couple of jars of clean water. A mixing palette is
always a good idea. Have some tissue to hand, some paper towels to
clean up those messes, or just to dampen your brush and get rid of all
that excess water. So these are usually
the typical supplies that you'd need if
you're going to go down the watercolor route. Having a sharpener and
an eraser is always a good idea if
you're going to be using a lot of colored pencils. And even when you're doing some light work with
graphite pencil, if that's the route
that you choose, having a decent eraser and a decent sharpener
will be super handy. And having some clips are always useful when you're
using a sketchbook so you can hold the pages together so they don't
flop all over the place, especially when you're applying watercolor or wet mediums. A bull clips or any kind of clipboard style
clips would work fine. And finally, some scissors. It's always a good idea to have some scissors at hand just
in case you want to do some cutouts and place
them on your spread to see how they so that's it for the other item
recommended list. And overall, we don't really
need that many things. It's just a sketchbook, a decent quality sketchbook. Get your mediums ready, have a few extra items that are going to help
you along the way, and you're ready to start. So let's now move on to the exciting stuff and focus on your lovely
subject selection.
5. Subject Selection: Hidoki welcome back. I
know you're excited for this part because we're going to look at subject selection. Now this is divided
into three parts. Part number one, write a list of five to seven subjects or things that you love,
like, and enjoy. Now, I've only said
five to seven things because sometimes if you have
a list of too many things, then it's difficult
to focus on one. So write as many as you want, have it on a piece of paper, and keep it to the
subjects that you really enjoy rather than
additional subject, which you can add
at a later stage. Number two, select anyone from that list that
particularly excites you at that moment in
time and highlight it with a highlighter or
just circle around it, so it's in focus on the
actual list itself. And finally, number three, place that sheet where
you've got the list of your favorite subject and
the one that's highlighted, place it in the back
part of your sketchbook. Generally, a lot of sketchbooks have this lovely kind
of pocket at the back. We can throw in a couple
of sheets of paper, small little kind of
cuttings ideal for this at but if you haven't got this, then that's absolutely fine. Just get that piece
of paper that you have and stick it at the back, maybe the back hardcover part of your sketchbook,
so it's inside. Stick it with some
sellar tape or a bit of glue or even
a bit of blue tech, whatever you have at hand. This will remain as our
reference list for when we continue doing our
lovely subject in our sketchbooks. That's it. Now we have initiated
our subject selection. We can move on to the next one, and that's all about
planning our spread.
6. Planning The Spread: Okay, welcome back. I know
you're super excited like me because we're about to
start planning our spread. So I'm just going
to quickly give you a summary of the options
and methods that you can use to start planning at this stage of this
wonderful journey. So, number one,
research your subject. Now you can research your
subject in two main methods. You can do the easy method, which is the most quick method, and that is online, go online in the
world of digital and have a look on
Google, pinterests, go onto websites, articles, YouTube, or you can
even use a little bit of AIchat GPT, if that's
what you want to do. But again, if you
don't like using AI, then just go ahead and
do the research from proper articles
that you can find online on your selected subject. The second option is
to go offline and go all analog
instead of digital, where you can go to libraries, visit the libraries and find books on those subjects
that you love, go to museums, go to shops, even go to art galleries, where you can have a look at your subjects that
have been painted by the masters and get inspired
by their color palettes, and their beautiful
compositions. And you can also
have a look at maybe some books or
newspaper articles or even some exhibitions
that might be going on or event displays in your area for that particular
subject or topic. Then number two,
you're going to be summarizing and sketching all of the information
that you've gathered, whether it be online information
or offline information, or maybe a mixture of both. That's usually the
route that I take. I like to do a bit
of online and a bit of offline and bring
it all together and start scribbling
away and writing a summary of my main
topic on plain paper, sketching rough outlines of the key elements that
I want to include. And then once you've done this, it doesn't have to just
be on one sheet of paper. It can be on two or three
or as many as you'd like. This is just the
initial ideation stage where you're getting
everything down on paper, really nice and rough, maybe summarizing some of
the areas that you find in maybe a book or a magazine
or on an article, just highlight and pick out those areas that you find
interesting or that are relevant to you
and have a look at the kind of photographs and
images of those subjects. And also look at the real life versions
of those things, too. So, for example, if your subject that
you've chosen is fruit, then maybe just go
to a fruit store, buy a couple of fruit, take
some pictures of some fruit, and do some studies on fruits. I love doing lovely watercolor illustrations
with some poetry, all about the wonderful
world of fruits. So that's another way
on the offline method. So try it out online, offline, get your
information together, scribble it all down on a
few sheets of plain paper, and that's that stage complete. And now we've got all our
information together and we've roughly outlined it and
planned it across our paper, our plain piece of paper. We are now ready to do the
layout and composition. So let's now move on to that.
7. Layout & Composition: O kidokF this next stage, the layout and composition, what I want you
to do is download the PDF that I've got
in the resource area, and this has all the
different variations and layouts and compositions for
portrait size sketchbooks, for landscape size sketchbooks, and also for square size sketchbooks for you
to get inspired from. If you can't come up with a quick layout on composition and you
can't think of anything, this is just there to
give you some focus and direction and some
inspiration for you to use. So print whichever one
is relevant to you. So if you're using a
portrait sketchbook, then print that sheet. Using a landscape or a square, then print that relevant sheet out and fold it up and keep it at the back pocket of your sketchbook just like you
did with your subject list. And that's it now. You've
selected your subject. You've researched it, you've
planned it on a page, on a couple of sheets of paper, and now you've refined
the layout and composition by looking at the template that you've
just printed out. So now you're going to be ready to start designing your spreads. So let's move on
to that one next.
8. Create The Pages: Dk, welcome back. It's now
time to create the pages. So this is the final
step before we go ahead and start designing
in our sketchbooks. So, number one, select the
summary pages that you want to include in your first spread that
you want to design. So those sheets of
paper that you put all the information on that you picked out
from your research, select the areas that you
want to use for your spread. And then number two, select the layout composition that
you want to go with and create a new plan
on a plain sheet of paper using your
selected summary page. So now you've got a new plan that you've used and picked
out the research and the little bits and bobs
and the drawings and the illustrations and
the writings that you want to go ahead with in your sketchbook and you've
decided that you want to go with a certain
layout and composition all you're going to
do now is you're going to just
amalgamate all of that, put it together in
a nice sheet of paper that reflects the
orientation of your spread. Then finally, number three, use your new plan and recreate
it in your sketchbook, start off with a pencil
to do the outlining, following along the patterns and the composition layout that
you've done in your plan, and then go in with
some ink and then maybe go in with a little bit of cross hatching, if you want. And then finally,
when it's all dry, give it a splash of
watercolor and add in those beautiful writings or even some journal notes of your thoughts of what you
feel like, whatever you like. That will give you a beautiful, complete spread that
you've just done, following this method, and we're all going
to be in happy days. So I can't wait to actually
go ahead and start this now. So we've gone through all of the process and
the procedure that we need to do to
get to this stage. What I'm going to do now is I'm going to grab
myself an ice drink. Get myself a nice little treat. I might actually just
go to the coffee shop. I think I will. Yes,
I think I'll do that. I think I'll go to
the coffee shop, have a nice little treat,
a bit of relaxation. Everything's ready.
My plan is ready. It's on my table, and I'm going to start doing the
sketching of my spread, so I'll see you when
I'm ready to do that.
9. Inspired!: Kidoki welcome back. So I've just come back from
the coffee shop. I had a gorgeous, gorgeous coffee and
some lovely biscuits with a bit of jammy jam in them. And that got me thinking
while I was eating meat biscuits with
a jam that, oh, I actually fancy doing a
little bit of research on jam, and it was raspberry
jam, I think it was. But I was in the kind of
mode of jam and fruit. So on the way back
from the coffee shop, I went past the grocery store, and I just got inspired 'cause I saw some gorgeous, lovely plums. And, yes, that's what
I'm going to do. I'm going to go ah I do my lovely little spread
all about plums. I'm inspired and
motivated to do it now. So I'm going to start doing
some research into plums. I even got myself a couple of different varieties that
could get me hands on. And yes, I know what
you're thinking. I already had a plan before to do those these teapot
sketches that I did, but I'm going to
park that because I've just been completely bamboozled when I saw
these plums in the shops. So what I'm going to do
now is jump straight into that research method
where I'm going to go online. I've already been inspired
by the offline visuals of these plums and
thinking about it on my walk on the way back
home from the coffee shop. So let's get the paper out. Let's get the iPad out, and let's go and do a
bit of research on Mr. Google or on Pinterest and
see what we can come up with.
10. Research: Okay, okay, welcome back.
Let's now do our research. We have selected our subject, as you already know lovely
plums. That inspired me. Let's now get the iPad
out and let's have a nice little writing and research from what
we can find online. So let's quickly go
ahead and do that. Now, so I'm just going
to generally have a look at what I can find on Google. I've got nice plums over here, different types of plums. These are the ones that
I actually picked up the yellow ones, the black ones, and these nice Victoria plums
that we have in the UK, which are an absolute classic. So maybe just have a look at some writings that we
can find some things on. So let's just click
away from that and yes, I think this is
looking really good. So what I'm going to
do is I'm going to go ahead and jot down some
of the main kind of facts and things that really
stick out to me that I like to read up
on and then maybe do some sketches of the images that I can find
online and especially the sketches of those
real plums that I have to come up with
some information pages. So let's move on
to that one now. Okay, okie, welcome back. You can see now I've done my
rough little research using the iPad and having a look at Pinterest and finding some
more details on Google. And I also looked at
those lovely pums that I bought earlier on. I did a nice cross section
of them, cut them up, and after I cut them
up and left them and took some nice little videos and pictures. You know what I? I eat them, I eat them all,
and they were delicious. So that's a great way
to do your subject spread and eat your subject at the same time as
long as it's edible. Don't be eating things
that are not edibles, but if having fruit, generally,
that should be edible. So enjoy and draw and
research at the same time. So you can see here,
I've just done a nice bit of rough
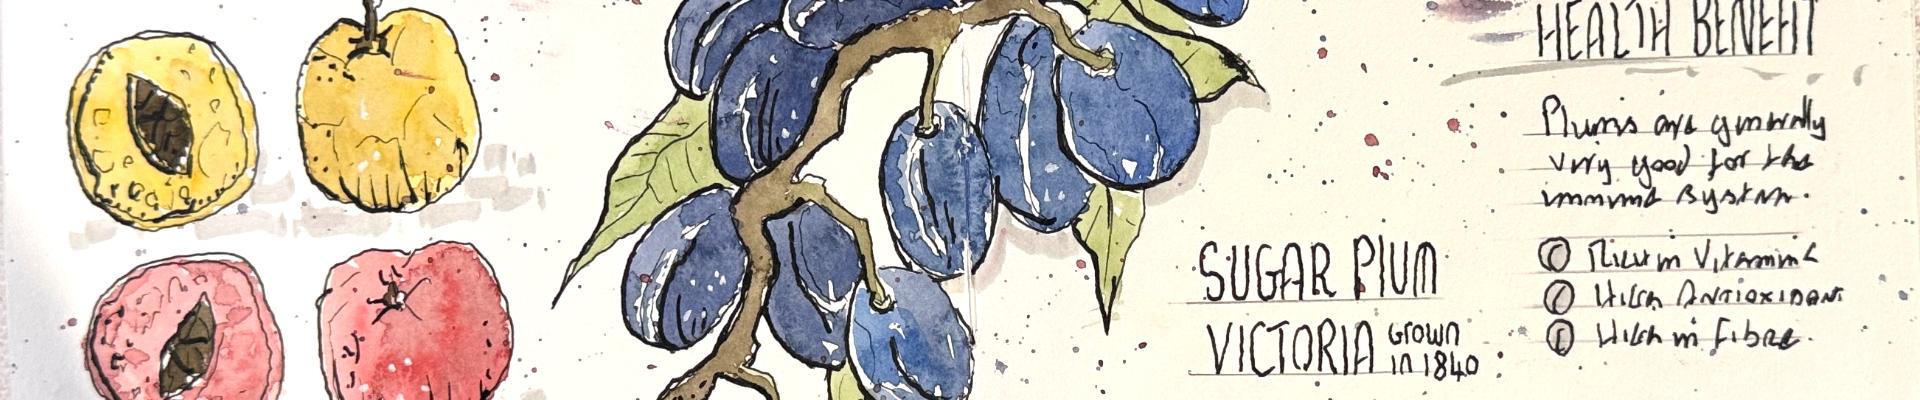
writing of a few details, a bit of history of plums, different types of plums, especially in the UK,
Victoria plums there. Then we have these
blue tip plum trees, then we have local
plums from our kind of local garden then the ones that I found in the supermarket, the grocery store, I found nice yellow plums, black plums. And the Victoria plums, they're fantastic, beautiful
shapes and lovely flavor. We've actually got
our own plum tree at one of my relatives houses, so I might just go there
and have a look and see if they've got any nice
ripe plums on the tree. Absolutely fantastic
stuff. And again, just on the last page over here, just a few details of the benefits of plums and
what you can do with plums, some drawings of the
plums that I found. So just like this,
I've just done this. It only took me about
five or 10 minutes to do. I did it quickly on the
screen for you to see. So once you've got all
your lovely details here on your pieces of paper, the next stage we
need to do is have a look at our layout and
composition like we did before. So let's grab hold of our
layout and composition sheet. This one over here is
for the portrait spread. So I'm thinking with all this lovely lovely
information and a lot of drawings and sketchings that I
can potentially do, I'm thinking maybe I might do a combination
of these spreads, so I might have a main spread
on the left hand side of my book that has mainly drawing on it and a bit
of scattered writing, so maybe something like
this on the left hand side. The right hand side, I might
have something that has more information with accompanying
picture on the right. So just like this, like a
crisscross design in a grid, but I'll do it as I go along
and see whatever works best. The next stage now is to use
all our information now and fit it in into a nice layout
on a fresh piece of paper. Let's move on to that one next.
11. New Plan: Oki doke, welcome back. Now, what we're going to do is we're going to start creating our new plan that has our layout and composition
that we want to go ahead with. So on the screen over
here, you can see, I've got a nice clean
sheet of paper. This is just normal printer
paper, nothing fancy. And I've got my Bwpoint
pen, and I've got a ruler. What I'm going to
do is, I'm just going to go ahead
and measure out the kind of mid section
of this piece of paper, so it's roughly about here, and I'm just going to draw
myself a line in the middle. Now, the sketchbook
that I like to use, as you already know, is a
B five size sketchbook. So this kind of replicates
the area of a B five spread. So that's the left
side of the page, and this is the right
hand side of the page. And that's the reason that
I'm doing this so that I can easily imitate this when it comes to the final
stage of putting the lovely work onto the
actual sketchbook itself. So what I'm going to do is
on this left hand side, I've actually decided that I'm going to keep this free flowing. I'm not going to stick too much to the layout and
templates that I've got. Again, these are just
guides for you to give you a bit of
an idea to kind of, like, spark up that inspiration for where you
want to place things. It's always good to have one of these printed out and maybe just put on the side of your table so you can
keep looking at it. I've just got it
on the top there, and then that can give me
some sort of guidance or direction when I'm a little bit confused of where
to place things. So what I want to start off with is I want to have
the title over here, so I'm just going to add in plums on the top left hand side. I'm not going in neat. This is not about being
neat and perfect. This is about going in with the layout
and composition and just adding in the
words that we want to use and just doing
light rough sketches. So I'm going to put down plums over here because
that's what it's all about. And then I'm thinking maybe
have some detail over here. I might start off
with a little bit of detail from this first
sheet that I have. I've got this history
of plums when plums first started being cultivated. I think I'm going to do that. Let's quickly go ahead and write this down in this
space over here. Oki Doke, so I've got my little bit of blurb about the
history over there. And then what I'm thinking
is I might just do a nice little drawing of a plum over here on
the right hand side. So actually, on this sheet, I've actually got
the Victorian plum, so I might go ahead and do that. So maybe just drop in
this kind of image, and it doesn't have
to be exactly the same from the reference
source that you use. You can go ahead and
manipulate the image and make it fit the
design of your spread. That's absolutely fine.
I don't want you to be worrying about designing
things perfectly. Just get a rough indication where you want your
drawings to go. Then when you come to do
them in your sketchbook, when you come to inking them, then you can spend as much
time on them as you want. We're not here
creating perfect art, like I always say
in all my classes. It's never about realism, photorealism or any
type of realism. It's just about relaxing
your mind and just following this process and just having something to do while you relax. That's what art is all about. It's an escape, a relaxation. So just draw it as it flows, and you can see I'm going
over the spread now, so I'm going over the midpoint. So I want it to kind of
flow across the spread. Generally, I like
the way that looks. It tends to look quite nice
and gives it a unique flow. So I think that's
about it for this one. And then I think I might just
put a little bit of a note over here on Okay, so that's my first page done. I've nicely labeled it and put it across the spread so I can move that one
out of the way. The next spread that I've got
or the next few spreads is basically these here that we
did of the cross section, and then I've got
a little bit of details on different types of kind of benefits of
those plums in gardens. So I think I might keep that
for this right hand side. And I think let's keep that for the right hand side and maybe
do the cross sections here. Yes, I think we can do the
cross sections over here. And we'll see how it goes. So I think let's do
the cross sections in this section over
here of my spread. But before I do that, what I really want to do
is I really want to have a nice drawing kind
of covering this area. So for this area,
maybe I do this one, might do this kind of
this blue tit plum tree. Funny name that isn't it, but let's just call it
the blue plum tree. So let's maybe add
that over here. So we've got blue. And then all I'm going to
do is I'm just going to maybe start with a bit
of writing over here, put this writing across here, and then I'm going to
expand this drawing. I'm going to go get that
reference image that I have, expand the drawing when I come to do it in the sketchbook, but just have kind of
a nice shape coming in this way. So
let's do that now. Okay? Now, what I'm going to do is I'm
going to start doing that design of this
branch over here, so I'm just going to
drop this branch. And with this one,
we have a lot of the kind of plums coming out from the branches in this kind of scene that
I've got down here, and then again, maybe
drop one in over here. And then just drop in these
plus gorgeous looking plums, these beautiful color there. Again, with the
spread that I want, I want to vary the color, so I'll have some bluish purple
shade here for the plums and have some red,
orange, yellowish shade. It'll just make it look
so much more vibrant. I think that'll just give it
a really, really nice look. Again, we're just doing
this to enjoy the process. It's all about
enjoying the process. Make it up as you go along, if that's what you want to do. You don't have to draw
anything specific or correct. Just enjoy that process, enjoy these subjects
that you like to talk about or admire or just enjoy. That's what it's all
about. Draw, enjoy, relax, do a bit of writing, and you're good to go. Just like that,
I'm going to maybe drop in a couple of
leaves from here and I think maybe a bit more
fruit hangings down here, and I think that
looks quite nice, maybe just adding
another one down there and then to
leave it at that. So I think that part is done, and then I've just got
this one over here a little bit blurb
about local plums, but I might leave that towards
the end if I have space. Again, you don't have to fit everything in from
your research. Just pick out the
bits that you like. It's always a good idea to have more pages of research so
that you can pick and choose. But when you start
drawing it out, you've got options
rather than you're stuck with just one or two drawings and one or two bits
of information, always give yourself flexibility so that you don't
get frustrated. No, we don't want
to get frustrated. We just want to relax
and just go with the flow and enjoy this
fantastic process. So, let's now do that cross section thing
that we're talking about. From these. I think, yes, I'm going to go straight
into the cross section. I really like the way
the cross section looks. I bring it up on the
screen, as well. So this is what I did from my images that I took off
my plums that I was eating. So this was a cross section. Let's quickly put these in now. And there you go. So what I've done is I've kind of, like, alternated between
the cross section and the full size and then gone the other way just to
make it more interesting. I just did that as I went along. I didn't plan to
do that. I plan to just have it straight as
I did with my research. So just like that, be
flexible, change it around, make it fit the orientation, and just add in a couple of interesting bits and bobs
throughout your spread. So now I've got my last bit
of information over here. I just move this one to the side down here and see what
we can pull out of here. So this was mainly
the health benefits. So let's just maybe add
in health benefits here. And there we go, so I've just added in the health
benefits over here, and I've done a little
drawing of jam jar with some kind of plum jam in there and a bit
of a chutney there. And then I've got
some gaps over here, but I'm going to
leave them as it is. This has given me a
nice little kind of overview of what I want my spread to look
like, and that's it. So really nice and
simple few bits, just make them as you
go along and then just add in whichever
elements you like. And then when it comes
to the actual sketching of it in your sketchbook, you can add in wherever
you have space, do a couple of splashes, just do a couple of
patterns if you like, just to fill in those
areas if you need to. So that's my plan on a page, done that new plan. We are now ready to go ahead, open our lovely sketchbook, get our lovely supplies out, and start sketching this spread. So let's move on
to that one next.
12. Sketchbook Time!: Ooky, welcome back. Let's now continue. We've got our lovely
plan over here. So what we can do is do the exciting stuff and
get it in our sketchbook. So on the screen over here, you've got the plan that we did. So that was my kind of
rough layout of the plan. Again, sometimes when
you're doing a plan, you might change your mind, you might want to move
something around. That's absolutely fine. This is just a guideline to give you that direction so
that you don't get too confused or you don't have that blank sketchbook
page syndrome going on where you can't figure out where
to place things. So just use your
plan as a guide, and as you go along in your sketchbook when you're
transferring this over, you may want to
change it around. I might do that. Let's
see how it goes. So the sketchbook
that I'm going to be using is my favorite sketchbook. By etcha This is just the standard sketchbook in hot pressed paper,
this particular one. I've used both the
cold press and the hot pressed in this
particular version, and currently my Cal press
one is all finished, and I started this
hot press one, so I'm going to
continue in this. I don't like to leave
the sketchbooks blank. I'd like to just
continue until they get finished until I
move on to the next one. This is the echa one, so let's just have a quick look at this. So see on the screen. You should be able to see
that, and there we go. We've got our lovely
etch sketchbook. And in this sketchbook,
I actually just did different things and some
drawings here and there, and a little bit of research
type topics like this. And this was actually part of
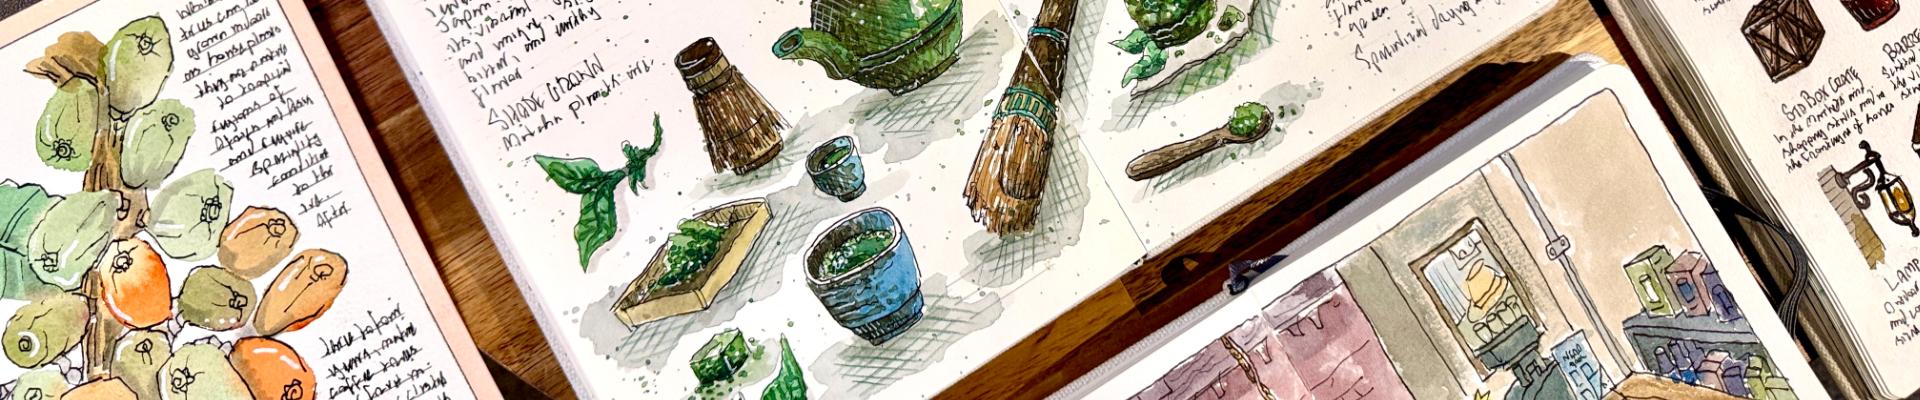
my pencil work that I did, enjoying a bit of InktensPencil, if you've not seen that class. And then here this is where
I've got a nice spread that I did a while back
all about matcher. The world of match not
that I really drink match, but I just found it
really interesting. My daughter was drinking a matcha oat milk
glotte type thing, and I just found the
colors really interesting. So I thought, I'll
do a deep dive, and that's what it's all
about doing a deep dive into things that
interest you and doing your research and then coming up with some
nice drawings from the research that so that's the last thing
that I did in this book, so let's go on to the next page. Nicely marked up over here, move that out of the way. And I think what I'm
going to do is I might just go ahead and go
straight in with pen. I tend to not recommend
going straight in with pen just in case you want to change
things around. So ideally, for this stage, I would say just grab yourself a pencil and start
doing the sketch. But like I said, I'm going
to go ahead and use my pen straight because I
have a rough idea and I know what I'm
going to do with this. Let's get my pen out, and
the pen that I'm using for the inking is my
lovely fountain pen. This is just my standard ami all star fountain pen. That
will work really nice. We don't want the lines to
be too thick at this stage. So let's have a look. So I think I'm going
to prop this up right in front of me so I
know what I'm looking at. And then that way, I'll be able to
work really well. So again, got my spread over here really nice, nice and easy. What I'm going to do is instead of doing the writing first, I'm going to go ahead
and do the drawings. So I'm going to do the drawings first and
get them laid out. That's the step that
I always like to do when I'm working
in my sketchbook. And then that gives me enough
room to figure out where to put the writing and maybe make a few changes if I need to. So what I'm going to
do is I'm going to start drawing this
in now with my pen, and then I'll see you
once that's done. Ok ok, I've now done the
lovely drawings from my plan. Now you can see that I've
changed my drawing slightly. So with my plan, I had
the plums on this side, and I had the Victoria
plum here as well. But I've decided that
I want to change the layout a little bit so that it looks a
bit more balanced. I didn't really like having
the Victoria plum on the bottom here because it was
kind of a different shape, and it kind of didn't look right to me when I was
thinking about it. But that's what it's all
about having this plan, having those rough little
drawings that we did before. So the research drawings, having all these laid out
in front of you close by, we'll give you some
more ideas and spark a little bit more interest in your layout and composition. So just like that, I went ahead straight with
pen and just drew in some of the
areas that I liked from my plan and then changed
it around a little bit. And what that has done
now is that has given me a nice template to go ahead and start drawing in the lines for where I
want my writings to go. Now best way to do
the writing is, I would say, first of all, let's put a pen away. Let's
put the pen away. So the best way to
do the writings is draw some writing lines. Now, get your pencil out.
That's what I'm going to do. I'm going to get my pencil out, use my standard pencil here. And what I'm going to
do is I'm just going to get my ruler, so get a ruler, and then I'm just
going to draw in my kind of title lines where
I want the titles to go. So the main titles
going to go over here. So I'm just going to
go ahead and just draw a line down here. Just nice and lightly, we don't want these
lines to be too hard. So that was where the main
title of the page was. And then I had a little
bit going on over here, so maybe have another title
here for the Victoria plums, a bit of detail on
the Victoria plums that I had written
down on my plan. For the blue plums over here, we had another title over here, so just like that,
on the titles, I'm just doing that so that
we have a bit of guidance and then maybe there was the health benefits
that I put down here, so maybe a title
going down here. I think that's it for the main wants and
maybe on this area, I've come up with this
idea as I've gone along, but I can just do the
writings that go underneath, which is absolutely fine. And for the actual lines
for the content to go in, I've actually got myself a nice little template, and
I know what you're thinking. Where did you get
this template from? This looks really good. This
is like a line stencil, and it's a little secret that I shouldn't
really tell you, but I think I'll
tell you anyway, but I actually make these. So this is one of my
side projects that I do. I love to design things
and make things as well, or to do with art, of course. So this is a product that
I create. I make it. So if you're interested,
then let me know, and I'll let you know where
you can get this from. But yeah, so this is one of my templates, my
stencil linemer. And all I'm going to
do is with this now, I'm going to draw in
the lines underneath the title areas and
potentially where else, I think I might add
some more writing. So let's quickly go
ahead and do that now. Okay, okay, now you can see, I've added in my lines, and now this gives
me a nice, lovely, lovely kind of template to just start dropping
in my writing. So what I'm going to do
now is I'm going to go ahead and I'm going to
get my fountain pen because I think I'm
just going to do my writing with my fountain pen first and then we'll move on to the coloring
aspect of things. But before we do that, I think
it's time to grab myself a nice drink and have a break
and just relax for a bit. So we'll move on to
that stage next.
13. Writing: Oh, that's a nice bit of that licorice licorice TA
hooked onto this stuff. Has a bit of a plum taste. Maybe that's because all I
keep thinking about is plums. Okay. I'll have to park that on the side,
put it on the side. And now let's get back to the
class and do some writings. Okay, ok. Welcome back. Let's now continue on
our page over here. We can start doing
the writings now. I've got all my
writings on me plan. So all I'm going to do
is I'm going to use my same fountain
pen or actually, I might change I
might change it to my thicker fountain pen
that I've got here. One of my favorite ones is my Ecoline. Is this the Ecoline? No, it's the ECO It's
the ECO T fountain pen. I've got that plum tea.
It's not even plum tea. It's licorice teas just
made me go all funny, so let's just carry on. So I've got my
black ink in this, just gonna open this on the side to make sure it doesn't leak. Let's just get that on
the side over there. Fantastic stuff. So what we're gonna do is what I'm
going to go ahead and do is just add in my title and start filling in those
details that I had before. And then once we're
done on that, we can let it dry and then have a look and see what
it looks like. So I'll see you
once that's done. Okay. Okay, now we're done, so I had a lot of
fun doing that. It's such a relaxing
exercise just doing some lovely writings with
a nice fountain pen. And you can see,
I've just filled in the areas that I put in
with the pencil lines, and I think it's
looking really good, especially with the nice deep
black of the fountain pen, and then the light thin
lines of the artwork. I think it just gives it
a really nice balance, and it just makes it look
interesting, doesn't it? So absolutely do this in
your class project when you go and find your subject that you want
to draw and write about. Try this out.
Remember, you don't need to be very
specific in things, keep things nice and loose. You don't need a lot
of detail at all. Keep it very subtle in detail, subtle in writing, the
writings that you do. They don't have to be specific facts or
anything like that. You could even do some
journals over here of what you feel for example, what I like what type of
plums I like to eat and which kind of really give me a lot of enjoyment by just
looking at the colors, it's just about enjoying the subject that
you're writing about. Again, the advantage of doing fruit is you can go ahead and eat the fruit once you've
drawn it and written about it. So absolutely great. What I'm going to do is I'm
going to let this dry now and then the final stage is just to give it
a splash of color. If you don't want to add color to it, that's absolutely fine. If you just want to
go in with cross hatching or just maybe just light kind of tone work
on it, absolutely fine. If you just want
to leave it as it is, again, absolutely fine. So I'm going to let
this completely dry out because I don't
want any smudgy smudgies. And while this dries,
I think I might go and grab a cheeky
little snack. So I'll see you
once that's done.
14. Watercolour: Okay, welcome back. So what I'm going to do now is
I'm going to go ahead and splash a bit of watercolor
onto my illustrations. I'm going to keep it
really nice and light. I'm not going to go
in too much detail and start building
lots of layers. That's not what I
want to demonstrate. I just wanted to
demonstrate just completing a nice simple page so that you have an idea
how to follow this, and then you can go ahead and do as much detail as you like. And again, one thing to
note is that you don't need to do an entire process and this entire
spread all in one go, break it down, maybe spend a little bit of time on
doing some research. On day one, and
maybe the next day, spend a bit of time just
amalgamating your information. And maybe the following day, Day three, just go ahead and start doing
some sketching work. And then on day four,
maybe you're ready to start doing the layout
work in your sketchbook. And then on the next
couple of days, just spread it out. Don't put too much
pressure on yourself. It's all about building
this routine so that you're constantly doing some type of artwork in your sketchbooks. And again, lot of the times this will just be a daily process. And that's what it's
all about building that daily habit of
having something to do in your sketchbook and remaining focused and having a direction. So, what I'm going
to do now is I'm going to go ahead
and quickly fill in just maybe one or two layers of watercolor on this,
and then at the end, we'll see what it looks
like and see if we need to do any additional work on it, maybe add a bit of
colored pencils or a little bit of marker work, but we'll see how it goes. So let's move on
to that one now. Okay, okay. We've now
finished the kind of first and half second
layer of the watercolor, and I'm just going to
leave it like that. I don't want to spend too
much time going in on it. I probably spent about 30
minutes just doing that. So let's let that dry now, and then once it's
completely dry, I might add in a couple of hatching lines to just bring
out a little bit of texture. And then what I might do is do a bit of a splashy splash of some watercolor droplets on it just to finish the page
off, and then we're done. So I'll see you once that dry.
15. Finishing Touches: Okay, okay, welcome
back. Everything is nice and dry to the touch now. So all I'm going to do is going to put my watercolor palettes away and my watercolors away so that they don't
smudge everywhere. So just get that on
the side over there now so we have our
watercolors away. And then what I'm going to really do now is I'm
just going to go ahead and maybe just add
in some more detail with my fine liner
or my fountain pen. Actually, I think I'm going to go in with my fountain pen. I just want a nice couple of thick lines going across some of the detailed
area over here. And what I'm going
to do is basically just use my fine liner to just really bring out some of the texture just
on the sides here, like so so that it
doesn't look too flat. But again, it makes
no difference how much detail
you have on yours. You can spend a couple of
days doing detail work on it, work on it like a
piecemeal type of thing, so that you maintain your
lovely sketchbook habit. And again, that's what I'm
really emphasizing here. It's not about the final result. It's about that habit, creating this habit that
will last and you will continue the momentum of and that's what really
it's all about. So just like this, just a couple of details there on the edges, and I'm just going to
finish that off and just add in a bit
more cross hatching. And then once that's done, maybe a few splashes
of watercolor, and we are done. So let's quickly do that now. Okay, okay, welcome back.
So now I've just added in a few stipples and a couple
of cross hatching lines, a few hatching lines with my fountain pen just to really
bring it out a little bit. I'm going to leave it at
that. Otherwise, I'm going to sit here and I'm going to do
lots and lots of details, and I'm going to be here forever all the way till my next class. So let's leave it at that. What I will do, though,
is let's maybe do some splashes of a little
bit of paint on here. So I've got me palette that I
mixed with my other colors, maybe this nice kind of reddish color over here just
to give it a bit of a pop. I like to do this in my
watercolor sketchbooks. So it just gives it a nice
funky look, not too much. Don't want to overdo it. But just like this,
maybe just a couple of splashes here and there, just to fill in those kind of gap areas just like that.
I've got a bit of red. It doesn't matter if it goes over the illustration
or the writing. It just gives it that nice
kind of organic effect, just like that with
the red color. I think that's going to
bring it out really nice. And then I've got my
blue color as well. So maybe a couple
of splashes with my bluish grayish tone
that I use for the plums, just like this, on
the corners there. That's looking really nice. Beautiful stuff. So I
think that is done. What I might do is I
might add in some kind of drop shadow typelines with a marker and thinking about it. I don't know whether I
should do it or not. But sometimes what
that does is it just adds a nice bit of pop.
I think I'll do that. Let's see. I've got
my brush marker here. Let's see what color that is. Always test it out
before you use it. I think that's a bit too dark, that one, maybe a
lighter tone would work. So maybe this one over
here, that's much better. So yeah, I think I'm
going to do that. I think I'm just going to add in maybe a couple of
these kind of drop shadow areas here just to make the illustration
pop a little bit. So just like that.
Nothing too much. I'm not really that
bothered whether it mixes in with those speckles. Should I really done this
before I did those speckles. And then I've actually
left this bit out. So this would be nice
just to color these in in this gray tone over here, and again, just maybe
a little bit under the leaves and under
a couple of plums. It just adds to the illustration and just makes
it look a bit more nicer. And again, if you have
one of these brush pens, then maybe give
this a go yourself. So let's just see over
here where we've got this plate with a kind
of fruit salad of plums. I do fancy a few
plums right now. Actually, I'm a
little bit hungry, so I might see which
ones I've got left. I kept them in the fridge,
the ones that I opened up, and I might have a
few more of them. They do taste very nice, especially if they're
nice and ripe. Don't want unripe ones because then they just
taste all horrible. They taste like potatoes,
just raw potatoes. But now, let's have some
nice ripy ripe plums. So again, maybe just a
couple of lines there, a couple of dots here and there, add that final kind of touch
to the overall illustration. And I think that should
be enough for now. Yes, I think I'm
going to leave that. Otherwise, like I said, I'm
going to be here forever, and you're probably just going
to end up falling asleep. So let's now have
a look at this. I've actually left that
little plumby plum there. How dare you leave that
little plum alone? I've got to color that in, so let me just get me
maker out again, that brush pen gonna color
it in with the brush pen. Always end up leaving
something out, don't we? So just like that and maybe drop in a couple of lines like this, a couple of dots,
make it look nice, then maybe do the same
for these over here. Maybe nice little
kind of effect. And I've left those pencil lines that I did with my
template in there. Sometimes I rub them out, I raise them out before
I put the paint on. This time, I thought,
you know what? Let's leave them in. Let's
make it look nice and raw, just like plums, but
not eat them raw. Let's eat them nice and ripe. So there we go. I think that looks pretty cool. Looks really nice. So
I think that's it. Now, we've done all of the steps for our
lovely everyday pages. We selected our subject,
we did the research. We then planned our spread
using the template, maybe picked a few other
template layouts out, and then we just went to and
did it ourselves, didn't we? We just let it kind of organically grow on the page,
and it was so much fun. It did take me quite a
long time to do this. So as I mentioned before, take your time with each step, maybe do one step
every single day, or kind of spread it over your day depending on
how much time you have, and then just complete a page. It's so satisfying, having a nice complete
page like this, and then once it's all dry, you can have a look at the
one that you did before and then keep moving on and then you'll have your
sketchbook filled over the next couple of months
with some beautiful work, and I want to see all of it. So there it is. The class is now done and you're ready to do
your class project, and I can't wait to
see what you do. So let's just wrap up the class
with some final thoughts.
16. Final Thoughts: Oh Oki doke, just a few
final thoughts now. I hope you really
enjoyed the class. You know, I enjoyed it. I enjoyed the entire process. You know, I enjoy anything to do with art, especially
traditional art. So hopefully, you would
have gone through the process and watched
me do a complete spread and really got inspired by what I do and that
this easy step by step method that really gives some motivation to you to really grab hold of
that sketchbook, get that medium
out and just start this journey of everyday pages. Remember to follow
me on Skillshare, on social media
and stay in touch. Post your lovely work
on the project gallery, regardless of whether
it's finished, it can be just on pager or just some pencil sketching that you do in your sketchbook. Keep posting it in the lovely project gallery so that we can all see what
your progress is like. And once you've
completed your spread, it will give so much
satisfaction to you. It'll give me so much
satisfaction to see you complete a lovely spread in this everyday pages
sketchbook and have it. So thank you so
much for your time. Thank you so much for
your lovely motivation and the work and the
comments that you leave me. So hopefully this
will really get you warmed up in your daily
routine of sketchbook, journaling, everyday pages, and having this
momentum going forward. So do remember once you've
completed the class, and once you've uploaded your beautiful work to
the project gallery, do ensure that you leave a
nice review on the class. Otherwise, other students are not going to be able
to find the class, and learn from your experience. That's a huge, important
point to make. Thank you so much for your time. Thank you so much for your help. And hopefully, I'll see
you on the next one. Don't stress, relax,
and keep sketching.