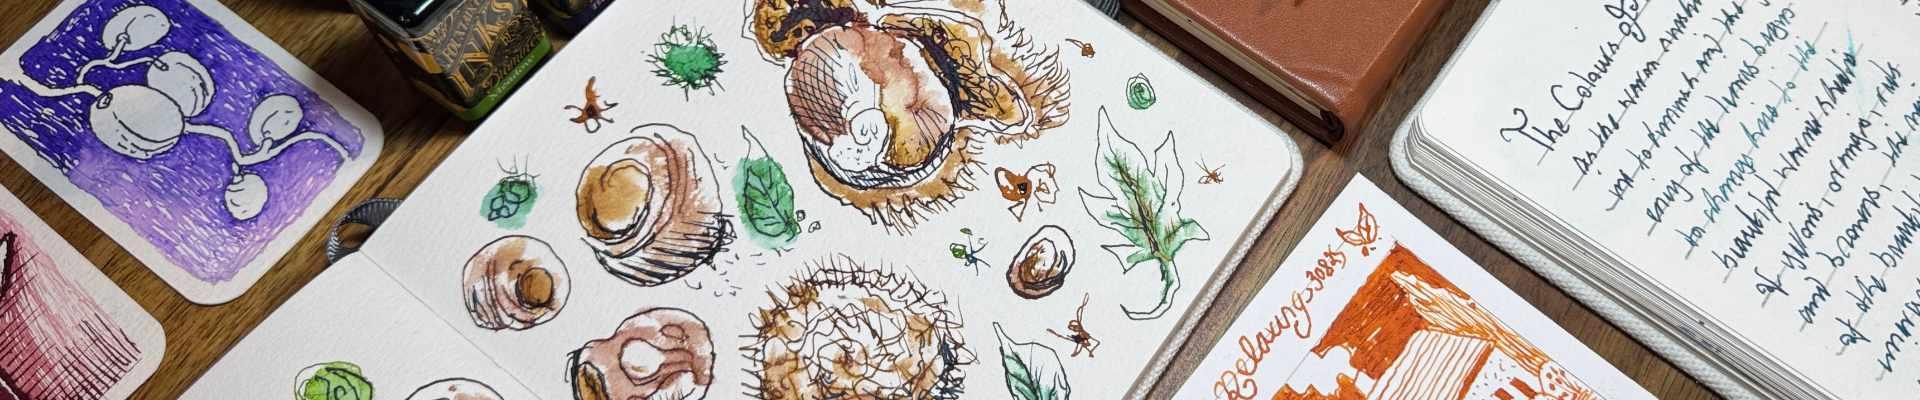
Transcripts
1. Introduction: Hello and welcome to my
new class Glass Dip Pens, sketching and writing with Glass dip pens for
your everyday pages. Have you heard about
Glass **** pens? Have you seen them online or in an art store where people
are doing really cool, funky little writings
and drawings with them? And are you curious about what
these pens are all about? How they work, how to use them? Can you even draw with them if the answers to any of
these questions is yes, and it sparked your
curiosity in Glass Dip Pens. This class is perfect for you. My name is Imran. I'm a graphic
designer and illustrator. And this class is
a continuation of my series of sketchbook
journaling and everyday pages, where I really advocate
and encourage you to draw, sketch, and write on a daily basis to improve
your well being. And this is an addition now to adding to the
excitement of creating those beautiful pages by using this fantastic tool that we
know and call as a glass dip. He. This class is divided
into five main parts. Part one is all
about glassed pens, where we're going to talk
about what these lovely, fantastic tools are all
about, how to use them, which inks work best with them, which surfaces work
best with them, and then just to go
through the general pros and cons of using
these where I will demonstrate my past
experience of using these and so that you don't make the same
mistakes that I did. Then number two, we're
going to jump straight into the warm up
exercises where we're going to do three
different exercises to practice and get familiar
with this pen and how to use it and really
get into the groove and flow of using
this fantastic tool. Then number three,
we're going to do the exciting stuff and look
at how this tool can be used with inks to create wonderful special effects
where we may add or use other mediums or
other tools to really enhance the experience and
results that we can get. And then P four,
we're going to delve straight into
sketching ideas and techniques that we can
use so that we can incorporate these into
our everyday pages. And then in the final
parts of the class, I'm going to go through
some of the work that I've created using this
fantastic little tool, the Glass dip pen so that it can inspire you, motivate you, and get you all
excited about using this tool in your
everyday pages, your sketchbook journaling or just to use as a
tool on the side. You're bored of
using your mediums or you just can't come up
with something to excite you, then you've got this glass
dip pen so that you can continue this journey
of everyday pages and sketchbook journaling to improve your well being and really get excited of creating
that beautiful art and relaxation on a daily basis. So I know you're excited, can't wait to start the class, and what you're waiting for,
grab yourself an ice drink, get yourself an ice cake, grab your glass dip pen and supplies if you haven't
already got them, and let's get started
with the class.
2. Class Project: Oki, welcome back. Let's now quickly go through what your class
project is all about. So it's really simple. Let's just go through
it step by step. So for step number
one, all you need to do is the warm up exercises. These are from lessons five to eight within the
class and then step two, then all you need to do is the effect exercises where we go through the beautiful
special effects. These are going to be
from lessons nine to 12. And then number three,
all you need to do is follow those lovely sketching exercises that we go through. These ones are less 13 to 14. And then the next steps
are just to go ahead and create your beautiful artwork because that's
what it's all about. We just want to create
and express ourselves with the techniques that we've learned and the most
important part, once you've completed or
as you're going along, do sure to take
some lovely pics of your and then upload all of that to the
class project gallery. You don't have to do it
all at the same time. You can do it systematically. Once you've done a few exercises and maybe a few sketches, just go ahead and take some pictures and
just upload them. That way we can
see your progress and we can talk to each other and really enjoy this
experience. Doing it together. And then finally, once you've completed all the exercises, create that beautiful
final artwork, whether it be in
your everyday pages sketchbook or in your
sketchbook journaling, as in the previous classes,
it makes no difference. If you just want to do one piece on a separate piece of paper, go ahead and do that. But do ensure that once
you've done the techniques, you really bring
that excitement and energy into your
own beautiful work, do some sketches, do
a bit of writing, and just create a
wonderful piece using your glass dip. And that's it. You've done all the
exercises and you've uploaded all your beautiful
work to the project gallery, and then the final
step is just to go ahead and leave a lovely
review on the class. And that's all you need to
do. That's it super easy. I know you're really
excited like me. So let's just maybe go
have a nice little drink, get our tables set up
and get nice and comfy, and then we can now move on to part one of the
class where we're going to start off
by talking about the wonderful world
of glass depends. Let's move on to that one next.
3. Glass Dip Pens: Oh. That was nice, actually. I think I put a little
bit of lemon in there. Oh, it did enhance the flavor a little bit. Not bad at all. I think I'm going to
put that on the side before I start the next
part of the class. Do you need to
remember what I did so add a bit of lemon
to my ginger tea. Ok, dookie, welcome back. Again, what I was
doing there was just admiring the
drink that I had, and it was a ginger
tea that I had, but I added a few drops of
lemon, fresh lemon in there. And it did really enhance
it just like we're enhancing our art with
our Glastic pens. So let's continue now. We started the first
part now of our class, and we're going to talk
all about Glasti pens. So let's jump straight
into it right now. So what are glass dip pens? Glass dip pens are handmade
pens crafted from glass, often featuring decorative
swirls and colored patterns. The nibs are spiraled to hold ink through
capillary action, through grooves that have
been created so that the ink can flow and
hold into these grooves. And as you move your pen up
and down through the nib, the ink flows just like it
would do in a normal dip pen. They are typically
used for calligraphy, journaling, sketching,
and ink testing. They are easy to clean and suitable for both right
and left handed users. So how to use a glass dip pen, dip the nib in about
halfway into the ink, but don't submerge the
entire nib itself. Otherwise, you're
going to get a lot of mess all over the place. Twist slightly as
you pull it out. This helps the ink, coat
the grooves evenly, start writing or drawing
with light pressure, rotate the pen as you go to maintain a consistent ink flow. When the ink runs out,
simply just re dip. You can clean between inks by rinsing the nib in
water and wiping gently with a soft cloth or just dabbing it in a
bit of dry tissue. What are the best inks to
use with glass dip pens? Fountain pen inks
are ideal because of their smooth flow and wide color variety,
calligraphy inks, which are non Sheliac
based are good for vibrant pigmented
writing and try avoiding acrylic inks or India
inks because these can clog or damage the glass
grooves as you use them. And if you do want to
use this type of ink, then make sure that you clean it thoroughly with a
clean brush so that all those little bits
and bobs get out of those grooves and don't damage
the glass dip pens tip. What are the best
surfaces to use then? Smooth, high quality paper, such as bristle board paper, hot press watercolor paper
or mixed media pads are ideal so that the
ink flows really nicely and smoothly on
this type of a surface. Velum or coated papers for crisp lines and
minimal feathering are also really good for this. I use this quite often for a lot of the glass
dip pen work that I do. Avoid using rough, highly
textured or absorbent papers. They can cause skipping
and uneven ink flow. I generally use smooth
watercolor paper or I use a really nice vellum coated paper pad
that I tend to use. But I will go through these
as we go along in the class. So generally, what are
the pros and cons? The pros are that
this glass dip pen is beautiful and an artistic
writing instrument. There's no need for
cartridges or refills. Just dip and start
to draw and write. They're easy to clean
and switch colors quickly so you don't have to worry about just
sticking to one color. You can easily swap
your colors around. All you need to do is
dip it in a bit of water and rinse that water off, and you're ready to move on
to whichever color you fancy. They are excellent
for ink testing and swatching and generally
really nice to create beautiful titles
in your work when you're creating your sketchbook
journals or everyday pages. With everything, you get
positives and negatives. So some of the cons
of this pen are that they are very fragile
because they're made of glass, so they can break
if they're dropped, and I personally have dropped
my pen once or twice, and I have damaged the tip. I'll go through and show you
that in the next lesson. Some of the nibs
in glass dip pens can feel a bit scratchy on cheaper paper or paper that's too rough
with a texture on it. These pens are not ideal for
long writing sessions due to the ink drying out or
the flow of inconsistency, generally, sometimes they can be a little bit
uncomfortable to use depending on the shape and size of your glass dip
pen. And that's it. Now we can now
move to looking at the class supplies that
you're going to need for this class and they're
very basic and minimum, so you don't need to worry
about having so many supplies. All you're going
to really need is a glass dip pen and
some inks and paper. So let's move on
to that one next.
4. Class Supplies: Okidoke, welcome back. Let's now go through
what you're going to need for your class supplies in order to complete this class and do your class project. Okidoke. So the first
supply that we're going to need for this class is
the glass dip pens. This class is all
about glass depends, so we are definitely going
to need a glass dip pen. Now, glass dipens come in different sizes,
shapes, and variations. It makes no difference at all which glass dip pen you use. Just get the one that you're
most comfortable with if you have a few and if you don't
have a glass dip pen, then maybe just watch
the class, have a look, get inspired, and
then have a look at the resource sheet to have a
look at the ones that I use, and maybe it's something
that you want to get into. They don't start off at
a very expensive price. They can get very
pricey when you go into the unique versions
and the high brands, but the entry point of a glass
dip pen is fairly cheap. The ones that I'm using
over here in this class, they cost about seven
to eight pounds UK GBP. So basically, less than
ten pounds will get you started in the world
of glass dip pens. Two, you're going
to need some inks. As we mentioned before, I'm going to be using fountain
pen inks for this class. You can use other inks as well. Drawing inks are fine. However, do bear in mind that with any type
of drawing ink, you tend to have
pigments in them and these can attach themselves
to the glass dip pen. Cleaning the glass dip pen can sometimes be a
bit problematic, do bear that in mind. For this reason,
I tend not to use my pigmented or waterproof inks too much with
my glass dip pen. Stick to the fountain pen inks, which are easily washable and interchangeable with a
quick little dip in water. So all you're going to need
is just a couple of inks. If you only have one ink, absolutely fine,
get your ink ready. Number three, you're
going to need some paper, some surface to draw with
your glass dip pen on. And the ones that I usually
use are watercolor paper. I prefer to use the
smooth surface one so that the glass dip pen
glides on it nice and easily. However, for my sketchbooks, I do use the cold pressed
paper because you don't get too much texture
with cold press paper, depending on the brand
that you're using. And I do tend to use my sketchbooks quite a lot
with my glass dip pen. Especially because I'm
focusing on my everyday pages. So whether you're
using a sketchbook, watercolor pad or just
individual sheets, just get it ready and just make sure that they're nice
and clean on the surface. And another good option to use, which I will be using
in this class for the lessons is using elm paper. So llen paper is just
a coated smooth paper. The one that I use more
often than not is the one by Rod this is great for
writing and practicing on. And again, it's a
very cheap paper to buy, generally speaking. I usually have quite
a lot of pads of these that I just tear out
and use for practicing. That's a great option
using vellum paper. Bristlebard, again, is another great paper option to use because it's
really nice and smooth. It's a lot more thicker
than the rodeo paper. So that's another
option that I use. So if you have bristle board, try it out with the
bristle board paper. Whichever paper
you have at hand, you don't have to
specifically go out and buy a specific surface
to do this class. Just grab hold of the smoothest
sheets of paper you have. And if you've got
your sketchbook, that's ready to start working
in after the lessons, then just keep that to the side so that you can use it
for your class project. Number four, you're going
to need some water, have a nice water jar or a container to keep
clean water in, preferably have two of these so that you can switch between clean water and the
dirtied inky water when you're switching
your colors. Having water is absolutely
necessary for this class. Number five, some cloth or some tissues to wipe
away the excess ink or the excess water in between
the washes that you do absolutely necessary when you're using ink and glass dip pens. Number six, this is
an optional supply, but if you have a nice
clean brush at hand, it will be very useful, especially in the lessons where we look at special
effects in this class. So any type of brush is fine. Using it for part three, specifically of this
class will be really beneficial if you've
got your brush ready. So it doesn't have to
be any specific brush. Any clean brush
will Number seven, having a brush to actually clean your glass dip
pen is also handy. I tend to just use a toothbrush that I've
used not in my mouth. I've kept this toothbrush
just for cleaning purposes. So if you just have
a cheap toothbrush or if you have a toothbrush
that you want to throw away, just maybe keep that just to
clean your glass dip pen, specifically if you're using pigmented ink or any type of acrylic ink for special
effects or anything like that. It's always handy
to have a brush that you can use to clean your
glass dip pen. We have it. We have now gone through
what glass dip pens are all about and we've gone through the class supplies that
you're going to need. That's part one of
the class complete. I know you're super excited for the next part because
now things start getting interesting and we're
going to start working on some warm up
exercises for part two. So maybe have a bit of a
break, let it all sink in, get your supplies ready, and then now let's move
on to the next one.
5. Warmup Exercises: Hmm, I wonder which one of these fantastic inks we should use
for these warm up exercises. Oh, I don't know.
I've got so many. I am quite tempted to
use my Emad de chevoi. Beautiful ink, but I think we might just stick to maybe
something basic for now. I do love that tabasco
sunburst. Oh, I don't know. I think we'll save these
for maybe the sketches. Yeah, let's save them oh,
hello and welcome back. What I'm doing now is I'm just contemplating which one of
my lovely inks I should use for this part of the class because this is part
two of the class now and we're going to concentrate now on our warm up exercises. But they're not going to be
physical warm up exercises. They're going to be
warm up exercises with our glass **** pen. Let's now make a start on that. Yoke, welcome back. So before we start off with our
warm up exercises, what we're going to
do is we're going to quickly go through what I need for these warm up exercises so that you can get
yourself prepared, and there's just a few items. But before we start,
let's talk a little bit about the main item,
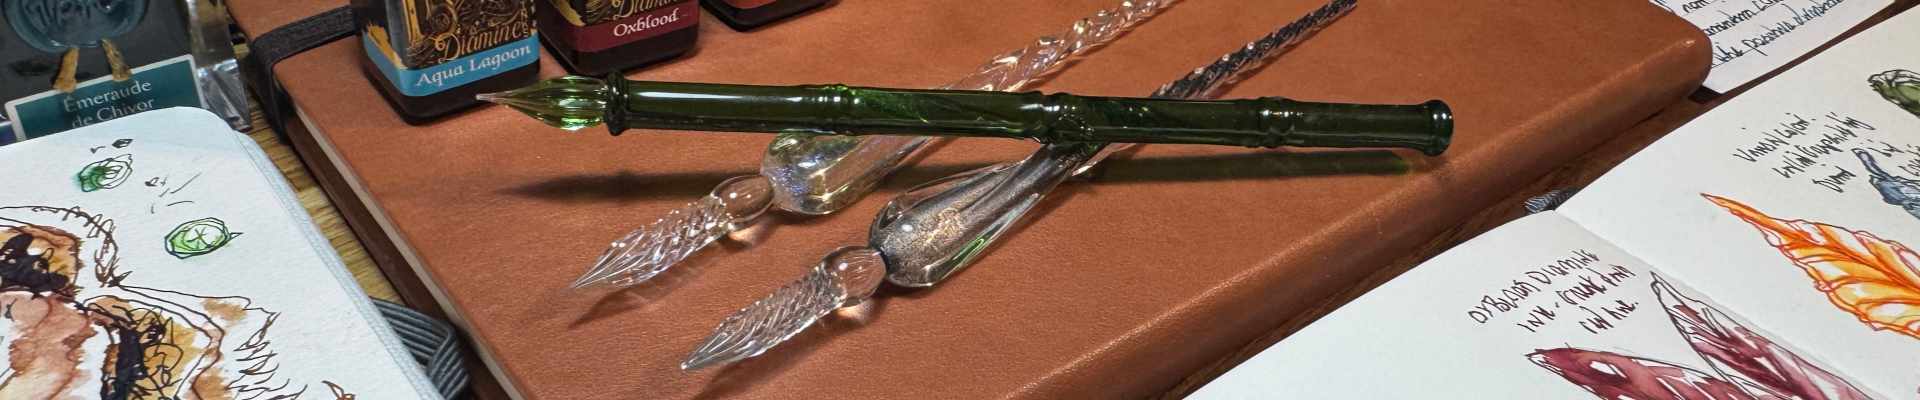
the glass dipen. So on the screen
here, you can see, I've got my glass dip pens here, I've got three different
glass dip pens, and then on the left hand
side, I've got my paper. I've got some inks selected. I've got some water
jars, a cloth, a microfiber cloth for cleaning, and some tissue papers. That's all we're
going to need for this warm up exercise
part of the class. But first, like I
said, let's talk a bit about the glass dip pens. Now, this glass
dip pen that I've got here, that I've
got on the screen, this is the first ever glass
dip pen that I bought many, many years ago, and I was
so excited about this pen. I wanted to try it out and
see what it's all about. It looked really nice
and funky and cool. But I didn't really
know much about glass depends back then and I thought that all the inks would work
perfectly with them and I could just use it like I
would use my normal dip pens. But I was super wrong, and as we mentioned before, the type of ink that
you use really, really is important,
especially with a really delicate item
like a glass de pens. I'm not sure if you can see
on the camera but this pen I actually accidentally
damaged because I didn't really know
how to use it properly. I put too much pressure on it, and I was like, throwing it
around like my other pens, and I ended up chipping the nib, and it got chipped from
the nib over there again. I don't know if you
can see that properly, but it kind of damaged the pen, and once that nib gets chipped, then the pen is practically useless because
it becomes really scratchy on the paper and it's not going to
function as it should. I've kept this all this
time just to remind myself to make sure that I be very delicate with
my glass dip pen. Naturally, I ended up
getting another one, and this was my replacement. It's practically the same. The grooves are slightly more thicker and deeper than my
original one over here. But on the screen, you
probably can't even tell. These are my glass de pens. You can see that the
design is very similar. You've got this
really thick part over here where you've
got the grip of the pen. Then you've got this little
round ball and then it comes into that spiraling,
lovely twisted design. Of what we have in
our glass dip pens. And the kind of inside material, it's got this nice glittery
glow to it, a blue shade. You can get these in so many
different shapes and sizes. My original one that
I had over here, I think this might have even had a strip of another
material inside there, but I don't know it's damaged. But again, it's just
a reminder to be really careful with
these beautiful pens. So with this one that I got, I got a really nice
rest like this. It's like a little
drop, isn't it? It's like a sweet, but
don't go eating it. These are not sweet drops
or anything like that. These are just nice
little rests that you can rest your glass
dip pen on like that, and they come really,
really handy. So that was kind of the
main pen that I bought. Let's move the
damaged pen out of the way so we don't
accidentally use it. And then I've got
another one over here. This is quite a nice one. This one is a beautiful
bamboo style, green, beautiful glass dip pen. It is very different in terms
of the tip and the nib. So if I bring this closer, you can see that on the screen. Not sure if you
can see properly, but the grooves in this
are straight compared to the twisted grooves
that you get in a common glass dip pen
like this one over here. And the grooves on this
one are a lot more deeper. And the advantage
of that is that it can hold ink for longer. Compared to the twisted grooves. So it all depends on the type of glass
depend that you have. The ones like these, these kind of speciality ones, these are actually a bit more
comfortable to hold because of the actual part of the glass depend
that you're holding. So you've got this area here, which is really nice and smooth. It's more like a traditional
pen compared to this one, which is a bit more fancy. I find this a little bit tricky to hold for
longer period of time. It can get a bit uncomfortable because it's not a standard pen. Again, whichever one you have, just get that one ready. I do love this bamboo one. I do tend to use this
one quite a lot. So let's maybe move the glass dip pens
to the side for now. So that's the first
thing we're going to be using our lovely glass d pens. And then let's move
on to our inks. So for the inks, my
diamine fountain pen inks, and I've just selected four different colors because
we're going to be doing four different exercises for part one of
this warm up stage. And if you want to follow along, if you have the same colors, then I'll quickly read them out. I've got ancient copper, I've got Sherwood green, I've got lavender, and
I've got ox blood. I've just chosen four
different colors so that it makes it interesting. So we're not using the
same color all the time. So that's my inks. And then I've got my glass jars, so two glass jars of
water, clean water. On the right hand side,
I've got my cloth. This is just my regular
watercolor cloth that I used to clean my
brushes and my fountain pens. So that's just great to have when you're dipping in between colors and giving them a rinse
with your glass dip pen, always handy to
have a nice cloth. And then I've just got
some tissues over here, some clean paper towels, some tissues to just dab off
any excess ink and water. And then the final thing
is our lovely paper. Now, I mentioned this before in the previous lesson
about surfaces. This is my Rodia
vellum paper pad. And if you have a look at the
back, it says it down here, the specific grade of this, this is the AT GSM paper. It's high grade vellum, absolutely fantastic for you doing smooth inkwork
on with dip pens, with fountain pens,
with glass dip pens, great little paper,
not too expensive. I've got quite a lot of these nicely folded
over like this, and it's really a great
option to exercises, warm up exercises on because we don't want to be doing
warm up exercises and all these pre exercises before we start working
in our sketchbook. I'm all ready and set up. I'm just going to open up
the jars, lay out my things, and we can start with Exercise
one of warm up exercises. Oki doke, everything
is now ready for exercise one of the warm
up exercises stage. And for this, what I'm going
to do is I'm going to get my regular glass dip
pen and I'm going to use my ox blood
diamine fountain pen ink. I'm just going to
give that a little open on the side over here. And with the glass dip pens, all you've got to
really do is just go ahead and dip them in. Now, I have quite a lot
of ink in this one, which is why I chose this ink for this
particular exercise. So I'm just going to give
it a little twist like so, and then with the excess ink, I'm just going to get it
off on the edge over there. Move my ink bottle to the side, make sure I cap it up. Otherwise, it will fall if
my hand hits it on the side, so that's great there. Then with the ink, I'm just going to turn
it around like this, so I'm going to let the
ink flow into the grooves. Good idea to do that. You can see I've got a lot of this excess ink coming over here because
I've over dipped it. But that's not a problem
with your paper towel, just go ahead and get rid of any excess ink that goes onto the kind bridge and
the kind hot of the pen that you
hold so that you don't get inky fingers
all over the place. So we don't need the ink to
be there that's pretty good. Move that tissue to the side, and we are ready to start
doing our first exercise. So for this first exercise, just grab your glass dip pen, hold it in a position that's
comfortable to yourself, and all I want you to do is just do some light lines like this. Now, you can see I'm
pressing very lightly, but it's not really giving
me much of an ink flow. And the reason for
that is because I haven't put enough ink on it. What I've done is I
twisted it up like this. All the ink fell to the back, and now it's not flowing. So it's really important
that you ensure that you dip your pen in the ink appropriately you
get a good coverage, do a little twisty, twisty
move like this with your ink, and then pull it out and you've got that beautiful
ink in the grooves. Now, if we do this again, you can see the flow
is so much better. I'm going to see if I
can get a Zoomy zoom in on this so just like that, we've got a really
nice flow of ink. You can see I'm just creating these scribble lines just to demonstrate to you
that it's so easy, but it does depend on the
glass di pen that you've got. It depends how deep
those grooves are, and it depends on the
ink that you use. You can see this is
fountain pen ink, and I've managed to
get a decent spread of that ink with just one dip. I'm going to go ahead and dip
it in again just like this, give it a little twisty twist, and then turn it upside down so that the ink falls into the grooves and then
I'm going to go again, maybe just do some
straight lines like this, do some warm up lines. What this does is it just
gets you into the mood, into the flow of using your glass dip pen if you
haven't used it for a while, or if you're completely
brand new to glass dip pens, it just gives you an
idea of how the flow of ink and the application of ink will be with
your glass dip pen, and it's really just
having a bit of fun on a page just do some
scribble lines. Once you've finished, then
just get rid of the page, let it rest on the
side so it dries up. And again, I'm
going to move this to the side because it's
actually getting in my way. So let's go ahead and grab
hold of our ink again. I'm going to do
another dippy dip with my glass dip pen like this. Nice and juicy ink on that pen. So again, now I'm going to do just some lines coming down, whereas before I
did normal lines. And what I'm doing is I'm
twisting my pen as I go along so that I get the
maximum flow of ink. And basically, what
we're going to do is just do some scribbly
wiggly lines like this, just like that, and you can see, you can see the sound that beautiful sound of that
glass on the paper. It's such a nice
soothing sound that is a lot nice bit of ASMR
going on over there. So just like this, I want you to practice doing lines,
squiggly lines, and just up and down
scribbles effectively, do this on a couple of pages, especially if you've
got this paper that I'm using the rodeo paper, it's great for this
type of practice. Do another dip, maybe twist
it into your ink bottle. And get it out like that. So maybe this time we do some diagonal lines and
keep them nice and loose. You do not need to
press hard with your glass dip pen
because again, you're not really going to
get any flexibility in it. It's a solid piece of glass
with a very fine tip, and you can see that so easily done and you can just produce beautiful lines without
much effort at all. All you've got to do is
keep dipping your pen. What I'm going to do
now is I'm going to go ahead and just get
this paper off here. And another thing
is with your ink, because my ink bottles here, these are just the small
ink bottles that I've got. They have a very small
kind of opening. So it's actually ideal
for the glass depend to go in without it moving around
and banging on anything. And these ink bottles
are made of plastic, which is a huge advantage
because glass, again, if you've got glass ink bottles, for example, these ones here, these are the same diamond inks. These are made of
glass with a bigger. If you bang a glass onto glass, then it's more likely
going to get damaged. So if you do have these
plastic bottles, these, I think, are so much more safer to use with glass dip pens. But again, I use a lot of ink. So I have bigger ink
bottles like this, and these are made out of glass. So you do have to be
careful when you do dip your ink into your bottles. So again, I'm just going to go ahead and do some
squiggly lines like this. I'm going to do a little
bit more pressure, twist the pen around to see
what my flow of ink is like. Have a bit of fun, bit of
scribbly scribble works just like this and to see how
much ink flow I'm getting. So just give that a
go, a couple of dips, maybe on about four
or five light pages. Don't waste paper. We
don't want to waste paper. We just want to
get into the flow. We can use these sheets again because you don't want
to be wasting paper. We want to preserve paper. We want to just use
our materials the best we can and we don't
want to throw things away. So I'm going to go ahead
and clean this now, so just a nice little
clean on the pen. So just like that, we have that mesmerizing ink
going off there, just a little bit of a twisty
twist, twisting it around, trying not to hit the glass
jar of this water jar, and you can see it
easily cleaned, just like so fantastic stuff. And then all we need
to do is just get our cloth with our cloth, just dab it on like this, don't need to press too hard. I'm just dabbing it on, twisting it at the same time, and to get rid of any excess
water, using me tissue, and then I'm just going to give that a little pinch like so, twisting it as I go along, you've got a beautiful clean glass dip pen,
fantastic stuff. So let's just move all this to the side. And there we have it. We've done our
first exercise with our glass dip pen doing
the warm up stage. So we've got some nice
squiggly wiggly lines. We've got some straight lines, we've mixed it around,
done some scribbles. Now you are more familiar
with how the flow of your glass dip pen works with the particular inks
that you're using. Great little warm up, and we're going to
save these sheets to use as a scrap sheets
just to test some inks later on so we don't
want to throw anything away and we can now move
on to the next exercise.
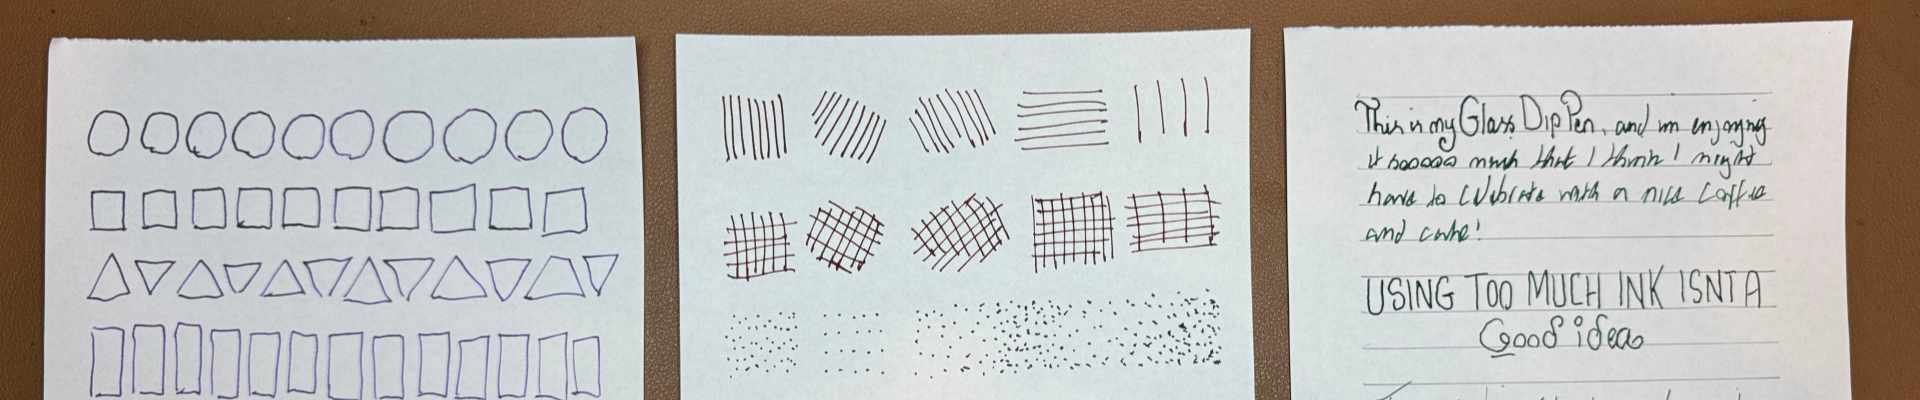
6. Shapes: Okay, doke, welcome back. What we're going to do now
is move on to exercise too, and what I'm going to
do is I'm going to use my lovely lavender ink for this. So same process as before. Let's just move that
out of the way. Got my glass dip pen.
It's nice and clean. No residue on it,
no water on it. Let's just open up me ink, and I'm going to do a nice
dippy dip of that Ink, give it a little twist to get as much ink
on there as I can. Sometimes if you've only got a little bit of ink and
your inks running out, maybe just give your ink
bottle a little kind of angle so that the ink
touches all of that, lovely glass dip pen
and look at that. What a fantastic color
that lavender purple. For this, what we're going
to do is we're going to concentrate on doing
some shapes now. So let's maybe start
off with some circles. All I want you to do is with your glass dip pen hold it in a comfortable position and just draw some
circles like this. What this will do is
this will give you familiarity of how to create different angles and concentrate on certain specific shapes. So just like that, I've
got a nice row of circles, and then let's continue
and do some squares. Doing some rigid
lines like this, just a couple of squares, following that same pattern. This will just help
give you an idea of how angles work when you're drawing and sketching
with your glass dip pen. Because again, it's a
heavy solid material, the glass tip that you've got, and you will only get better
at it as you practice. These warm up
exercises are just to serve that purpose
of just practicing. You can see my first dip
is actually continued, so it's working really well. Let's continue with a
triangle shape now. So maybe a couple of triangles
like this up and down. Just give it a play aound, come up with whichever
shape you want. Idea really is just to fill
this little page with shapes, different shapes so that you use the different angles and
tips of your glass dip pen. That turned out to be
a non triangle shape, but it's absolutely fine. And then I'm going
to move into maybe rectangles like this,
just some rectangles. I just going to
follow it through. You can see I'm getting a lot of really nice flow with
this one dip that I did. Sometimes it can
depend on the ink, the thickness of the ink. If your ink is too thick, you're going to get
much of a flow. But if your ink is
fountain pen ink and it's good quality ink, then you get a lot of flow. I mean, I've drawn so many
shapes or I've lost count. I'm not really counting them,
but I'm just continuing on. So you can see I've got four lovely rows of
shapes all with one dip, and I think there's still
quite a bit of ink on there. Then maybe let's just do
some funky shapes like this. Hexagons, whatever, how
many other sides they are, I have forgotten how many
sides there are to shapes. I haven't done math
for so many years, but it's all good come up
with some funky shapes that you can go ahead
and draw hexagons, pentagons, whichever
gos you've got, just go ahead and do
them and continue. They don't have to be the same. They don't have to be perfect. Warm up exercises are all
about just warming up. And just getting into
the flow of things. So just like that, I've created
these weird funky shapes. So maybe let's do some stars, some stars like this, just a couple of stars. You can see this is a continuous
star line that I've got, and I think this is just
great. I mean, look at that. We've just done one
dip it's still going. Do you think we'll be able to
manage to do the full page, maybe a couple more shapes? Oh, I spoke too soon. Look at that. It's
all running out. I can see it fading away. However, it still
wants to continue, so maybe let's do some
more circles here. Well, let's do the number
eight over here like this. Let's do a nice big
eight. Eight like this. Nice swirly worthy
shape over here, like so keeping it different and creep interesting and it's
really so easy to do. Again, I'm not pressing
down hard on this. I'm using a very light touch, just letting that glass
tip glide on the surface, and I think we'll call
it a day on that one. That was exercise too, all done with one dip
of my glass tip pen. Give that a go, make
sure that you clean your glass dip pen as
soon as you've used it because you
don't want the ink drying out onto that tip. So I'm just giving
it a little rinse in that earlier jar that I used, the red colour, the oxbod color. So just giving it a
little dip in there, and then I'm going to go ahead and I made it four then I
move that out of the way, get my other jar of clean
water, put that there. And then just give
it a rinse in that to make sure we just
have clean fresh water on there and then just dab
it on to my lovely cloth, like so twisty twisty and then give it a final
dry with some tissue, paper towel, and we're going to be ready to go for
the next exercise. Put that on the side and we're done. That
was a lot of fun. Try that out for exercise
number two of the warm stage. We can now move on to
exercise number three.
7. Textures: Koki, welcome back. Let's now
move on to exercise three, for this one, I'm going to
use my ancient copper color. Let's just get a
nice dip on the pen, so quickly open that up. It's nice bit of twisty,
twisty action on there, tilting my bottle so that I get maximum ink on the tip,
that looking great. So let's maybe, I think I've
got a bit too much on there. I think I need to clean
that off over there. I don't want to get inky
fingers all over the place. I'm not going to be
happy bunny, then, am I. So let's just do that and maybe
do another dip because we did move it quite far
up. That should be good. For exercise three, what
we're going to do is we're going to do some texture
work because in sketching, especially with ink,
textures are beautiful, so why not practice them
in the warm up exercises. Firstly, what I'm going to do is I'm just going
to go ahead and do some hatching lines like
this nice and easy, let them flow, and then maybe do some hatching lines in another direction like
this in a diagonal. Just like that. They don't
have to be the same, they don't have to be even, just go with the flow and then maybe do some hatching
lines the other way around at the other angle just to get familiar with
how lines can be produced. Then going across this way, to give the full flow of how
you can produce lines and then maybe doing some
wider lines like this, just to give you a reference
to see what we can get. Let's maybe move that page down a little bit so you
can see a bit better. Then what I'm going
to do is I'm going to go ahead and I'm
going to repeat this again at the bottom so we can do some
cross hatching. Let's quickly go
ahead and do that. Okay, so we're using the same
lines with the hatching. Let's go the other way now. I'm going to do some
hatching lines like this. So we effectively
have cross hatching. Again, I'm going to move
my hand to the top here, go the opposite way produce some beautiful cross
hatching textures. You know, if you watch
any of my classes before, I love to do cross hatching. I love to create these
beautiful textures. Is it. This is just warming
up so that you get used to using
your glass dip pen, and you may not have been
using it in this way before. You may have only
been using it for writing or doing simple doodles. You might not have even
done any texture work, so it's a great idea to start doing this to get more
familiar with it. You can see we've got
the hatching on the top, then we've got the
cross hatching. Now, I'm not sure how
much ink is left in this, but what I will do is give it another dip just to make
sure that we don't run out. So just like that,
nice little dippy and then what I'm going to do now is I'm going to do some stippling, a little bit of stippling, just like dots, not
pressing too hard. We don't want to
damage the surface because the glass can be
a little bit sharp if you press down too hard compared to a normal metal nib pen, just like that and then maybe do some that are
a bit more wider, a bit more uniform, just to create this
variance of texture, and then we can use this
in our sketching and then maybe do some random
ones like this. And then vary it a little bit, make them a little bit wider, then again, more close together
with the stiply stipples, great technique to use to
create some variations in tone, just like that and maybe
just go all the way across like so that way, it just creates this kind
of strip of stipples, and it looks really,
really nice. Again, just take your time
with this, don't rush. You don't want to be
using a glass dip pen too quickly, otherwise, there is potential that
you may damage it, especially if you use
too much pressure. Sometimes you
forget you're using a glass dip pen and you just think that you're
using a normal pen. I've done that so many times, and then I've had
to dial myself back and calm down and
maybe go for a drink. Have a nice little sip of my coffee to just
relax and get back into that slow mood of working
slow with a glass dip pen. So you can see,
I've just created this lovely texture over here
just with some stipples. Try that out. And then finally, for some final textures, what we can do is we can
just do a combination of all of these in
this space over here. So I'm going to do
another dip with my ink. Beautiful color that color
I got what it's called, what's it called Ancient copper? Fantastic color. Look
how gorgeous that looks. It's going to look
really good when we come to the special effect. So what I'm going to do now is I'm just going to
go ahead and do some longer lines coming
like this over here, maybe do it up to there, and then I'm just
going to go ahead and do some lines going across. Create some hatching lines then I'm going to
go the other way. Just to vary it and combine all those little samples
that we did on the top, and then maybe at the bottom, do a couple of these
stipples nice and gently. And we can also probably do
some scribbles like this, some wiggly scribbly
lines like we did in the first exercise, and then maybe do some
lines going across. And all this is doing
is it's just building that texture and then
maybe do another dip and just fill up the page with some random textures like this, just to give you an idea of the results that you can achieve with your lovely glass dip pen, just like that on the side, nice and quickly and then maybe some straight lines
to go on top. That looks really
good, varying it. Can see it creates
so much depth, doesn't it? And it's so easy. So relaxing with a glass dip
It adds that experience of enjoyment to when
you're going ahead and creating your lovely
sketches and illustrations. Absolutely beautiful. So there you go a
little bit more, maybe do another dippy dip, like sew and do some little
dots going on the top. But you know, me, once I
started doing something, then I don't stop I want to
keep working on details. So let's just keep it just to the warm up exercises and
maybe stop at this point. So there it is. Let's
do a cleaning clean. So I've got my color water here where I do
the initial clean, little bit of a
squiggly wiggly there. Get it off there, put it into the clean water now to make sure that we don't
have any residue, and you can see some of
the residue did come off there because sometimes
when you clean your pen, you might miss a little section. That's why it's important
to clean it twice. And then again, following the same suit, just
going to go ahead, dab off that excess
liquid and then get me tissue and on me
tissue, do exactly the same. Give it a little
squeezy squeeze. And the glass pen is done. I mean, look at that. We've just created some beautiful textures with our glass dip pen
with beautiful ink. So give that a go and that
exercise three complete, so we can now move on to the final exercise of
this part of the class.
8. Writing: Going to focus now
on doing writing. Yes, it's all about writing beautiful words in
our everyday pages. So let's just do a warm
up of our writing. For this, I'm going
to use my same paper. I'm just going to
quickly go ahead and draw in some lines
because it's always easier to draw in
some lines like I usually do with my
everyday pages. I'm going to quickly go
ahead and do that now. Okay, okay. That's all done now. I've drawn in my lines
with my lovely stencil. Let's just put that to the side. Now, what we're going to
do is we're going to do our lovely dippy dip of our
Glass Dip pen in our ink. And the ink that I
want to write with on this occasion is Sherwood Green. Fantastic, Sherwood Green. So grab my glass dip pen. Quickly give this an open and we don't really
have much ink in there, so it's probably
not a good choice to do in this demonstration, so I'll just try getting
my ink onto that. Pen as much as I can. That's looking good. What we want to do is we want
to start writing. I'm going to start I'm
going to bring this down a little bit over here so
that you can see this. Then it's just exactly the same, just like you would
write with a normal pen. Just go ahead and start writing in the style
that you write. This is my Glass. Dip. Pen. As you can see, the writing is just fantastic. But the only thing
is that because this pen is a funky shape, I would not recommend using this for too long while you're
doing your writing, so I wouldn't write pages
and pages with this, maybe use a glass
dip pen that has a more comfortable grip
like this one over here if you're going to focus
more on the writing part. But generally speaking,
I don't tend to use my Glass Dip pen
too much for writing. I do it for my everyday pages and my Sketchbook Journaling, where I just have a little bit, and I tend to use this
one more than I use. This one I tend to use for just the drawings
and sketching. But whatever you
find comfortable, just go ahead and do it
for the warm up exercise, try writing some random words or just write your thoughts, just do a quick little
thought journal on a page and see how it goes. That's what I'm going to do
here. I'm just going to go ahead and write down what I'm doing right now with this class and I'm recording
and enjoying my time. I'm going to quickly do that now and do a couple of dippy dips in my ink just to make sure
that my flow remains going, and then I'll see you
once that's done. Okey dog, so I've done my
little page of writing. I've got ink all over my fingers because I was getting
too excited as usual. So let's just give that a little clean and maybe give
it a dip in the water to just make sure
we rinse it off so we don't have any
residue on there, giving it a dry now on me cloth, and you can just
put it to the side and enjoy our writing
that we've done. Also make sure to close
that bottle of ink. Otherwise, you're just
going to knock it over and I'm not going
to be very happy then. And then I won't be
writing happy things, then, well I, I won't. So let's have a look at this. I've just done some
different styles of writing, and I had to dip in
a couple of times. Using too much ink isn't a
good idea because it can sometimes blotch depending on
the pressure that you use. So do ensure that when
you use your ink, you kind of get
the excess off on the edge of your ink
bottle, and that way, you'll have a nice flow
of I do remember to keep dipping your pen in your ink because you've not
got a fountain pen, have you? No. This is a dippy dip ink pen, so keep dipping consistently. Don't dip when it's too late. Otherwise, you're going
to have this over here. You've got this
kind of dry stuff, and then when you dip, you're going to have it
really nice and juicy, so you're going to
get this variation unless that's something
that you like. And again, the most important
thing, don't stress, relax. Smiling and keep sketching. That's what it's all about using these beautiful tools
in your everyday pages, in your day to day journaling, your Sketchbook Journaling. It's all about relaxing. Don't get frustrated
with the tool. It can be a little bit
frustrating if you're trying to do something
and you can't remember, this tool, this class pen tool is about slowing
down and relaxing. Don't do anything
in a rush, chill, put a bit of soundtrack on in the background and relax
and do these exercises, and that's about it. So we've completed our
warm up exercises. Let's just have a quick look at all of them on the
screen. And here we go. We've got our lovely four
exercises that we've completed in the warm
up part of the class. So that's part two complete now, we've completed part two. It was so much fun. We did it with a different
range of colors. So if you have different
ranges of colors, you've got loads of
fountain paintings like I have. I've
just got so many. I've got so many on my
desk here if you can see, I've just got boxes
and boxes of these. You know how it is when you start initially looking
at a new medium, you want to try all the colors, and that's what I did all those years ago when I
got into fountain pens, it was such a long time ago. I think I built an collection, entire shelf of
fountain penn ins. Use the inks that you have. You don't need to go out and buy any more inks or
any more supplies. Just use what you have and go ahead and do these
warm up exercises, do them a couple of times, do some scribbles on a page, keep these pages that you have
for that first exercise so that you can use these just to scribble down on, do
it on the other side. Don't waste the
paper, keep them, keep them together,
and that way, you'll have a nice little keep
safe of what you've done, and then do these
lovely exercise two shapes and
sizes that we did, these beautiful little shapes. Have a go at that, practice, do it on the other side,
do it in different colors, and then do some texture
work like we did in exercise three beautiful
textures that we created, and these are going
to form part of our illustrations that we
do in our everyday pages. And then finally, just a
bit of writing exercise, draw a couple of lines on your paper if you
haven't got lined paper, and just go ahead and
stylize your writing, just add your thoughts or whatever you're thinking
about or just copy from a sheet of paper
that you have something written on just to get into the flow of writing and drawing. What that will do is,
once you've completed this exercise, you'll
be ready again, all geared up for
the next stage, and your memory
muscles all be ready. So give that a go, try it out. Don't forget to take
pictures of all your work so you can upload them to
the class project gallery. Okdoki, that's part
two, now complete. We are now fully warmed up and we can now move
on to looking at some wonderful special effects where we can do some exciting
stuff for our sketches. Let's now move on
to that one next.
9. Special Effects: Hello, and welcome back.
We can now delve into the special effects that we're going to do with
our glass Dip pens, so we're all warmed up as
per the previous part. This next part, we're just
going to go ahead and create these beautiful special
effects with our inks, glass dip pens, and maybe
a few other mediums. Let's quickly move
on to this one now. Ok dokey, let's now start
the special effect, part three of the class. On the screen here, I've got a nice sheet of hot
pressed watercolor paper. This is just a
standard store brand. So grab yourself some watercolor
paper if you have it, if you're going to follow
along at this stage. In addition to our
glass pen that we need, we're going to need
our ink as well. But in addition to that, we're going to need some
optional supplies, and these are just a
standard clean brush, so it can be a watercolor brush. It can be any brush. It doesn't have to be anything specific, any brush that you have,
that's nice and clean. This is just a round brush
that I have that I keep for my inkwork I don't
use watercolor on it. I just keep this
specific brush for ink. So grab yourself a clean brush. And also, if you
have a water bottle, water spray bottle with
clean water inside it, if you've got one of these,
then grab hold of these. So just going to keep
them to the side for now, so just put them to on the side. And what I'm going to do now is I'm going to go ahead and select the ink that I'm
going to use for this special effects
part of the class. So let's quickly select the ink. And the color that I'm going
for is Tabasco sunburst. Fantastic color that. Beautiful, beautiful shade in the fountain pen ink
in the diamine range. It's important to know that for this type of special effect, you're going to have to use
an ink that is water based. So these DiamandFountain
pen inks are water based. You don't want to be
using permanent pigment based inks for this because it's not
really going to work. So make sure that your
ink is water based. Most fountain pen inks are usually water
based unless they're specifically waterproof or water resistant after they dry. Grab yourself, your ink. I'm going to grab my pen and
just move that to the side, give it a little
open, like that. Get rid of them bubbles. Do a nice little dip. I do need to get a
bigger bottle of this ink because it is one
of my favorite colors, this fantastic Tabasco sunburst. Such a dynamic range of values from this ink,
fantastic stuff. I just want to make sure that I get enough of it on my pen. So just like that, move
that to the side now. And all I'm going to do here
is I'm going to go ahead and maybe draw a quick little
doodle of a house. You can see what I've
just done there is, you can see that blotching
because I went in too fast. I didn't dip it in properly
and let it rest on the tip. It's gone and done
a blotchy blotch, but that's absolutely fine. At least I could show
you that example of how not to do it. So just like this, going to do a quick,
housy house drawing. You can draw anything
for this example. So just a little door
there, little window, nothing super duper neat, keeping it nice
and doodle style, little chimney to go there, and then maybe some
details over here, just rough areas down here, and I think maybe just a
little thing going down there, another little thing
there, and just going to kind of square it
off at the bottom. I'm going to leave it like that. But what I'm going to do is with that little spill that I've
gotten I'm going to just tilt me paper so it's
easy for me to do this. I'm just going to
go ahead and drag that little spill across so we have element of detail so it doesn't just look like
a big splodge of ink. So that's all I'm going to do. For now, I'm going
to go ahead and give my pen a clean because I
made the right mess of it. Look at that all over the
pen to give that a clean. And what I want to do is I
want this to completely dry now before the next stage before that special
effect starts. So I'm going to let
that completely dry, give this a clean, and maybe go for a little tea, ginger tea. Why not? Let's have
a little ginger tea, and then we'll come back
once this is completely dry.
10. Brush Strokes: OkidkiO ink is nice and dry. You can see over here really
nice and perfectly dry, crisp and dry, so we can move on to the
exciting part now. So I'm just going to move me glass dip pen out of the way. Otherwise, I don't want to
get it banged up anywhere or get it damaged like I did with my first
ever glass dip pen, so just keep that
out of the way. And we're going to
now use our brush. So make sure for this next part, if you're using a brush,
it's nice and clean. So just give it a
rinse in water, clean water to make sure
it's nice and clean. Get a nice bit of water
onto that brush like so. All we're going to do
is we're going to go in onto these lines and we're going to start bringing in some of that
color. Look at that. Beautiful, isn't it? We're using the dry ink to effectively fill in some of
those elements that we drew, using the tip of the brush
just to let it come in, let it blend into
the lovely paper. Create this wonderful, wonderful hue and you can see,
I mean, just look at that. That's just gorgeous that. Look at that beautiful color
of that Tabasco sunburst. I was saying this is
a fantastic color to create beautiful values. I mean, you wouldn't
even think it's got this beautiful yellowish
kind of tint to it, but it just looks like a
brown coloring, doesn't it? But once you start adding
water to water based inks, it starts really emphasizing the makeup of those inks and
what colors it's made up of. So just like this, just going in really lightly with
the tip of me brush, just bringing it down, like, so just adding that lovely
little edge color to it, not doing too much
at this stage, just bringing it in so that you have a little
bit of wet over there, and that's looking great. So what we're going
to do is just a bit more water on me brush. You're just adding a bit
more water on me brush. Now I'm going to go ahead and
just go across these lines. You can see I'm going across the lines where we had
a lot of that ink. Look at that beautiful. So I'm just dragging
that ink across. Look at that special effecte you never thought you
could do that with inks and glass depends and things like but there
we go. Look at that. Beautiful. Now you've got quite a bit of ink on the brush, so I'm going to get rid of that, do a little rinse
rinse. Move that away. I've got some more
water on there, and then maybe we bring in a little bit of that color
from the edge there, and that's looking
great as well. And then maybe just bring in that color, let it come down. And I think that's
looking fantastic. So on the door, just a little swipe
like that on the door, on the window, a little
swipe like that. And there you have it. Look
how gorgeous that looks. Beautiful stuff, magical
magical special effects. And on the bottom here, I'm
just going to swipe over that line a couple
of times so it brings disperses that color and creates this
wonderful effect. I'm just going to
put my brush away on the side now and you can see it's bubbling up
all over the place, and that's because we're
adding quite a bit of water and liquid to
it to our paper. And that's why it's important
to use watercolor paper for this because if you use the vellum paper
that we used before, the sheet of vellum, like we did for the exercises, then that's not really
going to be able to work and take the load of water. What I'm going to do
now is I'm just going to wait until that dries again, and I think my ginger tea
should be ready and brewed up. Have a couple of
sips of that and enjoy watching this ink dry.
I'll see you once that.
11. Water Spray: Oh, look at that tea. Gorgeous bit of
ginger tea that eh, actually looks quite like
that tabasco sunburst, oh, I better not accidentally
put that into my tea. Oh, I better be careful. So let's just move
this tea out of the way so we don't get confused and all mixed up and
muddled up, right. Let's just move that out of
the way. Okay, don't back. So you can now see that we've got a beautiful dry on our page. Gorgeous stuff, isn't it? Just look how nice that looks. So let's now move on to the next step of this
wonderful special effect. What we're going to do is
we're going to grab hold of our lovely spray bottle. If you have a spray
bottle, then grab hold of it and all I'm
going to do is I'm going to go in and just
add in a little bit of sprays on top of this
actual drawing itself. Very lightly, just a few
little sprays like this, what that does is
that's going to enhance that look and just spread it out into
the background. You can see by doing that, my paper started
curling up like magic, so I'm just going
to hold it down. Should have really taped
it down at this stage. I'm going to hold
it down and you can see that it's creating
this beautiful, fuzzy, beautiful
feathering effect on my lovely illustration. And I'm going to
let that dry now. So just a couple of sprays of that water just to give
that extra special effect. So let this completely
dry, enjoy it dry, take a few sips
of my ginger tea, and then I'll see you
once that's done.
12. Details: Dk, we have a nice, lovely dry on our beautiful
little drawing over there, and you can see, Look at that spray effect
that we just did. We sprayed on top
of the dry ink, and it's just created this
gorgeous feathering effect that we've done all
with one color. Initially, we started with the Glass dip pen,
added in water, and now we're going
to do the next part and add some details onto this. I just love this effect. It works so nice. It gives it such a
unique random look, and then the next stage is
going to be about refining it. So what we're going
to do is grabbing our glass dip pen and getting that same colour, that
tabasco sunburst, making sure that I don't
spill any of this all over the page or get any drops
of it into my ginger tea, which was really
nice, by the way. So let's just continue. Get a nice little dip on there. Onto that beautiful
tip, twist it around. Again, I'm running
out of this color. I do need to get a
big bottle of this. So hopefully we'll have
enough for the class and then just giving it a little twist up and down,
that should be enough. And all I'm going
to do now is I'm just going to go ahead
and I'm just going to go in and add in
those detail lines over it so that we have the
beautiful effect underneath. So just like this. And then I'm going to go ahead and maybe turn the page just
so that it makes it a bit easier for
myself to do this. So just do it however you like, and then just add
in these lines. Effectively, we're doing
the outline again. Just to enhance and refine our details with our glassy pen. And you can see it's created this gorgeous kind of
speckled sparkled look. Absolutely fantastic. I love doing this in
my everyday pages. Again, you have to be a
little bit careful with this. If you go a bit too much
with the spray bottle, then it can get a bit jazzy, and it can quite overboard and sometimes it might produce a result
that you don't like. But again, just experiment. The whole point about this is to experiment and create these wonderful
effects that you can, which you wouldn't
be able to really get if you used permanent ink. You could do it with a dip pen. You could do it just with
any other type of inks, but the fun of it is mixing
and matching techniques using new tools like a
Glass dip pen to just create wonderful art
and keep things interesting, especially in your
everyday pages where I highly recommend
you work on it every day. Bit by bit, you don't
have to complete huge drawings or huge spread detailed
work on a daily basis, work on it a little
bit at a time. That way, it stays manageable. And that way, the interest level stays quite high and relevant, especially if you use
different tools like Glass Dip pens and
different inks and mediums. And just to keep it
even more interesting, add in a couple of special
effects like this. So just like that, I'm creating these
outlines again over the areas where I've got
that special effect going, and then I might need to do
another dippy dip of my pen. It's really just to
show you that you can produce various
results when you work with ink Glass depends in your everyday pages or just in general drawings
and illustrations, if you don't have to do this
in your everyday pages, if you don't want, you can just go ahead and create beautiful artwork if you've got a little bit of
time and you're in the mood of just splashing some ink around and just
creating some textures. So all I'm doing now is
just adding in some of those hatching lines
like we did in the warm up exercise just
to finish this drawing off, and you can see it's
produced a beautiful effect. Look at that all with one ink. With one glass dip pen, just a little few splashes
of water here and there. And we've got ourselves a gorgeous little
quick illustration that was done in no time. And we enjoyed the
drying process, grabbing ourself a
nice bit of tea, maybe adding in
some more details here now and just like this, couple of cross hatching lines. Really nice and easy. Take your time with
it, if you're going to follow this sketch step by step, then just take your time, relax, do it a couple of times. Try it in a few other colors. You don't have to
just use one color, try it with different colors. That's the advantage
of these pens because you can easily switch
the colors in and out. And I think that's
going to look great. What I might actually
do is I might actually go ahead
and add a color to the background just
to demonstrate it just to make it pop
a little bit more. So just like that,
adding in them beautiful cross hatching lines and look at that looks great. What I might do is I'm
going to go in and maybe add in some of these lines here. Just adding some details.
You know what I'm doing? I'm getting all excited and I don't want to stop,
but I will stop. I promise you I'll stop. Otherwise, we're going
to be here all day, and we're going to have to have many more coffees and teas to keep ourselves
awake and going, but it's all good. It's all about art.
It's all fun and art. So I think I'm going
to leave it there. I'm not going to add
another color to this. I'll add another color to the next stage and the
next part of the class. So that's it. Let's just
make sure that we get a nice clean on
our glass dip pen. Always make sure that your glass dip pens are clean
as soon as you use them to avoid the drying up in the grooves and
ruining those grooves. And just like that, nice clean little bit of a dib
dab on the cloth, and the pen is done. And let's put it to the side. Look at that. That is
just gorgeous, isn't it? Special effect using
those warm up textures that we did in our warm up
exercises, and that's it. Oh, that was really exciting
stuff that, wasn't it? Those special effects. I
really enjoyed doing that, and I use a lot of these special effects
in the work that I do for my Sketchbook
Journaling and everyday pages. So that's it for this part. We can now move on
to the next part where we're going to
go ahead and start creating beautiful little
sketching techniques with everything that
we've learned up to now. So maybe go for a little I think I might go get
myself a nice coffee. Yes, let's get a nice Americano, beautifully grind
with choclaty notes and maybe have a little
snack on the side, and then I'll see
you when I'm back.
13. Sketching: Ok, welcome back. That
was a gorgeous coffee. Beautiful chocolate,
nutty hazelnut notes in that beautiful grinded coffee, absolutely fantastic stuff. It's really woken me up and got me into the
mood now of doing some beautiful sketches with those techniques that we learned in the previous exercises. So let's jump
straight into that. Now. Okey, welcome back. Let's now do a nice little
sketch using all of those techniques
that we learned in the previous two lessons. So this is part four of the class where we're going
to do a lovely sketch. So for this one, I'm
going to go ahead and do this in my watercolor block. This is my Arches, cool
pressed Watercolor block. Ideally, I want to be doing this for my everyday pages
in my sketchbook. Can be a little bit
difficult to record and do it on the screen in a sketchbook because
I have to move the sketchbook
around quite a lot to get the right angles. So just for demonstration, I'm going to use this
watercolor block that I've got so I don't have to worry too much about moving my sketchbook
all over the place. But I will show you a complete
sketchbook sketch that I've done in my
Everyday Pages style using these techniques. But we'll go through that in a sped up video where
I'll talk you through it. But for this one, let's
do this step by step. So if you want to follow
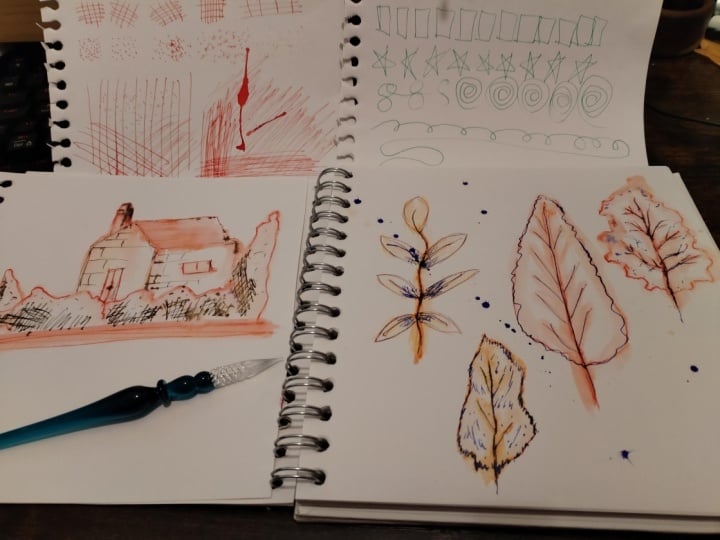
along in your sketchbook, you can here, this is my basic outline
of what I'm going to do. It's just all about
autumn leaves. I've just got four autumn leaves with a few titles at the bottom, and I might add in some writing
if I have time and space. But generally, I'll leave
a link to this reference. It's just a quick little doodle. So if you want to
follow along, you can. What I'm going to now is I'm going to grab hold of my paper. Again, this is a
coal pressed paper. It has a nice texture to it, but not too much that the
glass dip pen won't work on. And for this demonstration, I'm going to be using my lovely green bamboo glass dip pen. I'm not going to use the one
that I've been using so far. This one, I thought I'll
just change it around a little bit to just
show you the differences between the different
types of glass dip pen you can get so that you can
see a visual of this. Again, I do like to use
this one more often than partly because of the
grooves that it has in it, it has more deeper
grooves and I just find that the ink lasts a
bit longer in this one. Going to move the holder
of it on the side, keep that to the side like this for my four leaves
that I'm going to do, I'm going to do them in
four different colors. So if you've got
these colors, great, if you haven't,
that's no problem, use whichever colors you have. I've got sepia burnt sienna, honey burst, and ox blood. And these are really
nice warm colors that match the vibe of
these autumn leaves. So let's make a start. I'm not going to go ahead
and do a pencil outline. I usually do pencil
outlines in my sketchbooks. But for this
demonstration, because it's just on one sheet of paper, I'm just going to do
it fairly quickly and just go as it goes along. So let's just get a Zoomy
zoom in on this now. The first leaf that
I'm going to do is a lovely hickory leaf. It's a nice golden bronze color. So let's get our sepia. Again, like I said, if you
don't have these colors, just use whichever
colors you want. It's just a demonstration to
show you a complete sketch, how I would do it in
my lovely sketchbooks, and again, just so that you have an idea of the
entire process. I'm going to get
a nice decent dip on this one, twisting it around, making sure that it's covered
in that beautiful ink, then I'm just going
to go ahead and start drawing that lovely
hickory leaf. So just like that. You can see just smoothly flows
really nice into there, and I'm just going to
draw in these leaves, nice and simple, not
doing too much detail, just keeping things really
nice and simple here. We're not here doing
detailed work. We're just doing this
as a demonstration so that you can see how it works. Again, I'm just going to
go ahead and just draw in these leaves nice and
lightly just like this. It doesn't have to be accurate. You don't have to follow
no reference image for your actual everyday
pages that you have. The reference images
can be important, but just for this
type of an exercise, it's absolutely fine. Just go along with
it, see how it looks, and then tweak it if you want, if you don't relax and
enjoy the process. You can see I don't
know if you can hear, but it is quite scratchy
like that on this paper, and that's because this is cold press compared
to the hot press, you're not going to get
that much scratchiness, but it still works. Again, my sketchbooks
are usually cold press, so they have that
texture to them, and I just prefer the
look and effect of them, but it's entirely up to you. Hot Press would be
ideal if you just want a super smooth
surface to work on, like those vellum sheets
that we worked on in the earlier parts of the
class. But that's it there. I've just got my Hickory golden, lovely little leaf drawn up. I'm going to let
that one dry now and let's just close
the ink and do a nice little switch on the colors and washing
between our switches. So I'm just going to go in into my dirty water dirty water
jar there with the ink. Give it a nice rinse on that. Move that to the side, and then make sure like
we've been doing, give it a nice rinse in clean water so that we don't have any residue
of the old ink, and I'm just going to use
my tissue to go ahead and dab all that excess off and
I think that's looking good. Let's now move on to the second leaf and I've
got that birch leaf. For that, I'm going to use
the burnt sienna color. So again, whichever colors
that you have, just use them. Just like that, get a nice
bit of dippy dip in there. Spin it around a little bit because these are
plastic bottles. This should work fine. Let that ink flow, and then maybe start this
one around about here and just let that come down with that kind of storky
part of the leaf. Let it come down
here, just like that. It doesn't have to be
accurate, like I said, and then maybe the kind of
overall shape of the leaf, bringing it in like this. Beautiful, lovely autumn leaves, my favorite part of the year, my favorite season, as
you well and truly know. And then just go ahead and
drop in these lines that represent those veins of the leaf that are
going like this. Just like that. And that's it. How easy was that nice and easy. So I'm just going to
give that a close. Just rinse me pen now again. Okay, dog and then
let's go and find the color which is honeyburst
for our sugar maple. Love them sugar maple leaves. You see them all over the place, especially when I go
for me walkies in the park every morning to
get a bit of exercising. What a fantastic leave that is. It comes in all
different colors. Colors of autumn looking great, so just a bit of a dip on that. Now for this leaf, I'm going
to go ahead and draw in those rain lines
first, just like this. Oh, dear. Look what
we've done there. We've done a little
splogy sploge because I was getting excited,
but that's no problem. We'll deal with that later. Don't worry if the ink flops and sploges
all over the place. I don't want you
to worry at all. We're not creating perfect
art. We're just having fun. Have fun with it,
go along with it. Wherever you get a
little spidgy sploge, if you've got a bit
excited like me, then just leave it, leave
it there, let it dry. Don't try smearing it away, try using it within the design, and you're going to
be absolutely fine. So just like that, I might
actually pick a bit off there. So that's going to
be pretty nice. And then I might
just go ahead and just let that line flow into it, and then maybe add in a couple
of dots here and there. So just like that, we fixed it. It's not the end of the world. We're not here to worry. We're just here to
enjoy ourselves. So again, I get a lot
of these what we call happy happy accidents that they call them sometimes in art, but I just call them.
They're not accidents. They're just happy movements
and happy marks that I get, which are random, not planned. But again, we just
go along with it, go with the flow, relax your
mind, enjoy that moment. And sometimes these
kind of random marks can turn out to be rather
unique now, can't they? So you can see I've
just closed it off over there, absolutely fine. Might throw in a
couple of lines here, might pick up a little
bit of ink from there, saves me having to dip me ink. So there you go. That's a
benefit of doing these sloges. These random sloges you have a little pool of
ink to work from. There's always a positive
and everything in life. Ok doke and now we
can do a final leaf. You'll squeeze it
in it over here. I'm not going to leave it. I'm going to dip it
in. I'm determined, so I'm going to get
my ox blood color for that beach leaf. So just get a dip, nice clean dip on
the pen like that. Fantastic color, that ox blood, and just do a small little
version of this leaf here. We don't need to be accurate. Drop that leaf in there
just so that I can show you the different
colors and ranges that we can work with with our lovely ink and
our glass pen. So just like that following the and just bringing
it in from here, like so, and it looks like
a really nice shape there. And I think I'm going
to leave it like that, maybe dropping a couple
of lines here and there. So that's the main structure
done of the leaves. What I'm going to do now is I'm going to let that completely dry and give my pen a clean, and then once it's
dry, we can move on to that next stage of adding
in those special effect. Dk, everything is nice and dry. Even that lovely sploge that
we did error, by mistake, has gone nice and dry now, so we can move on
to the next step. So I'm going to grab hold of
my lovely spray over here. So again, if you've got a
spray, go ahead and do this. I'm not going to
bother with the brush. I just wanted to do
it with a spray right now and see what results we get. So very lightly from a distance, I'm just going to go ahead and start with this leaf over here. So just like this, a
little bit of a spray, and you can see the
magic of that Beautiful. Fountain pen ink
has just started making it disperse.
It looks great. Then again, on this one, I'm going to go ahead
and just spray it. I'm not spraying directly down. I'm spraying it at an angle like this so that the water
goes in one direction. And then we're catching a
bit of this here as well. You can see, look at that. Beautiful bit of hickory there. Look at that. Nice
splash of color. And then finally
on the ox blood. Over there, you've got a
beautiful, beautiful spray, and it's just enhanced that entire look of that
little illustration drawing. Move that to the side, and you know what
we're going to do now, we're just going to go ahead
and wait until it all dries, maybe grab ourself a little
snack or go for a walk, and then I'll see you
once that's done.
14. Detail Work: Okay, everything is nice and
dry now. And look at that. It's this gorgeous dispersed
effect that we've got. Nice and dry, it
looks quite unique, especially with that
little lovely little sloge that we do there. I
told you not to worry. Don't worry about them,
little sldges that you get, work with them and continue
and see how it goes. Our next step now is, yes, to do some details. Let's add in some details. Now you can add in the details
using the same inks and the same colors that you had on the leaf or you can
change it around. Why not change it around
Because you'll have the colors mixing in from underneath
as the first layer, and it'll just add
a bit more depth. A rather show you a
different version than what we did so that it
just creates uniqueness. So what am I going to
use for my next ink, I think I'm going to go ahead and I'm going
to use this one, one of my favorite inks,
Emma Rod de chevoi. However you pronounce
it, I don't know. I just love the
color of this ink. So I'm going to move me little ink bottles out of the way, and I'm going to
concentrate using this going to give that
a little shaky shake. This ink is also fantastic. But what I'm going to
do is I'm going to turn my little pad like this so that it's easy
for me to do this. And then just give that
a little open over here. And we should be good to go. So I'm just going to go in and just add in some random details. That's what I want to do. So just a nice
dippy dip in there, and you can see it's a lot
easier to dip your pen in when you're using
a wider bottle. So just like this, I'm
just going to go in and just add in some nice little squiggly wiggly lines
like this just to give a little bit more depth and interest to this drawing, and it just effectively looks like a nice
outline, doesn't it? So all I'm going to do is, I'm just going to do that
across all of these leaves. Some of them I'm going
to do the full outline. Some of them I'm just going
to leave as they are. And I'll quickly go
ahead and do this now. As I'm going along,
you can watch, and then once we're
done, we'll have a nice little chat and
see what results we get. Doke, now you can see, I've added that detail on now, basically an outline with this beautiful dark green color. And all I've done is just added in where I want
the details to go, not outlining every single
line that I had on before, just to keep it nice
and interesting, and just adding in a couple of little stipples
here and there, just to complete the look of
the entire drawing itself. And you can see that little
thing on the corner. It looks quite
unique, doesn't it? I don't know what it is. It could be like a I don't know, a little jelly sweet
just hanging at the end of that lovely,
beautiful maple leaf. So just like that,
having a play around, just adding in some
textures here and there, bit of dots over
here, some lines, maybe some scribble kind
of things like this, just to add in some
extra texture over here. And it all depends what you
like and what you want to do, how far you want to take it. Again, this was just a
quick little demonstration. I spend a lot more time
in my sketchbooks, which I will show you in
the next part of the class. So just like this,
have a go at this, just maybe do these leaves that I've got in the reference image, kind of like the
reference sketch. You don't have to
follow it exactly. You want to use your own
reference for leaves. Go ahead and do
just give it a go, a quick sketch,
nothing too deep, but nothing too detailed,
just like this. Then what you can do is
you can go ahead and start doing some writing on here just to add a bit more interest. Over here, we had our hickory, so I'll just quickly do that. Add in a couple of lines, maybe add some details in, add a few more leaves, add some nice little
design elements. Maybe you just want to add in a couple of leaves like this, just to float them around in the kind of empty space
that we have over here. So just like that, maybe
just drop in a couple of leaves, make it look nice, fill it up, a couple
of round berries here and there in that
lovely autumn look. And I think it just adds a nice touch to your
overall illustration, which you can then incorporate
into your everyday pages, and I think it's going
to look wonderful. So let's maybe just add in a couple more leaves here and there and then just add a
couple of berries here, maybe a few berries, just like that randomly placed, maybe a little leaf on
the top area down here. A couple of lines, and I think I'm going to
leave it at that. Otherwise, I'm going to be here all day and I'm going to
fill the entire page up. But let's leave it at
that. And that's it. That's part four,
complete of the class. Okeke, that's part four
of the class done. We're going to now move on to the next final part of the
class where I'm going to go through some of the work
that I've created in my sketchbooks for
Sketchbook Journaling and Everyday Pages. So let's move on
to that one next.
15. Everyday Spreads: Koki, welcome back. This is the final part of
the class part five, all about inspiration and motivation so that
you are inspired and motivated to create
beautiful work inside your everyday pages, Sketchbook Journaling,
using Glass Dip Pens. So let's move straight on to the exciting stuff
and have a look at some of the things
that I have produced. Oke. So let's start
off by looking at this sketchbook spread that
I did for my everyday pages. So the first stage I did in this one was just to
do some outline work. I added in my lines
for the writing part, and all I'm doing here
is I'm just drawing out some nice leaves for that
autumn vibe autumn feeling, just like we did in one
of the previous lessons, we did a little bit
of leaf drawing. But with this one, I've started in with the pencil
lines because I want to work with quite a bit of detail and spend my time on it. So just going in
now with some ink, just using my standard
Glass dip pen, and I focused really on using different colored inks for
each one of these leaves. You can see I'm switching
the colors now, moving on to that
second leaf there, using that really
nice orange color. And just like that, I was
just going to go ahead and outline each one of these leaves and really
focus on those details, taking my time didn't do
this all in one session. I did this over the course
of a couple of days. I just spent maybe 15, 20 minutes in each
session per day, just to relax my mind and
just to enjoy the process. And that's the advantage
with everyday pages and Sketchbook Journaling and
especially using a glass pen, the process, the enjoyment that you get from that movement, from that material
of ink onto paper. That's just great. I had a nice soundtrack in the background that I
was listening to, so it was just a
relaxing session. And that's what this entire
series is all about. So you can see now I'm just using all the different
colors that I've got for each one of these kind of leaves and components of autumn. And then we're doing that
special effect where I'm going in with the water
to wet those lines, and then all we're doing here is we're wetting them
lines and making sure that I rinse in between each wash. And that's
now fully dry, so I've just moved on
to the writing part. I think I was just writing
whatever was in my mind, it's all about getting your
thoughts onto the page, either you're writing
something specific or not, it makes no difference. Then once everything dried, I think on the next
day I went in with the same colors that I did
for those particular leaves, and I just wrote
some more thoughts, some more information about
those particular leaves. I think I went in with the color and what that leaf is all about. But again, it's just
this building momentum and just doing something
every day with your beautiful colors and using this fantastic tool that will effectively force you
to slow down and relax. I think this spread turned
out absolutely fantastic. I really liked the look of it. Once it's all dry,
it looked great. Okie doke, let's now start looking at
another example here. This one I've done in my smaller square
format Sketchbook, and I'm just going
in with the inclines immediately using my
bamboo glass dip pen, and I've just gone
in, and I'm just looking at those conkers
that I've got on the table. That's the theme,
the autumn Ckers, the horse chestnuts, if you
don't know what conkers are. And I'm just drawing in,
as I like to free flowing, not planning too much. Just whatever I can
see, drawing it in, spreading it out on the spread. And because I'm using
a smaller sketchbook, it's just so much
easier and manageable. I actually did this
all in one session. I didn't take too many
breaks in between. Now I'm going in with the brush, just adding in water, more controlled rather
than dispersed, just to get a bit of
color and interest into those little
scribbles and doodles. And then I went in with
some different greens using the same pen, just filling in those areas where I've got a little
bit of white space. Really enjoyed this,
and if you notice, I did a couple of
sploges of ink as well. One was by mistake, and then the others
were all planned, and I liked how they turned out. And you can see now I'm just drying with my dryer
that I've got. This just speeds up the process, and I'm using a bit of
tissue there just to dab that excess pool of ink, and I thought the effect
looked really nice. Going in again with the brush and water and drying in between, it just speeds up
the entire process. This one didn't really take much time and real time to do. I think it only took
me about half an hour because I was fast
drying with my dryer. And now I'm just
finishing off with some nice outlined and a
bit of cross hatching, like we did in the class. This is my usual systematic
approach of doing my everyday pages and journaling sketches
with glass dipen Again, it forces you to slow
down rather than using just a fine liner or
some colored pencils. You have to go
through this process. And when you have that
extra bit of time or when you want to
just relax and listen to a talk or put
some tracks on in the background, it's
just fantastic. So now I have dried up the illustration and I'm just
going in with the writings, and I'm just writing whatever's coming in my mind,
writing my thoughts. Related to what I'm
feeling on that day, what I'm drawing,
conquers bonkers. So just getting it all out, and I really liked how
this one turned out, it was more manageable,
got it done really quickly in
a smaller format. So that's a couple of
examples that I've shown you of my Everyday Pages
using Glass Dip Pens. Let's now move on to some
single sheet illustrations that I've done using Glass Dip
Pens for more inspiration.
16. Inspirational Pieces: Okay, welcome back. Let's have a look at some small format, doodles and drawings that I've done with my glass dip pen. So I usually like to cut down some paper into small sizes, do a little frame
with my stencil, and then just go ahead and start doodling with my glass
dip pen in one color, two colors, or as many colors
as I feel like on the day, it's a great exercise this
just to get warmed up, put a little bit of
soundtrack on the background, listen to a nice talk
a motivational talk. Just go ahead and doodle for about 10 minutes, 11 minutes, so you can start really creating those
beautiful patterns and textures in your beautiful
artwork with glass dip pens. You can see I'm using those
lines and stipple lines, and I'm going ahead and
creating cross hatching, using nice variation in my work. I'm not thinking
too much about it. I'm just going ahead and
creating this pattern design, and then I'm just
adding in a little bit of notes on positivity because it's all about being positive to improve
our well being. So give this a try, cut down your piece of paper, whether it be bristle
board or watercolor paper, cut it down into small sizes, and maybe sketch on them once
a day, and see how you go. It's a great idea. And here are some
examples that I've done systematically
with different colours, different ideas and layouts. So do give this a go. Don't spend too much time on it. It's a great warm up exercise
in addition to the class. I've also done this technique
on bigger pieces of paper. So these longer strips
of my bristle board, you can see, very loose work, detailed work, and
then some pattern work with a little bit
of writing to go along. And yes, I've done some mini doodles as well
on really small cutouts of watercolor paper with my glass dip pen.
So much fun to do. So please give this
a try if you can. Okay, okay. The
class is now done. We've gone through so
many different things. Let's now finally wrap up the class with some
final thoughts next.
17. Final Thoughts: Doke, welcome back. Now just a couple
of final thoughts just to wrap up the class. I hope you really enjoyed going
through the exercises and the demonstrations of using
our fantastic Glass Did pen, and I hope you continued and did the sketching exercises and maybe completed a
complete spread for your class project really to get some excitement
and enjoyment in this process of daily
sketching to improve being, you know, I enjoyed
myself as usual with traditional mediums and this
magical tool of a Glass pen. Just try your best to create art in your sketchbooks
on a daily basis, explore and experiment with fantastic tools that
you can find like this. They don't cost much
to buy and give some enjoyment into your day to day routine of daily sketching. So thank you so
much for your time and help and your support. Do follow me on
social media if you don't already do so
and also ensure that you follow me on Skillshare
so that you have all the latest news of
my upcoming classes. Again, just leave
beautiful discussions in the class post so that we can keep talking
with each other. If you want to contact
me separately, you can go ahead and email me on my email link that I
have in my profile page, in my Skillshare
profile channel. And this way, we can stay
in touch with each other. We can explore this
wonderful world of art and the most
important thing, we can improve our well being because that's what
it's all about. That's what I want you to do.
I don't want you to stress. I don't want you to worry.
Life has its up and downs. Sometimes there's too many
downs and not many ups, but when we do have our ups, then we want to enjoy
them and express them and really bring that inner
peace into our lives. And why not do this
with the work of art? Expressing yourself with
fantastic tools like Glass pens and inks and all
other traditional mediums. So thank you again for all your support
without your support. I can't create this class, I can't create and continue being motivated to
create classes. But I love to do this, and I love to watch the
work that you produce. And I just love this
beautiful community that we create where we
talk to each other and enjoy each
other's experiences. And it's just a fantastic
little world that we live in. So thank you again
for all your support. Do ensure that you upload your class projects in the
class project gallery and also ensure that you leave a beautiful review on the class so that other students
can find the class. So if you don't leave a review, then people won't be
able to find this class, and they won't be
able to learn from your wonderful experience. And so let's just go ahead and just get as many
people as we can in this beautiful circle
of art and journey and adventure into our
artistic well being. So thank you again so
much for your time. Thank you again for your help. Can't wait to see
your class project, and I can't wait to see
you on the next one. Take care of
yourself, stay happy, stay relaxed, and peace.
 Imran Mughal, Graphic Designer & Illustrator