Transcripts
1. Introduction: Hello and welcome
to my new series, our projects episode one. Subject cards. Are you feeling uninspired or unmotivated to produce
beautiful art? But you have lots
of art material. You've got colored pencil,
you've got watercolors, you've got markers and loads
and loads of art materials. Your tray or in your
art supply boxes. Don't know what to draw, need some motivation, then
this class is perfect for you. My name is Jim Ryan. I'm
a graphic designer and illustrator and welcome
to my new series, our project episode
one, subject cards. This series is all about doing our projects with the
supplies that you already have to give you that
motivational kickstart and inspiration to produce
beautiful artwork on a daily basis. I always advocate using art to escape away
and improve your well-being by doing a little bit of artwork on a daily basis. And this series is all about
getting you to start up on the habit of doing something every day to keep
your mind motivated, inspired, and to act as
that lovely gets away, away from your hustle and
bustle of your daily life. And to just relax and enjoy that beautiful process of using your gorgeous art materials
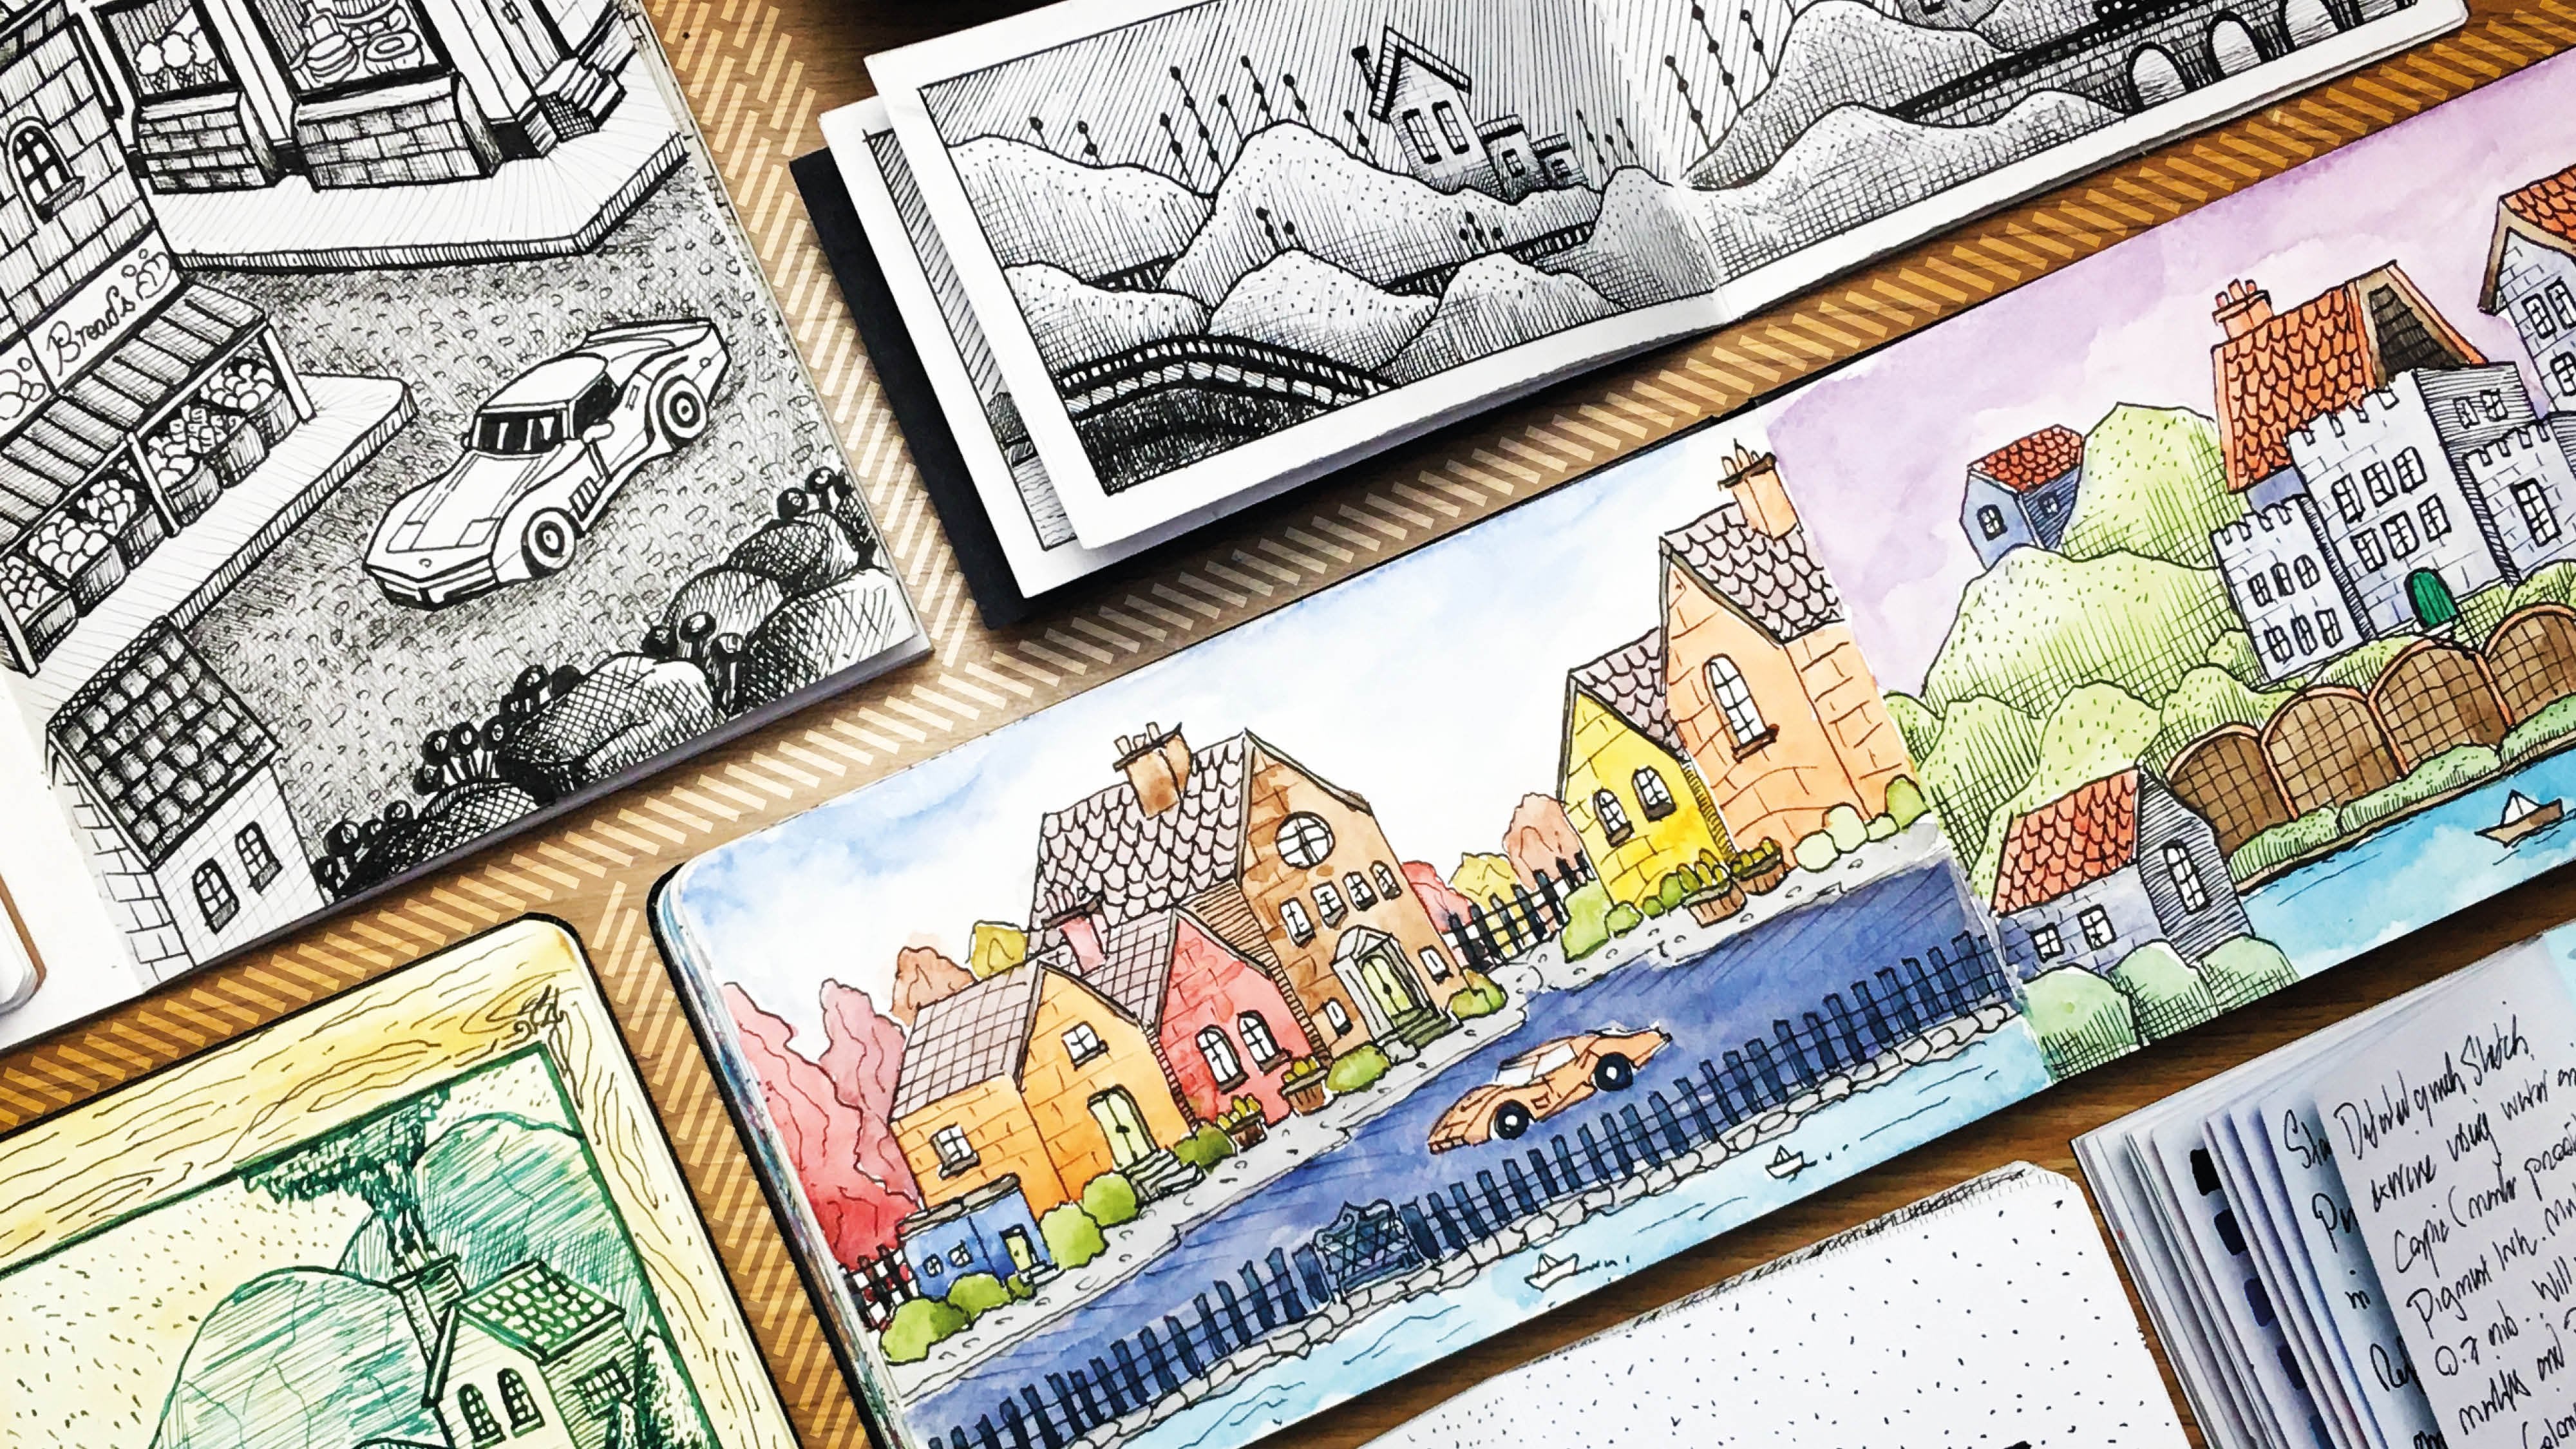
to produce daily art. For this first episode
of this series, we're going to be diving into designing these
beautiful subject cards. We will begin the class by going through the class
supplies that you need. These are gonna be
absolute, bare, minimum, and you're going to most likely already have these
class supplies. The whole idea of
this series is to use the materials
and supplies that you already have to start using them to create
beautiful art. We're going to then look
at creating and designing some templates to produce
our subject cards on. This will include adding
beautiful frames, adding a splash of color, creating the layout,
composition, and adding beautiful patterns
to our subject cards. Then most importantly, deciding on what
subject we're going to use to produce these brilliant
little subject cards. I will be designing
step-by-step so that you can follow with whichever materials that you have available to you. We're going to use
different materials such as pencil, ink, watercolors, and maybe even some markers to produce these gorgeous
patterns and designs. But if you don't have
these materials, it makes absolutely
no difference. You can substitute with
whichever materials you have. So you are not limited to
any type of art supply. And once we've finished
the step-by-step lessons, then you're going to
be ready to produce your own beautiful subject card or a complete setups object cards for you to do in
your class projects. So if you want to start this
wonderful adventure with me, then grab hold of your art
supplies and materials. Sit back, get yourself
a nice hot drink, get yourself a nice treat. And let's get started
with the class.
2. Class Supplies: Okey-dokey, welcome back. Let's now start off with going
through our small classes, supplies and materials that we need to do this exciting class. So let's start off with
the first item and that is the lovely
job lead pencil. So you're going to need a
pencil to do your initial sketching with and grab
yourself an eraser as well, which will come in
handy to get rid of all those squiggly wiggly
lines that you don't want. So we're starting
off with pencil. Let's put that to
the side there. And then to do some line work, we're going to need
some fine liners or even a fountain pen if that's
what you're accustomed to, I personally will be
using my fountain pen, but if you don't
have a fountain pen, then fine line as we'll do. Now, the type of fine liner
is important because this will depend upon the actual
medium that you go for. So I always use waterproof ink, fine liners like
these ones here. And I also use waterproof
ink in all my fountain pen. So if we're going
to do wet mediums, which we're going
to move on to next, then make sure you've
got waterproof ink. But if you're going
to use dry mediums, then you can use any
ink for this class. Let's now look at our
fantastic medium. So you have a choice of
mediums for this class. So firstly, I've got some
standard markers here. These are just
water-based markers, basic, cheap Crayola markers. You can use whichever
markers you want if this is the option
that you want to go for. So this is the
first option to use water-based markers like this. If you have brush pens, they'll work fine as well. The second choice
is colored pencil. So I've got a few
colored pencils here. I've got many more
colored pencils, but if I put them
all on the screen, just going to go into
a colored pencil. So I've just selected
a few here just for showing you what
I'm talking about. So we've got the second
option as colored pencils. They can be any colored pencils. So I've got a few down here. I'm, the third choice is
our lovely watercolor. So I've got a nice sets of May standard
watercolors over here. And obviously you're
going to need a brush if you decide to use watercolor. So we got watercolor
as the third option, giving us a total of three. Now I'm going to suggest
you use maybe one or two of these options for this class or even a combination
of all if you like. However, I'm going
to concentrate on the watercolor side because that's just my
personal preference. I may do a little bit with
the watercolor markers, but just use whatever you
have at your disposal. It doesn't really
matter what you use as long as you're using
the right surface. And that's what we're
going to move on into the next part of the class. But before we do that, let's just quickly go through some other items that you're
going to need for the class. Let's just move all these
lovely mediums to the side. So now I've got a nice
little white paint marker. You can use a white gel
pen if you have it. And this is just a speckle, a couple of highlights onto our lovely illustrations
that we produce. And then I've got a ruler
and this is going to come into play in the next
part of the class. So important to get yourself a ruler and also some squeezes. So we've got some lovely
scissors over here. So scissors, ruler and an option of a white paint
marker or a gel pen. It's not absolutely necessary
that you have one of these. That's fine. If you have one
lying around, great. If you don't, then
that's not a problem, but absolutely
scissors and a ruler. Finally, we just need
something round which will come into play when we do the next part of the lesson. So I've just got this little
five penny piece here. You don't need to have
a five p. You can have anything that's round that
you can draw it around. And that's going to be for the corners of the
dimensions that we use. So anything around that you can draw around if you
can't find it. No problem, just
leave it as it is, and that's it then. So let's just do a
summary of what we need. Okay, so firstly, we need
a pencil and an eraser. And then we said we needed
some type of ink tools, so fine liners or a fountain pen with ink, preferably
waterproof ink. If we're going to use
watercolor mediums, then some of mediums
that we have over here, we've got the
water-based markers. You can use felt-tip. You can use any
type of brush, pen, or marker as long as
it's water-based and not alcohol-based because
we're not going to really be doing
alcohol markers here. But if you want to
use alcohol markers, then you can go ahead and do it. It might you might end up
getting different results, but that's absolutely fine. And then we've got
some colored pencils which are always good
in handy to use. And then my favorite, which is the watercolor
super-duper watercolor there. And then obviously
you're going to need a watercolor brush if
you go for that option. And then I've got this
additional option of a highlighter marker. So a paint marker or white
highlight gel pen would do. Then I've got scissors, a ruler, and then I've got
something round to draw corners from,
um, that's it. That's all we need from the
actual tools and supplies. Let's now move on to
the next main supply, and that is the surface
that we're going to use. So let's move on
to that one next. Okey-dokey, the next
and most important supply for this class
is the surface. So the paper stock that
we use is very important. Now, I'm going to
recommend that you use the thickest paper
that you can find. And it all depends on which
medium you decide to go for. So if you don't want to use watercolors and you
just want to go ahead. Maybe just use ink and colored pencils then I would
suggest you use a heavyweight cartridge paper or any cartridge paper that has
a decent thickness to it. And bristle board for
that would work great. If you've watched any
of my previous classes on colored pencils, I always love using smooth
Bristol board paper. This for me is one of the
best papers you can use. You can see it's nice, durable and it has a decent
amount of thickness to it. So bristle board or
cartridge paper, if you decide to use colored
pencils and ink only. Alternatively, we can use a nice mixed media
surface like this. We've got this acrylic paper, which is quite nicely
textured and would work pretty nicely this actual
exercise for this class, however, this is something that you probably won't
have lying around. But if you do, why not
give this one a go? This will even work well
with watercolors and the actual watercolor markers themselves and even
acrylic paint, which is what it's designed for. But we're not going to go
down the acrylic paint roots. I'd rather keep it
nice and a pliable and simple for this first
episode in this series. So if you have any acrylic
or mixed media paper, then maybe give that
a go for this class. And finally, and this is
what I'm going to use, and that is a watercolor paper. Now this is one of
my favorite brands of watercolor paper. It comes in a book and this
is what I'm going to use. It's hot press, so it has
a nice smooth finish. And the advantage of using
watercolor paper is you can use watercolor markers on
them, which is brilliant. You can use the brush markers, you can use ink, and you won't have any problems. So if you have watercolor paper, then I'm going to say go for your watercolor paper
option for this class. So again, I'm gonna be using watercolor paper and I'm
going to mainly concentrate on with my watercolors
and maybe a little bit of these standard
watercolor markers and maybe a little bit of Anki. Anki, or I might add a splash of colored pencil or maybe
some marker work, and this paper will work fine, but it doesn't really
matter what brand of watercolor paper you use, whichever one you have
at your disposal, just use that whether it's
hot pressed, cold pressed, because generally
watercolor paper is usually quite thick. The one that I use and
the one that I always recommend is the 300 GSM. That's usually with
some decent brands. That's the thickness you
get and the weights, it's 140 pounds, anything
lighter then that will work. However, if you do have 300 GSM, then absolutely go for that. That's all the supplies that
you need for this class. I know you're getting excited because I'm getting excited. So let's now move on to the first stage of
this exciting journey.
3. Template Design: Okey-dokey, welcome back. Now the excitement begins. So we're going to do the
first stage of the class. And this is all
about cutting out our sheets of watercolor paper or cartridge paper
or whichever paper that you decided to use into its lovely little shapes so that we can get
them ready and prepped up for the beautiful
illustrations that we do on this actual example
that I'm going to show you. I'm just using some
standard paper here that's because it's quick and
easy to do on a camera. So I'm not going to use
my watercolor paper, but I am going to use the watercolor paper for when I actually go ahead and do it. So just for
demonstration purposes, I'm just using this normal printer paper because it's just easier to cut and show
while I'm talking so, well, either paper
you decide to use, just use this same method. Now, for this first
stage, we need, obviously we need the sheets of paper that we're going
to go ahead and use. We need our scissors ruler, we need our pencil eraser, and we need our
round little thing that we're going to
use to do the corners. So first stage is to get
your ruler and your pencil, and we're gonna do
some measurements. Now, the whole point of
this class is to create some beautiful little
panels that are rectangular shapes that we can mimic and create templates of. So my paper here is A4 in size. My watercolor paper is going
to be slightly bigger. Your sheet might be bigger as well or even might be smaller. So I'm gonna give you a ballpark recommended size to cut out. This is just a ballpark size. You don't have to imitate this exact size if it's not
feasible for you to do, you can do something maybe
a bit bigger or smaller, but just keep the dimensions and proportions similar so that
we get similar results. So what I'm gonna do is
I'm going to measure across the page
and this is giving me approximately around
about 29 point maybe seven. So 29.7 cm, I've got a cross. And what I want to do is
I want to divide this into as many strips as I can. That's our 7 cm across. So over here I've
got seven and I'm just going to literally just
throw in a little dot there. Then the next seven is
going to be on the 14, throw in the dark there. The next term is
gonna be on the 21, and then the final sermon
is going to be on the 28th. It feels like a
maths class doesn't say the seven times table. So now you can see I've got seven centimeter spacing in
between each of these dots. And then I've got this
excess area over here, which we don't need
to worry about. So what I'm gonna do now is I'm just going to
bring the rule that down and I'm going to
literally do that again. So I'm just going to
make sure that my edge is on the starting point there. And again, all I'm gonna do
is I'm just going to add in these dots at the seven
centimeter intervals, 71421, and then we've got 28. And this will make more sense
when we do the next part. So we've got double
dots going across our page and all we need to
do now is just connect them. Yes, we need to connect them. So it's like a dotted piece of artwork with my
ruler and pencil. I'm just going to join
up them two dots and just do a line going down. And you can see we've got a
nice little stripy strip of a seven centimeter
rectangle going across. So again, join the dots
over here, like so. Don't press down too
hard with your pencil. You don't want to
indent your paper, just keep it nice and light. Finish the third one over
here like this, easy-peasy. And then finally that
last part down there. Let's get rid of that
one. And there you go. So now I've got four equal-size strips
that are 7 cm across. Now, what I'm going
to suggest is let's now trim these lengths. So we've got these
lengths over here, and I'm going to say,
let's maybe have 14 cm. So if we just measure 14 on
this first one over here, so we've got, let's
just get that straight. So we've got 21 all the way down here
on this sheet of paper. So all I want is this to
be up to 14, 14 there. And then on the line at the end, I'm just going to do another
14 measurement there. So 14 cm from the top on
the end of that line there. So effectively just
got two points now that our 14 and
you guessed right, we're just going
to join them up. So we're going to do a join me, join the line on this, just to give us a nice equal dimension going
all the way across that. And there we have it. We've got our four
panels that are seven centimeter
by 14 centimeter. Now can you guess what
we're gonna do next? Absolutely. Going to cut these
out with ours. Let's get our scissors ready and let's just do a
quick coffee cut. Now, if you don't
have big cities like I've got here and
you're struggling, then just take
your time with it. Don't rush this. I'm only doing this really
quickly because I'm recording this at the same time. So I'm going to be a little
bit rough with mine. But when I come to doing
my watercolor paper ones, then I'm going to spend
a bit more extra time on it to get it right. So just like this, I'm just going to do with
quick little cut there so I can get rid of that
and put that to the side. And then what I want to do is just trim this edge
off just to keep things nice and simple so that you can visualize this
while I'm doing it. And again, you may have
some more advanced tools. You may have a tremor that
you could use to do this. Or if you've got a tremor,
then go ahead and do that. Or you might even have a super-duper cutting
machine that does some fancy cutting like a
cricket explore heir to do. I have one of them. I think I might want
to then add fire. Not everyone's going to have
a dye coating machines. So let's keep it nice and
simple with this scissors. So we've got our
four panels here. And all I'm gonna do is
I'm just going to go in and cook quickly cut these. So we have some
nice little panels. There we go. Fantastic. We've got some beautiful seven
by 14 centimeter panels. And you can see mine
are a little bit wonky because I've
done this really fast, but do spend your time on it. Get that coating,
don't really nice. Now, the next stage
is we're going to do our nice corner
corner things. So if you remember, I said have a nice little round
thing that you can draw around the five P or whichever currency
you're using a coin, anything that has around to it. So what I'm gonna
do is I'll just move three of these
out of the way. And we can concentrate on one. So let's just get a zoom in. Zoom in on this looking
nice and sharp, Fantastic. So what we need to do now
is we'd get our pencil and use the round coin that you have or whatever you have
that has a round edge to it and just bring it close to the corner over here
so you can see, I'm just bringing it
closer that this part of the coin searches that edge and this part of the
coin touches that edge. And effectively,
all we're gonna do is just get a bit more
of a zoom in zoom. So you can see there's
a bit, that's all, that's fantastic. So all we're going to
do here is keeping it within the corner itself. We're just gonna do a little
curvy curve with our pencil. And you can see we've
got a perfect curve. Fantastic, isn't it? Great little tip, should I say? So? Let's do the same
on this corner, so make sure it lines up nicely. Then just do a little corner
and then flipping it over. And we're going to
basically do the same on the edges over here. And the reason for this
is that once you've finished this beautiful
little panel, you've got something
that you can easily move around and it just
looks quite nice, doesn't say it rather than
having those sharp edges which do tend to fold away when you kind of
like using them. So it does have its advantage. So there we have it. We've got these
lovely little corners here for rounded corners. And yep, what we're gonna do now is we're just going
to get our scissors. We're just going to
carefully just cut these roundy rounds so
that they match nicely. You can see that
beautiful look at that and then get rid
of that little excess. And all I'm gonna do is I'm
just gonna do this around all four. There we go. So let's just do a Zoom
is zoom back on this. Get rid of them. Little corner things
out of the way. And we're looking really
good. I mean, look at that. How easy was that super simple? All you need is a
pencil, a penny, or a five P, and
some scissors and you've got yourself
a gorgeous cutout. So just do this and
repeat it for all four of your little panels
so that you have for the equally the same. And then we're pretty
much ready to move on to the exciting part
of the design stage. So once you've done
this, give this a go. I mean, if this corner thing
that I've done here is fits a bit too fiddly and tricky for you
then do you know what? Just leave it. You don't need
to bother with it too much. But really it is
quite easy to do. It's not as difficult
as you might think. You literally just
do that little curve and just slowly cut around it. Take your time. Don't rush it like I've rushed
it in this demonstration, you're gonna be using
your watercolor paper or your expensive
cartridge paper. And it's a good idea. Sometimes it may be just
practice on some cheap papers, on cheap printer paper to see if you've got the hang
of it before you go ahead and use your expensive,
lovely watercolor paper. So I'm going to let
you do that and take your time on it and don't
worry if you mess it up, if the corners aren't
perfect, that's fine. We're not here to create
perfect artwork, are we? We're here to relax and enjoy ourselves and
just get busy with our art materials to produce a some wonderful beautiful
pieces of artwork. So once you've got that done, then you can see me
on the next one.
4. Frame Design: Okay, welcome back. I've now got four
beautiful little panels, seven by 14 with gorgeous
rounded corners. And mine are done. And I've actually gone
ahead and done this with my watercolor
hot pressed paper. So I spent a bit more time on this than I did with
the demonstration, just to get these angles
really nice and lined up. And it's looking fantastic. So double-sided playing hot
pressed watercolor paper and we have four gorgeous strips of beautiful seven by 14. Now for the exciting part, now what we're gonna do is go ahead and do some design work. So let's just move maybe
three of these out of the way so we can concentrate
just on one scatter, zoom in, zoom in, zoom in on this over here, looking good. So let's get that bang
on in the center. Or we need to do now
is we need to grab hold of our pencil
and we need a ruler. I've switched to a
nice small ruler just to make it a little bit easier. And what we're gonna do
here is we're gonna go in and draw a border that follows the shape of our overall strip of
card watercolor paper. So in order to do that, we're going to create a
half a centimeter ring effectively with in this
rounded edge shapes. So firstly, what we're
gonna do is we're gonna get our ruler measure
half a centimeter here. So you've got half a centimeter
there and just throw in a little dot like we did
in the previous exercise. Move it down a little bit
towards the end and again, another half a
centimeter dot there. Then we're going
to switch over to the other side and we're going to just follow along and
do exactly the same. So half a centimeter dots coming in from the left and
then at the bottom, half a centimeter dot
coming in from the left. I can just write that fantastic. Then what we're gonna do is
we're just going to go in and draw our lines to join these
two dots, three dots up. So just like that, draw a line all the way from the
top to the bottom. Again, don't press too hard, just keep it nice and light. Fantastic. And again, on the
other side over here. So we're just gonna go in, gets it lined up, really nice, and we're
just gonna go ahead and join those lovely dots. So you can see now we've got a nice half a centimeter line from the edge and
it's looking great. So I'm just gonna
do a little tilt, the tilt of this now just
to make it easier to see, and I'm going to follow
the same routine and do a, another half a centimeter. The right-hand side,
a little dot there, and then another
half a centimeter, a little dot over here. And then let's join these up. So again, line it
up with your ruler, do a straight line
all the way across. And then we're going to do
the same on the other side. We've got that half
a centimeter down there and then another half
a centimeter over here. And this will complete our actual inner frame
that we're creating. So just like that line itself and just do
a nice little y. And again, take your
time with this. I'm doing this fairly quickly
for the demonstration. But eventually what
you'll have is you'll have this lovely
little frame border coming along all the way
through the edge and you may be off by a millimeter here and there, but that's fine. Just do it as best as you can. You can see that my line
that I've done over here is gone slightly
above that point, but I'm not really
that bothered. And again, I don't
want you to stress. It's all about relaxing
and enjoying the process. Remember, we've got
another four panels to do so practice makes perfect. So the next stage now
is to grab hold of your little penny or your little round thing that
you used to do the corners. We're going to just use our
round edge to effectively do a curve between the two lines that we've just drawn
in that cross over. So just line it up
like we did before. The edge going on to
the right-hand side, the top part going on. So the one going across and just draw in that little curvy curve. Fantastic. And again, on the other side, we have exactly the same. Just line it up and do a
nice little curvy curve. And that's looking good. So we're doing the
same for the bottoms. Just move this on this side, actually, that'll
be a lot better. So I won't say. So again, just line it up in-between those lines
that we've just drawn in. I'm just dropping
that little corner. And I'm going to do
the same on this side. So just dropping in
that little corner. And look how easy that is. So look at that
beautiful stuff, right? Let's just do a zoom back now so we can see
what we're doing. Let's get that out of the way and we're looking very nice. So what we've basically
done is we've just created this will half a
centimeter frame within the panel that follows the stimulus shape of
it on the outside. So the next stage
now is to go ahead and come up with some creative
patterns and designs. So let's move on to that next.
5. Colour & Patterns: Okey-dokey, welcome back. What I'm gonna do
now is I'm going to select a nice color and fill in this border edge
that I've got over here. And I'm gonna do this with my
water-based Crayola marker. I've got a nice little
pinky color over here. You can use whichever
color you want. If you're using
markers, that's fine. If you're using colored
pencils, that's fine. Just select a color and the exercise is
basically to color in this border that
we've effectively created to frame our panels. So all I'm gonna do before I do that is I'm
just going to grab hold of a sheet of plain
paper and just place my panel on top of that so
that I don't mess up my mat. Then we're just going to
go in and color this in. And it's just a case of going in and keeping within the
lines as best as you can. So just like this, I'm
just dropping this in. And you can see with
the watercolor paper, these cheap Pete
markers work so well. They actually feel a lot more
expensive than they are. They feel like
those high-quality brush pen markers don't like. But again, if you've
got these lying around, then there are a great way
to use them in this project. It's just such an
easy thing today, so I'm just going to
continue doing this until all this border
edge is finished. Ok, and there we go. I've got a lovely
little pink border that goes all around the lovely
petal that we have. And again, just take
your time on this, make sure you get
every area cupboard in the color that you're using. And that's it for this stage. Now, wait until this dries out. Because again,
even with markers, if you're using
markers like I am, they do tend to be a little bit wet for a couple of minutes. So ensure that before
we do the next stage, everything is completely dry because we don't want to
have horrible smudgy. Smudgy is everywhere
now, doing so, I'm going to wait
for that to dry and then I'll see you
on the next one. Okay. Okay, that's nice and dry. Now we can now move
on to the next stage. For the next stage, what we're gonna do is we're not
going to actually work on the front of the panel
where we've got the frame. We're going to turn this around, flip it over, and we're gonna go ahead and work on the back. So let me just get hold
of that piece of paper, but just putting my piece
of paper underneath my actual panel itself so that I don't make
a mess everywhere. So what I'm gonna do now is
I'm just going to create a nice little pattern to
fill up this back panel. Because what I want
to do is I want to concentrate on the front. And it's always nice to
add in a back panel. And because we've just
used the color to do the front frame of
this actual panel. It's just a good
idea to just do that continually and go
ahead and do this next. So I'm just going to
grab hold of my ruler. And all it is is it's just creating some lines that I'm
going to do going across. So just like this is just an estimate line
going across like this, just to create a nice pattern
to fill up that back area. So over here I've just drawn a little wine space
and then another line. And then this is
all I'm gonna do. I'm just going to
follow this along. I'm just going to nudge my ruler a little bit further down, just a little bit like that. And then with my marker, go ahead and just keep adding these lovely little
hatching lines. And it just gives
it a nice effect. So I'm going to continue
doing that now. Okay, So we've just done some beautiful little
horizontal lines that are spaced really tightly together to create this
beautiful pattern. And it's just such a relaxing
exercises and say so what we're gonna do
now is I'm just going to flip this over. So I'm just going to
move my entire sheets. Just going to flip that over. Let's get Central. So rub out there. And then I'm just
gonna go ahead and do exactly the same the other way. So we effectively have a cross hatching
pattern on the back. Now, if you are not
using these GP markers, like I've got over here, these water-based markers,
you can do this with anything as long as
it has a tip on it. So you can do it at the
pencil with your fine liners, with your normal pens. You can do it with paint
markers or colored pencils. Whatever tools you're using, You can go ahead and
create this crisscross, cross hatch pattern
that I'm doing and it's just a nice little
exercise just to relax. I mean, just play something in the background or just to sing the song while
you're doing it. I'm sure you don't
want to hear me sing, so I'm not going to do that. I'm just gonna go ahead
and add these lines. And then basically I'll
see you once this is done. So I will just do
the first-line to show you what I'm talking about. So just there on the edge first-line going
across and again, just bringing it down
maybe a little further than we did before just to
create an interesting pattern. And just like that, I'm just gonna go ahead and
create these beautiful, crisp cross, cross
hatched box wines. And I'll see you
once. That is done. Okey-dokey, We're now
Dawn and look at that. Look how beautiful that looks at gorgeous little
criss-cross pattern with our lovely color
that we're using. So let's just flip this over. We've got our frame on the
main front side of it. And then we've got a
beautiful little pattern for the panel back. So that's it for this stage. We've just basically prepped up our beautiful panel
so that we can get ready for the
illustration stage. And we're just going to do maybe a couple more things on this before we go ahead
and actually start working on our main artwork. So let's sit back,
maybe have a break, have a nice little
coffee and a cake, and I'll see you
on the next one.
6. Layout Composition: Okey-dokey, welcome back. Now what we're gonna do is
we're going to move on to the next stage of our
lovely adventure. So I hope you had
a nice coffee in that break because
we're going to get all the exciting stuff done now. So I've got my lovely
panel that are colored in and added the
texture on the back. And this is pretty much ready for that next stage
of excitement. But before I do that, I'm just going to show
you a little trick. Just keep watching over here. Look at my hand, and
now we have four. We've just multiplied
it by four. And magically, four of the identical designs
have appeared. Well, no, they haven't
actually went ahead and did this and completed
exactly the same steps. So I've got that beautiful
texture on the back. I've used the same color just
for demonstration purposes. But again, if you have four of these strips
out of your paper, then go ahead and complete the template design just with
the frame and the colors. Use different
colors if you like, or just use the same ones. It's absolutely fine. What this does is it keeps you ready for each stage at a time. And if you do mess up, then you have a backup of
maybe two or three more of the panels that
you can work on so that you don't have to
start all over again. And it's just a great
relaxing process, isn't it? So let's now have a look
at our layout, Okey-dokey. So for little layout,
what I'm talking about here are two options. We've got this lovely
whitespace here that we can do our illustration in for our particular subject
that we choose. But it's also nice to have
a little bit of writing. So what we're gonna do is
we're going to come up with some different compositions
for where we're going to place the text, the writing. And in the end we're
just going to draw in some pencil lines for the
position of our writing. And then that will give
us a nice idea of how we're gonna go ahead and compose each one
of these panels. So what I've got here
is I've just got some printed paper here
just for demonstration. We're not going to
use printed paper. This is just for me
to give you an idea of the different types of
layouts that we can do. So I've just got some lined
paper here that I've cutout. So we have two options. We can either do our designs in a portrait mode,
which is like this. You've got the long
strip of paper, or we can do it in
the landscape mode. And we can go ahead and turn these the other way round
and use them like this. So let's look at the
different variations of the portrait mode first. So I've got my nice
line paper here. So one option could be, we could have our lines up the bottom half of
the actual panel. And then we've got this space on the top where we can
do our illustration. We can also have
smaller lines to have less text and maybe more
space for the actual drawing. So we've got maybe half
the area in writing lines. And then on this option we've
probably got about 25% a quarter of lines and then
more space for the drawings. Or you could actually go
ahead and have no lines at all and maybe annotate your
illustration as you go along. Or you could just have no
text or writing altogether. So you could just have the
illustration as it tastes. So there's four options here. Text on half of the panel, text on one-quarter
side of the panel, maybe just the illustration with annotations Along the
illustration itself, or just the illustration
completely by itself. So it's entirely up to you
which option you go for. I mean, you can have a mix
and match of the options. So you could maybe
have a couple that have texts and writing
on half of the panels, maybe a few that just have annotations on the
actual illustration, or maybe just one
that has nothing on it and just has the
illustration as it says, that choice is
entirely up to you. As you go ahead and make more of these in your
beautiful collection, you can play around with the
process and composition. So that was the four options that I've got for
the portrait mode. Let's now turn it over. So the horizontal mode. Okay, so now we've got our
panels laid horizontally. We've got four options here. And again, it's a
similar process. I've got a nice little
strip of paper that I'm going to be placing on
the left-hand side over here. Now, you've got the option of placing this on the
left-hand side, or maybe having it on
the right-hand side, you can change the orientation according to your preference. So again, like we had
with the portrait panels, you can have text
on half of it and maybe some drawings or
illustrations on this side. You can actually go ahead and do the same on the opposite side and have text on the
left-hand side and have your illustration on
that side. There. The other options are
to maybe have less text and more space for the
actual illustration. And again, the other way
round where you have text on the left-hand side and more space for your
illustration there. Or the alternative is that you don't have any text at all, and you just go ahead and have a space for some
beautiful artwork or illustrations for your
subject and maybe just annotate them or just
leave them as it is. You can actually go ahead and change this
around a little bit. So e.g. over here, I've got text on that side. I can maybe have a little bit of text on the left side as well. So you've got this nice little
space in the middle? No. So some annotations or just
a little story on each side. That's a nice little
orientation to work with. You have many different options. So play around with them and see which composition you like. So these are a few
more options for the horizontal landscape
orientation, Okey-dokey. So once you've decided which orientation and which
layout you want to go for, then the next step is to go ahead and physically
door in them lines. So that's what we're
gonna do here. Now, I've decided to do
it the portrait mode, and I want to have a little
bit of writing on mine. So I'm going to use the
one where we just have the quarter area of the
panel with lines on. So I want to have the
lines about this much. So what do we do next? What we do is we grab
hold of our pencil, we get our lovely ruler. We don't need this
little place holder because that was just
for demonstration. And what I'm gonna do
now is I'm going to go ahead and I'm going to start measuring in some
measurements to come up with some even
spacing for the line. So let's just get a zoom in. Zoom in on this so that we can
see and not miss anything, wouldn't want you to do that. So for me, I'm going to
say I'm going to have the text maybe around
about over here. So you can see right
at the bottom, I'll actually move this to the
top so it's easier to see. So right at the
bottom of your panel, right on the edge
where we've got the edge of the actual paper. I want to go in with 4 cm, so I've got four there. And I'm just gonna go
in and I'm going to place my ruler so that
I have four down there. And I'm just going to go ahead
and I'm just going to add a little dot where
the measurements starts and where
the measurement is zeros from zero all
the way to four, I've got that little point. Then what this is going
to do is this is going to give me my line spacing. And I'm going to go in with half a centimeter
line spacing dots. So I'm just going to
do a little dot here, half a centimeter there. One one-and-a-half
to two-and-a-half, and then just to
finish off on three. So you can see over
here I've got these nicely spaced out dots that are half a centimeter
in spacing length. So what we're gonna
do is we're going to do exactly the same
on the other side. So we're just going to
measure up what we did so we make sure that
we get to the four. So we've got four over here, right on the edge of the card. And then we've got the dotty
dot starting from zero, half, one, one-and-a-half, two and
a half, and then three. What this does is this gives us a nice guide that we can
just draw in our wines. So again, like we did with the frame which is going to
join up these dots, the dots. And just like this
without a ruler, nice and faint, don't
need to press too hard. So just a nice little
line across there. Move it down to the next one. A nice little line
across over there. Then again, just following that pattern to produce
these beautiful lines, spaces that we can add in
a little bit of texts. Now, the amount of
lines that you have will just depend on your
own preference really. I mean, if you want to
do a lot of writing, then adding few more
lines if you just want. So maybe just have a title and a tagline or a kind of like
just a subject description, then just have a space
for a few lines. Now another thing about the line spacing is
I'm doing nought 0.5 centimeter intervals
because my writing does tend to be quite small, I probably don't have the best
handwriting in the world, so it all depends on
your handwriting style. So if you've got
bigger handwriting may be spaced out the
lines a little bit bigger, maybe have 1 cm lines. I personally prefer to have
the naught 0.5 centimeter. Okay, so let's just
do a Zoom is zoom back and have a look at this. Fantastic. So you can see now we've got space for a little bit
of text to go over here, some lovely worthy words. And then we've got this
really nice panel area for us to do the artwork. So let's now move
on to the next one.
7. Border Design: Okey-dokey. The next
stage now is to do a nice little pattern in this frame border
that we have now, this stage is optional. You don't need to
do a pattern if you dealt want you can
leave it as it is. But for me, I always like to add in a beautiful intricate
little pattern, which just gives it an overall gloss to the actual project
that we're designing. So for this, I'm gonna be using my ink and I've just got
a fountain pen here. If you want to do
something similar, then just go ahead and grab
hold of your ink tool, whatever it may be. It might be the fine liners or even might just be
a black pencil. Now, if you're gonna be
using watercolor for the main illustration and maybe you're gonna
get a couple of species of water going good, then I would say probably use waterproof ink like I'm doing. But if you decided that
you're not going to really delve into watercolor, actual paints
themselves, then you can go ahead and just use
any ink for the pattern. So I'm gonna go ahead and
open up my fountain pen. And this one has a really
nice thick nib on it. So this is a broad nib. So if you're new to fountain pens and you
want to learn more about fountain pens and do
check out my class on fountain pens specifically, if you just want
a quick refresh, I personally love to
use fountain pens, especially when I do watercolor or any
type of illustration. I've actually moved away from fine liners and just
start using fountain pens because there's just
so much more nicely the experience and
the actual results. So what I'm gonna do now
is I'm just going to go in over here into
this border area. I'm just going to really create some random squiggly lines. So again, if you want to follow the exact
pattern that I'm doing, you can, but you don't
really have to because I'm actually just making
it up as I go along. So I'm just gonna do
a little S-shaped there and then maybe do a, another S shape over here. And then I might have something
that comes in like this, just like a W. And
then maybe throw in a dot over here and maybe
have another dark down there. So you can see on this corner, I've just created this little funny little squiggly
wiggly pattern. I think it looks rather nice. So what I'm gonna do is continue doing maybe some curvy
lines down here. And then let's
maybe do a circle, a nice black dot, and then how about a couple
of stippled dots down here. And then maybe just throw in some wines with curves
going on at the end. And then again another line with a curve going
the other way. And then I'm going
to turn my pen across because the
line is quite thick. I'm going to turn it away
the other side of the nib and let's just do a thin
line coming down there. There may be some
thin dots over here. So just play around, come up with some
squiggly lines, and just come up
with a nice kind of pattern that just makes
it look interesting. Curly willy is like this. Big leaf shapes or just
some dots and lines. Now you can just
actually go ahead and just do circles like this. If you just have like a
couple of circles and just continue this circle
pattern all the way around. That looks rather nice as well. Or you could just do some
lines that are going across. I tend to just have a mix
and match when I'm doing this exercise for this
beautiful little projects. So again, I'm just going to randomly just keep doing
these squiggly big leaves. Maybe do a shorter one here, couple of dots there, and then maybe just
have a circle, a circle over here. And then again, maybe just have some lines that curve out. And then at the
bottom I'm going to turn back to my thicker point, maybe do the S shape
again and then have a similar shape on the opposite
side and then just align. And then maybe some
curly curlies down here and then just throw
in a couple of dots. Fantastic. So you
can see we've just created this lovely
little pattern. Keep continuing on it
as much as you want. You might find that
you want to just maybe add a few little
bits and bobs here. That's absolutely fine. You don't need to follow
this exact pattern. Just come up with your own pets. And, and if you don't want
to do a pattern and just, just throw in a
couple of lines or circles that just follows suit. And if you don't feel
like doing that, don't do that at all. Just leave it as it is with the beautiful color going
all the way around. So what I'm gonna do
is now I'm going to attempt to do something
similar on the other side. Now I don't need to have
it perfectly symmetrical. Yeah, I might even
have random patterns going on each one of these four sides
of this rectangle. So I'm going to do that and I'll see you once that is done. Okey-dokey. Now I'm done. I've just filled
in my border with a nice random squiggly
wiggly pattern. And I think it
looks rather nice. It gives it that Lovely
mystic vibe, doesn't say so. I'm gonna wait until
this dries up. But before that dries up, I'll just explain to you
what the next step is. What we're going to basically
do is we're gonna go in and with our ink liner, we're just gonna go
in and just lying out the actual edge of our border
that we did in pencil. And then with a thin tip, we're just going to outline
these lines that we did. And that way we're
going to have a beautiful ready to start illustration panel with some pre drawn in lines to really
get that excitement going. So that's what I'm gonna do. I'm just gonna go
ahead and I'm gonna go in and I'm just going
to draw in them lines. Now you can use the rule
that you use to go in and maybe just line up and
do a nice straight line. But sometimes with ink, what happens is
if you use ink on the edge of a ruler and
you move the ruler away, you get a bit of
a smudgy smudge. So I tend not to use rulers when I'm using ink
to do my outlining, you can alternatively
use a colored pencil. So if you have a
black colored pencil, then you can use your ruler
to get a nice straight line. But I'm not going to
bother with that. I'm just going to
do it free hand. I don't really care whether
it's not perfectly straight. Sometimes just adding that
raw, organic, wobbly look, it looks quite nice and it fits the overall design of
our beautiful panel. So I'm just going to
wait for that to dry out. Once that's dried. And I'm just gonna go ahead and outline these and I'll
see you when that's done. Okey-dokey. So you can see, I just did a nice little
outline of the inner parts of the frame with a more thin nibs that this is just another nib that I have on a fountain pen. This is a medium-sized nib
because you don't want to go too thick just
in cases smudges. And you can see I just followed the line really nice and slowly. But again, if you
want to use a ruler, go ahead and use a
ruler and maybe just use a ballpoint pen if
you have one of them. However, I would suggest that you use your waterproof ink. So if you've got
your waterproof ink, fine liner, then go
ahead and use that. But if you're not
that bothered me about having everything
perfectly straight, then just go ahead
and do it freehand. Just take your time
and just follow the pencil line
that you have and you can get some beautiful, nice organic results
now. So there you go. And if you noticed, I use just a plain piece of paper just to make sure that my hand doesn't smudge any of the
ink work while I'm doing it. So that's a nice little tip. If you're doing ink work to follow some
intricate patterns, or you need to have
a very steady hand, then maybe just have a
plain piece of paper to lean your hand down to
avoid ruining your artwork. So what I'm gonna do now is I'm just gonna go ahead and
do exactly the same. And just do these lines that I've drawn here
using the same pen. So I'll see you
when that is done. Okey-dokey, we now don't. So our prep work on our
panel is complete now. Everything is nice and gorgeous. So we've got the
bat that don't are ready with the
beautiful pattern. We've got the front now that is a really nicely designed out, and now the excitement is
going to really begin. So grab yourself a nice drink, have a break, have a little
tea cake if you like. And let's get all ready for the illustration and text of
our beautiful subject card.
8. Subjects: Okey-dokey, Welcome back. Hope you had a
nice little break. I certainly did with that lovely Americano and that little naughty
slice of cake. Anyway, let's now carry
on to the next stage. So before we do the next stage, all I want you to
do is just to have a quick look at our final
templates that we designed, that beautiful
pattern on the back. And then we've got the
beautiful ornamental border on the front with
our outlines done. So now we're ready to go
in and start creating our wonderful subject
part of the subject card. But before we do that, just have a quick look at
my hand and look at LAX. We now have a force. So what I've done
is I've just done the same design on the
rest of my panels, and that gives me
four lovely panels that look very similar. And on the back I've got
the same pattern going on. And this is just a
great little exercise to do, just to relax. Just when you have a
little bit of spare time, just cut out maybe
another couple of pages to produce maybe
another set of these cards. And then just work
on these patterns that we have at the
back over here. Just these nice simple
straight crisscross patterns. And then maybe come up with a theme using the same
color like I have here. I've used that
lovely pink color. Use different colors, maybe
do different patterns. I tend to like to work in the set that I get
from one page. So I usually get about
four cards from one page. Sometimes I get three. And then I tend to
do the same design so that I just have a nice
set that I can work with. And then if I do mess up
on any of the designs that I have another spare
that I can work on. So just like that, Maybe before we start
doing the design stage, if you want to go ahead, just imitate your design
on the other cards. Now if you can't imitate the exact design,
that's absolutely fine. If you have a close
look at mine, I've done some wonky
lines here and there, and maybe doing an extra dark. There are a few more lines here, so it makes no difference. This is just a relaxing exercise for you to just escape
away without having to think too much and just use those art materials
that you have lying around to produce this
beautiful little card, gorgeous, gorgeous
patterns just for a bit of mindful relaxation with art. So what I'm gonna do now is I'm just going to
select one of these now and then we're
coming from and then I can work on
the others later. So let's move them
out of the way. Okay, so now these
are subject cards. So the first thing we need
to do is we need to think of a subject that we want
to base our card on. This is really easy. What I tend to do
is I just looked at my favorite type of things
that I like to draw or even what I like to
eat and then just draw them and then I'll just go
ahead and base it on that. It could be anything for you
if you want to follow along with what I'm gonna do in this demonstration version,
that's absolutely fine. Follow along and
do what I'm doing. But then after you do this, then the idea really
is to get the rest of your cards and come up with a subject that you really love. It might be the
same subject like myself or something
completely different. And then just do that series
and complete your cards set with a little bit of
writing and some drawing. Or if you fancy not doing
any writing at all, just do the drawing and
leave the panel blank as it tastes like we went
in the previous lesson, going through the different
template designs. So I'm gonna show you some
of the examples that I've already done just to give
you a bit of an idea. So over here, I've got
a nice little set. So we'll just move this one
out of the way for now. I've got a nice set of some
food items that I love. So over here we've got a
gorgeous chicken burger there. Oh, I'm getting
tempted right now. I feel like I'm in one right now is I've got chicken burger, one of my favorite types
of food items do I have? And then I've got a nice
barbecue mixed going on there, and then some pro
noodle noodles. So gorgeous brown
noodles over there. And all I've done here
is I've just done a big title underneath
the illustration and just add it in a little
bit of text just to make it look nice
with these ones, what I've done is I've drawn
pencil, I've drawn ink, outline, and then I've
just gone in with watercolor and added
in a few highlights. And that's usually the
method that I like to do. But if you don't want
to do watercolor, then just use whatever
materials you have colored pencils or markers, or anything that you'd like to use or just leave
it black and white. There's some examples
that I've got, black and whites as well
that I can show you. But if you notice over here, if you notice the pattern that I have on the actual border, I've just kept it really simple. Whereas the one that
we designed was with that nice kind of
like an intricate design. Those squiggly wiggly
lines over here, all I've done is I've just
done just simple lines going all the way across a little dots and each four of the corners. And I've done them
in different colors. So if this is something
that you like, then go ahead and do this, it's a lot quicker and
more simple to do. And on the reverse. All I did was pretty
much exactly the same. I just use the same color as the border to come up with
that crisscross pattern. It's just really easy
and quick to do and you don't have to think
about it and it's just a nice relaxing exercise. So that was one example of the
food subjects that I like. And again, I usually do
food subjects all the time. Let's just move
these ones out of the way and I'll show
you another example. So with this next example, I've got cars and if
you've watched any of my videos before or if you
follow me on social media, you'll know that I'm absolutely
crazy about my cars, especially my classic cars. So I've got a nice, a three set of designs
here for cars. I'll just do a bit of a zoom in, zoom back over here, gets everything out
on the way so you can concentrate on the
gorgeous drawings. Over here, we've got
three designs on the horizontal way where we've got the text on the
right-hand side, and then we've got the main
illustration in the middle. And again, with this one, all I've done is I've just
used ink and kept it nice monotone black and whites gives
it a really nice effects. Or if you want to work
in black and white, it was absolutely great. Then with the
border on this one. This one's slightly different compared to the original
one that we did. So I've just got
the little lines and then I just
basically putting a little dots
in-between the lines and just given them
a different color. So again, with this
just little bits of writing on the right-hand side
and little bits of blurb, whatever you want to do, maybe if you want to do it in this orientation
and in this style, go for it on that one. And then if we just
flip these over again, I've just used that
same crisscross pattern on the back just to give it that nice touch and
it's looking rather nice. So that was the second
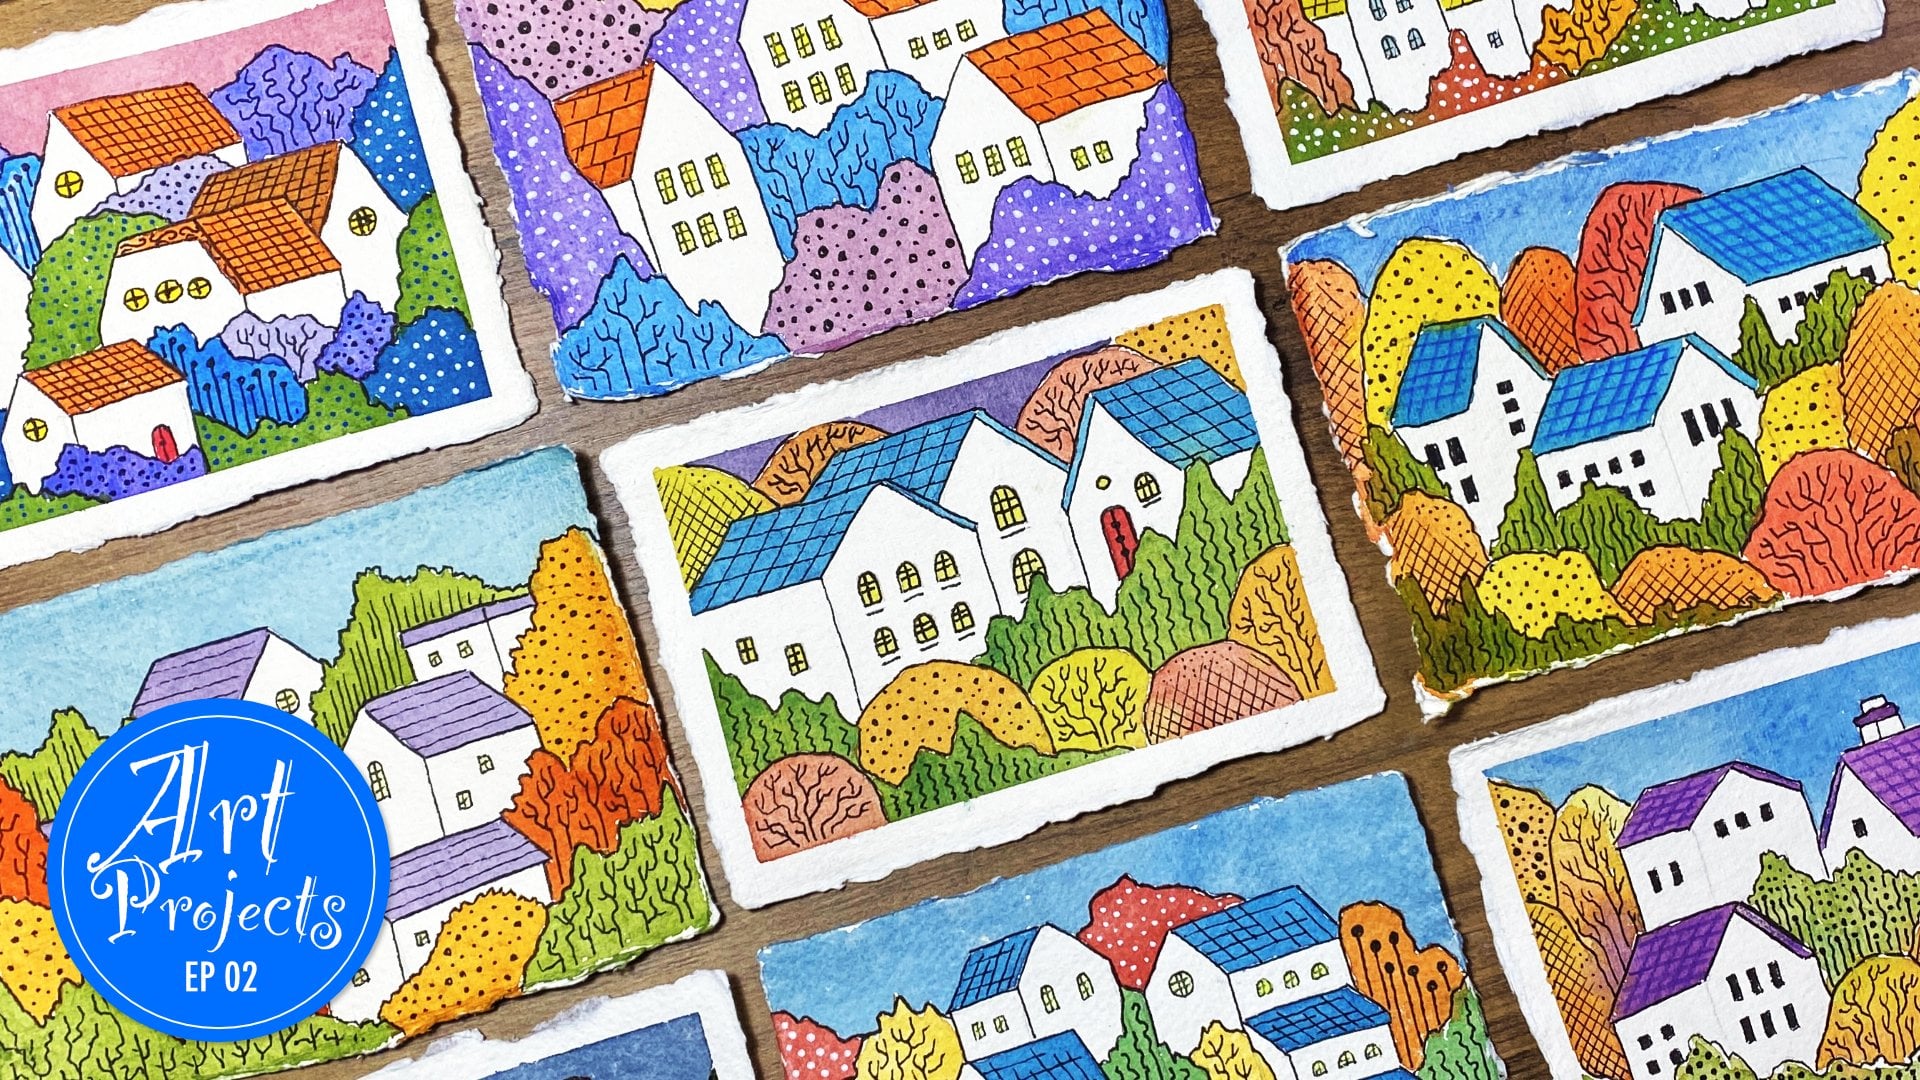
example that I've done. Then let's move on to
the final example, and probably one of my
most favorite ones, and that is beautiful houses. So again, if you've watched
any of my classes, you know, I'm absolutely
crazy about drawing these whimsical fairy
land style houses and doing these little
landscapes scenes. So you can see here, I've got
three nice little designs, and these are what I do more often than
any other subject. So again, with these ones, you can see if you look at
the kind of orientation, I've done different template designs for each one of them. Whereas with the other examples we have the same
template design. But for this one, what
I've done is I've got a little bit of
space for text here. I've got more space
over here for text. And if you notice, I've
left this little bar here as well where I can
actually add in a title. So that's another funky
little designed to do. That's what you like. And then over here I've got half the area for our writing. Again, the style is
exactly the same. I start off with a pencil sketch and then I go in
with my ink liner, do watercolor, and then do some final highlights with
a little bit of white. And then with the borders again, I've got this more
ornamental floral kind of wiggly line style
ornaments style frame here. But again, if you have a look at this one on the right here, I've done a little
indent of a circle. So if you have maybe a series of maybe ten or 12 different illustration
cards that you want to do. Maybe you could number them 123. So that's always a
nice little touch to do and that's really easy to do. All you need to do is
basically just use that penny, that you had the
five people can't find me if I pay anywhere.
Oh, where's it gone? Where's my five pig on
a someone's stolen. It's okay. So all I did on this
one was I just added the five P there in the middle
and I just drew around it, rounds it in pencil when I was doing that initial border stage. And again, that's all I did. And then I just created this nice little
pattern inside it. So if you want to do
something like this, then go ahead and do it. What I'll do is I'll leave all of these designs that I've got. I'll take a picture
of each one of these designs so that
you can use them as a reference in the resource
sheet for you to check out, have a look at and maybe look at the patterns and the
orientation so that you have something else to actually look out for
more inspiration. So I will leave that in the
resource packs or do check that out if you want to have a look at that.
And there you go. There's all my beautiful designs or muddled up and mixed up. Let's now start with
our actual design. And I'm gonna get the
card right in the middle, do a zoom, zoom, zoom on that. And then we are ready to go. And the subject that
I'm thinking right now, by looking at those cards, I've just been inspired immediately as I'm
recording this class, is that I'm going to do
that, you've guessed it. I'm going to do my
whimsical house drawing, so I'm just going
to come up with a whimsical house sketch, do it in the three stages, pencil, pen, and
then watercolor. And then just write a
little bit of a story that connects it and we're gonna be ready to go.
So let's move on. That one. Next.
9. Pencil & Ink: Okey-dokey, welcome back. Now the main excitement begins. So let's start drawing
in with our pencil, a nice little construct
for our illustration. So what I'm gonna do is I'm
going to start off maybe by dropping in a couple of
bumpy bumps over here, just a few bumps there. And then maybe throw
in a couple of these mini mushroom houses
that I always like to do, keeping it really
nice and clean. I mean, you don't have
to have so many details in these illustrations. I just have a habit of just clustering so many
elements into my drawings, but that's just my style. If that's what you'd like to do, then go for it. If you want to follow this
actual illustration that I'm doing step-by-step and
go ahead and just follow, go back and see what
I'm doing on this. Again, I'm gonna give
you these images of every stage of this process and these drawings in
the resource packs or do check that out. Once I've completed
the pencil sketch, I'll take a picture
of it and I'll put it on that resource
pack so that you can go ahead and imitate it if that's
what you want to do. But if you want to come up with your own image, That's
absolutely fine. It can be any subject
that you want, food, cars, whatever you want to draw, whatever you fancy, go for. Great. So I've got that little nice little cluster of mushroom house is there. And then maybe we have
a little, we believe, wobbly horizontal line
here that could be a riverbed and maybe just a
few little bumps down here. Again, this is just a
light pencil sketch. I'm going to go over
this with my ink. So again, just doing these nice little rock
bedside things over here. It's a similar
pattern, isn't it? So what I usually do with the
type of drawings that I do, so I'm going to do now
is maybe add in a couple of these triangular
shapes down here. And I think that's
looking rather nice, maybe a little one down there. And then the main
part is the house, the house drop in, maybe a roof, they're keeping it nice
and light this way. And then dropping that
roof top down here. And then maybe throwing
in that angle there. And then let's just square
it off at the bottom for our lovely house
and then maybe have a space here for a window,
little window there. Maybe another little
window offsets over here. And how about another
window there? And should we do with door? Now, I'm going to just
leave it as window. So let's just add a
nice chimney down here. So again, simple drawing, just simple little
shapes and sizes. And again, if you
want to go ahead and do your own, absolutely. Go ahead and design
something. You love to do. A subject, whatever
that subject may be, something in technology, something in kind of like landscapes or anything you want, maybe some food, food
items, some sweets. So go ahead and do that. Am I adding a little
side element here? Maybe dropping a garage. Maybe this could be a little
garage or a hot that you can do your artwork in beautiful
little houses and say, I just looked at jumping
and just go and start designing things in
and having a cup of coffee in this
little whimsical. There we go. Now I'm
going to do is maybe drop in a couple of
peaks up the back. So just like this, some of these peaky peaks
coming in just like that. And I think we'll
just add a couple of design elements on top that can be like the ends of
ice cream cones. Can write, maybe throw in another one of these
triangles things here. And maybe another tip of the triangle thing that I
think that's looking good. So a couple of detail lines
here for the brakes again, keeping it really
light and clean. I'm gonna go over the
whole thing with my pen. So when you do outline, it looks so much more better. And then we've got this
space here for a nice, You guess, the boats. Boats. I know. I constantly keep talking about
boats and houses. It's because I'm just obsessed with beautiful houses and bow. So let's just keep
it really nice and whimsical and uttering that say, look how quickly we did. Literally took just
a few minutes. And just like this,
if you want to maybe do your sketches on your
other panel as well, if you're in the mode for doing different designs and
that's what I tend to do. But I'm not gonna do this now because it will
take a bit longer. I tend to usually get my
other panels and just literally to two to three
drawings at the same time. So I'll just maybe
do a continuation of this during hair or adding
some more elements. And that way you can
get the job done a lot quicker and
complete your set. But again, I'm
just going to move them to the side because we're just going to
concentrate on this one. So for this one, what I'm gonna do is
I'm just going to give you a little snapshot of that and puts it in
the resource pack so that you have this
little outlines at work on. And then the next stage for me now is to go in with my ink. And all I'm gonna do
is I'm just gonna go over these lines in ink. So I'll see you once that don't Okey-dokey, welcome back. So I've just done my outline using my fountain pen
and waterproof ink. And again, I want, I'm gonna do is I'm gonna
go ahead and take a little picture
of this and put it into the resource pack
so that you have this. You can follow along just like I had doing
this illustration. So what I'm gonna do now
is I'm just going to wait for this ink to dry. And then once the ink has dried, then we can go in and
start splashing in our lovely watercolor colors. So let's wait for this ink to dry and I'll see you
on the next one.
10. Colour Splash: Okey-dokey, welcome back. So now we're ready for our exciting stage
of adding color. But before you add color, just do a quick little Ruby, ruby out with your eraser
of those pencil lines, like you can see here, I've just rubbed out to
all my pencil lines, so I have a nice clean
ink sketch over here. And if you still have some
pencil lines remaining on the border from the initial
border frame that we created. You can go ahead and remove
them as well if you want. If you don't want to remove
them, That's absolutely fine. Sometimes I just leave them in. But if you don't
like these kind of lines coming away from the
patent that you've done. Then just go ahead and do a quick little eraser job on this so that you
have a beautiful, clean, lovely panel of art. So the next step now
is to add color. So let's go ahead and do that. But before we do that, I just want you to have
a look at my hand. And now we have
three look at that. So I bet you could
have guessed what I was going to take
that I'm sure you got I've just done
two or more panels and I've basically extended
my artwork and just had a continuation on
the right-hand side with my little whimsical sketch
and done the same on the left hand side and just kind of varied it a little bit. Again, you don't need to do this if you don't
want to go ahead. But I will leave picture
of this full sets that I've drawn
just in case you'd like to follow it step-by-step. So just like that, we've got a nice a three
panel design there. I decided not to use the
fourth panel because I just wanted to keep
that as a tester. So three gorgeous
little panels there and we can start now
adding the color. Okay, So now let's
concentrate on our main panel and get a nice
splash of color in this. Just going to do is zoom in, zoom in on this so that you
can see what I'm doing. We don't need to focus
on the lines for now. Just focusing on that color of the main illustration
that we've got. Make sure we've got a gorgeously
me zoom in, nice, crisp, clear image for you
to see so you don't miss anything and
we're ready to go. So what I'm gonna do for
this is I'm just going to use my watercolor set here. These are just the standard watercolors that normally use. And I've got my little
sample swatch there. If you're new to
watercolors or if you want to learn the
basics of watercolors, then do check out my class on
watercolors for beginners. It's an extensive
class that goes through or watercolor
techniques. If you want a refresher
course or if you just generally want to know
more about watercolor, the tools that I'm
gonna be using, just a standard velvet
brush over here, my normal watercolors
and that's it. And we're just gonna be
applying that paint to this. So let's now start off by just getting a bit of wet
on my watercolors are going to make sure that I have nice little towel underneath
there so nothing gets wet. Do a quick little spray spray of my watercolors
to activate them. And again, I go through all these techniques in
my watercolor class. If you're interested in
learning more about watercolor, get my water ready, my water jar, and
we are ready to go. So we'll just move this
on this side over here. And then we've got
our lovely panel. What I'm gonna do
is I'm going to go ahead and I'm going
to go in and maybe just adding some water just
to this area over here. So I'm just getting
some plain water now, added some plain
water on my brush. And where I've got
this water area, I'm just going to literally
drop in a little bit of plain clean water just so that it gives it a
nice moist and look. And we can create a beautiful
little shadowy area underneath the boats
and easily blend the colors in with just
adding a bit of blue. So I'm just going to
add a bit of blue. What I'll do is I'll
move my colors on this side so you can
actually see what I'm doing. So again, Let's
maybe move this here and move this down here so you can see and follow along
if you want again, if you've got the same
image that I've got here, just use whichever
colors you like. Or if you've got
similar colors like me, then just go ahead and do that. I'm just going to add a bit
of blue to the palette there, just a bit of standard
ultramarine blue. I'm just going to drop it in
where I've added that water. I just want this to be a nice
liquidy water on the base. And again, I'm just going to keep things very simple here. I'm not going to do too
much color blending or due to many different techniques because I'm not really
focused on that. This exercise is all about just creating panels
and using your mediums. It really get practicing
again in art and just relax. It's all about relaxing. It's not about stressing and getting the perfect technique. So the perfect artwork, it's just about
relaxing and that's what this series is all about. So quick little
cleaner the brush. Then I'm going to go in
with some darker color now. So maybe let's add in
some nice bit of orange. I've got some orange here and he oranges know we've finished, so I'm just going to drop in some orange in my
palette down there. Nice bits of gorgeous
orange over here. And maybe just adding a
little tub of that red. A clean it cleans. Don't want to get me colors
or muddied and mixed up. So a bit more red there. Ready orange color down there, and then maybe warm it
up with a bit of yellow. So it got so gorgeous
cadmium yellow there. Okay, What a beautiful
color that is. Okay, So with that color, what I'm gonna do is I'm gonna
go in and start dropping in some of this color on
these peaks just like that, okay, That fantastical of that gorgeous, beautiful,
vibrant color. You don't need to follow with the same colors that I have. Go ahead and do whichever
colors you want. You want to use, greens,
pinks, wireless, whatever color you're fancy,
it's your illustration. Do any colors that you like. So with the orange, I've got that there
and then maybe I might add in a
little bit more red. Let's make this like
an autumn feel because at the moment we're
in the autumn season, so I'm just going
to add a bit more red to that mixture there. Bit more red there, and maybe dropping that red tone on this peak at the front,
again with watercolors, it's a slow medium to use because you've got
to wait for each of the layers to dry
out before you go ahead and start doing
close to each other. Otherwise they're going
to bleed into each other. So if you don't want to spend too much
time in watercolor, then just go ahead and
use another medium like colored pencils or
just normal markers. So that'll be a lot quicker, but I always prefer to
use my watercolors. If you know me, it's one
of my favorite mediums, CH, so it's got a dry brush. I just dry out my brush, tap it on the side
of my paper towel. And then all I'm gonna
do is I'm going to pick some more colors now, maybe let's do the roof for the roofing going
to use this gorgeous, gorgeous shade of brown, this role brown colored, beautiful burnt sienna, beautiful color that
one gorgeous, right? Just like that. I'm
just going to drop that in on the roof and
keep it nice and dry. Don't want too much
water saturation. I don't really want any bubbling up or I don't
want my car to start warping because that's
another thing because this is a very small surface
that we're working on. And it all depends
on the quality of the watercolor
paper that you use. You will get some bubbling up
and warping of your cards. So just bear that in mind. Keep the water
content really low. Don't over saturate
your brush with water. You just want to keep
it nice and dry. So again, I'm just
going to add in maybe some color down here. And just like this, I'm just going to slowly build this scene and just build up
the colors from warm colors, cool colors, then switch
it to the mushrooms here. Again, for the mushroom
is going to use the same color for
the stems of them mushrooms where we've got these windows and these
really nice patterns. And it's looking rather nice. So just like that, just strategically pick out
the areas that are dry, that don't have wet next to them and just fill
in that area with color and then wait
for the whole thing to dry and then move on
to the next section. That's usually the
practice that I do. And it works very nicely. So again, I've got a
bit of wet over here, so don't want to touch
anything down there. Maybe I might just add in some of the color on
this sky type area. So let's just go
ahead and do that. Let's pick a nice bluey blue. We've got a nice
vibrant blue over here. Just going to add
a little bit of that vibrant blue
and then maybe dull it down a little
bit with some red, just a tip of red on there. Little bit of red. And that's looking nice. So just like that, droplets in gorgeous,
believe that isn't it. Like a slight indigo
blue that beautiful, just a light indigo,
gorgeous, gorgeous color. So still getting so excited because I get excited and just get a
message on low pants. I'm gonna, I'm gonna
fumble my brush. I use just going to fall over that border and I'm
going to ruin it all. Then I'm not gonna
be happy bunny. And then I might have
to have another coffee. I've already had
one this morning. So let's just continue. And then just like that, ferritin don't need to be
very specific about it. Just keep it nice and tidy
and it's looking great. So I'm trying to do is I'm trying to avoid colors that are too similar to the color that
I've got on my border here. Because if I've used
this pinkish shade, it's going to blend in too much. I want to use colors
that are effectively not really too much of the
lighter red tones. I want to have them and more opposite color
that are contrasting to that frame that I'll give
it a really nice touch. So what I'm gonna do now is over here where
I've got the blue we've got this water area
here that's still a bit wet. We can start adding some
nice little dribble, dribble of color on it. So I'm just going
to clean my brush.
11. Building Colour: I'm gonna get it nice and dry. Don't want to over saturate now. And then with that darker, more vibrant blue that
I've got up here, I'm just going to go
in and just going to start dropping that in. So you can see we're getting these beautiful cauliflower
bubbly effects. And it merges in
really nice because our base layer was that light
blue to just set it all up. And then you've got this
gorgeous, vibrant blue. Love it, absolutely love it. Imagine a world
without color array. So it would be a very, very different world,
wouldn't say it, but color is such a blessing. And he's just fantastic. What a great thing cholerae. Beautiful blue, that one. I mean, I love all colors and if you've watched
any of my classes, you'll know that I
absolutely love vocal is, but some people, they don't like certain colors
they don't like. But to be honest with you, there are certain shades
I'm not too fond of like lime green or like
a pure lemon yellow. I'm not really too
fond of them colors, but even if I have them
colors, I'd still use them. Because again, colors adjust
gorgeous, aren't they? They just add so much dimension
to everything in life, not just to paintings, just to everything that
you see. There we go. Just a few little dabs of color. They're nice and saturated
and you can see I'm using minimal water for this
because I already laid down that water getting a bit of a bleed and bleed
there on the lines. I don't want that. No, I don't. So I'm just going to push
it to help with my finger. And that's looking really nice. So just like that,
clean that up. And in-between these
mushroom house is just going to add in maybe
just a dab of that blue. Just make sure it doesn't
smudge over to that orange. And look at lot fantastic stuff. So we've got our blue part done. We've got our peaky peaks
and the actual house area, roof stone and the chimney. Let's maybe concentrate
on this area here now. I'm just going to
go in and clean my brush and dry brush out. So all I'm doing to
drive the brush out is I've got me little towel here and I'm just
dabbing my brush on the towel like
this to dry it out. So what we're gonna do
now is let's just maybe add in some green color. So I've got my gorgeous
green down here. Beautiful sap green can't be, it's a bit of sap green, a pizza bit of sap green. I'm just going to
use this area of my palette just to give it
a bit of a spread and maybe just add a dot of water to it just to keep it
nice and fluid. And then with that green, I might just go ahead and do
some nice green over here. So just like that, I'm just going to drop in some green to that beautiful green, nice warm autumn style colors. These aren't, they want to make sure that I don't go ahead and mix it into this orange because
that's still quite wet. This one has dried
out because we just use a little bit
of water in that. Just carefully bring that down. And even if it
doesn't make sense, it's no big deal. Not to worry. If you mess up. It's not the end of the world. You just go ahead, wait for it to all dry out. And then you can just
add another layer on top or just use some colored pencils to
go over it and fix it, or there's always a
fixed and you can see now I've got that
little bit of bleed there, but I'm not bothered because I just want to chill
out and relax. Just continue and add in that
nice, gorgeous green there. I mean, look at that
fantastic that isn't. It's so nice and colorful,
popping with color. And what I'm gonna do is on my other panels that I have
a Mac just go ahead and color then in
straight after I've done this one so that I've
got the similar colors in my palette that I'm ready
to go so that I can have this beautiful
continuation artwork that we can all see at the end, but that all depends
on what mood I'm in. So if I'm in the mood
of doing more coloring, then I'll go ahead and
do it just like that. Just do what you feel like
and that's gonna be great. So just like that, my green is in those peaks. Oh, I forgot a little
spot down there, so just get a bit more green. And let's just drop
in that lovely green, just pure colors, not
too much color mixing. In fact, we're not really
doing any color mixing. Just did a little bit
on that water area. But just keep it
nice and simple. Don't over-complicate things
and you'll be good to go. And what I want now
is I want to create a bit of a warm gray color, so just a bit of red here, and I get that bit of red. I'm just going to add it to this blue mixture that I've got and then just bring
that green in as well. And then just go ahead, clean my brush and then add some more speckles
of blue to that. What that'll do is it'll
give me a nice gray tone, a nice kind of reddish
gray tone there. And I think that's going
to look quite nice. So just a nice reddish
gray tone over here. I'm just going to drop it on these little rocky
rocks down here. Again, that's looking a bit too close to the
color of me pink. So I've decided
to change my mind and I'm gonna go
in clean my brush. And let's add in a bit
more blue to this, a bit more blue to that. And then that will mute
it out a little bit more. And then what we can also do is. Just add in just a tub of
brown to the actual mixture. And we've got ourselves
that nice warm, grayish color over there. So I think this will
be a bit better. Just dry my brush
and just pick up that pigment and then
just drag it across C. Now that looks so much better. I just want this to
be nice and light. And that's the advantage
of using watercolor. You can just quickly come up
with these light mixtures. Whereas if you're
using colored pencil or any other medium, then you're stuck with the
colors that you've got. It takes a lot of effort to
get the colors that you want, especially if you don't have those particular
colors in your pack. So you can see beautiful
little light shade of gray over there. And I'm going to use
that same shade to go across these
peaks. Over here. Again, I might end up getting some mixing or some
bleeding from them, orange bits coming down or
from the blue coming up. But do you know what? I'm not really that bothered. I just wanted to give
me water colored dawn. That's the thing again
about watercolor. You got to wait for
all the layers to dry. So if you don't
fancy waiting and spending more time on
it, then that's fine. Just go ahead and use another medium or just
go ahead and just throw the watercolor
together and see what creation it gets easy. I've got a bit of a
bleed to bleed there, but I'm going to read
that and sometimes it can look quite
nice just having colors going all over the place and bleeding
into each other. Sometimes it creates
a beautiful effect. So just like that, they go in and add that
beautiful color to me. Rock bed, pit of rocks is water area edge that we've got and just let that color bleeding,
that's absolutely fine. Just adding a little bit
more and spread it out. And it's looking
fantastic, isn't say Okay, so now what we're gonna
do is we're going to concentrate now on the
House, the House part. And then when nearly
done on this, so let's just do the
house, the house part. And from that one, I'm
gonna go ahead and maybe do a nice light
shade of this color here. So this is like a
yellow ocher color. And I'm going to
just add it into that palette there,
as you can see. Really nice, hello,
beautiful shade. And then you can add
a bit more water to it because I want
this to be quite light. I don't want it to
be too saturated. We want everything to have a bit of contrast and variation. If everything looks the same, then you just can't
see anything going. Yes. Let's just see what
this color looks like. Yes, I like that color. That looks really nice and I'm just going to spread it out. Not put too much color in, just spread it out
to keep it nice. And Postel like
beautiful color there. Bring it down. Now my rock bed is a very saturated and wet, so I'm just going to
leave a bit of a gap until that drives because they don't want that
going into my house, the house color,
although as you can have all sorts of issues
then outweigh. So again, just garage
area is going to bring that color and all I'm doing is dragging
this color across. You can see I'm not adding
any more water or color, just dragging that color
across and that's going to be sufficient to do
the whole house. So again, let's bring
that down here, leave that little gap and just
adding this in like dots, just like that over
here so that basically the light color touches
the whites of the paper. And it just lightly
hints and tints that beautiful paper into
a nice shade of color. I think that's looking good, so let's just add that same one. So the chimney and again, I still got quite a bit of
that moisture on my brush. And I'm just bringing that up here to complete this
off and a little bit on them shoots of that chimney doing things
modal up with the green. I'm not really that bothered. And that's looking
quite nice, isn't it? So let's now
concentrate maybe on these mushroom areas and that bowtie belt for the mushrooms, I think I'm going to have
maybe a nice pure red. Let's have a pure red for them. Mushrooms let them
pop with pure red. So we've got pure red hair, just added it to
that orange mixture. And then that'll
look quite nice too. So maybe just throw away in red and I'm going to put the red all the way
across the mushroom head. That rhymes that, doesn't
it read all the way, cross, cross them.
Mushroom head. Let's just color them in. Throw that gorgeous,
vibrant red on there. Look at that
beautiful, isn't it? I'm not bothered about the dots because I'm going to fix them later when we come
to the next part.
12. Completing Colour: Maybe for the boat, let's just go in and create a nice brown for the Brown who's going to take this
pure Brown from here? I'm just going to add it to
where I've got this orange. Just add it to that
orange, pure brown. So that orange so that it
contrasts nicely with our blue. So just like that, pure brown
into the orange there and just going to lightly
bring that across. Gorgeous koala,
isn't it beautiful? What a beautiful color
that it's like a, it's like a coffee color though. Fancy another coffee now
actually beautiful brown there. And we've just got
these PGP x left now. And then we're nearly done. So clean my brush
and then maybe add a nice reddish tone to them as well to give
it a bit of contrast. So I've got this
orange mixture here. I'm just going to bring in
my red and maybe just add a bit of that orange to red just to make it
slightly more deeper. And that's looking quite nice. Let's just throw
that saying yes, look at that beautiful stuff. So I don't want that to touch my house because I don't
want it to bleed in because that's going to be quite heavy bleed co-working into
the house so we keep it nice and dry on the edges and sometimes just leaving
that white border around the edges looks
quite nice as well. It looks like the
little highlights. So just doing that there. And then again to take a
bit more of that paint. And then just go across here and then just
bring it down there. And again, if it mixes with
the top part of the garage, I'm not that bothered. There's bringing that
down here and not touching the edge of
the House garage. And I think that's
looking great. So look at that beautiful,
warm, gorgeous colors. So we've just got these kind
of like little points on these background kind of
peaks that we've got. So maybe we could just add in a darker green on them that
might look quite nice. So let's just get
a nice dark green. So what we do is we
just get the blue. I'm just going to
get the blue and maybe just add it to the red there to get a
nice shade of violet. Then I've got a nice
bright green color here. So this is like the milli
in green at the onset that, and that's gonna give us
that gorgeous Look at that. What a fantastic color, That's a beautiful green, one of my favorite colors. But then again, I bet you're saying with color, don't you? Like? I like all colors. So just add that
beautiful green to that. Look at that fantastic. It's become like an emerald
green, doesn't say. So. Just add that there
and you know what, I don't really care if it mixes in with the light green there. I think that'll give
it a nice effect. And then when we come to outline this with a bit of white, then we can go ahead
and separate it. So I'm just going to
literally drop that in. And that's looking
rather than isis. And so nice rich emerald
green mixture over there. Again, we'd go through a lot of color mixing and creating colors and just doing the
basics of watercolor in my watercolor classes,
do Chatbots out. If you really want to get back into watercolors or
you want a refresher. So there we go. Now we've got these
little elements here for the mushrooms
underneath the red. But I'm going to leave them
as it tastes because I want to have a little bit
of white popping out. You don't need to
color every element that you have of your drawing or your illustration just
leave some areas of white so that they just pop out and add a bit of contrast. So now I'm gonna do is I'm going to let
that completely dry out once that's done and we
can move on to the next one.
13. Cross-hatching: Ok, welcome back. So now the watercolor has all
dried out really nicely and you can see we've got a nice contrast of
color going on. Nice vibes going on there in this nice little lowly
whimsical sketch. What the next stage for
me usually is to do is just add in some
crosshatching lines. And you don't need to do this
if you're following along, but if you want
to, then go ahead. So all I'm gonna do
is I'm going to use a medium nib pen that I've
used before for the details. And then I'm just gonna
go in and just add in a little bit of
hatching lines here, just to add some texture to the elements that I've
got in the drawing. For me just adds a little bit more interests and it's my style of sketching. I always prefer. I'm sure if you've
watched any of my other clusters, you know, I always do a lot of cross
hatching work and ink work, especially when it
comes to watercolor and just general sketching. So just adding in them lines there and then maybe
on the rocks on top, I'm just going to add in some
lines going the other way, just like this really nice and thin going gain
in one direction. So it just gives an indication that we have some
texture over here, a bit of a rough surface just to add a bit more
interests, really. So just like that. Adding them in quickly, not spending too
much time on it. Then again, on these
ones in the foreground, I'm just gonna go in and do them in that direction
just like this. So it creates a nice frame for the text that we're going
to work on later on. So just like that. And then I'm going to maybe just adding a bit more
outlined on the bolt. See boats here. So just like that, I'm just
going to outline again and then maybe just adding some
lines coming down like this. And then a couple
of going across. And then on the
outside of the sales, I might just add in
some darker lines. So where I've got
those white gaps, I'll just wants to
cover them all. Then for the poll
that holds the sales, just bring that across there. There's basically doing a
double outline so that it just be a bit more prominent
so that's looking good. And then where does
water area is? Maybe just drop in
a couple of dots here just to indicate that
we've got some movement. And then where we've got this horizontal line that divides the rocks
from the water. Just going to add
in a thicker line there and then maybe
just dropping a couple of dots and wavy lines just
to add a bit more effect. So that's enough for the
foreground and the middle part. Let's now move on to
the house, the house. So again, with the
house, the house, I'm just gonna go in and maybe just darken up some
of these lines down here just to make
them a bit more prominent. And again, just
bring that down here so that we don't have it all
fading away into the cooler. And then basically just adding that lovely thick outline just on the outer
part of the house. We don't need to do this for every single detail,
just like this. And then maybe just for the
outer part of the Chimney. Just like that. And that looks quite nice. And I'm going to do the same for the peaky peaks over here. Just create that we will wobble
line just so that we have a nice dark contrasting
line going across. And it looks fantastic. So just a bit more here. And then we unknowingly
don't own this one, so I'm happy with that. So for the windows, again, I might just go ahead just adding a little bit
of an outline on the left side and maybe just
adding those windows bars. Again. Maybe out someone's going across like this just with
varying gifts, creating my own
little window house. So just like that. Fantastic. And I forgotten
to do this part. I'm inside the edge of the roof. The most important parts of
the house is living roof to keep those rainy
rain drops out. So just on the actual
chimney there. And then what I might do
is just going to tilt my panels so it
makes it easier for me to go in and do these
random lines going across. And then maybe just
adding a couple more over here on the
side of the house, indicate some brick lines and then a few on the
garage over here. And then just bring that down. And let's center it again and just create those
brick layer lines. Brick pattern looks
fantastic and just a few on the garage
don't need to go overboard. And I think that's enough
for the detail part. So let's just look
at these peaks at the back and maybe clean
these up a little bit. So again, a little bit
of an outline over here, just on the peaky
parts, just like this. Just move it up and down
on those beautiful peaks. Then maybe we're
just going to add in some stippled dots here, just underneath where
we've got these kind of like M shapes. We've got these
little sharp shapes just to give it a bit
more interest in texture. Couple of stippled
dots there and then maybe some thicker
stippled dots on the top. Just like that. And we're looking great. So there you go, that's looking pretty nice. And then maybe just
that dividing line between the outlines
that as well. So just maybe just outlined
this just like that. And we're looking fantastic. So I think that's enough for
the actual outline itself. Let's now move on to the next part and we're
gonna go ahead and use our lovely white
paint marker pen to go ahead and add
in the highlights. So let's just give this
a little shaky shake. Now with the white,
Let's just maybe adding some little dots here just
to give it a nice divider. And then maybe just adding some highlights over here
on the edge of the rocks, just like that, just to
make it look a bit nice. And then we've got the tower
dots on our mushroom houses. You remember I said
just going to paint over them so we're going
to deal with them later. And that's what we're doing now. So we just whitening then dots so that we've
got this really nice, beautiful pattern on them. Most of your mouse is. And then maybe just a line over here just on top of that boats just to distinguish
it a little bit more. And then just a couple of white lines that
are going in from the top just to add an element
of highlights over here. So it looks like we've
got a bit of a sparkle of light just hitting
these rock areas. And then the same for the little beautiful
triangular peaks that we've got at the front. Just a couple of lines, just dotted on the
top hand right side. And again over here just
on the top right side, just to add a little
bit of interests. And then maybe just a nice
white line going down here. That's looking good. And then maybe just a
couple of random lines just going on the roof
tiles just to make it pop. Then just on the edge
of that chimney. And then on the chimney shoots
over here just a bit of white and maybe just drop in some random
ones from the bottom. And just give a
quick shaky shake, make sure it doesn't spill
all over my illustration. So there we go. Just a couple of light dots over here so that it
doesn't look too odd. And maybe just a little bit
hints of whites over here. You can keep going on
and on as much as you want to satisfy your
detailed needs. But I think I'm going
to leave it at that. So this one is a now, don't, so the last part now to do is just add a bit of
a blurb over here. And all I'm gonna do is
I'm just going to use my fountain pen to come up with a nice little story that connects the
hairs lovely scene. But you don't have to do
this if you don't want to. So I'm gonna go ahead
and do that now. I've finished my little blurb now with my little
writing over here. These are just the kind
of writing that I do that connect it to my own
illustrated book. It's just all about a trip, go into a cafe on the boats, on this lovely journey, all about a gorgeous reverie, thinking about the
food that treats and cakes that we
are anticipating. That's what it's all about. So that's it for this one. Let's just do a summary
of the class around up before we explain what the class project is
going to be all about. And then I'll see
you on the next one.
14. Class Project: Welcome back. We are now complete with our
beautiful subject cards. So before we go on to
what the cost project is, all I want you to do
is look at my hand and look at LAX magically have
completed another two panels. Here. You can see over here, what I've done is
I've just continued that illustration on the
left panel and then doing the same on the right
so that it looks like A1 complete sketch added my
little blurb at the bottom, and it's all done. I have a nice complete
set of subject cards, so you don't need to do
this the way I've done it. But if you want to
absolutely go ahead, decide on whichever subject you want to do and
you're going to have a wonderful adventure in
creating your subject cards. So for your class project, what I want you to do is
follow the steps in the class, in the lessons that we did in creating our beautiful
subject cards. Now, you don't have to
finish all three or four depending on how many cuts out of your piece of paper, you can just complete one
and leave it as it is. But make sure that once
you've completed it, you've gone ahead and posted
it to the project gallery. Then if you have time to do maybe another one
or another few, go ahead and take a
picture of them and put them together and post it on the project gallery
as you create them so that we can have
a look at your wonderful, beautiful subject card artworks. And I can't wait to
see what you come up with because I'm
sure you're going to do much more
better illustrations and I've quickly
don't hate today. So I just can't wait. It's such a nice exercise to do. And then once you've done it, you can just stack them
together and just maybe just put them in an envelope
or even put them on display, put them in a frame or put
them on your wall for you to see and for everyone to enjoy
your gorgeous creations. So I hope you enjoyed the steps. I certainly did. And I'm going to
have a coffee now. And then I'm going to
think about my next step. I'm gonna go ahead and
design because it's just such a great exercise. So that's your class project. Then follow the lessons, come up with your
own subject car. Decide on any subject
that you like. Add a bit of text
to it if you want, if you want to do a different
orientation the other way, then go ahead and do that. If you don't want any texts, just leave it as it says, and do it however you like. Add a nice little
pattern at the back. I'm going to show
you is actually, let's show you some other styles of patterns that I've
got at the back here. So what I've also done is I've also done a sets and we'll just move
these out of the way. These are just
templates that I did. I've got these different
orientations where I've got the landscape and then I've
got the portraits over here. But I did this whole thing
with a watercolor border. And then I used a color pencil to go in and create those lines. If you want to use
colored pencil, that's absolutely fine. And then on the back of these high went a little bit funky. So I decided to
just come up with all sorts of lovely
little patterns. Patterns, crisscrosses,
round circles. Let's just get a zoom
back so you can see I've got all these funky
little patterns here, all created with pen
and colored pencil. I spent quite a
lot of time on it. And it's just a case of just
sitting down and spending a little bit of time every day just to come up
with these patterns. But you don't need to do
this for your class project. You can do this after
when you get into the routine of creating these
beautiful subject cards, I thought I'll just show you this so that it's something a little bit different than the crisscross
pattern that we did. But again, it's just
entirely up to you. Again, do remember with
colored pencils when you do a lot of this pattern
work at the back, you do tend to get a lot of the colored pencil coming after. You can see It's coming
on my fingers there. So you might get a bit smudgy, smudgy all over the place. So that's another thing
to watch out for. So I would probably recommend that for
your class project, you just stick to a simple background
pattern using maybe a marker or just with
your watercolor brush, just come up with some
squiggly wiggly lines. So you could just
do it with ink or pencil just to
fill in that back. Or alternatively, if you don't want to do a
pattern on the back, than what you can
do is like I've done on these examples here. I've actually done
double-sided on these. So let me just show you this. So on these cards over
here that I've got, I've got a few cards. I've actually gone ahead
and drawn a double side. So I've done a
landscape on this side and I've got the
portrait the other side. So if you just flip these over, you can see I've done a
bit of a landscaping, landscaping on one side and a portraits on the other side. So that's entirely up to you if that's what you
want to do and you don't want to do a pattern this way you have two cards
and you can complete two designs or just have the same panel
going across both sides. It's entirely up to you. You are as flexible
as you like to base. So there's no restriction, just complete set of
cards if you can, and if you can't complete a set, then just do one and we're
going to be good to go. Again. I can't wait to see
what you come up with. So let's just round the class up with some final thoughts.
15. Final Thoughts: Oh, just a couple of final
thoughts now on the class. I hope you enjoyed the
step-by-step process in producing these lovely
subject cards that we did. You know, I certainly
enjoyed the process and I'm going to continue doing
it just like I have. And I hope that you
continue to do this. I hope you'll give the
class project to go. And I hope you really use
this as a motivational, inspirational idea to give
you a daily task to do, to just build up and keep that memory muscle going
with your art supplies, just to give you a bit
of an escape away from your daily hustle of daily
life and work lives. So hopefully this will give you a nice little taster
into this series. And what I'm gonna do is
I'm going to continue with this series by producing
different art projects and to maintain the momentum
of really coming up with some beautiful designs
and ideas that you can do, again on a daily
basis to really keep yourself engaged within
the world of arts. So I really hope
you give this a go. And if you have any questions, leave them for me in
the project gallery and do upload all your
artwork that you produce. No matter how many
designs you produce, keep uploading them
for us to say. I will say all of them. And I can't wait to see the type of equations
that you've come up with. I'm sure they're gonna be
much better than mine. So do give it a go
and don't forget to follow me on social
media and also follow me on Skillshare so that we can keep in
touch and see what we're doing with our daily
life in the project series. And just generally, I personally like to
draw on a daily basis. And like I said before, I always advocate
using art as an escape for your well-being and for
mindful art adventures. So I hope you enjoyed this first episode of the series is going to
be many more to come, and I hope you join
me on the next one. Take care of yourself, keep sketching and I'll
see you on the next class.
 Imran Mughal, Graphic Designer & Illustrator