Transcripts
1. Class Introduction: Welcome to my class, the
Creative Sketch Book. Start your daily
sketching habit. This class is all about getting you to start
sketching something on a daily basis in
an easy to access sketchbook where you can escape away into a creative
world of expression, relax your mind from the hustle
of daily life and stress, improve your well being by enjoying the process
and journey at any level and create
a sketching habit that will act as your
daily driver and getaway. I have actively been keeping
physical sketchbooks and sketching and doodling in them every day for
a few years now, and I absolutely recommend
it for your well being. This class is all about
giving you some tips, ideas, and direction, so
you can quickly get started in this wonderful
analogue journey. In this class,
we'll start off by going through some of
the basic materials and supplies that you
need to quickly get started with your
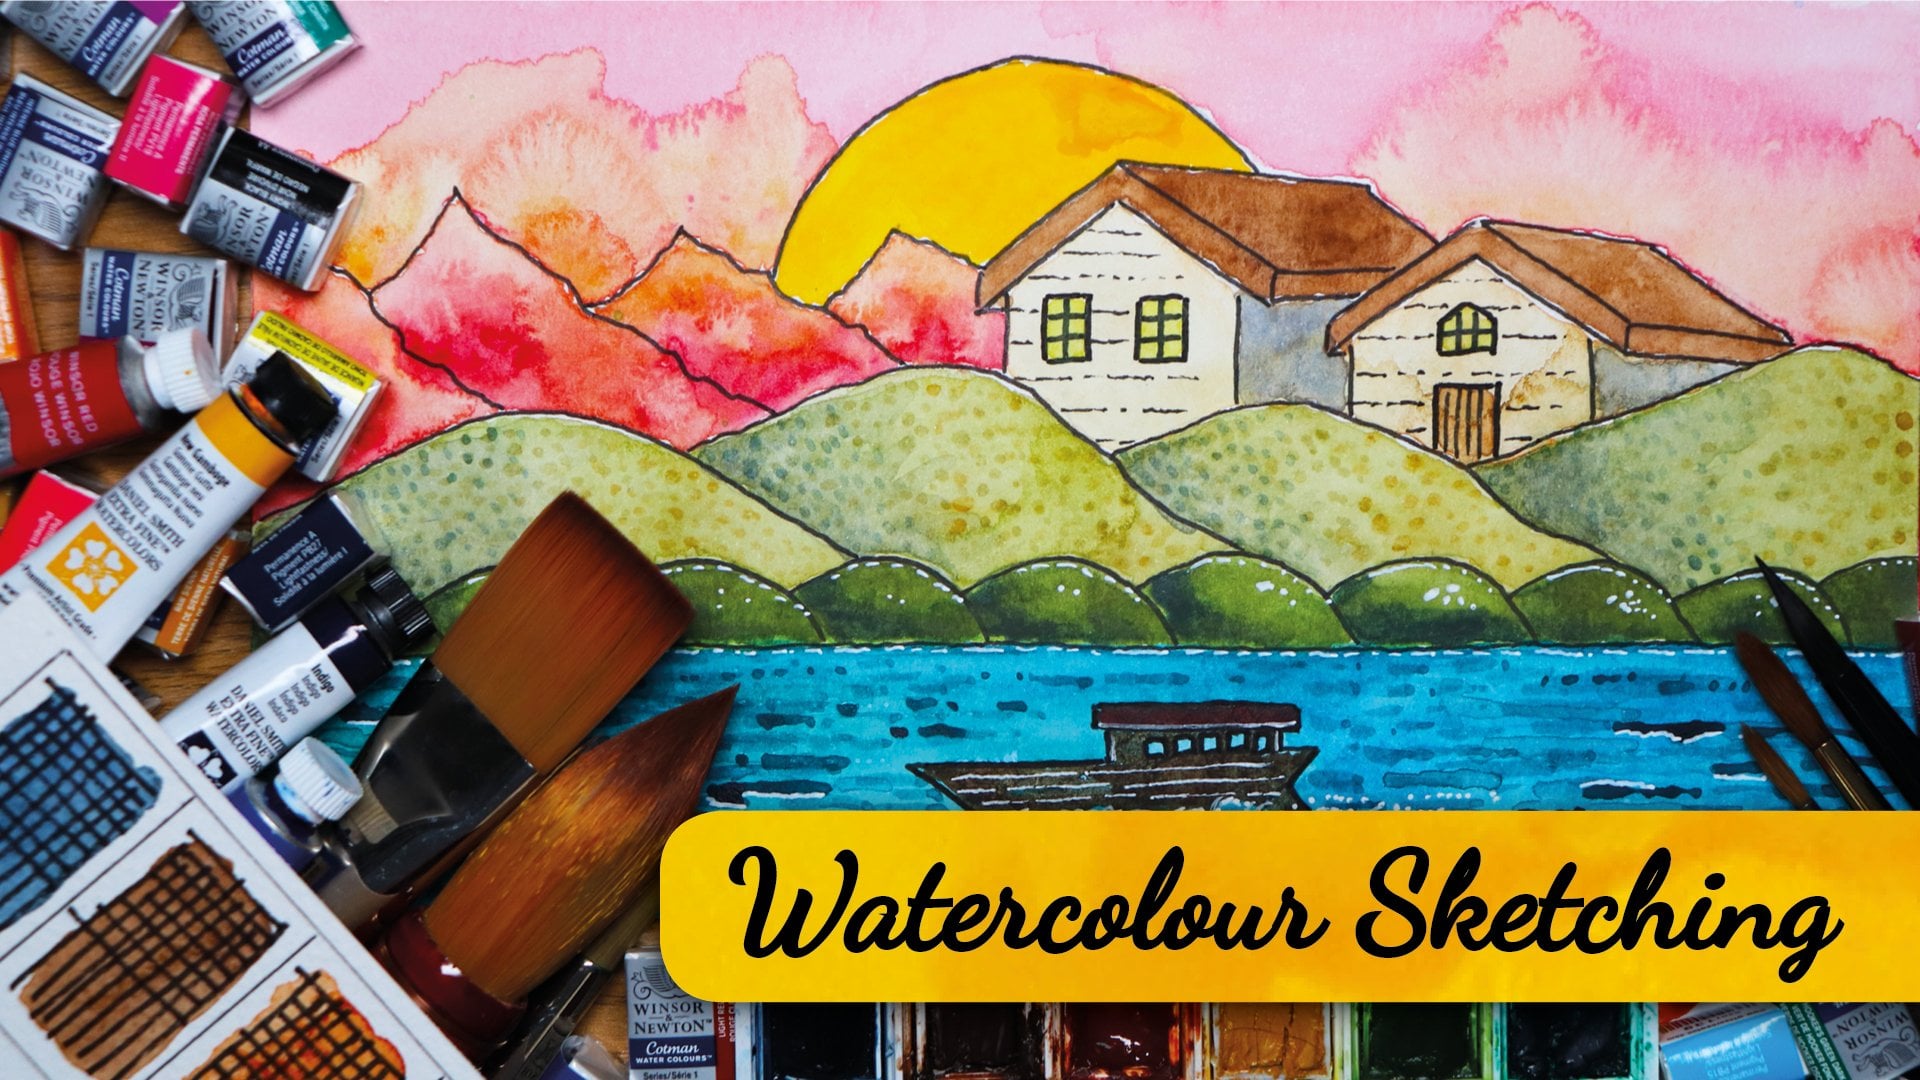
sketching habit. I will be demonstrating four different styles of
sketching so that you can keep things interesting and vary your sketches
on a daily basis. We will explore doing loose sketching with
graphite and ink. Detailed drawings with
ink and colored pencils. Creative illustrating
with watercolors and Ink. And finally, abstract
doodling with markers. You will also be provided
with a complete set of reference images so that you don't have to think about
what you need to draw. You can just go ahead and
start sketching immediately. This class is for
all skill levels, and the purpose of this class is not to draw perfect artwork. It's to relax and enjoy the process of putting
marks on paper on a daily basis and
to really enjoy that journey of creating
something every day. Once you watch lessons
in this class, you will be ready to take on
your class project and start your daily sketchbook and upload your beautiful sketches in
the class project gallery. If you're after a quick start into a new or revived hobby, then this class is
absolutely perfect for you. So what you're waiting for,
grab yourself a nice drink, get yourself some nice
treats, sit back, relax, and let's get
started with this class.
2. Materials & Supplies: Let's now start off by
talking a little bit about the materials and supplies that you're going
to need for this class. The two main supplies
that you'll be needing for this
class are number one, a sketchbook and number two, medium or mediums
to sketch with. Looking at sketchbooks now, let's look at some of the
different features of sketchbooks that you may need to consider before you
start this class. Sketchbooks come in
different sizes, paper types, covers,
and binding. The choice of sketchbook
is purely a personal one, so being comfortable while
you're sketching should really be the initial factor in selecting your sketchbook. Let's quickly now look at a
bit more detail on the size, paper type, covers, and
binding of sketchbooks. Having the right sized
sketchbook to create a daily sketching habit
is absolutely vital. If your sketchbook is too big, in size, or in dimension, then you will most
likely have to sketch at a table or desk or rest your sketchbook
on something flat. This may be difficult
for you to do depending on where you are
or where you're living. Therefore, it can be less flexible for you to carry
with you wherever you may go, making it less mobile and so you will be less likely
to sketch every day. If your sketchbook is too small, then it can be
difficult to actually sketch on the actual
pages themselves. Having a nice medium
sized sketchbook with medium sized pages that
are slightly bigger than your hand is something that
I would highly recommend for trying to build this
daily sketching habit that we're doing in this class. Personally, I prefer
to use an A five sized or a 13 by 20 1
centimeter sketchbook, and I would definitely
recommend this particular size. Unless you're comfortable
using a bigger sketchbook, such as an A four, or even
an A three, in some cases, use whichever size
sketchbook you are more comfortable
with because that is one of the main
factors that will depend on your daily habit. That's what it's all about.
It's about continuing this daily habit and maintaining
this in the long run. Sketchbooks come in
various paper types. Some of these types include
good quality cartridge paper, watercolor paper, plain lined or dot grid paper and
bleed proof paper. Which paper type
should you go for? The type of paper that you
should consider will be determined by the medium or the mediums that
you decide to use. We will look at this
in a lot more detail with my recommendations
in the next lesson. Sketch books usually come in
soft cover or hard cover. Soft cover sketchbooks
can be stapled, saddle stitched, ring
binded, or perfect bound. Hard cover sketchbooks tend to be ring bound
or perfect bound. Which sketchbook should you get? The sketchbook to use,
as mentioned before, will be determined by the
medium that you decide to use. Let's look at three mediums
that you may consider. Looking at pencils and ink. When we talk about pencils, this can either be
graphite pencils or even colored pencils. Ideally, you want to be
using good quality paper, preferably cartridge
paper that has a smooth surface and a
light texture on it. Cartridge paper is
a lot thicker than your usual printer paper
and is usually mold made so that the
layers are very thick and they can take a lot
of work with pencils, inks and various other mediums. Three main types of cartridge paper
sketchbooks that I use are sea white sketchbooks. They have a thick cartridge
paper in them with a really nice smooth
finish and are very durable and come in many
different shapes and sizes. I also use mold
skin sketchbooks, which would probably be my number one
sketchbook to go for. These have superb quality. They have hand elastic
closure straps on them, which I personally love, and they also have an
internal pocket at the back, which is really handy. But the main reason for me using these sketchbooks are that I just love the paper
quality of them. I think the paper quality is
just that perfect balance of thickness and ability to be durable and the finish is
just really nice and smooth, and it works great for
pencils and inking. There are many other brands of sketchbooks that you can get. The ones that I've mentioned are just the ones
that I personally use and that are easily
available to me in the UK. So depending on where
you live in the world, you can get brands from your local art store that will stock those
type of brands. Some other very good
and solid brands are Stillman and
burn sketchbooks. Rtiser Windsor and Newton
and another brand, which is Rodia notebooks. These are absolutely brilliant. I actually personally
use these myself. They have a very
nice thin paper, which is good for light
and fine inkwork. However, they're not thick
cartridge paper sketchbooks. So depending on how heavy
your marks are going to be, I would be a bit wary about
getting the Rodia notebooks. These are usually very good
for light fountain penwk. Looking now at watercolors. So if you decide to use watercolors in this class
for your sketchbooks, you must and absolutely must
use a watercolor sketchbook. And that is a sketchbook that is made of watercolor paper. Now, watercolor sketch
books can be very pricey, so that one that I usually
tend to use more than any is the same brand that I
use for my pencils and ink, and that is the moleskin
watercolor sketchbooks. These are usually priced at a decent price compared
to other brands, and the actual paper
itself is very good. The great advantage of using watercolor paper is that you can sketch in ink first and then color with
watercolors later. I quite often do four or
five sketches in Ink and then use watercolor after a few weeks when I
revisit my sketches. This gives me more freedom and flexibility and keeps
things interesting. One thing to note with
watercolor paper is that it comes in three main
surface textures rough hot pressed, which is smooth
and cold pressed or NOT, which is a medium texture. Mold skin watercolor paper
is a medium texture, which works very well
for detailed sketches. However, it's not
completely smooth. So if you're looking to
produce really high level detailed intricate work with ink first and then watercolor, then I would probably
say don't go for the Mold skin
watercolor sketch books, and instead, go for another brand maybe like
Stillman and burn Sketch books. These can have options in
their watercolor sketch books, which give you a more smoother hot pressed
watercolor finish. There are other brands
such as Saunders, Cardi, Dala Roni that also produce really good
watercolor sketchbook. Just get the type
of sketchbook that you can get in the
area that you live in. But if you can get the Mlskin
watercolor sketchbook, then that would be
absolutely brilliant. If you decide to go
with using markers, then you must use
marker proof paper, that is bleed proof, or you will have ink bleed going all the way through
to the next page, creating all sorts of lovely
abstract works of art. I personally used heavyweight
cartridge sketch books from the C white range for sketching with
markers previously and have placed a separate sheet of paper beneath to avoid the next paper actually getting ruined or getting any
bleed spots on them. But this tends to ruin the feel and look of
the sketchbook itself. I would only recommend doing this if you're planning to only use markers and Inc throughout
your entire sketchbook. The best option is therefore, to use bleed proof
paper sketchbooks. And the best one from my experience is the
render sketchbooks. Now, I've used these personally, and these are probably the
only sketchbooks that I've used that have absolute
zero bleed in them. You can go on with
alcohol markers, you can do water based
markers, and they will not led through not even to the
second side of the page. So they're absolutely brilliant. However, these are quite pricey, and it depends where you live, whether you can actually
get them or not. I think they're sourced
and made in the US. So for me in the UK, I usually get these online. Again, all of the links to all the materials
that I've mentioned in this class are going
to be available in the resource sheets
and do check that out.
3. Mediums: You can use the same
medium throughout your sketchbook or you can
use a combination of mediums. Just ensure that you have the correct
sketchbook paper type if you decide to mix
and match your mediums. Let's start off with
graphite pencils. You can get these in the standard wood case pencils that we all have lying
around in the house. You can get technical pencils
and even clutch pencils. With pen and ink, you have a few more options. You can get fine
liners that come in an absolute huge range of sets. You can get brush pens, dip pens, and even
fountain pens. With colored pencils, you
have a couple of options. You can get oil
based color pencils, like the poly chromos. You can get wax based
colored pencils, like the prisma
color, and you can also get ink based
colored pencils. Looking now at watercolors, which is one of my
favorite mediums, you can either go for a
student grade pan or tube set or go for the full end professional
grade pans and tubes, whichever ones you go for just ensure that you're
using watercolor paper. Finally, if you decide
to go for markers, you have a couple of options. Again, you've got
alcohol markers, you've got water based markers
and also paint markers, but do ensure that you
use your bleed proof, paper sketchbooks
for this option. So just a quick summary
of the materials and supplies just
in a single screen. Depending on the mediums
that you decide to go for. I've got a nice little
summary here of which type of paper
sketchbooks you should go for, whether you decide to just
use one medium or the other. Do check this out in the resource sheet where
you can refer back to so that you make the correct decision when
purchasing a sketchbook. If you've already got a couple of sketchbooks lying around, this will help you use
the right medium for the sketches that
you decide to go ahead and do and
follow this class. So let's now move on
to the next topic.
4. Styles of Sketching: Okay. Let's now move on to
the main part of this class, which is all about sketching. We're going to be covering four different styles of sketching, and this is where the
excitement starts. This class is all about creating and maintaining a
daily sketching habit. In order to build momentum, I recommend trying out
different styles of sketching to keep
things interesting and ensure that repetition
doesn't have a negative impact on your
motivation. However, You may only want to use one style of sketching
throughout your sketchbook, and that's absolutely fine. Do whatever you're
comfortable with, and if you feel like exploring the other styles
that we go through, then absolutely go for it. Remember, there are
no rules in art. Art is your own expression, and you can express yourself. However you wish. Let's now look at the four
different styles of sketching. If you have a look at
the resource pack, you will see that I have
provided you with a range of different reference images that I've personally
taken myself. And these are to
encourage you to try and practice the
different styles of sketching without having to think too much about what you need
to draw or waste time in trying to figure
out what you should draw for each type of
style that we go through. So I'm going to
demonstrate these styles. Using some of these
reference images. So follow along as you like, and for your class project, you have a huge
range to practice on and to produce your
beautiful sketches. So let's start off
with style number one, Style number one,
loose sketching. This is the quickest
method of sketching where you're not focused
on perfect details, but want to get down basic
shapes and contours. Working freely and loosely to produce a simple sketch of
the reference that you have, or you may not even have
a reference at all, and you're just working
from imagination, that's absolutely fine. You can add as many details
as you wish or leave out all the details and just keep it as an impressionistic visual. Graphite pencil and fine liners will work well for this style, and you could also add in a few splashes of color to
bring out some interest. The second style is
detailed drawings. This is effectively
the next step. In the sketching stage
to loose sketching where we go in with details to
flesh out our drawing. If you want to add
color to your drawing, then you can add the details first and then the color
like coloring in a picture, or you can add the
color first and then the details for a more
stylistic sketchy look. Or, finally, you can use color
only to build details for a more realistic look and do this in any order
as you please. You're absolutely
free and flexible in this style of sketching as you were with the
loose sketching. So just do whatever
is comfortable. The third style of sketching
is my favorite style, and that is the
creative illustrating. Using your imagination is
what this style is all about. The reference image will
act as a base for you to create your very own whimsical
inspired illustration. This is the most fun and
enjoyable type of sketching. You can make a regular cup
of coffee into a house, a village, a small city. A coffee shop or whatever
your mind can dream up of. A real expression
of what you enjoy. My favorite type of art, you may find that it takes a couple of attempts to
build your illustrations. I would recommend
using a pencil first, then inking once you're
happy with what you have, and then maybe adding in
some color if you want. Finally, the fourth and last
style is abstract doodling. This style of doodling is all about just relaxing
your mind and letting your medium move freely
around the page or spread in your sketchbook to produce a
unique abstract work of art. Absolute freedom with
no pressure to get it right is the basis of
this style of sketching. I would use Inc for this and maybe add some
color if you wish, you can use symmetrical
lines, dots, stippling, cross hatching,
or use swirly curves and random patterns in any form to create a gorgeous
abstract expression. Was just a quick
little introduction to the four different styles of sketching that
we're going to do. Now, what we're going
to do is go ahead and demonstrate each and
every one of these styles using a reference
image that you can follow along and
really gets yourself immersed into this
absolutely brilliant type of artwork that will hopefully be the
basis for you to create and develop your
daily sketching habit. Let's get started with that.
5. Loose Sketching: Okay, welcome back.
Let's now start off with the first
style of sketching, and that is the loose
sketching style. Now, for this style,
I'm going to be using an A five sized sketchbook. This particular one
that I've got is the ring bound C
white sketchbook, and this just has standard
cartridge paper in it. If I show you here, we have 160 GSM cartridge
paper acid free, and it's absolutely brilliant. We'll work fine with pencil, fine liners, and ink. So let's get into
this sketch book. So I'm going to just use this on the portrait side
of the sketchbook. You can even go in and use these on landscape, change
the orientation. However, it suits you. That's the advantage of having
a ring bound book because you can lay it flat
completely on both sides, gives you a lot of flexibility. So the tools that
I'm going to use for this first stole is just
going to be a pencil, and I've just got a
mechanical pencil here. And I've also got
myself a eraser, always got to have
an eraser at hand. And then with the inking part, I've got myself two pens, and this first one here is just a standard inkliner
which is a 0.8 tip. So it's a nice thick inkliner. We'll work really
nice on this paper. And then the second
pen that I've got is a fude nib fountain pen. So this is actually a
specialty nib fountain pen, and it's great for
adding thick lines. But most likely you
will not have this pen at your disposal unless you're really into
your fountain pens. So not to worry if you haven't got anything
to make thick lines, you can go ahead and do
your thicker lines with your normal standard fine liner or even shade in
with your pencil. So what I'm going to do
now is I'm going to select a picture from the
references that I've got. So do check out
the reference pack that you've got in this class. It gives you a nice range
of different images. These are my own
images that I've taken specifically
for this class. So let's have a look at this. And I think we'll start off with a nice simple sketch of
reference image one, and that is of the sharper. So what I'm going to do
is, I'm just going to go in with my pencil and go back to portrait
mode because that'll suit this sketch for
the orientation. Just move my other pens out of the way so that they
don't get in the way. And then with my pencil, all I'm going to
do is think about the main shapes of
this actual object. Now, you don't have
to follow me in this, you don't have to draw
what I'm drawing, but sometimes it's always good
to just follow a class and actually work through it step by step before you do
your class project. And that just gets
you warmed up. And that's what this exercise
is designed for you to do. So what I'm going to do is, I'm just going to start loosely drawing in these
shapes that I can see. So you're just going to go in, with my pencil very lightly
and draw myself a rectangle. So if you decide to do this, then just go ahead
and do this yourself. You don't have to go in with
pencil if you don't want. Usually, I tend not to
really use pencil first, but just to demonstrate
this style of sketching, I thought I'll just
go in with pencil first so that you
can follow along. So let's just get a bit
of a zoom in on there. Very good. I've got myself a
nice rectangle shape there. Then all I'm going to do is I'm just going to go in and create this little Kirby arc from
the top one end to the other, and then I'm going
to do the same at the bottom because that's
what this shape looks like. I'm not really bothered to actually imitate this
shape perfectly. It's just for something for us to actually work together on. I've got this nice
rectangle with these Kerby tops and bottoms and then I'm going to
do another curve like this to represent the
top part that flips open. Then we're just add in a couple of lines
coming down here. From top to bottom to represent that kind of front facing
part of this sharpener. And then we'll just
got another line here to maybe add
in some details. Doesn't have to be accurate, it's just so you have
something there. So again, just a
couple of lines here, very rough and loose. I'm not bothered about making things perfectly symmetrical. It's just about
getting something down quickly in your
sketchbook on your page. So I'm just going to add maybe a little shadow area
indentation over here. We've got this little area part coming in on the left hand side, and maybe just drawing that
table line that I've got, and maybe just adding a couple more lines just to make it a little bit
more interesting. Now over here, we have some more details and maybe some lines coming
in here from the top. And just like that,
all I'm doing is building this image of this sharpneer
just by looking at the contours and the
actual block shapes, and maybe just write
in where it says, press over there to
make it a bit more interesting and we've got this sticker that's coming here, the red and black sticker. That's it. I'm not
going to bother with the writing on the sticker. I think that's fine as it is. Then we have this little
curvy bit that comes in here. Then again, we've got
another curvy bit with these little
lips coming out. So that's looking rather
good. That's about it. We've only spent maybe a
couple of minutes doing that, adding in these block shapes. What you can actually do
is you can actually leave it at this if that's all
you feel comfortable with. If you just want to do a quick little
sketchy illustration every day in your
sketchbook like this, using this style, it's
absolutely brilliant. But the next level
really is within this style to start maybe
fleshing out some details. You can do this with pen, you can do this with
your fine liner. It's entirely up to you. What I'm going to
do is I'm going to go in with my fine liner, and I'm going to start sketching out some of these
lines that have drawn just to make them look
a little bit more better. You can see, I'm just doing
these vertical lines, starting off with
these vertical lines, and I'm not really
thinking about anything. All I'm doing is following in those marks that I made earlier. It's effectively a
warm up exercise to sketching more detailed
work in your sketchbook, and it's just a great way
to start this journey off. I'm just going to tilt
my page slightly to the right so that the
angles a little bit easy, and that's a good tip to do. If you're working
on a sketchbook and you're actually leaning
on the table like I am, then maybe tilt it to where it's most
comfortable with for yourself just to complete
your first little drawing. So you can see here my circle isn't perfectly symmetrical
and that makes no difference. I don't want you to
stress on making this into a perfect drawing because that's not
what it's about. That type of artwork
and sketch work may be something that we look at maybe in the second
or the third sketching style. However, all I want you to do here is I just want
you to focus on these lines and these basic
shapes that we've got. You can see all I'm
doing is I'm just outlining this little
drawing that I've done, and it's looking quite nice for the time that
we've spent on it, and it's hardly been any time. So All I want you to do is do something similar like
this in your sketchbook, depending on whichever
sketchbook you're using, stick to pencil and maybe fine liner for this first stage. That way you won't complicate things and you won't
get overwhelmed. Over here, I've just got that little writing part here
where it said press, I'm just going to
add that on here.
6. Adding More Interest: What I'm going to
do is, I'm just going to block in some colors. I'm going to add in
some darks here, and that's where my
other pen comes in. Now, if you don't
have a food add pen or a really
thick fine liner, then just go in with your pencil or just actually go in with your fine liner and just go in and do some hatching lines, and then maybe adding
some crosshatching, just to add some dark area
to this left hand side. And what that will do is, it'll just add a little bit
more interest and it'll give the illusion that you've got a finished sketch here because
that's what it's about. It's just about creating an
illusion of what you can see. Now, you don't have
to follow me in this actual reference
image that I'm using. You can just go in and do something from
imagination if you want. It's really about practicing this loose style of sketching, not working on tight details, just really going in with
whichever tools that you have to really produce
these nice marks on paper so that you're effectively warming yourself
up to getting back or starting a new habit of creating a daily
drawing sketchbook. You can see all I'm doing here
is just using these lines with this thick food
pen, It, by the way, is one of my favorite
pens to do this type of loose sketch work with
purely because it's just so free and so mobile
in terms of making lines. It's just so easy to get
thick and thin lines. It just works
absolutely brilliant. But if you're not
into fountain pens, then not to worry, that's a complete another ball
game fountain pens. Let's just carry on maybe adding in some more
dark over here. So I'm just going to block in some color just
backward and forward, effectively just
coloring in some of these darker areas just so that we have a little
bit more interest. And that's all it is, no stress, no worry. Just draw what you can see, and if it turns out completely, nothing compared to what
you were looking at, and don't worry about
it at all because that's what you're not
in an art class here, you're in a start
sketching habit class. So that's what it's all about. Just to start this
sketching habit journey, and then you can
actually move forward to creating your beautiful
masterpieces of art. But if you don't
practice every day, your sketch every day, then it can always be difficult to really get yourself
well immersed into drawing or sketching or anything else really practices
what you really want. That's what the aim
of this class is to build that practice,
that sketching habit, so that you don't sit around
waiting for the perfect time or perfect tables or perfect chairs and
papers that you have. You've just got your sketchbook and you can go in
and start sketching. Going to do here is
just very loosely, adding that shadow, and
we're nearly done on this. I mean we've hardly
spent any time on this. Again, just very
loose sketching, nice and easy, no stress. And all I'm going to do here is, I'm just going to maybe just
add some of these lines here just to show that we have
this reference on a table. I mean, the table line
is actually over there, but I don't care and I
don't want you to care. So all I want you to do is get some marks done in
your sketchbook, and I think we'll
leave it at that. So we'll close the pen. That's
it for this first style. You can see very
loose sketching. It's very quick and fast, a lot of energy, a lot
of expression work. Again, we're not looking
at perfect symmetry or replicating something to produce
a photo realistic image. All we're doing is using
our hands and our tools, basic stuff just to
get something down. It can be a nice
relaxing, daily routine. Try this one out
and let's now move on to the next
style of sketching.
7. Detailed Drawing: Okay, welcome back. Let's now start with style number two, which is the detailed drawing. Now, this style is just an add on style
from style number one, which was just loose sketching. We're going to start adding in more details and maybe use a
few different mediums like I've got here on the
screen to really give a bit more depth
and interest to our work This style of work, this
detailed sketching or detailed drawing will take much longer than the first
one because with the first, we just essentially did a rough sketch and just
added in some contour lines, darkening some areas
just to give it an overall feel of
actual drawing. Whereas with this style, what we're going to
do is, we're just going to do the same process, and we're just going to build
more and more details until we're happy with
the overall look of this particular sketch. On the left hand side over here, I've got a couple of
sketchbooks just to give you an idea of the type of drawings
that I'm talking about. So I've got this
small sketchbook, which is an A six size
C white sketchbook. I really like using these. These are the stapled
finished sketch books with a nice soft
little cover on them. And these work great because they're small and
mobile and compact, and they can open
up very nicely. So on this first one that I've
got, this is, by the way, a complete sketchbook,
there's not many pages in it, but it works really nice. So with this, I've just
got daily sketches, of my kind of day to day
routine at the office, just working and
just chilling out, just basically drawing
things that I see. And what this does is
this really increases that momentum in producing a sketching habit that
you can continue with, and then you can slowly
start developing that memory muscle
and that ability to just pick up a marker or a pen and just get on with
sketching wherever you are. And again, that's
what the purpose of this class is about
to really instill this idea of sketching
every day to create a sketching habit.
Over here, you can see you Just normal ink drawings here. I've not used any pencil. I've just gone
straight in with Ink. I've got a little bit of writing about what my actual
date was about. You don't have to
write anything in your sketchbook, but
you can, if you want. It's as versatile as you
would like it to be. And then again, some
sketches are very light, so they may be
stylistically similar to style one of just
loose sketching, and some I may have added
in a bit more detail, but I've just kept it
simple and basic and really actually enjoyed
doing this process, and I actually need to start this sketchbook again because
this one is finished, so that was the first one. And then on the second
one, this is taking the details a
little bit further. So this is more of whimsical
sketching from imagination. And you can see that I've
added in a lot more detail, I've started really drilling
down with the texture work. And I'll just get
a Zoom in so you can see this a bit
better on the screen. You can see here nice bit of detailed work here, and again, nice bit of contrast
with the pen and ink, which is one of my
favorite mediums to use. With this type of sketchbook, it just works
really well because it opens and closes very easily, and it can lay flat. It can even fit in your pocket. I don't usually use a
six size sketchbooks, but I only use them when
I'm going out and about. I wouldn't really use this
to do full pieces of art in. But then again, that's not
what this class is all about. It's just about creating
that sketchbook habit. You've got some
detail work here. Again, very dark detail work. Now, I do spend a lot of time doing this type
of sketch work. So that's kind of expected
with detailed drawings. But what I don't
want you to get put off by is that you're looking
at these and thinking, Oh, yeah, there's so
much detail on this. I don't know whether I
want to be able to spend so much time every day.
That's not a problem. And just showing this to
illustrate to you what type of sketching we're going to be doing in this second style. So over here, I've
got another book. I'll just zoom back
so you can see. So this is an A five
sketchbook, again, another staple sketch book, but this isn't from C white. This is just a basic one from a local art
store that I use. And again, I've gone in with
a lot of detailed work. This whimsical style of artwork. Now, again, in this class, we're not doing any
whimsical work. We will be touching
whimsical work when we're doing
style number three, but we're just tending to really just start
making marks in our sketchbook and
using references as a base because it's just easier to sketch something
that you can see. Again, I've got a lot of
detailed work over here. And again, it's just drilling down into a lot
of detailed work, and it just works really well. I mean, I would probably work on these sketches on a daily basis. I wouldn't finish
them all in one go. It probably takes me
around about 2 hours or maybe a little bit more
to complete one of these. But again, I don't want
you to be spending that type of time even
on this detailed stage. I want you to spend
maybe half an hour or maybe 45 minutes
on a detailed sketch. So let's put this one to aside. Finally, I've got my
favorite sketchbook, which is the mole skin. If you can see this
on the screen, this is the Moleskin
standard sketchbook. Let's just have a
quick look at this, this one, I've finished as well. I'll just do a little
flick through. You can see I've got
various illustrations, writing, bit of art journaling, and just different styles of sketching with fountain pens, different colored inks and predominantly mainly
pen and ink work. And again, I've got a
little bit of blur at the bottom sometimes I'm just doing this
on a daily basis, working in those details, and it works really nice. So it's always nice to have a sketch book
that you can fill, and then maybe come back
to it and you think, Oh, I remember this
place where I was at. I just did a quick
little sketch. So it is a lot of fun and
a very nice keep safe. So let's just close this one. And again, I've got that elastic closure on the mole skin, which I absolutely love
on the screen over here. I've got the mediums that
I'm going to intend to use for this second
style of sketching. I've got myself a normal, pencil over here. This
is just a B pencil, so it's nice and dark. Then I've got my eraser, which I used previously. Then I've got my
ink fine liners, and these are from Faber Castel. These are the pit artist pens, and I've got these in
some different grades. I've got a standard brush pen, and this is great for just
adding those dark marks. I've got an extra small, which is a fine tip. So you can see, we can bring in some nice fine
details with this. And then finally, I've decided to use a
medium tip as well, which is quite a broad tip. So again, three little pens
for some variations of line. And then over here,
I've got a selection of colors of my polychromos
colored pencils. Now, these colored pencils
are absolutely brilliant. These are oil based pencils and they work great
in sketchbooks. I've just selected
these colors for the reference image that
we're going to draw. And then, lastly, I've just got a standard paint
marker over here, the Posca paint marker, and this is just to bring
out some highlights. This is just a
white paint marker. So let's move our
materials to the side. For this, sketching
style example, demonstration that
I'm going to do, I'm going to be using
my normal sketchbook, the saddle stitched sketchbook with the staples at the end. And this is just basically an own brand sketchbook
from a local art store, which has some nice
cartridge paper on it, which will work really well. Now, this is good for
demonstration purposes, but if you have any other
sketchbooks that you've got. So, for example, if you've
got your mole skin, do try it out in your mole skin because
with detailed work, you always like to use it
on good quality paper. Now, the image from
the reference pack, the resource pack that
I've provided that I'm going to be using will
be image number five, and that is of the ink
bottle that we have, so you can see that
on the screen. And I'm going to go
in with pencil first. So the first stage of
this detailed sketch will be just doing an
outline in pencil. So let's just get
a zoom in on this
8. Pencil Base Sketch: So what we're going to do is just like we did in
the loose sketch, we're just going to start
off with a pencil sketch. Now, what I'm going to do here is I'm going to create myself a small area where I'm going to actually
keep my drawing in. What that does is that stops
you from going all across the page and kind of going
in the wrong direction. It just gives you a bit of a focal point to concentrate on. So I've just drawn
this very faint box that I'm going to keep most
of the drawing inside. So what we'll do
is we'll just put this over here so we
don't lose focus. What I'm going to start off
with is the circular cap. Before I start off
with the circular cap, I'm just going to
do a light line in the middle of the square, which will give me an indication
that this is the center. And then right on the top here, I'm just going to draw
myself a squashed circle or an oval to give that indication of the top
part of the cap of this, this bottle top, just like that. Very nice and loose. Again, it's just a loose
sketch to start off as a base. Then I'm going to
bring in two of these lines from both ends. Then I'm going to just do
another curvature that follows the shape of that
bottle top. Like this. Now, you don't have
to make this exact. I'm not going to
make this an exact image of what I'm seeing. It's just a basis to
get something down. It's quite an interesting
shape this one. That's why I've selected this. Now, I've got these little rims that are underneath
the bottle caps, what I'm going to do
is, I'm just going to go in, draw these in. Just get a bit more of a zoom in so you can see this a bit clearly what we've got here is we've got this other
rim coming in at the bottom. Fantastic. That's
the bottle top done. Now we've got this
little area here where it's actually a square
base but a rounded top. What I'm going to do is,
I'm just going to draw in some vertical lines from
the edge of the bottle top, and then that'll give
me an indication of whereabouts the width of the actual bottle
is going to be. I'm just going to
bring these two lines down here, just like that. Then what I'm going to do
is I'm going to bring in another line roundabout here from where the center line is, and that's going to effectively
represent the edge, one of the four
edges of the bottle. You've got this
little area here. Now, if you're
following me, just do exactly as I'm doing here, or just sketch as you
see in the reference, however you're comfortable with, you don't have to do this
exact method that I'm doing this for me is the
easiest way to do it. So that's what I'm going to do. Then from here, we've just got a diagonal line going there, and then from this section, we've got another
diagonal line going here. Fantastic. Let's have
another look at this. With the top part, I'm going to say we're going to probably have the
other edge down here. It's just another line there, and then a similar line
approximately over here. Now you can see that we've
got this curve coming in from this really
funky looking bottle. I'm going to draw this curve connecting both of them lines. Then from here, I'm going
to do exactly the same. Connect that curve like so. It's looking approximately as what we're seeing on the image. I'm just going to clean
this up a little bit. Maybe drop it down up to here, doesn't have to be exact. Again, we're not creating
photo realistic art. We're just doing some drawings and sketching to
add in some detail. Now, from the top left,
what I'm going to do is I'm going to bring this in as so. Then again, from this side,
going to bring it in. Nice curvy curvy on that side, and I think we're done. With the top part of this, what we've got is we've got
this little circular line, that's just adding
a bit of shadow. These are just contour lines that just give it a
bit more interest. Now, I'm going to just add in maybe a couple
more lines here. I've probably gone a
little bit too wide in this from this aspect in
terms of proportions. But that doesn't really matter. The actual lid is a bit bigger. So if we just increase
the size of the lid, the actual cap of the bottle. We can maybe get the
proportions right. But again, I don't
want you to get bogged down with getting perfect
proportions here. I just want you to
get something down quickly and whatever's
easy for you to do. Now, you don't have to do this particular sketch if
you're following along, you can select any of
the reference images to do in this style
of sketching, or you can just go ahead
and take a picture of anything that you want and
use that as your reference. So over here, I'm just going
to bring in some lines here. Which form this base of this actual object,
this ink bottle. Then maybe just add in a couple of these
circular things that are these accents that are coming from the side of
the glass of this bottle, maybe just a few more here, just as an illustrated effect to show that we have some interest going on here and that we
have some texture. That's pretty much it.
Then what I'll do is I'll just add in a little
area for the shadow. We've got a bit of a
shadow dropping down here, and that follows in
underneath the actual bottle. So what I'm going to do
now is, I'm just going to get my eraser and
I'm going to get rid of these lines that are
extra. We don't need these. That's one of the
reasons I always say working pencil first because if you make a mistake or
if you go in with pen, then you can't really
do much about it, but it doesn't really matter because you're not
getting judged here on how good you are at producing perfect images from references. All it is is to produce
that sketching habit. There we go, clean
this up a little bit, and it's looking quite nice. We've got that basic
image sketched out with our pencil and
it's looking very good. What I'm going to do now
is still using my pencil, I'm going to start adding
in a few more details. We've got this little
sticker area down here. You can see it's just a
sticker that they're stuck on it follows that shape of that arched window
shape if you like. All I'm doing is just
drawing that in. Then we've got some details
of the actual ink itself. We've got these
two little strips coming in from both sides, and then we've got the
curvy writing of the ink. Now, you don't have
to copy this writing. I'm just doing this to show
you in this illustration, just to give it a bit
of a complete look. You don't need to do this,
just leave this area out just draw in a couple of squiggly wiggly
lines if you want, and maybe just writing
fountain pen. Inc. I'm just going to write fountain because I don't
have enough room. I'm not really bothered
about that, and then Inc, maybe just in some nice writing over here doesn't
have to be exact, not to worry if it isn't. I mean, if you want to do it exactly as it is on the bottle, then, by all means, go ahead. Why not? It's all
about enjoying itself. But I don't want you to stress. Because if you're
getting stressed out, then that's not really the
purpose of this class. This class is just an expression
class where you're using expressions and you're using it time to just get marks on paper, so you can escape
away from the stress, not bring yourself
into new stress. What's the point of
that. We just want to release a bit of
enjoyment onto paper. Sounds a bit dodgy, that I
diamine I'm just going to write diamine. And
that's about it. I mean, it's called Onyx Black
if I've said that right, so it's Onyx and
black In Beautiful. I'm going to leave it at
that for the pencil sketch. Let's just get a bit of a zoom
back and clear the table.
9. Inking Outline: Kidoke What we're going to
do now is we're going to use our ink liner to go in and just outline this sketch like
we did in the first style. But you've got to remember
that with this type of sketching where we're
using different mediums, you can actually go
in in any order. You don't have to
go in in pencil. You can just go
straight in with ink, and then maybe add in color, or what you can do
is you can go in with pencil and then
color it in first. Then go over it
with the outline. It's entirely up to you, or you can just build in color
to flesh out the details. I'll leave that decision
entirely up to you. I'm going to go through
that systematic way of just doing the sketch, going in with the outline, then going in with the color, and then maybe
adding in some darks and lights with some
cross hatching. Let's go in and start
outlining this. Okay. You can see what I'm
doing here is I'm using this nice thick nib. It's that nice medium sized nib, just to go in and
draw in these lines. What I'm going to do is I'm
going to tilt my book to the side and just do
this little curvy curve. Again, if it makes it
easier for you to tilt, then go ahead and
tilt your page. You can see that just by
adding these darker lines, we're already making
some progress. It's already making it
look a lot sharper. That's what it's
all about. Just add those details to this drawing to make it look a bit sharper. I mean, it is a bit
of an odd shape this. You might think
that this shape is really just a horrible
shape to draw, but it's actually not that difficult because
if you just break it down into the kind of
boxes and lines and arcs, it's actually quite easy
to do it didn't really take that long to do
the initial sketch. And with these lines that
I'm drawing in, again, I'm not bothered if
they're not perfectly straight because it's just a sketch in
the end of the day. You're not going to
get an award to make a photo realistic piece of art unless you
enter a competition, but there's no competition here. It's all about relaxing. So just like that, I'm
just going to go in, turn the page to
the position where I'm comfortable with
and then just go in with my fine liner and start
this outlining process. The actual process of outlining
can be quite therapeutic. It's quite relaxing. I like
doing any type of art me. I find art relaxing per se. For me, for people like me, I just love doing my drawings. But just generally speaking, it's quite a therapeutic
practice just to create the lines and just follow the patterns or the shapes
that you've designed. Fantastic. Let's
carry on with this. Again, I'm just going
to use normal pressure, keep turning the page, doesn't have to be
super accurate. In fact, it doesn't have
to be accurate at all. If you want to keep this as loose as it was in
the first style, then go ahead and do that. Not a problem. All we're doing in this stage is effectively just adding in a little bit more detail and
just cleaning up our sketch. So that it looks a little bit nicer and so that we can spend
a bit more time with it. That's what it's all about
time. It's all about the time. I've got my details there. I'm happy with that, not really bothered about whether
they're right. Again, I'm just going to maybe
draw another accent here. Then these little dotty
dots that we did. Over here, let's just do these, just drop in these circles. Don't have to be
spaced out evenly. You can just throw them
in randomly if you want. It's not a problem at all. It's just adds
this bit of depth, a bit of interest looking good. So what we're doing
here is just going in again with them circles. Okay. You can see that
it's just so easy to work in a sketchbook because
you can move it around. I mean, I'm actually
drawing this while I'm standing up on
my standing up table, but you can actually
be sitting down on your couch or leaning
against a wall, if you like, or just
lying on the floor. I quite often lie on the floor and do a lot
of my drawings while I'm watching something or while I'm just having a bit
of fun with the kids, just playing around
with a little one. She often jumps on my back and starts jumping
on my head as well, but I like to just carry on with something to keep
my mind occupied. Again, I'm just adding in
the little curb lines to represent some kind
of glass variation, and I think that's about
it for the main part. What we can do now is we
can just go in and start adding in these
details over here. I'm actually watching
the image on my iPad. If you've got an iPad or
if you've got your phone, hand it's always good
to just keep it on, just so you have that
reference so that you don't lose the actual image itself and so that
you can keep on track of what you're
doing. Again, here we go. Nice and easy. With the inks, I'm just going to go in S. I'm not bothered about
keeping it the same as the font style on
the actual image. I'm just going to just
wing it if you like. I'm just going to go in
and draw it however I want because that's
what art is all about. Let's just go in a
couple of lines here. Let's just write
in fountain here, Fountain and it was
actually found in pen, but Fountain pen, and then over here we
have the brand which is diamine If we just go in
with diamine diamine. I'm just going to call it diami because I can't fit it on. Let's just do that. You
can get my picture up again because I've lost it
on my iPad and there we go. We've got the onyx Onyx black. I'm just going to say on bla. I'm just going to
call it on black. We've got onyx black there. Then we've got these
little splashes, which I think are quite nice, especially when we
come to color this in, it'll add a nice bit of contrast to the drawing
and the overall image. It's always nice to draw images that have high contrast in them. It just makes it
more interesting when it comes to
the coloring stage. Okay. What we're
going to do now is, we're just going to
go in and just do the outline of this
shadow area here. Now that shadow just
comes here and it just goes slightly under
the actual bottle. Fantastic. Right. I'm going to leave them marks as they are. And then what we'll do is just give this a quick little wipe. There's no need to go in
and actually erase any of those pencil lines
because sometimes it can add to that sketchy look. But if you want to erase
your pencil lines, then go ahead and do that now.
10. Blocking Darker Areas: What I'm going to do now
is I'm going to go in with my brush pen and the
brush pen is here. I'm going to go in and
I'm going to start highlighting or
darkening the areas where we've got a
lot of this black. We've got a nice bit
of beautiful black. Shadowy area here. I'm
just going to do that. Then again, just going
to go in in this area. You can hear the squeaky pen
because it's a brush pen. It's making a lot of
squeaky noise, isn't it? Again, just doing that there. We've got quite a
lot of it here. Now, there's no right or
wrong way to do this. I mean, you don't have
to put these darks in first or put them exactly
where I'm putting them. I'm just putting
them where I can see them or where I actually
feel like putting them because I think they just sometimes add a little bit more. Interest to the drawing because sometimes your drawing can
look a little bit flat, and it's always nice to make things look a bit
more interesting. Again, I'm just going
to add that in there. We've got a little bit of
a shadowy type thing here. I'm just going to go
in with the black pen. Now you don't have
to use the black pen or a brush marker for this. You can use a black
coloring pencil or even some markers
if you have them. But just do ensure that you add in some depth with
some darker tones. Over here, what I've
got areas again. I' going to add that dark down there and they
just add some kind of lines coming in and maybe
just adding some stipples, sketching lines just to add a little bit
of texture there. So from this left hand side, I'll just tilt my page. I'm just going to add in
another line that goes here. And then maybe on the arc, we've got this little
bit of shadow here. It is very dark on this end, but what we're going to
do is we're going to go in with the actual
colored pencils as well. Again, bring that
dark element here. Really nice and easy. Keep it very loose. Nothing is precise in this. It's just nice loose strokes. You have something to work with what we can do is
we can just go in. And cover these areas up. You've got them little
dotty dots sticking out. So a couple more
little areas there, and then we've got
a little bit of shadow here on this cap. What we're doing is we're
just going in with this. Again, very loosely, and
then on the edge here, maybe just adding a couple of little strokes. Looking good. Now what I'm going
to do is over here, we've got the sticker on this sticker where we've
got this contrast area, I'm just going to go in and
I'm just going to color that area completely in black. Just flat color there
because we'll have a nice bit of contrast with
those splashes of ink. What that does is that just brings it out a little bit more. It makes it look a
little bit better. And that's looking good. Then finally, just
for the front here, got this baseline
right down there, and then maybe
finish it off with the baseline just
underneath the sticker. I think that's looking okay. Let's now go in with some
lovely jobbly color.
11. Colouring Details: Okay, so I've got
two colors here. I've got this
really nice yellow, which is a dark pled ochre. Then I've got myself a
lighter shade of umber, which is a raw umber, which is a kind of
brownness shade. This is a nice light and dark. And what we can do
is we can just go in now and start adding in
a little bit of color. Now, these are one
of my favorite pencils that I like to use. These are the polychromos,
as I mentioned before. But you can use whichever
colored pencils that you have, whatever brand they are. It's just adding in that little splash of color to make it a
bit more interesting. Firstly, I'm just going
to use the lighter tone. You use a side of the pencil
and just go in and color in the main blocked areas
of this kind of color. It's just going in like
this and like that. Now you can see some
of the pencil marks are merging in with the color, and that's absolutely fine. Just going in on this side. Got a bit of a highlight there, so I'm just going
to leave that area, and then we have this
little highlight of it going on the lip area
here to slight reflection. Then again, just a little bit
of a highlight going there. That's about it for the light. Then what we can do is
we can go in here and just use this to block
in them color splashes, which I think look awesome
on nice dark background. And we're just going to use
that pure yellow color, this pure yellow ocher color. Then what we can do is
we can go in and use the same color for
the actual writing. So for the inks part, just go in with a yellow, whichever yellow you've got if you don't have yellow ocher, just use any shade of
yellow that you have, or even if you've got orange, it makes no difference if you haven't got the exact shade, just use whatever
color you have. I mean, you can use
blue, green, orange, whatever you have at your
disposal. That's fine. On the back of this, I'm
just going to lightly go in with the color because we haven't copied the
details exact. I'm just going to splash
in a little bit of color there to add in
a bit of interest. With the darker color now, let's add in some,
some darker areas. Over here, what I'm going to
do is use that darker tone to just add in a little
bit of depth and interest. Then same going for
this area down here. Then what I'll do is I'll do the pure darker value on
the edge of this cap. You can see that's
already started adding some nice
accents of color, and it's looking quite nice. With the same color, what I'm going to do is
just going to go in and maybe adding a little
bit on the background here just to give it a bit of a contrast from the yellow
spots that we have here, the yellow splashes, because I do like them on the black,
they look really good. I look like a bumblebee. Let's just carry on with that. Again, I'm not following the exact color scheme
that they have. I'm just using what I like adapting it to my
sketch. That's looking. Now what I'm going to
do is I'm going to use a gray and I've got here just for
your reference if you're using the same
pencils as I am. This one is a warm gray V one, a warm gray number six. This is going to be
quite a dark gray, but I purposely chose this. I'm going to do is, I'm just
going to go in over here, and I'm just going to fill
this area into this gray. What that does is it adds
that nice bit of gray tone so that it's not all looking
dark and gloomy on one side. It just brings out that gradual richness in
that color that we have, this nice, dark rich color. You can see, I'm just going
in with a bit more pressure, just adding another layer, and that's the great advantage
of using colored pencils, especially these
polychromos pencils. Using them in sketchbooks is great because
they don't smudge. When you turn the pages,
once you've done, you've got your artwork looking just as good as it was
when you first did it. Again, I'm just going
to go in with the gray. I'm just going to go in
and color in this area, release a little bit
of the pressure from the pencil and then go in
with a bit more pressure here just to start adding
in a bit of darker tone. Again, going over
this lip area in between the contrast of the
black and the paper white. That's looking
good. I like that, so I'm going to continue
that over here. But what I'm going to do
here is I'm not going to cover these circular
dots completely. I'm going to let them be
as bright as possible. I'm just going to
color around them because we've got quite a lot
of the highlight over here. And then if we go
towards the right, maybe color the last
ones in because the light source is
actually coming on this side. There we go. Then let's just color this in up to the edge but
leave a slight gap. Always want a slight gap
where the light is touching. Again, you don't
need to do this. You can just color it
in, however you want. All I want you to do is just
get some color on the page, if you have it at your disposal. If not, just go in with
more details with the ink, maybe adding a couple of cross hatching like we did
in the first style, and then just keep
adding more so that you have a more refined look. So Over here, what I'll do is
I'll just finish this area off and I'll leave
that area white. Then again, going in with the gray into this area
just above that sticker, adding in that nice
shade of gray, very lightly, and just
going in like this. I'm just going to go over
that text part of onyx black, and then I'm going
to leave this area, maybe leave this area white. Then at the bottom here, let's go in a bit darker and then finish it off by
just finishing this edge. Then over here, just go over
this cross hatched area. Then maybe going a little
bit darker at the base. I think that's about enough. But what we can do is
we can actually go in with the gray to maybe darken these areas
a little bit more. So versatile colored pencils, you can layer with
them, go in dark, create darker tones
with grays and blacks, and it looks really nice. So just a few more
finishing touches. I think I'm going to
leave it at that. We spent quite a bit
of time on this. So let's move on
to the next stage. So for the next stage,
all I'm going to do is actually just go in with a black colored
pencil and just add in that shadow
because the shadows are always going to be darker. Because we're
actually dealing with quite a dark ink color here, it's looking quite nice. How gorgeous is that color? I mean, I love using
black on white. The contrast is just amazing. One of the reasons I love doing ink work purely because of that deep contrast with beautiful black ink
going onto white paper. It just looks fantastic. You can see there.
We've got that black, and then what we're going to
do is we're going to add in a little bit more ink to
bring that shadow out. So what we can do now is just add in some
background color, and I've got myself
this pinkish red color, which is called a pompan red PomplaanRd
something like that, but yeah, that's what it is. What I'm going to do
is I'm just going to color in this
background so that it imitates the reference image and just basically
fills the page really. You don't have to do
this if you don't want, but I just like to do a complete sketch and maybe fill in as much
of the page as I can. So just like that, using the side of my pencil, just going to go in
lightly add a layer of that nice red color to represent the color that we
have on the actual image. Again, it's going in up
to this level over here. I actually take it a little bit higher like it
is in the image. Why not? We're just
going in just like that. You can see With the pencil, with the colored pencil, it's just so easy to
quickly get down color. I mean, I'm not
pressing down really hard because we don't
really need to do that. I mean, if you
want to press down really hard, by all means, go ahead, but you may have
an achy hand after it. So let's just put that to aside, and let's get the blue
for the top half. And again, with the
blue for the top half, all I'm going to do is just
like I did with the red. Use the side of the pencil. We don't want the attention
to go on the background. We want the attention
and the focus to remain on the actual
object that we've drawn. This is just adding a bit of completeness
to the overall sketch. And I think that's
looking pretty cool.
12. Final Elements: Okay. What we've also got here is we've got
some blue reflections. So I've got another
blue color here. That first blue that I used, that was actually
what was that called. That's a C light
cobalt turquoise. That was a nice color there. Then I've got a middle
thalo blue over here. What I'm going to do with that is I'm just going to add in a layer onto this area. If you see on the
reference image, you have a slight tint
of blue that's coming on from the background onto this
actual bottle glass itself. What that does is that
just gives it a nice feel, gives it that three D aspect, a little bit of realism. Again, we're not here to produce realism or realistic art, we're just doing sketches. But you can see just
by adding that blue, we've got ourself a
nice little sketch. Again, just with a blue, just add a bit of accent on the end of the edge
of this actual cap. Then maybe just add a
bit more accent here. Effectively, it's like a glow, like a blue glow on one
side of the actual bottle. I think I'm going to
leave it at that. What I need to do now is, which is going to go in
with the brush pen again, so we've got a nice
bit of dark to really bring out some
of the dark areas. Just like that, I'm
just going to create some render lines,
some hatching lines. To really bring out this line of contrast between the lightest and darkest
areas just like that. What I want here is, I just want to go in with
as much dark as I can. You can see that going in, maintaining a little
bit of that edge, and then over here, maybe just go in and start adding in some hatching
lines like this. You can see it's very subtle, but it makes a huge difference. Again, maybe just go in, do a little bit of
outlining work. What we can also do is
we can actually color in these dots because these
are all in shadow here. If we color these dots in here, it will add that
realistic effect to having one area as in
shadow and one area in light. That that bottom part done. Again, I was going to go in with the brush pen,
going like this, keep adding in them hatching lines, just
to add some interest, maybe add in a couple
of stipple lines here, some dots and stipples and maybe add some dots and stipples
to this area here. It just gels and merges
in quite nicely. Again, some more stipples. You can keep going
in and in and in. That's what it's
really all about, but what you don't want to do is just get yourself lost in the details because then you're probably going to spend hours and hours on it and
you're going to be like, Oh, I don't want
to do this again. Then that defies the
entire objective of this class because it's about
creating a sketching habit, not doing one sketch
and leaving it forever. It's about maintaining it. Let's leave it at that
and maybe go in with some more crisp crossy cross hatching with the medium pen. I'm going to go in here. You can see I'm just adding in some more
hatching lines here, a bit more thin, a
bit more subtle, but just to give it
that overall effect. I'd like to add in
these hatching lines. It's just a style of sketching that I personally like to do. You don't have to do
this if you don't want. Then maybe just do some more outlining where we went
over with the pencil, where you've lost the
sharpness of the black, and we've got some areas you can just outline here, very rough. Maybe go in, where it
says the ink and just go in and maybe darken those areas in
between the letters. And you can see it's looking
quite nice. There it is. Then what I might do is do some squiggly wiggly
lines just to add in some of those
patterns if you like, and maybe just make
it look a bit more vintage and authentic
like it is on the bottom. The bottle does
look rather nice. Let's just do a couple of
Crissy cross hatches there. I think I'm going to
leave it at that. You can go in with
more detail if you want or less detail. I'll leave that decision
entirely up to you. Let's just get a
Zoom back on this. Okay, so you can see now we've got a nice detailed
sketch over here. We can just finish
off by adding in some highlights with
our paint marker. So just going to give
that a little shake. Now, if you don't
have a paint marker, not to worry, you
don't need to do this, but I'd like to always add
in maybe some highlights or some areas that I think I might have covered up that
I didn't want to cover up. You can see here. Going in, fixing that area, maybe adding a nice little
contrasty line there. Then maybe just on these dots, just adding a little
bit of a glow that I'll give it some more interest and
then just a few dots here. Just to give it that
nice sketchy look, make it look pretty cool, and I think that
should do the trick. Then maybe just clean
up this area here. Again, maybe a couple of
dots here just to show that we have considered
some nice highlights. I think that's
looking rather nice, maybe a couple of dots there, and then maybe a
stronger line here. Fantastic. That's
it. I promise you. That's all I'm going
to do on this one. I'm not going to
keep going on and on until it becomes the
actual image itself. So that was the demonstration of the second style of
sketching, the detailed drawing. You can see if we compare and contrast it to the first style. So if we bring the
first style here, just get a bit of a
Zoom back on there. You can see we have two
complete different results. We've got a very loose sketch here with pencil first and
then with a bit of ink. And then over here, we've got a real I wouldn't
call this realistic. I would call this a
more detailed drawing. Of an image using similar principles like
we did in this one, but we spent much longer. Try this out, try this exercise out with the first style and
the second style. See how you go with it, try
it out with different images, or just come up with your
own creative images, and I think that's a great warm up exercise
into this class. Now let's move on to
style number three.
13. Creative Illustration: Okay. Welcome back. Let's now
look at style number three, which is my favorite
style of sketching, and that is creative
illustrating. Now, for this one,
I'm going to be using my favorite book, and that is the moleskin watercolor sketch
book that I've got down here. Now, this one that I've got
here is a landscape version. This is nearly a five in size. It's just slightly narrower, and I think it's an ideal size quick little sketches in and splash a little bit of
watercolor on them. So I'll just give a
quick little flick through of this one
and you can see, that I've got some
illustrations in there. Some of them have been
colored in, some haven't. That's the advantage of using
a watercolor sketchbook. If you're not in the mood
of doing some watercolor, then just go in and do a
normal sketch with ink. Then later on if you decide to get out your watercolors
and your brushes, then you can go in and
start coloring it in. But the most important part of this type of artwork where
you're doing inking first and then going in with
watercolor is that you need to be using
waterproof ink. So the pen that I'm
going to be using, for this sketch is going to
be my favorite fountain pen. Well, it's one of my
favorite fountain pens, especially for
watercolor sketching. And the reason for that is that this one has a nice broad nib. So if you can see
that on the camera, but you've got a very
nice broad nib on this. And this particular one
that I'm using here is by Twisbe and it's
the ECOT version, which has a nice thick barrel, and it has this little
pulley system at the end, which you swivel and the ink is uploaded into that reservoir. Now, the ink that I'm
using for this pen is this ink by the Atrientis. This is document black ink. And again, I'll leave links
to all these resources and tools that I'm using in the resource book. So
do check that out. The most important
part of this ink is that it is waterproof
when it's dry. So once it's completely dry, you can go over it with
watercolor, and that is the key. Now, you don't need
to use a fountain pen to be able to sketch like this or use waterproof
ink. There are other pens. There's pens like the uni ball, air micro pen, and I use this one quite a lot as well.
And it's fairly cheap. It's not that expensive, especially compared
to fountain pens. It's not even one tenth the
price of a fountain pen, but. These are nice and handy. They're lightweight, and
you can throw them around, and you won't be too
bothered about it. But the key for
this one is is that this has waterproof ink in it. So that's the key component of sketching when you're doing
watercolor sketching. So for this one,
this demonstration, I'm going to be using, this pen. And I've also got
my pencil here, so I think we're ready to go. Now, again, as I mentioned, this is my favorite sketchbook
that I like to use, and I probably use this more
than any other sketchbook. I always have extras of this sketchbook lying
around just to make sure that I don't run out of sketchbook space,
and it works great. Now, you can get this
particular one in a standard portrait mode
where it opens up like this, rather than in landscape. But I personally prefer the landscape when
I'm doing watercolor. It just gives me more of a nice kind of wide
angle to work on. So let's get the next clean
page. I've got it here. And what I'm going to do
is I'm going to actually work on this in a portrait mode. I'm just going to
flip this over purely so that it's easily
seen on the screen. And then let's have a look at our image bank in
our resource sheet. And I think for this one, I'm going to go for
image number three, which is the coffee cup. So if you want to
follow me on this one, then have a look at
image number three. We're going to use that as
a base for this sketch. Okay, so all I'm going
to do is you're going to put the ink and the
pen to the side. I'm just going to
use my standard pencil that I've been using, and I'm just going
to start sketching in this basic coffee mug shape. Again, it's the same process. Just go in with pencil first. If you don't want to
go in with pencil and just go straight
in with Ink, that's entirely up to you. I'm going to go in
with pencil first. Just to maintain
that same system that we've been
doing in this class. So just that nice
little shape of that simple coffee mug there with the little coffee inside, and then we've got the
handle coming out like this. Now, remember, we're
not going to be sketching this as an identical, you know, photo realistic
sketch or anything. This is the fun
style of sketching, where we're going to use our
creativity to come up with a nice whimsical
style of sketching. So I've got that basic
outline of the shape, and then we've got these little
lines that are coming up. Vertically on the actual mug and maybe just add that
little shadow area there, and that's about it. I'm not going to go
in any more detail. What I'm going to do is when I talk about creative sketching, using a base image like this, I'm talking about
creating an image, maybe creating a little scene, just using this as
that base shape. What I'm going to
do is I'm going to use that same shape again over here and I'm going to draw
myself another coffee mug. So it's as creative as you like. You don't have to draw
another coffee mug. You can draw whatever you like. And then what I'm going to do is I'm just going to scatter this mug and details
around this base shape. So just with my pencil, coming up with these ideas,
and that's all it is. It's the ideation stage
where you're really coming up with some nice
whimsical creative ideas. Now, you may not like to do this and spend
time doing this. You might like to just sketch. If that's what you want
to do, then just go ahead and just sketch
the image as it is, and then use the same method
that we've been using and maybe add a splash of
watercolor at the end. But what I'm going
to do is, I'm just going to add that
extra cup there. Then maybe over here, I'm just going to drop in a couple of these
round shapes that may end up becoming a
border in this image. I'm just going to I go
along as this fleshes out. Then over here, I've
decided now in my head. I'm building this
picture in my head. Going to add in a couple
of steps over here. I'll just raise that a little
bit higher so you can see, and then I'll have more of
these round shapes over here. Now again, your creative sketch might be completely different. Go ahead and do it
however you want. But if you want to follow me in this particular one,
that's absolutely fine. What I'm going to
do now over here, I'm just going to draw
another coffee mug. We've got the main big one here, a small teeny weenie one here, and then one just
hiding behind this one. Like we've got
three coffee mugs, a little border, and I think now what we can do is we can work on maybe some
of this background. So for the background, let's
probably drop in a couple of peaky peaks to make this
a bit of a landscape scene. So that's going on
in the background. Let's have a kind of
horizon line over here and maybe just drop in a
couple more shapes like this. A couple more triangular shapes, and these can form whatever
you like them to be. So just a couple
of circles there. I think that's about it. That's just the base sketch.
14. Whimsical Elements: Now comes the creative part. In my mind, what
I'm thinking is, I'm going to make this cup, this main cup into a
small little house, you're thinking, how
are you going to make this cup into a small house? Well, I'll show you. What
I'm going to do now is, I'm just going to do some
more stronger lines here. For the base of the cup, I'm going to add in
effectively the skirting or the edge of the house. I'm going to keep to the shape
of that cup just to make this a nice, interesting
little illustration. What I'll do is I'll just
get a zoom in on there, so you can see this
a bit clearly. So there you go. I'm just following the shape of that cup. Then I'm going to maybe add a roof top here so you
can do a little dot, and just going to
do a diagonal line going down on that side, another diagonal line
going down on that side, you can get a bit of an indication of what
I'm trying to do. I've got this roof
top edge coming here. Again, another one coming there. And that's how easy it is. So we've just created
these little shapes using our coffee cup and it's provided the base drawing or the base shape for
our little house. So all I'm going to do
now is maybe just add a little chimney over
here, just like this. Again, the perspective and
the proportions of this, are not going to be exact. We're not creating
perfectly symmetrical works of architecture or
anything like that. We're just having a bit of fun. So I've got that down there, and then this little coffee mug that's coming out
on the side and might end up making this an
extension of this house. So how about doing
the same on there? Then maybe the roof might
be slightly different. We'll give it a flat roof. I'm just going to create
a little flat border and just round it off for the top part to show
that it's still maintaining that shape
of that coffee cup. That's looking good. Now we've got this little
handle area here. What I guess we can do is
just use the bottom part of that handle and maybe
do another extension. We've got another
extension coming over here to the back and then maybe have another
roofy roof down here. Right to the end following that same line and orientation. You can see we've got ourself nice little
structure there. A nice coffee cup house. What I'm going to
do now is I'm going to do something with this here, I'll just maybe
just keep this as a coffee cup or have
this as a sweet pot, where I can have some little lollipops coming out of them. So maybe have a lollipop
coming out here. Why not? Make this an edible world
that we're designing, where we can end up eating, you don't really want to
be eating this now, do we? No, we don't. Okay. So I've got some little lollipop
sticks coming out there. They can represent
whatever you want. Keep the coffee mug as
it is looking good. Now, let's just get a Zoom
back so you can see that, so you can see the
coffee cup over here with a couple of
lollipops in the middle. Very rough and very light. We're going to go in
with the ink later. So Now, what I'm going to
do here is I'm going to start outlining maybe these
border rocks, if you like, this rock bed bed of
rocks on the edge, and then quickly just
make them a little bit more stronger so that
you can see Again, we can manipulate
this however we want. If you want to maybe design
something else at this level, go ahead and do
it or if you want to follow exactly
what I'm doing, then you can do that, not an issue at all. So there we go. And maybe over here,
this can represent some kind of water area, maybe a lake or something, and we'll have a nice to
have a nice boat boat, simple little boat design, very simple, easy to do squares and straight lines,
Looking good. Let's now start adding in
some details over here. Let's get a bit of a zoom back on there so you can
see the whole picture. For this area here, we might maybe have a door. Let's do a little arc on a door, little arc on a door, and then maybe have a couple
of steps coming out, maybe just one or two steps. Then we can add in the
details with a pen later. Then how about having a squared
off a rooftop like this. A couple of lines going across. Maybe have a nice
old school design on the actual frontage
of the house. All I'm doing is doing
these straight lines to create this criss
cross pattern, and it's looking quite nice. So let's add in maybe
dropping a window here. Just go in with that, nice little arched window, simple enough and maybe just dropping a window on this
little extended area over here, following the lines
and the curvature, the shape of that coffee mug. On this other side here, maybe what we can do is have this bit coming
out a little bit, so we've got this border, and then within that border, maybe have a couple
of lollipop sticks. Just throw in a couple
of lollipop sticks or some chocolate, if you like, throw in
whatever you want. I just adds that
bit of interest. How about finishing
this side off with a nice big window and keeping
it similar like the others, so we don't overclicate things. I think that's
looking rather good. Then for this last area here, this little extension, maybe
just have a small window. As Pz, lemon squeezy. What we're going to do
here is just add in some tile work on this kind of roof doesn't have
to be accurate. I mean, I'm doing
this really rough and just making them slightly wonky. It just adds to that
whimsical look. You've got a really nice kind roof texture
going on there. Then maybe at the back, we make the roof texture
slightly different. Maybe we just do lines on it, so it gives a little bit of variance so that it's not
all looking the same. Right? I'm happy with that. Let's maybe add a couple
more details here. How about we just drop a little
car here? Yeah, why not? Let's draw ourself
a nice little car just to make this look
even more funky and cool. So just a little car, you
don't have to do this. If you don't want, I've just
got a habit of drawing cars in my little illustration
because I do like my cars, especially my old
school Corvettes and my 1969 sting rays. Love them. Absolutely love them. But I'm sure you don't know
what I'm going on about. So I'll just leave it at that. I got a nice little car. Drop that in over
there, and then maybe have a little
path coming out, going to the back just to
complete the illustration, make it look a little
bit more convincing. Then what I might do
is actually might just throw in another
coffee cup here, throwing in another coffee
cup like we had before. Again, just have some of these little round
elements coming out to add a bit more interest
to the overall sketch. So over here, I'm just going to add this road area
where the car is. So that it doesn't look too odd, but then again, it's
whimsical, isn't it? I can look as odd as you like. Let's just get a
zoom back on that. That's it for the sketch.
I'm going to stop there. You can keep going, you can add as many elements
as you want, add some more coffee
cups if you like, or add in some
other elements from the other images that you
have on the resource pack, but I'm going to
leave it at that so the next stage is going to be the amazing inking stage.
15. Initial Inking: Ok doke. Let's start the inking. I'm going to use my
fountain pen for this, put the cap to the side, and let's get our hand
comfortable so that we can make this inking
process easier on ourself. It's the same process
that I did last time. All I'm going to do is,
I'm just going to use my pen to just go over the lines to really
bring them out so that they look nice
and flush and clean. And do this, however, you find it comfortable
if you like to just, you know, use loose
sketching marks, go ahead and do that. If you want to go
in really fine and bring out detail like we
did in Style number two, then you can do it that way. So what I'm going
to do is, I'm just going to do this as I go along, however much time as I feel
like I want to spend on it, You can spend as little or as much time on
this as you like. Or you can just skip the pencil stage and just go
straight in with the inking. I quite often do that in
a lot of my sketches, especially in the water color sketchbook because I just like to go in and
come up with ideas, create some creative
sketches by just looking at my surroundings
and it works really nice. All I'm doing here is, I'm just going over this. I think what we'll do is
we'll just speed the video up because it's exactly the
same process as before. I'll see you once I've
completed the line drawing. Okay, so now I've completed the basic outline structure
of the illustration, and you can see you would
probably haven't got a clue that this house is actually
based on a coffee cup shape. So that's the fun aspect of this amazing
style of sketching. It's just an initiation into
starting off your sketch, and then you can dream up kind of whimsical
world that you want. And again, I've left in them
coffee cups just to give it that indication whenever I come back to it
to remember that, Oh, I did this using
a coffee cup image. So there you go. This is
just a basic outline. What I'm going to do
now is, I'm just going to go in with my eraser, and I'm just going to erase
out those pencil lines. Because we're going to be
using watercolor in this, you don't really want
too much of the graphite to murky up that
watercolor because what that'll do is it'll just gray
it out and it can kind of contaminate the pureness of that color when you put it on. So just going to quickly
erase this And again, that's the advantage of
using watercolor paper. You can actually
go ahead and leave your sketch like this and come back to the coloring later on if you're not
really up for it, or you can go in and start
coloring in straight away. But just ensure that
your pen marks, that these ink marks
are completely dry before you start
adding watercolor. Otherwise, you're going
to have a horrible mess and you're going
to be very angry, and you're probably
never going to sketch in your watercolor book again. We don't want that to
happen. No, we don't. Let's just give that a quick
lit up clean. Lovely. Right. Okay. So what I'm
going to do now is, I'm just going to wait
until this dries out, close my fountain pen, maybe give it about
15 minutes to dry to make sure that
it's completely dry. And then what we'll do is we'll go in with our watercolors, and I'm just using my standard student grade
watercolors for this. I'm not going to use
professional grade because I don't really
think you need to, especially when you're
working in your sketchbooks. We're not creating a piece of art to sell or
anything like that. So standard water colors
will work absolutely fine. Just make sure you've got
yourself a nice brush. If you're going to
use water color, just to make it easy, try not using a brush
that's too small. So, for example, like the brush
that comes with this set, it's quite a small brush. It's a pocket brush, and for me, that's a little bit too small to cover an entire page of details. However, it can be quite handy, but that really depends
on your kind of way of coloring in when
you're using watercolors. So I'll leave that
to you. Just make sure that you have everything ready so that you can get this next stage done
nice and quickly.
16. Watercolour: Okay, so the actual ink has pretty much dried, so it's not smudging or anything like that when you rub your finger on it. That's one of the test to say that it's dried out. But again, if you're doubtful just give it maybe another 5 - 6 minutes, and then in the meantime, what we can do is you can just wet our watercolors. I'm just going to give my little watercolors a spray, and again, I'm just going to use my student grade. That'll do for this quick sketch. I'm just going to use the water wells hair for the mixing. I've got my nice brush over here, my size eight silver black velvet brush, one of my favorite brushes. So I think we can start. Just adding a bit of water to that brush and then decided now that I'm going to maybe go for the roof first. So let's use a little bit of this red. Put nice crimson over there, add it to my pan. Again, this is just such a beautiful sketch book to use, because you can go in with watercolor, and once the watercolor dries, the paper becomes completely flat. Now, do remember when you're using watercolor sketchbooks like this, like this small-skin [inaudible] , it will warp the paper depending on how much water you use. If you do use a lot of water on the page, it will start warping and [inaudible] , but so do be aware of that. Again, if you're interested in watercolor, then do check out my watercolor course where I explain all these aspects. But just generally for this particular class, I would probably recommend using some clips to clip the edges. But for me personally, I can't really bother doing that. I like to do quick watercolor. When I'm doing my water coloring in, I don't like to go in too much detail. So let's make a star on this. So I've got this nice red here, my adding maybe a little bit of orange to that to bring out a little bit more vibrancy, and I think we can go straight in with this. So I'm just going to go in and add in my red, and you can see the orbits of paint on there. So get rid of that little splotchy splodge of paint, and again, just adding a bit more water, and you can see how beautiful that color is. So easy to color once you've got your ink down. It's just an absolute relaxation as far as I'm concerned. So relaxing, don't worry about keeping the color within the lines and being super neat, just do a quick little wash of color. Now I've got my red there, I keep my red on this side. So I'm just going to bring that red down here and maybe read bit of red on the edge. Again, if you have these white spots, not to worry, just to leave it in the end of the day, it's just a quick sketch. So what I'm going to do now is I might intensify that color a bit more darker with this nice, beautiful color here, up that's on, we've got this gorgeous color down here and you can see it's intensified that color giving it a slight brown shade. So again, bringing that down here, what I'll do is, I'm not going to let it meet this side because otherwise it's just going to seep into that watercolor and make it all murky, will leave a highlight line there, and that's it. Then so it's just really nice and easy. What I'm doing is I'm holding the page down with my fingers here if you can see using my left hand, you just hold the page down because I'm adding water, you can see it's already started curling up a little bit. Just hold the page down. If you don't have any clips at hand, this is what I tend to do. I watercolor when I'm lying down on the floor because I just enjoy taking this sketch book wherever I am, and I just enjoy the entire process. Again, I'm not bothered about being super neat or making this into a perfect piece of art because that's not what it's about. It's just about quickly getting some color down and just adding a bit more interest to your beautiful sketches. So again, just going to add in a little bit color here on the border, give my brush a little clean, add in a bit more and maybe just add in some border color here on the doors and on the windows just to make it nice and cohesive, make it all gel together, and how about having the same color on this area here? We'll just color that whole area red, and then what we can do is once the watercolor dries up completely, you can actually go in and add more ink details after the water color has dried, and you can do that with any ink pen. You don't have to have water resistant ink for that. You can add ink with any pen. But then you got to remember that if you decide to watercolor over again, if you missed a spot, then you're going to get a muddy mess. So maybe best not to use a non-water resistant ink. Just stick to the normal water resistant ink that you have if you're going to add details later. So let's just quickly get on with this. A little bit of blue here, beautiful, ultra marine blue. Just go into that and take this color, add it to this to just gray it out slightly, and you've got this nice purplish shade, and what we'll do is we'll start coloring this area in, where we've got this road area where the car is, and that's what you got to do with the watercolor sketching, using watercolor fairly quickly. It's always a good idea to color in the areas where there's a gap between the actual water color and the illustration. That way you can focus more on just getting the color down and not having to worry about a bleeding into each other, and usually the watercolor will dry fairly quick. Keep your washes as light as you can. Don't go in with too much water. Otherwise, you're going to have some bumpiness and some little texture areas bobbling up. So got that color there, happy with that. How about adding some blue shade down here where we've got this water area. We've got this divide, wont touch this, we will straight into this. I love this nice [inaudible] of blue here. Could actually add that to the mix down here, to give us a nice shade of blue. So let's do that, add in that blue, look at that gorgeous blue. That's okay. Calm myself down and not get too excited. Could be just at the early stage of the coloring, we've not even reached halfway. I get excited with new colors, with new art, look at that. Absolutely gorgeous color that I think I'm going to try remembering how I made that color, and again with watercolor, you've got so much of a huge, vast array of colors that you can produce. You can keep making new colors as you go along, and that's a great advantage of it. But the problem is that if you don't remember how you made the color, then it's always difficult to make more. So it's always a good idea when you're making your colors make enough of it so that you can start coming back to it if you need to do some touch-up work. So again, just going in the wet on dry method, let's just pick up maybe a bit of this Van Dyke brown, so have that brown there and keep it nice and moist, got that nice brown over here, and let's just use this brown as it says, just going to use my finger to hold that down, and just this border area of the house, I'm just going to go in and just add this brown to the border area, and again, you don't need to plan too much with your watercolors. Don't worry about thinking that, "Oh no, will this color work with this, will that color work with that?" Just don't worry about it. Just get that color onto that page coloring your sketch. I mean, you don't even have to completely color it in. You can just partly color it in and just leave some of it as it is. Why not? It's just that experience. It's a journey. Isn't it all about the journey, not about the end result? It's about that journey. Right. Let's just go in maybe add in that board brown area down here. Now our roof area should be a little bit dry. So we would probably start looking at some of the details on the actual main part of the house. The main parts of the coffee cup are looking good.
17. Building Colour: Let's now look at some of the house elements. Let's create a nice light color, maybe use this color here. We've got this raw ocher over here, add that to the brown, lighten it up, bring in maybe some of this color, and just like that, do some color mixing. To be honest with you, I don't really like that color. I think it's a bit too murky, so I've changed my mind. Let's go back to the blue. Let's go back to the blue and create our self a nice cool color to contrast with the red. How about adding a little bit of this color to it here, and that will bring it out quite nicely. There you go. Again, with watercolor, just keep making your colors, mixing your colors. But even if you haven't got much experience with watercolor, I still say, try this out. What I'm going to do here is, I'm not going to bother about these little round things down here. I'm just going to literally go over it. Then once the watercolor dries, then I can go in and start adding more details and add more color if I need to. It's very flexible in how you're using it, and it looks quite nice. I do like that blue. You can tell that I'm a fan of blue. I do like blue. We've got this nice shade of blue here. It's like a indigo type of blue, isn't it? These windows over here, the watercolor isn't completely dry, but you know what? It doesn't matter. Even if it starts bleeding all over the place, don't worry about it. It's just about getting that color on to complete your gorgeous drawing. Let's just go in into this area again. I'm just going to go in straight with my watercolor and finish off that chimney area. If the watercolor goes over another one, not to worry. Let's make a slightly darker shade. I think I've got pure indigo here, so let's just add that pure indigo, which is a beautiful color, just to darken up the shade so that we can maybe add a little bit of variance on the one on the back. Just a slight variant. Everything in watercolor is subtle, so you can make these slight changes by just adding a dab of color. You can see that it elevates your overall feel and look of your illustrations. You can see a slightly darker color at the back, maybe add a bit more to that to darken it even further, and then what we can do, you can just drop in some of that, darken it up. Fantastic. Let that dry and then maybe add in a same color over here, just across there. Super-duper. I'm going to let all that dry now and let's see if we can find some more dry spots. How about using the same color and bringing out some color down? If we just use that same dark shade and maybe add a bit of this yellow into it, this kind of murky brown, we'll get a [inaudible] of green. That'll add a bit more variance to our color palette. There we go. That's a beautiful color as well. Look at that. Gorgeous. Gorgeous colors. We've got that nice darkish indigo, turquoise ecoline. We'll just fill [inaudible] , and again, I'm not bothered about the white spots. I don't really care about them. As long as I've covered the main areas, it's just an indication of color in your scene, and I think that's looking good. Let's now focus on these stony areas. For the stony areas, what we can do is we can actually create a new color. I'm just going to clean out my [inaudible] , then I have some fresh [inaudible] here. Just go in and let's start creating some gray. Again, let's go in with the blue, bit of blue and a bit of this nice dark brown here. That'll create a really nice gray. We got ourselves a nice gray there. All I'm going to do is just drop that in into the stony areas. I've got this little step thing that steps into the pavement from the watery area. I can see, very nice and subtle. The sails of this boat, I'm going to leave them as white as I can, so just going to leave it to the white of the paper. So let's just be a little bit more careful when we're painting around them, and there we have it. We got our self a nice stony color there. Let's go in and add in that indigo, a bit of indigo, dry out the brush, and then with the indigo, let's just add in maybe a bit of shadow here on the underbelly of the stones, just to add a little bit of interest. Again, we're not here doing photorealistic coloring or anything like that. No. We're here just to do some quick little sketching and have a bit of fun doing it. What we'll do now is let's use some bright colors. Let's brighten it up a little bit.. Let's go into the orange. Do you like a bit of orange? Look at that beautiful color, that orange. Pure orange. We've got a bit of pure orange there, and maybe use a little bit of yellow ocher, add that to the orange to make it really nice and vibrant. Look at that gorgeous color. Its like a saffron color. Then what I'll do is I'm going to make my Corvette, I don't think it's a Corvette anyway, but [inaudible] like one of these old school 1970 cars, which I absolutely love. Let's just add this orange to this. Take a little bit more time doing this one. You can see I'm just covering it up. Once that watercolor dries, it'll look fantastic. Again, just a bit on the roof edge and the spokes of the roof. [inaudible] Leave that part white. Then what we can do is we can go in and maybe use a little bit of sharp green. This is pthalo green over here. Add that to that mixture in the middle, you can see we've got that gorgeous vibrant color, and then bring that that into the orange color that we just created, and it gives us a nice muted green. With that muted green, what I'm going to do is I'm just going to go in, I'm just going to dab that on to this edge, dabbing it onto the edge, and over here, just around this cup, just to add a bit of brightness to the illustrations, or just there effectively. It's coming across here. What we don't really want is that mixing with the orange on the car because that will become quite murky. So we'll just leave that little gap right above the car. Bring the green all the way down here, just like so, and then finish it off over there. We'll finish that green off there, bit more green. Let's just finish these edges to stop all these white gaps popping all over the place. I think that's about enough. With that other green, we can intensify it a little bit. Maybe add a little bit of this to this green here. You can see we've got a slightly darker green, and what that'll do is if we just add that here, it will add a little bit more variation and interest. As you can see you've got two greens, effectively like a separation between this little garden-y element and the green pavement, if you like. What I'm going to do now is I'm just going to create a nice light color to go on the background so we could actually go for maybe, bleh, stick to the orange. Let's do an orange. Add it to the green, and then we've got our self a nice copper, brown color. Nice copper brown color there. Then what we can do is actually, we can use this copper brown color for the boat. You've got this really nice copper-ish brownish color, another color that I absolutely love, copper. Water color copper is a beautiful color. Copper, blue, green, I like all colors made don't I? Yes, I do. Let's come down now and just clean our brush.
18. Final Details: And can carry on and we can
actually go ahead and start doing a little bit of brights over here where
we've got these lollipops, what I like to call
them lollipops. Is going to go into
this lemon yellow, and you're going to literally
take that lemon yellow, and you're going to drop it in. On these lollipop
things that I've got nice lemon yellow there. Now this part has dried. Again, I'm just going to add
that lemon yellow to that, and I'll give it a tinge of greenish shade on there,
which is quite nice. Then maybe just add
that yellow here, making sure that
it doesn't bleed into this wet area on the top. We've got that yellow
coming in over here. Fantastic. We've got a nice
bit of color going on. What we'll do is we'll
wait for that to dry and see where
the color dries out. I'll just keep adding
in a little bit more just to have a
complete overall image. But what we can do is
we can actually just go ahead and color
the background. To contrast with the blue, we could possibly have
a yellowish shade, an orangish brownish shade, all these ish shades. You just come up
with a nice color. Again, if there's a color
that you want to try out and you think that I don't know what that color
is going to look like, get a bit of scrap paper and just add that color on
and I do like that color. I a lovely color that. I think I'm going to maybe add a bit of lemon yellow to this to
bring it out dab of green. I think we're ready to go. With this one, all
I'm going to do is just lightly give it one light coating of this beautiful shade
that I've just made up. I'm not bothered whether
it goes in completely. I'm just using this to just fill this airy space that we have on the back of
the illustration. It just makes it a
little bit brighter and gives it a nice fresh look. Again, just using that color, taking as much of
the color as I can, but not overloading my brush, just going in.
These little gaps. I'm not bothered whether it's smooth or
whether it's rough. It really adds to
the sketchy feel sketchy look of the illustration and I absolutely love that. Let's go over here.
Bring that down. I think we're nearly
done on this one. With those little elements
in the background, I'm going to leave
them as it is. I've got the door here,
and then I've got some of the window area here
and a bit on the boat. Let's use the same color
to do all of them. I guess we'll have a
nice sharp blue door. Let's just literally going straight with this
beautiful blue. Just like that. Dropping
that beautiful blue. Okay. And it's looking good. Sharp color here for the boat, these little things
that hold the sails. You can see a bit of that
color has gone across. Not to worry. You
can easily fix that. If you have a little cloth. You can even use your
finger from this. You just use your finger and just push it up and it's
gone just like that magic. I've got a nice coverage
now of water color. What I'm going to do is
going to wait for this to dry and then I'm
going to go over with ink with my same pen over here that I initially
did my illustration with to really bring out that sketchy look and start coloring in
some darker areas. Let's wait for that to dry. Kid k. What we've got now is, we've got some nice water color that's completely
dry on the page. As you can see, it's
much filled in nicely. What I'm going to do now as a final touch is I'm just going to go in with my pen
again, my fountain pen. I'm just going to
pick out areas, which I want to block in with some nice black ink and maybe go over some textures
with some cross hatching. Then what that will
do is it'll just complete the entire
picture and scene. Let's go ahead and do
that and then we'll come back and review
the illustration. Okay, Dak, now
what I've done is, I've just gone over some of the outlines and made
them a little bit darker, filled in some areas over here, added in some cross
hatching just to bring out a little bit
of texture and depth. And you can see it makes
a huge difference. You can keep working
in these types of sketches with as much
detail as you want. I'm going to leave it
at that. Otherwise, I'm going to probably spend
another 2 hours on it. So This is basically the
third style of sketching. Now, if we compare
this to the others, you'll be able to see a stark contrast in
the actual style. So let's have a look at
them. So there we have it. We've got our three different
styles of sketching. The first one was the
loose kind of doodle, loose light sketching style. The second one was
the detailed drawing. And then the third one was
the creative illustration, and you can see it's a complete difference
between all three. As I said before,
you can decide to do whichever one of these styles as you won in your sketchbook, either stick to the same style or have a bit of
a mix and match. Effectively, you're
always going to start off with a loose sketch, and then you're going to
build in some details. So it's entirely up to you how far you want
those details to go, whether you're using
colored pencils and ink or whether you're
just sticking to ink, or if you decide to go in with some water color and
some cross hatching, it gives you a huge range of options to start this
wonderful journey. So now let's move on to the
final style of sketching, and that is style number four.
19. Abstract Doodle: Okay, welcome back.
Let's now look at the final style of sketching, and that is the abstract
doodling style. Now, this style is all
about having fun and creating marks and shapes using whichever
material you like. For this particular exercise, I'm going to be using
my pro markers. So if you have any markers
that have wide tips on them, like chisel tips like this, then that would be great
to use in this exercise. If you don't have these, then just go ahead and use whichever pens or whichever instruments
for drawing you have. You can use anything
that you like. But the thicker, the broader, the stroke that you
can make the better and the quicker this
actual exercise will be. For the reference image, I'm going to be using image
eight on the resource pack. So check that image out if
you want to follow along, that's the one with
that funky looking Tcup and cup compination. Again, I'm going to be using
three pro markers here. I've got a purple
color blue, and a red. You don't have to color
match with your image. You can use any
color that you want. If you just have a black marker, go ahead and just use that. So the actual book that I'm going to use is going to be
the same book that I did, the Quick doodle, the
quick illustration in for sketching
style number one. I've got another one here, so this is just the basic
cartridge paper sketchbook. So just go to the
first page over here. Generally, I wouldn't
really be using these markers on a cartridge
paper sketchbook like this, but just for this video
and this specific class, I just want to illustrate to you how easy it is to do this. Ideally, you'd want to be
using the render book. So I've got the render book.
Here. I'll just quickly show you so I've got
my render book here. Ideally, I'd want to
do this in this if I were to continue using
markers for every sketch. But because I'm just doing
this as a one off sketch, I'm just going to
go ahead and use this cartridge paper sketchbook. And what'll happen is it'll
go through to the back, it'll bleed through to the back, and maybe I might get some
spots on the other page, but I'm not really too
fussed about that right now. So let's have a
look at this image. So we've got the
teapot image there. I'm going to start off with maybe using this purple color, and this is just absolutely brilliant because what you
can do is you can just go in, Draw a rough little
outline of your object. So I've got that teapot
object over here. I'm just going to create these squiggly wiggly lines
with that chisel tip, and you can see
how easy that is. No force, no stress,
just simple lines. Enjoy that process of
putting color on paper. It doesn't have to be accurate. It doesn't even
have to represent that image that you're drawing. Again, all I'm doing here
is just drawing that shape. I've got that handle shape here. If you want to follow this
particular pattern style that I'm doing, go
ahead and do it. If not, just come
up with whichever designs shapes and
contours as you like. You can see I'm just using the
side of that pen to create this overall impression
of this teapot. You've got that little
teapot end coming there. You've got that
handle bit there, and that's it. How
easy was that. What I'm going to do now is with the other side of
the actual pen, which is the bullet tip. I'm going to just create
some more interesting lines. To really fill up the gap that I produce in between
these abstract shapes. That's all it is. This exercise is just
about sitting down, having about five, ten
quick little minutes, just putting some
color to paper. You don't even need a
reference image for this. You can just come up with your
own patterns and designs. It's such a relaxing
thing to do, especially if you
had a hard day at work and you just want
to sit back and chill, just draw in the
squiggly wiggly lines, maybe do some stipling like
this, a couple of dots. And some cross hatching, just random cross
hatching, if you like, just to fill in that
space and maybe follow the pattern of the reference image
that you're using. But again, it's something
I don't want you to stress about by using
the reference image. It's just a starting point to
start creating these lines. Because this part is pink. I'm just going to
go in and maybe use this red color just to add a
little bit more variation. You can see all I'm doing
is using that chisel side, just to come up with
these rough lines, maybe break up the
lines to show some sort of a uneven abstract
type pattern, and you can see it looks
great, so much fun, so easy to do, and it's something you really don't
have to even think about. Again, I'm just going to
keep continuing doing that, no symmetry here at all. Now, if you want to create a really nice
symmetrical pattern around your actual
reference image, then go ahead and do that. You can do whatever you
like in this, no rules. There's generally no
rules in art anyway. Just do what you
feel like to give your mind a bit of
enjoyment. And there we go. So I'm going to put
that color to the side. Let's get this nice
blue color out. So we've got the blue
color chisel tip, and I think what
I'm going to do is, I'm just going to do these
little square things over here just to
fill in this space. I think that's looking
rather nice now. You probably won't
even realize once you've finished what you
based this sketch on, and that's not a problem. As I said, as I've been
saying throughout this class, this class is not about producing perfect
illustrations and artwork. It's about that
journey, that process, and experience of just getting
something down on paper. What I'm going to do
now is I'm going to use that bullet point now again, to just create some nice
little patterns and lines. Just to create this nice
little abstract doodle woodle. That's all it is
abstract doodle. You don't have to be exact, you don't have to be precise, maybe draw in some squares
and color them in, or you can even draw
in some squares and just leave the outline
of that square, why not. Whatever your mind takes
you to going in with that. Then again, I might do some stipple dots over here just to create some variation. It just creates this really
nice little random pattern in your sketchbook page. Now, if you decide to do this on every single sketch in your
sketchbook, then again, I recommend you probably do
this on the render paper, which is the bleed
proof paper because that way you can utilize
both sides of the page. You won't be worried
about the actual ink bleeding over and
ruining your sketchbook. If you decide to do that, then just go ahead and do that. All I'm going to do here is just keep doing these
little dotty dots. Let's finish this quick little abstract
doodle out over here. Maybe some squiggly wriggly curly lines going up like this. Squiggly bigs there,
and that's it. Look how quick and
easy that was. So you might be looking
at this and thinking, ha, this is just so
messy, I don't like this. Absolutely no problem.
I would still say, give this a go just to
see the fun aspect of it. But if it's something
that's not really your cup of tea
from this teapot. Is cup of tea from this teapot, then just go ahead
and choose something else from another one of the
styles that we went through. Now, I'll quickly show
you the page underneath, and you can see that it's
completely bled through. You've got massive
shadowing there and the actual ink has come
through to the other page. So don't be using a sketchbook
that is not bleed proof. Unless you like this look and
you just want to continue, or another way to do this is just put another
sheet of paper over here so that you can maintain a clean surface for
your next page, whereas with the back,
it's going to probably reflect that symmetry of what
you've got on the front. So that's about it
for this final style. It's that quick doodle abstract doodle
style just to relax your mind and get some color or lines
and shapes onto paper. So let's just have a look at
all four styles together.
20. Style Comparison: Okay, so there we have it
all four different styles of sketching in sketchbooks
that we went through on the left
style number one. We had the quick illustration, the quick doodle drawing
that we did just with Pen, spent about five to
10 minutes on there. Then we went to
style number two, which was the detailed drawing, the detailed illustration. We spent a little bit
more time on this, maybe about half an
hour to 40 minutes. Then the third style,
which is probably the most time consuming style is the creative illustration, probably spent around
about 1 hour on this one. And then finally, we
had Stauber four, which was the abstract doodling, and that took around
about 5 minutes. In terms of time being
spent in your sketchbook, I would recommend that
you spend at least 10 minutes every day, doing a sketch in
your sketchbook. Now, remember, 10 minutes is the minimum that I would
recommend when you start off sketching on a daily basis to build
that sketching habit. So style number one and style number four would
suit you if you just want to be spending about
ten or maximum 15 minutes on your sketchbook every day. So use the reference
images if you want to or just come up
with something creative. Or just have a look at
whatever's lying around in your house and just use
that as a base reference. If you want to start delving into a bit more detail
and come up with some more intricate details and use other mediums like colored
pencils or watercolor, then maybe try out style number two or style number three. Just remember, with
style number three, you're going to be spending
a lot more time with this style where you're going
in with a pencil sketch in water color, then
maybe a bit more ink, and then there's
drying time involved. So what I don't want you
to do is get put off by the actual stages and the
waiting time with this style, if that's something that you think it might
not work for you. So instead, maybe go with
this style and then move on to this when you're in that routine of
sketching every day. Now, I went in with
quite a lot of detail for style
number two and three, you don't have to do that. You can tone it
down a little bit, maybe give yourself a target
of just spending 30 minutes every single day and get done in that day, how
much ever you can. There's no limit or rule on having to complete an
image every single day. It's more about spending that
time drawing, sketching, getting marks on paper that will help achieve
that sketching habit. So if you, for example, spend half an hour
and you just get an ink outline drawn,
just leave it at that. The next day, come to do the watercolor and spend
half an hour on that. Then maybe the third day, do some fine refining or retouching with inkliners or even with colored
pencils, if you want. So just test it out,
see how you go with it. But again, I recommend that you start with a
small amount of time. Just start off with
loose sketches. And if you don't have
time for sketching, then just go straight into
doing some abstract work to make sure that you don't miss
a day in your sketchbook. And hopefully that will
give you a nice insight and some new exercises
and references to get you warmed up and started
in this wonderful journey. So now let's move on
to the class project.
21. Class Project: Welcome back. Hopefully, you would have done some
of these exercises by testing out these
different styles of sketching
throughout this class. But even if you haven't and
you just watched the class, then it's the ideal time now
to start your class project, which is basically just going through a
sketchbook and doing four different sketches by using a combination of these
four styles and medium or by just using one style four different times by using
four different references. So that's all I want you to do. And if you can't
complete four of these sketches in your
sketchbook, then maybe do three. If you can't do
three, just do two. And even if you can't
manage to do two, just do one sketch and post that in your class project
and then maybe work on your second or third sketch on the next day and keep posting to the class project area in the project gallery
so that we can all have a look at how
you're progressing. It's a great channel for open communication and for helping each other
in this journey, and it acts as a
great motivator. So try that out, have a go out
the exercises that I did in the class by following the steps that I did in your
class project, select whichever
reference image you want or come up with your own
creative sketches to do at least two to four
different sketches on different pages
in your sketchbook. But just make sure
that you go through the early lessons in the class again to ensure that
you buy the right sketchbook for the medium
that you intend to use. So if you're going
to go for markers, then I would suggest that you
go for a blue proof paper, sketchbook like the render, or you can get one of your C white sketchbooks like
I've got over here, and I've also done some
actual marker work on this, and it's just bled through to the other side when I put a
sheet of paper in between. So if you want to do that,
go ahead and do that. Again, marker work over here. I've done it for the first
few pages of this sketchbook. And then I just went in with colored pencils on the
next page, then ink work. And just like that, that's how you'll build
your sketchbook. Now, if you're very particular
about how you want to lay out your sketchbook or whether you don't
want to mix mediums, then go ahead and just
select one medium, maybe just do Inc and just stick to Inc for the first
sketchbook that you complete. And remember, you don't need to have a huge
sketchbook like this. This is a jumbo
sized sketchbook. You can even get these small
ones that you can start in. And these are only a few pages. And sometimes these act as
the best sketchbooks to start your sketching habit
in because you will most likely complete
this sketchbook. Within a matter of a couple of weeks if
you use all the pages. So I think this is a
great one to start. Maybe the size is a bit small for you so
you can get this in the A five size or if you're comfortable using A four,
go ahead and do that. But remember, again, the
smaller the sketchbook, the more likely you
are to finish it, and the more quicker, you'll be able to
finish each page. So I'm going to
leave that decision entirely up to you for
your class project. Do give the class project to go and post in the
project gallery. And then let's move on now to some final thoughts and
round up this class.
22. Final Thoughts: Okay, welcome back
to just a couple of final thoughts on the class. So hopefully, the
lessons would have motivated you to try the four different
styles of sketching. And this would have warmed
you up and got you into a habit of doing some type of sketching
in your sketchbook. And then this will effectively help you in your class project, where you select the pictures or reference images that you want to draw and draw them
in any style that you want. This then hopefully will
become a stepping stone for you to continue
this sketch book, where you do your daily
sketches in, for you to relax. Just get away from the
digitized digital world that we live in and
just move into a nice, relaxing analog five, ten minute work of expression
or whatever you like. That was the purpose
of this class. I hope you enjoyed this class. Do check out my other classes that go into more details of the materials that we used in this particular class
for colored pencils, water colors, markers,
and even pen and ink. I have specific
classes on each of them on skill sheaves,
do check them out. It goes into a lot
more detail on how to use these mediums to
get the best result. Also, follow me on my social
media on my Instagram where I personally sketch every
day and post my sketches. Please stay in touch on Skillshare so that we can
learn from each other and enjoy this process and this journey of really
producing artwork and sketching on a daily
basis to really help our own motivation and
our general well being. Stay in touch, follow
me on Skillshare, have a look at my other classes, and ask me any
questions that you like on this class or
on any other class and do post your class projects in the project galleries
so that we can all have a learn from each other and
enjoy this wonderful process. So thank you so much
for your time and help, take care of yourself, keep sketching every
day and peace.
 Imran Mughal, Graphic Designer & Illustrator