Transcripts
1. Introduction: Are you excited about
watercolor portraits, but not really
sure how to tackle the tricky issue
of painting teeth? Hi, and welcome to this class. My name is Nadia and I
am professional artists. In this class, let's
dive deep into capturing the difficult element of teeth in your
watercolor portrays. I will walk you through my
entire process step by step, sharing my personal
tricks to help you master this challenging
aspect and bring your portrays to life with
vibrant expressive details. Today, we will paint
the watercolor portrait putting special focus on practical techniques that make painting teeth easier
and more effective. First, let's go over the materials we will
need for this class, and then let's take a
look at how and where to find a suitable
image for your project. Next, we will practice
drawing teeth, and I will try to
address some of the common challenges
artists face when incorporating teeth
into their portrays and show you my strategy
for overcoming them. I'll share some of
my favorite tips for simplifying the process, such as how to
suggest teeth without getting into too much
detail and how to use contrast and where
to emphasize this to give the illusion of
depth and dimension. I will take you
through my process as we paint a watercolor portray showing you exactly how to apply these techniques to achieve
a natural and cohesive look. You will see how
to layer colors, add subtle highlights,
and create teeth that look
integrated and lifelike. Ughout this class,
I encourage you to paint along with me
and you can always hit pause or rewatch any parts if you want to
dive in a little deeper. And don't worry if your
first attempt isn't perfect. That's part of the
learning process. The goal is to practice and to become more comfortable
with these techniques. I would recommend this
class to those who already have some basic watercolor
and portraiture experience. But if you really want to take
this class and you're just starting out and you feel a little bit overwhelmed,
don't worry. I recommend checking out my watercolor portrait
from a photo class first, which is perfect for beginmers as we cover all the basics. For example, we explore fundamental drawing
techniques and watercolor techniques
and various methods for transferring your
image onto paper. For those of you who already
have some basic skills, but you're looking to refine your technique before diving
into the difficult elements. I recommend watercolor portray from a photo in three tones. This class really takes things back a step because we simplify our palette to just a few colors allowing you to focus
and hone your skills, developing a deeper
understanding of color dynamics
and portraiture. Remember that watercolor
is a medium that thrives on practice
and experimentation, so expect the
unexpected outcomes and use them to
enhance your work. By the end of this class, you will have a set
of practical skills for painting watercolor
portrays featuring teeth, and the confidence to incorporate them
into your own work. Let us you really join me, and let's get started.
2. Materials, Colours & Project: O. In this lesson, let's have a look
at the materials and colors that
we're going to need, and then also look at the
project for this class. So I've created a
materials list, which I will also be uploading
to the resources section, and let's just go through
that for a moment. So firstly, we're going
to need water colors. I like to use these tubes, but you can also use pans or liquid water colors,
whatever is best for you. What is important
is that we need a palette because we will
be mixing our colors. Next, we'll need some
watercolor paper, and the important thing is
that it's minimum 300 GSM. I like to use fine grain,
but it's up to you. We will also be needing brushes, and I'm going to be using three. I recommend you
have three to five brushes of different sizes. I'll be using a
one, ten, and a 16. And we will also be
needing masking tape to tape down our paper so
that it doesn't buckle. And for this, I will also
have a wooden board, but you could also tape your
paper down to the table. We will also be needing
graphite pencils as we will be doing some
details with pencils, and you'll want to probably have an eraser handy as
well. Really important. Two containers for water. One is to clean
your brushes with, and the other one is to make up fresh colors for which we
will want really fresh water. We don't want to be
making dirty colors. If you're going to be
using a light source for transferring your
image onto your paper, you also need a light
table or a window. You could also
transfer your image via grid method or free hand. I like to use a hair
dryer to dry off my paintings in between layers so that it goes
a little bit faster. So if you want to
speed up the process, I suggest you also have
a hair dryer on hand. Okay. Next, let's have a look at the colors that I'm
going to be using, and I like to mix my
own colors and they are staple colors that I like to use every time I paint portrays. So they are skin tone
one, two, and three, purple, shadow, blue, black, coffee brown and green ochre. So let's have a look
at those mixes. For skin tone one,
I use yellow ochre, crimson red, and
ultramarine blue. Skin tone two is using
the same colors, but using more red and
blue when you're mixing the color in relation
to the yellow ochre. So it's a little more on the intense side than
the skin tone one. Skin tone three also uses yellow cha and ultramarine
blue, but in this case, the red is cadmium red
and not crimson red, which gives it a
more orange tinge. Purple shadow is made
up of crimson red and ultramarine blue and
optionally some burnt sienna. The blue black is made of
Prussian blue and ivory black. For the coffee brown, I use
burnt sienna and ivory black. And the green cha is made up of yellow ochre mixed
with the Prussian blue. Now, this might be a lot of information to take
in, so don't worry. I will be uploading all of these color mixes to the
resources section of the class. And obviously, there are many, many ways to mix colors and
many, many colors to mix. So if you're working with different tones in your portray, you can go ahead and mix
your own staple colors or you can use some of
these other colors. I'm going to leave you a
few mixes that I've tried in other portrays in the
resource section as well. Now, when you're
mixing your colors, make sure to start from
lightest to darkest, so adding the lightest color
in your color mix first. So, for example, in
the coffee brown, it would be first,
the burnt sienna and then the ivory black. Or in the skin tone one, you would have first
the yellow ochre, then the crimson red, and then you would have
the ultramarine blue. Okay, so now for the project, the aim of this class is
to practice and improve our watercolor skills and
the portraiture skills by building up the painting through many translucent layers and incorporating a difficult
element which are the teeth. So at this point,
my goal is not to achieve a hyper
realistic result. It's not important if the painting doesn't look
like the reference image. To me, it's much more important that the painting is expressive, that we have contrast, that we build up
a depth in volume through the use of
layers and colors and really practice
integrating teeth into our portray painting practice so that if we have a portray, we want to paint and it has teeth that's not going
to hold us back. In this class, we will be
working with a reference image. So in the next lesson, let's have a look at how and
where to find that image.
3. Finding & Transferring Your Image: In this lesson,
let's have a look at how to find an image
for our portrait. There are a couple
of free to use image sites that I like to use. My favorites are
Unsplash and Pixels. Of course, you can also
just source your image from your own archives or go out
and take your own photos. But let's have a look at pixels. This is where I'm going to go to source my image right now. And I've put in photographic
portrait smile so that the search engine returns
images with teeth for me. And I found that using
photographic portrait or portrait photography usually renders
higher quality images than just putting in portrays. So I recommend using some
kind of version of that. And then you will
see that it just comes up with a whole
bunch of images, and you can start to
choose things that are interesting to you
for your project. I'd just like to have
a scroll through these images and then start to download a few and make a
kind of library for myself, a pre selection from
which I then go on to make a final
selection later on. So once I found an image that
could work from my project, I can just click on the image and then go to free download. And I like to download
the images in the original format because that is usually the
highest resolution. So I recommend making yourself a little library
of images that you found interesting for your
project so that you can make a final choice out of these pre selected images
a little bit later. Once you've collected,
say, 10-15 images minimum. The best images will be with
kind of a clear background, not too many elements, clear contrast and
clear facial features, and hopefully, also a little bit of interesting tonal varieties. So this is the image that I'm
going to choose in the end. I'm going to completely
ignore the hand, and I will touch on that in
another class in the future. And what I've done
is just edited the photo on my
phone and heightened the contrast and up the highlights and taken down
the shadows a little bit. Having a stronger
contrast just really helps me to identify
where the lights and shadows are and also
where the stronger colors are so that I can then go and
translate that into watercolor. All right. And now that
I've found my image, I'm going to transfer it to
my paper using a light table. And for that, I'm going
to get my printed image. I've turned that into
black and white so that I can see the
contrast more clearly, and I'm going to tape it
down to the light table with some masking tape just in the middle here
and also at the top. And I'm going to get my
watercolor paper and place that on top and turn
on my light source. And you can already see
it coming through here. I'm going to tape down my watercolor paper as well so that it doesn't move
while I'm sketching. Now, this works best
in a dark environment because then you will see the image coming
through more clearly. If it's really light, you will not be able
to see the image. Okay, now with the pencil, I'm just going to start lightly tracing around the contours. I don't want it to be too dark. I want to be able to erase it without leaving any
marks on the paper, and I'm just outlining
the features of the face and the
shadows and highlights. I'm really just trying to make a roadmap for myself so I know where to place color and
shadow and features later. So it's really just
the rough outlines. I don't want to be
going too detailed and I don't want to start
shading or anything. So, for example, I want to preserve this highlight
in the pupil here. So I'm just going to outline
that very delicately. You don't have to
be too detailed. I still want to have freedom. I just want to get
everything into place. You can see there's also a
bit of a highlight there. I want to reserve that, and then there's a bit of a
shaded area right next to it, and I'm just going
to outline that, and that is also a little bit of a highlight on the top
of the eyelid there. And this is what I'm going to do around the entire
face and the neck. And also, I'm going to outline
the clothes for myself, but I'm not getting into all
the very intricate details. I'm just giving
myself indications of areas that I want
to focus on later. I'm also going to put in
place for myself the teeth. I'm just going to insinuate
where they are going to go. Outline the shape a little
bit, but not too much. We will talk more
in detail about how to sketch the teeth
in the next lesson, and then we can go over
them again, if need be. Okay, so just leave the
teeth quite lightly, and then I am going to continue
outlining my features, my shadows, and my highlights. And once I have my entire
drawing on my paper, I will see you in
the next lesson.
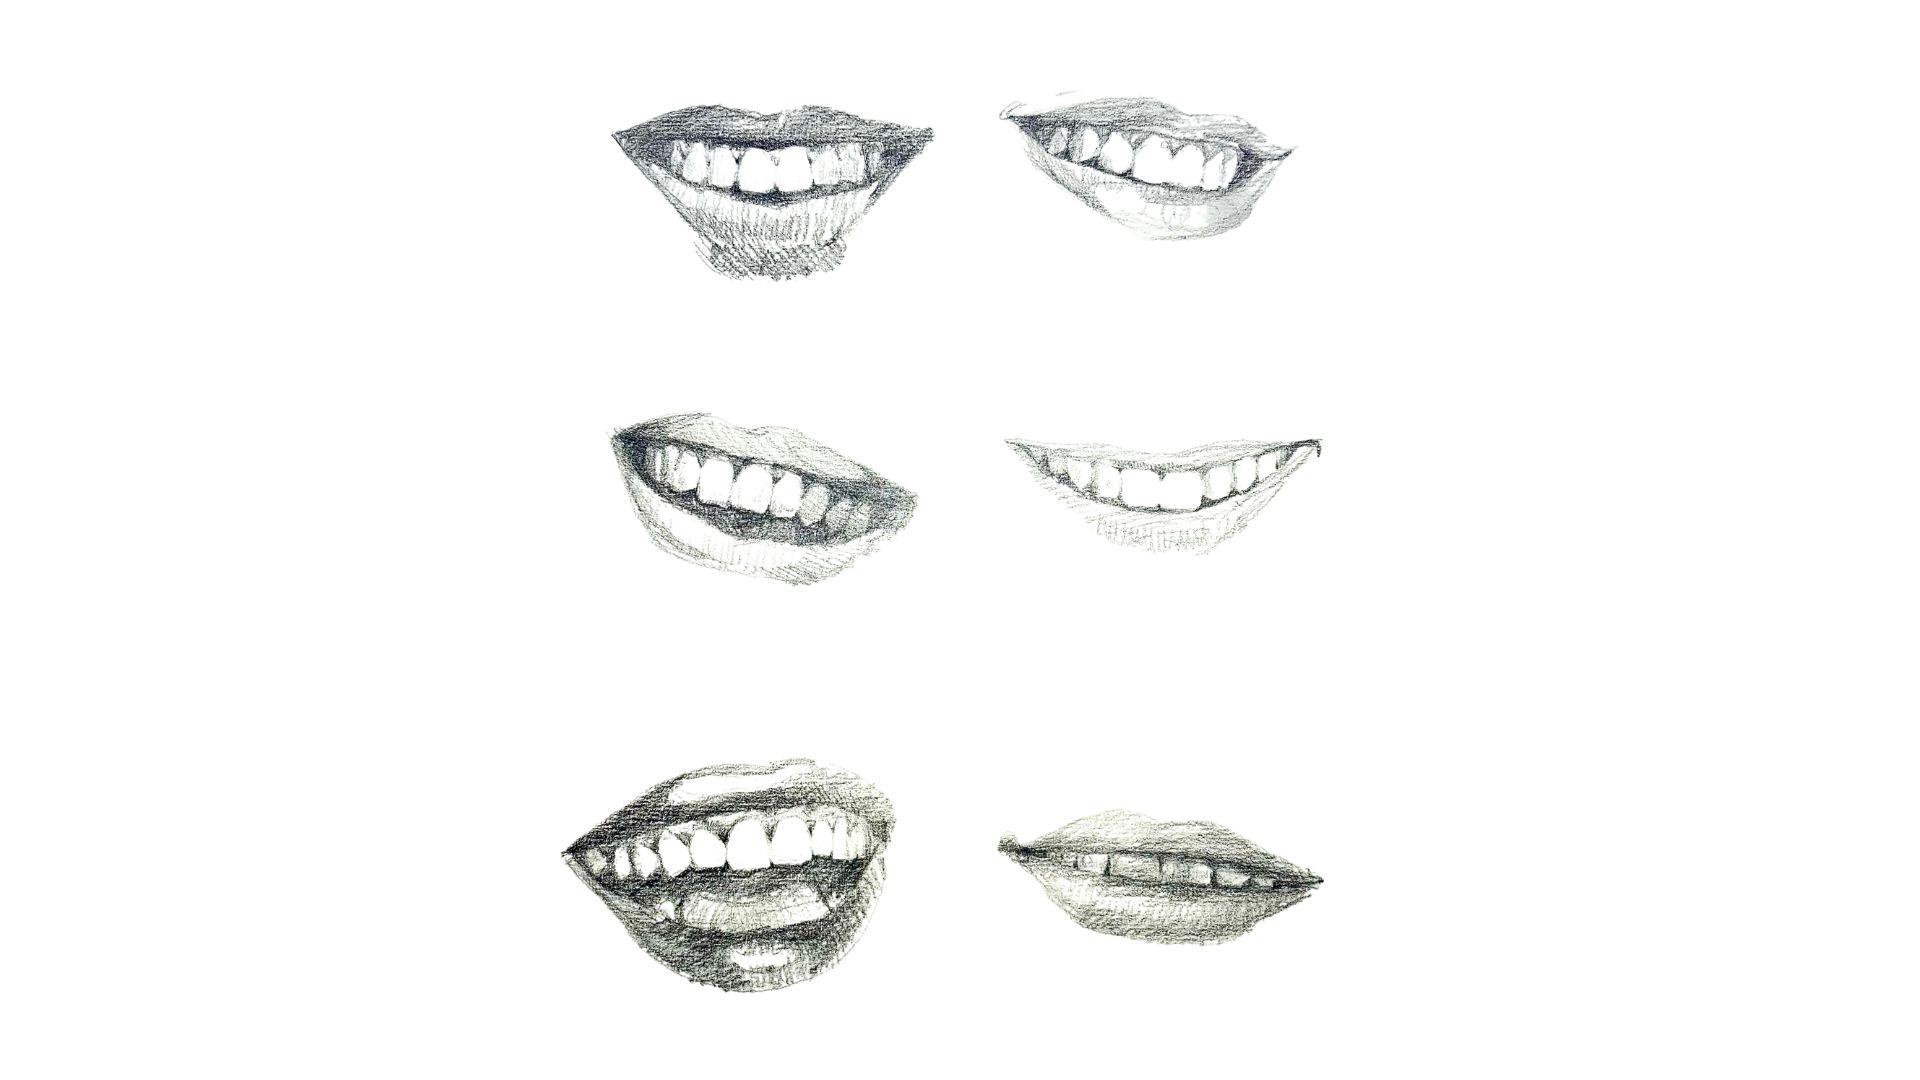
4. Practice Drawing Teeth: In this lesson,
let's have a look at some pointers about drawing teeth and also then go ahead and start practicing
drawing some teeth. Okay, so to begin with, let's have a look at what
we don't want to do. And what we don't
want to do is this. So we do not want to be
outlining the teeth with the same intensity all the way around because as you can see, it just does not end up looking like well
integrated teeth. Using the same intensity
lines to outline teeth makes them look
a little uncard for. So let's just practice drawing
some teeth, and for that, I have made myself a printout, which I'll also upload
to the resources, and of course, you can
make your own to practice. I've selected six
different smiles or mouth where you
can see teeth. So from very wide smiles to just seeing the
teeth a little bit, and I'm going to
practice using a pencil. And as you can see, I've already sketched my mouth onto paper, and you can do this as well, either by drawing
free hand or using the grid method or using a light table or
other light source. You can see I've outlined the teeth here,
but very lightly, and I'm using this
to start shading in the darker areas
because obviously the teeth are going to be the lightest part
of these mouths. We're going to be working
with shadow and light and making different intensities
in our pencil strokes. So I'm going to
start by shading in the gums and the lips
to bring the teeth out, and you will see that
my strategy is to insinuate the teeth rather
than explicitly draw them. I'm going to be focusing
on the darkest parts between the teeth and in the
gums and here underneath. And what happens then
is usually the teeth up standing out as
the lightest part instead of being outlined. Okay, so I'm going to start
with this one up here. I'm just going to start by
shading in the darker areas. Really simply, this
is just for practice. When you squint
your eyes, you can see it's mostly dark
in the corners of the mouth and the top lip
isn't that much lighter. I'm going to shade that in
really roughly as well. And then I'm going to start with the top part of the gums. I'm just going to put
a little emphasis here between the teeth. And also here between the teeth. Under the lip is going to
be a little dark as well. I'm just going to put a
little line in there. We can always use an
eraser to fix things. I'm just going to shade in
the gums quite uniformly, and then I'm going to accentuate some of the darker parts. Also, you can see this tooth
here goes up quite a bit. And it's clear that there's
a lot of shade over here, and I'm going to put accents in where the teeth
overlap and meet. I'll put a little line here, but I'm not going to make
it go all the way through. I'm going to put a line up here and then down
the bottom as well. If you feel like
you've overdone it, like I just have, you can
always erase and correct. Remember this is practice. But you can see, I'm just kind
of insinuating the top and insinuating the bottom just by heightening the contrast
in selected spots, and I'm going to make this
part here darker as well. So I put an accent there
where the teeth kind of meet. If you want you can also put the highlights on the teeth
where there's reflections. I'm going to try to keep
it fairly general for now. But in the painting,
I will definitely be paying close attention
to the highlights. That needs a bit of a shade. Okay. So you can see this tooth also in the
back here is a little bit darker because it
starts to disappear into the background just
like this one over here. Compared to the overall picture, I feel like my
accents in between the teeth are a little
bit too intense, so I'm just going to
take a little bit of that intensity away
with my eraser. And then maybe I'll just do
some really very fine lines, really super light and super fine and accentuate a little bit more
down the bottom. Just adjusting this
tooth here a little bit. Go over the shadow under
the top lip again. Maybe you want to give
the teeth a little bit of shading because there are
some highlights on there. Okay. Now, if you feel like
it's a little too intense, you can always use your eraser just to smooth things
out a little bit, tone down the contrast. I want to smooth this
out a little bit. The top lip is quite dark. Okay. And I think I'm just going to leave the first
one here for now, and I'm going to move
on to the second one. Again, I'm going to start by shading in the darkest parts, and I'm going to
quickly draw this a little bit clearer
for myself here, where the lip goes and lightly outline where the
teeth end here. I'm going to try and find
the different tones, at least the lightest mid
tone and darkest so that the teeth really start to come
out as the lightest part. So, as you can see, even though I have a light
outline of the teeth, this starts to fade away as I start to add more
depth and tones. So it's okay to use the outlines as a
guide, but in the end, there should be no
continuous lines with the same intensity
outlining the teeth. I feel like you can almost leave them like this
if you wanted to. Just really insinuated. Maybe I would just shade
in the gums a little bit. You know, it's kind of like a photograph that's
been overexposed, where the whites are very
white. That would be an option. In this practice session, I am not necessarily
looking for a likeness, but if that was important, I would need to pay
very close attention to the exact shape of the teeth. But as I say, it isn't
a priority right now. And you can see
again, this one at the back here kind of
gets lost in the shadows. This one's also shaded
on one side at least. And there's a highlight here. I feel like this is too much. You can hardly see
where these teeth meet. So imagine if you put a lot
of emphasis on that outline, it would look very
strange because that is not what it
looks like in nature. Just really lightly, you
can suggest this part. Okay, I'm going to
just shade them a little bit because
we have a highlight that's kind of over here. Okay. Now I'm going to leave the second
one there as well. Obviously, you could keep
heightening the contrast by increasing the shadow so that the highlights will
come out more, but this is a practice exercise, so I'm going to move
on to the next one. Again, I'm just going
to see where I have outlined my teeth for
myself and my sketch and to make that a little
bit more clear for now and tone that down with my eraser
in a moment, if need be. Again, if it helps you outline your teeth
for the beginning, then tone it down with
your eraser as you go, or if it's light enough,
it just disappears as you increase the contrast,
that's totally okay. That's why we're
doing this practice exercise to find out what works best for you and to show
you how I usually do it. I know that drawing teeth
can be quite daunting because it's one of those harder elements of the portrait. But I feel like it's
something you can learn by just using a few tricks
and knowing what to avoid, like, for example, the
monotonous outlines. Okay, so I'm just shading
in the darkest areas again, trying to make those teeth stand out first and
put them in context. So shading on the
lips a little bit loosely, deepening the contrast. And I'm just going to make
that a little darker still. Pretty much all of these teeth are a little bit in shadow. I'm going to shade in
the gums for a moment. At first, I'm going to look
for the darkest areas, which is still the lips and here the corners
of the mouth, and I'm just going to shade
in the lips a little bit. And then go onto the gums. As of here, it's much
all in darkness. You can hardly separate the
lips from the gums anymore. Then I'm going to
start shading in the gums a bit, not too intense. Then I'm going to put
these teeth in the shadow. These ones are a little
bit in the shadow two. And if you feel like it's a
little too intense again, you can always use your eraser to bring out
some of those highlights. Now I am going to make this a little more clear
down the bottom here, just by outlining a little
bit where these teeth end. Again, notice that I haven't got any lines going right through
at the same intensity. As I said before,
I feel like that's usually where it starts to
look a little bit strange. I'm going to leave that here and have it go at
the next smile. Again, I'm just going
to outline my teeth a little bit more at the bottom where they go into the shadow, and as soon as I shade this in the teeth really
start to come out. Sometimes I will just
leave it like this, very, very faint and leave it
up to the imagination, what the teeth look like
just by hinting at them. For me, the most important
part is this part up here where the teeth meet and at the bottom
where the teeth meet. Usually it is at underneath because it's inside the mouth as opposed to the part
under the top lip that's just in the slight
shadow of the top lip. So this is just a
matter of observation. Again, these teeth back here are in the shadow a little bit, and the further away from the front you go, the
more in the shadow, they will be usually under
natural light circumstances. Then maybe you want to shade in a couple of teeth,
they are around right, so the lights coming
from the front, and there will usually be a little bit of
shade on the sides. Or if the tooth is in
front of another one, it's a little bit shaded
on that side too. Wait. I'm going to shade a
little more on the top left here and I'm going to leave that there and
start on the next one. I am going to define
the single teeth again, which I will later tone down. Also observe that
the teeth aren't perfectly identical
or symmetrical. This tooth, for example, taking note of the difference
in the shapes of teeth will also give you drawing or painting a little bit
more of a natural note. We have the tongue disappearing
into the darkness. Again, where's the darkest part that will be under
the teeth here. I'm going to start
by shading and trying to preserve the
shapes of my teeth here. And this is very dark. We need to have a distinction
between the darkest part, which is inside
here and the lip, which is still pretty dark, but it's not as dark. So we need to distinguish between those two
parts, definitely. And here, where you
compare the tongue to the lip, the lip is a lot. Okay? Now I'm going
to go on to the gums, but first, I need to make
this darker so that I can put a darker shade on the gums that are still
lighter than my lip. We can use the eraser to pull that highlights from here
in a moment if we want, but I'm going to shade
it all in for now. And that's already
looking pretty good. Making the lip a
little darker now. And it looks like they
might have used a flash. And so these teeth aren't
that much more in shadow, even though they
are further back. Try not to put too much
detail into it again. If I want to
accentuate something, I'm just going to do
that from the bottom and cut out the shape of
the teeth from the bottom. The gums, however, are
darker in the back here. I'm going to shade
that a little bit. And that's too intense. I feel like it's
always better just to focus on the inside of
the mouth and the gums rather than actually
focusing on the teeth in that way the teeth will come
out looking like good teeth. So I'm just focusing on where the darker parts are in
the gums and the mouth. Working with the sharp
pencil is easier. Again, you can heighten the
contrast as much as you want, and I'm going to leave
it here in a minute. Again, we're just trying
to practice a little bit. It doesn't have to be perfect. Okay, I'm going to go on to
the last practice exercise, which is this
almost closed mouth that you can see some
teeth shining through. I wouldn't really
even call it a smile. It's kind of a half smile, so I'm going to start by shading in the
lips a little bit. Now, we don't have a bottom and a top to focus
on with these teeth. I'm just going to focus
on the spaces in between the teeth instead of
focusing on the teeth again, making sure we know where
the bottom and top ends. This is quite a large gap.
We're looking for gaps. Again, I don't want to
follow it right through to the top and one continuous
line with the same intensity. But here, I can also see that
it's not a straight line. It's a little wider at the
top than it is at the bottom. Also with this tooth,
let's have a look at that. It's not a completely
straight line, it's a little bit round. The next tooth is a
little bit round. So we have a shadow
on most of the teeth. Here we can really look into reserving some
highlights to make it look a little bit more like teeth and a little
bit more lifelike. So this one over here, there's a highlight here and
a little highlight here, one here and there. Then I'm just going to shade in the teeth, preserving
these highlights. So if you squint your eyes, the lips and the teeth aren't really that
much difference. The bottom lip is a little bit darker where it meets the teeth, and then again down here, and the top lip is
darker over this side. And then once we've shaded
in the teeth a little bit, we can go and look for some
more shadows if we want. This is a lot darker now, so I'll accentuate that as well. And if you accidentally
go over any highlights, you can always use your
eraser to bring them back. Okay, so just because
teeth are white does not mean that they're necessarily the
white of the paper. And I feel like I've gone a little over the top here, maybe. So I'm just going to shade
this in a little bit. Okay, so takeaways
from this lesson, I would think would be focus on these areas of the gums and where the teeth
meet at the top and the bottom and the
inside of the mouth, more than outlining each tooth, which you can do at
the beginning to guide yourself when
you're just starting out, and then you can erase the
lines if that helps you. Okay. And obviously, you can continue working on this as
long as you want. You can keep practicing. You can do as many
practice mouths as you want with pencil. And when you feel
like you're ready, join me in the next lesson
and we'll dive right into painting the
watercolor portrait.
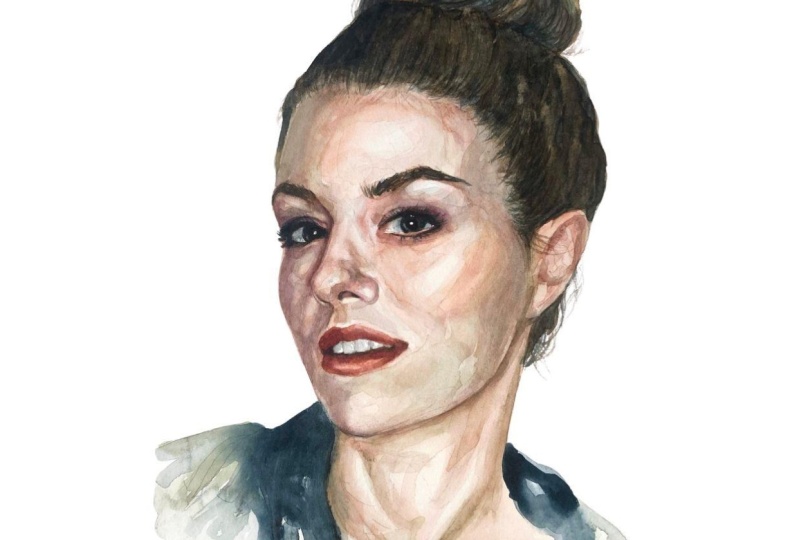
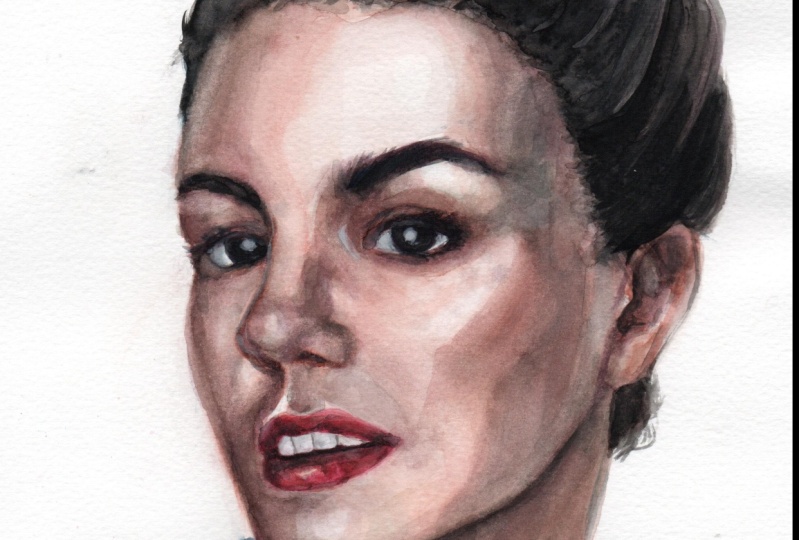
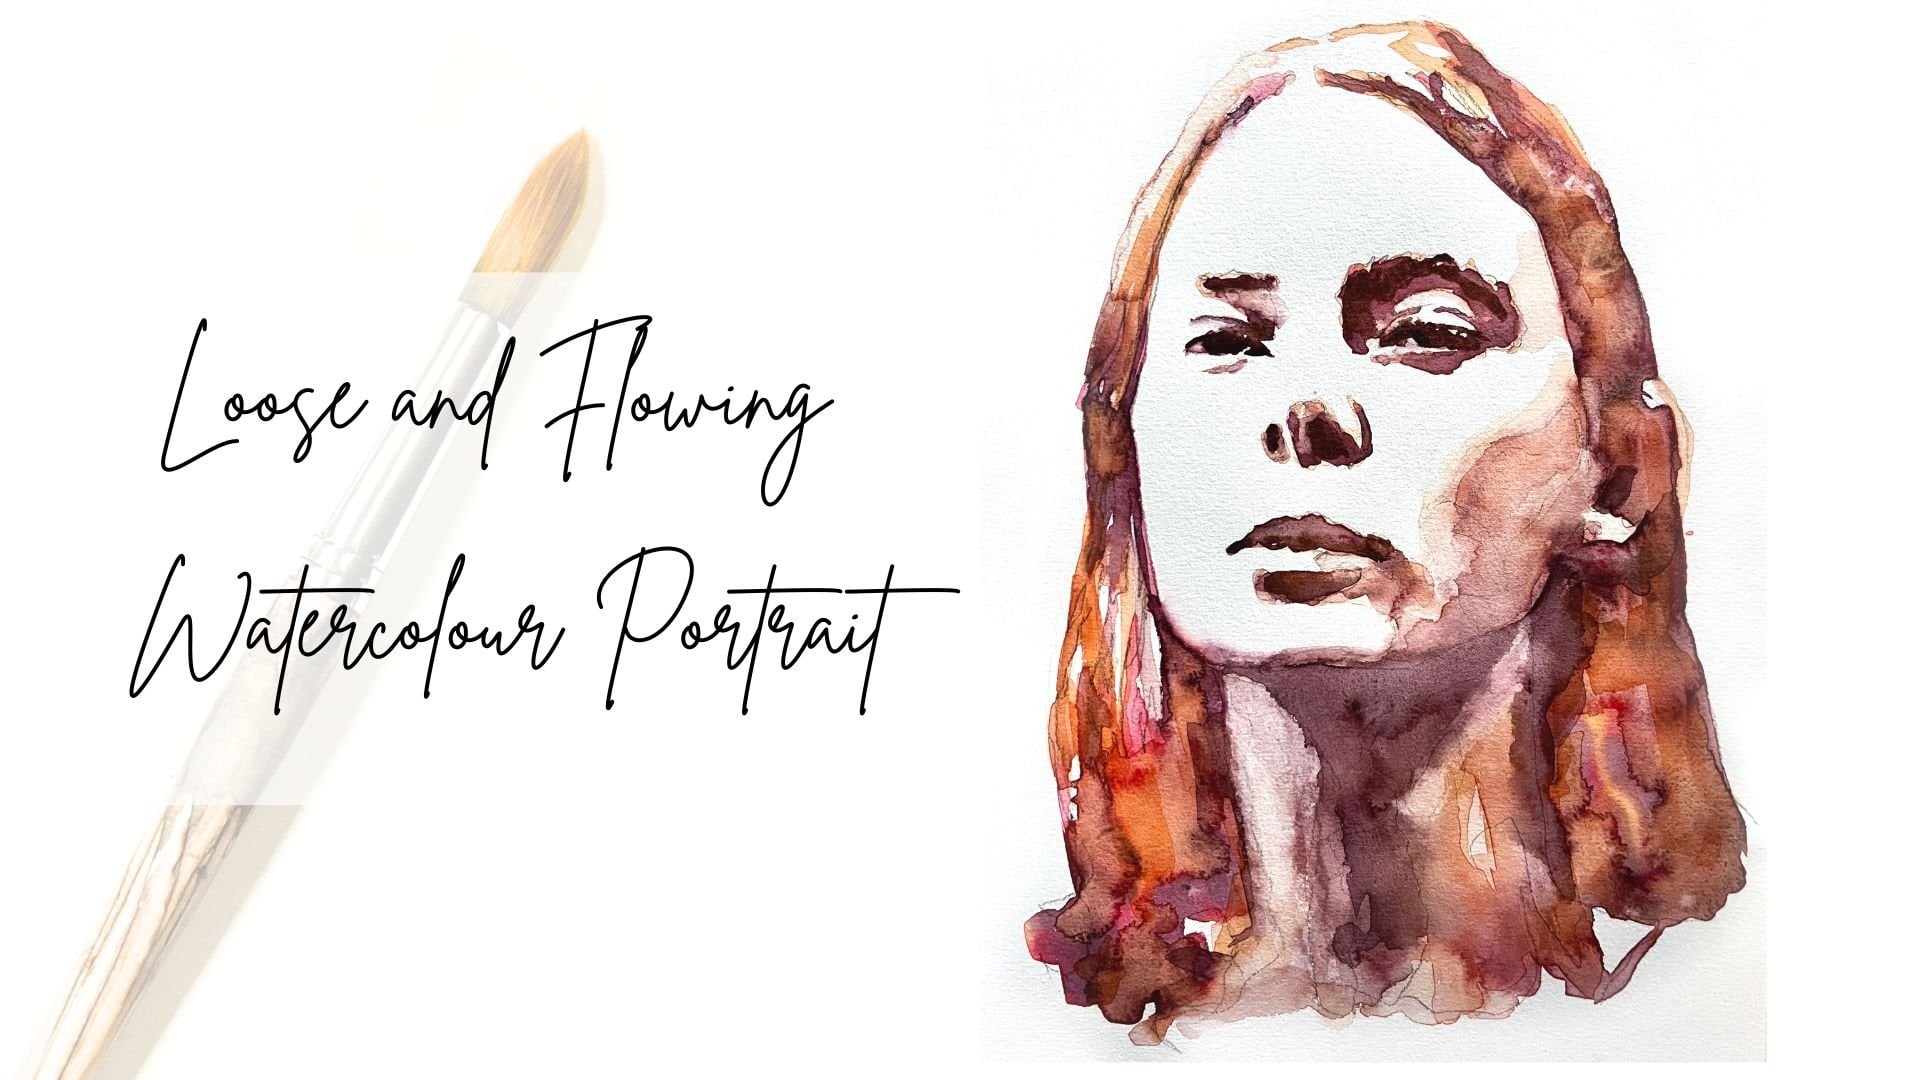
5. Starting the Painting: Now, as you can see, I have sketched my drawing
onto my paper, and I just want to recap on what we talked about when it
comes to drawing teeth. So you can see I have
lightly sketched them. And what I don't want to
be doing is the sketching in every tooth with a lot of definition
outlining every one. My strategy is just to
insinuate where the teeth are. Look at the spaces in
between the teeth and the contrast at the bottom and the top of where they meet, because you can see that
the contrast is big between the lips and the
teeth and between the inside of the
mouth and the teeth. But in comparison
between the teeth, it's not that big and it's not a line that goes all
the way through. And in my opinion, one
common mistake is to have one continuous line going from top to bottom to
describe the teeth, but that is not what
I observe here. If you squint your eyes, you'll
be able to see that, yes. You can see a definition
between the teeth, but it's not a
continuous line with equal intensity and it's rather faint compared to
the other contrasts. In fact, I'm just going
to go ahead and erase a little bit of that so that
there's even less contrast, and I'm just going
to have an inkling of where I'm going
to put the teeth, and now I'm going to
set up my workspace. I'll see you when you have
your sketch on your paper. Okay. So once you've got
your sketch on your paper, I'll just remind you of
how I set up my workspace. So you can see I've
got my drawing here in the middle and
it's taped down with masking tape so that it doesn't buckle. I've got my brushes. I've got my tissue
paper or kitchen roll to absorb any excess
water or pigment. Then I've got my test
strips so that I can test the colors before I
use them on the paper. I have my very clean water
for when I use new colors and another jar of water which I used to clean
my brushes with. Then I have my palette, and I've already
mixed my colors. As I said, I'm going to be
using skin tone one, two, and three today
plus coffee brown, purple shadow, green
ochre and blue black. So once you're all set up, let's start just one more thing about the teeth and my drawing. You can see that I've really just defined a
little more clearly now here underneath because
that is quite dark, the gap between the
teeth and the bottom lip and defining that a little bit more is going
to help me later. I'm going to use my number
ten brush to begin with, and I'm going to start
with skin tone one. I'm just going to bring
that over here onto my palette and try it out. We want to light wash
again to begin with. The beginning is always
really the same. Just looking for some
darker areas so I can start to see where I
want to go over later, and I'm going to
start on the eye. I've got this area here, and if I squint my eyes, I can see that it's darker
than this part up here. I also have a highlight here
that I want to reserve. Remembering we're trying to
make long brush strokes. Be careful here with
the high lights. There's often quite
a few in the eye, and you will want to reserve
those as much as possible. Now with the slightly
lighter wash, I'm just going to get this
area in here as well. And I'm going to go
over the other eye now. If I squint my eyes, I can actually see it's
ball and shadow over here. This part here is not quite
the white of the paper, but I'm just going to leave it a little bit lighter
for now so that I know that it is lighter when I circle background
in a future layer, when I start with
the darker colors and when I start building
up the contrast. In this first layer, I'm looking for and going over
the darker areas, and I'm not going to fill the entire paper with the paint. I've just gone over my
highlight here in the eye. I'm quickly removing that
with some tissue paper and moving onto the nose now and defining this line here. Okay. My eyes are constantly
scanning my reference image to find the dark areas I want to focus on in this first layer. And don't worry if
at the beginning, it doesn't look like
much that will change quite quickly as we go
building up the layers. Okay. Okay, so I'm moving
onto the lips now, I'm going to give
them a light wash. And remember that in watercolor, we try to preserve the white of the paper for the lightest
parts of our image. So I'm going to try and preserve this for the teeth for now. But they're not going
to stay completely white because as
you can observe, there's also highlights
on the teeth. And if the highlight
is the white of the paper, it
needs to stand out, which means there needs
to be a color next to it, even if it is very subtle
because there can be no highlight if
there's no shadow or color to contrast it against. And I'm moving on
to the check bone here now and just trying to mimit the shape of the face with my brush strokes
a little bit, and I'm not going
for hyper realism. If you mark to areas where your shadows and lights
are going to be, then this will be easier. I'm moving on to the
eyebrows now and going to give them a
little bit of a background so that they don't stay as the
weight of the paper. Okay. Then I'm going to move
on to the foreheads. I can see that all of this
is in shadow more or less, and then it gets
lighter over here. I've just got some
clean water and I'm going to go over
the lighter areas with a lighter wash then go back to my normal wash
and continuing here. This will probably expand a little bit and look
quite organic. Also going to go into
the temple here with the light wash and then also touch on the
side of the nose. And now I'm going to
continue with the air. Just give that a general wash
and then go on to the neck. Step by step, I'm going over all the features of
the face and the neck, looking for the dark areas to get my foundation
in the first layer. And then I am going to start
on my second layer now, still with my skin tone one, making sure that the
first layer is dry. And in the second light,
I'm going to go over some areas with a slightly
more intense wash, like for example here. Remember to dab off excess pigment when you
notice that you have it. And I'm not getting into
the very small details yet. I'm just going to go over
all the features again one by one and trying to
reinforce those darker areas. We're still in the
very first layers, so it's not as dark or as
much contrast as it will be, but I don't want to go over
the top at this stage. I like to build up
the drama layer by layer, so don't worry. We'll be getting
to that. You can see this part here is
still way too light. And I really want to start
building up that contrast so that you can start to see the planes of
the face emerge. And usually it's best to work in pairs when you've got them. I'm going to go over
to the other eye. Okay. And I'm going to go back over this side of the face with a bit
of a lighter wash, and you can see that
this building on where I went over with the first
wash layer by layer. The contrast is going to grow. And you can see here I've made a bit of a mistake,
but not to worry. I just clean my
brush, dry it off, and then I just absorb this pigment here with
an almost dry brush, and then I continue. This part here is darker I'm just going to leave
the lips like this for now, and we'll
come back to that. I'm going over the features
of the face again with the second layer with a little more intense wash just to start heightening
that contrast, and we will start to see the face coming
out of the paper. I'm going to go back
to the neck now and give that another
wash as well. Just a really light
one. I don't want to go into too many
details in the neck. Once this layer is dry, I'll probably have to erase
some pencil lines as well. I went a little bit over the top in the neck
with the pencil. Back to the air, I'm going to give that a general wash to. Moving to the cheek bone here. I want this to be a
smooth transition. I'm smoothing out
the brush strokes with a clean damp brush. And now I'm going to
give the nose a bit of a wash as well because we have
one little highlight here, and I really want
that to stand out. So as I've already said for
highlights to stand out, I need the white
of the paper to be just in some selected areas. And I can see I've gone a
little over the top here. So I'm just erasing
that a little bit with a slightly
wet and clean brush. And also, this is not as light
as the white of the paper. So I'm going to go over this area with a very
light wash as well. Okay. I think I'm
going to dry that off, and then I will continue with the next layer
and the next lesson.
6. Next Layers: I have dried off
the first layer, and I've also gone ahead
and just made a couple of the pencil lines a little
bit fainter with my eraser. For that, I made sure
that the drawing was completely dry
because otherwise, I would just ruin the paper. You can't start erasing
when the paper is wet. Okay, so I'm going
to continue now and I'm going to get my
smaller brush, which is, I think, number one, and I'm going to continue
with skin tone two. I'm going to bring that over onto my palette and mix
it up a little bit. Yeah, I like that a lot. Now I'm going to start defining some of these details a little bit more starting with
this part of the eye. Remember that when we're
working in pairs, for example, the eyes, we want to
start work on one eye, and then we want
to go pretty much directly over to the
next eye because otherwise they might
just look very different and it may look
very strange in the end. I'm going to smooth
that out a little bit. I still don't want to go
too much into the details. Now I'm going to go
into this line here. Once the eyes start coming out, the whole thing just
starts coming out. In this layer, I'm doing the same thing as in
the previous layers, building up the contrast,
going over the features. Then I'm going to start on
the line of the nose here. I want to smooth
that onto the face. Moving on to the nostrils,
we can only see one. Now I'm going to dilute
the wash a little bit and also touch on this
part of the nose here. And this curve that
comes across and down. Now I'm going to change to
my larger brush and add some shadows to this part of the nose here, remembering
the highlight. I'm going to go back to the small brush and start
on the lips and the mouth. Continuing with skin tone to. I'm just going to start
to define a little bit of the inside of the mouth after I've done
the top lip here. If you're going to rest
your hand on your paper, just make sure where you're resting your hand
is actually dry. Otherwise, you're going to
take away some of that paint. I just gave the top
lip an all over coat and now I'm moving on
down to the bottom lip. And I'm just going to mark
and where the teeth end at the bottom here so that they start coming
out a little bit. I'm going to go back
to my number ten brush and work on this
bottom lip here. Now you might want to reserve some highlights
down here as well. But I feel like it's looking
pretty good already. I'm just going to touch
on this bottom part here and hope that it expands
a bit to this lip here. I'm also going to inject the bit of pigment at the
top part of the bottom lip. And into here as well. Remember that we always want to be working with
translucent layers. I mean, it doesn't matter
how dramatic we get. We're always going
to be working with translucent layers as
opposed to a park layers. Okay. Now I'm going to try to get some of these
highlights back in the lip, and I'm just going to
use a little bit of tissue paper and just dab it on here and remove some
of the pigment. Actually looks quite organic. I'm just continuing to
lift up a little bit more and inject a
little more pigment into this area here. Just heightening the contrast, bottom of the top lip here and smoothing
that out a little bit. It's a little too
intense, I find. Let's leave that to dry. In the meantime, I'm
going to go over to the air to find just
a couple of lines. I don't want to pay too
much attention to it because it's not the most
important part of the portray. You can't ignore it entirely because then it
also looks strange, but I don't want to
make it a protagonist. I'm just going to
touch on it a bit. Then I'm going to
take my larger brush. I'm going to define a little bit more of this cheek bone here, still continuing
with skin tone to. You can see there's
a little light just at the bottom
here of the jaw. Then you've got
this very dark area and also this dark
area underneath. So I'm just using a bit
of a lighter wash in these areas here around the bottom of the eye
and within the cheek. But I want to start getting these areas just a little bit to find the planes of the face. I'm going to take
away a little bit of this lifting up some pigment
with my clean damp brush. So I'm going back to the neck and I'm trying to get it to go a little bit in the background to start adding some volume, get this three
dimensionality going. Really start to bring
out these planes, the foreground and the
background in the mid grounds. But I feel like I need to
just lift up a little bit of this and I can continue in
a minute when it's dry. Okay. You can see I've completely ignored the hand because I don't want to
talk about hands today. We'll do that another day. I'm just trying to focus
on one thing at a time, which today is a portrait
incorporating teeth. Now I'm going to move on to
the left side of the face and just give that another
wash with the skin tone to. Just a general wash. Again, trying to build up those layers, and also the eyebrows. Okay. And the more you
practice with watercolor, the more you get a hang
of how many layers, how much to charge your
brush with pigment and water and all of those things. Okay. You just start to get a
natural feeling for it. So I encourage you to
just keep practicing, and I'm sure you're doing great. But most importantly,
I hope you're having fun because sometimes we
try to do things well, so we forget to have fun, and I have to say that
happens to me quite a lot. So you can see I'm just trying to get this
shape of the nose. But again, it does not need
to look like the photo. Getting a likeness is not
my priority in the end. That's not my end goal. I'm just trying to paint
an expressive portrait. And, as I've already said, the point of this class is to see if we can incorporate t, which is quite a
difficult element, but we're still practicing
the portrait painting. So when you observe
the reference image, you can see there are areas of the face that kind
of go inwards, and they usually in shadow, and there are features of
the face that go outwards, that are usually
the lighter parts. So, for example, the chin will be a bit lighter
because it's outwards, the tip of the nose
will be lighter. Above the lips,
it'll be lighter, the forehead will be lighter, the cheekbone will be lighter. And for those lighter parts that come out of the
face to be lighter, we also need to
consider the areas that go into the face
that are concave. And those areas are
usually in shadow, like the eye sockets, like underneath the cheekbone, like between the
lip and the chin, And I'm going over
this part of the neck, again, the jaw line. Now, you might think this
is looking pretty rosy, and I'm not going to lie. It is, but we're going to incorporate some
brown tones soon and some purple tones and also a little bit of
green. So don't worry. We're going to tone it down. It's going to look
right in the end. I'm going to use a faint wash of the skin tone to and
my very small brush. Now to just start defining
up here a little bit, this area where the teeth are under the lip and
where they are meeting. And I'm just looking
for those gaps. Also, the space between the teeth and the
inside of the mouth. Once it's completely dry, I'm going to start on
the next layer and I'm going to use a little
bit of the blue black. Make sure it's not too charged. I'm just going to go over
the iris and the pupil. See this little highlight in the middle and the highlight at the top and also the
bottom of the eyelid. Make sure you reserve
a few highlights in the s and the pupil. And I'm going over to the other side and doing
the same thing. You can see I've already got a layer of skin
tone two on here. But it's not too dramatic
because it's just going to fade in the background once I
start adding more layers, and you're not going to
see it shining through. While that's drying, I'm going
to get the purple shadow, and I'm going to start going over this part of the eye again, the lash line, and if the pupil and the
iris is still wet, it really doesn't
matter because then it might expand nicely
into that part. You can see it's much darker
than I've got it right now, but we're still working with transparencies building
up the layers. So just don't go over the top. I'm going to go over
this crease up here. And since we're
working in pairs, I'm going over to the next eye. Doing the same as I've
done on the first eye, going over the lash
line in the crease. Maybe adding in a little
bit of detail with the eyelashes, but not too much. I'm going to start
with the nostril down here and then go
on the other side. You can hardly see it,
but you can a little bit. And I'm going to draw in this line of the
nose a little bit. And then it stops right here. I a bit of a shadow there, and I'm going to fade it out into the side of the
face a little bit. Smooth it out a
little bit of a curve there and going
back to the mouth. Going to work a little
bit on this corner here. It's kind of bothering me and then the space between the
teeth and the bottom lip. And going over this
part one more time. Now I'm going to take my
slightly larger brush and give the eyebrows a bit
of a layer of purple shadow. Not too intense. I
just want to give them a bit of a background because you can see they're quite dark. So essentially what
I'm always doing is working all over the face on
the features of the face. I usually like to
start with the eyes. It's my favorite part,
and then I work my way around to the different
elements, nose, mouth. Usually the eyebrows, contours
of the face, ear, neck. I'm going to leave the hair and the clothes until a bit later. I'm going to take
a little bit of purple shadow and run
it over here as well. And go under the eye
with a little bit more. Maybe a little bit more over
here by the nose as well. And the part under the nose, I feel like comes
down in a shadow, and the corner of
the mouth is a bit. I'm going to come back to the other eye and
also give it a bit of a layer over the top and
also down the bottom. I come through here, have another look at the nose. I feel like I went a
little over the top here. But there is a
slightly darker line, and I'm just going
to smooth it out. It was a little bit too much. But I'm also going to
come over this side of the nose and I'm going to
wait for that side to dry. That comes down and goes across comes over
here and up a bit. Now I'm going to go
back to skin tone too because this area here
is starting to bother me. It is the white of the paper
and it's not supposed to be. So it's a little bit irritating.
It's just too light. There are some
highlights around here that I would like to
stand out and they are not because I haven't been
using the color where it's supposed to go by leaving too much white of the
paper at this stage. I'm going to lift up a
little bit of pigment from here and come
in with a very, very light wash of
purple shadow to define some areas that are
slightly in shadow like here and put on a bit
of a shadow over here. Now that the pupils
and irises are dry, I'm going to get my pencil, and I'm just going to
define a little bit around here. Not too much. I'm just going to
lightly lightly sketch. There's the pupil
here, and I'm just going to shade it in a tiny bit. I don't want this to be
too much about the pencil, but I do enjoy using a bit
of pencil in watercolor. I feel like it really
makes it stand out. I'm just going to heighten the contrast here in the
mouth a little bit with the pencil as well and
define it a little bit. Okay, so one thing
when working with pencil and watercolor
is that you need to make sure that your
layer of watercolor is absolutely dry before you
start working with the pencil. Otherwise, you're totally
going to ruin your work. So I think that was a
little bit too much. So I'm just going to race
a little bit of that, and I'm also going to define this jaw line
a little bit more. I feel like it's got a
little bit lost here. Maybe also around this part of the nose, shading so blightly. I don't know if
you can see this, but I'm literally just touching
the pencil to the paper. I'm not applying any
pressure or anything. Okay, so let's move on to using a little coffee brown
in the next layer. I'll see you in the next lesson.
7. Intensifying Contrast: Okay, so once that layer is dry, I'm going to do
one thing to begin with before I move on
to the coffee brown. I'm going to wet my brush, get a very light
wash, the blue black, very light because as I've mentioned in other classes
before, it's really important. The eyeball is never
completely white. So what I want to do is just give the eyeball a really
light wash of the blue black. So look out for any
highlights and remember to reserve those as much
as you possibly can. I'm also going to give the
teeth a very light wash. Remember that there are
highlights on the teeth. So I'm trying to
reserve those as well. I've already marked
them in for myself. So obviously, if
there are highlights, there has to be a color next to it so that the
highlights can stand out. If I make it too dark, it's not going to
look very good. And if you do lose some of
your highlights, don't worry, you can always reapply them with some white
paint at the end. Okay, so now I'm going to
move on to the coffee brown. And again, I'm going to
start with a light wash, and I'm actually going to start with the
eyebrows this time. And I'm just going to give
them a bit of a background here and move on
to the other side. I'm going to dab a little
bit of pigment in there. It means it's going
to look a little bit more organic because
it's going to expand. Now I'm going to get my
fine brush again and just touch on some of those details in the face with
the coffee brown. So again, I'm going to start
with the eyelash line. So just like in the
previous layers, I'm going to work my way across the features of the face
with the coffee brown. I'm also going to go over the s and the pupil
with the coffee brown. So I can do the details of the eyelashes a bit
later if I want. Right now, I'm just trying to focus on getting
the contrast out. So while you're painting, you'll notice a few areas here and there that you
want to go over to fix them and you can
do that as you go. I usually do that
moving over the face, and then one area
will strike me, and I'll just want to go
and fix it right away. And I'm going to move
on to the next side, making sure I don't put my hand on any of the wet
part of the paper. So I'm going to give the ris and the pupil
another wash of this. So the more you practice
with watercolor, it's just going to
heighten your intuition with what feels good,
what looks good. It might open you up
to be a little bit more experimental
in your practice. So if you feel
like you shouldn't be using coffee brown right now, you should be using
a different color. Obviously, you can
just go and do that. I'm just sharing my
process with you, which you can follow along, but you're obviously also always free to follow your own
creative intuition. And I'm just going
to go back into the shadow here a little
bit with the coffee brown. I don't want to overdo it. I'm going to go back
to the mouth and just darkening in
here a little bit. The space between the
teeth and the bottom lip. With my number ten brush, I'm going to go back into
the air a little bit. And then have a look at this
neck line again as well, trying to follow the lines
of the body of the face of the neck so
that it looks like my brush strokes are organic. They mimic the
movement of the body. And I'm going to adjust
that a little bit. You can always go and smooth out your lines if you feel
like they're too dramatic. And I'm going to use my green
tone now, the green cha. And you can see there's a bit of a green shimmer on
the forehead here. I'm going to put that there
and then smooth it out. Bring a bit over this
part here as well over to the temple that line
is a bit too crisp, so I'm going to smooth
that out as well. And then I'm moving on to the contours of the
face, the cheek bone. I feel like there's a little
bit of that in there too. And also placing a
little green next to this red on the highlight
of the cheek bone is really going to make that
stand out and get in under the lip over the
top part of the chin, the part that's in shadow, and under the no
over the top lip. I feel like there's a
bit of green in there. You don't have to
do it exactly how it is in your reference
image, remember. But it is quite interesting
to observe what you see in your reference image and then apply that to your
watercolor painting. Also on the side here. In the neck, I can also see quite a bit of
the green tone. So I am going to apply
some of that over here. So I'm still trying to
work loosely on the neck. I don't want to define it too much because it's
quite hard, actually. There's not that many lines
that you can follow to draw. So it's more about the volume. So what I'm trying
to do is build up this volume using shade and light using my colors and not describing it
too definitely. So I'm going to go
back to the nose now, and I'm applying a little bit of the green tone here as well. I'm going to lift up a
little bit of pigment here. I feel like it's a little
bit too dark. That's better. Okay, I think I'm going
to let this dry now, and I'm going to
prepare some more purple shadow for my next layer, and I want that one to
be a little more blue. So I'm going to add
a little more of the blue to my purple shadow mix, and then I will see you in the next lesson to
continue painting.
8. Details, Adding Hair & Clothes: In this lesson, I'm going
to start putting in the details and also starting
on the hair in the clothes. And I'm going to be changing a lot between different colors, shades and brushes
in this process. So just bear with me, this is not a linear process. This is a bit of back and forth and putting in details
as you see them. So I hope you can follow
along and let's start. Okay, so now that
that's all dry, I'm going to start
with my purple shadow, and I feel like it's
still quite rosy, so I'm just going
to go over some of the areas that I
find darker again. I wanted to have a bit of
a blue tinge and I already mixed the new shade
of purple shadow in preparation for this
in the last lesson. As you can observe, I am continuing to build up
my layers to achieve a watercolor painting
with volume and depth by alternating between my
different colors and shades. I have to admit that this is
something that's intuitive, but if you're just starting out, you may not have
developed this as much. If you want, you can follow
my steps as they progress. And I'm going to
go over this side now just to heighten the
contrast here as well, by applying the purple shadow on top of my previous layers. And I'm just saying that this
is a little bit too far, so I'm going to lift
up some pigment here. And I also feel like this
is a bit too intense, so I'm also going
to lift up some of this pigment and just correct
some mistakes as I go. And then I'm going to go
on with skin tone too. That's a little too
intense as well. I'm just going to
smooth that out, and I'm also going to tone
this part down here as well. If you're going to
lift up pigment, be careful not to move
your brush around too much because otherwise you might
lift up some paper as well, and we want to avoid doing that. I'm also going to lift up
a little bit from here. And I'm going to go back
to purple shadow now. So as I said, if
at any point you find yourself noticing
things you dislike, you can always switch colors, brushes, and just correct
and then continue. See, I'm just not
enjoying this so much, so I'm going to lift up
some of this pigment here. Sometimes it just also looks
different once it's dry, remember that and continuing still with the
purple shadow now. Moving into the temple
area and the cheek bone. I'm just going to smooth
that out at the top here. And also go over this side
with a bit of purple shadow. And also this side here. So we have the most
control over our brush and the pigment when we move the brush with these
smooth movements. So seeing as we haven't
added the hair yet, it's not exactly how
it's going to look. So I think that's probably
what I'll do next. But I'm just going to go
quickly back to skin to two and just apply a
really light wash over some of these areas
that I've left out before so that I don't see
too many whites of the paper. So, for example, this area
on the forehead right here, under the eye, a little
bit on the cheek bone, this area down here by
the chin and the jaw. Remember trying to mimic
the lines of the face, the movement of the
face, and the muscles. And I'm going to come
here and just put on a few touches on the nose
with my skin tone to still. And if you spot any
areas where you feel like a little more
color needs to go here, not necessarily to make it dark, just to add a little
touch of color. So you don't have the
white of the paper. Just go ahead and do that. So that's what I'm
doing right now. I'm also just going to go over the entire neck with
the skin tone to the really light
wash. And I just want to go and tidy up
this area of the neck, as well, lift up a little
bit of pigment so that it's a little bit lighter.
Smoothing it out. Also over here. So
I'm not going to do a lot of detail in the hair because as you can see
in the reference photo, there isn't actually
a lot of detail. I'm going to start by covering the hair area with
the coffee brown, so just carefully where the face area ends
and the hair begins. I'm just going to do
this roughly right now, and then I will go and tidy
up the hair line in a minute. And I will be using some pencil here as well to
add some details. Sometimes I do this before
I put on the pigment, but I have decided to do it
the other way around today. I really feel like
the painting does come together a little
more once the hair is on, especially because this
is very dark hair. The contrast just
heightens instantly. And I'm going to
dab a little bit of pigment in these wet areas, and I love how that expands. Okay, so that's the first layer. And while that's drying, I'm going to smooth this
part out into the hair line. And as I said, I usually draw the hair before
I give it a coat. But today, I'm going to
do it a bit differently. I'm going to divide it
into some hair sections. And for now, I've just
got the top of the head, and then I will
have the hair do. And actually, I'm
just going to let that dry before I
do the hair do. In the meantime, I am going
to go back to my blue black, and I'm just going to work
on some of these details. So as per usual, I'm starting with the lash line, and then going into the
iris and the pupil again. So as I've said many times, we're not so concerned
about likeness, about hyper realism or anything. I really just want to
get some expressions, and contrasts, some
interesting depth in here. So keep that in mind when you're painting so that
you don't feel like you need to make a lot
of changes because it doesn't look exactly
like your reference. And remember what I
said about the eyeball. So while that's still wet, I'm actually going to
apply a little bit of water and blue paint in there, and I hope that
it expands a bit. Also on the side. I'm also going to go over
this crease here. I'm going to go over
to the side here now. Just going to go over
this part around the highlights and the pupil
and continue on the side. I'm just going to smooth this
part out here a little bit. It's too crisp for me. I don't want it to
look like a helmet. And now I'm going to take my coffee brown again to do
the eyebrows to begin with. Really put some detailed
eyebrows and just whisk the brush across there with
these wispy movements. Give it a bit of an
organic feeling. Oh, and I have not put the wash over the
left eyeball here, so I'm going to just
quickly do that. I forgot to do that before. And I'm just going
to lighten a bit of this in the is so that I have a little
bit of tonal variety. So I'm just lifting up a
little bit of pigment. And continuing with
the blue Black now. I'm just going to go
over the nostril. I'm not going to use the
blue black on the skin. I'm just going over some
of the shadows like in the nostril and also in
the inside of the mouth. I wouldn't usually
recommend using blue black on the skin because it's just a
little too drastic. You can do that when
you're working with monochrome or a limited palette. I just wouldn't recommend it if you're working with
these kinds of tones. Okay. And while the
hair is drying, I'm going to get a little
bit of coffee brown and go into the neck a little bit more tightening the contrast in some of these shadows here. Okay. And there's also a little section of hair
just behind the ear here, which I left out earlier. I'm going to cover
that with a little bit of coffee brown as well. Now that the hair
is completely dry. But you have to make sure
it's completely dry. Remember, we cannot work
with pencil on wet paint. I'm going to start sectioning the hair off into
different sections. And I want to do that
so that I can work on different sections
at different times and that it doesn't end
up looking like a helmet, and this is going to be the third section and
another section here, and another section here, and of course, this little
section here behind the ear. Make sure your
pencil stays sharp. And now I'm going to start
making these marks of hair, and usually it's darker towards the root and lighter out here. And often there's
some highlights in the middle section,
but it's quite dark. So you can't really
see that much detail. I'll have a look how
I work that in later, but you can just do your own
hair from your imagination. You don't need to go on
what the photo looks like. So you can see I'm making these long pencil
strokes across the hair. So varying intensities from where it's darker to
where it's lighter, you know, a firmer pencil stroke to a lighter
pencil stroke. I'm trying to imitate or suggest hair without it
being hyper realistic. Okay. And back here,
I'm also going to divide this
into two sections. There might be a couple
of highlights here. Okay, so now that I've divided the
hair into sections, I'm going to go over the
hair with some coffee brown, and I'm going to start with
this first section here, and I don't want
to be working on two adjacent sections at a time so that they don't end up looking the same and
looking like a helmet. That one is done and I'm starting on this
section over here. Maybe there's a little bit of detail coming in
here and the line. Maybe I'll leave it
a little bit lighter towards here so that you can see the detail of the pencil. Okay, so I've worked
on those two sections, and then I'm going to start
again on this section here. That's not adjacent
to the other ones. While the other ones are drying, and then the section
here behind the ear. Next, I'm going to
go up to the hair do and do one of these sections. And then this section here
while that is drying Now, I'm actually going to
start on the clothes. What I usually like to do is work those in wet
on wet technique. I wet the paper, and then I'm going to work on that
with some blue black. I just dab the pigment into
the wet area of the paper. It's going to expand super nice. I'll do the same
on the other side. So now I'm just going
to smooth that out towards the neck line a little bit towards
where the skin is. I don't want this
very intense edge. And for this part
of the clothes. I am going to use a little bit of the green
color that I made up. I like that it is
leaking in there. I want it to be organic, and I'm going to invent this
part because I can't see it. And now I'm going
to wet the rest of this paper so that paint
kind expands into there. So if you're working
with wet brushes, they might drip onto your paper accidentally and we want to
avoid that, so just be aware. While that's drying,
I am going to go back to the hair
with the coffee brown and work on these
sections that I couldn't cover before. This one here. And then this one here. I actually have some
highlights in this bun here, but I'm going to just cover
all of it for now and then I'm just going to lift up
some pigment in a moment. Now with the piece
of tissue paper, I'm just removing some of these highlights in the
top of the hair do. And I'm going to smooth
this out a little bit. Once we've finished
with the hair, let's that then in
the next lesson, let's have a look
at how to heighten the contrast even more and
add some more intensity.
9. More Contrast, More Details: Okay, so let's continue. I'm going to give the face another wash with the green cha. Just a light wash, and I'm going to start on
this side here. I just want to add a little
bit more blue to that. I'd like it to have
more of a bluish tinge. I'm just trying to tone down these red
tones a little bit. And I'm trying not to
go over the top here, I can always go over these
areas again and give them another coat that's better than going over the top in one coat. Watercolor, as I've said, is all about building up your
layers little by little, just transparent layer on top of transparent layer gives it
a bit more depth volume. You can always smooth
out your brush strokes. For example, here in the
temple around the cheek bone. Around the eye here as well. I want a few red
tones to stand out, so I'm toning down the
rest of the red tones with the green ocher I also want to go over this jaw line a little
bit more under the chin get in this shadow
here a little bit more and try to get
the face to come out of the paper a little bit more going over some areas where I feel like I need to
give it a bit of a wash. I'm going to go back
to the teeth now, and I'm going to
use my tiny brush, making sure that the area
of the clothes is not wet anymore because that's where I'm going to be resting my hand. Using the blue black, I'm
going to squint my eyes and I'm going to start
heightening this contrast here. You can see I'm making just
the faintest of lines. They're still very light. What I really want to focus on is not the lines
between the teeth, which is what we usually do, but it's the shadows on the teeth that I
want to focus on. Especially the
highlights will tell you where does one tooth begin, where does another one end. I'm just going to go back up to the nostril and go over
that a little bit again, change in color to
coffee brown now. I'm going to get
into a couple of details here like this one, this part here, for
example, if the nose. I feel like I've made this gap between the lip and
the teeth too large. I'm going to take a little
bit of pigment away from here with my little brush. It's just clean and damp. Then with the coffee brown, I'm going to go over a
couple of lines up here too with the go over the crease, for example, and changing
back to blue black. I'm going to give this
part here a bit more of a wash. Then at the same time
with my clean damp brush, I'm going to pull
out a little bit of a highlight over here. I just removing some pigment. Then I'm going to take a look at this detail in the
corner of the eye, which I haven't done yet. I'm doing it with
some skin tone to. I'm just getting in there because there's a
little bit of red, and I'm also going over
the bottom lid here, and then I'm going over the other side also
with some skin tone to. Now with my skin tone three, which is a little bit orange, I just want to have
this orange going on here on the cheekbone
a little bit that she has some rouge on Now, with a little skin tone one, I'm also just going to give the cheek a little
bit of a layer. So as you can see, I'm
constantly trying to balance the skin tones and the cooler tones and
the warmer tones so that it's not too rosy
but also not too gray. I'm constantly
making adjustments and figuring it out as I go along by observing my painting and also
my reference image. Now what I want to do
with some skin tone to Kind of work a little bit
more on these lips again, so I'm just going to
go over them entirely, and then I will go on to pull out some highlights by
removing some pigment. And I feel like the highlights
are mainly down here, and that's not really working
so much with the brush, the pulling out of
the highlights. It's a little bit too wet, so I'm going to get some
tissue paper just like before. Just dab it on there and also going to remove a little bit
of pigment from the top, cleaning my brush, and
then with my damp brush, going over there and
cleaning that up. I've come over the line here. Okay, I'm going to go over this with some purple
shadow again afterwards. But for now, I'm just going to soften this line down here, and the hair should
be dry by now, so I'm going to get
some blue black. Hair is very dark. I'm going to start working on
these sections again. Again, I'm trying to
make it smooth around the hair line so that we don't have this weird
helmet effect going on. Then I'm going to move on
to this next section here. Same as before, tidying it up a little bit
around the hair line. And it looks a little
strange right now, but it's going to look just
fine once we've finished. I'm going to move on to
this section back here. And I'm just going to wait for the hair to dry
and in the meantime, give a little bit of detail to the eyebrows with
my small brush, also with the blue black. Okay. So the eyebrows go
in different directions. The hairs sometimes will come from the top and some will
come from the bottom, and just varying
a little bit with the direction of the
hair is really going to help your work look a
little more organic. Now I'm going to go
back to skin tone one for a moment and I'm
going to go over the air. As I said, I don't want
this to be a protagonist, so I'm just going to give
it one more coat and also one more coat of the
skin tone one on the neck. Just really getting that volume
and that depth in there. Now I'm going to do one more
thing on the side here. It's really annoying me. I need to adjust this
hair on the side. It just doesn't
look right to me. I'm just going to do that
quickly with the blue black, and then I'm going to go over the eyelashes
again on this side. Maybe now I will add a
little bit of detail. Again, I'm just kind of
making wispy movements, flicking the brush really
finely to get these eyelashes. And I will do the same
on the other side. Now, the reason you
want to do the details at the end is because if you go over these with another coat or a
few other coats, they will just start to disappear and you'll be
covering up your details. So you don't really want
to spend heaps of time making all these
little eyelash marks and then covering them up. I want to try and
keep it organic. So I'm going to try and make them go in different directions. And I think I need another
coat of purple shadow. I really don't
want to overdo it, but I feel like this side
still has too much light. So it always does dry lighter
anyway than what you paint. So you need to
wait for your coat to finish drying before you can really evaluate how
much more shadow it needs, but I do think that another wash of the purple shadow on the
side will do it some good. So I'm just going over
some brush strokes that I already made
in previous layers. And I feel like that's
a little more like it. I've actually got a
big highlight here. I'm just going to
remove some pigment. But, again, you can't get all the highlights out
until you have the shadows. Everything's relative
to one another. Just tiding up a few
details around here, trying to lift up a few
of these highlights. Okay, I think the
hair is dry now, so I'm going to give a coat to the other sections that I
didn't get to cover before. I'm moving on to the other
section at the back. And again, I'm smoothing out
the edges of the hair line. I'm going to go back
to my green cha, and I'm going to cover
this part here again. Now, I really like to use
the green cha in the shadows of the face because it also makes the red times
really stand out. And now changing
to skin tone one, I'm getting a light wash. And I want to add a few more
warm areas to the face. So for example, around here, just a bit and also
under the eye, just a little touch
of the skin tone one. And here in the cheek, I feel like it needs a little bit more rosiness now that I've added so many different
shades of green and purple. Right. A little bit more on
the forehead as well. I feel like I'm getting towards the end and just really
light washes now though, also across the tempo area. Careful not to touch any of the weight hair
because otherwise it's going to start expanding onto the face, and I
really don't want that. I'm going to get some more of the green ochre and put
that around the jaw area here and also a tiny bit
in here for the shadow. Just putting on some light
light touches here and there. I want to go into this
beautiful cheekbone once more. Well, that's all drying, I'm going to get
my purple shadow, and I'm going to mix it with
a little bit of skin tone too so that I've got a little bit more of
an intense color, not too purple,
not too light red, and then I'm just going to
give the lips another go. And I'm just going to fade it out at the top
here a little bit. Leave those highlights,
getting into underneath the eyes here as well and just tightening that
shadow a little bit more. Maybe just with
some skin tone to give a couple of details
to the ear here. Now I'm going to take my
coffee brown and just give the hair a complete coating
so that it unifies the hair. Obviously, the layer
underneath has to be dry before we apply
this coffee brown. If you prefer to use your larger brush for this, that's fine. I'm just using my
number ten brush. H. And I'm going to smooth it out again
towards the hair line. And I'm going to
lift up the few of these highlights at the
top with my tissue paper. Then quickly just going into the mouth again with
some purple shadow. I don't usually like to use
ivory black out of the tube, except for in this one instance where it's about the pupil. I really like to use
pure out of the tube, ivory black for that
because that is really the darkest point
of the whole painting, and you really get that point
in there with ivory black. I'm going to go back
to my purple shadow, and I'm just going
to give a little bit of detail to the lips. I'm looking for
the darkest areas and really just trying
to accentuate them, also just get into that gap between the teeth
and the bottom lip again, just make that a little darker. Maybe I can give the eye a little bit more
darkness around here too. I'm just going to
smooth that out with my other brush and
same over here, then one more time over the s while the hair
is still drying, just going to go over
the clothes once more, but I really like how
they're just very loose, and I want to leave
that looseness. I'm just applying
a little bit of diluted paint just to give
it a little more intensity, and then I'm just going
to inject more pigment in there just like before
and let that expand. Just making sure that the hair line doesn't
get too messy now. Okay, I'm going to dry this off, and then in the next lesson, I'm just going to
finish the details on the hair and get into all the last details
and finishing touches.
10. Finishing Touches: Okay, so in this lesson, let's have a look
at where to put the finishing touches
on the painting. And I can see that up here, this part has expanded too
much into the eyelids. So I'm just going to lift
up some pigment here. And also in here. Okay, let's return to the teeth
for a moment. They're not that defined, and I actually quite
like it this way, but if we wanted to give
them more definition, we would give them another coat. I'm going to do that now with some green ochre really lightly, I'm going to go over this part and these parts that
are in the shadow. If you don't know where
they are, remember, you can just squint your eyes and they shod become apparent. So the highlights of the teeth
really stand out more now. Okay, so I'm going to work on the details of the hair now. And for that, I've got my
coffee brown and my tiny brush, and I'm just going
to start coming into this hair line here
with these wispy movements, just flicking my brush
and trying to keep it organic and not all the hair is going to come from
the same direction. So I'm just kind of working away here, flicking the brush, and if you feel like
it's too detail, or the brush strokes
are too dark, you can always go
ahead and remove them. And then you wait till it's dry and you can
give it another go. And remember, it always dries a little bit
lighter anyway? Okay. So just a couple of strokes
going over the ear here. I went a little
bit over the top. So I'm just going
to correct that. And let's go back up here and work on some of
these highlights. I'm just going to give them
a little bit of detail. Maybe in a moment
I can cover them with some yellow ocher just
straight from the tube. You can see she's got
these baby hes here. I really just want to
put some in really lightly because I think it's going to add to
the whole picture. I'm still using
the coffee brown. And I'm just going to go in
here behind the ear as well, put in some of these
little hairs coming down. So if you're always making the same kind of brush strokes, it's not going to look very
real, not very organic. So in nature, things are
always a little bit different. And I'm moving on to blue black now to give a little more
detail to this hair line. It's a bit tedious, but I think it's going
to look really good. Okay. So as I said, I'm
just going to give the hair do a bit of a coat of yellow ocher just
straight from the tube. But of course,
mixed with water so that it looks like there's
some highlights going on here. Just in some of
these areas here. Now that I'm looking more
closely at these baby hairs, I can see that there's a
little bit of a red tone. I'm just going to give it
a tiny bit of skin tone one and smooth that out. And I'm just going to put a couple more strokes
around the ear with the blue black tidying up some details that
are bothering me. Overall, I'm pretty
happy to be honest. I'm just going to put
the finishing details of the hair up here
with some blue black and the very small brush. Just putting in the
last bit of contrast here, to really make it pop. Then just touch up
on some eye lashes. Now I'm going to
use a little bit of white out of the tube
just to recover some of the highlights that I've
lost in the eye a couple, subtle dots that I'm putting in. Also in the teeth. And then one more thing that's been bothering me a little bit. The highlight on the pupil is actually a little bit too large. So I'm just going to
make that a little bit smaller and also
on the other side. Okay, I could go on for hours, probably, still, but I'm
going to leave it here. And I hope you join me in the next lesson for a
couple of final thoughts.
11. Final Thoughts: Thank you so much for
joining me today. It's been a pleasure sharing my techniques and tips with you, and I'm excited to see how you apply them
in your own work. Seeing your progress
and the unique touch that you bring to your
portraits is incredibly rewarding and also provides valuable inspiration to other
students. So don't be shy. Go ahead and share
your masterpieces and any insights or challenges in the project section
of this class. Also make sure to stop by my profile to see what
else I'm teaching. And you can do that just
by clicking on my name. And if you're
looking to continue your watercolor journey and
further refine your skills, make sure to check out the 30 day watercolor
painting challenge of painting one eye
per day for 30 days. If you have any questions, please don't hesitate to post them in the discussion
section of this class. If you want, you can also
follow me social media. You can find me on Instagram under Nadia underscore
underscore Alaska. If these walls underscore, underscore id talk
or night project, where I share some
different angles of my creative work
with the world. I hope you've enjoyed this
class, and if you have, then I would love it
if you could leave me a review in the
review section. I read every single review, and they always motivate me
to keep making these classes to share the things that I have learned on my creative journey, and it also assists
other students in deciding which classes
might be right for them. Of course, you can
also follow me here on Skillshare just by
clicking on this button. That way, you're always
in the loop about new classes and other things
that I've got going on here. Thank you again for
joining me today. I hope you've
enjoyed this class, and I hope to see you
again really soon.
 Nadia Valeska, Berlin based professional artist