Transcripts
1. Introduction: The Let's dive into the exciting world of
watercolors and textures. If you're a fan of those
two topics as I am, then join me and I will be
very happy to have you here. This class is huge because
it will be super long, but I'm sure we
will learn a lot. So let's get started.
My name is Anya. I'm an illustrator. I illustrate books, magazines, and I teach art
here on Skillshare. I thought about
making this class for a long time right now
because I often get asked. How do you make those textures? How do you create those effects? I am happy to create a block
of classes about textures, and let's start
with watercolors. In this class, we will explore different kind of textures
like sky textures, greenery textures
like trees or grass. We will explore also
different watercolors, traditional ones,
liquid watercolors, and we will add also some
mixed media to watercolors, and we will see what different
effects we can make. I'm sure this class
will be super helpful because you can just only
by painting textures, develop your watercolor skills, you will be more comfortable. With this medium,
and you can just play around and paint
on the textures, but you can also try to apply
them into illustrations. I will show you many examples of how I used textures
in my own art. So you will be free to explore this class in whatever
direction you want. But I will explain it
better in the next lesson. This class is for everybody, both for beginners
and advanced artists, you will probably notice
that this class is based on the classes that are
already here on Skillshare. I took some of the
lessons where I show different techniques
of how to make textures, and I put them in one place. So even if you took some of the classes already
that I mentioned here, don't worry because
there are lots of them. And I'm sure you will find
something new for you, but also you can watch the
lessons and see, again, how to create textures
because I won't repeat the steps or the
techniques from other classes, but I will specifically
focus on creating textures. So it could be useful as well for you to repeat
some of the steps, or you can just search for another content that
will be new for you. And in the next lesson, I will show you how
you can explore this class and what
is the class project? I cannot wait to start this adventure with
you. Let's dime in.
2. Class Project: I'm aware that this
class is huge. There will be a lot of lessons, a lot of content. So I want you to feel free to explore this class in
whatever direction you want. You can just explore textures on their own and paint
just simple textures, or you can apply them into your own art
and illustrations. I will show you different
examples of my art and illustrations and
the ways I applied them. So feel free to do it as well. But if you feel more
comfortable just to play around and has different
textures, then do that, you can all of the textures
are just one of them, you can paint just one type of illustration or paint many
different illustrations. Feel free to do whatever
you want and feel free to explore this class
in whatever way you want. So, for example, you can
make just sky textures, or you can paint an illustration
with the sky texture. Or you can paint all the types of textures and all the
type of illustrations. It's really up to
you, your instinct, and also because
this class is long, then feel free to
come back to it. When you feel like it, you can applaud
just one project. And for example, in the future, you can make other projects, other textures and
update your project. It's really up to you. So I hope this is clear for you and I hope that
you will enjoy, and I'm sure that you will
discover new things for you and that you will have a lot
of fun. Let's get started.
3. Materials: Let's see what art materials you will need for this class. So I'm aware that this class
is super big, super long, and there will be many
techniques involved, many different fun things
to do with many materials, but you don't have
to have it all. So at the beginning,
I will show you just the basic stuff that
you will need for sure, and the rest is something
extra. So don't worry. Let's see the basic stuff. So obviously, watercolors. There are many different types. You know about it. The kind of watercolors is really up to you. You can work with
a really basic, small set of watercolors. It will be enough. You don't
have to have lots of colors. For example, even if you have something small like this,
even if it's consumed, but if you have small
set of this kind, it will be perfectly enough. You can test many
different colors if you're a color freak as iron and
you have dozens or hundreds, even of different
colors, then obviously, feel free to experiment and test as many
colors as you want. As for the paper. Oh, sorry, let's take out of the
major zone also water. Obviously, you need water. As for the paper, most of
the exercises or most of the textures you can do
also with your sketchbook. For example, I used to do the
liquid watercolor textures. If you have a good
quality sketchbook and you're fine with it, then you can use it for
your textures as well. Sometimes we will load our
paper with a lot of water. So in this case, I would
recommend watercolor paper. Doesn't have to
be super quality. Sometimes it is better, especially if you want your paper to remain
wet for a long time. So in this case, try to
use something better, but don't feel forced to use very expensive
and push paper. For example, this one is a
good example of good quality, not so expensive paper honeymle. There are different types. This one is hot press, and important is it
should have 300 grams, and also it should
have cotton within it. Doesn't have to be 100% cotton. For example, lately,
I use this one and this one is 100% cellulose, and it works also fine. Just see what you have at home, see what works best for you. If you want just to
experiment and play, then obviously use
something cheaper. And if you would like to do some illustration that you
would like to hang on a wall, then go for cotton paper. And also, if you use
cellulose paper and see that, the effect is not so good, so maybe test some other paper, sometimes quality
makes difference. Okay, so for the basic stuff,
also, obviously, brushes, prepare a set of three or four different sizes of brushes, watercolor brushes. Basically, we will
use round brushes. This one is good for
applying water in a quick way as a
background when we will work with wet
on wet technique, then some bigger and
medium brush and have also one or two brushes
for thin lines because we will do some
thin strokes as well. But if you don't have
this kind of brush, then also brush with a
good tip will be enough, and you can make fine lines also with the very
tip of your brush. So only if you have small brush, then, then it's great. If not, then you use just
the very tip of your brush. So good things for our texture. Something that you probably
have at home is paper towel. You can use tissue. We will use it quite often. So be sure to prepare it. Also, I suppose that you
will have salt at home. This is regular kitchen
salt. This fine one. Um, is the one that we will
use for some of the lessons. I would recommend you to take
water that you will spray. It could be in
different bottles or different ways
that you can spray the water on your
watercolor. I have this one. I have also the spray in pen. I don't have it right
now, but smaller one. Maybe you can use the one
that you use for ironing, or you could just sprinkle
water also with a toothbrush. I think that's more
or less the things that are, let's say, necessary. Now, I will show you
the supplies that will be protagonists
of media techniques or liquid watercolor techniques
because there will be several lessons with textures made with those watercolors. Those are liquid watercolors. So if you have them at home, then I really recommend you to see those lessons
because they're really fun. I'll show you different
fun ways that are not so obvious or on how to work
with liquid watercolors. They are a great medium
with very vibrant colors. They are kind of ink, let's say, they have very intense colors, and they're very translucent. You can make really
lovely transparencies. There are different
types and kinds. This one is cheaper version. I think they're cheaper
than doctor Peach Martins. They work more or
less in the same way. Those one are more intense,
more concentrated. But I also explain what kind of medium it is in the
separate class. So you can have a look where I specifically explain the
differences and how they work. And for your exploration
with textures, only two colors will be enough. Okay, all the other techniques
that I will show you in this class involve water
soluble crayons and pencils. Crayons are like this
type of crayons. I have only one type basically carana neocolor number two. So if you're about to
buy something like this, and if you would like to
explore water soluble crayons, then be sure that you will buy number two series because there is also Parana neocolor
but number one. And those are
regular wax pastels that don't dissolve with water. And this one yes they dive
with water and also there's name Aquarel so be sure not
to buy the traditional one. There are also different types
of water soluble pastels, wax pastels, so you can test the one that
you have at home. And the same thing for pencils, there are different types, different kinds and brands. For example, this one is
Faber Castel Albredure. Usually, it is specified as well that they're
water soluble. They are named called
watercolor pencils or they have symbol
of the brush here. The other one is Karan dash, supercolor There's also
museum from Karan dash. Very good pencils are
also dean ink tints, which are very
intense with colors. They're ink based, so usually the colors
are more intense. Also here, test the
pencils that you have at home, water soluble pencils. I invite you to
explore those as well. There will be lesson with watercolors and mixed
media textures. Alright, a few items remained. As for watercolors,
regular watercolors. I will often use and name
granulating watercolors. Those are the example of
granulating watercolors. They are in the form of
traditional watercolor tubes, but they are also pans as well. And usually it is written. It is specified that
they are granulating. I will explain it a little
bit better in the class. Basically they have more
pigments inside and they create really lovely
effect of granulation, which is really perfect
for creating textures. So the thing you can do is to watch the charts you
can watch on YouTube on multiple places in
multiple places in the Internet to see search for granulating colors and
pick the one that you like. So since they are
quite expensive, like old good water colors,
it's something extra. You don't have to have it. But if you would like to dive
deeper into water colors, then this is something I
would recommend you to take. At the beginning, you can
take one or two colors. They really create
something magical. Personally, I love them
and use them really, very often for other lessons, where we will explore
skin fluid textures. If you have muskin
fluid at home, then I invite you to explore
this medium and see how you can create really fun
textures, really fun things. There are different
kinds and types. Basically, I will
use three of them. I will use in this marker, the one with a really
thin nip which seems like needle and also traditional one in the bottle which I don't
have right now with me, but it's something like
this, Muskin fluid. I use it as well. So if you have at least
one kind of them, then prepare it as well. Something extra is also masking tape. You
don't have to use it. I will use it sometimes
just for exercises to divide paper
into smaller areas. What else? Let's
talk about brushes. We already sew the base
brushes that you will need, but I will also explore different types and
shapes of brushes. If you have different
brushes at home, they are really great tool to add extra value to your
textures to build up textures. For example, sometimes I
will use this com brush. You can see it has bristles
which are divided. They are great to create like from animals or hair
or brass texture. I will also use often dagger brush for grass texture
or tree textures as well. Also, this kind of brush, which is good to create leaves
and different patterns, shapes with just a very
tip of this brush, let's say, I don't know, here I have also
different examples of brushes that are strange, and sometimes I use them. Most often, I use
the scum brush, but sometimes also this kind of brush tip is
useful to create, for example, leaves,
grass, et cetera. So if you have this
kind of brush, take it with you. Sometimes you can find them in the shops with
supplies for kids. It doesn't have to be very
expensive, for example, this one was not expensive. It's graduate serious. It means that it's
student level. And here, if you see something
like this in the shop, it doesn't cost a lot. Maybe you can test it and see what you
can create with it. I'm a big fan of
strange brushes, and sooner or later, I find
always a way to use them. And also, this kind of brushes, this is silicon brush. I will use it to
apply masking fluid, the one that is in battle. I always recommend to use
those ones instead of using traditional brush
with masking fluid because you will
ruin your brush. Easily, even if you use old brush that you
would throw away, I find that it's difficult
to apply masking fluid. So usually I apply it
with silicon brush, and I do it also because the silicon brushes create
extra lovely textures. You will see it in
the specific lesson. So it is also something
I would recommend if you work a lot
with masking fluid. Also, we will use a toothbrush. I use it often to
create textures, especially for starry sky. So that's something
you would like to have as well and white ink. So usually I use doctor
PH Martins, white ink. They are different kinds, and I'm always happy. They are opaque and really good to work on the top of
watercolors or quash. If you don't have white ink, obviously, you can
use, for example, quash or acrylic ink or
maybe white acrylic as well. The last thing, I suppose, and I think we finished
here is bleach. We will use it with
liquid watercolors. I have this bottle, and I put regular andr bleach, and I dilute it with Okay, guys, I think it's Oh, hope I didn't forget anything. I'm so excited to start
this journey with you. I cannot wait to use
all those supplies, and I hope that you
will have fun, as well. So let's get started.
4. Watercolor Textures - Basics: In this lesson, you will see the basic technique that we will apply to
all the textures. So let's see the main points, the key points, the base for all the textures of the class. Mainly, all the watercolor
textures within this class will
have the same base, which will be based
with three rules. One is to use different colors to mix
different watercolor colors. And the second and the third one are two different
watercolor techniques. One is wet on dry, and the second is wet on wet. So saying that, let's walk
through the presentation. You can do along with
me this exercise, especially if you're
new to watercolor, then I invite you to try
it to warm up your hand, but also to give it a
go with watercolors. And if you feel confident and you already did a
lot of this kind of textures and you're
confident with watercolor, then you can skip it or just
watch to see the process, more or less what will be the
base for the other lessons. The first exercise would be to start randomly paint
with your watercolors, to get confident with
watercolors, continue to swatch. You can start with
just one color and exercise yourself by
trying different values, meaning from dark to light, play with watercolor,
see what will happen if you will put a
lot of pigment, if you will dilute
it with water, what will happen if you will
paint on the wet surface, that will be just as a warm up. And now we will jump to the first technique
which is wet on dry. But this time, I will
mix different colors, and I invite you to
do this as well. Since colorful textures
are usually better, they are more vibrant
and colorful. Yeah, but the good
rule to follow, especially if you're a beginner is to use harmonious colors. From the same family or
from the same warmth, meaning it can be from the
cool family, blues and greens, or you can use colors from
the warm range of colors, reds, oranges or red
or warm yellows. So I'm using cool colors, but different hues, blues, greens, turquoise,
it's more or less. Usually, I pick this
kind of colors. I'm into blues and turquoise
very often. It's up to you. And what basically what
you do is that you paint colors next to each other
while they are still wet. But the paper is dry. So you paint and you try
to keep your paint wet and add new colors to the wet to the wet colors
that are already there. In this way, they will blend in a really beautiful way and create those
textured background. So that's more or
less technique. As you can see here, I'm adding the color
into the wet color. You can do it as well. Feel free to try to experiment. So you can both put the
colors next to each other, but also on the
top of each other. Right now we will try the same thing but
with a wet background. This is so called wet
on wet technique. First, you wet the paper with clean water and while
the paper is still wet, you paint in the
first technique, as in the first step, but over the wet paper. You will see that color
blends in a different way. They will spread a
little bit more. They will be more I don't know
how to say blurred maybe, depends also how many
colors you will add. Basically, wet on
wet technique gives you the softer
blending of colors, and also it's easier to use because it allows
your surface to remain wet for a longer
time and it's easier to work with water colors
when the surface is wet. And now let's recap this lesson. So basically, you will
work all the time with these techniques with wet on wet and wet on
dry techniques. So try to test them. See what will happen if
you use different colors, how they blend with each other, and it's good to use
different colors to create those
lovely gradients. And also, try to use different density
of your watercolor. Then one you can load with a
lot of pigment your brush, then use more water, dilute your color, and
play also with this kind of gradients and play
with transparencies. Now that you saw the
basic technique, let's start to explore textures.
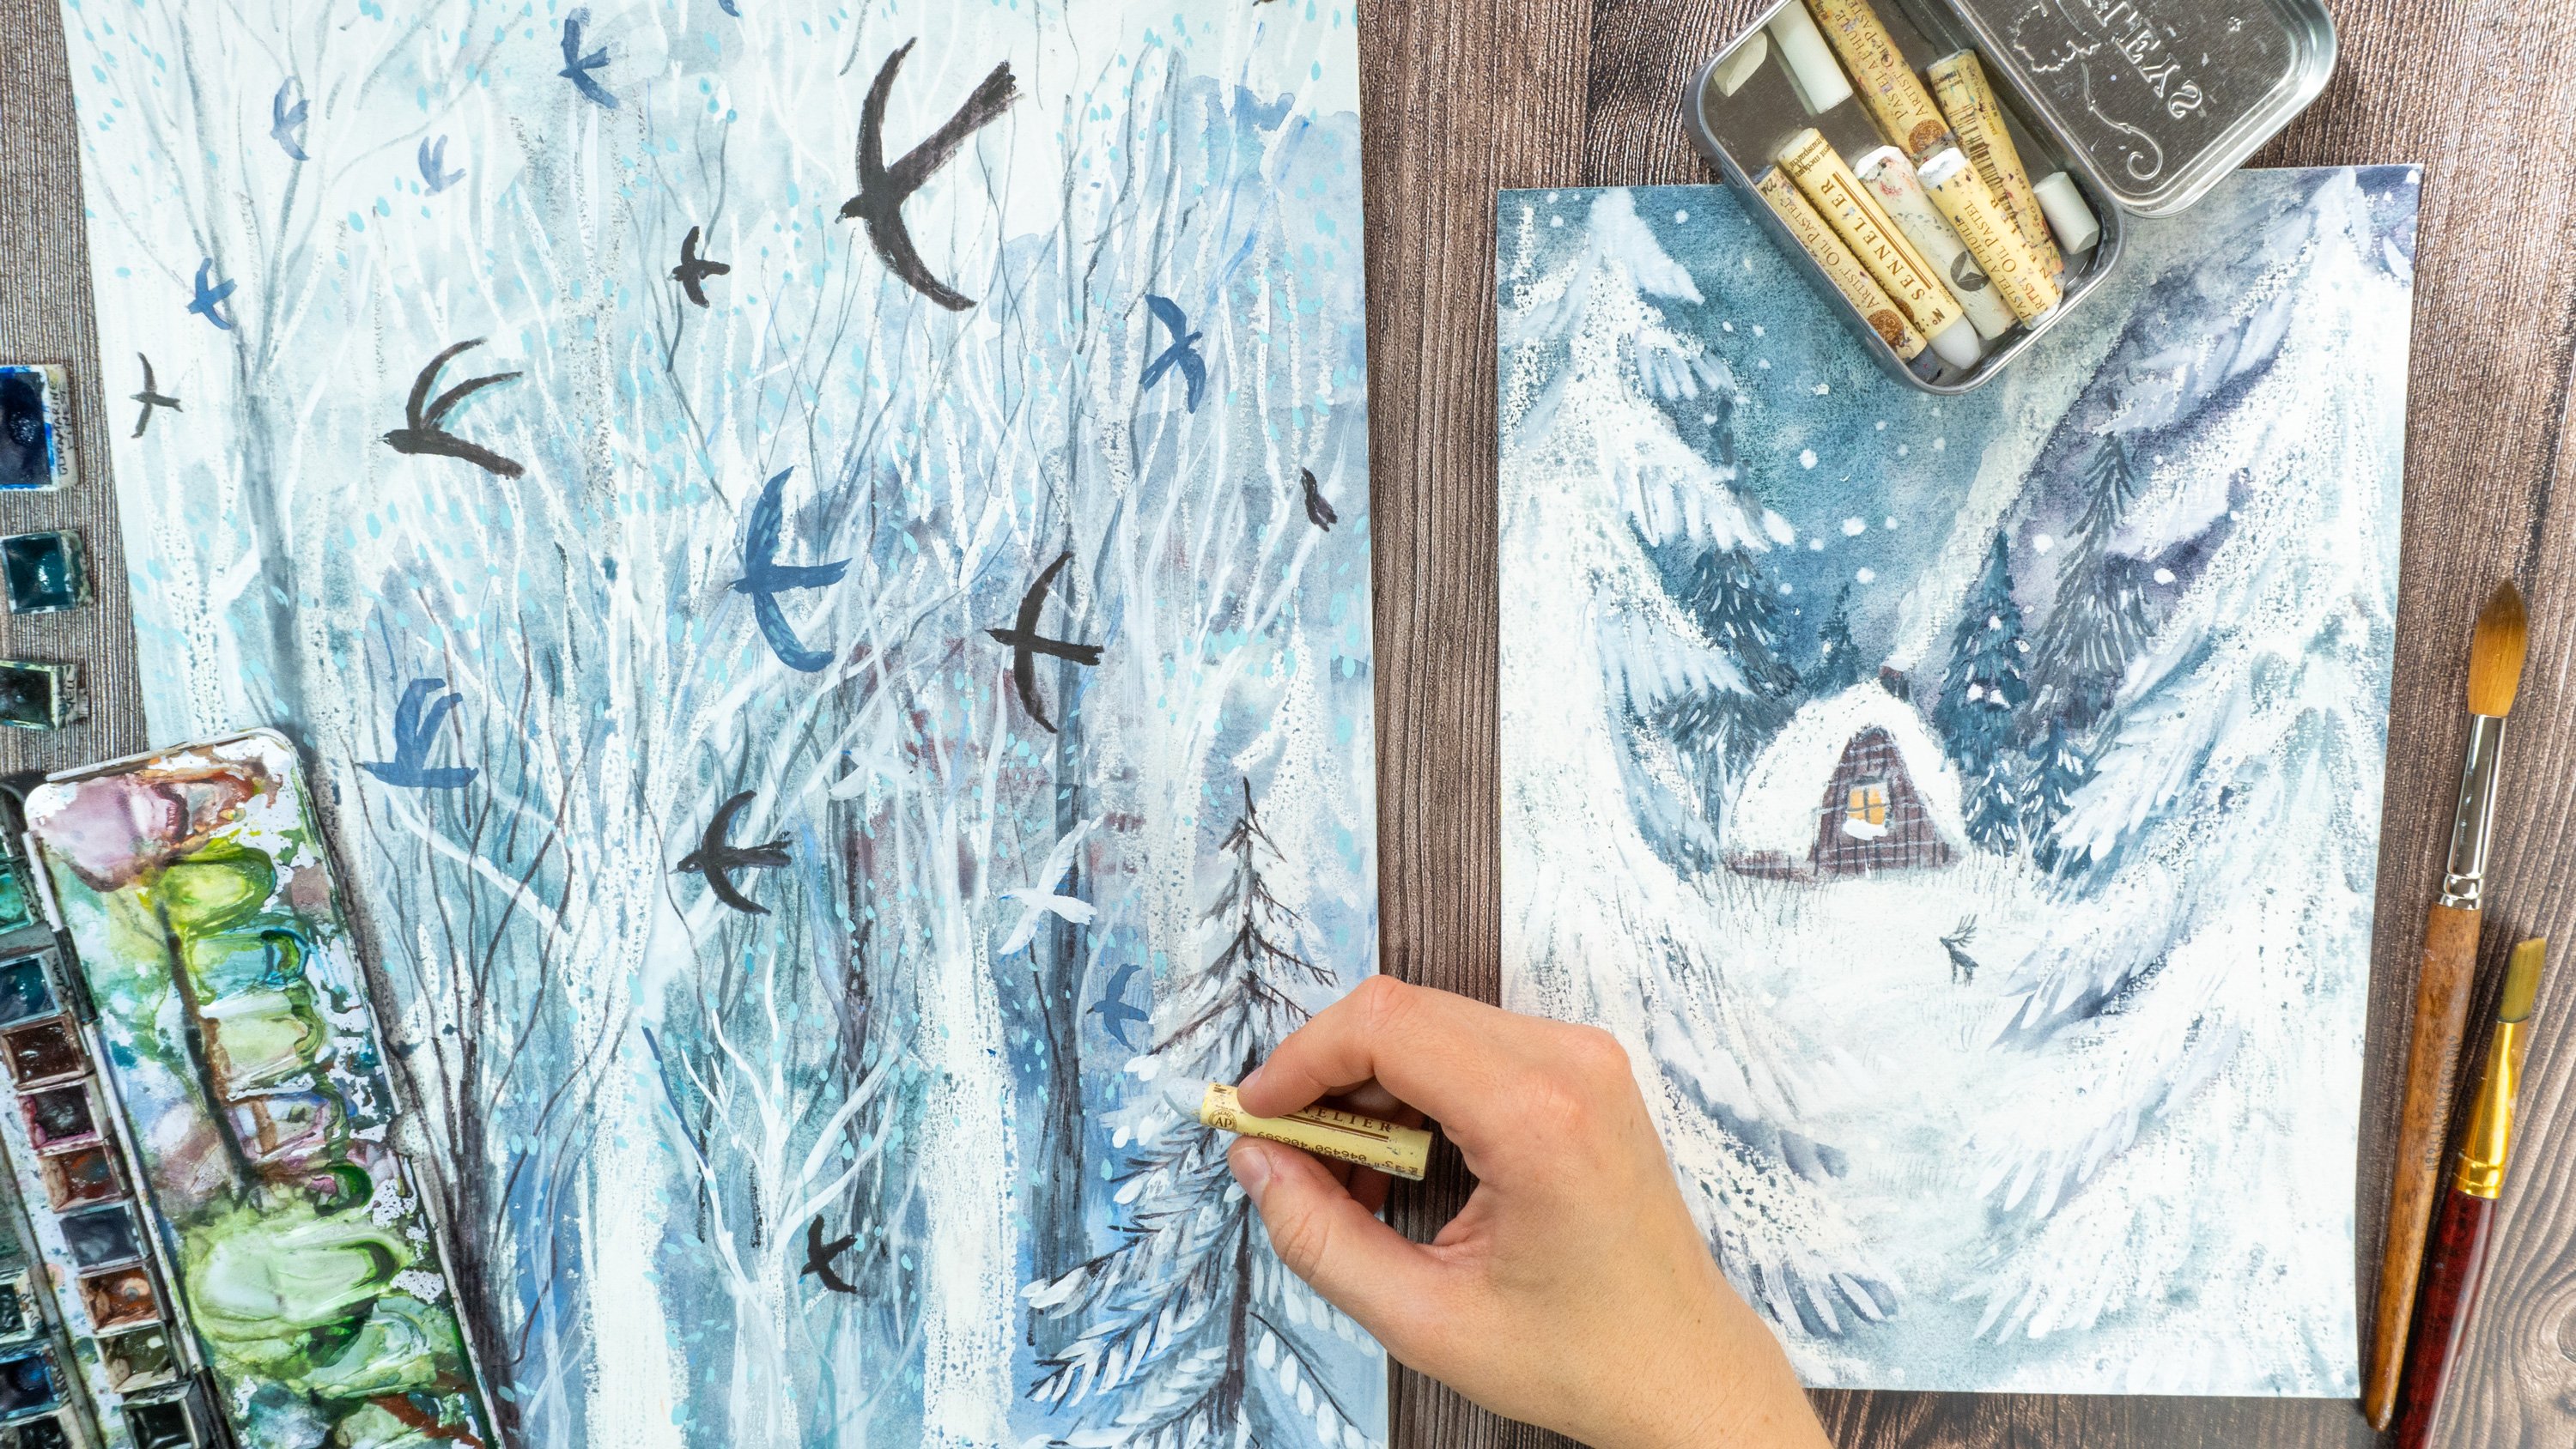
5. Sky Textures - Night and Day: Welcome to the lesson
where we will paint sky, one of my favorite topics, especially night sky, I will show you how to paint night sky, day sky, cloudy textures,
starry textures. You can paint just
skies and textures, or you can try to apply them
into your own illustration. And this lesson is
from the class about the magical watercolor world and painting from Imagination. You can see the other
steps of how to create different elements and the whole illustration
within this class, but also later on in this class, I will show you
other elements that you can use to create
your illustration. Right now, let's start
with those skis. For this lesson, you can work
on only one sheet of paper. It's up to you or you can
paint on a bigger surface. We will paint three
different kinds of sky, so you can divide your paper
into three rectangles or paint on the separate on the three separate sheets
of paper, it's up to you. I will use masking tape
to divide the paper, and we will paint one night
sky and two day skies. What I'm doing here is I'm
reducing the strength of the glue by putting the tape
first on the flat surface. And if you will do it, then later on the tape
will still be adhesive, but will not ruin your paper
when you will tear it off. Okay, so let's start with
the first rectangle, and we will paint the
night sky to do that, prepare your water
colors and salt. We will use it to
add extra texture. So you can use only one color
or three or more colors. Whatever colors you would like
to use for your night sky, I will use bluish and
grayish colors like indigo, paints gray, and I will also add a little
bit of ultramarine. So let's get started.
So to paint this guy, we will use wet
on dry technique, the one that you saw in the
first lesson about basics. So the thing here is to use colors to paint the
colors on the dry paper, one next to each other. So my recommendation here for you would be to use
quite a dense color. Don't dilute it too
much because when it will dry then it
will be lighter. So since we are
painting the night sky, we want it to be quite dark. But usually, one
layer is not enough, but try to be as dense as possible and paint the
color next to each other. In random way while the
color is still wet, then add the color paint
the other color next to it and they will blend
in a natural way. I'm switching two, three of
my colors. I'm not sure here. I think I use only two colors, it's paint gray and ultramarine, but you can add more
colors if you want. And, I will speed up a
little bit the process. Finished. And once while
the paint is still wet, we will use salt kitchen
salt to add extra texture. This is something that you can use in the
different situations, not only for the
sky, for the sky, it will create those galaxy
starry dust texture. And I will use it also, for example, also for the cacti. In the Alesson of this class, you will see it further. And yeah, that's something you can do in a different
situations, for example, wood texture or
cacti texture, and so on. So leave it to try. Don't remove it while
the paint is still wet. Sometimes it's good to leave it overnight or use hair dryer, but be really sure that the
paint is dry otherwise, otherwise, it will ruin
your paint a little bit. So the last two rectangles
will be about the day sky. I will show you two
different ways how to paint cloudy textures in the day sky. So for the first one, we
will repeat the same steps. We will use the wet
or dry technique, and I will use basically
the same colors. This is something that I
use often for the day sky. I don't you don't
really have to use bright and light blue colors, but you can create really lovely sky as well with
darker tones, for example, paints gray or indigo, but diluted diluted a lot
with a lot of water and paint with light wash of color. Obviously, if you
want brighter sky, more maybe summer sky, you can use brighter blues. So what I do is I cover
the whole sheet of paper. I premixed my color. Actually, I mixed paints gray with indigo and a
little bit of ultramarine, and I'm covering the paper. I can add, obviously
a little bit of different colors
into my background. Um and also what you can do is to play with different
values sometimes by adding the color from
your palette and then adding a little
bit of water to dilute some areas more. And in this way,
you already also create the cloudy textures. So you can see some
areas that are lighter and some
that are darker. And yeah, try to be a little bit quick
because the success here, the same as for the
night sky is to have the paint always wet while
you're adding color into it. So right now we are
creating the cloud texture. So grab your to do that, grab your paper towel. I use normal kitchen towel, but you can also use tissues. And dab the color
while it's still wet. In this way, you
will lift the color. And also by using
the tissue paper, you already create
lovely, cloudy texture. And also by lifting the color, you add white color by lifting your blue with
paper towel and wala, as you can see in
quite a footless way, you can achieve really,
really lovely day sky, sorry. And here we will jump
into the second way, the second day sky. This time, we will use
wet on wet technique. But first, I'm premixing
my colors again. I'm diluting them, adding water. I want my color to
be really diluted, so I'm creating the
puddle of color and I'm premixing some of the colors and some of them
are pure colors. And then grab another brush. It is good to use a large brush. But if you don't have, you can use your regular
round brush. And I will use the flat brush, which is specifically good to wet your paper for watercolor, wet on wet technique and paint with clean water
your background. Cover the whole surface. So the tip here
is to have middle with quantity of water, not too wet, not too dry. You don't want your water to you don't want to
move water on the paper. When you will see it,
it shouldn't move. It should be painted
in a uniform way. It should cover in
a uniform way and should leave a shiny
film of water. So basically, not too
dry and not too wet and uniform uniform
surface of water. And while your
paper is still wet, then grab your color and paint directly into the wet surface. In this way, colors will spread and blend in the more light way, in the more soft way. And as you can see, it creates already lovely
cloudy texture. So the thing here
is that you don't want to paint over
the whole surface, but you want to leave
some white areas, which will be clouds. This way is kind of
a negative painting. You create clouds by painting around the white paper and where the pigment
won't spread, there will be cloud. And so, yeah, that's
more or less the thing. And as you can see, by using wet on wet technique, the color spreads in
really lovely way, and it already suggests
that those are clouds. You can add some extra
darker color if you want into some areas. You can leave it
like that or you can again dab a little bit of tissue or paper towel into some areas by
lifting more color. For example, I'm just lifting more white around
the white clouds. But basically, it's up
to you as you wish. Let's turn back
to our night sky. The layer is already dry, and I'm removing the salt. So as you can see,
it created really, really lovely star effect. But I see that the sky is still light and there were some
cauliflower textures created. It's nothing wrong, but
sometimes you cannot control. So what you can do
is you can create the second layer of the same colors in the same way as you did
for the first layer, but in a more diluted way
to cover your first layer, and then this way, you will
darken up your skine and uniform a little bit
all the textures. So well, we finished our skies. We painted night sky
with the salty texture, and we created day sky, two different day skies
with a cloudy texture. So another tip, another
extra texture you can add, especially if you're
painting the night sky is to sprinkle a little
bit of white ink, white wash with a toothbrush
and create white dust. So I'm using here doctor
PH Martin's white ink, which is very opaque. I have two different
kind of ink, and they both work fine. They're very opaque. And the wise is really, really. Yeah, opaque because sometimes if you use quash or acrylic, it could be a little
bit translucent. But if you have, for example, acrylic ink or Guash, you can test it and
see how it works. So Walla. This really creates lovely galaxy, starry texture. So let's recap the main
steps from this lesson. So use wet on dry and wet techniques depending on what type of
sky you want to paint. Use different colours,
mix different colours and also try to use
different density to create varied values. So, for example,
for the night sky, we used really dense color
and for the day sky, we diluted it in a
quite significant way. For the textures, use
paper tower for clouds and salt and white ink in order
to create stardust textures. And again, let's see
the illustrations, different kind of
illustrations that you can make with this kind of sky. So the favorite theme of mind, the moon, night sky, where you can really experiment
with starry textures, with galaxy textures,
and moon as well. And, yeah, that's something
I really love to explore. But obviously, you can
also paint the sky. And usually I paint
winter scenes, so the sky is more
cloudy and gray, but there are also different
kind of sky that I'm sure you can explore as well
with brighter colors. It's up to you. So again, explore as you wish this lesson, you can paint only different
kind of skies or you can create the whole illustration or different small
illustrations. It's really up to you. Not
6. Sky Textures - Cosmic Sky: Welcome to the second
lesson about skies, where we will basically do similar things as in
the first lesson, but we will add some new
tips and new elements to add extra texture to paint
our galaxy cosmic sky. So this lesson was
in the class about being inspired by Byzantium
and where I painted Mosaic, Byzantium sky, inspired
by the mausoleum and by the chapel that I saw both in Ravenna and Palermo in Italy. So let's get started. For this sky, I will
choose more colors. I will use more colors, but the technique
is rather the same that for the previous lesson, both for the night
and day skies, which is wet on try, but it will be
something in between because the first layer that we will paint will be wet and dry. But while the paint and
the color will be wet, you can still add a little
bit of new colors into it. I will also show you
some extra tip to paint to add another texture. So in this class, I also painted at stars with gold,
watercolors and gouache. You can do it as
well, or you can just stop by painting the sky. We'll pick your colors. I will make some
dark and light tones because also in this class, I was creating the
color palette, which I used to paint sky and
the color palette was also inspired by the Byzantium art and by the mosaics that I saw. And the mosaics were made with really bold
and vibrant colors. And I'm a big fan
of vibrant colors. So this is what I will use
to paint this galactic sky. Also, I will add a little
bit of granulating colors. So the first tip to add extra texture to your
watercolor textures, both sky textures or whatever
kind of background you want to use is to use
granulating colors. So if you're new to watercolors, there is a kind of colors that you can find from
different brands, and usually they are called or named granulating or
supra granulating colors. For example, Shrimnk has sets of this kind of
colors, rem Brand. But I guess that
probably most of the brands have this in their
offer. What does it mean? It means that the color that you use have
multiple pigments inside. So while you paint with it. But when you paint
with it, the pigments will separate and create lovely granulations of
different pigments. As you can see right now, I'm combining two techniques
wet on wet and wet on dry. I started with a super
granulating grayish color and then I painted on the
top of it with the blue. So you can do it as well if you feel comfortable
with watercolors. You can switch techniques. I mean, you can add
you can paint and add new colors into your
drip white paper. And while it's still wet, you can also add darker colors on the top of the wet paint or the color that you painted. You can do it later
on, obviously, but you will have to be quick because the color
will have to be so wet. That's why that's
the only reason why I'm doing it right now. I'm just, um, using the fact
that the color is still wet. Also, if you want to
add your color next to the color to paint the color next to the color
that already is there, you will have to be sure
that it's still wet. I'm repeating the same things thousands and
thousands of times, but never mind because
if you're new here, then probably you hear it for the first time and if
you're new to watercolor, then it's good to know it. So what I'm meaning is
that the green color that I painted right now
next to the blue color, I painted it while the
blue was still wet, and also right now I'm doing it. In this way, you will avoid this cauliflower effect
when the color will dry. I will create cauliflower
and you can avoid it by painting while the
watercolor is still wet. So in this way, your
color will blend nicely. Your colors will create
lovely gradients. So yeah, that's it.
The only philosophy is that your color
must be always wet. In both situations when you paint next to the color
or on the top of it. Okay, so as you
can see, already, really lovely
granulating texture is being is showing through and I continue to paint
this light wash of color by mixing the
green and the blues. But whatever colors
you will use for your galactic sky, it
really doesn't matter. You can use also darker colors
already at the beginning. It's up to you. I
basically I basically used those greeny
turquoise color because I was inspired
by the Mosaics. And that's the reason
why I picked them. But since they are really light, I will paint on the top of it. I will add blue indigo colors to deepen and darken the sky. This is what I'm doing now. I'm painting, I'm adding new colors on the top
of my first layer, which is still wet
as you can see the color spreads in a
really lovely and soft way. And you can see also the granulations from
my granulating colors. I used for the green malachite of the Roman Schmal Aquarius, those are polish watercolors, polish brand, and
it's really delicate. But still, you can
see the granulation. I also use Schminkz. I think I used Shire blue and cascade green
from Daniel Smith. There are lots of gorgeous
pnulating colors out there. So explore whatever
colors you you like. If you have some other granulating
colors which are warm, you can do it as well. Why not? You can create, for example, purple and orange galaxy. Those colors also exist
out there in the universe. So why not? And as you can see, my layer is still wet. So to achieve that, first you have to be quick. But the other thing is to use really good quality watercolor
paper because that's the characteristic of a
good cotton based paper that it keeps water
for a long time. It doesn't dry, and it absorbs water and keeps the
humidity for a long time. Also, maybe don't do it in the full sun warm day because
it will dry immediately. If that's the case,
then maybe you would like to cover your window in the direct light or work in a darker place, cooler place. And yeah, you can see those
lovely transitions and granulating that is
already happening there. So as you can see, I added
quite a bit of darker tones. I continue adding
darker greens and blues into my wet background. I do it in a random way. So I'm trying to have as many gradients of
my colors as possible. And once I'm happy and while
the paint is still wet, I'm adding extra texture by spraying water into
my wet background. So the tip here is to spray the water while the
background is still wet, but it's a little bit
tricky because it shouldn't be too
wet and too dry. So I'm using this bottle inside. There is water, and I'm spraying the water on the
top of my background. So again, it's a little
bit tricky because the effect depends on the
humidity of your background. So it shouldn't be too wet. It shouldn't be too dry, if it's dry, that it
won't show through. But also if it's too wet, then adding extra water
won't change, basically. Anything and the texture won't show through. So
you have to test it. You have to give it a try. Do few attempts. Sometimes I'm able to do
really beautiful texture, and sometimes it
won't show through. So that's a little
bit of alchemy, but it really gives
beautiful outcome. So give it a try. If you don't have a bottle
with spry with water, sorry, you can use, for example, the bottle that you use for
ironing or for the flowers. Or you could use,
again, toothbrush. Or brush to paint with hard bristles to sprinkle
your water on the top. So here I'm sprinkling and
sparkling my water on the top, and maybe you can already see some of the texture
showing through. But I think it was a
little bit too wet and it's not so obvious,
but it's still there. So leads is the final outcome. Here you can see the
beautiful gorgeous pigments, the granulating pigments,
they do really magic. And here also, I use
the same background to paint the peacock for
the classes project. So you can use this kind of texture for whatever
objects you want, not only for the
sky or galaxies. Let's recap briefly
the main steps and the main tips for this. Lesson. So we mix wet on wet and wet on dry technique to create our sky. In both cases, techniques, be sure that your watercolor is always wet and to
maintain your colour wet, be sure to be quick and to use good quality cotton
watercolor paper. And for adding extra textures, you can use granulating type of colors and also spray water to your wet background to add those lovely extra textures. So I cannot wait to see
what you will create, and let's proceed
with other textures.
7. Background Textures: In this lesson, I
will show you how you can apply textures
into your background. So basically, we will use the same tools and techniques as for the previous lessons, but I will show you how you can apply them into backgrounds. Again, I'm showing you different illustrations where I applied
textured background. So you can do both things here. Again, you can paint just
simple textures, and later on, you can paint or draw
on the top of them and create illustration
with this background. Or you can just explore
backgrounds on their own. This lesson is from the
negative watercolor world. And again, I won't explain you step by step, the technique, the negative painting or how I created the final illustration, but I want to just
show you how I applied textures to create
this kind of background here. So let's get started. So as I told you, this
lesson comes from the class about the negative painting where we painted
the forest scene. So I won't be showing here how to use the negative
painting technique and how to paint forest. Mm. And if you already
did this class, then probably you can always learn something
new here because what I will show you here
is how I created textures within this project to
create textured background. So maybe there will be
something new for you as well. And if you're new here, then I also invite you to this particular lovely technique if that's something you
would like to explore. Anyway, um, so oftentimes I use this kind of texture
in my illustrations. And basically, we will mix
the things that we made in the previous lessons about
sky and mix techniques, wet on wet technique, and wet on dry technique. And we will build up the textures with the
techniques that I showed you with spray water
and with paper towel. So for this particular project, I started with wet
on wet technique. But it's rather irrelevant. You can also start with
wet on dry technique. I use wet on wet because I
want to have very wet surface. I wanted to create more
textured background, and I think that wet on wet technique is a
little bit easier. It lets your paper to remain
wet for a longer time. And in this way, also, your watercolors will work. You can work with watercolors in an easier way when you have
wet background and you want those nice blending
and nice gradients. So the other thing here is we will use, again,
granulating colors. But first, pick
more colors, three, four colors, again, to
create lovely blendings. And again, it's easier if
you will use similar colors like from the same range of
temperature, cool or warm. But do whatever you wish
and see what will happen. I'm always a fan
of experimenting and learning from
your experience. So here I'm using
granulating colors. I often use them if
I paint backgrounds, You already probably know it. I always talk about it and I told this in the
previous lesson. And here I'm using
glacier green, I think, from Schmincke and cascade
green of Daniel Smith. And those are really gorgeous
granulating turquoise, light turquoise and green
bottle green colors. Really, really love me.
And the third color is regular light blue. And since this project is
about negative painting, it means that I will paint multiple layers
above each other, one layer above on the top
of the previous layer. So I'm working really light because I will build
up the values, the darker tones with
every new layer. That's why the first
layer is really light. It depends on the project
that you want to work on. If it's only an exercise, then it's quite irrelevant. You can make light
layer of color and you can make it more
intense, more saturated. And if you working on
a specific project, then you have to think, is
it sky? Is it night sky? Is it day sky and then
decide if you want your texture to
be light or dark. So here what I'm
doing is that I'm adding colors while
the surface is still wet and you can see already beautiful
granulating that is showing through and here you can
see that we can use, again, a paper towel as we did for the sky for the
clouds in the day sky. But this time we can use
it to build up texture to add extra texture to our
watercolor background, and you can do it
in many contexts. Here, it's just
to make textures, but you can do it, for example, to make rocks or not only sky, but rocks or sand, many
different contexts. Um so here I painted the second layer on
the top of the previous one, and you can see that the
tissue texture is there. And here I will spray
the water again, as I did for the galaxy sky, for the cosmic sky to create a little sparkling texture
with the dots of water. So again, you can
use this technique, tip this tip in different situations for different textures,
not only for the sky, not only to create starry sky, but also just to add extra
effects to your background. And here you can see
that I continue to add this kind of textures for different layers
for this project. I have multiple layers
painted already, and I continue to add for each and every
layer some textures. So they will show through. Even if there will be another
layer painted on the top. So the parts that will remain uncovered will have
this kind of texture. Look how lovely effects
you can create. And here I will show you what
will happen if there are some random dots of water that fall over
your illustration. That happens also if
you spray the water. But in this case, just a random drop of water
fell on my illustration and I decided to use it in
my advance and I dapp it. So with the lifting technique, the color underneath became lighter because I
lifted the color. So this is also
something to explore. You can do this kind of drops on the purpose. So
yeah, it's up to you. And here I wanted to just to leave you with a small preview of how I finished the project
and those kind of textures. The first is
botanical texture to draw trees and grass
and botanical elements, and the other is how to use masking fluid to
build up the textures. But those will be topics
of the next lessons. So here I'm just leaving you
a brief preview of what we will be doing in
this class later on. Let's recap the major tips from this lesson to create
textured backgrounds. You can use wet
on wet technique, which allows you better your watercolors to work
and to blend nicely. You can use granulating color, which adds extra textures
to your background. You can use lifting
technique with paper towel or spray
water on the wet color, or you can lift single
drops of water to create lighter dots of color, which is also something. That you can work
for your texture. I cannot wait to see how you
will use the skills from this lesson to paint your
textured backgrounds. And if you're curious
on how to use textures for botanical
elements, let's proceed.
8. Tree Textures - Trunk: Let's start lessons
about how you can create textures that you
can apply to paint trees. Let's start with tree trunk. I will show you how you
can apply the same tools and techniques from
previous lessons to create tree trunk. You can do it in
many different ways. For example, by
applying salt as well. But I will show you the other
tools from other lessons. And this lesson is from
the class about making a family tree where I show you how you can
paint this kind of tree. Let's get started.
So this lesson comes from the class about
painting a family tree. Use this painting,
this watercolor illustration to be a
base for a family tree, but it doesn't matter for
purpose of this class, we will just be painting
a watercolor tree. So I'm starting with
wet on dry technique. I just paint my
watercolor trunk. I already sketched it beforehand because that was
important for me for this specific project to know
how to lay out my branches, because of the family photos that I put later on on the top. Anyway, I'm painting
with wet on dry. I'm using traditional
brown colors. This time, I don't use
any granulating colors, but obviously it is
always something you can consider if you want to add extra texture to
your water colors. As you can see, I repeat
basically the same things, but I think it's good
because um, small steps, small things, little
quantity of things to learn, but repeating them
continuously help you to build up those skills
without being overwhelmed. So sorry if I will repeat the same steps over and over
again in those lessons, but I think, yeah, this is the better way to
learn new skills. Here I'm using specific
one, premixed brown. But obviously, again, you
can blend more colors, add more hues of brown, brownish colors or
whatever colors you want to use for your trunk. Next to each other,
it's up to you. Right now, I'm painting the
first lighter layer of brown, and then I will paint a
darker one on the top. So I will spit up
a little bit of process because that's more or less the
techniques that we used. Or other previous lessons. The only thing here maybe
the tip I would give you if you want to paint really tiny lines for
the thinner branches, use a good quality brush. If it has a good tip, then you can just um use the very tip of your brush to paint
the thinner lines, and it's all about how you
paint your brush stroke. So when you push your
brush in a harder way, then you will get thicker lines. So try to exercise yourself, your hand and try to paint lines from thin to thick
with just one brush. It could be a good way to test yourself within
this kind of project. As you can see, the
thing that I did during the painting is that I
use different values, meaning sometimes
the color was more dense and sometimes
it was more diluted. It is also something you can do in order not to
paint a flat color, but to build this texture
with values of color. Here I'm adding darker
tones, darker values, but I'm using darker color, not just more dense color, but I'm using very dark. I think it's sepia color. On the top of the first
layer while it's still wet and the color will blend and create those gradients of colors which are also very
good to paint texture. So Valla, you can
see also how with building up tones with the tonal differences
between light and dark, you can also create
lovely texture. And Voila, here is
our old friend again, paper towel or tissue, and we will lift color again
and create lovely texture. So I told you during the other lessons that you can use it in multiple contexts. We saw how to build texture for clouds in this way for
the textured background. You could use it for
rock, sand and here, I'm using it to add
texture to wood. Again, the same tool, the same technique
used in multiple ways. I'm curious if you
will come up with other ideas how to use
this kind of technique. So in the class, I also
painted leaves for the tree. And when I painted leaves, I thought that I
would like to add some extra texture to
the wood and paint those specific lines
and veins that are on the trunk on
the wooden trunk. Basically, you could stop
over here and you could leave the trunk as it
is. So it's up to you. You can see the next
step that I will do, the second layer and decide
which one you prefer and which one works better for
you to paint a trunk texture. So I'm painting on the top
of the very dry layer. It's always important
if you're layering, if you paint another layer on the top of the previous
one with watercolors, you have to be sure
that the first layer, the previous layer is dry. Otherwise, you will lift up
the color and create holes. And also, the other thing, the other thing to consider
is to paint really light colors rather than create very dense intense
layers of colors. Try to build really light wash of colors because
watercolors are translucent and you want to use this characteristic
of this medium. It's really beautiful to see translucent
layers of colors. And also, you want immediately create
flat layers of color, but you build values. You build up the
tones and layers. Obviously, if you use
guash, for example, and if you like to work
with a flat colors, then it's another story. That's your choice of style, which is valid and good as well. But if you would like to work with textures and watercolor, then tip of using translucent more light layers of colors
is something to consider. So I paint random veins, let's say, of what? I'm not looking at specific
at nothing specific. I'm just imagine obviously, you can look at the photo
reference to see more or less how to build this
kind of situation, how to paint trunk, or you can improvise as I do. And I will speed up the process because
the only thing that I'm doing here that I'm painting
this translucent layer, translucent lines, and I
will see you when I finish. Again, a small recap
of the steps from this lesson to paint
your tree trunk, you can use both wet on dry
or wet on wet technique. It's basically up to you. You can use granulating colors to add this extra
texture as well. You can use lifting
technique with paper towel. You can also add salty texture
to your wet color as well. And also, if you want, you can paint a second
layer of wooden veins and remember to paint every layer in a light
and translucent way. If you're curious how I painted
the leaves for this tree, then obviously you can jump
into the original class. Otherwise, in the next lesson, I will show you
how to paint tree crowned and leafy textures.
So see you there.
9. Tree Textures - Crown: Let's continue the tree topic. This time we will see how to create tree crowns and leaves. If you already saw
some of my classes, then you know that I'm
a big fan of trees. I often paint forests,
woody, scenery. So I love to come
back to this topic. Here, I will show
you different tools, how you can paint trees, the green base, but also
how you can paint leaves. And again, this lesson is from the class about magical
watercolor world, and I will show you how
to use different tools, different kind of brushes, how you can use
different kind of strokes to create
those lovely textures, and they're very
useful because you can apply them both to
trees and grass. So I hope you will have
fun. Let's get started. If you want, you can sketch
your trees beforehand, or you can just paint free
hand style without sketching. It's up to you.
The thing you can consider already beforehand is painting different
shapes of trees. So prepare your green colors or the colors that you want
to use or your trees, and I will show you
different techniques to paint watercolor paint
crowns with watercolor. I picked both green and yellow ochre colors
for my trunks, but it's up to you depends what style and what colors you want to give to your trees. So we can skip the first
example from this lesson because it's basically just
painting with one color. But in the second example, we will use the technique from the previous lessons wet on dry with painting with
different colors. So as you can see, I pick different tones
and hues of yellow and green and I let the
colors glend with each other, and I use just wet
on dry technique, but it already created lovely leafy texture
for the crown. And then we will proceed
and add leaves into it. The second method is also the same from
the previous lessons, but wet on wet technique. Again, the, the same exact things we used for
sky and backgrounds, and we will use it for trees. Here, paint first, plain flat wash with water and while
the surface is still wet, add water colors into it. Again, pick different
colors for your tree, not only one and let your
color blend and and this way, you can see two different
types of how you can use this technique wet
on dry and wet on wet. Both work really well. And we can create
lovely trees with the same technique as for
the previous lessons. So in the lesson, I painted tree branches and trunk
if you're curious, then jump into the class into the lesson from
the original class. Nothing paints fancy just using watercolor and white ink here. And right now, let's
see how we can add extra texture, texture. Maybe, I don't know
if it's a good word. But yeah, there
are some tips and techniques that you
can consider to be a texture in order to paint leaks and to add
them to your crown. So the first one is
using very tip of your brush and painting
tiny, tiny leaves. As you can see, I'm
leaving just a drop of very diluted color, and there is a lot of color. The brush is loaded
with water we color. And I'm painting those
very drops of color, actually, and it means that
they will be very diluted. So the thing you can
do here is to play with the density of your color. You can use both very
diluted and more dense drops of color in order to create different tones and
build up leafy texture. Here you can see the leaves
that are already dry. They seemed very dark
at the beginning, but once the color is dry, you can see that the color was actually really
diluted and light. And you can change that alternate with a darker
tones, darker leaves, and um by playing around, you can also intertwine leaves, paint on the top of each other, so you can create really
lovely lovely, leafy texture. It is something that I also will show you in the
masking fluid lessons. I will show you
how you can create really lovely alternating
intertwining leafy texture for your trees by the use of different layers of
watercolor and masking fluid. But to start on,
you can start on. You can start easy with this kind of textures,
watercolor textures. So we will do the same
for the second tree, but this time, I will
add another color. I will use both
watercolor and ink, different colors of watercolors and also here you can play
with different tones. You can add more diluted
dots and drops of colour, then add some more
dense color and play with tones with transparency
with different colors. I will speed up the process so you will see the final effect. For the last three, I
will use white ink. You can use whitewash or
white diluted acrylic. And also here I will try
to play with transparency. Some of the strokes
will be more flat and opaque and some of
them more translucent. You can do that by alternating the intensity and how you
will dilute your color. Sometimes you can use a
pure ink without water, and then alternate
with diluted color, which will be more translucent. Also by painting,
while painting, you will use the brush
at the beginning, will be loaded with
a lot of colors, but each and every
next brushstroke will be less intense,
less opaque. So that's something
I really like and enjoy doing in
my art to create transparency effect effect
of transparent layers. And you can try to do
that by painting leaves, as I told before, by using different quantity of water that you mix into
your color, for example. This is the moment where
you can experiment different tools
and different kind of brush you have at home. If you have, for example, a calligraphy pen
or a bamboo pen or something sharp that you
can paint thin lines with, then you can test it. I use it often to paint
to paint grassy texture, but also for trees, for example, for yew tree and
pine tree, maybe, It allows you to paint
really thin, delicate lines. So I'm using white
ink here again, the same that I used for leaves, but you can also use watercolor. I will show you also how to use this tool in order to paint texture with liquid
fluid with masking fluid, sorry and a dip pen. So you can use it in
really many ways. You can use it for many
different mediums. And again, here I'm just
using regular white ink. You can use squash, for example, which is more opaque
and watercolor. Just be sure to wash your
pen after you use it, especially if you're
using acrylic ink or acrylic because otherwise it will remain on your
pen and won't go away, so be aware of what
medium you use. To paint very thin lines, you can obviously
use a thin brush. If you have at home a brush, usually it's like zero or 00 or triple zero brush to paint
really tiny, tiny details. I know that it's really tricky. A lot of artists are
continuously searching for this perfect brush that paints really thin lines,
delicate lines. So I'm telling you
it's not easy. The one that I am using
here is from Rub Blof. This is natural brush. So it's not very eco friendly, but I bought it once for painting icons because
I know they really have this very thin line and they are able to
create really tiny, tiny strokes, and it's something that icons
is really important. And I use it very
rarely for watercolors. I usually don't use them. And I have this one.
It's really old. I think it already
has like ten years, and you can see that
it's still working. So a lot of bristles are gone, so it's like half it's thinner than it was originally because a lot of
bristles were consumed, but it's even better because
the lines are even thinner. So once I use a brush like this until one or two left. So yeah. Anyway, I wanted to tell you that if you have
a good quality brush, then you can paint
really thin lines, maybe not this thin,
not this thin, but thin lines even with
the very tip of your brush. So right now I'm jumping into different
shapes of brushes. So this one is this
triangle brush. It is made to paint leaves, basically, flower
leaves or plant leaves. But I use it also in a different way by
using the very tip of it and touching just as you
can see the top of the brush, you can paint those
tiny triangles, this kind of birdy shape, and I invite you to experiment with different kinds of brushes if you
have them at home. Try to see what
will happen if you will use the tip of the brush. What kind of strokes you can paint and where you
could use them. It could be really fun and ham kind of experimenting
and exploration. Every time that I see
strange brush and shop, I usually buy it. And, you know, it doesn't
have to be nothing fancy. The one that I'm using
now is not expensive. It's a student level, really. So maybe you can find
this kind of brush, even in the shop with
art supplies for kids. So try them, test them. I'm not always sure at the beginning where I
buy this kind of brush, how to use them, but you can just simply
do brush strokes, and you will see that
sooner or later, you will find a
way to use them if you're kind of experiment
person as I am. So the other thing
here is that I'm playing with tones
again with values, a different quantity of pigment, more diluted, more dense color, and building up those
translucent layers. And I use it to paint leafy or this needles from pine
tree, something like that. But when I'm seeing it now, I think it also seems like a map from above with mountain
and mountainy land. So you see that right now. I think I can use it
in other contexts. Another type of brush
that I use very, very often is this dagger brush. You can also maybe know
it as a sword brush. It means that it has this
diagonal kind of bristles. This one is graduate. It means that it's
student level. So again, doesn't have
to be very fancy. There are different kind
of dagger brush sometimes with a lot more of bristles and longer
bristles depends on how you want to use them,
when you want to use them. But most often I use this short brush, short
bristles, brushes. And yeah, you can paint
this kind of lines, and I use them very
often to paint grass, but also leaves,
like in this case, you can alternate
directions and again, values from more dense
to more translucent one. You can intertwine. You can cross them the lines, change directions, play around, and you will see how
lovely textures you can do with this kind of brush. You can add also some
dots like berries, so you can experiment. You can mix different
brush strokes, different tools, see
what will happen. You can cross them, mix them together, change
colors, change the values, change the brush
tips, experiment, have fun, and see what you can come up with
with different tools. Maybe you will use
some different tools. Let me know in the project or in the comments
in the discussion, what you will come up with. Paint different kind of trees
and see what will happen. And you can obviously
paint just single trees or you can paint the
whole illustration with different kind of trees. You will see how lovely it looks together where
all the trees are near to each other in the one
illustration. So have fun. I cannot wait to see what
you will come up with. And in the other lesson, I will show you more or
less the same techniques. In a different contexts, I will show you
how you can create grassy green textures
for your illustrations. Let's summarize the main steps for your tree cram textures. You can use both wet and wet
and wentum dry technique, but use different
colors to blend, use different tools for leaves, different brush
tips and strokes, and also try to vary the
density of the color in order to create
different values.
10. Grass Textures: H. Let's continue
our green textures, and we will use the
tools and the techniques that we saw already and see
how you can paint grass. So again, I often paint grass. I often paint green scenery. And here you can see different tools and
techniques that you can use to enrich your illustrations to create those lovely
grass textures. Let's get started.
So the first step here is to create
backgrounds for your grass. The same thing we did
for the other lessons. I'm using here wet
on dry technique by mixing different colors,
and it's up to you. You can also use wet
on wet techniques. You can paint the
whole sheet of paper. I'm preparing for different
grass backgrounds to swat different textures,
but it's up to you. So for the first, kind of
textures, I will use, again, my trusty thin brush that I used for the tree crowns,
and it's very thin. It's consumed. So very few gristles left there, and it allows me to
paint really thin. Really thin strokes. But I must say that don't worry if you don't have
a very thin brush. Try to use some good quality
brush if you have at home, even if it's bigger, or if it has a good quality tip, then it should maintain
really fine tip lines. And with a bigger round brush, you can paint little dots. Also, it's a matter of how
much do you exercise yourself? How much do you paint strokes. And it's a matter really
of work and exercises. So don't worry if your
lines aren't very thin, just try to do as many
strokes as possible. Also, the good tip
to use brush and to paint good brush strokes is to use the whole
wristle of yours. So try to be loose
with your movements, use the whole hand, maybe even the whole
arm if the strokes are bigger and the whole
wrist, for sure. Other tool that
we already saw in the previous lesson
is the pen, dip pen. I use it very often to draw. I don't use it for
typography because I'm not so good in calligraphy
and typography, but it's a good tool to have those really
thin lines and dots. And you can paint both
with inks, white ink, but you can experiment
with different mediums, squash, different inks, or you can even use
watercolor if you want. So this is something I
use very often for grass. You can paint with
different density here, again, and different
strokes, smaller, bigger. And again, another tool
from the previous lesson, bugger brush, and the same kind of strokes that we
used for tree trunk. This time we will
use it for grass. Again, here, experiment with different directions with
different density as well, and you can cross your lines, your strokes, intertwine them. Change and vary the values, the density translucent
and more opaque. And you can see
that sometimes if the strokes are still wet and
you paint on top of them, they will blend really nicely. So that's something to
experiment as well. And you can also play
with your brush. And for example, here I'm dividing the bristles
of the brush. While it's a little
bit more dry, it shouldn't be too wet, so it will allow the bristles
to divide more easily. And try to use this
kind of strokes to paint your grass
texture as well. So if you don't have
a dagger brush, you can also use round
thin brush as well, and just to try to paint as
thin strokes as possible. Again, it's a matter of
exercises to be precise. The more you will paint
these kind of strokes, the more you will
see that you will become more precise and neat. With your strokes, here
I am using watercolor. Now I switched again
to dagger brush, but, the same kind of strokes here, watercolors, and also
diversing density of colors. So since it's quite repetitive, it's quite the same that we
did for the trunk trees, so I will leave it like this. If you want experiment
this kind of strokes and textures with different
tools with different mediums. And if you want, you can make just grass samples or you can try to make
the whole illustration. So right now, let's recap again the steps for the
grassy textures. So as a background as a base, we use still the
same techniques. You can paint wet on
wet or wet on dry, the background with
different colors, and then to paint grass,
use different tools, different kind of brush
tips and brush strokes, and also play with
the density to create varied values and
transparency layers. And remember that in order to paint those really nice lines. It's a matter of exercise, but remember to move this
wrist and not to be rigid in order to paint lovely,
really fine line.
11. Mixed Media Textures: Okay. Now that we already
explore watercolors, I'm sure you feel more
comfortable right now and we can start to add a little
bit of other materials. It won't be nothing
overwhelming. We will see just two
or three new materials that we will mix to
our watercolors, and I'm sure that you will
enjoy this technique. I use it a lot as a base
for my illustration. I create often just single
textured backgrounds or I paint on the
top of it as well. So let's see how to
use those new tools to create lovely backgrounds and how to put your
illustration into the next level just by
using those simple tools. Just a quick reminder
that this lesson comes from the class
about exploring architectures and applying them into illustration where we
paint different bodies, as well as the illustration that I will show
you in this lesson. For this lesson, you will need water soluble
cryons and pencils. Crans meaning pastels, those are wax pastels from Karen dash, No coolor number two, they are water soluble, and if you don't have them, then maybe you have
water soluble pencils. You can try them as well, or maybe you have a
different brands. Something that is water
soluble will work. Test and try what you
can make with it. So again, the, let's say, rule for this kind of texture
is to use different colors, the same as for water colors. But this time, we start
from drawing dry pastels. So just dry with the
pastels, random strokes, random colors next
to each other, and then take a brush
loaded with water, and dissolve your
crayons, your color. And as you can see, this kind of medium creates really
lovely, lovely texture, and it's really nice to
use it as a base layer for your project or for your
elements of illustrations. What you can do is that you can gradually add
different colors. You can do it next to the
colors on the dry paper or as I'm doing here by drawing on
the top of the wet surface. So it will add some different effect because it's different than if you would paint directly on the dry paper. Some of the strokes won't
dissolve and fully, they will remain, but
it doesn't matter. I don't worry about it because still it's a very nice effect. So try to do that. Try to draw random
swatches of color here and there next to each other or on
the top of each other, mix them together with
water and experiment. So the other way you can do this kind of background is
to mix it with watercolors. So we will do the same thing as we did
in the other lessons, painting different colors
next to each other. And then we will add
to them our crayons. So in this way, your watercolors become some kind of
mixed media background. You mix those two materials
and also remember to test different
colors And again, you can lay around, draw with the cran sorry next or on the top of your watercolor
while it's still wet. And right now I'm using a different brush
to mix those two, to blend those two with water. This one is a cam brush
which has already divided bristles and it's made to
paint fur, hair or grass. I use it very often. So something you can consider
to add extra texture to your already textured
background is to use different kind of brushes
to mix the colors. So you will see you will add different fan brush
strokes into your texture. And this is also texture wise, another element, right
to build up the texture. And here I'm adding watercolor. So basically play with
those two watercolor, water soluble crayons, mix them together and
see what will happen. And the other
material that we will use are water soluble pencils. There are different
kinds, different brands. Again, if you want to explore them more and see how they work, you can jump into my original class that I showed you at the
beginning of this lesson. And right now, let's test
the wet on wet technique. So painting with
water and, again, painting different colors
on the top of it just as we did for the day
sky, for example, and I'm doing it only because I want my paper
to remain wet for a longer time because now I will test different pencils
and different strokes. So I would like you
here to play with your pencils to try and
test different strokes. This is a great
exercise also to loosen up your hand and your wrist
to warm up your hand. And test different materials, different pencils and strokes. So this is something
I do really often. I play with strokes. This relax me a lot, and I really enjoy making
textures in this way. So this is one of the
ways you can create background texture by working with water soluble pencils
on the top of the wet. Let's let's repeat it. It should be wet surface
because in this way, you will see how pencil stroke dissolve in
the wet surface. The stroke will
spread a little bit. Some of the strokes
will be more visible, more dominant and bold depends on the pencil
that you're using. Some of them will be softer. And you can play with different types of
strokes, different forms. Those can be lines, circles, or whatever
shape comes to your mind. If you have in mind
a specific project, then you can think of what
kind of strokes you can paint. For example, this kind of dts and circles could be
good for, let's say, ground full of small pebbles
and rocks maybe dust, sand, or if you
want just strokes, it can be grass again. Also switch the colors of your pencils and if you have
different types and brands, test them as well and see what kind of texture
they will paint, what kind of strokes they will paint, experiment and enjoy. It's all about right
now just experimenting, nothing defined,
nothing final here. And if you like
expressive strokes, expressive kind of art, this is also a great
exercise for you to loosen up your
hand and wrist. And you will see that every time you will do better and better, and you will paint
in a more free way. So here you can see
different kinds. For example, more intense yellow is ink tints from Darwin. Their ink tanks
pencil are ink based, so the color is more
bold, more vibrant. So this is also the reason why I encourage you to test different materials
you have at home. But if you have just
only one type of pencil, never mind, use the thing
you have already at home. Okay, so the second part for this kind of texture
is using other materials. I will use crayons. So those are crayons, even if they seem pencils, but they are greasy. They are quite oily. That's why I will use
them here with again, with neo pastel wax,
water soluble crayons. Again, the technique
is the same. Paint wet on wet and paint the color draw on the wet
color while it's still wet. But this time, use your
crayons if you have them and see what kind of texture
you can make with them. So basically, here the
colors are bolder, more vibrant because
they are oily based, and it means that they
leave more color. And also because they are
high pigmented, as well. So they're good quality. And as you can see, again, I'm playing around here. I'm switching colors. I'm making different strokes. And once I'm ready, once I feel warmed up and
I tested my materials, then I'm ready to jump
into illustration. So I will show you how you can
apply this kind of texture both to one element and to
the whole illustration. So let's start by
painting a bird. Again, this lesson is included
in the original class. Here, it's super
quick version when I'm just briefly showing you
the texture, the technique. But if you want to dive deeper into this kind of
textures and materials, then I invite you to
see the original class. And again, we will
basically do the same what we did in the
first part of this lesson. First painting the
background and, again, using watercolors. And remember to
be quite generous with using diluted
and wet washes of color in order to leave your background
wet as long as possible. And while the color
is still wet, let's do some magic
with our materials. So I will use both wax pastels
and water soluble pencils, and we will paint feathers. We will build the texture to
paint feathers this time. So obviously, you can think to paint it
in the different contexts. Again, in the second part, I will show you how you can use this texture to paint
the grass background. But now we're painting bird. You can think of painting
the bird as well, or you can apply
this kind of texture on whatever element that you
want on whatever subject. That you want to draw. So what I'm doing here is I'm painting on the top of
the wet water color, and I'm switching
different colors. And basically, I'm using
neo coolors wax pastels. And what you can do is mix and switch between
different materials, switch to water soluble
pencils like I'm doing here. And I will speed up the process
because basically I will do I will apply the same
technique all over again, and I will draw also
feathers again if you want to dive deeper into this kind of project
and illustration, feel free to head
to the other class, and right now, I just
speed up the process. Et's skip to the
second illustration. This time we will paint textured grass background
for our project. So again, as we did for
the grass background here, but this time mixed media, so we're adding again,
our wax pastels. I did this corner with a masking tape to
leave the margins white. And also the yellow thing you see in the middle is
the masking fluid. I also explained it in
the original class. So here I will just focus
on the textured background. And what we're doing here is painting with a wet
on dry technique. You already know it by heart, I'm sure, and adding
extra texture with. I'm curious if you know
what I want to say. Yes, granulating water colors. So again, this is my
favorite thing to do mixing and blending different granulating colors
here, different greens. And again, the secret
tip here is to leave your colors wet in a way
that they will blend nicely. Otherwise, if the color is dry and you paint with
the other color next to it, it won't blend. Okay? So that's the main rule. If you feel more comfortable, then you can make wet
on wet technique. Basically, you can paint
with water first and then paint different colors on the top of the water,
it's up to you. And I'm painting
with watercolors, but the new thing is that I will add water soluble neo
colors, wax pastels. So as in the first
part of this lesson, I'm just adding color
next to the watercolor. I'm drawing with
neo pastel and then I'm dissolving it with water. And I will combine
those two, let's say, steps, watercolors, pastels
watercolors, pastels. And you can draw with pastel next to your
watercolor on the dry paper, or you can also paint on the top of it while
the color is still wet as we did in the previous
parts of this lesson. So the good thing about this technique that you
can continue building up the layers if you're not happy with the first
layer, if it's too light, or maybe, I don't know, you just want to paint over some part of the
drawing that you don't like. You can do it. For
example, here, I'm building the texture. I'm basically drawing
the second layer. I'm adding value because I think the background is
still too light, and there is not enough
texture, in my opinion. So I'm painting on the
top of the first layer. It's already dry and I'm using water colors to cover to
paint some darker colors. And I will also use
pastels to do that. So again, I will
repeat the same steps as for the first layer, and I will, um Yeah, paint the background until I'm happy with the values, with the depth of
it, with the colors. But the tools and the
techniques are always the same. So if the color is still wet, use it to use it in your
advantage by using the pastels. And if it's dry, it doesn't matter because
you can draw over it again, and then you can dissolve
it with water if you want, or Or if it's dry, then it's even better if you will use watercolor on the top. Because it is better to
paint the second layer of the watercolor if the
first layer is already dry. Here, for example,
I draw I drew with no pastels on the
dry background on the dry surface and now I'm
solving it with wet brush. Again, I'm using the calm brush to add extra texture,
extra hairy texture. So I'm sure you already you're
feeling this technique. It's something let's
say instinct based. There's no hard rule here. The only rules that I
already repeated here and in the adolescensO watercolors, but I will repeat it in the last steps when we will
summarize this technique. So enjoy the process. I'm leaving you
here and have fun. But summarize this lesson using our mixed media. So we use water soluble
wax pastels and pencils, and you can create
textures by using them as they are or mixed
with watercolors. So test different
colours and brands if you have them at
home, and if not, then test whatever
materials you have at home, test them together
with watercolor, mix it, play around and
see what will happen. You can apply these kind of textures into the illustration, the single element or the
whole background as you wish. Again, here it's up to you if you want to explore the textures by them own or if
you want to paint illustration with
this kind of texture. So here again, here's
the birdie and the backgrounds that I create
with this kind of texture. Enjoy.
12. Liquid Watercolor - Background Textures: Let's start the part where we will use liquid watercolors. I really love this medium, and I use it a lot in my art. I have several classes about how to use liquid watercolors and the specifics of this medium. And let's start with
simple backgrounds. And in the other lessons, you will see other types of textures with really fun
tools and techniques. So for these lessons, obviously you will need
liquid watercolors. There are different
brands and types. For example, eclines. I think they are the
most common out there, and for your
textured background, you will need at
least two colors, again, the same as for the
traditional watercolors. Right now, I will
use darker tones, but you can also use a lighter, brighter tones, it's up to you. And we will use our trusty
wet on wet technique. So you already know the steps, but let's repeat them. First, paint with water, and you can cover
the whole surface of your paper or just and leave
the margins as I will do. It's up to you. And try to be quick while the
paper is still wet. Use your liquid watercolor. Usually, it's together
with a pipette. So you apply the liquid
watercolor with this pipette. If you don't have pipette, you can use just brush and drop the colour on the top
of your wet surface. So depending on how
wet the surface is, the color will spread
in a different way, so it's better to have a more
wet surface than too dry. And you can help yourself with
a brush when you see that the colors don't land then paint with a brush
on the top of it, and you can also add
extra drops of color into it until you're happy until
all the surface is covered. So this is easy
and fun exercise, and you can see you can create really lovely,
lovely textures. Here is how it looks
like when it's dry. You can see it's dried, really lighter, but still it's really
very lovely texture. So I will dry on the top of
it in the original class, and I will paint all with
a lifting technique. If you're curious,
you can have a look. And let's see the same way of painting texture with different
colors with more colors. This time, there will be light
one and warm light colors. Again, painting with
water on the top of our paper And while
it's still wet, let's do the magic and drop
the color on the top of it. And this time, I will
try to be more generous both with water and with
liquid water color. In the way that color will
really flow in an easy way, in the way that if you bend your schatulebok
or your paper, the drops of color
will fall down. They will flow, and this
is something you can do. Just use more water, more of your liquid, watercolor. And instead of using brush, you can simply move your
paper, your sketchbook, and let the gravity do the whole work and see
what will happen if you will just let the drops to fall down and spread
in a natural way. But again, if you want, you can also use your brush
to unite all the surface, all the parts of the paper, of your color, and
it's up to you. You can leave it as it is, or you can use your brush
and unify all the surface. So add new drops of color
into the wet surface and look how hypnotizing it is to
create this kind of texture. I really, really love it. I really love liquid
water colors because they allow you to make those
vibrant, vibrant colors. And the last part is still
repeating the same steps. I will use different colors. I will use greens and blues. This one, this part is
from the class where I paint underwater we seen
and where I use bleach. And you can also see
it in the next lesson. This is the base for the
next lesson where we will add extra textures and
effects with bleach. So I will just leave you
with the speed up process because I use the same steps
as for the previous parts. So here's how we create textured background with
liquid water colors. We use wet on wet technique. We use liquid colors
by applying them with drops of different colours
onto the wet surface. And then we let the drops of colours blend into each other, flow into each
other or we help to uniform the whole
surface with a brush. So here are examples of illustrations that
you can make with lifting technique on the top of the liquid watercolor background
or by simply layering, painting layers of other colors on the top of your background. And in the next lesson, you will see better
what does it mean, and we will see what kind of magic you can create
with water and bleach.
13. Liquid Watercolor - Surprising Textures 1: And let's proceed with liquid watercolors and
see how we can work on top of the background from
the previous lesson and add some magical textures
with water and bleach. So here I'm showing you the examples of
the illustrations with the lifting technique. And again, it's all in
the class about how to learn the lifting technique and paint an
illustration with it. Here I will show you how you can achieve really lovely
textures with this technique. Also, we will use
bleach and Again, it's all in the original class
that explore this medium, bleach and liquid water colors and where we paint
an underwater world. So without further talking, let's start to explore
these magical techniques. Use one of the backgrounds
from the previous lessons. If you haven't done it yet, then that's the moment to do it in order to test
our lifting technique. So all you have to do is
to paint with water on the top of your liquid
watercolor background. It has to be dry, so you can see that my
background is already dry and to be quite
generous with water, you have to paint with a big
amount of water and also, you can see that I tried to
lift the water immediately, and it didn't work,
so be patient, try to paint with water multiple times and wait a little bit. And then you just grab the paper towel or tissue
and lift the water, and you will see the
lighter layer of the color because you are
lifting up the colors. So it's a little
bit different than using this technique with
traditional watercolors, since it's ink and it works differently with
traditional watercolors, probably you would be able
to lift up all the color and uncover the paper almost
the white surface of paper. While with this medium
with liquid watercolors, it's not possible because
it's work like ink. It doesn't have pigments. It has a dye inside and it
dyes your paper instantly. But this is not something wrong rather
than something really good and that you can use it to create different
but really lovely effect. That's why I use this
technique most of all, with liquid watercolors
because see how lovely vibrant and
electrical almost colors you can uncover with
lifting techniques. So, for example, this orange, look how vibrant and
electric it reveals to be. So, have fun, experiment. You can test the
timing of your water. You can leave the water for a longer time and for the short amount of time
and see the difference. In this way, you can play with transparency as well
transparencies as well. Sorry and play around. You can paint something less defined or more
defined. It's up to you. You can play with random
strokes and shapes, or you can think of some
more defined scene. So in this class, we were exploring this technique by painting underwater world because it's full of colors and electric colors, vibrant tones. But you can paint something
else, for example. In the other class I painted all with this technique,
it's up to you. You can just play around. So I will continue
with this technique, and then I will show
you how you can play with bleach and what you can
create with this material. So now I'm switching to bleach. I have this diluted bleach. I discovered that using
pure bleach is too strong, so to have a lovely
effect without having really white and
too strong strokes, you can dilute it with water, and I play with it
with different tools. So you can proceed by
painting it with brush, and I will do it later on. But I also paint really tiny strokes with
bleach with this dip pen, and I create tiny, tiny parts of this plant. And while here, you can see the different effect
it makes from water. The colors are different
and right now I'm using the same diluted bleach
to paint with a brush. So here, use low quality brush, just to be sure not to ruin it. Obviously, it won't damage your brush if you will
wash it immediately after, but still be careful about
the tools that you will use. And you can see already that it immediately creates
really lovely lovely hues. I call it electric
colors because they really seem something
natural neon. It seems like effect
of light or something. So I discovered that
this technique works really well with liquid
watercolors and inks, the same as for the
lifting technique. It doesn't have
the same strength and effect with
traditional watercolors. Um, it's better to
say that it rather doesn't work at all with traditional watercolors.
I mean, the bleach. And here I'm testing
different density of bleach. So right now, I will use more intense,
less diluted bleach, so you can test this as well and see different kinds of
effect that it will create. It also depends on the
colors that you use. Obviously, it will be different on warm colors, and later on, you will see how
lovely jellyfish you can make and what kind of hue it reveals when you paint
on the top of cool colors. So I will speed up the process. So Valla, the final
patches for this project. And look how lovely
effects you can make by combining two techniques lifting colour and fletch, and you can create those lovely transitions
of transparent layers. And let's jump to the
second part where we will paint another underwater
scene with jellyfish. And here we will combine, again, lifting technique with
applying the bleach. I will paint directly
with bleach, but I will also apply the
drops of bleach directly into the wet surface
and let the bleach spread to create
really lovely effect. So here, it's all combining
it's all about combining water and bleach by playing around with these two elements. So for example, here I
painted with water first, the shape of jellyfish. And right now I'm
applying the bleach into the water into
the wet surface. I'm applying bleach with brush, and you can see
what's happening. So I will do those thing. I will speed up the process. I will basically mix. This technique, also lifting
technique and painting directly with bleach as I did with the first illustration. Without specifying you
each and every step, you can see if you want to understand better
all the steps. Also, the other class, but I'm sure you
already get the point, play around, mix test. I also did numerous trials before I was happy
with the result. So it's all about
experimenting and testing and seeing
what works best. So have fun, and I hope you
will enjoy this process. H So let's see again what we covered
in this lesson. So we used our backgrounds from the previous lessons to use the lifting technique
to play with water and with bleach in order to
create lovely textures. So we can paint you can paint strokes or shapes with
clean water and lift it with a paper towel for the
lifting technique and use diluted bleach painted with different tools on the
top of your background. And play around with
water and bleach, different quantity of both. Use both wet on wet and
wet on dry technique, and just play around and see
what will happen. Enjoy.
14. Liquid Watercolor - Surprising Textures 2: Let's see what other
lovely and extra textures we can make with
liquid watercolors. So maybe you remember, I showed you this
illustration for the tree trunk and the traditional watercolors
in the previous lesson, and that's how I made it. So here I will show you how
I paint pebbles and kacti. That's the lesson from the original class about
exploring liquid watercolors, all the basic knowledge
about this medium. And exploring it. And here I'll show
you how to add extra textures by
painting pebbles, by painting cactus because
I also painted pebbles. But we will just
make cactus because the basic is the same, and you can apply it in different contexts
as for the tree, as for the pebbles,
as for the cacti, as for the rocks,
whatever you want. Okay, without further
tucking, let's get started. So here I will show you how you can paint background
in a different way. I will just use a single color. I won't do textured background since I want the
cacti to be textured, so it would be too much if also the background
would be textured, so I want it to be
just a plain color. I'm using this bright
yellow because it's a nice color to be combined
with the green one. You can paint whatever you want, whatever subject you want
and whatever color you want. You can also do it without painting background if you want. So our old friend
spray water spray, and I'm adding a little bit of dust texture for the
base of my cacti, even if probably it
will be covered, but, you know, layering
textures is never enough, and you can always start as well by making the first
texture in this way. So to paint the cactus, I will basically do the same what we did in the previous
lessons, nothing new here. So some of the parts I will paint as for
the background from the previous lessons by painting water first and then applying the drops of
colour on the top of it. And in this way, you
will create the base, which will create
lovely textured, colorful textures of colors that are blending
into each other. And then we will use the
secret ingredient that we already used for the
lesson about sky, and that is obviously salt. And that's the same rule
as for the watercolors. For the traditional watercolors, you have to sprinkle the salt on the top of the wet
colour and let it dry before you will
remove it and let the salt to do it work
while it's still wet. But the difference here, I mean, in my opinion, is that
the salt is more evident. I mean, the texture that you
can do with watercolors, with liquid watercolors,
it's a little bit different than for
the traditional colors. Probably it's
again, because they are thigh based and
not pigment based. So it's all more
vibrant and evident. So give it a try. And
also mix your techniques. Here, I'm using wet on dry. So I'm painting directly the colors of
liquid watercolors, the drops of color
on the dry surface. Now, the rules here
are more or less the same as for the
traditional watercolor. You can also drop a
color into your cactus, and this is also to
create cactus texture. Sometimes you can
see those dots of different colors on
the top of the cactus. So that's the same here. I will use it both on the color or directly
on the clean water, and this is the other tool
to build the texture. So again, I will
speed up the process. Here, the steps are all the same playing with drops
of liquid water colors. Here you can see, I drop
them directly on the water, playing with salt and
building this cacti texture. You can also use the pen or trusty pen that we already
used for leaves and grass. And also here, you can
add extra texture. I mean, here, just it's
so evident that you can paint the spines and Yeah, it's always adding an
extra texture to it, since it's like an
ink you can use in a very easy way by dipping your pen and direct into the
color and use it as an ink. So here is all the
secret magic knowledge to create those extra
lovely textures, mix different techniques
from previous lessons, create extra texture by dropping the color directly
into the wet surface. It could be water. It
could be your color and add the salt also
into the wet color. And again, some examples of where you can apply
this texture. Again, our tree,
but I also apply to the ground texture
and other types of cacti with or without the background
or also the pebbles. I hope you will enjoy, have fun.
15. Masking Fluid Textures - Basic Tools: And let's dive to the medium, last type of textures
from this class, and it will involve
masking fluid. I love to use this medium, and you can be really surprised how many different
fun textures and techniques you can make in
order to create textures. So I use it often not only to mask some parts
of my illustration, but most of the times I use
it to create those textures. Let's get started.
At the beginning, I will show you the basics
and how to use this medium. In a fun way, and then
you will see how you can apply those tools
to paint fun trees. But it's on the example,
you can apply it in many different
situations and contexts. Again, those lessons
are already here on my class on my profile. This is class about
masking fluid, where I explore this medium
in a really deep way. So if you're new to this medium, maybe you would like to
see first this class. Let's get started. I'm sure
we will have a lot of fun. I will walk you briefly
through masking fluid. But again, there's
the whole class that explores it in a wider way. There are different
types like this one in the bottle or the
one that you can apply in the form of pen or really thin line,
the other bottle. If you're new to masking fluid, then maybe you would
like to explore it first and see what does it? What do you use it when
you work with watercolors. But basically, as the name says, it's all about
masking some areas. You paint over it, and when it's dry,
you peel it off, and the area that you covered
it with will remain lang. It will remain white
or as you covered it. So this is the marker
pen with masking fluid, and this one is this
kind of applicator, which is really thin and serves to paint really thin lines. So it's also very good. I will test my masking fluids
on already painted paper. There is a layer of color,
but it's up to you. You can also use it directly on the paper without
painting it. I will do it only because it already creates a
first layer of textures. So let's test our
first muskin fluid. So it's already quite old, and the muskin fluid
was very liquid. I think it became
like this in time, and it's more
difficult to apply. But if you test, there is also a different
brand, different kind. And if they're dense enough, they can really create
really lovely thin lines. So I will apply it as it is, and I will do I will
make the best of it. Another type masking
fluid as a marker. This one is from Schminke again, it's made to apply masking fluid as a thin lines a little bit thicker
than the previous one, but since the other
one was to liquid, then maybe this one
will have more success. And yes, you can
see that it's more dense and lay around by applying different strokes and test it if you have this
kind of masking fluid. And there's the most common one that you probably know the
masking fluid in the bottle. So here you have to find
a way how to apply it. So you can use brush, but it ruins the brush. So even if you will use
a cheaper brush and something because
you want to use a cheaper brush or the brush
that you won't use anymore, still the bristles
will remain covered with this kind of silicon
glue and it won't go away. So in the end, it is very
uncomfortable to apply. And I'm not a big
fan of using brush. I know some people do,
and they clean it. Somehow I wasn't able to save
or clean any of my brushes. So what I'm using is
the silicon brush. They are made to
apply skin fluid, specifically, maybe
also other things, but I use it to
apply muskin fluid. And I also love them
because they also are a great tool to make
textures because as you can see, when I applying it, it won't
apply in a very uniform way. It creates this lovely texture, the parts of the masking fluid that are more dense
and other not. So it creates already really,
really lovely effect. You will see it later
when we will rub it off. And other fun tools
that you can use to use muskin fluid and to create lovely textures. Here they are. The first is our
trusting pen that we used already many times
here in this class. So here I decided
that I can use it because even if the muskin fluid will cover it and
while it's dry, obviously, it will remain
glued into the pan, but since it's metal,
it will peel off. It will easily peel off, or you can just clean it
while it's still wet. As you can see, it's
not always easy because sometimes it remains
clocked into the, but if it flows easily, then you can still give it a try and make some thin lines. That's the alternative,
for the first two tools. And as you can see, if it works well, then it creates really
lovely thin lines. So another fun way to
use masking fluid is by applying it with
toilet paper roll. So to do that, pour some of
the masking fluid aside, use some place that it's
not so precious for you. And then take your paper roll, dip into the masking
fluid, and apply it. Very fun to you can play around. And actually, it's about making
different circle shapes, but not only because
then you can later on fold your paper and create
some more oval shapes, some kind of petal shapes
and half circle shapes. The possibilities are endless. So explore, have fun,
try different strokes, think that you want to explore different
kind of textures, and you can do it just
by playing and trying. And once you're ready, once you try different tools, let your masking fluid dry. It has to be completely dry before you will
paint over it. So once it's dry, take your watercolor and
paint a layer of the color. In my case, it will be the
second layer of color, but if you um, used masking fluid on the paper that it will be the
first layer of color. Anyway, just paint the color on the top of your masking fluid and wait again until
your color gets dry. As you can see, you can use also the hair dryer to speed up the process of drying and
once everything is super dry, then peel off the masking fluid. You can do it with your
hand, with your finger, but sometimes it's annoying and sometimes the fastest way, especially if it won't
peel off easily is to using a plastic
foil or allopane. So in my case, I will use a piece of packaging of tissues. So it often makes the process of peeling
much more quick and easy. And here I'm zooming
in the textures made by this unusual application
of masking fluid, as you can see, different kinds. This is the one created
by the silicon brush, personally, my favorite one. But also, you know, the
toilet paper is really cool. And yeah, you can see that this kind creates really
plain kind of strokes. But also, since it
was very liquid, so the forms and shapes
are really interesting. And you can use
all these kind of characteristics to
work on your texture. So in the next lesson, I will show you how you can paint beautiful
and fun trees with this kind of way
with this technique. Obviously, there are some other things you can do with it, but we will see how
we can paint trees. So here are the
tools and step to work with masking
fluid textures, test different kinds
of masking fluid. If you have them at home, test different ways
of applying it. For example, with the
tools that you already have at home like
toilet paper roll, stick, pen or whatever, if you have a silicon brush, then definitely test it out and remember to work
with masking fluid, always work on the
dry watercolor and to peel it off both of them watercolor and masking
fluid must be dry. And here is an example of a fun way that you
can play around with masking fluids and
watercolors and create really lovely textured
patterns, for example.
16. Masking Fluid Textures - Applying Into Illustration: Although in this lesson,
I will show you how to paint trees with masking fluid. You can see that you can
apply masking fluid in many different ways and
many different themes, not only trees,
but, for example, animals, grass, et cetera. So it's up to you. I will
show you different tools, and you can paint
together with me those trees or the
site where you can apply the tools and the techniques
that I will show you. And this lesson is from the
class where I explore in a deeper way what is masking fluid and where
we paint found trees. Let's get started.
The first step is to paint the first layer of the trees or whatever
you are painting right now. I'm painting trees, so I
will paint different types and shapes of trees
with different colors. The layer can be quite light
because we will build up new layers with watercolor on the top and with
masking fluid, so it doesn't have
to be very dark. So I will speed up the
process of painting the first layer first layer
and shapes of all my trees. Once you're ready, remember
that your first layer must be dry and the second
step would be applying the masking fluid on the
top of your first layer. I will use different tools here. Again, for different
trees, different tools, I will play around test different kind of tools to
apply the masking fluid. And you can see also in the
original class, step by step. But basically, here, what I
will do is I will alternate the layer of skin fluid and
then the layer of watercolor. And I will repeat this process. So to recap, the first
layer of watercolor, the second layer of skin fluid, then the third layer, which will be,
again, watercolor. When it's dry, then I will apply another layer of muskin fluid. I forgot that in the meantime, I will peel off the previous
layers of skin fluid. So I will test different tools,
different masking fluids, the same as for the
previous lesson in order to make different textures,
different leafy textures. So if you remember the
previous lesson about painting leafy texture
in the tree crowns, then this is a fun
alternative way to do that. I'm using here both marker and then silicon brush,
alternate tools. I just play around and
see what will happen. The key here is to diversify, to see different to
use different tools, and also to use the knowledge that we already have from the previous lessons because then you can
you think how you can paint watercolors in a fun way that will help your
texture to build up. For example, use
granulating colors. Or use different
colors that will blend within the wet on
wet technique and so on. So right now, I will apply the masking fluid on the
top of all the trees. This is our second layer, and I will speed up the process. Again, playing, testing
different tools, experimenting. Here is the silicon, brush, for example, and so on. So the third step, the third layer is to
paint the watercolor. So basically, it's the
second layer of watercolor, but the third layer, meaning that there's the
layer of masking fluid. Anyway, you paint on
the top of what you already have your first layer
and your masking fluid. And once you're ready once
your watercolor is dry, then it's time to reveal the magic and peel
off the muskin fluid. So I will use my trusty
plastic tissue packaging because it will be easier and also it protects my finger
because if you have to peel off big surface of
muskin fluid and it warms up, then it can be quite painful. So that's my tip for you. Use some protective
plastic film. And a, you can see what fun, really lovely fun
textures are revealed. We are peeling off
the muskin fluid and revealing the layer
that was underneath. And you can see really, really gorgeous things you can do with with those basic tools, but you can really
be creative and invent a lot of fun textures. And Walla, here is
the final result. I'm super enthusiast
of this technique, and I'm sure you
will enjoy it too. If it's this kind of textures
you are searching for, it gives me an
impression of woodcut, of the techniques
of printmaking, which is woodcut or linem
cut, something like that. So basically, you can stop at this point and just
make three layers. I mean, two layers
of watercolor, but you can continue
and repeat the process. So, for example, for this tree, I will paint new dots of colors. And in this way, I will create this very three
dimensional effect. New colors, new textures will reveal by this. It's up to you. For example, here, I will paint, on the top of some
leaves also to make um colorful textures on the top and to add some extra sparkles
into my illustration. And here I'm making
a trunk texture. So again, something we
already did with watercolors, and you can use masking
fluid to do that. It is really great tool
because as you can see, it already creates
this woody texture as a woodcutu printed
technique does, and it's something
exciting as well. So here's the final result of my experimenting and of the trees. Here are some other examples of the trees that I made with this technique and some
illustrations that I did. So I tested quite a lot, often when I work
with watercolors. So I think it's something you
should try out too as well. Have fun, enjoy, and let's repeat briefly the process
and steps from this lesson. Okay, so to paint your
illustration with masking fluid, paint the first layer
of watercolor first, then apply the masking fluid, experiment with different
ways of how you can apply it in order to create
those lovely textures, paint the second layer of watercolor on the top
of the masking fluid. Then when it's dry, peel off the masking fluid
and you can repeat this process steps as many times
as you want remember, have fun, experiment and
explore those textures.
17. Final Thoughts: Alright, so we've made it. If you saw the whole class, then I congratulate you. I'm really proud of you, and I'm aware it was
really big to digest. So what I suggest to you
is that you can turn back to the content of this class step by
step, piece by piece. Just take one piece
at a time and see what inspires you
most and work on it. And when you're ready, then
you can come back to it later and work on something different and you can create your project
with just one texture, for example, and come back to it later and update your project with new pieces of art of textures or
whatever you created. So I cannot wait to
see what you created. Please share it with us. I will be super happy to
see and to hear from you. Was it useful for you? How it helped your art to
develop was it helpful? Was it inspiring? Also, if you will apply those textures into
your illustrations. I encourage you to
comment also on the projects of other
colleagues, of other students. It is really important
to see each other's art, to see what you created, to see what other are
creating, to comment it. And to appreciate it. I hope you really enjoy this adventure and that
you learned a lot. Follow me here on my Skillshare, I will continue to
create new content, also on the new textures. If you have any questions
about other types of textures you would
like to learn then come back to me in
the discussion panel, and I will be happy to hear
some suggestions from you. Also, you can follow
me on my YouTube where I post some different content, where I post many
different things that I don't share
here on Skillshare. I will be happy to have
you in my community. Also on Instagram. Let's connect together.
Let's create, and thank you for being
here with me. Bye.
 Ania Kropla Malinowska, Award-winning illustrator