Transcripts
1. Welcome to Class!: Ever wondered how to paint the serene beauty of
winter landscapes? Join me on what
color journey as we explore the art of
painting winter wonders. Capturing the hush beauty of snowy scenes and cozy cabins. Get ready to immerse
yourself in the magic of the season and create your own Winter
wonderland masterpiece. Hello, fellow artists. I'm Elena and I'm beyond
excited to welcome you to a captivating journey in the
world of winter landscapes. In this class, we're
not just painting, we're creating a serene
masterpiece that captures the essence of winter with
my passion for what color, that spans over five years. I'm thrilled to guide you through the
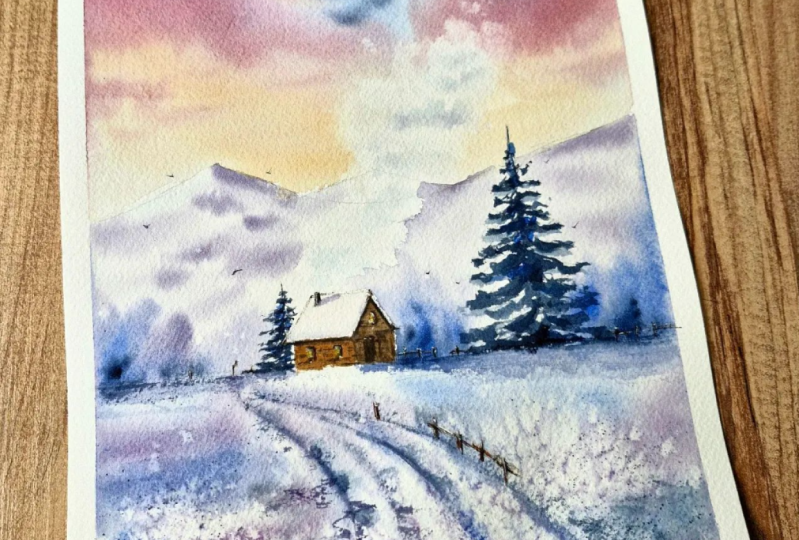
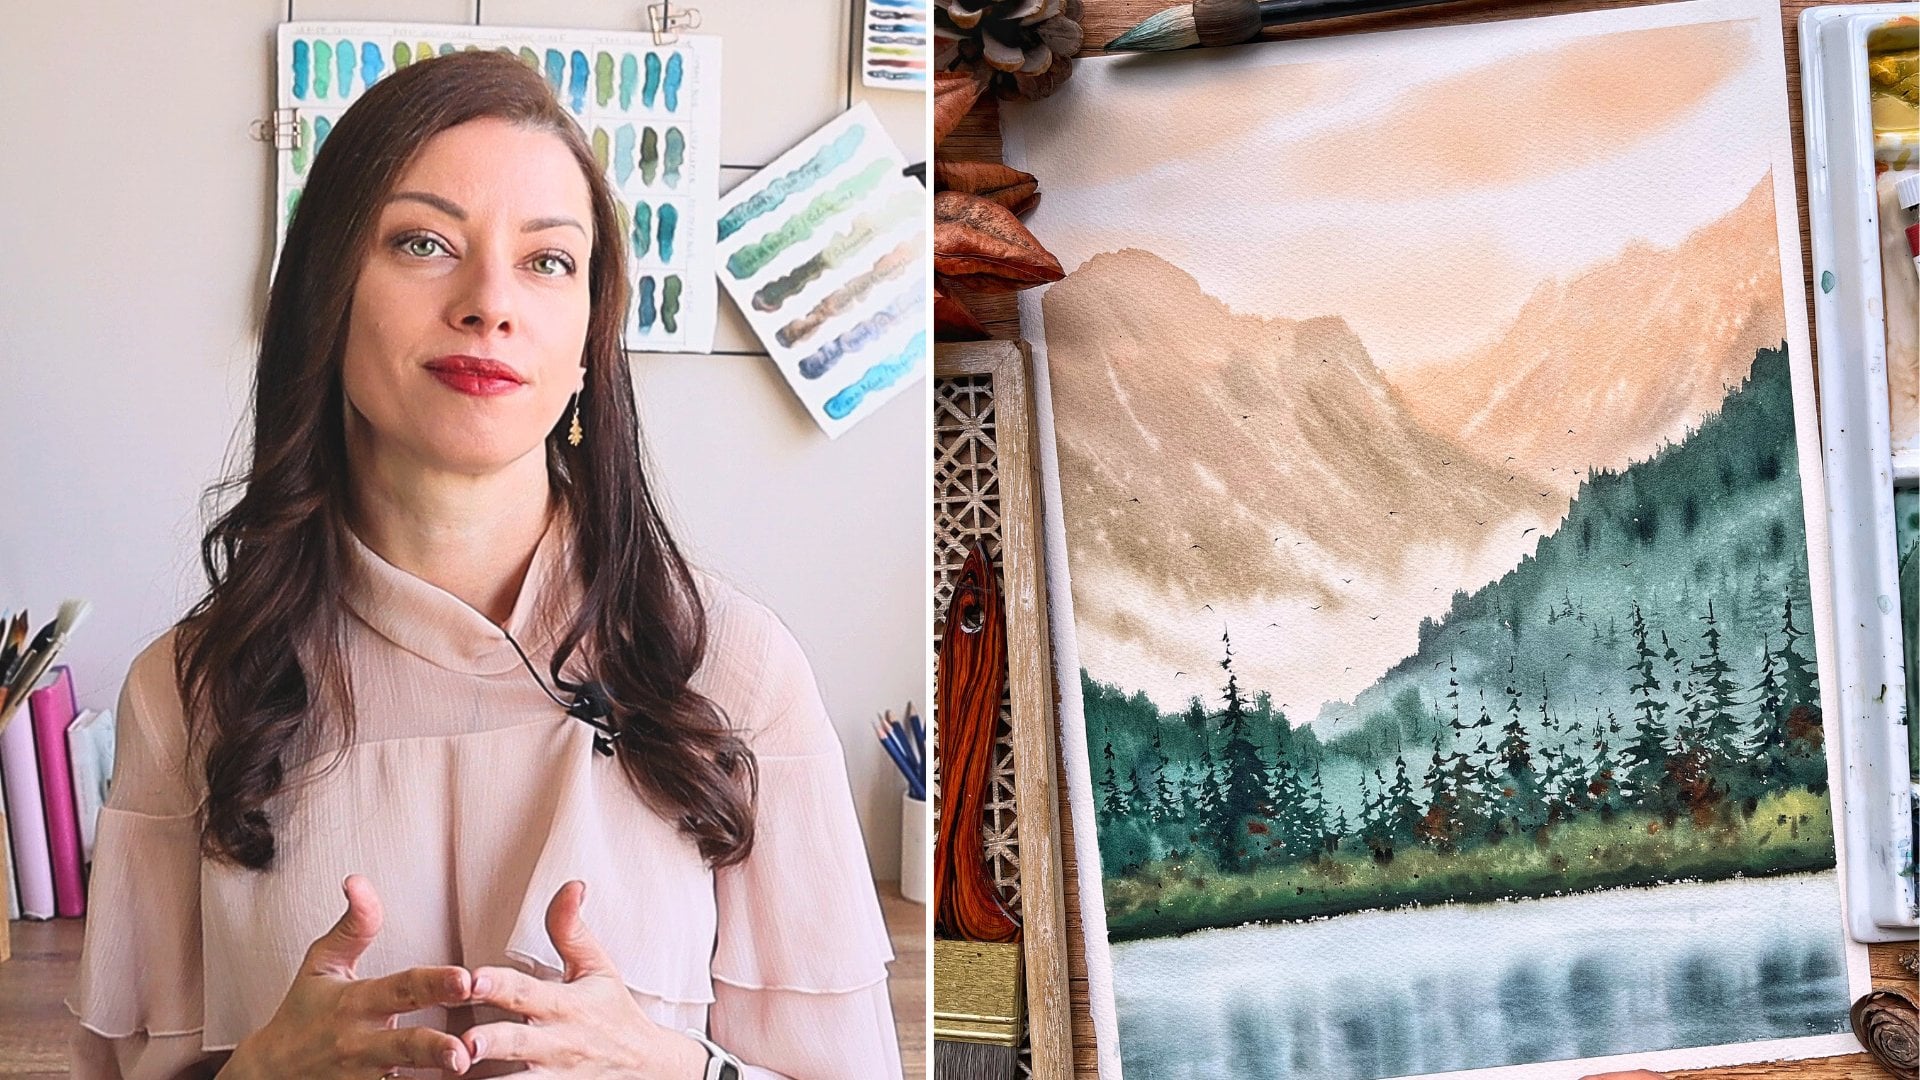
process of painting. Soft skies, snow
capped mountains and cozy cabin with smoke gently
arising from its chimney. We'll delve into the essential
watercolor techniques, unraveling the magic behind
different Watcolo effects, and mastering the art of
painting snowy pine trees. Whether you're a beginner
or an intermediate artist, this class is for you. So are you ready to
dip your bashes into the trunquil beauty
of winter landscapes? Join me in this
artistic adventure and let's create something
extraordinary together. Stay tuned for a
detailed overview of our Clue structure and the final project
in the next video.
2. Class + Project Overview: Welcome back, Creative Friends. In this video, we'll take
a closer look at what awaits you in our winter
landscape painting class. We'll start by going through the materials that you'll
need to complete the class. As usual, I'll provide
you with some options, so don't worry if you don't have the same materials in our
separate water control video. I'll unveil the
secrets to mastering different color effects and effortlessly painting
snowy pine trees. It's fundamental
skill that will add depth and life turn
landscapes, speaking of which, get ready to paint mesmerizing
scene, a soft urine sky, snow blanketed mountains and a charming cabin emitting
a warm trail of smoke. I'll guide you step by step, ensuring that each first stroke springs your landscape to life. This class is designed with both beginners and
intermediate artist in mind. If you have a basic understanding
of Utica techniques, you'll all set to embark
on this creative journey. Don't forget to share
your progress in our project gallery and let's celebrate the beauty
we're creating together. Now let's dive
into the materials you'll need for this class. See in the next video.
3. Materials: Let's begin by going through the materials that you'll
need for this class. Let's start with the
paper For this class, I'll be using this what
call paper block that I bought during one of
our trips to Poland. It's undercover. That's
100% cotton and 300 GSM. I find it quite different
than the paper. I'm usually using, S and
Sanders Ford for example. Nevertheless, I like the format and I won't be using
any complex techniques. So it will be perfect
for this class. If you have 100% cotton
paper, definitely use that. If not, you can still try and follow along with whatever
you have available. I'll be taping it to
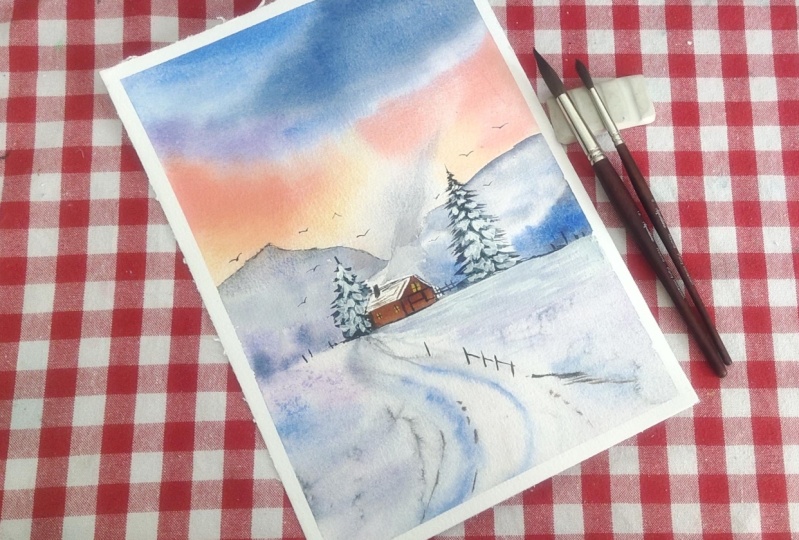
this plastic board with the help of my paper tape. Next, let's talk about brushes. I'll be using this
big and soft brush by Suni Art to at my paper, you can just use your
picket brush For that, you will need one large brush, preferably with soft hair, to paint the sky and other
large areas of the painting. Depending on the size of your paper and what you're
used to paint with, you may use a smaller one, like this size two soft quill. Both of these are bit
interato brushes. Then here I have sizes
2.6 silver black velvet, which I'll use for smaller
areas and details. Basically, you will need at least 11 medium
and one small brush. Next are the paint. So here I have my large ceramic palette, which I have filled with
my favorite colors. I have it for more than a year and it took me some time
to build my palette. You can see the full list of the colors that I'm
using currently. But for this class, we'll be
using only Naples Yellow, which is optional.
Transparent yellow. Any yellow woodwork, Opera Rose. Any other pink or cold
red woodwork burn Tiana. You can use burn timber
instead or any other brown, ultramarine and paint screen. You see that it also has
two large mixing areas. I use one for one colors and
the other for cult colors. You can use whatever mixing
palette you have available. And if you don't have one, the best thing you can use instead is a simple
white dinner plate. I'll use this pray bottle with clean water to
activate my paints. You'll also need a pencil. And then is there for the sage. You might want to have
some white quash for details or final touches,
I won't be using it. Two jars of water,
one to rings off your brushes and one for
when we need clean water, cotton or paper towels. I'll be using both that. These are all the supplies that you'll need for today's class. Gather your materials and I'll
see you in the next video, where we'll practice some
specific techniques.
4. Techniques: Welcome back. In this video, I'll demonstrate some
techniques that will help you achieve nice results when
painting the final project. First, let's practice
some water control. When we're painting
winter landscapes, we often add elements such as mist or smoke from a chimney. Another thing I'd like to do is using salt for
additional effect. To create those, we need a good understanding
of water control. And more precisely, when is the right moment to
add those elements. I will paint three separate
stripes and I will try to use the exact amount of liquid for each of them only. I will wait different
intervals of time before introducing
the elements. I'll start with the last one. I'm taking some clean
water on my brush and now we'll drop it on
the steel wet surface. Because the surface
is still very wet. It's very easy for me to push
the blue pig int away with the clean water because the particles of the pig
mint haven't settled yet. You can also wipe
some of the color by pressing with your brush and
wiping it on a paper table. This is how we'll
create the smoke coming out of the chimney
in our final project. Now let's add some salt here. Please note that the paper is not fully loaded
with blue paint. There are no huge
pools of water, and you can see
the paper texture. But still, the paper
is glistening. And we'll leave this one to dry and move to the
strip in the middle. This one has started
to dry lightly. The surface is not glossy as the first one was when I started tutting the
drops of water. Now, I will have
to work a little bit more to create that
natural looking smoke, but the upside here is that I have more
control when dropping the clean water as it's not spreading as wildly as
in the first section. Time for some salt crystals. Now for the first
try I painted here, the glossy surface is gone. The pig mines started
settling in the paper fibers. Now just dropping some
clean water won't work. I'll have to move
my brush across the paper surface to
reactivate the paint, and only then I can lift
some of that pigment. Note that this will
look very different depending on the pigment
tin the paper you're using. But the important
part is that you try this on your own
so that you'll get to see how your paper
behaves and which is the trying stage that
gives you the best results. It will be different
for everyone. I highly recommend you try
this with your own supplies. Now, we'll leave
it dry completely. In the meantime, let me
show you how I paint. No covered pine trees. You can see them in almost
every winter landscape, but they can be quite
tricky to paint. Having that, we need to leave some white
areas for the snow. I'm drawing a very rough
shape of a pine tree. First I'm drawing an
elongated triangle, and then I'm adding some
branches on the site. Following more or less
the dizact motion. Now I will take some
concentrated paint scrap. You can also use
indigo or dark green. I'll start adding
some messy trucks alongside my pencil lines. These are the parts of the tree that are uncovered with snow, so make sure you
list some space for the snow that sits
on top of them. We're painting the parts
of the branches that are peaking below the
snow that covers them. Our curious foster kitty decided to join
me for this part. My strokes are becoming wider and bolder as I
approach the base. Now I'll wash my brush. And using just the damp brush, I will start smudging the paint. This way we're painting the
shadowy part of the snow. I make sure to leave some uncovered white spaces
for the highlight. I don't have a photo reference, but you can find many
pine tree photos online and you can practice painting them using
this technique. And very soon you'll
get the hang of it. The key is not to get
angled up in the details, but for our class today, we'll paint very
small pine trees, so that won't be a problem. Mudding some additional strokes here and there for a
more realistic look. We can even drop other colors to make it more interesting. We can add on blue, for example, mudding a spot and
then I'm smudging its edges with a Am brush
to blend it with the rest. You can add different
colors depending on the light and the
colors of your sky. Purple, pink, or
even warm yellow. If it's a warm
sunset or sunrise. Few details with paint. Scrape our now covered pine
tree is complete. Lastly, let's have
a quick look at how the salt has worked on
the different sections. As you can see, the
best results are in the very first section
where the paper was still glistening
when we added the salt. So make sure you
try this and you'll be all set for our
final project. We'll start painting
it in the next video.
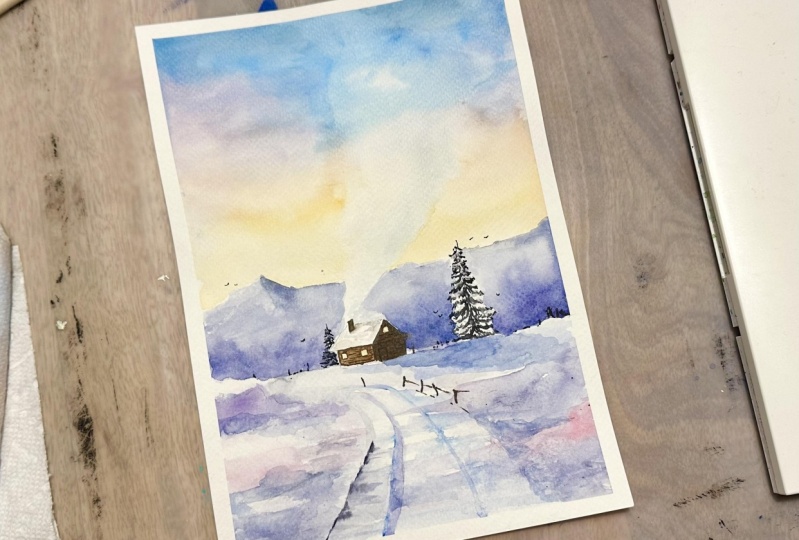
5. Painting the Sky: Welcome back. In this video, we'll start painting
our final project, and we'll start with the Sky. I have already
prepared my sketch. You can download it from the resources section of the class or post the
video here and copy it. I will take my paper to my
board with the paper tape. I'm taking some of
the excess graphite. Our painting will be quite
light and we don't want any harsh pencil lines to be visible beneath the
transparent we color. Let me just add
the small chimney and the smoke coming out of it. I'm placing my paper
tape below my board. In this way the water
and paint will flow down instead of forming
puddles on the paper surface. I'll start by waiting
the area of the sky. I won't be waiting the entire
sheet in just the sky. While the paper is
soaking up the water, I will prepare my colors
first, ultramarine. Now I'll make
another puddle with Tool turmarine and I'll add to it some opera to make purple. If you have purple
in your palette, you can use that instead. Or you can add another cold
red to the blue to mix it. Going one more time with some clean water
over the area of the sky, we can start painting. I'm taking some
ultramarine with my big. I add a few bold strokes with it in the upper
part of the sky. If you want to make it darker, you cannot paint spray or
indigo here and there. This creates a nice darker frame for the paintings upper corner. A few more strokes
with the blue, and now I'll switch to purple. I think just a touch of
opera to make it more pinkish and even more pinkish. Now adding that too, we're slowly building
our sky going from the dark blue to
warmer and warmer shades. Now I'll mix pitchy color
by combining nipples, yellow, transparent
yellow, and opera. If you don't have
similar colors, you can use whatever orange or warm red you have available. I'm adding that to
note how the slope of the bird helps with the blending
of the different colors. Few last strokes
without pinkish purple. Now it's time to add the clouds. I prepare a bright pink mixture. This one needs to
be thicker than the mixes we used for the sky. And I'll add a few puffy clouds. Let's make a darker mixture for the clouds in
the upper part. I'm using whatever
is left here on my palette and you can use
paints, gray or indigo. I will now wash my brush, dry it on my towel. And I will use it to move the pigments here and
there to encourage them to mix and create an even softer and dreamy
look of the clouds. Some small shapes
here below with pink. Now let's create the smoke
coming out of the chimney. I'm switching to
my smaller quill. I wash it in clean water and I'll use it to wipe
some of the color here. I'm cleaning my
brush on my table. Each time I pick up
a paint with it, oops, what a huge drop. I'll fix it. I'm changing the slope of my board and I will start adding clean water, and that will push
the pigment away. I continue shaping it now let's give it some arm. I will take this dark blue mix and we'll drop it
here and there. This will create a more
three dimensional lock. I dropped another
huge drop of water. But happily my paper is
still and I can fix it. I will add more color here. Someone touches for the smoke. I decided to make
it even bigger. I think it makes the
area of the sky more interesting and
creates a feeling of movement in the painting. And I will leave
it like that now. We need to let it try. And in the next video, we'll paint the
snow. See you there.
6. Painting the Snow: Okay. Let's prepare now
to paint the snow. I'm having a jar with some
regular table old here and I will place again my paper tape below the upper part
of the painting. Let's we now the bottom part of the painting will
cover the mountain, the foreground, everything
besides the house. I'll go around the smoke too. When painting is
now, we need to add some very light nuances to it to give the volume realistic, the time these colors will
reflect the colors of the sky. I will prepare a few puddles
with water mixtures that I'll use to paint the
snow first, ultramarine. Then I'll prepare some
purple again using ultramarine opera without
washing my brush. I'll just take a little
bit of paints gray in this way I get this muted
dark purple but still water. I'll use that to
cover the mountains. I'm taking texss liquid on
my paper towel and I will start tudding shadows on the mountains leaving
some white spaces. I'm going carefully around the smoke and
around that pantry. It's not a big deal if some
of the paint goes over it. I'm taking some of
that color again, and now I'll add
some darker spots. Now here at the base
of the mountain, we have some snow covered
forests or bushes. I'll pin them with spots
of ultramarine purple, just some random spots going between the
different colors. Let's now add a few decorous
spots here and there. That should be enough. And finally, lets
paint the foreground. I'm taking some
ultramarine and I'm madding a few horizontal
strokes with it, mixing some per pot to add a
few larger pots with it too. These could be some
bushes covered with snow. Some long strokes with it too. Make sure to leave white
spaces, then cover everything. Now let's paint the road. I'm mixing a bluish purple. With that, I will go
over the lines of the road adding some deper
shadows with ultramarine. Here, where the road
becomes smaller, we use a very light
crash mixture. I'm smudging the colors, which will create again, a sense of movement
to the foreground. Let's add another
darker spot here, Some latches. And now let's sprinkle some
salt while let's deal wet. We do this only in
the foreground, and let's leave it to dry.
7. Painting the Cabin: Okay, time to paint the cabin. Let's first remove the salt. I got this very nice,
delicate texture, so I'll use my size six
silver black velvet. And I'm taking some
bird, Tiana, with it. My knee is a bit warm, so I t, to touch a fuld marine
to mute the bit, I'm feeling the entire shape. But I'm going
around the windows. I'm mixing even darker brown
by adding more ultramarine. And now use it to
paint the shadows. I'm adding a little line
just below the roof here. This site is entirely
in the shadow, so I'll make it darker. A few more darker spots
here too. Below the roof, around the windows.
And just a few lines that will imitate planks. Now let's paint the roof. We just need to add some very light colors to give
it some volume. I waited first and then I
drop some pink Sam purpose, leaving some white areas, a shadow for the chimney
with darker paint. A few more touches with it, let's not forget the chimney. And finally I'll drop some
lo inside the windows, some details with dark brown. And our cute little
cabin is done. In the next video, we'll paint
the pine trees see there.
8. Painting the Pine Trees: Our winter landscape
is almost complete. We only need to
add the pine trees and some final touches. If you've practiced painting the pine tree from
the techniques video, this should be pretty easy. Let's start with the
smaller one on the left. I'm preparing a dark mix of
ultramarine paints, gray. You can also use
Tico or dark green. Same as we did in the
techniques video. Mudding the dark branches first following a
rough zigzac motion. Okay, this one is done. Let's move on to the
bigger one here. We need to be more careful to create natural
looking branches. Now I'll such some of the
paint here and there with the umbrush for my painting, I chose this perfect looking
Christmas tree shape. But if you like, you
can paint yours with less branches and less symmetry.
It's totally up to you. I just thought the whole
vibe of this painting is somewhat idyllic
and fair tail like I just have these nicely
looking perfect pine trees. So I as much the paint here
and there and now I will just add a few darker
spots with pints, Cray's. It the pine trees
are ready to now. Let's add a few
finishing touches. See you in the next video.
9. Finishing Touches: Welcome back. In this video, we'll finish our painting. It just needs some
final touches and texture that will add
more character to it. I'll start by mixing
watery, purple gray color. And with that I will
define the road. In the foreground, I think some spots on
the side of the road. Some textures. Now it's on water.
Ultramarine lays out the shadows for the
cabin and the pantries just add in land below them. And then after needed
to wait tackling press with the same water.
Real marine A adds some spots and
textures on the snow. Now I mix fans gray and burn
sienna to get a dark brown. And with that I will let the crooked fans here
alongside the road. And then unindentnified objects, just some spots and lights. Some tixture on
the roof as well. Some details on the cabin. With my brush size too
and some pens Gray, I will add a few birds. I think adding birds always
makes the scene more lively. If you want, you can
keep the birds and add some snow falling from
the sky with white cash. And if you just paying birds, don't forget that they
need to be pretty small because the cabin
and the trees are small, so splatters in the foreground. And my painting is ready. I will remove the tape. I hope you enjoyed painting this winter landscape with me and that you're happy
with your masterpiece. Let's wrap up the class
in the next video.
10. Wrapping Up the Class!: Congratulations my
fellow artists on completing this enchanting winter landscape painting class. I want to express my
deepest gratitude for joining me in this
artistic adventure. Throughout our lessons, we've painted soft skies,
snowy mountains, and cozy cabin, capturing the serene beauty of
winter landscapes. Take a moment to reflect on your journey and celebrate the masterpiece you've created. If there's one takeaway
from this class, it's the joy of bringing
nature to life on paper, I encourage you to share your incredible projects
in the project gallery, A space where we can all
appreciate and inspire one another for more art tutorials and behind the scenes glimpses. Find me on Youtube where
I share in the process. Videos connect with
me on Instagram for Nick pick into my current
projects and more. Thank you once again for being part of this creative
community until next time painting and let your imagination flow like
what call masterpiece. See you in my next class.
 Elina Zhelyazkova, Watercolor Artist