Transcripts
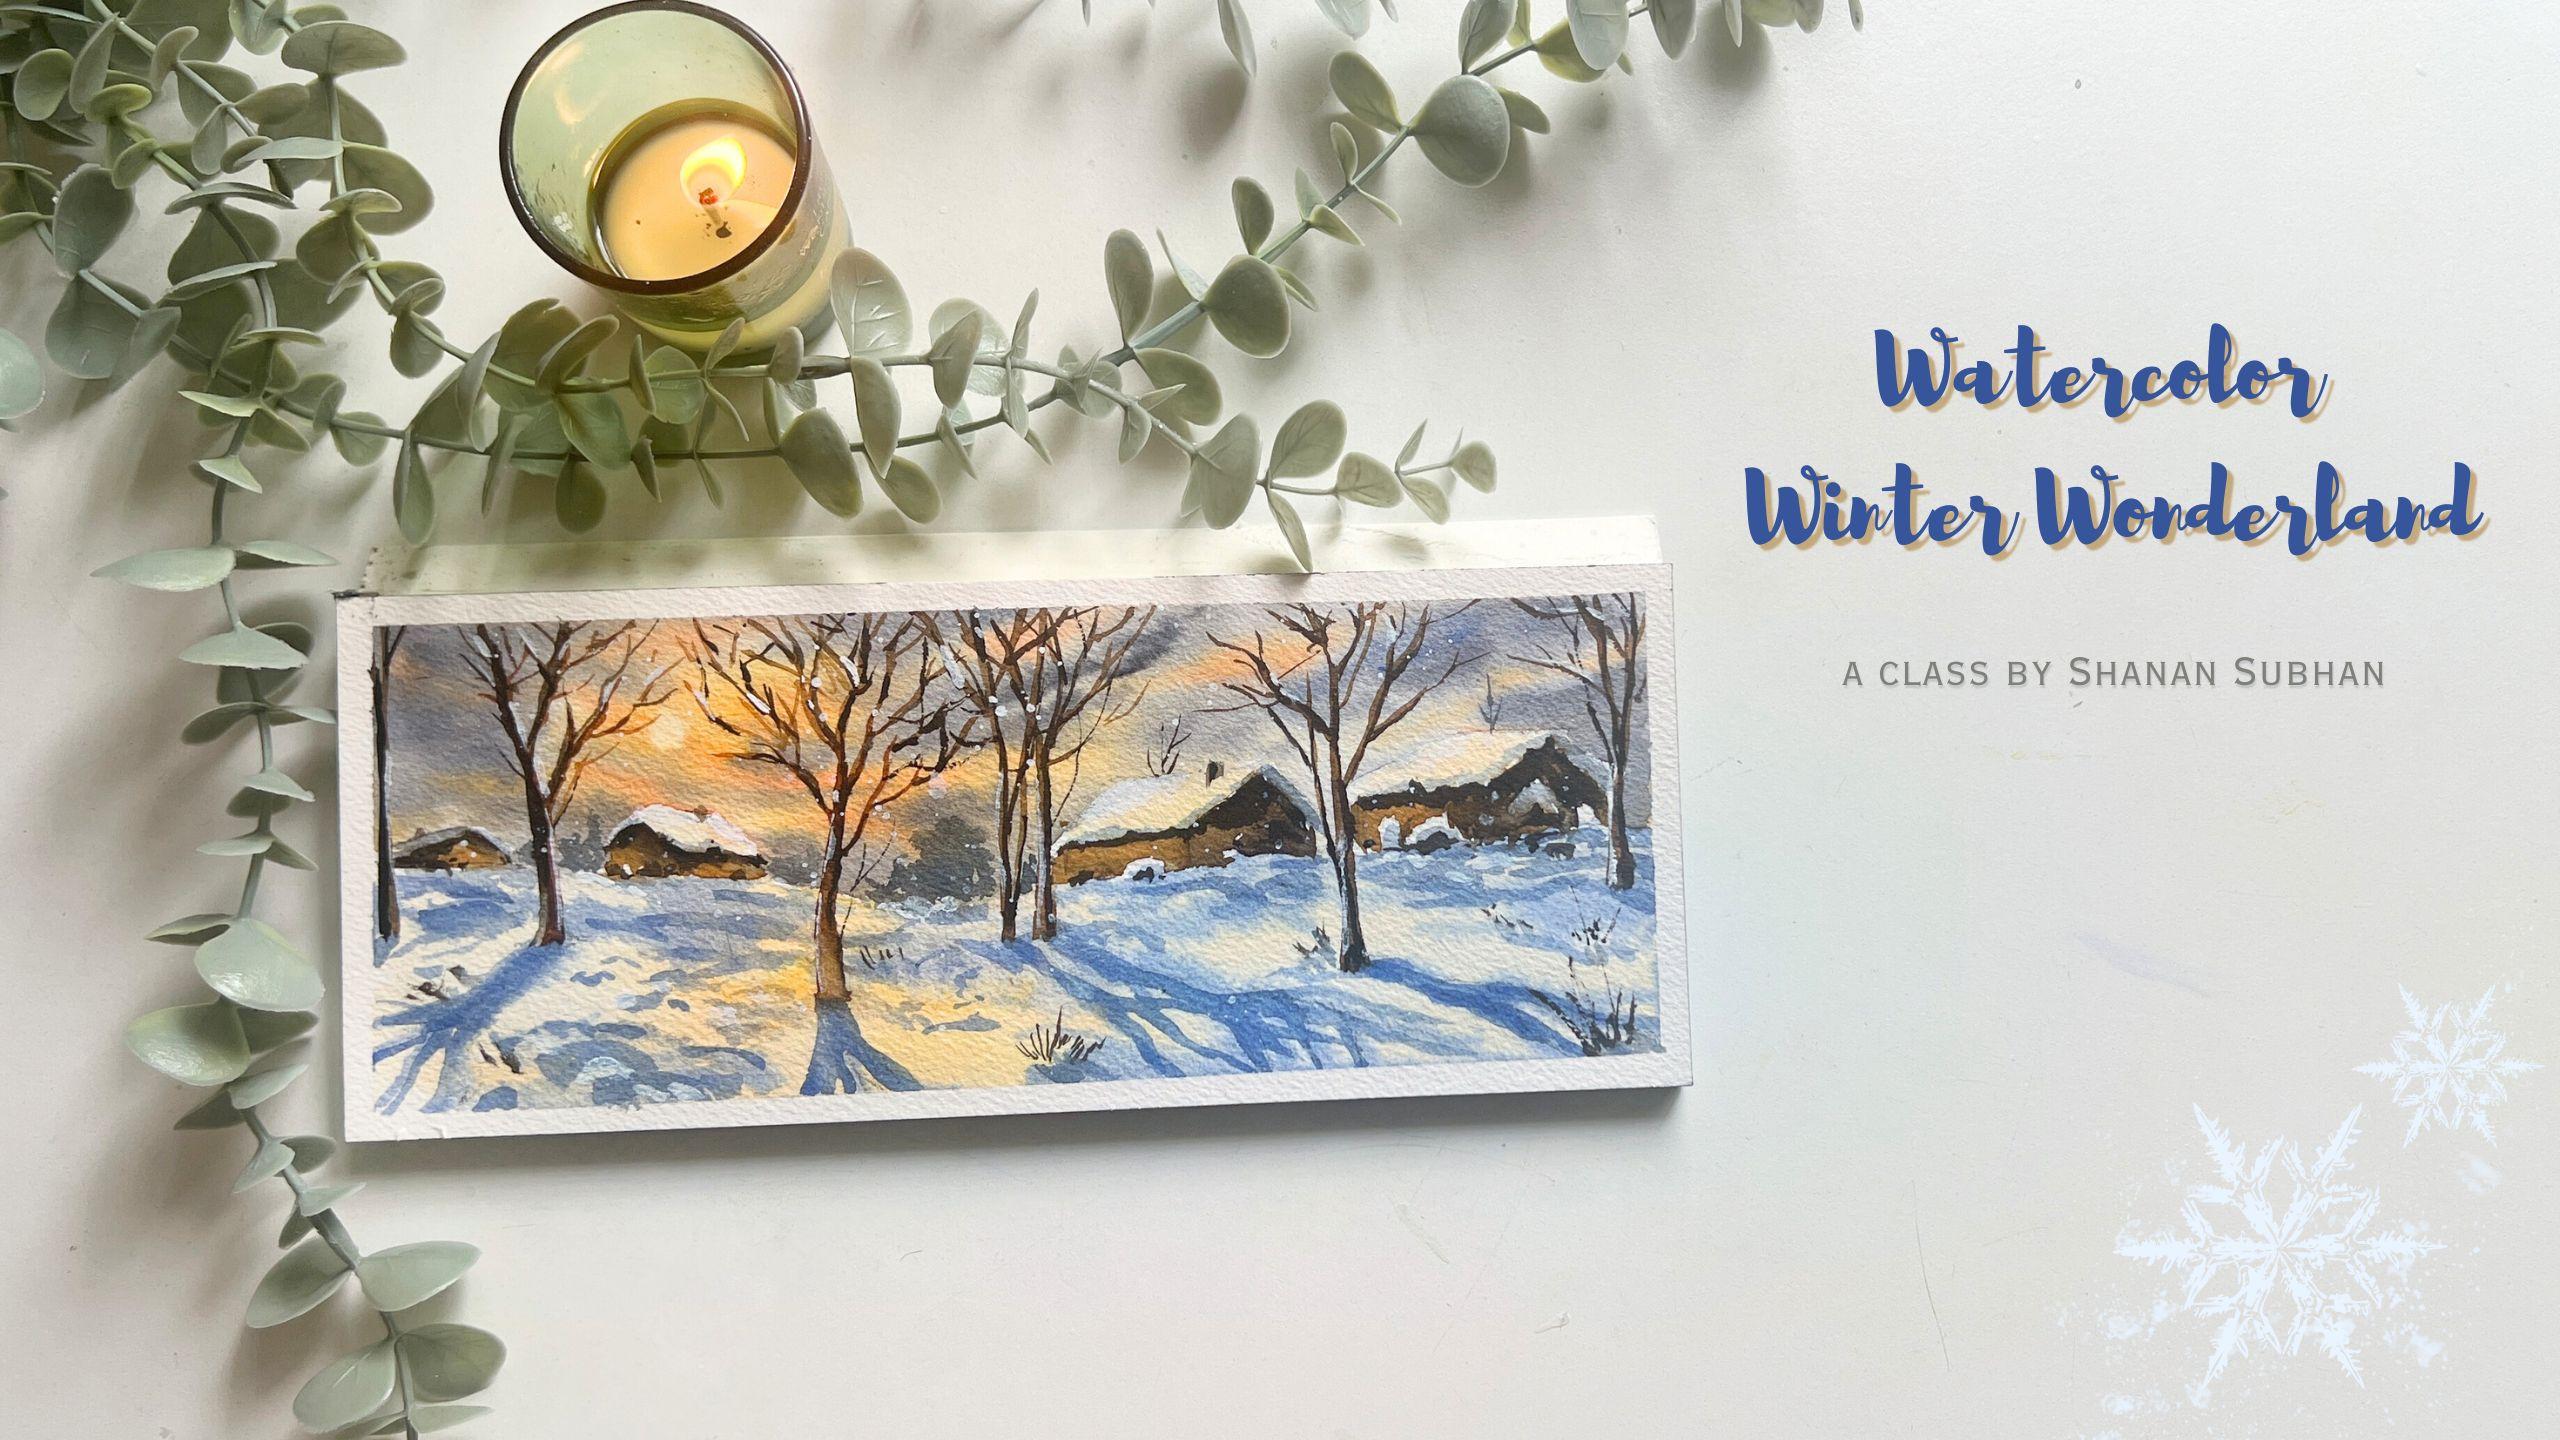
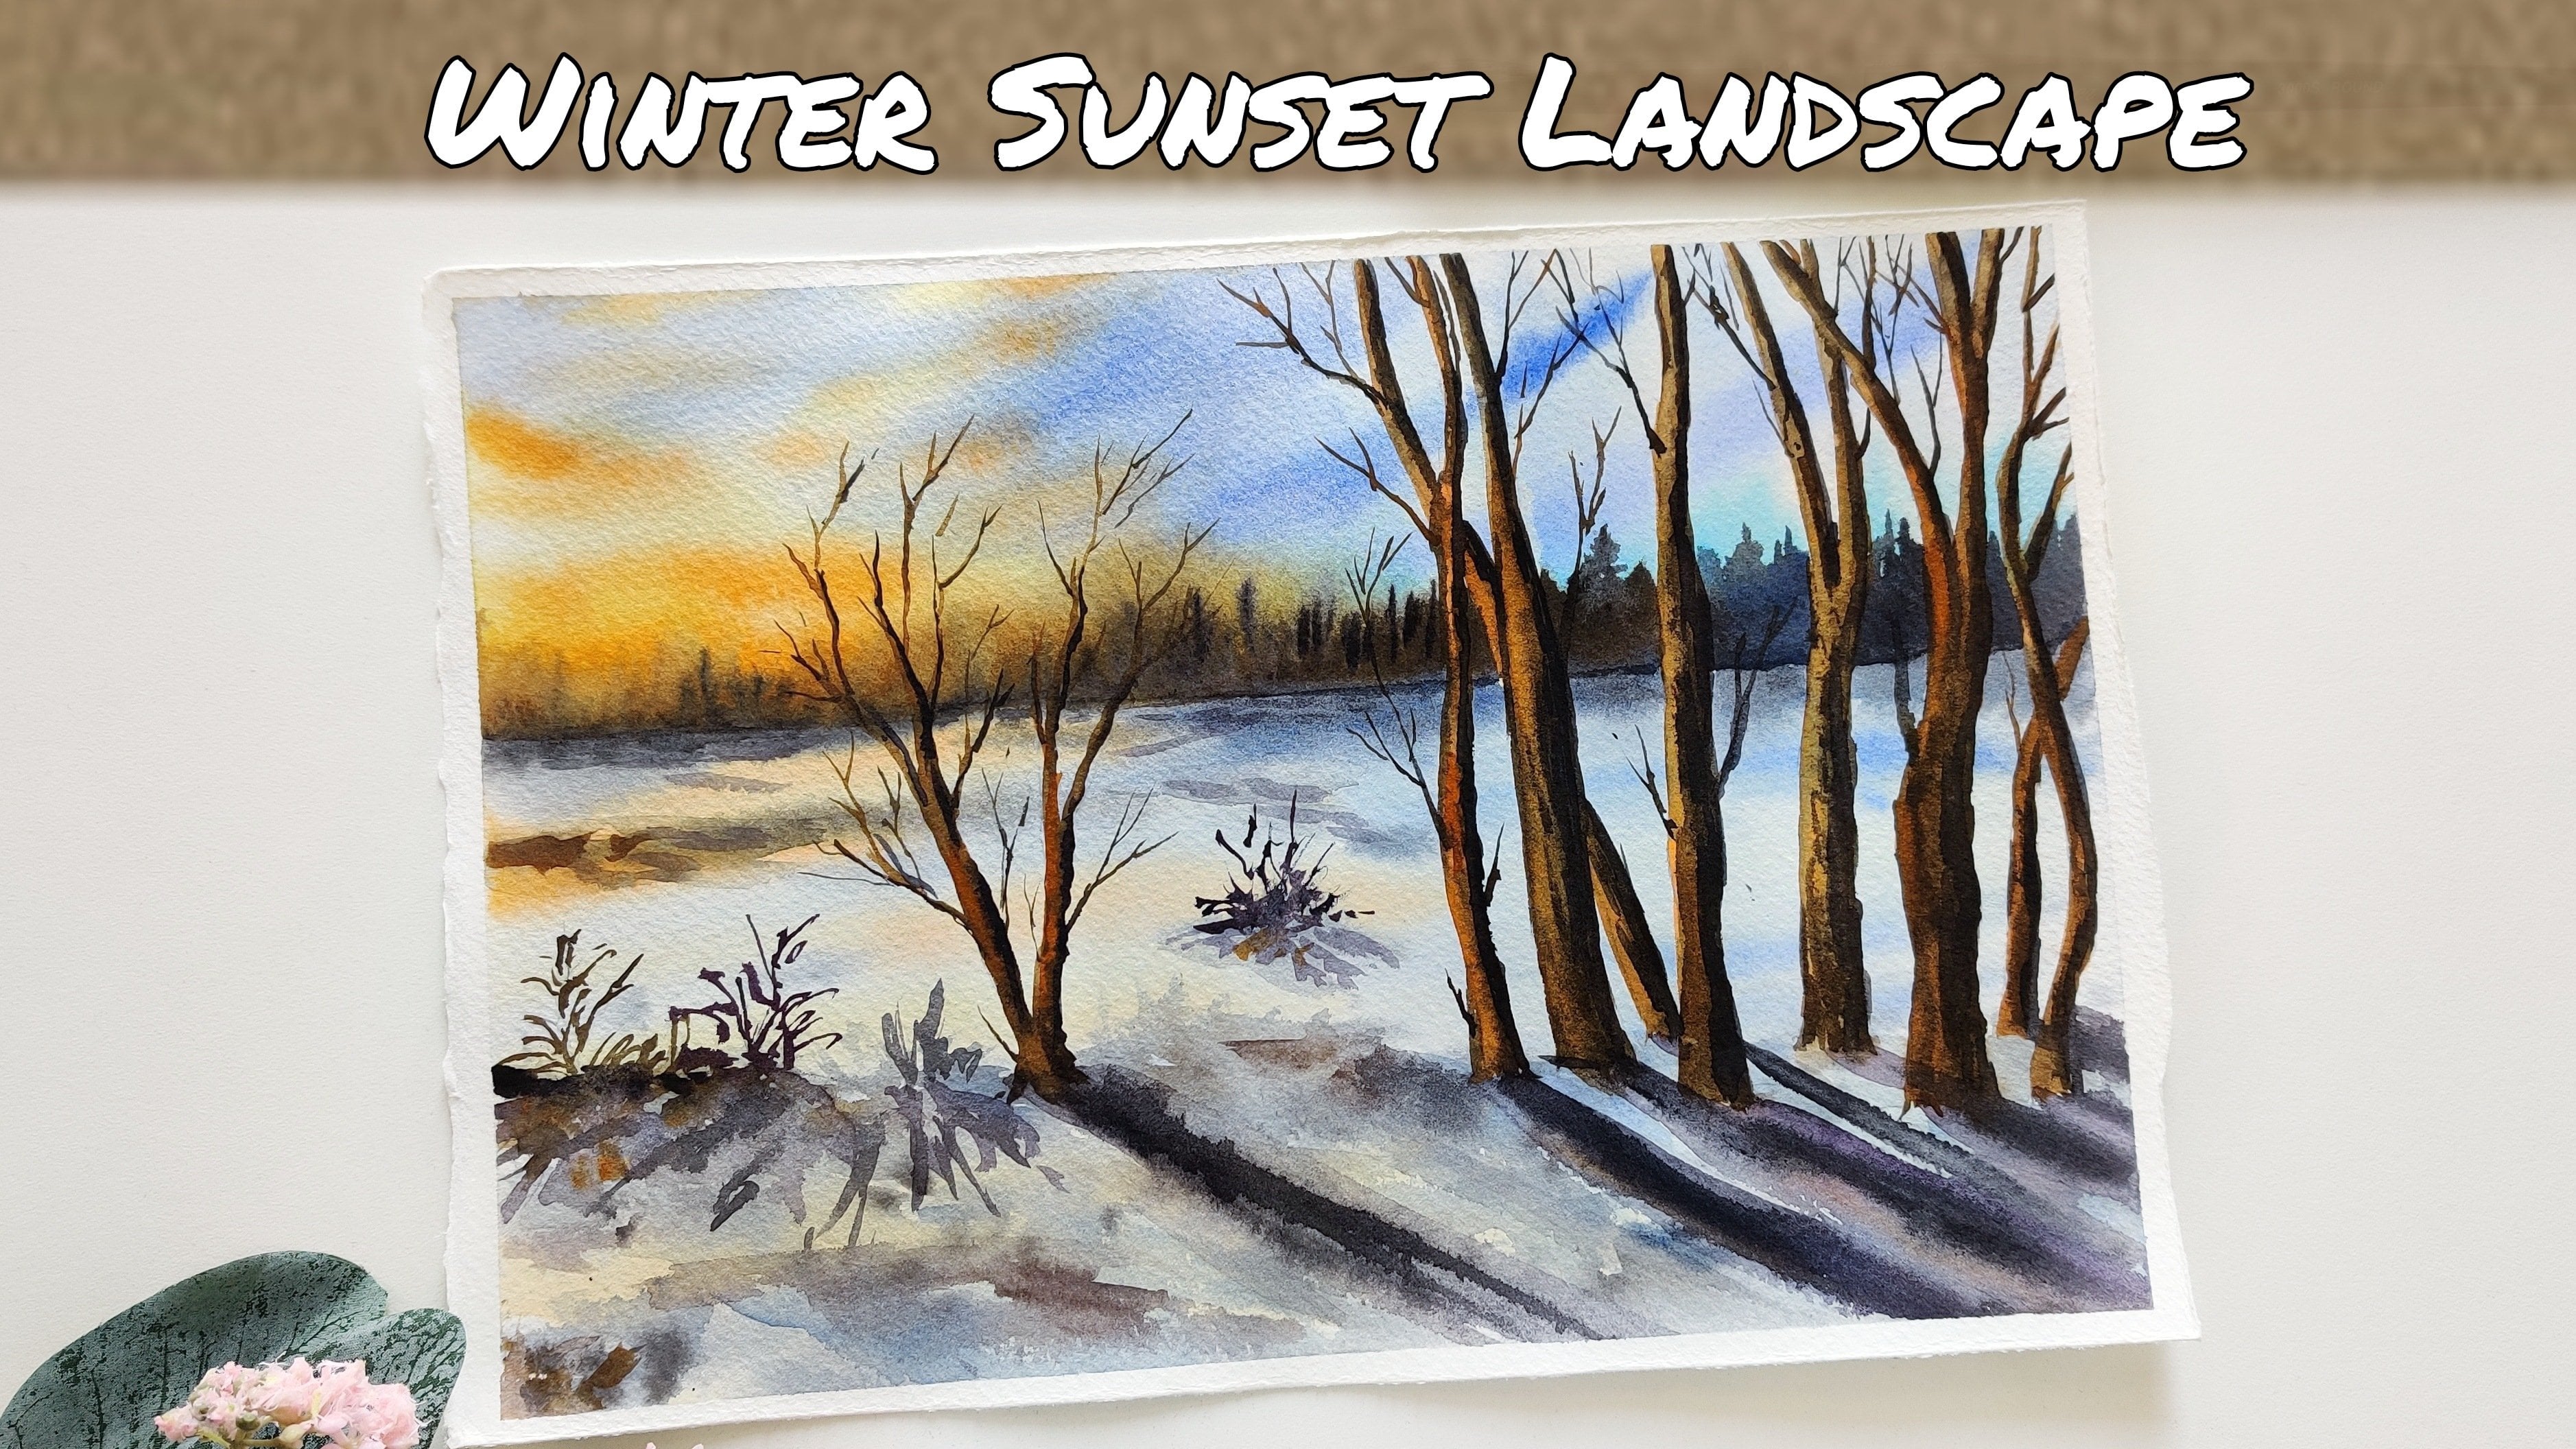
1. Introduction - Watercolor Winter Wonderland : In the depth of winter, I finally learned that there was in me an invincible summer. Today we venture onto
a similar journey of discovering the incredible
beauty within winter. Hello and welcome to my class on painting
Winter Wonderland. I'm Shannon, an artist and
art educator from India. You can check out my
skillshare profile to know more about
my art journey. Today, I'm thrilled
to guide you through the magical world of
watercolor, winter wonderland. We will delve into the
fundamentals of light and shadow, unlocking the secrets that make winter landscapes
truly come alive. We'll paint step by step, creating not just a masterpiece, but also a therapeutic
experience. I'll share every detail, ensuring you not
only follow along, but also gain the confidence to create your
winter wonderland. Independently, we will
explore composition, understanding each
element to bring out the essence of this
enchanting season. Our focus is on capturing
the mesmerizing snow, infusing depth, and adding those perfect highlights
to make it truly sparkle. Get ready for our session. Grab your watercolor supplies, find a cozy spot, and let's paint the
magic of winter. I'll see you inside the class.
2. Art supplies needed.: Hello and welcome to Winter
Wonderland painting class. I'm thrilled to have you here. Before we dive into
our painting session, let us go over the art
supplies you would need to follow along and create this
beautiful winter landscape. We will start with papers. The paper that I'm using is Arch 300 GSM, 100% cotton paper. The size of this paper is 3.99 0.8 " in landscape orientation. If you don't have
the exact paper, any similar 100% cotton paper should work well for
achieving similar results. For our color palette, we would need the
following colors. First is warm yellow. You could use Dmu yellow
or Indian yellow. Then we have orange, burnt sienna, burn timber black. If you don't want to use black, then go with the brown
and blue mixture. We would also need paints gray and then ultramarine
blue for painting the snow. Avoid using warmer blues like cobalt blue
or Thallow blue. I would recommend you to use a cooler blue for organic
snowy effect in the painting. Additionally, we will use white gauge paint for adding
highlights to the snow. If you don't have
white gauge thick, white water color can be
a suitable alternative. Next up is brushes, I'll be using Princeton
mop brush in size six. Then we have silver velvet
brushes in size 12, size eight, and size
two round sizes. These brushes will give
us the versatility that we need for different
details in our painting. Don't forget to have a pencil and an
eraser for sketching. Also need a masking paper
to secure your paper, ensuring a clean and
professional finish. Then we'll have two jars
of clean water ready. One is for taking clean
water for the washes, and the other one
is for cleaning the dirty paints
of your brushes. Keep a napkin or a tissue paper handy to wipe off excess
paint from the brushes. This helps to maintain the vibrancy of the color throughout the painting process. I'll be using my head dryer to speed up the drying process. You could either use this or naturally allow
the papers to dry. It is totally your call
and there you have it. With these supplies,
we are ready to hop on to our watercolor winter
landscape journey. If you're ready,
let's get started.
3. Composition and Fundaments: Before we dive into our
main painting session, it is important to
grasp the composition and fundaments of
shadows and light. This will enhance your
painting experience. Let us begin by breaking down the composition of the
winter landscape painting. I'll start by drawing a rectangular box to
suggest the painting frame. Now let us divide
this space into two halves using
the horizon line. This line separates the
sky from the ground. Along with it, we'll add some
cute houses here and there. Think of it as a small
village in the countryside. Now let us mark the sun somewhere in the center
of our painting frame. With that being established, we'll add some trees
to our snowy ground. You can place the trees
anywhere you want. Add multiple branches to the trees to make the
scene look dense. Here comes an essential part, casting shadows on these trees. To determine the
shadows of our trees, we need to look at the
direction of the light source. In our case, the sun
is in the center. If you consider the tree, the sun is being
on the left side, which means the shadow
will be on the right side. The same rule applies to
the tree on the left side. The shadow will be cast to
the left side of the tree. Applying the same
concept to the houses. If the sunlight is on the
right side of a house, the shadows will be
cast on the left side. Conversely, if the sun
light is on the left side, the shadow will be
on the right side. Understanding the basic
phenomenon allows you to paint shadows and lights
realistically in your artwork. These are some of the examples
of shadows and lights. Now let me illustrate this
concept with some examples. I have three trees here and the light source is in the
center all the videos, and you can determine
the direction in which each tree should
cast its shadow. Let me help you. For
the tree in the center, the shadow will be
right ahead of it, opposite to the light source for the tree on the right. With the light on the left, the shadow is on the right side. Similarly for the tree
on the left side, the light source is
on the right side. The shadow will be
casted on the left. I hope you now have a
clear understanding of how to paint shadows and
lights in your artwork. Feel free to apply
these concepts to create your own
trees and shadows. Now, based on the light source, I'll be adding the sunlight and darker colors to the trees. For the darker side, I'll add darker brown color next on the sunlit
part of the tree, I'll add orange color to suggest the reflected
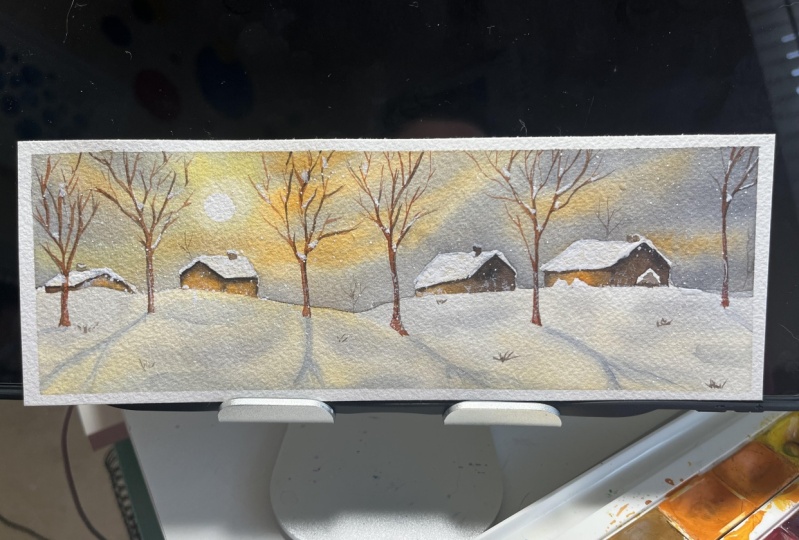
part in the tree. For this tree in the center, I'll be adding sunlit areas on both the sides because the light sources right behind the object. Moving on, I'll be painting a small thumbnail so that you understand the
flow of the painting. I'll begin by painting the sky. This is a sunset sky. We have orange hues
in the center. And I'll apply some darker
clouds using paint gray. Next, we will apply some
yellowish orange color on the ground to get
that reflected light. Then we will add
the cast shadows. You can sketch the direction of the cast shadows beforehand so that you don't get
confused while painting. Then we'll be
painting the trees. Once you paint the basic shape, then you can add the
shadows on the trees. We will add some dimension to the snow painting the houses based on the direction of light. At the end, you can
add all the details. This is simply a rough
depiction of the painting. We will be learning
to paint this in great details in the
upcoming chapters.
4. Part 1 - Painting the Sky: Welcome to the painting session. I hope you'll are set
with your supplies. Today we will be creating a
beautiful winter landscape. To start grab your masking
tape and let us prepare our canvas even if your
paper is already secured. Applying masking tape will give us a clean border
to our painting. A down all the sides. Take your time with this step and make sure it is well taped. Once you have taped
down all the sides, make sure to run
your finger over the edges to make sure
it is tightly sealed. Now let us mark the
composition of the painting. I'll draw a gentle horizon
line somewhere in the center. This line will separate the
snowy ground and the sky. Remember, we'll keep our
pencil marks very light. We want them to be subtle, not overpower the painting. Now, let us sketch the houses. I'll be sketching it in
a very simple shape. Pay attention to the
roof lines here. These are slightly
curved which will resemble the snow collected
on the top of the roof. This will add a sense of
depth to the painting. Next, I will add some random bumps in front
of the second house, suggesting accumulated
snow on various objects. It is these little details
that will make a painting pop, adding in a chimney
on the first house. Now let us add some houses on the left side of
the painting frame. Moving on, let us introduce the trees in our snowy painting. Trees are a vital part
of our composition. You can draw the trees anywhere you like on
this snowy ground, but you need to be mindful about the shadow that they cast. Talking about the shadows, the direction of
the cast shadows is determined by
the light source, which in our case is the sun. I'll place the sun
in the center area. The shadows will be cast on
the opposite side of the sun. For instance, trees on the
left will cast shadows on the left side because the sun is on the
right side, right? Similarly to trees
on the right side of the paper will cast
shadows on the right side, because the sun is
on the left side, which is the opposite side, the trees in the center will cast its shadow directly ahead. You have the creative freedom to place the trees
wherever you like, but ensure that the cast shadows align with the
position of the sun. This will make a snowy landscape appear more natural
and realistic. The tree in the center will cast a shadow right ahead of it, because the sun
will be behind it. Now to eliminate the
darker pencil lines, I'll use a kneading eraser, although this is
an optional step, But it can greatly contribute to achieving a
seamless painting. In the end, you could also use any eraser to gently dab
off the darker lines. Now that we have
prepped our canvas, it's time for us to dive
into the most exciting part, which is the painting part. Grab your brushes, clean water, and let's get started. First, take your mop brush or any large brush
that you want to use. The put it into the water. Be generous with the water carefully applied
to the sky area. Notice I am not applying
water on the roof part, leave it untouched for now. We are using wet
on wet technique. Here, apply multiple
coats of water to ensure the paper
absorbs the moisture. Well, this will set
the stage for the de, playing technique in the sky. Remember, if you apply
only one coat of water, the paper may dry too quickly. Make sure you apply
multiple coats, ensuring a perfect
canvas for our sky. Next, I'll switch to my
size 12 round brush. You could use any
similar size you have, load it up with yellow
paint and start applying it around the center
area for your glowy, sunny effect in the sky. Take your time and
enjoy the process. Remember, do not
apply thicker paints. We will go with slightly
diluted colors. Once you have applied
this yellow part, grab some orange paint, apply it around the
yellow section. We'll blend the
colors together for an intense and
vibrant sunny effect. Feel free to play around with the intensity by adjusting the amount of orange you apply. Next, I'm going to add a bluish gray color to achieve a sense
of depth in the sky. Pick paints gray or go and apply it to the sides
of the painting frame. Slowly blend it into the
mid area of the sky, creating a smoother transition. This will give the impression of distance and add
a dramatic touch to your painting around
the sunny area. We'll add a few blast
strokes of this color. Take some orange and apply
it around the sun area. I'll also apply a few strokes of orange on the
bluish gray area. How I paint my sky could be entirely different from
the result you achieve. Because in watercolors,
there is no guarantee that we will achieve
the exact same result. It is a completely
unpredictable medium. We must be willing to let go of the pursuit of perfect results. A fun fact is that
even I may not be able to replicate something
that I created once. It's okay if your sky, the entire painting
looks different. What is more important
is to understand the approach and the technique before you paint something. Here I am using slightly midtone gray color to add some darker
clouds in the sky. I'm using paints gray
around the horizon area so that the orange part of
the sky gets glorified. Once you're done with the sky, we'll move on to the
foreground part, which is the snowy ground.
5. Part 2 - Snowy ground: All right. Now let us
paint the snowy part. We will wet the area using a larger brush
and clean water. Apply multiple strokes of
water so that the paper absorbs good amount of moisture and remains wet for
a longer duration. We are going with wet on wet technique for
the snowy part, apply diluted yellow
color on the wet area. This step gives an illusion
of golden glow in the snow. Imagine a soft
reflection on the snow. Apply a slightly intense
low around the center. And tone it down as you
move towards the edges. Now I want the same
glowing effect on the roof top of
the houses as well. Apply the same diluted color
on the roof, but be careful. We don't want the sky color
to crash into our roof part. Either tilt your paper or
you could leave tiny gap between the sky and the roof to avoid any unwanted
blending of colors. Next, going back to the sky, perform this step only if you
feel the P is a bit damp, otherwise you can skip it. We are trying to add
a bit dramatic effect in the sky by adding
these darker clouds. A few strokes of paint
gray can do wonders here. By adding more depth to the sky. I'll apply this diluted paint, scra mix along the horizon line. If the sun in your painting got a bit
lost, then don't worry. Take a dry tissue
paper and delicately lift off paint in
a circular shape. This simple technique restores the presence of the
sun in our painting. Moving on, let us paint the
cast shadow of the trees. We will be using
ultramarine blue and a bit of paints gray. To paint the shadow
of the trees, use the color in a
slightly diluted mix. Remember those sketch lines
from earlier sketching part? They are like a map telling you where to put the
shadows exactly. Now to make things interesting, add some blue strokes
around the horizon. It makes the scene
look far away and adds a sense of dimension
to the overall painting in the front. Add some strokes
for uneven heaps of snow. I noticed that I went a bit
heavy on the midground area. With the darker strokes, I don't want the snow
to be this dark. What I'm going to
do is I'll grab a tissue and lift off
some paint of that area. When the paint is still wet, it comes off pretty easy. You can fix if
anything goes wrong. Now, let allow the paint to dry. You could either let
it dry naturally or use a head dryer to speed
up the drying process. I'm using my head dryer. I'll continuously
move the head dryer around so that the
paper dries evenly.
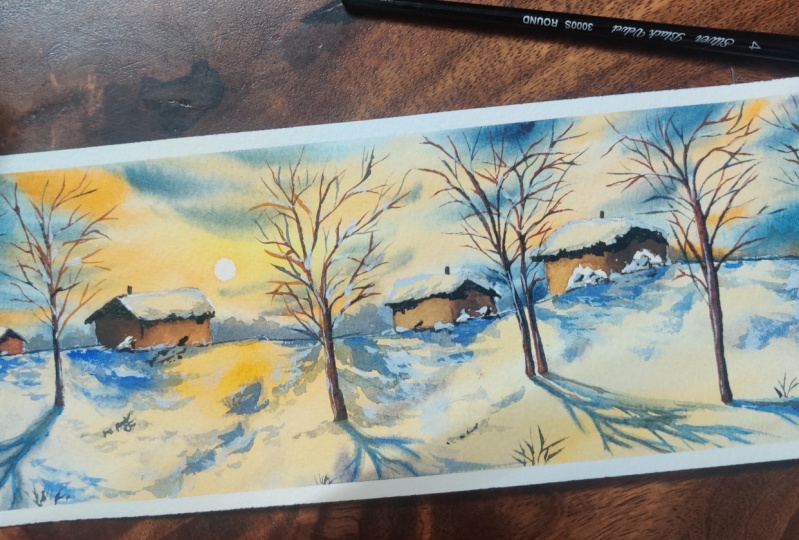
6. Part 3 - Houses and cast shadows: My paper has completely dried. You can touch your paper gently and see if it
has dried or not. Moving on, let us
paint the trees. I'll use burn Sana in a medium to diluted consistency to paint the initial
layer of trees. Now load your brush with this paint and start
painting the tree trunk. And then the branches folk the tree trunk
into multiple branches. Use irregular pattern and shape to create organic
looking branches. This will ensure that the
trees don't appear uniform. Take your time. There's no
fixed account of the trees. Just make sure it matches the shadows that
we have painted. Pay attention to the
origin point of the trees. It helps us determine their
distance from the viewpoint. Follow the shadows To
paint the actual trees, remember the keys to
make them look natural. And don't rush. Just enjoy the process. At this point, I'm painting the trees with only one color. Once it dries, we can add multiple layers to add
more depth to the trees. I'll extend the size of this tree and to make
it more organic, I'll make the trunk thicker. Now let us move on to
paint the houses mix a darker brown color for the sides facing away
from the light source. We will create shadows, so use a darker
brown for this part, I'll repeat the same step
for the other house as well. Leave tiny white spaces for the snowy heap in
front of the houses. For the sunny side
of the houses, we will use shades of orange, which will suggest the
reflected light on the walls. Gradually blend the darker side for a smoother transition. This will give a warm, glowing effect to the houses
facing the lighter side. Now let us add those charming
chimneys to our houses. Moving on, we are revisiting
the snowy ground. To enhance those cast shadows, grab some ultramarine blue
in midtone consistency. Let's run our brush over the same lines on
the snowy ground, infusing them with the
richness of the shadows. This will create intense
cast shadow effect. As you paint this, think
about the direction of light adding depth to
our snowy landscape. Next, we will apply some shadows beyond the
existing shadow lines. I'll dab my brush around
the horizon area. This will establish a sense
of distance and perspective. Don't forget the midground
and the foreground area. A few stroke there will enhance the overall balance
of our composition. Next, with clean water, I'll soften the edges
of these trees. I don't want very sharp
edges in the shadows.
7. Part 4 - Detailing work: Moving on, let us paint the
shadows on the rooftops. Grab some diluted mix
of ultra marine blue and apply it first on the
shadow side of the houses, and then apply it around
the heaps of snow. Next for the sunny
side of the houses, a few delicate lines
along the edges will suggest a sense of
depth. Keep it light. We're just giving the hint
of light and shadows. Now let us add some
dimension to the trees. I'll add some darker color on the sides opposite
to the light source and for the branches. You can add some
random brush strokes. Use a fine liner brush for
thinner and precise lines to the trees. On the right
side of the painting, I led the shadows on the
right side of the trees. You can introduce more
branches and twigs, creating an organic appearance. Here I have lifted the pains to achieve a brighter sunlight
effect on the tree trunk. Now for the trees that are
on the left side of the sun, we will mark the shadows on
the right side of the trees, which is opposite to
the light source. In order to achieve a
sunlit effect on the trees, you can use orange
color for this tree. With my fine liner brush, I'm adding some branches
using orange color. This suggests a sense of sunlit
effect on both the trees. Here, you can follow along with me as I
paint these trees. Take your time with the
branches and the trees. There is no hurry. Let the strokes flow naturally, contributing to the overall
harmony of our painting. Now let us add some
dimension to our houses. I'll use a darker brown
color on the shadow side, taking advantage
of the dry paper to achieve some hard edges. This will contribute to a sharp sunlight
effect on the houses. Add strokes on the sunny part, right under the roof, tiny strokes under the heaps of the snow for those final
beautiful touches. This darker color
around the houses really enhances the
appearance of the snow. Don't forget the chimney
Adding shadows there will further enhance the
realism of the scene. Speaking of realism, you can add more tiny
branches and twigs to the trees to make it more dense or keep it as
it, it's up to you. Your trees doesn't have to
look exactly like my trees. You can make it uniquely yours by adding your own
unique artistic touch. Next, let us expand our scene by adding distant trees
behind the houses. Use a slightly diluted tone to suggest distance
from the viewpoint. This will enhance
the overall depth and tranquility of
our winter landscape. You could also add some distant trees
around the horizon area. This will create a separation between the sky and the horizon. I'll be adding more trees
along the horizon line. You could use paints gray or any shade of
blue? Darker blue. Probably, we are now about 90% done with our
beautiful winter painting. Before we call it a masterpiece, let's take a moment to reflect and make some
final adjustments. I would suggest you
to step back from your painting and
observe it carefully. This is the time to
look for any mistakes or areas that might
need a bit of tweaking. Consider taking a picture
of your painting. It's a fantastic
trick to spot things that you might have
overlooked in my painting, I notice that the tree looks a bit thinner compared
to its shadow. To address this,
I'm going to make the tree trunk a bit thicker. Your painting might have its own unique
corrections needed. Take the time to find them and see if you can make
those adjustments. If not, it's perfectly fine. Sometimes imperfections add
character to our painting, Embrace your artwork as it is. Also. Remember, watercolors
have a tendency to, the final result might
differ from when it is. We keep an eye out
for those changes. Now, for example, on the
shadow side of the houses, I'm adding some darker color
to intensify the darkness, giving our winter scene
that extra depth. We will do some tweaking
to the snowy ground. We'll apply some diluted
paints in the snowy area. This will create an
uneven snowy surface. Adding realism to
the winter ground. Take your time with
these final touches, and once you're done, step back and observe those
changes that you have made.
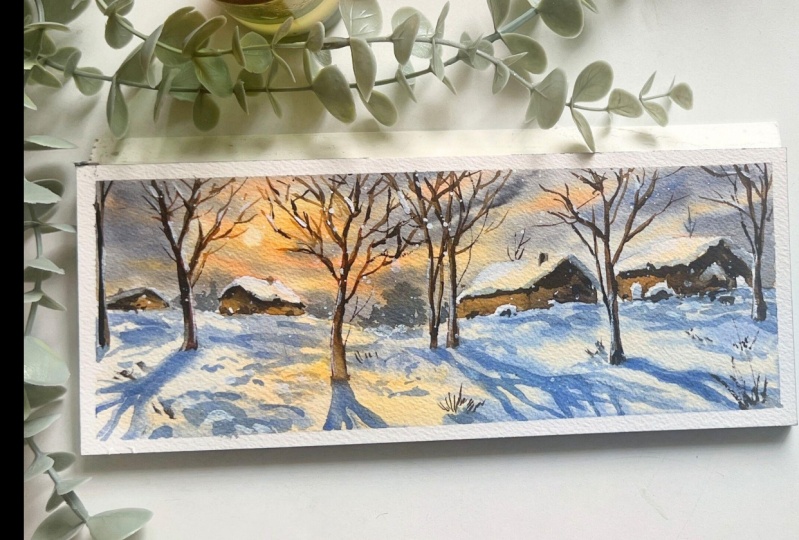
8. Conclusion: All right, we have reached the final stretch of our
winter landscape painting. Now it is time to add
those magical highlights and a touch of snowfall To
bring our painting to life. Grab some white paint or white
watercolor in thick form. We'll use this to highlight the elements like
rooftops, trees, and snow. Okay, I'll start by applying
it to the rooftops. Focusing around the edges, this will give them that
extra touch of whiteness, enhancing their snowy charm. Next, let us use the same thick white paint to add some snowy
effect to the trees. Apply it randomly
on the branches, suggesting the accumulation of snow on the branches and trunks. Take your time and neatly apply
the snow on the branches. We will also apply this around the horizon areas and
even on the snowy ground. This will create a wintery Vipe that feels truly enchanting. For the final touch, let us platter some white paints symbolizing the snowfall
in the atmosphere. It is a simple, yet effective way to capture the magic of falling
snow in the painting. If you want to make
the snow appear real, use a dark color to paint
grasses in the snow. This will add a
sense of depth and also separate the snow
from the shadows. Adding a touch of realism to we are done. The moment is finally here, let us carefully remove the masking tape and reveal the final look
of the painting. There we have the beauty
of the glowing snow, the play of lights and shadows. I'm so happy with how it has turned out. Isn't it gorgeous? I hope you enjoyed this painting journey
as much as I did. Please share your class projects under the projects scale. I'm eager to see your unique creations and hear what do you
think of this class? Thank you for joining me in
this creative adventure. I'll see you in my next class. Until then, take
care and bye bye.
9. Bonus Chapter: Hello, Hello. I hope you enjoyed and learned
something new from my class. Now, I'm thrilled to introduce
this bonus chapter to you. This painting serves as a reinforcement of the concepts we have covered in the class. Without any further
delay, let's get started. I have taken the same paper
as that of the class project. Now let us take down the paper, giving it a nice border. If you're using a loose
watercolor sheet, I would recommend you to tape
it down using masking tape. Aim down all the sides neatly. The paper is neatly taped
down on all the sides. Now let us get to
the sketching part. Now, take a pencil and mark the horizon line somewhere
on the top part. Then right next to it, I'll mark some more lines creating a segment
for the snowy area. This is the darker part, where we have the shadows. Towards the lower
part of the frame, we have this bright snowy area. Okay, now let us draw the trees on the left side
of the painting frame. We have this bigger tree, then we'll mark the
shadow as well. Then we'll draw some more trees and cast their shadow
on the snowy ground. Do not skip the marking of
the shadow because that will guide you to mark the shadows during
the painting process. Here we are considering the light source from the left side of
the painting frame. Hence, the shadows would be
casted on the right side. You can mark the trees
anywhere in the snowy ground. Just make sure that the shadows are casted
in the right direction. Now take an eraser and remove the unnecessary lines
within the three areas. I'll also erase
some darker lines since it is the snow part, so I don't want the darker lines to be visible at the end. Okay, we're done with the sketching now let us move
on to the painting part. First, take indigo and paints gray mix
in medium consistency. And we will apply this
above the horizon line. This will suggest
the darker tree line present around the horizon area. Carefully use the tip
of the brush possible. You can leave some
tiny white spaces. Otherwise it is fine. We can use white gauge paint. Apply paints completely
along the horizon line. I am trying to leave some white spaces around
the tree trunk areas. Using the tip of the brush, try to create a sort of uneven
effect around the horizon. We don't want a straight line. Once you're done, take
a tissue paper and try to lift off the paints by
dabbing it on the surface. This will create a winter
wipe in the background, the clean part of the tissue. Each time you dab, you could also the tissue and
lift the pains. If you're finding it difficult, then you don't have
to worry about this, just leave it as it is for now. Next, I'll use the
backside of my brush to create the markings on
the background area. I'm pressing the brush
against the paper, creating this textured
effect in the background. You could also use any other
object to create this mark. If you don't have anything
to do this marking effect, then you can skip. It doesn't matter. Okay, so the background
area is done. Now let us paint the snow
fake Altra Marine blue. We want a cooler blue
paint, the snow. Mix this color in
medium consistency and start applying the paints. I'll start from center and move towards the right
side of the painting. Here I'm applying wet
paints on dry paper, which is wet on dry technique. This blue color is
going to depict a sense of shadow around
the horizon area. Try to leave these
wide gaps if you can. Otherwise it is okay. I don't want you
to stress over it. Take it easy and
enjoy the process. Next, we will apply
few brush strokes in the midground area. Remember, this is wet
on dry technique, the paper is completely dry, that is why we are able to
achieve these Sharp edges. Also apply some
tiny brush strokes suggesting uneven surface. The style makes paints
gray and ultramarine blue. For a darker blue color, I'll apply this darker color right under the tree where we want to paint
the cast shadow. I'll also apply this color
around the horizon area, giving a sense of dimension. Next, with the
same darker color, let us paint the tree. I'm applying the paints on the right side of the
tree at this point. Let us also apply this on
the other trees as well. Kindly leave white spaces
that will suggest the snow. On the sides of the tree. If you don't want to leave
this wide gap, it's okay. You can use gas paint later on applying some zig
zagie brush strokes, trying to suggest a pine tree. Now take a clean brush, pull the paints towards the
other side of the tree. We want a transition from
lighter to darker color, suggesting a sense of light
and shadow in the tree. We will repeat the same on
the other trees as well. During this phase of
the painting process, the painting might
look ugly. Hang on. And trust the process, We'll take a medium
consistency of this darker color and apply around the shadow
parts on the right side. This will intensify the shadow and create a nice contrast. I'll also apply this
under the tree. For the cast shadow area, we need to have a
nice balance of lighter midtone and darker tones on the right side of
the painting frame. I want to make this area darker. I'm adding darker colors now. You can take paints gray and add darker color on the right
side of the tree trunks. Why right side? Because it is the shadow side of the tree. The left side of the
trees here should be well lit because the source of
light is on the left side. I hope you get that.
Now I'm introducing some more trees
in the background by loosely adding
these vertical lines. Whenever I paint
during the mid stage, I go for some wild
loose brush strokes that adds a sense of
character to my paintings. Further, adding some
darker shadows. This is important to create that contrast between
white and darker color. Otherwise the white
snow won't be glowing. Also add some tiny brush
strokes like this. This will suggest that the
snow is not simply flat. Now I'm taking my size to round brush for
some detailing work. The paints I've taken is paints
gray and ultra line blue. I'll gently glide my
brush on the snowy part. This will suggest an unevenness
in the snowy ground. Next, I'll load my brush with the burned siana and
apply it on the ground. This is to suggest some rocky
surface on the snowy part. Then I'm applying
some black over it. Next, I'll take a
bigger brush to soften these sharp edges on
the foreground area. Again, going back to
my fine liner brush to add some brass blades
around the foreground area. This is to make
the painting look organic by having various
elements in the painting. Feel free to add your own
touch to the painting. Next, I'm going to add some more darker color
around the foreground area because that is important to differentiate between the foreground and
the background. Apply a few strokes of darker blue color around
the horizon area. Use a thinner brush to
get nice precision. You don't have to define each and every element
in your painting. Some things you can leave it up to the viewer's
interpretation. Sometimes it is okay to not define each and every
element in the painting. Leave something mysterious, and leave it up to the
viewer's interpretation. Like for example, in this painting around
the background area, I just applied these
angular brush strokes. I don't know what it could mean, I don't want to
explain it as well. I leave it up to
your interpretation to depict whatever you want. But it is working for
my painting at the end. All that matters is how
your painting turns out. That was my pro tip
for this session. Let us add some darker
colors on the tree trunks, making them more prominent. Now let us use white
cash paint to add some white highlights
on the trees. Use the paint directly
from the paint tube and apply it on the left
side of the tree trunk. You know why I'm applying
it on the left side, right? The snow on the trees get highlighted because
of the sunlight. Lastly, I'll take paints gray and slightly add more colors
for the shadow of the trees. Sometimes you have to
follow your intuition. I had already applied
the cast shadow earlier, but for some reason I felt that the shadows were not so intense. There you go. I'm adding darker colors on
the cast shadow. If you feel your
shadows are perfect, don't touch it. We are done. Now, let us peel off
the masking tape and reveal the final look
of this bonus project. Okay, how was it? I hope you enjoyed
painting this with me. If you have painted
this with me, then please do share it under the projects gallery or
your social media profiles. I would really love
to see your works. All right, I'll see
you in my next class. Until then, bye bye.
 Shanan Subhan, Watercolor/Gouache | Art Educator