Transcripts
1. Hello & Welcome Back: Painting with watercolors is like unleashing a
magical want that holds the power to
transform ideas and emotions into
vibrant expressions. The very unpredictable nature of watercolor pigments as they
merge and dance on wet paper, makes it so magical. Sometimes it may be challenging, but in the very next moment, it rewards you with a beautiful outcome that
you will be proud of. This is the most
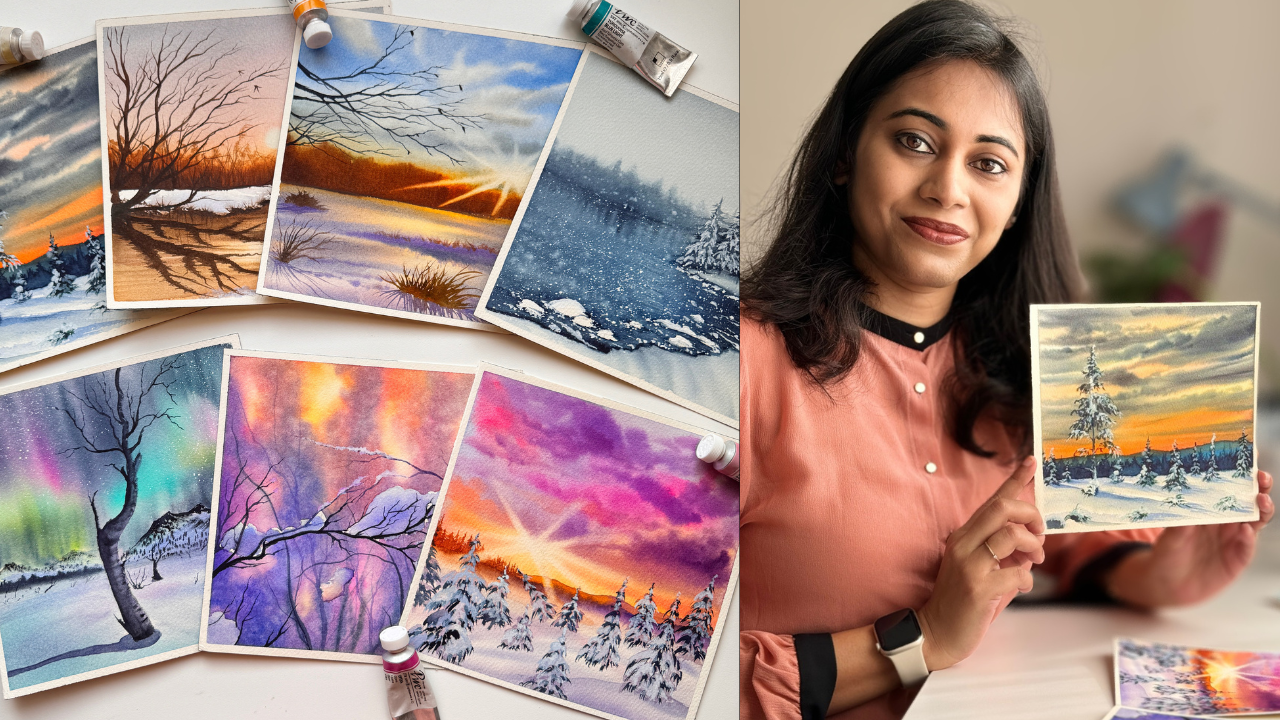
satisfying feeling. Hello, my dear creatives. My name is Nil Um Roy. I'm an artist and
an art educator based out of Bangalore, India. I'm also a brand ambassador for Mq Wash and to we arts in India. I love to explore different seasonal landscapes
and out of them all, winter has a special
place in my heart. Creating the moody
snowy atmosphere, Capturing sunlit snowy pines, painting gorgeous winter skies, casting its glow on a snowy blanketed surface is
such a magical experience. Altogether, I have been sharing my winter related
watercolor paintings on social media
such as Instagram. And many of you have
reached out for a detailed step
by step tutorial. And that is exactly when I was inspired to bring
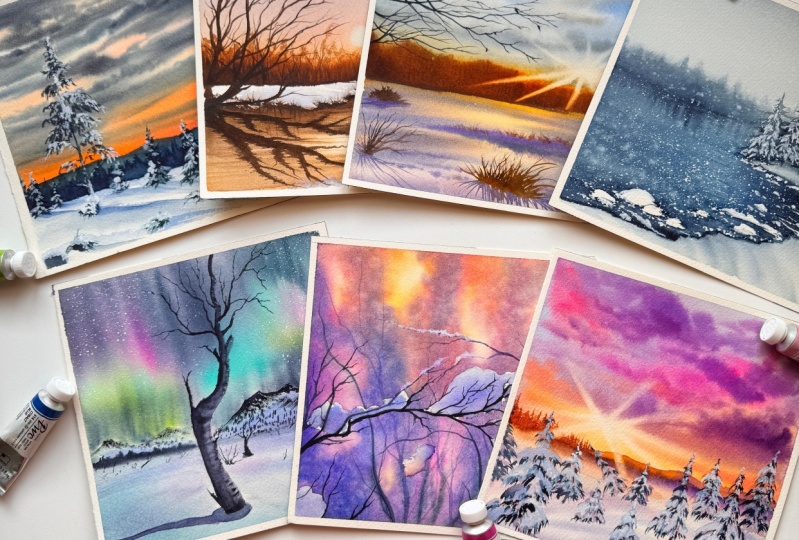
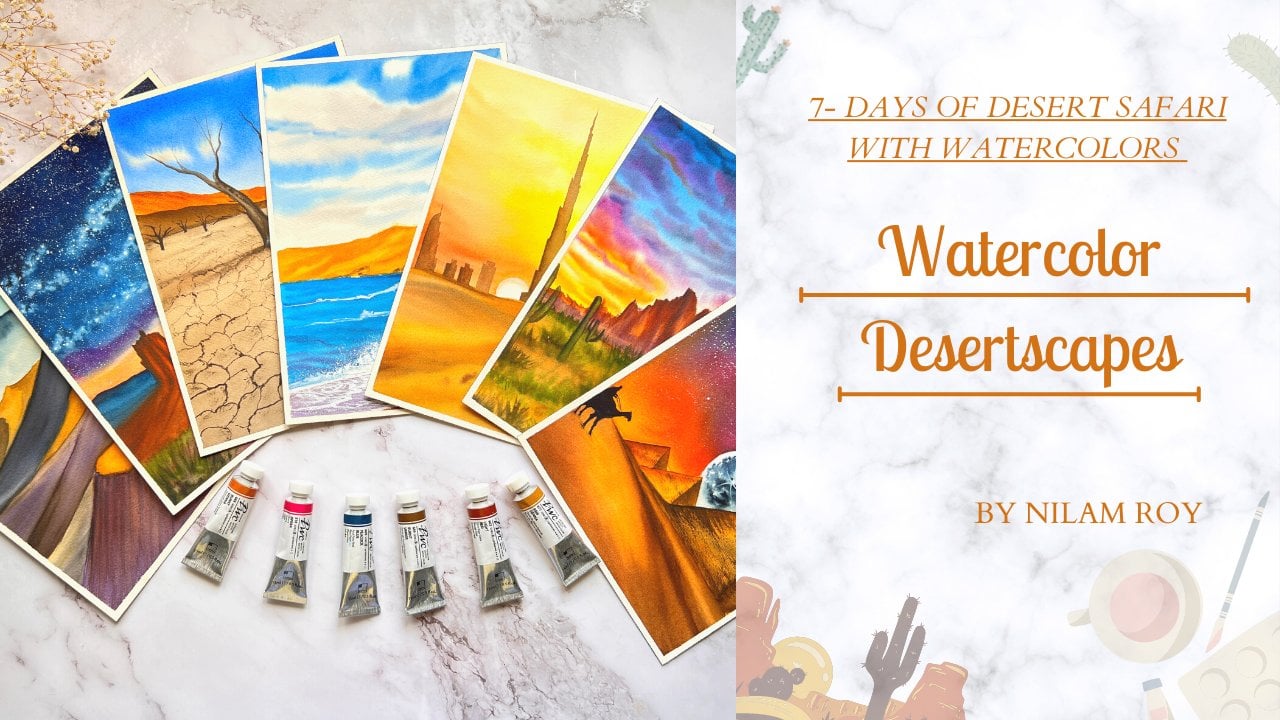
to you this class. Join me on a seven day
watercolor journey where we discovered the joy of painting seven beautiful
winter inspired landscapes. The main objective of
this class is to help you build your creative habit
by practicing every day. This will not only help you
build your watercolor skills, enhance it, but also let you create beautiful,
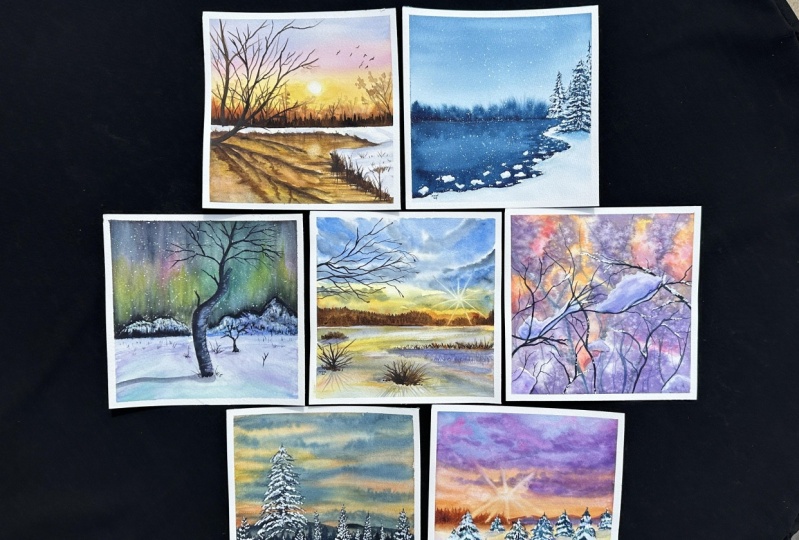
stunning masterpieces. In this class, we will paint series of gorgeous
winter landscapes. Starting from a
monogram painting to capturing gorgeous winter skies. We paint all characteristic
winter elements which will allow you to explore and master different winter color combinations
and technique. If you are ready to nurture
your creative habit, join me in this challenge
and let's paint together. See you in the next
video where I discuss about the organization and
structure of the class.
2. Class Organization & Structure: Before we get started
with the class, let me quickly take you
through how the class is organized so that you know
what to expect from the class. To begin with the
class, I will first talk about the
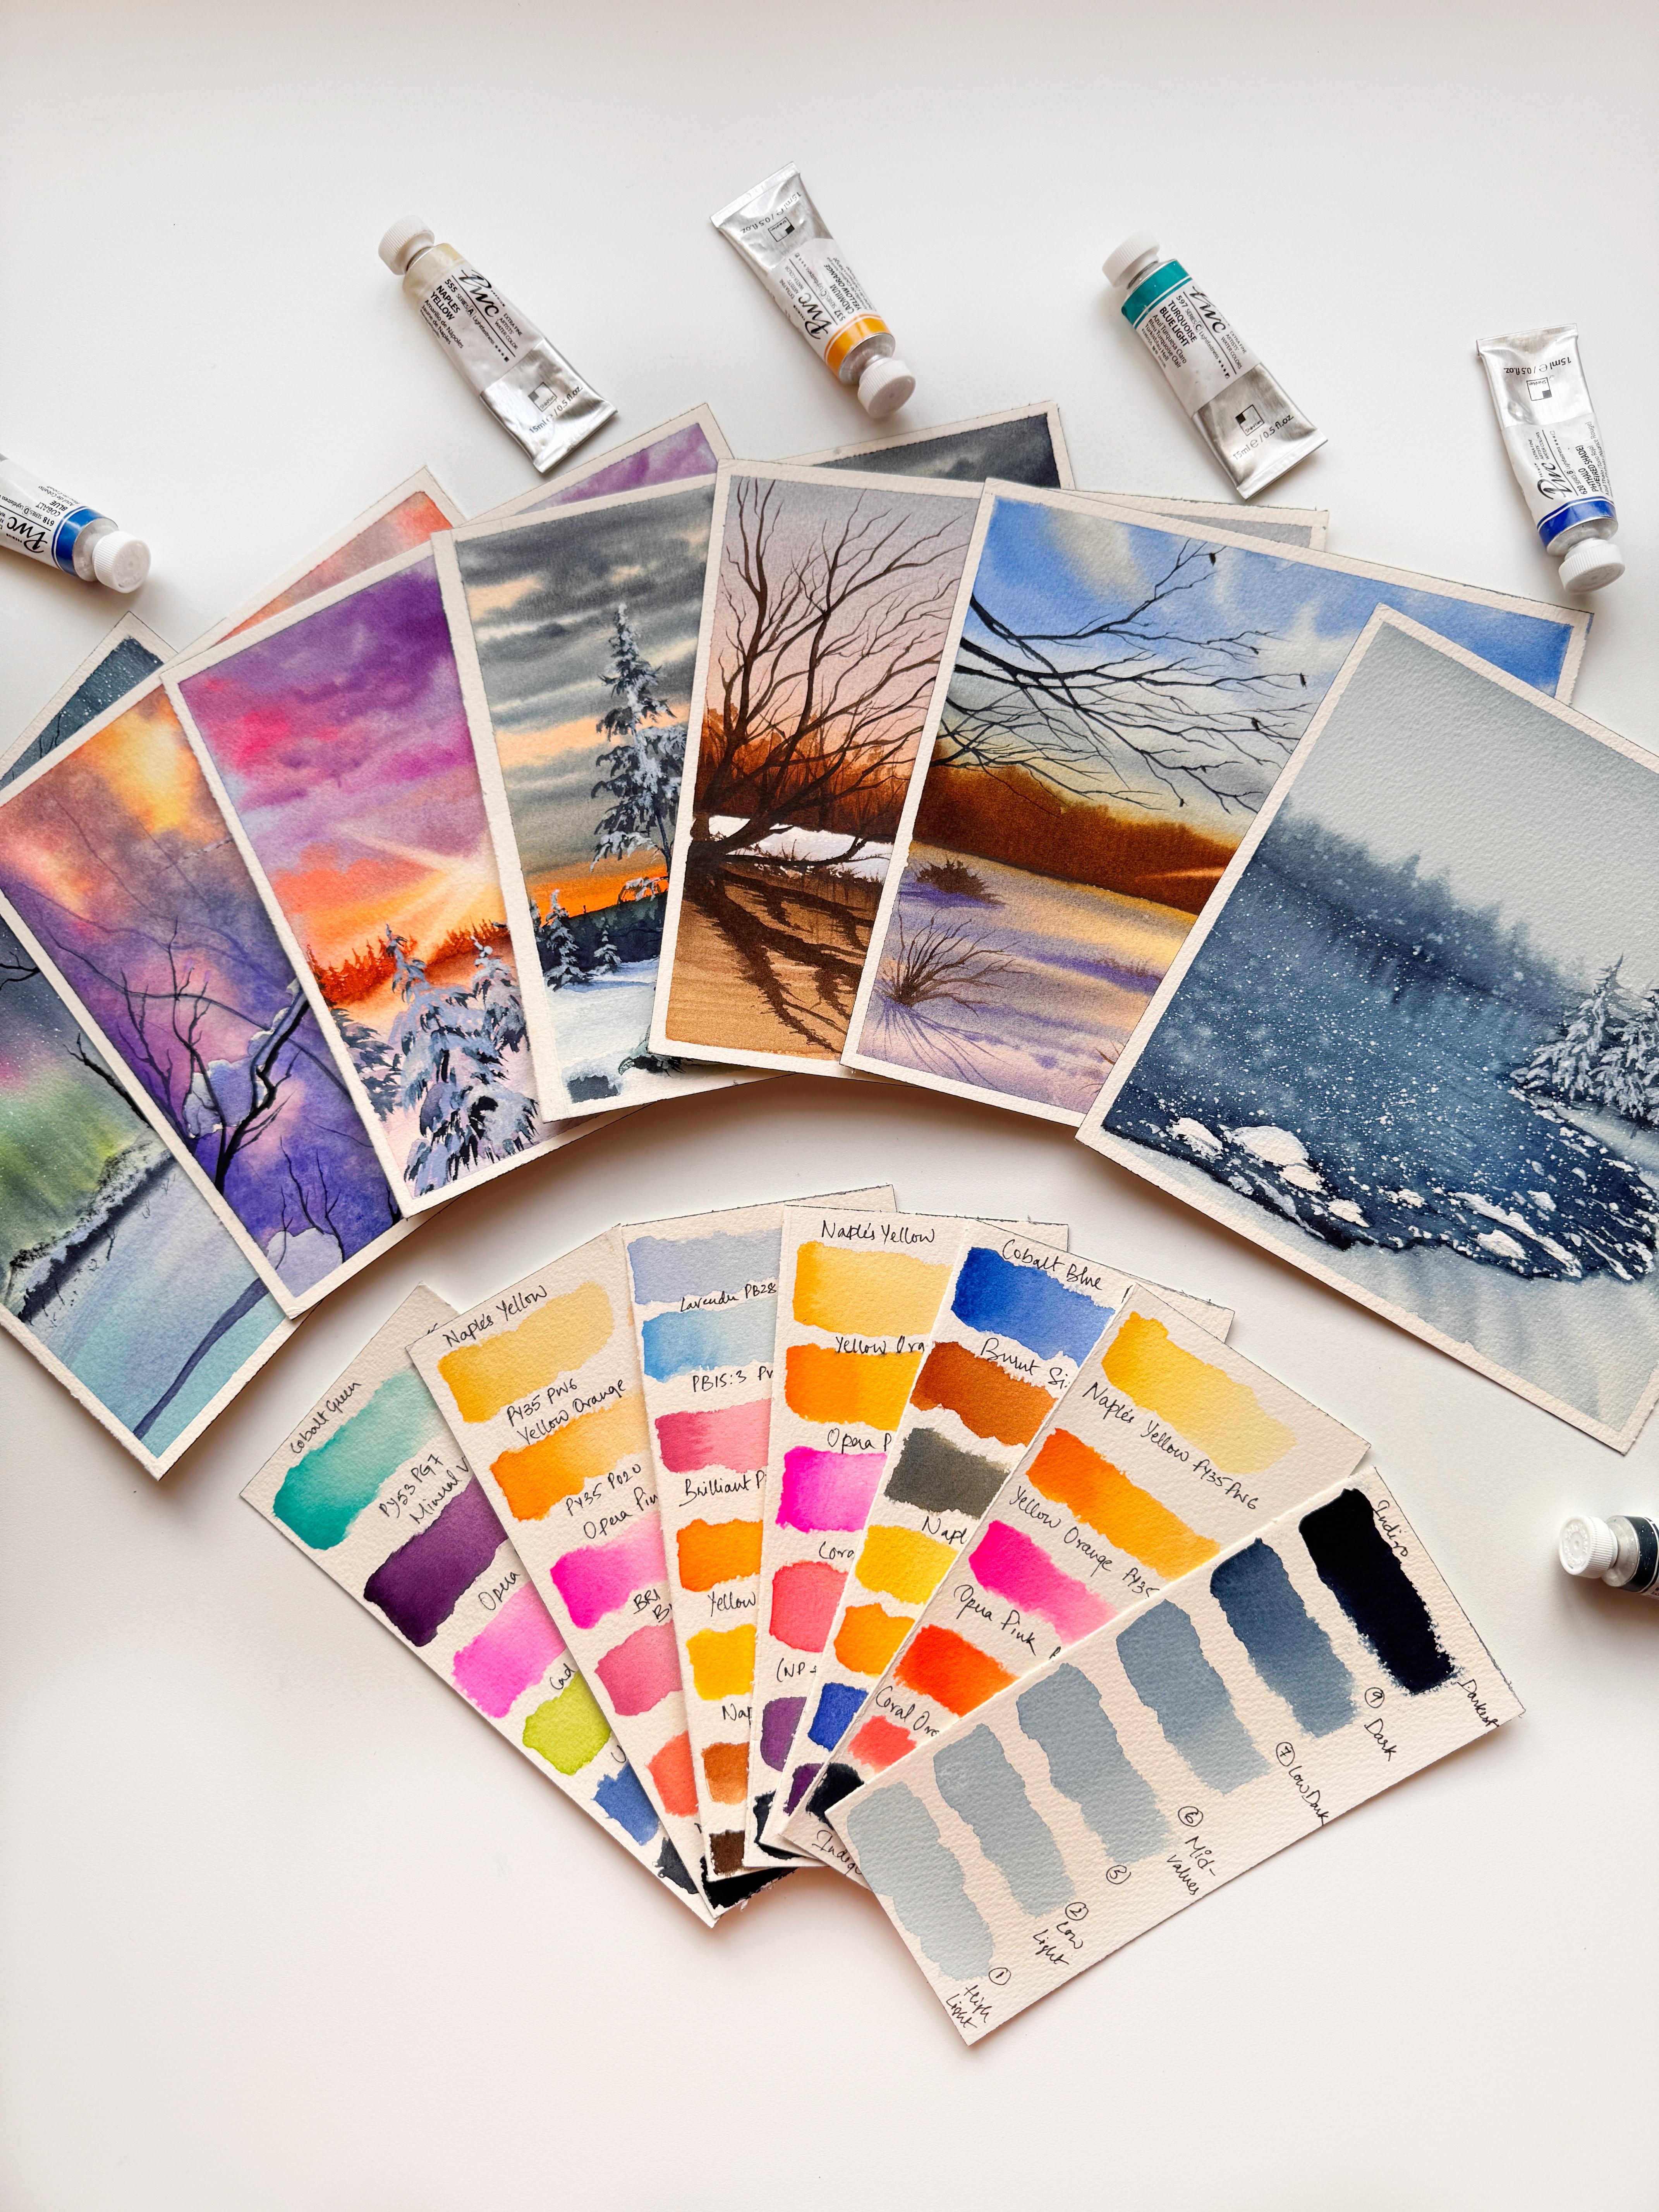
materials required and then discuss in detail about the color palette At the
beginning of every painting. We will also take a look at what alternative color
mixes you can use in case if you do
not have the colors being used during the
course of the projects. The class is set in a
daily challenge format. Each day, we will paint a
different winter landscape. Exploring different color
combinations and techniques, from the simplicity of
a monochrome painting to an elusive display
of magical skies. We are going to
explore a series of beautiful winter
inspired landscapes. This class is created with bigness and in students in mind, even if you are a
bigger, do not worry. I will be guiding you through
every step of the process. Each painting will take about 30 minutes
or so, even less. If you opt for a
smaller sized paper, it is absolutely perfect to fit it in your daily
busy schedule. Sharing from my own
personal experience, daily practice can
help you bring so much confidence and boost
in your watercolor skills. Take some time out from
your busy schedule and nurture your creative habit
by joining me in this class.
3. About Supplies: Before we get started
with our day one project, let's quickly discuss about the important supplies
that we are going to need. First, let's get started with our most important
supply which is a paper. The paper that I'm going to
use here for the projects is from Saunders
Waterford Aquaral Series. This water color paper is one
of my absolute favorites. Now coming down to the
specifications of the paper, this paper is coal pressed and the size of the
grain is grain fine. The color of the paper mentioned is white or blank, natural. And the most important part, it is 100% cotton mold made, archival grade, and acid free. And the GSM of the paper
is 300 GSM or 140 LV. The size of the paper that I'm using here is a perfect square. I have cut my paper
and sized it into 18 into 18 into 18 centimeter
on all four sides, but you could use any
size of your preference. You could go for 56. I have used the
remaining cutouts of the paper as Swatch cards. Now if you're using loose sheets of paper
like I'm using here, then you would need a
non absorbent surface on which you can stick the
paper and get to working. Now let's talk about a brushes. Do not be scared or intimidated, you do not need to own
all of these brushes. I'll take you
through one by one. These brushes are mob
brushes from silver etelia, series size number 20 and
size number 80 brush. This I'll be using for
layering flat wash, especially the big
rounded belly brushes. I use it for layering
flat wash on paper. And the smaller ones, I
use it for painting skies. Instead of this big
round fat brush, you could also have
a flat hake brush. Or simply go with
your flat wash brush, whichever is available with you. Always remember the
size of your brush is directly proportional to
the size of the paper. So always choose the sizes of your brushes according to
the sizes of your paper. Coming to your round brushes, I'll be sometimes be
using size number 86 and size number two brushes
from silver black velvet. Now opt for a bigger
size drawn brush such as size number
eight or ten, if in case you do not
have a mop brush, which is made up of goat hair. Another brush which you
might see me use most frequently is this silver
silk size number four brush. This is a synthetic brush exclusively designed
for watercolors. Now, apart from
this, I will also be using liner or
rigger brushes. Size number two from Princeton Heritage series is one of my most favorite
rigger brushes. In case if you do not
own any rigger brushes, you could also opt for
the detailing brushes. These are also synthetic
detailing brushes from Jimi or A Arts. Okay, the last brush from the brush series is this
Princeton Angular shader brush. This I will be most frequently be using for
lifting techniques. Now, instead of this brush, you could also opt for shorthair flat brush
if you own them, or else it is
absolutely fine to make do with whatever brushes
that you have got. Coming to our colors, the
colors that I'm going to use in this class are from Shinhan,
RPWC watercolor range. They are artists, great or professional
watercolor paints. Prior to every day's project, I will be swatching out
the colors that will be required to create the
project for that day. Do not worry if you do not
have the exact same colors, I'll be suggesting
you alternatives. Just go ahead and pick a
similar looking color. Okay, the next thing
that you would need is a mixing palette. The palette that I
have got here is from Shinhan Arts
polycarbonate palette. This palette has 52 wells. Now do not worry
if you do not have this kind of bigger
well palettes, you could go for a
ceramic palette or a plastic 12 or 24
Well palette is also good to go or even a basic normal
ceramic plate is good for mixing colors. Grab whatever is available
with you and get started. The next supply that we're
going to talk about is our masking tape or the
normal carpenter tape. There are different sizes
available in the market. This is the 1 " one and this is a half an inch choose whatever
is available with you. Even wash tapes would do. Next is our masking fluid. This masking fluid is
from Frank Borgois. You can use any masking
fluid that you have got. Next will be our
sketching supply. We will use some basic
supplies such as a ruler eraser and a
mechanical pencil. You could use any normal
pencil that you have got, followed by two jars
of clean water. Always remember to have
one clean source of water, always by your side, and the other one to
rinse your brushes. When you rinse your brushes, you need to dry them
or pat them dry. For that, we will be using some tissue paper
or tissue towel.
4. Day 1: Colour Palette: Before we get started
with our day one project, let's quickly take a look
at the color palette. For our day one project. We are going with monochrome. That is, use of a single color. And the color that I have
chosen here is indigo. When we squeeze out our
watercolor straight from our tubes and swatch it
using our dam brush, we can see the actual
strength of the color. That is the darkest range
that our color can go for. So when we keep adding drops of water to our existing
pool of color mix, we will notice a slight change
in the total intensity. But as we keep adding water droplets in
increasing amounts, we see the change subsequently until the Swatch is
close to paper white. This is what exactly
I'm doing out here. This change in range of
intensity that a color or hue produces is measured
in a nine point scale, which is known as
tonal value scale. And this exercise is very, very helpful and crucial for
all beginner watercolors. This tonal value exercise is
very important for everyone, whether we are
professional artist or a hobbyist painting, we should be able
to understand and manipulate the range of
light and dark tones, right? This is the reason why this tonal value exercise
is so very important because it helps us to give us a clear idea for effective
creation of depth, dimension, and contrast
in our overall painting. In a day one project, we will exactly
learn how to create different shades and tones using only variations of indigo. Helping you to understand the importance of
contrast in a painting. And also to adjust the
paint to water ratio, thereby controlling the
intensity of your indigo. For a day one project, we have chosen a winter, gloomy, snowy morning scene. Now, if you do not have
adequate knowledge about the value study exercise
or the color scale, then we will not be able to pick appropriate tonal
value range and thereby will not be able to capture the scene that
we want to recreate. For example, if we use two dark values of
indigo for a sky, it will repict a night scene
rather than a morning scene. And hence, here comes the importance of
tonal value study. I have talked in
detail about this in my previous class on
atmospheric spring landscapes. You could check lesson
number five for more detailed information about the tonal value range and how it is important in
depicting our landscapes.
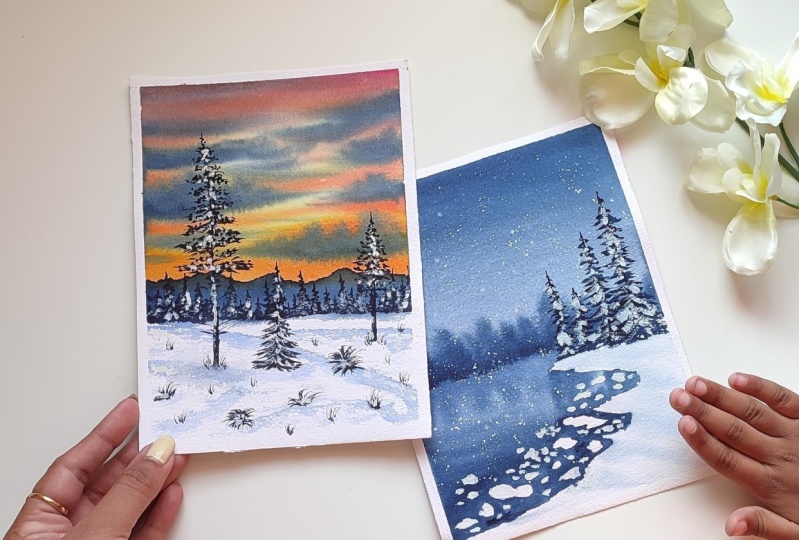
5. Day 1: A Snowy Morning By The Lake: Hello my dear creatives. Welcome to day one of
our seven day challenge. Today, we are going
to paint this beautiful, snowy winter morning. To begin with, I
already have my paper taped down onto the acrylic
boat using my masking tape. I'm now ready to begin
my pencil sketch. So one third of my paper, I'm going to leave
it for my sky. As you can see, I'm creating
a horizon line over here, just around a little
bit more than half of the paper from the top, and then going ahead and
creating the snowy landmass. Okay. Like this with my pencil. Make sure to go with very light
pencil markings over here because you do not want the markings to show through
when your watercolor dries. I chose to do the
snowy landmass area on my right side of the paper, but if you wish to, you could also do the same on your left
side of the paper. Okay. Everything will remain
the same in the composition, just that the land surface
mass will change to your left. That is also possible. It is totally left
to your imagination. You could do that now for the broken snowy landmass that I have created over here. You could also mask them
using your masking fluid. This process becomes easier when you mask it with
a masking fluid. But in case if you do not have masking fluid with
you, do not worry. I'm going to share the process how without the masking fluid, you can still achieve
the same result. Okay? Now, I'll quickly finish up my remaining
sketch over here, there will be some tall pines. Okay. So, this is
how I'm going to just roughly eyeballing
the positions. I'm getting started
with the sky. To apply the water to my sky, I'm going to use my silver
Atelior mop brush for the sky. This technique is known
as wet on wet technique. This means applying wet paint over your wet paper surface. So I'm here applying the
water first on the paper, making it wet, and
then we are going to apply our paint on
this wet paper surface. This will allow the paint to
spread freely on the paper, giving us a very
smooth blend of a sky. We are going to go with a
gradiate blend of the sky, for which I have switched to a smaller sized mop
brush size number 20. I am now mixing my pure
pigmented color well, and dropping it in
the other chamber where I had already added in some water so that I have a
tonal value of four or five. That means the medium
dark value of my indigo. I would recommend you
to go ahead and do your tonal value study of your chosen color
prior to this project, because this will enable you to follow my
instructions smoothly. Choosing the color for your sky is of utmost importance
in this project. Why? Because we are painting
a snowy winter morning sky. If you start with a
very dark value of your indigo and then tone it down to the lightest
possible shade, then it will appear to
be as a night scene, we need to keep it in
the ranges between the low light to
the lightest color. Right here you can see it has already appeared very dark at the start of the sky, right? So I'm going to tone it
down a little bit more. So I'm just going to
dip my brush in water. And using just the
belly and the tip of my brush with to and
fro motion of the brush, I'm just lightning the
colors away till the top. I went here with
one stroke at a go. Now I have tilted my board and I'm going to
repeat the same step, just using the watery
brush and moving the colors from horizon line
to the top part of the sky. I have toned down the
values. Can you see it now? Now the sky looks proper, It looks gloomy morning,
winter sky, right? Once we are done with the sky, we are going to get
started with our foliage, which will be just
above the horizon line. We are going to go with
control, wet on wet. And now's the perfect
time to do it. Can you see how
beautifully that paint is spreading above the horizon line because that area is wet? Make sure that you do this step in a very
controlled way to not have too much of watery brush tip or too much of water
added to your paint. Just a little watery paint
mix should do this trick. When you're doing this step, always remember to start at the base of
your horizon line. Just like I'm dropping the darker tones of my color
at the horizon line, right? This is because when the
color starts moving, it will lighten up
and fade out a bit. And that is exactly what I want. If you do the reverse, it's going to look very weird
and not realistic, right? Because the base of
anything is dark, because that is where
the shadows fall. So following by that concept, we are going ahead and using just the wet background to
advantage to create this soft, diffused, feathered looking
background foliage. I'm just going ahead and
adjusting the values. Drop all the darker tones towards the base of
the horizon line. Okay? So that's all about it. Now, once you are
done with this step, just let the sky and your background dry out properly and then we are
going to get started. Tar lake, our paper
is in semi dry state. But look at how
beautiful this is. Looking right with the sky and that smooth soft background. I love it. Let's proceed
to our next step, which is painting
our frozen lake. Now here too, I'm going
with wet on wet technique. But here we need to
be very mindful about the frozen areas or the parts that we have not marked
with masking fluid, right? I'm going to go around those areas wetting
the other areas, but being very careful when I'm near to the
horizon line because there might be
still a chance that I might be reactivating
that area. Because my paper is still
in the semi dry state. If the areas were marked
using a masking fluid, the process would have been much easier because that
would have enabled us to go over those areas without any worry of the
paint spreading into it. Right. Since this was
the first project and many of you might not have
a masking fluid with you, I thought of avoiding
that and showing you the technique of doing it
without the masking fluid. Right here, I'm going and loading the tip of my brush
with my darker paint mix. The same paint mix that
we have used for the sky. I'm being very cautious, trying to go around those areas, but here you can see the water is spreading very
uncontrollably. So I'll absorb all the
water in the tissue paper from my brush belly and try
to go around the areas. Now, now that I have removed all
that excess water from the belly of my brush, this is giving me better
control to layer the paint. And the paint is
spreading nicely on the paper because I had
already pre wetted the paper. This is the reason
if we were to go with ton right
technique over here, this would have been a
very much hasslesome task. It is easier to do it with wet, wet technique, but you can
do with tonight technique. But there might be chances that you might be frustrated easily. I did not want to get you frustrated at the very
beginning of the project, since this is just a day one. So just take it easy,
enjoy the process, and watch the colors
flow and bleed on your paper while you create
your beautiful landscape. Now as I move or
approach the line, I'm going to go with
lighter tonal value. I cleaned my brush of that
excess indigo that I have had, and now you can see
the tone have changed. Right? I have turned it
into a lighter tone. Now this, I'm going to mix
it back into the darker one. Blend it smoothly so that the blend looks
uniform and gradient. Oops, can you see what happened? Near the horizon line, you have got your
watery paint mix sled into the dried area. So here is another
way to fix it. This was unintended
and unintentional, but since it has happened, we are just going
to try to fix it. I'm just going ahead and
adding another layer of our background foliage with
same vertical strokes. Okay, You can go ahead and do this step if
something like this has happened or else you
can totally skip it. Now it's time to add in the
reflection in the lake. First, I'm going to start near the inner corners of
the snowy ground, where the pines will
get reflected here. Doing this step is essential because your paper is still wet and this will allow the colors to blend smoothly
into the background. We want the reflections
to be very smooth. Similar thing I'm going
to go ahead and do, for the reflection
of our foliage, which is near to the
horizontal line. For painting the reflections, if you would have noticed, I have switched to
my size number six, silver black velvet brush. Now using just the
tip of my brush, I'm pulling those longer
and shorter strokes to replicate the foliage which is there above the
horizon line, right? So we are just
taking advantage of the wetness of the paper and
allowing our paint spread, just like how we did for the foliage which was
in the background. Right now, I have switched
to my smaller size number two round brush because
now I'm going to go and start creating our pines. But the pines go with
smaller strokes, fanning it out outwards,
something like this. Now, as we come down towards
the base of the pines, the strokes will go and this is to give the form and shape of the pine tree as in triangle. Now, I'm going to
follow and create some more pines in
the very same way. This one I have
created a shorter one, but next to it I'll be creating a taller pine following
the similar process. Make sure when you are
creating this pines, you'd have controlled
paint mix in your paint mixture as well
as on the tip of your brush. Because if you have to
watery tip of your brush, you will not get the
fine, delicate strokes. You will get rather thicker
and blobbier strokes, which will not look very nice to see when you
create the pines. Okay? So be mindful of this exercise water control on your paint brush as
well as in your paints using the same size
number two brush. I'm going to go and create the darker outlines for the inner corners
of that snowy land. Okay, just around this corner, I'm going to add some depth. So I'm spreading the
colors horizontally, adding in some lines over there. My paper is still wet, so I'm going with
vertical strokes to create the reflections of the pines more
prominently over here. Okay? Do not do this step if your paper has completely
dried out, Skip this step. Time to get started
with a snowy ground. I'm here going with wet on wet, because this method gives you the most clean and more
smooth finish to your snow, Especially with the shadows. With my size number 20 more
brush using just the tip, I'm just going to go and add some rounded lines,
something like this, leaving in space
between the lines, The whites of my paper
showing through this is very essential when we are
creating shadows in the snow. The white part essentially
denotes the snowy part, and the lines that we are creating with indigo
are the shadows. Okay, this gives the depth and dimension to
our snowy ground. That's done now. I'll squeeze out some
fresh quash out of my tube and use the damp
tip of my size number six. Brush it nicely and use this to create the remaining
broken parts of the snow. Right. There were lots of snowy broken parts that we
had initially sketched out, but since we worked wet on, wet without masking it, it has all got covered
up using white quash. You can just do this tip easily. That's why this part
of the area which is facing towards the
snow land should be a little darker so that this white snowy broken
part that you will layer with your white quash pops out more bright and beautifully. I'm going and adding in some random snow
particles to this. But remember that the
bigger sized snow particles or the snow broken part will be towards the
bottom of the paper. And as you move closer
to the horizon line along the circumference
of the snowy landmass, the particle sizes are
going to be smaller. So, keep this in mind and you will see that after
finishing the project, you have created
something which is very closely realistic, right? So this is what I'm going to do. And follow over here, creating tiny dots and lines over here just to indicate
the snow particle. Okay? So with this step, you will almost be
done with this. Now, it's totally
up to you if you want the pines to
be kept as such, or you can add in some
dash of snow onto it. If you want to add the snow, just go along the direction of your leaves of the pine and add in the white
gouache to it. But make sure to leave some of the gap so that your color of the pines
are showing through. This will establish
the light and the dark contrast that we
are trying to bring through. Time to move on to the
most favorite step that is to add in the snow, I'm going to sprinkle
some of that white quash, make sure the guash is
not too runny liquidy. Once the paint
will start drying, you will see the sprinkles
that you have just plattered of white will
fade out too soon. So make sure it is thick but
not to watery consistency. And just sprinkle the snow away. This your painting is complete, let it dry completely, and then we are going to
peel off the masking tape. Now here I want to add
one interesting note. When your paper is still wet when you're
painting the lake, you could sprinkle some of the water droplets using just the tip of your size
number two round brush. This will give you that dreamy and misty
effect on the lake. Okay, this part I have
skipped in this tutorial because I didn't want you to feel overwhelmed in the
very first project. But this is another
alternative and a new technique which can give a very dreamy
feel to your painting. Now it's time to take off the masking tapes from
all the four sides. Make sure that you
do this step only when your paper has
dried out completely, or else you'll run
the chances of ripping off your paper along
with the painted part. Congratulations on completing
the first painting of a seven day challenge. I will see you
tomorrow with day two.
6. Day 2: Colour Palette: Hello and welcome
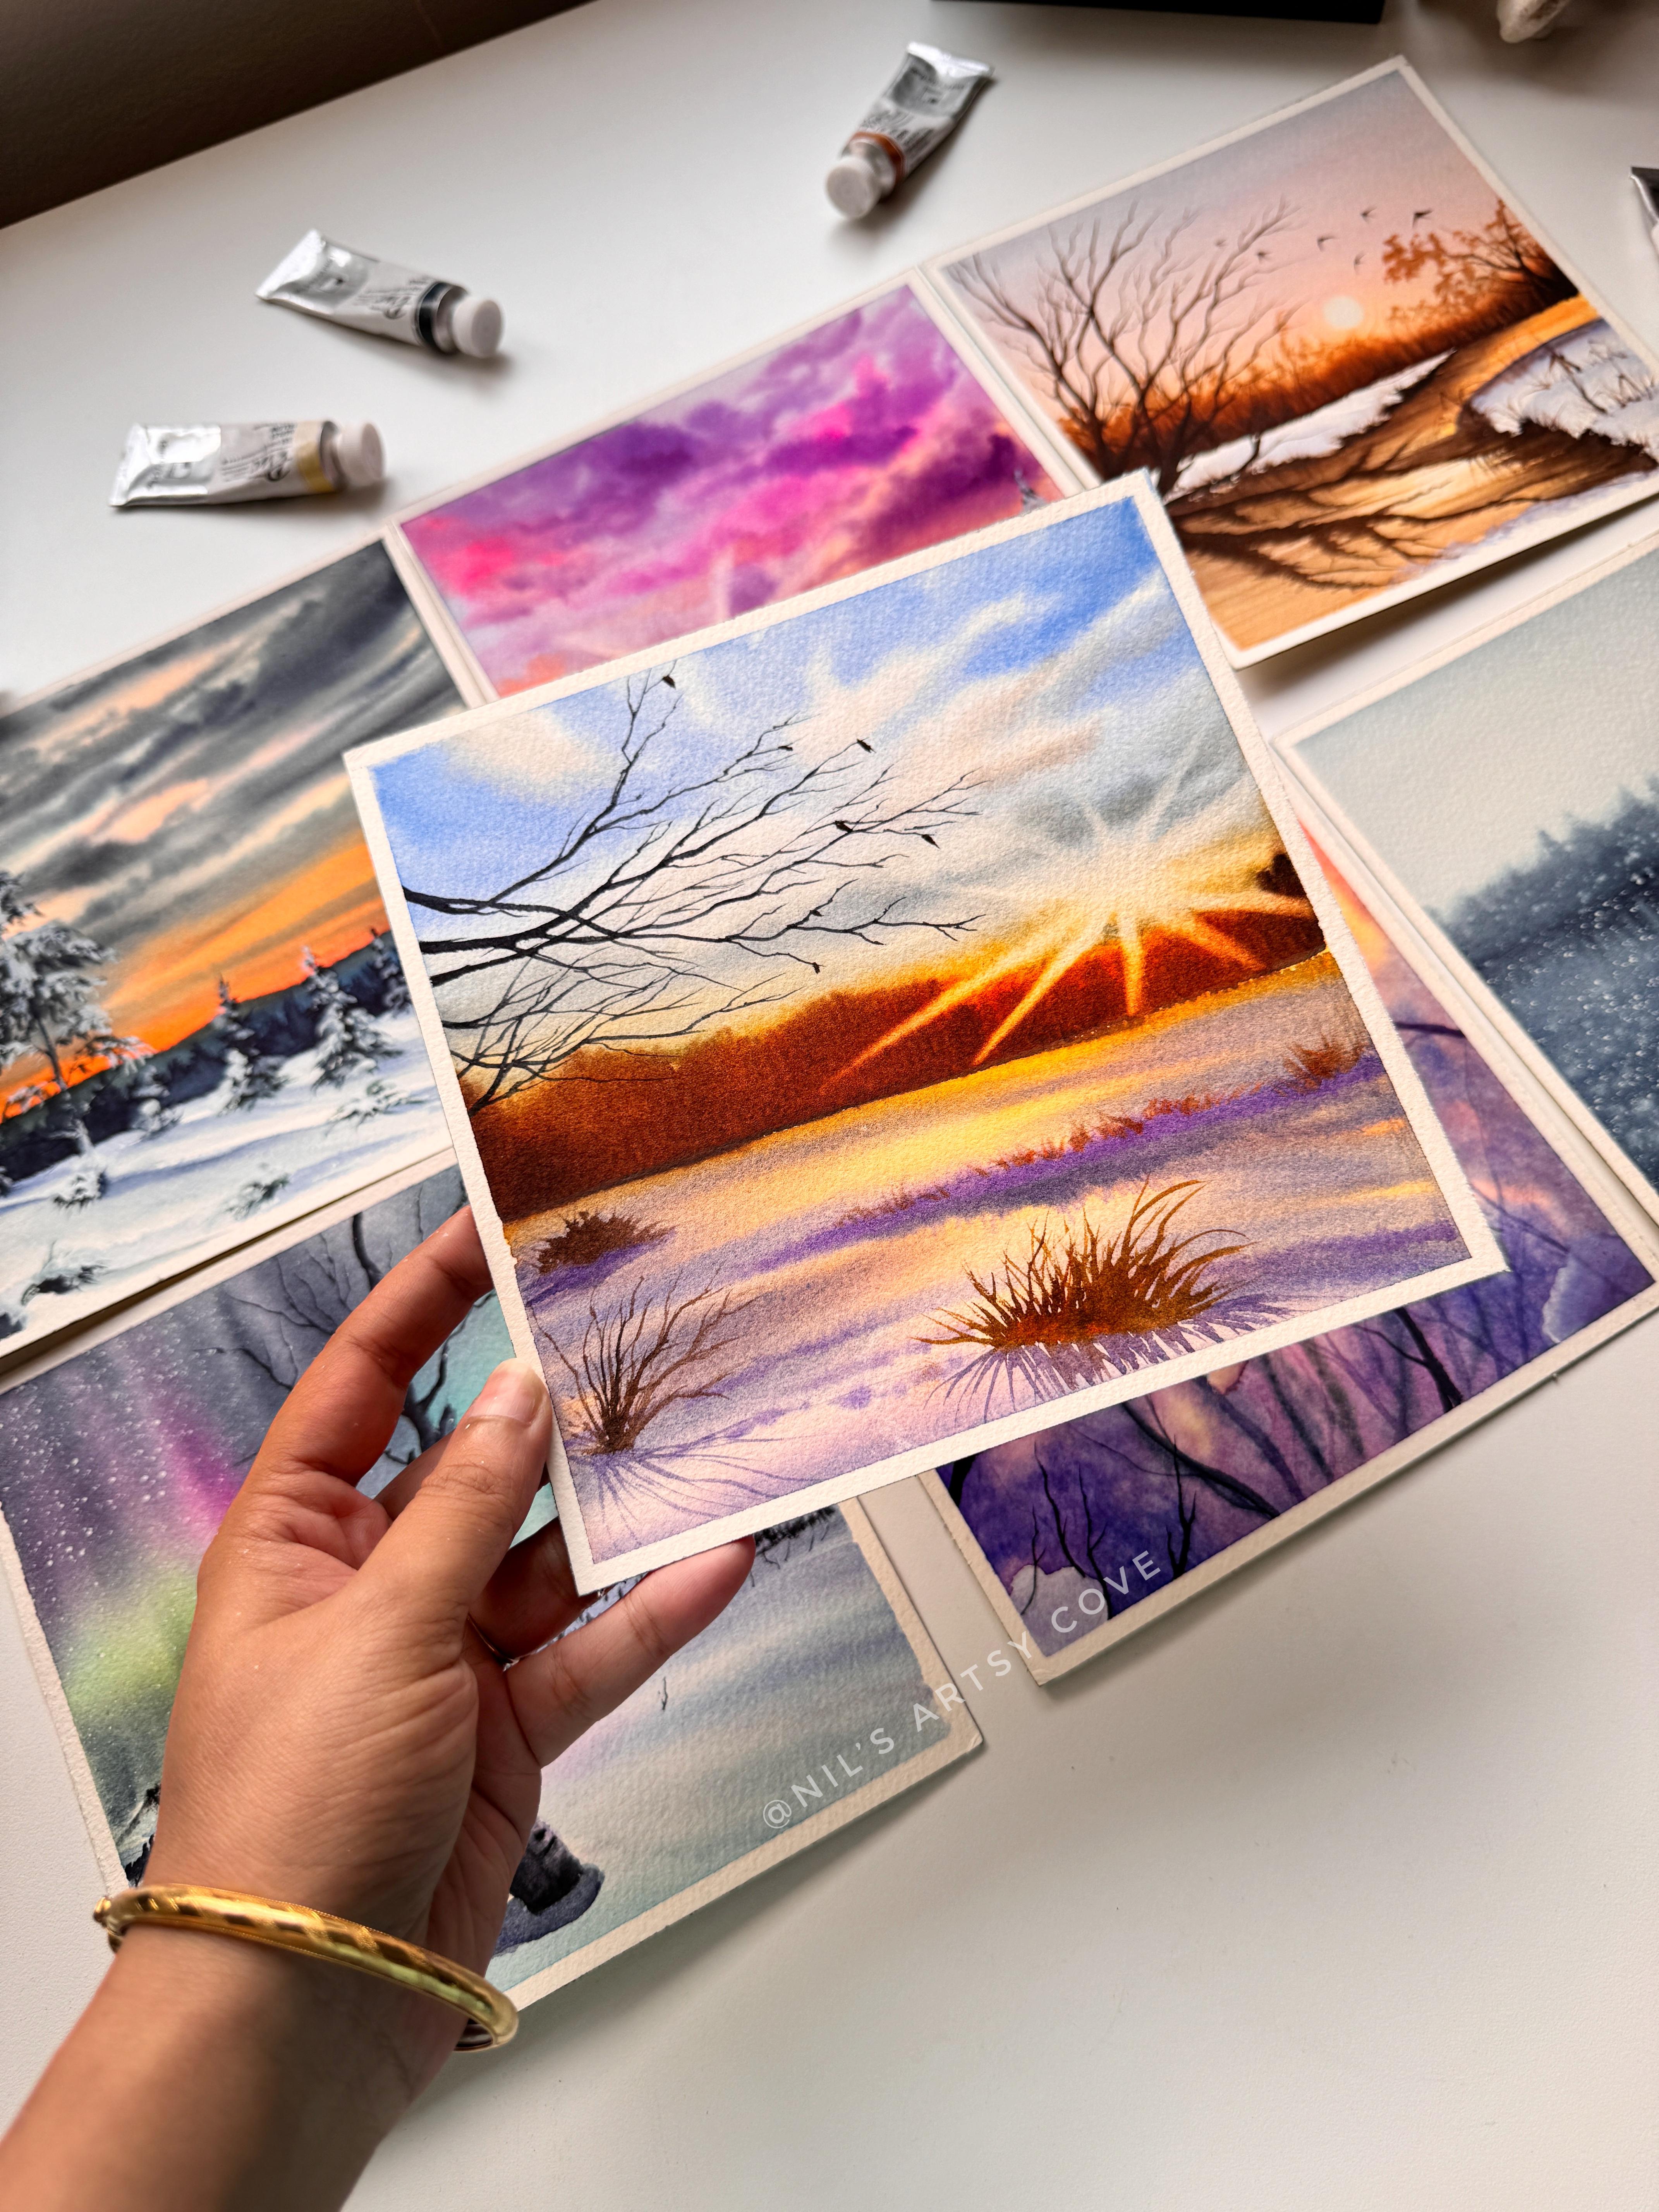
back to day two. We are going to paint this
beautiful winter sunset for our day two project. Now let's quickly take a
look at the colors required. The first color
that I'm going to swatch out is my Naples yellow. Now, Naples yellow is a
pastel light yellow shade. It's a very subtle
and beautiful color. But if you do not
have naples yellow, you could mix any of your
cool yellow shade, P, Y 35 or so on, and mix a little bit of white quash into it and
prepare the same color. The next color that I'm going to swatch is my yellow orange. Now this is a very warm color, as you can see, this is a
very warm yellow orange. Now if you do not have this
kind of color with you, you can always mix
your warm yellow and a little bit of red to
obtain this yellow orange. The next color is Opera Pink. Now instead of Opera Pink, you could use any of your alyzerine crimson color
or bright neon pink color. If you have bright rose
is also an alternative. But make sure your
bright rose has the pigment red in it
instead of purple. When your pinks will have
the pigment violet in it. Violet and yellows and
oranges will not go together. They will always
create a muddy mix instead of giving
you a warm color. And there I shared you
my secret recipe for creating this bright,
beautiful, pinkish orange. Sunsets. Yes, I
always mix my warms together to give me bright warm colors
such as Naples yellow, yellow orange, and Opera pink. I always use their combination
and create my skies. This is how I have prepared
this coral orange color. As you can see, I
have swatched out, I have used all the three colors in the ratio of one
is to one is to one. If you want it to be more
pinkish, more warmer, then you can add in a little
bit more of this opera pink into the same color mix and
create this coral pink color. Just look how pretty and beautiful this
color is, isn't it? Now for our class project, I'm going to use both
of the shades of coral orange as
well as the coral pink to create that
sunset horizon. Now the next color
that I'm going to swatch out is my indigo. My indigo here looks a
little bit of paints gray. So if you have paints gray
with you or your neutral tint, which is similar to black, you could use that because
we are going to use this shade to create our dramatic sky,
especially the clouds. And then go ahead and
create the pines in the background with
the distant mountains with varying tonal values, we will need another color, which is to create the
shadow of the pines. That will be the mixture of my ultramarine blue along
with a little bit of indigo. That's all prepare your colors and let's get started
with a final painting.
7. Day 2: A Chilly Winter Sunset: Let's begin our day to project. But before that, I'm taping
down my glute paper, which is glued on all four
sides on this paper pad. So you could also
use this kind of glued paper pad instead of acrylic or non
absorbent board. And go ahead and
do your painting. The paper is taped
on all four sides. Now let's create the horizon
line for our painting. So I'll be using 13 or
almost 34 of the paper as the sky and the remaining will be our snowy ground here. I'm using my ruler to
sketch out my horizon line, but if you're good with a straight line using
your free hand, you're welcome to do so using that horizon line as our guide and using
that as a base point. I have created here the small hillocks or small background mountains
in the distance. This is exactly what
we are going to paint. After a sky, there is
going to be a midground, and then there will
be our foreground, which is the snowy ground. So this will be our
composition for our painting. Now, always remember to do a
very light pencil sketching. You do not want this
lines to be too dark or else it will start showing
through your watercolors. Now I will be using my
kneading erasers and then lighten out the
darker pencil marks that I have created over here. This is a great tool in
your watercolor painting. You can easily take off those extra dark
graphite or lead marks. Time to get started with a sky. We are going wet
on wet technique. Wet on wet technique
means applying wet paint over your
wet paper surface. Here I am layering my paper
with uniform wash of water. You can apply this flat wash
of water with any brush. Here I am using a round mop brush of
size number 120 or 80. But you could also do this step using your
soft flat brush. Make sure that you
are going to and fro with your brush uniformly
spreading the water. There should not be any pools of water standing on your paper. I have switched to my
size number 20 mob brush from silver Elia series. This is a very soft hair brush. It's made up of goat
hair, which is natural. Hence, it has more water
absorbing capacity as well as paint retention. Here you can see I am not
using two watery paint mixes. It's a very creamy consistency of paint that I'm
trying to create. Getting my coral pink mix ready before we start
layering the colors. Now using a size
number 12 brush, I'll start applying the Naples yellow near the horizon line. This is where the sun
is setting, right? Hence, this place will be
the warmest of all colors. Using to and fro
motion of the brush. I'm going and spreading
the colors horizontally. Now I feel my paper has
started to dry out a bit, hence I'm going ahead
and layering it with a uniform coat of
water all over again. Starting from top
to bottom here, using just the tip of my
size number 12 brush. Going ahead with another coat of my Naples yellow near
the horizon line, since we had reapplied water to certain
areas of the paper. Hence, the values have
gone a little lighter. Now with the lighter values, I'm just going ahead and
using just the tip of my brush and creating this
slanted lines along the sky. If you so observe, I have left certain white
spaces in between. Those are very
essential for you. Do not cover them up with
yellows or your oranges. Now, starting at the base
of the horizon line, I will start applying our
coral orange very lightly. I want it to be a
little more pinkier. So I will just go
ahead and layer my Opera pink just at the base, since the base is always the warmest of all colors right now. Using soft, gentle strokes and using just the
tip of the brush, I'm slowly spreading the colors in slanted horizontal strokes. As you can see here, I want the tones to be
very warm and bright, hence, I'm reapplying the
colors again and again. But as you go up on the sky, please do not use such dark colors or dark
tones of your yellow. Instead, go with little
pinks because here you'll be adding the
darker clouds, right? So you do not want
this to turn very muddy and observe the
pressure that I'm applying. I'm just working with
the tip of my brush, not exerting too much of
pressure on it. Be little quick. You do not want your
paper to run dry or else the colors will
not bleed with one another to give you a
very smooth looking sky. It's time to start with
our blacks or our indigo. The color shade that I'm using is a mix of my paints,
gray and indigo. While I'm layering this mix of indigo and paints
gray on my sky, I'm mindful of the paint to water ratio as well as the
tonal value of my indigo. It is not too dark, it is not too light. It's just in the
mid values, right? Use mid value tonal
range of five or six while you are creating
this darker clouds. And use just the
tip of your brush. Very light, gentle strokes
and leave certain gaps in between for your orange and
your pinks to show through. You can see there is
not too much of water in my brush nor in my paint mix, but yet the colors are beautifully blending
into the background. Because my paper is still wet, this becomes a little hard when the paper
starts drying out. I have switched to
my size number six, silver black velvet brush. And using just the tip
and toe of my brush, you can see how I'm creating those fluffy
clouds in there, right? It's not too much of strokes, not too much of pressure. Just a slight little
wrist movement. Be flexible with your brush and create the dreamy fluffy clouds. Now, using some more
long striding strokes, just with the tip of my brush, I will go near the horizon
line and paint some. My paper is still wet. This is my last chance
to go ahead and create some form or shape
of the clouds if I want to. I don't want to tinker
with it too much, or else there might be a chance that I might be
lifting out colors. Once the paper starts drying, do this step only
when you know that your paper is sufficiently wet
enough for you to do this. Once the paper starts drying up, you'll only get hard
edges of your clouds. I'm retouching here and there slightly with just
the tip of my brush. I think I'm done with the sky. Now for our background,
distant mountains. I have prepared a
bluish gray mix which is in the tonal value
range of four to three. That is a low light
tonal value scale. I'm just simply using the tip of my brush and creating the
outline of the mountain. Do this step only when
your sky has completely dried or else these are all going to bleed
into the sky here. We do not want that. Here we are going ahead
with Ton right technique. Meaning the paper
is dry out here, but you're using wet
paint to layer on it. Hence, this is known as
Ton right technique. Now I'm creating this
background mountains with a little watery mix. As you can see, I diluted the paint mix over there so
that you get this misty, foggy effect at the foot
hill of the mountain. Using the same size
number six brush. And just with the
tip of my brush, I'm just going ahead and layering another
coat of my paints. Gray or indigo, bluish
gray mix over there so that the outline
of the mountains are a bit darker
than the foothills. This step is used to create that illusion of depth
into the painting and also contrast because you want the mountains to be
standing out a little. Since it is sunset, the shadows are being casted by
the setting sun. And hence, the colors are darker towards the
edge of the mountains, while at the foothills
it's lighter, right? This is the concept that
we are playing with. If you observe nature closely, you will find out the beauty
in all these little details. Now using the darkest mix of
my indigo or paints gray, whichever color you are using, I'm going ahead and
creating this illusion. Offer forest which is just near to the foothills or
a background foliage. Okay? Exercising a
little water control at the tip of my brush. I'm going ahead and creating these vertical strokes longer
and shorter to indicate the growth or the
natural look of how a background forest
or a foliage looks. Right? So I'm just going
ahead and following that step until I completely
layer this end to end. The technique that I'm
using here to create the foliage is wet
on dry technique. But you may also do this step
with wet on wet as well, like how we did it
in project one. But here I wanted my pine forest to have
some shape and form, and hence, I went ahead
with wet on dry technique. If you're happy with how your background pine
forest appears to be, then it's absolutely fine. You can skip to the next
part where I'll be showing you how to go ahead and
paint the snowy ground. But here I'm just adding a
little bit more details. That is to add in the shape of the pines using my
detailer brush over here. You could also use your size number one or
size number two brush, and using the tip of your brush, you could create the
shape of this pines. This step is going to be
little time consuming as you are going to add in
little details over here, but it's absolutely
okay if you want to skip this step
and you are happy with how your pine forest is looking in the background,
it's absolutely fine. If you're painting along with me and you are also
creating this pines, I would recommend
you to first watch the entire step and
then create your pines. Coming to the good part, that is to paint
our snowy grounds. Yes, we have started with wet, using a very watery mix
of my ultramarine blue. The total value range of this mix should be
close to high white. I'm just going ahead and
painting the shadows first. And then with a very damp brush, I'm just going to blend it into the whiter parts of the paper. This is another way
of painting the snow, but you'll have to make sure
that the total value of ultramarine blue that you are using is close to
that of high white. Only then you'll be able to do this step without any fuss. Added in some rocks over there using my darker
shade of paints gray with a very
diluted paint mix of my indigo and paints gray. I'm going over the
snowy ground all over again to create an illusion
of a darker shadow. Now using a rigger
or liner brush, I'm going to go ahead and paint the branch of the
pine tree over here. Okay, So you could use
any size number one or size number two round brush
which has a thin pointed tip. If you do not own a
liner or a rigger brush, creating very thin
and delicate lines. Using this liner
brush to indicate the thin branches stemming
out of this pine, make sure to use a very buttery consistency
of your paint. Too thick paint will give
you some dry strokes. You want to avoid that at
this stage of the painting. Now I have switched to my synthetic brush from
silver silk series. This is size number four. And using just the
tip of my brush and mid value tones of indigo, or paints gray, I'm
going ahead and creating this shape
of the pine leaves. I'm going to repeat
the same process, but each time that I
create the pine leaves, I'm going to do it in
varying shapes and sizes. Some will be smaller strokes, some will be longer
and shorter strokes. This will give the natural
look of your pines. Going ahead and creating some thinner and thicker strokes to create the varying shapes and the sizes of the
foliage of the pines. Okay? Going at random
positions and places. Okay? You can Google out your own pine
references and then paint it in your own style
using the same technique. It is not necessary to copy the same pine that
I'm doing out here. It's up to you. You can do it in your own style and
your own preference, switching to a size
number two round brush for better control. Because I want to create more thinner and smaller pines
here at the snowy ground. I think we are almost
done with a painting. Creating this pines is almost
like the final stages. I'm here going to go with the
natural shape of the pine, which is a cone shaped and
inverted triangle, right? I'm going ahead and
following this step. Thinner at the apex and
broader at the base, right? This is what I am
going to follow. I am positioning the
pines at random places, but make sure that you create
a perspective in here. When you are closer
to the horizon line, create smaller pines over there. And when you are almost
towards the foreground, which is closer to you, you create some bigger pines. This will establish the sense of depth and illusion
in the painting. I'm going ahead and
adding in more pines over here because I'm working
on a larger surface area. But if you're working on a smaller sized paper
such as five or six size, I think two to three pints
should be good for you. I am here going ahead and
creating some extra pins. Since I have to fill up this empty spaces on
the snowy ground, I'm going ahead and adding
one more pine towards the left side corner of the
paper just to fill the space, because here it looks like
it's kind of empty over here. I'm just going ahead and filling up the spaces in
between the pines using the damp yet right
tip of my mop rush, I'm going ahead and creating this slanted lines along the snowy shadows
that we have painted. This will help us to create or accentuate the
shadows a bit more. Here I'm introducing a
totally additional step. Feel free to skip it if you're happy with how your
pines are looking. Now, I just wanted to add a dash of very darker
green onto it. It is not much making of a difference with
the same paint mix. I'm going to create
here smaller pines, but here I'm not going ahead and creating the full size tree. I'm here going ahead and creating just the
leaves, the foliage. This is to represent that this pine trees have
been growing and they have been subdued
by the snowfall. You could also create some
bushy grasses over here. That's totally up to you, but use a darker color mix to bring that contrast
in your painting. Remember this rocks that we had painted using a darker
mix of paints gray. So I'm just going over it
and creating the illusion of a bushy grass or a bushy
shrub growing over there. I'm touching up those pines with a little darker shade of this darker green mix
that I have created. You could do the same using your darker mix of
indigo or paints gray, whichever combination you have
used to paint your pines. I am now preparing a creamy
consistency of white quash to create the snow on the
branches of this pine trees. So this is how I'm
going to go ahead. Using just the tip of my
size number one brush, I'm going ahead and
creating this shape of pine leaves on the pine leaves that we have already
created with darker tones. Can you see how I'm doing it? It's just that
going randomly over the darker tones and creating this contrasting
highlights of white quash. This will give the
illusion of snow, but make sure that you do
not cover it entirely. You want a little bit of the darker base color of
your pine trees to show up. I'm going to repeat the
same process until I have covered the entire pine tree along with all the
other pine trees. This is a quick and easy way of doing it with white quash. There are multiple other
different ways and different techniques that
people paint snowy pines. Some use masking
fluid to mask out the snowy pines or the
snowy areas of the pines, and then go ahead and fill
it later with shadows. That's another way or else
you create the illusion of a pine tree using a very light tonal values
of your shadow color, that is with ultramarine
blue or indigo. And then use the darker color of the same color mix and create the leaves of
the pines underneath. So that is one more
technique which we will be using in our
day four project. So there was a hint of what you can learn in the coming
days in this class. Now coming back to
our present project, I'm just going ahead and
layering my white quash on top of the snowy small pines
that we have just painted, or the shrubs, you could
call it shrubs also. And just covered them up, leaving some gaps of the
darker colors to show through. Now, near to the base of this tallest pine tree
that we have painted, I'm going to create a ball
of snow near the base of the tree and then
use another small Detailing brush over there and create the illusion
of leaves underneath. Okay, now using the dry
brush pattern technique that is applying the dry
gush on the damp brush, I'm just going to go over
this stem of the tallest pine using my liner brush, which is size number two. I'm going ahead and adding in some darker tones in
between those white quash. Okay? Just to give the illusion that it has been
covered with snow. So the time has finally
come where we are going to paint the snow on all the
other pine trees I have here. Fast forwarded this part. Feel free to do it
at your own pace. Once you are done adding
the snow on your pines, now it's time to create the shadows of the pines
on the snowy grounds. For that, I have been using my watery mix of ultramarine blue and with
my size number one brush, I'm just going to go with the shorter and longer
inclined strokes, planting towards
the snowy ground. Okay. So this is how I'm
going to do the shadows. That's all for this painting. With this, we wrap
up our painting. We will wait until the
painting is completely dry and then peel off the masking taste
from all four sides. Here is our beautiful winter
sunset painting for day two. I'll see you tomorrow again
with day three project.
8. Day 3: Color Palette: Hey, welcome to
day three project. For day three, we
are going to paint this bright and beautiful
winter sunrise. So let's quickly take a look
at the colors required. First, I'll be starting out
with the colors for the sky. I am here spotching
out my cobalt blue. This is a warmer blue pigment. Now in case if you do not
have cobalt blue with, you could also use alternatives of warmer blues
such as thalo blue, which is also with PB
29 as a warmer pigment. Or ultramarine blue, which
is also with B 29 pigment. You could also opt to
use cerulean blue. The next color that I'm going
to use is for the clouds. This will be gray.
Now if you do not have pains gray with
you readily available, you could mix your
own paints gray by taking some of
that burned sienna. I'm swatching my burned
sienna out here. When you mix burned sienna and your warmer
blues together, such as cobalt blue, ultramarine blue, in
ratio one is to one, you get a very beautiful,
neutral looking gray. Now if you add in more blue, it will have a more
bluish undertone to it. If you add in more
of the browns, then it will have more of
the brown undertone to it. So you can mix and balance out the gray that you are looking for and you can
create your own gray. I wasn't very happy with the
mixture that I had produced, so I mixed in more of the blue into that mixture to
obtain this gray. Now moving on to
the next colors, which will be the colors near the horizon line will be
our yellows and oranges. So the yellow that I'm going to use this project is my
favorite, Naples yellow. Now Naples yellow, like I
have already mentioned in day two project is a
very soft pastel yellow. It is made up of with
pigments Y 35 and PW six. But naples yellow
from other brands may have some other
constituent pigment. But if you have any pale yellow
cadmium pigment with you, which is of PY 35 or so, you could mix in a little bit of your white quash and prepare
your own Naples yellow. The next color that we are
going to swatch out is a warmer orange orange that I'm going to use here
is yellow orange. As I've mentioned
in day two project, you can prepare your own
yellow orange by mixing your warmer yellows
with your warmer red. Now the next colors that
we are going to look at is the colors of a
shadows for the snow. For that, I will be using
a mixture of two colors. First is ultramarine
blue and the second will be a little bit of my mineral
violet to paint the snow. You can also go ahead and use your cobalt blue instead
of your ultramarine blue. But I like to go with
ultramarine blue. Because ultramarine blue
is a little granulating, it provides a nice texture to your snow when mixed with
your mineral violet. Mineral violet in my case, is also a little granulating, hence it gives me
that best combination to create textures on snow. The last pigment that
I'm going to swatch out is my black or my neutral tint. Instead of black
or neutral tint, you can go ahead with paints
gray or your ivory black. Any black colored pigment
that you own will do. Get your colors
ready And join me in the next lesson where we get started with our final painting.
9. Day 3: A Bright Winter Sunrise: Time to get started
with a project. I have taped down my paper on all four sides
using masking tape. Now it's time to get started with pencil sketching
our composition. To begin with, I'm going
to apply the rule of two thirds to create the horizon line According
to the rule of two thirds, it suggests placing
the horizon line 13, or two thirds up or down the frame rather
than in the center. This can create a more
visually appealing composition in photography or art. So that's the
reason why I placed the horizon line not at
the center of the paper, but somewhere below the
center of the paper. Right, I'm now going ahead and sketching out
the shadow parts in the snowy land
that we are going to go ahead and paint later
on in the project. So simply sketch out
the areas and demarcate the masses where you want the shadows to be
prominently seen. Here, I'm going to
go ahead and create the midground foliage that separates the sky
and the foreground. Whenever you're sketching
out your composition, make sure to go with very
light pencil marks so that it does not show through
your watercolor paintings. Time to get started
with the sky. We are going with wet
on wet for the sky. And for that I'm using my size number 80 more brush to lay a flatwah on my paper. I'm going to wet it till my
horizon line always go with an even wash of water on your paper whenever
you're painting sky. This is a very
important step because if there are pools of water
stranded on your paper, it will only make the next
steps bit more messier. When you start
applying the colors, go to and fro with your brush and spread the water
evenly on your paper. So I'm going to start
with layering the colors. The first color that I'm reactivating is
my Naples Yellow. Squeezing out all that extra
water from the belly of my brush and using just the
tip to layer the colors. Starting from the horizon line, you can see I have left certain gap just
right at the center, spreading the color
from right to left. Now I'm going to make the
horizon line a little bit more warmer by adding in some
yellow orange hue to it. And just like how we went ahead with Naples yellow,
the same pattern, I'm going to follow and blend my yellow orange with
the Naples yellow. Now we will be starting with the topmost part of the
sky with our cobalt blue. Now I realize that right side, I have went ahead with
too much of yellow. I need to lift the yellows before the paper starts drying. So I'm just using my damp brush and lifting
out the shade of yellow. This technique is
known as lifting technique with a
clean damp brush. Go over those areas
just to blend out any remaining yellow hues that might be
present over there. I have prepared a
medium tonal value of cobalt blue and
started layering it on my paper using my silver black velvet size number
eight, round brush. Look at my brush strokes. I'm applying very soft, gentle strokes using just
the tip of my brush. Spreading the colors
in a very slanted way. You would have observed
that as I laid my blues, I did leave certain wide
spaces in between my blues, that is because those
are my fluffy clouds. I wanted those wide spaces in
between so that later on we can add in some shadows over there to create the
depth in our clouds. Before I start to add
depth in my clouds, I always do this step
with a damp brush. I just go over the wide
spaces all over again, making it wet so that when I start applying
my darker grays, it automatically blends and smoothens out without
forming any hard edges. Now, this step is the most critical point
in your painting. If you feel that your paper has started to dry out already, Skip this step altogether, because if you go with a dam brush in those
white pockets, you are likely going
to make the water seep into the blues and make uncontrollable
bleeds over there. It is not going to look nice, so you need to gauge the
wetness of your paper. So practice is the key. Over here, I have learned
to gauge the wetness of the paper over time and over
the years with my practice. So yes, it is an important step. If you feel your paper
has started to dry out, you can totally skip this step of adding the
depth in your clouds. You can just retain
the white spaces in your blues to create
the look of the cloud. With my size number
six round brush, I have started layering
some darker clouds in between the transitioning
layers of blues and yellows. Leaving the white gap in between the white space in between
that we had retained earlier. Do not fill that space because that is
exactly where we are going to create our sun
with the emanating rays. My paper is still wet enough
for me to do this step, but if you feel
that your paper has started to dry out,
please stop there. Do not go overboard with this. I will continue to add in some more darker tones over here because the clouds
are fading out. So I'm going ahead and
adding the darker tones, just underside of the clouds that we have created earlier, using just the tip of my brush. And with very soft, gentle strokes and
with light pressure, do not put heavy pressure, you will be lifting
out the colors. The area around my horizon
line has started to dry out. It is in semi wet state. So I will just quickly
go and start dropping in my burn sienna color over there to indicate
the midground. This burned sienna color
is a very warm color. Since the sun is setting
down in the horizon, the entire horizon will be lit
up with the warmer colors. And hence, I chose to
go with burned sienna. Now, just around the
area where the sun is going to rise up with
the rays shining out, I'm going to go with yellow orange with the
same vertical strokes, and connect it with my burned sienna,
something like this. Just go and lay the colors with your burnt sienna on top of your yellow orange. And
you will be good to go. At this point, I'm going
to go quickly and try to lift out the colors from
there using my damp brush. And I realize that my
paper has started to dry in order to
create warmer colors. Over there I go with a very medium tonal value of my yellow,
orange, and yellow. Lightly blend it out with
the tip of my brush here. At this point, I'm taking
advantage of the wet colors. And now I'm going to lift
the colors to create the full circle of a sun
and then create the rays. I have switched to my angular shader brush to lift the colors. To create the rays, you can use any synthetic short flathead
brush to do this step. Now, every time that
you lift the colors, always make sure to rinse
the brush in water, dab it clean in tissue paper, and then go ahead and
lift the colors back. It is a continuous process. Now, using a darker
shade of brown, I will quickly go and start adding the
darker tones towards the extreme ends of
this midground foliage that we just created before
it starts drying out. To create this darker
shade of brown, you can either mix
a little bit of ultramarine blue or your cobalt blue into
your burned sienna. Or add in your neutral black, or your paints gray into your burn sienna and turn
it into a darker shade. It is not necessary for you to own a darker
shade of brown, like Vandyke brown
or your burn timber. For this step, I'm going to keep laying this color until I
have reached the other end. Okay, I quickly grabbed my angular shader brush
and I'm lifting out the colors once more to create
the rays more prominently. I'm applying very
light pressure. And lifting the colors facing downwards so that the rays
are pointing towards us here. At this very moment, a big blob of water
fell on that area. And as a result, I wanted to fix those clouds which
ruined the sky. So I'm going again, re wetting the sky very gently with soft
handed as you can see. Not trying to lift any colors. For this you would need a very soft brush like I am using over here
from silver a tailor. Now again, I will start
reapplying my indigo. This step is totally optional
since I had ruined my sky. That's why I'm trying
to fix it back. Okay. But not every time you
can fix back your skies, because watercolor is not
a forgiving medium at all. I'm just trying to focus on my reworking of my brush strokes just around the horizon line. I'm not going to go and touch the sky which we have
already painted at the top. Okay, whenever you go with
the rewetting technique, this is a golden rule. If you try to retouch
all those areas, it's going to get
screwed even more here. I'm going ahead with
the lifting technique, creating brighter
rays of the sun here. Using the tip of my
size number six brush, I'm going ahead and creating
those sharp lines just to indicate the tip of
the forest. Okay. The forest trees over
there just this do not go over the rays that you
have just created of the sun. You do not want to
double work over there, just go underneath that
and fill those areas. To get started with
our snowy ground just near to the horizon line, I'm going to go with
wet on dry technique. Because here, if we try to paint the sun reflections
here with wet on wet, then there might be chances
that the wetness of the water will start seeping into the midground foliage
that we just painted. And it might be
screwing it up again, so I do not want that. Now for the remaining area, I'm just going to apply
this even coat of water so that my reflections
are well blended. Loading the naples yellow on
just the tip of my brush, I'll be going ahead and
creating some slanted strokes. The wetness of the paper will make the strokes
seem well blended. This is the reason
why we want to do this step with wet
on wet technique. The wetness of the
paper has made the whiter spaces disappear. So I'm going to go and lift out certain areas
from here and there. Just to have the hitter spaces in between those reflections. This is here where we are
going to start layering with our ultramarine and violet
shadows for the snow. Here I'm preparing a mix of my coral pink or coral orange. You remember that we have
seen in our day two project? So that I'm applying here somewhere in between
those spaces over there. Okay, Do not go overboard and completely layer it and
cover up your yellows. You need certain yellows
also to show through. Now it's time to
quickly go ahead and create the color mix
for our snow shadows. I'm mixing my ultramarine
blue with my mineral Valid to create the mixture
for my snow shadows. This step has to be done quickly
before your snowy ground starts drying up
or else you will not get the blended
snow shadows. I'm going to go with longer
and shorter broken strokes or lines for the shadows. Do not cover up the entire
area with your violets. You need certain of those coral pinks and your
yellows to show through. Just use the tip
of your brush and the belly to just
layer the color. Do not lift any colors. Be extremely gentle and careful when you
are doing this step to add more depth and contrast
to the snowy foreground, which is closer to us, that is at the
bottom of the paper. I went ahead and layered it with an initial coat
of my coral pink. Refer back to project number two on how we created
our coral pink. And then lay it with
our ultramarine blue to create the depth and
shadows of the snow. Now I'm creating
the color mix for my shadows of the snow which
we had earlier sketched out. Remember for that, I'm mixing a little bit of
my mineral violet along with my ultramarine blue. Remember to exercise
water control. Your paint mix should be creamy and buttery
and not too watery. Here the tonal value should be ranging between
the mid values. Do not go with very
dark or intense tones. It wouldn't look
like shadows at all. Using just the tip of my
size number six brush, I'm going to add in
some thinner lines and dotted strokes over there. Repeating the same
process out here. But here I'll be adding some more blob of
paint over there. And from there I will be going ahead and creating a
shrubby existence. Now, with slanted strokes, I'm just going ahead and
creating the shadows. I have mixed here a
little bit of my paints, gray or neutral tint
into it very lightly. I'm going ahead and creating the shadows with the
help of my rigger brush. I'm going ahead and adding in the little shrubby
grasses over there, which are already dried. Now, here at this stage, my paper is in a semi dry state. It is absolutely not dried, but it is not exactly wet too, So it will still give me
that well blended look. Now I will add in some darker
tones of the brown as well. I will be repeating the
same process of a here two. First I will start with
a darker bass tone. That is my darker browns. And then when I'm
doing the grasses, I will go with a mix of
darker and lighter tones. Once you are done
adding the grasses, it's time to paint the shadows using just the tip of my size. Number six round brush
and with slanted strokes, I'm creating the shadows of that shrub using the same mix of my ultramarine blue
and mineral valet. I'm going ahead and
creating the shadows of the grassy patches
over here too. While I'm closer
to the foreground, I will be here now adding some taller grassy shrubs and bushes and then
creating their shadows. Keep observing. The method that I'm going to use here
is right technique. I'll use a mixture of my
darker browns along with my light burnt sienna and create the impression of the
tall shrubby grasses which are already dried. I have your switched to
my liner or rigger brush. You may also do the same, or else if you do not have a liner or rigger
brush with you, you may do the same
using a size number one or two brush which
has a sharp pointed tip. I'm going ahead and adding one more shrub near
to our foreground. This will be the last one. And then we are going
to add the shadows and some branches coming out from the side
corners of the sky. Okay. So that's the last overall
steps that we are to do. I wanted to make this
bush a little shrubbier. I've switched to my size
number two brush and I'm going and making it much
more dense and thicker. I'm happy with how the
bush has turned out now. Time to add in the shadows. I'm going with the
same shadow color mix that we have prepared earlier. That is the mixture of my
ultramarine blue along with my mineral violet with
a very light tonal value. Now, going ahead with
wet on dry strokes, make sure that you have water control on your brush
as well as in the paint mix. That yard strokes are thinner
and not too blob and thick. Now going for the shadow, for our left bush. Now here I'm going to
go with a longer shadow with very slanted and
curvy lines of the bush. Replica. Make sure to go
unidirectional over here. Do not spread out
or fan out the Bush unless the real Bush is
something similar to that. At this point, the paper
has red completely, you can see there is no bulge. It's a good time to
go ahead and add the last remaining
branches jutting out from the side
corners from our left. You could also do the same
overhead branches too, but I just prefer
the side angle more. If you want to create
some overhead branches, you can just go ahead and
do the same along with the side branches
or it's totally left to your imagination. Choose whatever you
are comfortable with. I'll keep adding these
branches until I'm satisfied. But if you feel that
it's fine for you, you could stop it out here. I am done adding the
branches and now maybe I'll add some one or two leaves
out here. And that's all. With this painting, our paper has completely dried. Now it's time to take off the masking tapes
from all four sides. Make sure that you do this step only when your paper
has dried flat. If you are doing this step
when your paper is still wet, you might run the chances
of ripping out your paper, so be careful with it. We finally have our day
three painting completed. I'll see you again tomorrow with another brand new painting.
10. Day 4: Color Palette: Hello and welcome to day four. Let's quickly take a look at the colors that we
are going to require. First, I will be starting
out with the sky. Starting at the top of the sky, we are going to first
watch out our lavender. This is a very soft and
beautiful, pastel purple shade. The next color that I'm going to watch out is our blue gray. I will tell you
shortly how to mix and form your own shades of
lavender and blue gray. When you look at the
pigment information labeled on both the tubes, you would notice that both of these colors are using
a cool blue shade, which is PB 15 is to three or PB 15 along with the white
pigment for lavender two, they have used the
same blue pigment along with an additional
pigment which is your purple PV 15 along
with the white pigment. If you have any of the
purples and blues with, you could mix white quash into it and form your own color. Now coming to the next color, we are going to swatch
out a brilliant pig, which is another, a
beautiful pastel pink color. Now if you see the
pigment in formation, this has a red pigment in it
along with a white guash. So if you have any bright
rose ropia pink pigment, you could try adding in your white guash into them and turn it into a pastel shade. The next color is our
warm yellow orange. Now if you have already
watched day two and day three, you would know this
is a common color in our color palette. So I'm assuming you
already know how to form your yellow orange if you do not have this color readily
available with you. The next color that I'm going to swatch out is our Naples yellow, which is another
pastel yellow shade. This color, two,
is a common color which we have used in our
projects day two and day three, and have already
mentioned how you can prepare your
own naples yellow. Go check out the
color palette section of day two and day three. Now the next color
that I'm going to swatch out is our burnt sienna. Our very warm and
beautiful brown. The last color that we would
need is our burned timber. Now you can mix your
burned timber by mixing a darker shade of blue or
black into your burned sienna. And create your
own burned timber. Now that we have
our colors ready, let's get to our project.
11. Day 4: Golden Winter Part 1: Now that we have
our colors ready, let's begin our project. First, I will be taping down my paper on all four sides
using the masking tape. Once that's done, it's time to begin our
pencil sketching. To get started with
our horizon line, I'm going to follow the
rule of two thirds. And like the previous project, I'm going to go and place my horizon line somewhere just below the center
half of the paper. And now I'm going to
go ahead and sketch out the landmass which
will be covered with snow. So keep observing, it's a
very simple composition. There is not much of
sketching involved. We'll just mark out the areas where we are going to
have our landmass, which will be covered with snow. I'll create another part of
the land towards my right. So just notice how I'm going ahead with
the pencil sketching. I would first recommend you to observe the entire sketching
of the composition. And then you can
pause the screen and then go ahead
sketching out yours. I will also mark out the areas
where there is going to be little shadows just here at the right corner
of our sketch. Towards the left
corner of this area, I will be going ahead
and painting tree over here and the shadow
of it in the lake. Okay. So if you want, you can sketch out that area. I'm not doing it right here. I will be directly painting it. So if you want, you can
sketch it out using the reference that I just
attached at the site corner. If you're happy with
your composition, we can move ahead and
start a painting. I just lightened out my darker
graphite or pencil marks. Now for the sky as usual, I'm going to go with wet on wet. I'm going to layer my paper with a nice and uniform wash of water so that it does not dry
up when I start painting. So always make sure to do
this step a little patiently. Water down your paper well, so that it spreads
the color uniformly. Do not allow pools or puddles of water being stranded
on your paper. Spread it out evenly
and smoothly. Now I have loaded the brush with medium consistency
of Naples yellow. Now with the tip of the brush, I went ahead and
created a circle, leaving a white
space in the center. This is going to be our sun. And you might need to use your damp brush to
leave the white space remain white because
the colors will start spreading into the
wet areas of the paper. It's absolutely normal. So you have to be a
little cautious when you're doing this step because the colors will keep spreading. Or else you can just blindly go with a flat wash of
naples yellow here, just starting from the horizon. And later on, you
can come back and create the sun when your
paper is still wet, using a damp brush or a tissue paper to lift
out to create the sun. Now that step I'm going to show you in this
project itself, do not worry, you'll see it in the letter half
of the project. Now there is another
method of doing this step. You could use masking
fluid or cut out your masking tape in the shape of a circle and paste
it on your paper. So in that way, you
will be preserving your white that you
want for the sun. And then go ahead and create a variegated gradient
wash for your sky. I actually here,
intend to go with a variegated flat
wash for my sky. Now what exactly do I mean
by variegated flat wash? It means blending
multiple colors seamlessly while maintaining
a consistent tone. Here, I'm trying my best to
keep the color spreading into the whites of our sun by
going over with a damp brush. Now I have started layering my brilliant pink shade onto
the top parts of the sky. I will be now
layering my lavender starting from the top
right corner of the sky. In case if you do
not have lavender, you could easily mix your lavender by using
any of the blue shade, a little bit of your
purple or pinks into it, and mixing it with white quash. That's an easy way how you can
prepare your own lavender. But make sure to go with
a cooler shade of blue, such as with pigment
PB 15 or 15 to three. Any of it is fine. This is a cooler shade of
blue which is not very dark and yet has a very
nice subtle coolness to it. Let me tell you the reason why I chose naples yellow
and lavender, or blue gray for
creating the sky. This is because these
are pastel shades. The tones are very soft, and when you mix blue and
naples yellow together, it does not form
any greenish hue. Instead, it forms
a grayish gray, which is okay for our
gradient blend of a sky. Now when you observe, it is becoming increasingly difficult to keep the
whites of the paper. So I've just decided to go with a flat wash with naples
yellow over there. It's absolutely fine. We will use a damp
brush and go and lift out the colors
once again over here, this will give us a very
smooth and rounded finish, especially the corner
edges to our sun. I'm using a damp brush and just lifting the colors using
the circular motion. You can see how I'm
swirling my brush. This lifting is
only possible when your paper is
sufficiently wet enough. Once the colors are absorbed
deeply into the paper, you will not be able to lift
out the colors anymore. Now I'm going to go with
the midground foliage. The same drill like we have
seen in project number one. Project number
three, I'm going to go ahead with my burnt sienna, first layer with burnt sienna. And then I will be limiting the darker tones near
the base of the horizon. In this way, we will be
creating the illusion of depth. With the vertical strokes, you are only directing your pain to bleed into the
sky vertically. But obviously it's going to bleed according to its own will. That's the beauty
of water colors and that's the beauty
of wet on wet process. I'm here again trying
to fix my sun, which has again blended time to add depth to
our midground foliage. I have started with
darker tones here. I'm using a mix of my burn sienna along with
my ultramarine blue. But if you do not have
ultramarine blue, you could mix your
black or paints gray. Any of the darker shade of
blue or black would give you this darker shade
of brown there. Again, the water
droplet ruining my sky. The same thing had happened in a day three project and it
was so tricky to fix it back. But in this case, somehow it is still be achievable to get the sky back because we are here dealing with
vartigated flat wash. I loaded the brush with my lavender shade and
went from top to bottom. Not blending it too much into the areas where my browns
are there already, but just trying to be confining where my droplet of water
had fallen over there. I'm going with this
brilliant pink shade because the water droplet had removed the
entire of yellow. So I'm just going to
nice and cleanly blend it off all over again to
avoid this kinds of accident, always make sure
that you are not rinsing your brush
too aggressively. Always do it very
soft and gradually. Also, keep a tissue towel
or a tissue paper handy, and absorb all that extra water from the tip of your brush. To avoid this kind of mistakes
ruining your painting, I had to come back and fix the sun by lifting
out the colors. Here I'm using a dry tissue
paper and just using circular movement to dab it on the paper and absorb all
that excess color bleeds. Before I get started with the stream and the
snowy landmass, I'm using my kneading eraser to take off all that extra
dark graphite marks. Now with just the tip of my
size number 20 mop brush, I'm going to start with
little watery mix of my naples yellow to create the reflection of the
sky in the water. So I will just start to go
along with the corners, leaving the whiter space
around the center. If you so observe, I'm
using just the tip of my brush to lead the colors
and leaving the whiter spaces in between in some of
the areas do not cover the entire area with Naples Yellow leave
certain white spaces. We will fill them
out later on with other colors which are being
reflected in the water. Like same colors which
were there in the sky. We are going to replicate
the same in the water. If you observe, I'm here working first with
medium tonal values. If required, we'll
come back here and use a little darker tunes of the
color later if required. Because in water colors, it's the golden rule
that you cannot lighten out the colors once
a darker color is applied. But you can build your colors
by going first with light, then medium, and
then darker tunes. So yes, this is the
fundamental rule that we are following out here here to achieve that
soft, smooth, blend. I am here using the damp tip of my brush
and trying to lift out certain areas from there to achieve that
soft, glowing water. And also to mask out the
dry brush strokes that we have got in certain areas because we went on
wet on dry technique. Now I will be layering
the darker tones. I am here using the yellow orange mix,
and as you can see, I have started with
the inner corners, leaving out the center
area to be white. But I'm going with this long and short
horizontal strokes, going ahead with the
lifting technique using the size number six brush. And I'm just going and lifting out the colors
from certain areas to get that asymmetric reflection
of the shimmery water, denoting the
reflection of the sun. Now using a premix of my
lavender and my coral orange, I'm going ahead and layering
the brown gray strokes. Now towards the inner corners, I'll go with the lavender shade depicting the sky
colors into the water. When you are at this step, make sure that you go with
a bigger round brush. I'm here doing it with six, but I'm not happy with how
my strokes are coming out. It's not going to blend evenly
because it's wet on dry. So I'll be switching to
my mob brush to even out and smoothly blend
this areas all over again. I switched to my mob
brush and loaded it with a little watery mix of my
yellow, orange and lavender. And I'm going and blending
this areas all over again, but creating this long and
short horizontal strokes while I still maintain that
white areas of the paper. With the help of my
size number six brush, I will start to add these darker shadows
for our snowy landmass. With the help of this darker
shade of my burnt sienna, I have mixed in a
little bit of my black into it to turn it into
this darker shade. Or else you can also mix in your ultramarine blue or any darker shade of blue to get a darker shade
of brown to it. Can you see the bleeding which happened over there
because the paper was wet? I will now fix that area using a damp, dry
synthetic brush. Using just the tip
and going with some longer and shorter
horizontal strokes, I have created a very
smooth shadow over there. Can you see this is
how I'm going to go and fix the bleeded or the feathering that
has happened over there. Now, using more darker
tones of my browns, I will just go and add in the darker shadows just
beneath that snow mass. This will create depth and
lution that I want for this. Shadows go with some
irregularities, not very plain and smooth, but get some grooves and bounces into the
snowy land mass. This will give it more
dimension and depth. Now with the help
of my rigger brush, I'm going ahead and creating this grass like form over there. Wherever we have
created the shadows, I'm placing this grass
at random position, but making sure that they are fitting into the grooves
that we have created. With the darker browns repeating the same
process here too. I'm not exactly filling all
the grooves with the grasses, but leaving certain gaps
and spaces in between them. I think I'm happy
with the details that I have added here
to the snowy ground. That's all for it.
Now, I will see you next in the part two
of the same lesson.
12. Day 4: Golden Winter Sunset Part 2: With the darkest mix
of my burnt tumber. I'm going ahead and creating
this vertical strokes to create a second layer for
our midground foliage. You can see here, the colors are not spreading as it should. When the paper is wet, that means our paper has dried. So I will just go with
a little watery mix, but not too watery. Just go ahead and create a buttery consistency
of this mix. And use your vertical
strokes with your round brush tip and
create this foliage. Time to switch to a liner or a rigger brush and get started with creating
the dead trees. By now, you must have noticed
that all the elements that we are creating are with the help of wet
on dry technique. Because a paper
has dried already, and also all of these elements are having
its definite form and shape. Wet on dry technique is most
extensively used when you want any object or an element to have its
distinct shape and size. Now, just by wearing the
tonal intensity of my, this darker mix of burnt timber, I'm going to create
the illusion of many of these bay trees
in the background. I'm going ahead with varying shapes and
sizes of the trees. Make sure to have a natural
look of the trees by going with different taller
and shorter trees altogether, adding some more trees out here. The lines that I'm
going and creating are very soft and
delicate and very thin. Here in the background, it is almost far away from us. So the trees should be not too thick and strikingly
visible to your eyes. That's why I go with very
soft hand and go with thin strokes using the
frayed dry tip of my size. Number four, synthetic brush
from silver silk series. I'm going ahead and
creating the foliage of the dead trees which
are also dead here. I'm just going ahead and
creating this by dabbing the tip of the brush in
very random strokes. I think at this
stage we can go with a little bit more darker
value of my burnt sienna. Here I used a medium
total value of four to go and create this
foliage for my bad trees. Now if you want to create foliage for your bare
trees on your left, you could feel free to do so. I am randomly choosing and going ahead and creating
the foliage on the trees. Time to get started with the
reflection of the water. Now for the reflection
of the water, I'm first going with a little diluted value of my
burnt, timbered, and burnt. And with the vertical strokes, as you can see at this
point my paper is. So in order to keep my
colors smooth and blended, I'm going with another layer of light tonal value of my burned
timber and burn canamix. Then I'm again going ahead
with the vertical strokes. Now you can see the
difference, right? The colors are
blending well into the background and giving
us this soft reflections. This is exactly
what I want here. For the reflections, I'm using the darker tone of
my burned timber. When I say darker, I mean the mid value tones
of burned timber. You do not want the
reflection to be very dark, because we are going to
paint the reflection of the bigger tree and its
branches on the water. You need this
reflection to be soft, yet giving us the contrast
of light and shadow. Now I see my color has faded out a bit for
the reflection part. So I will switch
to my mop brush. Now the tip of my mob
rush is damp and dry. I have squeezed out
all the extra water and using just the tip. I have frayed the tip and will drag the colors along
the vertical strokes. Can you see the effect
of the strokes? It's very nice and soft. This is exactly what I want
for the reflection part. And now I'm using certain
horizontal strokes along the edges to create the impression of
the reflection. The right side of the paper
has dried completely, so I'm just going ahead with a damp brush over
the area again, so that it's easier for me
to lift the colors which is seeming to bleed into that area where we have
preserved the whites. Right? So with the help of
my angle dagger brush now, I'm trying to take off those extra colors which is
trying to bleed into there. And using some
horizontal strokes, shorter and longer,
I'm trying to replicate the impression
of the reflection. Now coming to the shadows
on the snowy land, I'm going to use a very diluted mix of my
ultramarine and my mineral, valid, the same mixture that we have seen
in Esters project. And I'm going to go and paint
the shadows on the snow, along the same pencil
sketched outlines. Now when I'm creating
the shadows, I'm making sure that I leave
out certain white space. Now using my damp mop brush, I'm going to go and blend this white and the
shadows we just created, giving it a seamless loop. Once we are done with
the shadows on the snow, now it's time to create the shadows underneath
the snowy area. Here I'm going with
a very dark value of my burnt umber mix. And you can see how I'm
creating those shadows with dabbing strokes of my brush,
creating the grooves, and then fanning it
out horizontally, shorter and longer strokes to
create this uneven surface. Now I will try adding some grassy patterns over
the grooves over here. Okay, something like
this, using my liner. A rigger brush, using very
thin strokes over here to create the impression of the
grasses subdued in snow. And then we are going
to paint the reflection of the same grasses
in the water as well, using the same rigger brush. Here, I'm creating the
reflection with my rigger brush. Creating the grass
patterns just like how we did at the
surface of the snow. We are doing the same thing
here in the reflection, Adding in some
taller grasses over here because we added
some in reflection. I'm just replicating the same using my angular dagger brush. I'm going ahead and
creating some horizontal, longer and shorter lines around the area where we
preserve the white. This is very essential because the white is the sun getting
reflected in the water. The sun we are building
the reflection. Use of the horizontal, longer and shorter strokes will create the
illusion and depth. Repeating the same
process to create the shadow areas
on the snow using my mop brush and using the light mix of my
ultramarine and mineral. Valid time to finally paint our tall tree with its branch
reflecting in the water. I'm going ahead with my
size number six brush. And using just the
tip of my brush, I'm going ahead and releasing my strokes very lightly to
generate those thin lines. Make sure that you
exercise water control in your paint makes as well as
at the tip of your brush. Because if you have
to watery brush tip, you will not get thinner lines. Now I'll be switching to my liner or rigger brush
of size number two. Very often when I want to
create very thin branches. If you do not have a
liner or rigger brush, you could go ahead and use your size number
one or two brush, which has a very
fine pointed tip. Or else you could also go
with a size zero brush. In case, if you do not have
size one or size two brush, keep observing my
brush strokes as I create the thin and
delicate lines. And then later on we will start painting the reflection
of this branch in water. When I'm painting the reflection
of the tree in water, I'm roughly projecting
the area out the position of the tree branch which is getting
reflected in the water. And then going ahead with my
size number six brush here, you can see how I'm going ahead and
creating those strokes. Now here is the trick to create illusion of reflection
in the water. I'm going with longer and
shorter horizontal strokes, following the guiding line of the branch that I
have just created. When you are at this step, make sure that your lines
are very thin and sharp. You do not want very thick
lines out here because it will not give the
illusion of reflection. You want it to look as
realistic as possible. Hence the Sp and
thinner your lines are, the more distinct reflection
it will stand out to be. I will repeat the
same process and create the branch
reflection in the water. So keep observing. I'm going to add another
branch to the left corner of the site because I feel that
this part a little empty. But if you are fine with how your trees have turned
out, that's totally fine. You can skip this step. I'm going and adding
more branches out here. We are finally done
with our painting. Now one last small addition that I want to do is paint some
birds flying in the sky. So I'll be using
my this liner or rigger brush because I'm comfortable doing
so with this brush. But if you are not comfortable using a
liner or rigger brush, you could go ahead
with your round brush of size one or two. I'm adding these birds
in random shapes and sizes and in
random direction. You could add the same, or you could paint
just one or two. It's totally up to you. The next step is to
wait for a paper to dry and take off the masking
tapes from all four sides. My paper has dried already. Time to peel our
masking tapes gently. Do this step only when
your paper has dried flat. And with that, we
have successfully completed our day four project. Really proud of how
this has turned out. I will meet you tomorrow again with this
beautiful project.
13. Day 5: Color Palette: Hello, Hello.
Welcome to day five. Let's quickly take a
look at the colors that we are going to require
to create a project. First, starting with the colors near to our base horizon line, I'll be starting to swatch
out my Naples yellow. Now, Naples yellow has been a common color in our
previous projects, and I have clearly
explained how to create one in case if you
do not own Naples yellow. Followed by yellow orange, which too has been discussed. The next color pigment that I'm going to swatch
is my Opera Pink. Instead of Opera Pink, you could opt for
alyzerine crimson or any bright rose pigments. Now, when you combine Opera
Pink with maple yellow, you get a very beautiful
pastel orange, which is our maples orange. Depending on your
color preference. If you wanted to have
a little bit of more pink dominance mix a little
bit more of pink into it, and then you will have
your required color. Now the next color that I'm swatching out is my blue gray. You can prepare by
mixing white with your blue pigments and
create your own pastel blue. Now the next color will be
this warm, burnt sienna. The next color that I'm
swatching is my mineral valid. Now you could mix your
own mineral valid by mixing your pink reds
with your cooler blues, you would get the
color similar to mine. Now the next color will
be ultramarine blue, which is a warm blue. This is present in most of the
basic watercolor palettes. To create our snow shadows, we will be mixing mineral valid along with
ultramarine blue and form very light tonal values of the color mix to create
the shadows on the snow. Now we will be swatching
our darker color such as neutral tint or paints gray
to do the leaves of the pine. Now instead of paints gray, you could also opt to go for
ivory black, or your indigo. I'm swatching out my
indigo over here. So get your colors
ready and join me in the next lesson where we will be starting to
paint our project.
14. Day 5: Polar Sunrise Part 1: Let's begin with the project. I have already
taped down my paper on Alpo size using masking tape. And now I'm going to leave more than two thirds of
the paper for our sky. In this painting, our sky is going to be the
main focus element. We will concentrate
more on the skies. I am now going ahead and sketching out the other
compositional elements, adding in some vertical
lines to present my pins. Now I will be adding some distant background
mountains here. Remember, the mountains are going to be a little smaller in size as compared to the other elements in
the foreground here. The atmospheric perspective
concepts will apply. If you do not know what are the concepts of
atmospheric perspective, I would recommend you to
go check out my class. Atmospheric Spring
Landscapes, where all these concepts have been
explained in great detail. Adding in some arches for
our snowy ground over here. And that's all with the basic composition of this painting. Time to move on
with a sky for sky. I'm going with Wet Hornet. That's my absolute favorite
technique because it gives me the soft and
smooth looking sky. Here, I'm layering my paper
with an even wash of water. Make sure that
there are no pools or puddles of water standing. This, I have been repeating
from Dave Un of the project. It is very important guys, that's why I have been repeating myself switching to my
Sis number 20 brush and using this dam brush
to load my Naples yellow. Here, an important point is
to exercise water control. I am absorbing all
that excess water from the belly of the brush and using just the tip
of my brush to load the paint and
lay it on the paper. With horizontal strokes
starting from the horizon line. I am here using a
natural hair mob brush, but you could do the same using your normal round brush of
size number eight or ten. But make sure the
bristles are soft enough. If you observe, I retained
some negative space closer to the horizon line when I layered the paper
with naples yellow. This is because that's
where our sun is going to be and the rays
will shine through. I have now prepared a mix of my bright orange using the
mixture of naples yellow, yellow orange and opera pink and retaining still that white
space as I layer my orange. To prevent the top part
of my paper from drying, I have went ahead and layered it with an even coat of
water once again. And now continuing to
work on my horizon area. I'm going ahead with
half horizontal strokes starting from right
to left of my paper. Now I will rinse my brush and squeeze out all
that extra water, Load it with my blue gray. And starting from the
left corner of my paper, I go with the slanted strokes, making sure that
I don't directly pull the blues into the orange, yellows that we have
layered in the sky, but keep some extra white caps in between the
transitioning layers. I have started layering the sky with the same
slanted strokes, with the light tonal value
of mineral violet on top of that blue gray switch
to a synthetic size. Number four brush. And
I'm going ahead and preparing a color
mix of lilac by mixing my opera pink
mineral violet and a little bit of white quash
or white water color. And then started layering
the clouds, random, horizontal and some slanted strokes to create some
cauliflower effect. Loading my brush with an
intense tone of purple. When you mix ultramarine blue
into your mineral valet, you would get this
darker tone of purple, layering a darker color on
top of a lighter color. When you are going ahead
and painting your clouds gives the cloud its depth
and three D dimension. I started layering some
bright pink copia clouds. But you can see my brush
did not have water control. As a result, it was
all very smudgy. I switched to a size
number four brush, which is from
silver silk series. And with just the tip, I'm going ahead with this
swirly, rounded strokes. Today I'm having a
little hard time controlling the
wetness of the paper. I think there must
be some problem with the sizing of this sheet
of paper that I'm using. You can see the colors are
bleeding uncontrollably. It's not that I used
to watery paint. Sometimes it happens, but you need to know the
solutions for it. The solution is to use a damp brush and take away
all that bleeding edges. Since that mineral violet is
bleeding into the yellow, it will form a muddy mix, which I don't like for skies. Hence, I will lay those transitioning areas
with this opera pink exercise water
control over here in case if your paper is giving
you problems like mine. But always do exercise water control when
you are at this step. You do not want too
much of water in your paint brush as well
as in your paint mix. So go ahead and do this lifting technique
while you do this. Because you need
that whiter areas for the sun to shine through. Use a damp brush and
lift off the colors that is bleeding into those
whiter spaces very smoothly. You do not want to take away
the colors very harshly. Now it's time to start painting the rays by the same
lifting technique. Every time you go
and lift the colors, please rinse your brush
in water or dab it dry in tissue paper and then
go ahead and do this step. Do not start to
worry or panic if your sky is not exactly
looking as mine. It of course, takes practice and little understanding
of the medium which will come with time. So do not worry, just go ahead, follow my steps and try painting your sky
in your own style. I'm still doing this
lifting technique to create the sun
rays over here. As you can see, the paper
is not drying anytime soon, so the paint is
continuously bleeding. The clouds at the top part of the sky is starting
to dry out and hence, I'm going ahead and adding in some medium tonal values of
my mineral violet over here. Just with slanted
and random strokes, using just the tip of my brush, the paper out here is still wet enough for me to go
and do this step. But if your paper has
started to dry out, please refrain from
doing this step because you do not want
to have some hard edges. But it's absolutely okay in case if you have
got some hard edges. It's all about practice and
with time you will get better at it now using a
clean damp brush size. Number four, I'm going
ahead and creating this sun rays towards
the left over here, cleaning out those
certain bleeds that are still there Now, with the same brush and with a creamy consistency
of my mineral valet, I'm going ahead and adding
in some darker tones, using very soft, gentle strokes. At this point, my paper
is starting to dry out, so I will do this step quickly, but making sure that I do
not go overboard with it. This will add little
drama to the sky. Now, on my left side, closer to the horizon line, I'm going ahead with
a warm color mix using my burnt sienna. And I have switched to a
size number zero brush, going ahead and adding a
shape of a mountain first. And then we'll go ahead creating
some vertical strokes to indicate the growth of foliage
or vegetation over there. Now, I tried adding this shape of pines using this
size number zero brush, which does not have a
very sharp pointed tip. And as a result, I got certain
messed up looking pines. But that's absolutely fine. It's okay. Since it is
at a distance from us, the shape of the pines will
not be a concern to us. I switched to my size number
six round brush and adding in mid value tones or burnt sienna just
beneath those pines. We'll be using a
little watery mix of burnt sienna and then
blending it into this area. Time to get started with
a distant mountain. Now I'll be first starting with my mineral violet with
a pistol shade that is a mixed little bit of
white and opera pink into this shade to get
it to a lilac shade. Now when you are closer to the sun and painting
the mountains, we will be using
some warmer tones. You could use either yellow, orange or a mix of burnt sienna. Either way, it's fine. And then when you go
further towards your right, we will go and mix our lilac shade to create
the distant mountains. Now below this mountains, we will go with a
light tonal intensity. But first, I'm going ahead and sketching out the outline
of our mountains. We are going ahead with
wet on dry technique, because we need the definite
shape of our mountains. We are going ahead with
the lifting technique, again, to bring out
the rays of the sun. Since we had covered it while
painting the mountains, you have to do this step quickly before your layer of
burnt sienna gets right below that first range
of the mountains. I'm going ahead with a
little bit more darker value of my purple and filling the
range of this mountains. So this is our second
layer of mountains. Now using a damp brush, I'm just going to blend in the color smoothly into
the background here. I'm also going
ahead and layering the paper with an
even coat of water. Because now we will start
painting our snowy ground. But using that brush
will take a longer time, so I switched to my
bigger mob brush and creating this flat wash
of water on this area. Now we will start to paint
the sky reflections, or the sunny reflections
on the snowy ground. So I have first use Naples yellow on the wet background
that we have just layered. And then using a slight tinge of my medium tonal values of my Opera pink along
with it, little purple. And then I'm going ahead
and using this mix of my lighter values of
ultramarine and mineral valid to create the
snowy shadows while keeping some of that whites
of our paper still visible. Now using this damn dry
tip of my map brush, I'm just smoothly going to
blend some of those lines, which I feel have become a
little hard on the paper. So I'm just going to lightly blend those strokes back again. Can you see the
feathering that has happened near the base
of the mountains? With a damn dry tip of
my siim per six brush. I'm just smoothly going to blend it all in since
our background, the snowy ground is still wet. So doing this step
won't be a problem. Now, we will let this
area dry and then we will start our part
two of the process.
15. Day 5: Polar Sunrise Part 2: Let's continue our painting now till the time our
snowy ground dries up. Let's quickly finish creating the shape of the distant
pines in the background. This is a totally optional step. Since I wasn't very happy
with the shape of my pines, I'm going ahead and
doing it all over again, using the same burnt sienna
mix and switching to a mini detailing brush
with a sharp pointed tip. I'm going ahead and creating the shape of the
pines all over again, but this is a totally
optional step. If you're happy with
your midground pines, please skip this step
and move on to the next. I'm almost done creating this
pines in the background. Now the next step is to create snow covered pines
in our foreground. For that, I'm going ahead and creating this watery
mix of ultramarine, blue and mineral violet. Why I'm saying watery
is that because we need a very light
tonal value of ultramarine and mineral
violet to create the shadows of the snow
on the pine trees. This is how our mixture
is looking right now. Let's watch it on a piece of rough paper and see
the tonal value. Yes, this is exactly
how I want it. I'm going to show you how we are going to
go ahead and create the shape of the pine using just the tip and the
toe of the brush. I'm going ahead and creating
this foliage like pattern, thinner strokes at
the top of the tree. As you come down, we will have some broader
strokes like this. Okay, Fanning it out, create broader base
and a thinner epix, giving it a cone like
shape and inverted cone. Now I'm going to add
in darker values and create this needle like
shape of pine leaves. Okay? Using just the
tip of my brush, maybe this tone isn't
very dark enough. I'll go and create some
more darker tones. As you keep doing this, you need to be
mindful to preserve those white spaces that
you have left in between, and the strokes have to go underneath the initial shadows
that you have painted. Okay? So this is
how we are going to go ahead and
create our pines. So this is how it's going
to look at the end. Now on top of this
lighter shadows, you could go ahead and
layer it with white quash. And that's all my
shadow mixes all ready. Now let's get started
with our Pines. I'm here using my size
number six brush, and if you feel
that your brush tip is loaded with too
much of water, you can soak up all that extra
water from the belly using tissue paper or swatch it out on a separate piece of paper to check the total value of your. I'll be going ahead and repeating
the same process that I showed you how we will be creating our pints on a
scrap piece of paper. I have started with
the base first, I will go with the broader
strokes at the base. And then when I am approaching
the top part of the tree, my tree should be looking
thinner and thinner. So that's how I'm
going to go ahead. From now on on
this snowy ground, we will be painting
several pine trees of varying shapes and sizes. The ones which are closest to us will be taller
and little broader, but as we keep approaching
the horizon distance, the pine trees will just
go shorter and shorter. This is because we are applying the concept
of linear perspective. Again, if you are not aware of this basic fundamental concepts, I would request you
to go check out my class, Atmospheric
Spring Landscapes, where I have discussed everything about
atmospheric perspective, tonal values, and so on, which are required for a generic landscape painting that will be very helpful for you from now on. I'm going to paint pine trees of varying shapes and sizes
like I mentioned earlier. But if you want to not paint so many pine trees on
your snowy foe ground, you could go for one
big centered pine tree right at the center of
the paper giving it. As the focus. So
that will become your focus subject
for this painting. Okay, So that's another way of varying your
landscape from mine. That was just a little idea. If you want to go
ahead and try it out, you are welcome to
do so or just follow along the steps that I'm
showing you out here now, just around the
base of the pine trees, I'm going to go ahead
and add the shadows. I have used more of
the ultramarine into the same watery mix
that we had prepared earlier using a dam soft brush. I'm just blending the
shadow as you can see. Now, I'll create the shadow over here around this part also. And blend it back smoothly with the help of a damp
tip of the brush. Now I'm going ahead
and preparing a darker color mix for
creating the leaves of a pint. Here I have used my indigo. Instead of indigo,
you can also go ahead and use your
darkest shade of green, which will be almost
closer to that of black. It's totally up to you
if you want to add in some green element
into this painting. You could go ahead and add
the darkest shade of green, any of your permanent
green or Hooker's green, and mix it in indigo or any
black that you have got, and create your own
darker shade of green. Or else directly go ahead with indigo as I'm
doing out here. When you are going ahead and
creating this darker mix, always make sure that
you are making it into a creamy consistency
and not too watery. Because too much of watery paint will not give you this result. Of thinner strokes, you will get very thick strokes,
you do not want that. Hence, you need to exercise water control in your paint
mix as well as in the brush. So in this case, I would recommend you to go for a synthetic
round brush of size number one or
two so that you can exercise better
water control in it using the same calmics. I'm going ahead and adding
the leaves of the pines. For all the pines, I'm going
to go and do this step. So it's going to be a
repetition of the process. But trust me, when you
complete this process, you will see how the
entire landscape has changed and your snowy
pines will look gorgeous. Now comes the final
step of adding little white quash to
the shadow areas of the snowy pine to create the illusion of the
shiny snow, okay? But if you feel
that you are happy with how your pines are
looking at the moment, you could totally
skip this step. This is an optional step. Most of the times
this itself looks like the snow covered
shadowy pines, but I like to add in
certain brighter, white element into it. So I'm just going ahead
and covering some of the areas with
this mix of guash. You can also add in a
little tinge of ultramarine into your white quash mix and it will look
something like this. This also looks
equally beautiful, dropping in this
white quash over here to actually help you dropping
in in all the trees. I think I'm done with this tree. That's all about this painting. Once you have finished
covering your pines with snow, the entire landscape will change into a wander
land, isn't it? It's looking so pretty. We will let the paper get
dried out completely, and then we will start peeling off our tapes from
all the four sides. With this, we have successfully
completed our day five. It looks so gorgeous, isn't it? I will see you
again tomorrow with another beautiful
project. Until then. By.
16. Day 6: Color Palette: Hey guys, welcome to day six. Let's quickly take a look
at the colors required. I will be first watching
out my Naples Yellow. Now, Naples yellow has been a constant favorite in
all of our projects. This color palette is going to be very similar to that of
day five color palette. I will be next watching
out my Opera Pink. Now instead of Opera Pink, you could opt to choose and
go ahead with neon pink, bright rose, or
alycerine crimson. But make sure that
it has a red pigment in it instead of
purple or violet, as I've already mentioned in the previous color
palette sections. Now when you mix all the
three colors together, you would get a very nice
and soft looking orange. Which is also known as Coral
orange or Naples orange. Now when you mix in this color, little bit more of pink, that is your Opera pink. You would have a very
nice and sweet pink, which will be very
soft and subtle. This pink, we have
named it as Coral pink. This pink is one of my
favorites and I love to use this pink for most
of my winter sunset skies. The next color
that I am going to swatch is my mineral valet. Now this mineral valet, you could prepare your own
by mixing your warm blues, such as ultramarine
or cobalt blue, with your pink reds. That is Alizarin,
crimson, crimson, lake, rose, medal, lake
with this pigments. If you mix your blues, you would get a shade similar
to that of mineral vallet. Now the next color that I'm
swatching here is my indigo. Instead of indigo, you
could also opt for paints, gray or neutral tint
or ivory, black. Up to you. This
painting is another of my favorites from the
entire Seven Days collection. I really love how
we have achieved that background and how soft
and beautiful it looks. I cannot wait to get started, so grab your supplies
and let's get started.
17. Day 6: Through the Snowy Woods Part 1: Hello my dear friends. Welcome to day six. Now I have already taped down my paper on all four
sides using masking tape. Now it's time to sketch
out the composition. The composition of this
painting is very simple. The background is
going to be a blurred, sunlit background
in the foreground. There is going to
be this mean branch with some dollops of
snow accumulated on it. I'm here going ahead
and sketching out the main branch on which
there will be no deposition. Going with a very
light pencil sketch. Always remember to go with light pencil sketch
because you do not want your marks to show through your watercolors when
you start layering them. I would recommend you
guys to first watch this entire process of sketching until I'm done
with the sketching part. Then you could pause
the screen and go ahead and create
the final outline. I am here outlining the other snow filled
areas over here. Somewhere in between here two, I'm going ahead and creating an abrupt random
shape of snow dollop. And then creating
blurred background branch time to move on to a next step. Now we will be using
a synthetic brush. And with the damp tip
of the synthetic brush, we'll be applying the
masking fluid over this. So dollops, these are the areas
that we want to preserve. Now in case if you do not
have masking fluid with you, but have a thicker masking tape such as two inch masking tape. You could cut out this area of the snow dollops
on masking tape and paste it on top of the dollar areas where you
want to preserve the whites. Yes, it's going to be a
little tricky cutting the masking tape based on
the size of your dollar, but it's worth the try. You could also go
ahead and try out this method if you do not
have masking fluid with you. One important tip, whenever you are using a masking fluid, use a synthetic brush, which you don't use
very frequently because masking fluid generally ruins
the tips of your brushes. Also, after you're done
applying the masking fluid, immediately dip the tip of the brushes into a soapy
water in solution, so that the masking fluid can come off easily from the
tips of the brushes. I have covered up all the snow areas with
the masking fluid. Now we will wait for it
to dry completely and then go ahead and start
our wet on wet technique. The layer of masking fluid
has dried out completely. Now I can go easily with
a flat wash of water on my paper applying a nice
even wash of water. You can see here,
I'm going ahead with vertical and
horizontal strokes, ensuring that my entire
paper is covered with water, absorbing all of the
water drop lids over this masking fluid area with
the help of dry tissue. Can you see my paper bulging up? That means my paper
is sufficiently wet. Now it's time to go ahead and
start a painting process. Dropping in some naples
yellow in random areas, but keeping in certain
white spaces as well. Keep observing my brush
strokes out here. I'm just going ahead and lightly spreading out
the Naples yellow. We, I'm leaving certain
white spaces in between as I'm going ahead and spreading
the layers over the paper. You observe, I'm confining my medium tonal values
to the top part. As I'm approaching the
bottom half of the paper, I'm going ahead with the
lighter tonal values. One quick tip or suggestion
when you are going ahead layering your
mid tonal values of your Naples yellow. Make sure that you are
exercising water control. You do not want the mid
tonal values to feed out. Once the paper starts drying, now I'm going ahead and mixing my naples yellow opera pink and yellow orange to form my coral orange and
coral pink color, which we have already seen in
our color palette section. Now I will go and drop this color mix around
my yellow areas, something like this, not
entirely covering the yellow, keeping the whites and
the yellows intact. There is no definite
rule in doing it. Be free and go with
very loose strokes, but making sure that
you are not covering up the entire whites and the
yellows keep it preserved. And when you are approaching the bottom side of the paper, go with more pinker shades, because that is where we
will start with our violets. Now I'm going in and adding
some water to those areas, my yellows and the whites, so that this areas remain wet for a
longer period of time. As well as if you feel that your paper is drying
out from the bottom, then you could go ahead
and layer the paper one more time with the
wet wash. Now, I have started
layering my violets. As you can see, I'm using
here my mineral violet shade. As I'm layering my
darker shades of mineral violet as well
as my ultramarine blue, I'm still retaining those white and the yellow
spaces in between. If you so observe, when you are reaching for
the top part of the paper, make sure that you use more
of your mineral violet, which has a little bit more
of the pinkish undertone to the areas where you
had laid your pinks. So that it will not give
you the brown muddy mix. Okay, because yellows react with violet to create this
brown muddy mixes, we want to avoid it la, according to the
biasness of the colors. Here, the importance of color wheel theory or the
color theory will come in very handy if you are someone who are struggling with understanding
the color theory. I do have a class on that, you could go refer
back to my class on evocative golden
hour landscapes, where I have explained about the color theory and the basic
concepts of color wheel. The main trick to achieve this blurry background
is to work wet on wet. Understand the wetness of your paper and work accordingly. Now it's time to create some magical textures
on your wet background. Here I'll be using my water
droplet method to create this very nice blurred defect instead of the sprinkling
water droplets. You could also go ahead
and sprinkle salt in the areas where you feel like to create
some starbust effect. I'm going ahead and adding
in some more water splatters because I wanted the blooms to come through
more prominently. But somehow, the paper is not
very cooperative this time. I think this has to do with
the sizing of the paper. The last few sheets of paper, I have been facing the
problems with the sizing. But anyhow, I hope you
get the desired effect. The blooms will come out much more pronounced
on the paper. We need to work a little
quickly and then go ahead and create the blurred
background branches, right? Because we are painting a bag bookede
background of a forest, we will be going ahead and
creating some branches. That's why we need the
paper still to be wet. Now, in case if your paper
has started to dry out, do not worry, there
is a hack for this. Also go with a very
light tonal value of your indigo and start creating the branches
that would also be like the branches are
blurred into the background. This is another alternative hack in case if your paper
has started to dry out. Now when your paper is still
wet and you are going with the background blurred
branches using your paint mix, then make sure that you're exercising water control
or else you will get background branches with
bleeds or feathering effect. You do not want that. You
want the lines to still have some blurred effect but yet have maintained some shape. So I so dab off all that extra water on
tissue paper and then go ahead with
medium tonal values of your paint mix
because this is going to Get faded. Once it dries, I'll be going ahead and
creating some more of this background
blood branches using the same color mix and with the help of my liner
or rigger brush. Because I like
doing this tip with this brush because it gives
me control and precision. But feel free to use any brush
with a fine pointed tip, whichever you are
comfortable with. As I went on creating
those branches, my water splattered effect has almost disappeared
from the papers. My paper is still wet, so I'm taking my
chances and going ahead and creating the water splatters all over
again to retain the effect that I want
to have it on my paper. This is the best effect that I can get as of now
from this paper. I will let it dry and then we will start painting
the main branch. While your paper dries, I will rub off all
this paint residue over the masking fluid with
the help of wet tissue. Now, using a very light
tonal value of my indigo, I'm going ahead and going over those blurred
lines all over again. This, I'm going to repeat
for the entire process, but for now I'm
going to stop here and then go ahead and
remove the masking fluid. Before removing
the masking fluid, make sure that you have gotten rid of the paint residues
that you might have. So I'm using an eraser and just scraping of
the masking fluid, something like this, peeling it off with the help of my fingers. Now that we have removed
the masking fluid, now it's time to go ahead
and create our snowy branch. I'm going to use my liner
or rigger brush now. You could use any fine
pointed round brush of sizes 1.2 to do the same. Now I'm going to draw my stem
and connect it to the snow. So this is very simple and easy. You just have to
follow the lines, the outline of your snow and just connect it
with the main branch. Don't worry about it. If you're not very confident, you can go ahead and create
a pencil outline first. But doing this step is
also fine with your brush, if only you are confident. But trust me, this is nothing
much of a difficult task. You also can do it now to create the branch a
little bit more realistic. I'm just going
ahead and creating this very thin and short
details on the branch. I will continue to add more of this branches or stems
to this main branch. Okay, it's all about fine tuning the branch and creating
more realistic details. One important thing to note is that when you are
doing the foreground, branches go with the
intense dark tone of your indigo or black, whichever color you chose. But when you are
going ahead with the blurred background branches go with a very
light tonal value. You do not want them also to appear very dark on the paper. Then the perspective
becomes null and void here, it becomes confused, right? So the background branches
should be blurred, while your foreground
branches in focus should have this
bold and crisp outline. Now to give this branch a little bit more
realistic detail, I'm going ahead with certain
curves and lines over here to indicate that because
of the weight of the snow, the branch has bent over. Okay, so these are the
little minute details that bring so much of
difference into your painting. For this painting, I went with a very bright and
soft background, but if you want to create a little bit more moody
feel to this painting, then you could go ahead and create the same using
a monochrome color, that is use of single pigment. You could opt for paints, gray, indigo, and so on. Pick a color of your choice, or even you could use just
two colors and create a variegated
background to give a very beautiful and moody
feel to this painting. It's totally up to you with what color combination
you want to go ahead. I wanted to go ahead with
a bright combination. I went ahead and did this. Now, this part of
the painting is all about filling in the
details of the branches. Go on, add your branches, but do not go overboard with filling the entire painting
with just the branches, leave certain gaps for the background to show
through, and that's about it. I will continue to add
the branches over here towards the bottom
right of my paper too. I'm going to go ahead
and add in the branches, but I'm using this
light tonal value of mineral violet and
ultrabarine blue mix. You can see how light
those branches are, right? Go with a very light tonal
value of your color mix. I think that's all with
adding the branches, I'm happy with how the
background is looking right now. I'll see you in the
next part where we will start painting and adding
details to our snow.
18. Day 6:Through the Snowy Woods Part 2: Let's get started with the snow. Here. I'm going with
ton wet technique. Now here, be careful when you are going with
weton wet technique. You do not want the
water to go out of the boundary of the snow
that you have created. Because if the water seeps out, then it will ruin
the background. So you need to be extra cautious when you
are doing this step. Now as the next step, I'm going ahead and
preparing my shadow, Colmix for the snow. I will be using little
tinge of opera pink, a slight tonal value of Opera pink followed by
my permanent violet, or you could also use
your mineral violet. And along with it
I will be going ahead and using some of
that ultramarine blue. Okay, so this is what exactly will give you the combination with mineral violet. Okay, now I will be going
ahead and using this. You can see the tonal
value, It's very light. I have not used very
Taka tones out here. On top of this,
I'm going to layer some ultramarine blue underneath
base layer of the snow. I want to have the
mineral violet because that's what we have done at the bottom
of the paper, right? So it's going to
get reflected here. It's all the play of light and shadows and we are painting
the shadow on the snow. While I'm layering this color, I will also make sure that I leave certain white space around the edges at the bottom as well as on the top of
the snow droplet. Now to make it look smoother, I'm going to use the
dam tip of my brush and simply blend in that area. Okay? So it will be
something like this and you'll have the
beautiful blend over there. You can also darken the colors here at the bottom
belly of the snow. I will be going ahead and using my same color mix which
we have prepared. Using a little bit more value of ultramarine blue
and mineral violet. Just lay it at the
bottom of the snow. Okay. Something like this. Since the area is wet, it will automatically
start blending it. In case if it is
not, you can use the dam tip of the brush
and help it to blend. I will be repeating the
same process to the snow, which is towards the
extreme left of my branch. I'm first here wetting the area. Now, when you are
doing this step, be very careful of
not to reactivate the darker tones of
your indigo over here. Because if you do so, then it might spread
uncontrollably, and then it might become a
little difficult for you to have a light and
a darker contrast. Now as I'm layering
my color mix, I'm also following along
the shape of the snow and leaving those white
top edges okay. And then with a clean, damp tip of the brush, I have all blended in. Now for the bottom blob of snow, I'm going with wet
on dry technique. First, you layer your shadow, mix with mid tonal values. Then with a clean, damp brush, you just blend it all in. And then layer your
color once more time, let this area get dried a bit. I will be repeating
the same process for this part of
the snow as well, since the snow
direction is facing up. So I'm going to use
little bit tones of my Naples yellow mixed
with my coral orange mix. And then for the other half, I'm going to use my shadow mix to prevent the muddy color mix. I'm going on top of yellow, little bit of opera pink. And there you can prevent your colors to get
that muddy mix. Now using the damp
tip of the brush, I will be trying to smoothen out the transitioning colors. Now I will be preparing
the slurry of white quash. Make sure that you
are not preparing to watery mix but make it creamy consistency or
buttery consistency. Okay, now loading my
brush size number six, brush with this squash. And using just the
tip of my brush, I'm going ahead and creating the snow blobs on top
of these branches. My guash paint seems
to be a little watery. This will fade out to
be dull after it dries. So I will have to go with
another layering of guash. So if you are doing this step, just go with a
creamy consistency, not this watery
consistency of guash. I'm going with random, irregular patterns from just
the tip of my brush dots and daps to form the irregular
snow line on the branches. These are minute little details of the snow that
you are creating. Now if you are going ahead with a monochrome
painting of the background, then you could also add in some snowflakes by
going and dabbing your gas filled tip on the entire paper to
have the snowflakes, which will mean that it
is snowing at the moment. Even that can be created since this one is a bright
sunlit background. So I don't want to add
the snowflakes over here, but instead this blobs of snow. With this step, we are
done with our painting. Now we will let the
paper to get dried and then we will be peeling
out the masking tapes. I found this painting to be
very relaxing and soothing, especially creating
the background was so much fun, isn't it? I can't wait to see what are the effects that you got
for your background. If you are creating
along with me, please do upload
your projects in the project's gallery
resources section. We would all love to see each other's work
and appreciate it. We have successfully completed our day six, and with this, we realize that we are coming to an end of our seven
day long journey. Tomorrow is the last day for
challenge and we will be painting this gorgeous northern
lights. See you tomorrow.
19. Day 7: Color Palette: Hello, Hello, welcome
to day seven. Today is the last
and the final day of our seven day long journey. So let's quickly take a
look at the color palette. To start with, I'll be starting to swatch
out my cobal green. In the screen here, I have mentioned how you can mix and form your own
cobal green shade, followed by mineral volet, then followed by Opera pink, which is a bright neon pink. We will be using the mixture of mineral violet and Opera Pink. The next color that
I'm going to swatch is a very bright and
beautiful neon green. This is cadmium green
light from Shinhan art. Now the same color, you could get it in white
nights in the form of green. But you could also
mix this color by using sap green
and lemon yellow. Next is ultramarine blue, followed by my neutral
tint or paints gray. You can use either of your
blacks or your paints gray to create the outline of the tree
or the mountain textures. Grab your colors, mix
it in your palette and let's get ready to get
started with a main project.
20. Day 7: Elusive Dancing Polar Lights Part 1: Hello? Hello. Welcome
back to day seven. Today is the last
and the final day of our seven day challenge. My paper is already
taped to the board, and now I'm going to go ahead and start our
pencil sketching. I'm going to go ahead and
sketch out our horizon line, leaving two thirds
of our paper for the sky and the remaining
to be our foreground. After we sketch
our horizon line, I'm going to go over the horizon line and draw
some mountain figures. I'm going ahead with some smaller and taller
mountain figures. It's up to your will to switch things up and maybe
reverse the sites. That's totally up to you. So this is going to be our
basic composition for sky, the mid ground and a foreground. Towards a foreground,
we are going to paint some snow arches
or the snow land. Okay, Then the main
focus element of this painting is going
to be our bar tree, which is standing tall that I'm going to
sketch out in a while. I would recommend
you to first watch through the entire
process of sketching. And then you can go ahead and pause the screen when
I'm done sketching out the entire composition and then do your own sketching, I will be starting sketching the tree out. Keep observing, I am almost done
sketching out our tree. So I'm going to add
just a little bit more of the thinner
branches or stems. We are going to
start with our sky. For the sky, I'm going with my favorite techniques that
is wet on wet technique, we are painting a
northern light sky. I will be going ahead
and using multicolors. For this reason, I
will be making sure that my paper stays wet for
a longer period of time. Hence, I will go with a
uniform layering of water on my paper just to ensure that my paper stays wet for a
longer period of time. I will be going ahead with two or more flat washes
of water on the sky area, but making sure that there are no lumps or puddles of water
forming at any corner. I will be spreading
them out evenly and uniformly throughout my sky. Time to add colors to a sky. First, I'll squeeze out all that extra water from
the belly of my mop brush, load the tip of my brush
with my cobalt green. Now in case if you do
not have cobalt green, you can mix your cobalt green by mixing in
your cooler shade of blue such as turquoise blue or cerulean
blue along with it. Mix din green and then a
little bit of white quash. You will have a color similar
to this cobalt green. Okay, now as you can see, I went with a swirl. Now using just the
tip of my brush and exercising water
control, I layered it. You need your colors to
remain bright and vibrant. So you need to go with
darker tones right now, because as it starts drying out, this is going to get lighter. Now I have switched to my smaller sized brush
size number six, round brush and loaded with this cadmium green light color. Using just the tip and the toe, I'm going ahead
with this vertical, shorter and longer strokes. If you see, I'm going ahead with some random zigzag strokes. Now this green is a
very bright neon green. You could mix this
green by mixing a little bit of your
sap green and lemon yellow to form this
green in case if you do not have this color
available with you. Now I'm going ahead and using just the tip of my
mop brush re wetting those certain areas
of the top part of the skies so that it remains weight for a
longer period of time. Now with just the damp, dry tip of my mop brush, I'm going ahead and fanning out the edges.
Something like this. With long slanted strokes, I will repeat the same process for the area which
is on my left. I will blend the neon green
and my cobalt green color together using just the tip of my mop brush with this longer and shorter vertical strokes. And now I'm going to
mix my opera pink and mineral violet color together to form this beautiful
purple pink. Now using the longer
slanted strokes, I'm going to blend it together with very
light, gentle strokes. Here I am not using too much
of pressure very lightly. I'm going ahead and creating
this vertical stroke. The pinks look a little dull, so I will go ahead with little intense tone of
pinks all over again. Using the same vertical
and slanted strokes. Observe my brush movement. How light and gently. I'm just pulling the
colors downwards. Now, while doing this step, I also want to make sure that there are some paper
whites visible. I'm going ahead and with just the damp tip
of my clean brush, I went ahead and lifted
some of the colors. Now at the bottom of my paper, near to the horizon line, I'm going ahead and layering this purple pink shade and blending it with
that same layer, using same vertical strokes. I'm going to add in my neutral
tint or paints gray color. Make sure that whenever you are pulling the
colors downwards, you do not go to and
fro back motion. You layered the color
in one direction. Only now I will
repeat the same step, starting from the bottom
of the horizon line. I'm just going ahead and
pulling the colors upwards. This is what I'm talking about. You need to go unidirectional
with your strokes, not blending it to and fro. Okay, Just using just
the tip of my brush. I'm just going ahead and
pulling the colors upwards. When I'm starting
from the bottom, I want to add a little
bit more mid value tones to my cobalt green. Just with flicking the brush, I'm going ahead with
some upward strokes, as well as when I
reach for the pinks, I'm going ahead with
downward strokes, thereby blending the
layers together. Now I'll be repeating the same process at
this bottom part Also just slightly
flicking the colors upwards with the damp
tip of the brush. Make sure that you are loading the tip of the
brush with indigo. Okay, And slightly
flick the colors. This will ensure that you have blended the colors
all well together. I'm already loving how
the sky has turned out. I will not overwork this
area but just let it dry. Now my paper is in semi dry state and with
a fluffy hake brush, I'm just going to go ahead and smoothen out the edges of the
sky, something like this. Following the same strokes
or the patterns in the sky. Every time that you
are smoothing the sky, make sure that you
rub the tip of the brush on tissue
paper or tissue towel. Now we let the sky to
get right completely. We will be starting to work
with our midground mountains. For that, I'm going
to go ahead with a very light tonal wash
of my ultramarine blue. Exercising water control,
I'm going to go ahead and start layering my ultramarine
blue mix on the mountains. I will be going
ahead and keeping some of the areas white
of the mountains. And using just the
tip of my brush, I'm just going to go
and create the strokes. Now we get started
with a snowy ground. For that, I have
created a mix using my ultramarine blue indigo and a little bit of mineral valid In a very
light tonal value, I first led the color, and now I'm going to blend it in using a very watery brush. Using this watery
tip of my brush, I'm going to go and layer a flat wash of water
onto this area, leaving the tree silhouette. Once the bottom half
of the paper is wet. Now we will start adding
in lighter tonal values of your ultramarine blue with
just the tip of your brush. Very nice and smoothly, leaving certain white
spaces in between. We will also mix
in a little bit of cobalt green because
in basically the snow, the sky colors are
getting reflected. So we will go ahead and paint the snowy ground with a mixture of all the colors that
are there in the sky, leaving certain white
gaps in between. I feel there is too much of that ultramarine blue to the
left side of the paper. So I'm just going ahead with my damp brush and lifting
out certain areas using just the tip of my
brush and loading it with a light tonal value mix of my Opera pink mixed
with mineral Valid. I'm going ahead and adding this small dotted lines
onto our snowy ground. Since the background is still
wet, it will all blend in. Make sure that this part you are doing only when your
background is wet. Now, towards the bottom
half of the paper, I'm going to go ahead and add in some more lighter
tonal values of my cobalt green using the same lighter tonal
value mix of cobalt crane. I'm going to go ahead and add it to the background
mountains over there. Now, once these are added, we will let these
areas to get dried, then we will go ahead and add some textures to our mountains. I'm going to extend
my mountains on the right and level it
to the snowy ground over there by using a mix of my indigo and a
lighter tonal value of my ultramarine blue towards the left near the foothills
of the mountains. I'm going to go ahead and add some foliage over there with some vertical strokes using the tip of my size
number six brush. Now if you see any feathering or bleeding of this indigo
or neutral tint, you can go ahead and
use the damp tip of a mop brush and lighten
or smoothen it out. We will let this areas to
get dried a bit and then we will start adding textures to our mountains
in our next part. I'll meet you at
the next lesson.
21. Day 7: Elusive Dancing Polar Lights Part 2: Time to get started
with the mountains. I'll be just going ahead with
my size number six brush. And you can see I have exercised water
control on the tip of my brush as well as on the paint mix I
will be using here. A combination of wet on
dry and dry dry technique. Dry dry technique basically means applying your
dry paint with your dry brush Using
ton right technique. I am first creating
the darker patches on the mountains and then followed
by tryon right technique. I will create some
textures on the mountains. Now I have switched
to my dry brush. Here I'm using my synthetic
size number four brush from silver cell series
loading the tip of my brush with this wet paint. It is not very wet, it's just the freshly
paint squeezed out. Okay, and there you can see
the dry brush strokes, right? This is because
the brush is also, and the paper is also dry. Hence, you will get this
dry brush strokes which will enhance the look
of the mountains, thereby giving it some textures. I'm going to repeat
the same process for the top of the mountains
on my left as well. Here, just the on
your paper surface. It will automatically create
the dry brush strokes. Now towards the base
of the mountains, I'm going to go with shorter
and taller vertical strokes. This will indicate that there is some growth on the
mountains over here. Repeating the same dabbing
strokes from my brush and going ahead and filling the outer fringes
of the mountain, I will be going and creating the dry brush strokes on the mountains to
our left as well. Now here, always make
sure that whenever you are picking up your paint
on the tip of your brush, make sure to test it out on
a separate piece of paper or a scrap piece of
paper before you go with your brush tip on
the final painting. This will allow you to gauge if really your tip is loaded with wet paint or if the paint is dry using my liner
or rigger brush. I'm going ahead and adding in the smaller trees in the distance just near
to the horizon line. I'm going to go with
different shape and sizes of the trees. I will also be going ahead and creating the small
vertical lines. Same thing that we have done for the mountains on our right. This we are just giving the
illusion that some kind of growth or vegetation is
there on the snowy landmass. But since it is at
a distance from us, it is not clearly visible. I'll be going ahead and create
one more tree over here. It's up to you if you want
to create this one tree or you want to add few more in the backdrop in varying sizes, that's totally left
to your imagination. And you will time to get started with the main focus
tree on a foreground. I'm here going ahead and
preparing a shadow mix first using ultramarine
blue and my mineral valid. Observe the tonal value, it's very light
and I'm going with watery paint mix over here using the size
number six brush. I'm just going and filling out the outline of my tree that we had sketched with
pencil earlier. Now towards the left, I will start layering my light tonal value
of neutral tint. As you can see, look
at the pressure that I'm using on
the tip of my brush. I'll be layering some more
black paint over here. Starting from the left. What I'm doing
here, I'm confining all the darker tones
towards the extreme left of this tree and while the right side of the tree is going to be in
the lighter shade. Okay, The shadow will be
at one end of the tree, whereas the other end, which is facing the light, is going to be in lighter tones. That is exactly what I'm
trying to create over here. And this will give the tree so much of character and depth. Now, with my rigger brush, I'm going ahead and creating this small rounded strokes towards the right
side of my tree. I'm going ahead just the half of the tree,
if you observe, I have added in some
more darker values of my black because as
the tree was drying up, it was starting to all fade out. I'm going ahead with a little bit more darker
tonal values of my black. And doing the same
process of having those rounded strokes to create
the textures on the tree. Observe my brush
strokes out here. I'm going along with the curves of the tree that we
have already painted. And just creating
those textures, this will add so much of depth
and dimension to the tree. Now I have switched to my liner or rigger brush with
size number two, liner or rigger brush, and I'm going ahead and creating this thinner branches at
the top of this tree. Now it's all about creating this side lateral
branches of the tree. When doing this tip,
go ahead and use your buttery or creamy
consistency of paint mix. Even if you're using
a light tonal value, make sure that your tip of
the brush is not too watery. If you have too
watery brush tip, then you will not be
able to get this thin, fine, delicate strokes
for your branches. It will be all very thick and will be watery. You
do not want that. So please do exercise
water control by absorbing all that extra water
from the belly of your rigger brush and
not from the tip. If the tip is moist, it will help you
to go ahead with this fine strokes instead
of having some dry patches. Time to get started with
the shadow of the tree. Now, since the light coming to the tree
is from the right, the shadow will be on the left. Okay. Why I say this? Because we have painted
the right side of the tree to be in the
lighter tonal values, right? That is where the light
is hitting the tree. Left side is the darker side. Hence, I have decided to
go with the shadow on the left side for this
shadow, the same concept, I'm going ahead with a mix
of my ultramarine as well as little bit of indigo with medium tonal value
with your shadow mix. And use just the pointed
tip of your brush to create the outline
of the shadow tree. The left side of the paper
feels a little empty, so I'm just going
ahead and adding in some more thinner trees
here at the backdrop. I think that's enough of the
trees that I have added. So we will move on
to the next step, which is plattering some
stars onto our sky. So I'm covering the tree because we have already
painted the tree. Now, you could do
this plattering step before you go ahead
and paint the tree, or you covered the tree using
a scrap piece of paper. And then go ahead and
reactivate your white a, make it thick and
creamy, not too watery. And just dab the brush with your finger or
using another brush, just go ahead and
splatter the white quash. Now remember, if your
paint mix is too watery, you will get bigger splatters. So if you want to have
small, tiny splatters, exercise water control in your paint mix and you
will be good to go. Now, did you see the shadow of the tree has tried out
to be so much lighter, so I'm just going ahead
with a light tonal value of my neutral tint or
paints gray and going over the shadow
one more time, okay? So this time it will be proper because you can see the
intensity over here. You do not want it too dark
like that of your tree. It's just the shadow. So this would be fine. My paper has tried already. So let's take off
the masking tape. Peel it from all the four sides. Now I always emphasize on this, do this step very
gently and slowly. Do not rush into it. You do not want your
paper to get ripped. With this, we wrap up
our seven day journey. I hope you have
enjoyed the class. If you did enjoy the class, please do not forget to leave a constructive
review for my class. It would help my class
to reach wider audience. Also, I can't wait to
see your projects do, upload them in the projects and resources section and we will all take a look
and appreciate it. With this, we are
wrapping up the class. Thank you all for joining.
 Nilam Roy, Art Instructor